mastering an airbrush - model train help
TRANSCRIPT
Mastering An Airbrush
All Rights Reserved.
This is copyright material. If you got this material by any means other than a purchasefrom Robert Anderson or model-train-help.com you have a pirated copy.
If this is the case, please email the publishers at service (at) model-train-help.com and letus know where you obtained it. (You can keep your copy for providing this help)
You cannot give this book away for free.
You cannot give it away as a bonus.
You do not have rights to resell this ebook.
© Market Leaders Ltd model-train-help.com All Rights Reserved. 1

Mastering An Airbrush Step-By-Step
Index 2Use An Airbrush In So Many Ways 3Why Use An Airbrush 3How An Airbrush Works 4Single Action Airbrush 5Double Action Airbrush 5Paint Cups And Bottles Explained 6Airbrush Air Sources Explained 7 to 9Selecting The Right Paint 10Mixing Paints 11Choosing Acrylic Or Oil Paints 11 to 1210 important steps to getting started 13Preparing Your Workspace 13Preparing The Painting Surface 14Holding The Airbrush 14Controlling The Flow Of Paint 14 to 16Spraying Techniques 17Cleaning Your Airbrush 18
For those who don't already know, an airbrush is simply aprecision air driven paint sprayer. However, it differs from aconventional paint gun or spray can, because it is precisioninstrument that can be adjusted to achieve different andhighly detailed effects.
© Market Leaders Ltd model-train-help.com All Rights Reserved. 2
Use An Airbrush In So Many Ways
Airbrushing can add amazing realism and special effects to any model railroad layout.An airbrush can be used for all sorts of projects from weathering buildings, addingsubtle effects to landscapes and backdrops, through to adding realism to advertisingsigns and rolling stock.
Airbrushing is a skill that takes time and practice to master, but when done well,results in a very good finish. However, don’t expect to get a good finish first time... ittakes practice.
Many airbrush artists create works that are so sharp in detail, so lifelike as to mimicthe real thing. An airbrush can also be used to get the opposite effect of feather-edged, cloud-like softness... the type of subtlety that couldn't be achieved with apaintbrush. So, whether it is detail, from fine lines to wispy, or mere suggestions ofcolor, an airbrush is a versatile tools to use on any model railroad layout.
Why Use An Airbrush:
1. With airbrushing there are no tell-tale signs of brush strokes. As any experiencedmodeler will know, brush strokes on a model can look awful and spoil the desiredeffect especially when models are viewed closeup. When using a conventional brush itis impossible to achieve the uniformity in a thin coat that can be achieved with anairbrush.
2. Airbrushes can be used for large areas and the paint quantity can be varied from afine mist to a "one pass" full coverage coat. For example spraying your baseboard,hillsides, tunnels, clouds and sky on backdrops or even a large model.
3. An airbrush can be ideal for creating weathered effects, because of the smallamount of paint (vaporized) that is applied. The paint goes on nearly dry, so that themodel can be handled almost immediately. With an airbrush the coatings of paint arethin meaning that fine details are not obscured as they would be by a thick layer ofbrushed on paint. A little paint can go a long way with an airbrush and the paint tendsnot to seep under masking tape (or masking Friskit liquid or Frisket film) like brushedpaint does.
© Market Leaders Ltd model-train-help.com All Rights Reserved. 3

How An Airbrush Works
This diagram shows the front end of a typical airbrush. Please note that some systemsvary so this is a guide only. The airbrush shown here is often referred to as an“internal mix” airbrush. This is because the paint and air mix inside the airbrush.Internal mix airbrushes combined with double action (see definition below) take moreeffort to master but offer more control over the painting process.
With “external mix” airbrushes the air and paint are mixed outside the main body ofthe airbrush. They are usually single action (see definition below) , simple in designand easy to clean.
Looking at the earlier diagram you will see that the paint is an orange color, theneedle is represented in blue and the airflow is represented by black arrows. Air isinjected around a “tip” where the sharp needle valve is located. When the air rushespast the tip, the pressure drop draws paint from the tip. The amount of paint releasedis controlled by the needle valve and the flow of air. The paint is vaporized by the flowof air and is carried along to be sprayed out the front end of the airbrush onto themodel being sprayed.
© Market Leaders Ltd model-train-help.com All Rights Reserved. 4
AIRBRUSH NEEDLE PULLS BACK
PAINT
AIR
Needle pulls back
to control the
flow of paint Paint Mixed
With Air
Air Brush Body
Here is a quick explanation of the two main types of “internally mixed” airbrushes:
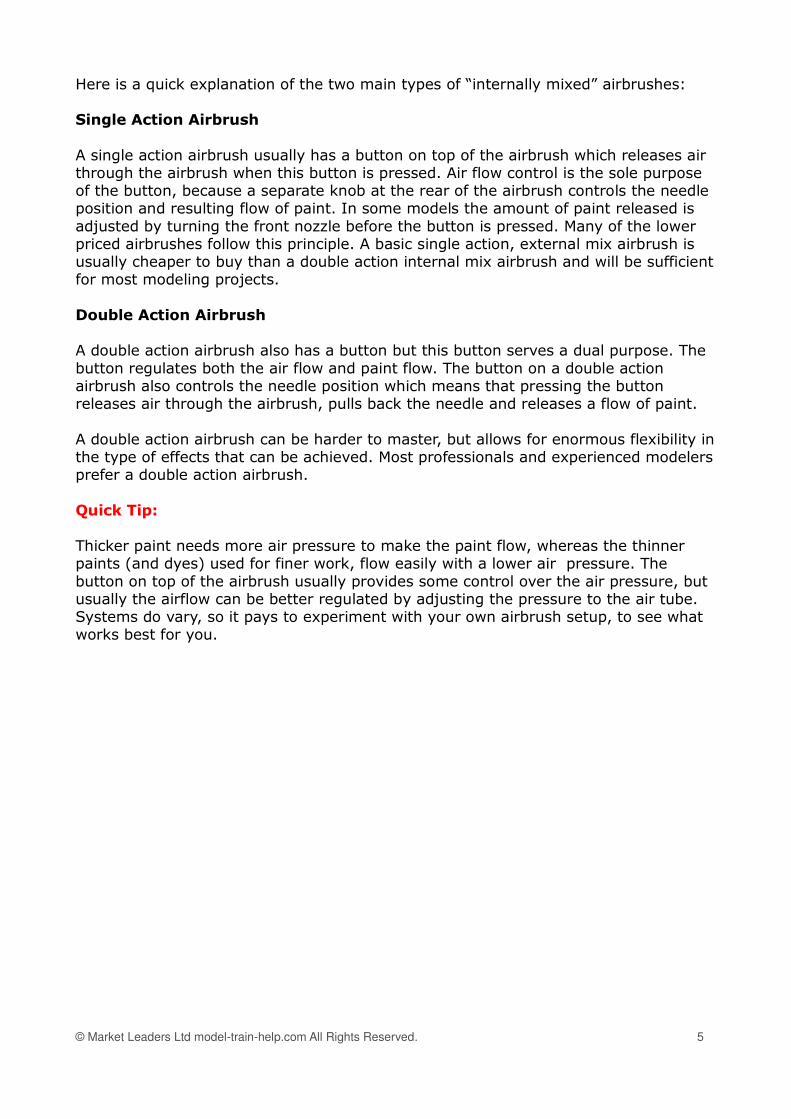
Single Action Airbrush
A single action airbrush usually has a button on top of the airbrush which releases airthrough the airbrush when this button is pressed. Air flow control is the sole purposeof the button, because a separate knob at the rear of the airbrush controls the needleposition and resulting flow of paint. In some models the amount of paint released isadjusted by turning the front nozzle before the button is pressed. Many of the lowerpriced airbrushes follow this principle. A basic single action, external mix airbrush isusually cheaper to buy than a double action internal mix airbrush and will be sufficientfor most modeling projects.
Double Action Airbrush
A double action airbrush also has a button but this button serves a dual purpose. Thebutton regulates both the air flow and paint flow. The button on a double actionairbrush also controls the needle position which means that pressing the buttonreleases air through the airbrush, pulls back the needle and releases a flow of paint.
A double action airbrush can be harder to master, but allows for enormous flexibility inthe type of effects that can be achieved. Most professionals and experienced modelersprefer a double action airbrush.
Quick Tip:
Thicker paint needs more air pressure to make the paint flow, whereas the thinnerpaints (and dyes) used for finer work, flow easily with a lower air pressure. Thebutton on top of the airbrush usually provides some control over the air pressure, butusually the airflow can be better regulated by adjusting the pressure to the air tube.Systems do vary, so it pays to experiment with your own airbrush setup, to see whatworks best for you.
© Market Leaders Ltd model-train-help.com All Rights Reserved. 5

Paint Cups And Bottles Explained
Depending on the price and style of the airbrush it could have either a paint cup orpaint bottle attachment.
With a top paint cup airbrush, the paintcup is above the nozzle, so that gravityassists the paint to flow out of the tip.This is ideal for fine work because gravityfeed means that less air pressure isrequired for any given paint volume.
However, special care is needed with gravity fed models because the cup and airbrushbody are usually one unit. This means that once some paint in in the cup the airbrushcan't be put down on its side because the paint will spill out. Also, some people findthat changing colors and cleaning is a bit slower with gravity fed airbrushes.
A bottom paint cup, or side paint cup, or paint bottle are other variations available. Inmost cases a bottle is not necessary because only a small amount of paint is required.The small cup on an airbrush usually holds ample paint.
Bottle filled airbrushes are popular withbeginners, because they are inexpensive.They are not as versatile, so if you wantthe best results you will generally have tospend more money to get an airbrushthat is more like a “precision instrument.”
Some of the side mounted cups allow for the airbrush to be placed down withoutspilling the paint, especially if the cup is less than half fill. However, side mountedcups don't generally use gravity feed so these airbrushes can be more sensitive toconsistency of the paint being used. Depending on the brand, they can also be harderto clean.
Quick Tip:
Low-priced airbrushes can be a good idea to see if you like the hobby, but they canalso be frustrating. Most people get better results and experience fewer problemswith the more expensive models.
© Market Leaders Ltd model-train-help.com All Rights Reserved. 6

Airbrush Air Sources Explained
Depending on how much you want to spend there are several possibilities for gettingair power to your airbrush.
Air Propellant In Cans
Some of the cheaper airbrushes simply run on a disposable can of compressed air.That is how many people get started before progressing to a more permanent setup.The initial cost is cheaper at perhaps around $10 -$20 compared to $100 - $500 for amini compressor. However, if you are serious about mastering an airbrush and intendto use it frequently or for a major project, then disposable cans will will prove to be anexpensive option.
A can contains only about 10 continuous minutes of air, sofor a lot of people that won't go very far, especially if youare doing a lot of experimenting. Believe me, it can get very frustrating when the air runsout in the middle of a project. Although it is possible to fitan air regulator to an air can, in most cases the airpressure starts to reduce as the can empties. This cancause an erratic flow of paint and spoil your work of art.
Although not necessarily a disadvantage, the cans tend to get cold as moisturecondenses on the outside as the can empties. Be careful that none of the moisturetouches your paint job as it could cause some damage.So, in summary, disposable cans are reasonably cheap and convenient option if youare just going to do the odd spray job. However, if you are more of a perfectionist, orintend to do a lot of airbrushing, then cans may prove to be less consistent,inconvenient and expensive.
Air Storage Tanks
Another option is a large air tank of some kind. There are gas cylinders and propane-style storage tanks, but you will need to check a couple of things before gettingstarted. Firstly, you will need to thoroughly check to see that the system is safe to usebefore connecting your airbrush. Secondly, you will need to know if it is capable ofworking reliably.
Some people use an old car or truck tire. However, you willneed to understand how to use adapters and regulators.The air pressure may need to be regulated down to about25 psi. Whether you are using a propane-style storage tankor a car/truck tire, both of these solutions will eventuallyrun out of air and need refilling. The advantage is greaterstorage capacity meaning that the air will last longer than ina can.
© Market Leaders Ltd model-train-help.com All Rights Reserved. 7

Air Compressors
Compressors are generally the best solution, however the initial cost can proveprohibitive particularly if you don't intend to get much use from it. In the long-run, acompressor will be the most economical and reliable option.
Before you rush out and buy acompressor, have a good think about yourrequirements, as the options are manyand varied. For example, pictured is aTamiya re-chargeable compressor. It usesa rechargeable 7.2 volt battery (about 20minutes continuous running) and comesin a convenient case form. Maximum airoutput is about 20 liters per minute(unburdened). The Tamiya airbrush yousee attached is suitable for beginners andeasy to use with a trigger control.
In most cases, compressors use an electric motor and a piston or diaphragm tocompress the air. The piston or diaphragm causes the air supply to “pulse”. The“pulsing” effect, can be seen in the paint job, especially if you are trying to spray finelines.
A higher priced compressor will usually be coupledwith a storage tank which will act as a buffer to reducethe “pulsing” effect. The other big advantage of thestorage tank is that the tank stores the compressedair, eliminating the need for the compressor to run allthe time. Compressors can be noisy, so a storage tankis a good option.
If you need a quieter alternative, then again there areoptions. Silent compressors often come with aregulator/moisture trap and a small holding tank. Pictured isthe Badger 480-1 Silent Compressor which is one possibilityto consider.
Smaller table-top compressors generally have no regulators, no storage tank and apulsing air supply.
Many smaller compressors are designed specifically for airbrushing and are generallyavailable from hobby stores. Others can also be used for air-powered workshop toolsand are available from hardware/home improvement stores. These have a tank, built
© Market Leaders Ltd model-train-help.com All Rights Reserved. 8
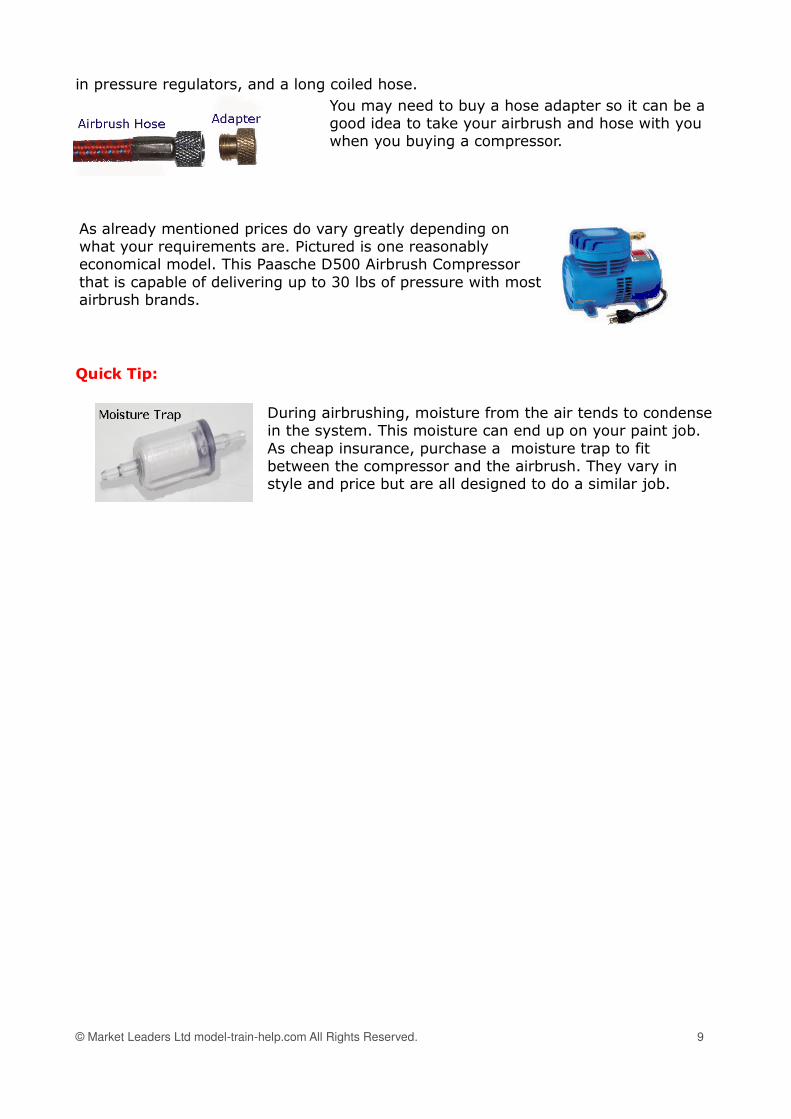
in pressure regulators, and a long coiled hose.
You may need to buy a hose adapter so it can be agood idea to take your airbrush and hose with youwhen you buying a compressor.
As already mentioned prices do vary greatly depending onwhat your requirements are. Pictured is one reasonablyeconomical model. This Paasche D500 Airbrush Compressorthat is capable of delivering up to 30 lbs of pressure with mostairbrush brands.
Quick Tip:
During airbrushing, moisture from the air tends to condensein the system. This moisture can end up on your paint job.As cheap insurance, purchase a moisture trap to fitbetween the compressor and the airbrush. They vary instyle and price but are all designed to do a similar job.
© Market Leaders Ltd model-train-help.com All Rights Reserved. 9
Selecting The Right Paint
All kinds of substances from dyes to latex, acrylic and oil based paints can be used inan airbrush provided they are reasonably fluid. The substance needs to be able toescape from the tiny hole at the front of the airbrush. If it can't escape, it will needmore air pressure to force it through, or it will simply clog the airbrush.
You may choose to mix your own paints to suit your own needs, or you can buy ready-mixed colors. There are numerous brands that could be used including: Aquaflow,Createx, Polyscale, Golden, Floquil, Polytranspar, Lifetone, Wildlife Colors, NaturesGallery, Tamiya, Testor and Modelflex to name a few.
Quick Tip:
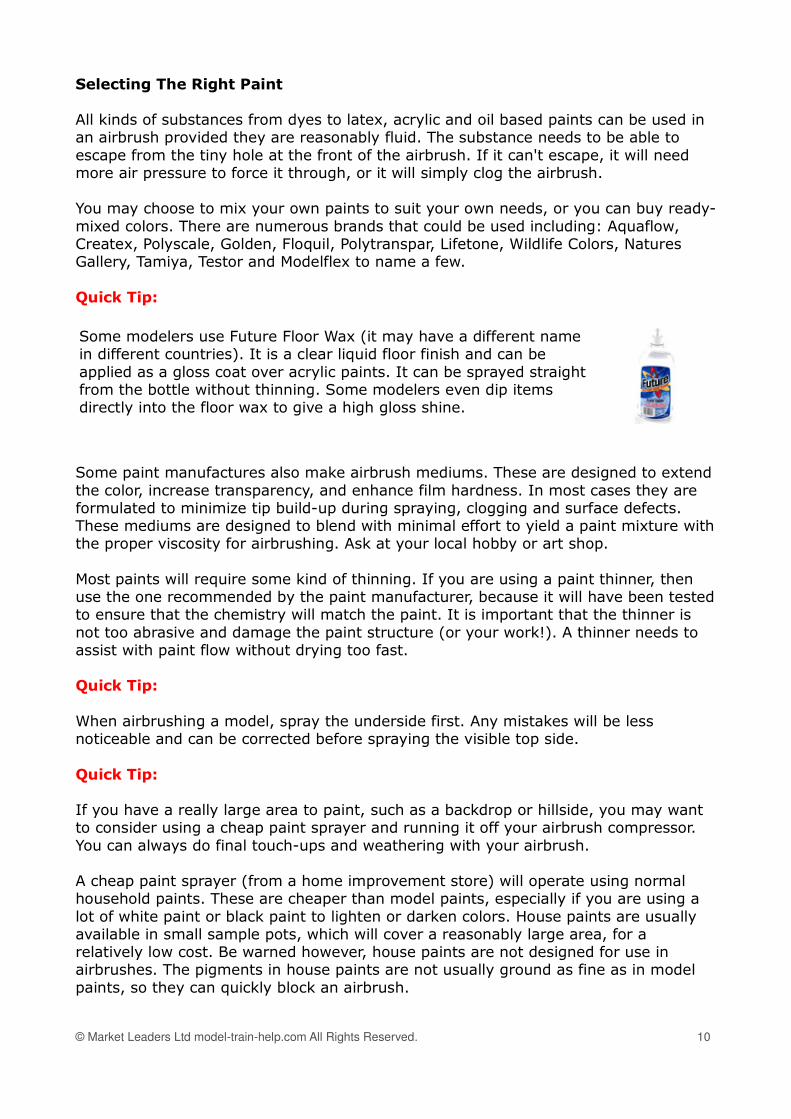
Some modelers use Future Floor Wax (it may have a different namein different countries). It is a clear liquid floor finish and can beapplied as a gloss coat over acrylic paints. It can be sprayed straightfrom the bottle without thinning. Some modelers even dip itemsdirectly into the floor wax to give a high gloss shine.
Some paint manufactures also make airbrush mediums. These are designed to extendthe color, increase transparency, and enhance film hardness. In most cases they areformulated to minimize tip build-up during spraying, clogging and surface defects.These mediums are designed to blend with minimal effort to yield a paint mixture withthe proper viscosity for airbrushing. Ask at your local hobby or art shop.
Most paints will require some kind of thinning. If you are using a paint thinner, thenuse the one recommended by the paint manufacturer, because it will have been testedto ensure that the chemistry will match the paint. It is important that the thinner isnot too abrasive and damage the paint structure (or your work!). A thinner needs toassist with paint flow without drying too fast.
Quick Tip:
When airbrushing a model, spray the underside first. Any mistakes will be lessnoticeable and can be corrected before spraying the visible top side.
Quick Tip:
If you have a really large area to paint, such as a backdrop or hillside, you may wantto consider using a cheap paint sprayer and running it off your airbrush compressor.You can always do final touch-ups and weathering with your airbrush.
A cheap paint sprayer (from a home improvement store) will operate using normalhousehold paints. These are cheaper than model paints, especially if you are using alot of white paint or black paint to lighten or darken colors. House paints are usuallyavailable in small sample pots, which will cover a reasonably large area, for arelatively low cost. Be warned however, house paints are not designed for use inairbrushes. The pigments in house paints are not usually ground as fine as in modelpaints, so they can quickly block an airbrush.
© Market Leaders Ltd model-train-help.com All Rights Reserved. 10
Mixing Paints
Always follow the manufacturers directions when mixing paints with thinners. Disposable plastic eyedroppers (from a hobby or drugstore) are excellent for drawingsmall amounts of paint and thinner from the bottles. Use separate eyedroppers for thedifferent color paints and the thinner.
Pouring paint directly from the bottle to a mixing container is messy, unscientific, andleaves dripping paint around the bottle rim. The paint on the rim dries hard making itdifficult to open and close the bottles securely. Also, little flakes of dry paint can fallinto the paint causing potential blockages during future airbrushing sessions.
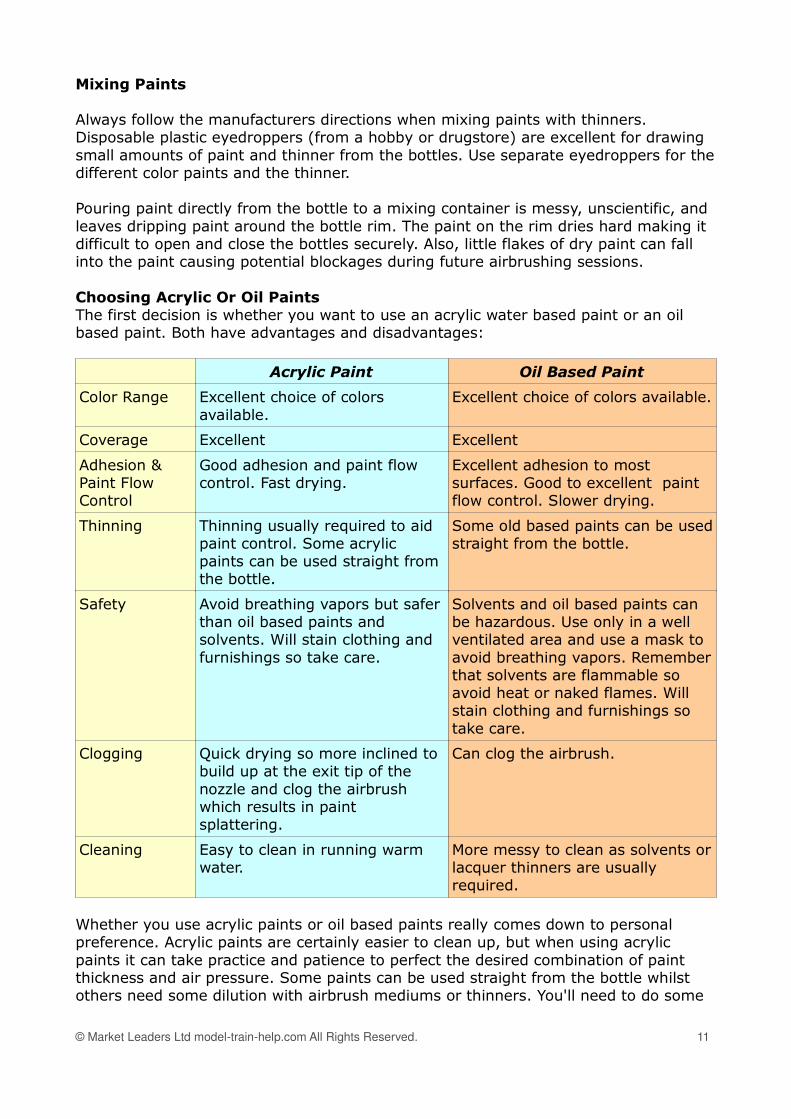
Choosing Acrylic Or Oil PaintsThe first decision is whether you want to use an acrylic water based paint or an oilbased paint. Both have advantages and disadvantages:
Acrylic Paint Oil Based Paint
Color Range Excellent choice of colorsavailable.
Excellent choice of colors available.
Coverage Excellent Excellent
Adhesion &Paint FlowControl
Good adhesion and paint flowcontrol. Fast drying.
Excellent adhesion to mostsurfaces. Good to excellent paintflow control. Slower drying.
Thinning Thinning usually required to aidpaint control. Some acrylicpaints can be used straight fromthe bottle.
Some old based paints can be usedstraight from the bottle.
Safety Avoid breathing vapors but saferthan oil based paints andsolvents. Will stain clothing andfurnishings so take care.
Solvents and oil based paints canbe hazardous. Use only in a wellventilated area and use a mask toavoid breathing vapors. Rememberthat solvents are flammable soavoid heat or naked flames. Willstain clothing and furnishings sotake care.
Clogging Quick drying so more inclined tobuild up at the exit tip of thenozzle and clog the airbrushwhich results in paintsplattering.
Can clog the airbrush.
Cleaning Easy to clean in running warmwater.
More messy to clean as solvents orlacquer thinners are usuallyrequired.
Whether you use acrylic paints or oil based paints really comes down to personalpreference. Acrylic paints are certainly easier to clean up, but when using acrylicpaints it can take practice and patience to perfect the desired combination of paintthickness and air pressure. Some paints can be used straight from the bottle whilstothers need some dilution with airbrush mediums or thinners. You'll need to do some
© Market Leaders Ltd model-train-help.com All Rights Reserved. 11

experimenting depending on the type of paint you are using, the air pressure you areusing and the desired effects you are hoping to achieve.
For example; a low air pressure does limit the volume of paint that the airbrushdispenses, so with low pressure the paint may require more dilution.When diluting paints be sure to mix them thoroughly. If the paint is not mixedthoroughly, then the paint consistency passing through the airbrush could altercausing problems like erratic paint flow and splattering. Remember too, that paint leftsitting for any length of time might change in consistency with the thicker paintsettling to the bottom. I use the wood end of a artist brush to stir the paints I havestored in bottles. This way I can locate any clumps of thick paint before mixing thepaint vigorously. Shaking the bottles is one option, but air bubbles can developcausing the paint in the airbrush to splatter.
Quick Tip:
If you are weathering a building using an airbrush, a subtle buildup of layers and colorwill usually look best. This will require several passes of the airbrush to gradually buildup the weathering effect rather than applying one thick coating. Dirt and grime on abuilding usually builds up over time, so weathering needs to replicate this procedureby building up several thin layers of paint (dirt and grime) using an airbrush.
Airbrushing is a skill that needs to be learned from trial and error.
Some people start by reading the instructions before connecting the system up.Others just choose a paint color.... and pour it into the jar.... and are then surprisedthat the airbrush doesn't work. After some fiddling around the airbrush suddenlystarts working. Well, it works okay for a while before it starts to splutter larger dropsof paint onto their precious model.
Many people give up at this point. They pour the paint back out, clean up the messand clean the air brush. The airbrush gets put away in a cupboard where it stays forsome time. Weeks or months later the airbrush is brought out of hiding with theintention of having another go at mastering the art of using an airbrush. SHOCK!HORROR! They discover that the airbrush can't be adjusted because the paint hasstuck it solid! So, as you can see, there are some important things you need to knowabout airbrushing before you rush in.
Quick Tip:
Good airbrushing is usually about building up the layers slowly for the best effect. Thefinish should be flawless.
Quick Tip:
Spluttering paint is often a result of the paint being too thick. The thin paint comesout first leaving all the thick paint in the bottom of the jar (if you are using a jar).Thicker paint needs more air pressure to make the paint flow.
© Market Leaders Ltd model-train-help.com All Rights Reserved. 12
10 important steps to getting started:
1. Read the instructions carefully BEFORE you get started.
2. Use an airbrush ONLY in a well ventilated area.
3. Prepare the area. Construct your spray booth, lay down your plastic sheets etc.
4. Prepare the surface to take the paint. Position the model ready for spraying usingdisposable plastic gloves.
5. Prepare the equipment and assemble the needle and nozzle into the airbrush if notalready done. Attach the paint cup or bottle to the airbrush. Use special air brushpaint or thin the paint with thinners, to make a more watery consistency. Turn on thecompressor and set the pressure (or attach the propellant can).
6. Make yourself comfortable. Sit down when spraying if you can. Otherwise have achair handy to sit on between spray coats.
7. Practice on paper or an old piece of wood first. Don't risk damaging a preciousmodel before you are confident in your ability to achieve the desired effect. Even ifyou are very experienced you never know what is going to come out the end whenyou first press the button. Make testing a part of your routine. After a quick spraymake any adjustments to the airbrush, air pressure, or the paint consistency. Thentest again.
8. Now test spray on a similar material to the final surface. The piece of wood, plastic,or foam material should be prepared and primed in the same way as the actualsubject. This is a good way to test the chemical compatibility and spray pattern.
9. Spray the underside first. Any mistakes will be less noticeable and can be correctedbefore spraying the visible top side. Remember also, that some paints eat intocertain materials like styrofoam.
10. Cleaning the airbrush is very important. Don't leave it 5 minutes... clean itimmediately after use. After cleaning the airbrush separate any parts that can easilybe separated so that any remaining paint won't solidify the parts together.
Preparing Your Workspace
Airbrushing can be a messy business so you need to keep your airbrush workspaceseparate from your model railroad layout if possible. You would want airborne paintparticles to settle on your layout (or on furnishings, your car etc). Sometimes a reararea at the back of a garage is suitable. An old sheet can be hung up if necessary toprevent paint from falling outside the workspace.
A simple spray booth can be erected using an old cardboard box sitting on a table orbench. Cut off the top and one side. Otherwise, plastic sheets (like on real estatesigns) can be used to make a simple spray booth.
Solvents and paint spray can be dangerous to your health, so make sure there isadequate ventilation, or install an exhaust hose or extractor fan.
© Market Leaders Ltd model-train-help.com All Rights Reserved. 13
Some people prefer to do their spraying outdoors. However, care is required becausethe wind can blow dirt particles (and tiny insects) into the wet paintwork. A still day isbest.
Plastic garbage sacks opened out can be excellent for covering walls or laying on theground. Old newspapers are also good, but you may want to weigh them down withsome weights or bricks to stop then blowing onto your paintwork.
A toolbox or fishing box is ideal for storing airbrush parts and accessories. It pays tohave everything close at hand for easy access. A pair of disposable plastic gloves is agood idea.
Another good investment is a small craft turntable. These are available from hobbyshops and from chain stores like K Mart and Target. These turntables are usually madeof plastic and rotate on a base. As well as being ideal for cake decorating, they areperfect for airbrushing small models. One hand can do the airbrushing whilst the otherhand rotates the turntable so that all sides get painted.
Preparing The Painting Surface
Dirt and dust are the enemy of model railroad enthusiasts and artists alike. Not onlydoes the airbrush need to be kept in a dust-free place, but also the surfaces beingpainted need to be kept clean, dry and free from dirt and dust. The paintwork will onlybe as good as the surface it goes onto. Remember, an airbrush is designed to applythin coats, so the paint will not hide dust, dirt, grit, unevenness, water droplets,styrofoam chips, cracks or anything else lying on the surface.
Sandpaper can be helpful when preparing a surface, but remember to carefullyremove all the dust afterwards. Open grit sandpaper works well for most surfacealthough wet sandpaper is a popular option after primer coats. Those disposableplastic gloves will come in handy for cleaning down the surface in preparation forpainting. The oils from fingers and hands can sit on the surface and affect the paintjob, so careful preparation is essential. A small hand-held vacuum clearer may beuseful.
Holding The Airbrush
Hold your airbrush much the same as you would a pen. Position your index finger overthe trigger with the air-hose over your fore-arm . The airbrush should feel comfortablein your hand with your hand and arm relaxed .
Controlling The Flow Of Paint
Airbrushes often come with a range of tip sizes like: fine, medium and course. Someof the cheaper brands can't be adjusted and some offer replacement tips as anoptional extra. A lot of modelers stick with a medium tip for all but the most exactingwork.
Two main factors influence the paint coverage. They are 1) the amount of paint beingdispersed and 2) the distance between the airbrush tip and the work being painted. Ifyou look again at the earlier diagram, you will see that the paint exits from the tip andexpands into a cone shape pattern.
© Market Leaders Ltd model-train-help.com All Rights Reserved. 14
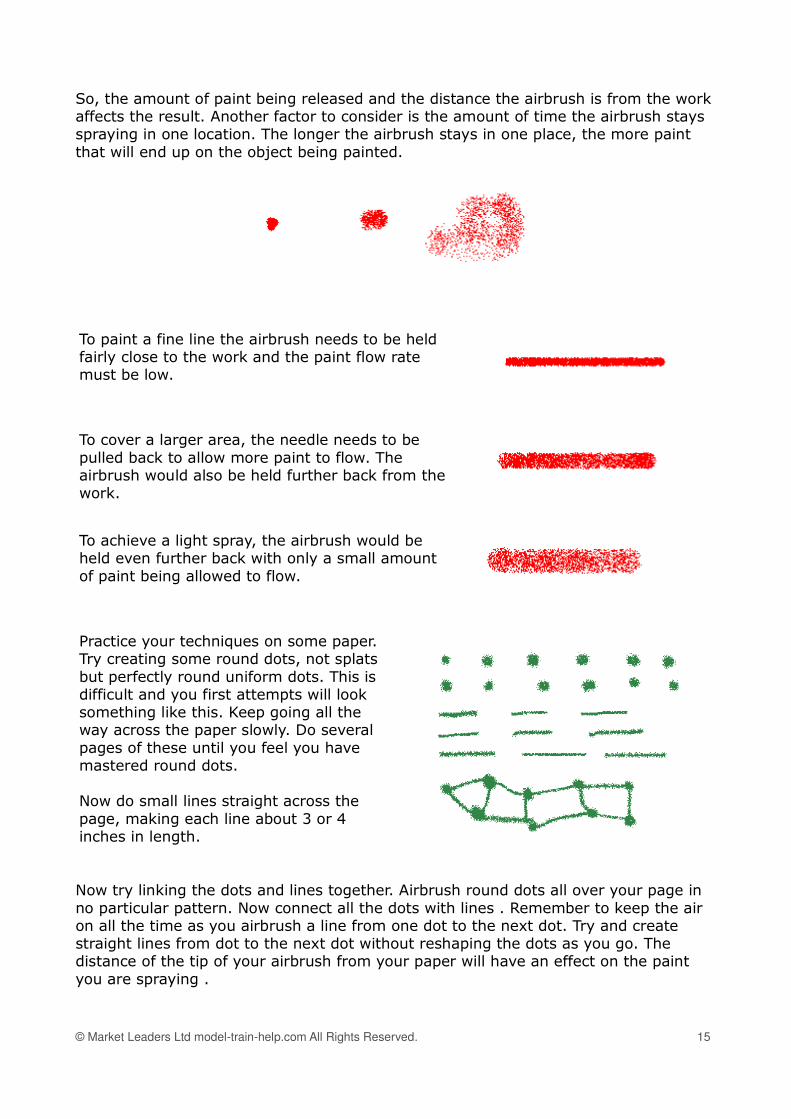
So, the amount of paint being released and the distance the airbrush is from the workaffects the result. Another factor to consider is the amount of time the airbrush staysspraying in one location. The longer the airbrush stays in one place, the more paintthat will end up on the object being painted.
To paint a fine line the airbrush needs to be heldfairly close to the work and the paint flow ratemust be low.
To cover a larger area, the needle needs to bepulled back to allow more paint to flow. Theairbrush would also be held further back from thework.
To achieve a light spray, the airbrush would beheld even further back with only a small amountof paint being allowed to flow.
Practice your techniques on some paper.Try creating some round dots, not splatsbut perfectly round uniform dots. This isdifficult and you first attempts will looksomething like this. Keep going all theway across the paper slowly. Do severalpages of these until you feel you havemastered round dots.
Now do small lines straight across thepage, making each line about 3 or 4inches in length.
Now try linking the dots and lines together. Airbrush round dots all over your page inno particular pattern. Now connect all the dots with lines . Remember to keep the airon all the time as you airbrush a line from one dot to the next dot. Try and createstraight lines from dot to the next dot without reshaping the dots as you go. Thedistance of the tip of your airbrush from your paper will have an effect on the paintyou are spraying .
© Market Leaders Ltd model-train-help.com All Rights Reserved. 15
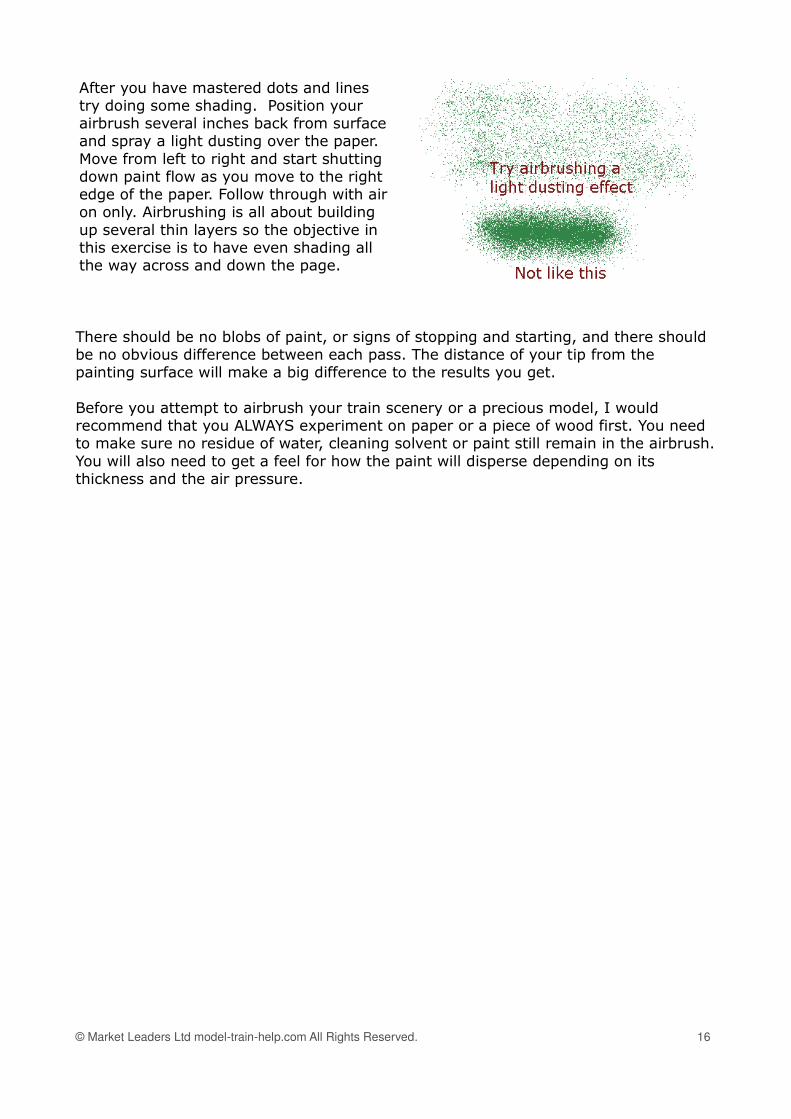
After you have mastered dots and linestry doing some shading. Position yourairbrush several inches back from surfaceand spray a light dusting over the paper.Move from left to right and start shuttingdown paint flow as you move to the rightedge of the paper. Follow through with airon only. Airbrushing is all about buildingup several thin layers so the objective inthis exercise is to have even shading allthe way across and down the page.
There should be no blobs of paint, or signs of stopping and starting, and there shouldbe no obvious difference between each pass. The distance of your tip from thepainting surface will make a big difference to the results you get.
Before you attempt to airbrush your train scenery or a precious model, I wouldrecommend that you ALWAYS experiment on paper or a piece of wood first. You needto make sure no residue of water, cleaning solvent or paint still remain in the airbrush.You will also need to get a feel for how the paint will disperse depending on itsthickness and the air pressure.
© Market Leaders Ltd model-train-help.com All Rights Reserved. 16
Spraying Techniques
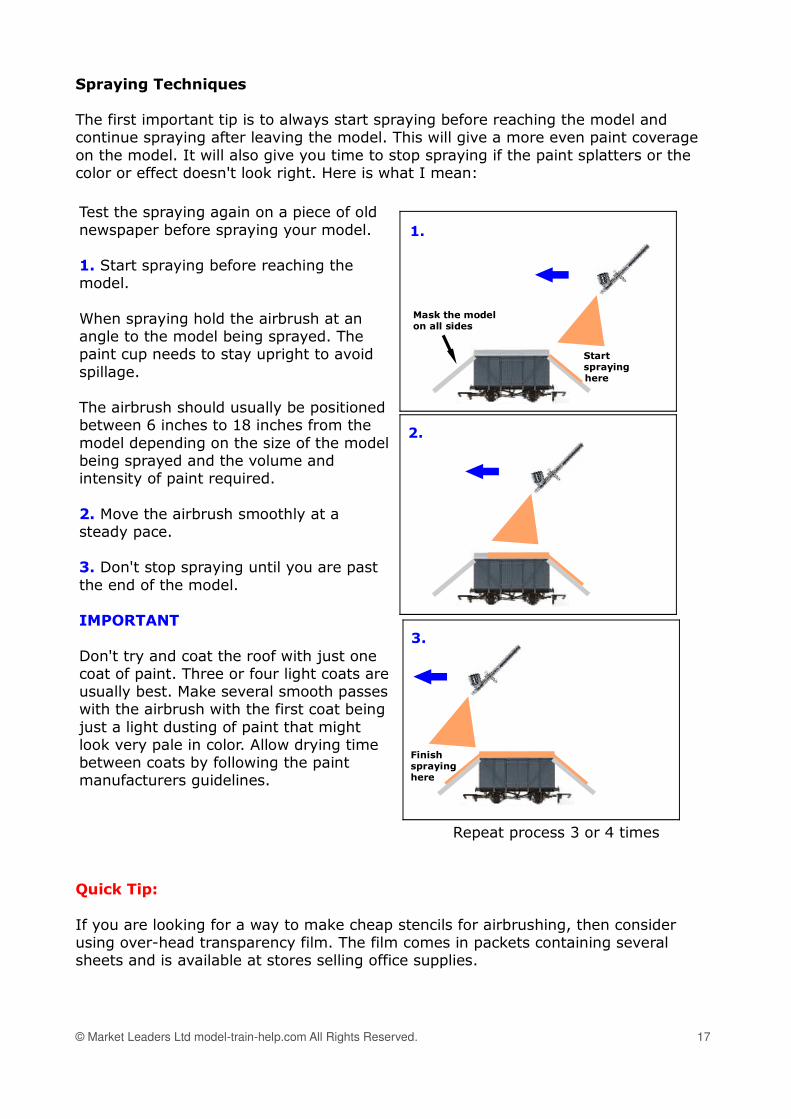
The first important tip is to always start spraying before reaching the model andcontinue spraying after leaving the model. This will give a more even paint coverageon the model. It will also give you time to stop spraying if the paint splatters or thecolor or effect doesn't look right. Here is what I mean:
Test the spraying again on a piece of oldnewspaper before spraying your model.
1. Start spraying before reaching themodel.
When spraying hold the airbrush at anangle to the model being sprayed. Thepaint cup needs to stay upright to avoidspillage.
The airbrush should usually be positionedbetween 6 inches to 18 inches from themodel depending on the size of the modelbeing sprayed and the volume andintensity of paint required.
2. Move the airbrush smoothly at asteady pace.
3. Don't stop spraying until you are pastthe end of the model.
IMPORTANT
Don't try and coat the roof with just onecoat of paint. Three or four light coats areusually best. Make several smooth passeswith the airbrush with the first coat beingjust a light dusting of paint that mightlook very pale in color. Allow drying timebetween coats by following the paintmanufacturers guidelines.
Repeat process 3 or 4 times
Quick Tip:
If you are looking for a way to make cheap stencils for airbrushing, then considerusing over-head transparency film. The film comes in packets containing severalsheets and is available at stores selling office supplies.
© Market Leaders Ltd model-train-help.com All Rights Reserved. 17
Mask the model on all sides
Start spraying here
1.
2.
Finish spraying here
3.
Cleaning Your Airbrush
An airbrush is a precision instrument and to function efficiently and reliably it must bekeep in near-new condition. If it is left uncleaned it will clog up with dried paintresidue and may become irreparable. Even with careful cleaning, paint deposits canbuild up in the paint cup and inside the airbrush. Every few weeks or months it maypay to carefully disassemble the airbrush and soak the metal parts in lacquer thinnerto loosen any old paint that has built up. A paper towel or soft cloth is handy fordrying the parts. A second soaking may be necessary to loosen really stubborn paintresidue. If you unscrew the nozzle be careful not to jab yourself with the sharp needleinside the airbrush.
Quick Tip:
It is usually a good idea to close the nozzle on the airbrush if you are waiting for acoat of paint to dry. This can prevent dried paint building up on the tip.
Oil Based Paints
Airbrush lacquer thinner can be used for cleaning oil paint from an airbrush. Whenyou have finished painting simply pour any unused paint back into the bottle andspray the excess paint on a piece of old newspaper. The paint cup can then be wipedclean with a small soft cloth. The end of the airbrush and the paint cup can then beplaced in a jar (or can) containing lacquer thinner. I usually slosh the end around inthe lacquer thinner to loosen any oil paint that remains. I then pour the surplusthinner from the airbrush cup and partially refill the cup with a little clean thinner. Ithen spray the clean thinner into the jar of used thinner. All done!
Acrylic Paints
The same cleaning method can be used for acrylic paint, but if you are using acrylicpaints, you may not want to use a solvent such as a lacquer thinner. Some people useisopropyl alcohol (from a drugstore) mixed with water for cleaning after using acrylicpaints. A jar of warm water may be your preferred option, although using a laundrysink may be easiest (just remember to clean up the sink too).
If you are using a sink you can gently run warm water into the paint cup to flush outany remaining paint. One option is to hold your finger over the end of the airbrush(with the needle pulled back) and squirt some air into the airbrush. This results in akind of “back-flush” which forces the remaining paint back into the paint cup to bewashed away by the gently running warm water. (note: this method may not besuitable for some airbrush brands depending on the design of the airbrush).
Some people like to use a 50/50 mixture of water and Windex for soaking the airbrushwhen using acrylic paints.
The needle valve can then be used to open and close the airbrush tip until there is nofurther sign of any paint remaining. The paint cup can then be filled with water whichcan be blown through the airbrush.
© Market Leaders Ltd model-train-help.com All Rights Reserved. 18

The airbrush needs to be given a good blow through of air, a shake and a clean with asoft cloth to ensure that no surplus water remains inside or on the airbrush. If anywater remains, it will mix with any new paint you add and and cause unwantedresults.
Useful videos:http://www.youtube.com/watch?v=AeZOFhu6FvIhttp://www.youtube.com/watch?v=fCzDZjOwCaY
Enjoy your airbrushing!
Recommended follow-on ebooks:
• Model Train Scenery & Layout Construction Ideas• 303 Model Railroad Answers
Available separately or as a package (save 41%) at http://www.model-train-layouts.net
© Market Leaders Ltd model-train-help.com All Rights Reserved. 19