markbook reference manual - asylum software inc
TRANSCRIPT

MarkBook® for Windows on a Mac 1
MarkBook CY, MarkBook AM, version, edition

Installation/Use on an Apple® Macintosh Computer Ordinarily, a Mac computer cannot run Windows software. However, with the introduction of Intel Macs running OSX (Operating System 10), Mac users have two options for running Windows software on their Macs. They can use Boot Camp to partition the computer’s hard drive. Or, they can install “virtual machine” software and then install Windows on their Mac. And there’s MarkBook for Mac which IS designed to run in OSX.
1. Mac MarkBook Asylum Software makes a different version of MarkBook specifically for Mac OSX machines. The database is not compatible with the Windows version. Data cannot be moved between Mac MarkBook and the Windows version except at the transfer-to-SIS stage. See section 14-4 of the Reference Manual. However, no purchase of additional software like XP, Vista, Parallels or VMware is required.
2. Boot Camp In early 2006, Apple released its ‘Intel” Macs with the OSX operating system. Now included on each new Mac is a copy of Boot Camp – software that’s set up for installing a separately-purchased Windows operating system (Vista, XP) onto the Mac. Once installed, the Mac computer can ‘dual-boot’ with either the OSX system or the installed Windows operating system. The Windows software is on a separate part of the hard drive. It’s as if the user had two independent computers both using the same keyboard, mouse and screen. For details, see http://www.apple.com/macosx/features/bootcamp.html If this Boot Camp option is selected, a Mac user can install and run MarkBook for Windows inside the Windows partition. To move MarkBook class data between a Mac at home and a Windows computer at school, see Backup in section 3-2 of the Reference Manual. This Boot Camp option, or the next two options, are recommended for a Mac user when their school has Windows machines running MarkBook for Windows. It’s also recommended for users with a Windows license from another machine. TIP: many computer users keep a machine for just a few years before replacing it. Just because that machine is old or defective doesn’t mean that the operating system license is invalid. If there’s an older machine that’s not in service, its Windows license may be used with Boot Camp on the Mac computer. If you can supply the old license number, then you or a computer shop will be able to legally install Windows on the Mac without the cost of a new Windows license! This same tip applies to the “virtual machine” options following.
2 MarkBook® for Windows on a Mac

On the Mac machine, click the search tool (Spotlight) in the upper right corner of the screen. In Spotlight, type in “boot” and then click on Boot Camp Assistant. An introduction will appear as per the next image.
Read the text and click Continue.
MarkBook® for Windows on a Mac 3

It’s necessary to divide the Mac’s hard drive into two partitions – one part for each operating system.
The Divide Equally button may be used, or slide the dot between the two parts left or right. Click Partition to “reserve” a space on the hard drive for all of items going into Windows: the operating system, the Windows software applications like MarkBook, and data files.
Partitioning will take a half minute or so.
4 MarkBook® for Windows on a Mac

Once the drive is partitioned, insert the Windows XP or Vista CD (sold separately) and click Start Installation. When installation is complete, re-start (“boot”) the computer and select the option to launch Windows. Once Windows is running, install MarkBook for Windows as described in section 1-1 of the Reference Manual.
3. Parallels This software tool for Mac allows both the Mac and Windows systems to run simultaneously on a Mac OSX machine. Install it on the Mac, then install the Windows operating system (XP, Vista or Windows 7 – sold separately) and then install MarkBook for Windows.
http://www.parallels.com
4. VMware Fusion A software product called VMware Fusion is available for Mac computers running OSX. It’s not available for OS9 and earlier machines. Fusion enables a Mac user to install and run as many operating systems as they wish. For instance, a Fusion user could install Windows, Vista and Linux and then run all three operating systems simultaneously. The one most recently clicked on is said to have the ‘focus’. That is, it’s the active window. Once a Windows OS is installed (‘98SE or newer), install MarkBook for Windows inside it as described next. Listed price is the same as Parallels. Interestingly, there’s a high variance in cost among retailers. Shop around! For more information, see the rest of this section and visit
http://www.vmware.com/products/fusion/
MarkBook® for Windows on a Mac 5

Installing MarkBook in VMware Fusion With Windows having the focus, insert the MarkBook CD. Its Menu program should start automatically. Click on “Install MarkBook” and then “Standard” to start the process. Default options should be appropriate.
Using MarkBook in Fusion MarkBook needs a minimum screen resolution of 1024X600. If needed, resize the virtual computer’s window or, in Windows, use the Settings tab within Display Properties (or its equivalent).
6 MarkBook® for Windows on a Mac

If you’re planning to use MarkBook exclusively on your Mac, then any path may be used to save class files. However, if you intend to use more than one computer such as your Mac at home and a Windows computer at school, then a good model is to use a USB Drive as the primary location for your files. This model is described next. Please see the data management recommendation at the end of this section. Moving data to and from the USB drive is handled differently depending on whether Windows, when it has the focus in Fusion, assigns a letter to the USB drive. The two alternatives, A and B, are described next.
Printer Driver in Windows In order to access any feature related to report comments or printing, MarkBook needs a printer driver installed in Windows. This may be done by installing the software for an attached printer but it’s not required. It’s possible to install just a driver even without an attached printer as per the next paragraph. Driver only: without connecting a printer, start the Add a Printer wizard in Windows. Choose Local Printer. When Windows can’t find a physical printer, it will present a list of possibilities. Just about any printer manufacturer and model may be selected from the list:
FINEPRINT®: You may also install the Demo version of FinePrint, which is included in the MarkBook APP folder (usually c:\MkBk20xx\FinePrint). FinePrint behaves like a real printer except that its initial output is to the screen. If you do have a real printer available, you may then print to it from FinePrint.
MarkBook® for Windows on a Mac 7
To install FinePrint, open its folder and double click on fp560.exe. More recent versions may be available on their web site (www.fineprint.com). See Appendix B of the Reference Manual.
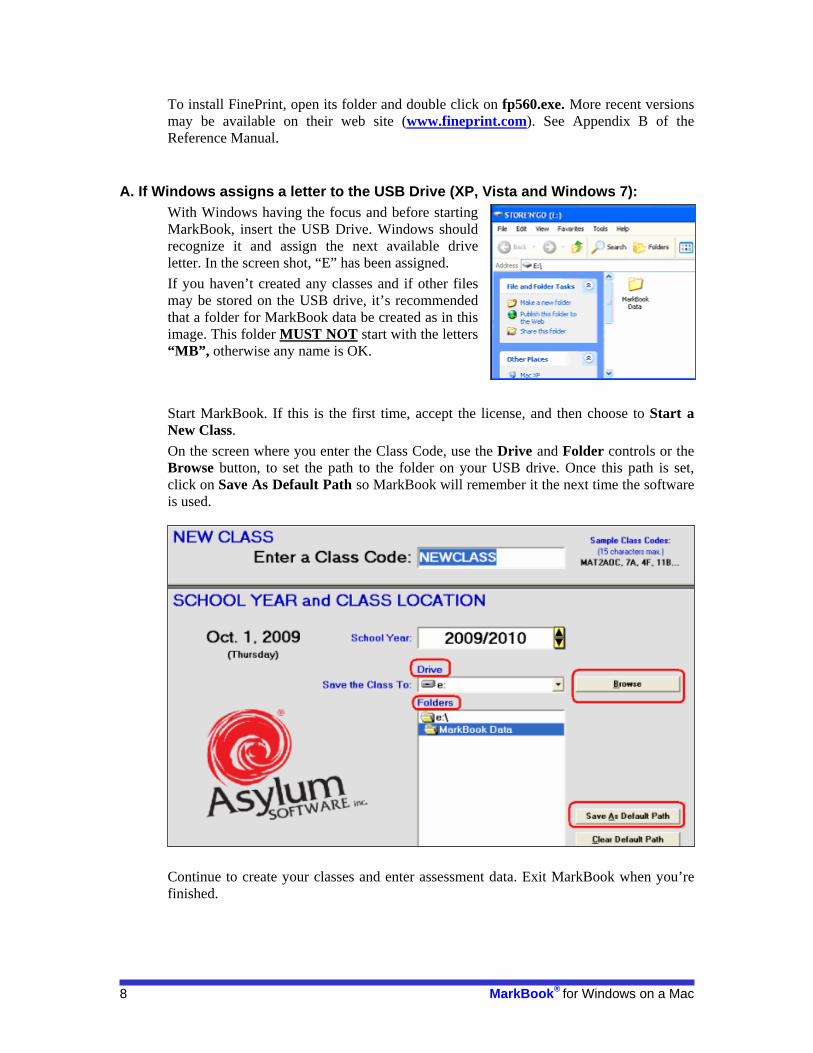
A. If Windows assigns a letter to the USB Drive (XP, Vista and Windows 7): With Windows having the focus and before starting MarkBook, insert the USB Drive. Windows should recognize it and assign the next available drive letter. In the screen shot, “E” has been assigned. If you haven’t created any classes and if other files may be stored on the USB drive, it’s recommended that a folder for MarkBook data be created as in this image. This folder MUST NOT start with the letters “MB”, otherwise any name is OK. Start MarkBook. If this is the first time, accept the license, and then choose to Start a New Class. On the screen where you enter the Class Code, use the Drive and Folder controls or the Browse button, to set the path to the folder on your USB drive. Once this path is set, click on Save As Default Path so MarkBook will remember it the next time the software is used.
Continue to create your classes and enter assessment data. Exit MarkBook when you’re finished.
8 MarkBook® for Windows on a Mac

Accessing MarkBook files at a later time Make sure Windows has the focus. Insert the USB Drive before starting MarkBook. Then launch MarkBook. On a computer where the default path has been saved, MarkBook should open to the correct source path on its own. If this is not the case, use the Drive and Folders menus or the Browse button as before to set the path. Save as Default Path may be used at any time. Select the class you want to work with from the Select a Class: list, then click on Open:
B. If Windows does NOT assign a letter USB Drive (‘98, Me and 2000 Pro): In Fusion, some versions of Windows may fail to assign a letter to the USB drive. This means that neither Windows nor MarkBook can access that drive directly. While this makes things a little more awkward, there is a solution and perhaps more than one. The one described next takes advantage of the fact that files and folders can be dragged between the Mac and Windows sides. It is assumed that Windows is running with a resolution of at least 1024X600 and the Mac desktop is partially visible and shows its drive icons. Please note which OS has the focus in each step. 1. Mac has the focus: Insert the USB drive. A drive icon should appear on the Mac desktop:
MarkBook® for Windows on a Mac 9

2. Windows has the focus: If no classes have been created then open My Documents and create a folder for storing MarkBook data. This folder MUST NOT begin with the letters “MB” but otherwise, any name is OK. In the screen shot below it’s called MarkBook Data.
3. Start MarkBook. If this is the first time, accept the license and then choose “Start a New Class”. Work through the options until you get to the screen where the class name is entered and the path to store data is set. 4. Set the path to My Documents in the folder created for this purpose. The easiest way to do this is double click on Drive C in the Folders list; then double click on My Documents. With My Documents open, double click on the MarkBook Data folder.
10 MarkBook® for Windows on a Mac
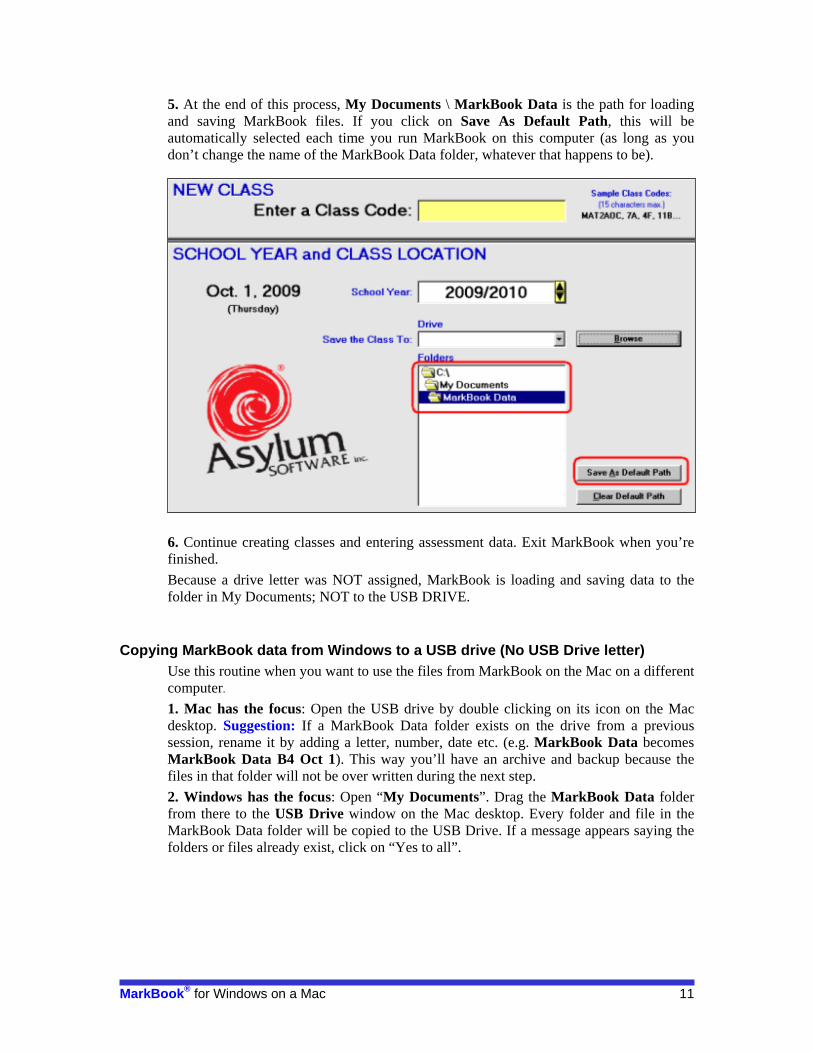
5. At the end of this process, My Documents \ MarkBook Data is the path for loading and saving MarkBook files. If you click on Save As Default Path, this will be automatically selected each time you run MarkBook on this computer (as long as you don’t change the name of the MarkBook Data folder, whatever that happens to be).
6. Continue creating classes and entering assessment data. Exit MarkBook when you’re finished. Because a drive letter was NOT assigned, MarkBook is loading and saving data to the folder in My Documents; NOT to the USB DRIVE.
Copying MarkBook data from Windows to a USB drive (No USB Drive letter) Use this routine when you want to use the files from MarkBook on the Mac on a different computer. 1. Mac has the focus: Open the USB drive by double clicking on its icon on the Mac desktop. Suggestion: If a MarkBook Data folder exists on the drive from a previous session, rename it by adding a letter, number, date etc. (e.g. MarkBook Data becomes MarkBook Data B4 Oct 1). This way you’ll have an archive and backup because the files in that folder will not be over written during the next step. 2. Windows has the focus: Open “My Documents”. Drag the MarkBook Data folder from there to the USB Drive window on the Mac desktop. Every folder and file in the MarkBook Data folder will be copied to the USB Drive. If a message appears saying the folders or files already exist, click on “Yes to all”.
MarkBook® for Windows on a Mac 11

Copying MarkBook Data from a USB Drive to Windows (No USB Drive letter) Use this routine when MarkBook files have been updated on a different computer and you want them copied for use with MarkBook on the Mac. 1. Mac has the focus: Insert the USB Drive and open a window on the Mac desktop 2. Window has the focus: Open “My Documents”. If there’s an existing MarkBook Data folder, rename it in the same way you did when transferring it to the USB Drive. 3. Mac has the focus: Drag the MarkBook Data folder from the USB window to the My Documents folder in Windows.
4. Start MarkBook. If the name of the MarkBook Data folder has not changed, then it should open by default. If this is not the case, use the Drive and Folder lists or the Browse button to set the path. 5. Select a class from the drop down list; then, click on Open.
Data Management Recommendation Regardless of the version of Windows operating on the Mac, each user should backup their class folders regularly. Two copies on two hard drives (work computer and home computer) plus a third copy on a USB drive that moves the data from one computer to another should do the trick! This applies to PC users as well.
12 MarkBook® for Windows on a Mac