marine catalogue - tiflex
TRANSCRIPT

MARINE CATALOGUE
Photo courtesy of UKSA.org

CONTENTS:
Treadmaster Marine DeckingTreadmaster Step Pads
Treadmaster Sports Pads
FAQ’s
Fitting Treadmaster Marine
Removing Treadmaster Marine
Marine Adhesives
Associated Products
Mar
ine
Dec
kin
g
The Treadmaster Original range has been the benchmark for anti-slip deck coverings for over thirty years. Its performance benefits have been enjoyed by professional seamen and yachtsmen the world over.
Bla
ck
Faw
n
Gre
y
Lig
ht
Gre
y
Blu
e
Lig
ht
Blu
e
Wh
ite
Supply Details
Treadmaster Original is available in sheet form which is easy to install and does not require special tools.
Length mm
(Imperial)
Width mm
(Imperial)
Thickness mm
(Imperial)
Surface Finish
1200 (4’) 900 (3’) 3 (3/10’) DP
1200 (4’) 900 (3’) 2 (1/6’) SP
Treadmaster Engine Room (ER)
Specifically designed for below deck applications in machinery spaces. It has an enhanced level of resistance to mineral oils and is coloured black to minimise the effects of staining.ER is available in diamond pattern with a sheet size of 1200 x 900 mm.
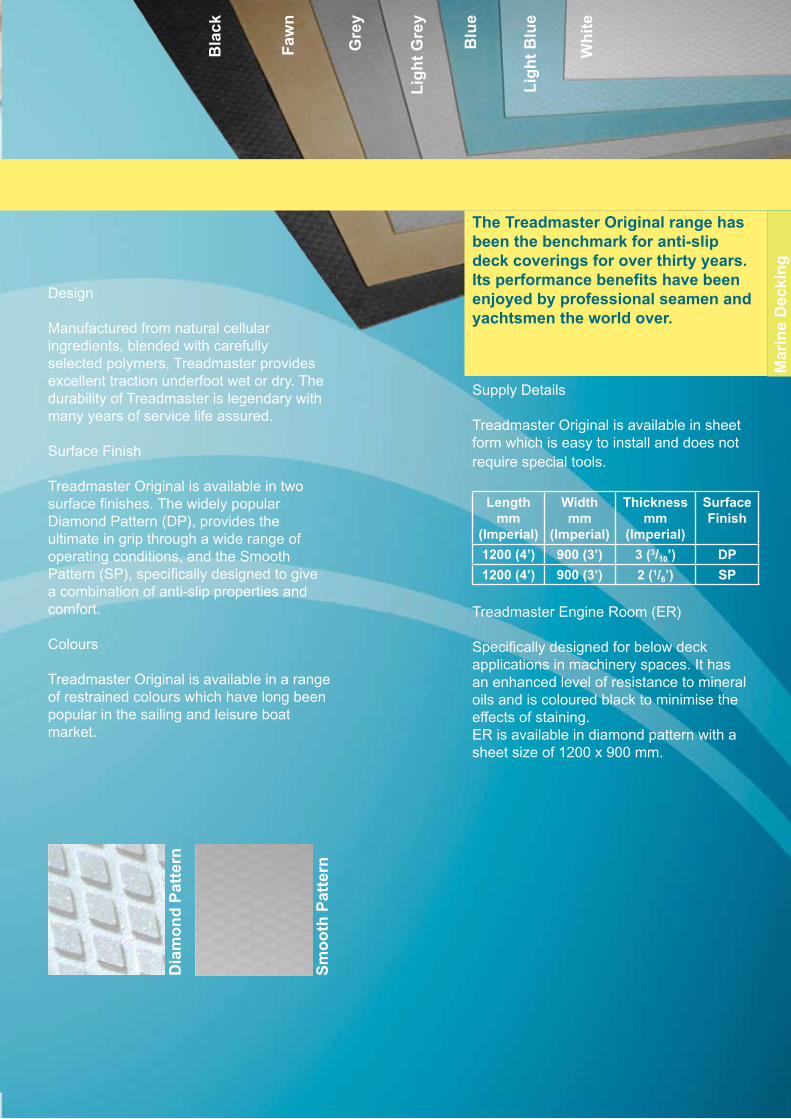
Design
Manufactured from natural cellular ingredients, blended with carefully selected polymers, Treadmaster provides excellent traction underfoot wet or dry. The durability of Treadmaster is legendary with many years of service life assured.
Surface Finish
Treadmaster Original is available in two surface finishes. The widely popular Diamond Pattern (DP), provides the ultimate in grip through a wide range of operating conditions, and the Smooth Pattern (SP), specifically designed to give a combination of anti-slip properties and comfort.
Colours
Treadmaster Original is available in a range of restrained colours which have long been popular in the sailing and leisure boat market.
Dia
mo
nd
Pat
tern
Sm
oo
th P
atte
rn

As well as the Treadmaster Original Decking, ‘Step Pads’ are also available to provide a quick and easy method of covering smaller areas using a simple ‘Peel and Stick’ system.
Step
Pad
s
Design
Step Pads are self adhesive making them very easy to fit.Ideal for use on step treads and other small surfaces, these pads lend themselves to many different applications
Typical applications include:
• Boat Steps• Gangways• Jet Ski’s• Caravan and Motorhome Steps
Supply Details
Treadmaster Step Pads are available in the same colours as Treadmaster Marine Decking:
• Black• Fawn• Grey• Light Grey• Blue• Light Blue• White
Length mm
(Imperial)
Width mm (Imperial)
Thickness mm
(Imperial)
Surface Finish
275 (10.7”)
135 (5.3”) 3 (1/8”) DP
275 (10.7”)
135 (5.3”) 2 (5/64”) SP
550 (21.5”)
135 (5.3”) 3 (1/8”) DP
550 (21.5”)
135 (5.3”) 2 (5/64”) SP
412 (16”) 203 (7.9”) 3 (1/8”) DP
412 (16”) 203 (7.9”) 2 (5/64”) SP
(All supplied in packs of 2)
Sp
ort
s P
ads
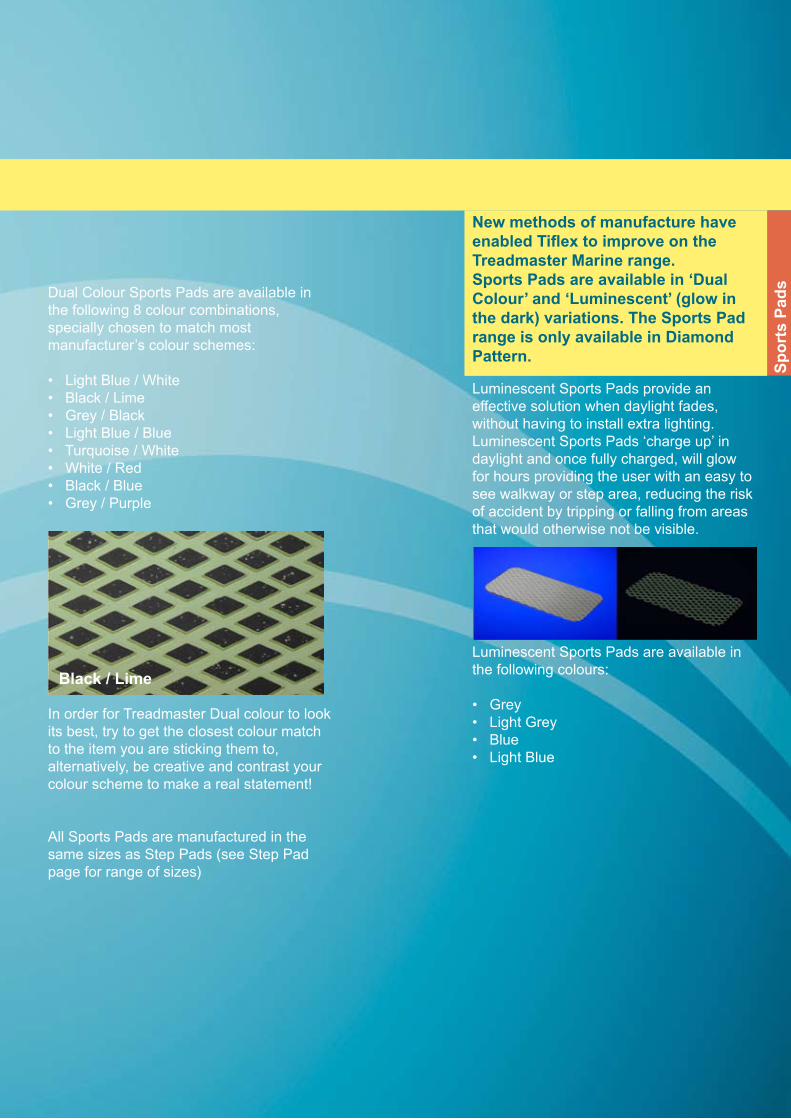
New methods of manufacture have enabled Tiflex to improve on the Treadmaster Marine range.Sports Pads are available in ‘Dual Colour’ and ‘Luminescent’ (glow in the dark) variations. The Sports Pad range is only available in Diamond Pattern.
Dual Colour Sports Pads are available in the following 8 colour combinations, specially chosen to match most manufacturer’s colour schemes:
• Light Blue / White• Black / Lime• Grey / Black• Light Blue / Blue• Turquoise / White• White / Red• Black / Blue• Grey / Purple
In order for Treadmaster Dual colour to look its best, try to get the closest colour match to the item you are sticking them to, alternatively, be creative and contrast your colour scheme to make a real statement!
All Sports Pads are manufactured in the same sizes as Step Pads (see Step Pad page for range of sizes)
Luminescent Sports Pads provide an effective solution when daylight fades, without having to install extra lighting. Luminescent Sports Pads ‘charge up’ in daylight and once fully charged, will glow for hours providing the user with an easy to see walkway or step area, reducing the risk of accident by tripping or falling from areas that would otherwise not be visible.
Luminescent Sports Pads are available in the following colours:
• Grey• Light Grey• Blue• Light Blue
Black / Lime

This page gives some general guidance and answers to frequently asked questions regarding Treadmaster Marine Decking. This document is for guidance only and is based on our best experience.FA
Q’s
Application of Treadmaster Marine decking to painted or varnished surfaces
It is our general recommendation that paint/varnish should be removed from the deck prior to application of Treadmaster as this will always ensure a good bond between the Treadmaster sheets and the deck. However, in some instances it is not possible, or desirable, to remove the paint or varnish.
When considering applying Treadmaster to a painted/varnished deck it should first be appreciated that the degree of success will depend largely on the condition of the painted/varnished surface and the compatibility of the paint/varnish with the adhesive used. If the surface is at all unsound (e.g. flaking) then the coating MUST be removed as it will not be possible to successfully bond the Treadmaster to the deck otherwise.
If the surface is sound then it should first be lightly abraded with a fine grit paper and then thoroughly cleaned and degreased prior to application of the adhesive and Treadmaster. This will provide a good surface bond and increase the chances of a strong bond. Instructions for use of the adhesive should be followed carefully.
Care should be taken to ensure that the adhesive used is compatible with the painted/varnished surface. Marine Contact adhesive contains solvents which may affect some types of coated surfaces and it would be preferable to use the Marine two part epoxy adhesive instead. If the deck has been painted using an epoxy paint, and is in good condition, then a good bond will normally be achieved using the Marine 2-part epoxy adhesive.
Because of the wide variety of primers, paints and deck coatings currently available it is strongly recommended that a bonding test is carried out on a small area prior to application over the whole deck.

Rem
ovi
ng
Tre
adm
aste
rThe following information was first published in the ‘Jobs for Winter’ section in Practical Boat Owner in February of 2005. It demonstrates the best methods of fitting Treadmaster Marine.
Non-slip coverings combine aesthetics with function, with diamond pattern (DP) Treadmaster being an old favourite.
Polymers and Cork
Treadmaster is stain resistant, it is made from a mix of polymers and ground up cork and comes in sheets measuring 120 cm x 90 cm (4 ft x 3 ft). It is flexible and easily cut with a knife or scissors. Once bonded down with a two-pack epoxy glue, it will last for many years.
Thanks to the diamond pattern it also gives incredibly good grip, which is why you will see pilot cutters, military craft and other all-weather boats covered in the stuff. Treadmaster is also available with a smoother, radial pattern for areas you may want to sit on, and can also be glued down with a contact adhesive. Fitting it is a straightforward job, but does require care to avoid mess and unnecessary waste. For the Treadmaster to look good and work well, take some time to really study your deck. Look at the pads on similar boats for ideas. Unless you like to emboss your bum, remember that the diamond pattern is not good to sit on without a cushion, but works really well where you need maximum grip. Fit the smooth pattern (SP) in sunbathing areas.
Think about the colour, too. Light colours won’t get as hot, but will mark more easily. Darker colours make the boat look heavier, but can match tan sails nicely.
Make Templates
Once you know what you want, make up some templates, preferably out of hardboard or thin ply, so they give you a stiff edge to draw and cut against. You can try these out on deck to see how they look, and modify as necessary.For aesthetic reasons, the diamonds should follow the line of the boat on curved decks, and run fore and aft on centrelines. If you intend to paint the deck between the pads with a hard wearing GRP paint, do this first. Leave the areas that will be covered in Treadmaster clear of paint for a better key. You’ll find it quicker and easier to paint first and fit the pads afterwards. Masking pads in situ will be fiddly and paint will somehow find its way onto the edges or the pattern itself.Cut the larger pads first, being mindful of the pattern. The templates will help you get the best from a sheet. No two sheets are the same at the edges, but careful parquetry can make an almost invisible join between two different pads or make a large one from scraps.
Marking and Cutting
Use a plywood template to cut the pad, keeping the diamond pattern in line with the sweep of the deck. A sharp Stanley knife cuts through the material with ease.

Fitting Treadmaster Continued...Fittin
g Tread
master
Tip - If you are replacing an existing pad, make the new pad slightly larger than the original to cover up any removal marks, and to ensure the edges sit on virgin gel coat.
The pad is positioned, and then a line is drawn around it with an HB pencil. Some boatbuilders like to ‘frame’ each pad with masking tape to catch any squeezed out glue. Simply mask off the deck under the pad, draw around the pad and then trim the masking tape with a knife, peeling away the tape beneath the pad’s intended position.Sand the area inside the pencil marks with a 120 grit sandpaper. Take special care to sand right up to the line, and not over it. Avoid using very coarse paper, as it creates channels for the glue to escape.
Once the GRP has a good matt finish, wipe it down with acetone to remove the dust and any greasy residues. You can cross the line with the acetone, but expect the pencil marks to fade a bit. As with any glueing job, the surfaces must be clean and dry. On damp days, you may want to dry the area with a hot air gun first, before wiping with acetone.
Mixing the Glue
The Treadmaster epoxy glue is made up of two parts, a white epoxy and a caramel-coloured hardener, They are mixed together to a ratio of 1:1. The epoxy tin is only half full to allow the hardener to be decanted into it if necessary. One pack is measured to stick exactly one sheet. If using smaller amounts, keep the decanting sticks separate so you don’t start a reaction in the unused glue.When mixed it should be a consistent cream colour and will remain workable for at least an hour - and much longer if it is cold - so there’s no need to rush. A one-pot contact adhesive is also available, but has a quick grab which makes positioning harder. It is also easier to remove at a later date.
Sticking Down
Apply the glue in a reasonably thick film to the back of the pad, using a flat spreader make sure you cover the whole pad evenly.Tip - You could create a lip of glue about 3 mm from the edge. Beyond this, the remainder of the pad is dry. When the pad is pressed down, this glue lip is forced outwards, sticking the final part of the pad with minimal ‘squeeze-out’.
A film of glue is also applied carefully to the deck, inside the pencil marks (or within the masking tape boundary)
The pad can now be carefully lowered into place. To avoid trapping air, fit the narrow end first, and then gently lower the rest, creating a leading edge with your hand to force out any air pockets.
Fit
tin
g T
read
mas
terFitting Treadmaster Continued...
If you are fitting several pads at once, it helps to number them and indicate their orientation with pencil marks on the underside. You can still read them through the glue.
Use a roller from the centre outwards to drive out any remaining air bubbles. Be aware that the pad may move on its film of glue, (which can help with final positioning) so take care as you push the roller towards the edges.
As the excess glue starts to go slightly tacky, it can be trimmed away with a sharp chisel, in both the vertical and horizontal planes.
Cleaning Up
With all the excess glue scraped up, the remainder can be cleaned away with methylated spirit. This can also be used to clean spilt glue from the pattern. Don’t use white spirit, as it leaves an oily residue. Although meths won’t damage the colour of the Treadmaster, use it carefully and sparingly. If left on the GRP it can mark.
Finally, tape the pad down with duct tape. This will stop it moving out of position as the glue sets. If any parts of the pad look likely to lift, tape them down as well. Because the glue takes a while to set, several pads can be done at once and then cleaned up in turn.
Some owners like to run sandpaper along the top edges of the pads, just to round them over. This removes the sharp points of some of the diamonds, but the sanding needs to be done evenly to make the rounding look intentional rather than worn!
Fitting full size sheets: For covering large areas, a slightly different technique is used.
The edges of the floor are lined with masking tape, and the sheets positioned over the top. Small strips of tape hold them firm. Where each sheet meets another, they are trimmed where necessary so the pattern merges seamlessly. Pencil lines are then drawn on the masking tape, to be later trimmed with a Stanley knife. The idea is that any squeezed-out glue will run onto the tape, and not the deck, making clean-up easier. The side decks are masked a similar way, and the pattern will also run across the boat.
Cutting the Pattern
Unlike with wallpaper, its rare to find two sheets of Treadmaster with the same pattern at the edges. For a seamless join between two sheets, use a transparent ruler and cut the diamonds through the centre.

Fitting Treadmaster Continued...Fittin
g Tread
master
With the same done on the opposing sheet, the two half diamonds make up the full pattern again. Curves on corners are made by drawing around a penny washer, and then trimming with a Stanley knife. For a really smooth edge, the corner can then be gently rubbed with sandpaper.
Sticking Down
Sticking down is similar to the pad technique, except that a full pack of epoxy is used per sheet. Use a flat metal scraper to ease the glue to the very edge of the sheet. Unlike the ‘glue lip’ technique, reverse the blade and draw the glue back in again, to actually avoid a build-up.
Apply the other half of the activated glue to the deck. One sheet, with a cut out, has already been applied, so now you have to carefully draw the glue back from the first sheet to a mark on the sole which denotes the end of the second sheet. The glue is built up each side of the slightly raised metal strip down the centreline to fill a void.
The sheet is carefully positioned. Use a roller to drive out the air, moving to the four sides from the centre in turn. The glue makes a crackling sound as the air bubbles are purged.
Masking tape is stuck to the leading edge of one sheet, pulled taut, and then stuck to the edge of the adjoining sheet.This tension in the tape will pull the two sheets tightly together, so the join should be invisible.
On a cold day the Treadmaster will tend to lift at the corners. On long edges, a hot air gun can be used to heat up the material and make it more pliant. Lifting areas are rolled flat and then taped down. Treadmaster is usually supplied in rolls, so it pays to lay it flat, under a weight (such as a thick plywood board), and if possible keep it at room temperature before use.
Cleaning Up
The glue is allowed to harden, and then a Stanley knife with a sharp blade is run carefully along the edge of the sheet. Use only enough pressure to cut though the excess glue and the tape underneath. The tape is then peeled backwards and inwards, creating a clean edge to the Treadmaster sheet. Any last tidying-up can be done with a sharp chisel before a final wipe down with meths.Clean tools are the key to a good finish. Dried glue will simply shatter off plastic spreaders when they are flexed, but metal scrapers will need a wipe down with acetone before a fresh batch of glue is used.
Once installed, Treadmaster should give years of service, needing only a wash with mild detergent to keep it pristine.

Rem
ovi
ng
Tre
adm
aste
rThe following information was first published in the ‘Jobs for Winter’ section of Practical Boat Owner in January of 2005. It demonstrates the best ways of removing Treadmaster Marine without damaging your boat.
When applied, the sheets are cut into the required shapes with a knife or scissors. Rounded corners, which are recommended to prevent localised lifting, can be smoothed with sandpaper.
Once sculpted, the pads are then carefully stuck down with glue. Again there are two types - a powerful contact adhesive, or a two part epoxy designed for maximumdurability, especially in warmer climates.
Maintaining Treadmaster
The material has been formulated to last a long time, but it is not indestructible. The nitrile/PVC formulation is pretty tough but should only be cleaned with a soft brush and warm water containing a mild detergent. Cleaning fluids containing bleach should never be used, and neither should abrasive cleaners.
Faded Treadmaster
The colours do fade in time, especially if part of the pad is under sun and the remainder exposed to the sun. The pads can be renovated with a specially formulated paint called Treadcote, which is applied directly to a properly cleaned surface, with no need for primers or undercoat. It is available in colours of blue, white, sand, grey or fawn and the retail price £36.52 per litre. A 1 ltr tin will cover approximately 7 m2.
Before using Treadcote on faded Treadmaster
After using Treadcote rejuvenation paint

Removing Treadmaster Continued...Rem
ovin
g Tread
master
Removing worn pads
Regular use of your boat will inflict numerous gouges and scratches from dropped anchors or spinnaker poles, and the patter of thousands of footfalls. Racing boats will probably suffer more than most. Once the pads age too far, then the old Treadmaster will have to come off. Some restoration may be possible - small areas can be patched with carefully inserted pads that match the pattern before being painted over with Treadcote. however, it isn’t re-ally an option to leave the Treadmaster in place and cover straight over the top, and you may get damp areas, and poor adhe-sion. Your new covering would also sit 4 mm higher. The best results will need total removal.Here the effort begins - remember Treadmaster is designed to stay stuck down, whatever happens! Fortunately, there are some weapons to help you separate the epoxy, but there is still the possibly of damage to the deck. This may not be a problem as you are probably going to re-cover your deck anyway, and any gouges can be filled with epoxy filler.
The condition of the Treadmaster itself may help. It is often applied by the DIY enthusiast and, as a result, some pads may be quite badly stuck down. This could be due to poor surface preperation, damp or dirty decks, or the use of a contact adhesive instead of epoxy. Air pockets within the pad may also reduce adhesion.A sharpish chisel is probably the best tool. Used either way up, it will cut its way between the Treadmaster and epoxy, and with a bit of effort, the Treadmaster will come away. You will end up with most of the material removed, and with most of the epoxy left behind.
Removing Epoxy
Removing the epoxy is less easy. Some builders suggest it can be gently heated with a hot air gun, and then planed back with a mechanical plane, but the blade will need regular sharpening. More effective is to use an electric tool - and there are several to choose from.
Mechanical Assistance
There are two types of machine we recommend, the P*erago and angle grinder. The P*erago comes in several varieties, and the type used for removing rust from steel has proven very effective.

Rem
ovi
ng
Tre
adm
aste
rRemoving Treadmaster Continued...
A series of spring-steel bars protrude from rubber arms, and strike the surface with considerable force. Care is needed using this tool, as it quickly cuts right through both the deck covering and the epoxy, and starts to take chunks out of the gel coat under-neath.
The wood substrates version was also very effective, and became more user friendly (less vicious) when the saw blades in the arms blunted slightly. This version not only chewed through the Treadmaster, but also smoothed out the epoxy underneath, leaving a scored surface. This will help key the replacement pads.
Another very useful tool for smoothing off the remains of chiselling is the angle grinder. Using a coarse grit, this can remove the last traces of epoxy, but it is also likely to take a millimetre or two off your underlying gel coat, and won’t give an even finish. This isn’t a great hardship, as the surface can be built up again with epoxy filler, and the new deck covering - especially if its teak - will be a great leveller anyway.
Cleaning Up
With the Treadmaster and epoxy removed, the gel coat (or possibly what’s left of it) needs to be wiped down with acetone to remove the last of the residue.
This is important to ensure that the replacement material will stick properly.The larger gouges and damage can now be made good with epoxy filler or gel coat repair material.
This can then be sanded flat prior to laying down the new deck coverings. Perfection isn’t needed here, especially if the intended replacement is a teak deck.
Other Substrates
Treadmaster on steelRemoving Treadmaster from a steel deck will depend almost solely on the use of a sharp scraper, or on an angle grinder with a coarse-grit sanding disc. Most steel decks will have had an epoxy preparation before the Treadmaster glue was applied, so scraping back with a sharp chisel should prove effective. The remaining epoxy can be sanded flat.
Treadmaster on woodThe epoxy supplied with Treadmaster has been thickened with volcanic ash to prevent it sinking into wood substrates, so you should be able to scrape it off in much the same way as with GRP substrates.
Health and safety
You’re going to get mucky doing this job, as well as creating a huge amount of dust, so have a dustpan and brush handy, or preferably, a heavy duty vacuum cleaner. When sanding, wear eye protection and use a decent mask.

As well as the Treadmaster Original Decking, ‘Step Pads’ are also available to provide a quick and easy method of covering smaller areas using a simple ‘Peel and Stick’ system.
Step
Pad
s
Design
Step Pads are self adhesive making them very easy to fit.Ideal for use on step treads and other small surfaces, these pads lend themselves to many different applications
Typical applications include:
• Boat Steps• Gangways• Jet Ski’s• Caravan and Motorhome Steps
Supply Details
Treadmaster Step Pads are available in the same colours as Treadmaster Marine Decking:
• Black• Fawn• Grey• Light Grey• Blue• Light Blue• White
Length mm
(Imperial)
Width mm (Imperial)
Thickness mm
(Imperial)
Surface Finish
275 (10.7”)
135 (5.3”) 3 (1/8”) DP
275 (10.7”)
135 (5.3”) 2 (5/64”) SP
550 (21.5”)
135 (5.3”) 3 (1/8”) DP
550 (21.5”)
135 (5.3”) 2 (5/64”) SP
412 (16”) 203 (7.9”) 3 (1/8”) DP
412 (16”) 203 (7.9”) 2 (5/64”) SP
(All supplied in packs of 2)

Treadmaster TM7 For use where there are fire / smoke specifications to be met, such as Navy Vessels.
Sterngland PackingFor use on smaller stern glands and bilge pumps
TICO NebarFor specifications gasket applications
Treadmaster AFDBFor use on diving boards and bare foot areas. (Contains anti-fungal properties)
TICO CF/PA 10 & 80 Low frequency pads for critical frequency applications
TICO Clip StripPipe isolation from the hanger
TICO Pipe GripsFor use where pipes need to be isolated
Tiflex 100 SealerFor use on all
Treadmaster flooring products
Treadmaster TM8For use where there
are smoke / fire specifications to
be met
TICO SHigh performance
anti-vibration machinery mounting
material
Below are a list of associated products suitable for use in the marine industry.
Please feel free to request more information on any of these products by contacting our Marketing Department on +44 (0) 1579 320808
Ass
oci
ated
Pro
du
cts

Marine MA/CAT-290807
Tiflex LimitedTiflex HouseLiskeardCornwall PL14 4NBUnited Kingdom
IMO Approval and Certification
Telephone: +44 (0) 1579 320808
Email: [email protected]
Buy Online: www.tiflex.co.uk