manual for greenhouse nursery 0,51x0,91x1,68m
TRANSCRIPT

03-02-2021
forGreenhouse Nursery
0,51x0,91x1,68m
Manual

Assembly Instructions
PRODUCT SIZE(LxWxH): 51X91X168CMPLEASE READ CAREFULLY BEFORE ASSEMBLY

1
PART NO QTY PART NO QTY PART NO QTY PART NO QTY
L01A
L01B
2
1
L01C
L01D
1
1
L02B 1
L01E 1
L02A 1
L08A
L08B
2
1
L07 1
L06 1
L03B 1
L23A 1
L20 1
L10A 1
L14A 1
L22A 6
L22B 1
L13 2
L15 2
L18A 4
L19B 1
L19A 2
L21A 9
D109 1
D99 2
D101 2
D108 2
S2136M6X10
S282M4X10
M022M4
S052M6X12
M032M6
M0736M6
Z02
Z19
70
4
Ø4X16D
M4.2X10
J121L
J121R
1
1
J119L
J119R
J120
1
1
1
PART NO QTY
NO.1
PC/Glass
N0.1
Y4 2
Y1 1
Y2 1
Y5 1
Y7 3
1Y10
Y11 2
A68 1
Z032Ø4X12
L18B 2
ALU

2
L19A
L20
L19B
Y10
L19A
Z02
1
22
window
Fix L19A to L20 & L19B using Z02,then put the panel Y10 into position.
Fix another L19A to L20 & L19B using Z02.
S282M4X10
M022M4
PART NO QTY
L19A
L19B
2
1
L20 1
8
1Y10
Z02
D108 2
L03B 1
L23A 1
A68 1
Ø4X16D

2
S28
M02
3
1
Z02
1
D108
L20L20 L03B
L23A
L03B
D108 Z02
1
A68
A68
Fix L03B & L23A to the windowas below, using D108 and Z02.(L03B & L23A are factory fittedas a part already)
Slide 2 * S28 into the channelof L19B to fix A68 with M02.

4
Z02
2
Z02
Door Assembly
Fix L18A to L15 usingZ02,then put the panelY11 into position.
Fix another L18A to L15 using Z02.
Z02
L18B
L18A
1
L18A
L18B
L15
Y11Y11
11
2 2
1
2
1
2
L18B
L15
PART NO QTY
L15 2
L18A 4
Y11 2
Z028Ø4X16D
L18B 2
5
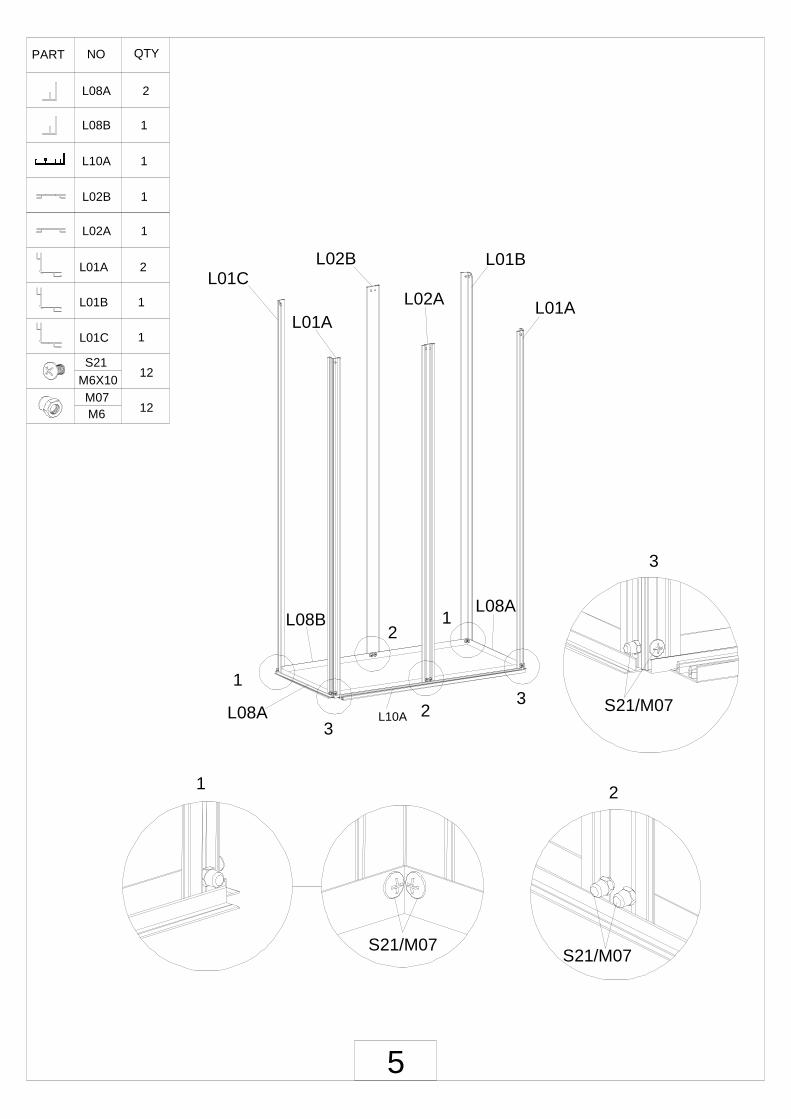
PART NO QTY
L08A
L08B
2
1
L10A 1
L02B 1
L02A 1
L01A 2
L01B 1
L01C 1
S2112M6X10
M0712M6
1
3
3
1
2
2
1 2
S21/M07 S21/M07
L01BL01C
L02B
L02A L01AL01A
L08A
L08AL08B
S21/M07
3
L10A

6
1
Z02
PART NO QTY
L22A 2
L21A 3
Z026
Y7 1
L21A
L21A
L21AL22A
L22A
1
1
1
1
1
1
Y7
Shelves Assembly (3PCS)
Fix L21A (3PCS) to 2 * L22A as below,using Z02.
Insert panel Y7 into the channel of L22A.
Attention: If you choose glass, make sure put the shelves in a safe place after assembly,to avoid the glass damaging or falling off.
Ø4X16D

7
PART NO QTY
1
1
22
1
1
2
2
11
Y1
Y2
Y4Y4
Z0224
Y4 2
Y1 1
Y2 11 2
Z02Z02
L22A L22A
L01A&BL02A
Fix the shelves to L01A , L01B, L01C, L02A & L02B using Z02
Put the panels into positions
Ø4X16D

8
PART NO QTY
S2122M6X10
M0722M6
L06
L01E
L01D
L22B
1
1
22
L07 1
L06 1
L01D 1
L01E 1
L22B 1
D99 2
D101 2
1 S21/M07
S21/M07
2
S21
M07
Y5 1
Y5
Fix L01D & L01E to L06,using S21 & M07
Fix L22B to L01D & L01E,using S21 & M07
Put Y5 into position

3S21/M07
9
L07
44
D99
S21/M07
4
3
5
5 5
S21/M07
D101
Fix L07 to L01A & L02A, using S21 & M07.Then fix the roof to L01A, L01B, L01C,L02A & L02B, using D99, D101, S21 & M07.

10
PART NO QTY
L14A
L13
DOOR
2
2
33
2
Door 2
L14A 1
L13 2
Z02
Z024
Z194M4.2X10
1
1111
Z19
4
4
Z02
L13
3
Ø4X16D
Z19
L14A
L07
L18B
L15
Fix L14A to L07,using Z19.
Slide the doors into theslot of L14A & L10A,and fix L13 * 2 to bothends of L14A and L10A,using Z02.

S05
1
L03B
L23AS05
M03
S052M6X12
M032M6
Window 1
11
PART NO QTY
1
1
When fixing the window to the roof,open it up fully as shown for easyassembly.
Slide 2 * S05 into the channel of L03Bto fix it to L22B using M03.

12
PART NO QTY
6
J121L
J121R
J119L
J119R
J120
1
1
1
1
1
Z02?X16D
Z02
1
1
1
J121L/R
2
2
2
Z02
J119L/RD109 1
S21/M07
Z03
J120D109
S212M6X10
M072M6
Z032?X12
3
3
Fix plate D109 to L07,using S21 & M07.Then Fix J120 to D109,using Z03.

I
For more information please visit:www.dancovershop.com
l
l
ll
ll
l
l
l
ll
Dancover A/S Lyngevej 16A, Nørre Herlev 3400 Hillerød Denmark
Head office: