manual combi-steamer ccm - rational ag · pdf filemanual combi-steamer ccm. 2 ... the service...
TRANSCRIPT
Manual
Combi-Steamer CCM

2
We grant a 12 month guarantee which is valid from the date of invoice,exempted are damages to glass, light bulbs and gaskets.
All rights are reserved for technical changes.
In case you may need further assistance, please do not hesitate to call us Telephone: Germany (08191)3270.
For operational problems call our “Hot Line”: Telephone: Germany (08191) 327300.
Your RATIONAL U.K. Team: (01582) 480388.
Your customer service
For inquiries please indicate the following:
Type of unit:
Unit serial number:
Your unit was checked by:
RATIONAL Combi-Steamer CCM
______________________________
______________________________
3
Control panel 5
Features 6
Loading and unloading 7
Safety hints 8
Cooking methods of RATIONAL CCM model 9
Steam mode 11
Hot Air mode 13
Combi-Steaming mode 16
Vario-Steaming mode 21
Reheating mode 24
ClimaPlus 27
Cooking with core temperature 29
Additional function: Moistening 32
Additional function: Cool down 34
Additional function: 1/2 fan speed 35
Additional function: 1/2 energy 36
Programming 38
Accessories 42
Cooking examples 48
Cleaning 66
Descaling 67
Important installation information 68
Maintenance 72
Contents
4
Control paneland descriptionplease turn
O
30°C
300°C
D
1 - 120 min 20 - 99° C
A
we congratulate you on your wise choice to buy a RATIONAL Combi-Steamer.
With this RATIONAL Combi-Steamer you possess the best unit amongst those which are available on themarket.The Combi-Steamers further development is a result of close contact with our customers – an innovation forthe demanding chef, a unit with almost unlimited possibilities.
We have specialised in solid workmanship, high functional safety and precise control systems and most of allsimple, practical operation.
However we still recommend you to study this manual for the RATIONAL Combi-Steamer carefully. This wayyou will profit from the many possibilities and advantages the RATIONAL Combi-Steamer can offer.
Keep this manual safe and within easy reach.
Please let us know about your pratical experiences, your suggestions and ideas so we can share them withour other customers.
And now enjoy your new RATIONAL Combi-Steamer.
YourRATIONAL Großküchentechnik GmbH
Dear Customer,
5
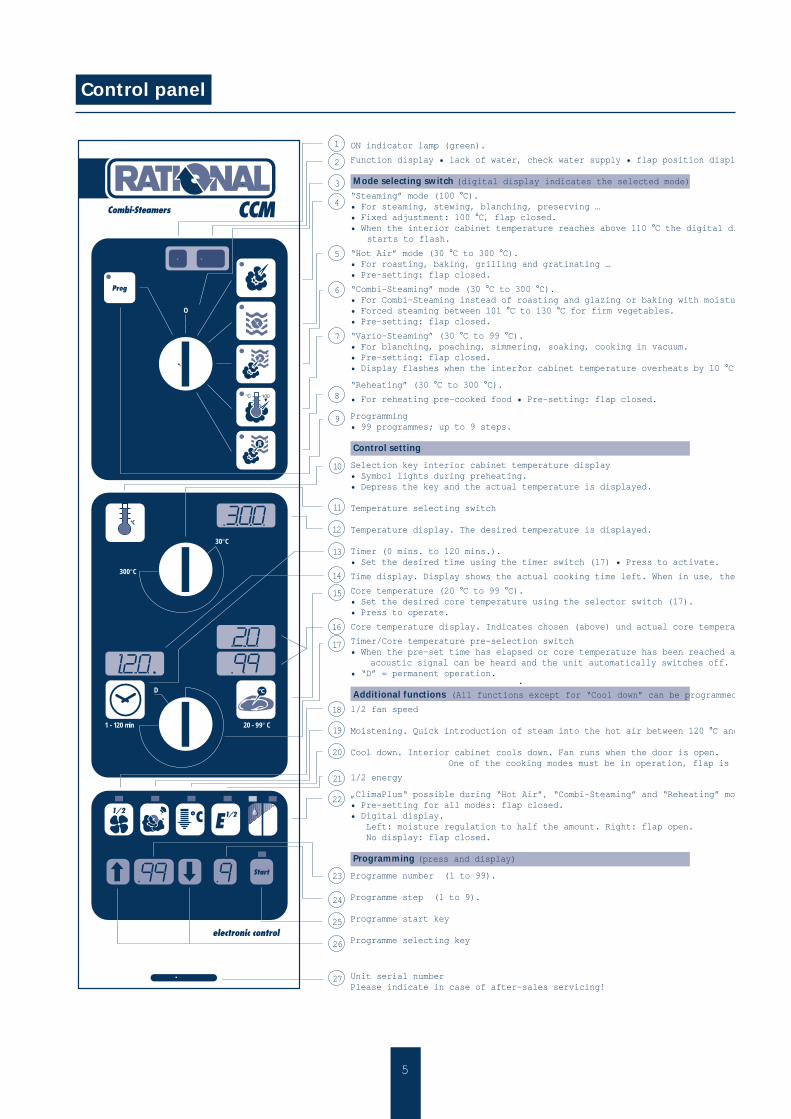
Control panel
ON indicator lamp (green).
Function display • lack of water, check water supply • flap position displ
Mode selecting switch (digital display indicates the selected mode)“Steaming” mode (100 °C).• For steaming, stewing, blanching, preserving …• Fixed adjustment: 100 °C, flap closed.• When the interior cabinet temperature reaches above 110 °C the digital di starts to flash.
“Hot Air” mode (30 °C to 300 °C).• For roasting, baking, grilling and gratinating …• Pre-setting: flap closed.
“Combi-Steaming” mode (30 °C to 300 °C).• For Combi-Steaming instead of roasting and glazing or baking with moistu• Forced steaming between 101 °C to 130 °C for firm vegetables.• Pre-setting: flap closed.
“Vario-Steaming” (30 °C to 99 °C). • For blanching, poaching, simmering, soaking, cooking in vacuum.• Pre-setting: flap closed.• Display flashes when the interior cabinet temperature overheats by 10 °C
“Reheating” (30 °C to 300 °C).• For reheating pre-cooked food • Pre-setting: flap closed.
Programming• 99 programmes; up to 9 steps.
Control setting
Selection key interior cabinet temperature display• Symbol lights during preheating.• Depress the key and the actual temperature is displayed.
Temperature selecting switch
Temperature display. The desired temperature is displayed.
Timer (0 mins. to 120 mins.).• Set the desired time using the timer switch (17) • Press to activate.
Time display. Display shows the actual cooking time left. When in use, the
Core temperature (20 °C to 99 °C).• Set the desired core temperature using the selector switch (17).• Press to operate.
Core temperature display. Indicates chosen (above) und actual core tempera
Timer/Core temperature pre-selection switch• When the pre-set time has elapsed or core temperature has been reached an acoustic signal can be heard and the unit automatically switches off.• “D” = permanent operation.
Additional functions (All functions except for “Cool down” can be programmed1/2 fan speed
Moistening. Quick introduction of steam into the hot air between 120 °C and
Cool down. Interior cabinet cools down. Fan runs when the door is open. One of the cooking modes must be in operation, flap is o
1/2 energy
„ClimaPlus“ possible during “Hot Air”, “Combi-Steaming” and “Reheating” mo• Pre-setting for all modes: flap closed.• Digital display. Left: moisture regulation to half the amount. Right: flap open. No display: flap closed.
Programming (press and display)
Programme number (1 to 99).
Programme step (1 to 9).
Programme start key
Programme selecting key
Unit serial numberPlease indicate in case of after-sales servicing!
2
1
3
4
5
6
7
8
9
10
11
12
13
14
15
16
17
18
19
20
21
23
24
25
26
27
22
O
30°C
300°C
D
1 - 120 min 20 - 99° C
6
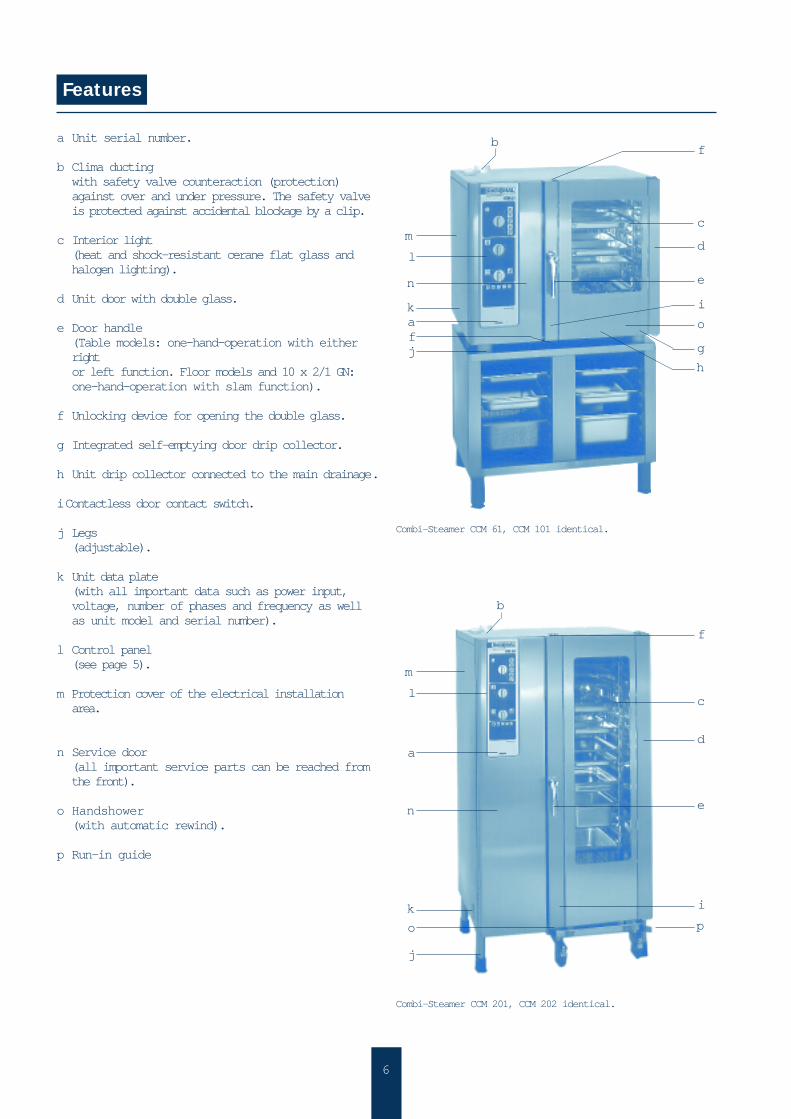
a Unit serial number.
b Clima ductingwith safety valve counteraction (protection)against over and under pressure. The safety valveis protected against accidental blockage by a clip.
c Interior light(heat and shock-resistant cerane flat glass andhalogen lighting).
d Unit door with double glass.
e Door handle(Table models: one-hand-operation with eitherright or left function. Floor models and 10 x 2/1 GN: one-hand-operation with slam function).
f Unlocking device for opening the double glass.
g Integrated self-emptying door drip collector.
h Unit drip collector connected to the main drainage.
i Contactless door contact switch.
j Legs(adjustable).
k Unit data plate(with all important data such as power input,voltage, number of phases and frequency as wellas unit model and serial number).
l Control panel(see page 5).
m Protection cover of the electrical installationarea.
n Service door(all important service parts can be reached fromthe front).
o Handshower(with automatic rewind).
p Run-in guide
Features
b
a
jf
l
m
k
a
n
j
o
l
m
k
c
d
e
g
h
i
o
c
f
d
e
p
i
n
Combi-Steamer CCM 61, CCM 101 identical.
Combi-Steamer CCM 201, CCM 202 identical.
b
f
7
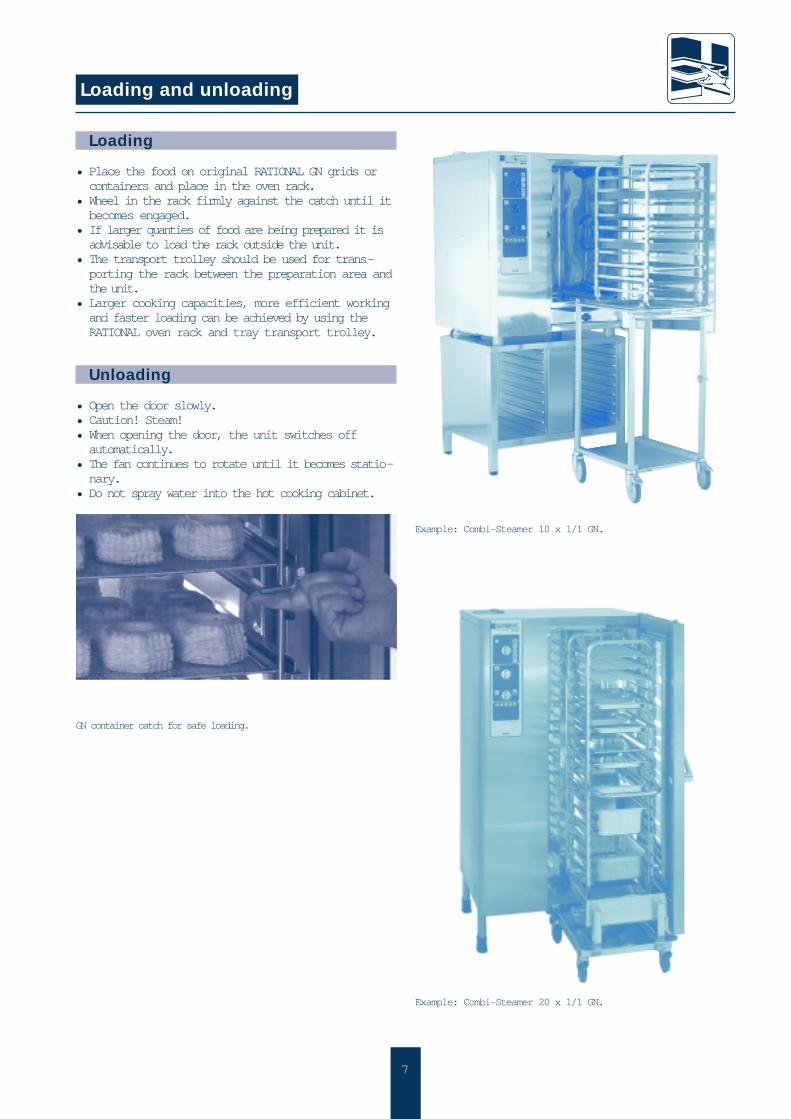
Loading
• Place the food on original RATIONAL GN grids orcontainers and place in the oven rack.
• Wheel in the rack firmly against the catch until itbecomes engaged.
• If larger quanties of food are being prepared it isadvisable to load the rack outside the unit.
• The transport trolley should be used for trans-porting the rack between the preparation area andthe unit.
• Larger cooking capacities, more efficient workingand faster loading can be achieved by using theRATIONAL oven rack and tray transport trolley.
Unloading
• Open the door slowly.• Caution! Steam!• When opening the door, the unit switches offautomatically.
• The fan continues to rotate until it becomes statio-nary.
• Do not spray water into the hot cooking cabinet.
GN container catch for safe loading.
Loading and unloading
Example: Combi-Steamer 10 x 1/1 GN.
Example: Combi-Steamer 20 x 1/1 GN.
8
Safety hints
Unloading
• Open the door slowly.• Caution! Steam!• Caution! Containers can be hot.• When opening the door, the unit switches off auto-matically.
• The fan continues to rotate until it becomes statio-nary.
• Do not spray water into the hot cooking cabinet.• Lock GN containers for safe loading.
Using the core temperature
• The core probe can be very hot.• Place the core probe in the holder provided whennot in use.
• Do not let the core probe hang freely outside thecooking area.
• Make sure the core probe is not inserted into thefood when removing from the oven.
Working with mobile oven racks andtransport trolleys for table models(option)
• The transport trolley must be fixed to the unitproperly.
• When transfering from the mobile oven rack tothe transport trolley beware of the safety catch.
• Use the wheel brakes provided on both rack andtrolley.
Extra function “Cool down”
• Caution! While the door is open during the cooldown phase the fan continues to rotate.
• Only use the cool down function in accordance toregulations when the air baffle system is closed.
General hints
• The temperature of the door glass can be higherthan 60 Kelvin as the temperature of the room.
• During long periods of non usage the main stop-cock should be turned off.
• Fasten the standard catering container catches onfloor models – for safe loading and unloading.
• Lack of water display flashes – check the watersupply.
• To check the set time, press the timer once more.• Make sure, that the mobile oven rack is insertedfully and the locking device is snapped into it’slocked position
Cleaning
• Spray the cleaning detergent using the originalRATIONAL hand pressure spray gun.
• Do not use a high pressure cleaner.• Do not use acids or let acidic fumes come intocontact with the protective layer of the unitsnickel chromium steel otherwise it will be dama-ged and could become discoloured.
• Observe the handling instructions on the cleaningdetergent container (only spray into the cabinetwhen the temperature is below 60 °C).
Descaling
• The SC-Automatic (self-clean) makes regulardescaling of the steam generator superfluous.
• In areas where water hardness is normal thesteam generator must be cleaned thoroughly every12 months. This operation must be carried out byour service department.
Maintenance
• Inspection and repair work should be carried outby qualified electricians. Caution! The unit mustbe isolated from the power supply before openingthe service door and working on live parts.
9
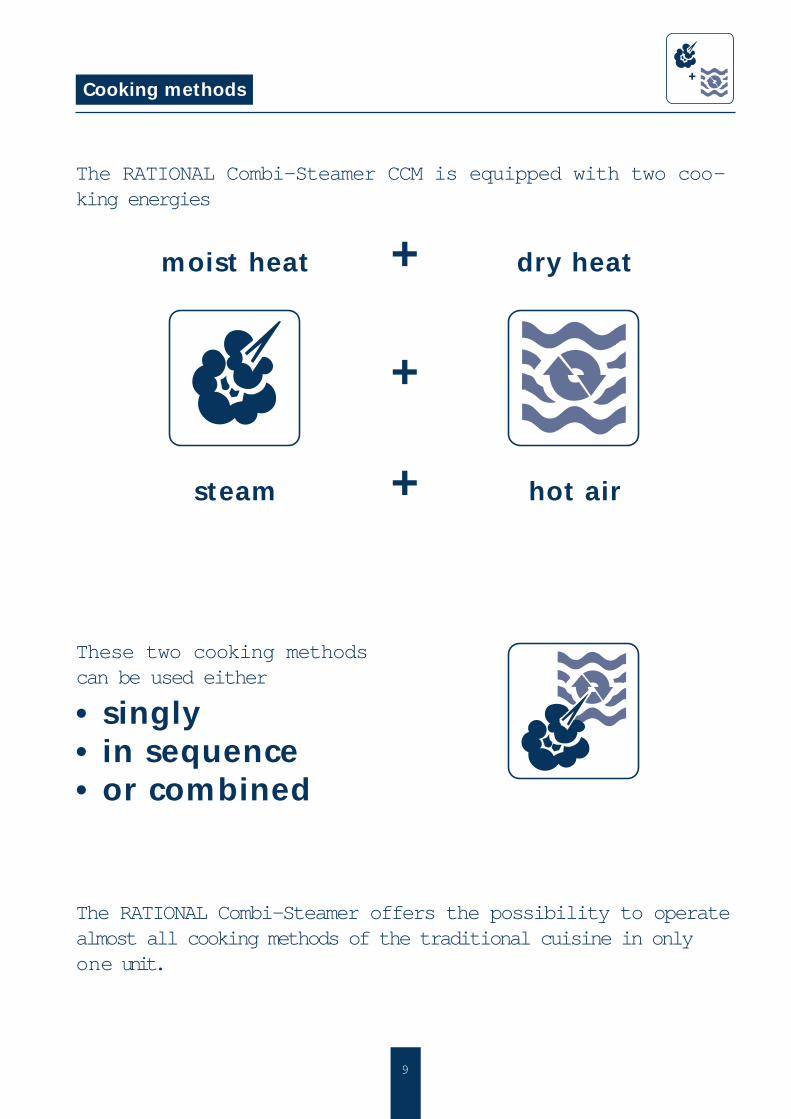
Cooking methods
The RATIONAL Combi-Steamer CCM is equipped with two coo-king energies
moist heat dry heat+
+
steam hot air+
These two cooking methodscan be used either
• singly• in sequence• or combined
The RATIONAL Combi-Steamer offers the possibility to operatealmost all cooking methods of the traditional cuisine in onlyone unit.
1 0
Five modes are at your disposal
“Steaming” mode = moist heat
The high capacity steam generator produces hygienic steam. This is let,pressureless, into the interior cabinet and is circulated at high speed bythe fan. The patented control system regulates the input of steam; only asmuch steam is let in as the food is able to absorb. Thecooking temperature is fixedat100 °C.
“Hot Air” mode = dry heat
High capacity heating elements heat the dry air. The fan circulates this hotair equally inside the interior cabinet. The temperature can be selectedbetween30 °C to 300 °C.
“Combi-Steaming” mode = moist heat + dry heat
The two cooking modes “Steaming” (moist heat) and “Hot Air” (dryheat) are combined by a control system. This combination creates a hot-humid climate for a specially intensive cooking. The temperature can beselected between 30 °C to 300 °C. The interior cabinet continuously con-tains the optimal humidity, which will prevent the food from drying out .
“Vario-Steaming” mode = moist heat from 30 ° to 99 °C
The electronic automatic control system with the built-in temperaturesensor guarantees that the pre-selected temperature is kept constant inthe cooking cabinet. The control technology provides a cooking climatewhich meets the needs of the food being prepared. The temperature can beset to vary between 30 °C to 99 °C. The Temperature tolerance is +/- 1°C.
“Reheating” mode = moist heat + dry heat
When both cooking modes steaming and hot air are combined by this spe-cial control system, an ideal environment is created for the process ofreheating. This ideal climate prevents the food from drying out and stopsunnecessary water marks. The temperature ranges between 30 °C and300 °C.According to the preparation desired, you can choose or combine theequivalent modes either singly, in sequence or combined.
1 1
Advantages
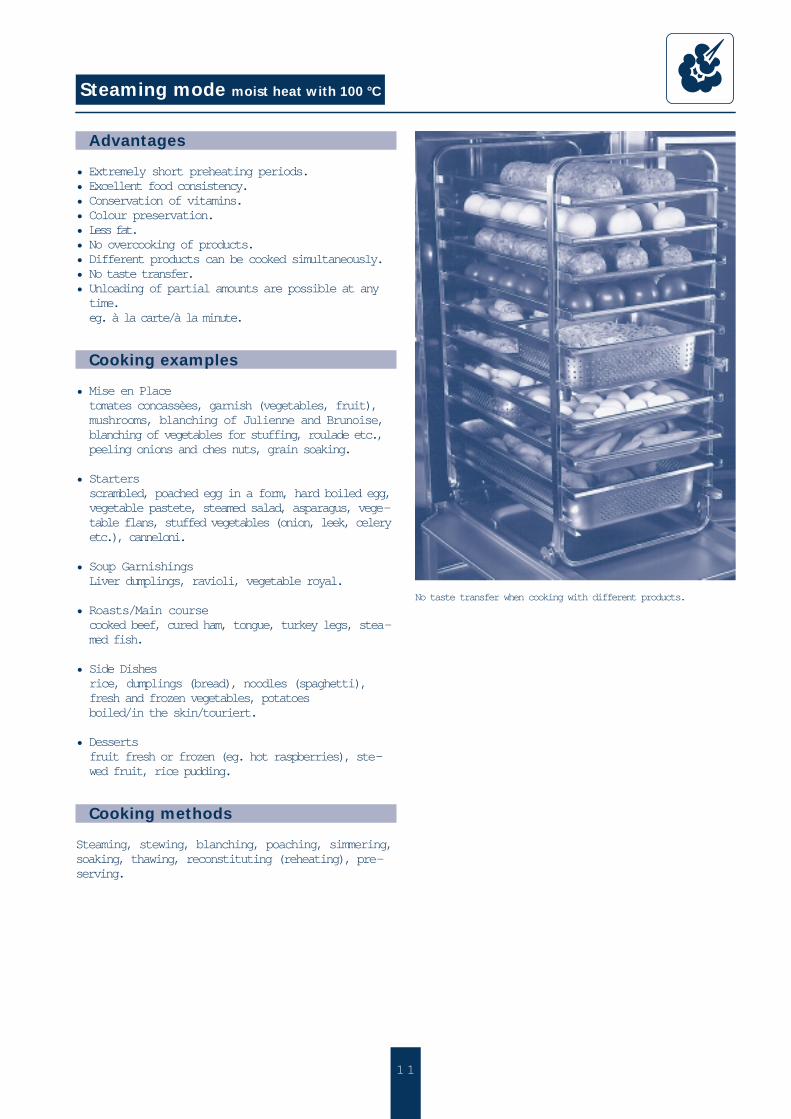
• Extremely short preheating periods.• Excellent food consistency.• Conservation of vitamins.• Colour preservation.• Less fat.• No overcooking of products.• Different products can be cooked simultaneously.• No taste transfer.• Unloading of partial amounts are possible at anytime.eg. à la carte/à la minute.
Cooking examples
• Mise en Placetomates concassèes, garnish (vegetables, fruit), mushrooms, blanching of Julienne and Brunoise,blanching of vegetables for stuffing, roulade etc.,peeling onions and ches nuts, grain soaking.
• Startersscrambled, poached egg in a form, hard boiled egg,vegetable pastete, steamed salad, asparagus, vege-table flans, stuffed vegetables (onion, leek, celeryetc.), canneloni.
• Soup GarnishingsLiver dumplings, ravioli, vegetable royal.
• Roasts/Main coursecooked beef, cured ham, tongue, turkey legs, stea-med fish.
• Side Dishesrice, dumplings (bread), noodles (spaghetti),fresh and frozen vegetables, potatoesboiled/in the skin/touriert.
• Desserts fruit fresh or frozen (eg. hot raspberries), ste-wed fruit, rice pudding.
Cooking methods
Steaming, stewing, blanching, poaching, simmering,soaking, thawing, reconstituting (reheating), pre-serving.
Steaming mode moist heat with 100 °C
No taste transfer when cooking with different products.

1 2
Steaming mode moist heat with 100 °C
Operation
• Set the “Steaming” mode.
• Preheat until the warm up control light goes out.The temperature is fixed at 100 °C.
Load …
… the oven rack and place in the unit.
• Set timer/permanent operation or core tempera-ture.
Setting
Change the set values when necessary.
Remove …
… the containers when the food has reached itsrequired firmness resp. softness. When the door isopened the unit switches off automatically. The fancontinues to rotate until it becomes stationary.
Control …
… of the food is always possible by:
• Reading the display controls.• Self control (finger, needle, prodding).• Inserting the automatic core probe.
Safety hints
• Caution! Steam! (Danger scalding!)• Caution! Hot containers!• Caution! Scalding!• Please observe the correct locking of the mobilie oven rack.
Hints
• Check and consider which types of food can becooked together each day using the mode steamingin order to achieve an optimal performance. Bearin mind that fish, meat, vegetables, fruit etc. canbe cooked together.
• Potatoes should always be cooked in perforatedcontainers. Due to the perforations, steam cancirculate and cooking is quicker.
• Vegetable stock can be collected by inserting acontainer in the bottom of the mobile rack. It isbetter to use two shallow containers rather thanone high one in order to avoid bruising the food.
• Dumplings should be placed in shallow containers(not too close together).
• Rice and cereals is the only type of food wherewater must be added (1 part rice: 1.5–2 partswater).
• Tomatoes can be skinned easily: steam for30–60 sec. chill with cold water.
/ or
/
1 3
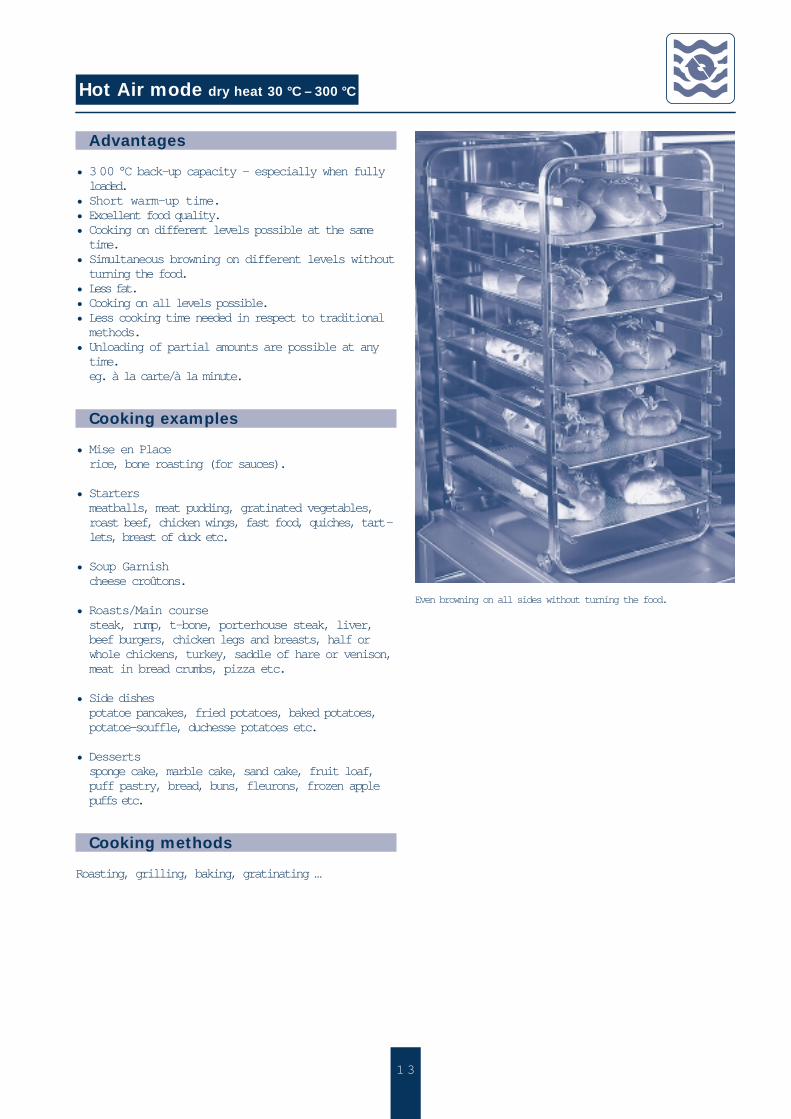
Advantages
• 300 °C back-up capacity – especially when fullyloaded.
• Short warm-up time.• Excellent food quality.• Cooking on different levels possible at the sametime.
• Simultaneous browning on different levels withoutturning the food.
• Less fat.• Cooking on all levels possible.• Less cooking time needed in respect to traditionalmethods.
• Unloading of partial amounts are possible at anytime.eg. à la carte/à la minute.
Cooking examples
• Mise en Placerice, bone roasting (for sauces).
• Startersmeatballs, meat pudding, gratinated vegetables,roast beef, chicken wings, fast food, quiches, tart-lets, breast of duck etc.
• Soup Garnishcheese croûtons.
• Roasts/Main coursesteak, rump, t-bone, porterhouse steak, liver,beef burgers, chicken legs and breasts, half orwhole chickens, turkey, saddle of hare or venison,meat in bread crumbs, pizza etc.
• Side dishespotatoe pancakes, fried potatoes, baked potatoes,potatoe-souffle, duchesse potatoes etc.
• Dessertssponge cake, marble cake, sand cake, fruit loaf,puff pastry, bread, buns, fleurons, frozen applepuffs etc.
Cooking methods
Roasting, grilling, baking, gratinating …
Hot Air mode dry heat 30 °C – 300 °C
Even browning on all sides without turning the food.

1 4
Hot Air mode dry heat 30 °C – 300 °C
Operating
• Set the “Hot Air” mode.
• Preheat: until the set temperature is reached(at least until the control light goes out)
• grilling• frozen products 300 °C• gratinating
Load …
… the oven rack and place in the unit.
• Set cooking temperature.
• Select cooking time/continuous duty or coretemperature.
Note:Before opening the door wait until the fan wheelstops rotating (heat accumulation).
Setting
Change the set values when necessary.
Remove …
… the containers when the food has reached itsrequired cooking consistency. When the door is ope-ned the unit switches off automatically. The fan con-tinues to rotate until it becomes stationary.
Control …
… of the food is always possible by:
• Reading the display controls.• Self control (finger, needle, prodding).• Inserting the automatic core probe.
Safety hints
• Caution! Steam!• Caution! Hot containers!• Caution! Danger scalding!• Please observe the correct locking of the mobilie oven rack.
/ or
J +

1 5
Hot Air mode dry heat 30 °C – 300 °C
For fish preparation use granite-enamalled sheets. Place quick fried food on grids.
Hints
• Cooking timesThe cooking time depends on the quality, weightand size of the product.Do not overload grids or containers in order toensure even air circulation.
• General Hints– Preheat up to 300 °C in order to have enoughheat stored as a buffer.
– Do not open the door of the unit before the fanstops rotationg so that as little heat as possible escapes from the interior cooking cabinet.
– Fill the unit quickly in order to avoid a drop of temperature within the cooking cabinet.
– Use ClimaPlus while cooking in order to let the surplus of humidity escape.
– When cooking products which release a lot of humidity (e.g. chicken legs) we recommend to reduce the batch size to 75% or even 50% ofthe usual theoretically recommended „max pos-sible loading capacity“.
• Pan fried foodGenerally every conventional type of breadcrumbs can be used. The quality of some dishes canbe improved by oiling the surface with either oilor paprika oil mixture. Press breading firmly tothe meat, cover with oil and do not overload.Gerneral rules: every one cm meat cut needsapprox. 8 to 10 minutes cooking time.Preheating: Always preheat the unit to 300 °C(at least until the control light goes out).Ideal cuts: 1,5–2 cm thickness.Do not beat or flatten the meat (or toss in flour).Containers: Grids have the advantage, that the topand bottom sides of roasts etc. will show an evenbrowning. Take care that the same thickness andthe cuts of similar sizes are placed on the samegrids.
• Gratinating:of soups, light and dark meat dishes, fish, mus-sels, asparagus, broccoli, tomatoes toast etc.Preheating: preheat to 300 °C (at least until thecontrol light goes out). After loading set to thedesired temperature.Containers: Use grids or containers (20 mm 1/1GN) to gratinate toast, steaks and soups. To reducehumidity inside the interior cabinet, switch on“ClimaPlus”.
• Preparation of fishDo not cover in flour.When preparing a large whole fish (pike, perch-pike), wrap the tail in aluminium foil and sup-port it from underneath with raw potatoes.Containers: Use granite enamalled containerspreviously preheated.
• BakingPreheat: to the baking temperature. When doing acomplete loading, you might preheat to a highertemperature.Baking temperature: is 20 °to 25 °C (70 °to 80°F) lower than for traditional ovens.When baking bread and rolls only use every secondrail.Baking tins should not be higher than 70 mm.When too much humidity is inside the interiorcabinet switch on “ClimaPlus” and allow to diffu-se until the set value is reached.For ideal heat transmission use granite enamelledcontainers and inserts.
When baking frozen convenience products,preheat to 575 °F (300 °C) – do not defrost.
Defrost frozen bread dough and let it rise for ashort time (insert: aluminium and baking paper).Keep in mind the special “moistening” and“1/2 fan speed” functions.
1 6
1. “Combi-Steaming” 30 °C – 300 °C
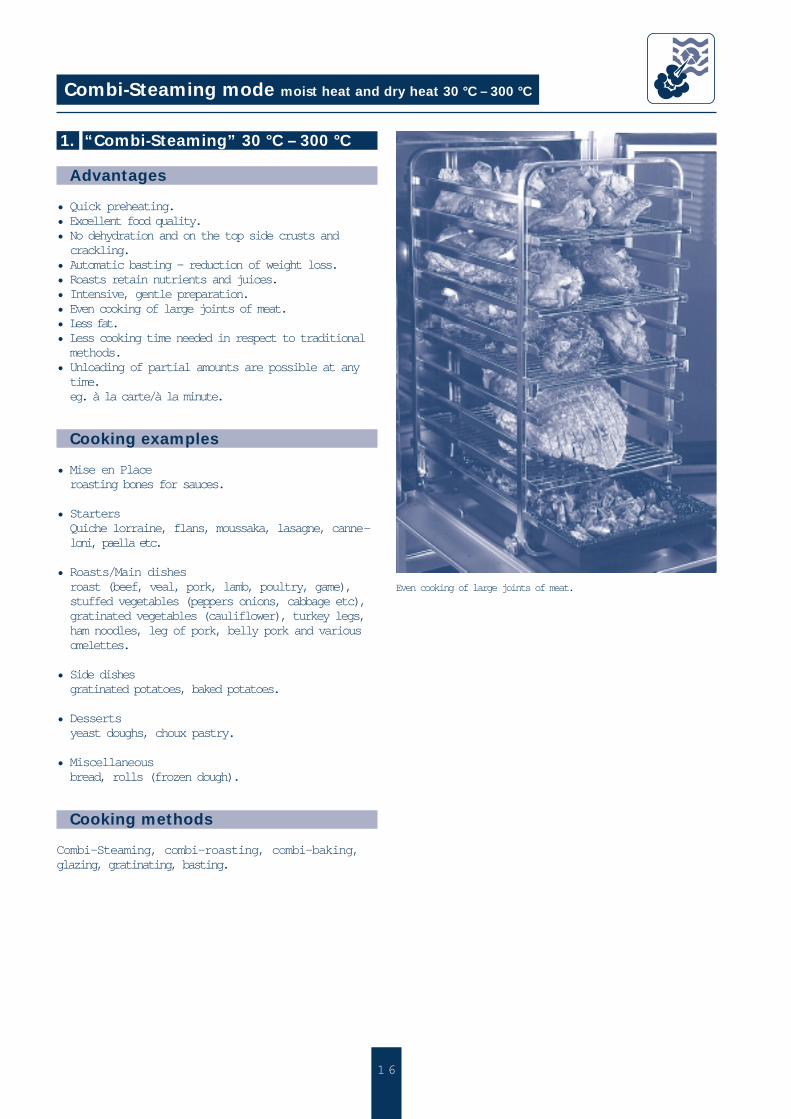
Advantages
• Quick preheating.• Excellent food quality.• No dehydration and on the top side crusts andcrackling.
• Automatic basting – reduction of weight loss.• Roasts retain nutrients and juices.• Intensive, gentle preparation.• Even cooking of large joints of meat.• Less fat.• Less cooking time needed in respect to traditionalmethods.
• Unloading of partial amounts are possible at anytime.eg. à la carte/à la minute.
Cooking examples
• Mise en Placeroasting bones for sauces.
• StartersQuiche lorraine, flans, moussaka, lasagne, canne-loni, paella etc.
• Roasts/Main dishesroast (beef, veal, pork, lamb, poultry, game),stuffed vegetables (peppers onions, cabbage etc),gratinated vegetables (cauliflower), turkey legs,ham noodles, leg of pork, belly pork and variousomelettes.
• Side dishesgratinated potatoes, baked potatoes.
• Dessertsyeast doughs, choux pastry.
• Miscellaneousbread, rolls (frozen dough).
Cooking methods
Combi-Steaming, combi-roasting, combi-baking,glazing, gratinating, basting.
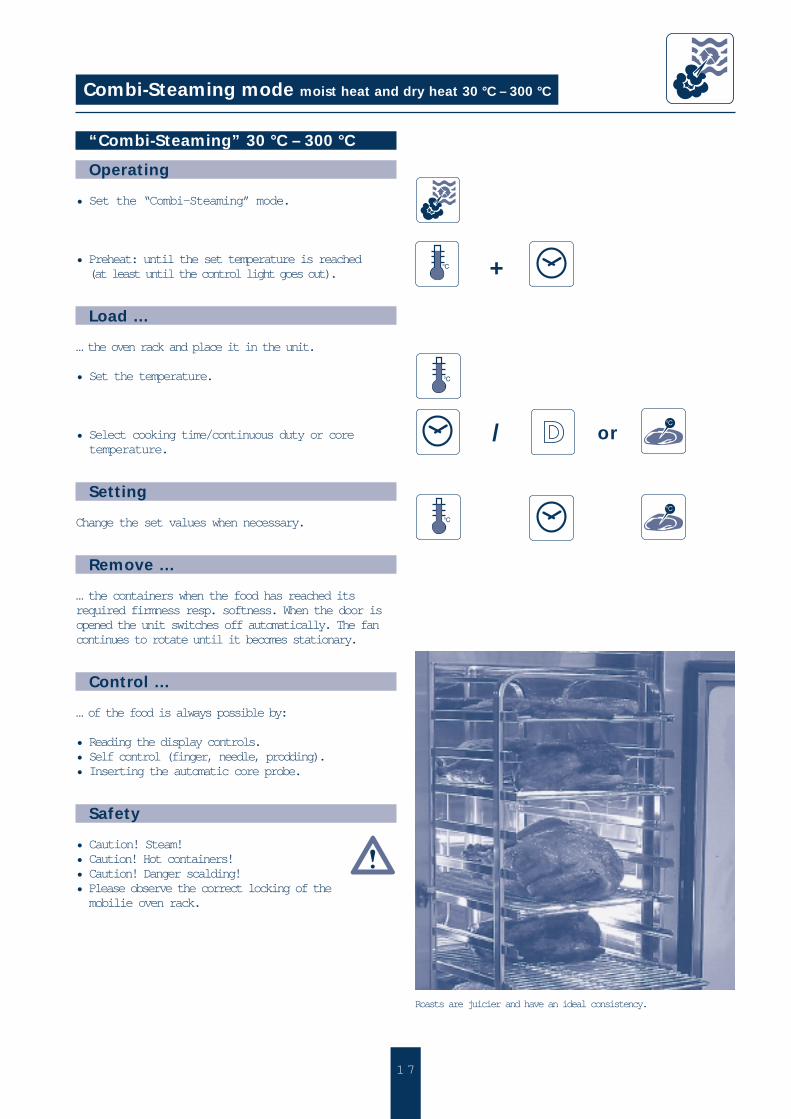
Combi-Steaming mode moist heat and dry heat 30 °C – 300 °C
Even cooking of large joints of meat.
1 7
+
/ or
“Combi-Steaming” 30 °C – 300 °C
Operating
• Set the “Combi-Steaming” mode.
• Preheat: until the set temperature is reached(at least until the control light goes out).
Load …
… the oven rack and place it in the unit.
• Set the temperature.
• Select cooking time/continuous duty or coretemperature.
Setting
Change the set values when necessary.
Remove …
… the containers when the food has reached itsrequired firmness resp. softness. When the door isopened the unit switches off automatically. The fancontinues to rotate until it becomes stationary.
Control …
… of the food is always possible by:
• Reading the display controls.• Self control (finger, needle, prodding).• Inserting the automatic core probe.
Safety
• Caution! Steam!• Caution! Hot containers!• Caution! Danger scalding!• Please observe the correct locking of the mobilie oven rack.
Combi-Steaming mode moist heat and dry heat 30 °C – 300 °C
Roasts are juicier and have an ideal consistency.
1 8
“Combi-Steaming” 30 °C – 300 °C
Hints
• Do not place roasts too close together in order toensure even cooking.
• Meat fibres must be placed parallel to the aircirculation, this will enable a better heat absorp-tion and shorten the cooking time.
• Steam roasts with crusts or large pieces of meatfor approx. 1/3 of the cooking time.
• Condensation and meat juices can be collected byplacing a container underneath and used latertogether with roasted bones to make a sauce.
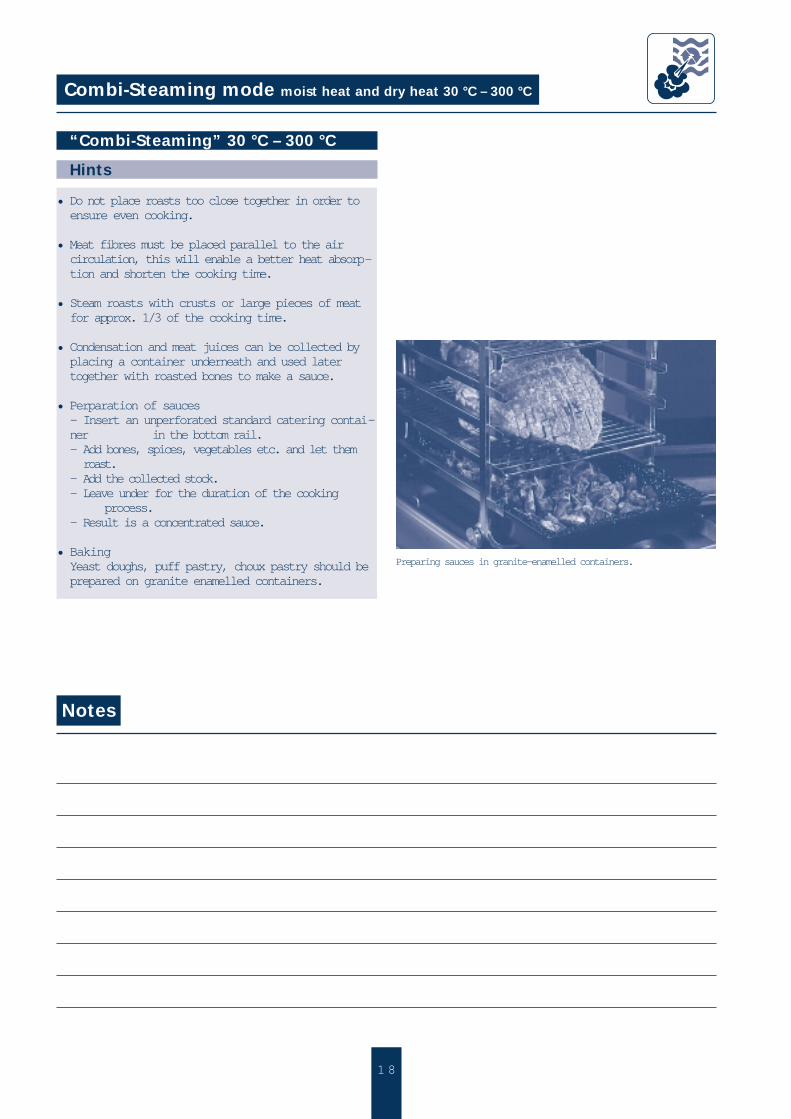
• Perparation of sauces– Insert an unperforated standard catering contai-ner in the bottom rail.– Add bones, spices, vegetables etc. and let them roast.
– Add the collected stock.– Leave under for the duration of the cooking
process.– Result is a concentrated sauce.
• BakingYeast doughs, puff pastry, choux pastry should beprepared on granite enamelled containers.
Combi-Steaming mode moist heat and dry heat 30 °C – 300 °C
Notes
Preparing sauces in granite-enamelled containers.
1 9
2. Cooking method“Forced Steaming” 101 °C – 130 °C
Advantages
• Cooking is intensified.• Cooking times are shorter.• Bear in mind the advantages of the steam mode too.
Cooking examples
• potatoes, carrots, celery.
Operating
• Set the “Combi-Steaming” mode.
• Preheat: until the set temperature is reached(at least until the contol light goes out).
Load …
… the oven rack and place it in the unit.
• Set the cooking temperature.
• Select cooking time/continuous duty or coretemperature.
Setting
Change the set values when necessary.
Remove …
… the containers when the food has reached itsrequired firmness resp. softness. When the door isopened the unit switches off automatically. The fancontinues to rotate until it becomes stationary.
Combi-Steaming mode moist heat and dry heat 30 °C – 300 °C
+
/ or
2 0
Combi-Steaming mode moist heat and dry heat 30 °C – 300 °C
Cooking method“Forced Steaming” 101 °C – 130 °C
Control …
… of the food is always possible by:
• Reading the display controls.• Self control (finger, needle, prodding).• Inserting the automatic core probe.
Hints
Combi-Steaming mode temperatures“Forced Steaming”:celery 110 °Cpotatoes 115 °Cfrozen kohlrabi/turnip 120 °C
Safety hints
• Caution! Steam! (Danger scalding!)• Caution! Hot containers and grids!• Please observe the correct locking of the mobilie oven rack.
Notes

2 1
Advantages
• Quick preheating.
Gentle cooking:• Excellent food quality.• Taste preservation.• Excellent consistency and elasticity for differentsorts of meat and fish dishes.Better handling during service.
• Prevents curdling and crumbling. • No blistering = flat surface.• Large joints and pieces for exhibition purposes(bufetts) are cooked gently, resulting in lessweight loss which means less shrinking.
• Less fat.• Less cooking time needed in respect to tradtionalmethods.
• Unloading of partial amounts is possible at anytime.eg. à la carte/à la minute.
Cooking examples
• Mise en Placeblanching bacon and ham, soups, sauces, stocks,fish garnishings.
• Startersliver, galantine, pike fish cakes, vacuum cooking,egg royal, patés etc.
• Soup Garnishingsdumplings, stuffings.
• Rôte/Main coursefish (salmon, sole), poultry, diet food, vacuumcooking (chicken breasts, tongue, liver), turkeyfilets, chicken breasts, filet of beef, sausages etc.
• Side dishesflans, vegetable caserroles.
• Dessertsfruit, crème caramel, semolina pudding etc.
Cooking methods
Scalding, simmering, soaking, poaching, blanching,vacuum cooking, thawing, reheating, preserving,pasteurisation.
Vario-Steaming mode moist heat 30 °C – 99 °C
Delicate products turn out well every time without much effortand no risk.
2 2
Operating
• Set the “Vario-Steaming” mode.
• Preheat at least until the minimum temperatureis reached and the control light goes out.
Load …
… the oven rack and place it in the unit.
• Set the temperature.
• Cooking time/continuous duty or core temperatu-re.
Setting
Change the set values when necessary.
Remove …
… the containers when the food has reached itsrequired firmness resp. softness. When the door isopened the unit switches off automatically. The fancontinues to rotate until it becomes stationary.
Control …
… of the food is always possible by:
• Reading the display controls.• Self control (finger, needle, prodding).• Inserting the automatic core probe.
Safety hints
• Caution! Steam (danger scalding).• Caution! Hot containers and grids!• The fan wheel works in certain intervals so to cook the food slowly.
• Please observe the correct locking of the mobilie oven rack.
Vario-Steaming mode moist heat 30 °C – 99 °C
+
/ or

2 3
Hints
• Cooking timeThe same principles apply like those for the“Steaming” mode.Generally the lower the cooking temperature thelonger the cooking time.
Examples : Approx cooking temperatures“vario steaming”:Soup garnishings: 75 °to 90 °CFish and shell fish: 65 °to 90 °CPale meat: 72 °to 75 °CWhite meat: 75 °to 85 °CDark meat: 80 °to 90 °CPoultry: 80 °CDesserts: 65 °to 90 °C
• SeasoningSeason lightly. Due to the low cooking temperaturethe typical own taste is intensified. Do not over dose alcohol, essences, reducingagents, etc.
• PreservingIn accordance to the firmness of the raw productand the desired consistency cover the item witheither hot or cold water. The diameter of the glassjars should not exceed 100–120 mm. The cookingtemperature depends on the product (ripeness,cutting).Temperature guide: 74 °–100 °C.
• ScaldingThe process is very gentle, no weight loss.
Advantages compared with cooking in cauldrons/large pans:– Firm structure.– Intensified aroma and taste of products.– The weight loss is low, especially with fatty foods.
– Bursts can be avoided especially when using skins with damaged surfaces.
Recommended temperature: 71 °–80 °C.
• Cooking on plates is possible, e.g. fish.
Vacuum cooking
• The development of cooking in a vacuum was basedon the method of vacuum preserving. The mostimportant requirement for cooking is that the rawmaterial must be 100% vacuum packed. The rawmaterial should be sealed in either special sealingor vacuum bags. After cooking in a vacuum theproducts are cooled down very quickly to 2 °C.
Vario-Steaming mode moist heat 30 °C – 99 °C
Sausages can also be cooked successfully using “Vario-Steaming”mode.
• The cooking times can be based on those from thesteam mode chart.
Practical experiences:• The higher the standard of vacuuming, the shorterthe cooking time.
Application methods:• Fish, meat, poultry, vegetables, side dishes, fruit,can be prepared in the conventional way. Differentgarnishings and stuffings can be prepared withspecial care.
• Place goods to be vacuumed cooked on grids.
Vacuum cooking…Fish, goose livers: 70 °CPale meat: 80 °CVegetables, mushrooms, fruits: 90 °CDark meat, side dishes: 100 °C
Hint:Apply for our special manual on vacuum cooking!

2 4
Advantages
• Different food products can be reheated withoutbeing covered.
• There is no time limít between cooking and reheating/serving.
• Allows more time for decorating, garnishing andpreparing the dishes and trays. Quality is impro-ved.
• Staff work more efficiently.• Catering for banquets, large functions, travelgroups, à la carte meals, free flow convenient loa-ding.
• Applicable everywhere, either in canteens, largeindustrial kitchens or the catering trade.
Examples
• Startersspaghetti, lasagne, canneloni, vegetable dishes,cheese noodles, quiche lorraine, spring rolls,onion flan, etc.
• Soup garnishingsliver dumplings, pancakes, noodles, bacon balls,etc.
• Rôte/Main courseroasts, casseroles, frozen meat and fish, leg ofpork, leg of veal, roasts with crackling, stuffedvegetables, ready to serve meals etc.
• Side dishesrice, potatoe pancakes, noodles, vegetables, pota-toes(mashed, french fries, gratinated, baked) etc.
• Dessertsapple pie, cheese cake, hot fruit, stewed fruit, etc.
Time saving
No more warming-up and keeping warm. Reheatingof pre-cooked food possible (cook and chill method).Reheating of the food is possible either direct onplates, dishes or in containers.
Operating mode Reheating moist heat and dry heat 30 °C – 300 °C
Reheating using different containers and utensils.
2 5
/ or
+
+Operating
• Set the “Reheating” mode and if necessary“ClimaPlus”.
• Preheat to the set temperature or at least until thecontrol light goes out.
Load …
… the oven rack and place it in the unit.
• Set the temperature.For best results the average temperature lies bet-ween 120 °C–140 °C, however the temperaturewill vary according to the different products.
• Set cooking time/continuous duty or coretemperature. The reheating time depends on theproduct, product temperature, number of plates,fullness, and the desired result, but as a generalrule set between approx. 5–8 minutes.
Setting
Change the set values when necessary.
Unload …
… the containers when they have reached the requi-red temperature. When the door is opened the unitswitches off automatically. The fan continues torotate until it becomes stationary.
Control …
… is possible any time.
• Ideal serving temperature: 75 °C – possible tocontrol by using the automatic core temperature.
• When desired change the set values.
Operating mode Reheating moist heat and dry heat 30 °C – 300 °C
2 6
Hints
• Reheating utensilsPorcelain plates, clay, glass, silver plates, copperpans, brass beakers, aluminium, stainless steel,chrome.
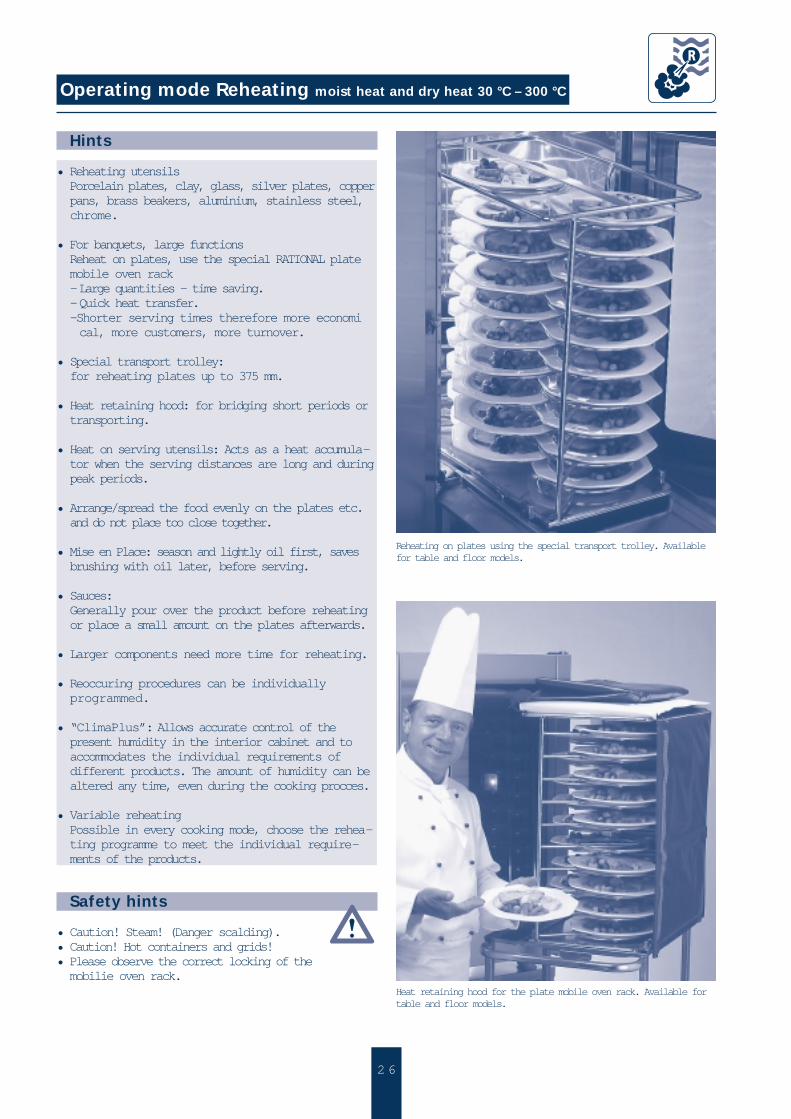
• For banquets, large functions Reheat on plates, use the special RATIONAL platemobile oven rack-Large quantities – time saving.-Quick heat transfer.-Shorter serving times therefore more economical, more customers, more turnover.
• Special transport trolley:for reheating plates up to 375 mm.
• Heat retaining hood: for bridging short periods ortransporting.
• Heat on serving utensils: Acts as a heat accumula-tor when the serving distances are long and duringpeak periods.
• Arrange/spread the food evenly on the plates etc.and do not place too close together.
• Mise en Place: season and lightly oil first, savesbrushing with oil later, before serving.
• Sauces:Generally pour over the product before reheatingor place a small amount on the plates afterwards.
• Larger components need more time for reheating.
• Reoccuring procedures can be individuallyprogrammed.
• “ClimaPlus”: Allows accurate control of thepresent humidity in the interior cabinet and toaccommodates the individual requirements ofdifferent products. The amount of humidity can bealtered any time, even during the cooking procces.
• Variable reheatingPossible in every cooking mode, choose the rehea-ting programme to meet the individual require-ments of the products.
Safety hints
• Caution! Steam! (Danger scalding).• Caution! Hot containers and grids!• Please observe the correct locking of the mobilie oven rack.
Operating mode Reheating moist heat and dry heat 30 °C – 300 °C
Reheating on plates using the special transport trolley. Availablefor table and floor models.
Heat retaining hood for the plate mobile oven rack. Available fortable and floor models.
2 7
Advantages
• Intensive browning.• Ideal consistency.• Easy to operate.• Serving capacity (full or partial loading possible).• Better quality.• Increase of slices.• For most products shorter cooking times.• Crispy crackling and stocks for roasts.
By pressing a button the operator can decide:• Crispness: (crackling).• Juiciness: (meat, caserroles, meat loaf etc.).• Consistency: (light breads, pastries, not greasy).• Surface: (tasty crusts, typical roast meat aroma,appetizing appearance).
• Force: (different pastries: yeast, puff etc. bread,rolls, croissants etc.).
Function of ClimaPlus
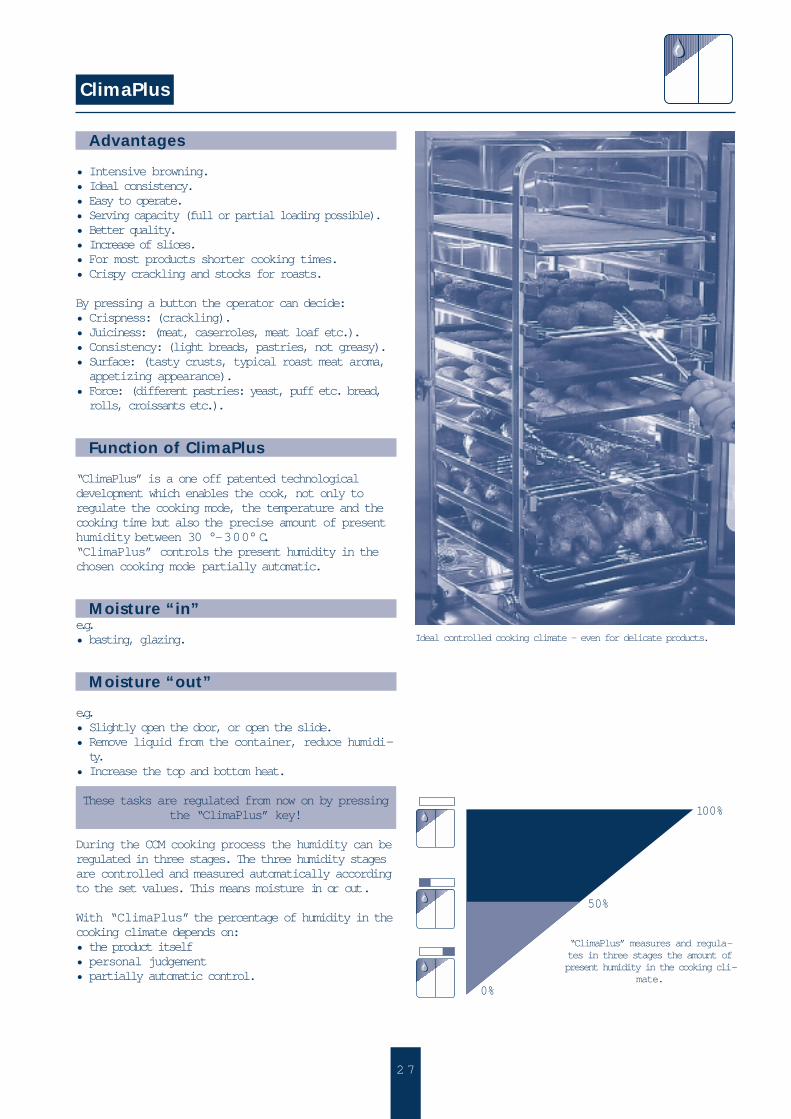
“ClimaPlus” is a one off patented technologicaldevelopment which enables the cook, not only toregulate the cooking mode, the temperature and thecooking time but also the precise amount of presenthumidity between 30 °–300°C. “ClimaPlus” controls the present humidity in thechosen cooking mode partially automatic.
Moisture “in”e.g.• basting, glazing.
Moisture “out”
e.g. • Slightly open the door, or open the slide.• Remove liquid from the container, reduce humidi-ty.
• Increase the top and bottom heat.
These tasks are regulated from now on by pressingthe “ClimaPlus” key!
During the CCM cooking process the humidity can beregulated in three stages. The three humidity stagesare controlled and measured automatically accordingto the set values. This means moisture in or out.
With “ClimaPlus” the percentage of humidity in thecooking climate depends on:• the product itself• personal judgement• partially automatic control.
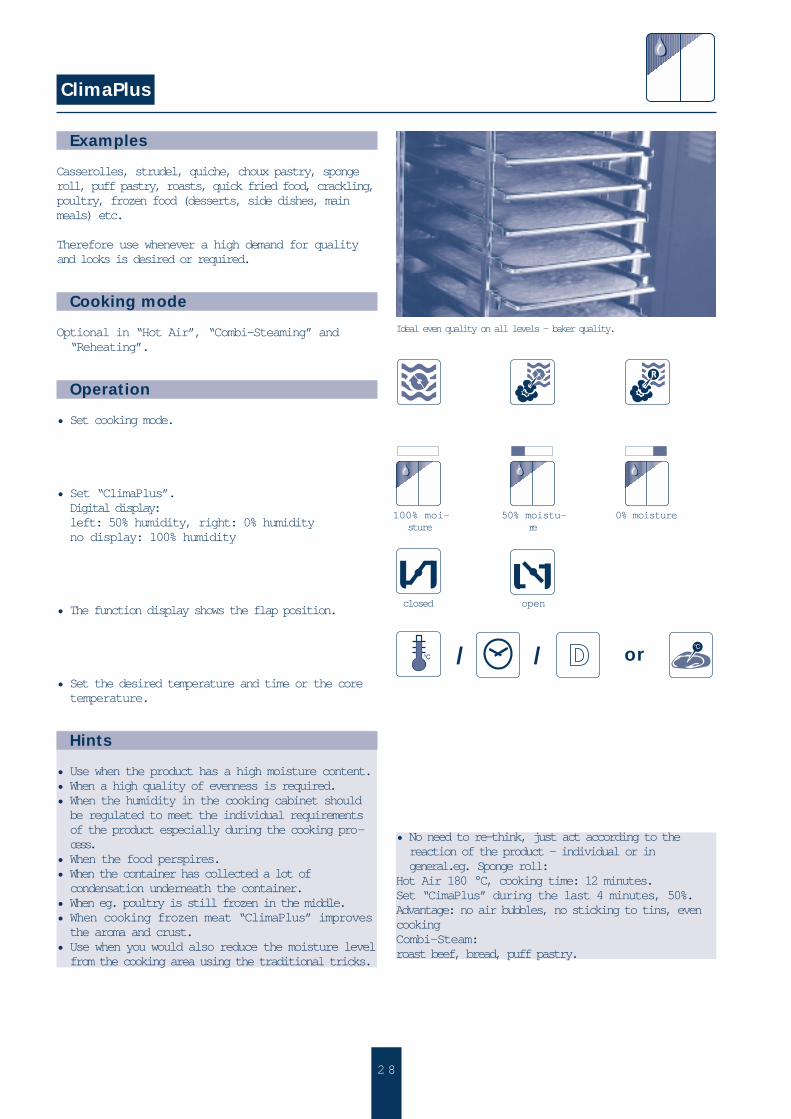
ClimaPlus
100%
50%
0%
“ClimaPlus” measures and regula-tes in three stages the amount ofpresent humidity in the cooking cli-
mate.
Ideal controlled cooking climate – even for delicate products.
2 8
Examples
Casserolles, strudel, quiche, choux pastry, spongeroll, puff pastry, roasts, quick fried food, crackling,poultry, frozen food (desserts, side dishes, mainmeals) etc.
Therefore use whenever a high demand for qualityand looks is desired or required.
Cooking mode
Optional in “Hot Air”, “Combi-Steaming” and“Reheating”.
Operation
• Set cooking mode.
• Set “ClimaPlus”.Digital display:left: 50% humidity, right: 0% humidityno display: 100% humidity
• The function display shows the flap position.
• Set the desired temperature and time or the coretemperature.
Hints
• Use when the product has a high moisture content.• When a high quality of evenness is required.• When the humidity in the cooking cabinet shouldbe regulated to meet the individual requirementsof the product especially during the cooking pro-cess.
• When the food perspires.• When the container has collected a lot ofcondensation underneath the container.
• When eg. poultry is still frozen in the middle.• When cooking frozen meat “ClimaPlus” improvesthe aroma and crust.
• Use when you would also reduce the moisture levelfrom the cooking area using the traditional tricks.
ClimaPlus
/ /
closed open
or
50% moistu-re
100% moi-sture
0% moisture
• No need to re-think, just act according to thereaction of the product – individual or ingeneral.eg. Sponge roll:
Hot Air 180 °C, cooking time: 12 minutes.Set “CimaPlus” during the last 4 minutes, 50%.Advantage: no air bubbles, no sticking to tins, evencookingCombi-Steam: roast beef, bread, puff pastry.
Ideal even quality on all levels – baker quality.

2 9
Cooking with core temperature
Advantages
• Perfect cooking.• Less weight loss.• Prevents over cooking.• Easier and precise cooking control – digital dis-play.
• Constant personal care not necessary.• Guarantees high, constant quality standards asopposes to traditional methods such as needle, fin-ger, lip, fork and cut test.
Function
To measure the core temperature of food thus enab-ling a perfect cooking process. No risks.
Cooking method
Possible in all modes.
Operation
Introduce the clean, cold tip of the core probe intothe thickest part of the food item.
• Set the mode switch.
• Set the cooking temperature.
• Set the desired core temperature – the preselectedtemperature is displayed.
• The timer does not operate.
• A buzzer is sounded when the preselected coretemperature is reached and the unit switchesautomatically off.
Using the core temperature cooking method you “can cookexact”. Insert the sensor into the thickest part of the meat.
Lay equal sizes together on the same grid.
3 0
Hints
• When roasting meat for slices, the core tempera-ture should be set approx 5 °C lower then usual,because the roast continuous to cook during thecool down phase.
Example: “Roasting”, ratio core temperature – coo-king time.– Fully cooked – 80°C core temperature desired.– 60 °C core temperature is reached after 60minutes.– For the last 20 °C core temperature the remai-ning cooking time should be half the time again, inthis case 30 minutes.– As desired increase the core temperature(10 °C, 20 °C, 30 °C more).
– When increasing the roasting time bear in mind:20% more compares to (approx. 1/5), 50%
more (1/2), 80% more (4/5) cooking time.
• In order to avoid holes (protein coagulation) coolthe core probe before inserting.
• The set temperature and cooking mode can bechanged any time.
• Core temperature measurement: ensures the idealserving temperature when reheating.
• The core temperature is programmable.
Safety hints
• The core probe can be very hot.• When not in use always place it in the holderprovided.
• Do not let the core probe hang loose outside thecooking cabinet.
• Remove the core probe from thefood before unloading it.
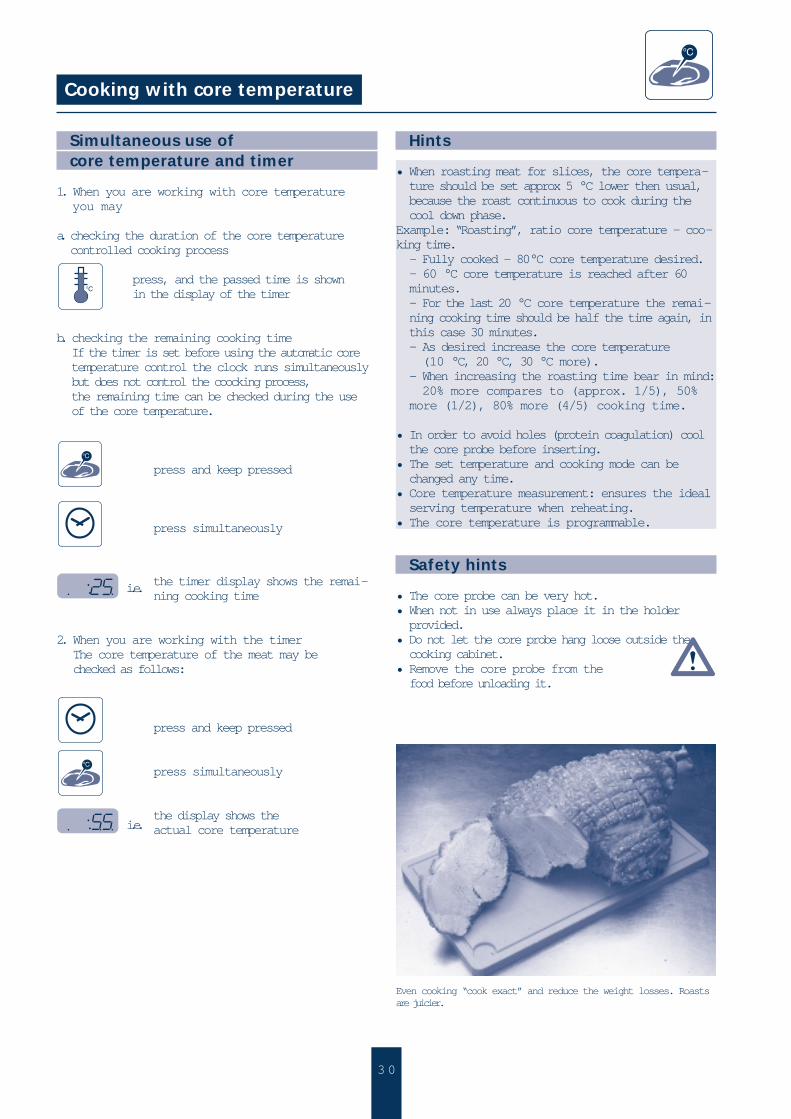
Cooking with core temperature
Even cooking “cook exact” and reduce the weight losses. Roastsare juicier.
Simultaneous use of core temperature and timer
1. When you are working with core temperature you may
a. checking the duration of the core temperature controlled cooking process
press, and the passed time is shown in the display of the timer
b. checking the remaining cooking timeIf the timer is set before using the automatic core temperature control the clock runs simultaneously but does not control the coocking process, the remaining time can be checked during the use of the core temperature.
press and keep pressed
press simultaneously
the timer display shows the remai-ning cooking time
2. When you are working with the timerThe core temperature of the meat may be checked as follows:
press and keep pressed
press simultaneously
the display shows the actual core temperature
i.e.
i.e.

3 1
Cooking with core temperature
Cooking with core temperatureMeat Core Colour
temperature of meat core
Beef
bleu 45 °C dark blood redrare
saignant 50 °C read meatmedium rare juice – blood red
a point 55 – 60 °C light pink fadingmedium into greyish-brown
towards theoutside
bien cuit 75 – 85 °C grey-brownwell done throughout
Veal
fully cooked over 77 °C reddish-browngreyish-whitemeat juice
Cooking with core temperatureMeat Core Colour
temperature of meat core
Porkmedium 65 °C light pink
fully cooked 75 – 80 °C yellowish brown,greyish-whitemeat juice
cured 65 °C pale red brownish or nearly colourless
Lamb
fully cooked 79 °C grey, lightly pale red
Mutton
fully cooked 82 °C grey, lightly palered juice
Poultry
fully cooked 85 °C yellowish-white,nearly colourless
juice
Notes

3 2
Core temperature values
State Core temperatu-
re
Beef
Filet of beef medium 55–58 °C
Roast beef medium 55–60 °C
Beef rose well done 85–90 °C
Roast beef joint well done 80–85 °C
Aitchbone well done 90 °C
Pork
Leg well done 75 °C
Leg under done 65–68 °C
Saddle slightly light pink65–70 °C
Shoulder well done 75 °C
Belly/stuffed well done 70–75 °C
Belly well done 80–85 °C
Knuckle, roasted well done 80–85 °C
Knuckle, cured well done 80–85 °C
Ham juicy 64–68 °C
Smoked pork chops 65–70 °C(Buffet slices) 55–60 °C
Knuckle pickled well done 75–80 °C
Ham in bread crust well done 65–70 °C
Tongue well cooked 85–90 °C
Pig’s head 75–82 °C
Veal
Saddle light pink 65–70 °C
Leg, Top-side, well done 78 °C Fricandeau
Kidney well done 75–80 °C
Shoulder well done 75–78 °C
Breast (often stuffed well done 75–78 °Cor boned)
Cooking with core temperature
Core temperature values
State Core temperatu-
re
Mutton
Saddle light pink 70–75 °C
Saddle well done 80 °C
Leg light pink 75–78 °C
Leg well done 82–85 °C
Lamb
When the meat is well done, the core temperaturevaries between 79 °C and 85 °C. The colour of themeat core is grey, slightly pale pink. The meat juiceis clear.
Poultry
Chicken well done 85 °C
Goose pink 75–80 °C
Goose well done 90–92 °C
Turkey, Duck well done 80–85 °C
Pies, Pates etc.
Pies 72–74 °C
Terrinies 60–70 °C
Galatines 65 °C
Ballotines 65 °C
Fois gras 45 °C
Salmon 60 °C
Pike 63 °C
Fish mousse 65 °C
3 3
Hints
• Moisten pastries shortly after the cooking hasbegun.
Programming
• Programme as usual.
• Bear in mind the capital on programming.
Where moistening has been programmed, it will beinjected at intervals of 120 seconds for a period of4 seconds at a time.
The green LED only lights up when the temperature inside the cooking cabinet is between 120 °C - 250°C and the moistening is in operation.
Additional function “Moistening”
Advantages
• Doughs rise exceptionally well due to the quickaddition of moisture.
• Pastries shine slightly.• Sudden addition of moisture.
Function
Sudden addition of moisture.
Cooking examples
• Mise en PlaceBlind baking, (tartlettes etc.).
• StartersVal-au-vents, baguette, fleurons, flûtes etc.
• Soup garnishingsProfiteroles.
• Roasts/Main courseHam in bread dough, filet of beef in yeast doughetc.
• DessertsEclair, choux pastry, puff pastries, croissantes,poppy seed cake, nut strudel etc.
Cooking mode
Hot Air
Temperature range
120 °C – 250 °C cooking temperature.
Operating
• Press “Moisture” key.
• Moisture time span: The moisture is produced foras long as the key is depressed, e.g. restricted tofour sec. (when activated a red digital displaylights up).
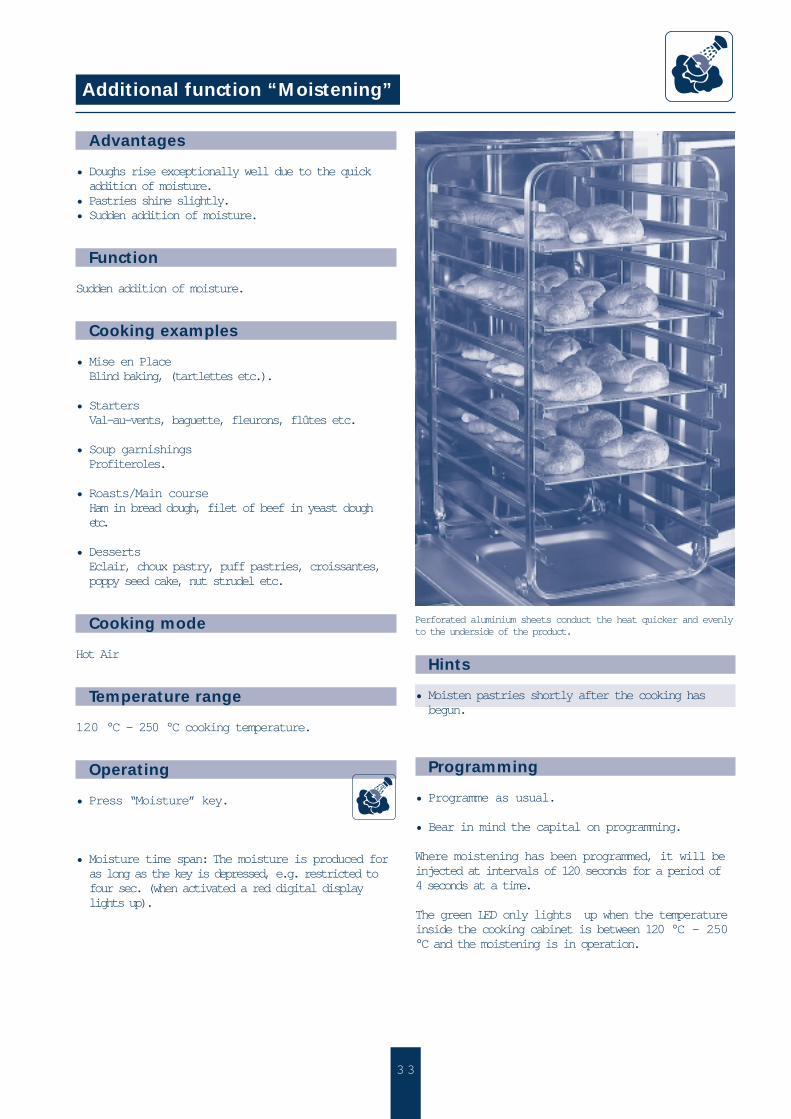
Perforated aluminium sheets conduct the heat quicker and evenlyto the underside of the product.

3 4
Advantages
• The cooking cabinet temperature cools downquickly.
• Automatic – no manpower required.
Function
Quick cooling down of the cooking cabinet.
Cooking method
Possible in all modes.
Operation
• Close the door.
• Set the cooking mode.
• Set to “Cool down”.
• Open the door.– A red digital light indicates that the function isin operation, the real interior cabinettemperature is displayed, the tem-perature blinks.
Safety hints
• Caution!During the ”cool down” the fan wheel is not switched off when the door is opened.
• Only choose the “Cool down” function when the air baffle is closed.
Caution! Before setting the “Cool down” function –close the door!
”Cool down” is not programmable.
Additional function “Cool down”
3 5
Advantages
• Light and delicate products such as cheese cakerise evenly.
• Light weight cakes and pastries do not move. • Gentle cooking.
Function
Fan wheel rotates with half the speed.
Cooking method
Possible in all modes.
Examples
Light mixtures such as sponge roll, small pastries(eg. cheese cake, profiteroles, meringue, etc.),cheese sticks, puff pastries, soufflés, stuffings(stuffed sole,stuffed filet de bouef etc.).
Operating
• Set the cooking mode.
• Set the desired time, temperature or coretemperature.
• Set to “1/2 fan speed” (a red digital light is dis-played indicating the function is active).
Hints
• “1/2 fan speed” can be programmed• Baking large loaves.
Additional function “1/2 fan speed”
// or
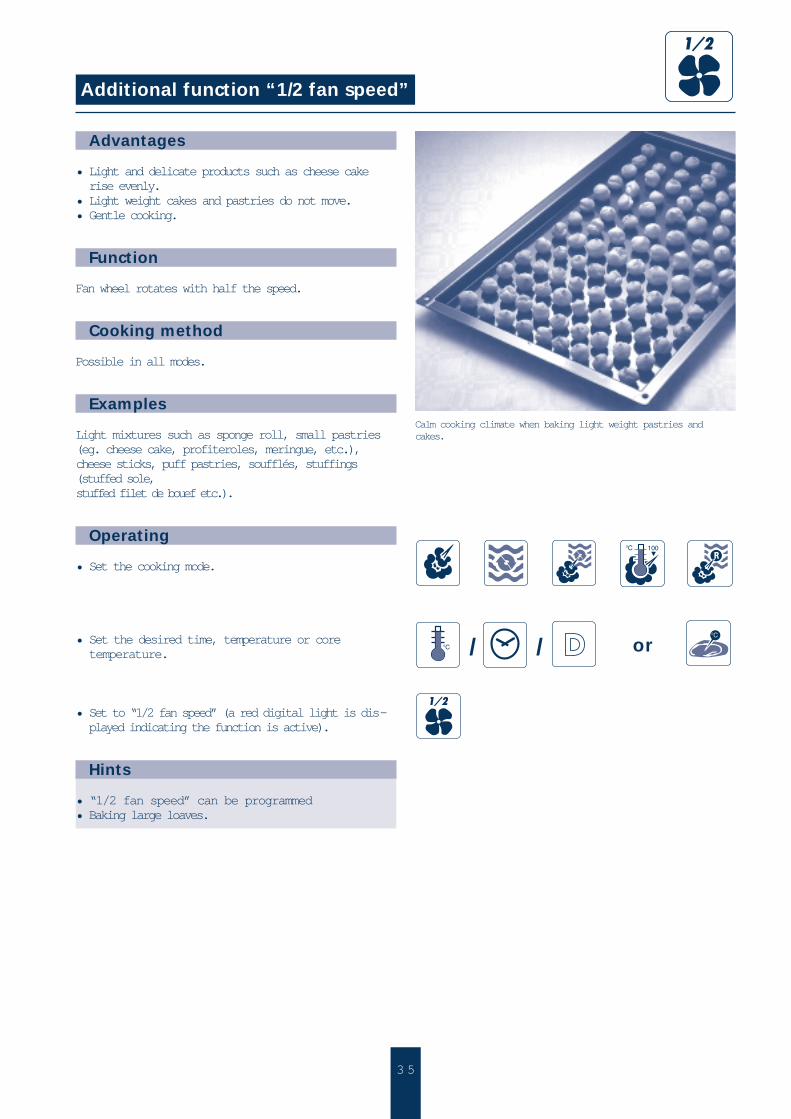
Calm cooking climate when baking light weight pastries andcakes.
3 6
Advantages
• Avoidance of electrical peaks by reducing thepower consumption.
Function
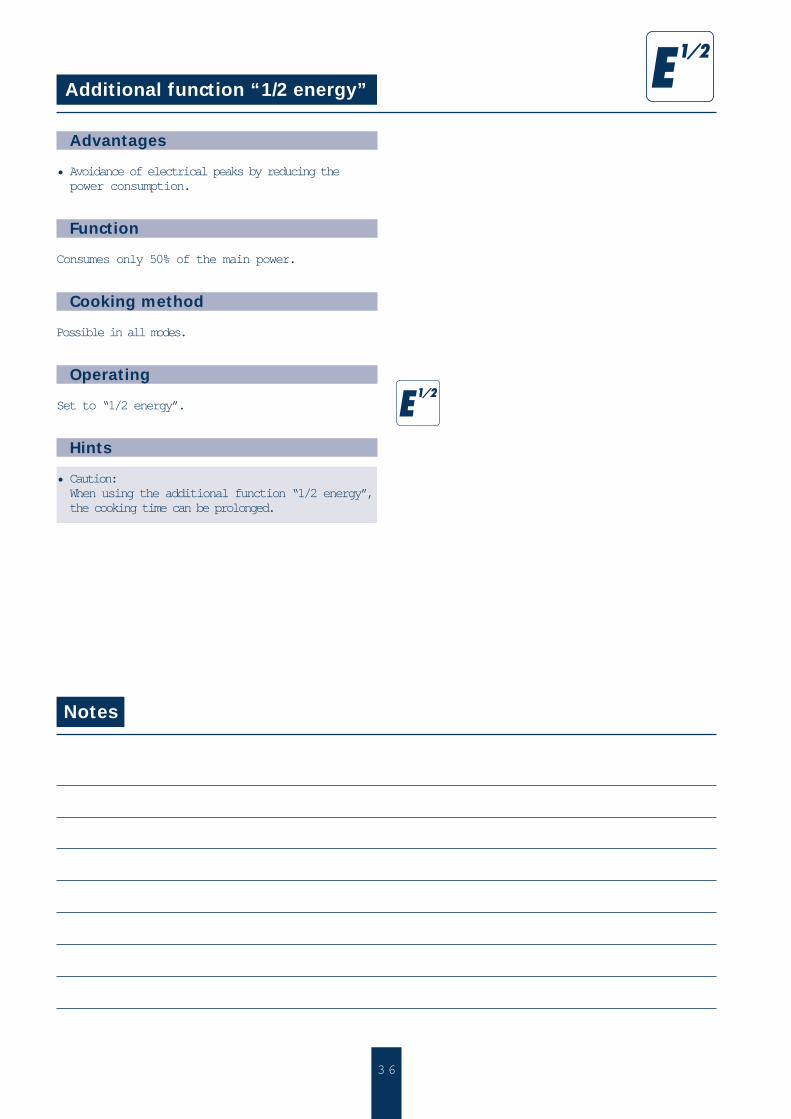
Consumes only 50% of the main power.
Cooking method
Possible in all modes.
Operating
Set to “1/2 energy”.
Hints
• Caution:When using the additional function “1/2 energy”,the cooking time can be prolonged.
Additional function “1/2 energy”
Notes
3 7
Programming
99 programmes each with 9 steps …
… are at your disposal. The programme number 99is occupied by a cleaning programme (see clea-ning).
1: Open the door otherwise a buzzer will sound. Theunit must not be switched onto continuous duty.
2: Set the mode knob to “Prog” the programmememory bank is open.
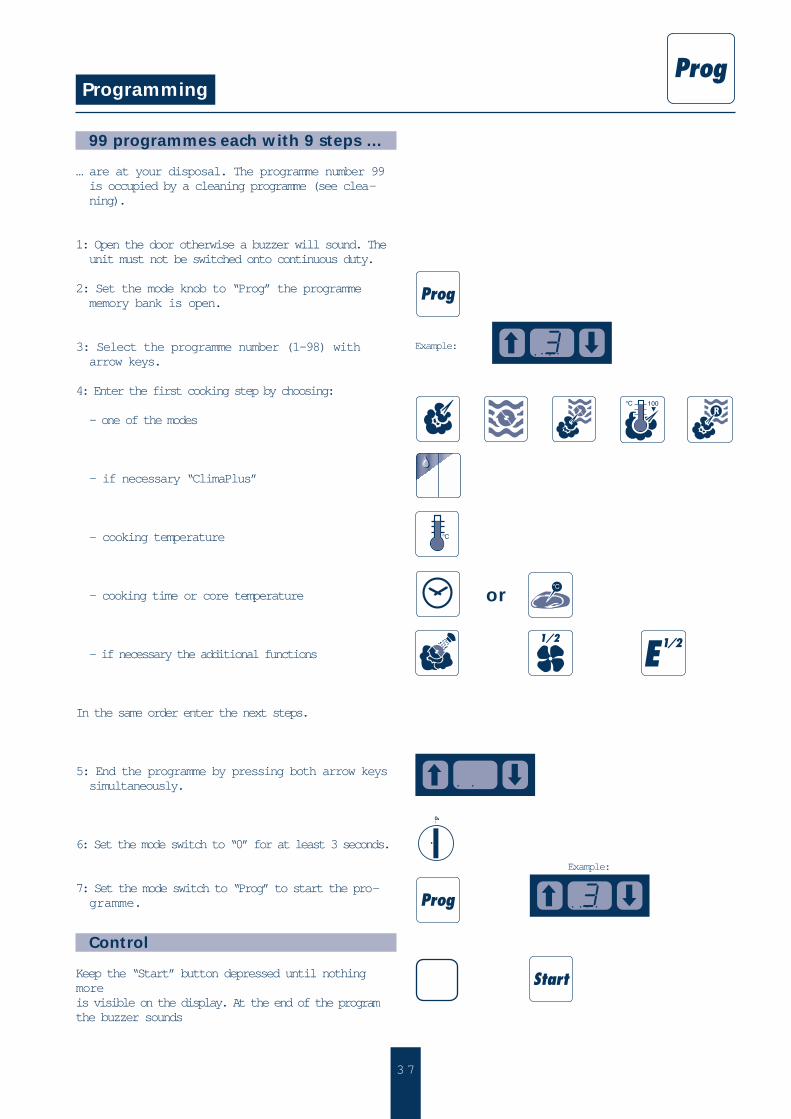
3: Select the programme number (1–98) witharrow keys.
4: Enter the first cooking step by choosing:
– one of the modes
– if necessary “ClimaPlus”
– cooking temperature
– cooking time or core temperature
– if necessary the additional functions
In the same order enter the next steps.
5: End the programme by pressing both arrow keyssimultaneously.
6: Set the mode switch to “0” for at least 3 seconds.
7: Set the mode switch to “Prog” to start the pro-gramme.
Control
Keep the “Start” button depressed until nothingmore is visible on the display. At the end of the programthe buzzer sounds
or
Example:
Example:
O
3 8
Advantages
• Time saving due to the fact that the programmescan be recalled any time.
• It’s not necessary to control the cooking process.
• The cooking programme is fully automatic.
• The quality of calibrated and convenience food is kept.
• Standard programmes can be professionally ope-rated by non qualified staff.
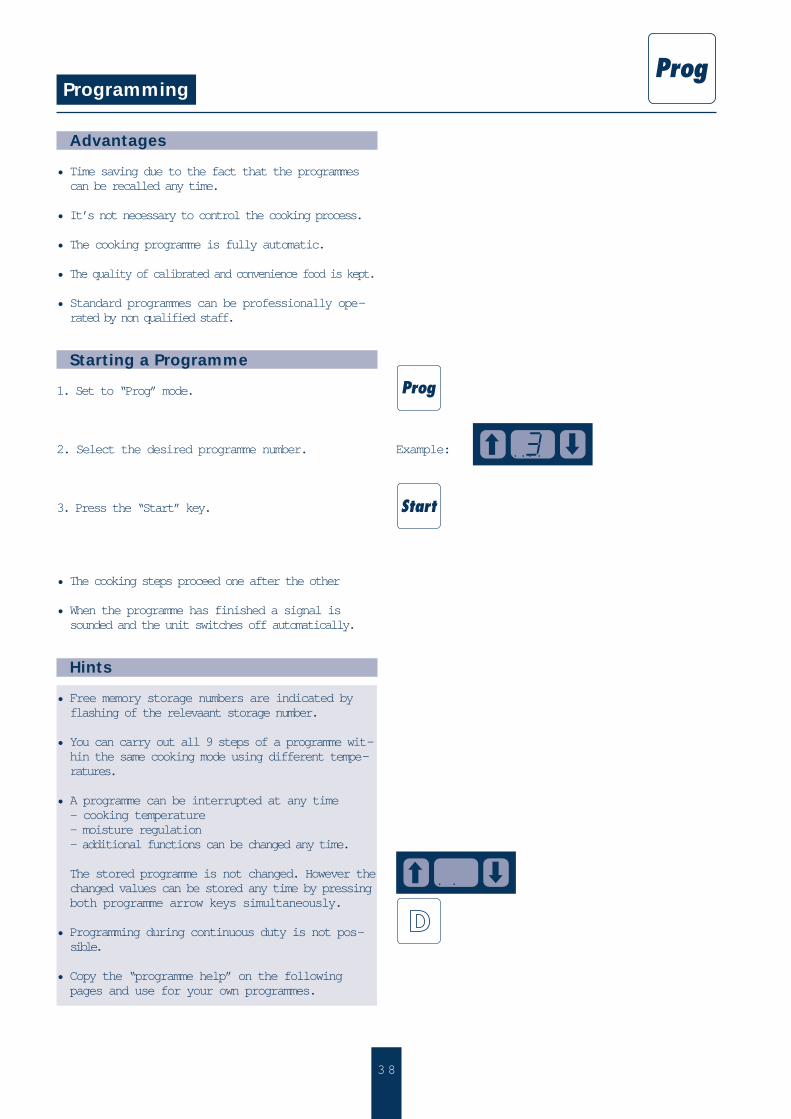
Starting a Programme
1. Set to “Prog” mode.
2. Select the desired programme number.
3. Press the “Start” key.
• The cooking steps proceed one after the other
• When the programme has finished a signal issounded and the unit switches off automatically.
Hints
• Free memory storage numbers are indicated by flashing of the relevaant storage number.
• You can carry out all 9 steps of a programme wit-hin the same cooking mode using different tempe-ratures.
• A programme can be interrupted at any time– cooking temperature– moisture regulation– additional functions can be changed any time.
The stored programme is not changed. However thechanged values can be stored any time by pressingboth programme arrow keys simultaneously.
• Programming during continuous duty is not pos-sible.
• Copy the “programme help” on the followingpages and use for your own programmes.
Programming
Example:
3 9
Programming
Code to lock access to programming
the locking of programming avoids uncontrolled programming and overwriting of programs. By this means access to programming may be limi-ted to authorized staff only.
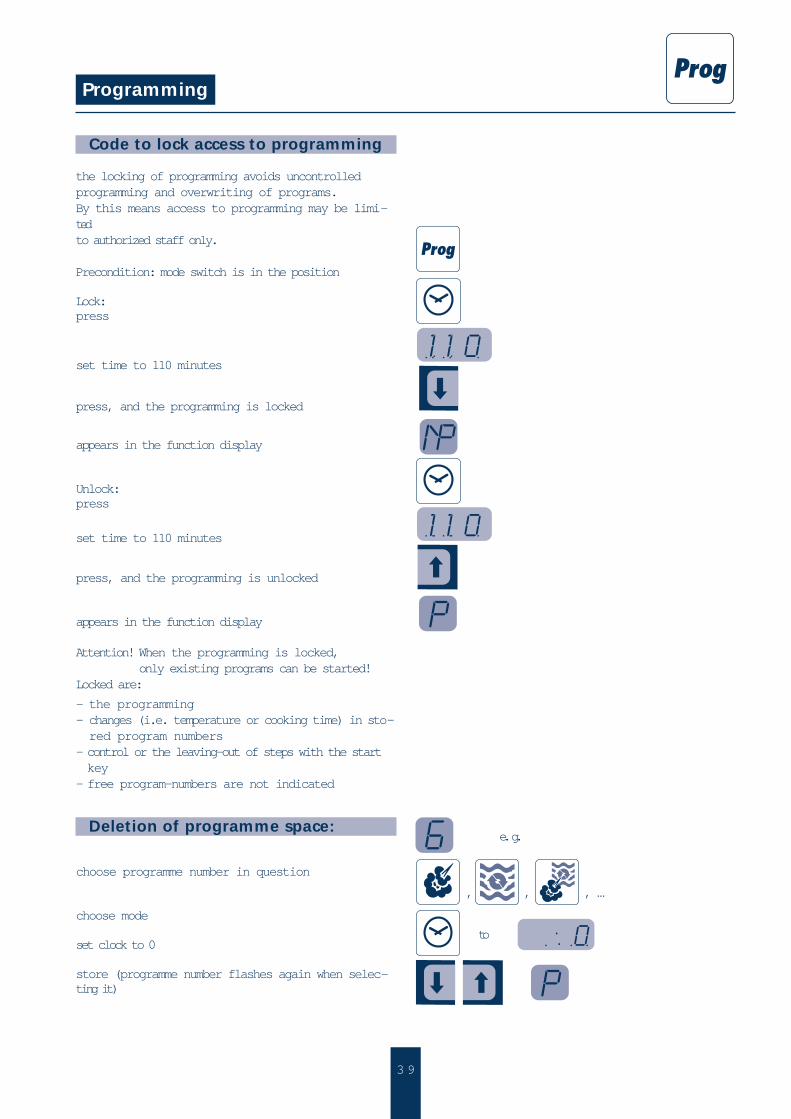
Precondition: mode switch is in the position
Lock:press
set time to 110 minutes
press, and the programming is locked
appears in the function display
Unlock:press
set time to 110 minutes
press, and the programming is unlocked
appears in the function display
Attention! When the programming is locked, only existing programs can be started!
Locked are:
– the programming– changes (i.e. temperature or cooking time) in sto-red program numbers
– control or the leaving-out of steps with the startkey
– free program-numbers are not indicated
Deletion of programme space:
choose programme number in question
choose mode
set clock to 0
store (programme number flashes again when selec-ting it)
to
e. g.
, , …,

4 0
Programme number:
Help for programming
Product: pork roast
1. step
Setting
Stea Comb Hot
–
100 160 220
30 78 12
Maincoo-
Chrisping
2. step 3. step 4. step 5. step 6. step 7. step 8. step 9. step
Mode
Programme number: Product:
1. step 2. step 3. step 4. step 5. step 6. step 7. step 8. step 9. step
Mode
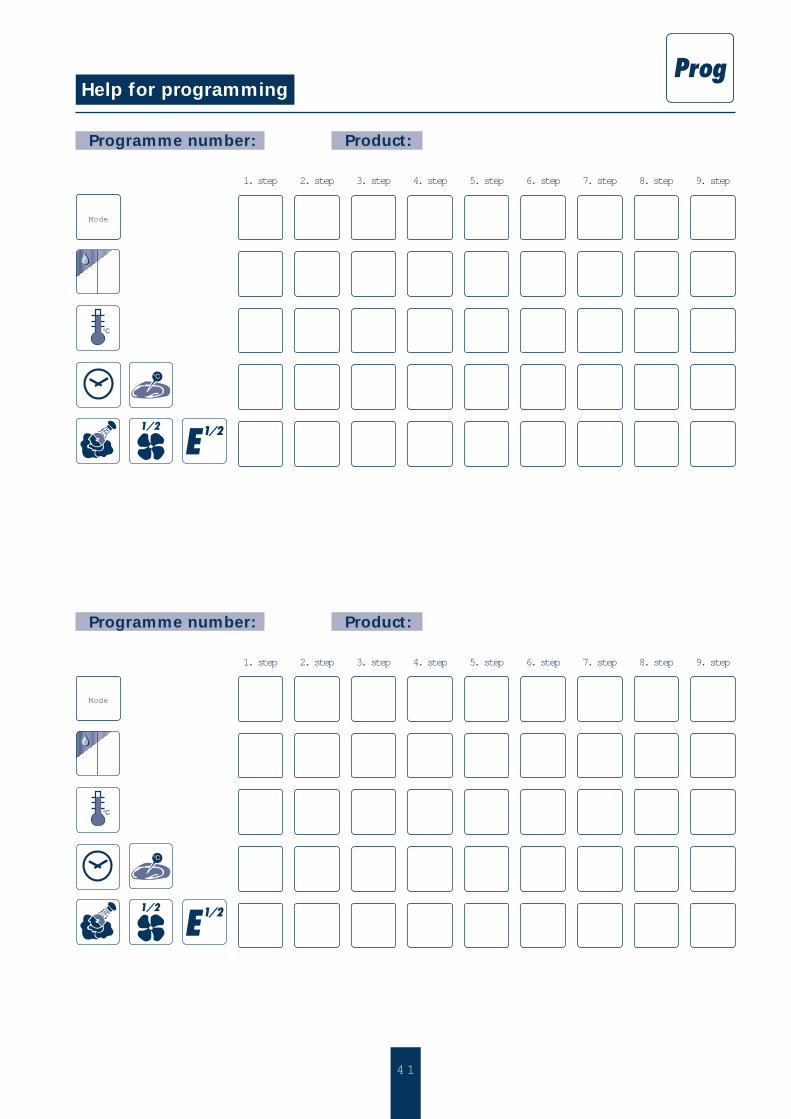
4 1
Help for programming
Programme number: Product:
1. step 2. step 3. step 4. step 5. step 6. step 7. step 8. step 9. step
Programme number: Product:
1. step 2. step 3. step 4. step 5. step 6. step 7. step 8. step 9. step
Mode
Mode
4 2
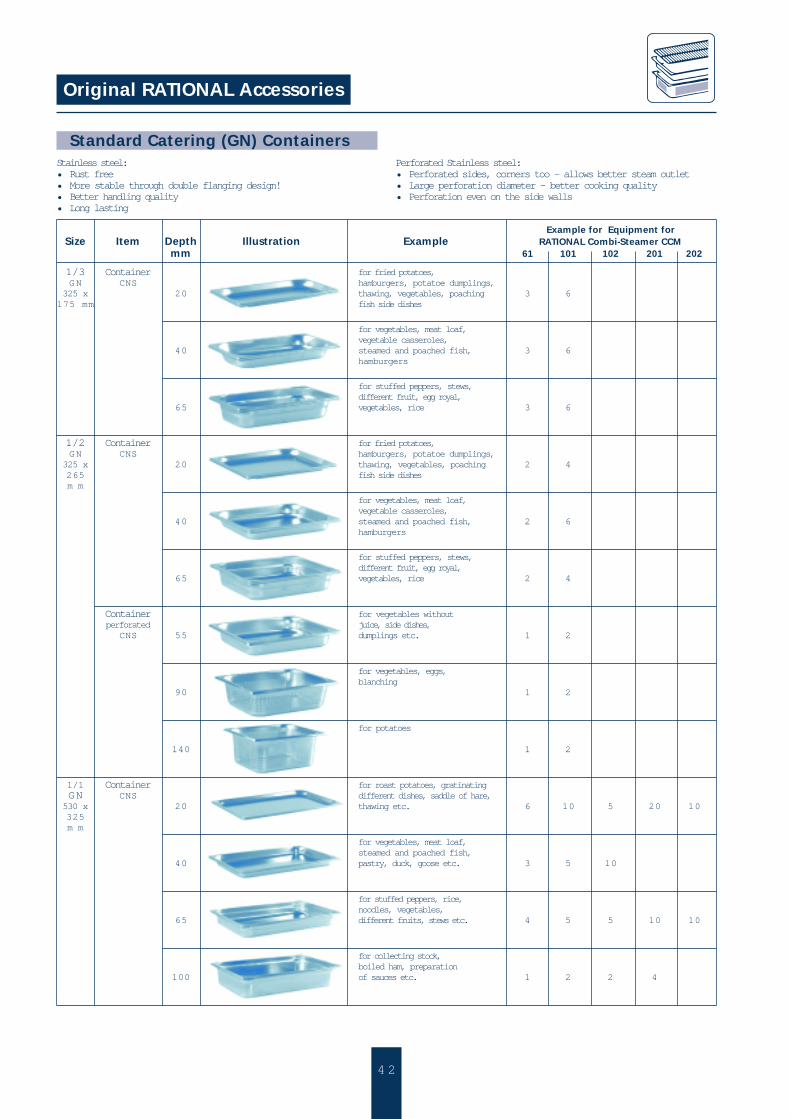
Original RATIONAL Accessories
Example for Equipment forSize Item Depth Illustration Example RATIONAL Combi-Steamer CCM
mm 61 101 102 201 202
1/3 Container for fried potatoes,GN CNS hamburgers, potatoe dumplings,
325 x 20 thawing, vegetables, poaching 3 6175 mm fish side dishes
for vegetables, meat loaf,vegetable casseroles,
40 steamed and poached fish, 3 6hamburgers
for stuffed peppers, stews,different fruit, egg royal,
65 vegetables, rice 3 6
1/2 Container for fried potatoes,GN CNS hamburgers, potatoe dumplings,
325 x 20 thawing, vegetables, poaching 2 4265 fish side dishesm m
for vegetables, meat loaf,vegetable casseroles,
40 steamed and poached fish, 2 6hamburgers
for stuffed peppers, stews,different fruit, egg royal,
65 vegetables, rice 2 4
Container for vegetables withoutperforated juice, side dishes,
CNS 55 dumplings etc. 1 2
for vegetables, eggs,blanching
90 1 2
for potatoes
140 1 2
1/1 Container for roast potatoes, gratinatingGN CNS different dishes, saddle of hare,
530 x 20 thawing etc. 6 10 5 20 10325m m
for vegetables, meat loaf,steamed and poached fish,
40 pastry, duck, goose etc. 3 5 10
for stuffed peppers, rice,noodles, vegetables,
65 different fruits, stews etc. 4 5 5 10 10
for collecting stock,boiled ham, preparation
100 of sauces etc. 1 2 2 4
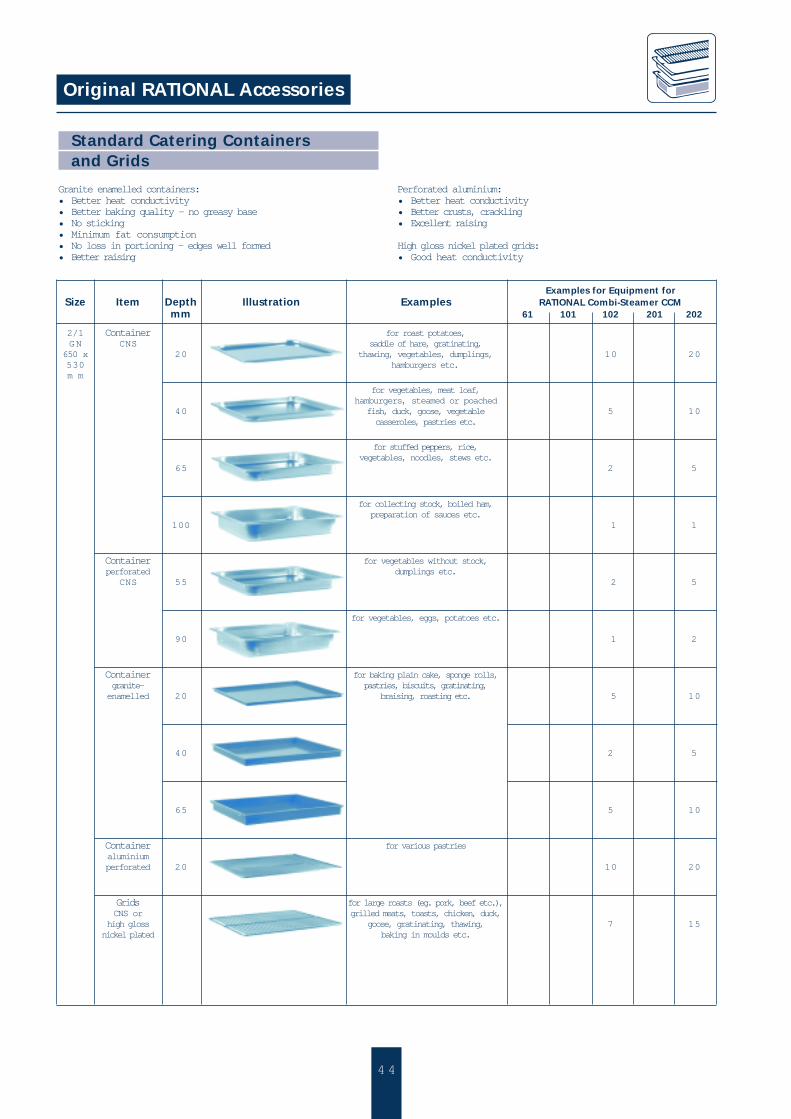
Stainless steel:• Rust free• More stable through double flanging design!• Better handling quality• Long lasting
Perforated Stainless steel:• Perforated sides, corners too – allows better steam outlet• Large perforation diameter – better cooking quality• Perforation even on the side walls
Standard Catering (GN) Containers

4 3
Granite enamelled containers:• Better heat conductivity• Better baking quality – no greasy base• No sticking• Minimum fat consumption• No loss in portioning – edges well formed• Better raising
Perforated aluminium:• Better heat conductivity• Better crusts, crackling• Excellent raising
High gloss nickel plated grids:• Good heat conductivity
Original RATIONAL Accessories
Standard Catering Containersand Grids
Example for Equipment forSize Item Depth Illustration Example RATIONAL Combi-Steamer CCM
mm 61 101 102 201 202
1/1 Container for vegetables withoutGN perforated stock, different side dishes,
530 x CNS 55 dumplings etc. 3 5 6 10 10325m m
for vegetables, eggs,potatoes, blanching etc.
90 3 5 3 5 6
for potatoes
140 2 3 6 5 12
Container for baking plain, cake, biscuits,granite- sponges, roasting, braising,enamelled 20 gratinating etc. 6 10 6 20 10
40 3 5 6 10 10
65 3 5 4 10 10
Container for different pastriesaluminiumperforated 20 6 10 20
Grids for large roasts, grilled meats,CNS or toasts, thawing, gratinating,
high gloss chicken, duck, goose, 6 10 6 20 10nickel plated preserving etc.
4 4
Original RATIONAL Accessories
Examples for Equipment forSize Item Depth Illustration Examples RATIONAL Combi-Steamer CCM
mm 61 101 102 201 202
2/1 Container for roast potatoes,GN CNS saddle of hare, gratinating,
650 x 20 thawing, vegetables, dumplings, 10 20530 hamburgers etc. m m
for vegetables, meat loaf,hamburgers, steamed or poached
40 fish, duck, goose, vegetable 5 10casseroles, pastries etc.
for stuffed peppers, rice,vegetables, noodles, stews etc.
65 2 5
for collecting stock, boiled ham,preparation of sauces etc.
100 1 1
Container for vegetables without stock,perforated dumplings etc.
CNS 55 2 5
for vegetables, eggs, potatoes etc.
90 1 2
Container for baking plain cake, sponge rolls,granite- pastries, biscuits, gratinating,enamelled 20 braising, roasting etc. 5 10
40 2 5
65 5 10
Container for various pastriesaluminiumperforated 20 10 20
Grids for large roasts (eg. pork, beef etc.),CNS or grilled meats, toasts, chicken, duck,
high gloss goose, gratinating, thawing, 7 15nickel plated baking in moulds etc.
Granite enamelled containers:• Better heat conductivity• Better baking quality – no greasy base• No sticking• Minimum fat consumption• No loss in portioning – edges well formed• Better raising
Perforated aluminium:• Better heat conductivity• Better crusts, crackling• Excellent raising
High gloss nickel plated grids:• Good heat conductivity
Standard Catering Containersand Grids
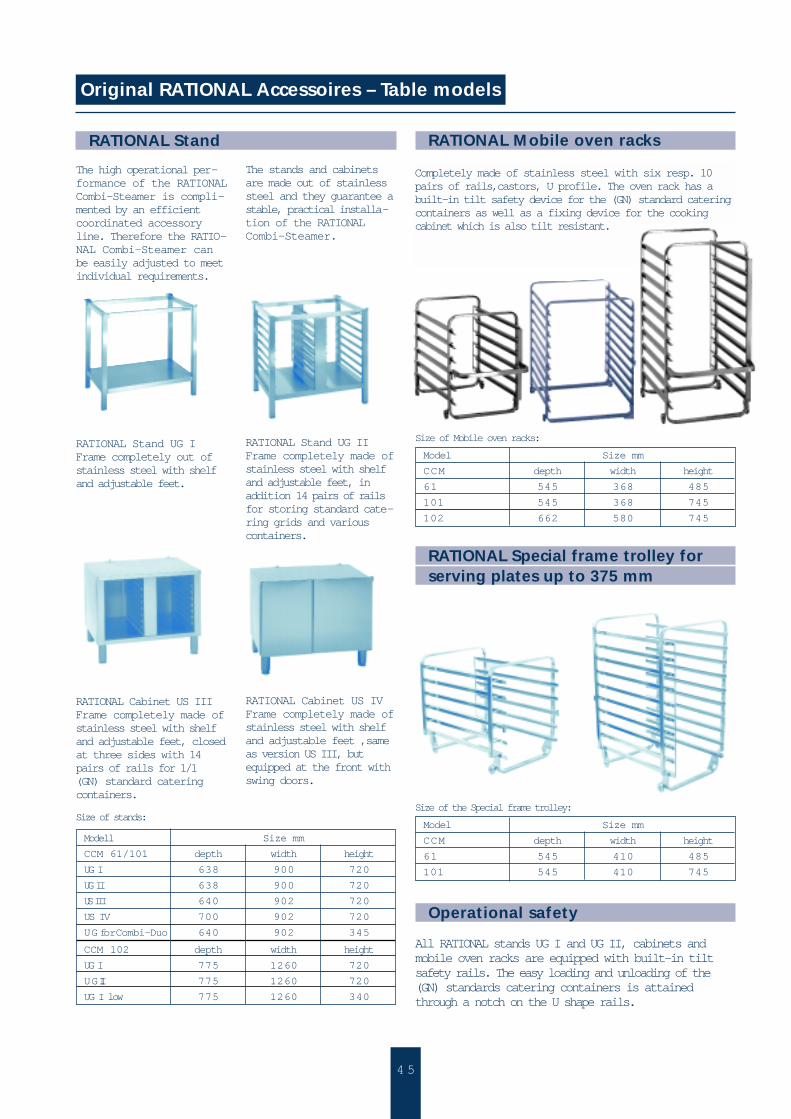
Completely made of stainless steel with six resp. 10pairs of rails,castors, U profile. The oven rack has abuilt-in tilt safety device for the (GN) standard cateringcontainers as well as a fixing device for the cookingcabinet which is also tilt resistant.
Original RATIONAL Accessoires – Table models
The high operational per-formance of the RATIONALCombi-Steamer is compli-mented by an efficientcoordinated accessoryline. Therefore the RATIO-NAL Combi-Steamer canbe easily adjusted to meetindividual requirements.
The stands and cabinetsare made out of stainlesssteel and they guarantee astable, practical installa-tion of the RATIONALCombi-Steamer.
RATIONAL Stand RATIONAL Mobile oven racks
RATIONAL Stand UG IFrame completely out ofstainless steel with shelfand adjustable feet.
RATIONAL Stand UG IIFrame completely made ofstainless steel with shelfand adjustable feet, inaddition 14 pairs of railsfor storing standard cate-ring grids and variouscontainers.
RATIONAL Special frame trolley forserving plates up to 375 mm
Model Size mm
CCM depth width height
61 545 368 485
101 545 368 745
102 662 580 745
Size of Mobile oven racks:
RATIONAL Cabinet US IIIFrame completely made ofstainless steel with shelfand adjustable feet, closedat three sides with 14pairs of rails for 1/1(GN) standard cateringcontainers.
RATIONAL Cabinet US IVFrame completely made ofstainless steel with shelfand adjustable feet ,sameas version US III, butequipped at the front withswing doors.
Modell Size mm
CCM 61/101 depth width height
UG I 638 900 720
UG II 638 900 720
US III 640 902 720
US IV 700 902 720
UG forCombi-Duo 640 902 345
CCM 102 depth width height
UG I 775 1260 720
UG II 775 1260 720
UG I low 775 1260 340
Operational safety
All RATIONAL stands UG I and UG II, cabinets andmobile oven racks are equipped with built-in tiltsafety rails. The easy loading and unloading of the(GN) standards catering containers is attainedthrough a notch on the U shape rails.
Size of stands:Model Size mm
CCM depth width height
61 545 410 485
101 545 410 745
Size of the Special frame trolley:
4 5
4 6
Original RATIONAL Accessories
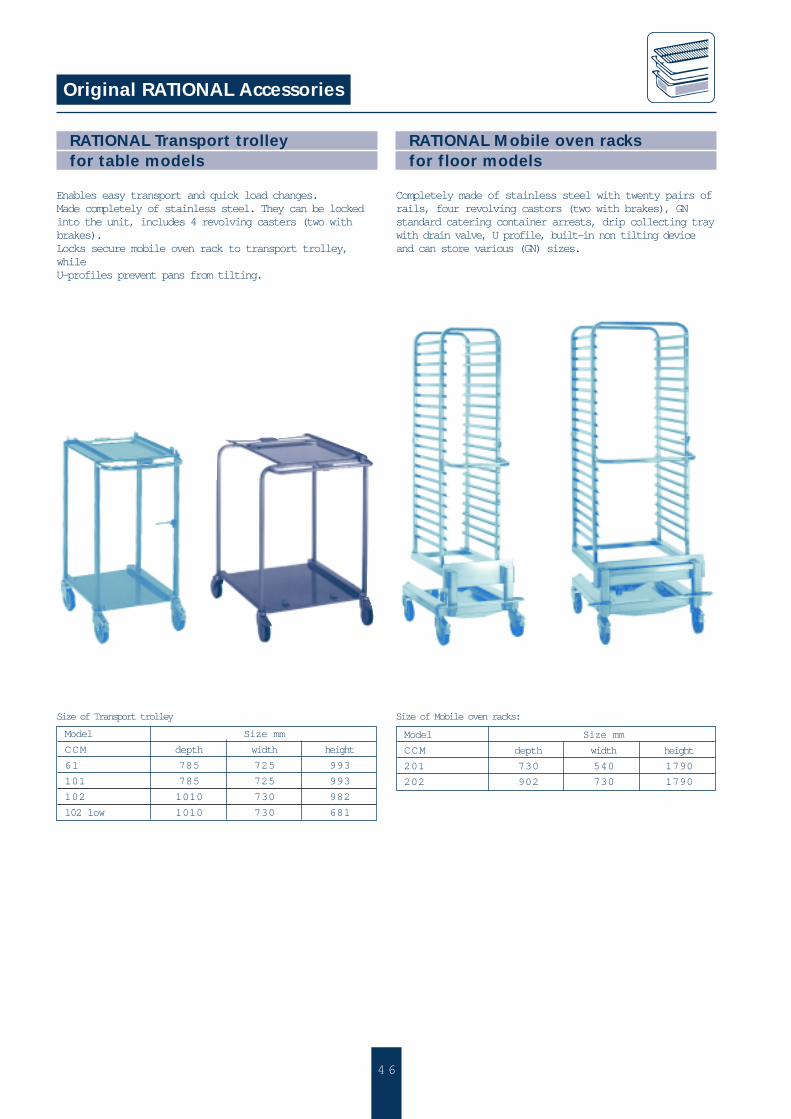
Enables easy transport and quick load changes.Made completely of stainless steel. They can be lockedinto the unit, includes 4 revolving casters (two withbrakes).Locks secure mobile oven rack to transport trolley,whileU-profiles prevent pans from tilting.
RATIONAL Transport trolleyfor table models
Model Size mm
CCM depth width height
61 785 725 993
101 785 725 993
102 1010 730 982
102 low 1010 730 681
RATIONAL Mobile oven racksfor floor models
Completely made of stainless steel with twenty pairs ofrails, four revolving castors (two with brakes), GNstandard catering container arrests, drip collecting traywith drain valve, U profile, built-in non tilting deviceand can store various (GN) sizes.
Model Size mm
CCM depth width height
201 730 540 1790
202 902 730 1790
Size of Transport trolley Size of Mobile oven racks:
4 7
Original RATIONAL Accessories
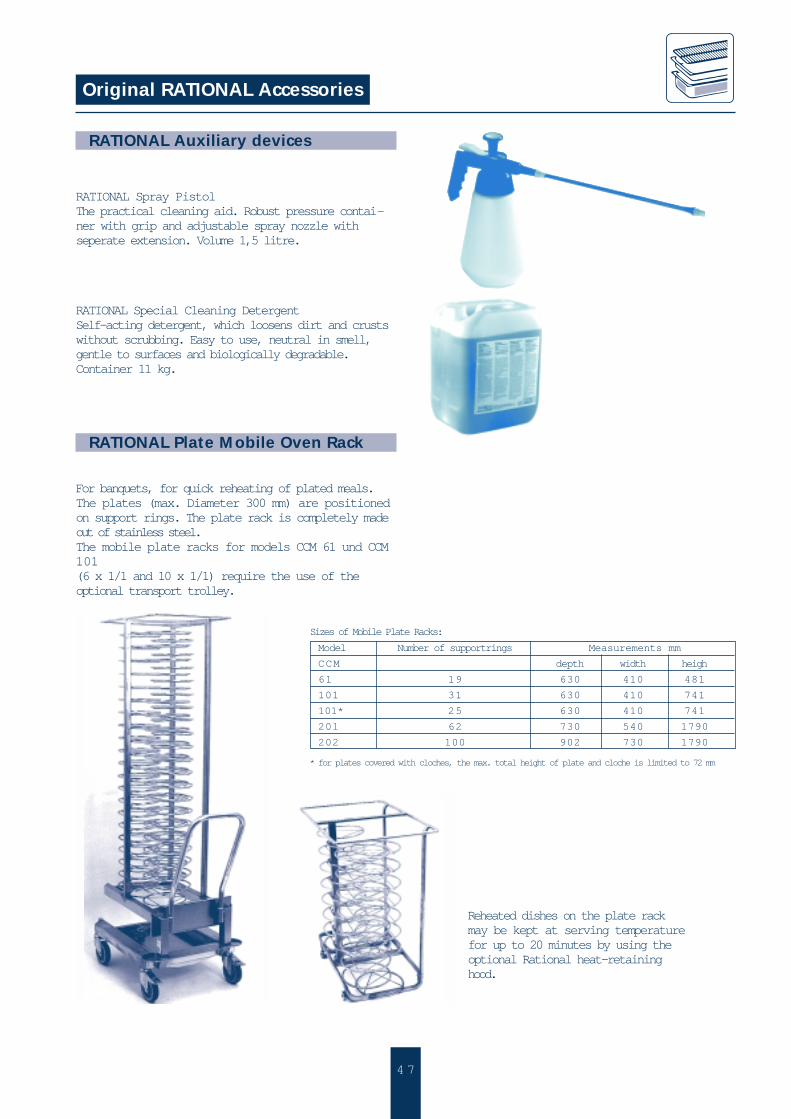
RATIONAL Auxiliary devices
RATIONAL Spray PistolThe practical cleaning aid. Robust pressure contai-ner with grip and adjustable spray nozzle withseperate extension. Volume 1,5 litre.
RATIONAL Special Cleaning DetergentSelf-acting detergent, which loosens dirt and crustswithout scrubbing. Easy to use, neutral in smell,gentle to surfaces and biologically degradable.Container 11 kg.
For banquets, for quick reheating of plated meals.The plates (max. Diameter 300 mm) are positionedon support rings. The plate rack is completely madeout of stainless steel.The mobile plate racks for models CCM 61 und CCM101 (6 x 1/1 and 10 x 1/1) require the use of theoptional transport trolley.
* for plates covered with cloches, the max. total height of plate and cloche is limited to 72 mm
RATIONAL Plate Mobile Oven Rack
Model Number of supportrings Measurements mm
CCM depth width heigh
61 19 630 410 481
101 31 630 410 741
101* 25 630 410 741
201 62 730 540 1790
202 100 902 730 1790
Sizes of Mobile Plate Racks:
Reheated dishes on the plate rackmay be kept at serving temperaturefor up to 20 minutes by using theoptional Rational heat-retaininghood.
4 8
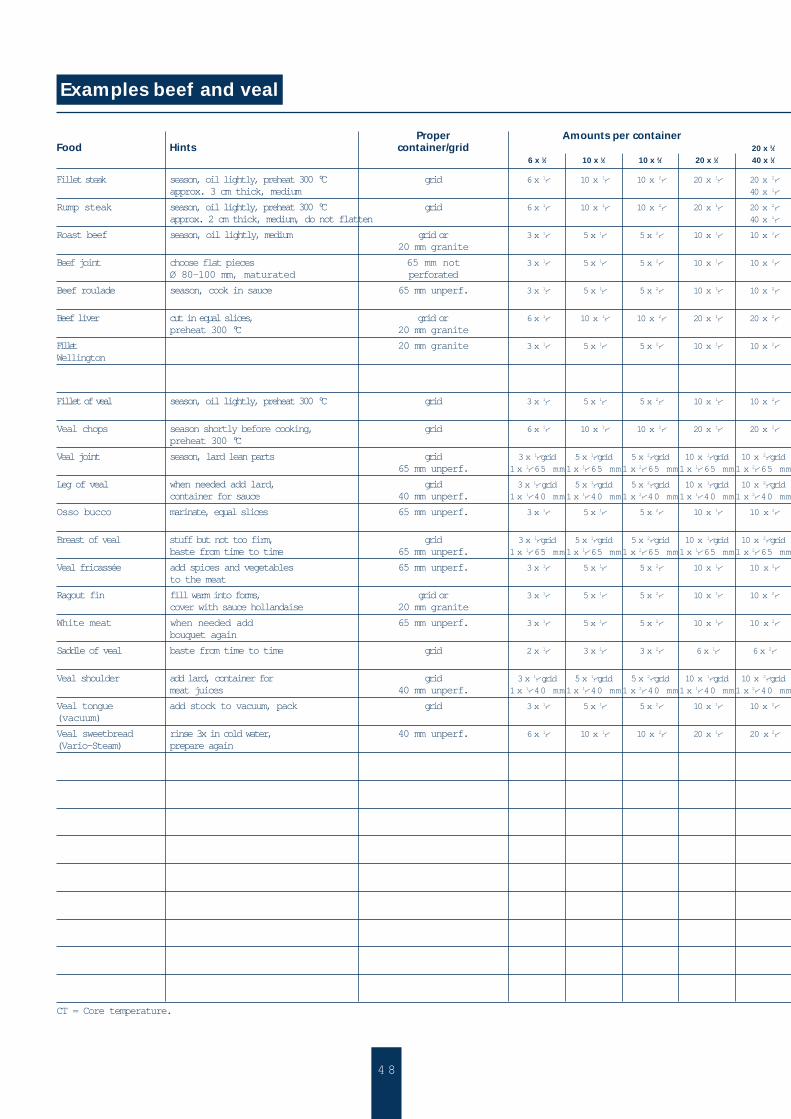
Examples beef and veal
Proper Amounts per containerFood Hints container/grid 20 x 2⁄1
6 x 1⁄1 10 x 1⁄1 10 x 2⁄1 20 x 1⁄1 40 x 1⁄1
Fillet steak season, oil lightly, preheat 300 °C grid 6 x 1⁄1 10 x 1⁄1 10 x 2⁄1 20 x 1⁄1 20 x 2⁄1 approx. 3 cm thick, medium 40 x 1⁄1
Rump steak season, oil lightly, preheat 300 °C grid 6 x 1⁄1 10 x 1⁄1 10 x 2⁄1 20 x 1⁄1 20 x 2⁄1approx. 2 cm thick, medium, do not flatten 40 x 1⁄1
Roast beef season, oil lightly, medium grid or 3 x 1⁄1 5 x 1⁄1 5 x 2⁄1 10 x 1⁄1 10 x 2⁄120 mm granite
Beef joint choose flat pieces 65 mm not 3 x 1⁄1 5 x 1⁄1 5 x 2⁄1 10 x 1⁄1 10 x 2⁄1Ø 80–100 mm, maturated perforated
Beef roulade season, cook in sauce 65 mm unperf. 3 x 1⁄1 5 x 1⁄1 5 x 2⁄1 10 x 1⁄1 10 x 2⁄1
Beef liver cut in equal slices, grid or 6 x 1⁄1 10 x 1⁄1 10 x 2⁄1 20 x 1⁄1 20 x 2⁄1preheat 300 °C 20 mm granite
Fillet 20 mm granite 3 x 1⁄1 5 x 1⁄1 5 x 2⁄1 10 x 1⁄1 10 x 2⁄1Wellington
Fillet of veal season, oil lightly, preheat 300 °C grid 3 x 1⁄1 5 x 1⁄1 5 x 2⁄1 10 x 1⁄1 10 x 2⁄1
Veal chops season shortly before cooking, grid 6 x 1⁄1 10 x 1⁄1 10 x 2⁄1 20 x 1⁄1 20 x 2⁄1 preheat 300 °C
Veal joint season, lard lean parts grid 3 x 1⁄1 grid 5 x 1⁄1 grid 5 x 2⁄1 grid 10 x 1⁄1 grid 10 x 2⁄1 grid65 mm unperf. 1 x 1⁄1 65 mm1 x 1⁄1 65 mm1 x 2⁄1 65 mm1 x 1⁄1 65 mm1 x 2⁄1 65 mm
Leg of veal when needed add lard, grid 3 x 1⁄1 grid 5 x 1⁄1 grid 5 x 2⁄1 grid 10 x 1⁄1 grid 10 x 2⁄1 gridcontainer for sauce 40 mm unperf. 1 x 1⁄1 40 mm1 x 1⁄1 40 mm1 x 2⁄1 40 mm1 x 1⁄1 40 mm1 x 2⁄1 40 mm
Osso bucco marinate, equal slices 65 mm unperf. 3 x 1⁄1 5 x 1⁄1 5 x 2⁄1 10 x 1⁄1 10 x 2⁄1
Breast of veal stuff but not too firm, grid 3 x 1⁄1 grid 5 x 1⁄1 grid 5 x 2⁄1 grid 10 x 1⁄1 grid 10 x 2⁄1 gridbaste from time to time 65 mm unperf. 1 x 1⁄1 65 mm1 x 1⁄1 65 mm1 x 2⁄1 65 mm1 x 1⁄1 65 mm1 x 2⁄1 65 mm
Veal fricassée add spices and vegetables 65 mm unperf. 3 x 1⁄1 5 x 1⁄1 5 x 2⁄1 10 x 1⁄1 10 x 2⁄1to the meat
Ragout fin fill warm into forms, grid or 3 x 1⁄1 5 x 1⁄1 5 x 2⁄1 10 x 1⁄1 10 x 2⁄1cover with sauce hollandaise 20 mm granite
White meat when needed add 65 mm unperf. 3 x 1⁄1 5 x 1⁄1 5 x 2⁄1 10 x 1⁄1 10 x 2⁄1bouquet again
Saddle of veal baste from time to time grid 2 x 1⁄1 3 x 1⁄1 3 x 2⁄1 6 x 1⁄1 6 x 2⁄1
Veal shoulder add lard, container for grid 3 x 1⁄1 grid 5 x 1⁄1 grid 5 x 2⁄1 grid 10 x 1⁄1 grid 10 x 2⁄1 gridmeat juices 40 mm unperf. 1 x 1⁄1 40 mm1 x 1⁄1 40 mm1 x 2⁄1 40 mm1 x 1⁄1 40 mm1 x 2⁄1 40 mm
Veal tongue add stock to vacuum, pack grid 3 x 1⁄1 5 x 1⁄1 5 x 2⁄1 10 x 1⁄1 10 x 2⁄1 (vacuum)
Veal sweetbread rinse 3x in cold water, 40 mm unperf. 6 x 1⁄1 10 x 1⁄1 10 x 2⁄1 20 x 1⁄1 20 x 2⁄1(Vario-Steam) prepare again
CT = Core temperature.
4 9
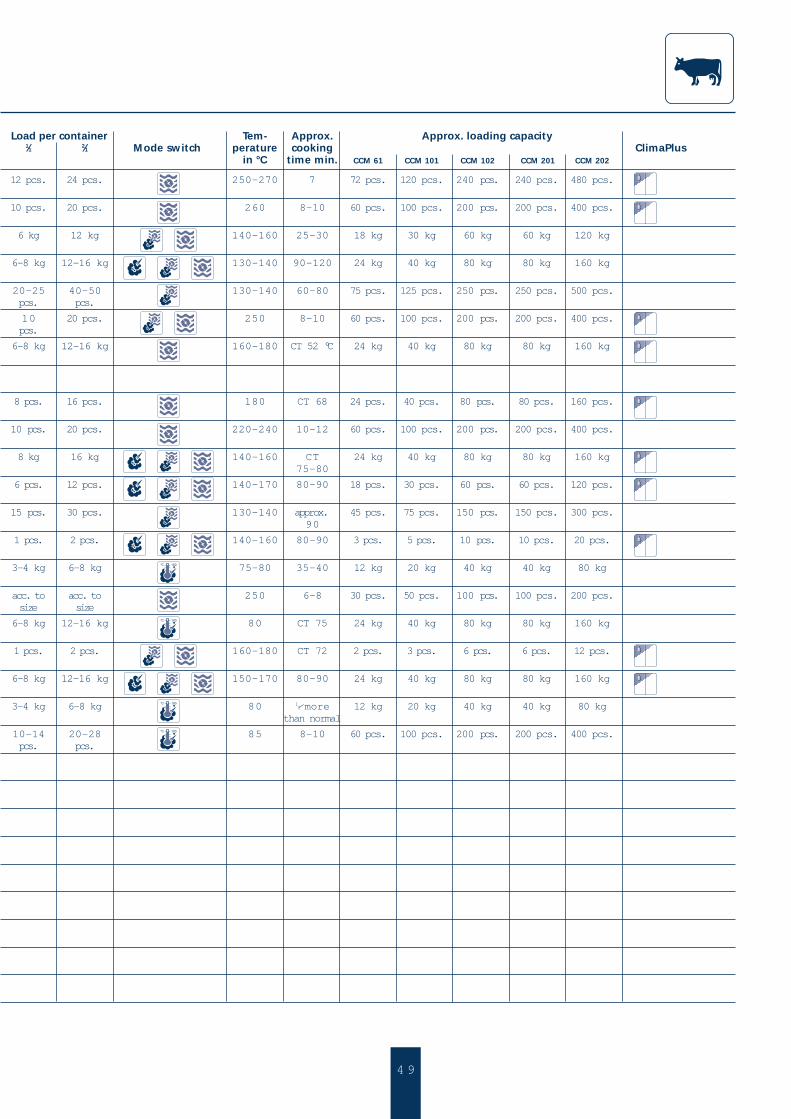
Load per container Tem- Approx. Approx. loading capacity1⁄1 2⁄1 Mode switch perature cooking ClimaPlus
in °C time min. CCM 61 CCM 101 CCM 102 CCM 201 CCM 202
12 pcs. 24 pcs. 250–270 7 72 pcs. 120 pcs. 240 pcs. 240 pcs. 480 pcs.
10 pcs. 20 pcs. 260 8–10 60 pcs. 100 pcs. 200 pcs. 200 pcs. 400 pcs.
6 kg 12 kg 140–160 25–30 18 kg 30 kg 60 kg 60 kg 120 kg
6–8 kg 12–16 kg 130–140 90–120 24 kg 40 kg 80 kg 80 kg 160 kg
20–25 40–50 130–140 60–80 75 pcs. 125 pcs. 250 pcs. 250 pcs. 500 pcs.pcs. pcs.
10 20 pcs. 250 8–10 60 pcs. 100 pcs. 200 pcs. 200 pcs. 400 pcs.pcs.
6–8 kg 12–16 kg 160–180 CT 52 °C 24 kg 40 kg 80 kg 80 kg 160 kg
8 pcs. 16 pcs. 180 CT 68 24 pcs. 40 pcs. 80 pcs. 80 pcs. 160 pcs.
10 pcs. 20 pcs. 220–240 10–12 60 pcs. 100 pcs. 200 pcs. 200 pcs. 400 pcs.
8 kg 16 kg 140–160 CT 24 kg 40 kg 80 kg 80 kg 160 kg75–80
6 pcs. 12 pcs. 140–170 80–90 18 pcs. 30 pcs. 60 pcs. 60 pcs. 120 pcs.
15 pcs. 30 pcs. 130–140 approx. 45 pcs. 75 pcs. 150 pcs. 150 pcs. 300 pcs.90
1 pcs. 2 pcs. 140–160 80–90 3 pcs. 5 pcs. 10 pcs. 10 pcs. 20 pcs.
3–4 kg 6–8 kg 75–80 35–40 12 kg 20 kg 40 kg 40 kg 80 kg
acc. to acc. to 250 6–8 30 pcs. 50 pcs. 100 pcs. 100 pcs. 200 pcs.size size
6–8 kg 12–16 kg 80 CT 75 24 kg 40 kg 80 kg 80 kg 160 kg
1 pcs. 2 pcs. 160–180 CT 72 2 pcs. 3 pcs. 6 pcs. 6 pcs. 12 pcs.
6–8 kg 12–16 kg 150–170 80–90 24 kg 40 kg 80 kg 80 kg 160 kg
3–4 kg 6–8 kg 80 1⁄2 more 12 kg 20 kg 40 kg 40 kg 80 kgthan normal
10–14 20–28 85 8–10 60 pcs. 100 pcs. 200 pcs. 200 pcs. 400 pcs.pcs. pcs.
5 0
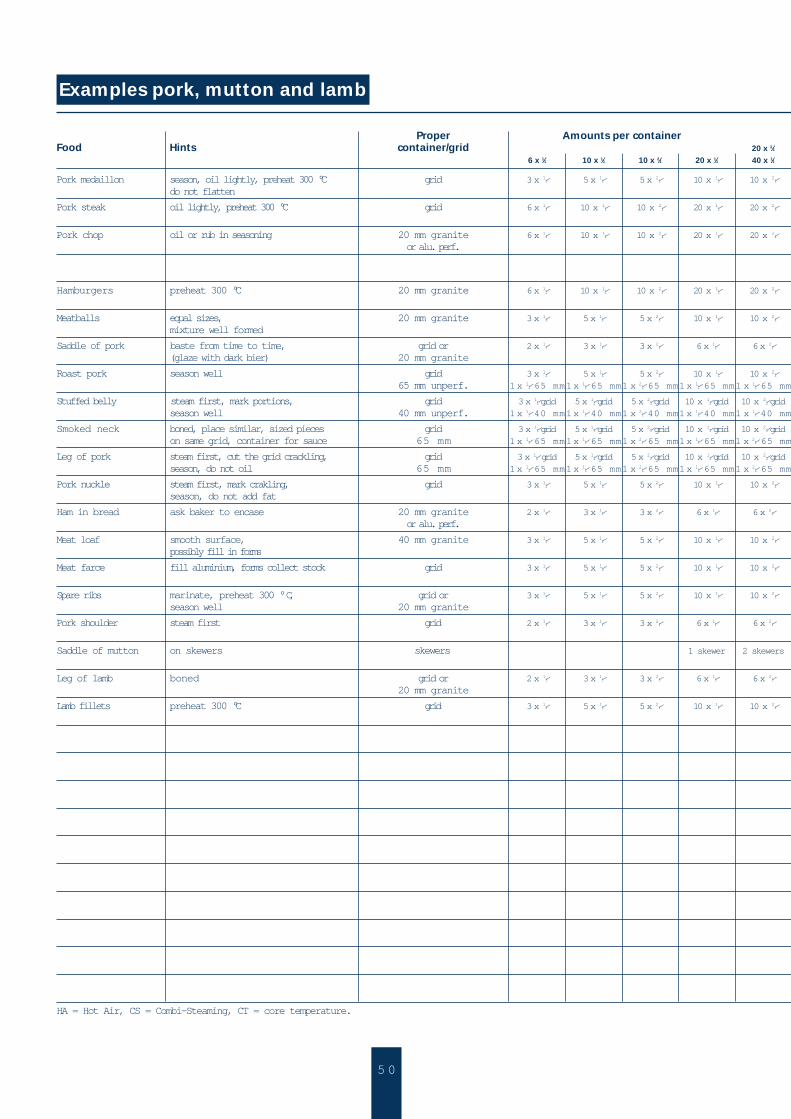
Examples pork, mutton and lamb
Proper Amounts per containerFood Hints container/grid 20 x 2⁄1
6 x 1⁄1 10 x 1⁄1 10 x 2⁄1 20 x 1⁄1 40 x 1⁄1
Pork medaillon season, oil lightly, preheat 300 °C grid 3 x 1⁄1 5 x 1⁄1 5 x 2⁄1 10 x 1⁄1 10 x 2⁄1 do not flatten
Pork steak oil lightly, preheat 300 °C grid 6 x 1⁄1 10 x 1⁄1 10 x 2⁄1 20 x 1⁄1 20 x 2⁄1
Pork chop oil or rub in seasoning 20 mm granite 6 x 1⁄1 10 x 1⁄1 10 x 2⁄1 20 x 1⁄1 20 x 2⁄1or alu. perf.
Hamburgers preheat 300 °C 20 mm granite 6 x 1⁄1 10 x 1⁄1 10 x 2⁄1 20 x 1⁄1 20 x 2⁄1
Meatballs equal sizes, 20 mm granite 3 x 1⁄1 5 x 1⁄1 5 x 2⁄1 10 x 1⁄1 10 x 2⁄1mixture well formed
Saddle of pork baste from time to time, grid or 2 x 1⁄1 3 x 1⁄1 3 x 2⁄1 6 x 1⁄1 6 x 2⁄1(glaze with dark bier) 20 mm granite
Roast pork season well grid 3 x 1⁄1 5 x 1⁄1 5 x 2⁄1 10 x 1⁄1 10 x 2⁄1 65 mm unperf. 1 x 1⁄1 65 mm1 x 1⁄1 65 mm1 x 2⁄1 65 mm1 x 1⁄1 65 mm1 x 1⁄1 65 mm
Stuffed belly steam first, mark portions, grid 3 x 1⁄1 grid 5 x 1⁄1 grid 5 x 2⁄1 grid 10 x 1⁄1 grid 10 x 2⁄1 gridseason well 40 mm unperf. 1 x 1⁄1 40 mm1 x 1⁄1 40 mm1 x 2⁄1 40 mm1 x 1⁄1 40 mm1 x 1⁄1 40 mm
Smoked neck boned, place similar, sized pieces grid 3 x 1⁄1 grid 5 x 1⁄1 grid 5 x 2⁄1 grid 10 x 1⁄1 grid 10 x 2⁄1 gridon same grid, container for sauce 65 mm 1 x 1⁄1 65 mm1 x 1⁄1 65 mm1 x 2⁄1 65 mm1 x 1⁄1 65 mm1 x 2⁄1 65 mm
Leg of pork steam first, cut the grid crackling, grid 3 x 1⁄1 grid 5 x 1⁄1 grid 5 x 2⁄1 grid 10 x 1⁄1 grid 10 x 2⁄1 gridseason, do not oil 65 mm 1 x 1⁄1 65 mm1 x 1⁄1 65 mm1 x 2⁄1 65 mm1 x 1⁄1 65 mm1 x 2⁄1 65 mm
Pork nuckle steam first, mark crakling, grid 3 x 1⁄1 5 x 1⁄1 5 x 2⁄1 10 x 1⁄1 10 x 2⁄1 season, do not add fat
Ham in bread ask baker to encase 20 mm granite 2 x 1⁄1 3 x 1⁄1 3 x 2⁄1 6 x 1⁄1 6 x 2⁄1or alu. perf.
Meat loaf smooth surface, 40 mm granite 3 x 1⁄1 5 x 1⁄1 5 x 2⁄1 10 x 1⁄1 10 x 2⁄1possibly fill in forms
Meat farce fill aluminium, forms collect stock grid 3 x 1⁄1 5 x 1⁄1 5 x 2⁄1 10 x 1⁄1 10 x 2⁄1
Spare ribs marinate, preheat 300 °C, grid or 3 x 1⁄1 5 x 1⁄1 5 x 2⁄1 10 x 1⁄1 10 x 2⁄1season well 20 mm granite
Pork shoulder steam first grid 2 x 1⁄1 3 x 1⁄1 3 x 2⁄1 6 x 1⁄1 6 x 2⁄1
Saddle of mutton on skewers skewers 1 skewer 2 skewers
Leg of lamb boned grid or 2 x 1⁄1 3 x 1⁄1 3 x 2⁄1 6 x 1⁄1 6 x 2⁄120 mm granite
Lamb fillets preheat 300 °C grid 3 x 1⁄1 5 x 1⁄1 5 x 2⁄1 10 x 1⁄1 10 x 2⁄1
HA = Hot Air, CS = Combi-Steaming, CT = core temperature.

5 1
Load per container Tem- Approx. Approx. loading capacity1⁄1 2⁄1 Mode switch perature cooking ClimaPlus
in °C time min. CCM 61 CCM 101 CCM 102 CCM 201 CCM 202
24 pcs. 48 pcs. 250 6–8 72 pcs. 120 pcs. 240 pcs. 240 pcs. 480 pcs.
10 pcs. 20 pcs. 250 8–10 60 pcs. 100 pcs. 200 pcs. 200 pcs. 400 pcs.
8 pcs. 16 pcs. 200–220 10–15 48 pcs. 80 pcs. 160 pcs. 160 pcs. 320 pcs.
15 pcs. 30 pcs. 200–220 15 90 pcs. 150 pcs. 300 pcs. 300 pcs. 600 pcs.
45 pcs. 90 pcs. 180 15 135 pcs. 225 pcs. 450 pcs. 450 pcs. 900 pcs.
8 kg 16 kg 150–180 CT 72 °C 16 kg 24 kg 48 kg 48 kg 96 kg
8 kg 16 kg 140–160 85–100 24 kg 40 kg 80 kg 80 kg 160 kg
5–7 kg 10–14 kg HA 220 HA 12 21 kg 35 kg 70 kg 70 kg 140 kgCS 160 CT 78 °C
6–8 kg 12–16 kg 80 CT 24 kg 40 kg 80 kg 80 kg 160 kg65–70 °C
7–9 14–18 100 70–100 27 pcs. 45 pcs. 90 pcs. 90 pcs. 180 pcs.pcs. pcs.
6–8 12–16 150–170 70 24 pcs. 40 pcs. 80 pcs. 80 pcs. 160 pcs.pcs. pcs. HA 200
ca. 6 kg ca. 12 kg 170 90–120 12 kg 18 kg 36 kg 36 kg 72 kg
6 kg 12 kg 150–170 70 18 kg 30 kg 60 kg 60 kg 120 kgHA 200
4–6 kg 8–12 kg CS 130 CT 70 °C 18 kg 30 kg 60 kg 60 kg 120 kgHA 160
3 kg 6 kg 180–190 30 9 kg 15 kg 30 kg 30 kg 60 kg
8 kg 16 kg 140–160 CT 75 °C 16 kg 24 kg 48 kg 48 kg 96 kgHL 180
140–180 CT 60 °C 6 pcs. 6 pcs. 12 pcs.
1 pcs. 2 pcs. 140–180 CT 2 pcs. 3 pcs. 6 pcs. 6 pcs. 12 pcs.54–58 °C
6 –7 kg 12–14 kg 70 double than 21 kg 35 kg 70 kg 70 kg 140 kgnormal
5 2
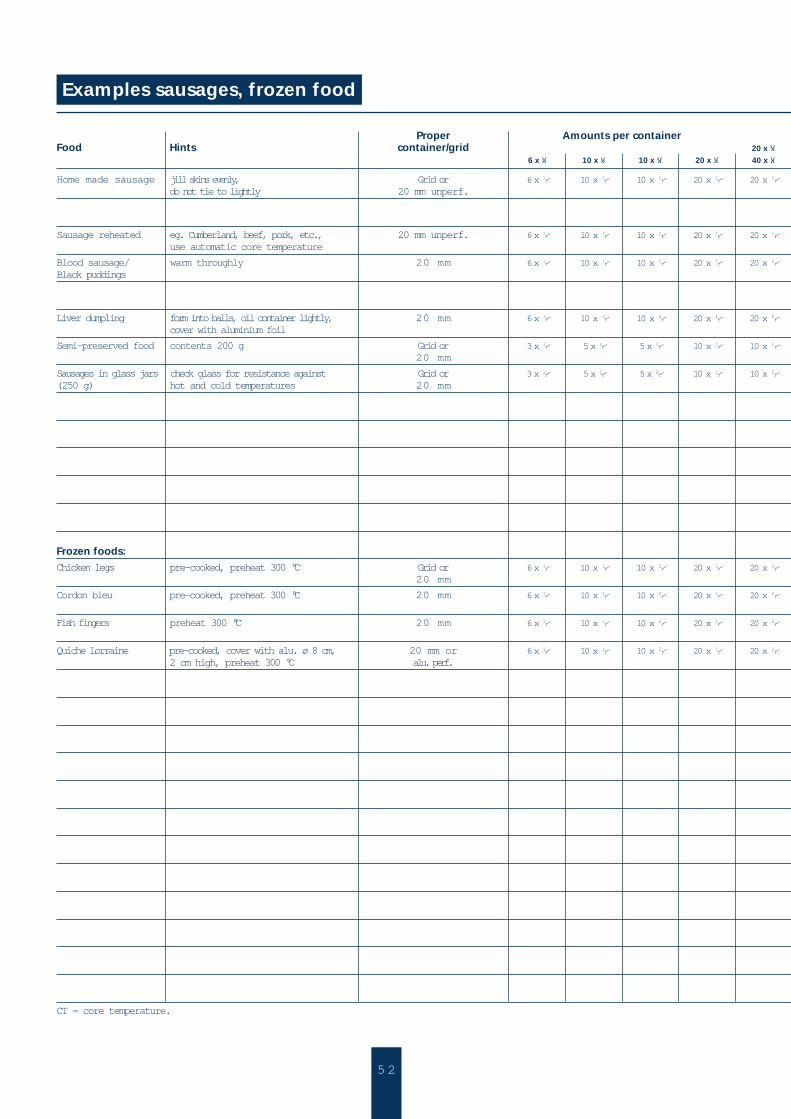
Examples sausages, frozen food
Proper Amounts per containerFood Hints container/grid 20 x 2⁄1
6 x 1⁄1 10 x 1⁄1 10 x 2⁄1 20 x 1⁄1 40 x 1⁄1
Home made sausage jill skins evenly, Grid or 6 x 1⁄1 10 x 1⁄1 10 x 2⁄1 20 x 1⁄1 20 x 2⁄1do not tie to lightly 20 mm unperf.
Sausage reheated eg. Cumberland, beef, pork, etc., 20 mm unperf. 6 x 1⁄1 10 x 1⁄1 10 x 2⁄1 20 x 1⁄1 20 x 2⁄1use automatic core temperature
Blood sausage/ warm throughly 20 mm 6 x 1⁄1 10 x 1⁄1 10 x 2⁄1 20 x 1⁄1 20 x 2⁄1Black puddings
Liver dumpling form into balls, oil container lightly, 20 mm 6 x 1⁄1 10 x 1⁄1 10 x 2⁄1 20 x 1⁄1 20 x 2⁄1cover with aluminium foil
Semi-preserved food contents 200 g Grid or 3 x 1⁄1 5 x 1⁄1 5 x 2⁄1 10 x 1⁄1 10 x 2⁄120 mm
Sausages in glass jars check glass for resistance against Grid or 3 x 1⁄1 5 x 1⁄1 5 x 2⁄1 10 x 1⁄1 10 x 2⁄1(250 g) hot and cold temperatures 20 mm
Frozen foods:Chicken legs pre-cooked, preheat 300 °C Grid or 6 x 1⁄1 10 x 1⁄1 10 x 2⁄1 20 x 1⁄1 20 x 2⁄1
20 mm
Cordon bleu pre-cooked, preheat 300 °C 20 mm 6 x 1⁄1 10 x 1⁄1 10 x 2⁄1 20 x 1⁄1 20 x 2⁄1
Fish fingers preheat 300 °C 20 mm 6 x 1⁄1 10 x 1⁄1 10 x 2⁄1 20 x 1⁄1 20 x 2⁄1
Quiche Lorraine pre-cooked, cover with alu. ø 8 cm, 20 mm or 6 x 1⁄1 10 x 1⁄1 10 x 2⁄1 20 x 1⁄1 20 x 2⁄12 cm high, preheat 300 °C alu. perf.
CT = core temperature.
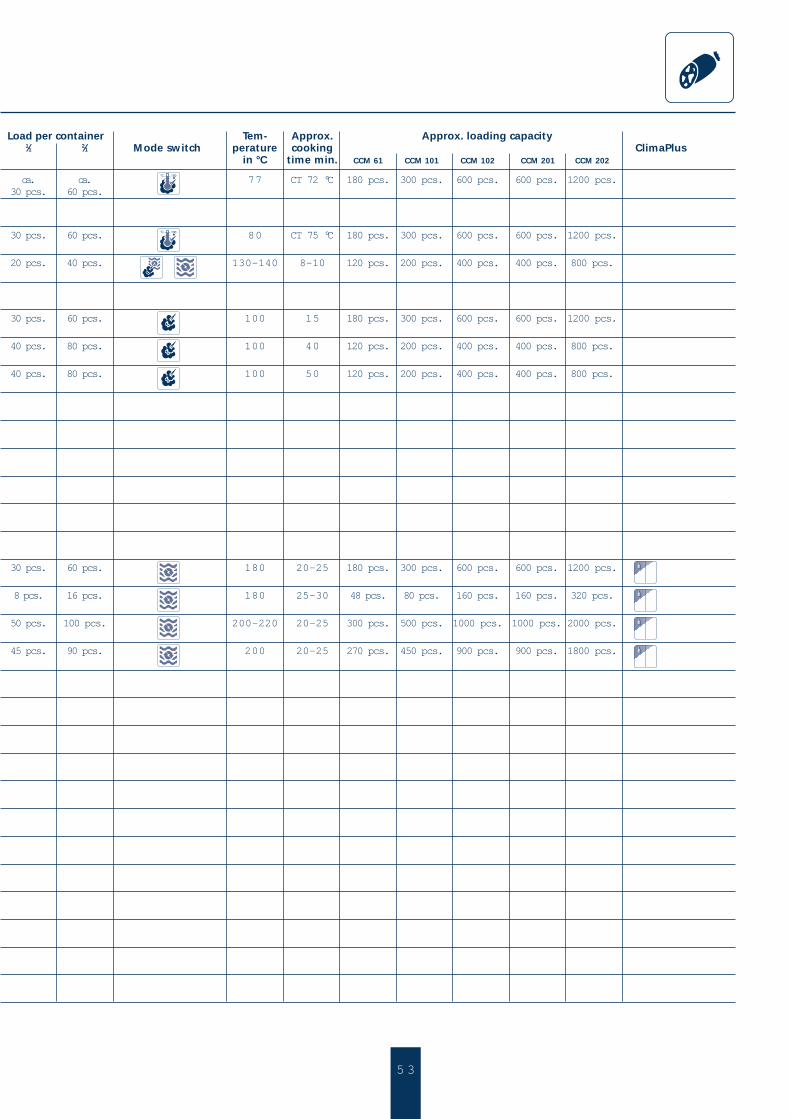
5 3
Load per container Tem- Approx. Approx. loading capacity1⁄1 2⁄1 Mode switch perature cooking ClimaPlus
in °C time min. CCM 61 CCM 101 CCM 102 CCM 201 CCM 202
ca. ca. 77 CT 72 °C 180 pcs. 300 pcs. 600 pcs. 600 pcs. 1200 pcs.30 pcs. 60 pcs.
30 pcs. 60 pcs. 80 CT 75 °C 180 pcs. 300 pcs. 600 pcs. 600 pcs. 1200 pcs.
20 pcs. 40 pcs. 130–140 8–10 120 pcs. 200 pcs. 400 pcs. 400 pcs. 800 pcs.
30 pcs. 60 pcs. 100 15 180 pcs. 300 pcs. 600 pcs. 600 pcs. 1200 pcs.
40 pcs. 80 pcs. 100 40 120 pcs. 200 pcs. 400 pcs. 400 pcs. 800 pcs.
40 pcs. 80 pcs. 100 50 120 pcs. 200 pcs. 400 pcs. 400 pcs. 800 pcs.
30 pcs. 60 pcs. 180 20–25 180 pcs. 300 pcs. 600 pcs. 600 pcs. 1200 pcs.
8 pcs. 16 pcs. 180 25–30 48 pcs. 80 pcs. 160 pcs. 160 pcs. 320 pcs.
50 pcs. 100 pcs. 200–220 20–25 300 pcs. 500 pcs. 1000 pcs. 1000 pcs. 2000 pcs.
45 pcs. 90 pcs. 200 20–25 270 pcs. 450 pcs. 900 pcs. 900 pcs. 1800 pcs.

5 4
Examples game, poultry, pastete
Proper Amounts per containerFood Hints container/grid 20 x 2⁄1
6 x 1⁄1 10 x 1⁄1 10 x 2⁄1 20 x 1⁄1 40 x 1⁄1
Saddle of venison add lard grid or 3 x 1⁄1 5 x 1⁄1 5 x 2⁄1 10 x 1⁄1 10 x 2⁄120 mm granite
Venison leg boned, season well grid or 3 x 1⁄1 5 x 1⁄1 5 x 2⁄1 10 x 1⁄1 10 x 2⁄165 mm
Shoulder of venison add pieces of lard, marinate 65 mm 3 x 1⁄1 5 x 1⁄1 5 x 2⁄1 10 x 1⁄1 10 x 2⁄1
Venison ragout vacuum cooking, grid 3 x 1⁄1 5 x 1⁄1 5 x 2⁄1 10 x 1⁄1 10 x 2⁄1 approx. 2 kg per bag
Saddle of hare marinate, season, preheat 300 °C grid or 3 x 1⁄1 5 x 1⁄1 5 x 2⁄1 10 x 1⁄1 10 x 2⁄120 mm granite
harded leg of hare marinate, season, baste 65 mm unperf. 3 x 1⁄1 5 x 1⁄1 5 x 2⁄1 10 x 1⁄1 10 x 2⁄1with hot sauce
Venison vacuum cooking, grid 3 x 1⁄1 5 x 1⁄1 5 x 2⁄1 10 x 1⁄1 10 x 2⁄1 mise en place for peak periods
Roast venison braised, use container, 100 mm 3 x 1⁄1 5 x 1⁄1 5 x 2⁄1 10 x 1⁄1 10 x 2⁄1ideal for mise-en-place
Pheasant add lard, season, grid or 3 x 1⁄1 5 x 1⁄1 5 x 2⁄1 10 x 1⁄1 10 x 2⁄1preheat 300 °C 20 mm granite
Wild duck season, add lard grid or 3 x 1⁄1 5 x 1⁄1 5 x 2⁄1 10 x 1⁄1 10 x 2⁄120 mm granite
Quail vacuum bake grid 3 x 1⁄1 5 x 1⁄1 5 x 2⁄1 10 x 1⁄1 10 x 2⁄1
Poultry for salads, starters etc. 20, 40 or 3 x 20, 40 5 x 20, 40 5 x 20, 40 10 x 20, 40 10 x 20, 4065 mm or 65 mm or 65 mm or 65 mm or 65 mm or 65 mm
Turkey possibliy stuff, baste from grid or 2 x 1⁄1 grid 3 x 1⁄1 grid 3 x 2⁄1 grid 6 x 1⁄1 grid 6 x 2⁄1 gridtime to time 40 mm unperf.
Goose possibliy stuff, season grid or 2 x 1⁄1 3 x 1⁄1 3 x 2⁄1 6 x 1⁄1 6 x 2⁄140 mm granite
Duck breast boned, good vacummed grid 3 x 1⁄1 5 x 1⁄1 5 x 2⁄1 10 x 1⁄1 10 x 2⁄1
Whole chickens dry, season, tie grid 3 x 1⁄1 5 x 1⁄1 5 x 2⁄1 10 x 1⁄1 10 x 2⁄1 preheat 300 °C
Chickens space out evenly on grid, grid 3 x 1⁄1 5 x 1⁄1 5 x 2⁄1 10 x 1⁄1 10 x 2⁄1 (1/2) preheat 300 °C
Chicken legs season, place on grids, shape, grid 6 x 1⁄1 10 x 1⁄1 10 x 2⁄1 20 x 1⁄1 20 x 2⁄1 preheat 300 °C
Paté à la fill forms well grid 3 x 1⁄1 5 x 1⁄1 5 x 2⁄1 10 x 1⁄1 10 x 2⁄1 Maison
Liver paté fill into forms and cover well grid 3 x 1⁄1 5 x 1⁄1 5 x 2⁄1 10 x 1⁄1 10 x 2⁄1
Chicken paté fill into forms, flatten grid 3 x 1⁄1 5 x 1⁄1 5 x 2⁄1 10 x 1⁄1 10 x 2⁄1
Goose liver form before cooking grid 3 x 1⁄1 5 x 1⁄1 5 x 2⁄1 10 x 1⁄1 10 x 2⁄1 Galantine

5 5
Load per container Tem- Approx. Approx. loading capacity1⁄1 2⁄1 Mode switch perature cooking ClimaPlus
in °C time min. CCM 61 CCM 101 CCM 102 CCM 201 CCM 202
2 pcs. 4 pcs. 220 25 6 pcs. 10 pcs. 20 pcs. 20 pcs. 40 pcs.
5–6 kg 10–12 kg 140–160 60–70 18 kg 30 kg 60 kg 60 kg 120 kg
6 kg 12 kg 140–150 80–100 18 kg 30 kg 60 kg 60 kg 120 kg
4 kg 8 kg 75 1⁄2 more 12 kg 20 kg 40 kg 40 kg 80 kgthan normal
6–8 12–16 200–220 15–20 24 pcs. 40 pcs. 80 pcs. 80 pcs. 160 pcs.pcs. pcs.
12 pcs. 24 pcs. 140–160 50 36 pcs. 60 pcs. 120 pcs. 120 pcs. 240 pcs.
6–8 kg 12–16 kg 75 1⁄2 more 24 kg 40 kg 80 kg 80 kg 160 kgthan normal
8 kg 16 kg 130–150 90–120 24 kg 40 kg 80 kg 80 kg 160 kg
6–8 12–16 160–180 25–30 18 pcs. 30 pcs. 60 pcs. 60 pcs. 120 pcs.pcs. pcs.
3 pcs. 6 pcs. 140–160 60–70 9 pcs. 15 pcs. 30 pcs. 30 pcs. 60 pcs.
6–8 12–16 80 1⁄4 more 24 pcs. 40 pcs. 80 pcs. 80 pcs. 160 pcs.pcs. pcs. than normal
6 kg 12 kg 85 CT 78 °C 18 kg 30 kg 60 kg 60 kg 120 kg
2 pcs. 4 pcs. 130–150 120–150 4 pcs. 6 pcs. 12 pcs. 12 pcs. 24 pcs.
2 pcs. 4 pcs. 140–160 120–150 4 pcs. 6 pcs. 12 pcs. 12 pcs. 24 pcs.
10 pcs. 20 pcs. 70 1⁄4 more 30 pcs. 50 pcs. 100 pcs. 100 pcs. 200 pcs.than normal
6 pcs. 12 pcs. 180–200 40–45 18 pcs. 30 pcs. 60 pcs. 60 pcs. 120 pcs.
8 pcs. 16 pcs. 200 30 24 pcs. 40 pcs. 80 pcs. 80 pcs. 160 pcs.
10–12 20–24 220 18 72 pcs. 120 pcs. 240 pcs. 240 pcs. 480 pcs.pcs. pcs.
6–8 kg 12–16 kg 78 CT 72 °C 24 kg 40 kg 80 kg 80 kg 160 kg
6 kg 12 kg 130 40 18 kg 30 kg 60 kg 60 kg 120 kg
6 kg 12 kg 140–150 90–120 18 kg 30 kg 60 kg 60 kg 120 kg
5 kg 10 kg 73 120 15 kg 25 kg 50 kg 50 kg 100 kg
5 6
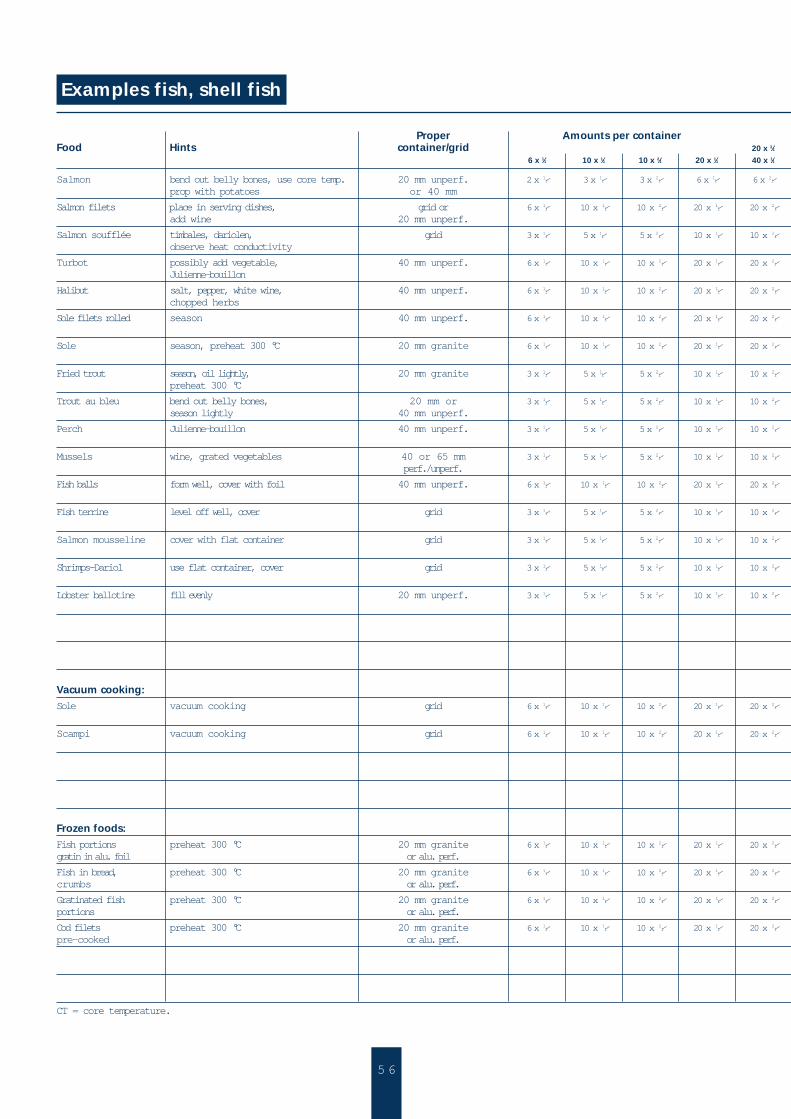
Examples fish, shell fish
Proper Amounts per containerFood Hints container/grid 20 x 2⁄1
6 x 1⁄1 10 x 1⁄1 10 x 2⁄1 20 x 1⁄1 40 x 1⁄1
Salmon bend out belly bones, use core temp. 20 mm unperf. 2 x 1⁄1 3 x 1⁄1 3 x 2⁄1 6 x 1⁄1 6 x 2⁄1prop with potatoes or 40 mm
Salmon filets place in serving dishes, grid or 6 x 1⁄1 10 x 1⁄1 10 x 2⁄1 20 x 1⁄1 20 x 2⁄1add wine 20 mm unperf.
Salmon soufflée timbales, dariolen, grid 3 x 1⁄1 5 x 1⁄1 5 x 2⁄1 10 x 1⁄1 10 x 2⁄1 observe heat conductivity
Turbot possibly add vegetable, 40 mm unperf. 6 x 1⁄1 10 x 1⁄1 10 x 2⁄1 20 x 1⁄1 20 x 2⁄1Julienne-bouillon
Halibut salt, pepper, white wine, 40 mm unperf. 6 x 1⁄1 10 x 1⁄1 10 x 2⁄1 20 x 1⁄1 20 x 2⁄1chopped herbs
Sole filets rolled season 40 mm unperf. 6 x 1⁄1 10 x 1⁄1 10 x 2⁄1 20 x 1⁄1 20 x 2⁄1
Sole season, preheat 300 °C 20 mm granite 6 x 1⁄1 10 x 1⁄1 10 x 2⁄1 20 x 1⁄1 20 x 2⁄1
Fried trout season, oil lightly, 20 mm granite 3 x 1⁄1 5 x 1⁄1 5 x 2⁄1 10 x 1⁄1 10 x 2⁄1preheat 300 °C
Trout au bleu bend out belly bones, 20 mm or 3 x 1⁄1 5 x 1⁄1 5 x 2⁄1 10 x 1⁄1 10 x 2⁄1season lightly 40 mm unperf.
Perch Julienne-bouillon 40 mm unperf. 3 x 1⁄1 5 x 1⁄1 5 x 2⁄1 10 x 1⁄1 10 x 2⁄1
Mussels wine, grated vegetables 40 or 65 mm 3 x 1⁄1 5 x 1⁄1 5 x 2⁄1 10 x 1⁄1 10 x 2⁄1perf./unperf.
Fish balls form well, cover with foil 40 mm unperf. 6 x 1⁄1 10 x 1⁄1 10 x 2⁄1 20 x 1⁄1 20 x 2⁄1
Fish terrine level off well, cover grid 3 x 1⁄1 5 x 1⁄1 5 x 2⁄1 10 x 1⁄1 10 x 2⁄1
Salmon mousseline cover with flat container grid 3 x 1⁄1 5 x 1⁄1 5 x 2⁄1 10 x 1⁄1 10 x 2⁄1
Shrimps-Dariol use flat container, cover grid 3 x 1⁄1 5 x 1⁄1 5 x 2⁄1 10 x 1⁄1 10 x 2⁄1
Lobster ballotine fill evenly 20 mm unperf. 3 x 1⁄1 5 x 1⁄1 5 x 2⁄1 10 x 1⁄1 10 x 2⁄1
Vacuum cooking:Sole vacuum cooking grid 6 x 1⁄1 10 x 1⁄1 10 x 2⁄1 20 x 1⁄1 20 x 2⁄1
Scampi vacuum cooking grid 6 x 1⁄1 10 x 1⁄1 10 x 2⁄1 20 x 1⁄1 20 x 2⁄1
Frozen foods:Fish portions preheat 300 °C 20 mm granite 6 x 1⁄1 10 x 1⁄1 10 x 2⁄1 20 x 1⁄1 20 x 2⁄1gratin in alu. foil or alu. perf.
Fish in bread, preheat 300 °C 20 mm granite 6 x 1⁄1 10 x 1⁄1 10 x 2⁄1 20 x 1⁄1 20 x 2⁄1crumbs or alu. perf.
Gratinated fish preheat 300 °C 20 mm granite 6 x 1⁄1 10 x 1⁄1 10 x 2⁄1 20 x 1⁄1 20 x 2⁄1portions or alu. perf.
Cod filets preheat 300 °C 20 mm granite 6 x 1⁄1 10 x 1⁄1 10 x 2⁄1 20 x 1⁄1 20 x 2⁄1pre-cooked or alu. perf.
CT = core temperature.
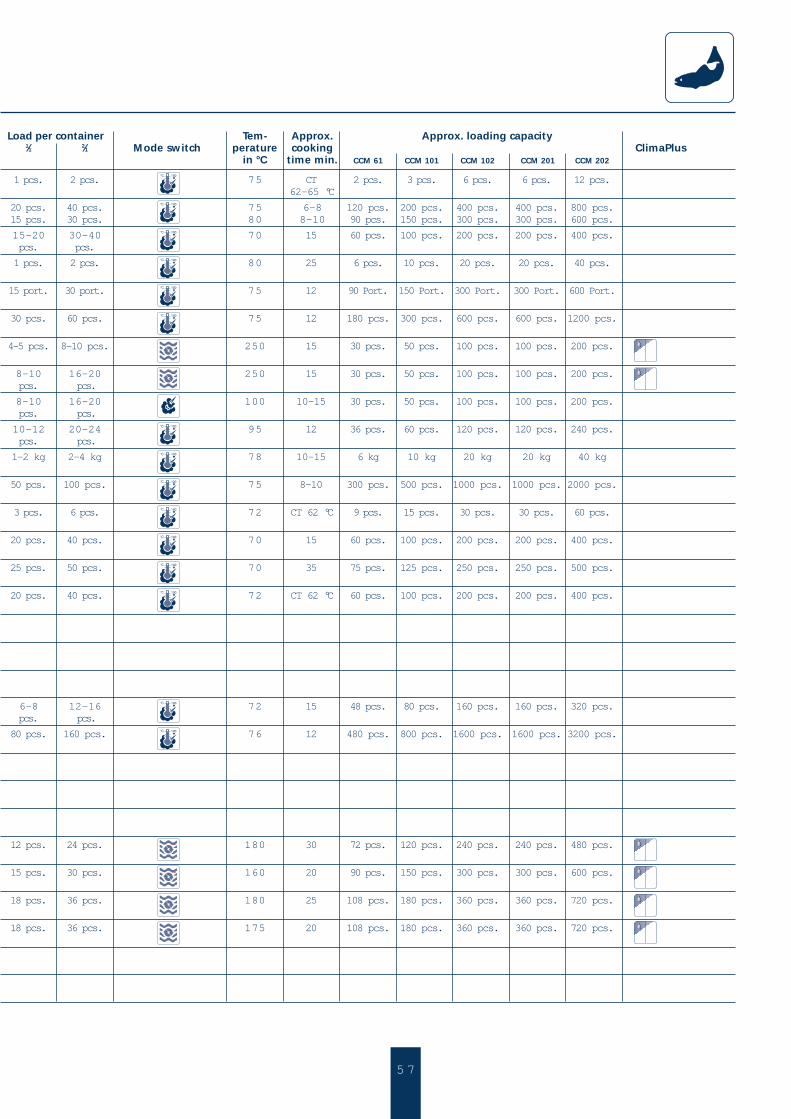
5 7
Load per container Tem- Approx. Approx. loading capacity1⁄1 2⁄1 Mode switch perature cooking ClimaPlus
in °C time min. CCM 61 CCM 101 CCM 102 CCM 201 CCM 202
1 pcs. 2 pcs. 75 CT 2 pcs. 3 pcs. 6 pcs. 6 pcs. 12 pcs.62–65 °C
20 pcs. 40 pcs. 75 6–8 120 pcs. 200 pcs. 400 pcs. 400 pcs. 800 pcs.15 pcs. 30 pcs. 80 8–10 90 pcs. 150 pcs. 300 pcs. 300 pcs. 600 pcs.
15–20 30–40 70 15 60 pcs. 100 pcs. 200 pcs. 200 pcs. 400 pcs.pcs. pcs.
1 pcs. 2 pcs. 80 25 6 pcs. 10 pcs. 20 pcs. 20 pcs. 40 pcs.
15 port. 30 port. 75 12 90 Port. 150 Port. 300 Port. 300 Port. 600 Port.
30 pcs. 60 pcs. 75 12 180 pcs. 300 pcs. 600 pcs. 600 pcs. 1200 pcs.
4–5 pcs. 8–10 pcs. 250 15 30 pcs. 50 pcs. 100 pcs. 100 pcs. 200 pcs.
8–10 16–20 250 15 30 pcs. 50 pcs. 100 pcs. 100 pcs. 200 pcs.pcs. pcs.
8–10 16–20 100 10–15 30 pcs. 50 pcs. 100 pcs. 100 pcs. 200 pcs.pcs. pcs.
10–12 20–24 95 12 36 pcs. 60 pcs. 120 pcs. 120 pcs. 240 pcs.pcs. pcs.
1–2 kg 2–4 kg 78 10–15 6 kg 10 kg 20 kg 20 kg 40 kg
50 pcs. 100 pcs. 75 8–10 300 pcs. 500 pcs. 1000 pcs. 1000 pcs. 2000 pcs.
3 pcs. 6 pcs. 72 CT 62 °C 9 pcs. 15 pcs. 30 pcs. 30 pcs. 60 pcs.
20 pcs. 40 pcs. 70 15 60 pcs. 100 pcs. 200 pcs. 200 pcs. 400 pcs.
25 pcs. 50 pcs. 70 35 75 pcs. 125 pcs. 250 pcs. 250 pcs. 500 pcs.
20 pcs. 40 pcs. 72 CT 62 °C 60 pcs. 100 pcs. 200 pcs. 200 pcs. 400 pcs.
6–8 12–16 72 15 48 pcs. 80 pcs. 160 pcs. 160 pcs. 320 pcs.pcs. pcs.
80 pcs. 160 pcs. 76 12 480 pcs. 800 pcs. 1600 pcs. 1600 pcs. 3200 pcs.
12 pcs. 24 pcs. 180 30 72 pcs. 120 pcs. 240 pcs. 240 pcs. 480 pcs.
15 pcs. 30 pcs. 160 20 90 pcs. 150 pcs. 300 pcs. 300 pcs. 600 pcs.
18 pcs. 36 pcs. 180 25 108 pcs. 180 pcs. 360 pcs. 360 pcs. 720 pcs.
18 pcs. 36 pcs. 175 20 108 pcs. 180 pcs. 360 pcs. 360 pcs. 720 pcs.

5 8
Examples vegetables, canned foods
Proper Amounts per containerFood Hints container/grid 20 x 2⁄1
6 x 1⁄1 10 x 1⁄1 10 x 2⁄1 20 x 1⁄1 40 x 1⁄1
Broccoli frozen (perf. container rinse in cold 65 mm unperf. 3 x 1⁄1 5 x 1⁄1 5 x 2⁄1 10 x 1⁄1 10 x 2⁄1water) or perf.
Cauliflower quartered, remove stalks 65 mm unperf. 3 x 1⁄1 5 x 1⁄1 5 x 2⁄1 10 x 1⁄1 10 x 2⁄1or perf.
Brussels sprout frozen, season, add butter 65 mm unperf. 3 x 1⁄1 5 x 1⁄1 5 x 2⁄1 10 x 1⁄1 10 x 2⁄1before serving or perf.
Spinach fresh 65 mm perf. 3 x 1⁄1 5 x 1⁄1 5 x 2⁄1 10 x 1⁄1 10 x 2⁄1
Kohlrabi frozen, slice 65 mm unperf. 3 x 1⁄1 5 x 1⁄1 5 x 2⁄1 10 x 1⁄1 10 x 2⁄1or perf.
Parisienne carrots season while frozen, add butter 65 mm unperf. 3 x 1⁄1 5 x 1⁄1 5 x 2⁄1 10 x 1⁄1 10 x 2⁄1or perf.
Peas season while frozen 65 mm unperf. 3 x 1⁄1 5 x 1⁄1 5 x 2⁄1 10 x 1⁄1 10 x 2⁄1or perf.
Asparagus bundle, when desired cook 65 mm unperf. 3 x 1⁄1 5 x 1⁄1 5 x 2⁄1 10 x 1⁄1 10 x 2⁄1in meat juices or perf.
Tomatoes blanch for tomatoes concessèes, 20 or 40 mm 5 x 1⁄1 20/4010 x 1⁄1 20/4010 x 2⁄1 20/4020 x 1⁄1 20/40 20 x 20/40
salt 65 mm perf. 3 x 1⁄1 65 mm 5 x 1⁄1 65 mm5 x 2⁄1 65 mm10 x 1⁄1 65 mm 10 x 2⁄1 65m m
Beans frozen, whole or cut fresh blanch, 65 mm unperf. 3 x 1⁄1 5 x 1⁄1 5 x 2⁄1 10 x 1⁄1 10 x 2⁄1cold water or perf.
Mushrooms sprinkle with lemon, 65 mm unperf. 3 x 1⁄1 5 x 1⁄1 5 x 2⁄1 10 x 1⁄1 10 x 2⁄1white wine
Cabbage remove stalk 65 mm perf. 3 x 1⁄1 5 x 1⁄1 5 x 2⁄1 10 x 1⁄1 10 x 2⁄1
Stuffed peppers place the opening upright 65 mm unperf. 3 x 1⁄1 5 x 1⁄1 5 x 2⁄1 10 x 1⁄1 10 x 2⁄1
Cauliflower cheese every second rail, grid or 3 x 1⁄1 5 x 1⁄1 5 x 2⁄1 10 x 1⁄1 10 x 2⁄1preheat 20 mm
Vegetables pre-cooked, add butter grid or 3 x 1⁄1 5 x 1⁄1 5 x 2⁄1 10 x 1⁄1 10 x 2⁄1dishes before serving 20 mm
Canned vegetables bear in mind the grid or 3 x 1⁄1 5 x 1⁄1 5 x 2⁄1 10 x 1⁄1 10 x 2⁄1size of cans 20 mm
Vegetable cassoroles distribute out evenly 40 mm or 3 x 1⁄1 5 x 1⁄1 5 x 2⁄1 10 x 1⁄1 20 x 2⁄165 mm granite
Vegetable flan grease form well, load with foil or grid or 3 x 1⁄1 5 x 1⁄1 5 x 2⁄1 10 x 1⁄1 10 x 2⁄1cover with GN-containers 20 mm
Cabbage rolls blanch cabbage leaves, 65 mm perf. 3 x 1⁄1 5 x 1⁄1 5 x 2⁄1 10 x 1⁄1 10 x 2⁄1preheat
Farmers omelette distribute the mixture evenly 40 mm or 3 x 1⁄1 5 x 1⁄1 5 x 2⁄1 10 x 1⁄1 20 x 2⁄1approx. 1 – 2 cm under the rim 65 mm granite
Soaked grain prepare cold, leave to soak, shortens 40 mm or 6 x 1⁄1 10 x 1⁄1 10 x 2⁄1 20 x 1⁄1 20 x 2⁄1cooking time 65 mm granite
Whole food bear in mind the various 40 mm or 3 x 1⁄1 5 x 1⁄1 5 x 2⁄1 10 x 1⁄1 20 x 2⁄1casseroles soaking times 65 mm granite
Moussaka fill till approx. 2 cm under the rim 40 mm or 3 x 1⁄1 5 x 1⁄1 5 x 2⁄1 10 x 1⁄1 20 x 2⁄165 mm granite
Vacuum cooking sliced, one or more grid 6 x 1⁄1 10 x 1⁄1 10 x 2⁄1 20 x 1⁄1 20 x 2⁄1 carrots, fennel portion bags
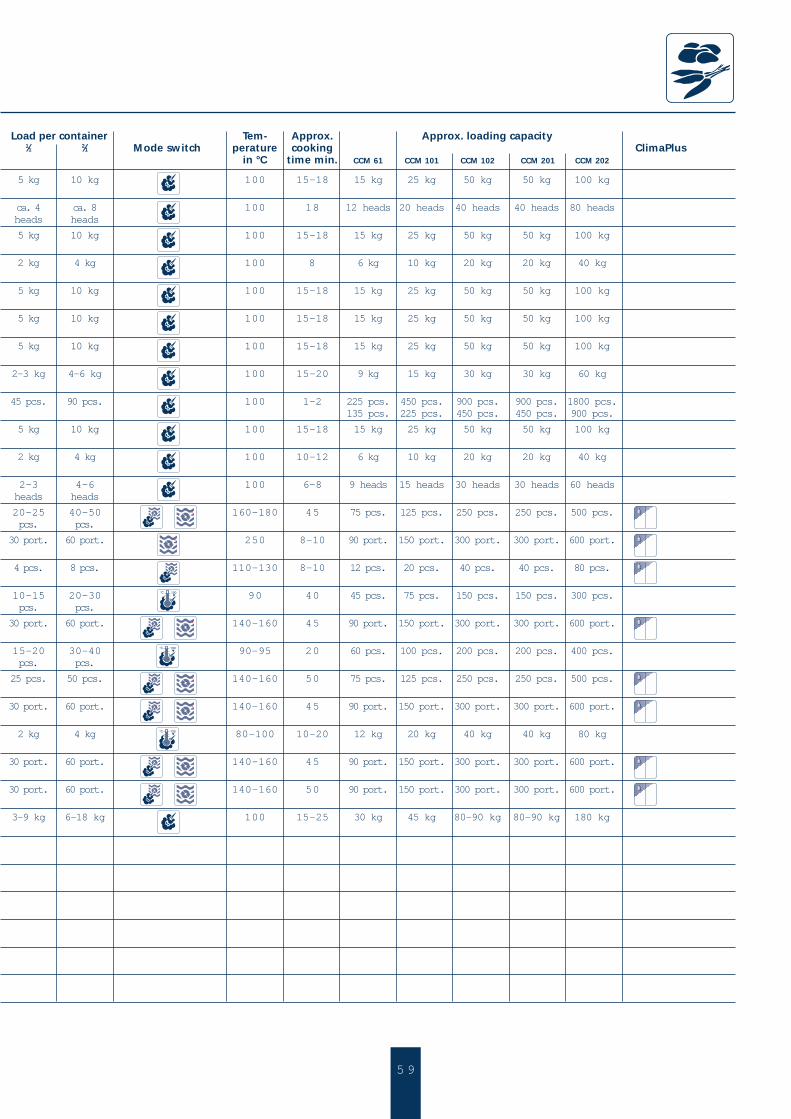
5 9
Load per container Tem- Approx. Approx. loading capacity1⁄1 2⁄1 Mode switch perature cooking ClimaPlus
in °C time min. CCM 61 CCM 101 CCM 102 CCM 201 CCM 202
5 kg 10 kg 100 15–18 15 kg 25 kg 50 kg 50 kg 100 kg
ca. 4 ca. 8 100 18 12 heads 20 heads 40 heads 40 heads 80 headsheads heads
5 kg 10 kg 100 15–18 15 kg 25 kg 50 kg 50 kg 100 kg
2 kg 4 kg 100 8 6 kg 10 kg 20 kg 20 kg 40 kg
5 kg 10 kg 100 15–18 15 kg 25 kg 50 kg 50 kg 100 kg
5 kg 10 kg 100 15–18 15 kg 25 kg 50 kg 50 kg 100 kg
5 kg 10 kg 100 15–18 15 kg 25 kg 50 kg 50 kg 100 kg
2–3 kg 4–6 kg 100 15–20 9 kg 15 kg 30 kg 30 kg 60 kg
45 pcs. 90 pcs. 100 1–2 225 pcs. 450 pcs. 900 pcs. 900 pcs. 1800 pcs.135 pcs. 225 pcs. 450 pcs. 450 pcs. 900 pcs.
5 kg 10 kg 100 15–18 15 kg 25 kg 50 kg 50 kg 100 kg
2 kg 4 kg 100 10–12 6 kg 10 kg 20 kg 20 kg 40 kg
2–3 4–6 100 6–8 9 heads 15 heads 30 heads 30 heads 60 headsheads heads
20–25 40–50 160–180 45 75 pcs. 125 pcs. 250 pcs. 250 pcs. 500 pcs.pcs. pcs.
30 port. 60 port. 250 8–10 90 port. 150 port. 300 port. 300 port. 600 port.
4 pcs. 8 pcs. 110–130 8–10 12 pcs. 20 pcs. 40 pcs. 40 pcs. 80 pcs.
10–15 20–30 90 40 45 pcs. 75 pcs. 150 pcs. 150 pcs. 300 pcs.pcs. pcs.
30 port. 60 port. 140–160 45 90 port. 150 port. 300 port. 300 port. 600 port.
15–20 30–40 90–95 20 60 pcs. 100 pcs. 200 pcs. 200 pcs. 400 pcs.pcs. pcs.
25 pcs. 50 pcs. 140–160 50 75 pcs. 125 pcs. 250 pcs. 250 pcs. 500 pcs.
30 port. 60 port. 140–160 45 90 port. 150 port. 300 port. 300 port. 600 port.
2 kg 4 kg 80–100 10–20 12 kg 20 kg 40 kg 40 kg 80 kg
30 port. 60 port. 140–160 45 90 port. 150 port. 300 port. 300 port. 600 port.
30 port. 60 port. 140–160 50 90 port. 150 port. 300 port. 300 port. 600 port.
3–9 kg 6–18 kg 100 15–25 30 kg 45 kg 80–90 kg 80–90 kg 180 kg
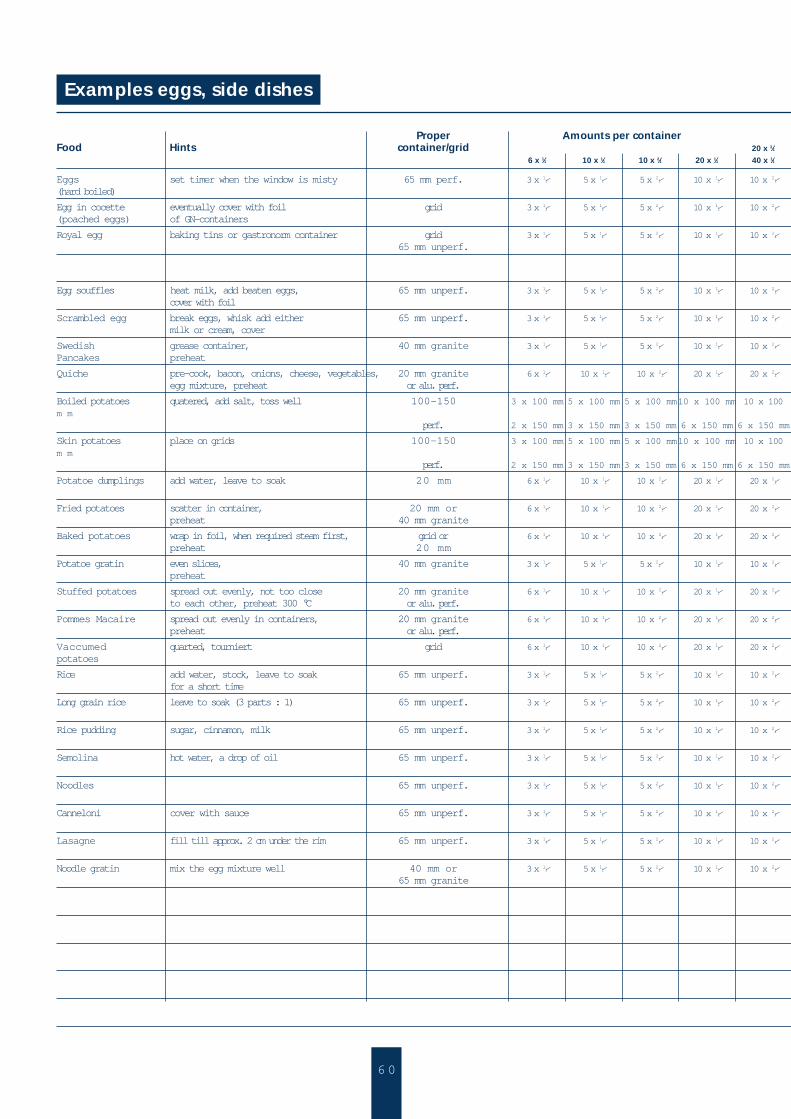
6 0
Examples eggs, side dishes
Proper Amounts per containerFood Hints container/grid 20 x 2⁄1
6 x 1⁄1 10 x 1⁄1 10 x 2⁄1 20 x 1⁄1 40 x 1⁄1
Eggs set timer when the window is misty 65 mm perf. 3 x 1⁄1 5 x 1⁄1 5 x 2⁄1 10 x 1⁄1 10 x 2⁄1(hard boiled)
Egg in cocette eventually cover with foil grid 3 x 1⁄1 5 x 1⁄1 5 x 2⁄1 10 x 1⁄1 10 x 2⁄1 (poached eggs) of GN-containers
Royal egg baking tins or gastronorm container grid 3 x 1⁄1 5 x 1⁄1 5 x 2⁄1 10 x 1⁄1 10 x 2⁄165 mm unperf.
Egg souffles heat milk, add beaten eggs, 65 mm unperf. 3 x 1⁄1 5 x 1⁄1 5 x 2⁄1 10 x 1⁄1 10 x 2⁄1cover with foil
Scrambled egg break eggs, whisk add either 65 mm unperf. 3 x 1⁄1 5 x 1⁄1 5 x 2⁄1 10 x 1⁄1 10 x 2⁄1milk or cream, cover
Swedish grease container, 40 mm granite 3 x 1⁄1 5 x 1⁄1 5 x 2⁄1 10 x 1⁄1 10 x 2⁄1Pancakes preheat
Quiche pre-cook, bacon, onions, cheese, vegetables, 20 mm granite 6 x 1⁄1 10 x 1⁄1 10 x 2⁄1 20 x 1⁄1 20 x 2⁄1egg mixture, preheat or alu. perf.
Boiled potatoes quatered, add salt, toss well 100–150 3 x 100 mm 5 x 100 mm 5 x 100 mm10 x 100 mm 10 x 100m m
perf. 2 x 150 mm 3 x 150 mm 3 x 150 mm 6 x 150 mm 6 x 150 mm
Skin potatoes place on grids 100–150 3 x 100 mm 5 x 100 mm 5 x 100 mm10 x 100 mm 10 x 100m m
perf. 2 x 150 mm 3 x 150 mm 3 x 150 mm 6 x 150 mm 6 x 150 mm
Potatoe dumplings add water, leave to soak 20 mm 6 x 1⁄1 10 x 1⁄1 10 x 2⁄1 20 x 1⁄1 20 x 2⁄1
Fried potatoes scatter in container, 20 mm or 6 x 1⁄1 10 x 1⁄1 10 x 2⁄1 20 x 1⁄1 20 x 2⁄1preheat 40 mm granite
Baked potatoes wrap in foil, when required steam first, grid or 6 x 1⁄1 10 x 1⁄1 10 x 2⁄1 20 x 1⁄1 20 x 2⁄1preheat 20 mm
Potatoe gratin even slices, 40 mm granite 3 x 1⁄1 5 x 1⁄1 5 x 2⁄1 10 x 1⁄1 10 x 2⁄1preheat
Stuffed potatoes spread out evenly, not too close 20 mm granite 6 x 1⁄1 10 x 1⁄1 10 x 2⁄1 20 x 1⁄1 20 x 2⁄1to each other, preheat 300 °C or alu. perf.
Pommes Macaire spread out evenly in containers, 20 mm granite 6 x 1⁄1 10 x 1⁄1 10 x 2⁄1 20 x 1⁄1 20 x 2⁄1preheat or alu. perf.
Vaccumed quarted, tourniert grid 6 x 1⁄1 10 x 1⁄1 10 x 2⁄1 20 x 1⁄1 20 x 2⁄1 potatoes
Rice add water, stock, leave to soak 65 mm unperf. 3 x 1⁄1 5 x 1⁄1 5 x 2⁄1 10 x 1⁄1 10 x 2⁄1for a short time
Long grain rice leave to soak (3 parts : 1) 65 mm unperf. 3 x 1⁄1 5 x 1⁄1 5 x 2⁄1 10 x 1⁄1 10 x 2⁄1
Rice pudding sugar, cinnamon, milk 65 mm unperf. 3 x 1⁄1 5 x 1⁄1 5 x 2⁄1 10 x 1⁄1 10 x 2⁄1
Semolina hot water, a drop of oil 65 mm unperf. 3 x 1⁄1 5 x 1⁄1 5 x 2⁄1 10 x 1⁄1 10 x 2⁄1
Noodles 65 mm unperf. 3 x 1⁄1 5 x 1⁄1 5 x 2⁄1 10 x 1⁄1 10 x 2⁄1
Canneloni cover with sauce 65 mm unperf. 3 x 1⁄1 5 x 1⁄1 5 x 2⁄1 10 x 1⁄1 10 x 2⁄1
Lasagne fill till approx. 2 cm under the rim 65 mm unperf. 3 x 1⁄1 5 x 1⁄1 5 x 2⁄1 10 x 1⁄1 10 x 2⁄1
Noodle gratin mix the egg mixture well 40 mm or 3 x 1⁄1 5 x 1⁄1 5 x 2⁄1 10 x 1⁄1 10 x 2⁄165 mm granite

6 1
Load per container Tem- Approx. Approx. loading capacity1⁄1 2⁄1 Mode switch perature cooking ClimaPlus
in °C time min. CCM 61 CCM 101 CCM 102 CCM 201 CCM 202
60–100 120–200 100 10–12 300 pcs. 500 pcs. 1000 pcs. 1000 pcs. 2000 pcs.pcs. pcs.
20 pcs. 40 pcs. 90 6–8 60 pcs. 100 pcs. 200 pcs. 200 pcs. 400 pcs.
4 Litre 8 Litre 85 30 12 Litre 20 Litre 40 Litre 40 Litre 80 Litre
4 Litre 8 Litre 90 20 12 Litre 20 Litre 40 Litre 40 Litre 80 Litre
4 Litre 8 Litre 90 20 12 Litre 20 Litre 40 Litre 40 Litre 80 Litre
2 Litre 4 Litre 200 20–25 6 Litre 10 Litre 20 Litre 20 Litre 40 Litre
10 pcs. 20 pcs. 180–200 20–25 60 pcs. 100 pcs. 200 pcs. 200 pcs. 400 pcs.
8–14 kg 16–28 kg 100 25–30 24 kg 42 kg 80–90 80–90 160–180kg kg kg
6–12 kg 14–24 kg 100–130 30–40 18 kg 36 kg 60–72 60–72 120–154kg kg kg
30 pcs. 60 pcs. 100 15 180 pcs. 300 pcs. 600 pcs. 600 pcs. 1200 pcs.
2 kg 4 kg 230 15 12 kg 20 kg 40 kg 40 kg 80 kg
20 pcs. 40 pcs. 180–200 30–40 120 pcs. 200 pcs. 400 pcs. 400 pcs. 800 pcs.
30 port. 60 port. 150–170 35–40 90 port. 150 port. 300 port. 300 port. 600 port.
30 port. 60 port. 200 15–18 180 port. 300 port. 600 port. 600 port. 1200 port.
40 pcs. 80 pcs. 200–220 15–18 240 pcs. 400 pcs. 800 pcs. 800 pcs. 1600 pcs.
4–4,5 kg 8–9 kg 100 25–30 20–25 kg 40–50 kg 80–90 kg 80–90 kg 180 kg
2 kg 4 kg 100 25 6 kg 10 kg 20 kg 20 kg 40 kg
2 kg 4 kg 100 45 6 kg 10 kg 20 kg 20 kg 40 kg
2 kg 4 kg 90–100 35–40 6 kg 10 kg 20 kg 20 kg 40 kg
2 kg 4 kg 100 20–25 6 kg 10 kg 20 kg 20 kg 40 kg
2 kg 4 kg 100 10 6 kg 10 kg 20 kg 20 kg 40 kg
30 port. 60 port. 150 30–35 90 port. 150 port. 300 port. 300 port. 600 port.
20 port. 40 port. 140–160 35–40 60 port. 100 port. 200 port. 200 port. 400 port.
20 port. 40 port. 150–170 40 60 port. 100 port. 200 port. 200 port. 400 port.
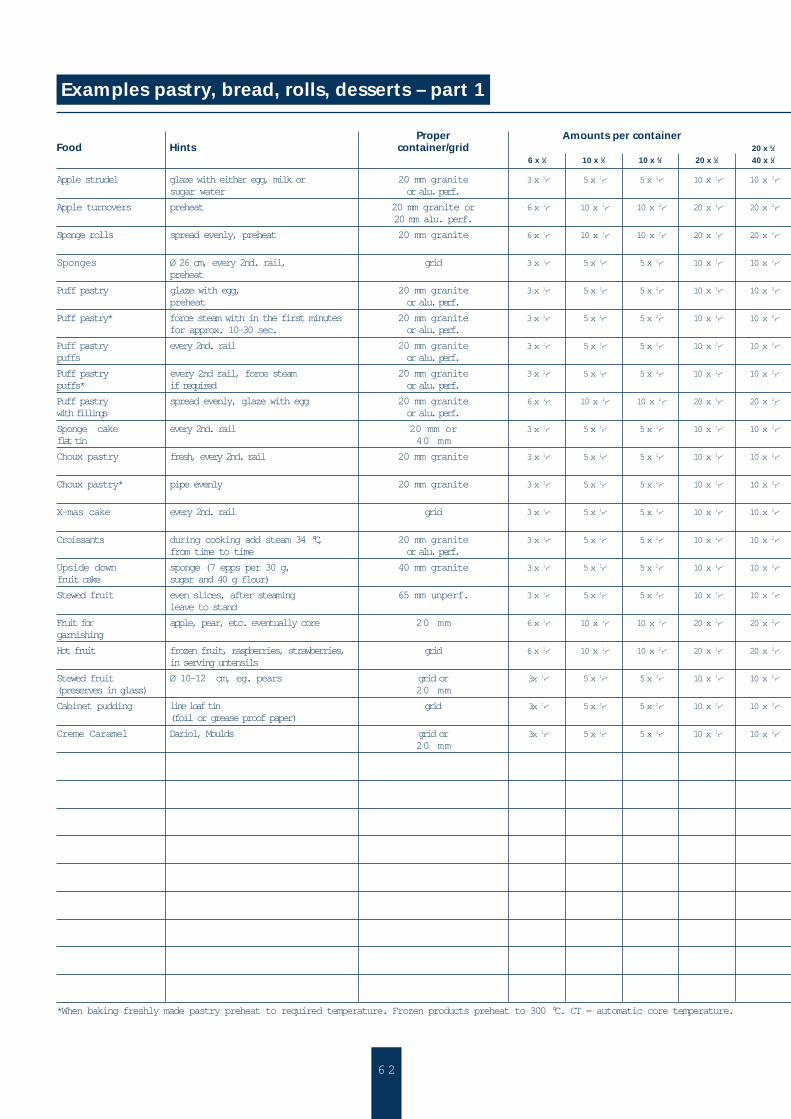
6 2
Examples pastry, bread, rolls, desserts – part 1
Proper Amounts per containerFood Hints container/grid 20 x 2⁄1
6 x 1⁄1 10 x 1⁄1 10 x 2⁄1 20 x 1⁄1 40 x 1⁄1
Apple strudel glaze with either egg, milk or 20 mm granite 3 x 1⁄1 5 x 1⁄1 5 x 2⁄1 10 x 1⁄1 10 x 2⁄1sugar water or alu. perf.
Apple turnovers preheat 20 mm granite or 6 x 1⁄1 10 x 1⁄1 10 x 2⁄1 20 x 1⁄1 20 x 2⁄120 mm alu. perf.
Sponge rolls spread evenly, preheat 20 mm granite 6 x 1⁄1 10 x 1⁄1 10 x 2⁄1 20 x 1⁄1 20 x 2⁄1
Sponges Ø 26 cm, every 2nd. rail, grid 3 x 1⁄1 5 x 1⁄1 5 x 2⁄1 10 x 1⁄1 10 x 2⁄1 preheat
Puff pastry glaze with egg, 20 mm granite 3 x 1⁄1 5 x 1⁄1 5 x 2⁄1 10 x 1⁄1 10 x 2⁄1preheat or alu. perf.
Puff pastry* force steam with in the first minutes 20 mm granite 3 x 1⁄1 5 x 1⁄1 5 x 2⁄1 10 x 1⁄1 10 x 2⁄1for approx. 10–30 sec. or alu. perf.
Puff pastry every 2nd. rail 20 mm granite 3 x 1⁄1 5 x 1⁄1 5 x 2⁄1 10 x 1⁄1 10 x 2⁄1puffs or alu. perf.
Puff pastry every 2nd rail, force steam 20 mm granite 3 x 1⁄1 5 x 1⁄1 5 x 2⁄1 10 x 1⁄1 10 x 2⁄1puffs* if required or alu. perf.
Puff pastry spread evenly, glaze with egg 20 mm granite 6 x 1⁄1 10 x 1⁄1 10 x 2⁄1 20 x 1⁄1 20 x 2⁄1with fillings or alu. perf.
Sponge cake every 2nd. rail 20 mm or 3 x 1⁄1 5 x 1⁄1 5 x 2⁄1 10 x 1⁄1 10 x 2⁄1flat tin 40 mm
Choux pastry fresh, every 2nd. rail 20 mm granite 3 x 1⁄1 5 x 1⁄1 5 x 2⁄1 10 x 1⁄1 10 x 2⁄1
Choux pastry* pipe evenly 20 mm granite 3 x 1⁄1 5 x 1⁄1 5 x 2⁄1 10 x 1⁄1 10 x 2⁄1
X-mas cake every 2nd. rail grid 3 x 1⁄1 5 x 1⁄1 5 x 2⁄1 10 x 1⁄1 10 x 2⁄1
Croissants during cooking add steam 34 °C, 20 mm granite 3 x 1⁄1 5 x 1⁄1 5 x 2⁄1 10 x 1⁄1 10 x 2⁄1from time to time or alu. perf.
Upside down sponge (7 epps per 30 g, 40 mm granite 3 x 1⁄1 5 x 1⁄1 5 x 2⁄1 10 x 1⁄1 10 x 2⁄1fruit cake sugar and 40 g flour)
Stewed fruit even slices, after steaming 65 mm unperf. 3 x 1⁄1 5 x 1⁄1 5 x 2⁄1 10 x 1⁄1 10 x 2⁄1leave to stand
Fruit for apple, pear, etc. eventually core 20 mm 6 x 1⁄1 10 x 1⁄1 10 x 2⁄1 20 x 1⁄1 20 x 2⁄1garnishing
Hot fruit frozen fruit, raspberries, strawberries, grid 6 x 1⁄1 10 x 1⁄1 10 x 2⁄1 20 x 1⁄1 20 x 2⁄1 in serving untensils
Stewed fruit Ø 10–12 cm, eg. pears grid or 3x 1⁄1 5 x 1⁄1 5 x 2⁄1 10 x 1⁄1 10 x 2⁄1(preserves in glass) 20 mm
Cabinet pudding line loaf tin grid 3x 1⁄1 5 x 1⁄1 5 x 2⁄1 10 x 1⁄1 10 x 2⁄1 (foil or grease proof paper)
Creme Caramel Dariol, Moulds grid or 3x 1⁄1 5 x 1⁄1 5 x 2⁄1 10 x 1⁄1 10 x 2⁄120 mm
*When baking freshly made pastry preheat to required temperature. Frozen products preheat to 300 °C. CT = automatic core temperature.
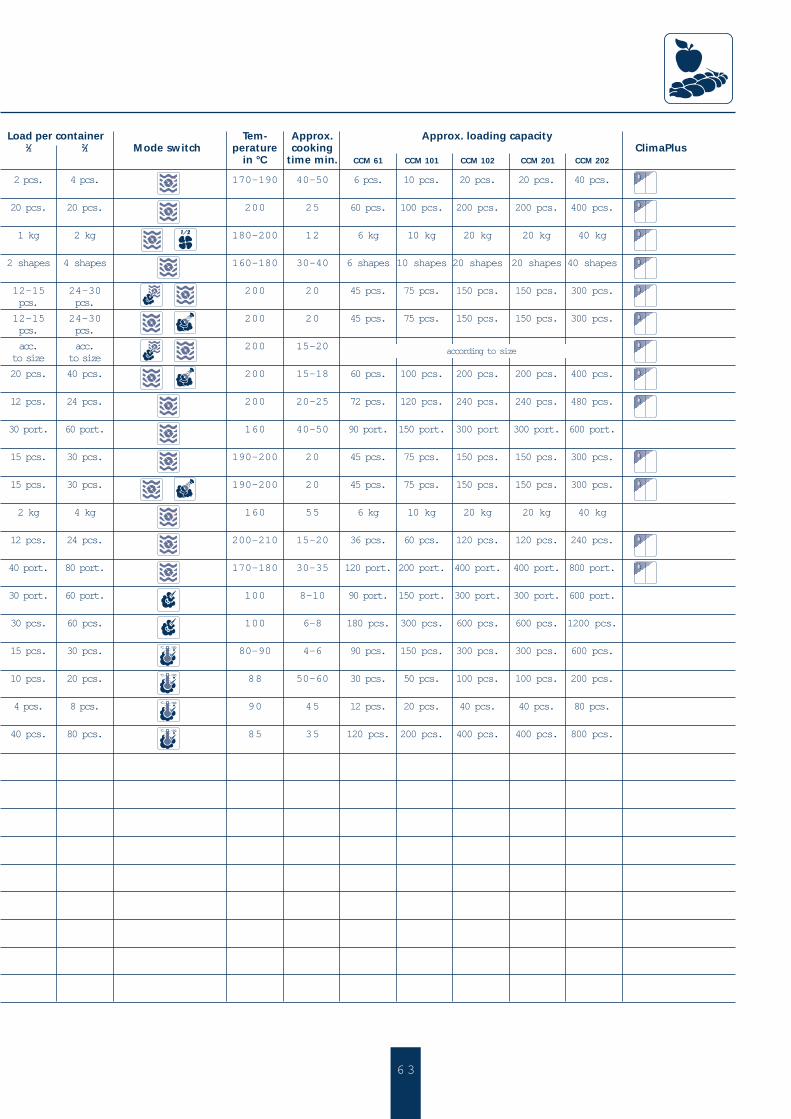
6 3
Load per container Tem- Approx. Approx. loading capacity1⁄1 2⁄1 Mode switch perature cooking ClimaPlus
in °C time min. CCM 61 CCM 101 CCM 102 CCM 201 CCM 202
2 pcs. 4 pcs. 170–190 40–50 6 pcs. 10 pcs. 20 pcs. 20 pcs. 40 pcs.
20 pcs. 20 pcs. 200 25 60 pcs. 100 pcs. 200 pcs. 200 pcs. 400 pcs.
1 kg 2 kg 180–200 12 6 kg 10 kg 20 kg 20 kg 40 kg
2 shapes 4 shapes 160–180 30–40 6 shapes 10 shapes 20 shapes 20 shapes 40 shapes
12–15 24–30 200 20 45 pcs. 75 pcs. 150 pcs. 150 pcs. 300 pcs.pcs. pcs.
12–15 24–30 200 20 45 pcs. 75 pcs. 150 pcs. 150 pcs. 300 pcs.pcs. pcs.
acc. acc. 200 15–20to size to size
20 pcs. 40 pcs. 200 15–18 60 pcs. 100 pcs. 200 pcs. 200 pcs. 400 pcs.
12 pcs. 24 pcs. 200 20–25 72 pcs. 120 pcs. 240 pcs. 240 pcs. 480 pcs.
30 port. 60 port. 160 40–50 90 port. 150 port. 300 port 300 port. 600 port.
15 pcs. 30 pcs. 190–200 20 45 pcs. 75 pcs. 150 pcs. 150 pcs. 300 pcs.
15 pcs. 30 pcs. 190–200 20 45 pcs. 75 pcs. 150 pcs. 150 pcs. 300 pcs.
2 kg 4 kg 160 55 6 kg 10 kg 20 kg 20 kg 40 kg
12 pcs. 24 pcs. 200–210 15–20 36 pcs. 60 pcs. 120 pcs. 120 pcs. 240 pcs.
40 port. 80 port. 170–180 30–35 120 port. 200 port. 400 port. 400 port. 800 port.
30 port. 60 port. 100 8–10 90 port. 150 port. 300 port. 300 port. 600 port.
30 pcs. 60 pcs. 100 6–8 180 pcs. 300 pcs. 600 pcs. 600 pcs. 1200 pcs.
15 pcs. 30 pcs. 80–90 4–6 90 pcs. 150 pcs. 300 pcs. 300 pcs. 600 pcs.
10 pcs. 20 pcs. 88 50–60 30 pcs. 50 pcs. 100 pcs. 100 pcs. 200 pcs.
4 pcs. 8 pcs. 90 45 12 pcs. 20 pcs. 40 pcs. 40 pcs. 80 pcs.
40 pcs. 80 pcs. 85 35 120 pcs. 200 pcs. 400 pcs. 400 pcs. 800 pcs.
according to size
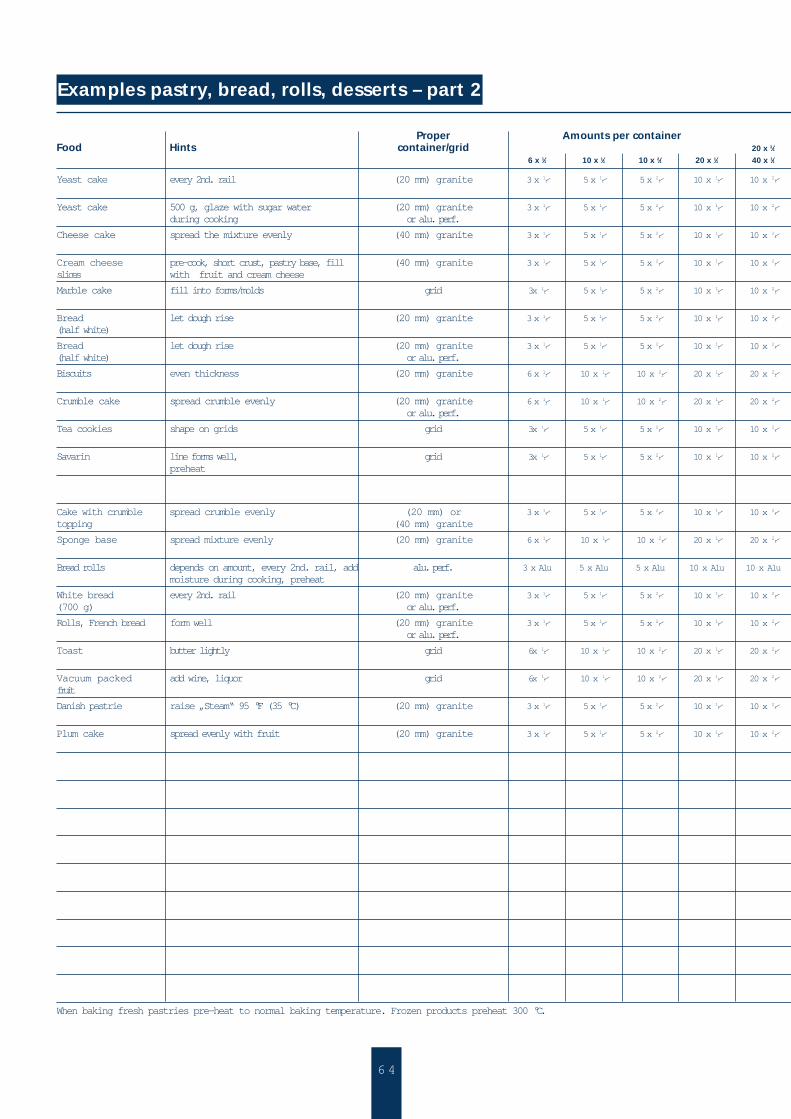
6 4
Examples pastry, bread, rolls, desserts – part 2
Proper Amounts per containerFood Hints container/grid 20 x 2⁄1
6 x 1⁄1 10 x 1⁄1 10 x 2⁄1 20 x 1⁄1 40 x 1⁄1
Yeast cake every 2nd. rail (20 mm) granite 3 x 1⁄1 5 x 1⁄1 5 x 2⁄1 10 x 1⁄1 10 x 2⁄1
Yeast cake 500 g, glaze with sugar water (20 mm) granite 3 x 1⁄1 5 x 1⁄1 5 x 2⁄1 10 x 1⁄1 10 x 2⁄1during cooking or alu. perf.
Cheese cake spread the mixture evenly (40 mm) granite 3 x 1⁄1 5 x 1⁄1 5 x 2⁄1 10 x 1⁄1 10 x 2⁄1
Cream cheese pre-cook, short crust, pastry base, fill (40 mm) granite 3 x 1⁄1 5 x 1⁄1 5 x 2⁄1 10 x 1⁄1 10 x 2⁄1slices with fruit and cream cheese
Marble cake fill into forms/molds grid 3x 1⁄1 5 x 1⁄1 5 x 2⁄1 10 x 1⁄1 10 x 2⁄1
Bread let dough rise (20 mm) granite 3 x 1⁄1 5 x 1⁄1 5 x 2⁄1 10 x 1⁄1 10 x 2⁄1(half white)
Bread let dough rise (20 mm) granite 3 x 1⁄1 5 x 1⁄1 5 x 2⁄1 10 x 1⁄1 10 x 2⁄1(half white) or alu. perf.
Biscuits even thickness (20 mm) granite 6 x 1⁄1 10 x 1⁄1 10 x 2⁄1 20 x 1⁄1 20 x 2⁄1
Crumble cake spread crumble evenly (20 mm) granite 6 x 1⁄1 10 x 1⁄1 10 x 2⁄1 20 x 1⁄1 20 x 2⁄1or alu. perf.
Tea cookies shape on grids grid 3x 1⁄1 5 x 1⁄1 5 x 2⁄1 10 x 1⁄1 10 x 2⁄1
Savarin line forms well, grid 3x 1⁄1 5 x 1⁄1 5 x 2⁄1 10 x 1⁄1 10 x 2⁄1 preheat
Cake with crumble spread crumble evenly (20 mm) or 3 x 1⁄1 5 x 1⁄1 5 x 2⁄1 10 x 1⁄1 10 x 2⁄1topping (40 mm) granite
Sponge base spread mixture evenly (20 mm) granite 6 x 1⁄1 10 x 1⁄1 10 x 2⁄1 20 x 1⁄1 20 x 2⁄1
Bread rolls depends on amount, every 2nd. rail, add alu. perf. 3 x Alu 5 x Alu 5 x Alu 10 x Alu 10 x Alumoisture during cooking, preheat
White bread every 2nd. rail (20 mm) granite 3 x 1⁄1 5 x 1⁄1 5 x 2⁄1 10 x 1⁄1 10 x 2⁄1(700 g) or alu. perf.
Rolls, French bread form well (20 mm) granite 3 x 1⁄1 5 x 1⁄1 5 x 2⁄1 10 x 1⁄1 10 x 2⁄1or alu. perf.
Toast butter lightly grid 6x 1⁄1 10 x 1⁄1 10 x 2⁄1 20 x 1⁄1 20 x 2⁄1
Vacuum packed add wine, liquor grid 6x 1⁄1 10 x 1⁄1 10 x 2⁄1 20 x 1⁄1 20 x 2⁄1 fruit
Danish pastrie raise „Steam“ 95 °F (35 °C) (20 mm) granite 3 x 1⁄1 5 x 1⁄1 5 x 2⁄1 10 x 1⁄1 10 x 2⁄1
Plum cake spread evenly with fruit (20 mm) granite 3 x 1⁄1 5 x 1⁄1 5 x 2⁄1 10 x 1⁄1 10 x 2⁄1
When baking fresh pastries pre-heat to normal baking temperature. Frozen products preheat 300 °C.

6 5
Load per container Tem- Approx. Approx. loading capacity1⁄1 2⁄1 Mode switch perature cooking ClimaPlus
in °C time min. CCM 61 CCM 101 CCM 102 CCM 201 CCM 202
2 kg 4 kg 160–180 20–25 6 kg 10 kg 20 kg 20 kg 40 kg
2 pcs. 4 pcs. 180 30–35 6 pcs. 10 pcs. 20 pcs. 20 pcs. 40 pcs.
40 port. 80 port. 140–160 50–60 120 port. 200 port. 400 port. 400 port. 800 port.
50 port. 100 port. 150–170 35–40 150 port. 250 port. 500 port. 500 port. 1000 port.
4 shapes 8 shapes 160 45 12 shapes 20 shapes 40 shapes 40 shapes 80 shapes
3 pcs. 6 pcs. 160-180 75–85 9 pcs. 15 pcs. 30 pcs. 30 pcs. 60 pcs.
3 pcs. 6 pcs. 160-180 75–85 9 pcs. 15 pcs. 30 pcs. 30 pcs. 60 pcs.
24 pcs. 48 pcs. 160-200 12–15 144 pcs. 240 pcs. 480 pcs. 480 pcs. 960 pcs.
10 pcs. 20 pcs. 170-180 16–18 60 pcs. 100 pcs. 200 pcs 200 pcs. 400 pcs.
4 pcs. 8 pcs. 160-180 40–60 12 pcs. 20 pcs. 40 pcs. 40 pcs. 80 pcs.
10 pcs. 20 pcs. 190 10–12 30 pcs. 50 pcs. 100 pcs. 100 pcs. 200 pcs.
40 port. 80 port. 160–180 30–35 120 port. 200 port. 400 port. 400 port. 800 port.
180 10–12
15 pcs. 30 pcs. 170 17 45 pcs. 75 pcs. 150 pcs. 150 pcs. 300 pcs.
4 pcs. 8 pcs. 180–200 30–40 12 pcs. 20 pcs. 40 pcs. 40 pcs. 80 pcs.
15–20 30–40 160–180 6–8 60 pcs. 100 pcs. 200 pcs. 200 pcs. 400 pcs.pcs. pcs.
15–18 30–36 250 5 108 pcs. 180 pcs. 360 pcs. 360 pcs. 720 pcs.pcs. pcs.
4 kg 8 kg 80–100 20–30 24 kg 40 kg 80 kg 80 kg 160 kg
12 pcs. 24 pcs. 200 10 36 pcs. 60 pcs. 120 pcs. 120 pcs. 240 pcs.
30 port. 60 port. 160 35 90 port. 150 port. 300 port. 300 port. 600 port.
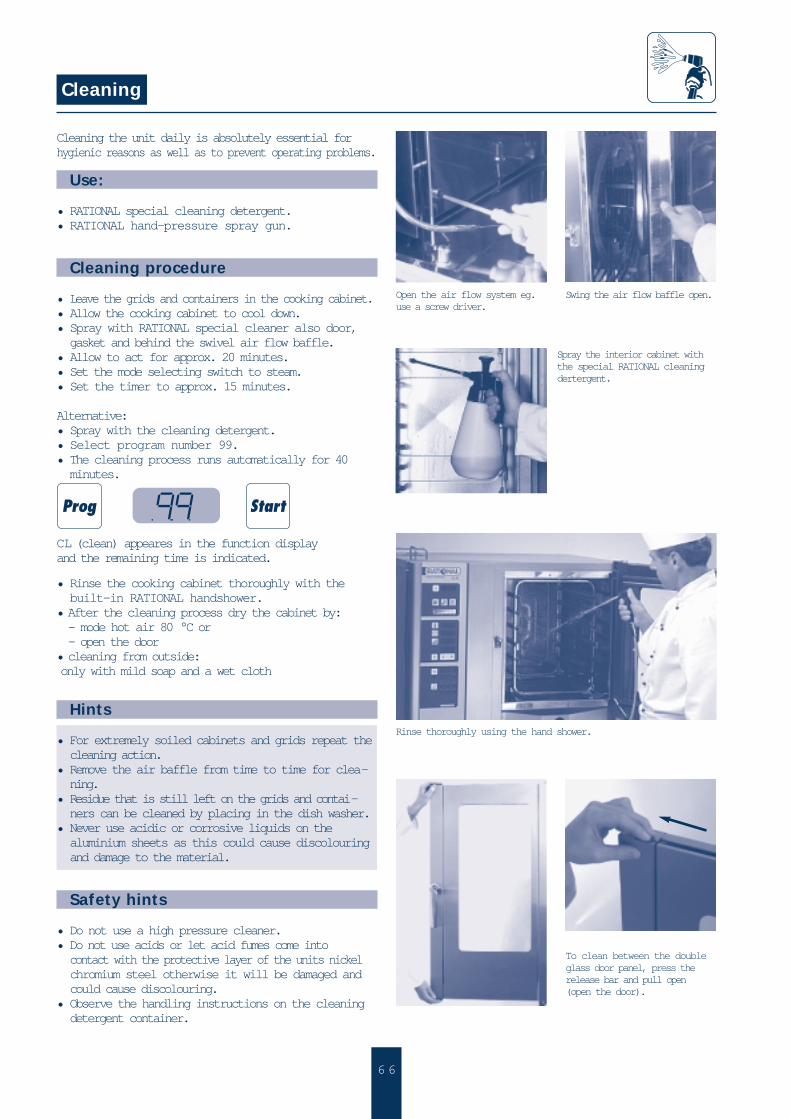
6 6
Cleaning
Cleaning the unit daily is absolutely essential forhygienic reasons as well as to prevent operating problems.
Use:
• RATIONAL special cleaning detergent.• RATIONAL hand-pressure spray gun.
Cleaning procedure
• Leave the grids and containers in the cooking cabinet.• Allow the cooking cabinet to cool down.• Spray with RATIONAL special cleaner also door,gasket and behind the swivel air flow baffle.
• Allow to act for approx. 20 minutes.• Set the mode selecting switch to steam.• Set the timer to approx. 15 minutes.
Alternative:• Spray with the cleaning detergent.• Select program number 99.• The cleaning process runs automatically for 40minutes.
CL (clean) appeares in the function displayand the remaining time is indicated.
• Rinse the cooking cabinet thoroughly with thebuilt-in RATIONAL handshower.
• After the cleaning process dry the cabinet by:– mode hot air 80 °C or– open the door
• cleaning from outside:only with mild soap and a wet cloth
Hints
• For extremely soiled cabinets and grids repeat thecleaning action.
• Remove the air baffle from time to time for clea-ning.
• Residue that is still left on the grids and contai-ners can be cleaned by placing in the dish washer.
• Never use acidic or corrosive liquids on thealuminium sheets as this could cause discolouringand damage to the material.
Safety hints
• Do not use a high pressure cleaner.• Do not use acids or let acid fumes come into contact with the protective layer of the units nickel chromium steel otherwise it will be damaged and could cause discolouring.
• Observe the handling instructions on the cleaning detergent container.
Spray the interior cabinet withthe special RATIONAL cleaningdertergent.
Open the air flow system eg.use a screw driver.
Swing the air flow baffle open.
Rinse thoroughly using the hand shower.
To clean between the doubleglass door panel, press therelease bar and pull open(open the door).
6 7
Descaling
RATIONAL Steam Generatorwith SC Automatic
The SC-Automatic reduces significantly the need forregular descaling of the steam generator.
SC Self clean
The steam generator is drained and flushed at certaintime intervals at least once a day and the scaledeposits are discharged before they can form asediment. As our experience proves, a yearly descalingis sufficient in most of the case. The frequency of thedescaling however strongly depends on the water hardness. We recommanda regular inspection of the steam generator and desca-ling as necessary. Please contact your local ServicePartner for more information.
Please bear in mind
Should some kind of interference occur the “WaterLow” display will start to flash. In this case checkthat water faucet leading to the unit is open or if thesoleniod valve is blocked. When the cause has beenremoved the unit will automatically restart. If thisdoes not happen after 3 minutes, call your localservice department.
Hints
For long periods of intermission (holidays etc.)drain the steam generator as follows:
• Close the door.
• Set the “Hot Air” mode.
• Set the temperature to 32°C.
• Open the door.
• Set the “Steaming” mode.
• The steam generator will be emptied.
• Stop emptyingmode selecting switch to “0”.
O
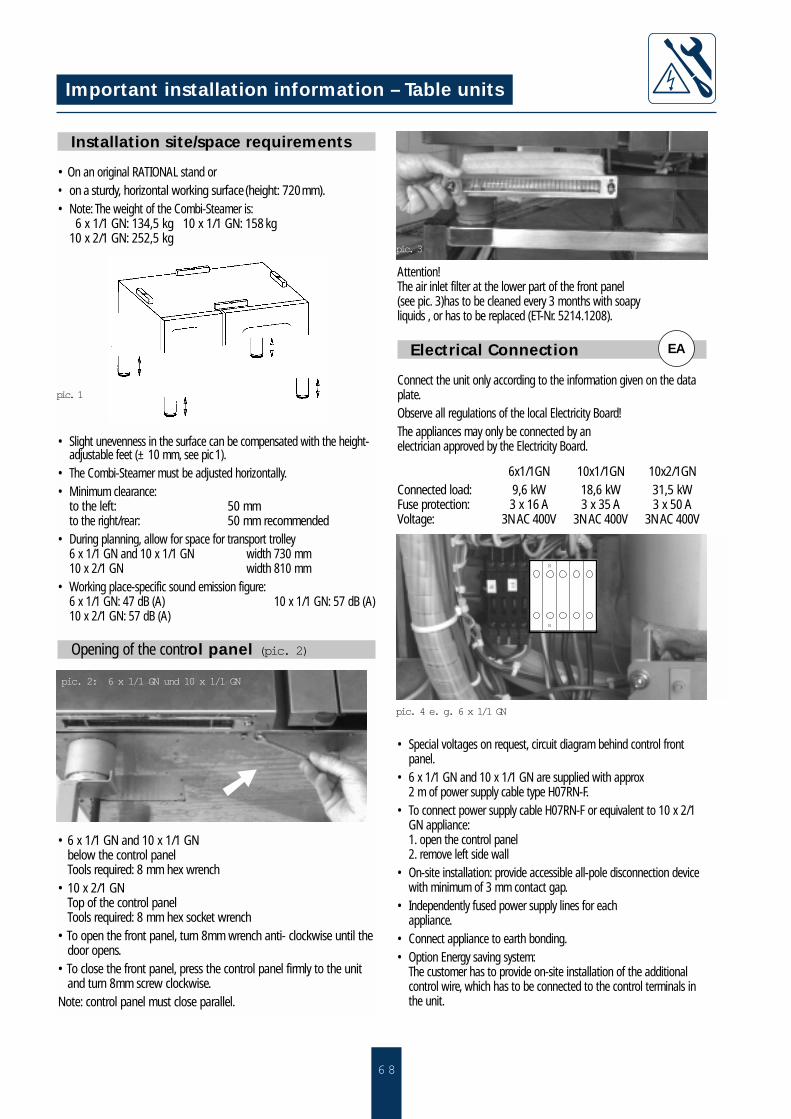
6 8
Important installation information – Table units
Installation site/space requirements
• On an original RATIONAL stand or• on a sturdy, horizontal working surface (height: 720mm).• Note: The weight of the Combi-Steamer is:
6 x 1/1 GN: 134,5 kg 10 x 1/1 GN: 158kg10 x 2/1 GN: 252,5 kg
• Slight unevenness in the surface can be compensated with the height-adjustable feet (± 10 mm, see pic1).
• The Combi-Steamer must be adjusted horizontally.• Minimum clearance:
to the left: 50 mm to the right/rear: 50 mm recommended
• During planning, allow for space for transport trolley6 x 1/1 GN and 10 x 1/1 GN width 730 mm10 x 2/1 GN width 810 mm
• Working place-specific sound emission figure:6 x 1/1 GN: 47 dB (A) 10 x 1/1 GN: 57 dB (A)10 x 2/1 GN: 57 dB (A)
Opening of the control panel (pic. 2)
• 6 x 1/1 GN and 10 x 1/1 GN below the control panelTools required: 8 mm hex wrench
• 10 x 2/1 GNTop of the control panelTools required: 8 mm hex socket wrench
• To open the front panel, turn 8mm wrench anti- clockwise until thedoor opens.
• To close the front panel, press the control panel firmly to the unitand turn 8mm screw clockwise.
Note: control panel must close parallel.
pic. 1
pic. 2: 6 x 1/1 GN und 10 x 1/1 GN
pic. 4 e. g. 6 x 1/1 GN
Attention!The air inlet filter at the lower part of the front panel (see pic. 3)has to be cleaned every 3 months with soapy liquids , or has to be replaced (ET-Nr. 5214.1208).
Electrical Connection
Connect the unit only according to the information given on the dataplate.Observe all regulations of the local Electricity Board!The appliances may only be connected by an electrician approved by the Electricity Board.
6x1/1GN 10x1/1GN 10x2/1GNConnected load: 9,6 kW 18,6 kW 31,5 kWFuse protection: 3 x 16 A 3 x 35 A 3 x 50 AVoltage: 3N AC 400V 3N AC 400V 3N AC 400V
• Special voltages on request, circuit diagram behind control frontpanel.
• 6 x 1/1 GN and 10 x 1/1 GN are supplied with approx 2 m of power supply cable type H07RN-F.
• To connect power supply cable H07RN-F or equivalent to 10 x 2/1GN appliance:1. open the control panel2. remove left side wall
• On-site installation: provide accessible all-pole disconnection devicewith minimum of 3 mm contact gap.
• Independently fused power supply lines for each appliance.
• Connect appliance to earth bonding.• Option Energy saving system:
The customer has to provide on-site installation of the additionalcontrol wire, which has to be connected to the control terminals inthe unit.
EA
N
N
pic. 3
➚
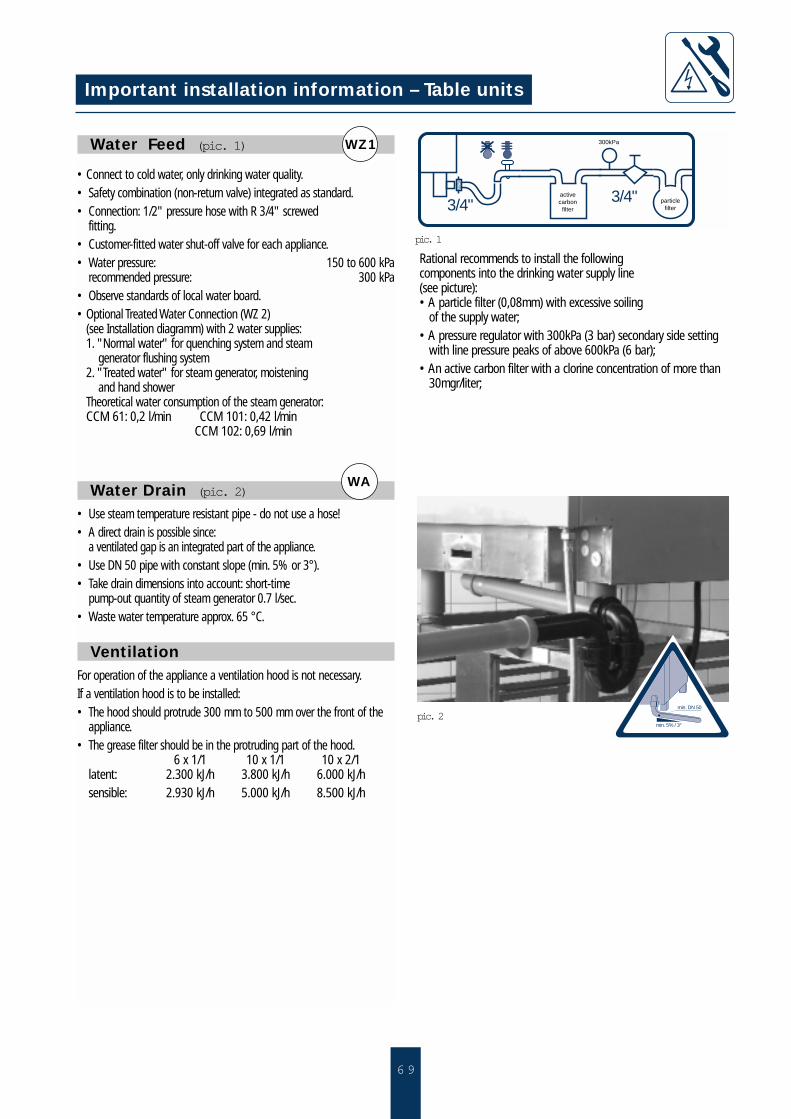
6 9
Important installation information – Table units
Water Feed (pic. 1)
• Connect to cold water, only drinking water quality.• Safety combination (non-return valve) integrated as standard.• Connection: 1/2" pressure hose with R 3/4" screwed
fitting.• Customer-fitted water shut-off valve for each appliance.• Water pressure: 150 to 600 kPa
recommended pressure: 300 kPa• Observe standards of local water board.• Optional Treated Water Connection (WZ 2)
(see Installation diagramm) with 2 water supplies:1. "Normal water" for quenching system and steam
generator flushing system2. "Treated water" for steam generator, moistening
and hand showerTheoretical water consumption of the steam generator:CCM 61: 0,2 l/min CCM 101: 0,42 l/min
CCM 102: 0,69 l/min
Water Drain (pic. 2)• Use steam temperature resistant pipe - do not use a hose!• A direct drain is possible since:
a ventilated gap is an integrated part of the appliance.• Use DN 50 pipe with constant slope (min. 5% or 3°).• Take drain dimensions into account: short-time
pump-out quantity of steam generator 0.7 l/sec.• Waste water temperature approx. 65 °C.
VentilationFor operation of the appliance a ventilation hood is not necessary.If a ventilation hood is to be installed:• The hood should protrude 300 mm to 500 mm over the front of the
appliance.• The grease filter should be in the protruding part of the hood.
6 x 1/1 10 x 1/1 10 x 2/1latent: 2.300 kJ/h 3.800 kJ/h 6.000 kJ/hsensible: 2.930 kJ/h 5.000 kJ/h 8.500 kJ/h
3/4" particlefilter
activecarbon
filter
300kPa
3/4"
pic. 1
pic. 2
WZ1
WA
Rational recommends to install the following components into the drinking water supply line (see picture):• A particle filter (0,08mm) with excessive soiling
of the supply water;• A pressure regulator with 300kPa (3 bar) secondary side setting
with line pressure peaks of above 600kPa (6 bar);• An active carbon filter with a clorine concentration of more than
30mgr/liter;
min. DN 50
min. 5% / 3°
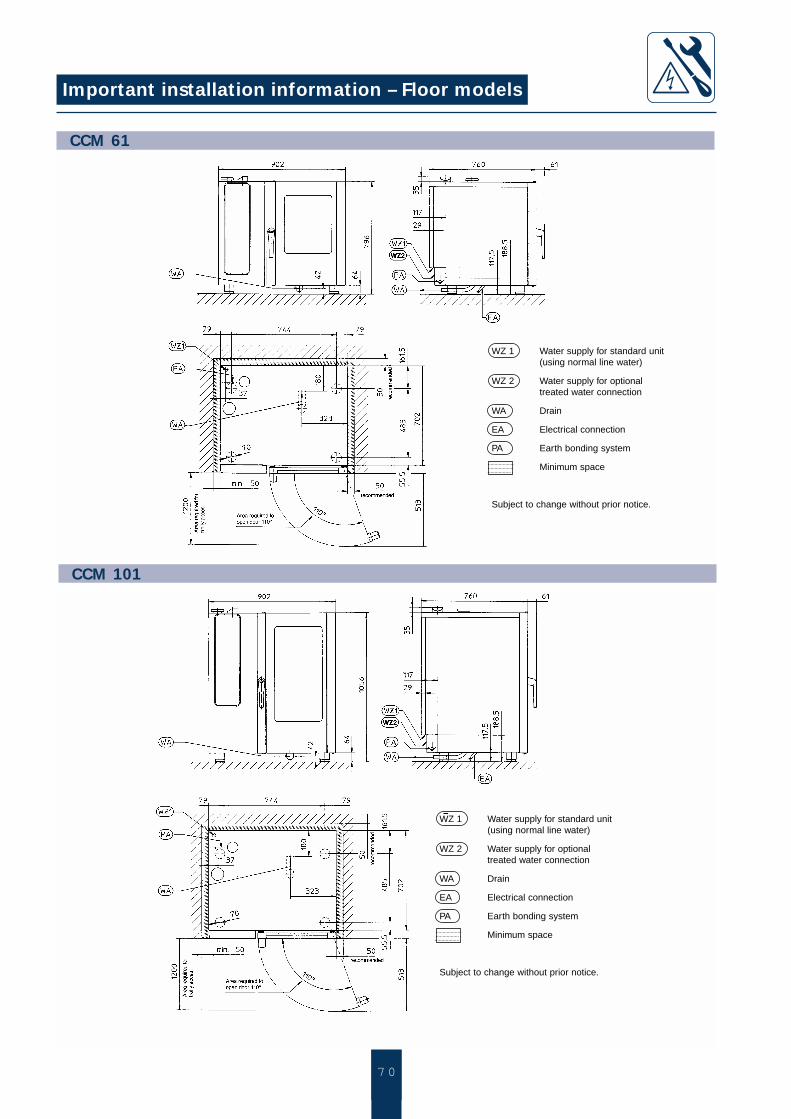
7 07 0
Important installation information – Floor models
WZ 1 Water supply for standard unit(using normal line water)
WZ 2 Water supply for optionaltreated water connection
WA Drain
EA Electrical connection
PA Earth bonding system
Minimum space
Subject to change without prior notice.
WZ 1 Water supply for standard unit(using normal line water)
WZ 2 Water supply for optionaltreated water connection
WA Drain
EA Electrical connection
PA Earth bonding system
Minimum space
Subject to change without prior notice.
CCM 101
CCM 61
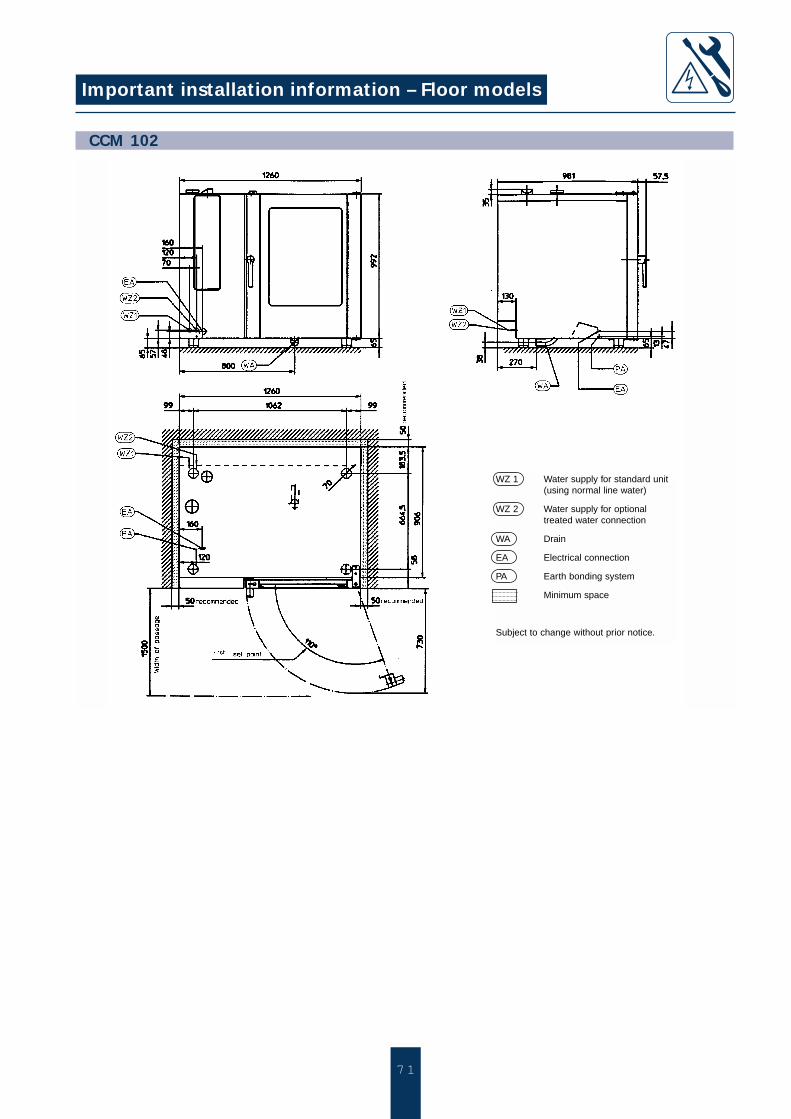
7 1
Important installation information – Floor models
CCM 102
WZ 1 Water supply for standard unit(using normal line water)
WZ 2 Water supply for optionaltreated water connection
WA Drain
EA Electrical connection
PA Earth bonding system
Minimum space
Subject to change without prior notice.
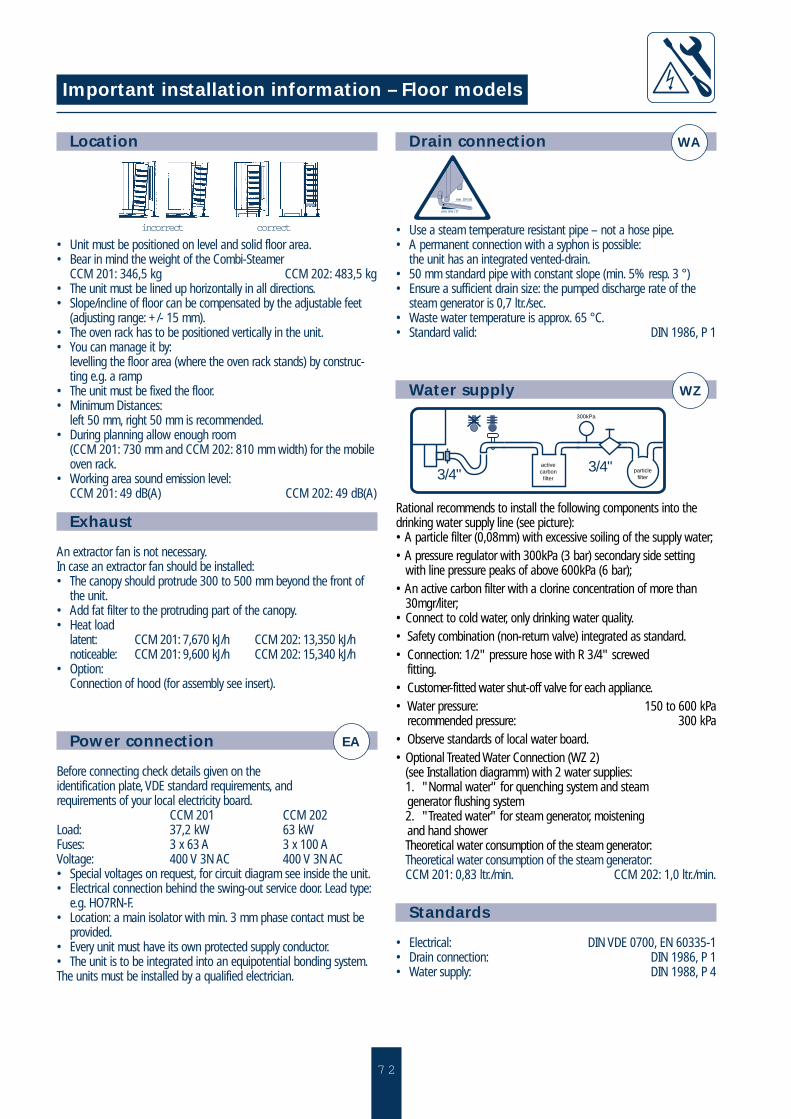
Location
• Unit must be positioned on level and solid floor area.• Bear in mind the weight of the Combi-Steamer
CCM 201: 346,5 kg CCM 202: 483,5 kg• The unit must be lined up horizontally in all directions.• Slope/incline of floor can be compensated by the adjustable feet
(adjusting range: +/- 15 mm).• The oven rack has to be positioned vertically in the unit.• You can manage it by:
levelling the floor area (where the oven rack stands) by construc-ting e.g. a ramp
• The unit must be fixed the floor.• Minimum Distances:
left 50 mm, right 50 mm is recommended.• During planning allow enough room
(CCM 201: 730 mm and CCM 202: 810 mm width) for the mobileoven rack.
• Working area sound emission level:CCM 201: 49 dB(A) CCM 202: 49 dB(A)
Exhaust
An extractor fan is not necessary.In case an extractor fan should be installed:• The canopy should protrude 300 to 500 mm beyond the front of
the unit.• Add fat filter to the protruding part of the canopy.• Heat load
latent: CCM 201: 7,670 kJ/h CCM 202: 13,350 kJ/hnoticeable: CCM 201: 9,600 kJ/h CCM 202: 15,340 kJ/h
• Option:Connection of hood (for assembly see insert).
Power connection
Before connecting check details given on the identification plate, VDE standard requirements, andrequirements of your local electricity board.
CCM 201 CCM 202Load: 37,2 kW 63 kWFuses: 3 x 63 A 3 x 100 AVoltage: 400 V 3N AC 400 V 3N AC• Special voltages on request, for circuit diagram see inside the unit.• Electrical connection behind the swing-out service door. Lead type:
e.g. HO7RN-F.• Location: a main isolator with min. 3 mm phase contact must be
provided.• Every unit must have its own protected supply conductor.• The unit is to be integrated into an equipotential bonding system.The units must be installed by a qualified electrician.
Drain connection
• Use a steam temperature resistant pipe – not a hose pipe.• A permanent connection with a syphon is possible:
the unit has an integrated vented-drain.• 50 mm standard pipe with constant slope (min. 5% resp. 3 °)• Ensure a sufficient drain size: the pumped discharge rate of the
steam generator is 0,7 ltr./sec.• Waste water temperature is approx. 65 °C.• Standard valid: DIN 1986, P 1
Water supply
Rational recommends to install the following components into thedrinking water supply line (see picture):• A particle filter (0,08mm) with excessive soiling of the supply water;• A pressure regulator with 300kPa (3 bar) secondary side setting
with line pressure peaks of above 600kPa (6 bar);• An active carbon filter with a clorine concentration of more than
30mgr/liter;• Connect to cold water, only drinking water quality.• Safety combination (non-return valve) integrated as standard.• Connection: 1/2" pressure hose with R 3/4" screwed
fitting.• Customer-fitted water shut-off valve for each appliance.• Water pressure: 150 to 600 kPa
recommended pressure: 300 kPa• Observe standards of local water board.• Optional Treated Water Connection (WZ 2)
(see Installation diagramm) with 2 water supplies:1. "Normal water" for quenching system and steam generator flushing system2. "Treated water" for steam generator, moistening and hand showerTheoretical water consumption of the steam generator:Theoretical water consumption of the steam generator:CCM 201: 0,83 ltr./min. CCM 202: 1,0 ltr./min.
Standards
• Electrical: DIN VDE 0700, EN 60335-1• Drain connection: DIN 1986, P 1• Water supply: DIN 1988, P 4
7 2
Important installation information – Floor models
min. DN 50
min. 5% / 3°
incorrect correct
EA
WA
WZ
3/4" particlefilter
activecarbon
filter
300kPa
3/4"
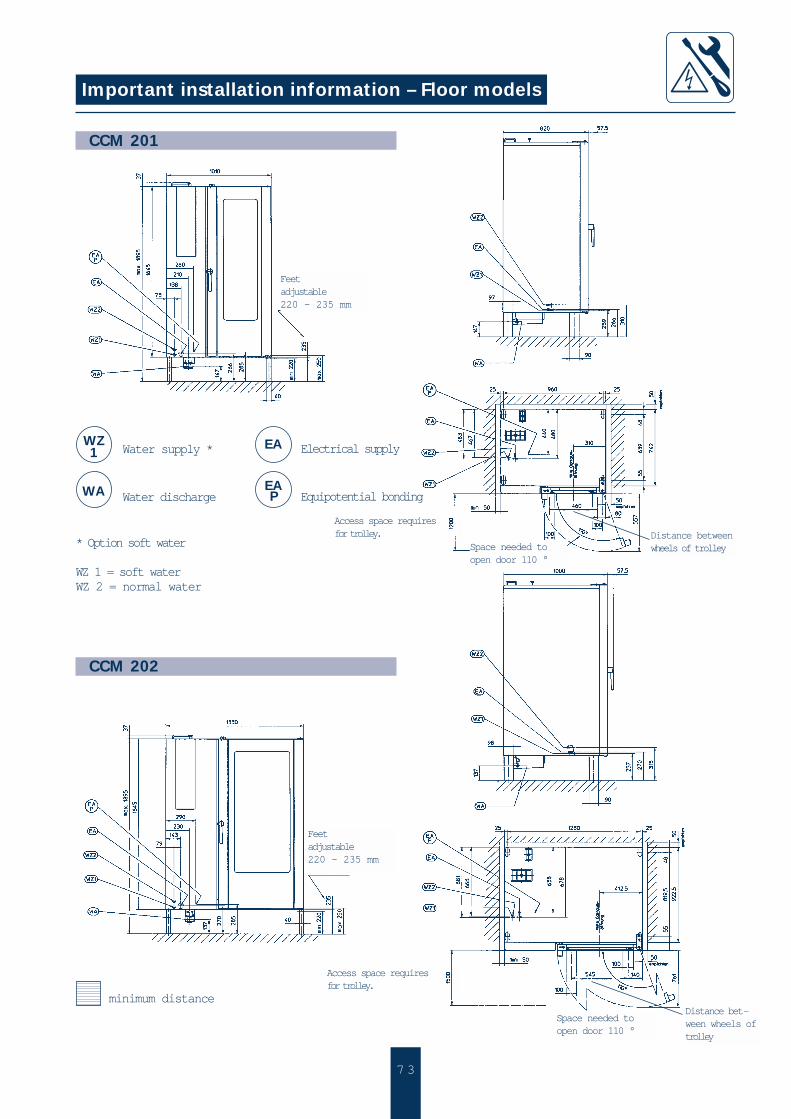
7 3
Important installation information – Floor models
CCM 201
CCM 202
minimum distance
Water supply *
Water discharge
WZ1
WA
EA
EAP
Electrical supply
Equipotential bonding
* Option soft water
WZ 1 = soft waterWZ 2 = normal water
Access space requiresfor trolley.
Space needed toopen door 110 °
Feetadjustable220 – 235 mm
Feetadjustable220 – 235 mm
Access space requiresfor trolley.
Space needed toopen door 110 °
Distance betweenwheels of trolley
Distance bet-ween wheels oftrolley
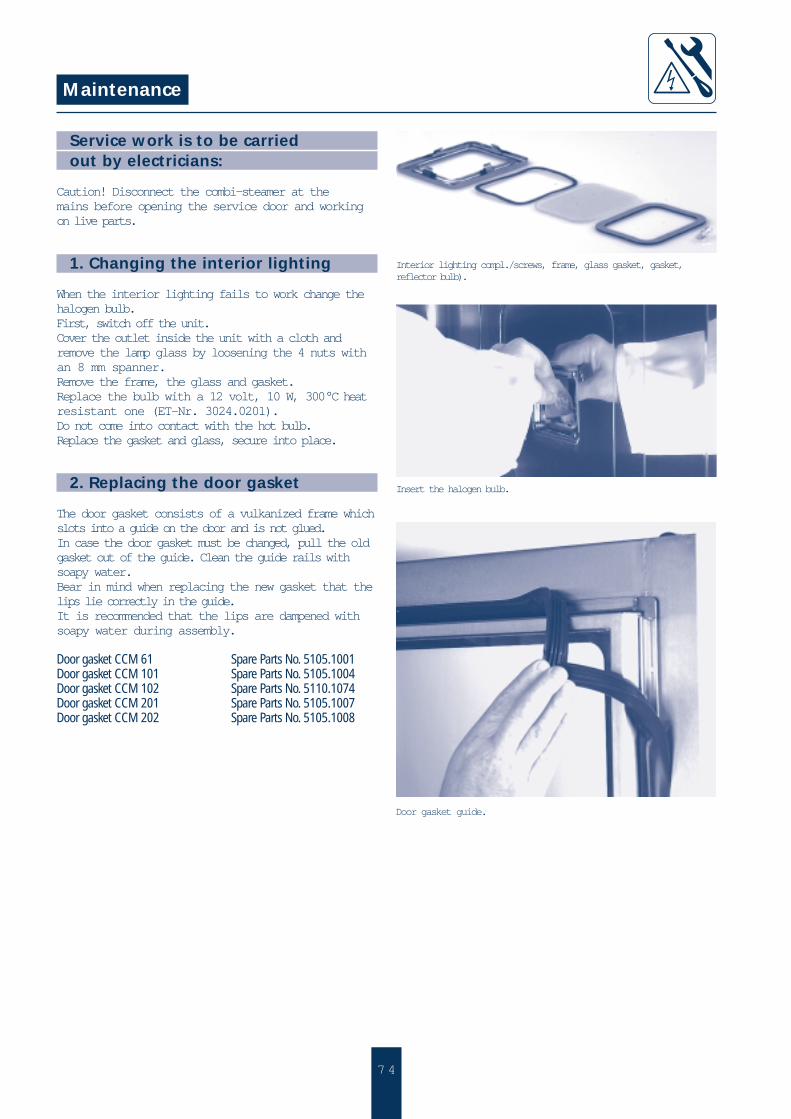
7 4
Service work is to be carriedout by electricians:
Caution! Disconnect the combi-steamer at the mains before opening the service door and workingon live parts.
1. Changing the interior lighting
When the interior lighting fails to work change thehalogen bulb.First, switch off the unit.Cover the outlet inside the unit with a cloth andremove the lamp glass by loosening the 4 nuts withan 8 mm spanner.Remove the frame, the glass and gasket.Replace the bulb with a 12 volt, 10 W, 300°C heatresistant one (ET-Nr. 3024.0201).Do not come into contact with the hot bulb.Replace the gasket and glass, secure into place.
2. Replacing the door gasket
The door gasket consists of a vulkanized frame whichslots into a guide on the door and is not glued.In case the door gasket must be changed, pull the oldgasket out of the guide. Clean the guide rails withsoapy water.Bear in mind when replacing the new gasket that thelips lie correctly in the guide. It is recommended that the lips are dampened withsoapy water during assembly.
Door gasket CCM 61 Spare Parts No. 5105.1001Door gasket CCM 101 Spare Parts No. 5105.1004Door gasket CCM 102 Spare Parts No. 5110.1074Door gasket CCM 201 Spare Parts No. 5105.1007Door gasket CCM 202 Spare Parts No. 5105.1008
Maintenance
Interior lighting compl./screws, frame, glass gasket, gasket,reflector bulb).
Insert the halogen bulb.
Door gasket guide.

7 5
Maintenance
Changing of quenching temperature
Vapor quenching is not necessary for correct func-tioning of the Combi-Steamer also woorks withoutquenching.
Therefore, the quenching temperature can be adju-sted in 3 settings.
Setting No. 1 the water consumption is reduced andthe temperature of the quenchingwater increases to > 65 °C.
Setting No. 2 ex-works setting, the quenching watertemperature is about 65 °C.
Setting No. 3 the water consumption increases andthe quenching water temperature willbe reduced to < 65 °C.
Setting method
Set cooking mode
press simultaneously for approx. 10 sec., the program numberdisplay lights up
the adjusted number (e.g. 2)appears in the program numberdisplay
select the setting No. by using thearrow keys
press for confirmation
Notes
+

RATIONAL Großküchentechnik GmbH RATIONAL UK Limited RATIONAL SingaporeIglinger Straße 62 Unit 4, Titan Court Representative Office
86899 Landsberg a. Lech Laporteway, Portenway Business Park 58 Tanjong Pagar RoadTelefon (0 81 91) 32 70 Luton, Bedfordshire, LU4 8EF. Singapore 0208Telefax (0 81 91) 2 17 35 Telephone (01582) 480388 Telephone 2 27 22 36
Fax (0582) 485001 Telefax 2 2712 81
HCCM - 201/05/96/Ad. All rights reserved for mistakes and technical changes.