managing the vmware cloud on aws data center - vmware ... · aws data center the managing the...
TRANSCRIPT

Managing the VMware Cloud on AWS Data Center10 March 2020VMware Cloud on AWS

You can find the most up-to-date technical documentation on the VMware website at:
https://docs.vmware.com/
If you have comments about this documentation, submit your feedback to
VMware, Inc.3401 Hillview Ave.Palo Alto, CA 94304www.vmware.com
Copyright © 2017-2020 VMware, Inc. All rights reserved. Copyright and trademark information.
Managing the VMware Cloud on AWS Data Center
VMware, Inc. 2
Contents
About Managing the VMware Cloud™ on AWS Data Center 5
1 vSphere Administration in VMware Cloud on AWS 6vSphere Components and Interfaces 8
View Permissions and Privileges 10
CloudAdmin Privileges 10
2 Installing and Configuring the vCenter Cloud Gateway Appliance 15Install the vCenter Cloud Gateway Appliance from the Graphical Installer 15
Install the vCenter Cloud Gateway Appliance Using the Command-Line Installer 18
Replace the Certificate for the vSphere Cloud Gateway Appliance 20
Backing Up the Cloud Gateway Appliance 21
3 Configuring Hybrid Linked Mode 22Hybrid Linked Mode Prerequisites 23
Configuring Hybrid Linked Mode using the vCenter Cloud Gateway Appliance 26
Link the vCenter Cloud Gateway Appliance to Your Cloud SDDC from the Gateway Client UI 26
Configuring Hybrid Linked Mode from the Cloud SDDC 28
Validate Network Connectivity for Hybrid Linked Mode 28
Link to an On-Premises Data Center 29
Add an Identity Source to the SDDC LDAP Domain 29
Troubleshooting Networking for Hybrid Linked Mode 31
Connectivity Validator: DNS Server Can't Be Reached 31
Connectivity Validator: DNS Lookup Failure for a Given FQDN 32
Connectivity Validator: Ping Failure for a Given FQDN 33
Connectivity Validator: Port Reachability Failure for a Given FQDN 33
Connectivity Validator: Traceroute Failure for a given FQDN 34
Connectivity Validator: Test Failure Due to Internal Error 35
Unlink a Cloud SDDC 36
4 Clusters and Resource Pools in VMware Cloud on AWS 38Predefined Clusters and Resource Pools 39
Examine VMs and Hosts in the Cluster 39
Examine and Monitor vSphere DRS 40
Examine and Monitor vSphere HA 41
Examine Cluster Configuration 42
Create and Manage Child Resource Pools 42
VMware, Inc. 3
5 vSAN Storage in VMware Cloud on AWS 46Storage Capacity and Data Redundancy 47
vSAN Deduplication and Compression 47
vSAN Encryption in VMware Cloud on AWS 48
Generate New Encryption Keys in VMware Cloud on AWS 49
vSAN Policies 49
Define a Virtual Machine Storage Policy for vSAN 54
Assign Storage Policies to Virtual Machines 54
Managing Virtual Machines in VMware Cloud on AWS 56VM Configurations With Limited or No Support in the SDDC 57
Virtual Hardware Support in the VMware Cloud on AWS SDDC 59
Using PowerCLI and the Guest Operations API 61
Use ovftool to Deploy a VM from a Client OVF or OVA Template 62
Deploy a VM from an OVF Template in a Content Library 63
Managing the VMware Cloud on AWS Data Center
VMware, Inc. 4

About Managing the VMware Cloud™ on AWS Data Center
The Managing the VMware Cloud on AWS Data Center documentation explains how to configure and manage your VMware Cloud on AWS software-defined data center (SDDC) and the virtual machines that run in it.
Intended AudienceThis information was written for administrators who have a basic understanding of configuring and managing vSphere in an on-premises environment and are familiar with VMware virtualization concepts. In-depth knowledge of Amazon Web Services is not required.
vSphere Management in VMware Cloud on AWSAfter you complete the initial configuration of your VMware Cloud on AWS SDDC and its networks, you can create resource pools and folders, add a vCenter Single Sign-On identity source, and perform other operations that you might already be familiar with from an on-premises environment. You can also use hybrid linked mode to view and manage you on-premises vCenter Server and the one in your VMware Cloud on AWS SDDC with a common set of user identities.
VMware, Inc. 5

vSphere Administration in VMware Cloud on AWS 1vSphere in a software-defined data center like your VMware Cloud on AWS SDDC works in the same way that your on-premises vSphere does. In the SDDC, some vSphere components are owned and managed by VMware, so some of the on-premises administrative workflows that you're familiar with aren't needed in VMC.
For information about vSphere administration in VMware Cloud on AWS, you should refer to the vSphere 6.7 Documentation, but you'll need to keep a few high-level differences in mind when reading those topics:
n VMware Cloud on AWS users don't have physical access to access ESXi host hardware and cannot log in to the ESXi host operating system. Procedures that require this kind of access are performed by VMware staff.
n Global Permissions are not replicated from your on-premises vCenter Server and the vCenter Server in your SDDC. Global permissions do not apply to objects that VMware manages for you, like SDDC hosts and datastores.
Specific Differences to be Aware OfIn addition to the high-level differences we've noted, many topics in the vSphere 6.7 Documentation are written specifically for on-premises users, and don't include some of the information you need when using vSphere in the SDDC.
VMware, Inc. 6

Table 1-1. Topic Content Differences Between On-Premises and SDDC vSphere
Topic Highlights
vSphere Managed Inventory Objects Each VMware Cloud on AWS SDDC has a single data center named SDDC-Datacenter. The data center defines the namespace for networks and datastores. The names for these objects must be unique within a data center. You cannot have two datastores with the same name within a single data center. Virtual machines, templates, and clusters need not be unique within the data center, but must be unique within their folder.
vCenter Server System Roles The vCenter Server in your SDDC includes two predefined roles that are not present in your on-premises vCenter.
CloudAdmin Role
The CloudAdmin role has the necessary privileges for you to create and manage workloads on your SDDC. However, you cannot access or configure certain management components that are supported and managed by VMware, such as hosts, clusters, and management virtual machines.
CloudGlobalAdmin Role
The CoudGlobalAdmin role, which has a subset of the privileges granted to the CloudAdmin role, is deprecated as of SDDC version 1.7.
n Host Management with the VMware Host Client
n Securing ESXi Hosts
VMware Cloud on AWS users don't have physical access to access ESXi host hardware and cannot log in to the ESXi host operating system. Procedures that require this kind of access are performed by VMware staff.
Securing vCenter Server Systems In an on-premises SDDC, you are responsible for ensuring the security of your vCenter Server system. In VMware Cloud on AWS, VMware performs most of these tasks for you. You are responsible for following security best practices, especially for the VMs in your environment, and might want to be aware of some other aspects of vCenter Server and vCenter Single Sign-On such as password and lockout policies.
vSphere Authentication with vCenter Single Sign-On When you change the password for your SDDC from the vSphere Client, the new password is not synchronized with the password that is displayed on the Default vCenter Credentials page. That page shows only the Default credentials. If you change the credentials, you are responsible for keeping track of the new password. Contact Technical Support and request a password change.
After installation, [email protected] has administrator access to both vCenter Single Sign-On and vCenter Server. That user can also add identity sources, set the default identity source, and set policies in the vmc.local domain. Certain management operations in the vmc.local domain are restricted to VMware Cloud on AWS operations staff.
This chapter includes the following topics:
Managing the VMware Cloud on AWS Data Center
VMware, Inc. 7

n vSphere Components and Interfaces
n View Permissions and Privileges
n CloudAdmin Privileges
vSphere Components and InterfacesVMware vSphere is a suite of software components for virtualization. These include ESXi, vCenter Server, and other software components that fulfill a number of different functions in the vSphere environment. VMware manages many parts of your VMware Cloud on AWS SDDC for you, but you can examine all components, and change certain parts of the configuration..
vSphere ComponentsvSphere includes the following software components:
ESXi The hypervisor on which you run virtual machines as a set of configuration and disk files that together perform all the functions of a physical machine.
Note No VMware Cloud on AWS user can have physical access to access ESXi host hardware or root access to the ESXi operating system. Procedures that require this kind of access must be performed by VMware staff. This means that you can't add, remove, or manage ESXi users, or undertake any other ESXi Authentication and User Management operations.
vCenter Server A service that acts as a central administrator for VMware ESXi hosts.
vCenter Server runs continuously in the background. It performs its monitoring and managing activities even when no clients are connected.
VMware Cloud on AWS includes a single vCenter Server that can be connected to an on-premises vCenter Server using Hybrid Linked Mode.
vCenter Single Sign-On A service that is part of the vCenter Server management infrastructure. The vCenter Single Sign-On authentication service makes the VMware cloud infrastructure platform more secure by allowing the various vSphere software components to communicate with each other through a secure token exchange mechanism, instead of requiring each component to authenticate a user separately with a directory service like Active Directory.
Managing the VMware Cloud on AWS Data Center
VMware, Inc. 8
vSphere InterfacesThe vSphere interface you use depends on the task you want to perform and on the component you want to manage.
vSphere Client The vSphere Client is an HTML5-based client for managing VMware Cloud on AWS. vSphere Client also performs most configuration tasks for on-premises vSphere SDDCs.
vSphere Command-Line Interfaces
vSphere supports multiple command-line interfaces for configuring virtual machines and other vSphere components.
vSphere SDKs vSphere supports several SDKs for managing different aspects of your vSphere environment.
Virtual Machine Console
Just as a physical machine, each virtual machine has a console that supports certain management tasks, depending on the operating system.
vCenter Server FeaturesMany vCenter Server features that required special licensing in earlier versions of the product are available as part of the vSphere Standard license in vSphere 6.x and are also supported for VMware Cloud on AWS.
vCenter Server features include:
vSphere vMotion Enables you to move running virtual machines from one ESXi host to another ESXi host without service interruption. vSphere HA uses vSphere vMotion to migrate virtual machines if a host becomes unavailable.
Storage vMotion Allows you to move the disks and configuration file of a running virtual machine from one datastore to another without service interruption.
vSphere High Availability
vSphere High Availability ensures that if a host fails in an SDDC cluster, all virtual machines on the host are restarted on another host in the same cluster. vSphere High Availability settings are preconfigured in VMware Cloud on AWS and cannot be reconfigured by customers.
vSphere DRS Helps improve resource allocation and power consumption across all hosts and resource pools. vSphere DRS collects resource use information for all hosts and virtual machines in the cluster and or migrates virtual machines in the following situations:
n Initial placement – When you power on a virtual machine in the cluster for the first time, DRS either places the virtual machine or makes a recommendation.
Managing the VMware Cloud on AWS Data Center
VMware, Inc. 9

n Load balancing – DRS attempts to improve resource use across the cluster by performing automatic migrations of virtual machines (vMotion) or by providing a recommendation for virtual machine migrations.
See Using Policies and Profilesfor more detail on the storage policies that govern DRS operation in the SDDC.
View Permissions and PrivilegesFor each object in the hierarchy, you can use the vSphere Client view the privileges granted to users in the CloudAdmin role as well as other predefined or custom roles.
Procedure
1 Select an object in the object hierarchy, for example a resource pool or virtual machine, and click Permissions.
2 You can then view the privileges associated with each group.
a On the vSphere Client Home page, click Administration.
b Under Access Control, click Roles.
c Click a role name (CloudAdmin, for example).
d Click the Privileges tab on the right.
Results
You can scroll through the list to see the privileges granted to the selected role. See Defined Privileges for a detailed list of all vSphere privileges.
CloudAdmin PrivilegesBecause VMware performs host administration and other tasks for you, a Cloud Administrator requires fewer privileges than an Administrator user on an on-premises data center.
The CloudAdmin role has a set of privileges that is dynamically generated for your SDDC. They include most of the available privileges in all categories. To view the privileges granted to the CloudAdmin role, log into the SDDC vSphere Client, click Administration > Roles, select CloudAdmin from the list of roles, then click PRIVILEGES.
You can also use a PowerShell snippet like this one to retrieve the list of privileges for the CloudAdmin role in your SDDC.
$vmcUserName = "CloudAdmin"
$authMgr = Get-View $global:DefaultVIServer.ExtensionData.Content.AuthorizationManager
Managing the VMware Cloud on AWS Data Center
VMware, Inc. 10

Write-Host "vCenter Version: $($global:DefaultVIServer.ExtensionData.Content.About.Version)"
Write-Host "Build: $($global:DefaultVIServer.ExtensionData.Content.About.Build)"
($authMgr.RoleList | where {$_.Name -eq $vmcUserName}).Privilege
The CloudAdmin role has the following privileges in SDDC Version 1.9. This list might not be correct for other SDDC versions.
Alarm.Acknowledge
Alarm.Create
Alarm.Delete
Alarm.DisableActions
Alarm.Edit
Alarm.SetStatus
Authorization.ModifyPermissions
Authorization.ModifyRoles
CertificateManagement.Manage
Cns.Searchable
ComputePolicy.Manage
ContentLibrary.AddLibraryItem
ContentLibrary.CheckInTemplate
ContentLibrary.CheckOutTemplate
ContentLibrary.CreateLocalLibrary
ContentLibrary.CreateSubscribedLibrary
ContentLibrary.DeleteLibraryItem
ContentLibrary.DeleteLocalLibrary
ContentLibrary.DeleteSubscribedLibrary
ContentLibrary.DownloadSession
ContentLibrary.EvictLibraryItem
ContentLibrary.EvictSubscribedLibrary
ContentLibrary.GetConfiguration
ContentLibrary.ImportStorage
ContentLibrary.ProbeSubscription
ContentLibrary.ReadStorage
ContentLibrary.SyncLibrary
ContentLibrary.SyncLibraryItem
ContentLibrary.TypeIntrospection
ContentLibrary.UpdateConfiguration
ContentLibrary.UpdateLibrary
ContentLibrary.UpdateLibraryItem
ContentLibrary.UpdateLocalLibrary
ContentLibrary.UpdateSession
ContentLibrary.UpdateSubscribedLibrary
Datastore.AllocateSpace
Datastore.Browse
Datastore.Config
Datastore.DeleteFile
Datastore.FileManagement
Datastore.UpdateVirtualMachineFiles
Datastore.UpdateVirtualMachineMetadata
Extension.Register
Extension.Unregister
Extension.Update
Folder.Create
Folder.Delete
Managing the VMware Cloud on AWS Data Center
VMware, Inc. 11

Folder.Move
Folder.Rename
Global.CancelTask
Global.GlobalTag
Global.Health
Global.LogEvent
Global.ManageCustomFields
Global.ServiceManagers
Global.SetCustomField
Global.SystemTag
HLM.Manage
Host.Hbr.HbrManagement
InventoryService.Tagging.AttachTag
InventoryService.Tagging.CreateCategory
InventoryService.Tagging.CreateTag
InventoryService.Tagging.DeleteCategory
InventoryService.Tagging.DeleteTag
InventoryService.Tagging.EditCategory
InventoryService.Tagging.EditTag
InventoryService.Tagging.ModifyUsedByForCategory
InventoryService.Tagging.ModifyUsedByForTag
InventoryService.Tagging.ObjectAttachable
Network.Assign
Resource.ApplyRecommendation
Resource.AssignVAppToPool
Resource.AssignVMToPool
Resource.ColdMigrate
Resource.CreatePool
Resource.DeletePool
Resource.EditPool
Resource.HotMigrate
Resource.MovePool
Resource.QueryVMotion
Resource.RenamePool
ScheduledTask.Create
ScheduledTask.Delete
ScheduledTask.Edit
ScheduledTask.Run
Sessions.GlobalMessage
Sessions.ValidateSession
StorageProfile.Update
StorageProfile.View
StorageViews.View
System.Anonymous
System.Read
System.View
Trust.Manage
VApp.ApplicationConfig
VApp.AssignResourcePool
VApp.AssignVApp
VApp.AssignVM
VApp.Clone
VApp.Create
VApp.Delete
VApp.Export
Managing the VMware Cloud on AWS Data Center
VMware, Inc. 12

VApp.ExtractOvfEnvironment
VApp.Import
VApp.InstanceConfig
VApp.ManagedByConfig
VApp.Move
VApp.PowerOff
VApp.PowerOn
VApp.Rename
VApp.ResourceConfig
VApp.Suspend
VApp.Unregister
VirtualMachine.Config.AddExistingDisk
VirtualMachine.Config.AddNewDisk
VirtualMachine.Config.AddRemoveDevice
VirtualMachine.Config.AdvancedConfig
VirtualMachine.Config.Annotation
VirtualMachine.Config.CPUCount
VirtualMachine.Config.ChangeTracking
VirtualMachine.Config.DiskExtend
VirtualMachine.Config.DiskLease
VirtualMachine.Config.EditDevice
VirtualMachine.Config.HostUSBDevice
VirtualMachine.Config.ManagedBy
VirtualMachine.Config.Memory
VirtualMachine.Config.MksControl
VirtualMachine.Config.QueryFTCompatibility
VirtualMachine.Config.QueryUnownedFiles
VirtualMachine.Config.RawDevice
VirtualMachine.Config.ReloadFromPath
VirtualMachine.Config.RemoveDisk
VirtualMachine.Config.Rename
VirtualMachine.Config.ResetGuestInfo
VirtualMachine.Config.Resource
VirtualMachine.Config.Settings
VirtualMachine.Config.SwapPlacement
VirtualMachine.Config.UpgradeVirtualHardware
VirtualMachine.GuestOperations.Execute
VirtualMachine.GuestOperations.Modify
VirtualMachine.GuestOperations.ModifyAliases
VirtualMachine.GuestOperations.Query
VirtualMachine.GuestOperations.QueryAliases
VirtualMachine.Hbr.ConfigureReplication
VirtualMachine.Hbr.MonitorReplication
VirtualMachine.Hbr.ReplicaManagement
VirtualMachine.Interact.AnswerQuestion
VirtualMachine.Interact.Backup
VirtualMachine.Interact.ConsoleInteract
VirtualMachine.Interact.CreateScreenshot
VirtualMachine.Interact.DefragmentAllDisks
VirtualMachine.Interact.DeviceConnection
VirtualMachine.Interact.DnD
VirtualMachine.Interact.GuestControl
VirtualMachine.Interact.Pause
VirtualMachine.Interact.PowerOff
VirtualMachine.Interact.PowerOn
Managing the VMware Cloud on AWS Data Center
VMware, Inc. 13

VirtualMachine.Interact.PutUsbScanCodes
VirtualMachine.Interact.Reset
VirtualMachine.Interact.SESparseMaintenance
VirtualMachine.Interact.SetCDMedia
VirtualMachine.Interact.SetFloppyMedia
VirtualMachine.Interact.Suspend
VirtualMachine.Interact.ToolsInstall
VirtualMachine.Inventory.Create
VirtualMachine.Inventory.CreateFromExisting
VirtualMachine.Inventory.Delete
VirtualMachine.Inventory.Move
VirtualMachine.Inventory.Register
VirtualMachine.Inventory.Unregister
VirtualMachine.Namespace.Event
VirtualMachine.Namespace.EventNotify
VirtualMachine.Namespace.Management
VirtualMachine.Namespace.ModifyContent
VirtualMachine.Namespace.Query
VirtualMachine.Namespace.ReadContent
VirtualMachine.Provisioning.Clone
VirtualMachine.Provisioning.CloneTemplate
VirtualMachine.Provisioning.CreateTemplateFromVM
VirtualMachine.Provisioning.Customize
VirtualMachine.Provisioning.DeployTemplate
VirtualMachine.Provisioning.DiskRandomAccess
VirtualMachine.Provisioning.DiskRandomRead
VirtualMachine.Provisioning.FileRandomAccess
VirtualMachine.Provisioning.GetVmFiles
VirtualMachine.Provisioning.MarkAsTemplate
VirtualMachine.Provisioning.MarkAsVM
VirtualMachine.Provisioning.ModifyCustSpecs
VirtualMachine.Provisioning.PromoteDisks
VirtualMachine.Provisioning.PutVmFiles
VirtualMachine.Provisioning.ReadCustSpecs
VirtualMachine.State.CreateSnapshot
VirtualMachine.State.RemoveSnapshot
VirtualMachine.State.RenameSnapshot
VirtualMachine.State.RevertToSnapshot
Vsan.Cluster.ShallowRekey
vService.CreateDependency
vService.DestroyDependency
vService.ReconfigureDependency
vService.UpdateDependency
For more information on the permissions granted by each privilege , see the vSphere Defined Privileges reference.
Managing the VMware Cloud on AWS Data Center
VMware, Inc. 14

Installing and Configuring the vCenter Cloud Gateway Appliance 2The Cloud Gateway Appliance is an appliance installed in your on-premises data center. It provides a number of features for hybrid management, that is, cases where an on-premises data center is connected to your cloud SDDC.
Features included in the Cloud Gateway Appliance include:
n Hybrid Linked Mode. Hybrid Linked Mode allows you to view and manage your on-premises data center and your cloud SDDC from a single view. See Chapter 3 Configuring Hybrid Linked Mode.
This chapter includes the following topics:
n Install the vCenter Cloud Gateway Appliance from the Graphical Installer
n Install the vCenter Cloud Gateway Appliance Using the Command-Line Installer
n Replace the Certificate for the vSphere Cloud Gateway Appliance
n Backing Up the Cloud Gateway Appliance
Install the vCenter Cloud Gateway Appliance from the Graphical InstallerDownload and install the Cloud Gateway Appliance if you want to enable Hybrid Linked Mode from your on-premises SDDC or access other features of the Cloud Gateway Appliance.
Prerequisites
Verify that the host on which you intend to the install the Cloud Gateway Appliance appliance meets the following hardware requirements.
Hardware Minimum required
CPUs 8
Memory 28 GB
Storage 190 GB
Procedure
1 Log in to the VMC Console at https://vmc.vmware.com.
VMware, Inc. 15

2 Click the Tools ( ) tab.
3 Click Download on the Gateway Appliance card.
You are directed to My VMware, where you can complete the download of the appliance installer ISO image.
4 In the installer ISO image, browse to the ui-installer folder and open the folder for the operating system from which you want to install the appliance.
n For Windows OS, go the win32 subdirectory and run the installer.exe file.
n For Linux OS, go to the lin64 subdirectory, and run the installer file.
n For Mac OS, go to the mac subdirectory and run the Installer.app file.
5 Click Get Started.
6 Under Deploy Cloud Gateway, click Start.
7 Accept the End User License agreement.
8 Specify the Gateway deployment parameters and click Next.
Option Steps
You can connect to an ESXi host on which to deploy the appliance.
1 Enter the FQDN or IP address of the ESXi host.
2 Enter the HTTPS port of the ESXi host.
3 Enter the user name and password of a user with administrative privileges on the ESXi host, for example, the root user.
4 Click Next.5 Verify that the certificate warning displays the SHA1 thumbprint of the SSL certificate that is
installed on the target ESXi host, and click Yes to accept the certificate thumbprint.
You can connect to a vCenter Server instance and browse the inventory to select an ESXi host or DRS cluster on which to deploy the appliance.
1 Enter the FQDN or IP address of the vCenter Server instance.
2 Enter the HTTPS port of the vCenter Server instance.
3 Enter the user name and password of user with vCenter Single Sign-On administrative privileges on the vCenter Server instance, for example, the administrator@your_domain_name user.
4 Click Next.5 Verify that the certificate warning displays the SHA1 thumbprint of the SSL certificate that is
installed on the target vCenter Server instance, and click Yes to accept the certificate thumbprint.
6 Select the data center or data center folder that contains the ESXi host or DRS cluster on which you want to deploy the appliance, and click Next
Note You must select a data center or data center folder that contains at least one ESXi host that is not in lockdown or maintenance mode.
7 Select the ESXi host or DRS cluster on which you want to deploy the appliance, and click Next.
Managing the VMware Cloud on AWS Data Center
VMware, Inc. 16

9 Set up the target appliance VM and click Next.
Parameter Description
VM name Enter a name for the Cloud Gateway Appliance VM. The appliance name must not contain a percent sign (%), backslash (\), or forward slash (/) and must be no more than 80 characters in length.
Set root password Set a root password for the Cloud Gateway Appliance VM.
The password must contain only lower ASCII characters without spaces, at least eight characters, a number, uppercase and lowercase letters, and a special character, for example, an exclamation mark (!), hash key (#), at sign (@), or brackets (()).
Confirm root password Confirm the password you set above.
10 Select the datastore location for the Cloud Gateway Appliance and click Next.
a Select the datastore where you want to place the Cloud Gateway Appliance.
b Select Enable Thin Disk Mode to conserve disk space by deploying the appliance using a thin disk.
11 Configure the network settings for the appliance and click Next.
Parameter Description
Network Select the network
The networks displayed in the drop-down menu depend on the network settings of the target server. If you are deploying the appliance directly on an ESXi host, non-ephemeral distributed virtual port groups are not supported and are not displayed in the drop-down menu.
IP version Select the version for the appliance IP address.
You can select either IPv4 or IPv6.
IP assignment Select how to allocate the IP address of the appliance.
n static
The wizard prompts you to enter the IP address and network settings.
Note Avoid using an IP address as a system name. If you use an IP address as a system name, you cannot change the IP address and update the DNS settings after deployment.
n DHCP
A DHCP server is used to allocate the IP address. Select this option only if a DHCP server is available in your environment.
FQDN If you have an enabled DDNS in your environment, you can enter a fully qualified domain name (FQDN) for the appliance. If you enter a FQDN that already exists, the installer warns you that this will cause an error in deployment unless you isolate the network that the appliance is on. For example, you can deploy the appliance on a different port group from the existing FQDN.
Managing the VMware Cloud on AWS Data Center
VMware, Inc. 17

Parameter Description
IP address If you selected a static IP address, enter the IP address for the appliance. If you enter an IP address that already exists, the installer warns you that this will cause an error in deployment unless you isolate the network that the appliance is on. For example, you can deploy the appliance on a different port group from the existing IP address.
Subnet mask or prefix length Enter the subnet mask or prefix length for the IP address.
Default Gateway Enter the default gateway to be used by the appliance.
DNS Servers Enter the addresses of the DNS servers used by the appliance.
12 Configure appliance Settings and click Next.
n Select Synchronize Time with NTP servers and enter the address of one or more NTP servers in the text box to use NTP servers for time synchronization.
n Select Synchronize Time with ESXi host to synchronize time to the host you're deploying to.
13 Click Finish to deploy the appliance.
Results
The Cloud Gateway Appliance is deployed to your on-premises environment. A progress bar shows the progress of deployment.
What to do next
Note After you have installed the appliance, consider configuring appliance log collection following the guidelines in VMware Knowledge Base article 67158. Appliance logs are useful when requesting support.
Install the vCenter Cloud Gateway Appliance Using the Command-Line InstallerUse the command-line installer to script or automate your Cloud Gateway Appliance installation.
Use the command vcgw-deploy to install the Cloud Gateway Appliance from the command line. In addition to installing the appliance, you can use vcgw-deploy to validate your installation templates and run pre-checks on your installation. For a full list of vcgw-deploy options, run vcgw-deploy install --help.
Prerequisites
Verify that the host on which you intend to the install the Cloud Gateway Appliance appliance meets the following hardware requirements.
Managing the VMware Cloud on AWS Data Center
VMware, Inc. 18

Hardware Minimum required
CPUs 8
Memory 24 GB
Storage 190 GB
Procedure
1 Log in to the VMC Console at https://vmc.vmware.com.
2 Click the Tools ( ) tab.
3 Click Download on the Gateway Appliance card.
You are directed to My VMware, where you can complete the download of the appliance installer ISO image.
4 Prepare a JSON template for the installation.
a In the installer ISO image, browse to the cli-installer/templates folder.
This folder contains sample JSON templates for installing the Cloud Gateway Appliance either directly on an ESXi host or through a vCenter Server system.
b Copy a template to a working directory and edit it to include the necessary parameters.
For more information about available template parameters, invoke the installer with the option --template-help. For example, on Windows, enter vcgw-deploy.exe install --template-help.
5 From the command line, change to the cli-installer folder and run the installation prechecks.
n For Windows OS, enter vcgw-deploy.exe install path-to-template --precheck-only.
n For Linux OS, enter vcgw-deploy install path-to-template --precheck-only.
n For Mac OS, enter vcgw-deploy install path-to-template --precheck-only.
The prechecks identify problems with the template and parameters provided, so that you can fix any errors before launching the installation.
6 Launch the installer.
n For Windows OS, enter vcgw-deploy.exe install path-to-template --accept-eula.
n For Linux OS, enter vcgw-deploy install path-to-template --accept-eula.
n For Mac OS, enter vcgw-deploy install path-to-template --accept-eula.
Managing the VMware Cloud on AWS Data Center
VMware, Inc. 19
What to do next
Link the Cloud Gateway Appliance to your cloud SDDC as described in Link the vCenter Cloud Gateway Appliance to Your Cloud SDDC from the Gateway Client UI.
Note After you have installed the appliance, consider configuring appliance log collection following the guidelines in VMware Knowledge Base article 67158. Appliance logs are useful when requesting support.
Replace the Certificate for the vSphere Cloud Gateway ApplianceYou can replace the certificate for the Cloud Gateway Appliance when the certificate expires or when you want to use a certificate from another certificate provider.
Prerequisites
Generate certificate signing requests (CSRs) for each certificate you want to replace. Provide the CSR to your Certificate Authority. When the Certificate Authority returns the certificate, place it in a location that you can access from the Cloud Gateway Appliance.
Procedure
1 In a web browser, go to http://cga-address/ui where cga-address is the IP address or FQDN of the Cloud Gateway Appliance.
2 Log in with your on-premises credentials.
3 Navigate to the Certificate Management UI.
a From the Home menu, select Administration.
b Under Certificates, click Certificate Management.
4 Enter your credentials and click Login and Manage Certificates.
5 On the Machine SSL Certificate, select Actions > Replace.
6 Click the browse button on the Certificate Chain and provide the path of the certificate chain file.
This file should contain the machine SSL certificate, the Root CA certificate, and the entire chain of trust.
7 Click the browse button on the private key and provide the private key for the certificate.
8 Click Replace.
What to do next
When the certificate is successfully replaced, restart all services on the Cloud Gateway Appliance. See https://kb.vmware.com/s/article/2109887.
Managing the VMware Cloud on AWS Data Center
VMware, Inc. 20

Backing Up the Cloud Gateway ApplianceBacking up the Cloud Gateway Appliance is not necessary, because it is stateless and can be redeployed if needed.
File-based backup and restore solutions are not supported for the Cloud Gateway Appliance.
Managing the VMware Cloud on AWS Data Center
VMware, Inc. 21

Configuring Hybrid Linked Mode 3Hybrid Linked Mode allows you to link your VMware Cloud on AWS vCenter Server instance with an on-premises vCenter Single Sign-On domain.
Important Before you can use Hybrid Linked Mode with VMware Cloud on AWS, you must configure your on-premises vCenter to enable single sign-on. See vSphere Authentication with vCenter Single Sign-On for details.
If you link your cloud vCenter Server to a domain that contains multiple vCenter Server instances linked using Enhanced Linked Mode, all of those instances are linked to your cloud SDDC.
Using Hybrid Linked Mode, you can:
n View and manage the inventories of both your on-premises and VMware Cloud on AWS data centers from a single vSphere Client interface, accessed using your on-premises credentials.
n Migrate workloads between your on-premises data center and cloud SDDC.
n Share tags and tag categories from your vCenter Server instance to your cloud SDDC.
Hybrid Linked Mode supports on-premises vCenter Server systems running 6.0 Update 3 patch c and later with either embedded or external Platform Services Controller (both Windows and vCenter Server Appliance). vCenter Server systems with external Platform Services Controller instances linked in Enhanced Linked Mode are also supported, up to the scale limits documented in vSphere 6.0 Configuration Maximums.
You have two options for configuring Hybrid Linked Mode. You can use only one of these options at a time.
n You can install the Cloud Gateway Appliance and use it to link from your on-premises data center to your cloud SDDC. In this case, SSO users and groups are mapped from your on-premises environment to the SDDC and you do not need to add an identity source to the SDDC LDAP domain.
n You can link your VMware Cloud on AWS SDDC to your on-premises vCenter Server. In this case, you must add an identity source to the SDDC LDAP domain.
This chapter includes the following topics:
n Hybrid Linked Mode Prerequisites
n Configuring Hybrid Linked Mode using the vCenter Cloud Gateway Appliance
VMware, Inc. 22

n Configuring Hybrid Linked Mode from the Cloud SDDC
n Troubleshooting Networking for Hybrid Linked Mode
n Unlink a Cloud SDDC
Hybrid Linked Mode PrerequisitesEnsure that you have met the following prerequisites before configuring Hybrid Linked Mode.
Common PrerequisitesThe following prerequisites are common to both linking from the Cloud Gateway Appliance and from the cloud SDDC.
n Configure a connection between your on-premises data center and the SDDC. You can use Direct Connect, a VPN, or both. See Configure AWS Direct Connect for VMware Cloud on AWS and Configure a VPN Connection Between Your SDDC and On-Premises Data Center in the VMware Cloud on AWS Networking and Security guide.
n Regardless of the type of connection you choose, the vCenter FQDN must resolve to a private IP address. This is not the default configuration. See Set vCenter Server FQDN Resolution Address for more information.
n Ensure that your on-premises data center and your cloud SDDC are synchronized to an NTP service or other authoritative time source. When using Hybrid Linked Mode, VMware Cloud on AWS can tolerate a time skew of up to ten minutes between the on-premises data center and the cloud SDDC.
n The maximum latency between your cloud SDDC and on-premises data center cannot exceed 100 msec roundtrip.
n Decide which of your on-premises users will have Cloud Administrator permissions. Add these users to a group within your identity source. Ensure that this group has access to your on-premises environment.
Prerequisites for Linking with Cloud Gateway ApplianceThe following prerequisites apply when linking with the Cloud Gateway Appliance.
n Install the Cloud Gateway Appliance as described in Chapter 2 Installing and Configuring the vCenter Cloud Gateway Appliance.
n Your on-premises environment is running vSphere 6.5 patch d or later.
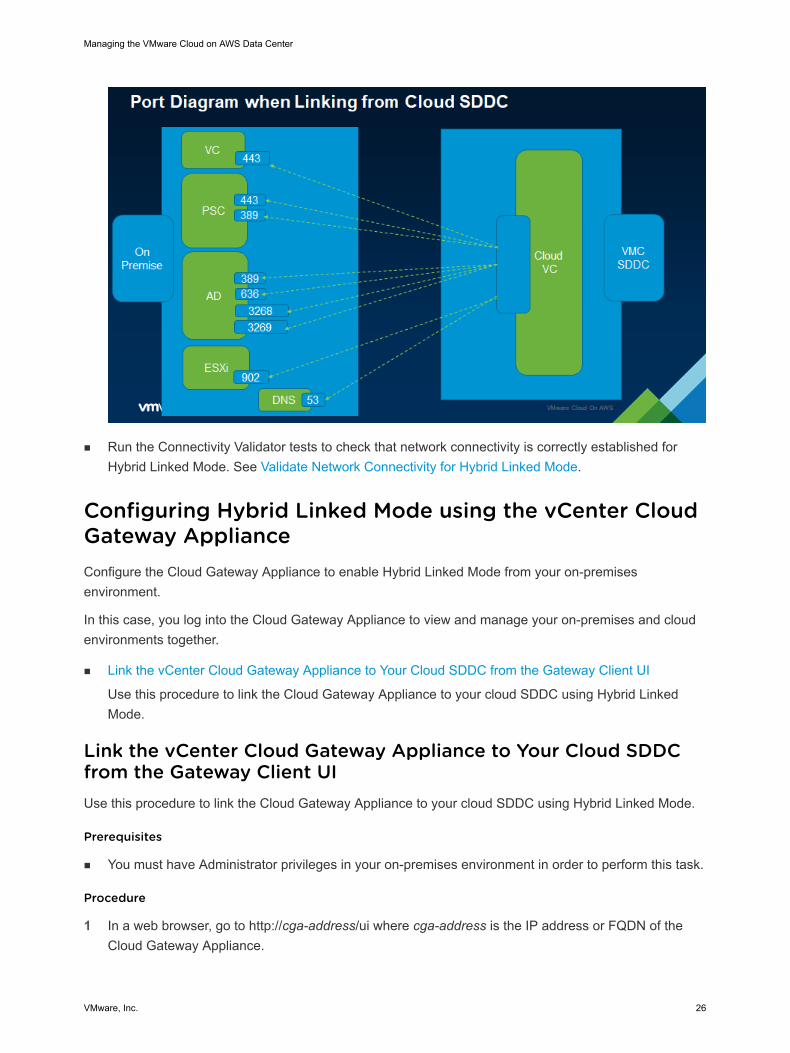
n Ensure that the Cloud Gateway Appliance and your vCenter Server instances can reach each other over your network. Ensure that the following firewall ports are open.
Source Destination Port Purpose
User's web browser Cloud Gateway Appliance 5480 Gathering support bundle
Cloud Gateway Appliance On-premises vCenter Server 443 Hybrid Linked Mode
Managing the VMware Cloud on AWS Data Center
VMware, Inc. 23

Source Destination Port Purpose
Cloud Gateway Appliance On-premises Platform Services Controller
443, 389 Hybrid Linked Mode
Cloud Gateway Appliance Cloud SDDC vCenter Server 443 Hybrid Linked Mode
Cloud Gateway Appliance Cloud ESXi host 902 Virtual Machine Console
Cloud Gateway Appliance On-premises Active Directory server (ports dependent on your usage)
389, 636, 3268, 3269 Identity source
Cloud Gateway Appliance https://vcgw-updates.vmware.com/
443 Cloud Gateway Auto-update
The following figure shows the ports required to be open for linking with the Cloud Gateway Appliance.
n Verify that the host on which you intend to the install the Cloud Gateway Appliance appliance meets the following hardware requirements
Hardware Minimum required
CPUs 8
Memory 24 GB
Storage 190 GB
Managing the VMware Cloud on AWS Data Center
VMware, Inc. 24

Prerequisites for Linking from the Cloud SDDCThe following prerequisites apply when linking from the cloud SDDC.
n Your on-premises vCenter Server system is running one of the following:
n vSphere 6.0 Update 3 patch c and later.
n vSphere 6.5 patch d and later.
n Ensure that you have the login credentials for your on-premises vSphere SSO domain.
n Ensure that you have login credentials for a user who has a minimum of read-only access to the Base DN for users and groups in your on-premises environment. This is used when adding an identity source.
n Ensure that an on-premises DNS server is configured for your management gateway so that it can resolve the FQDN for the identity source and on-premises VMware Cloud on AWS systems.
n Ensure that your on-premises gateway or firewall allows access to the necessary ports from your SDDC for the following services.
Source Destination Ports Purpose
Cloud SDDC On-premises vCenter Server 443 Hybrid Linked Mode
Cloud SDDC On-premises Platform Services Controller
389, 443 Hybrid Linked Mode
Cloud SDDC On-premises Active Directory server (ports dependent on your usage)
389, 636, 3268, 3269 Identity Source
Cloud SDDC On-premises DNS 53 Resolving FQDN of on-premises vCenter Server and Active Directory Server
Cloud SDDC On-premises ESXi host 902 Virtual Machine Console
The following figure shows the ports that are required to be open for linking from the cloud SDDC.
Managing the VMware Cloud on AWS Data Center
VMware, Inc. 25
n Run the Connectivity Validator tests to check that network connectivity is correctly established for Hybrid Linked Mode. See Validate Network Connectivity for Hybrid Linked Mode.
Configuring Hybrid Linked Mode using the vCenter Cloud Gateway ApplianceConfigure the Cloud Gateway Appliance to enable Hybrid Linked Mode from your on-premises environment.
In this case, you log into the Cloud Gateway Appliance to view and manage your on-premises and cloud environments together.
n Link the vCenter Cloud Gateway Appliance to Your Cloud SDDC from the Gateway Client UI
Use this procedure to link the Cloud Gateway Appliance to your cloud SDDC using Hybrid Linked Mode.
Link the vCenter Cloud Gateway Appliance to Your Cloud SDDC from the Gateway Client UIUse this procedure to link the Cloud Gateway Appliance to your cloud SDDC using Hybrid Linked Mode.
Prerequisites
n You must have Administrator privileges in your on-premises environment in order to perform this task.
Procedure
1 In a web browser, go to http://cga-address/ui where cga-address is the IP address or FQDN of the Cloud Gateway Appliance.
Managing the VMware Cloud on AWS Data Center
VMware, Inc. 26
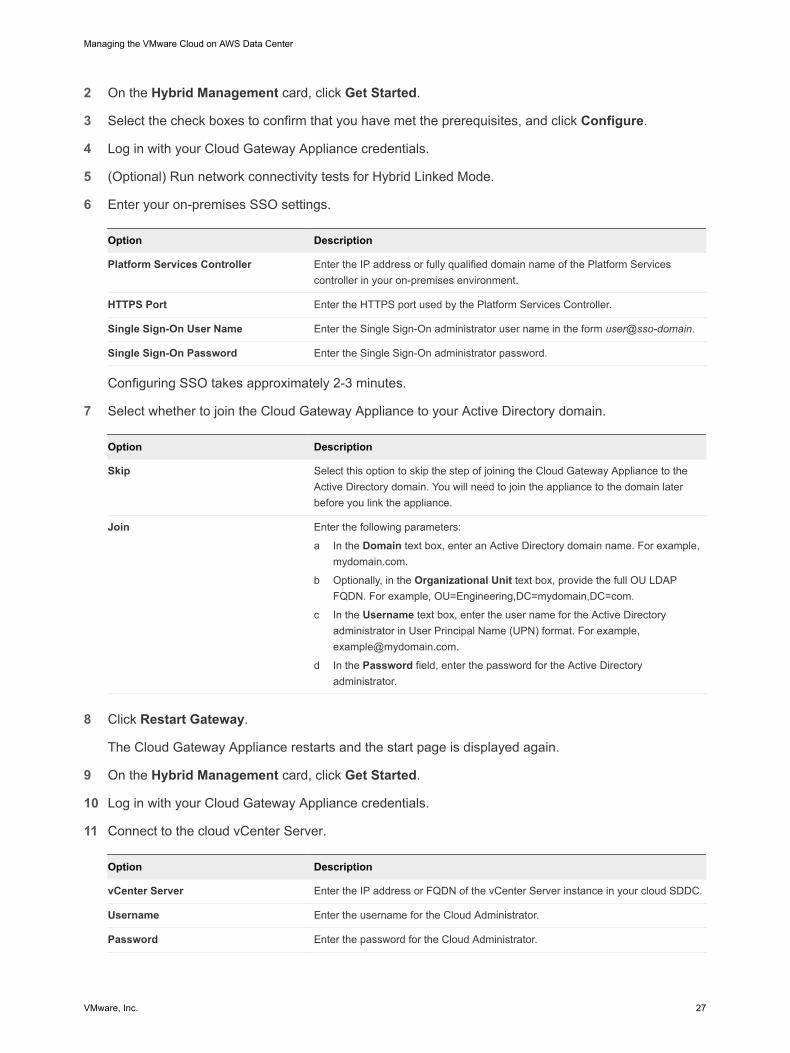
2 On the Hybrid Management card, click Get Started.
3 Select the check boxes to confirm that you have met the prerequisites, and click Configure.
4 Log in with your Cloud Gateway Appliance credentials.
5 (Optional) Run network connectivity tests for Hybrid Linked Mode.
6 Enter your on-premises SSO settings.
Option Description
Platform Services Controller Enter the IP address or fully qualified domain name of the Platform Services controller in your on-premises environment.
HTTPS Port Enter the HTTPS port used by the Platform Services Controller.
Single Sign-On User Name Enter the Single Sign-On administrator user name in the form user@sso-domain.
Single Sign-On Password Enter the Single Sign-On administrator password. Configuring SSO takes approximately 2-3 minutes.
7 Select whether to join the Cloud Gateway Appliance to your Active Directory domain.
Option Description
Skip Select this option to skip the step of joining the Cloud Gateway Appliance to the Active Directory domain. You will need to join the appliance to the domain later before you link the appliance.
Join Enter the following parameters:
a In the Domain text box, enter an Active Directory domain name. For example, mydomain.com.
b Optionally, in the Organizational Unit text box, provide the full OU LDAP FQDN. For example, OU=Engineering,DC=mydomain,DC=com.
c In the Username text box, enter the user name for the Active Directory administrator in User Principal Name (UPN) format. For example, [email protected].
d In the Password field, enter the password for the Active Directory administrator.
8 Click Restart Gateway.
The Cloud Gateway Appliance restarts and the start page is displayed again.
9 On the Hybrid Management card, click Get Started.
10 Log in with your Cloud Gateway Appliance credentials.
11 Connect to the cloud vCenter Server.
Option Description
vCenter Server Enter the IP address or FQDN of the vCenter Server instance in your cloud SDDC.
Username Enter the username for the Cloud Administrator.
Password Enter the password for the Cloud Administrator.
Managing the VMware Cloud on AWS Data Center
VMware, Inc. 27

12 Add the groups you have defined in your on premises environment to serve as cloud administrator groups.
a Select the on-premises identity source.
b Enter the name of the administrator group in the search box and select the group.
13 Log in to your on-premises SSO domain.
14 Click Configure.
What to do next
When the linking process is complete, you can use the Cloud Gateway Appliance to view and manage the inventories of your on-premises and cloud SDDCs. Access this interface at http://cga-address/ui where cga-address is the IP address or FQDN of the Cloud Gateway Appliance.
Configuring Hybrid Linked Mode from the Cloud SDDCAs an alternative to using the Cloud Gateway Appliance, you can configure Hybrid Linked Mode from the cloud SDDC.
In this case, you use your cloud SDDC's vSphere Client to view and manage your complete inventory. When you link from the cloud SDDC, you can link only one on-premises domain.
Validate Network Connectivity for Hybrid Linked ModeUse the VMC Console Connectivity Validator to check that all required network connectivity is in place for Hybrid Linked Mode.
When you provide the required inputs to the Connectivity Validator, it can verify the network connections required for Hybrid Linked Mode.
Procedure
1 Log in to the VMC Console at https://vmc.vmware.com.
2 Click View Details for your SDDC.
3 Click the Troubleshooting tab.
4 From the Use Case drop down menu, select Hybrid Linked Mode.
The Hybrid Linked Mode connectivity tests are shown. Tests are organized into groups according to the input needed for each group.
5 In the Input column, enter the required input for each test you want to run.
6 Run one or more tests.
n To run all tests, click Run All.
n To run a particular test group, click Run Group to the right of the group listing.
n To run an individual test, expand the test group and click Run next to the individual test.
Managing the VMware Cloud on AWS Data Center
VMware, Inc. 28

Results
The status of each test is displayed as it runs. When a test has finished, you can expand the test to see details of the test results.
What to do next
When all tests pass, continue to set up Hybrid Linked Mode. See Add an Identity Source to the SDDC LDAP Domain.
Link to an On-Premises Data CenterTo complete the configuration of Hybrid Linked Mode from the cloud SDDC, link your on-premises data center from your cloud vCenter Server.
Procedure
1 If you haven't already, log in to the vSphere Client for your SDDC and browse to the Linked Domains page.
a Select Menu > Administration to display the Administration page.
b Under Hybrid Cloud, select Linked Domains.
2 Connect to the on-premises vCenter Server.
Option Description
Platform Services Controller Enter the IP address or FQDN of the Platform Services Controller instance in your on-premise data center.
HTTPS Port Enter the HTTPS port used by the Platform Services Controller.
Username Enter the username for the on-premises SSO administrator.
Password Enter the password for the on-premises SSO administrator.
3 Add the groups you have defined in your on premises environment to serve as cloud administrator groups.
a Select the on-premises identity source.
If you haven't already added the on-premises identity source, do so as described in Add an Identity Source to the SDDC LDAP Domain.
b Enter the name of the administrator group in the search box and select the group.
4 Click Link.
Add an Identity Source to the SDDC LDAP DomainThe first step toward configuring Hybrid Linked Mode from your SDDC is to add your on-premises LDAP domain as an identity source for the SDDC vCenter Server .
Managing the VMware Cloud on AWS Data Center
VMware, Inc. 29

You can configure Hybrid Linked Mode from your SDDC if your on-premises LDAP service is provided by a native Active Directory (Integrated Windows Authentication) domain or an OpenLDAP directory service.
Important If you are using OpenLDAP as the identity source, see the VMware knowledge base article at http://kb.vmware.com/kb/2064977 for additional requirements.
Prerequisites
Ensure that you meet the Common Prerequisites in Hybrid Linked Mode Prerequisites.
Procedure
1 Log in to the vSphere Client for your SDDC.
To add an identity source, you must be logged in as [email protected] or another member of the Cloud Administrators group.
2 Bring up the Add Identity Source dialog.
Use case Description
Hybrid Linked Mode a Select Menu > Administration.
b Under Hybrid Cloud, select Linked Domains.
c Under Add Cloud Administrator, select Add Identity Source from the Identity Source drop-down menu.
All other use cases a Select Menu > Administration.
b Under Single Sign On, click Configuration.
c Click Identity Sources and click Add.
3 Configure the identity source settings.
Option Description
Identity Source Type Select Active Directory as an LDAP Server to use a Windows Active Directory Server or OpenLDAP to use an OpenLDAP server.
Name Enter the name of the identity source.
Base DN for users Enter the Base Distinguished Name for users.
Base DN for groups Enter the Base Distinguished Name for groups.
Domain Name FQDN of the domain. Do not enter an IP address here.
Domain Alias Enter an alias for the domain.
For Active Directory identity sources, the domain's NetBIOS name. Add the NetBIOS name of the Active Directory domain as an alias of the identity source if you are using SSPI authentications.
Username Enter the ID of a user in the domain who has a minimum of read-only access to Base DN for users and groups. Use UPN format (for example, [email protected]), rather than DN format.
Password Enter the password of the user who is specified by Username.
Managing the VMware Cloud on AWS Data Center
VMware, Inc. 30

Option Description
Connect To Select which domain controller to connect to.
n Select Any domain controller in the domain to connect to any domain controller.
n Select Specific domain controllers to specify the domain controllers.
If you select Specific domain controllers, specify the URL for the primary server and the secondary server used for failover. Use the format ldap://hostname:port or ldaps://hostname:port. The port is typically 389 for ldap: connections and 636 for ldaps: connections. For Active Directory multi-domain controller deployments, the port is typically 3268 for ldap: connections and 3269 for ldaps: connections.
SSL Certificates If you want to use LDAPS with your Active Directory LDAP Server or OpenLDAP Server identity source, click Browse to select a certificate.
Note Choose a certificate file in the Base-64 encoded X.509 (.CER) format.
To export the root CA certificate from Active Directory, consult the Microsoft documentation.
Results
When the identity source is added, on-premises users can authenticate to the SDDC, but have the No access role. Add permissions for a group of users to give them the Cloud Administrator role.
Troubleshooting Networking for Hybrid Linked ModeYou can use the network troubleshooting functionality in the VMC Console or as part of the Hybrid Linked Mode functionality in the Cloud Gateway Appliance to troubleshoot network connectivity for Hybrid Linked Mode.
Connectivity Validator: DNS Server Can't Be ReachedOn-prem Primary DNS Server or On-prem Secondary DNS Server tests fail in the Connectivity Validator.
Problem
The tests Connectivity to On-prem Primary DNS Server on Port 53 and/or Connectivity to On-prem Secondary DNS Server on Port 53 in the Connectivity Validator fail with a message that says Port 53 Connection timed out.
Figure 3-1. Image of failed DNS Server connectivity test
Managing the VMware Cloud on AWS Data Center
VMware, Inc. 31

Cause
Potential causes of this failure could be:
n The IPsec VPN connection from the cloud SDDC to the on-premises data center might be down.
n The DNS server port 53 is blocked by a firewall rule on the cloud SDDC or on-premises data center.
n You have entered an incorrect IP address for the DNS server.
n The DNS server is down.
Solution
1 Verify that the VPN tunnel from the cloud SDDC to on-premises is up. See View VPN Tunnel Status and Statistics.
2 Inspect the firewall rules in the VMC Console to ensure that access to port 53 on the on-premises DNS server is not blocked.
3 Inspect the firewall rules in your on-premises environment to ensure that access to port 53 on the on-premises DNS server is not blocked.
4 Verify that you entered the correct IP address for your on-premises DNS servers. See Specify Management Gateway DNS Servers.
5 Verify that your DNS server is running, and bring it back up if it is down.
Connectivity Validator: DNS Lookup Failure for a Given FQDNThe DNS lookup test for an on-premises vCenter Server, Platform Services Controller, Active Directory, or ESXi fails.
Problem
One or more DNS lookup tests fails. The Resolved Address field in the test results shows no result.
Figure 3-2. Example of DNS lookup test failure
Cause
If the DNS server reachability test succeeded, but the DNS lookup for a given FQDN fails, this could be caused by one of the following:
n The on-premises DNS server does not have an entry for the given FQDN.
Managing the VMware Cloud on AWS Data Center
VMware, Inc. 32

n You entered an incorrect FQDN for the test.
Solution
1 Ensure that you entered the correct FQDN.
2 Check that the on-premises DNS server has an entry for the FQDN.
Connectivity Validator: Ping Failure for a Given FQDNThe test that pings an on-premises vCenter Server, Platform Services Controller, Active Directory, or ESXi fails.
Problem
A ping test for a given FQDN fails. Test details show that no responses to ICMP packets were received.
Figure 3-3. Example of a ping test failure
Cause
Potential causes of this failure could be:
n A firewall rule in the cloud SDDC or the on-premises data center might be blocking ICMP traffic.
n The remote system with the given FQDN is powered-off.
Solution
1 Check your firewall rules set in the VMC Console to ensure that they are not blocking ICMP traffic to the given FQDN.
2 Check your on-premises firewall rules to ensure that they are not blocking ICMP traffic to the given FQDN.
3 Check that the remote system being pinged is powered-on and functioning, and power on or restart if necessary.
Connectivity Validator: Port Reachability Failure for a Given FQDNA test to reach a specific port on
Managing the VMware Cloud on AWS Data Center
VMware, Inc. 33

Problem
A test for connectivity to a particular port at a given FQDN fails with the message Port port-number Connection timed out.
Figure 3-4. Example of a port reachability test failure
Cause
Potential causes of this failure could be:
n A firewall rule in the cloud SDDC or the on-premises data center might be blocking access to the port.
n The remote system with the given FQDN is powered-off.
Solution
1 Check your firewall rules set in the VMC Console to ensure that they are not blocking access to the specified port.
2 Check your on-premises firewall rules to ensure that they are not blocking access to the specific port.
3 Check that the remote system being pinged is powered-on and functioning, and power on or restart if necessary.
Connectivity Validator: Traceroute Failure for a given FQDNA traceroute test to a given FQDN fails.
Problem
A traceroute test to an FQDN fails. In the test results, you can see hops to the destination listed without accompanying IP addresses.
Managing the VMware Cloud on AWS Data Center
VMware, Inc. 34

Figure 3-5. Example of traceroute test failure
Cause
Potential causes of this failure could be:
n If the ping test to the FQDN itself is successful, a firewall rule in the cloud SDDC or the on-premises data center might be blocking ICMP traffic to one of the hops along the traffic path.
n The remote system with the given FQDN is powered-off.
Solution
1 Check your firewall rules set in the VMC Console to ensure that they are not blocking ICMP traffic to one of the hops along the traffic path.
2 Check your on-premises firewall rules to ensure that they are not blocking ICMP traffic to the one of the hops on the traffic path.
3 Check that the remote system is powered-on and functioning, and power on or restart if necessary.
Connectivity Validator: Test Failure Due to Internal ErrorA test fails due to an internal error.
Problem
Any of the Connectivity Validator tests might fail with an error message beginning with Internal Error:.
Managing the VMware Cloud on AWS Data Center
VMware, Inc. 35

Figure 3-6. Example of test failure due to internal error
Cause
This error most commonly occurs when the Connectivity Validator experiences an internal connectivity problem.
Solution
Most of these failures are intermittent and resolve without you needing to do anything. However, if the error persists, contact VMware customer support.
Unlink a Cloud SDDCYou can unlink a cloud SDDC from Hybrid Linked Mode when you no longer want linking between your cloud SDDC and a particular on-premises data center..
For example, you might want to link an on-premises data center to your SDDC in order to migrate virtual machines to the SDDC, and then unlink the on-premises data center. If you plan to decomission a linked on-premises data center, unlink it before doing so.
Note Unlinking an on-premises data center from the cloud SDDC does not remove the associated identity source or permissions that you added before linking the domain. Users can still use their on-premises credentials to authenticate to your SDDC, and retain the permissions granted to them. However, they are not able to view the on-premises inventory after unlinking the domain. When you unlink a cloud SDDC from the Cloud Gateway Appliance, users can't use their on-premises credentials to log into the cloud SDDC any longer.
Unlinking also leaves tags and categories in place, because VMs in your cloud SDDC might still be using those tags.
Prerequisites
Ensure that you have network connectivity between your SDDC management gateway and your SSO Domain.
Procedure
1 Log into the appropriate system.
n If you linked your cloud SDDC and your on-premises data center from the Cloud Gateway Appliance, log into the Cloud Gateway Appliance UI.
Managing the VMware Cloud on AWS Data Center
VMware, Inc. 36

n If you linked your cloud SDDC and your on-premises data center from the cloud vCenter Server, log in to the vSphere Client for your SDDC.
2 Browse to the Linked Domains page.
a Select Menu > Administration to display the Administration page.
b Under Hybrid Cloud, select Linked Domains.
3 Under the name of the linked domain, click Unlink.
A dialog box appears asking you to confirm the unlinking. Note that all currently active sessions are logged out when you unlink a domain.
4 Click OK.
When the unlinking is complete, you are prompted to log out.
5 Click OK to log out.
Results
The SSO domain is unlinked. If you want to continue using Hybrid Linked Mode, you can link to another SSO domain or relink to the same domain.
Note After you unlink from the cloud SDDC, new connections to the cloud SDDC vSphere Client cannot view or interact with previously-linked on-premises resources. Currently active sessions in the cloud SDDC vSphere Client continue to be able to view and interact with resources in the previously linked on-premises vCenter Server instances until the users of those sessions log out of the cloud SDDC vSphere Client or the sessions expire. If necessary, log in to each of the previously-linked on-premises vCenter Server instances, and forcibly terminate these sessions.
After you unlink from the Cloud Gateway Appliance, new connections to the Cloud Gateway Appliance cannot view or interact with previously-linked cloud resources. Currently active sessions in the Cloud Gateway Appliance continue to be able to view and interact with resources in the cloud SDDC until the users of those sessions log out or the sessions expire. If necessary, log in to the Cloud Gateway Appliance and forcibly terminate these sessions.
Managing the VMware Cloud on AWS Data Center
VMware, Inc. 37

Clusters and Resource Pools in VMware Cloud on AWS 4In an on-premises vSphere environment, you configure clusters to group ESXi hosts and to set vSphere HA, vSphere DRS, and other cluster features. You use resource pools group resources. In a VMware Cloud on AWS environment, VMware creates a single cluster with a preset configuration. VMware creates a resource pool for compute VMs and a second resource pool for management VMs. You can view cluster and resource pool settings and create and configure child resource pools.
What you can do in VMware Cloud on AWS depend on what you select.
Table 4-1. Supported Tasks on Clusters and Resource Pools in VMware Cloud on AWS
Object Supported Tasks
Cluster A VMware Cloud on AWS environment has one cluster that includes all ESXi hosts that are part of your SDDC.
n View the cluster configuration, including vSphere DRS and vSphere HA. The cloudadmin user cannot change the cluster configuration.
n Examine all hosts and all resource pools that are associated with the cluster. You can see the consumed memory and CPU, HA state, and uptime.
n Examine all VMs, datastores, and networks that are associated with the cluster.
n Set tags and attributes. See vSphere Tags and Attributes.
Resource pool A VMware Cloud on AWS environment has two predefined resource pools. You can perform the following tasks:
n Create new virtual machines and child resource pools.
n Change resource allocation settings on child resource pools
n Rename the resource pools to better match company policy.
n Monitor the resource pool, its VMs, and its child resource pools, and examine resource pool utilization.
n Set tags and attributes. See vSphere Tags and Attributes.
Note Some menu options, such as Delete, are available on top-level resource pools but have no effect. As [email protected], you do not have permissions to perform those tasks. A warning appears in the Alarms window.
This chapter includes the following topics:
n Predefined Clusters and Resource Pools
VMware, Inc. 38

n Examine VMs and Hosts in the Cluster
n Examine and Monitor vSphere DRS
n Examine and Monitor vSphere HA
n Examine Cluster Configuration
n Create and Manage Child Resource Pools
Predefined Clusters and Resource PoolsYour VMware Cloud on AWS SDDC includes a cluster and two resource pools. A vSphere cluster organizes and manages all CPU, memory, and storage resources of a set of hosts. Inside each cluster, different resource pools can further carve up the resources. You can create child resource pools of the Compute-ResourcePool.
In a VMware Cloud on AWS SDDC, VMware creates a cluster and manages all the resources in the cluster for you. That means if a VM needs more resources, vSphere DRS migrates it to a different host. If one of the hosts becomes unavailable, vSphere HA immediately brings up all the VMs running on that host on different hosts.
Resource pools allow further division of resource allocation but do not affect the behavior of vSphere DRS and vSphere HA. A VMware Cloud on AWS SDDC has two predefined resource pools. Both resource pools share the same physical hardware but are dedicated to different uses.
Compute-ResourcePool By default, all workload virtual machines are created to the top-level Compute-ResourcePool. You can create child resource pools of this resource pool if you want to prioritize resource allocation to different VMs.
Mgmt-ResourcePool All management virtual machines, for example the NSX Manager and NSX Controller instances, are created in the Mgmt-ResourcePool. Resources in this pool are reserved for management VMs so that they can operate correctly without consuming resources from the Compute-ResourcePool.
Table 4-2. Resources Consumed by Management VMs
Resource Type Average Resource Consumption
vCPU 32
Memory 104 GB
Storage 3898 GB
Examine VMs and Hosts in the ClusterIn an VMware Cloud on AWS environment, you can examine the VMs and hosts in a cluster.
Procedure
1 In the vSphere Client, click Menu and select Hosts and Clusters.
Managing the VMware Cloud on AWS Data Center
VMware, Inc. 39

2 Select Cluster-1.
In VMware Cloud on AWS, a single cluster holds the configuration settings. Because the settings are predefined, a second cluster is not needed.
3 Click VMs to examine virtual machines and vApps.
a Check how much CPU and memory that each VM is consuming, and check the allocated and used storage.
b Right-click a down arrow in the title bar to show or hide columns in this display.
c If you want to make changes to a VM or vApp, select it, right-click the VM in the object hierarchy, click Settings, and make the change.
See the Virtual Machine Management documentation for VMware Cloud on AWS for details.
4 Click Hosts to see the resource that the hosts in the cluster are consuming.
You can request additional hosts if current resource useage shows that you'll need them soon.
Examine and Monitor vSphere DRSvSphere DRS ensures optimal resource allocation across the VMs in your SDDC. In an on-premises environment, you can configure several options, for example, you can use fully automated DRS or decide to receive recommendations. In a VMware Cloud on AWS SDDC, VMware has preconfigured the vSphere DRS options for the cluster of hosts.
VMware has selected settings that ensure optimal resource distribution while minimizing the number of migrations that occur. You don't have to - and you can't - change those selections. You might find it interesting to look at the preconfigured values.
Note For a seamless user experience, the screens for configuring, monitoring, and examining clusters and resource pools are the same in an on-premises SDDC and in a VMware Cloud on AWS SDDC. However, the Edit button is grayed out for VMware Cloud on AWS.
Procedure
1 In the vSphere Client, click Menu and select Hosts and Clusters.
2 Select Cluster-1.
In VMware Cloud on AWS, a single cluster holds the configuration settings. Because the settings are predefined, a second cluster is not needed.
3 Examine the DRS settings, which fully automate resource allocation across the cluster.
The UI explains the background information. For detailed information, see the vSphere Resource Management documentation.
Managing the VMware Cloud on AWS Data Center
VMware, Inc. 40

Examine and Monitor vSphere HAvSphere HA ensures availability of your virtual machines. If a host fails, vSphere HA restarts the VM on a different host. In a VMware Cloud on AWS SDDC, VMware immediately replaces failed hosts, so you can always count on the full set of resources in your SDDC
Note For a seamless user experience, the screens for configuring, monitoring, and examining clusters and resource pools are the same in an on-premises SDDC and in a VMware Cloud on AWS SDDC. However, the Edit button is grayed out for VMware Cloud on AWS.
Procedure
1 In the vSphere Client, click Menu and select Hosts and Clusters.
2 Select Cluster-1.
In VMware Cloud on AWS, a single cluster holds the configuration settings. Because the settings are predefined, a second cluster is not needed.
3 Examine the vSphere HA settings, which are optimized for a cloud environment.
Setting Discussion
vSphere HA is Turned ON With vSphere HA turned on, virtual machines are protected against host failure.
Proactive HA is Turned OFF Because VMware immediately replaces failed hosts, Proactive HA is not needed in the VMware Cloud on AWS environment.
Failure conditions and responses Because your VMware Cloud on AWS is protected at the hardware level, some vSphere HA features are disabled. It makes no sense to have these features enabled in the cloud.
Admission Control Shows reserved CPU and memory capacity. If your cluster does not have the specified failover capacity, you cannot start additional VMs.
Advanced Options Displays the settings for advanced options that are preset in the cloud SDDC.
For detailed discussions of vSphere HA and other features that ensure availability in an on-prem vSphere environment, see the vSphere Availability documentation. Many of the features that on-prem administrators have to manage are preset in VMware Cloud on AWS.
4 Click the vSphere HA Monitoring link for more information on vSphere HA events.
Managing the VMware Cloud on AWS Data Center
VMware, Inc. 41

Examine Cluster ConfigurationIn your VMware Cloud on AWS SDDC, you can examine all cluster configuration details that you can view and change in an on-premises deployment.
Note For a seamless user experience, the screens for configuring, monitoring, and examining clusters and resource pools are the same in an on-premises SDDC and in a VMware Cloud on AWS SDDC. However, the Edit button is grayed out for VMware Cloud on AWS.
Procedure
1 In the vSphere Client, click Menu and select Hosts and Clusters.
2 Select Cluster-1.
In VMware Cloud on AWS, a single cluster holds the configuration settings. Because the settings are predefined, a second cluster is not needed.
3 Examine the following settings.
Configuration Setting Description
General Displays the predefined swap file location and VM Compatibility settings.
VMware EVC VMware Enhanced vMotion Compatibility is disabled. The hosts are uniform, so vMotion Compatibility problems do not occur.
VM/Host Groups
VM/Host Rules The administrators of your VMware Cloud on AWS environment create rules to ensure that certain virtual machines never run on the same rules. You can view those rules, but you cannot create rules.
VM Overrides VM Overrides change the behavior of certain VMs. For example, the vCenter VM has the highest vSphere HA Restart Priority. You can view the overrides that the VMware Cloud on AWS administrator set for some system VMs. You cannot specify overrides for your own VMs.
Host Options Displays host options, including some information about the host.
Host Profile All ESXi hosts are managed by VMware and are set up in a uniform fashion. Host profiles are not required.
Create and Manage Child Resource PoolsResource pools allow you perform resource allocation depending on the needs of different groups. You can create a hierarchy of child resource pools for the top-level compute resource pool, called Compute-ResourcePool by default. You can specify resource settings when you create a resource pool, and you can change those settings later.
Managing the VMware Cloud on AWS Data Center
VMware, Inc. 42

For example, assume a host has a number of virtual machines. The marketing department uses three of the virtual machines and the QA department uses two virtual machines. Because the QA department needs larger amounts of CPU and memory, the administrator creates one resource pool for each group. The administrator sets CPU Shares to High for the QA department pool and to Normal for the Marketing department pool so that the QA department users can run automated tests. The second resource pool with fewer CPU and memory resources is sufficient for the lighter load of the marketing staff. Whenever the QA department is not fully using its allocation, the marketing department can use the available resources.
The numbers in the following figure show the effective allocations to the resource pools.
Managing the VMware Cloud on AWS Data Center
VMware, Inc. 43

Figure 4-1. Parent Resource Pools and Child Resource Pools
Compute Resource-Pool6GHz, 30GB
RP-QA4GHz, 20GB
QA 1 QA 2 Marketing 1 Marketing 2 Marketing 3
RP-Marketing2GHz, 10GB
Managing the VMware Cloud on AWS Data Center
VMware, Inc. 44

Procedure
1 Start the task.
Task Steps
Create a resource pool Right-click the parent resource pool and select New Resource Pool.
Edit resource pool settings Right-click a resource pool and select Edit Resource Settings.
Note If you edit the settings of a system-defined resource pools, the changes do not take effect.
2 Specify how to allocate CPU and memory resources.
Option Description
Name Name for this resource pool.
Shares Specify shares for this resource pool with respect to the parent’s total resources. Sibling resource pools share resources according to their relative share values bounded by the reservation and limit.
n Select Low, Normal, or High to specify share values respectively in a 1:2:4 ratio.
n Select Custom to give each virtual machine a specific number of shares, which expresses a proportional weight.
Reservation Specify a guaranteed CPU or memory allocation for this resource pool. Defaults to 0.
A nonzero reservation is subtracted from the unreserved resources of the parent (host or resource pool). The resources are considered reserved, regardless of whether virtual machines are associated with the resource pool.
Expandable Reservation When the check box is selected (default), expandable reservations are considered during admission control.
If you power on a virtual machine in this resource pool, and the combined reservations of the virtual machines are larger than the reservation of the resource pool, the resource pool can use resources from its parent or ancestors.
Limit Specify the upper limit for this resource pool’s CPU or memory allocation. You can usually accept the default (Unlimited).
To specify a limit, deselect the Unlimited check box.
3 Click OK.
Managing the VMware Cloud on AWS Data Center
VMware, Inc. 45
vSAN Storage in VMware Cloud on AWS 5VMware Cloud on AWS provides two vSAN datastores in each SDDC cluster: WorkloadDatastore, managed by the Cloud Administrator, and vsanDatastore, managed by VMware.
These datastores are logical entities that share a common capacity pool. Each datastore reports the total available free space in the cluster as its Capacity. Capacity consumed in either datastore updates the Free value for both.
vsanDatastoreThis datastore provides storage for the management VMs in your SDDC, such as vCenter Server, NSX controllers, and so on.
The management and troubleshooting of the vSAN storage in your SDDC is handled by VMware. For this reason, you can't edit the vSAN cluster settings or monitor the vSAN cluster. You also do not have permission to browse this datastore, upload files to it, or delete files from it.
WorkloadDatastoreThis datastore provides storage for your workload VMs, templates, ISO images, and any other files you choose to upload to your SDDC. You have full permission to browse this datastore, create folders, upload files, delete files, and perform all other operations needed to consume this storage.
The datastores in your SDDC are assigned the default VM storage policy by default. You can define additional storage policies and assign them to either datastore. For more information on vSAN storage policies, see Using vSAN Policies.
This chapter includes the following topics:
n Storage Capacity and Data Redundancy
n vSAN Deduplication and Compression
n vSAN Encryption in VMware Cloud on AWS
n vSAN Policies
VMware, Inc. 46

Storage Capacity and Data RedundancySDDC storage capacity and data redundancy scale with the number of nodes in the SDDC.
Single node SDDCs provide no data redundancy. SDDCs with more nodes support data redundancy through various RAID configurations. All SDDC storage provides data deduplication and compression. Data redundancy in SDDCs that have more than one host is expressed as a number of failures to tolerate (FTT), where a failure can be the loss of a single host in a cluster or a single storage device in an array.
Typical Storage Allocation and Consumption ScenariosAll RAID configurations consume data to support redundancy, as shown in this table. The Usable Storage column shows how much data you could store on a given host under a specific vSAN policy, and accounts for recommended free space by subtracting 30% from that total.
Table 5-1. Usable Storage Per Node
Nodes FTT and RAID Config Usable Storage (TB)Projected Usable Capacity After Dedup/Compression (TB)
1 none 7 10
3 1 failure, RAID-1 (Mirroring) 3.7 5
4 1 failure, RAID-5 (Erasure Coding) 5.6 8
5 2 failures, RAID-1 (Mirroring) 2.5 3.6
6 2 failures, RAID-6 (Erasure Coding) 4.9 7
RAID overhead can also be expressed in terms of the storage consumed by a VM. This table shows how various RAID and FTT configurations affect the average amount of storage consumed by a 100 GB VM for a given storage allocation.
Table 5-2. Storage Consumed by a 100 GB VM
Nodes FTT and RAID Config Actual GB Allocated Average GB Consumed
1 none 100 69
3 1 failure, RAID-1 (Mirroring) 200 138
4 1 failure, RAID-5 (Erasure Coding) 133 92
5 2 failures, RAID-1 (Mirroring) 300 207
6 2 failures, RAID-6 (Erasure Coding) 150 103
vSAN Deduplication and CompressionvSAN performs block-level deduplication and compression to save storage space. This allows you to make more efficient and cost-effective use of storage in your VMware Cloud on AWS SDDC.
Managing the VMware Cloud on AWS Data Center
VMware, Inc. 47

Deduplication removes redundant data blocks, whereas compression removes additional redundant data within each data block. These techniques work together to reduce the amount of physical storage required to store the data. VMware vSAN applies applies deduplication followed by compression as it moves data from the cache tier to the capacity tier.
Deduplication occurs inline when data is written back from the cache tier to the capacity tier. The deduplication algorithm uses a fixed block size and is applied within each disk group. Redundant copies of a block within the same disk group are deduplicated.
Storage savings resulting from deduplication and compression are highly dependent on the workload data. On average, storage space savings are in the range of 1.5X to 2X.
Starting with SDDC Version 1.3, deduplication and compression are enabled on all new clusters you create. The feature is automatically enabled for all VMware Cloud on AWS clusters and cannot be turned off.
Clusters created with older SDDC versions have deduplication and compression enabled after they are upgraded to the new SDDC version. During the enablement of deduplication and compression, an extra host is temporarily added to the cluster. You are not charged for this host. The upgrade process moves data out of each disk group, reformats the disk group with deduplication settings, and writes the data back to the disk group.
Enablement of deduplication and compression takes some time. During the process, some clusters might operate in a partial state, with some disk groups having deduplication enabled, and others not. While the upgrade is in progress, you cannot remove hosts from the cluster. During the upgrade process, the cluster may experience some slowness, especially during heavy I/O load.
To speed up the enablement of deduplication and compression, follow these best practices.
n Avoid changes to the cluster configuration as much as possible, including addition of hosts and addition or deletion of VMs.
n Avoid changes to storage policies.
n Maintain current cluster capacity as much as possible.
vSAN Encryption in VMware Cloud on AWSvSAN encrypts all user data at rest in VMware Cloud on AWS.
Encryption is enabled by default on each cluster deployed in your SDDC, and can't be turned off.
When you deploy a cluster, vSAN uses the AWS Key Management Service (AWS KMS) to generate a Customer Master Key (CMK), which is stored by AWS KMS. vSAN then generates a Key Encryption Key (KEK) and encrypts it using the CMK. The KEK is in turn used to encrypt Disk Encryption Keys (DEKs) generated for each vSAN disk.
You can change KEKs by using either the vSAN API or the vSphere Client UI. This process is known as performing a shallow rekey. Changing the CMK or DEKs is not supported. If you must change the CMK or DEKs, create a new cluster and migrate your VMs and data to it.
Managing the VMware Cloud on AWS Data Center
VMware, Inc. 48

Generate New Encryption Keys in VMware Cloud on AWSYou can generate new Key Encryption Keys (KEKs) for your VMware Cloud on AWS cluster if needed.
This process is known as performing a shallow rekey. Changing the CMK or DEKs is not supported. If you must change the CMK or DEKs, create a new cluster and migrate your VMs and data to it
Procedure
1 Log in to the vSphere Client for your cloud SDDC.
2 Navigate to the vSAN cluster.
3 Click the Configure tab.
4 Under vSAN, select Services.
5 Click Generate New Encryption Keys.
6 Click Apply to generate a new KEKs.
The Disk Encryption Keys (DEKs) are re-encrypted with the new KEKs.
Example: Using VMware PowerCLI for this TaskIf you know the cloudadmin password, you can use a PowerCLI command like this one to do a shallow re-key for the vSAN service. This example, based the Vsan-EncryptionRekey.psl code sample you can download from https://code.vmware.com/samples/2200#code, re-keys the vSAN service running on Cluster-1 of SDDC vCenter vcenter.sddc-54-200-165-35.vmwarevmc.com:
PS > ./Vsan-EncryptionRekey.psl -vCenter vcenter.sddc-54-200-165-35.vmwarevmc.com -User
[email protected] -Password cloudadmin-password -ReKey shallow -ClusterName Cluster-1
vSAN PoliciesvSAN storage polices define storage requirements for your virtual machines. These policies guarantee the required level of service for your VMs because they determine how storage is allocated to the VM.
VMware Cloud on AWS includes two vSAN datastores, one for the management VMs (vsanDatastore) and one for the workload VMs (WorkloadDatastore). Both datastores share the same underlying storage devices and consume from the same pool of free space.
Each virtual machine deployed to a vSAN datastore is assigned at least one virtual machine storage policy. You can assign storage policies when you create or edit virtual machines.
Storage policies have availability attributes and advanced attributes.
Availability Attributes for vSAN VM Storage Policies
Site disaster tolerance Defines the data redundancy method used by stretched clusters to handle a site failure. This attribute applies to stretched clusters. If you have a standard vSAN cluster, choose None (standard cluster).
Managing the VMware Cloud on AWS Data Center
VMware, Inc. 49

The options are:
n None (standard cluster)
n Dual-site monitoring (stretched cluster)
n None - Keep data on primary (stretched cluster)
n None - Keep data on secondary (stretched cluster)
Failures to tolerate Defines the number of host and device failures that a virtual machine can tolerate. You can choose to have no data redundancy, or select a RAID configuration optimized for either performance (Mirroring) or capacity (Erasure Coding).
n RAID-1 uses more disk space to place the components of objects but provides better performance for accessing the objects.
n RAID-5/6 (Erasure Coding) uses less disk space, but the performance is reduced.
Table 5-3. RAID Configurations, FTT, and Host Requirements
RAID Configuration Failures to Tolerate (FTT) Minimum Hosts Required
RAID-1 (Mirroring) This is the default setting. RAID-1
1 3
RAID-5 (Erasure Coding) 1 4
RAID-1 (Mirroring) 2 5
RAID-6 (Erasure Coding) 2 6
RAID-1 (Mirroring) 3 7
Note VMs with FTT = 0 (No Data Redundancy) might experience data loss if there is a failure or if the VM becomes unresponsive.
The Managed Storage Policy Profile determines the initial RAID configuration of a cluster. When a Managed Storage Policy Profile is applied to the cluster, the RAID configuration is updated automatically as the cluster size changes. See VMware Cloud on AWS Managed Storage Policy Profiles for details.
Advanced Attributes for vSAN VM Storage Policies
Number of disk stripes per object
Minimum number of capacity devices across which each replica of a virtual machine object is striped. A value higher than 1 might result in better performance, but also results in higher use of system resources. Default
Managing the VMware Cloud on AWS Data Center
VMware, Inc. 50

value is 1. Maximum value is 12. Change the default value only when recommended by VMware support.
IOPS limit for object Defines the IOPS limit for an object, such as a VMDK. IOPS is calculated as the number of I/O operations, using a weighted size. If the system uses the default base size of 32 KB, a 64-KB I/O represents two I/O operations.
When calculating IOPS, read and write are considered equivalent, but cache hit ratio and sequentiality are not considered. If a disk’s IOPS exceeds the limit, I/O operations are throttled. If the IOPS limit for object is set to 0, IOPS limits are not enforced.
vSAN allows the object to double the rate of the IOPS limit during the first second of operation or after a period of inactivity.
Object space reservation
This setting defines the percentage of the logical size of the virtual machine disk (vmdk) object that must be reserved (provisioned) when deploying virtual machines. The default reservation value in VMware Cloud on AWS is 0% (Thin provisioning). You can specify Thick provisioning to reserve capacity for larger-than-expected vSAN writes, but the underlying vmdk structure remains the same as it is in the Thin provisioning configuration, and is not the same as the Thick provision eager zeroed provisioning model available on-premises.
Flash read cache reservation
This setting is ignored in VMware Cloud on AWS. In Hybrid vSan deployments, it designates how much flash capacity is reserved as read cache.
Disable object checksum
If the option is set to No, the object calculates checksum information to ensure the integrity of its data. If this option is set to Yes, the object does not calculate checksum information.
vSAN uses end-to-end checksum to ensure the integrity of data by confirming that each copy of a file is exactly the same as the source file. The system checks the validity of the data during read/write operations, and if an error is detected, vSAN repairs the data or reports the error.
If a checksum mismatch is detected, vSAN automatically repairs the data by overwriting the incorrect data with the correct data. Checksum calculation and error-correction are performed as background operations.
The default setting for all objects in the cluster is No, which means that checksum is enabled.
Force provisioning If the option is set to Yes, the object is provisioned even if the Primary level of failures to tolerate, Number of disk stripes per object, and Flash read cache reservation policies specified in the storage policy cannot be satisfied by the datastore. Use this parameter in bootstrapping
Managing the VMware Cloud on AWS Data Center
VMware, Inc. 51

scenarios and during an outage when standard provisioning is no longer possible.
The default No is acceptable for most production environments. vSAN fails to provision a virtual machine when the policy requirements are not met, but it successfully creates the user-defined storage policy.
VMware Cloud on AWS Managed Storage Policy ProfilesWhen you create a cluster in your SDDC, VMware Cloud on AWS creates a managed storage policy profile that is applied as the default storage policy to VMs that you create in the cluster. This storage policy profile is named "VMC Workload Storage Policy - cluster name". The policy settings are configured to ensure that the cluster meets the requirements outlined in the Service Level Agreement for VMware Cloud on AWS (the SLA).
The storage policy settings are based on the cluster configuration as follows:
n Single host SDDCs are not covered by the SLA but use RAID-1 and FTT = 0.
n For single-AZ clusters, the policy depends on the size of the cluster and the storage type:
n Clusters using Elastic VSAN storage use RAID-1 (Mirroring) and Failures to Tolerate (FTT) equal to 1, regardless of cluster size.
n Clusters using non-Elastic VSAN storage containing 3 to 5 hosts use RAID-1 (Mirroring) and FTT equal to 1.
n Clusters using non-Elastic VSAN storage containing 6 or more hosts use RAID-6 (Erasure Coding) and FTT equal to 2.
n Stretched clusters use RAID-1 (Mirroring) and FTT equal to 1, but also have Site Disaster Tolerance set to Dual Site Monitoring.
Because the storage policy for non-Elastic VSAN clusters varies based on cluster size, adding or removing hosts will trigger a storage policy reconfiguration if it changes the size of the cluster so that it requires a different policy. For example, if you add an additional host to a cluster contaning five i3.metal hosts, the storage policy for that cluster is reconfigured from using RAID-1 and FTT=1 to RAID-6 and FTT=2. The reverse happens if the extra host is removed and the number of hosts is reduced from six to five.
When you make a change to a cluster that triggers a storage policy reconfiguration, the reconfiguration temporarily requires additional storage. If the cluster is close to 75% storage capacity, this might trigger an EDRS scale out event, adding a host to the cluster. After the reconfiguration is completed, EDRS might not remove the additional host. Check your clusters after storage reconfiguration and remove any extra hosts.
Managing the VMware Cloud on AWS Data Center
VMware, Inc. 52

If you remove one or more hosts from a cluster, and that triggers a storage policy reconfiguration, the reconfiguration must complete before the host or hosts are removed. If your workloads use a large amount of storage, this reconfiguration could take anywhere from hours to days to complete. During this time, any hosts you have designated to be removed remain usable and you are still billed for host usage. After the storage policy reconfiguration completes, the host or hosts are removed and you are no longer billed for the host usage.
Note Do not edit the managed storage policies that VMware Cloud on AWS creates for your clusters. If you rename the policy, it is no longer managed by VMware Cloud on AWS. If you edit the settings of the managed storage policy, your changes are overwritten at the next storage policy reconfiguration.
VM Templates and Managed Storage PoliciesIf a VM template is associated with a VMware Cloud on AWS managed storage policy, the template's policy is not automatically updated if the cluster's policy is reconfigured. After the cluster's storage policy is reconfigured, the VM template compliance status is "Out of Date". To make the template policy status "Compliant", you must convert the template to a VM, reapply the VM storage policy, and then convert the VM back to a template.
When you deploy a VM from a template, VMware recommends that you select Datastore Default for the VM Storage Policy in order to ensure that the VM is deployed with the current cluster managed storage policy.
Storage Policies and SLA RequirementsWhen working with virtual machine storage policies, it's important to understand how they affect the consumption of storage capacity in the vSAN cluster and whether they meet the requirements defined in the Service Level Agreement for VMware Cloud on AWS (the SLA).
The managed storage policy is initially configured based on the number of hosts in the cluster. For example, a three-host cluster defaults to FTT=1 using the RAID-1 Mirroring policy. Clusters with more than six i3.metal hosts in a single AZ default to FTT=2 using the RAID-6 Erasure Coding policy. You can create custom policies that align data availability with the needs of your underlying data, but workload VMs with storage policies that do not meet the requirements set forth in the Service Level Agreement may not qualify for SLA Credits. The VM Storage Policy must be configured with the appropriate level of protection. Ephemeral workloads may use the No Data Redundancy policy to save capacity, foregoing any SLA guarantees of availability.
Important When scaling an i3.metal cluster up from five to six hosts, the underlying policy configuration must be updated to FTT=2 using either Mirroring or Erasure Coding to compensate for the larger failure pool. Clusters using the managed storage policy will be reconfigured automatically, but you must manually update any clusters that use custom policies. Continued use of FTT=1 for this host configuration means that VMware cannot guarantee availability per the service definition guidance. R5.metal clusters using Elastic vSAN are able to sustain the SLA with FTT=1 for any cluster size of three hosts or more.
For more information about designing and sizing considerations of storage policies, see the Administering VMware vSAN documentation.
Managing the VMware Cloud on AWS Data Center
VMware, Inc. 53

Define a Virtual Machine Storage Policy for vSANYou can create a storage policy that defines storage requirements for a VM and its virtual disks. In this policy, you reference storage capabilities supported by the vSAN datastore.
Procedure
1 In the vSphere Client, click Menu > Policies and Profiles, then click VM Storage Policies.
2 Click Create VM storage policy.
3 On the Name and description page:.
a Leave the vCenter Server selected.
b Type a name and a description for the storage policy, and click Next.
4 On the vSAN page, specify the Availability and Advanced attributes and click Next.
The defaults are appropriate for many situations. See vSAN Policies for details on each attribute.
5 On the Storage compatibility page, review the list of datastores that match this policy and click Next.
To be eligible, a datastore does not need to satisfy all rule sets within the policy. The datastore must satisfy at least one rule set and all rules within this set. Verify that the vSAN datastore meets the requirements set in the storage policy and that it appears on the list of compatible datastores.
6 On the Ready to complete page, review the policy settings, and click Finish.
What to do next
Assign this policy to a virtual machine and its virtual disks. vSAN places the virtual machine objects according to the requirements specified in the policy. For information about applying the storage policies to virtual machine objects, see the vSphere Storage documentation.
Assign Storage Policies to Virtual MachinesYou can assign a VM storage policy in an initial deployment of a virtual machine or when you perform other virtual machine operations, such as cloning or migrating.
This topic describes how to assign the VM storage policy when you create a virtual machine. For information about other deployment methods that include cloning, deployment from a template, and so on, see the vSphere Virtual Machine Administration documentation.
You can apply the same storage policy to the virtual machine configuration file and all its virtual disks. If storage requirements for your virtual disks and the configuration file are different, you can associate different storage policies with the VM configuration file and the selected virtual disks.
Procedure
1 In the vSphere Client, start the virtual machine provisioning process and follow the appropriate steps.
Managing the VMware Cloud on AWS Data Center
VMware, Inc. 54

2 Assign the same storage policy to all virtual machine files and disks.
a On the Select storage page, select a storage policy from the VM Storage Policy drop-down menu.
Based on its configuration, the storage policy separates all datastores into compatible and incompatible sets. If the policy references data services offered by a specific storage entity, for example, Virtual Volumes, the compatible list includes datastores that represent only that type of storage.
b Select an appropriate datastore from the list of compatible datastores.
The datastore becomes the destination storage resource for the virtual machine configuration file and all virtual disks.
3 Change the VM storage policy for the virtual disk.
Use this option if requirements for storage placement are different for virtual disks. You can also use this option to enable I/O filter services, such as caching and replication, for your virtual disks.
a On the Customize hardware page, expand the New hard disk pane.
b From the VM storage policy drop-down menu, select the storage policy to assign to the virtual disk.
4 Complete the virtual machine provisioning process.
Results
After you create the virtual machine, the Summary tab displays the assigned storage policies and their compliance status.
What to do next
If storage placement requirements for the configuration file or the virtual disks change, you can later modify the virtual machine policy assignment.
Managing the VMware Cloud on AWS Data Center
VMware, Inc. 55

Managing Virtual Machines in VMware Cloud on AWS
Your VMware Cloud on AWS SDDC provides all the tools you need to, you deploy, configure, and customize VMware virtual machines (VMs).
Because it is a service, VMware Cloud on AWS imposes a few constraints on VM operations, especially those that require you to have physical access to the host hardware or root access to the host operating system. But with a few exceptions (which we point out in this document), on-premises operations described in vSphere Virtual Machine Administration for vSphere 6.7 work the same way in your VMware Cloud on AWS SDDC.
Table 6-1. vSphere Virtual Machine Administration Highlights
Topics Content Highlights
Introduction to vSphere Virtual Machines n Overview of VM lifecycle and components.
n List of VM files and what they're used for.
n Overview of VM hardware and other options.
Deploying Virtual Machines Step-by-step instructions for creating VMs. You have many options, including:
n Deploying a VM from scratch.
n Cloning existing VMs or templates
n Deploying an OVF or OVA template
n Deploying a VM from an uploaded OVF or OVA file
Using Content Libraries Content libraries are container objects for VM and vApp templates and other types of files, such as ISO images, text files, and so on. You can use the templates in the library to deploy virtual machines and vApps in the vSphere inventory. You can also use content libraries to share content between your on-premises infrastructure and your SDDC.
Configuring Virtual Machine Hardware Detailed information about the options for configuring different hardware options, such as CPU, memory, and devices. You can modify existing virtual devices or add new devices, thous as we've noted some constraints may apply in VMware Cloud on AWS compared to what you can do in your on-premises vCenter environment.
VMware, Inc. 56

Table 6-1. vSphere Virtual Machine Administration Highlights (continued)
Topics Content Highlights
Configuring Virtual Machine Options Explains VM options and how to change them.
n Power Management settings
n UEFI secure boot for virtual machines
n VM Boot options
n Advance options such as logging, debugging, and latency sensitivity
Customizing Virtual Machines Instructions for performing post-deployment customization tasks, including:
n Options for installing a guest OS
n Customizing the guest OS with a customization spec
n Using a virtual machine console
n Using snapshots
n Upgrading VMware Tools or the Hardware Compatibility setting.
VM Configurations With Limited or No Support in the SDDCSome virtual machine configurations that you may be using in your on-premises data center are not supported in the SDDC. Others are supported with limitations.
Use vSphere Virtual Machine Administration in the VMware vSphere Documentation as your guide to creating, configuring, and managing workload VMs in VMware Cloud on AWS. Because VMware Cloud on AWS is a service, some VM configuration options documented in vSphere Virtual Machine Administration aren't available for use in an SDDC even though they may be mentioned in a help topic or listed in the vSphere Client when you right-click a workload VM and choose Edit Settings. But with a few exceptions, which we document here, you can use the guidance provided in that document when you configure, deploy, and manage workload VMs in the SDDC.
Table 6-2. On-Premises VM Configuration Options That Are Unavailable in an SDDC
Configuration Option References Comments
Use the vSphere Client and the vSphere Web Client.
The vSphere Client and the vSphere Web Client and other topics.
Only the vSphere Client is supported for access to the SDDC vCenter.
Enable hyperthreading in a virtual CPU.
Virtual CPU Configuration and other topics.
To mitigate security vulnerabilities, including the ones discussed in VMware Knowledge Base article 55808, VMware Cloud on AWS disables CPU hyperthreading on all hosts.
Change CPU identification masks.
Change CPU Identification Mask Settings
You cannot change CPU ID mask of a VM in your SDDC.
Change virtual disk type.
Change the Virtual Disk Configuration
You cannot change storage type for virtual disks on a VM in your SDDC.
Managing the VMware Cloud on AWS Data Center
VMware, Inc. 57

Table 6-2. On-Premises VM Configuration Options That Are Unavailable in an SDDC (continued)
Configuration Option References Comments
Configure virtual hardware.
Virtual Machine Hardware Available to vSphere Virtual Machines
You cannot create a VM that includes any virtual hardware device that requires a physical change to the host. This includes things like serial ports, USB drives, and floppy drives.
Add a SCSI controller. Add a SCSI Controller to a Virtual Machine
You can add a SCSI controller but cannot use virtual SCSI bus sharing.
Map a raw LUN or logical disk.
Raw Device Mapping VMware Cloud on AWS does not support external block storage. You cannot deploy a VM that uses an RDM disk in an SDDC.
Add a hard disk. Large Capacity Virtual Disk Conditions and Limitations
VMware Cloud on AWS does not support external block storage. You cannot deploy a VM that uses VMFS5 or NFS in an SDDC.
Add a network adapter Network Adapter Basics
VMware Cloud on AWS supports only E1000E, VMXNET3, and SR-IOV adapters.
Add virtual CPUs Virtual CPU Limitations
Because hyperthreading is disabled in VMware Cloud on AWS hosts, a virtual machine in the SDDC cannot have more virtual CPUs than the number of physical cores on the host.
On-Premises VM Configurations that are Blocked or Limited in an SDDCCertain VM configuration options can prevent the host from entering maintenance mode, interfere with vMotion, or otherwise prevent VMware from performing service upgrades. These configurations, which are permitted on premises, have limited support or no support the SDDC. If you upload a template with an unsupported configuration from your on-premises content library to your SDDC, VMs created from the template will not power on in the SDDC.
Table 6-3. VM Configurations With Limited or No Support in the SDDC
Configuration Option Support Comments
VM includes a serial port with network output
None This configuration is blocked in the SDDC
VM disk enables both multi-writer and Changed Block Tracking (CBT)
None This configuration is blocked in the SDDC.
VM includes a parallel port
None Parallel ports are not supported for physical device or file output.
Managing the VMware Cloud on AWS Data Center
VMware, Inc. 58
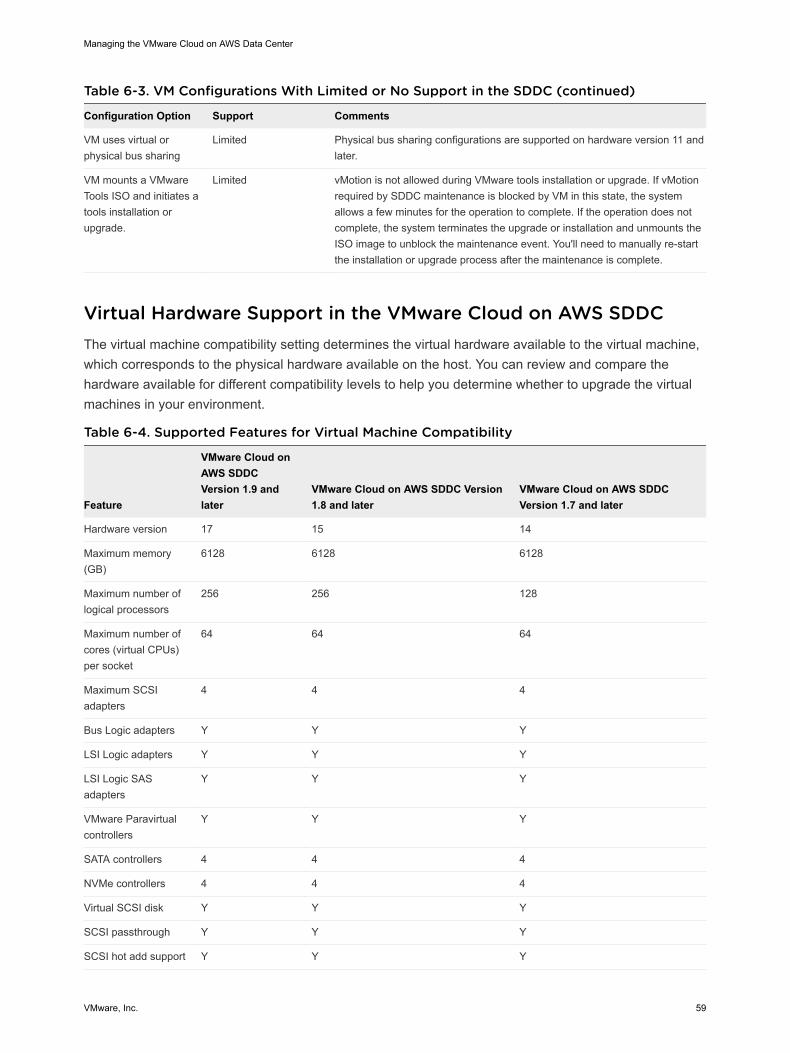
Table 6-3. VM Configurations With Limited or No Support in the SDDC (continued)
Configuration Option Support Comments
VM uses virtual or physical bus sharing
Limited Physical bus sharing configurations are supported on hardware version 11 and later.
VM mounts a VMware Tools ISO and initiates a tools installation or upgrade.
Limited vMotion is not allowed during VMware tools installation or upgrade. If vMotion required by SDDC maintenance is blocked by VM in this state, the system allows a few minutes for the operation to complete. If the operation does not complete, the system terminates the upgrade or installation and unmounts the ISO image to unblock the maintenance event. You'll need to manually re-start the installation or upgrade process after the maintenance is complete.
Virtual Hardware Support in the VMware Cloud on AWS SDDCThe virtual machine compatibility setting determines the virtual hardware available to the virtual machine, which corresponds to the physical hardware available on the host. You can review and compare the hardware available for different compatibility levels to help you determine whether to upgrade the virtual machines in your environment.
Table 6-4. Supported Features for Virtual Machine Compatibility
Feature
VMware Cloud on AWS SDDC Version 1.9 and later
VMware Cloud on AWS SDDC Version 1.8 and later
VMware Cloud on AWS SDDC Version 1.7 and later
Hardware version 17 15 14
Maximum memory (GB)
6128 6128 6128
Maximum number of logical processors
256 256 128
Maximum number of cores (virtual CPUs) per socket
64 64 64
Maximum SCSI adapters
4 4 4
Bus Logic adapters Y Y Y
LSI Logic adapters Y Y Y
LSI Logic SAS adapters
Y Y Y
VMware Paravirtual controllers
Y Y Y
SATA controllers 4 4 4
NVMe controllers 4 4 4
Virtual SCSI disk Y Y Y
SCSI passthrough Y Y Y
SCSI hot add support Y Y Y
Managing the VMware Cloud on AWS Data Center
VMware, Inc. 59

Table 6-4. Supported Features for Virtual Machine Compatibility (continued)
Feature
VMware Cloud on AWS SDDC Version 1.9 and later
VMware Cloud on AWS SDDC Version 1.8 and later
VMware Cloud on AWS SDDC Version 1.7 and later
IDE nodes Y Y Y
Virtual IDE disk Y Y Y
Virtual IDE CD-ROMs Y Y Y
IDE hot add support N N N
Maximum NICs 10 10 10
PCNet32 Y Y Y
VMXNet Y Y Y
VMXNet2 Y Y Y
VMXNet3 Y Y Y
E1000 Y Y Y
E1000e Y Y Y
USB 1.x and 2.0 N Y Y
USB 3.1 SuperSpeed Y Y Y
USB 3.1 SuperSpeedPlus
Y N N
Maximum video memory (MB)
128 128 128
Maximum 3D graphics memory (GB)
4 2 2
SVGA displays 10 10 10
SVGA 3D hardware acceleration
Y Y Y
VMCI Y Y Y
PCI passthrough 16 16 16
Dynamic DirectPath Y N N
PCI Hot add support Y Y Y
Virtual Precision Clock device
Y N N
Virtual Watchdog Timer device
Y N N
Virtual SGX device Y N N
Nested HV support Y Y Y
vPMC support Y Y Y
Serial ports 32 32 32
Managing the VMware Cloud on AWS Data Center
VMware, Inc. 60

Table 6-4. Supported Features for Virtual Machine Compatibility (continued)
Feature
VMware Cloud on AWS SDDC Version 1.9 and later
VMware Cloud on AWS SDDC Version 1.8 and later
VMware Cloud on AWS SDDC Version 1.7 and later
Parallel ports 3 3 3
Floppy devices 2 2 2
Virtual RDMA Y Y Y
NVDIMM controller 1 1 1
NVDIMM device 64 64 64
Virtual I/O MMU Y Y Y
Virtual TPM Y Y Y
Microsoft VBS Y Y Y
Using PowerCLI and the Guest Operations APIYou can use the vSphere Guest Operations API or the PowerCLI Invoke-VMScript and Copy-VMGuestFile cmdlet in your customization workflows for SDDC VMs.
Prerequisites
n Configure either or both of these connections between your on-premises environment and your SDDC.
n Management VPN
n Direct Connect through a Private Virtual Interface (VIF)
See Getting Started With VMware Cloud on AWS and VMware Cloud on AWS Networking and Security.
n Create a management network firewall rule that allows access from your on-premises network to port 443 of your SDDC hosts. See Add or Modify Management Gateway Firewall Rules.
Procedure
1 Verify that the VM is running the latest version of VMware Tools.
2 Verify that you can access the Guest Operations API, either directly or via a simple PowerCLI cmdlet.
You could use a cmdlet like this one to test your ability to reach port 443 on the ESXi host with IP address 10.100.1.1.
PS C:\Users\admin>Test-NetConnection -Port 443 -ComputerName 10.100.1.1
A response of True or TcpTestSucceeded indicates a successful test.
Managing the VMware Cloud on AWS Data Center
VMware, Inc. 61

Example: Using the PowerCLI Invoke-VMScript CmdletAfter you establish a network connection that allows traffic to port 443 on your hosts, you can use the Guest Operations API directly, or via PowerCLI as shown here. API and cmdlet requests go to port 443 on the host where the subject VM (Win10-Example here) is running. VMware Tools running on the VM handles the requested guest operations.
PS C:\Users\admin> $vm = Get-VM Win10-Example
PS C:\Users\admin>
Invoke-VMScript -ScriptText "dir C:\" -VM $vm -GuestUser admin -GuestPassword $passwd"
ScriptOutput
------------------------------------------------------
|
| Directory: C:\
|
| ...
Use ovftool to Deploy a VM from a Client OVF or OVA TemplateYou can use ovftool deploy a VM from an OVF or OVA template on your client machine or transfer a VM from your on-premises vSphere environment to your VMware Cloud on AWS SDDC.
VMware OVF Tool (ovftool) is a flexible command-line utility that you can use to migrate virtual machines between an on-premises installation and an SDDC. For more information about ovftool, see the OVF Tool User's Guide
Prerequisites
n You must have the CloudAdmin role to run this command.
n Configure a management VPN.
n Configure additional firewall rules for the management gateway that allow traffic on port 443 from your on-premises vSphere environment to the vCenter Server and ESXi hosts in your SDDC.
Table 6-5. Firewall Rules Required by ovftool
Name Action Source Destination Service Ports
On-Premises to SDDC vCenter
Allow CIDR block of on-premises data center
vCenter HTTPS (TCP 443)
443
On-Premises to SDDC ESXi
Allow CIDR block of on-premises data center
ESXi HTTPS (TCP 443)
443
Procedure
u Construct an ovftool command line that specifies Workloads as the vmFolder and the Compute-ResourcePool.
See Use ovftool to Deploy a VM from an OVA Template.
Managing the VMware Cloud on AWS Data Center
VMware, Inc. 62

Example: Use ovftool to Deploy a VM from an OVA TemplateThis example ovftool command deploys the OVA template in \tmp\Example.ova from the local host to the SDDC vCenter with FQDN SDDC-FQDN. The locator path (vi) argument specifies the required target resource pool name, .../Compute-ResourcePool.
ovftool --acceptAllEulas --name=Example-to-SDDC \
--datastore=WorkloadDatastore --net:Non=sddc-cgw-network-1
--vmFolder=Workloads \tmp\Example.ova \
'vi://[email protected]:passwd@SDDC-FQDN/SDDC-Datacenter/host/Cluster-1/Resources/Compute-
ResourcePool/'
Deploy a VM from an OVF Template in a Content LibraryYou can deploy a virtual machine from an OVF template in a local or subscribed content library.
Prerequisites
You must have a Content Library containing the OVF template you want to use.
n For more information on creating content libraries, see Create a Library.
n For more information on importing content into a content library, see Add Items to a Content Library in Managing Virtual Machines in VMware Cloud on AWS.
Procedure
1 Select Deploy from template and click Next.
2 Select the template to deploy.
3 Proceed through the New Virtual Machine wizard, using the following settings.
a For the VM folder, select Workloads, Templates, or another folder that you have write permissions on.
b For the compute resource, select Compute-ResourcePool.
c For the datastore, select workloadDatastore.
4 On the Select networks page, enter an IP address in the IP address field.
The IP Allocation Settings on this page show only the Static IP option, even if the logical network you have selected uses DHCP. You must enter something into the IP address field to proceed in the wizard. If DHCP is enabled, the VM deploys with DHCP.
5 Review the VM settings and click Finish.
Managing the VMware Cloud on AWS Data Center
VMware, Inc. 63