managing firewall devices - cisco.com€¦ · 43-3 user guide for cisco security manager 4.1...
TRANSCRIPT

OL-23991-01
C H A P T E R 43
Managing Firewall DevicesThe following topics describe configuration and management of security services and policies on Cisco security devices: Adaptive Security Appliances (ASAs), PIX Firewalls, and Firewall Services Modules (FWSMs) on Catalyst 6500 series switches:
This chapter contains the following topics:
• Default Firewall Configurations, page 43-1
• Configuring Firewall Device Interfaces, page 43-2
Default Firewall ConfigurationsFirewall devices are shipped with certain settings already configured. When you manually add a newly installed firewall device to Cisco Security Manager, you should discover (import) the pre-set or default policies for that device. Importing these policies into Security Manager prevents them being unintentionally removed the first time you deploy a configuration to that device. For more information about importing policies, see Discovering Policies, page 5-12.
Cisco Security Manager provides a set of configuration files that contain default policies for a number of device types and versions. These configuration files are located in the directory: <install_dir>\CSCOpx\MDC\fwtools\pixplatform\ (for example, C:\Program Files\CSCOpx\MDC\fwtools\pixplatform\).
The file name indicates device type, operating system version, context support, and operation type. For example, “FactoryDefault_FWSM2_2_MR.cfg” is the configuration file for an FWSM, version 2.2, with support for Multiple contexts, operating in Routed mode. Similarly, “FactoryDefault_ASA7_0_1_ST.cfg” is the configuration file for an ASA, version 7.0.1, in Single-context, Transparent mode.
Refer to Interfaces in Single and Multiple Contexts, page 43-4 for more about security contexts, and Interfaces in Routed and Transparent Modes, page 43-3 for more about routed and transparent operation.
See Adding Devices from Configuration Files, page 3-17 for information about adding new devices from the supplied configuration files.
43-1User Guide for Cisco Security Manager 4.1

Chapter 43 Managing Firewall DevicesConfiguring Firewall Device Interfaces
Configuring Firewall Device InterfacesThe Interfaces page displays configured physical interfaces, logical interfaces, and redundant interfaces, as well as hardware ports and bridge groups, for the selected device. From this page, you can add, edit and delete interfaces; enable communication between interfaces on the same security level; and manage VPDN groups and PPPoE users.
Note The Interfaces page displayed for ASA 5505 devices presents two tabbed panels: Hardware Ports and Interfaces. Similarly, the Interfaces page displayed for Firewall Services Modules (FWSMs) operating in transparent mode also presents two tabbed panels: Interfaces and Bridge Groups.
Navigation Path
To access the Interfaces page, select a security device in Device View and then select Interfaces from the Device Policy selector.
This section contains the following topics:
• Understanding Device Interfaces, page 43-2
• Managing Device Interfaces, Hardware Ports, and Bridge Groups, page 43-13
• Advanced Interface Settings (PIX/ASA/FWSM), page 43-40
Understanding Device InterfacesAn interface is a point of connection between a security device and some other network device. Interfaces are initially disabled; thus, as an essential part of firewall configuration, interfaces must be enabled and configured to allow appropriate packet inspection and forwarding.
There are two types of interface: physical and logical, where a physical interface is the actual slot on the device into which a network cable is plugged, and a logical interface is a virtual port assigned to a specific physical port. Generally, physical ports are referred to as interfaces, while logical ports are referred to as subinterfaces, virtual interfaces, VLANs, or EtherChannels, depending on their function. The number and type of interfaces you can define varies with appliance model and type of license purchased.
Note On devices running version 6.3 of the PIX operating system, the labels “physical” and “logical” are used, rather than “interface” and “subinterface.” Also, transparent mode and multiple contexts are not supported on these devices.
Subinterfaces let you divide a physical interface into multiple logical interfaces that are tagged with different VLAN IDs. Because VLANs keep traffic separate on a given physical interface, you can increase the number of interfaces available to your network without adding additional physical interfaces or security appliances. This feature is particularly useful in multiple-context mode, allowing you to assign unique interfaces to each context.
As a general rule, interfaces attach to router-based networks, and subinterfaces attach to switch-based networks. All subinterfaces must be associated with a physical interface that is responsible for routing allowed traffic correctly.
If you use subinterfaces, you typically do not also want the physical interface to pass traffic, because the physical interface passes untagged packets. The physical interface must be enabled for the subinterface to pass traffic, but do not name the physical interface to ensure it does not pass traffic. However, if you do want to let the physical interface pass untagged packets, you can name the interface as usual. See
43-2User Guide for Cisco Security Manager 4.1
OL-23991-01

Chapter 43 Managing Firewall DevicesConfiguring Firewall Device Interfaces
Managing Device Interfaces, Hardware Ports, and Bridge Groups, page 43-13 for information about naming an interface.
Note The ASA 5505, combining switch and security appliance features, is a special case in that you configure both physical switch ports and logical VLAN interfaces. See Understanding ASA 5505 Ports and Interfaces, page 43-5 for more information.
The Firewall Services Module (FWSM) does not include any external physical interfaces—instead, it uses internal VLAN interfaces. For example, assume you assign VLAN 201 to the FWSM inside interface, and VLAN 200 to the outside interface. You assign these VLANs to physical switch ports, and hosts connect to those ports. When communication occurs between VLANs 201 and 200, the FWSM is the only available path between the VLANs, forcing traffic to be statefully inspected.
See the following sections for additional information about device interfaces:
• Interfaces in Routed and Transparent Modes, page 43-3
• Interfaces in Single and Multiple Contexts, page 43-4
• Understanding ASA 5505 Ports and Interfaces, page 43-5
• Configuring Subinterfaces (PIX/ASA), page 43-6
• Configuring Redundant Interfaces, page 43-7
• Configuring EtherChannels, page 43-8
Security Appliance Configurations
Firewall devices allow a variety of configurations, and the configuration determines how to define the interfaces associated with a specific device. The following table outlines the various configurations.
Interfaces in Routed and Transparent Modes
Beginning with ASA/PIX 7.0 and FWSM 2.2.1, you can configure a security device to operate in one of two modes: routed or transparent. (The PIX 6.3 operates only in routed mode.)
In routed mode, the security appliance acts as a gateway or router for connected networks: it maintains IP addresses for its interfaces, and inspects and filters traffic traversing these interfaces based on IP address (Layer 3) information. In this mode, each device interface is connected to a different IP subnet, and has its own IP address on that subnet. Routed mode supports up to 256 interfaces in single mode or per context, with a maximum of 1000 interfaces divided between all contexts.
Table 43-1 Security Appliance Configurations
Device TypeOperational Mode (Router or Transparent)
Context Support (Single or Multiple)
PIX 6.3.x N/A N/A
PIX 7.0+/ASA Router or Transparent Single
PIX 7.0+/ASA, or security context of unmanaged PIX 7.0+/ASA
Router or Transparent Multiple (see Checklist for Configuring Multiple Security Contexts, page 54-2)
FWSM, or security context of unmanaged switch (multiple mode)
Router or Transparent Single or Multiple
43-3User Guide for Cisco Security Manager 4.1
OL-23991-01

Chapter 43 Managing Firewall DevicesConfiguring Firewall Device Interfaces
In transparent mode, the security appliance operates as a Layer 2 (data link) device, or transparent bridge, and is often referred to as a “bump in the wire,” or a “stealth firewall.” In this mode, you can define only two interfaces: inside and outside. The interfaces do not require IP addresses; they use VLAN IDs to forward inspected traffic. However, if the device includes a dedicated management interface, you can use it—either the physical interface or a subinterface—as a third interface for device-management traffic.
Note Cisco Security Manager does not populate the interface information for FWSM 2.x devices during discovery.
Bridge Groups
Beginning with the ASA 8.4.1 and FWSM 3.1, in transparent mode, you can increase the number of interfaces available to a device or context through use of bridge groups. You can configure up to eight bridge groups; on an FWSM each group can contain two interfaces; on an ASA each group can contain four interfaces. See Add/Edit Bridge Group Dialog Box, page 43-39 for more information.
Related Topics
• Chapter 43, “Configuring Bridging Policies on Firewall Devices”
Interfaces in Single and Multiple Contexts
Security “contexts” allow a single physical device to operate as multiple, independent firewalls. In multiple-context mode, each context defines a single virtual firewall, complete with its own configuration. Each context acts as a unique virtual firewall that inspects and filters traffic traversing the interfaces allocated to that context. Each context is “unaware” of other contexts defined on the same security appliance.
As with a single-context, routed-mode device, interfaces on a multiple-context device connect to router-based networks, subinterfaces connect to switch-based networks, and each subinterface must be associated with an interface that routes allowed traffic correctly.
However, you cannot define IP addresses, the routed-mode portion of the configuration, or identify the management interface until you have defined and deployed the contexts. But you cannot define a security context until you have defined the necessary interfaces and subinterfaces.
In other words, you must enable and configure the interfaces and subinterfaces on a device that will provide multiple security contexts (in either routed or transparent mode) before you can define and configure the security contexts themselves.
Refer to Chapter 54, “Configuring Security Contexts on Firewall Devices” for more information.
About Asymmetric Routing Groups
In some situations, return traffic for a session may be routed through a different interface than the one from which it originated. Similarly, in failover configurations, return traffic for a connection that originated on one unit may return through the peer unit. This most commonly occurs when two interfaces on a single FWSM, or two FWSMs in a failover pair, are connected to different service providers and the outbound connection does not use a NAT address. By default, the FWSM drops the return traffic because there is no connection information for that traffic.
43-4User Guide for Cisco Security Manager 4.1
OL-23991-01

Chapter 43 Managing Firewall DevicesConfiguring Firewall Device Interfaces
You can prevent return traffic being dropped by assigning the VLAN interfaces on which this is likely to occur to an asymmetric routing (ASR) group. When a member interface receives a packet for which it has no session information, it checks the session information for other interfaces that are members of the same group.
If a match is not found, the packet is dropped. If a match is found, one of the following actions occurs:
• If the incoming traffic originated on a different interface on the same FWSM, some or all of the Layer 2 header is rewritten and the packet is re-injected into the stream.
• If the incoming traffic originated on a peer unit in a failover configuration, some or all of the Layer 2 header is rewritten and the packet is redirected to the other unit. This redirection continues as long as the session is active.
Note In failover configurations, you must enable Stateful Failover for session information to be passed from the standby unit or failover group to the active unit or failover group.
To assign an FWSM virtual interface to an asymmetric routing group, simply specify an ASR Group ID in the Add/Edit Interface Dialog Box: Advanced Tab (ASA/PIX 7.0+), page 43-25. If the group does not exist, it is created and the interface assigned to it.
You must repeat the assignment for each interface that will participate in this ASR group. You can create up to 32 ASR groups and assign a maximum of eight interfaces to each group.
Note The upstream and downstream routers must use one MAC address per VLAN, and have different MAC addresses for different VLANs, to allow the redirection of packets from a standby unit to an active unit in failover configurations.
Understanding ASA 5505 Ports and Interfaces
The ASA 5505 is unique in that it includes a built-in switch, and there are two kinds of ports and interfaces that you need to configure:
• Physical switch ports – The ASA 5505 has eight Fast Ethernet switch ports that forward traffic at Layer 2, using the switching function in hardware. Two of these ports are power-over-Ethernet (PoE) ports. You can connect these ports directly to user equipment such as PCs, IP phones, or DSL modems. Or you can connect to another switch.
• Logical VLAN interfaces – In routed mode, these interfaces forward traffic between VLAN networks at Layer 3, using the configured security policy to apply firewall and VPN services. In transparent mode, these interfaces forward traffic between the VLANs on the same network at Layer 2, using the configured security policy to apply firewall services.
To segregate the switch ports into separate VLANs, you assign each switch port to a VLAN interface. Switch ports on the same VLAN can communicate with each other using hardware switching. But when a switch port on one VLAN attempts to communicate with a switch port on another VLAN, the ASA 5505 applies the security policy to the traffic, and routes or bridges between the two VLANs.
Note Subinterfaces and redundant interfaces are not available on the ASA 5505.
43-5User Guide for Cisco Security Manager 4.1
OL-23991-01

Chapter 43 Managing Firewall DevicesConfiguring Firewall Device Interfaces
Navigation Path
The Interfaces page displayed for ASA 5505 devices presents two tabbed panels: Hardware Ports and Interfaces. To access these panels, select an ASA 5505 in Device View and then select Interfaces from the Device Policy selector.
Configuring ASA 5505 Switch Ports and Interfaces
Refer to Configuring Hardware Ports on an ASA 5505, page 43-37 for information about configuring the switch ports.
Refer to Add/Edit Interface Dialog Box (PIX 7.0+/ASA/FWSM), page 43-18 for information about configuring the interfaces.
Related Topics
• Managing Device Interfaces, Hardware Ports, and Bridge Groups, page 43-13
Configuring Subinterfaces (PIX/ASA)
Subinterfaces let you divide a physical interface into multiple logical interfaces that are tagged with different VLAN IDs. Because VLANs keep traffic separate on a given physical interface, you can increase the number of interfaces available to your network without adding additional physical interfaces or security appliances. This feature is particularly useful in multiple-context mode, letting you assign unique interfaces to each context.
Note If you use subinterfaces, you typically do not also want the physical interface to pass traffic, as the physical interface passes untagged packets. Because the physical interface must be enabled for the subinterface to pass traffic, do not name the physical interface to ensure it does not pass traffic. However, if you do want to let the physical interface pass untagged packets, you can name the interface as usual.
Note This option is available only on PIX 7.0+ and non-5505 ASA devices.
Defining Subinterfaces
Follow these steps to configure a subinterface in the Add/Edit Interface (ASA/PIX 7.0+) dialog box, which is accessed from the device Interfaces page (see Managing Device Interfaces, Hardware Ports, and Bridge Groups, page 43-13).
1. Choose Subinterface as the interface Type in the Add/Edit Interface dialog box.
The VLAN ID and Subinterface ID fields appear below the Hardware Port, Name and Security Level fields.
2. Choose the desired Hardware Port from the list of previously defined interface ports. If you do not see a desired interface ID, be sure that Interface is defined and enabled.
3. VLAN ID – Provide a VLAN ID for this subinterface: enter a value between 1 and 4094. The specified VLAN ID must not be in use on any connected device.
Some VLAN IDs might be reserved on connected switches; see the switch documentation for more information. In multiple-context mode, you can only set the VLAN ID in the system configuration.
43-6User Guide for Cisco Security Manager 4.1
OL-23991-01

Chapter 43 Managing Firewall DevicesConfiguring Firewall Device Interfaces
4. Subinterface ID – Provide an integer between 1 and 4294967293 as the Subinterface ID. The number of subinterfaces allowed depends on your platform.
For subinterface port identification, this ID is appended to the chosen Hardware Port. For example, GigabitEthernet0.4 represents the subinterface assigned an ID of 4, operating on the port GigabitEthernet0.
Note You cannot change the Subinterface ID after you set it.
5. Continue configuring this interface, as described in Add/Edit Interface Dialog Box (PIX 7.0+/ASA/FWSM), page 43-18.
Configuring Redundant Interfaces
Beginning with Security Manager 3.2.2, you can define logical “redundant” interfaces to increase security appliance reliability. A redundant interface is a specific pair of physical interfaces, with one designated as active (or primary) and the other as standby (or secondary). If the active interface fails, the standby interface becomes active and starts passing traffic. This feature is separate from device-level failover, but you can configure redundant interfaces as well as failover, if desired. You can configure up to eight redundant interface pairs.
A redundant interface functions as a single interface (inside, outside, etc.), with only one of the member pair active at any one time. This redundant interface is configured normally, with a unique interface name, security level and IP address. Note that each member interface must be of the same type (e.g., GigabitEthernet), and cannot have a name, security level, or IP address assigned. In fact, do not configure any options other than Duplex and Speed on the member interfaces.
The redundant interface uses the MAC address of the first physical interface that you specify. If you change the order of the member interfaces in the configuration, then the MAC address changes to match the MAC address of the interface that is now listed first. Alternatively, you can explicitly assign a MAC address to the redundant interface; this address is then used regardless of the member interface MAC addresses. In either case, when the active interface fails over to the standby, the same MAC address is maintained so that traffic is not disrupted.
Note This option is available only on PIX 8.0+ and non-5505 ASA devices.
Defining Redundant Interfaces
Follow these steps to configure two physical interfaces as a single logical “redundant interface” in the Add/Edit Interface (ASA/PIX 7.0+) dialog box, which is accessed from the device Interfaces page (see Managing Device Interfaces, Hardware Ports, and Bridge Groups, page 43-13).
1. Choose Redundant as the interface Type in the Add/Edit Interface dialog box.
The Redundant ID, Primary Interface and Secondary Interface options appear.
2. Provide an identifier for this redundant interface in the Redundant ID field; valid IDs are the integers from 1 to 8.
3. Primary Interface – Choose the primary member of the redundant interface pair from this list of available interfaces. Available interfaces are presented by Hardware Port IDs, as named interfaces cannot be used for a redundant interface pair.
43-7User Guide for Cisco Security Manager 4.1
OL-23991-01

Chapter 43 Managing Firewall DevicesConfiguring Firewall Device Interfaces
4. Secondary Interface – Choose the secondary member of the redundant interface pair from this list of available interfaces. Available interfaces are presented by Hardware Port IDs, as named interfaces cannot be used for a redundant interface pair.
Note Member interfaces must be enabled and of the same type (e.g., GigabitEthernet), and cannot have a Name, IP Address, or Security Level assigned. In fact, do not configure any options other than Duplex and Speed on the member interfaces.
5. Continue configuring this interface, as described in Add/Edit Interface Dialog Box (PIX 7.0+/ASA/FWSM), page 43-18.
Configuring EtherChannels
Beginning with ASA 8.4.1, you can define logical EtherChannel interfaces. An EtherChannel, also called a port-channel interface, is a logical interface consisting of a bundle of individual Ethernet links (a channel group). This provides increased bandwidth and fault tolerance compared to the individual links.
An EtherChannel interface is configured and used in the same manner as a single physical interface. You can configure up to 48 EtherChannels, each of which consists of between one and eight active Fast Ethernet, Gigabit Ethernet, or Ten-Gigabit Ethernet ports.
Note You cannot use a redundant interface as part of an EtherChannel, nor can you use an EtherChannel as part of a redundant interface. You cannot use the same physical interfaces in a redundant interface and an EtherChannel interface. You can, however, configure both types on the ASA if they do not use the same physical interfaces.
EtherChannel MAC Addressing
All interfaces that are part of a channel group share the same MAC address. This makes the EtherChannel transparent to network applications and users, because they only see the one logical connection; they have no knowledge of the individual links. By default, the EtherChannel uses the MAC address of the lowest-numbered member interface as its MAC address.
Alternatively, you can manually configure a MAC address for the port-channel interface. We recommend doing so in case the channel interface membership changes. For example, if you remove the interface that provides the port-channel MAC address, the port-channel is assigned the MAC address of the next lowest numbered interface, causing traffic disruption. Manually assigning a unique MAC address to the EtherChannel interface prevents this disruption. (Note that in multiple-context mode, you can assign unique MAC addresses to interfaces assigned to an individual context, including EtherChannel interfaces.)
About Management Only EtherChannel Interfaces
You can specify an EtherChannel group as a management-only interface, but note the following caveats:
• Routed mode – You must explicitly configure the EtherChannel to be Management Only in the Add/Edit Interface Dialog Box (PIX 7.0+/ASA/FWSM), page 43-18. Any non-management interface added to the management-only port-channel is treated as a management port. If you add an interface already defined as management-only to the management-only group, that attribute is ignored on the physical interface. Similarly, you cannot designate an interface as management-only if it is already a member of a management-only port-channel.
43-8User Guide for Cisco Security Manager 4.1
OL-23991-01

Chapter 43 Managing Firewall DevicesConfiguring Firewall Device Interfaces
• Transparent mode – In this mode, members of a management-only EtherChannel can themselves only be management-only ports. Thus, when a management-only member is added to a transparent-mode EtherChannel, the channel inherits the management-only designation, while the designation is removed from the member interface. Conversely, when such an interface is removed from the EtherChannel, the designation is restored on the individual interface.
Using an EtherChannel Interface as a Failover Link
If an EtherChannel interface is specified as a failover link, all state-sync traffic for that link will travel over a single physical interface. Should that physical interface fail, the state-sync traffic will then traverse another physical interface that is part of the EtherChannel aggregated link. If there are no remaining available physical interfaces in the EtherChannel link specified for failover, the ASA falls back to the redundant interface, if one is specified.
While an EtherChannel interface is being used as an active failover link, changes to that EtherChannel configuration are not allowed. You can change the EtherChannel configuration of that link only by disabling either the link or failover, as follows:
• Disable the EtherChannel link while the configuration changes are being made, and then reactivate it (failover will not occur while the link is disabled).
• Disable failover while the configuration changes are being made, and then re-enable it (failover will not occur in the interim).
Note As with any other type of interface assigned as a failover link, the EtherChannel interface cannot be named. Further, none of the EtherChannel’s member interfaces can be named.
Defining EtherChannels on an ASA
Follow these steps to configure multiple physical interfaces as a single logical EtherChannel interface in the ASA Add Interface or Edit Interface dialog boxes, which are accessed from the device Interfaces page (see Managing Device Interfaces, Hardware Ports, and Bridge Groups, page 43-13).
Step 1 Choose EtherChannel as the interface Type.
The Port-channel ID and interface-selection options appear on the General panel of the dialog box; the Load Balancing and the Active Physical Interfaces: Minimum and Maximum fields appear on the Advanced panel.
Step 2 Provide an identifier for this EtherChannel in the Port-channel ID field; valid IDs are the integers from 1 to 48. This number is appended to “Port-channel” to identify the EtherChannel in the Interface column of the table on the device’s Interfaces page.
Step 3 Available Interfaces – Specify the members of this port-channel group by select one or more interfaces in this list of available interfaces, and then click the >> button to add them to the member list on the right.
Note All interfaces in the channel group must be the same type and speed. The first interface added to the channel group determines the correct type and speed.
You can assign up to 16 interfaces to a channel group. In a standard EtherChannel, up to eight of these interfaces can be active, while the remaining interfaces act as stand-by links in case of individual interface failure. Alternatively, you can create a static EtherChannel by setting LACP Mode to On (on the Advanced panel, as described below), which means all interfaces in the group can pass traffic.
43-9User Guide for Cisco Security Manager 4.1
OL-23991-01

Chapter 43 Managing Firewall DevicesConfiguring Firewall Device Interfaces
Note After assigning interfaces to this EtherChannel group, you can edit the LACP Port parameters for each member interface, as described in Editing LACP Parameters for an Interface Assigned to an EtherChannel, page 43-10.
Step 4 Click the Advanced tab to display that panel.
Step 5 Choose a Load Balancing option in the EtherChannel section. See About EtherChannel Load Balancing, page 43-12, for more information about this option.
Step 6 Select the desired LACP Mode; the default is Active, which means up to eight interfaces are active, while up to eight are in stand-by mode, as determined by the Minimum and Maximum values under Active Physical Interfaces.
If you select On, a static port-channel is created in which all member interfaces are all “on,” meaning you can have up to 16 ports passing traffic, with no stand-by ports. When you select this option, the Mode for all interfaces assigned to this EtherChannel group is switched to On (if the Mode for each is not already On). See Editing LACP Parameters for an Interface Assigned to an EtherChannel, page 43-10, for more information about this mode.
Step 7 Specify the Minimum and Maximum number of Active Physical Interfaces for this EtherChannel.
As mentioned, an EtherChannel can consist of between one and eight active links, with up to 16 assigned to the group (on the General panel). Use these fields to indicate the minimum and maximum number of interfaces that can be active in this channel group at any given time.
Step 8 Continue configuring this interface, as described in Add/Edit Interface Dialog Box (PIX 7.0+/ASA/FWSM), page 43-18.
Note The EtherChannel LACP System Priority for this device is specified in the Advanced Interface Settings (PIX/ASA/FWSM), page 43-40 dialog box.
Editing LACP Parameters for an Interface Assigned to an EtherChannel
After assigning interfaces to an EtherChannel (port-channel) group, you can edit the LACP Port parameters for each member interface, as described here.
Note This feature is available only on ASA 8.4.1+ devices.
The Link Aggregation Control Protocol (LACP) directs aggregation of physical Fast Ethernet, Gigabit Ethernet, or Ten-Gigabit Ethernet interfaces into an EtherChannel group, and updating the remote partner device with current information after it finds a compatible set of ports and assigns a unique value called an “operational key” to the group. Note that operational key assignment is automatic; you cannot configure it.
Caution These LCAP parameters are not available when the EtherChannel is assigned as a failover link.
43-10User Guide for Cisco Security Manager 4.1
OL-23991-01

Chapter 43 Managing Firewall DevicesConfiguring Firewall Device Interfaces
LACP System Priority
Every LACP-enabled device has a unique system ID that is formed by combining a System Priority identifier and the system’s MAC address. In certain situations, two EtherChannel-linked systems may need to change the operational key assigned to a set of ports to allow optimal aggregation. In such a situation, the system with higher priority is allowed to dynamically modify the operational key value assigned to the ports to achieve better aggregation. The system with the lower priority is not allowed to change the operational keys. The System Priority identifier is user-configurable, as described in Advanced Interface Settings (PIX/ASA/FWSM), page 43-40.
LACP Port Parameters
Port identification is provided by a unique number assigned to every group interface; this identifier is formed by combining a configurable Port Priority number and the port number assigned to the interface.
The port identifier provides port aggregation priority. Ports are considered for active use in an aggregation starting with the port that has highest aggregation priority in the system, and working down through an ordered list of port identifiers. The use of this port aggregation priority makes aggregation predictable and reproducible by selecting the links for aggregation in the same manner when all links are running LACP concurrently.
In addition, you can configure the priority of each port to administratively control the set of stand-by ports. For example, the port with the lowest priority will be considered last for group aggregation and will be become a stand-by port (assuming enough members are assigned to the group to allow stand-by ports).
Related Topics
• Configuring EtherChannels, page 43-8
Editing LACP Port Parameters for an Existing Channel Interface
Follow these steps to edit an existing EtherChannel-assigned interface:
Step 1 In the table on the device’s Interfaces page, select an interface that is a Member of a Port-channel group. (See Managing Device Interfaces, Hardware Ports, and Bridge Groups, page 43-13 for information about accessing and using this table.)
Step 2 Click Edit Row to open the Edit Interface dialog box for that interface.
Only the Enable Interface check box, the LACP Port parameters, and the Description field can be altered.
Step 3 Edit the LACP Port parameters as necessary:
• Priority – This number is combined with the port number assigned to the interface to produce a unique port identification number. This value can be 1 to 65535, with higher numbers signifying lower priorities. The default is 32768. This parameter applies only when the port is in Active or Passive mode.
• Mode – Choose one of these LACP modes:
– Active – In Active mode, a port initiates LACP exchanges with the partner device and periodically sends updates to the partner. Active LACP reflects the port’s preference to participate in the protocol regardless of the partner’s control mode.
– Passive – A Passive-mode port does not initiate LACP exchanges, but upon receiving a request from the partner, the port will start exchanging LACP information with the partner. Passive mode is useful when it is not clear if the remote port supports LACP.
Some devices may show undesired behavior when they do not have LACP enabled and they receive periodic LACP updates. However, for channeling to operate correctly, at least one port must be configured in Active mode.
43-11User Guide for Cisco Security Manager 4.1
OL-23991-01

Chapter 43 Managing Firewall DevicesConfiguring Firewall Device Interfaces
– On – Use this mode to configure a static port-channel in which all member interfaces are “on,” meaning up to 16 ports are passing traffic, with no stand-by ports. No negotiation takes place and most restrictions associated with the other two modes do not apply; for example, the speed and duplex settings do not have to be the same for all member ports, and all member ports (up to 16) remain Active. Note that the remote ports also must be On.
Step 4 Continue editing this interface, as described in Add/Edit Interface Dialog Box (PIX 7.0+/ASA/FWSM), page 43-18.
About EtherChannel Load Balancing
Traffic in an EtherChannel is distributed across the individual bundled links in a deterministic fashion; however, the load is not necessarily balanced equally across all the links. Instead, frames are forwarded on a specific link as a result of a hashing algorithm. This algorithm uses a specific field or combination of fields in the packet header to produce a fixed Result Bundle Hash (RBH) value that indicates which link to use.
The algorithm can use one or a combination of the following packet-header fields to determine link assignment: source IP address, destination IP address, source MAC address, destination MAC address, TCP/UDP port numbers, or VLAN IDs. The field combination used by the algorithm is chosen from the Load Balancing list (on the Advanced tab of the ASA’s Add Interface and Edit Interface dialog boxes); these options are described in the following section. For additional information, see Configuring EtherChannels, page 43-8.
For example, suppose source MAC address (src-mac) is the chosen field: when packets are forwarded to an EtherChannel, they are distributed across the ports in the channel based on the source MAC address of each incoming packet. Therefore, to provide load balancing, packets from different hosts use different ports in the channel, but packets from the same host use the same port in the channel (and the MAC addresses learned by the device do not change).
Similarly, with destination MAC address forwarding, when packets are forwarded to an EtherChannel, each packet is distributed across the ports in the channel based on the packet’s destination host MAC address. Thus, packets to the same destination are forwarded over the same port, and packets to a different destination are sent on a different port in the channel.
Therefore, when choosing a load-balancing option, use the option that provides the greatest variety in your configuration. For example, if most of the traffic on a channel is going only to a single MAC address, choosing the destination MAC address results in most of the traffic always using the same link in the channel. Alternatively, using source addresses or IP addresses might result in better load balancing, while a method that uses the source and destination addresses along with UDP or TCP port numbers can distribute traffic much differently.
Note This option is available only on ASA 8.4.1+ devices.
Load Balancing Options
When defining a single logical EtherChannel interface in the ASA Add/Edit Interface dialog box, choose one of the following Load Balancing options (on the Add/Edit Interface Dialog Box: Advanced Tab (ASA/PIX 7.0+), page 43-25) to specify the basis of load distribution:
• dst-ip – Load distribution is based on the destination-host IP address only; the source of the packets is not considered. Each packet with the same destination IP address is forwarded over the same link.
• dst-ip-port – Load distribution is based on the destination-host IP address and TCP/ UDP port. This option offers more granularity and a little more complexity than destination IP address alone.
43-12User Guide for Cisco Security Manager 4.1
OL-23991-01

Chapter 43 Managing Firewall DevicesConfiguring Firewall Device Interfaces
• dst-mac – Load distribution is based on the destination host MAC address of incoming packets.
• dst-port – Distribution is based on the destination port; that is, a TCP or UDP port and not a physical interface.
• src-dst-ip – Distribution is based on source and destination IP addresses—source and destination IP addresses are paired for hash calculations. This method provides more granularity than destination IP address, for example: packets to the same destination can be forwarded over different links in a port-channel if they are coming from a different IP source.
• src-dst-ip-port – Distribution calculation considers source and destination IP addresses, and TCP/ UDP ports. Provides even greater granularity and distribution.
• src-dst-mac – Calculation is based on source and destination MAC address pairing.
• src-dst-port – Load distribution is based on source and destination TCP/UDP port.
• src-ip – Based on source host IP address only.
• src-ip-port – Source IP address and TCP/UDP port.
• src-mac – Source MAC address only.
• src-port – Source TCP/UDP port only.
• vlan-dst-ip – Destination IP address and VLAN ID pairing.
• vlan-dst-ip-port – Combination of destination IP address, TCP/UDP port, and VLAN ID.
• vlan-only – VLAN ID only.
• vlan-src-dst-ip – Source and destination IP address, and VLAN ID.
• vlan-src-dst-ip-port – Source and destination IP address, TCP/UDP port, and VLAN ID.
• vlan-src-ip – Source IP address and VLAN ID.
• vlan-src-ip-port – Source IP address, TCP/UDP port, and VLAN ID.
Managing Device Interfaces, Hardware Ports, and Bridge Groups The Interfaces page displays the interfaces, subinterfaces, redundant interfaces, virtual interfaces (VLANs), and EtherChannel interfaces, as well as the hardware ports and bridge groups, configured on the selected device, and lets you add, edit and delete them.
The types of interface available depend on device type, operating system version, and mode (routed or transparent). For example, EtherChannel interfaces are available only on ASA 8.4.1 and later devices, in both routed and transparent mode. See Understanding Device Interfaces, page 43-2 for more information.
Note The Interfaces page displayed for ASA 5505 devices presents two tabbed panels: Interfaces and Hardware Ports. Similarly, the Interfaces page displayed for both Firewall Services Modules (FWSMs), version 3.1 and later, and ASAs version 8.4.1 and later, operating in transparent mode also present two tabbed panels: Interfaces and Bridge Groups. Links to configuration information for these features are included in the following procedure.
Each security device must be configured, and each active interface must be enabled. Inactive interfaces can be disabled. When disabled, the interface does not transmit or receive data, but its configuration information is retained.
43-13User Guide for Cisco Security Manager 4.1
OL-23991-01
Chapter 43 Managing Firewall DevicesConfiguring Firewall Device Interfaces
If you bootstrapped a new security device, the set-up feature configures only the addresses and names associated with the inside interface. You must define the remaining interfaces on that device before you can specify access and translation rules for traffic traversing that security device.
Transparent firewall mode allows only two interfaces to pass traffic; however, if your platform includes a dedicated management interface, you can use it (either the physical interface or a subinterface) as a third interface for management traffic.
Follow these general steps to manage security-device interfaces and related options. You can add, edit and delete configured interfaces, subinterfaces, redundant interfaces, virtual interfaces (VLANs), EtherChannel interfaces, hardware ports, and bridge groups, according to the type of device selected.
Step 1 Ensure Device View is your present application view; if necessary, click the Device View button on the toolbar.
Note For more information on using the Device View to configure device policies, see Managing Policies in Device View and the Site-to-Site VPN Manager, page 5-28).
Step 2 Select the security device you want to configure.
Step 3 Select Interfaces in the Device Policy selector.
The Interfaces page is displayed. The information displayed, and the page itself, varies based on the selected device type and version, the operational mode (routed versus transparent), and whether the device hosts single or multiple contexts.
Note that the Interfaces page for ASA 5505 devices presents two tabbed panels: Hardware Ports and Interfaces. Similarly, the Interfaces page displayed for both FWSMs (version 3.1 and later) and ASAs (version 8.4.1 and later), operating in transparent mode also presents two tabbed panels: Interfaces and Bridge Groups.
Step 4 Add, edit and delete interfaces and related options, as necessary.
The Interfaces pages/panels and the Bridge Groups and Hardware Ports panels present standard Security Manager tables, with Add Row, Edit Row and Delete Row buttons, which are described in Using Tables, page 1-36.
The actual dialog box presented when you click the Add Row or Edit Row button depends on the type of device (and panel) you have selected. Refer to the following topics for device-specific dialog box information:
• Add/Edit Interface Dialog Box (PIX 6.3), page 43-15
• Add/Edit Interface Dialog Box (PIX 7.0+/ASA/FWSM), page 43-18
• Configuring Hardware Ports on an ASA 5505, page 43-37
• Add/Edit Bridge Group Dialog Box, page 43-39
Step 5 To manage Advanced Interface settings, including enabling communication between interfaces with the same security level, click the Advanced button at the bottom of the Interfaces page to open the Advanced Interface Settings dialog box. See Advanced Interface Settings (PIX/ASA/FWSM), page 43-40 for more information.
Step 6 When you are finished adding, editing and deleting interfaces, click Save at the bottom of the window to save your interface definitions to the Cisco Security Manager server.
43-14User Guide for Cisco Security Manager 4.1
OL-23991-01

Chapter 43 Managing Firewall DevicesConfiguring Firewall Device Interfaces
Add/Edit Interface Dialog Box (PIX 6.3)
Table 43-2 Add/Edit Interface Dialog Box (PIX 6.3)
Element Description
Enable Interface Enables this interface to pass traffic. In addition to this setting, you must specify an IP Type and a Name before traffic can pass according to your security policy.
You must enable a physical interface before traffic can pass through any enabled subinterfaces.
Type Choose the type of interface:
• Physical – VLAN is on the same network as its underlying hardware interface.
• Logical – VLAN is associated with a logical interface.
Name Provide an interface name up to 48 characters in length. The Name should be a memorable name for the interface that relates to its use. Supported interface names are:
• Inside—Connects to your internal network. Must be most secure interface.
• DMZ—Demilitarized zone (Intermediate interface). Also known as a perimeter network.
• Outside—Connects to an external network or the Internet. Must be least secure interface.
Hardware Port When defining a physical network interface, this value represents the name identifies the interface type and its slot or port in the device.
When you add a logical network interface, you can choose any enabled physical interface to which you want to add a logical interface. If you do not see the desired hardware port, verify that the interface is enabled.
Valid values are:
• ethernet0 to ethernetn.
• gb-ethernetn.
where n represents the number of network interfaces in the device.
IP Type The IP Type defines the type of IP addressing used for the interface; choose Static IP or Use DHCP, as described in Device Interface: IP Type (PIX 6.3), page 43-17. (The PPPoE option is not applicable to PIX 6.3 devices.)
Note You can configure DHCP only on the outside interface of a security appliance.
43-15User Guide for Cisco Security Manager 4.1
OL-23991-01

Chapter 43 Managing Firewall DevicesConfiguring Firewall Device Interfaces
Speed and Duplex Lists the speed options for a physical interface; not applicable to logical interfaces. Choose one of the following options:
• auto – Sets Ethernet speed automatically. The auto keyword can be used only with the Intel 10/100 automatic speed-sensing network interface card.
• 10baset – 10-Mbps Ethernet half-duplex.
• 10full – 10-Mbps Ethernet full-duplex.
• 100basetx – 100-Mbps Ethernet half-duplex.
• 100full – 100-Mbps Ethernet full-duplex.
• 1000auto – 1000-Mbps Ethernet to auto-negotiate full- or half -duplex.
Tip We recommend that you do not use this option to maintain compatibility with switches and other devices in your network.
• 1000full – Auto-negotiate, advertising 1000-Mbps Ethernet full-duplex.
• 1000full nonnegotiate – 1000-Mbps Ethernet full-duplex.
• aui – 10-Mbps Ethernet half-duplex communication with an AUI cable interface.
• bnc – 10-Mbps Ethernet half-duplex communication with a BNC cable interface.
Note We recommend that you specify the speed of the network interfaces in case your network environment includes switches or other devices that do not handle autosensing correctly.
MTU Specify the maximum packet size in bytes; that is, the maximum transmission unit (MTU). The value depends on the type of network connected to the interface. Valid values are 300 to 65535 bytes. Default is 1500.
Physical VLAN ID For a physical interface, enter the VLAN ID, between 1 and 4094. This VLAN ID must not be in use on connected devices.
Logical VLAN ID Provide the alias, a value between 1 and 4094, for the VLAN associated with this logical interface. This value is required if the logical interface Type is selected.
Security Level Specify the security level of the interface: enter a value between 0 (least secure) and 100 (most secure). The security appliance lets traffic flow freely from an inside network to an outside network (lower security level). Many other security features are affected by the relative security level of two interfaces.
• The outside interface is always 0.
• The inside interface is always 100.
• DMZ interfaces are between 1 and 99.
Table 43-2 Add/Edit Interface Dialog Box (PIX 6.3) (Continued)
Element Description
43-16User Guide for Cisco Security Manager 4.1
OL-23991-01

Chapter 43 Managing Firewall DevicesConfiguring Firewall Device Interfaces
Device Interface: IP Type (PIX 6.3)
A PIX 6.3 security device requires IP addressing for its interfaces; however, firewall interfaces do not have IP addresses until you assign them.
The Add/Edit Interface dialog box presented for a PIX 6.3 security device includes the section IP Type, where you specify the type of IP addressing for the interface and provide related parameters, as described here. See Add/Edit Interface Dialog Box (PIX 6.3), page 43-15 for information about the other sections of the dialog box.
Note The IP Type options presented for other security appliances are described in Device Interface: IP Type (PIX/ASA 7.0+), page 43-34.
Step 1 In the Add/Edit Interface dialog box, choose a method for address assignment from the IP Type list, and then provide related parameters, as follows:
• Static IP – Provide a static IP Address and Subnet Mask that represents the security device on this interface’s connected network. The IP address must be unique for each interface.
The Subnet mask can be expressed in dotted decimal format (for example, 255.255.255.0), or by entering the number of bits in the network mask (for example, 24). Do not use 255.255.255.254 or 255.255.255.255 for an interface connected to the network because this will stop traffic on that interface. If you omit the Subnet Mask value, a “classful” network is assumed, as follows:
– The Class A netmask (255.0.0.0) is assumed if the first octet of the IP Address is 1 through 126 (i.e., addresses 1.0.0.0 through 126.255.255.255).
– The Class B netmask (255.255.0.0) is assumed if the first octet of the IP Address is 128 through 191 (i.e., addresses 128.0.0.0 through 191.255.255.255).
– The Class C netmask (255.255.255.0) is assumed if the first octet of the IP Address is 192 through 223 (i.e., addresses 192.0.0.0 through 223.255.255.255).
Note Do not use addresses previously used for routers, hosts, or any other firewall device commands, such as an IP address in the global pool or a static NAT entry.
Roles For more information on roles and how to define and use them, see Understanding Interface Role Objects, page 6-56.
All interface roles assigned to this interface are listed in this field. Role assignments are based on pattern matching between the Name given to this interface and all currently defined Interface Role objects in Cisco Security Manager.
Interface role objects are replaced with the actual interface IP addresses when the configuration is generated for each device. They allow you to define generic rules—ones that can apply to multiple interfaces.
For more information on roles and how to define and use them, see Understanding Interface Role Objects, page 6-56.
Table 43-2 Add/Edit Interface Dialog Box (PIX 6.3) (Continued)
Element Description
43-17User Guide for Cisco Security Manager 4.1
OL-23991-01

Chapter 43 Managing Firewall DevicesConfiguring Firewall Device Interfaces
• Use DHCP – Enables Dynamic Host Configuration Protocol (DHCP) for automatic assignment of an IP address from a DHCP server on the connected network. The following options become available:
– Obtain Default Route using DHCP – Check this box to obtain a default route from the DHCP server so that you do not need to configure a default static route.
– Retry Count – The number of times the PIX will resend the DHCP request. Valid values are 4 to 16; the default is 2
• PPPoE (PIX and ASA 7.2+) – This option does not apply to PIX 6.3 devices.
Note You can configure DHCP only on the outside interface of a firewall device.
Add/Edit Interface Dialog Box (PIX 7.0+/ASA/FWSM)
These Add Interface and Edit Interface dialog boxes are used to define and configure interfaces, subinterfaces, redundant, and EtherChannel interfaces on PIX 7.0+, ASA, and FWSM devices. You can access the Add/Edit Interface dialog boxes from the Interfaces page. See Managing Device Interfaces, Hardware Ports, and Bridge Groups, page 43-13 for more information.
Note The ASA 5505, combining switch and security appliance features, is a special case in that you configure both physical switch ports and logical VLAN interfaces. Thus, the Interfaces page displayed for ASA 5505 devices presents two tabbed panels: Hardware Ports and Interfaces. See Understanding ASA 5505 Ports and Interfaces, page 43-5 for more information.
ASA 8.4.1+ and FWSM 3.1+ devices operating in transparent mode also present two tabbed panels: Interfaces and Bridge Groups. See Add/Edit Bridge Group Dialog Box, page 43-39 for information about configuring bridge groups.
Many of the parameters presented in these dialog boxes vary according to device type and version, operational mode (routed versus transparent), and whether the device hosts a single or multiple contexts.
Note If you intend to use an interface for failover, you can define that interface in the Add Interface dialog box but do not configure it; instead, use the Failover page (see Chapter 46, “Configuring Failover”). In particular, do not specify an interface Name, as this parameter disqualifies the interface from being used as the failover link.
Using the Add Interface and Edit Interface Dialog Boxes
The following steps outline the general use of these dialog boxes:
1. An interface Type drop-down list appears at the top of the Add Interface and Edit Interface dialog boxes. (FWSMs and the ASA 5505 do not present the Type list.) Depending on device type, operating-system version and operating mode (router or transparent), the Type options presented will be two, three or all of the following:
– Interface – Choose this option to configure a physical interface on the device.
– Subinterface – Choose this option to configure a logical interface (or VLAN connection) associated with a previously defined physical interface. Refer to Configuring Subinterfaces (PIX/ASA), page 43-6 for more information.
43-18User Guide for Cisco Security Manager 4.1
OL-23991-01

Chapter 43 Managing Firewall DevicesConfiguring Firewall Device Interfaces
– Redundant – Choose this option to configure two physical interfaces as a single logical “redundant interface.” Refer to Configuring Redundant Interfaces, page 43-7 for more information.
– EtherChannel – Choose this option to configure a logical interface consisting of a bundle of up to eight individual Ethernet links; this bundle is known as an EtherChannel, or a port-channel interface. (This option is available only on ASA 8.4+ devices.) Refer to Configuring EtherChannels, page 43-8, for more information.
2. Below the Type option, the dialog boxes present up to three tabbed panels. Again, this depends on device type, operating-system version and operating mode.
The PIX 7.0+ Add Interface and Edit Interface dialog boxes present two tabbed panels: General and Advanced. The ASA 7.0+ Add Interface and Edit Interface dialog boxes present three tabbed panels: General, Advanced and IPv6.
– Configure the General options, as appropriate. This panel is described in Add/Edit Interface Dialog Box: General Tab (PIX 7.0+/ASA/FWSM), page 43-19.
– Configure the Advanced-panel options, as appropriate. This panel is described in Add/Edit Interface Dialog Box: Advanced Tab (ASA/PIX 7.0+), page 43-25.
– Configure the IPv6 options, as appropriate. This panel is described in Configuring IPv6 Interfaces (ASA/FWSM), page 43-27.
3. When you have finished configuring this interface, click OK to close the dialog box and return to the device Interfaces page.
Add/Edit Interface Dialog Box: General Tab (PIX 7.0+/ASA/FWSM)
The Add/Edit Interface Dialog Box (PIX 7.0+/ASA/FWSM), page 43-18, is used to define and configure interfaces, subinterfaces, VLAN interfaces, and redundant, and EtherChannel interfaces on firewall devices. You can access the Add/Edit Interface dialog box from the Interfaces page. See Managing Device Interfaces, Hardware Ports, and Bridge Groups, page 43-13 for more information.
Note In the following descriptions, the term “interface” may be used generically to refer to any of these types of interface.
The General panel of this dialog box is used to configure general interface settings, including Name, Security Level and IP Type parameters. Note that many of the parameters presented in this panel vary according to device type and version, operational mode (routed versus transparent), and whether the device hosts a single or multiple contexts. Thus, some of the options in the following table may not appear for the device you are configuring.
Related Topics
• Configuring Subinterfaces (PIX/ASA), page 43-6
• Configuring Redundant Interfaces, page 43-7
• Configuring EtherChannels, page 43-8
• Add/Edit Interface Dialog Box: Advanced Tab (ASA/PIX 7.0+), page 43-25
• Configuring IPv6 Interfaces (ASA/FWSM), page 43-27
• Understanding ASA 5505 Ports and Interfaces, page 43-5
• Configuring Hardware Ports on an ASA 5505, page 43-37
43-19User Guide for Cisco Security Manager 4.1
OL-23991-01

Chapter 43 Managing Firewall DevicesConfiguring Firewall Device Interfaces
Table 43-3 General tab: Add/Edit Interface Dialog Box
Element Description
Enable Interface Enables this interface to pass traffic.
By default, all physical interfaces are shut down. Traffic cannot traverse an interface of any type if the interface is not enabled. If you are defining a logical interface such as a subinterface, enable the physical interface it will be associated with before defining the subinterface. If you are defining a redundant interface or an EtherChannel interface, enable the member interfaces before defining the group interface.
When you check this option, you must also specify a Name and, in routed mode, an IP Type (or IP Address and Subnet Mask on an FWSM) before traffic can pass according to your security policy.
In multiple-context mode, if you allocate a physical or logical interface to a context, the interface is enabled by default in the context. However, before traffic can pass through the context interface, you must also enable the interface in the system configuration. If you shut down an interface in the system execution space, that interface is shut down in all contexts in which it shared.
Management Only Reserves this interface for device administration. Only traffic for management of this device is accepted; pass-through traffic for other interfaces and devices is rejected.
You cannot set a Primary or Secondary ISP interface to be Management Only.
Defining a management-only EtherChannel interface has certain member-interface restrictions. See Configuring EtherChannels, page 43-8, for more information.
Note Not available on ASA 5505 devices in transparent mode.
43-20User Guide for Cisco Security Manager 4.1
OL-23991-01

Chapter 43 Managing Firewall DevicesConfiguring Firewall Device Interfaces
Hardware Port On the ASA 5505, the Hardware Port is specified on the Hardware Ports panel (see Configuring Hardware Ports on an ASA 5505, page 43-37). Also, this option is not part of FWSM configuration.
For a physical interface, provide the specific hardware port assigned to the interface: enter a physical port ID, which includes network type, slot and port number, in the form: type[slot/]port. This is also the name by which subinterfaces can be associated with the interface.
The network type specified for the physical interface can be either Ethernet or GigabitEthernet; on the ASA 5580, TenGigabitEthernet is also available. This field provides automatic pattern matching: if you begin typing with the letter e, “Ethernet” is inserted into the field. Similarly, typing the letter g produces “GigabitEthernet.” Therefore, valid values are:
• Ethernet0 to Ethernetn
• GigabitEthernet0 to GigabitEthernetn
• GigabitEthernets/n
• TenGigabitEthernets/n (ASA 5580 only)
where s represents a slot number, and n represents a port number, up to the maximum number of network ports in the slot or device.
For an ASA 5500 series appliance, enter the type and a slot/port pair; for example, gigabitethernet0/1. Ports that are built into the chassis are assigned to slot 0, while ports on the 4-Port Gigabit Ethernet Security Services Module (4GE SSM) are assigned to slot 1. When you enter a slot/port pair, the Media Type options are enabled.
The ASA 5500 series appliances also include a management interface type. The management interface is a Fast Ethernet interface designed for device-management traffic only, and is specified as management0/0. You can, however, use this physical interface for through traffic if desired (be sure the Management Only option is not selected). Thus, in transparent firewall mode, you can use the management interface in addition to the two interfaces allowed for through traffic. You can also add subinterfaces to the management interface to provide management in each security context in multiple-context mode.
If you are defining a subinterface, you can simply choose the desired Hardware Port from a list of previously defined ports (you must also supply a VLAN ID). If you do not see a desired interface ID, be sure that Interface is defined and enabled.
Table 43-3 General tab: Add/Edit Interface Dialog Box (Continued)
Element Description
43-21User Guide for Cisco Security Manager 4.1
OL-23991-01

Chapter 43 Managing Firewall DevicesConfiguring Firewall Device Interfaces
Name Provide an identifier for this interface of up to 48 characters in length. The name should be a memorable name for the interface that relates to its use. However, if you are using failover, do not name interfaces that you are reserving for failover communications; this includes an EtherChannel intended for failover, as well as its member interfaces. Also, do not name interfaces intended for use as a member of a redundant-interface pair.
Certain names are reserved for specific interfaces, in accordance with the interface naming conventions of the security appliance. As such, these reserved names enforce default, reserved security levels, as follows:
• Inside – Connects to your internal network. Must be the most secure interface.
• DMZ – “Demilitarized zone” attached to an intermediate interface. DMZ is also known as a perimeter network. You can name a DMZ interface any name you choose. Typically, DMZ interfaces are prefixed with “DMZ” to identify the interface type.
• Outside – Connects to an external network or the Internet. Must be the least secure interface.
Similarly, a subinterface name typically identifies its associated interface, in addition to its own unique identifier. For example, DMZoobmgmt could represent an out-of-band management network attached to the DMZ interface.
Note Again, do not name the interface if you intend to use it for failover, or as a member of a redundant interface. See Chapter 46, “Configuring Failover” and Configuring Redundant Interfaces, page 43-7 for more information.
Security Level Specify the security level of the interface: enter a value between 0 (least secure) and 100 (most secure). The security appliance lets traffic flow freely from an inside network to an outside network (lower security level). Many other security features are affected by the relative security level of two interfaces.
• The outside interface is always 0.
• The inside interface is always 100.
• DMZ interfaces are between 1 and 99.
Table 43-3 General tab: Add/Edit Interface Dialog Box (Continued)
Element Description
43-22User Guide for Cisco Security Manager 4.1
OL-23991-01

Chapter 43 Managing Firewall DevicesConfiguring Firewall Device Interfaces
Media Type When Interface is the chosen Type and you enter a hardware port ID with slot/port numbers in the Hardware Port field, these options are enabled. (These options apply to ASA slot/port interfaces only.)
For all ASA 5500 series appliances, except the 5505, ports that are built into the chassis are assigned to slot 0, while ports on the 4GE SSM are assigned to slot 1. By default, all connectors used on an ASA are RJ-45 connectors. However, the ports on the 4GE SSM can include fiber SFP connectors. As part of the interface configuration for one of these fiber-based connections, you must change the Media Type setting from the default (RJ45) to the fiber-connector setting (SFP).
Fiber-based interfaces do not support duplexing and have a fixed speed, so the Duplex option is disabled, and the Speed options are limited to auto and nonegotiate.
Select the connector type used by this slot-1 interface:
• RJ45 – The port uses RJ-45 (copper) connectors.
• SFP – The port uses fiber SFP connectors. Required for 10-Gigabit Ethernet cards.
VLAN ID When Subinterface is the chosen interface Type, or when you are defining a logical interface on a device operating in transparent mode, on an ASA 5505, or on an FWSM, provide a VLAN ID for this interface.
For PIX/ASA devices running operating system 7.2(2)18 or earlier, valid VLAN IDs are 1 to 1001; with version 7.2(2)19 or later, valid IDs are 1 to 4090. For FWSMs, valid IDs are 1 to 4096. The specified VLAN ID must not be in use on any connected device.
Some VLAN IDs might be reserved on connected switches; see the switch documentation for more information. In multiple-context mode, you can only set the VLAN ID in the system configuration.
See Configuring Subinterfaces (PIX/ASA), page 43-6 for more information.
Subinterface ID When Subinterface is the chosen interface Type, or when defining an interface on a device operating in transparent mode, provide an integer between 1 and 4294967293 as the Subinterface ID.
For subinterface port identification, this ID is appended to the chosen Hardware Port. For example, GigabitEthernet0.4 represents the subinterface assigned an ID of 4, operating on the port GigabitEthernet0.
Note You cannot change the Subinterface ID after you set it.
IP Type PIX 7.0+ and ASA (except the 5505 in transparent mode) only.
The IP Type defines the type of IP addressing used for the interface; choose Static IP, Use DHCP, or PPPoE (as described in Device Interface: IP Type (PIX/ASA 7.0+), page 43-34).
Note You can configure DHCP and PPPoE only on the outside interface of a security appliance.
Table 43-3 General tab: Add/Edit Interface Dialog Box (Continued)
Element Description
43-23User Guide for Cisco Security Manager 4.1
OL-23991-01

Chapter 43 Managing Firewall DevicesConfiguring Firewall Device Interfaces
IP Address
Subnet Mask
FWSMs in routed mode only.
Use these two fields to assign an IP address and subnet mask to the VLAN interface. The IP address must be unique for each interface.
The Subnet Mask can be expressed in dotted decimal format (for example, 255.255.255.0), or by entering the number of bits in the network mask (for example, 24). Do not use 255.255.255.254 or 255.255.255.255 for an interface connected to the network because this will stop traffic on that interface. If you omit the Subnet Mask value, a “classful” network is assumed, as follows:
• The Class A netmask (255.0.0.0) is assumed if the first octet of the IP Address is 1 through 126 (that is, addresses 1.0.0.0 through 126.255.255.255).
• Subnet Mask
The Class B netmask (255.255.0.0) is assumed if the first octet of the IP Address is 128 through 191 (that is, addresses 128.0.0.0 through 191.255.255.255).
• The Class C netmask (255.255.255.0) is assumed if the first octet of the IP Address is 192 through 223 (that is, addresses 192.0.0.0 through 223.255.255.255).
Note Do not use addresses previously used for routers, hosts, or any other firewall device commands, such as an IP address in the global pool or a static NAT entry.
Description You can enter an optional description of up to 240 characters on a single line, without carriage returns. In multiple-context mode, the system description is independent of the context description.
For a failover or state link, the description is fixed as “LAN Failover Interface,” “STATE Failover Interface,” or “LAN/STATE Failover Interface,” for example. You cannot edit this description. The fixed description overwrites any description you enter here if you make this interface a failover or state link.
Redundant Interface; these options not available on ASA 5505 or FWSM devices.
Redundant ID When Redundant Interface is the chosen interface Type, provide an identifier for this redundant interface; valid IDs are the integers from 1 to 8.
See Configuring Redundant Interfaces, page 43-7 for more information.
Primary Interface
Secondary Interface
When Redundant Interface is the chosen interface Type, choose the primary member of the redundant interface pair from the Primary Interface list of available interfaces. Available interfaces are presented by Hardware Port IDs, as named interfaces cannot be used for a redundant interface pair.
Similarly, choose the secondary member of the redundant interface pair from the Secondary Interface list of available interfaces.
Note Member interfaces must be enabled and of the same type (e.g., GigabitEthernet), and cannot have a Name, IP Address, or Security Level assigned. In fact, do not configure any options other than Duplex and Speed on the member interfaces.
Table 43-3 General tab: Add/Edit Interface Dialog Box (Continued)
Element Description
43-24User Guide for Cisco Security Manager 4.1
OL-23991-01

Chapter 43 Managing Firewall DevicesConfiguring Firewall Device Interfaces
Add/Edit Interface Dialog Box: Advanced Tab (ASA/PIX 7.0+)
The Add/Edit Interface Dialog Box (PIX 7.0+/ASA/FWSM), page 43-18, is used to define and configure interfaces, subinterfaces, redundant, and EtherChannel interfaces on ASA and PIX 7.0+ devices. You can access the Add/Edit Interface dialog box from the Interfaces page. See Managing Device Interfaces, Hardware Ports, and Bridge Groups, page 43-13 for more information.
The Advanced panel of this dialog box is used to configure basic interface settings, including Duplex, Speed, and maximum transmission unit (MTU) parameters, as described in the following table.
Related Topics
• Add/Edit Interface Dialog Box: General Tab (PIX 7.0+/ASA/FWSM), page 43-19
• Configuring IPv6 Interfaces (ASA/FWSM), page 43-27
These options available on ASA 5505 devices only.
Block Traffic To Restricts this VLAN interface from initiating contact with the VLAN chosen here.
Backup Interface Choose a VLAN interface as a backup interface, for example, to an ISP. The backup interface does not pass traffic unless the default route through the primary interface fails. To ensure that traffic can pass over the backup interface, be sure to configure default routes on both the primary and backup interfaces so that the backup interface can be used when the primary fails.
Active MAC Address
Standby MAC Address
Use the Active MAC Address field to manually assign a private MAC address to the interface; the Standby MAC Address field can be used to set a standby MAC address for use with device-level failover.
Refer to Device Interface: MAC Address, page 43-36 for more information about these fields.
EtherChannel Interface options; available on ASA 8.4.1+ devices only.
Port-channel ID When EtherChannel is the chosen interface Type, enter an identifier for this EtherChannel (also referred to as a “port-channel”). Valid values are 1 to 48—you can define up to 48 port-channel groups. See Configuring EtherChannels, page 43-8, for more information.
Available Interfaces/Members in Group
When EtherChannel is the chosen interface Type, you can assign interfaces to this EtherChannel group by selecting them in the Available Interfaces list and then clicking the >> button to add them to the members list to the right.
Each channel group can have up to eight active interfaces, although you can assign up to 16 interfaces to the group. While only eight interfaces can be active, the remaining interfaces act as stand-by links in case of individual interface failure.
Note All interfaces in the channel group must be the same type and speed. The first interface added to the channel group determines the type and speed for the group.
See Configuring EtherChannels, page 43-8, for more information.
Table 43-3 General tab: Add/Edit Interface Dialog Box (Continued)
Element Description
43-25User Guide for Cisco Security Manager 4.1
OL-23991-01

Chapter 43 Managing Firewall DevicesConfiguring Firewall Device Interfaces
Table 43-4 Advanced tab: Add/Edit Interface Dialog Box (ASA/PIX 7.0+)
Element Description
Duplex Lists the duplex options for the interface, including Auto, Full, Half, or N/A, depending on the interface type.
For TenGigabitEthernet (ASA 5580 only), Duplex is automatically set to Full.
Note This option is not available when Subinterface or Redundant is the chosen Interface type.
Speed Lists the speed options (in bits per second) for a physical interface; not applicable to logical interfaces. The speeds available depend on the interface type.
• auto
• 10
• 100
• 1000
• 10000 (set automatically for a TenGigabitEthernet interface; available only on ASA 5580)
• nonegotiate
Note This option is not available when Subinterface or Redundant is the chosen Interface type.
MTU Specify the maximum packet size in bytes; that is, the maximum transmission unit (MTU). The value depends on the type of network connected to the interface. Valid values are 300 to 65535 bytes. Default is 1500 for all types except PPPoE, for which the default is 1492. In multiple-context mode, set the MTU in the context configuration.
Active MAC Address
Standby MAC Address
Available only on PIX 7.2+ and ASA 7.2+ devices.
Use the Active MAC Address field to manually assign a private MAC address to the interface; the Standby MAC Address field can be used to set a standby MAC address for use with device-level failover.
Refer to Device Interface: MAC Address, page 43-36 for more information about these fields.
Roles All interface roles assigned to this interface are listed in this field. Role assignments are based on pattern matching between the Name given to this interface and all currently defined Interface Role objects in Security Manager.
Interface role objects are replaced with the actual interface IP addresses when the configuration is generated for each device. They allow you to define generic rules—ones that can apply to multiple interfaces.
For more information on roles and how to define and use them, see Understanding Interface Role Objects, page 6-56.
EtherChannel Interface options; available on ASA 8.4.1+ devices only.
Load Balancing When EtherChannel is the chosen interface Type (on the General panel), choose a load-balancing method for the channel links. See About EtherChannel Load Balancing, page 43-12, for more information about this option.
43-26User Guide for Cisco Security Manager 4.1
OL-23991-01

Chapter 43 Managing Firewall DevicesConfiguring Firewall Device Interfaces
Configuring IPv6 Interfaces (ASA/FWSM)
When Interface, Subinterface, Redundant, or EtherChannel is the chosen Type in the Add Interface or Edit Interface dialog box, the dialog box presents three tabbed panels of options: General, Advanced and IPv6. The options provided by the IPv6 panel are described in this section.
Note These options are available only on ASA 7.0+ devices in routed mode; ASA 8.2+ devices in transparent mode; and FWSM 3.1+ devices in routed mode.
Navigation Path
You can access the IPv6 panel in the Add Interface and Edit Interface dialog boxes, which are accessed from the ASA or FWSM Interfaces page, as described in Managing Device Interfaces, Hardware Ports, and Bridge Groups, page 43-13.
Active Physical Interfaces
When EtherChannel is the chosen interface Type (on the General panel), specify the minimum and maximum number of interfaces that can be active for this EtherChannel group:
• Minimum – Specify the minimum number of interfaces that can be active for this group; enter a value from 1 to 8. Interfaces available to the channel are selected on the General tab of this dialog box (Add/Edit Interface Dialog Box: General Tab (PIX 7.0+/ASA/FWSM), page 43-19).
• Maximum – Specify the maximum number of interfaces that can be active; enter a value from 1 to 8. Interfaces available to the channel are selected on the General tab of this dialog box.
Specifying 3, 5, 6, or 7 active ports in an EtherChannel bundle provides poor load balancing, because some ports get up to twice the load of others. We recommend specifying 2, 4, or 8 active ports per EtherChannel to achieve effective load balancing. (A value of 1 provides no load balancing at all.)
Advanced tab options specific to ASA 5505 devices (routed mode only)
Block Traffic To Restricts this VLAN interface from initiating contact with the VLAN chosen here.
Backup Interface Choose a VLAN interface as a backup interface, for example, to an ISP. The backup interface does not pass traffic unless the default route through the primary interface fails. To ensure that traffic can pass over the backup interface, be sure to configure default routes on both the primary and backup interfaces so that the backup interface can be used when the primary fails.
Advanced tab options specific to FWSM 3.1+ devices
Bridge Group For an FWSM 3.1+ operating in transparent mode, this read-only field indicates the Bridge group to which this interface is assigned. See Add/Edit Bridge Group Dialog Box, page 43-39 for more information.
ASR Group To add this interface to an asymmetric routing group, enter the ASR group number in this field. Stateful failover must be enabled for asymmetric routing support to function properly between units in failover configurations. Valid values for ASR group range from 1 to 32. See About Asymmetric Routing Groups, page 43-4 for more information.
Table 43-4 Advanced tab: Add/Edit Interface Dialog Box (ASA/PIX 7.0+) (Continued)
Element Description
43-27User Guide for Cisco Security Manager 4.1
OL-23991-01

Chapter 43 Managing Firewall DevicesConfiguring Firewall Device Interfaces
Related Topics
• IPv6 Support in Security Manager, page 1-6
• Add/Edit Interface Dialog Box: General Tab (PIX 7.0+/ASA/FWSM), page 43-19
• Add/Edit Interface Dialog Box: Advanced Tab (ASA/PIX 7.0+), page 43-25
Field Reference
Table 43-5 IPv6 tab: Add/Edit Interface Dialog Box (ASA/FWSM)
Element Description
Enable IPv6 Check this box to enable IPv6 and configure IPv6 addresses on this interface. You can deselect this option to disable IPv6 on the interface, but retain the configuration information.
Enforce EUI-64 When selected, use of Modified EUI-64 format interface identifiers in IPv6 addresses on a local link is enforced.
When this option is enabled on an interface, the source addresses of IPv6 packets received on the interface are verified against the source MAC addresses to ensure that the interface identifiers use the Modified EUI-64 format. If the interface identifier in an IPv6 packet is not in the Modified EUI-64 format, the packet is dropped and the following system log message is generated:
%PIX|ASA-3-325003: EUI-64 source address check failed.
Address format verification is performed only when a flow is created. Packets from an existing flow are not checked. Additionally, address verification can be performed only for hosts on the local link. Packets received from hosts behind a router will fail the address format verification, and be dropped, because their source MAC address will be the router MAC address and not the host MAC address.
The Modified EUI-64 format interface identifier is derived from the 48-bit link-layer (MAC) address by inserting the hex number FFFE between the upper three bytes (OUI field) and the lower 3 bytes (serial number) of the link-layer address. To ensure the chosen address is from a unique Ethernet MAC address, the next-to-lowest order bit in the high-order byte is inverted (universal/local bit) to indicate the uniqueness of the 48-bit address. For example, an interface with a MAC address of 00E0.B601.3B7A would have a 64-bit interface ID of 02E0:B6FF:FE01:3B7A.
43-28User Guide for Cisco Security Manager 4.1
OL-23991-01

Chapter 43 Managing Firewall DevicesConfiguring Firewall Device Interfaces
DAD Attempts To specify the number of consecutive neighbor solicitation messages that are sent on an interface during duplicate address detection (DAD), enter a number from 0 to 600 in this field. Entering 0 disables duplicate address detection on the interface. Entering 1 configures a single transmission without follow-up transmissions; this is the default.
Duplicate address detection verifies the uniqueness of new unicast IPv6 addresses before the addresses are assigned to interfaces (the new addresses remain in a tentative state while duplicate address detection is performed). Duplicate address detection uses neighbor solicitation messages to verify the uniqueness of unicast IPv6 addresses.
When duplicate address detection identifies a duplicate address, the state of the address is set to DUPLICATE and the address is not used. If the duplicate address is the link-local address of the interface, the processing of IPv6 packets is disabled on the interface and an error message similar to the following is issued:
%PIX-4-DUPLICATE: Duplicate address FE80::1 on outside
If the duplicate address is a global address of the interface, the address is not used and an error message is issued, similar to that shown previously for a duplicate link-local address.
All configuration commands associated with the duplicate address remain as-configured while the state of the address is set to DUPLICATE. If the link-local address for an interface changes, duplicate address detection is performed on the new link-local address, and all other IPv6 address associated with the interface are regenerated (that is, duplicate address detection is performed only on the new link-local address).
NS Interval The interval between IPv6 neighbor solicitation retransmissions, in milliseconds. Valid values range from 1000 to 3600000 milliseconds; the default value is 1000 milliseconds.
Note This value is included in all IPv6 router advertisements sent out on this interface.
Reachable Time The amount of time, in milliseconds, within which a remote IPv6 node is considered still reachable, after initial reachability was confirmed. Valid values range from 0 to 3600000 milliseconds, the default value is 0. When 0 is used for the value, the reachable time is set as undetermined—it is up to the receiving devices to set and track reachable time.
A configured time enables detection of unavailable neighbors. A shorter time allows detecting unavailable neighbors more quickly; however, shorter times consume more IPv6 network bandwidth and processing resources in all IPv6 network devices. Very short configured times are not recommended in normal IPv6 operation.
Table 43-5 IPv6 tab: Add/Edit Interface Dialog Box (ASA/FWSM) (Continued)
Element Description
43-29User Guide for Cisco Security Manager 4.1
OL-23991-01

Chapter 43 Managing Firewall DevicesConfiguring Firewall Device Interfaces
Enable RA When checked, IPv6 router advertisement transmissions are enabled on the interface. The following options are enabled:
• RA Lifetime – The “router lifetime” value specifies how long nodes on the local link should consider the security appliance as the default router on the link. Valid values range from 0 to 9000 seconds; the default is 1800 seconds. Entering 0 indicates that the security appliance should not be considered a default router on the selected interface.
Any non-zero value should not be less than the following RA Interval value.
Note This value is included in all IPv6 router advertisements sent out on this interface.
• RA Interval – The interval between IPv6 router advertisement transmissions on this interface. Valid values range from 3 to 1800 seconds, (or from 500 to 1800000 milliseconds if the following RA Interval in Milliseconds option is checked); the default is 200 seconds.
The interval between transmissions should be less than or equal to the RA Lifetime value if it is non-zero. To prevent synchronization with other IPv6 nodes, randomly adjust the actual value used to within 20 percent of the desired value.
• RA Interval in Milliseconds – Checking this option indicates that the provided RA Interval value is in milliseconds, rather than seconds.
Interface IPv6 Addresses
The IPv6 addresses assigned to the interface are specified in this section of the dialog box.
• Link-Local Address – To override the link-local address that is automatically generated for the interface, enter the desired IPv6 link-local address in this field.
The link-local address is composed of the link-local prefix FE80::/64 and the interface ID in Modified EUI-64 format. For example, an interface with a MAC address of 00E0.B601.3B7A would have a link-local address of FE80::2E0:B6FF:FE01:3B7A. An error will occur if another host is using the specified address.
• Enable Address Auto-Configuration – Select this option to enable automatic configuration of IPv6 addresses on the interface using stateless autoconfiguration. The addresses are configured based on the prefixes received in Router Advertisement (RA) messages. If a link-local address has not been configured, then one is automatically generated for this interface. An error occurs if another host is already using the generated link-local address.
• The table in this section displays the IPv6 addresses assigned to this interface. Use the Add Row, Edit Row, and Delete Row buttons below this table to manage these entries. (These are standard buttons, as described in Using Tables, page 1-36.)
Add Row and Edit Row open the IPv6 Address for Interface Dialog Box, page 43-31.
Table 43-5 IPv6 tab: Add/Edit Interface Dialog Box (ASA/FWSM) (Continued)
Element Description
43-30User Guide for Cisco Security Manager 4.1
OL-23991-01

Chapter 43 Managing Firewall DevicesConfiguring Firewall Device Interfaces
IPv6 Address for Interface Dialog Box
This dialog box is used to add or edit an IPv6 address assigned to an ASA or FWSM interface. Multiple IPv6 addresses can be assigned to the interface in the IPv6 panel of the Add Interface or Edit Interface dialog box.
Note This dialog box is available only on ASA 7.0+ devices in routed mode; ASA 8.2+ devices in transparent mode; and FWSM 3.1+ devices in routed mode.
Navigation Path
You can access the IPv6 Address for Interface dialog box:
• From the IPv6 panel of the ASA or FWSM Add Interface and Edit Interface dialog boxes.
• From the Management IPv6 page of an ASA 5505 in transparent firewall mode (version 8.2 and 8.3 devices only).
Click the Add Row or Edit Row buttons beneath the table in the Interfaces IPv6 Addresses section to open the dialog box.
Related Topics
• IPv6 Prefix Editor Dialog Box, page 43-32
• Add/Edit Interface Dialog Box (PIX 7.0+/ASA/FWSM), page 43-18
• Managing Device Interfaces, Hardware Ports, and Bridge Groups, page 43-13
• Management IPv6 Page (ASA 5505), page 43-11
Interface IPv6 Prefixes Use the table in this section to configure which IPv6 prefixes (that is, the network portion of the IPv6 addresses) are included in IPv6 router advertisements. Use the Add Row, Edit Row, and Delete Row buttons below this table to manage these entries. (These are standard buttons, as described in Using Tables, page 1-36.)
Add Row and Edit Row open the IPv6 Prefix Editor Dialog Box, page 43-32.
Table 43-5 IPv6 tab: Add/Edit Interface Dialog Box (ASA/FWSM) (Continued)
Element Description
43-31User Guide for Cisco Security Manager 4.1
OL-23991-01

Chapter 43 Managing Firewall DevicesConfiguring Firewall Device Interfaces
Field Reference
IPv6 Prefix Editor Dialog Box
This dialog box is used to add or edit an IPv6 prefix (that is, the network portion of an IPv6 address), providing control over individual parameters, including whether the prefix should be included in IPv6 router advertisements. Multiple prefixes can be configured in the IPv6 panel of the ASA or FWSM Add Interface or Edit Interface dialog box.
Note This dialog box is available only on ASA 7.0+ devices in routed mode; ASA 8.2+ devices in transparent mode; and FWSM 3.1+ devices in routed mode.
By default, prefixes configured as addresses on an interface are advertised in router advertisements. If you configure specific prefixes for advertisement, then only those prefixes are advertised. The valid and preferred lifetimes are counted down in real time. Alternately, a date can be set to specify the expiration of a prefix. When the expiration is reached, the prefix is no longer advertised.
Navigation Path
You can access the IPv6 Prefix Editor dialog box from the IPv6 panel of the Add Interface and Edit Interface dialog boxes: click the Add Row or Edit Row buttons beneath the table in the Interfaces IPv6 Prefixes section in either of those dialog boxes.
Related Topics
• IPv6 Address for Interface Dialog Box, page 43-31
• Add/Edit Interface Dialog Box (PIX 7.0+/ASA/FWSM), page 43-18
• Managing Device Interfaces, Hardware Ports, and Bridge Groups, page 43-13
Table 43-6 IPv6 Address for Interface Dialog Box
Element Description
Address/Prefix Length Enter an IPv6 network address to be assigned to the interface, with its Prefix Length appended, where the Prefix Length integer indicates how many of the high-order, contiguous bits of the address comprise network portion of the address. A slash (/) must precede the Prefix Length. For example, 3FFE:C00:0:1::/64.
EUI-64 If this box is checked, the EUI-64 interface ID will be used in the low-order 64 bits of the IPv6 address. If the value specified for the Prefix Length is greater than 64 bits, the prefix bits have precedence over the interface ID. An error occurs if another host is using the specified address.
The Modified EUI-64 format interface ID is derived from the 48-bit link-layer (MAC) address by inserting the hex number FFFE between the upper three bytes (OUI field) and the lower 3 bytes (serial number) of the link layer address. To ensure the chosen address is from a unique Ethernet MAC address, the next-to-lowest order bit in the high-order byte is inverted (universal/local bit) to indicate the uniqueness of the 48-bit address. For example, an interface with a MAC address of 00E0.B601.3B7A would have a 64 bit interface ID of 02E0:B6FF:FE01:3B7A.
43-32User Guide for Cisco Security Manager 4.1
OL-23991-01

Chapter 43 Managing Firewall DevicesConfiguring Firewall Device Interfaces
Field Reference
Table 43-7 IPv6 Prefix Editor Dialog Box
Element Description
Address/Prefix Length Enter an IPv6 network address, with its Prefix Length appended, where the Prefix Length integer indicates how many of the high-order, contiguous bits of the address represent the network portion of the address. A slash (/) must precede the Prefix Length. For example, 3FFE:C00:0:1::/64.
Default If this box is checked, the settings in this dialog box will apply to all prefixes, rather than a single address. (When checked, the Address/Prefix Length field is disabled.)
No Advertisements When checked, hosts on the local link cannot use the specified prefix in advertisements.
Off Link When checked, the specified prefix is “off-link”; that is, not locally reachable on the link.
When on-link (the default), the specified prefix is assigned to the link. Nodes sending traffic to addresses that contain the specified prefix consider the destination to be locally reachable on the link.
No Auto-Configuration When checked, hosts on the local link cannot use the specified prefix for IPv6 autoconfiguration.
When auto-configuration is on (the default), hosts on the local link can use the specified prefix for IPv6 autoconfiguration.
43-33User Guide for Cisco Security Manager 4.1
OL-23991-01
Chapter 43 Managing Firewall DevicesConfiguring Firewall Device Interfaces
Device Interface: IP Type (PIX/ASA 7.0+)
A security device operating in single-context, routed mode requires IP addressing for its interfaces; however, firewall interfaces do not have IP addresses until you assign them. Note that in transparent mode, the device acts as an access-control bridge (a “bump in the wire”)—you assign different VLANs to each interface, but IP addressing is not necessary.
The Add/Edit Interface dialog box presented for an ASA or PIX 7.0+ device in single-context, routed mode includes the section IP Type, where you specify the type of IP addressing for the interface and provide related parameters, as described here. (The IP Type section of the Add/Edit Interface dialog box for PIX 6.3 devices is described in Device Interface: IP Type (PIX 6.3), page 43-17.)
In multiple-context mode, interface IP addresses are set in the context configuration.
Prefix Lifetime You can expand this section of the dialog box to display the following expiration options:
• Lifetime Duration – Select this option to define prefix expiration as a length of time; the following options are enabled:
– Valid Lifetime – The amount of time (in seconds) that the specified IPv6 prefix is advertised as being valid. Enter a value from 0 to 4294967295 seconds. The maximum value represents infinity (that is, the lifetime does not expire), which can also be specified by the checking the Infinite box. The default is 2592000 (30 days).
– Preferred Lifetime – The amount of time (in seconds) that the specified IPv6 prefix is advertised as being preferred. Enter a value from 0 to 4294967295 seconds. The maximum value represents infinity (that is, the lifetime does not expire), which can also be specified by the checking the Infinite box. The default is 604800 (7 days). The Preferred Lifetime must less than or equal to the Valid Lifetime.
• Lifetime Expiration Date – Select this option to define prefix expiration as a specific date. Note that acceptable values for this date can range from today’s date to one year from today’s date. The following options are enabled:
– Valid – The prefix is advertised as being valid until this date and time are reached. Enter a date in the form Mmm dd yyyy (that is, three-letter month abbreviation, two-digit date, and four-digit year), or click the calendar icon to select a date from a scrolling calendar. Also, enter the time of expiration on the specified date, in the form hh:mm, based on a 24-hour clock.
– Preferred – The prefix is advertised as being preferred until this date and time are reached. Enter a date in the form Mmm dd yyyy (that is, three-letter month abbreviation, two-digit date, and four-digit year), or click the calendar icon to select a date from a scrolling calendar. Also, enter the time of expiration on the specified date, in the form hh:mm, based on a 24-hour clock. The Preferred date and time must be earlier than or equal to the Valid date and time.
Table 43-7 IPv6 Prefix Editor Dialog Box (Continued)
Element Description
43-34User Guide for Cisco Security Manager 4.1
OL-23991-01

Chapter 43 Managing Firewall DevicesConfiguring Firewall Device Interfaces
Note Do not use addresses previously used for routers, hosts, or any other firewall device commands, such as an IP address in the global pool or a static NAT entry.
Also, do not specify IP Type information for an interface you intend to use as a redundant interface.
Step 1 In the Add/Edit Interface dialog box, choose a method for address assignment (Static IP, Use DHCP, or PPPoE (PIX and ASA 7.2+)) from the IP Type list, and then provide related parameters, as follows:
• Static IP – Provide a static IP Address and Subnet Mask that represents the security device on this interface’s connected network. The IP address must be unique for each interface.
The Subnet mask can be expressed in dotted decimal format (for example, 255.255.255.0), or by entering the number of bits in the network mask (for example, 24). Do not use 255.255.255.254 or 255.255.255.255 for an interface connected to the network because this will stop traffic on that interface. If you omit the Subnet Mask value, a “classful” network is assumed, as follows:
– The Class A netmask (255.0.0.0) is assumed if the first octet of the IP Address is 1 through 126 (i.e., addresses 1.0.0.0 through 126.255.255.255).
– The Class B netmask (255.255.0.0) is assumed if the first octet of the IP Address is 128 through 191 (i.e., addresses 128.0.0.0 through 191.255.255.255).
– The Class C netmask (255.255.255.0) is assumed if the first octet of the IP Address is 192 through 223 (i.e., addresses 192.0.0.0 through 223.255.255.255).
Note Do not use addresses previously used for routers, hosts, or any other firewall device commands, such as an IP address in the global pool or a static NAT entry.
• Use DHCP – Enables Dynamic Host Configuration Protocol (DHCP) for automatic assignment of an IP address from a DHCP server on the connected network. The following options become available:
– DHCP Learned Route Metric (required) – Assign an administrative distance to the learned route. Valid values are 1 to 255. The administrative distance for learned routes defaults to 1.
All routes have a value or “metric” that represents its priority of use. (This metric is also referred to as “administrative distance.”) When two or more routes to the same destination are available, devices use administrative distance to decide which route to use.
– Obtain Default Route using DHCP – Select this option to obtain a default route from the DHCP server so that you do not need to configure a default static route. See also Configuring Static Routes, page 51-31.
– Enable Tracking for DHCP Learned Route – If Obtain Default Route using DHCP is selected, you can select this option to enable route tracking via a specific Service Level Agreement (SLA) monitor. The following option becomes available:
– Tracked SLA Monitor – Required if Enable Tracking for DHCP Learned Route is selected. Enter or Select the name of the SLA monitor object that defines the route tracking (connectivity monitoring) to be applied to this interface. See Monitoring Service Level Agreements (SLAs) To Maintain Connectivity, page 47-7 for more information.
43-35User Guide for Cisco Security Manager 4.1
OL-23991-01

Chapter 43 Managing Firewall DevicesConfiguring Firewall Device Interfaces
• PPPoE (PIX and ASA 7.2+) – Enables Point-to-Point Protocol over Ethernet (PPPoE) for automatic assignment of an IP address from a PPPoE server on the connected network; this option is not supported with failover. The following options become available:
– VPDN Group Name (required) – Choose the Virtual Private Dialup Network (VPDN) group that contains the authentication method and user name/password to use for network connection, negotiation and authentication. See Managing VPDN Groups, page 43-43 for more information.
– IP Address – If provided, this static IP address is used for connection and authentication, instead of a negotiated address.
– Subnet Mask – The subnet mask to be used in conjunction with the provided IP Address.
– PPPoE Learned Route Metric (required) – Assign an administrative distance to the learned route. Valid values are 1 to 255; defaults to 1.
All routes have a value or “metric” that represents its priority of use. (This metric is also referred to as “administrative distance.”) When two or more routes to the same destination are available, devices use administrative distance to decide which route to use.
– Obtain Default Route using PPPoE – Select this option to obtain a default route from the PPPoE server; sets the default routes when the PPPoE client has not yet established a connection. When using this option, you cannot have a statically defined route in the configuration.
– Enable Tracking for PPPoE Learned Route – If Obtain Default Route using PPPoE is selected, you can select this option to enable route tracking for PPPoE-learned routes. The following options become available:
– Dual ISP Interface – If you are defining interfaces for dual ISP support, choose Primary or Secondary to indicate which connection you are configuring.
– Tracked SLA Monitor – Required if Enable Tracking for DHCP Learned Route is selected. Enter or Select the name of the SLA monitor object that defines the route tracking (connectivity monitoring) to be applied to this interface. See Monitoring Service Level Agreements (SLAs) To Maintain Connectivity, page 47-7 for more information.
Note You can configure DHCP and PPPoE only on the outside interface of a firewall device. If you have already configured PPPoE on the outside interface, it is no longer available as an option.
Step 2 Continue configuring the device interface in the Add/Edit Interface Dialog Box (PIX 7.0+/ASA/FWSM), page 43-18.
Device Interface: MAC Address
By default, a physical interface uses its “burned-in” MAC address, and all subinterfaces of a physical interface use the same burned-in MAC address.
A redundant interface uses the MAC address of the first physical interface that you add. If you change the order of the member interfaces in the configuration, then its MAC address changes to match the MAC address of the interface that is now listed first. If you manually assign a MAC address to the redundant interface, that is used regardless of the physical-interface MAC addresses.
Similarly, all interfaces assigned to an EtherChannel group share the same MAC address. By default, the EtherChannel uses the MAC address of the lowest-numbered member interface. However, you can manually configure a MAC address for the EtherChannel to prevent traffic disruption should the low-numbered interface be removed from the group.
43-36User Guide for Cisco Security Manager 4.1
OL-23991-01

Chapter 43 Managing Firewall DevicesConfiguring Firewall Device Interfaces
You also might want to assign unique MAC addresses to subinterfaces. For example, your service provider might control access based on MAC addresses.
Further, if you use failover, you can provide a standby MAC address. If the active unit fails over and the standby unit becomes active, the new active unit starts using the active MAC addresses to minimize network disruption, while the old active unit uses the standby address.
Note The following options appear only on the Advanced tab of the Add Interface and Edit Interface dialog boxes presented by PIX 7.2+ and ASA 7.2+ devices.
(Optional) To manually assign a private MAC address to the current interface:
Step 1 In the Add/Edit Interface dialog box, provide the desired MAC address in the Active MAC Address field.
MAC addresses are provided in H.H.H format, where H is a 16-bit hexadecimal digit. For example, the MAC address 00-0C-F1-42-4C-DE would be entered as 000C.F142.4CDE.
Note In some cases, you may have to press the Tab key after entering the Active MAC Address to activate the Standby MAC Address field.
Step 2 If desired, provide a Standby MAC Address for use with device-level failover.
If the active unit fails over and the standby unit becomes active, the new active unit begins using the active MAC addresses to minimize network disruption, while the old active unit uses the standby address.
Step 3 Continue configuring the device interface in the Add/Edit Interface Dialog Box (PIX 7.0+/ASA/FWSM), page 43-18.
Configuring Hardware Ports on an ASA 5505
The Interfaces page displayed for ASA 5505 devices presents two tabbed panels: Hardware Ports and Interfaces. The table on the Hardware Ports panel displays currently configured switch ports for the selected ASA 5505.
Use the Configure Hardware Ports dialog box to configure the switch ports on an ASA 5505, including setting the mode, assigning a switch port to a VLAN, and setting the Protected option. (The following dialog-box parameter descriptions also describe the fields in the Hardware Ports table.)
Caution The ASA 5505 does not support Spanning Tree Protocol for loop detection in the network. Therefore, you must ensure that any connection with the appliance does not end up in a network loop.
Navigation Path
You can access the Configure Hardware Ports dialog box by clicking Add Row or Edit Row on the Hardware Ports panel of the ASA 5505 Interfaces page. See Managing Device Interfaces, Hardware Ports, and Bridge Groups, page 43-13 for more information.
Related Topics
• Understanding ASA 5505 Ports and Interfaces, page 43-5
• Add/Edit Interface Dialog Box (PIX 7.0+/ASA/FWSM), page 43-18
43-37User Guide for Cisco Security Manager 4.1
OL-23991-01
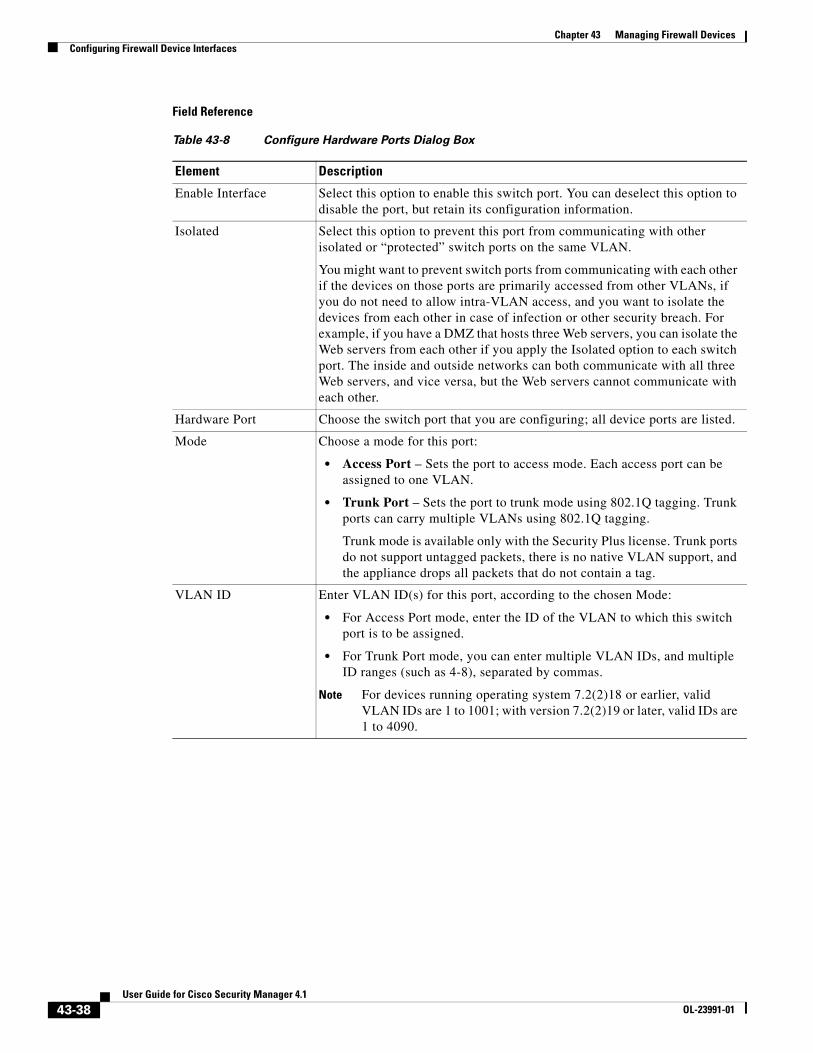
Chapter 43 Managing Firewall DevicesConfiguring Firewall Device Interfaces
Field Reference
Table 43-8 Configure Hardware Ports Dialog Box
Element Description
Enable Interface Select this option to enable this switch port. You can deselect this option to disable the port, but retain its configuration information.
Isolated Select this option to prevent this port from communicating with other isolated or “protected” switch ports on the same VLAN.
You might want to prevent switch ports from communicating with each other if the devices on those ports are primarily accessed from other VLANs, if you do not need to allow intra-VLAN access, and you want to isolate the devices from each other in case of infection or other security breach. For example, if you have a DMZ that hosts three Web servers, you can isolate the Web servers from each other if you apply the Isolated option to each switch port. The inside and outside networks can both communicate with all three Web servers, and vice versa, but the Web servers cannot communicate with each other.
Hardware Port Choose the switch port that you are configuring; all device ports are listed.
Mode Choose a mode for this port:
• Access Port – Sets the port to access mode. Each access port can be assigned to one VLAN.
• Trunk Port – Sets the port to trunk mode using 802.1Q tagging. Trunk ports can carry multiple VLANs using 802.1Q tagging.
Trunk mode is available only with the Security Plus license. Trunk ports do not support untagged packets, there is no native VLAN support, and the appliance drops all packets that do not contain a tag.
VLAN ID Enter VLAN ID(s) for this port, according to the chosen Mode:
• For Access Port mode, enter the ID of the VLAN to which this switch port is to be assigned.
• For Trunk Port mode, you can enter multiple VLAN IDs, and multiple ID ranges (such as 4-8), separated by commas.
Note For devices running operating system 7.2(2)18 or earlier, valid VLAN IDs are 1 to 1001; with version 7.2(2)19 or later, valid IDs are 1 to 4090.
43-38User Guide for Cisco Security Manager 4.1
OL-23991-01

Chapter 43 Managing Firewall DevicesConfiguring Firewall Device Interfaces
Add/Edit Bridge Group Dialog Box
A transparent firewall connects the same network on its inside and outside interfaces, and supports only the two interfaces per context. However, you can increase the number of interfaces available to a context through use of bridge groups. You can configure up to eight bridge groups; on an FWSM each group can contain two interfaces; on an ASA each group can contain four interfaces.
Each bridge group connects to a separate network. Bridge group traffic is isolated from other bridge groups; traffic is not routed to another bridge group within the security appliance—traffic must exit the security appliance to be routed by an external router back to another bridge group in the security appliance.
You might want to use more than one bridge group if you do not want the overhead of security contexts, or want to maximize your use of security contexts. Although the bridging functions are separate for each bridge group, many other functions are shared between all bridge groups. For example, all bridge groups share a syslog server or AAA server configuration. For complete security policy separation, use security contexts with one bridge group in each context.
For FWSM 3.1+ and ASA 8.4.1+ devices in transparent mode, the Interfaces page displays two tabbed panels: Interfaces and Bridge Groups. The following information applies to the Bridge Groups panel and the Add/Edit Bridge Group dialog box; refer to Add/Edit Interface Dialog Box (PIX 7.0+/ASA/FWSM), page 43-18 for information about the Interfaces panel.
Navigation Path
You can access the Add/Edit Bridge Group dialog box from the Bridge Groups panel of the Interfaces page.
Related Topics
• Interfaces in Routed and Transparent Modes, page 43-3
• Bridging Support for FWSM 3.1, page 43-3
• Managing Device Interfaces, Hardware Ports, and Bridge Groups, page 43-13
Duplex Choose a duplex option for the port: Full, Half, or Auto. The Auto setting is recommended, and the default.
If you set Duplex to anything other than Auto for PoE ports Ethernet 0/6 or 0/7, then Cisco IP phones and Cisco wireless access points that do not support IEEE 802.3af will not be detected and supplied with power.
Speed Choose a speed for the port: 10, 100, or Auto. The Auto setting is recommended, and the default.
If you set Speed to anything other than Auto for PoE ports Ethernet 0/6 or 0/7, then Cisco IP phones and Cisco wireless access points that do not support IEEE 802.3af will not be detected and supplied with power.
The default Auto setting also includes the Auto-MDI/MDIX feature. Auto-MDI/MDIX eliminates the need for crossover cabling by performing an internal crossover when a straight cable is detected during the auto-negotiation phase. Either Speed or Duplex must be set to Auto to enable Auto-MDI/MDIX for the interface. If you explicitly set both Speed and Duplex to a fixed value, thus disabling auto-negotiation for both settings, then Auto-MDI/MDIX is also disabled.
Table 43-8 Configure Hardware Ports Dialog Box (Continued)
Element Description
43-39User Guide for Cisco Security Manager 4.1
OL-23991-01

Chapter 43 Managing Firewall DevicesConfiguring Firewall Device Interfaces
Field Reference
Advanced Interface Settings (PIX/ASA/FWSM)Advanced configuration options are available for interfaces on FWSMs and ASA/PIX 7.0+ devices operating in single-context mode.
These are general device-related settings; that is, they are not applied to individual interfaces.
Note The information in this section does not apply to PIX 6.3 devices, nor to security devices in multiple-context mode.
The Advanced Interface Settings dialog box includes the following elements:
• Traffic between interfaces with same security levels – This parameter controls communication between interfaces and subinterfaces on the same security level. If you enable same security interface communication, you can still configure interfaces at different security levels as usual. Refer to Enabling Traffic between Interfaces with the Same Security Level, page 43-41 for more information.
Table 43-9 Add/Edit Bridge Group Dialog Box
Element Description
Name Enter a name for this bridge group.
ID Enter an identifier for this bridge group; can be an integer between 1 and 100.
Interface A Choose the first interface or VLAN to assign to this bridge group; all interfaces defined on the Interfaces panel are listed.
Interface B Choose the second interface or VLAN to assign to this bridge group; all interfaces defined on the Interfaces panel are listed.
Interface C
Interface D
Choose the third and fourth interfaces or VLANs to assign to this bridge group; all interfaces defined on the Interfaces panel are listed.
Note These two options are available only on ASA 8.4.1 and later devices operating in transparent mode.
IP Address Enter or Select a management IP address for the bridge group. A transparent firewall does not participate in IP routing. Thus, the only IP configuration required for a bridge group is this management IP address. This address is the source address for traffic originating on the security appliance, such as system messages or communications with AAA servers. You can also use this address for remote management access.
Note IPv6 addresses are not supported for bridge groups.
Netmask Network mask for the specified IP address. You can express the value in dotted decimal format (for example, 255.255.255.0) or by entering the number of bits in the network mask (for example, 24).
Note Do not use 255.255.255.254 or 255.255.255.255 for an interface connected to the network because this will stop traffic on that interface.
Description You can enter an optional description for this bridge group.
43-40User Guide for Cisco Security Manager 4.1
OL-23991-01

Chapter 43 Managing Firewall DevicesConfiguring Firewall Device Interfaces
• PPPoE Users button – Click this button to open the PPPoE Users dialog box, where you can add, edit and delete PPPoE users, as described in Managing the PPPoE Users List, page 43-42. This option is available only for ASA and PIX 7.0+ devices.
• VPDN Groups (PIX and ASA 7.2+) – This table lists currently defined VPDN Groups. The buttons below the table are used to add, edit and delete VPDN group entries, as described in Managing VPDN Groups, page 43-43.
• LACP System Priority (ASA 8.4.1+) – All systems participating in EtherChannel link aggregation require a Link Aggregation Control Protocol (LACP) System Priority. The value can be 1 to 65535, with the higher number signifying lower priority. The default is 32768.
This value is combined with the system MAC address to form the system’s LACP identifier, and thus is applicable only for EtherChannel interfaces. See Configuring EtherChannels, page 43-8, for more information.
Note Additional LACP parameters are available in the Edit Interface dialog box for individual interfaces assigned to an EtherChannel; see Editing LACP Parameters for an Interface Assigned to an EtherChannel, page 43-10, for more information.
Navigation Path
You can open the Advanced Interface Settings dialog box by clicking the Advanced button at the bottom of the Interfaces page (for non-5505 ASAs, PIX 7.0+ devices, and FWSMs), or at the bottom of the Interfaces tab on the ASA 5505 Ports and Interfaces page.
Related Topics
• Managing Device Interfaces, Hardware Ports, and Bridge Groups, page 43-13
Enabling Traffic between Interfaces with the Same Security Level
The Advanced Interface Settings (PIX/ASA/FWSM), page 43-40 dialog box presented for a single-context security device includes the “Traffic between interfaces with the same security level” drop-down list, as described in this section.
By default, interfaces or subinterfaces on the same security level cannot communicate with each other. Allowing communication between same-security interfaces provides the following benefits:
• You can configure more than 101 communicating interfaces.
If you use different levels for each interface and do not assign any interfaces to the same security level, you can configure only one interface per level (0 to 100).
• You can allow traffic to flow freely between all same-security interfaces without access lists.
Note If you enable NAT control, you do not need to configure NAT between same-security-level interfaces.
Step 1 In the Advanced Interface Settings dialog box, choose the option that identifies how you want this device to handle Traffic between interfaces with the same security levels:
• Disabled—Communication between interfaces on the same security level is not allowed.
• Inter-interface—Enables traffic flows between interfaces with the same security level setting. When this option is enabled, you are not required to define translation rules to enable traffic flow between interfaces in the firewall device.
43-41User Guide for Cisco Security Manager 4.1
OL-23991-01

Chapter 43 Managing Firewall DevicesConfiguring Firewall Device Interfaces
• Intra-interface—Enables traffic flows between subinterfaces with the same security level setting. When this option is enabled, you are not required to define translation rules to enable traffic flow between subinterfaces assigned to an interface.
• Both—Allows both intra- and inter-interface communications among interfaces and subinterfaces with the same security level.
Step 2 Continue with Advanced Interface Settings (PIX/ASA/FWSM), page 43-40 configuration, or click OK to close the Advanced Interface Settings dialog box.
Managing the PPPoE Users List
Point-to-Point Protocol over Ethernet (PPPoE) allows standard PPP communication between a security device and an external ISP, via an Ethernet interface on the device. To establish a communication link, the device must provide authentication credentials and obtain network parameters. This is accomplished using a Virtual Private Dialup Network (VPDN) group, which basically consists of established PPPoE user credentials (i.e., a user name and password) and an authentication protocol. See Managing VPDN Groups, page 43-43 for more information about VPDN groups.
The PPPoE user credentials available for use with VPDN groups are maintained in the PPPoE Users dialog box, which you can access from the Advanced Interface Settings (PIX/ASA/FWSM), page 43-40 dialog box, and from the Add/Edit VPND Group dialog boxes.
Adding and Editing PPPoE Users
The PPPoE Users dialog box presents a table of currently defined PPPoE users, along with standard Add Row, Edit Row, and Delete Row buttons. The Add Row button opens the Add PPPoE User dialog box; the Edit Row button opens the virtually identical Edit PPPoE User dialog box.
Enter or edit the following PPPoE user parameters, and then click OK to close the Add (Edit) PPPoE User dialog box and return to the Advanced Interface Settings dialog box.
Note PPPoE user options are not available on Firewall Service Modules (FWSMs).
Field Reference
Table 43-10 Add and Edit PPPoE User Dialog Boxes
Element Description
Username The name assigned to this user account; generally provided by the external ISP.
Password The password assigned to this user account; also generally provided by the external ISP.
Confirm Re-enter the password.
Store Username and Password in Local Flash
If checked, this PPPoE user information will be stored in the device’s local flash memory, ensuring it cannot be inadvertently overwritten.
43-42User Guide for Cisco Security Manager 4.1
OL-23991-01

Chapter 43 Managing Firewall DevicesConfiguring Firewall Device Interfaces
Managing VPDN Groups
A Virtual Private Dialup Network (VPDN) group—basically an established PPPoE user and an authentication protocol—is used by a security device to contact an external ISP and authenticate itself, in order to establish a PPPoE communications link and obtain network parameters. (See Managing the PPPoE Users List, page 43-42 for information about establishing PPPoE users.)
Available VPDN groups are maintained in the Advanced Interface Settings dialog box, which opens when you click the Advanced button at the bottom of the Interfaces page, as described in Advanced Interface Settings (PIX/ASA/FWSM), page 43-40.
Adding and Editing VPND Groups
The Advanced Interface Settings dialog box includes a table of currently defined VPDN groups, and standard Add Row, Edit Row, and Delete Row buttons. The Add Row button opens the Add VPDN Group dialog box; the Edit Row button opens the virtually identical Edit VPDN Group dialog box.
Enter or edit the following VPDN group parameters, and then click OK to close the Add (Edit) VPDN Group dialog box and return to the Advanced Interface Settings dialog box.
Note VPDN group options are not available on Firewall Service Modules (FWSMs).
Field Reference
Table 43-11 Add and Edit VPND Group Dialog Boxes
Element Description
Group Name A name to identify this group in Security Manager; up to 63 characters.
PPPoE Username The name identifying the PPPoE credentials to be used by this group for authentication with an ISP; choose from the list of available PPPoE users.
Choose Edit User from this list to open the PPPoE Users dialog box, where you can add or edit a user for this option. Refer to Managing the PPPoE Users List, page 43-42 for information about creating and editing users.
PPP Authentication Select the PPP Authentication method:
• PAP – Password Authentication Protocol, with exchange of credentials in clear text.
• CHAP – Challenge Handshake Authentication Protocol, with encrypted credential exchange.
• MSCHAP – Microsoft’s CHAP, version 1 only.
43-43User Guide for Cisco Security Manager 4.1
OL-23991-01

Chapter 43 Managing Firewall DevicesConfiguring Firewall Device Interfaces
43-44User Guide for Cisco Security Manager 4.1
OL-23991-01