managerÕs pos procedures - epicor1).pdf · the change will have on other parts of your triad...
TRANSCRIPT

ManagerÕs POSProcedures

This manual contains reference information about Triad’s hardlines and lumber
line of software products. The software described in this manual, as well as the
manual itself, are furnished under the terms and conditions of a license agree-
ment. The software consists of software options which are separately licensed. It
is against the law to copy the software on any medium, or to enable any software
options, except as specifically permitted under the license agreement. In addi-
tion, no other part of this manual may be copied or transmitted in any form or by
any means without the prior written permission of Triad.
From time to time, Triad makes changes to its software products. Therefore,
information in this manual is subject to change, and the illustrations and screens
which appear in the manual may differ somewhat from the version of the soft-
ware provided to you.
Created by
Learning Products Developmentfor Triad Systems Corporation
Copyright© 1986, 1991, 1992, 1996, 1998 Cooperative Computing, Inc. All rights reserved. Printed in the United States of America
Triad and the stylized logo are registered trademarks of Cooperative Computing, Inc.
Eagle
ª
is a trademark of Cooperative Computing, Inc.
Hardlines and Lumber ÑTriad Systems Corporationa Cooperative Computing, Inc. company3055 Triad DriveLivermore, CA 94550-9559
Publication No. 1075275Date of Publication April 1998

i
Table of Contents
Using This Manual 1 -1
In This Section 1-1Who Should Read This Manual 1-1About This Manual 1-1
Tabbed Sections 1-2Conventions Used in This Manual 1-3Where to Get Help 1-4
Introduction 2 -1
Point-of-Sale Packages 2-1Learning To Use Point-of-Sale 2-4
How to Train Your Clerks 2-5Three Training Methods 2-7
POS Transactions 2-9What Are These Transactions? 2-9
Questions You May Have 2-11
Getting Started 3 -1
Big Picture for Setting Up POS 3-1Preparing for Live POS 3-2
Setting Up Store-wide Constants 3-2Setting Up Terminal Constants 3-9Terminal Numbers Over 99 on Your System 3-10Verifying Store Information 3-11Entering Paid Out Reasons 3-13

ii
Getting Started (cont’d)
Setting Up Special Inventory Records 3-14Adding Security for Each Clerk 3-15Training POS Clerks 3-15
Security and Control 4 -1
Security at POS 4-1Training Mode 4-4
Questions You May Have 4-5Entering Training Mode 4-5Exiting Training Mode 4-7
Checking Whether Items Are Sold at CorrectPrices 4-9
Questions You May Have 4-9Running Report RPE 4-10
Checking the Cash Drawers 4-12Checking Cash Drawers From aTerminal 4-12Checking Cash Drawers From a CashBalancing Worksheet 4-13
Additional Features 5 -1
About QuickView 5-1Setting Up QuickView 5-1
Creating Short Descriptions 5-1Using Function MSD 5-3Using SDUTL 5-5Setting Up the QuickView Defults 5-9
About QuickRecall 5-11Setting Up QuickRecall 5-11
Setting Up Security 5-11Setting Up Function MQK 5-12

iii
Making Changes to Point-of-Sale 6 -1
Changing POS 6-1Procedural Changes 6-2Checks and Bankcards 6-3Clerk Capabilities 6-3Message Lines 6-4Prices to Use 6-4What Prints Where 6-5Security 6-6Miscellaneous 6-7
Getting Information for BetterManagement 7 -1
Keeping Track of Pending Transactions 7-1Printing a List of Outstanding Transactions 7-1Printing a List of Open Quotes 7-3Printing a List of Bids That AreOver-Volume 7-4Batch-Printing Pick Tickets 7-6Printing Orders/Special Orders withOutstanding Deposits 7-8Printing a List of Uninvoiced Orders 7-10
Keeping Track of Items 7-13Printing a List of Items Returned asDefective 7-13Printing Outstanding Special OrderItems 7-14Printing a List of Backordered Items 7-16

iv
Deleting and Purging Transactions 8 -1
About Deleting and Purging 8-1Removing Transactions from the OpenOrder File 8-1Transaction Life Cycles 8-2
Basic Sale 8-2Estimates, Open Quotes and Bids 8-2Orders and Special Orders 8-3
Printing a List of Expired Transactions 8-4Reading the Report 8-5
Deleting Transactions 8-6Protecting a Transaction from Purging 8-7Purging Transactions 8-8Reversing Completed Transactions 8-10
Interpreting Your End-of-DayReports 9 -1
About End-of-Day Reports 9-1Questions You May Have 9-1
Reading your Price Exception Report 9-2Questions You May Have 9-2
Reading your Daily Inventory Report 9-5Questions You May Have 9-5
Reading your Daily Sales Totals Report 9-8Questions You May Have 9-8
Reading your Daily Journal Report 9-12Questions You May Have 9-12
Reading your Check Register Report 9-16Questions You May Have 9-16
Index I

i
Using This Manual
In This Section 1 -1
Who Should Read This Manual 1 -1
About This Manual 1 -1
Tabbed Sections 1-2
Conventions Used in This Manual 1 -3
Where to Get Help 1 -4


Using This ManualIn This Section 1-1
Using This Manual
In This Section
This section describes:
¥ who should read this manual
¥ how the manual is structured
¥ what conventions are used throughout
¥ who to call for help
Who Should Read This Manual
This manual is intended for managers and owners of thebusiness. It contains sensitive information that you may notwant to share with all employees. Keep it in a safe place!
About This Manual
This is the ManagerÕs POS Procedures Manual. It covers manyprocedures that give you the information necessary to makeinformed management decisions. You have a lot of informationat your fingertips. With this information, you can fine tune yourinventory, gross margins, pricing and accounts receivable. Andthat can mean increased profits!

Using This Manual1-2 About This Manual
Tabbed Sections The tabbed sections included in this manual are as follows:
USING THIS MANUAL Ñ describes the manual, structure andconventions which will help you find the information you need.
INTRODUCTIONÑ describes general information you shouldknow about point-of-sale, including how to learn POS and howto train your clerks.
GETTING STARTEDÑ explains how to set up your point-of-sale system.
SECURITY AND CONTROL Ñ describes the securityavailable in point-of-sale and explains how to monitor pricingat point-of-sale.
ADDITIONAL FEATURES Ñ explains how to set upQuickView and QuickRecall.
MAKING CHANGES TO POINT-OF-SALE Ñ explains how tomake changes to your point-of-sale system, including the effectsthe change will have on other parts of your Triad system.
GETTING INFORMATION FOR BETTERMANAGEMENT Ñ explains how to use your Triad system tokeep track of pending transactions and special items.
DELETING AND PURGING TRANSACTIONS Ñ describeshow your Triad system purges transactions, and how you canmanually delete and purge transactions.
INTERPRETING YOUR END-OF-DAY REPORTS Ñ providesreport samples and explanations of your end-of-day reports.
INDEX Ñ helps you find information based on a topic.
NOTES Ñ provides a place for any report samples or notes.

Using This ManualConventions Used in This Manual 1-3
Conventions Used in This Manual
You will notice several style conventions in this manual thathave been designed to make the information more accessible.They are described below:
Convention Description
Tasks Tasks you perform are presented in a two-column format. The left-hand column containsthe step or specific action you complete. Theright-hand column presents additionalexplanation about the step, such as messagesand warnings. It also contains additionalinformation about that specific step in theprocedure.
Keys The keys you press to perform a function at theterminal appear with initial caps, bold face,within delimiters (for example, <Enter>).
Entries Actual entries you type at the terminalkeyboard are shown in bold face (for example,type IMU ). You may type your entries in eitherupper- or lowercase letters, except for callletters for programs such as IMU or RPE.
Messages The messages and prompts you receive from thesystem are presented in special type. Forexample:
THIS TRANSACTION HAS BEEN CHANGED
Footer At the bottom of every page is a footer. Usethese as guides when looking up information.Look at the bottom of this page to see anillustration of a footer.
¥ On the top line is the name of thissectionÑUsing This Manual.
¥ The software release level is opposite thename of the sectionÑ12.
¥ Underneath the section name is the topicnameÑConventions Used in this Manual.
¥ Next to the topic name is the pagenumberÑ1-3.
¥ The documentation number is opposite thename of the topicÑ1030074.
Using This Manual1-4 Conventions Used in This Manual
Convention Description
References Throughout this guide you are referred todifferent manuals, sections within this guide,or page numbers within the same section. Hereare the conventions for each part of a reference:
¥ Manual or guide names are initial caps,italic.
¥ Tabbed sections are initial caps followed bya comma.
¥ Procedures are initial caps withinquotation marks.
For example, please see the Manager's POSManual, the tabbed section Security andControl, "Checking the Cash Drawer".
MagnifyingGlass
When you see a magnifying glass, you will findadditional information about a procedure, aparticular part of a procedure, or a specificentry. This information can help you betterunderstand the inner-workings of your Triadsystem.
Where to Get Help
If you have difficulty with any of the procedures in thismanual, contact the Advice Line or your CER. You should callthe Advice Line about any error messages, and call your CER foradvice about implementing store-specific procedures on yourTriad system.

i
Introduction
Point-of-Sale Packages 2 -1
List of Functions Available in thePoint-of-Sale Packages 2-3List of Reports Available in thePoint-of-Sale Packages 2-3
Learning to Use Point-of-Sale 2 -4
Procedural, Reference, Quick Referenceand Training Materials 2-4
POS Quick Reference 2-4Clerk’s POS Procedures Manual 2-4Manager’s POS Procedures Class 2-5Manager’s POS Procedures Manual 2-5
How To Train Your POS Clerks 2-5Using the POS Quick Reference 2-6Using the Clerk’s POS ProceduresManual 2-6Using the Manager’s POSProcedures Class 2-7
Three Training Methods 2-7Learning to use Point-of-Sale is as easy as... 2-8

ii
POS Transactions 2 -9
What are These Transactions? 2-9Sale 2-9Estimate/Quote 2-9Open Quote 2-10Bid 2-10Order 2-10Special Order 2-10Credit Memo 2-10Receipt On Account 2-10
Questions You May Have 2-11

IntroductionPoint-of-Sale Packages 2-1
Introduction
Point-of-Sale Packages
Triad Systems Corporation offers four Point-of-Sale packages:Point-of-Sale, Classic Point-of-Sale, Decorating/SpecialtyPoint-of-Sale, and Lumber/Contractor Point-of-Sale.QuickRecall is also available as a purchase option.QuickRecall can be used with every Point-of-Sale package.
Off-Line POS is a backup system which provides basic POScapabilities when your CPU is down for maintenance or repair.If you have invested in the optional battery pack, you can evenuse Off-Line POS during a power failure. Off-Line POS comeswith every Point-of-Sale package.
Point-of-Sale includes:
¥ Full Function Retail Point-of-Sale
¥ Automatic Price Look-Up
¥ Automatic Promotional Pricing
¥ Customer Credit Look-Up
¥ Charge Invoice Printing
¥ Cash Balancing
¥ Special Tallies
¥ Line Item Insertion
¥ Invoice Reprint
Classic Point-of-Sale includes all of the Point-of-Sale features,plus:
¥ Price Matrix
¥ Orders, Special Orders
¥ Generate Purchase Orders from Special Orders
¥ Open Quotes
¥ Deposit Tracking

Introduction2-2 Point-of-Sale Packages
¥ QuickView
- Descriptive Item Look-Up
- Multiple Item Display
- Select and Post Capabilities
¥ Multiple Customer Look-Up
Decorating/Specialty Point-of-Sale includes all of the ClassicPoint-of-sale features, plus:
¥ Quantity Break Pricing
¥ Estimate to Invoice Processing
¥ Estimate/Bid Retention
¥ Job Accounting
¥ Kits
¥ Backorders
Lumber/Contractor Point-of-Sale includes all of theDecorating/Specialty Point-of-Sale features, plus:
¥ Tallies
¥ Inventory Adjustments
¥ Multiple Unit of Measure Selling/Stocking
¥ Gross Profit % Display
¥ Transfers
You can use QuickRecall with all of the above POS packages.This purchase option includes:
¥ Invoice Storage and Recall
¥ Invoice Reprint
¥ Warranty/Paint Formula Tracking
¥ Item Sales History by Customer
¥ Combine Transactions
If you want more information about these point-of-salepackages, contact your Marketing Representative.
The following table shows which functions and reports areavailable with each point-of-sale package.

IntroductionPoint-of-Sale Packages 2-3
List of Functions Available in the Point-of-Sale Packages
Function Point-of-SaleClassic
Point-of-SaleDecorating/
Specialty POSLumber/
Contractor POS
DCD X X X X
GPO X X X
IAD X
IST X
MIV X X X X
MKR X X
MPM X X X
MQB X X
MSD X X X
MTL X
PDO X X X X
SDUTL X X X
TRAN X
List of Reports Available in the Point-of-Sale Packages
Function Point-of-SaleClassic
Point-of-SaleDecorating/
Specialty POSLumber/
Contractor POS
RCK X X X X
RDI X X X X
RDS X X X X
RDJ X X X X
RIA X
RIO X X X
RKR X X
RMR X X X X
ROO X X X
RPE X X X X
RTL X

Introduction2-4 Learning To Use Point-of-Sale
Learning to Use Point-of-Sale
This section will cover:
¥ what procedural, reference, quick reference, and trainingmaterials are available
¥ how to train your POS clerks using these materials
Procedural,Reference, QuickReference, andTraining Materials
Use the following materials to help you learn and rememberhow to use point-of-sale.
POS Quick Reference The Point-of-Sale Quick Reference is a flipchart that yourclerks can use to quickly reference POS procedures while sellingitems to customers. The flipchart also includes off-line POSprocedures. It explains how to continue using Point-of-Sale,even if your Triad system is down for maintenance or repair.
Clerk’s POS ProceduresManual
The ClerkÕs POS Procedures Manual provides all the proceduresfor the transactions your clerks may have to handle at theregister. Training exercises are at the end of each tabbedsection.

IntroductionLearning To Use Point-of-Sale 2-5
Manager’s POS ProceduresClass
The ManagerÕs POS Procedures Class will cover the following:
✎ Benefits of the POSSystem
✎ Creating Estimates
✎ Training POS Clerks ✎ Orders/Special Orders
✎ Completing Basic SalesTransactions
✎ Open Quote
✎ Using the Training Mode ✎ Backorders
✎ Running End-of-DayReports
✎ Gross Profit Percent
✎ Completing End-of-DayProcedures
✎ Quantity Break
✎ Activating PromotionalPrices
✎ GPO
✎ Setting Up Security ✎ ROO
✎ RIO
Manager’s POS ProceduresManual
This is the ManagerÕs POS Procedures Manual. It explains howto set up POS the way you want it, make changes as theybecome necessary, and control and keep track of whatÕs going onat the cash registers. It will also explain how you can learnabout POS, and how you can train your clerks.
If you are security-sensitive, youÕll want to keep this manual ina safe place, because it contains some information that you maywish to keep confidential.
How To Train YourPOS Clerks
It is your responsibility to train your POS clerks. You can use thefollowing materials to help you with this training.
The training for the POS clerks is meant to be self-instructionaland self-paced. See page 2-10 to find out when to train your POSclerks.
NOTE: Information about the POS Training Mode is in thetabbed section Security and Control.

Introduction2-6 Learning To Use Point-of-Sale
Using the POS QuickReference
Use the POS Quick Reference with the POS Training Mode asone method of training your POS clerks. If the clerk needs moreinformation, he/she can read the ClerkÕs POS ProceduresManual and practice the lab exercises.
Using the Clerk’s POSProcedures Manual
Use the ClerkÕs POS Procedures Manual and the POS TrainingMode as another method of training your POS clerks. Theclerk(s) should read a tabbed section for detailed information,then complete the lab exercise(s), to practice what they justlearned.
IMPORTANT
There are some training exercises that the clerk will not be ableto practice because of limitations in the training mode. Thesetraining exercises are marked throughout the ClerkÕs POSProcedures Manual.
If your clerks need to practice these exercises, you will need tosupervise the training session. The training will need to becompleted on your live POS system, not in training mode.
If you practice a training exercise on your live POS system, dothe following:
¥ supervise the training session
¥ use a special customer for all training activity
¥ do not print any invoices (you will update your saleshistory if you invoice training items)
¥ print copies of all transactions
¥ run Report ROO to get a list of all training transactions
¥ delete all training transactions
¥ run Report ROO to purge
For more information on Report ROO, see the Reports Manual orthe tabbed section Getting Information for Better Managementin this manual.

IntroductionLearning To Use Point-of-Sale 2-7
Using the Manager’s POSProcedures Class
You will be covering the same material, and completing thesame training exercises in class that you will ask your clerks tocomplete; therefore, you will be able to help them with theirtraining, if necessary.
Three TrainingMethods
Use TriadÕs diverse learning products to fit the differentlearning needs of your clerks. The chart on the following pageoutlines three different training methods from which to choose.

Introduction2-8 Learning To Use Point-of-Sale
1 =
Then they can help customers and ring up sales.
$$A clerk can use the flipchart to learn the basics.
++ =
Then the clerk can use the Clerk's POS Procedures Manual for more detailed information and lab exercises.
Then they can use the flipchart to help them remember the basics.
$$Then they can help customers and ring up sales.
Learning to use Point-of-Sale is as easy as. . .
You need to use the Point-of-Sale Training Mode for all three methods. There are some exercises that can not be practiced in Training Mode, besure to supervise these training sessions.
Important:
=+
A clerk can use the Clerk's POS Procedures Manual for more detailed information and lab exercises.
Then they can use the flipchart to help them remember the basics.
$$Then they can help customers and ring up sales.
2 Pointof
Sale
Pointof
Sale
Pointof
Sale
You can help your clerk because you attended a POS procedures class.
3

IntroductionPOS Transactions 2-9
POS Transactions
The following chart shows the nine basic transactions. Theprocedures for all of them are in the ClerkÕs POS ProceduresManual.
Transaction ContractorPOS
RetailPOS
ClassicPOS
Decorating/Specialty POS
Sale X X X X
Estimate X X
Quote X X X X
Open Quote X X X
Bid X
Order X X X
SpecialOrder
X X X
CreditMemo
X X X X
Receipt onAccount
X X X X
What Are TheseTransactions?
Each transaction is explained below.
Sale A sale is the basic retail transaction. A customer selectsmerchandise from your stock, pays for it or charges it, and takesimmediate delivery.
Estimate/Quote When a customer asks you to quote prices on a list of materials,you would create an estimate or a quote. Perhaps you think ofthis as a proposal or offer. The difference between an estimateand a quote is that estimates are stored in your Triad system,and quotes are not.

Introduction2-10 POS Transactions
Open Quote An open quote is a custom price list. You can give a certainaccount a special price on a particular list of items for a certainperiod of time. Open quotes are allowed only for designatedaccounts, and only one at a time per account. An open quote isactually a kind of estimate.
Bid If a customer accepts an estimate that you have stored in yourTriad system, you would change the estimate into a bid. A bidis an estimate that has been accepted by your customer. Youhave agreed on the quantities and prices.
Order An order is very much like a sale, except you have moreflexibility concerning when to ship the merchandise and whento invoice the customer.
Special Order A special order is very much like an order. YouÕll probably usespecial orders for selling merchandise that isnÕt currently instock.
Credit Memo You can create a credit memo whenever you need to allow acredit or refund for a customer.
Receipt On Account When a customer comes to a cash register to give the clerk apayment to be applied to his charge account, the clerk can do areceipt on account, or ROA. This has more to do with accountsreceivable than with POS, but the idea is the clerk can receivethe payment at the POS terminal without having to send thecustomer to a back-office terminal.

IntroductionQuestions You May Have 2-11
Questions You May Have
How do I make a customer or jobaccount eligible for an openquote?
If you want to be able to create an open quote for an account, setthe Open Quote field to Y in the accountÕs record in FunctionMCR.
You can create open quotes for customer accounts and/or jobaccounts. A job account is a separate subaccount for a customerwho wishes to be invoiced separately by job. You may haveseveral job accounts associated with any customer account. Youcan choose whether or not to make a customer or job accounteligible for an open quote.
If a customer account has anopen quote, do job accountsassociated with that customeraccount also get the open quoteprices?
That depends on two things: whether the job account is eligiblefor an open quote, and whether the job account has an open quoteof its own.
Suppose you are selling to job account 1, which is associatedwith customer account 100.
¥ If there is an open quote for job 1, the prices from Job 1Õs openquote will automatically be used in the transaction.
¥ If Job 1 is eligible for an open quote
and
¥ there is no open quote for Job 1
and
¥ customer 100 has an open quote, then prices from customer100Õs open quote will automatically be used in thetransaction for job 1.
An open quote for a customer account also applies to anyassociated job account that is eligible for an open quote butwhich doesn't have one.
How do I make an accounteligible for a trade discountand/or a terms discount? Howwould I change the amount ofdiscount an account gets?
Each accountÕs record (Function MCR) controls whether it gets adiscount, what kind, and how much. You make an accounteligible for a trade discount by entering a percent in the TradeDisc % field in Function MCR. You make an account eligible fora terms discount by entering the appropriate code in the TermsCode field in Function MCR. Please see the Accounts ReceivableManual for more information about discounts.

Can I use my Salespersonrecords to track theproductivity of my POS clerks?
Yes. To track productivity by clerk, do the following:
1. Add a salesperson record for each clerk in Function MSL.Please see the Accounts Receivable Manual for moreinformation about salesperson records.
2. Add a user record for each clerk in Function MUR. Type theclerkÕs salesperson code in the Default Salesperson field.Please see the Security Manual for more information aboutadding users.
3. For each account whose purchases you want to credit to theclerk who rings up the sale, make sure the Salesperson fieldin Function MCR is blank.
Now, whenever a clerk signs on at POS, his own code willdisplay at the Slspr field on the POS header screen (unlessselling to an account that has another code on file). The clerkÕstransactions will be automatically credited to his salespersonfile. Your Triad system keeps month-to-date and year-to-datesales, cost and gross profit information in the salesperson files.
If there are any accounts whose purchases you donÕt want totrack by clerk (if you want to credit them to the salespersonwho opened the account, for example, rather than to the clerkwho happens to ring up the sale), keep the originalsalespersonÕs code in Function MCR for that account. Thesalesperson in Function MCR will display at POS and will becredited with the sale, not the clerk.
Do clerks need passwords beforethey can use POS?
No. A clerk needs a password to use POS only if you require it. Ifyou want to require a clerk to type his password as well as hisclerk name before he can get into POS, type Y at CheckPassword At P.O.S. in that clerk's user record, in Function MUR.If you type N at Check Password At P.O.S., the clerk will haveto type only his clerk name to get into POS. The password is foridentification only.

IntroductionQuestions You May Have 2-13
What happens if a customerexceeds his credit limit?
Clerks begin transactions by identifying which customertheyÕre selling to. If the customerÕs balance exceeds his creditlimit, your Triad system informs the clerk by displaying amessage. You should establish a standard procedure for clerksto follow in such cases.
If you donÕt assign security bit 532 to a clerk, a managerauthorization warning appears when the customer haspurchases that exceed the credit limit you set up in MCR. Thischeck is done both at the start and end of a transaction. If thecustomer is within the limit at the start, but exceeds it duringtotals, the manager authorization warning will appear.
You can also discontinue charge privileges on a customer accountby typing N at Charge Allowed in that accountÕs MCR record.As soon as the clerk identifies such customers at the beginning ofa transaction, your Triad system will warn that charging is notpermitted, and will require payment by cash, check orbankcard.
What happens when customersreturn or exchange defectivegoods?
Your Triad system assumes that you will return defective goodsto your vendor, and that your vendor will replace them at nocost to you. Make sure your clerks set aside such items for return.If you need a list of the items that have been returned, pleasesee Getting Information for Better Management, ÒPrinting a Listof Items Returned as Defective.Ó

i
Getting Started
The Big Picture for Setting Up POS 3-1
Preparing for Live POS 3-2
Setting Up Store-wide Constants 3 -2
Setting Up Terminal Constants 3 -9
Terminal Numbers Over 99 onYour System 3-10
Verifying Store Information 3-11
Entering Paid Out Reasons 3-13

ii
Setting Up Special InventoryRecords 3-14
Adding Security for Each Clerk 3-15
Training POS Clerks 3-15

Getting StartedBig Picture for Setting Up POS 3-1
Getting Started
Big Picture for Setting Up POS
Before you implement POS, you need to complete the setupprocedures. The following diagram shows the basic stepsnecessary for setting up POS. The procedures appear in the samesequence as the steps in the diagram below.
Function MIV
Set up storewide constants
Function PDO
Enter paid-out reasons
Function MTR
Set up terminal constants
Function MSR
Verify store information
Function LOD
Set up special inventory records
Train POS Clerks
Function MSE
Add security foreach POS clerk

Getting Started3-2 Setting Up Store-wide Constants
Preparing for LivePOS
When should you go live POS? Before you and your CustomerEducation Representative (CER) make that decision, considerthe following:
• Do you have a FastStart or Lumber FastStart tape? If so,you need to edit the information on your system to make sureit is correct.
• Will you be using bar code scanners? If so, you may haveinvested in a ScanStart tape, which you also should edit.
• Be sure to discuss these and other considerations with yourCER. Your CER can help you determine the best time toimplement POS.
Setting Up Store-wide Constants
MIVThe decisions you will make in this procedure govern whatprints on POS invoices and receipts, which credit cards areacceptable, whether clerks endorse checks and bankcard slips,what information will be available to clerks, and the discountpolicy you will adopt. These constants will all be the same forall the POS terminals in one store.
Multistore users:You must do this for each store. You can set up the constantsdifferently for each store.
These store-wide constants are not one-time decisions. You canchange them if necessary.

Getting StartedSetting Up Store-wide Constants 3-3
1At any menu, type MIV andpress <Enter>.
The Modify Invoice Constants screen displays. This is the firstof three MIV screens.
Modify Terminal Record (MTR)Modify Invoice Constants (MIV)Screen: 1 Store: 1
Receipt Printer Decisions
Print Cash Tendered Line? Print Store Name Line?
Print Change Line? Print Charge Customer?
Print Audit Line? Print Message Lines?
Next Invoice Number: 119
Suggested Price to Print?
Print Prices on Estimates?
Message Lines:
Customer Display Message
Invoice Decisions
R (L/M/R)
Y (Y/N)
Print Invoices? Y (Y/N)
With Description? Y (Y/N)
With Store Name? Y (Y/N)
With Message Line? Y (Y/N)
With Due Date? Y (Y/N)
With Kits Expanded? Y (Y/N)
Terms Discount Readable? N (Y/N)
Invoice Spacing? 1 (1-3)
Promo/Discount Pct? N (Y/N)
Display Matrix Pricing? N (Y/N/B)
Y (Y/N)
Y (Y/N)
Y (Y/N)
Y (Y/N)
Y (Y/N)
Y (Y/N)
The top part of the screen governs what prints on POS invoices.The bottom part governs what prints on the journal or cashreceipt tape.
Multistore users:At the Store field, type the number of the store you'resetting up now.
2At Next Invoice Number, typethe number you want the Triadsystem to assign to the nextinvoice it creates. Then press<Enter>.
You can use up to six digits. This must be purely numeric. It's agood idea to start your Triad system invoices at a distinctivebreak point, like 10000.
The invoice number is not the same as journal number. A journalnumber is assigned to every transaction on your Triad system.Invoice numbers, on the other hand, are assigned only to thetransactions you print copies of on your invoice printer.

Getting Started3-4 Setting Up Store-wide Constants
3Use the table at the right todecide what you want to enterat Suggested Price to Print.
The table below shows which price prints in the “SUGGPRICE” column on the invoice.
If field is And retail price is Then “SUGG PRICE” is
L higher than thecustomer price*
list price
L lower than thecustomer price
customer price (if customerprice is higher than listprice)
or
list price (if list price ishigher than customer price)
M higher than thecustomer price
retail price
M lower than thecustomer price
blank
R higher than thecustomer price
retail price
R lower than thecustomer price
customer price
blank – – blank
* Customer price is the price a customer is actually chargedat POS.
4At Print Prices on Estimates,type Y or N, and press <Enter>.
If you type Y, the price for each line item will print onestimates and quotes. If your customers insist on having pricesbroken down by item, type Y.
If you type N, only the total price for the estimate or quotewill print, not the price for each line item. This can discourageyour customers from “cherry-picking” the lowest margin itemsoff the quotes or estimates you prepare for them.
Regardless of how you answer this field, your clerks will alsohave the option of overriding it for any particular estimate orquote they create in POS.

Getting StartedSetting Up Store-wide Constants 3-5
5At Message Lines, type themessage you want to print onthe first two lines of eachinvoice and/or receipt. Thenpress <Enter>.
Type the message exactly as you want it to print on the invoice.If you want it centered, for example, center it on these lines.
Press <Enter> to move the cursor from the end of the first line tothe beginning of the second line.
You can leave this blank, if you want.
Many managers like to change this message about once a month.You can use it to draw attention to special promotions, newproduct lines, new store openings, and so on.
6At Customer Display Message,type the message you want toappear on the customer displayunit.
If there has been no POS activity after three minutes, themessage you enter in this field will appear on the customerdisplay unit.
You can use the Customer Display Message to display specialpromotions, upcoming events, return policies, and so on.
7At Print Invoices, type Y or Nand press <Enter>.
Type N only if you will never print an invoice for any customeron any kind of transaction. A journal tape will still print. If youanswer N, skip to step 9 below.
8Answer the next eight fields.Press <Enter> to move betweenfields.
These fields all govern what prints on the invoice, and how itlooks. Please refer to the Functions Manual for detailedinformation on these fields.
9Type Y or N for each of the sixReceipt Printer Decisions. Press<Enter> to move betweenfields.
These decisions govern what will print on the receipt printer.
The receipt printer prints two copies, because the receiptactually has two purposes:
• The first copy is a cash receipt to give to your customer.
• The second copy is a journal tape; it serves as an audit trailof exactly what happens at each POS terminal.
Please refer to the Functions Manual for detailed informationon these fields.

Getting Started3-6 Setting Up Store-wide Constants
10Press <Change>. The screen says CHANGED.
11Press <Home>, type 2, andpress <Enter>.
The second MIV screen displays.
Most of the decisions you make here will affect the proceduresyour clerks use at POS.
12At Default Customer Number,type the cash account number tosell to unless the clerk entersanother number. Then press<Enter>.
At the beginning of each POS transaction, your Triad system willassume this is the customer you're selling to. This should be acash customer whom you have already set up as an account inFunction MCR.
Cash customer account numbers always begin with an asterisk (*).
13Answer all of the questions onthis screen. Press <Enter> tomove between fields.
Please refer to the Functions Manual for an explanation of eachfield.
14Press <Change>. The screen says CHANGED.

Getting StartedSetting Up Store-wide Constants 3-7
15Press <Home>, type 3 atScreen, and press <Enter>.
The third MIV screen displays. This screen governs howdiscounts are applied.
Modify Terminal Record (MTR)Modify Invoice Constants (MIV)Screen: 3 Store: 1
Price Variance as Deferred Discount?
Apply Discounts to:
Promotion Items?
Discounted Items?
Qty Break Items?
Non Discountable Items?
Discount Decisions
Prc Matrix Items?
Open Quote Items?
Tax Amount?
(Y/N)
N
Give Immediate Discount?
Terms Trade
N
N
N
N
N
N
N
N
N
N
N
N
N
N/A
N/A
N/A
N/A
(Y/N)
(Y/N)
(Y/N)
(Y/N)
(Y/N)
(Y/N)
(Y/N)
(Y/N)
16Answer each of the fields onthis screen. Press <Enter> tomove between fields.
Be sure you understand the decisions you are making becausethey have a direct effect on your gross profit margin. You maywant to discuss your discount policy with your CER and/oraccountant. Please refer to the Functions Manual for furtherdiscount information.

Getting Started3-8 Setting Up Store-wide Constants
17Press <Change>. The screen says CHANGED.
You can come back to this screen any time you wish to changeyour discount strategy.
Multistore users:To set up the store-wide constants for the other store(s), dothe following:
1. Press <Home>, type 1 and press <Enter>.
2. Press <Backtab>, type the number of the next store andpress <Display>.
3. Repeat steps 2–17 for each store.

Getting StartedSetting Up Teminal Constants 3-9
Setting Up Terminal Constants
Use Function MTR (Modify Terminal Record) to decide howeach terminal will operate at POS. Each terminal has its ownrecord and you can customize how you want each to operate. Youcan make terminal decisions about:
• POS default settings
• POS device information
• terminal default settings
• QuickView default settings
Use the following procedure to set up terminal constants.
1At any menu, type MTR andpress <Enter>.
The Modify Terminal Record (MTR) Screen displays.
2Type the terminal number youare changing in the Terminalfield and press <Display>.
The information displays for the specified terminal.
3Fill in or type over the otherfields on the screen and press<Change>.
The system changes the constants.
If you need more information about a field, refer to online help.
4Press <End> to exit the screenorPress <Next Screen> to go toscreen 2.
If you pressed <Next Screen>, continue with step 5.
Getting Started3-10 Terminal Numbers Over 99 on Your System
5Fill in or type over the fields onthe screen and press <Change>.
The system changes the constants.
If you need more information about a field, refer to online help.
6Press <End> to exit the screen.
Terminal Numbers Over 99 on Your System
You can assign terminal numbers from 1 to 998. If you useterminal numbers over 99, you must use Function MIV (ModifyInvoice Constants) to assign journal numbers instead of using theJournal Number field in Function MTR. Journal numbers areassigned by store rather than by terminal in stores that haveterminal numbers over 99.
If you have Sierra POS terminals on your system, theirterminal numbers must be 98 or lower.
For more information about alternate journal numbers, refer toFunction MIV, online field help, the fields:
• Alt Journal # Usage
• Beg Alt Journal #
• End Alt Journal #
• Next Alt Journal #

Getting StartedVerifying Store Information 3-11
Verifying Store Information
MSR
You should check the information about your store that willprint on invoices and receipts, and as the endorsement on checksor charge slips.
If you will not use your Triad system to:
• print your store name on invoices, or
• print your store name on receipts, or
• endorse checks, or
• endorse charge slips,
then you can skip this procedure. If you will use your Triadsystem for at least one of these tasks, you should complete thisprocedure.
Much of this information has probably been entered already,but you should make sure it is correct before you implement POS.
Multistore users:You must complete this procedure for each store.
1At any menu, type MSR andpress <Enter>.
The Modify Store Record Screen displays.
Modify Store Record (MSR)
Store NumberStore NameStore Short Name
Address Line 1Address Line 2Address Line 3Phone #
Resale NumberWarehouse Ind
:::
::::
::
1____________________________________________________________________________________
______________________________________________________________________________________________________________________________________ ( ) _____ - _________
________________________________N
NameAccnt #
::
_________________________________________________
Checking Bank Accounts Credit Card
NameAccnt #
::
_________________________________________________
1st Affiliate2nd Affiliate
::
____________
Which A/P?Which P/R?Which G/L?
111
Multistore users:This is the store that this terminal is “locked” into. Youlocked this terminal into a specific store in Function MTR.

Getting Started3-12 Verifying Store Information
2Make sure the information iscorrect. Press <Enter> to movebetween fields.
3If you have made any changesor typed any new information,press <Change>.
The screen says RECORD CHANGED, and the cursor returns to theStore Number field.
Multistore users:If you need to check another store’s information, do thefollowing:
1. Type the store number in the Store field and press<Display>.
2. Repeat steps 2 and 3.
4Quit and then re-boot eachterminal that is “locked” intoany store whose Store Recordyou just changed.
The changes you made to the Store Record(s) don’t take effectat a terminal until the next time you log on.
To quit and then log on a terminal, do the following:
1. At any menu, type <Quit> and press <Enter>.
2. At LOGIN: type M.

Getting StartedEntering Paid Out Reasons 3-13
Entering Paid Out Reasons
PDO
Occasionally it may be necessary to open a cash drawer in orderto pay out cash for some reason unrelated to a sale. For example,you may need to reimburse an employee expense, or pay a CODcharge for merchandise or freight. This is called a paid out.
The procedure for doing a paid out is in the Clerk’s POSProcedures Manual. Before the cash drawer will open, the clerkmust select the appropriate reason from a list that displays onthe POS screen. The amount and reason for each paid out printson the Daily Sales Report (Report RDS) at the end of the day.
NOTE: If you never permit paid outs, you should delete thepaid out descriptions. Do the following:
1. At any menu, type PDO and press <Enter>.
2. At each paid out description, press <Clear Field>.
3. Press <Change>.
Now when a clerk presses the <Paid Out/COD> key,no paid out reasons will appear.
If you do permit paid outs, complete the following procedures.
1At any menu, type PDO andpress <Enter>.
The Paid Out Reasons Maintenance screen displays.
Paid Out Reasons Maintenance (PDO) Store: 1
Description
1
2
3
4
5
6
7
8
9
FREIGHT/UPS
POSTAGE
DONATIONS
STORE SUPPLIES
OFFICE SUPPLIES
TEMPORARY LABOR
EMPLOYEE EXPENSE
TRAVEL & ENTERTAINMENT
MISCELLANEOUS

Getting Started3-14 Setting Up Special Inventory Records
2In the Description field, typethe appropriate paid outreason. Then press <Change>.
Your Triad system comes with nine default paid out reasons.
You may want to include the general ledger account number inthe description. This may help the bookkeeper know whichgeneral ledger account to post each paid out to.
Setting Up Special Inventory Records
LODSpecial inventory records are typically products and servicesthat you sell but don’t keep quantity-on-hand information for.Examples of special inventory records are:
• gift certificates
• rentals
• labor charges
• delivery and freight charges
You can add special inventory records in Function LOD.
NOTE: For additional information about adding specialinventory records, consult your CER.

Getting StartedAdding Security for Each Clerk 3-15
Adding Security for Each Clerk
MSE
You can control what happens at POS by restricting what yourclerks can and can’t do.
For detailed information about security:
• Read the tabbed section Security and Control in thismanual.
• Read the tabbed section Setting Up System Security in theSecurity Guide.
Training POS Clerks
Train POSClerks
You, as the manager, must learn about the Training mode and itslimitations. Please see the “Security and Control” section ofthis manual.
Training for POS clerks is meant to be self-instructional andself-paced. For details about training your POS clerks see thetabbed section Introduction, “How To Train Your POS Clerks”.

i
Security and Control
Security at POS 4-1
Training Mode 4-4
Questions You May Have 4-5Entering Training Mode 4-5Exiting Training Mode 4-7
Checking Whether Items Are Sold atCorrect Prices 4-9
Questions You May Have 4-9Running Report RPE 4-10
Checking the Cash Drawers 4-12
Checking Cash Drawers From a Terminal 4-12Checking Cash Drawers From a CashBalancing Worksheet 4-13

Security and ControlSecurity at POS 4-1
Security and Control
Security at POS
You can control what happens at POS by controlling what yourPOS clerks can and can’t do.
Before you set up security for your POS clerks, be sure to readthe tabbed section Setting Up System Security in the SecurityGuide. It will help you understand how the Triad securitysystem works.
This chapter simply outlines the security considerations thatapply to POS. Of course, these are merely suggestions; the levelof security you find necessary is entirely up to you.
At the strictest level of security, you would:
• assign a password to each clerk, and have passwordschecked at POS (Function MUR). No one can sign on usinganother clerk’s name unless he also knows the other clerk’ssecret password.
• have the cursor return to the Clerk field after eachtransaction (Function MIV). Clerks will be required to typetheir name and password at the beginning of eachtransaction. This can be time-consuming for the clerk, andmakes sense only if several clerks are taking turns using aPOS terminal.
• give certain security bits and capabilities to only a few keyemployees who must have them. The POS security bits areexplained in detail later in this chapter.
At a more relaxed level of security, you would:
• not use passwords, or not have them checked at POS
• instruct clerks to make sure their name is in the Clerk fieldbefore beginning a transaction
• give most or all clerks the same POS security bits
The following security bits govern what your clerks are allowedto do at POS:

Security and Control4-2 Security as POS
Bit Controls a clerk’s ability to
6 Display items stocked in other stores. This bit is formultistore users only.
40 Perform Received On Accounts (ROAs).
69 Delete a transaction using the <Delete> key.Transactions include orders, open quotes, estimates,bids and special orders. This bit does not affect aclerk’s ability to perform voids.
70 Move the cursor (on the Big Header screen) into thePricing field. The Pricing field determines what pricesthe customer receives for a transaction. There is nosecurity bit that controls the ability to change prices forindividual items.
71 Change a transaction using the <Change> key.Transactions include orders, open quotes, estimates,bids and special orders. This bit does not affect aclerk’s ability to perform voids.
72 Copy or reprice a transaction using the<No Tax/Trans> key.
73 Change a bid back into an estimate.
74 Initiate a credit memo transaction or credit an itemduring a sale.
75 Enter CPOS. You should also give these clerks bit 76.Clerks who don’t have this bit are only allowed to useRetail POS.
76 Create or recall an estimate, open quote, bid, order orspecial order. If you have CPOS, you should also givethese clerks bit 75.
183 Manually delete archived transactions in QuickRecall.
184 Reprint in POS.
185 Access QuickRecall. You should also give these clerksbit 184.
187 Access MQK.
205 Sell items in POS.
206 Enter POS.
207 Exit out of the training mode.
208 Display GP % while in QuickView. Display therunning gross profit percent and the line item grossprofit percent.

Security and ControlSecurity at POS 4-3
Bit Controls a clerk’s ability to
402 Accept a check that exceeds the deposit amount whena special order deposit is required. Accept a check thatis greater than the transaction amount without themanager’s authorization. If the clerk is not assignedthis bit, manager authorization will be required tofinish the transaction.
406 Create transfers. This is available to multistore usersonly.
407 Delete transfers. This is available to multistore usersonly.
408 Change transfers. This is available to multistore usersonly.
409 Change the status of transfers. This is available tomultistore users only.
531 Allow customer who is past due to charge on theiraccount which is based upon the amounts in theappropriate A/R aging buckets. If the clerk is notassigned this bit, manager authorization will berequired to finish the transaction.
532 Allow customer credit if he/she has purchases thatexceed the predefined credit limit established in MCR.If the clerk is not assigned this bit, managerauthorization will be required to finish the transaction.
533 Allow customer a trade discount that exceeds 10%. Ifthe clerk is not assigned this bit, managerauthorization will be required to finish the transaction.
534 Void a transaction from either the body or totals. If theclerk is not assigned this bit, manager authorizationwill be required to finish the transaction.
535 Refund a special order deposit. If the clerk is notassigned this bit, manager authorization will berequired to finish the transaction.
536 Sell an item with a price that is less than the cost. If theclerk is not assigned this bit, manager authorizationwill be required to finish the transaction.
537 Save an invoice as an order.
538 Backorder an item.
539 Receive special order or order deposits.
Bit Controls a clerk’s ability to
540 Capture UPCs at POS.

Security and Control4-4 Security as POS
541 Create an order/special order for cash-only(for example, *5)customers. If a clerk does not havethis bit, a manager’s override is required before theclerk can proceed with the transaction.
542 Answer No to the Reprice? prompt when you return tothe Big Header in the middle of a transaction. If a clerkdoes not have this bit, a manager’s override is requiredbefore the clerk can answer No to the Reprice? prompt.
543 Change the cost of an item. If a clerk does not have thisbit, he or she can change the cost of an item on aspecial order, but must get a manager’s override tochange the cost anywhere else.
549 Choose No Sale Option 1 (Open Cash Drawer).
550 Choose No Sale Option 4 (Cash a Check).
551 Change the Slspr (Salesperson) field on the Big Header(when maintaining an order or special order).
552 Make paid outs.
Training Mode
When a terminal is in training mode, the POS transactions clerksperform do not affect any of your inventory, customer or salesrecords. Training mode is designed so you can train your clerkson POS procedures without affecting your real businessinformation.
WARNING
Never use training mode when selling real merchandiseto a real customer.
You will not be able to recall estimates, open quotes,bids, orders or special orders that were created on aterminal that was in training mode. Training mode doesnot save them in your Triad system.
For security reasons, you may not want your clerks to know howto get into and out of training mode. Instead, when you need totrain a new clerk, put a terminal into training mode yourself. Be

Security and ControlTraining Mode 4-5
sure to take it out of training mode again when training iscomplete.
When you are in training mode, it’s okay tomake mistakes!
Questions You MayHave
How can I tell if a terminal isin training mode?
There are three ways:
1Check Function MTR (ModifyTerminal Record)
At any menu, type MTR and press <Enter>. At the Terminalfield, type the number of the terminal you want to check andpress <Display>. Look at the POS In Training? field. If it is Y,that terminal is in training mode. If it is N, that terminal is not intraining mode.
2Check the screen. Look at the bottom right corner of the POS Posting Screen. If you
see TR, the terminal is in training mode.
NOTE: During some transactions, the TR may not show, eventhough the terminal is in training mode.
3Check the receipt or invoice. Look at the bottom of the receipt, or the invoice number on the
invoice. If it says TR, the terminal where the transaction tookplace is in training mode.
Entering TrainingMode
There are two ways to put a terminal into training mode. UseMethod A if you’re already in POS. Use Method B if you’re notin POS but want to put a terminal into training mode.

Security and Control4-6 Training Mode
Method A
1With the cursor at Item (SKU)on the Posting Screen, press<No Sale/Layaway>.
You are given a choice of four numbers to enter, but you won’tuse any of these four.
2Type 9. The EOD FLAG field appears.
3Type Y. The letters TR appear in the lower right corner of the screen. This
terminal is now in training mode, and the transactionsperformed here will not affect your inventory, customer or salesrecords.
Method B
1At any menu, type MTR andpress <Enter>.
The Modify Terminal Record Screen displays.
Modify Terminal Record (MTR)
Default UserDefault PrinterSpecial SecurityJournal NumberOld Journal NmbrJournal Rollover
::::::
LIMITED01N 49 34 1
TERMINAL DEFAULTS
POS In Training?Return to HeaderCursor in Qty FieldBackorder PromptBackorder Pick TicketCheck Guar AllowedCredit Checking
:::::::
NNNYNNN
POS DEFAULTS
Terminal: 03 Lockin Store: 1 Current Signed on User: Limited
Display Qty NA MsgDisplay Cost on InqryDisplay Matrix PricesDisplay Running GP%
::::
NNNN
POS DISPLAYSQuickViewSequenceQuickView FormatPrint Cost and GP%Lumber Totals
::::
FANN
QUICKVIEW/INVOICES To see data about thisTerminal, enter "ME" inthe TERMINAL field andpress <DISPLAY>.
PrintersPrinter TypeInvoice Printer #Invoice Form TypeBar Code Scan AllwdCustomer DisplayTerminal Type
:::::::
POS DEVICES
4S 0RNNT

Security and ControlTraining Mode 4-7
2Type the number of the terminalto be put in training mode, andpress <Display>.
The record for that terminal displays.
3At POS In Training? type Y.Then press <Change>.
The message CHANGE COMPLETED displays. Now the terminalis in training mode, and any POS transactions performed therewill not affect your inventory, customer or sales records.
Exiting TrainingMode
There are two methods of exiting training mode, just as there aretwo methods of entering it. Use Method A if you’re already inPOS. Use Method B if you’re not in POS.
Method A
1With the cursor at Item (SKU)on the Posting Screen, press<No Sale/Layaway>.
You are given a choice of four numbers to enter, but you won’tuse any of these four.
2Type 9. The EOD FLAG field appears.
3Type N. The letters TR disappear from the lower right corner of the
screen. This terminal is no longer in training mode, and anytransactions performed here will affect your inventory, customerand sales records.

Security and Control4-8 Training Mode
Method B
1At any menu, type MTR andpress <Enter>.
The Modify Terminal Record Screen displays.
Modify Terminal Record (MTR)
Default UserDefault PrinterSpecial SecurityJournal NumberOld Journal NmbrJournal Rollover
::::::
LIMITED01N 49 34 1
TERMINAL DEFAULTS
POS In Training?Return to HeaderCursor in Qty FieldBackorder PromptBackorder Pick TicketCheck Guar AllowedCredit Checking
:::::::
NNNYNNN
POS DEFAULTS
Terminal: 03 Lockin Store: 1 Current Signed on User: Limited
Display Qty NA MsgDisplay Cost on InqryDisplay Matrix PricesDisplay Running GP%
::::
NNNN
POS DISPLAYSQuickViewSequenceQuickView FormatPrint Cost and GP%Lumber Totals
::::
FANN
QUICKVIEW/INVOICES To see data about thisTerminal, enter "ME" inthe TERMINAL field andpress <DISPLAY>.
PrintersPrinter TypeInvoice Printer #Invoice Form TypeBar Code Scan AllwdCustomer DisplayTerminal Type
:::::::
POS DEVICES
4S 0RNNT
2Type the number of the terminalto be taken out of trainingmode, and press <Display>.
The record for that terminal displays.
3At POS In Training? type N.Then press <Change>.
The message CHANGE COMPLETED displays. Now the terminalis no longer in training mode, and any POS transactionsperformed there will affect your inventory, customer and salesrecords.

Security and ControlChecking Whether Items are Sold at Correct Prices 4-9
Checking Whether Items are Sold at Correct Prices
Whenever a clerk sells an item at a price other than the priceentered in the inventory record, your Triad system automaticallymakes a “mental note.” Then, whenever you want to see whichitems have been sold at a non-standard price, you can print thePrice Exception Report (Report RPE). You can print theinformation by department, terminal or clerk.
Questions You MayHave
What causes my Triad systemto make a “mental note”?
Your Triad system makes a “mental note” whenever a clerk:
• types over the price that automatically displays and sells it,regardless of whether the price entered is higher or lower
• gives credit for a returned item for an amount that is not thesame as the current selling price
• sells an item using the <Discount> key or the <Promo> key
• places an item on an order at a different price than wasoriginally offered on the bid from which the order wascreated
• sells an item at a price that gives a gross profit percent that ismore or less than the desired gross profit percent (fromFunction IMU)
• voids an item from a sale
• returns or exchanges a defective item, even if the creditamount is the same as the current selling price
• gives a trade discount on an entire sale or an immediateterms discount
• changes the pricing code for an individual line item usingthe <Run> key

Security and Control4-10 Checking Whether Items are Sold at Correct Prices
Why would a clerk change theprice of an item?
Clerks might be doing this for any number of reasons:
• The price is incorrectly marked on the item itself, or on theshelf.
• A customer who is returning an item has his receipt, whichshows he paid a different price than the current systemprice.
• The customer was a friend.
• For a long list of additional reasons, ask any clerk.
When should I run ReportRPE?
Many managers like to run this report as part of their end-of-dayqueue. You could run it several times with various options toprint different information. You can print it whenever you likeduring the day or after the close of business, or even the next day(if you use Option R).
Running Report RPE Below is the procedure for running Report RPE. For additionalinformation about Report RPE, see the following:
• Reports Manual
• the tabbed section Interpreting Your End-of-Day Reports inthis manual
1At any menu, type RPE andpress <Enter>.
The initiation screen for the Price Exception Report displays.

Security and ControlChecking Whether Items are Sold at Correct Prices 4-11
Multistore users:At the Store field, type the number of the store whose priceexceptions you want to print, or press <Clear Field> to printprice exceptions for all stores.
2At Options, type the code lettersfor the kind of price exceptionsyou want to print, or leave itblank.
Please see the Reports Manual for a detailed explanation of theoptions. If you use no options, then all price exceptions willprint.
3At Print Options, type the letterof any special printing formatyou want. Then press <Enter>.
NOTE: If you select Print Option R (Reprint Previous Report),the report will print yesterday’s price exceptions, nottoday’s.
4Decide how you want the priceexception items to be sorted,and type the appropriate codeat Print Sequence. Then press<Enter>.
The codes display on the screen when your cursor is in the PrintSequence field.
5If you did not type G at theOptions field, press <Enter>and skip to step 6. If you didselect G, type the level of grossprofit variance you’re interestedin. Then press <Enter>.
For example, if you want to print only those items whose grossprofit varied by more than 10% from your desired gross profitpercent, type 10 and press <Enter>. If your desired gross profitpercent is 30%, any item sold at a gross profit of less than 20% ormore than 40% will print on the report.
6Type the number of copies youwant and the printer numberwhere you want the report toprint. Then press <Run>.
You can press <Clear> and repeat this procedure if you want torun this report again using other options.
If you have questions about the meanings of any of the headingsor totals on the report, please see the Reports Manual.

Security and Control4-12 Checking the Cash Drawers
Multistore users:At the Store field, type the number of the store whose priceexceptions you want to print, or press <Clear Field> to printprice exceptions for all stores.
2At Options, type the codeletters for the kind of priceexceptions you want to print, orleave it blank.
Please see the Reports Manual for a detailed explanation ofthe options. If you use no options, then all price exceptions willprint.
3At Print Options, type theletter of any special printingformat you want. Then press<Enter>.
NOTE: If you select Print Option R (Reprint PreviousReport), the report will print yesterday’s priceexceptions, not today’s.
4Decide how you want the priceexception items to be sorted,and type the appropriate codeat Print Sequence. Then press<Enter>.
The codes display on the screen when your cursor is in the PrintSequence field.
5If you did not type G at theOptions field, press <Enter>and skip to step 6. If you didselect G, type the level of grossprofit variance you’reinterested in. Then press<Enter>.
For example, if you want to print only those items whose grossprofit varied by more than 10% from your desired gross profitpercent, type 10 and press <Enter>. If your desired gross profitpercent is 30%, any item sold at a gross profit of less than 20%or more than 40% will print on the report.
6Type the number of copies youwant and the printer numberwhere you want the report toprint. Then press <Run>.
You can press <Clear> and repeat this procedure if you want torun this report again using other options.
If you have questions about the meanings of any of the headingsor totals on the report, please see the Reports Manual.

Security and ControlChecking the Cash Drawers 4-13
Checking the Cash Drawers
There are two ways to verify how much should be in your POScash drawers:
1. You can display the status of any cash drawer at any timeduring the day without interrupting the clerk who is usingit. Just look at Function DCD (Display Cash Drawer).
2. As part of your Daily Sales Report (RDS), youautomatically get a cash balancing worksheet for all yourcash drawers. You’ll always run Report RDS at the end ofevery day, but you can also run it without Option F anytimeduring the day to print an interim cash balancingworksheet.
Checking CashDrawers From aTerminal
If you want to display the status of any cash drawer, use thefollowing procedure.
1At any menu, type DCD andpress <Enter>.
The Display Cash Drawer Screen displays.

Security and Control4-14 Checking the Cash Drawers
2If you want to see the salesfigures by clerk, type C. If youwant to see them by terminal,type T. Then press <Display>.
The sales figures for the first 12 clerks or terminals display. Ifyou need to display additional clerks or terminals, press <NextItem>.
The information shows how much the amount in the cashdrawer has increased so far today, not the total amount in thedrawer. Remember that there was a certain amount of cash inthe drawer to begin with, which is not included in thesefigures.
The information is set back to zero each night when you run yourDaily Sales Report (RDS). You cannot reset any of these figuresduring the day; you can only accumulate totals.
If you want to see the information sorted another way, repeatstep 2, using the other letter (C or T).
The figures do not change as you watch, even thoughtransactions may be continuing at the POS terminals. The screenshows the figures as they stood only at the moment you pressed<Display>. If you want to see how they stand right now, press<Display> again.
If you have any questions about what any of these fields mean,please see the Functions Manual.
Checking the CashDrawers From aCash BalancingWorksheet
One page of the Daily Sales Report (Report RDS) is a CashBalancing Worksheet.
Report RDS is always part of your end-of-day queue, but youcan also print one without Option F any time during the day toprint an interim cash balancing worksheet for any clerk orterminal. You can use it to balance the cash drawer of a clerkwhose shift ends before the close of business.
To print a Cash Balancing Worksheet any time during the day,use the following procedure.

Security and ControlChecking the Cash Drawers 4-15
1At any menu, type RDS andpress <Enter>.
The initiation screen displays for the End of Day Sales TotalsReport.
Multistore users only:If you want to print this report for a clerk or terminal inanother store, press <Backtab> and type that store numberat Store.
2At Options, you can type J or D,but don't use Option F.
Never use Option F until the store has been closed at the end ofthe day.
Don't use Option T unless you want the activity for allterminals or all clerks combined into just one worksheet.
If you want more than one copy, type the quantity at the Copiesfield.
3At Print Sequence, leave the Tif you want a worksheetshowing activity by terminal,or type C if you want aworksheet showing activity byclerk.
Security and Control4-16 Checking the Cash Drawers
4In the From and To fields, typethe numbers of the terminals orclerks you’re interested in.
5Press <Run>. To see how to use a Cash Balancing Worksheet, study the
filled-in example on the next page.
NOTE: Since this is not the end of the day, the report willshow totals so far today instead.

i
Additional Features
About QuickView 5-1
Setting Up QuickView 5-2
Creating Short Descriptions 5-1Using Function MSD 5-3Using SDUTL 5-5Setting Up the QuickView Defaults 5-9
About QuickRecall 5 -11
Setting Up QuickRecall 5 -11
Setting Up Security 5-11Setting Up Function MQK 5-12

Additional FeaturesAbout QuickView 5-1
Additional Features
About QuickView
With QuickView you can:
• search for and display inventory items
• display up to 9 inventory items at a time
• search for items by several different sort sequences
• post items to an invoice or order from the QuickViewwindow
QuickView searches for items by fineline, class, SKU,manufacturer part number and short description. The shortdescription can be the first 15 characters of the item descriptionor anything else that you want. Depending on how your itemdescriptions are structured, you may choose to add the shortdescriptions manually (Function MSD) or let your Triad systemautomatically copy the first 15 characters of the itemdescription to the short description (SDUTL). Using shortdescriptions is the most effective way to search for itemsat POS.
An item doesn’t need a short description for you to look it up inQuickView. For example, you can search for items by class ifyou have set up classes in Function MCL. Before you set upQuickView, make sure you set up your classes and/or finelines.Since QuickView searches for classes and finelines by theirdescription, you should make sure the descriptions are easy touse. Although the next section, “Creating Short Descriptions,”is primarily for item descriptions, the guidelines also apply toclass and fineline descriptions. You may want to use theguidelines to help you modify your class and finelinedescriptions.

Additional Features5-2 Setting Up QuickView
Setting Up QuickView
The rest of this section explains the procedures for setting upQuickView. For procedures on how to use QuickView, see thePOS Quick Reference.
Creating ShortDescriptions
Before you begin adding short descriptions, read the followingshort description guidelines. They will help you create shortdescriptions that are easy to use.
Make it easy to learn The short descriptions will not be very useful if they aren’teasy to learn. Make sure your short descriptions aren’t toospecific. It is better to have your employees search through alarge number of items than to make them frustrated becausethey cannot find an item they know exists.
Choose your first wordcarefully
Your Triad system looks items up alphabetically. The firstword of the short description should be the first category thatcomes to employees’ minds when they see the item.
Here are some examples.
Item description First word
Galvanized pipe 1/2" x 21' T&C PIPE
#1 Stanley Phillips screwdriver SCREWDRIVER
Avocado appliance touchup paint PAINT
Duracell AAA batteries 8pk BATTERY
Make abbreviationsconsistent
As a general rule, you should avoid using abbreviations. Youmay be tempted to abbreviate long categories like screwdriverto SCRWDRVR. Unless the abbreviation is more common than thefull spelling, it is difficult to learn which categories areabbreviated and which ones are not. If you must useabbreviations, make them consistent. If the abbreviations arenot common ones, make sure your clerks know what they are.
Avoid plurals To avoid confusion, make short descriptions singular. Mostemployees will not know that single AA batteries are under

Additional FeaturesSetting Up QuickView 5-3
BATTERY, and multi-packs are under BATTERIES. In thisexample, use one short description: BATTERY.
Select the remaining wordsin order of importance
The second word of the short description is a tie-breaker. Forexample, if you used the short description DRILL to look up aparticular drill, you would probably have to search through alot of drills before you found the one you want. In situations likethis, the second word of the short description helps you quicklyfind the item you want.
Here are some examples.
Description First Word Second Word
Galvanized pipe 1/2" x 21'T&C
PIPE GALVANIZED
20 oz Stanley claw hammer HAMMER CLAW
Avocado appliance touchuppaint
PAINT APPLIANCE
Duracell AAA batteries 8pk BATTERY AAA
Pocket auto center punch PUNCH CENTER
Avoid spaces To avoid confusion, separate words with a comma and no space.This will also minimize the number of keystrokes.
Avoid special characters It is difficult to determine when to use a dash (-), pound/numbersign (#) or foot/inch designation ('/"). You should avoid usingthese and other special characters in the first three words of ashort description.

Additional Features5-4 Setting Up QuickView
Give numbers a commonformat
Your Triad system will display 2X4 before 10X12. To preventthis from happening, use 02X04 instead. Where possible, usedecimals (.25, .50, .75) instead of fractions (1/4, 1/2, 3/4). Makesure that sizes are not in the first three words of the shortdescription.
Sample Short Descriptions Here are some examples of short descriptions.
Description Short description
Galvanized pipe 1/2" x 21'T&C
PIPE,GALVANIZED
20 oz Stanley claw hammer HAMMER,CLAW,20
Avocado appliance touchuppaint
PAINT,APPLIANCE
Duracell AAA batteries 8pk BATTERY,AAA
Pocket auto center punch PUNCH,CENTER
“Caution” barricade tape TAPE,CAUTION
2 x 4 x 8 Doug Fir S4S Std & Btr DF,20408,S4S
Using FunctionMSD
Use Function MSD to manually add and change shortdescriptions.
NOTE: You cannot add or change short descriptions inFunctions LOD or IMU—there is no short descriptionfield in either function.

Additional FeaturesSetting Up QuickView 5-5
1At any menu, type MSD andpress <Enter>.
The Modify Short Description screen displays.
Modify Terminal Record (MTR)Modify Short Description (MSD) Store: 1
Default Short Desc: Sort Records By: D
SKU Short Desc Description
1)
2)
3)
4)
5)
6)7)
8)
9)
10)
11)
12)
13)
14)
15)
2At Default Short Desc, typethe short description or leavethis field blank.
Entering a short description in this field will update the shortdescription of all SKUs that are currently displayed and havea blank Short Desc field.
Multistore users:Short description is master data. Entering a shortdescription for a specific item in one store will update theshort description of that item in all stores.
If you leave this field blank, you must enter a short descriptionin the Short Desc field for each SKU whose short descriptionyou want to add or change.
3At Sort Records By, type D toscroll through the inventoryfile by short description, or S toscroll by SKU.
The Sort Records By field determines how the <Next Item>and <Prev Item> keys scroll through the inventory file.

Additional Features5-6 Setting Up QuickView
4Press <Next Item> or<Prev Item> to display thefirst group of items.
If you press <Next Item> or <Prev Item>, the first group ofitems will display based on what you entered in the SortRecords By field.
or
Type the SKU number(s) andpress <Display>.
If you type the SKU number(s) and press <Display>, only thoseSKUs you entered will display.
5Press <Add> or <Change> ifyou entered a default shortdescription.
If you entered a short description in the Default Short Descfield, pressing <Add> or <Change> will update the shortdescription of all SKUs that are currently displayed and havea blank Short Desc field.
or
Type the short description foreach item displayed. Thenpress <Add> or <Change>.
6If you have more shortdescriptions to add or change,repeat steps 2–5.
NOTE: For additional information about Function MSD,please refer to the Functions Manual.
Using SDUTL If you want to update the short description for a range of items,use SDUTL. SDUTL automatically copies the first 15characters of the Item Description field in Function IMU to theShort Description field in Function MSD.

Additional FeaturesSetting Up QuickView 5-7
1At any menu, type SDUTL andpress <Enter>.
The Short Description Utility screen displays.
Modify Terminal Record (MTR)Store: 1Short Description Utility (SDUTL)
Copy Item Description to 'Short Description'? (Y/N): N
Copy only if 'Short Description' is blank? (Y/N): Y
Strip Part Number from 'Short Description'? (Y/N): N
Replace 'Short Description' with Default Desc? (Y/N): N
Default Short Description:
Print updated short descriptions? (Y/N): N
Printer (P) : 1
Report Options : ____
From: To: Codes Exclusion
Department
Class
Sequence #
Primary Vendor
: __
: ___
: _____________
: ______
__
___
_____________
______
User: ____ NNNN
Multistore users:The Store field defaults to the store number in the LockinStore field in Function MTR. You may enter a number from1–9, or type C for a consolidated print sequence.
If you use the Copy Item Description to ‘Short Description’option, you don’t need to specify a store because the shortdescription is master data.
2At Copy Item Description to‘Short Description’? type Y orN and press <Enter>.
Answer Y to copy the first 15 characters of the Item Descriptionfield in Function IMU to the Short Description field in FunctionMSD.
3At Copy only if ‘ShortDescription’ is blank? type Y orN and press <Enter>.
If you type Y, only those items with a blank short description inFunction MSD will be updated.

Additional Features5-8 Setting Up QuickView
4At Strip Part Number from‘Short Description’? type Y orN and press <Enter>.
This option appears only if the store’s 1st or 2nd Affiliate fieldin Function MSR is COT.
The Cotter FastStart tape includes the manufacturer partnumber in the item description. Since SDUTL copies the first 15characters of the item description, the manufacturer partnumber may be the only part of the description that is copied.This can make it very difficult to use QuickView.
Answer Y to strip the manufacturer part number from the ShortDesc field in Function MSD.
5At Replace ‘Short Description’with Default Desc? type Y or Nand press <Enter>.
This field and the Default Short Description field worktogether.
If you answer Y and type a short description in the DefaultShort Description field, all selected items’ short descriptionswill be changed to the Default Short Description.
If you answered Y at Copy Item Description to ‘ShortDescription’? in step 2, type N in this field.
6If you answered Y to thequestion in step 5, type theshort description in the DefaultShort Description field. Thenpress <Enter>.
7At Print updated shortdescriptions? type Y or N andpress <Enter>.
Type Y if you want a list of all updated items.
8Fill in the Printer field withthe printer you want and press<Enter>.

Additional FeaturesSetting Up QuickView 5-9
9Type the options you want atReport Options and press<Enter>.
The available options and their definitions are as follows:
Option Definition
DDouble Spacing
J Suppress Prepage
S Only print items with short descriptionAvailable when you answer N to Copy ItemDescription to ‘Short Description.’
W Only print items without short descriptionAvailable when you answer N to Copy ItemDescription to ‘Short Description.’
10Use the From and To fields tospecify a range of SKUs toupdate.
11Press <Run>.

Additional Features5-10 Setting Up QuickView
Setting Up theQuickView Defaults
Below is a sample of the first screen you see in QuickView.
As you can see, you have more than one sequence and displayformat from which to choose. So your clerks will not have todecide which sort sequence and format to use, set the defaultsort sequence and format for QuickView in Function MTR. Youcan customize the defaults for each terminal.
To set the default sort sequence and display format forQuickView, use the following procedures.

Additional FeaturesSetting Up QuickView 5-11
1At any menu, type MTR andpress <Enter>.
The Modify Terminal Record screen displays.
Modify Terminal Record (MTR)
Default UserDefault PrinterSpecial SecurityJournal NumberOld Journal NmbrJournal Rollover
::::::
LIMITED01N 49 34 1
TERMINAL DEFAULTS
POS In Training?Return to HeaderCursor in Qty FieldBackorder PromptBackorder Pick TicketCheck Guar AllowedCredit Checking
:::::::
NNNYNNN
POS DEFAULTS
Terminal: 03 Lockin Store: 1 Current Signed on User: Limited
Display Qty NA MsgDisplay Cost on InqryDisplay Matrix PricesDisplay Running GP%
::::
NNNN
POS DISPLAYSQuickViewSequenceQuickView FormatPrint Cost and GP%Lumber Totals
::::
FANN
QUICKVIEW/INVOICES To see data about thisTerminal, enter "ME" inthe TERMINAL field andpress <DISPLAY>.
PrintersPrinter TypeInvoice Printer #Invoice Form TypeBar Code Scan AllwdCustomer DisplayTerminal Type
:::::::
POS DEVICES
4S 0RNNT
2At the QuickView Sequencefield, type the defaultQuickView sequence and press<Enter>.
The QuickView Sequence field determines the order in whichitems are displayed on the screen.
QuickView uses the sequence to sort by when searching foritems.
3At the QuickView Formatfield, type the defaultQuickView format and press<Enter>.
The QuickView Format field determines the default format touse while displaying items in QuickView.
The format determines which fields display in QuickView(similar to Function IQR).
4At the Display GP% field,type Y or N and press<Change>.
NOTE: For procedures on how to use QuickView, see the POSQuick Reference.

Additional Features5-12 About QuickRecall
About QuickRecall
With QuickRecall you can store and retrieve sales and credits.You can also store and retrieve estimates on a selective basis.After you save them, you can:
• reprint them at POS
• display them at POS
• combine them to create new transactions
• use ReQuest to print reports with information from thetransactions
Screen prompts and <Shift> <Help> are available to answerany questions you may have.
Setting Up QuickRecall
The rest of this section explains the procedures for setting upQuickRecall. For procedures on how to use QuickRecall, see thePOS Quick Reference and the Clerk’s POS Procedures Manual.
Setting Up Security You must set up security for QuickRecall. Please refer to theSecurity Guide to help you set up these security bits.

Additional FeaturesSetting Up QuickRecall 5-13
Setting Up FunctionMQK
Use Function MQK (Modify QuickRecall Constants) to enter andmaintain the system-wide QuickRecall constants. Theinformation on this screen determines how long the system willsave archived transactions, and the amount of disk space thearchived transactions use on your system.
You will only need to set up MQK once. Use the followingprocedures.
1At any menu, type MQK andpress <Enter>.
The Modify QuickRecall Constants screen displays.
Modify QuickRecall Constants (MQK)
Default Criteria for Purging Archived Transactions:
CASH CUSTOMERSCHARGE CUSTOMERSSPECIAL SKU'S
: 1W: 1D: 50
PURGE TRX FOR DELETED CUSTOMERS
1D - 9D = 1 to 9 Days1W - 9W = 1 to 9 Weeks01 - 96 = 1 to 96 Monthsblank = Purge Tonight
QuickRecall Archive File Status
Number of Transactions*
% Used and Available
341
17%
÷
÷
1,659
83%
=
=
2,000
100%
*Based on your current average of 2 lines per transaction
Currently Used Available Total
: N
2Fill in the appropriate fields. You must fill in the following fields:
• Cash Customers
• Charge Customers
• Special SKU’s
• Purge Trx for Deleted Customers
Refer to the Functions Manual to answer any questions you haveabout these fields.

i
Making Changes to Point-of-Sale
Changing POS 6-1
Procedural Changes 6 -2
Checks and Bankcards 6 -3
Clerk Capabilities 6 -3
Message Lines 6 -4
Prices to Use 6 -4

ii
What Prints Where 6 -5
Security 6 -6
Miscellaneous 6 -7

Making Changes to Point-of-SaleChanging POS 6-1
Making Changes to Point-of-Sale
Changing POS
You can change your mind at any time about the decisions youmade when you started POS.
The tables in this section will help you find the field thatcontrols the change you want to make. They also tell youwhether the change will affect a single terminal or an entirestore.
If you have questions about the choices that are available toyou, please refer to the tabbed section Getting Started in thismanual.
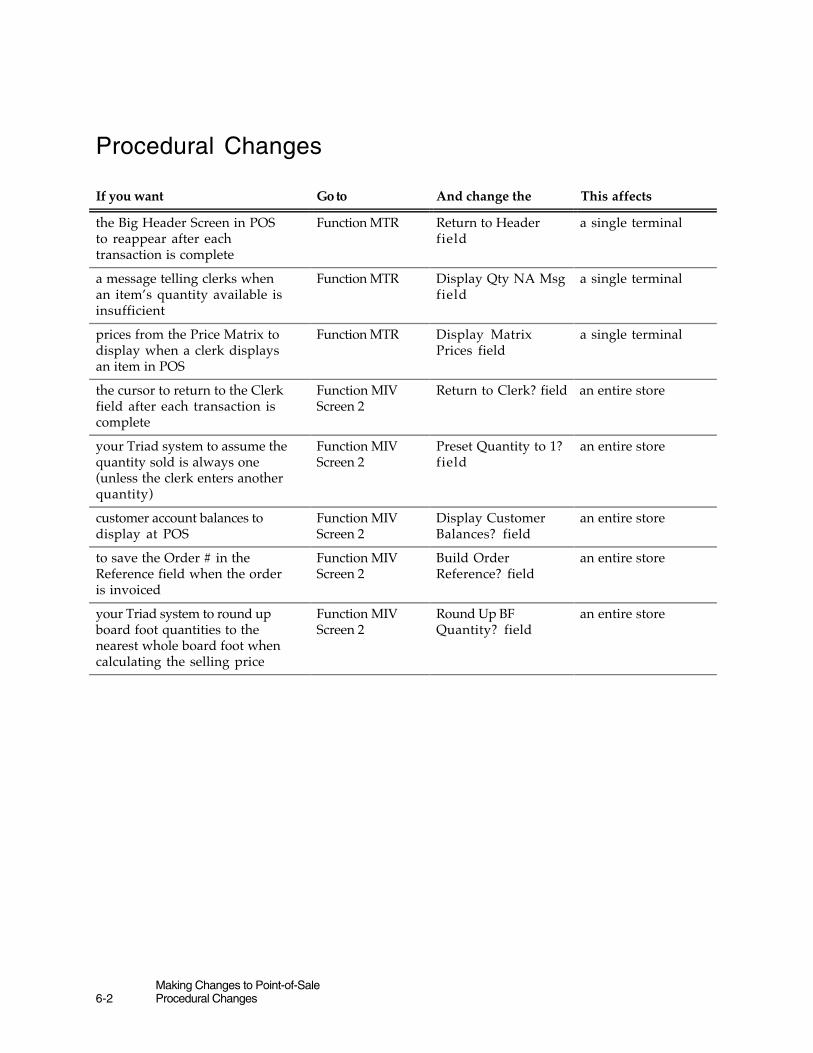
Making Changes to Point-of-Sale6-2 Procedural Changes
Procedural Changes
If you want Go to And change the This affects
the Big Header Screen in POSto reappear after eachtransaction is complete
Function MTR Return to Headerfield
a single terminal
a message telling clerks whenan item’s quantity available isinsufficient
Function MTR Display Qty NA Msgfield
a single terminal
prices from the Price Matrix todisplay when a clerk displaysan item in POS
Function MTR Display MatrixPrices field
a single terminal
the cursor to return to the Clerkfield after each transaction iscomplete
Function MIVScreen 2
Return to Clerk? field an entire store
your Triad system to assume thequantity sold is always one(unless the clerk enters anotherquantity)
Function MIVScreen 2
Preset Quantity to 1?field
an entire store
customer account balances todisplay at POS
Function MIVScreen 2
Display CustomerBalances? field
an entire store
to save the Order # in theReference field when the orderis invoiced
Function MIVScreen 2
Build OrderReference? field
an entire store
your Triad system to round upboard foot quantities to thenearest whole board foot whencalculating the selling price
Function MIVScreen 2
Round Up BFQuantity? field
an entire store

Making Changes to Point-of-SaleChecks and Bankcards 6-3
Checks and Bankcards
If you want Go to And change the This affects
to endorse checks Function MIVScreen 2
Endorse Checks? field an entire store
to endorse bankcard slips Function MIVScreen 2
Endorse Bankcards?field
an entire store
to change the name or number ofthe bank account that prints onthe back of endorsed checks
Function MSR CheckingName/Accnt# field
an entire store
to change the name or number ofthe bank account that prints onthe back of endorsed bankcardslips
Function MSR Credit CardName/Accnt# field
an entire store
to change acceptability ofcertain credit cards
Function MIVScreen 2
Valid Credit Cardsfield
an entire store
Clerk Capabilities
If you want Go to And change the This affects
clerks to be able to display thecost of an item at POS
Function MTR Display Cost on Inqryfield
a single store
a message telling clerks that anitem’s quantity available isinsufficient
Function MTR Display Qty NA Msgfield
a single terminal
prices from the Price Matrix todisplay when the clerkdisplays an item
Function MTR Display MatrixPrices field
a single terminal
customer account balances todisplay at POS
Function MIVScreen 2
Display CustomerBalance? field
an entire store
a warning message to displayat POS whenever a clerk beginsa transaction for a customerwith a past due balance
Function MIVScreen 2
Display Past DueWarning? field
an entire store
a prompt asking for awallpaper pattern, paint tintformula or toxic warningmessage
Function IMUScreen C
Tally field entire store

Making Changes to Point-of-Sale6-4 Message Lines
Message Lines
If you want Go to And change the This affects
to print/not print the messageline on invoices
Function MIVScreen 1
With Message Line?field
an entire store
to print/not print the messageline on receipts
Function MIVScreen 1
Print Message Lines?field
an entire store
to change the message line thatprints on invoices and receipts
Function MIVScreen 1
Message Lines an entire store
Prices to Use
If you want Go to And change the This affects
prices from the Price Matrix todisplay when the clerkdisplays an item
Function MTR Display MatrixPrices field
a single terminal
to change the price that printsin the SUGG column on theinvoice
Function MIVScreen 1
Suggested Price toPrint? field
an entire store
your Triad system to considerany promotion prices entered inFunction MIP when clerkscreate estimates
Function MIVScreen 2
Promo Prices inEstimates? field
an entire store
your Triad system to considerretail price when comparingprices
Function MIVScreen 2
Use Retail Prc in BestPricing? field
an entire store
to change the kinds of itemssubject to terms or tradediscounts
Function MIVScreen 3
all fields an entire store
to change the basis forcalculating cost of goods soldwhen invoicing orders andspecial orders
Function MIVScreen 2
Use Curr Cost whenInvoicing? field
an entire store

Making Changes to Point-of-SaleWhat Prints Where 6-5
What Prints Where
If you want Go to And change the This affects
to assign a terminal’s invoicesto print at a different printer
Function MTR Invoice Printer # field a single terminal
cost and gross profit percent toprint on the store copy ofContractor invoices
Function MTR Print Cost/GP% OnInvoices field
a single terminal
to change the type of form usedin the invoice printer
Function MTR Form Type field a single terminal
to change the store name oraddress that prints on theinvoice and receipt
Function MSR Store Name andAddress Lines fields
an entire store
to change the name or number ofthe bank account that prints onthe back of endorsed checks
Function MSR CheckingName/Acct# field
an entire store
to change the name or number ofthe bank account that prints onthe back of bankcard slips
Function MSR Credit CardName/Acct# field
an entire store
to change the message line thatprints on the invoice
Function MIVScreen 1
Message Lines field an entire store
to print prices of individualline items on estimates
Function MIVScreen 1
Print Prices onEstimates? field
an entire store
to change whether or not toprint invoices
Function MIVScreen 1
Print Invoices? field an entire store
to print item descriptions oninvoices
Function MIVScreen 1
With Description?field
an entire store
to print store name on invoices Function MIVScreen 1
With Store Name?field
an entire store
to print a message line oninvoices
Function MIVScreen 1
With Message Line? an entire store
to print the invoice due date oninvoices
Function MIVScreen 1
With Due Date?field
an entire store
to print all components of a kiton invoices
Function MIVScreen 1
With Kits Expanded?field
an entire store
to print the terms discount oninvoices in a readable form(instead of backwards)
Function MIVScreen 1
Terms DiscountReadable? field
an entire store
to change the spacing oninvoices
Function MIVScreen 1
Invoice Spacing?field
an entire store

Making Changes to Point-of-Sale6-6 What Prints Where
What Prints Where, cont’d
If you want Go to And change the This affects
to print the cash tenderedamount on receipts
Function MIVScreen 1
Print Cash TenderedLine? field
an entire store
to print the change amount onreceipts
Function MIVScreen 1
Print Change Line?field
an entire store
to print the date, time,terminal # and clerk on receipts
Function MIVScreen 1
Print Audit Line?field
an entire store
to print the store name onreceipts
Function MIVScreen 1
Print Store NameLine? field
an entire store
to print a receipt for chargecustomers
Function MIVScreen 1
Print ChargeCustomer? field
an entire store
to print the message line onreceipts
Function MIVScreen 1
Print Message Lines?field
an entire store
to print the promotion ordiscount percent on the invoice
Function MIVScreen 1
Promo/Discount Pct?field
an entire store
Security
If you want Go to And change the This affects
to check passwords at POS Function MUR Check Password atPOS? field
a single clerk
the cursor to return to the Clerkfield after each transaction
Function MIVScreen 2
Return to Clerk? field an entire store

Making Changes to Point-of-SaleMiscellaneous 6-7
Miscellaneous
If you want Go to And change the This affects
to see if a terminal is inTraining Mode
Functions MTR orPOS
a single terminal
to put a terminal into TrainingMode (or take it out of TrainingMode)
Functions MTR orPOS
POS in Training?field
a single terminal
to start over with a new seriesof invoice numbers
Function MIVScreen 1
Next Invoice Numberfield
an entire store
to change the default customernumber
Function MIVScreen 2
Default CustomerNumber? field
an entire store
to change the salesperson codeassociated with a particularclerk
Function MUR Default Salespersonfield
a single clerk

i
Getting Information for BetterManagement
Keeping Track of PendingTransactions 7-1
Printing a List of Outstanding Transactions 7-1Printing a List of Open Quotes 7-3Printing a List of Bids that are Over-Volume 7-4Batch-Printing Pick Tickets 7-6Printing Orders/Special Orders withOutstanding Deposits 7-8Printing a List of Uninvoiced Orders 7-10
Keeping Track of Items 7-13
Printing a List of Items Returned asDefective 7-13Printing Outstanding Special Order Items 7-14Printing a List of Backordered Items 7-16

Getting Information for Better ManagementKeeping Track of Pending Transactions 7-1
Getting Information for BetterManagement
Keeping Track of Pending Transactions
Tracking pending transactions is a major part of yourresponsibilities as manager. Your Triad system makes this easierby allowing you to print various listings of the pendingtransactions in the system.
Printing a List ofOutstandingTransactions
1At any menu, type ROO andpress <Enter>.
The initiation screen for the Open Order File Report displays.

Getting Information for Better Management7-2 Keeping Track of Pending Transactions
Multistore users:Type the store number you want this report to cover at theStore field, or press <Clear Field> to print transactions fromall stores.
Type another printer number if necessary.
2At Printing Seq, type C or leavethe O, and press <Enter>.
If you want this list to print in customer number order, type C.Otherwise, leave the O and the list will print in transactionnumber sequence.
3At Trans Type, type the lettercode for the type(s) oftransactions you want to print.Then press <Enter>.
If you leave this field blank, all transaction types will print.
You can enter as many of the transaction types as you want. Itdoesn’t matter what order you type the codes in.
4At Options, type the letter codefor any special formats orrequirements you have. Thenpress <Enter>.
If you leave this field blank, you’ll get an unrestricted list.
Options D, J, N and T determine how the printed report willlook.
If you want more than one copy, type the quantity at the Copiesfield.
5In the From and To fields, typeany ranges to which you wantto restrict this listing.
If you leave the ranges blank, all transactions of the type youindicate will print.
6Press <Run>. For a detailed explanation of Report ROO, see the Reports
Manual.

Getting Information for Better ManagementKeeping Track of Pending Transactions 7-3
Printing a List ofOpen Quotes
It’s a good idea to keep a current list of open quotes so you’llknow who is getting special prices on what. Each week, youmight want to print a list of the open quotes due to expire thatweek to decide whether to extend them or not.
1At the main menu, type ROOand press <Enter>.
The initiation screen for the Open Order File Report appears.
Multistore users only:Type the store number you want this report to cover at theStore field, or press <Clear Field> to print open quotes forall stores.
Type another printer number, if necessary.
2At Printing Seq, type C or leavethe O, and press <Enter> twice.Leave Trans Type blank.
It doesn’t really matter which printing sequence you use.
Leave the Trans Type field blank because you’ll indicate in thenext field that you’re interested only in open quotes.
3At Options, type Q and press<Enter>.
You can also use Options C, D, J or N if you want, but don't useany of the other options.
If you want more than one copy, type the quantity at the Copiesfield.

Getting Information for Better Management7-4 Keeping Track of Pending Transactions
4In the From and To fields, typeany ranges to which you wantto restrict this listing.
Triad Systems Corporation suggests you leave these fields blank.That way all open quotes on file will print, and you can be sureyou haven’t overlooked any. If you don’t enter any ranges, allthe open quotes will print, even if they have expired.
If you want to only print the open quotes due to expire this week(to decide whether to extend them or not), type the range ofdates you want in the Expiration Date From and To fields.
5Press <Run>. If you find an open quote that you want to change, please see the
Clerk's POS Procedures Manual, the tabbed section Open Quotes,“Changing an Open Quote”. For example, you might want tochange the expiration date, prices or items on an open quote.
If you find an open quote that you want to cancel, please see thetabbed section Deleting and Purging Transactions in thismanual.
Printing a List ofBids that are Over-Volume
When the total dollar amount that you have shipped andinvoiced on a particular bid exceeds the total dollar amount ofthe bid itself, the bid is “over-volume.”
This happens if your customer finds he needs more of some ofthe items on the bid than he had originally expected, andrequests that increase order quantities as they create orders fromthe bid. This is a legitimate procedure, although such increasesmay sometimes be undesirable. For example, your cost mayhave increased so much since the bid that you cannot afford tosell any greater quantity at the bid price than you originallycommitted.
To print a list of over-volume bids, use the following procedure.

Getting Information for Better ManagementKeeping Track of Pending Transactions 7-5
1At the main menu, type ROOand press <Enter>.
The initiation screen for the Open Order File Report appears.
Multistore users:Type the store number you want this report to cover at theStore field, or press <Clear Field> to print over-volume bidsfor all stores.
Type another printer number, if necessary.
2At Printing Seq, type C andpress <Enter> twice.
Although you could use the default sequence, which prints byorder number, the customer number sequence is moreconvenient in this case. The customer number sequence groupstogether all bids for any one customer. This will make it easier tosee if you have a problem with any particular customer.
You can leave the Trans Type field blank, because you willspecify an option that includes only bids.
3At Options, type O. You can also use Options D, H, J or N, but don’t use any other
options.
If you want more than one copy, type the quantity in the Copiesfield.

Getting Information for Better Management7-6 Keeping Track of Pending Transactions
4Press <Run>. Triad Systems Corporation suggests you leave the From and To
fields blank. That way, all over-volume bids on file will print,and you can be sure you haven’t overlooked any.
If you want to institute controls on over-volume bids, you couldrequire clerks to get a manager’s approval before they increasequantities on orders they create from bids.
Batch-Printing PickTickets
A pick ticket is the list of items that identifies what to pick andship for a given order.
There are two ways to print pick tickets:
• If an order is to be picked and shipped immediately, yourclerks should print the order at POS, and immediately sendone of the copies out to the yard. This kind of pick ticket isprinted at your invoice printer on an invoice.
• For orders not picked and shipped immediately, it makessense to batch-print pick tickets. You can print pick ticketsby delivery date, item location or order number. This kind ofpick ticket prints at your back-office report printer on plainpaper, not on POS invoices.
Here are some of the ways you can use batch-printed picktickets:
• You can batch-print pick tickets at the end of the day fororders to be shipped the next day.
• On Mondays you can print all orders to be shipped duringthe week.
• You can print separate pick tickets for different areas of theyard.
To batch-print pick tickets, use the following procedure.

Getting Information for Better ManagementKeeping Track of Pending Transactions 7-7
1At any menu, type RIO andpress <Enter>.
The initiation screen for the Open Order Item Report appears.
Open Order Item Report Store: 1
Printer (P)
Printing Seq
Trans. Type
Options
Copies
Order/Est #Delivery DateItem LocationSku/ItemB/O Date Crtd
: 1
: D
: _____
: ________
: 1
From:: _______: __/__/__: _____: ____________: __/__/__
To: _______ __/__/__ _____ ____________ __/__/__
ExclusionTrans. Codes: ___ NNNN
Multistore users:Type the store number you want this pick ticket to cover atthe Store field, or press <Clear Field> to batch-print picktickets for all stores.
Type another printer number if necessary.
2At Printing Seq, press <Enter>to accept the default of D.
You could type O if you want to print in order number sequence,but this is usually less useful for pick tickets.
3At Trans Type, type O andpress <Enter>.
Type S if you want to include special order items on this pickticket.
4At Options, type the letter forany options you want and press<Enter>.
If you want item prices and extended prices to print on picktickets, use Option P.
If you want more than one copy, type the quantity in the Copiesfield.

Getting Information for Better Management7-8 Keeping Track of Pending Transactions
5In the From and To fields, typeany ranges to which you wantto restrict this pick ticket.
If you enter no ranges, all items on all orders will print,regardless of delivery date or item location.
To see orders to be delivered on a certain date, type the samedate in the From and To Delivery Date fields.
To see orders to be delivered on or before a certain date, type thedate in the To Delivery Date field, but leave the From field blank.
In the Item Location field, use location codes from the inventoryrecords.
6Press <Run>. You can repeat this procedure whenever you like, with any
ranges or options. Printing pick tickets does not affect the actualinformation you have on file.
PrintingOrders/SpecialOrders withOutstandingDeposits
You should regularly print a list of all orders or special orders onwhich customers have paid a deposit so you can:
• review the status of those transactions
• make sure you’re filling orders in a reasonably short time
To print orders and special orders with outstanding deposits,use the following procedures.

Getting Information for Better ManagementKeeping Track of Pending Transactions 7-9
1At any menu, type ROO andpress <Enter>.
The initiation screen for the Open Order File Report appears.
Multistore users only:Type the store number you want this report to cover at theStore field, or press <Clear Field> to print orders and specialorders from all stores.
Type another printer number if necessary.
2At Printing Seq, type C andpress <Enter>.
Although you could use the default sequence, which prints byorder number, using the customer number sequence is morebeneficial. The customer number sequence groups together allorders and special orders for any one customer.
3Leave Trans Type blank andpress <Enter>.
If you leave this field blank, both orders and special orders withoutstanding deposits will print.
If you want to print only orders, type O.
If you want to print only special orders, type S.
It’s not possible to take deposits on bids or estimates, so they areautomatically excluded from this report.

Getting Information for Better Management7-10 Keeping Track of Pending Transactions
4At Options, type L and press<Enter>.
You can also use Options C, D, H, J, N or T, but don’t use anyother options.
If you want more than one copy, type the quantity in the Copiesfield.
5In the From and To fields, typeany ranges to which you wantto restrict this pick ticket.
If you want to restrict this list, you could type ranges in the Fromand To fields. But it’s wise to print this list without ranges to besure you’re not missing anything.
6Press <Run>. If you find any orders or special orders which you want to:
• ship and invoice
• receive an additional deposit
• cancel, then refund the deposit
please see the tabbed section Orders and Special Orders in theClerk’s POS Procedures Manual.
Printing a List ofUninvoiced Orders
You should have an established internal procedure at your storefor making sure that orders are invoiced as soon as they havebeen shipped.
For auditing purposes, you may want to print a list of all ordersthat have not been invoiced. An order will appear on this list if:
• it has not yet been shipped or invoiced
• it has been shipped, but has not been invoiced, or it was onlypartially invoiced
• it has been partially shipped, but has not been partiallyinvoiced
Any order that’s been fully shipped and fully invoiced is nolonger an order—it is a completed sale, and does not appear onthis list.

Getting Information for Better ManagementKeeping Track of Pending Transactions 7-11
You can use this list to:
• check how promptly orders are being shipped.
• check how promptly orders are being invoiced after beingshipped.
• see what orders could be shipped and invoiced within agiven time period; for example, use this list to select the mostprofitable orders to ship and invoice before a quarterly orannual close.
To print a list of uninvoiced orders, use the following procedure.
1At any menu, type ROO andpress <Enter>.
The initiation screen for the Open Order File Report appears.
Multistore users only:Type the store number you want this list to cover at the Storefield, or press <Clear Field> to print uninvoiced orders fromall stores.
Type another printer number if necessary.
2At Printing Seq, press <Enter>to accept the default printingsequence.
Type C if you want to group all your orders together for any onecustomer.

Getting Information for Better Management7-12 Keeping Track of Pending Transactions
3At Trans Type, type O andpress <Enter> twice.
If you also want to see uninvoiced special orders, type S.
You can use Options D, J or N, but you shouldn’t use any of theothers.
If you want more than one copy, type the quantity in the Copiesfield.
4In the From and To fields, typeany ranges to which you wantto restrict this list.
If you enter no ranges, then all the orders on file will print. Youmay want to do this to make sure you’re not missing anything.
5Press <Run>. Remember, the orders on this list are:
• not yet shipped
or
• not yet invoiced
or
• only partially shipped
or
• only partially invoiced
Use this list to check to:
• make sure that orders are shipped promptly
• make sure that orders are invoiced as soon as they areshipped
If you find an order that should be:
• shipped, you could print a pick ticket. For additionalinformation about pick tickets, please see “Batch-PrintingPick Tickets” in this chapter.
• invoiced, please see the tabbed section Orders and SpecialOrders in the Clerk’s POS Procedures Manual.

Getting Information for Better ManagementKeeping Track of Items 7-13
Keeping Track of Items
As a manager, you also need to track certain kinds of items.Most of the procedures for getting information about inventoryitems is in the Inventory Item Information Manual, but there are afew procedures here that are closely related to POS.
Printing a List ofItems Returned asDefective
You can use the Price Exception Report (Report RPE) to print alist of defective items returned by customers. This list can helpyou keep track of items to be returned to the manufacturer forrefund, credit or replacement.
To print a list of items returned as defective, use the followingprocedure.
1At any menu, type RPE andpress <Enter>.
The initiation screen for the Price Exception Report displays.
Multistore users:At the Store field, type the number of the store whosedefective items you want to print, or press <Clear Field> toprint defective items for all stores.
2At Options, type X. Option X prints only items returned as defective.

Getting Information for Better Management7-14 Keeping Track of Items
3At Print Options, type the letterfor any special printing formatyou want. Then press <Enter>.
If you select R (Reprint Previous Report), the report will printdefective items returned yesterday.
4Decide how you want the priceexception items to be sorted,and type the appropriate codeat Print Sequence. Then press<Enter>.
The codes display on the screen when your cursor is in the PrintSequence field.
5Press <Run>. For detailed information about Report RPE, see the Reports
Manual.
Printing OutstandingSpecial Order Items
Your purchasing manager needs to know exactly what itemsyour clerks are selling on the special orders they create at POS.He/she needs to order the items from your vendor, receive themand notify the customers of their arrival.
How does the purchasing manager find out what to order? Youcan:
• use Function GPO to automatically generate a purchaseorder from a special order
or
• instruct your clerks to set aside a copy of each special orderto pass along to the purchasing manager
or
• print a list of all special order items every day or two
The following procedure is for printing a list of items onoutstanding special orders.
NOTE: For information about Function GPO, please see theFunctions Manual or the tabbed section Creating aPurchase Order in the Purchasing and Receiving Manual.
1At the main menu, type ROOand press <Enter>.
The initiation screen for the Open Order File Report appears.

Getting Information for Better ManagementKeeping Track of Items 7-15
Multistore users:Type the store number you want this report to cover at theStore field, or press <Clear Field> to print special orderitems from all stores.
Type another printer number, if necessary.
2At Printing Seq, type C andpress <Enter>.
You could use the default sequence, which prints by ordernumber, but the customer number sequence is more useful inthis case. It groups together all special order items by customer.
3At Trans Type, type S and press<Enter> twice. Leave Optionsblank.
You can use Options C, D, J or N, but don’t use any of the otheroptions.
If you want more than one copy, type the quantity in the Copiesfield.
4In the From and To fields, typeany ranges to which you wantto restrict this listing.
Triad Systems Corporation suggests you leave these fields blank.That way, all special order items on file will print, and you canbe sure you haven’t overlooked any.
If you print this report regularly, though, you might want toprint only those special orders created during a certain period.For example, you might want to print only those special orderscreated since the last time you printed this report. In that case,you would type the range of dates you want in the Date Createdfields.

Getting Information for Better Management7-16 Keeping Track of Items
5Press <Run>. Make sure the person responsible for purchasing special order
items gets the information on this report.
Printing a List ofBackordered Items
Your purchasing manager needs to keep track of what items arebackordered. Use Report RIO to print a list of backordered items.
If you want to monitor backordered items daily, you can print adaily backorder report by adding RIO to your daily reportqueue. If you enter 999999 in the backorder date created(B/O Date Crtd) From/To fields , your Triad system will usetoday’s date.
To print a list of backordered items, do the following:
1At any menu, type RIO andpress <Enter>.
The initiation screen for the Open Order Item Report displays.
Open Order Item Report Store: 1
Printer (P)
Printing Seq
Trans. Type
Options
Copies
Order/Est #Delivery DateItem LocationSku/ItemB/O Date Crtd
: 1
: D
: _____
: ________
: 1
From:: _______: __/__/__: _____: ____________: __/__/__
To: _______ __/__/__ _____ ____________ __/__/__
ExclusionTrans. Codes: ___ NNNN
2At Trans. Type, type O andpress <Enter>.
3At Options , type B and press<Enter>.
Option B prints items that were backordered in POS.

Getting Information for Better ManagementKeeping Track of Items 7-17
4At B/O Date Crtd From and Tofields, type the dates to whichyou want to restrict this listingand press <Enter>.
If you enter 999999, the report will print all backordered itemsusing today’s date.
5Press <Run>. For detailed information about Report RIO, see the Reports
Manual.

i
Deleting and Purging Transactions
About Deleting and Purging 8-1
Removing Transactions from the OpenOrder File 8-1Transaction Life Cycles 8-2
Basic Sale 8-2Estimates, Open Quotes and Bids 8-2Orders and Special Orders 8-3
Printing a List of ExpiredTransactions 8-4
Reading the Report 8-5
Deleting Transactions 8-6
Protecting a Transaction fromPurging 8-7
Purging Transactions 8-8

ii
Reversing Completed Transactions 8-10

Deleting and Purging TransactionsAbout Deleting and Purging 8-1
Deleting and Purging Transactions
About Deleting and Purging
You can store transactions in your Triad system, which keepstransaction information in the Open Order File. Depending onthe POS software you have, you can store certain types oftransactions. Use the table below to determine whichtransactions you can store in your Triad system.
Transaction CPOSPOS with SpecialOrder/Open Quote POS
Sale as anorder
X X X
Estimate X X
Open Quote X X
Bid X
Order X X
Special Order X X
RemovingTransactions fromthe Open Order File
When an order or special order is shipped and invoiced, it isautomatically removed from the Open Order file. Whenestimates, open quotes and bids expire, they are purged from theOpen Order File the next time you run the purge report (ReportROO with Option X). You should purge the Open Order File atleast once a week so it doesn’t get filled up with uselesstransactions.
You may find it necessary to delete an estimate, open quote orbid before its expiration date. Or you may need to delete anorder or special order that will not be shipped and invoiced.Before you delete a transaction, you should know about its “lifecycle.”

Deleting and Purging Transactions8-2 About Deleting and Purging
Transaction LifeCycles
Each transaction has a life cycle. It helps to understand eachtransaction’s natural life cycle in order to understand how todelete it.
Basic Sale A sale is never stored in your Triad system. When a customerpays for merchandise and takes delivery, the sale is complete.The inventory, cash and customer files are all updatedaccordingly, and that's the end of it.
NOTE: If you save a sale as an order, then it’s stored as anorder, not a sale.
If you need to void a completed sale, create a credit memo tooffset it. For additional information about voiding a sale, pleasesee the tabbed section Credits and Returns in the Clerk's POSProcedures Manual .
Estimates, Open Quotes andBids
Estimates, open quotes and bids require expiration dates whenthey are created. Unless a clerk enters something different, yourTriad system automatically sets the expiration date for the nextday.
When the expiration date has passed, the transaction hasexpired. However, you can still display the expired transaction.If you want, you can reactivate it by changing the expiration date(to do this, please see the Clerk's POS Procedures Manual).Expired estimates, open quotes and bids remain in your OpenOrder File until you purge them with Report ROO.
If you want to cancel an estimate, bid or open quote before itsexpiration date, please see Deleting Transactions in this chapter.

Deleting and Purging TransactionsAbout Deleting and Purging 8-3
BEFORE YOU DELETE OPEN QUOTES
Ask yourself why. If you just want to create another openquote for the same customer, consider adding the newitems to the existing open quote. That works fine if theexpiration date should be the same for all of the items.
Ask yourself for how long. If you just want totemporarily disable the open quote prices, you don’tneed to delete it. Instead, turn the open quote into anestimate. Later, when you’re ready to activate the openquote prices again, turn it back into an open quote.
For additional information about open quotes, please seethe tabbed section Open Quotes in the Clerk's POSProcedures Manual.
If you want to keep an estimate, bid or open quote in your Triadsystem after its expiration date (and prevent it from beingpurged by Report ROO Option X), please see “Protecting aTransaction From Purging” in this chapter.
Orders and Special Orders Orders and special orders are stored in your Triad system untilthey have been completely shipped and completely invoiced.After that, they are just like sales—they update your inventory,cash and accounts receivable, and are no longer stored in yourTriad system.
If you need to void an order or special order after it has beenshipped and invoiced, do a credit memo to offset it. Theprocedure is in the Clerk's POS Procedures Manual.

Deleting and Purging Transactions8-4 Printing a List of Expired Transactions
You may need to cancel an order or special order while it isstored in your Triad system; that is, before it has beencompletely shipped and invoiced. If the order or special orderhas an outstanding deposit, you must first refund the deposit ortell your Triad system you want to keep the forfeited deposit. Todo this, please see the tabbed section Orders and Special Ordersin the Clerk's POS Procedures Manual. After you have disposed ofany outstanding deposit, you can delete the order or specialorder. Then you should purge it immediately by running ReportROO. The Committed Qty field in Function IMUScreen S isn’t updated for the items that were on the order orspecial order until you purge the transaction.
Printing a List of Expired Transactions
Use the following procedure if you want to consider reactivatingany expired transactions.
1At any menu, type ROO andpress <Enter>.
The initiation screen for the Open Order File Report appears.
Multistore users:Type the store number you want this report to print for atStore, or press <Clear Field> to run it for all stores.

Deleting and Purging TransactionsPrinting a List of Expired Transactions 8-5
2At Printing Seq, type C or Oand press <Enter>.
If you want the transactions to print in Customer number order,type C. If you want them to print in estimate number order, type O.
3At Trans Type, type BE andpress <Enter>.
This will print bids, estimates and open quotes only.
4If you want to print all theestimates, open quotes and bidsin the system, leave Optionsblank. If you want to print onlythose that have expired, type Eat Options. Then press <Run>.
When the report finishes printing, look at it carefully to decidewhether to reactivate any of the expired transactions. You canreactivate expired transactions by changing their expiration date.You can also delete any unexpired transactions before theirexpiration date.
To reactivate expired transactions, please see the tabbed sectionEstimates, Quotes, and Bids in the Clerk's POS ProceduresManual. All of the expired transactions will be purged when yourun Report ROO with Option X unless you first reactivate themby changing their expiration date.
To delete any transactions before their expiration date, please seeDeleting Transactions in this chapter.
Reading the Report If you ran the report with Option E, every transaction on thereport has expired.
If you ran the report without Option E, check the EXP-DATEfield for each transaction.

Deleting and Purging Transactions8-6 Deleting Transactions
Deleting Transactions
Use this procedure if you want to delete a transaction before itsexpiration date. Once you have deleted a transaction, you will nolonger be able to display or reactivate it, and it will be purgedthe next time you run Report ROO with Option X.
1Display the transaction youwant to delete.
Please see the tabbed section Looking Things Up in the Clerk'sPOS Procedures Manual.
2Press <Delete> twice. The transaction is deleted. You will not be able to display it
again or reactivate it. If the transaction was:
• an estimate or open quote, it will be purged the next timeyou run Report ROO with Option X
• an order or special order, it will be purged the next time yourun Report ROO, regardless of what options you use
• an order or special order, you should purge it immediately,because the committed quantity isn’t updated in theinventory record for the items that were on the order orspecial order until you purge the transaction

Deleting and Purging TransactionsProtecting a Transaction from Purging 8-7
Protecting a Transaction From Purging
You can mark an estimate or open quote so that Report ROO willnot purge it from your Triad system even after it expires. Youcan mark a bid this way, too, if you first turn it back into anestimate. To change a bid into an estimate, please see the tabbedsection Estimates, Quotes, and Bids in the Clerk's POS ProceduresManual. Use this procedure sparingly, though; otherwise you’llwaste a lot of file space on expired transactions.
To protect a transaction from purging, use the followingprocedure.
1In POS/CPOS, display thetransaction you want to protectfrom purging.
For detailed procedures, please see the tabbed section LookingThings Up in the Clerk's POS Procedures Manual.
2Move the cursor to the Retainfield near the bottom rightcorner of the header screen.
This field appears on estimates, open quotes and bids only.
3Type Y over the N and press<Change>.
The message THIS TRANSACTION HAS BEEN CHANGED displays.
Now this transaction will not be purged when Report ROO isrun with Option X, even if it has expired. It will remain in yourTriad system until you change the Retain field to N again. To dothis, repeat steps 1-3, only type N in the Retain field.

Deleting and Purging Transactions8-8 Purging Transactions
Purging Transactions
You should purge the Open Order File at least once a week.Before you purge the file, you may want to print a list of expiredtransactions, and protect certain ones from purging. Everythingyou purge will print on Report ROO for your records.
To purge expired and deleted transactions from the Open OrderFile, use the following procedure.
1At any menu, type ROO andpress <Enter>.
The initiation screen for the Open Order File Report appears.
Multistore users:At the Store field, type the store number whose transactionsyou want to purge, or press <Clear Field> to purge for allstores.
2At Printing Seq, type C or O,and press <Enter> twice.
If you want the transactions to print and purge in customernumber order, type C. If you want them to print and purge intransaction number order, type O.
You will probably want to leave Trans Type blank so that alldeleted and expired transactions purge. If you want, however ,you can restrict this purge to only estimates and open quotes bytyping E, or to bids only by typing B.

Deleting and Purging TransactionsPurging Transactions 8-9
3At Options, type X. This option prints and purges deleted and expired transactions.
You will probably want to leave the From and To fields at thebottom of the screen blank to purge the entire Open Order File.However, you can type From and To ranges if you have aparticular reason to only purge a certain range.
4Press <Run>. Once the report prints, do the following:
• Make sure no transactions were purged that you wanted tokeep. If you accidentally purged a transaction that you wantto keep, you can recreate it.
• If you expected a transaction to be purged, and it was not,check the Retain field on the transaction's header screen inPOS/CPOS. If a transaction’s Retain field is Y, thetransaction cannot be purged.
• Look for deleted transactions that never should have beencreated in the first place. The ROO Report is an audit trail forkeeping track of what your clerks are doing.
There is no need to keep this report for an extended period.When you are satisfied with it, throw it away.

Deleting and Purging Transactions8-10 Reversing Completed Transactions
Reversing Completed Transactions
Use this procedure to quickly reverse a completed transaction,such as a sale or a credit memo. Using this procedure reversesthe entire transaction without entering in each line itemseparately.
This method uses QuickRecall software. If you are not familiarwith using QuickRecall, refer to the Clerk's POS Manual.
There are two versions of QuickRecall software, Limited andFull. Limited QuickRecall is provided to you at no charge andallows you to reverse a transaction the same day it wascompleted. If you want to reverse transactions that occurredprior to the day they were completed, you need to purchase FullQuickRecall. Contact Triad Direct at 1(800)538-8597 for moreinformation about investing in Full QuickRecall.
To use this feature you need to have security bit 596. Refer toyour Security Guide for more information on adding security bits.For security purposes, Triad recommends you control thenumber of employees who have access to this feature.
Use the following procedure to reverse a completed transaction.
1Display the customer for whomyou want to reverse atransaction.
See the tabbed section, Looking Things Up, in the Clerk's POSManual, if you need help.
You must display the customer number before reversing thetransaction.
2From the Item (SKU) field, press<Home> once.
The Reprint Invoice window displays.
3At Document #, type thedocument number for thetransaction you want to reverse.
If you do not know the document number and you havepurchased Full QuickRecall, press <Home> again to display theQuickRecall Lookup window. Look up the transaction you wantto reverse and put your cursor next to it. Refer to your Clerk'sPOS Manual if you need help.

Deleting and Purging TransactionsReversing Completed Transactions 8-11
4Press <Void>. The Paste Into Current Transaction window displays with the
transaction number listed in the upper left corner of the screen.
You cannot use <Void> to post a reversed transaction if any ofthe following conditions exist:
• The transaction you are posting into is a transfer or creditmemo.
• You don't have security bit 596.
• When reversing a cash transaction, your receipt printer isslaved to the terminal and the Receipt Printer Opt. field inFunction MTR is not EN (print receipt at the end of thetransaction). In this case you will see the message, REVERSALNOT ALLOWED WHEN RECEIPT IS NOT PRINTING AT THE 'END'.
5At Reprice type N and press<Run>.
The Paste Summary window displays, indicating the number ofline items to be reversed. The message, PRESS ANY KEY TOCONTINUE, displays at the bottom of POS Posting screen.
6Press <End> twice. The POS Posting screen displays.
Each line item from the selected transaction displays in theposting section of the screen, along with the pre-tax total. Ifthe item was originally posted as a credit item, then thereversed transaction will post the item as a positive amount. Ifthe item was originally posted as a sale, then the reversedtransaction will post the item as a negative (credit) amount.
7Press <Total>. The total amount of the reversed transaction displays in the
Total field. If you adjusted the sales tax or the trade discount onthe original transaction, you must adjust it on the reversedtransaction now.

Deleting and Purging Transactions8-12 Reversing Completed Transactions
8Enter the total amount to berefunded and press <Enter>. Ifyou are reversing a transactionfor a charge customer, press<Enter> without entering thetotal amount.
Enter the amount as a positive amount. Do not enter a negativesign.
9Press <Clear> or <Invoice> asprompted.
The reversed transaction displays on your End-of-Day reportsas a credit memo (if the original transaction was a sale) or aninvoice (if the original transaction was a credit memo).

i
Interpreting Your End-of-DayReports
About End-of-Day Reports 9-1
Questions You May Have 9-1
Reading Your Price ExceptionReport 9-2
Questions You May Have 9-2
Reading Your Daily InventoryReport 9-5
Questions You May Have 9-5
Reading Your Daily Sales TotalsReport 9-8
Questions You May Have 9-8

ii
Reading Your Daily Journal Report 9-12
Questions You May Have 9-12
Reading Your Check RegisterReport 9-16
Questions You May Have 9-16

10 Interpreting Your End-of-Day Reports1075127 About End-of-Day Reports 9-1
Interpreting Your End-of-DayReports
About End-of-Day Reports
The reports that print in your end-of-day queue contain a lot ofinformation that is vital to your business and your Triad system.This section explains how to read these reports, what to do withthem, and how to correct errors on them.
The end-of-day reports:
• tell you what happened at POS
• tell you what happened in the back office
• update information in your files
To get a complete picture of everything that happened in yourbusiness, you must look at several reports.
Questions You MayHave
How should my end-of-dayreports balance?
Don’t try to balance figures between the various reports unlessthis manual or your Triad representative specifically instructsyou to. The reports cover different information from differentsources, so naturally some of the totals differ. For example,CASH on Report RDJ is not necessarily the same as NET CASHon Report RDS. The figures that should balance are noted on thereports samples in this section.
What if figures that shouldbalance don't?
Do the following:
1. Look at the audit copy of your receipt tape invoices for anystrange transactions. You should look for anything unusual,such as duplicate receipts or invoices, exceptionally largevoids, and so on.

Interpreting Your End-of-Day Reports 109-2 About End-of-Day Reports 1075127
2. Determine if there were any power outages or surges. Thiscan sometimes cause errors.
3. Determine if Off Line POS was used during the day. Anytransactions performed in Off Line POS will not appear onthe end-of-day reports.
4. If you can’t determine what happened or how to correct theproblem, call your local Customer Education Representative(CER).
NOTE: Check with your CER about the availability of theSales Integrity class. In this class, you use case studiesto help you learn how to balance sales totals and proveaccounts receivable totals. You also learn sometroubleshooting techniques to help you identifyproblems and immediately correct them.
Reading Your Price Exception Report
Your Price Exception Report (Report RPE) is a security andprofit margin tool. It alerts you to any items sold at a price otherthan the official price entered in the inventory record. You canprint the information by department, terminal, or clerk.
Questions You MayHave
What is a Price Exception? A price exception occurs when a clerk:
• types over the price that automatically displays at POS andsells an item at another price instead, regardless of whetherthe manually entered price is higher or lower than thesystem price
• gives credit for a returned item for an amount that is not thesame as the current selling price
• sells an item using the <Discount> or <Promo> keys
• places an item on an order at a different price than wasoriginally offered on the bid from which the order wascreated
• sells an item at a price that gives a gross profit percent that ismore or less than the desired gross profit percent
• voids an item from a sale

10 Interpreting Your End-of-Day Reports1075127 Reading Your Price Exception Report 9-3
• returns or exchanges a defective item, even if the creditamount is the same as the current selling price
• gives a trade discount or an immediate terms discount on anentire sale
• changes the pricing code for an individual line item usingthe <Run> key
You can use various options to print different kinds of priceexceptions. Please see the Reports Manual for a completeexplanation of the options available.
Remember that clerks may have legitimate reasons for changingitem prices. For example, an item may have been labelled withthe wrong price.
When you run this report, a copy of the data used in it is storedin a temporary storage place on your Triad system. It remainsthere until the next time you run backups (probably at close ofbusiness tomorrow). If necessary, you can reprint the report byrunning Report RPE with Option R.
Should I make any corrections? This report does not update any information in your files, sothere’s never any need to make any corrections after running it.However, you should follow up on any questionable priceexceptions.
Should I keep this report? You can throw it away when you’re finished looking at it.

Interpreting Your End-of-Day Reports 109-4 Reading Your Price Exception Report 1075127
PRICE EXCEPTION REPORT FOR OPTIONS: PAGE: 1
M TE CLERK QTY ST SYSTEM ACTUAL DES ACT GP PTO DE SKU DESCRIPTION ID CODE JNL/INV# SOLD UM COST PRICE UM PRICE $DIFF GP GP DIF DO
H 34 3M MANUALLY POSTED COST 3 JIM A33361 1 EA 15.00 EA 35.00 35.00 45.00 57.14 12.14L 34 4002 4X8X1/2" GYPSUM WALL 3 JIM A33363 1 EA 5.12 .185 MF .158 -.85 26.60 -.98 -27.58 DI
34 4005 4X8X5/8" FIRE CODE GY 3 JIM A33363 1 EA 6.432 .244 MF .174 -2.25 30.21 -15.26 -45.47 PIKC KITCOMPONENT1 ACTUAL MERCHANDISE UN 3 MARTY A33365 1 EA .69 1.00 EA .86 .86 31.00 .00 69.00 DKC KITCOMPONENT2 ACTUAL MERCHANDISE UN 3 MARTY A33365 2 EA 1.26 2.00 EA 3.45 3.45 37.00 .00 63.00 DK1 KITSUB2 SUB-KIT LEVEL2 3 MARTY A33365 1 EA 52.66 82.99 EA 71.55 71.55 36.55 .00 63.45 DKC SITCOMPONENT3 ACTUAL MERCHANDISE UN 3 MARTY A33365 3 EA 2.19 3.00 EA 7.76 7.76 27.00 .00 73.00 DKC KITCOMPONENT4 ACTUAL MERCHANDISE UN 3 MARTY A33365 4 EA 2.54 4.00 EA 13.79 13.79 36.50 .00 63.50 DK1 KITSUB3 SUB-KIT LEVEL3 3 MARTY A33365 1 EA 35.93 56.50 EA 48.71 48.71 36.41 .00 63.59 DKC KITCOMPONENT5 ACTUAL MERCHANDISE UN 3 MARTY A33365 5 EA 2.41 5.00 EA 21.55 21.55 51.80 .00 48.20 DKC KITCOMPONENT6 ACTUAL MERCHANDISE UN 3 MARTY A33365 6 EA 3.98 6.00 EA 31.04 31.04 33.67 .00 66.33 D
L K1 KITSUB1 SUB-KIT LEVEL1 3 MARTY A33365 1 EA 55.87 89.25 EA 75.86 -13.39 37.40 26.35 -11.04 DL 49 1610CC 1X6X10 T&G D&BTR INLA 3 LOIS 350 1 EA 8.90 13.439 EA 14.00 -.44 33.78 31.53 -2.24L 09 33841 POSTED W/ "SLASH" PRI 3 LOIS 351 3 EA 3.19 5.84 EA 15.00 -2.52 50.85 36.20 -14.65
REPORT TOTALS:
OCCURENCES QUANTITY SOLDSKU COUNT: 31 HIGHER MANUAL OVERRIDE : 1 1 CURR COST EXT : 245.35
LOWER MANUAL OVERRIDE : 5 7 SYS PRICE EXT : 133.97PROMO KEY COUNT : 1 1 ACTUAL PRICE EXT : 348.22DISCOUNT KEY COUNT : 10 25 PRICE EXCEPTION (NET) : 214.26RETURN ITEMS : 0 0 AVG DESIRED G.P. : 38.06DEFECTIVE ITEMS : 0 0 AVG REALIZED G.P. : 71.02EXCHANGE ITEMS : 0 0 NET DIFF (%) : 32.97ORDER COUNT : 0 0
END OF REPORT

10 Interpreting Your End-of-Day Reports1075127 Reading Your Check Register Report 9-5
Reading Your Daily Inventory Report
The Daily Inventory Update Report (Report RDI) tells you howthe day’s POS transactions affected your inventory. It does notinclude anything that took place at any of the back-office terminals.
Questions You MayHave
What Does Option F Do? Running Report RPE with Option F updates:
• each item’s sales history (Function IMU Screen H) to reflectthe day’s sales
• the department records (Function MDE) to reflect the day’ssales
• the class records (Function MCL) to reflect the day’s sales
• the fineline records (Function MFI) to reflect the day’s sales
• each item’s expanded sales and promotion history (FunctionIMU Screen H), if applicable
• the monthly sales recap information (Function MMR) toreflect the day’s sales
When you run this report, a copy of the data used in it is storedin a temporary storage place on your Triad system. It remainsthere until the next time you run backups (probably at close ofbusiness tomorrow). If necessary, you can reprint the report byrunning Report RDI with Option R.
Should I make any corrections? Yes. If you find something wrong on this report, you shouldcorrect the information affected by the error. Your local CER cangive you more complete guidance on what corrections you needto make and how to do them.
Should I keep this report? Yes. When you have finished looking at this report, you shouldfile it and keep it for at least a year, or as long as your accountantrecommends.

Interpreting Your End-of-Day Reports 109-6 Reading Your Check Register Report 1075127
PRELIMINARY PAGE FOR DAILY INVENTORY UPDATE REPORT (RDI) FOR
DATE OF REQUEST :TIME OF REQUEST : 11:50:55TERMINAL ID : 02USER ID : OSCAR
REPORT INITIATION CHOICES
REPORT ON STORE : 1 REPORT OPTIONS:OPTIONS : S D=DOUBLE SPACESORT OPTIONS : T F=FINAL RUN (DELETE FILES)COPIES : 01 J=SUPPRESS PRE-PAGEPRINTER : 01 P=PRINT UPDATE DETAIL
S=SUBTOTALS T=TOTALS R=REPRINT PREVIOUS REPORT
--------------- CODES ---------------Z TRANSFER STATUST TRANSACTION TYPEC TRANSACTION CODEX TAXABLE INDICATORQ QUANTITY PRICE INDICATOR SORT OPTIONS:I MANUAL OVERRIDE INDICATOR C=STORE/CLERK/DEPTD D=DISC, P=PROMO, S=PROMO-SUBSYSTEM, D=STORE/DEPT/PART
O=OPEN QUOTE, *=NON-DISC T=STORE/TERMINAL/DOC #S SPECIAL RECORD INDICATORK KIT COMPONENTI ITEM TRADE DISCOUNTED
---TRANSACTION TYPES ---D RETURN OF DEFECTIVE ITEMU INVOICE SALE (NORMAL SALE)R RETURNED ITEMX EXCHANGE DEFECTIVE ITEM
NOTE ON TOTALS:POS MARKDOWNS/MARKUPS AND GROSS PROFIT DOLLARS AND PERCENT ARE ONLY CALCULATED FOR ITEMS WITH PRICES ON FILE.MARKUPS WILL SHOW AS A POSITIVE NUMBER.MARKDOWNS WILL SHOW AS A NEGATIVE NUMBER.

10 Interpreting Your End-of-Day Reports1075127 Reading Your Check Register Report 9-7
See the code key onthe prepage of the report.
DAILY INVENTORY UPDATE REPORT FOR OPTIONS:S PAGE: 3
QTY EXTENDED—PRICES ACTUAL DESIRED CODESDE ITEM DESCRIPTION JNL# INV# SOLD ACTUAL SYSTEM COST GP% GP% ZTCXQODSKI CLERK TE
50 17187 RO-1PITCH, HORSESHOE SETA33371 350 1 24.95 24.95 13.30 46.69 46.69 I N N LOIS 0349 1610CC 1X6X10 T&G D&BTR INLAND A33371 350 1 13.00 13.439 8.90 31.54 33.78 I NSL N LOIS 03
09 33841 POSTED W/ "SLASH" PRICINA33372 351 3 15.00 17.52 9.57 36.20 50.85 I Y/L N LOIS 0320 16502 808-29 16 GAL WET/DRY VAA33372 351 1 89.99 99.99 65.96 26.70 34.03 I Y LS N LOIS 03
2A 12160 98661 1/2 PT.ENGINE OIL A33375 352 12 11.11 13.08 7.44 33.03 43.12 I N LQ N LOIS 03
2A 14654 11067 R.V. MIRROR ADHESIVA33376 1 2.79 2.79 1.54 44.80 44.80 I Y N LOIS 032A 21346 GEC54W 3OZ. GLASS SEAL A33376 1 2.99 2.99 2.00 33.11 33.11 I Y N LOIS 032A 31767 24399 32/1 ENGINE OIL A33376 1 1.09 1.09 .68 37.61 37.61 I Y N LOIS 03
REPORT TOTALS :QUANTITY SOLD : 139NET SALES : 1,724.26AVERAGE $ PER UNIT : 12.40TOTAL COST : 1,147.11POS MARKDOWNS/MARKUPS : 1.51GROSS PROFIT DOLLARS : 577.15GROSS PROFIT PERCENT : 33.47
END OF REPORT.
Check for items sold under department SKUsthat should have been sold under their own SKUnumber. The clerk should have typed a completedescription of the item. Check the shelf to makesure such items are properly labeled.
Create a Credit Memo to return the departmentSKU, then resell the item under its own SKUnumber. This is necessary in order to keep yourquantities and sales history correct. Make sureyour clerks understand how important it is to sellitems by their SKU numbers.
Spot check for major discrepancies actualand desired GP%.
Equals Net Totals on first page ofReport RDS.
You may wish to post this figure to yourGeneral Ledger as Cost of Goods Sold. Youraccountant can help you determine if thisis appropriate, depending on whether youuse LIFO or FIFO.
If this is a negative number, it probably meansthere is something wrong in some items'inventory records. Possible problems includeincorrect cost, selling price or conversionfactors in Function IMU. Find the items withnegative GP%s in the line detail. Then checkthe inventory records for those items. Correctthe items in Function IMU if necessary. Thencorrect Functions MDE, MCL and MFI ifnecessary. Your CCI/Triad representative canguide you.

Interpreting Your End-of-Day Reports 109-8 Reading Your Daily Sales Totals Report 1075127
Reading Your Daily Sales Totals Report
Your Daily Sales Totals Report (Report RDS) tells you how theday’s POS transactions affected your sales figures. It does notinclude anything that took place at any of the back-office terminals.
If you use Option T (Totals only), the three pages in thefollowing report sample print, which summarizes the store’sperformance as a whole.
If you don’t use Option T, then three pages like those in thereport sample print for each clerk or terminal, and the storesummary pages print at the end of the report.
Questions You MayHave
What Does Option F Do? Running Report RDS with Option F updates the monthly salesinformation.
When you run this report, a copy of the data used in it is storedin a temporary storage place on your Triad system. It remainsthere until the next time you run backups (probably at close ofbusiness tomorrow). If necessary, you can reprint the report byrunning Report RDS with Option R.
Should I make any corrections? Yes. If you find something wrong on this report, you shouldcorrect the information affected by the error. Do the following:
1. Look at the detail pages. You printed the report by clerk orterminal, so you should be able to determine which clerk orterminal is in question.
2. You must correct the information in Function MMR.
Your local CER can give you more complete guidance on whatcorrections you need to make and how to do them.
Should I keep this report? Yes. When you have finished looking at this report, you shouldfile it and keep it for a month, or as long as your accountantrecommends. If a trend of cash shortages develops, these reportscould help you determine when they began, and whichterminals or clerks are responsible.

10 Interpreting Your End-of-Day Reports1075127 Reading Your Daily Sales Totals Report 9-9
DEPARTMENT TOTALS STORE: 1 (RDS) OPTIONS: FT PAGE: 2
DEPT STORE NAME SALES CREDITS DISCOUNTS NET % TOTAL SALES
02 1 OUTDOOR LIVING 49.45 49.45 2.58%03 1 PAINT & SUNDRIES 21.11 1.14 19.97 1.10%05 1 HARDWARE & FASTENERS 15.32 1.54 13.78 0.80%06 1 LAWN & GARDEN 12.62 1.26 11.36 0.66%08 1 ELECTRICAL 7.98 18.00 -1.41 -8.61 0.42%09 1 PLUMBING 15.00 15.00 0.78%20 1 HOUSEWARES/GIFTS 122.15 0.85 121.30 6.37%29 1 ANDERSEN WINDOWS AND DOORS 44.97 44.97 2.35%2A 1 AUTOMOTIVE 17.98 17.98 0.94%33 1 ROOFING 11.99 11.99 0.63%34 1 BUILDING MAT. 24.12 3.63 20.49 1.26%35 1 POWER TOOLS & ACCESSORIES 4.95 0.25 4.70 0.26%36 1 INSULATION 10.49 10.49 0.55%37 1 MILLWORK 32.69 16.52 16.17 1.71%3M 1 METAL PRODUCTS 35.00 35.00 1.83%40 1 DOORS & MISC KITS 809.99 809.99 42.25%41 1 SPECIAL ORDERS 31.25 31.25 1.63%43 1 FIR 265.93 119.80 11.98 134.15 13.87%49 1 CEDAR 13.00 13.00 0.68%50 1 SPORTING GOODS 38.53 38.53 2.01%9H 1 HEATING 31.43 5.98 25.45 1.64%K 1 KIT HEADER TOP LEVEL ONLY 211.99 211.99 11.06%K1 1 KIT HEADERS MID LEVELS ONLY 89.25 13.39 75.86 4.66%
* * * TOTALS * * * 1917.19 160.30 32.63 1724.26 100.00%
SALES TAX 66.47
* * * * TOTAL SALES * * * * 1790.73
These are manual andautomatic trade discounts,manual item discounts,and immediate termsdiscounts. Deferred termsdiscounts are not included,which is why it does notequal the discounts onReport RDJ.
Check to see how eachdepartment contributes tototal sales. Spot check fortrends, major deviationsfrom your usual pattern,and effectiveness ofadvertising or promotions.
If you have a single store system,this equals Sales Tax on the lastpage of Report RDS. If you have amultistore system, this is this store'scontribution to the Sales Tax on thelast page of Report RDS.
If you have a single store system, thisequals Total Sales on the last page ofReport RDS. If you have a multistoresystem, this is this store's contributionto the Total Sales on the last page ofReport RDS.
This equals Net Sales on Report RDI,and Net Sales on the last page ofReport RDS. This does not equal TotalSales on the last page ofReport RDS.

Interpreting Your End-of-Day Reports 109-10 Reading Your Daily Sales Totals Report 1075127
SALES TOTALS STORE: 1 (RDS) OPTIONS: FT PAGE: 3
C A S H B A L A N C I N G W O R K S H E E T DATE:
SYSTEM ACTUAL DIFFERENCE AUTHORIZATION
BEGINNING CASH .CASH TENDERED 347.70
LESS CHANGE 3.83
TOTAL CASH IN 343.87
LESS PAID OUTS 45.61
LESS CASH REFUNDS .00
LESS CHECKS CASHED 50.00
TOTAL CASH OUT 95.61
NET CASH 248.26 NET CASH 248 . 26
ENDING CASH .
CASH IN DRAWER .
OVER/SHORT .
LESS: BEGINNING CASH .
CASH DEPOSIT .
CHECKS 401.53 ( 5) CHECKS IN DRAWER . . .
BANK DEPOSIT .
BANKCARDS—VISA 850.49 ( 1) BANKCARDS — VISA . . .
MASTERCARD .00 ( 0) MASTERCARD . . .
OTHER 109.52 ( 1) OTHER . . .
TOTAL BANKCARDS 960.01 ( 2) TOTAL BANKCARDS . . .
SERVICE CHARGE .
BANKCARD DEPOSIT .
If you want, you can use this page to balancecash drawers. To see how to use thisworksheet, please see "Checking CashDrawers from a Cash Balancing Worksheet" inthe tabbed section Security and Control.

10 Interpreting Your End-of-Day Reports1075127 Reading Your Daily Sales Totals Report 9-11
SALES TOTALS STORE: 1 (RDS) OPTIONS: FT PAGE: 4
* * TRANSACTIONS TOTALS * * ** TRANSACTIONS PER HOUR **
$ # $ #
CASH SALES 143.87 8 09:00 09:59 47.38 3CHECK SALES 47.70 1 10:00 10:59 1016.75 17BANKCARD SALES 960.01 2 11:00 11:59 680.99 10CHARGE SALES 790.76 10REFUNDS & RETURNS - CASH .00 0REFUNDS & RETURNS - CHECK .00 0REFUNDS & RETURNS - BANKCARDS .00 0CREDIT & RETURNS - CHARGE 151.61 3DEPOSITS NOW SALES .00
TOTAL SALES 1,790.73 24
TRANSFERS W/O AYMENT .00
* * SALES TOTALS * * $
TAXABLE MERCHANDISE 1,341.02LESS: TAXABLE MERCH DISC 20.65NON-TAXABLE MERCHANDISE 415.87LESS: NON-TAXABLE MERCH DISC 11.98
NET SALES 1,724.26SALES TAX 66.47
TOTAL SALES 1,790.73
TRANSFERRED MERCHANDISE .00LESS: TRANS MERCH DISC .00NON MERCHANDISE 31.25
ORDERS CREATED 94.01 2 * * PAID OUTS ** $ #ORDER DEPOSITS TAKEN 20.00 1 1 A MAXIMUM OF NINE DI 2.5 1ORDER DEP RETURNED .00 0 2 PAID-OUT REASONS ARE 5 1COD CREATED .00 0 3 CALL YOUR LOCAL TRIA 3.11 1COD PAYMENTS .00 0 4 SET-UP OR CHANGE THE 10 1TRANS CREATED .00 0 5 MESSAGES :: CURRENTL 25 1
GROSS RECEIPTS 507.73 6LESS: DISCOUNTS 3.50 2
TOTAL R. O. A. 503.83
$ #SALES VOIDED 77.00 2 AVERAGE DOLLARS (RETAIL) / CUSTOMER - CASH = 17.98CREDIT MEMOS VOIDED .00 AVERAGE DOLLARS (RETAIL) / CUSTOMER - CHECK = 47.70R. O. A.'S VOIDED .00 AVERAGE DOLLARS (RETAIL) / CUSTOMER - BANKCARD = 480.00SALE ITEMS VOIDED 14.84 2 AVERAGE DOLLARS (RETAIL) / CUSTOMER - CHARGE = 49.16CREDIT ITEMS VOIDED .00 AVERAGE DOLLARS (RETAIL) / CUSTOMER - ALL = 74.61
TOTAL VOIDED 91.84 4 NUMBER OF TIMES CASH DRAWER OPENED = 1END OF REPORT
Helps you schedule clerk time.
Equals Total Sales on theDepartment Totals page ofReport RDS.
Check how active you are inOrders/Special Orders.
Post to your General Ledger.
At POS only! This does notinclude back-office ROAs.
Check for unusual activity.It might indicate inadequateclerk training, or fraud.
Useful for trend analysis. Using the <No Sale> key.

Interpreting Your End-of-Day Reports 109-12 Reading Your Daily Journal Report 1075127
Reading Your Daily Journal Report
Your Daily Journal Report (Report RDJ) tells you how the day’sPOS and back-office transactions affected your business.Although you can limit this report to back-office transactionsonly (Option B) or POS transactions only (Option O), you shouldnot use them when you run Report RDJ with Option F.
Questions You MayHave
What Does Option F Do? Running Report RDJ with Option F does the following:
• finalizes back-office transactions(Functions MOI and ROA)
• updates the tax file (Function MTX) with today’s sales taxinformation
• updates the salesperson records (Function MSL) withtoday’s sales information
• passes off the Net Change to Accounts information into thegeneral ledger (Function GGMU), if applicable
When you run this report, a copy of the data used in it is storedin a temporary storage place on your Triad system. It remainsthere until the next time you run backups (probably at close ofbusiness tomorrow). If necessary, you can reprint the report byrunning Report RDJ with Option R.
Should I make any corrections? Yes. If you find something wrong on this report, you shouldcorrect the information affected by the error.
Your local CER can give you more complete guidance on whatcorrections you need to make and how to do them.
Should I keep this report? Yes. When you have finished looking at this report, you shouldfile it and keep it for as long as your accountant recommends.

10 Interpreting Your End-of-Day Reports1075127 Reading Your Daily Journal Report 9-13
A/R DAILY JOURNAL REPORT (RDJ) FOR OPTIONS: FX 12:41:23 PAGE: 1
DOC # CUST-# JOB DOC-DATE DUE DATE CODES TOTAL TX-MERCH TX-NON-MERCH FREIGHT TAX GP % DISCOUNT PAYMENT T S B APP-TO ACCOUNT NAME REFERENCE N/T-MERCH N/T-NON-MRCH LABOR TAX CODE SALESPN ALLOWNACE CHECK#
333 4750 06/01/90 07/28/90 29.76 28.34 0.00 0.00 1.42 40.47 0.60 I 1 GEORGE GRANGER 0.00 0.00 0.00 1 JF
335 5000 06/01/90 06/01/90 ( 5.98) 0.00 0.00 0.00 0.00 53.18 0.12 C 1 HEMLOCK MOMES APP# 009734 5.98 0.00 0.00 0 JF
336 1001 06/01/90 06/28/90 20.70 14.00 0.00 0.00 0.70 32.35 0.00 I 1 CANDYMAN INC. PO # 22408 0.00 6.00 0.00 1 JF
337 2500 06/01/90 06/01/90 ( 2.49) 2.37 0.00 0.00 0.12 100.00 0.13 C 1 ADVANCE MACHINE WORKS STATED AS CHARGE 0.00 0.00 0.00 1 MS
338 9958 06/02/90 06/22/90 153.00 3.00 150.00 P 1 TOMS ELECTRICAL SERVICE 0.00 338
339 8000 805 06/02/90 06/22/90 73.28 68.79 0.00 0.00 3.49 20.03 2.67 I 1 VALLEY VIEW DEVELOPMEN PO # 5602 0.00 0.00 0.00 1 OW
340 0 06/02/90 07/28/90 16.02 15.26 0.00 0.00 0.76 45.09 0.00 I 1 LOIS BURNS 0.00 0.00 0.00 EMP
343 1002 06/03/90 06/28/90 20.00 0.00 0.00 0.00 0.00 100.00 0.00 I 1 BOB JOHNSON PAINTING C SELECTED TERMS CO 20.00 0.00 0.00 1
344 5000 06/03/90 07/28/90 211.99 0.00 0.00 0.00 0.00 32.44 4.24 I 1 REMLOCK HOMES 211.99 0.00 0.00 0 JF
345 6000 06/03/90 06/23/90 143.14 136.32 0.00 0.00 6.82 37.59 7.16 P 1 GERRY & SON PAINTERS 0.00 0.00 0.00 1 JF
346 9000 06/03/90 06/03/90 50.50 0.50 50.00 P 1 DECORATING TOUCH 0.00 346
347 1074 06/03/90 06/03/90 50.28 0.00 50.28 C 1 345 STRAWBERRY LANE APARTM 0.00 1420
348 6000 06/04/90 06/23/90 ( 143.14) 136.32 0.00 0.00 6.82 37.59 7.16 I 1 GERRY & SON PAINTERS CHARGE TO WRONG A 0.00 0.00 0.00 1 BK
349 4000 06/04/90 06/24/90 123.99 0.00 0.00 0.00 0.00 31.38 6.20 I 1 JIM ABERNATHY GEN. CON RESEL TO CORRECT 123.99 0.00 0.00 0 BK
350 4500 06/04/90 06/24/90 50.53 0.00 0.00 0.00 0.00 42.43 2.53 I 1 KISSMEN CONSTRUCTION 50.53 0.00 0.00 0 BK
351 1002 06/04/90 06/28/90 110.24 104.99 0.00 0.00 5.25 28.06 0.00 I 1 BOB JOHNSON PAINTING C PO # 6552 0.00 0.00 0.00 1 MS
352 9550 06/04/90 06/28/90 11.11 0.00 0.00 0.00 0.00 33.03 0.00 I 1 STATE HIGHWAY DEPT. PO # 1388 11.11 0.00 0.00 GVT BK
A33337 4700 06/01/90 06/28/90 110.50 0.00 110.50 P 1 297 CONTRACTOR LICENSE SCH APPLIED TO POS 0.00 2354
A33338 4700 06/01/90 05/28/90 89.50 0.00 89.50 P 1 213 CONTRACTOR LICENSE SCH APPLIED TO POS 0.00 2354
Two lines of information foreach transaction.
Terms discount only. This isthe terms discount that will beearned if the customer payson time.

Interpreting Your End-of-Day Reports 109-14 Reading Your Daily Journal Report 1075127
CASH TOTALS FOR STORE 1 Page: 3
CUST-# TOTAL TX-MERCH N/T-MERCH TX-NON-MERCH FREIGHT LABOR TAX
#5 DEBITS 1055.09 989.89 0.00 0.00 10.25 5.00 49.95CREDITS: 0.00 0.00 0.00 0.00 0.00 0.00 0.00
NET: 1055.09 989.89 0.00 0.00 10.25 5.00 49.95
#9 DEBITS 47.70 35.00 0.00 0.00 10.00 0.00 2.70CREDITS: 0.00 0.00 0.00 0.00 0.00 0.00 0.00
NET: 47.70 35.00 0.00 0.00 10.00 0.00 2.70
CHARGE DEBITS 48.79 46.47 0.00 0.00 0.00 0.00 2.32CREDITS: 0.00 0.00 0.00 0.00 0.00 0.00 0.00
NET: 48.79 46.47 0.00 0.00 0.00 0.00 2.32
TOTALS: 1151.58 1071.36 0.00 0.00 20.25 5.00 54.97
These are cash, check andbankcard totals only!

10 Interpreting Your End-of-Day Reports1075127 Reading Your Daily Journal Report 9-15
TOTALS FOR STORE 1 PAGE: 4ACCOUNT NAME ACCOUNT DEBIT CREDIT SALES TAX SUMMARY
TAX TAX TAX SLS
INVOICES ( 23):CODE N/T SLS
001 10.74 214.75CASH 3000-000 1151.58 LOCAL AREA CHARGE CUSTOMERS * 26.00ACCOUNTS RECEIVABLE 1000-000 810.76 000 2.32 46.47TAXABLE MERCHANDISE 8000-000 1440.06 RESALE ACCT'S:RESALE# REQUIRED 380.53NON-TAX MERCHANDISE 9000-000 417.62 EMP 0.76 15.26TAXABLE NON-MERCH 1100-000 0.00 EMPLOYEE ACCTS #0 -> #100 ONLY 0.00NON-TAX NON-MERCH 1200-000 6.00 GVT 0.00 0.00TAXABLE FREIGHT 1500-000 20.25 GOVT ACCTS MCR TAXABLE = N ONLY * 11.11NON TAXABLE FREIGHT 1600-000 0.00 CSH 49.95 1005.14TAXABLE LABOR 1300-000 5.00 CASH CUSTOMERS #1 -> #9 ONLY 0.00NON TAXABLE LABOR 1400-000 0.00 XXX 2.70 45.00TAX 5000-000 73.41 OUT OF COUNTY SALES 6.5% RATE 0.00
CREDIT MEMOS ( 3):
CASH 3000-000 0.00ACCOUNTS RECEIVABLE 1000-000 151.61TAXABLE MERCHANDISE 8000-000 138.69NON-TAX MERCHANDISE 9000-000 5.98TAXABLE NON-MERCH 1100-000 0.00NON-TAX NON-MERCH 1200-000 0.00TAXABLE FREIGHT 1500-000 0.00NON TAXABLE FREIGHT 1600-000 0.00TAXABLE LABOR 1300-000 0.00NON TAXABLE LABOR 1400-000 0.00TAX 5000-000 6.94
PAYMENTS ( 7):
CASH 3000-000 503.83ACCOUNTS RECEIVABLE 1000-000 507.33TERM DISCOUNTS 2000-000 3.50ALLOWANCE 6000-000 0.00
FINANCE CHARGES ( 0):
ACCOUNTS RECEIVABLE 1000-000 0.00FINANCE CHARGES 4000-000 0.00
NET CHANGE TO ACCOUNTS:
CASH 3000-000 1655.41ACCOUNTS RECEIVABLE 1000-000 151.82TAXABLE MERCHANDISE 8000-000 1301.37NON-TAX MERCHANDISE 9000-000 411.64TAXABLE NON-MERCH 1100-000 0.00NON-TAX NON-MERCH 1200-000 6.00TAXABLE FREIGHT 1500-000 20.25NON TAXABLE FREIGHT 1600-00 0.00TAXABLE LABOR 1300-000 5.00NON TAXABLE LABOR 1400-000 0.00TAX 5000-000 66.47TERMS DISCOUNTS 2000-000 3.50ALLOWANCE 6000-000 0.00FINANCE CHARGES 4000-000 0.00
END OF REPORT (RDJ)
Automatically posted to Function MTX.
}
} Includes tax.
Includes tax.
POS and back-office ROAs.
If you don't use automatic pass-off,post these amounts to General Ledger.If you do not use automatic pass-off,these amounts are automaticallyposted to General Ledger.

Interpreting Your End-of-Day Reports 109-16 Reading Your Check Register Report 1075127
Reading Your Check Register Report
The Check Register Report (RCK) lists all bankcards and checksentered at POS. Also, if you enter checks with their ABANumbers in the back office through Function ROA, the systemwill include them on Report RCK.
Questions You MayHave
What Does Option F Do?
When you run this report, a copy of the data used in it is storedin a temporary storage place on your Triad system. It remainsthere until the next time you run backups (probably at close ofbusiness tomorrow). If necessary, you can reprint the report byrunning Report RCK with Option R.
Should I make any corrections? This report does not update any information in your files, sothere’s never any need to make any corrections after running it.
Should I keep this report? You may want to use this report as a deposit slip of checks andbankcards for the bank. Printing this report will eliminate thetask of reposting checks on deposit slips.
If you don’t use this report as a bank deposit document, you canthrow it away when you’re finished looking at it.

10 Interpreting Your End-of-Day Reports1075127 Reading Your Check Register Report 9-17
REPORTS MANUAL: SHORT NAME MSR REPORTS MANUAL: SHORT NAME MSRMSR ADDRESS LINE #1 _________________/ MSR ADDRESS LINE #1 _________________/MSR ADDRESS LINE #2 _________________/ MSR ADDRESS LINE #2 _________________/MSR ADDRESS LINE #3 _________________/ MSR ADDRESS LINE #3 _________________/
CHECKING 'NAME' IN MSR # CREDIT CARD NAME IN MSR #CHECKING ACNT# OR CARD ACCNT#
ABA # CHECK NO. AMOUNT BANKCARD NO. AMOUNT
2354 200.00 11128765443 109.521254 53.55
112/478 7696 47.70 OTHER ( 1) 109.52123/877 1420 50.28123/11 11447 50.00 4213564587666615 850.49
TOTAL ( 5) 401.53 VISA ( 1) 850.49
TOTAL ( 2) 960.01
SERVICE CHARGE ________.____
NET DEPOSIT ________.____

Manager’s POS Procedures ManualIndex I-1
IndexAadding
passwords 2-12security 3-15short descriptions 5-4 to 5-5
address lineschanging 6-5
assigningjournal numbers 3-10
audit linechanging 6-3
Bbackorders
printing a list 7-16 to 7-17balancing
cash drawer 4-12 to 4-15end-of-day reports 9-1, 9-7, 9-9, 9-11
bankcardschanging what prints on endorsement 6-3endorsing 6-3
basic salelife cycle 8-2
bidslife cycle 8-2deleting 8-6purging 8-8 to 8-9printing a list of over-volume bids 7-4
Ccash balancing worksheet
how to use 4-13sample 4-16
cashier see clerkschanging
address lines 6-5audit line 6-3clerk capabilities 6-3message lines 6-4paid outs 3-14prices to use 6-4security 6-6short descriptions 5-5 to 5-6store records 3-12 to 3-13store-wide constants 3-3 to 3-8terminal constants 3-9 to 3-10
changing (cont.)what prints where 6-5 to 6-6
Check Register Reportquestions and answers 9-16sample report 9-17
checking cash drawersfrom a cash balancing worksheet 4-13 to
4-15from a terminal 4-12 to 4-13
clerksadding passwords 2-12adding security 3-15changing capabilities 6-3training 2-5 to 2-8, 3-16
Clerk’s POS Procedures Manualreference 3-13, 7-4, 7-10, 7-12, 8-5, 8-7
constantssetting up store-wide 3-2 to 3-8setting up terminal 3-9 to 3-10
conventions used in this manual 1-3 to 1-4credit limits
discontinuing 2-13exceeding 2-13
credit memosreversing 8-10 to 8-12
DDaily Inventory Report
questions and answers 9-5sample report 9-6 to 9-7
Daily Journal Reportquestions and answers 9-12sample report 9-13 to 9-15
Daily Sales Totals Reportquestions and answers 9-8sample report 9-9 to 9-11
DCDdisplaying 4-12
defective goodsexchanging 2-13returning 2-13printing a list 7-13 to 7-14
deletingpaid outs 3-13transactions 8-1, 8-6

Manager’s POS Procedures ManualI-2 Index
discountssetting up terms 2-11setting up trade 2-11
displayingDCD 4-12MIV 3-3, 3-6, 3-7MSD 5-5MSR 3-12MTR 3-9, 4-5, 4-7, 5-10PDO 3-14short descriptions 5-5 to 5-6
Eend-of-day reports
Check Register Report 9-16 to 9-17Daily Inventory Report 9-5 to 9-7Daily Journal Report 9-12 to 9-15Daily Sales Totals Report 9-8 to 9-11Price Exception Report 9-2 to 9-4questions and answers 9-1 to 9-2
endorsingbankcards 6-3
estimatesdeleting 8-6life cycle 8-2purging 8-8 to 8-9
FFull QuickRecall
when reversing transactions 8-10Functions Manual
reference 3-5 to 3-7, 4-12, 5-6, 7-14
Hhelp 1-4
Jjob accounts
defining 2-11journal numbers
assigning 3-10
Llearning
how to use point-of-sale 2-4 to 2-5, 2-8
MMIV
Screen 1changing information on 3-3 to 3-6
MIV (cont.)displaying 3-3
Screen 2changing information on 3-6 to 3-7displaying 3-6
Screen 3changing information on 3-7 to 3-8displaying 3-7
MQKsetting up 5-12
MSDsee also short descriptionsdisplaying 5-5how to use 5-3 to 5-4
MSRchanging 3-12 to 3-13displaying 3-12
MTRchanging 3-9 to 3-10displaying 3-9, 4-5, 4-7, 5-10
MUR 2-12
Nopen quotes
creating 2-11printing a list 7-3
ordersdeleting 8-6life cycle 8-3 to 8-4printing uninvoiced orders list 7-10 to 7-12printing outstanding deposits 7-8 to 7-10purging 8-8 to 8-9
Ppaid outs
see also PDOchanging 3-14defining 3-13deleting 3-13
passwordsadding 2-11
PDOsee also paid outsdisplaying 3-14
pick ticketsbatch printing 7-6 to 7-8
Point-of-Salelearning how to use 2-4 to 2-5, 2-8making changes to 6-1 to 6-7
procedural 6-2checks and bankcards 6-3clerk capabilities 6-3

Manager’s POS Procedures ManualIndex I-3
Point-of-Sale (cont.)message lines 6-4prices to use 6-4what prints where 6-5 to 6-6security 6-6miscellaneous 6-7
manuals 2-4 to 2-5packages 2-1 to 2-3preparing for live POS 3-2questions and answers 2-11setting up 3-1transactions 2-9 to 2-10
POS Quick Referencereference 5-10, 5-11
Price Exception Reportquestions and answers 9-2 to 9-3sample report 9-4
printingbackorder list 7-16 to 7-17defective goods list 7-13 to 7-14expired transactions list 8-4 to 8-5open quote list 7-3outstanding deposits 7-8 to 7-10over-volume bid list 7-4pick tickets 7-6 to 7-8uninvoiced orders list 7-10 to 7-12
Purchasing and Receiving Manualreference 7-14
purgingtransactions 8-8 to 8-9
QQuickRecall
security 5-11setting up 5-11 to 5-12overview 5-11
QuickViewcreating short descriptions 5-1 to 5-3overview 5-1setting up 5-2 to 5-10
RRCK
questions and answers 9-16sample report 9-17
RDIquestions and answers 9-5sample report 9-6 to 9-7
RDJquestions and answers 9-12sample report 9-13 to 9-15
RDShow to use 4-13 to 4-15questions and answers 9-8sample report 9-9 to 9-11
Reports Manualreference 4-9 to 4-10, 7-2, 7-14
reversing transactions 8-10 to 8-12security bits 8-10, 8-11
RIOhow to use 7-7 to 7-8
ROOhow to use 7-1 to 7-6, 7-9 to 7-12, 7-15 to 7-16,
8-4 to 8-5, 8-8RPE
how to use 4-10 to 4-11, 7-13 to 7-14questions and answers 4-9 to 4-10, 9-2 to 9-3sample report 9-4
Ssale
reversing 8-10 to 8-12salesperson
tracking productivity 2-12SDUTL
how to use 5-5 to 5-8security
changing 6-6POS bits 4-2 to 4-4setting up 4-1
Security Guidereference 3-15
setting up special inventory records 3-14Sierra Workstations
terminal numbers 3-10short descriptions
see also MSD SDUTLadding 5-4 to 5-5changing 5-5 to 5-6creating 5-1 to 5-3displaying 5-5 to 5-6
special ordersdeleting 8-6life cycle 8-3 to 8-4printing outstanding deposits 7-8 to 7-10printing outstanding items 7-14 to 7-16purging 8-8 to 8-9

Manager’s POS Procedures ManualI-4 Index
Tterminal
logging on 3-13quitting 3-13
terminal numbers 33-10training
clerks 2-5 to 2-8, 3-16managers 2-4 to 2-5materials 2-4 to 2-5
training modeentering 4-5 to 4-7exiting 4-7 to 4-8overview 4-4questions and answers 4-5
transactionsdeleting 8-1, 8-6life cycles 8-2 to 8-4purging 8-1, 8-8printing expired transactions list 8-4 to 8-5protecting them from purging 8-7removing from Open Order File 8-1reversing 8-10 to 8-12