making a double blade or kayak paddle · pdf filemaking a double blade or kayak paddle by sam...
TRANSCRIPT

Making a Double Blade or Kayak PaddleBy Sam Rizzetta
This is a photo series on making a foam core carbon composite touring paddle for my Wasp solo canoe and includes procedures that can aid you in building or designing a sophisticated ultra-light paddle. Please note that this is not a complete how-to-do-it description in that it does not contain plans, diagrams, or basic information on laminating fabrics and resins. All that can be found in my book Canoe and Kayak Building the Light and Easy Way. The information here is an expansion of the paddle making chapter and can be used in conjunction with the book. The additional photos and details here help illuminate the process and avoid pitfalls. This method produces the advanced composites features I desire such as buoyant blades, ultra light weight, strength, durability, safety, and ease of use. There is more on design features on the last two pages.
For the shaft a wood blank is sawn with cross-sectional dimensions of 3.5 cm (1-3/8”) by 2.5 cm (1”) and equal to the length of the paddle which, for this Wasp paddle, equals 215 cm (84.5”). The 3.5 cm dimension will be at right angles to the blade face. The shaft will be reinforced with a carbon cloth sleeve, so I’ve chosen a very light weight piece of western red cedar. For a simpler project you might choose to use only wood for the shaft, in which case a stronger and harder wood must be used. Spruce has the best strength to weight ratio. Douglas fir is a close second and is stronger but heavier. Soft maple is harder but strong and does not dent as easily as spruce or fir. Whatever wood you select must be perfectly clear and straight grained.
1

Figure 1. A cedar blank is planed to an oval cross section with a small block plane.
Figure 2. Plywood forms were made to insure correct blade dihedral for the foam core. See also Figure 3. Blade size and shape are planned first. Read more on this at Figure 8.
Rigid polyurethane foam, available from aircraftspruce.com, is used for cores because it can be carved easily with knives, smoothes well with sand paper, and is inexpensive. Do
2

not use Styrofoam. The easiest way to make foam core blades is to glue 2” rigid polyurethane foam to the wide sides of the shaft blank and then carve the blade face dihedral. However, I wanted to use 1/2” foam I had on hand, so I made plywood forms to hold the thinner foam at the proper angles. Each side angles up toward the shaft at 8º. Total dihedral will be 16º. In the blade area, the cedar shaft is tapered side to side, and the last 15 cm toward the tip is tapered from the back toward the power face or front. For an easier and faster project you could make blades with a flat power face and no dihedral. Dihedral can reduce the possibility of flutter during fast, powerful strokes.
Figure 3. The plywood forms hold the foam at the proper angle and location. Foam is tack glued to the shaft with 5 minute epoxy which is kept away from the blade surface.
Figure 4. Blade face is ready for laminating. My lay-up included a 1” wide strip of 9 ounce unidirectional carbon over the cedar center, followed by two layers of 5.8 ounce carbon cloth, plus Dynel fabric or fiberglass to protect the blade tip. I used Dynel.
3

Figure 5. Foam and cedar are wet out with epoxy. Each cloth layer is added and wet out.
Figure 6. Polyester cloth peel ply is placed on top of the final layer and worked into the epoxy with a squeegee or with gloved fingers. Use disposable rubber gloves when working with epoxy. An absorbent layer of polyester breather material is placed over the peel ply to absorb excess resin which would only be extra weight. Felt or cheap blanket
4

material is often adequate as a breather material. A layer of thin plastic wrap goes over the breather followed by soft foam rubber, flat boards, and something to weight it all down to insure that the laminate lays flat and adheres uniformly to the foam and cedar core. In this picture heavy tool boxes and blocks of wood serve as weights. Vacuum bagging could have been used to clamp the lay-up. But I was too lazy to set it up, and, in this situation, weights work quite well. If you use vacuum bagging over rigid foam, be careful not to crush the foam. Test at various vacuum settings first. The light weight, rigid urethane foam that I use is very soft and crushes easily until after the resin cures.
There are many more details on laminating, peel ply, breather layers, and vacuum bagging in Figures 17 through 25.
Figure 7. The weights and peel ply can be removed after the epoxy cures hard enough to feel dry to the touch and dent only very slightly with a fingernail. Use the left over epoxy in your mixing cup to test. At 60º F this cure stage takes about 5 to 9 hours with WEST epoxy resin and 207 UV resistant hardener. Then add more coats of epoxy to seal the surface; two or three coats will be required. For best adhesion add a coat as soon as the previous coat reaches the green cure stage, or at least within 24 hours. If you must wait longer, sand thoroughly. If you want to achieve a very level smooth surface, sand most of the epoxy off, but not into the fabric, and add more epoxy layers. Repeat until you are happy with the surface. My paddles get rough use and many scars in short order, so I don't often waste much effort on cosmetic details.
5

Figure 8. This blade is ready to remove from the plywood dihedral forms and trim to shape. The lighter colored fabric at the tip is the abrasion resistant Dynel.
If you haven't already done so, make a pattern for the blade shape you desire. In my book you will find a scale drawing of the asymmetric shape I prefer. It is on a convenient grid for enlarging to full size. Or you can trace a paddle you like or design your own. Be certain to include a centerline on your drawing. The full size pattern is drawn onto a large sheet of heavy paper or cardboard and then cut out with scissors to make a template. The template can be turned over in book match fashion to insure symmetry when tracing left side and right side blades. As you've probably guessed, it is a good idea to make the foam blade cores a good bit oversize and trim blades to shape after laminating. An inch or more oversize is not too much and makes costly errors less likely.
Before trimming the oversize laminate down to the blade shape, use a long straightedge and fine marker to draw a centerline from the blade throat at the shaft to the end of the blade tip. Do this for both blades.
6

Figure 9. The blade shape template is traced onto the lay-up, and the blade is cut to shape 1/8” oversize. A bandsaw with a fine tooth blade is especially convenient, but use what you have. A hacksaw blade works okay. Be certain the saw blade cuts from the laminate side toward the foam side. Cutting the other way can separate the carbon from the foam. The Dynel reinforcement is easily seen in this photo. It is on a diagonal to protect the edges that get the most wear. Fiberglass could be used instead of Dynel.
7

Figure 10. Although working with 2” foam is probably faster and more convenient, I wanted to use up some 1/2” thick foam, as mentioned earlier. Therefore, two more layers of 1/2” foam were added to the backsides of the blades, as shown here. Urethane foam is easy to saw or cut. The layers are tack glued with quick epoxy only at the inside corners against the cedar shaft, and glue is kept well away from ANY AREAS where shaping might take place. The foam is so soft that you CANNOT form a smooth surface at any glue line.
8

Figure 11. The foam is carved to approximate shape with gouges, chisels, and knives.
Figure 12. After rough carving, switch to course sandpaper glued or wrapped around a flat wood sanding block. Use 100 grit for final shaping and smoothing. The foam can have a straight taper or a very slight arch from the cedar center to the edges. The full 3.5 cm (1-3/8”) thickness of the central cedar shaft is maintained from the throat of the blade
9

to about 15 cm (6”) from the tip, at which point it curves smoothly into the tip. Shape the cedar before attaching the foam.
Figure 13. Foam is scraped away from the blade edge along the tip and sides.
Figure 14. A small file or similar tool is used; the thumb acts as a depth stop. Scrape to a width of at least 5/8” or greater.
10

Figure 15. After scraping, feather the foam smoothly into the scraped area with sand-paper. Note that the scraped edge extends from the tip along the sides but terminates several inches short of the throat area. This is so that the carbon cloth does not have to make too sharp a bend to conform. The scraped area ensures a strong bond between the back laminate and the front laminate along the vulnerable tip and sides. The foam core produces volume and buoyancy in the blades which has some advantages. Bracing strokes are easier, and the paddle has a pleasant feel in the water. You'll notice in Figure 15 that the cedar shaft is tapered side to side from throat to tip to save a little weight.
11

Figure 16. An internal abrasion resistant reinforcement can be added to the tip and sides. Here a piece of Dynel has been cut and test fitted into place.
Figure 17. The backside of a blade is being laminated. The foam and cedar are coated with epoxy. If they absorb too much, then the epoxy on the surface is allowed to get thick and tacky before applying additional freshly mixed epoxy. The edge reinforcement is put in place and wet out. This does not add much weight, but the abrasion resistance and additional thickness make the edges more durable. As on the front side, I added a 1” wide strip of 9 ounce unidirectional carbon which is being wet out with epoxy resin in the
12
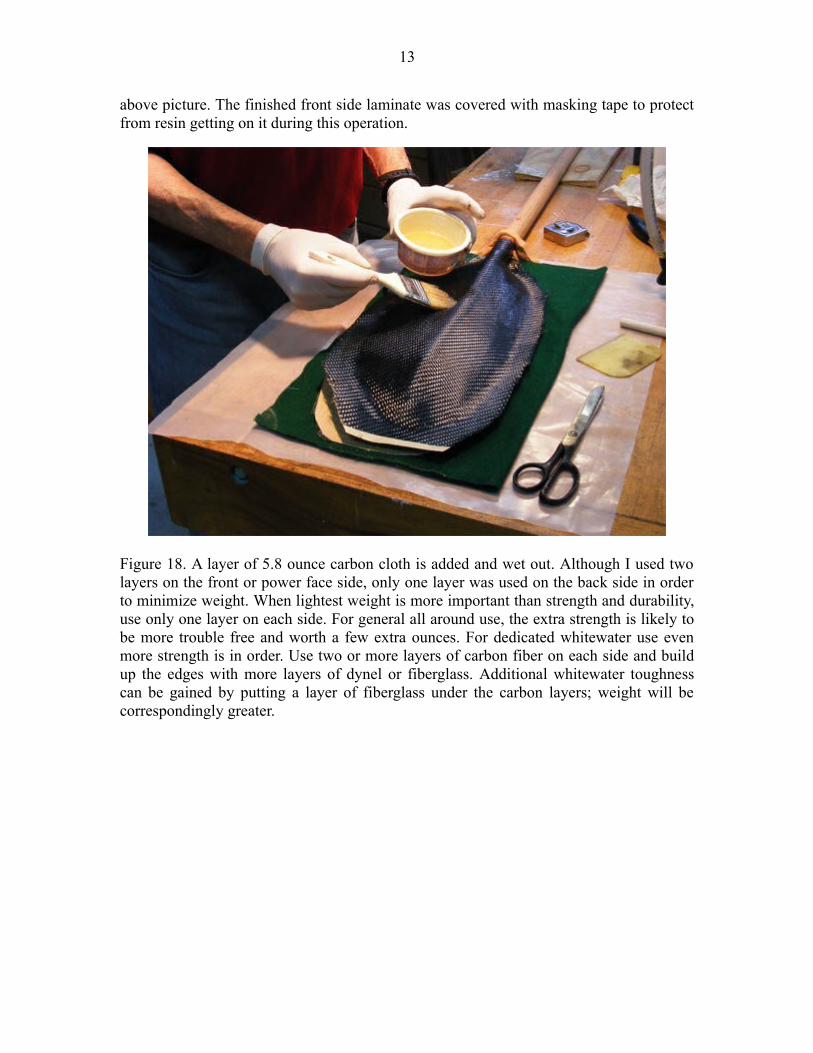
above picture. The finished front side laminate was covered with masking tape to protect from resin getting on it during this operation.
Figure 18. A layer of 5.8 ounce carbon cloth is added and wet out. Although I used two layers on the front or power face side, only one layer was used on the back side in order to minimize weight. When lightest weight is more important than strength and durability, use only one layer on each side. For general all around use, the extra strength is likely to be more trouble free and worth a few extra ounces. For dedicated whitewater use even more strength is in order. Use two or more layers of carbon fiber on each side and build up the edges with more layers of dynel or fiberglass. Additional whitewater toughness can be gained by putting a layer of fiberglass under the carbon layers; weight will be correspondingly greater.
13

Figure 19. Next, the polyester cloth peel ply is worked into the epoxy with a squeegee.
Figure 20. A white polyester breather material layer has been placed on top of the peel ply. Thick layers of soft foam rubber and weights could be used to compress the layup, as described earlier for laminating the power face. Use four inches or more of foam rubber due to the complex backside surface. I decided to use vacuum bagging for this lay-up. A sheet of heavy plastic has been placed under the blade as an airtight layer. And modeling clay was used to make an airtight seal around the shaft prior to bagging.
14

Figure 21. Vacuum bagging film has been placed on top of entire assembly, pressed into the clay at the shaft, and sealed to the underlying 4 mil plastic with packaging tape. Then the vacuum hose fitting was attached.
Figure 22. A small vacuum pump is adequate.
15

Figure 23. The vacuum pump pulls air from bagged items so that external air pressure provides uniform clamping pressure. Excess resin bleeds through the peel ply and into the breather layer insuring a strong but light weight laminate. Experiment with pressure to achieve good clamping without crushing the foam core.
16

Figure 24. After the epoxy has cured sufficiently, the peel ply is removed. A pair of pliers or vice grips can be helpful when starting to peel.
Figure 25. As peeling proceeds, pulling with the hands is easier.
17

Note: if the epoxy is allowed to cure too long and too hard, the peel ply becomes more difficult to remove. Next trim the excess laminate and cut the blades to final shape.
Figure 26. I decided to add a 2 piece ferrule so that the paddle can be taken apart as well as paddled unfeathered or with a 55º feather angle. Ferrules are available from clcboats.com. The shaft was sawn in two and cut to the proper lengths. The cut ends of the shaft are fitted to the inside of the carbon ferrule with a very snug fit, but not so tight that the shaft can’t be rotated in the ferrule to enable alignment. If the ferrule fits too loosely, add wood shims until the fit is very snug. Any shims are glued to the wood shaft with waterproof glue. The shaft should go into the ferrule as far as possible without interfering with the operation of the ferrule. Leave an extra 1/4” to 1/2” for any excess epoxy to squeeze out on the inside.
Next the cut ends of the shaft are sealed with three coats of epoxy. Then the ferrule is glued to the shaft with epoxy. Be liberal with epoxy on the shaft; it can be wiped off. Put only a small amount of epoxy inside the ferrule so that any squeeze out on the inside will be minimal. If there are gaps in the fit, add thickened epoxy to the shaft before inserting it into the ferrule. With the ferrule set in the unfeathered position, sight end to end down the assembled paddle, as shown in Figure 26, and rotate the shaft halves until the blades are facing in exactly the same direction.
18

Figure 27. After blades are aligned, take the paddle apart using the ferrule joint, and stand the halves vertically with the blades down until the epoxy sets. Check with a level to insure they are vertical. This is to prevent any epoxy on the inside from flowing into areas where it might interfere with the operation of the ferrule. If the wood shaft fits into the ferrule tight enough, then the paddle can be taken apart to stand up the two halves without disturbing blade alignment. Next, it is a good idea to pour a 1/8 inch epoxy layer into each ferrule half to insure the ends of the wood shaft are bonded well to the ferrule. Caution, do not get any epoxy on the inside walls of the female side of the ferrule. Make
19

a paper funnel that reaches the bottom of the ferrule and use it to pour the epoxy. Note, if you do get too thick a layer of epoxy in the bottom of the female ferrule half, then the male half might not insert far enough for the locking button to fit. It is okay to cut the male side of the ferrule a little shorter to correct this.
Figure 28. Since I chose light weight but weak cedar for the shaft, it will be strengthened with 8 ounce woven graphite sleeve. This sleeve material is very convenient for making or reinforcing paddle shafts. It is available from sweetcomposites.com. Another way to reinforce wood shafts with fiberglass is described in my book. Two thin coats of epoxy are wiped onto the wood shaft; the second coat is added as soon as the first coat reaches the green cure stage. As soon as the second layer is dry to the touch, slip the sleeve in place, stretch it to tighten against the shaft, and wet out the cloth with epoxy. It should overlap a little onto the ferrule and onto the carbon lay-up at the blade throat.
20

Figure 29. The carbon sleeve must adhere tightly to the shaft, so the next steps are very important. The shaft is wrapped tightly with polyester cloth tape, or cut strips, as a peel ply. Tape one end tightly, make a spiral wound wrap working the peel ply into the epoxy, and tape the other end, as shown. Wear rubber gloves and smooth the peel ply into the epoxy with your hands and fingers. I wear disposable rubber gloves for all epoxy operations. An organic filter breathing mask is a good idea also.
Figure 30. Next wrap an absorbent breather layer over the peel ply. Here I used green felt cut into long strips and wrapped into place and taped at the ends like the peel ply. The felt is held tightly to the shaft to compress all the layers by wrapping string or twine very tightly over it. String should be wound until all you can see is string and no breather
21

material remains visible. This will insure that there are no bubbles or areas of poor adhesion between the sleeve and the wood shaft.
Figure 31. As seen here, clamps may be needed near the throat area to insure that the sleeve conforms to the complex shape where the blades meet the shaft. Spring clamps may be handy. These shafts will be wound with more string to cover the green breather felt entirely before setting them aside while the epoxy cures.
22

After removing the peel ply, the shaft was sanded and given a thin coat of epoxy to seal and level the surface. It required only one coat. But if your shaft surface shows pits and the weave of the fabric, then more coats might be necessary. If you wish, you can add more layers of epoxy to the shaft and blades and sand until a very level and smooth surface is achieved. Or, if light weight is more important than appearance, you can stop adding layers of epoxy as soon as the surface seems adequately sealed.
Because the black carbon has poor visibility in the water, it is a good idea to paint the blades with a bright color. So paint is in my plan, at least for the blades. If the paddle is dropped in the water I'll be glad to have a high visibility color. And power boaters often spot the bright moving blades more easily than they see a kayak or kayaker. Getting run over can ruin the day.
Cost of materials can be reduced greatly by using fiberglass instead of carbon to build this style of paddle. If you do that, you have some important decisions to make. You can use the same cloth weights and numbers of layers, in which case your laminates will have much less stiffness and strength. Or, you can use more layers of fiberglass, and or heavier cloth, in which case weight will be greater. The increased weight is due not only to more fabric, but also to the greater amount of epoxy resin required to saturate it.
So, if you’ve stayed with me this far, you are probably wondering how I like this paddle. The short answer is that I love it. Although made specifically as a touring paddle for my Wasp solo canoe, I've also used it with my Kayoo decked canoe and a Pakboats kayak on
23

flat water and class 2 whitewater. It is already my favorite. To put that in perspective, I do own a variety of high quality factory made carbon touring paddles including models from Lendal, Adventure Technology, and Werner, some of them bent shaft models. And I have a little past experience making both wood and composite paddles. The paddle that is the subject of this article brings together most of my favorite features for a double blade touring paddle, although the fabrication process and some of the design approaches can be applied to whitewater and single blade paddles.
I should explain some of the design features. Blades are 3.5 cm thick in the center tapering to the edges and tip, thus providing good volume and buoyancy. The buoyant blades are probably the most important feature. They make bracing easier, faster, and more powerful. Blade buoyancy also eases paddling effort in an interesting way. When holding the paddle with a blade resting in the water in the paddling position, the blade will float partially submerged. This is convenient for taking a power stroke, and no effort is required to maintain blade depth. To make the blade run deeper I only need to add a little weight from my arm and shoulder. Paddling feels less tiring than with conventional non-buoyant blades which seem to require more constant arm muscle effort to maintain a desired and consistent depth. An unexpected bonus is that the buoyant blades are relatively quiet. When paddling slowly to fish or observe wildlife, the blades enter the water more quietly than with any of my other paddles.
Overall paddle length is 215 cm (84.5”). Blade shape is similar to the pattern in my book. Blades are a relatively short 44 cm (17”) long by 18.5 cm (7.2”) wide, resulting in medium size blade area and power. Shaft length between the blades is 125 cm (49”). The relatively short length and short blades are good for touring with the boats mentioned and using the slightly high angle stroke I prefer. The paddle is also not too long for occasional white water use.
The entire shaft, except for the ferrule, is a 3.5 cm (1.37”) by 2.5 cm (1”) flattened oval in cross section. This makes it very easy to exert powerful control over the blade angle while gripping anywhere on the shaft. I can also feel the precise blade angle from any position on the shaft, and I definitely consider that a safety feature. With a round or almost round shaft it is easier to become confused as to blade orientation, and this is also true with bent or “crank” shaft double paddles. Blade angle mistakes can even cause capsizing.
One of my goals was to have a paddle that could be rested across the gunwales or coaming and have the blades remain upright in the proper orientation to take a quick corrective paddle stroke. I like to rest the paddle on the coaming while map reading, fishing, snacking, taking pictures, or observing wildlife. All my other paddles annoyingly roll to some blade orientation that makes it slower to take a quick stroke to correct for wind, wave, current, and drift. This is especially annoying while fishing. Shafts that are mostly round just don't stay put, and most bent shaft kayak paddles that I've tried have poor balance in this regard. The flattened oval shaft cross section of my new paddle solves this dilemma, regardless of feather position. While that may seem like a small thing, it definitely contributes to my overall paddle happiness.
24
The grip areas of the shaft got extra attention in the form of some minor sculpting. An indentation for the crotch of my thumb increases grip comfort and helps me locate the hand position by feel.
The foam core carbon blades are very light weight which results in low “swing weight” at the ends of the paddle. This makes long paddling sessions and trips much less fatiguing. And it is almost effortless to move the paddle quickly for maneuvering. Overall weight is similar to my other carbon paddles, around 25 ounces. Using a single layer on the power face would have reduced weight noticeably, but I might be less confident of the durability.
Because the relatively short overall length requires a relatively high angle stroke, I expected the blades to drip more water onto my knees and into the cockpits of solo canoes. But this paddle is better than expected in that regard. I attribute that to a somewhat sharp bend where the bottom edge of the blade turns toward the throat. You will notice that feature in the photos here; it might be slightly less pronounced on the pattern in my book.
A 203 cm paddle has long been my whitewater stick. But for touring kayaks and solo canoes I've generally used paddles of 230, 225, and 220 cm, trending over time toward shorter lengths. My current preference is for the shortest paddle that will suit the boat, the mission, my size, and my paddling style. At 215 cm, the new paddle has a shorter distance from the grip position to the blade resulting in more leverage. This is somewhat analogous to using a slightly lower gear on a bicycle. I can accelerate the boat more quickly and maneuver it with less effort. Less strength is needed to accelerate and maintain a moderate cruise speed, although high speeds require a faster stroke count. Less strain is transferred to my shoulders, and that is increasingly welcome with age. I believe I will be happy to have this paddle as a companion on many adventures.
© 2011Sam Rizzetta
25