m0305 n series operators manual - always on€¦ · always on ups systems ii important safety...
TRANSCRIPT

GES-N-Series Operators Manual
GES-701N – GES-302N
On Line: 700VA, 1kVA, 1.5kVA, 2kVA, 3kVA
Dual Conversion On-Line UPS Single-Phase Input, Single-Phase Output
Version 2.12

THIS PAGE IS INTENTIONALLY BLANK

Always On UPS Systems
i
Note
The instructions contained in this manual are not intended to cover all of the details or variations in equipment, or to provide for every possible contingency to be met in connection with installation, operation, or maintenance. Should further information be desired or should particular problems arise which are not covered sufficiently for the purchaser’s purposes, the matter should be referred directly to Always On UPS Systems Inc. Any electrical or mechanical modifications to this equipment, without prior written consent of Always On UPS Systems Inc, will void all warranties and may void UL/cUL/CSA listing. Unauthorized modifications also can result in personal injury, death, or destruction or the equipment.
Uninterruptible Power Supply Please complete the Warranty Card supplied with this UPS and return it by mail to Always On UPS Systems Inc. This activates the warranty. If additional information or technical assistance is required call: Always On UPS Systems Inc Sales and Technical Support Line Toll free at 1-877-259-2976 Ext. 451 or (250) 491-9777 Ext. 451 or Fax (250) 491-9775 Or E-mail at [email protected] or visit our web site at www.alwaysonups.com Or write to
Always On UPS Systems Inc. Bldg 1 – 150 Campion Road,
Kelowna, BC, V1X 7S8, Canada
Please complete the following information for your records. Model Number: ______________________________________________________________ Serial Number: ______________________________________________________________ Date of Installation: ____________________________________________________________ Inspected By: ______________________________________________________________

Always On UPS Systems
ii
IMPORTANT SAFETY INSTRUCTIONS • THIS MANUAL CONTAINS IMPORTANT INSTRUCTIONS THAT SHOULD BE
FOLLOWED DURING INSTALLATION AND MAINTENANCE OF THE UPS AND BATTERIES.
• THE UPS SYSTEM IS NOT INTENDED FOR EXTERNAL USE UNLESS SPECIFICALLY DESIGNED FOR IT.
• ALL SERVICING MUST BE DONE BY QUALIFIED PERSONNEL. DO NOT ATTEMPT TO SERVICE THIS EQUIPMENT YOURSELF. OPENING OR REMOVING COVERS WILL RISK EXPOSURE TO DANGEROUS VOLTAGES. DO NOT LOCATE UPS IN AN AREA WHERE UNAUTORIZED PERSONNEL HAVE ACCESS.
• THE POWER SUPPLY FOR THIS UNIT MUST BE SINGLE PHASE RATED IN ACCORDANCE WITH THE EQUIPMENT DATA PLATE. IT MUST BE SUITABLY GROUNDED.
• DO NOT STAND BEVERAGE CONTAINERS ON THE UNIT. • EXTERNAL SLITS AND OPENINGS IN THE CABINET ARE PROVIDED FOR
VENTILATION. TO ENSURE RELIABLE OPERATION OF THE PRODUCT AND TO PROTECT FROM OVERHEATING, THESE OPENINGS MUST NOT BE BLOCKED OR COVERED. OBJECTS MUST NEVER BE INSERTED INTO VENTILATION HOLES OR OPENINGS.
• THE POWER OUTLET ON THE UPS DISTRIBUTION PANEL WILL BE LIVE WHEN THE UNIT’S POWER SWITCH IS ON, WHETHER OR NOT THE UNIT AC SUPPLY IS PRESENT.
• QUALIFIED PERSONNEL SHOULD BE CONSULTED WHEN: 1. THE POWER CABLE HAS BEEN DAMAGED 2. LIQUID HAS BEEN SPILLED INTO THE UNIT 3. THE UNIT DOES NOT OPERATE NORMALLY EVEN THOUGH THE
OPERATING INSTRUCTIONS HAVE BEEN FOLLOWED • DO NOT PLACE MAGNETIC STORAGE MEDIA ON TOP OF THE UNIT, AS
THIS CAN RESULT IN DATA CORRUPTION. • THIS UPS WAS DESIGNED TO POWER ALL MODERN COMPUTER LOADS
AND ASSOCIATED PERIPHERAL DEVICES, SUCH AS MONITORS, MODEMS, CARTRIDGE TAPE DRIVES, EXTERNAL FLOPPY DRIVES, ETC. DO NOT USE IT FOR PURE INDUCTIVE OR CAPACITIVE LOADS. IT IS NOT RATED TO POWER LIFE SUPPORT EQUIPMENT.
CAUTION: ALL RECORDED MEDIA, SUCH AS DISKETTES, TAPES AND CARTRIDGES, SHOULD BE KEPT A MINIMUM OF 60CM FROM THE UPS. THE MAGNETIC FIELD CREATED BY OPERATION OF THE UPS MAY ERASE DATA ON THOSE DEVICES.
ATTENTION: INSTALL THE ON-LINE UPS IN A WELL-VENTILATED AREA, AWAY FROM FLAMMABLE LIQUIDS, GASES, OR EXPLOSIVES. DO NOT LET THE UNIT COME INTO CONTACT WITH WATER. POTENTIALLY LETHAL VOLTAGES EXIST WITHIN THIS UNIT AS LONG AS THE BATTERIES ARE CONNECTED. DO NOT TOUCH ELECTRICAL CIRCUITS WHEN POWER IS CONNECTED TO THE UPS. TURN THE UPS “OFF” AND DISCONNECT THE UNIT FROM THE POWER SOURCE BEFORE REMOVING THE COVER PLATES. ALL REPAIRS SHOULD BE PERFORMED BY QUALIFIED SERVICE PERSONNEL. READ THIS MANUAL CAREFULLY BEFORE INSTALLING OR USING THE UNIT. FOLLOW ALL PROCEDURES, AS DESCRIBED, TO INSURE SAFE, RELIABLE OPERATION OF THE UPS.
SAVE THESE INSTRUCTIONS

Always On UPS Systems
iii
MORE SAFETY INSTRUCTIONS • DO NOT USE THIS EQUIPMENT FOR ANY PURPOSE OTHER THAN THE
INTENDED USE. • EXAMINE THE PACKAGING CONTAINER FOR DAMAGE. NOTIFY THE
CARRIER IMMEDIATELY IF DAMAGE IS PRESENT. • DO NOT DISASSEMBLE THE UPS. • DO NOT OPERATE OR LOCATE NEAR WATER OR EXCESSIVE HUMIDITY. • DO NOT USE OTHER MANUFACTURERS ACCESSORIES. MAY CAUSE
DAMAGE OR UNSAFE CONDITIONS • KEEP LIQUID AND FOREIGN OBJECTS FROM GETTING INSIDE THE UPS. • DO NOT BLOCK AIR VENTS IN THE FRONT OF THE UPS OR AIR EXHAUSTS
IN THE BACK. • DO NOT PLACE OR OPERATE CLOSE TO GAS, HEATERS OR FIRE. • DO NOT LET POWER CORDS CONTACT HOT SURFACES • DO NOT PLUG APPLIANCES, SUCH AS HALF BRIDGE RECTIFIED LOAD,
INTO THE UPS. • USE CAUTION WHEN SERVICING BATTERIES. BATTERY ACID CAN CAUSE
BURNS TO SKIN AND EYES. IF ACID IS SPILLED ON SKIN OR IN EYES, FLUSH WITH FRESH WATER AND CONTACT A PHYSICIAN IMMEDIATELY.
• DO NOT OPERATE IF THE UNIT IS LEAKING LIQUID OR IF A WHITE POWDERY RESIDUE IS PRESENT.
• BATTERIES MAY CONTAIN METALS AND OTHER CHEMICAL HAZARDOUS WASTE. FOR PROPER DISPOSAL, CONSULT YOUR LOCAL STATE AND FEDERAL EPA AND OTHER ENVIRONMENTAL LAWS AND REGULATIONS.
• USE ONLY THE POWER SUPPLY CORD PROVIDED WITH THIS UNIT. THE POWER CORD FOR UPS IS WIRED IN ACCORDANCE WITH NATIONAL ELECTRICAL CODE (NEC) SPECIFICATIONS. BE SURE THAT THE WALL OUTLET IS ALSO WIRED TO THESE SPECIFICATIONS.
• THE UPS CONTAINS ITS OWN ENERGY SOURCE (BATTERY). THE OUTPUT RECEPTACLES MAY BE LIVE EVEN WHEN THE UPS IS NOT CONNECTED TO AN AC SUPPLY.
• ONCE YOU HAVE CONNECTED THE BATTERY CONNECTORS, DO NOT ATTEMPT TO LIFT THE CABINETS.
• DO NOT CONNECT OR DISCONNECT BATTERY CABINETS WHILE THE UPS IS OPERATING FROM BATTERY.
SYMBOLS Protective grounding terminal; a terminal which must be connected to
ground prior to making any other connection to the equipment. A terminal to or from which an alternating (sine wave) current or voltage
may be applied or supplied. A terminal to or from which a direct current or voltage may be applied or
supplied. This symbol indicates the word “phase”. May be used in lieu of the wording “caution, risk of electric shock” for
any cautionary marking.

Always On UPS Systems
1
Table of Contents 1. INTRODUCTION ....................................................................................2
1.1. MODES OF OPERATION ......................................................................................................... 2 2. PRODUCT DESCRIPTION ..................................................................3
2.1. THEORY OF OPERATION........................................................................................................ 3 2.2. BLOCK DIAGRAM .................................................................................................................... 3 2.3. DESCRIPTION OF EACH BLOCK ............................................................................................ 4 2.4. SPECIAL FEATURES ............................................................................................................... 5
3. HANDLING ..............................................................................................6 3.1. DELIVERY................................................................................................................................ 6 3.2. INITIAL INSPECTION................................................................................................................ 6 3.3. STORAGE................................................................................................................................ 6
4. INSTALLATION ......................................................................................7 4.1. LOCATION ............................................................................................................................... 7 4.2. ELECTRICAL CONSIDERATIONS ............................................................................................ 8 4.3. REAR VIEW DIAGRAMS.......................................................................................................... 8 4.4. INPUT, OUTPUT AND EXTERNAL BATTERY CONNECTION................................................. 10
5. START-UP/SHUTDOWN ....................................................................11 5.1. TURN ON PROCEDURE:....................................................................................................... 11 5.2. TURN OFF / SHUTDOWN PROCEDURE: .............................................................................. 11
6. FRONT CONTROL PANEL ................................................................12 6.1. NORMAL DISPLAY ................................................................................................................ 12 6.2. UPS METERS DISPLAY ........................................................................................................ 12 6.3. BUTTON OPERATION ........................................................................................................... 13 6.4. CONTROL PANEL FUNCTIONS............................................................................................. 13 6.5. UPS CONFIGURATIONS....................................................................................................... 13
7. AUDIBLE ALARM.................................................................................16 7.1. BACKUP MODE ..................................................................................................................... 16 7.2. LOW BATTERY...................................................................................................................... 16 7.3. BYPASS................................................................................................................................. 16 7.4. FAULT.................................................................................................................................... 16
8. BATTERY MAINTENANCE ................................................................16 9. ENVIRONMENTAL PROTECTION...................................................16 10. BATTERY REPLACEMENT ...............................................................17 11. SOFTWARE SETUP FOR STANDARD SOFTWARE APPLICATIONS......................................................................................................18
11.1. CONNECTING THE UPS TO A COMPUTER.......................................................................... 18 11.2. RS- 232 STANDARD INTERFACE PORT .............................................................................. 18 11.3. USB PORT ............................................................................................................................ 18 11.4. EPO PORT (EMERGENCY POWER OFF) ............................................................................ 19 11.5. NETWORK TRANSIENT PROTECTOR (700 - 3000 VA) ...................................................... 19 11.6. LOAD SEGMENTS (700 - 3000 VA)..................................................................................... 19
12. OPTIONAL EXTRAS ...........................................................................20 12.1. PROCEDURE FOR (OPTIONAL) EXTENDED BATTERY CABINETS...................................... 20 12.2. SNMP (NETWORK MANAGEMENT) ADAPTER (OPTIONAL) .............................................. 21 12.3. AS-400 AND RELAY CONTACT (OPTIONAL) ...................................................................... 22
13. TROUBLESHOOTING ........................................................................24 14. TECHNICAL DATA ..............................................................................25 15. CONTACT INFORMATION ................................................................26
15.1. ADDITIONAL PURCHASES OR UPGRADES .......................................................................... 26 15.2. QA / WARRANTY QUESTIONS ............................................................................................. 26 15.3. SOFTWARE QUESTIONS ...................................................................................................... 26

Always On UPS Systems
2
1. Introduction Congratulations on your choice of the Always On N Series On-Line Uninterruptible Power System (UPS). The N Series features the very latest, top of the line, microprocessor technology and IGBT transistors for clean, highly regulated, PWM (Pulse Width Modulated) True Sine Wave power. For ease of use, the N Series utilizes an LCD display to indicate “load percentage”, “battery capacity”, input voltage, output voltage, input frequency, output frequency, internal UPS temperature and the mode of operation. It also provides self-diagnostics, a combination On/Alarm Silence/Manual Battery Test button, a combination Off/Bypass button, and two levels of alarms when the unit is operating on battery. The N Series incorporates an interface port for communications between the UPS and a LAN server or other computer system with various operating systems installed. This port provides detailed operating information including voltages, currents, and alarm status to the host system when used in conjunction with the shutdown software. Also available are the optional SNMP Adapter to permit remote control, monitoring and notification of UPS conditions via a network or the internet, and an AS-400 interface to allow for relay communications in PLC or contact environments.
1.1. Modes of Operation The N Series UPS is designed to operate as a continuously on-line dual conversion system in the following modes: Normal - The critical AC load is continuously supplied by the UPS Inverter. The input Rectifier derives power from a utility AC source and supplies power to the Inverter while simultaneously float-charging the storage batteries. Back-Up - Upon failure of utility AC power, the Inverter obtains power from the batteries without interruption. There are no interruptions in power to the critical load upon failure or restoration of the utility AC source. Recharge - Upon restoration of utility AC power after an outage, the Rectifier will automatically restart and supply power to the inverter and battery charger. Automatic Restart - Upon restoration of utility AC power, after an extended outage and complete battery discharge, the UPS will automatically restart and resume supplying power to the critical load. Also the battery charger will automatically recharge the batteries. This feature is enabled in the factory and is capable of being disabled (consult factory). Static Bypass - The bypass will provide an alternate path for power to the critical load and is capable of operating in the following manner:
Automatic - In the event of the inverter overload capacity being exceeded or should an internal failure occur, the UPS will perform an automatic transfer of the critical AC load from the inverter to the bypass source. Manual - Should the UPS need to be taken out of service for limited maintenance or repair, manual activation of the bypass will cause an immediate transfer of the critical AC load from the inverter to the bypass source. The input rectifier, inverter, and battery charging operations will be inhibited until the user transfers the UPS back to normal operation.

Always On UPS Systems
3
2. Product Description 2.1. Theory of Operation
The UPS (Uninterruptible Power Supply) is designed to be installed between utility (commercial supplied power) and your loads. It is used to protect your loads from noticing any power fluctuations (eg. Blackouts, brownouts, over-voltage conditions). The UPS will supply a sufficient amount of steady, constant AC power during these power fluctuations, allowing the loads to be shutdown properly preventing possible damage to both hardware and software.
2.2. Block Diagram
Figure 2.2.1 Block Diagram for N Series

Always On UPS Systems
4
2.3. Description of Each Block Input Breaker: Prevents the breaker of the distribution panel from tripping when a UPS fault or over-current condition occurs. EMI/RFI Filter: This filter attenuates the electrical noise associated with the polluted utility power to the UPS or noise (THD) generated by the UPS. Rectifier / Power Factor Correction (PFC): During normal operation, the rectifier/power factor correction (PFC) circuit converts the utility power (AC power) to DC power, which in turn is used by the inverter, while ensuring that the waveform of the input current used by the UPS is close to ideal. This type of conversion and technology maintains two key objectives: the utility power is used as efficiently as possible, and the amount of distortion reflected back to the utility is minimized therefore providing cleaner power to other devices in the building not being protected by the N Series.
PFC Control: By utilizing control circuits, the current drawn from the utility power is in-phase with the input voltage. The control circuit also allows the UPS to have a broader input voltage range (±25%).
Charger: During normal operation, it converts AC voltage drawn from utility power into regulated DC voltage, which charges or maintains the batteries at the desired level by a float charge. Batteries: Sizes will vary in series and series-parallel configurations. Batteries are Sealed Lead-Acid Valve regulated gel cells. DC-to-DC Converter: The converter utilizes energy from the battery system and raises the DC voltage to the DC Bus operating voltage for the inverter. This allows the inverter to operate continuously at its optimum efficiency and voltage, thus increasing reliability. Inverter: The term inverter will denote the solid-state equipment and controls used to convert power from the input rectifier or batteries to regulated pure sine wave AC power for supporting the loads. The inverter will produce 50 or 60Hz (auto-selectable) using Insulated Gate Bipolar Transistors (IGBT’s) switching at approximately 18kHz, above the audible frequency range, and without low frequency magnetic components. The inverter is of pulse width modulated (PWM) design capable of providing the specified AC output with a very small tolerance (±2%), with little to no distortion. CPU/Control/User Interface: The CPU controller monitors and maintains all systems within the UPS while permitting communication between the UPS, user and peripheral devices. Static By-pass: A static transfer switch and bypass circuit is provided as an integral part of the UPS. The inverter has an overload rating of 125% rated load for one minute, 150% rated load for 20 seconds, 200% rated load for one and a half cycles. The static bypass will auto transfer to bypass if these overload conditions are exceeded. The static transfer switch control logic will contain an automatic transfer control that senses the status of the inverter logic signals, and operating and alarm conditions. This control circuit will provide an uninterrupted transfer of the load to a normal input source (or alternate bypass source). Transfers are made when an overload or malfunction occurs within the UPS, without exceeding the transient limits specified herein.

Always On UPS Systems
5
2.4. Special Features Efficiency Optimizer function The Efficiency Optimizer function adds cost effectiveness, minimizes power loss and reduces power consumption. Alternating between bypass and on-line modes is achieved automatically and in accordance with the conditions of the utility AC power. On-line mode may be used during times of intermittent power, and bypass mode when the utility is within selectable parameters in order to obtain greatest efficiency. Irregularities can be detected in less than a second, and on-line mode reactivated immediately. Switching back to on-line mode occurs when input voltage is outside ±10% of nominal (± 15% selectable), when input frequency is outside of ±3Hz or when no input utility is present. Although high efficiency is standard, the default operation is in on-line mode. The bypass can be activated in the LCD panel, though on-line can be run permanently if preferred. Free Run Mode The UPS operates in free run mode when input frequency is outside of the selected Input Frequency Setting (Chapter 6.5). Free run mode is when output frequency does not match input frequency. When starting the UPS, the frequency regulation detected is 50 or 60 Hz ±0.25Hz. Please refer to chapter 6.5 if you want bypass available while running in free run mode. Diagnostic tests When you start the UPS, a diagnostic test is automatically executed that checks electronics, battery, and reports any problems on the LCD display. An advanced battery management system always monitors the conditions of the batteries sending any forewarnings if replacement is needed. Otherwise every 30 days of normal operation, a battery discharge test is performed and, if a problem arises it will be reported on the LCD display. Other than during the initial 24 hours, after startup, or while the UPS is in charging mode, diagnostic tests (please see chapter 6.5) can be performed manually from the front panel at any time.

Always On UPS Systems
6
3. Handling 3.1. Delivery
Upon receiving the UPS system, inspect the packaging integrity and the physical condition of the cabinet carefully. In the event that physical damage is visible, the carrier must be informed immediately and a claim filed with them. Inform Always On as soon as the claim has been filed and a copy of claim should be faxed to Always On at (250) 491-9775. A detailed report of the damage is necessary for carrier insurance claim.
3.2. Initial Inspection Unpack the UPS carefully, notice the packing method, and retain the box and packing material. If you must return the UPS at any time, you must repack it the way it was originally shipped. Visually inspect the UPS for damage that may have occurred during shipment. If there is damage, or anything is missing, contact the dealer from whom you purchased the unit, and save the packaging for future shipment. When the unit has passed the initial inspection, record the Installation date on the back panel of the unit and in the space provided towards the front of this manual. Included with UPS System: 1. User manual 2. Communication cable 3. Software package 4. Power Cord (for the 700VA, 1kVA and 1.5kVA UPS systems only).
3.3. Storage 1. If the on-line UPS is to be stored prior to installation, it should be placed
in a dry, well-ventilated area where it will not be exposed to dirt, moisture or other contaminants.
2. Extreme storage temperatures are: a. -30ºC to +60ºC without battery b. -20ºC to +45ºC with battery for a short period
3. Maximum storage period for battery is 6 months at 20ºC or 3 months at 30ºC.
Important: 1. When the UPS and/or battery banks are to be stored for longer than 3 months,
it is recommended the batteries are recharge every 3 months. 2. Do not stack these units.

Always On UPS Systems
7
4. Installation The UPS is intended for installation in a temperature-controlled indoor area, free of conductive contaminants. Installation should be conducted by qualified individuals.
4.1. Location
The N Series UPS is intended for installation in a temperature and humidity controlled indoor environment, free of conductive contaminants with unrestricted airflow. Ambient temperature must not exceed 40ºC (104ºF). IMPORTANT: Maximum battery life is obtained by placing the battery in a room at an ambient temperature of 15ºC to 25ºC. Battery life decreases by half for every 10ºC above 25ºC. Air vents are located on the front, rear and sides of the UPS system. Do not position the UPS in an enclosed area with restricted airflow. Allow a minimum of 100mm (4 inches) around the UPS, with a minimum of 300mm (12 inches) at the rear for easy operator access to the connections and the rear panel mounted input/output/battery/maintenance breakers. (Figure 4.1.1) Maintenance and Servicing of the N Series requires access to all sides of the UPS system and battery banks. Provide the necessary free space and flexible wiring to allow complete access to the UPS system.
Figure 4.1.1 Top View
Always On UPS Systems
8
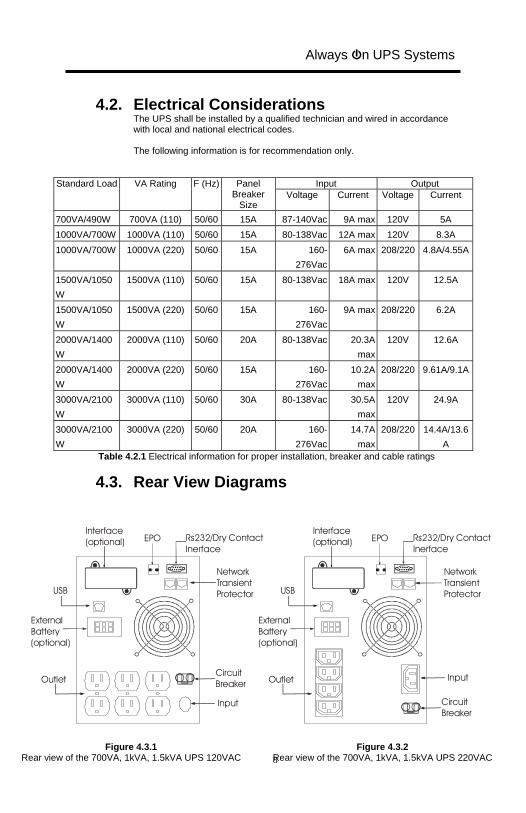
4.2. Electrical Considerations The UPS shall be installed by a qualified technician and wired in accordance with local and national electrical codes. The following information is for recommendation only.
Input Output Standard Load VA Rating F (Hz) Panel Breaker
Size Voltage Current Voltage Current
700VA/490W 700VA (110) 50/60 15A 87-140Vac 9A max 120V 5A 1000VA/700W 1000VA (110) 50/60 15A 80-138Vac 12A max 120V 8.3A 1000VA/700W 1000VA (220) 50/60 15A 160-
276Vac6A max 208/220 4.8A/4.55A
1500VA/1050W
1500VA (110) 50/60 15A 80-138Vac 18A max 120V 12.5A
1500VA/1050W
1500VA (220) 50/60 15A 160-276Vac
9A max 208/220 6.2A
2000VA/1400W
2000VA (110) 50/60 20A 80-138Vac 20.3A max
120V 12.6A
2000VA/1400W
2000VA (220) 50/60 15A 160-276Vac
10.2A max
208/220 9.61A/9.1A
3000VA/2100W
3000VA (110) 50/60 30A 80-138Vac 30.5A max
120V 24.9A
3000VA/2100W
3000VA (220) 50/60 20A 160-276Vac
14.7A max
208/220 14.4A/13.6A
Table 4.2.1 Electrical information for proper installation, breaker and cable ratings
4.3. Rear View Diagrams
Figure 4.3.1 Rear view of the 700VA, 1kVA, 1.5kVA UPS 120VAC
Figure 4.3.2 Rear view of the 700VA, 1kVA, 1.5kVA UPS 220VAC
Interface(optional) EPO Rs232/Dry Contact
Inerface
NetworkTransientProtector
CircuitBreaker
Input
Outlet
USB
ExternalBattery(optional)
Interface(optional) EPO Rs232/Dry Contact
Inerface
NetworkTransientProtector
CircuitBreaker
InputOutlet
USB
ExternalBattery(optional)

Always On UPS Systems
9
Figure 4.3.3 Rear view of the 2 and 3kVA 120VAC UPS
Figure 4.3.4 Rear view of the 2 and 3kVA 220VAC UPS
Outlet
Interface(optional) EPO RS232/Dry Contact
Inerface
NetworkTransientProtector
CircuitBreaker
Input
USB
ExternalBattery(optional)
Interface(optional) EPO RS232/Dry Contact
Inerface
NetworkTransientProtector
CircuitBreaker
Input
USB
ExternalBattery(optional)
CircuitBreaker
Outlet

Always On UPS Systems
10
4.4. Input, Output and External Battery Connection The 700VA, 1,000VA and 1,500VA (701N, 102N and 152N) come with a 6’ cord, complete with a 5-15P connection that will plug into a regular wall receptacle (Figure 4.4.1). The 2,000VA and 3,000VA have a terminal strip connection to which will require a connection to a cord to (Figure 4.4.2). Ensure that the cable is long enough to place the UPS system and allow for maintenance on the UPS system in the future (See 4.1 Location). The cable sizes, input breakers/outlets and distribution methods used during installation are subject to the local and national electrical codes of practice, therefore are not detailed here. Permanent wiring must be routed to the terminal strip using appropriate materials as required by local and national codes.
External battery bank connections are described later in this manual.
Ensure UPS is provided with an adequate ground (earth).
Figure 4.4.1 700VA, 1,000VA and 1,500VA input connection
Figure 4.4.2 2,000VA and 3,000VA input connection

Always On UPS Systems
11
5. Start-up/Shutdown Once the UPS is installed, make sure it is located on a sturdy, well-ventilated surface, and that the exhaust fans and ventilation grills are not obstructed. Below is the necessary information for operation of the unit. Normally the UPS runs automatically, but on those few occasions such as just after installation start-up or shutdown procedures maybe required.
5.1. Turn On Procedure: - Ensure that installation was correct and successful and that the input
power cable is connected to a well-grounded outlet. - The UPS can be started by pushing the “ON/OFF” button, located on the
front panel, for at least three seconds. - The UPS should now start its self-test testing the internal functions, main
synchronization and inverter startup. After a successful test inverter power will be supplied via the outlets.
- During the self-test, the LCD will display “Ready on”. The LED will light
up when output power has commenced and the LCD will display “Line mode”.
- Switch on the loads.
5.2. Turn Off / Shutdown Procedure: - Shutdown and turn off the loads. - Push the “ON/OFF” button on the front panel for five seconds. The alarm
will sound and the UPS will shutdown. - The LCD will display “UPS OFF” for a few seconds.
NOTE: In case of an emergency situation, the Emergency Power Off (EPO) located on the back of the unit should be used.

Always On UPS Systems
12
6. Front Control Panel
6.1. Normal Display The UPS status is shown in normal display mode. From here you have a choice to go to UPS meters display and the Settings display by pushing the button.
6.2. UPS meters display Various measurements are available through the UPS meters display; pressing the button will scroll through the following meters:
LCD Message Description O/P VOLT=***.*V Shows Output AC voltage O/P FREQ=**.*Hz Shows Output Frequency I/P VOLT=***.*V Shows Input AC Voltage I/P FREQ=**.*Hz Shows Input Frequency BAT VOLT=**.*V Shows Battery Voltage O/P Load%=**% Shows % of Maximum Rated Load O/P W=*W Shows Output Watts O/P VA=*VA Shows Output VA O/P Curr=*A Shows Output Current BACKUP TIME=**min Shows Estimated Backup time in minutes BAT CHARG=**% Shows approximate % of battery capacity TEMPERATURE=**C Shows approximate ambient temperature BAT PACK NUM=* Shows External Battery Packs Number RATING=****VA Shows UPS Rating CPU VERSION **.* Shows CPU Version Table 6.2.1 UPS metered display
Figure 6.1 LCD Display

Always On UPS Systems
13
6.3. Button Operation Please note the three operating buttons on the front panel: 1. “ON/ OFF” button:
(a) Push the “ON/OFF” button for at least 3 seconds to turn on the UPS. (b) When UPS is working, push the “ON/OFF” button for at least 3
seconds to turn off the UPS. 2. “ENTER” button. Use this button to check contents of UPS, method is
listed below: (a) Push the “ENTER” button for at least 2 seconds to check contents of
the UPS. (b) Each content can be displayed by pressing the “ENTER” button
once, and there are fifteen different functions to check (Table 6.2.1). (c) If nothing has been pressed for 10 seconds, the display will return to
original status. 3. “FUNC” is a Function button . Each function can be enabled by pressing
this button. (a) Push the “FUNC” button for at least 2 seconds to choose which
function that you want. (b) Each content can be displayed by pressing it once, and there are
fourteen different functions to check. (c) After selecting the function, push the “ENTER” button to enter the
selected function. (d) Push the “FUNC” button to choose other function. (e) Push the “ENTER” button to enable your function. (f) Push the “ENTER” button to confirm and enable the selected
function. (g) If nothing has been pressed for 10 seconds, the display will return to
original status.
6.4. Control Panel Functions Operation of the UPS is indicated on the monitor panel with five LED indicators and an LCD screen. The unit is also capable of alerting the user with audible alarms. • ON - This green LED is lit when UPS has been turned on. • ON-LINE - When the UPS is in normal or static bypass modes, there is
voltage at the output terminals and this LED will light up in green.
• ON-BAT - While operating in battery mode. • BYPASS - While operating in bypass mode, this LED will light up in
yellow. • FAULT - If any internal error occurs in the UPS, this LED will light up in
red and give off an audible alarm. Press any of the buttons on the front panel to turn off the alarm.
6.5. UPS Configurations 1. Default settings have been chosen and are shown in Table 6.5.1.

Always On UPS Systems
14
2. To enter configuration mode, press and hold the “FUNC” button for one second. The first configuration parameter will be shown on the LCD display.
3. Press the “FUNC” button to scroll through the parameters. 4. Press the “ENTER” button to select the parameter. 5. Press the “FUNC” button to scroll through the options for the selected
parameter; Press the “ENTER” button to select the option.
You may be prompted to save the selection, if so press the “ENTER” button to either confirm or save your selection. Other options are saved and started automatically. See Table 6.5.1 for further details.
6. If no buttons are pressed for 10 seconds, the UPS shall exit the
configuration mode and return to normal mode display.
Caution: The factory default settings do not necessarily have to be changed, although you are free to tailor the UPS to your specific needs.

Always On UPS Systems
15
Settings LCD Display Explanation Selection Factory Default
100/110/115/120/127VAC 120VAC Output Voltage Setting O/P V Setting Select nominal output
voltage 208/220/230/240VAC 220VAC ±2% ±5% Input Frequency I/P F Setting
Select input frequency range when UPS goes into free run mode ±7%
±5%
±10% +10 to -15% Input/Bypass Voltage I/P Bypass Set
Select input voltage range when bypass is available +15 to -20%
+10 to -15%
Free Run Mode Free Run Set Select if UPS can run in Free Run Mode (unsynchronized)
ON/OFF ON
Bypass Enable/Disable at Free Run Mode
Bypass Disable
If enable is chosen, the UPS can go to bypass when unsynchronized.
Enable/Disable Disable
HE Mode Setting HE Mode Set Select if UPS runs in efficiency optimizer mode
ON/OFF OFF
Force Manual Bypass Manual Bypass Permanently force UPS to bypass. For service only*
ON/OFF OFF
1 ON & 2 ON 1 OFF & 2 ON 1 OFF & 2 OFF
Management of Load Groups Outlet Setting
You can turn the two load groups on and off from the front panel
1 ON & 2 OFF
1 ON & 2 ON
Do Battery Test Battery Test Detect battery is within normal parameters
Silence Function Silence Set Enable or disable silence function ON/OFF OFF
0 (only internal batteries) 1 (one external battery pack)Number of External
Battery Packs Bat Cabinet Set This setting is needed for UPS's to predict expected back-up time 2 (two external battery
packs)
0
Site Wiring Alarm Sit Fault Set You can enable or disable the site wiring alarm
Enable/Disable Disable
Select Language Language Select display language
English / German / French / Spanish / Italian English
Set Generator Mode Generator Set unit in generator mode** ON/OFF OFF
Set RS-232 Communication RS-232 Control
Set RS-232 communications on or off
Enable/Disable Enable
Table 6.5.1 UPS configurable settings
* In order for the UPS and power management software to operate normally, Manual Bypass should be set to OFF as the load will not be protected by the unit when Manual Bypass is ON. This is aimed for operating an external maintenance bypass switch. ** You should turn the UPS off and keep the AC power connected before you use “Generator” function. (Even when you go from Generator Mode to Normal mode.)

Always On UPS Systems
16
7. Audible Alarm 7.1. Backup mode
The UPS will beep once every five (5) seconds and the BACKUP LED will light, when the unit is in back-up mode. (beep - - - - beep - - - - beep) [Slow beep]
7.2. Low Battery The UPS will beep twice every five (5) seconds and the BACKUP LED will flash, when the batteries are almost depleted. (beep - beep - beep) [Fast beep]
7.3. Bypass The UPS BYPASS LED will illuminate. The UPS will not beep.
7.4. Fault The UPS will sound a continuous beep and the FAULT LED will illuminate and the LCD will display the cause. (beeeeep) [Continuous beep]
8. Battery Maintenance • On initial start-up it is recommended the batteries have a minimum of eight (8)
hours of charging to ensure proper operation. • During normal operation of the UPS, the charge level of the batteries will be
maintained automatically. • The typical recharge time to 90% from 0% charge level is 6-8 hours • Under normal operating conditions, the supplied batteries are expected to last
approximately five (5) years, or 200 discharges, from date of receipt. • Refer to the purchase date you recorded in this manual if you suspect that the
batteries have been exhausted. • If the UPS is to remain in storage for an extended period of time, it is strongly
recommended that the UPS be powered up for a period of twenty-four (24) hours, every three (3) months, to recharge the batteries and prevent premature failure.
9. Environmental Protection The UPS incorporates sealed maintenance free lead-acid batteries. When replacing the batteries, the defective batteries must be disposed of carefully to prevent any risk of environmental pollution by the harmful products they contain (lead and acid). Please refer to local and regional environmental codes when disposing of the batteries.

Always On UPS Systems
17
10. Battery Replacement The batteries may be replaced without having to turn the UPS off or disconnecting the load due to the hot-swappable battery feature. When replacing batteries, use the same number and the following types of batteries:
UPS Rating Number of Batteries Type of Batteries 700VA Two (2) 12VDC – 7Ah 1kVA Three (3) 12VDC – 7Ah 1.5kVA Three (3) 12VDC – 9Ah 2kVA Six (6) 12VDC – 7Ah 3kVA Six (6) 12VDC – 9Ah
Table 10.1 Number of batteries per system
Attention: Potentially lethal voltage exists within this unit as long as the battery supply is connected. Do not disconnect the batteries when the unit is in back-up mode Battery cabinet assembly may be heavy. Use suitable lifting equipment.
Caution: Servicing of the batteries should be performed or supervised by personnel knowledgeable of batteries and the required precautions. Keep unauthorized personnel away from the batteries. Do not dispose of batteries in a fire. They may explode. Do not open or mutilate the battery or batteries. Released electrolyte is harmful to the skin and eyes. It may be toxic. A battery can present a risk of electrical shock and high short circuit current. The following precautions should be observed when working on batteries: Remove watches, rings, and other metal objects. Use tools with insulated handles. Wear rubber gloves and boots. Do not lay tools or metal parts on top of batteries. Disconnect charging source prior to connecting or disconnecting battery terminals. Determine whether the battery is grounded. If grounded, remove the source of the ground connection. Contact with any part of a grounded battery can result in electrical shock. The likelihood of such a shock is reduced if grounds are removed during installation and maintenance (applicable to a UPS and a remote battery supply not having a grounded supply circuit).
Figure 10.1 Battery Replacement

Always On UPS Systems
18
11. Software Setup For Standard Software Applications At the back of the UPS is an interface allowing direct communication with your computer system, the location of which can be found in figure 4.3.1-4. There is a RS232 serial data interface, one USB data interface and an emergency power off switch supplied. However, the RS232 port cannot be used when the USB interface is in use. In addition there is an optional interface slot that allows you to install different communications cards. It can be used parallel with either the RS232 or USB ports. Currently there are two cards available for the optional interface slot. An SNMP/ WEB card allows management and monitoring over a network or internet, and the AS/ 400 card allows voltage free relay contacts (see sections 12.2 and 12.3).
11.1. Connecting the UPS to a Computer The communication device for the UPS and PC comes as a complete package with power management software. Only the communication cable provided with UPS may be used to connect to your computer, which is accomplished through the UPS RS232 port. Also ensure that the operating system on your computer is supported. Instructions provided in the power management software will help with this installation. Other advanced power protection solutions such as SNMP are provided by your dealer.
11.2. RS- 232 Standard Interface port The RS- 232 interface uses a 9- pin female D- sub connector. This information consists of data about utility, load and the UPS. The interface port pins and their functions are identified in the following table.
Pin # Signal Name Direction (Ref. UPS) Functions
2 TxD Output TxD Output
3 RxD Input RxD / Inverter Off Input
5 Common Common
6 CTS Output AC Failure Output
8 DCD Output Low Battery Output
9 RI Output +8 to 24VDC Power Table 11.2.1 Pinout for RS-232 connector NOTE: Maximum rated values are 24VDC at 50mA
11.3. USB port Connecting the UPS to your computer is accomplished through the USB port on the back of your computer. USB compliant hardware and operating system will be necessary including installation of a USB driver. The serial port cannot be used when using the USB port. The USB cable is standard and must be bought separately.

Always On UPS Systems
19
11.4. EPO port (Emergency Power Off) A customer-supplied switch located remotely can be used to open the EPO connection and allows UPS output receptacles to be switched off. Since the EPO shuts down the equipment immediately, orderly shutdown procedures are not followed by the power management software. The UPS will have to be manually restarted in order to regain power to the outlets.
11.5. Network Transient protector (700 - 3000 VA) The network transient protector, located on the back panel, has both IN and OUT jacks, and houses a single RJ- 45 (10BaseT) network connector. Connect the input connector to the jack labeled IN, and the output connector to the jack labeled OUT.
11.6. Load segments (700 - 3000 VA) The power management software controls the sets of receptacles known as load segments, which provides organized shutdown and startup of the equipment. Less critical equipment can be turned off during power outages saving battery power for critical loads. The power management software manual has more details regarding this. The load group status can be viewed from the LCD display and can be changed if necessary. These load segments are usually handled with the UPS management software. Refer to chapter 6.5 regarding the two load segments that come with each model. Necessary information for operation of the unit is covered in this chapter. Normally the UPS runs automatically, but on those few occasions such as just after installation, all the starting and shutting down procedures are described herein.

Always On UPS Systems
20
12. Optional Extras 12.1. Procedure for (Optional) Extended Battery
Cabinets
Attention: Choose the correct battery pack voltage, according to the UPS rated capacity. Do not connect too few or too many batteries, as this could cause electrical shock, damage or death. Caution: It is important to follow the correct procedures for connecting the battery packs. If the procedures are not followed properly, it will increase the chance of electrical shock, damage or death. Follow the procedure to avoid any possible danger. Attention: Ensure correct battery bank voltage and polarity before connecting. Ensure UPS is “OFF” and battery breaker(s) are “OFF” Do not connect the wires to the UPS first, electrical shock might occur. Caution: Observe the appropriate cable connections regulation (e.g. National Electrical Code – NEC in the USA) at all times. Using cables of improper size may damage your equipment and cause fire hazards. Ground the UPS and the load equipment to a common point to prevent looping.
1) Battery Cabinet(s) should be installed as close as possible to the UPS system. (cable to be as short as possible)
2) The DC Voltage of the Battery Cabinet must be the same as the DC
Voltage of the UPS system. Battery Bank Voltage is provided in Table 12.1.1.
MODEL NO. BATTERY VOLTAGE
700VA 24VDC 1000VA 36VDC 1500VA 36VDC 2000VA 72VDC 3000VA 72VDC
Table 12.1.1 UPS battery voltage configurations

Always On UPS Systems
21
3) Before connecting the Battery Cabinet to the UPS: i) You Must Power down the UPS and remove input AC supply. ii) If present: Battery Breaker MUST BE in the “Off” position on the
UPS system and Battery Bank. 4) Battery cable (supplied) is attached to the Battery Cabinet and the UPS. 5) If multiple battery banks have been purchased connect all batteries
banks together in a parallel fashion (Batt. Pos. to Batt. Pos. and Batt. Neg. to Batt. Neg.) before connecting the final battery bank to the UPS.
6) Connect Red and Black Connectors to the Red and Black connectors
located on the back of the UPS system. Ensure proper polarity before connecting
7) Additional battery banks for the N series UPS systems may require an
additional 120VAC supply to power the additional charger. (Cable not supplied).
Start-up Procedure
1) Once all connections are secure, turn the Battery Breaker “On”. 2) Connect the UPS to the AC supply and turn “On” the UPS.
12.2. SNMP (Network Management) Adapter (Optional) The Always On Simple Network Management Protocol (SNMP) adapter is a web-based management product that uses multiple, open standards such as Telnet, HTTP, and SNMP to provide full management of supported devices. The SNMP Adapter is designed to connect directly to the network and allow for network broadcasting of UPS conditions as well as remote access to the UPS system to monitor parameters and displays. For set-up instructions view the READ ME file provided with the set-up disk.

Always On UPS Systems
22
12.3. AS-400 and Relay Contact (Optional) Located on the rear panel of the UPS is a connector, which provides status information through relay and photo-coupler of the UPS operation.
Pin Assignment (DB 25pin male connector) Input signal pin assignment: Remote Emergency Power Off: Pin 24, 25
When pin 24 and pin 25 are shorted, the UPS will power off immediately. Remote Shut Down: Pin 22, 23
If Vpin22 > Vpin23 (5V~12V), the UPS will power off after 1 second. Output signal pin assignment: Fault Pin 1, 2, 3 On Battery Pin 4, 5, 6 Battery Low Pin 7, 8 On Bypass Pin 9, 10 On Inverter Pin 11, 12 Dry Contact Capacity: 3A / 250VAC Max
Figure 12.3.1 Line drawing of AS-400 Communications interface

Always On UPS Systems
23
*1 = Inactive. State may be “open” or “closed” condition Table 12.3.1 Output Truth Table
State Pin 1,2
Pin 2,3
Pin 4,5
Pin 5,6
Pin 7,8
Pin 9,10
Pin 11,12
Normal Open Closed
Open Closed
Open Open Closed
Fault Closed
Open *1 *1 *1 Closed Open
On Battery Open Closed
Closed
Open *1 Open Closed
Battery Low Open Closed
Closed
Open Closed
Open Closed
On Bypass *1 *1 *1 *1 *1 Closed Open On Inverter Open Close
d *1 *1 *1 Open Closed

Always On UPS Systems
24
13. TROUBLESHOOTING The following chart of unusual situations includes some possible problems and solutions occurring under daily operation. If the UPS loses its basic functions, please check the following items before contacting your local dealer or service center:
1. Is the UPS connected to the power source? 2. Does the input voltage match the specification?
When you contact anyone for service, please provide the following information:
1. UPS model name and serial number. 2. Date the problem occurred. 3. Complete description of the problem.
TROUBLESHOOTING CHART
Displayed on LCD Audible Alarm Alarm Description What You Should Do
Output Overload Two Beeps per Second
The UPS is overloaded (in On-Line mode). Your equipment needs more power that the UPS can provide. The UPS operates in bypass.
Shut off the least important equipment connected to the UPS. If this solves the overload problem, the UPS will switch from bypass back to normal operation.
Battery Test No Beeps The UPS is doing a battery test.
No action needed. The UPS will return to normal operation when it successfully completes the battery test.
Over-Charge Constant Beep Batteries are over-charged.
Turn off protected loads. Turn off UPS and call local dealer.
Low Battery 2 beeps every 5 seconds
The unit is operating on Battery Power and will shutdown soon due to very low battery voltage
The unit will restart automatically when acceptable power returns
On-Battery One beep every 5 seconds
The unit is operating on Battery Power
Save your data and perform a controlled shutdown
Charger Failure Constant Beep Charger has failed Phone the local dealer
Over-Temperature Constant Beep High ambient Temperature
Make sure the fans and vent holes are not blocked, and make sure the ambient surrounding temperature is not above 40 degree C. If these conditions did not solve the problem, call your service representative.
Output Short Constant Beep Output short circuit Call the Local Dealer High output voltage Constant Beep High output voltage Call the Local Dealer Low Output voltage Constant Beep Low output voltage Call the Local Dealer
Bus Fault Two Beeps per Second
High internal DC bus voltage
Turn off protected loads. Turn off UPS and call local dealer.
Site wiring fault One beep per second
Voltage detected between neutral and ground
UPS mains connector polarity wrong. Rotate the connector. UPS installed to mains supply without ground.
Line abnormal One beep per second
Wrong AC line backed up during auto restart

Always On UPS Systems
25
14. TECHNICAL DATA Standard Models
N-SERIES MODEL NO. GES-701N GES-102N GES-152N GES-202N GES-302NMaximum Capacity 700VA/490W 1000VA/700W 1500VA/1050W 2000VA/1400W 3000VA/2100WUPC Order Code 825433 30100 825433 30200 825433 30300 825433 30400 825433 30500Nominal VoltageVoltage RangeBypass VoltagePhaseFrequency WindowSynchronization WindowPower FactorOutput VoltageVoltage RegulationFrequency RegulationVoltage Distortion - THDMax Current @ 120VAC 5.8A 8.2A 12.4A 16.5A 24.7ATransient ResponseOverload CapacityCrest FactorEfficiencyTransfer Time
Outlets10-(5-20R-US),
1-(L5-20R)10-(5-15R), 1-(L5-30R)
Battery TypeQuantity 2 3 3 6 6Voltage 24VDC 36VDC 36VDC 72VDC 72VDCRecharge TimeAdvanced Battery ManagementBackup Time - Full Load 9 min 10 min 8 min 12 min 8 minExtended RuntimeOutput ShortAbnormal VoltageAbnormal FrequencyI/O Noise ProtectionI/O Spike and TransientTelephone/NetworkDisplayAudible AlarmsCommunicationsEmergency Power OFFOperating TemperatureHumidityAudible NoiseSafetyApprovalSurge / TransientEMI/RFIWarrantyW x D x H mm (in.)Weight in kg (lbs.) 13.5 (29.7) 16.2 (35.6) 17.0 (37.4) 31.6 (68.4) 32.5 (71.5)MODEL NO. GES-701NR GES-102NR GES-152NR GES-202NR GES-302NRUPC Order Code 825433 30111 825433 30202 825433 30301 825433 30403 825433 30501WxDxH mm (in.)Weight in kg (lbs.) 18 (35.3) 20 (44.1) 25 (55) 31.6 (68.4) 32.5 (71.5)MODEL NO. GES-701N-ABS GES-202N-ABS GES-302N-ABSUPC Order Code 825433 30112 825433 30233 825433 30234
WxDxH mm (in.) 155x410x238 (6.0"x16.5"x9.4")
Weight in kg (lbs.) 20 (44.1) 42 (92.2) 47 (103.5)Approval
UL, cUL, (Optional ABS [American Bureau of Shipping] see below)
ABS(American Bureau of Shipping), UL, cUL
Available Consult Always "On" Representative
Two Year Factory Warranty (Optional Extendable Warranties Available)
RACK-MOUNT MODELS
CONFORMANCE
UL1778, CSA C22.2
FCC Part 15
PHYSICAL DATA 155x410x238 (6.0"x16.5"x9.4") 225x425x360 (8.9"x16.7"x14.2")
428x425x84 (16.9"x16.7"x 3.3") [2U] 428x635x84 (16.9"x25.0"x3.3") [2U]
IEEE C62.41 CAT.A
0 - 40 °C (32 - 104 °F)0 - 95% (Non-condensing)
<40 dBA at 1 Meter
INTERFACE
LCD / LED - Status, Readings and Setup ParametersOn Battery, Low Battery, Overload, Fault
RS232 / Dry Contact / (Optional: USB, SNMP, AS400)YES - Via Normally Closed Contact
ENVIRONMENT
PROTECTION
YESYESYES
Common & Normal Noise SuppressionYES
RJ11/RJ45
Zero
BATTERY
Sealed Lead Acid, Maintenance Free - Hot Swappable Cartridge
<4 Hrs to 90% Recovery
Auto Self-test, Temperature Compensated 3-Stage Charging, Load Dependent Discharge
Available
6-(5-15R)
120VAC (OPTIONAL 220VAC AVAILABLE)
OUTPUT
100/110/115/120/127VAC (User Selectable)+/- 2%
+/- 0.25Hz (Battery or Free Run Mode)<3% Linear Load, <5% Non-linear Load
4% (100% Load Change)125% for 1 min. / 150% for 10 sec.
3:186% normally, > 98% (High efficiency mode)
MARINE GRADE MODELS 260x555x700 (10.2x21.9x27.6)
GENERAL
INPUT Single Phase (L-N-G)45-65Hz (+/-2%, +/-5%, +/-7% - User Selectable)
+/- 3Hz
+/-10%, +10/-15%, +15/-20% (User Selectable)
0.97
60VAC/40% Load, 70VAC/70% Load, 80VAC/100% Load - 144VAC
Specifications subject to change without notice to reflect upgrades and enhancements in technology

Always On UPS Systems
26
15. CONTACT INFORMATION 15.1. Additional Purchases or Upgrades
Always On UPS Systems Inc. Bldg 1 – 150 Campion Road, Kelowna, BC, Canada, V1X 7S8 Phone: (250) 491-9777 Ext 451 Fax: (250) 491-9775 Email: [email protected] Website: www.alwaysonups.com
15.2. QA / Warranty Questions Always On UPS Systems Inc. Bldg 1 – 150 Campion Road, Kelowna, BC, Canada, V1X 7S8 Phone: (250) 491-9777 Ext 209 Fax: (250) 491-9775 Email: [email protected] Website: www.alwaysonups.com
15.3. Software Questions Always On UPS Systems Inc. Bldg 1 – 150 Campion Road, Kelowna, BC, Canada, V1X 7S8 Phone: (250) 491-9777 Ext 204 Fax: (250) 491-9775 Email: [email protected] Website: www.alwaysonups.com