wswildcats.wikispaces.comwswildcats.wikispaces.com/file/view/song+lyrics+with... · web viewthe...
TRANSCRIPT
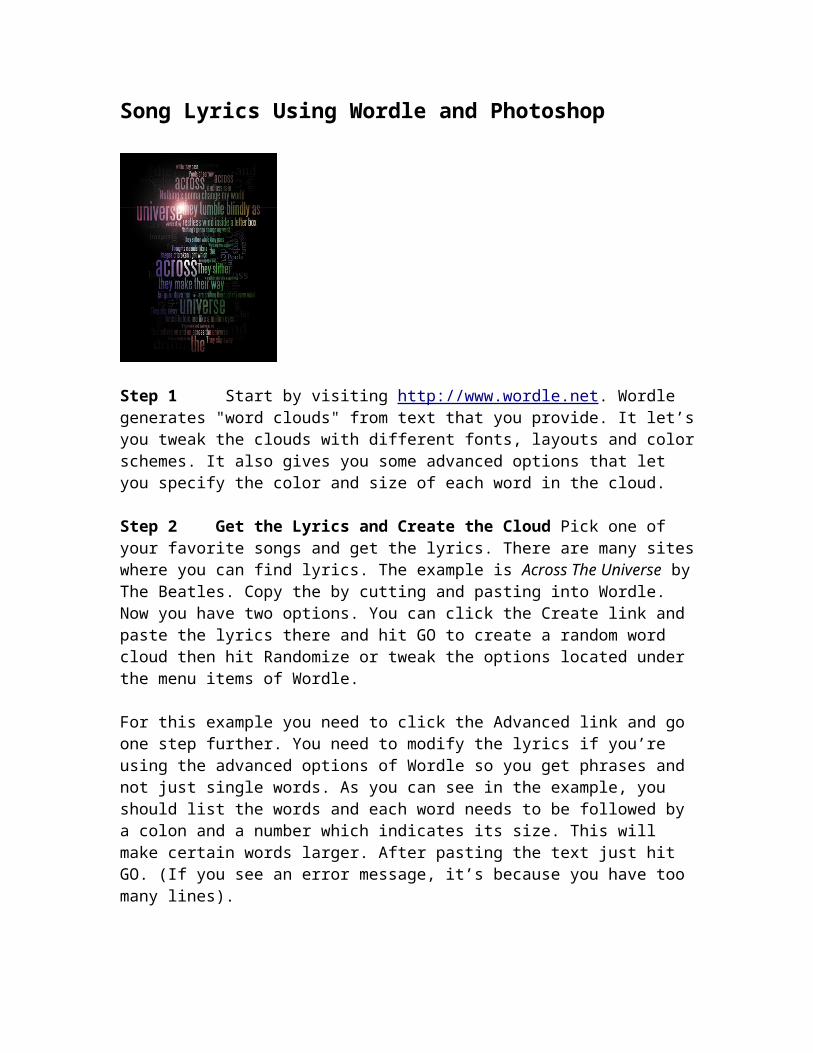
Song Lyrics Using Wordle and Photoshop
Step 1 Start by visiting http://www.wordle.net. Wordle generates "word clouds" from text that you provide. It let’s you tweak the clouds with different fonts, layouts and color schemes. It also gives you some advanced options that let you specify the color and size of each word in the cloud.
Step 2 Get the Lyrics and Create the Cloud Pick one of your favorite songs and get the lyrics. There are many sites where you can find lyrics. The example is Across The Universe by The Beatles. Copy the by cutting and pasting into Wordle. Now you have two options. You can click the Create link and paste the lyrics there and hit GO to create a random word cloud then hit Randomize or tweak the options located under the menu items of Wordle.
For this example you need to click the Advanced link and go one step further. You need to modify the lyrics if you’re using the advanced options of Wordle so you get phrases and not just single words. As you can see in the example, you should list the words and each word needs to be followed by a colon and a number which indicates its size. This will make certain words larger. After pasting the text just hit GO. (If you see an error message, it’s because you have too many lines).

Step 3 Fine tune. You can see that the words are randomly organized. Now we need to make some adjustments. First select a Font. The example is Steelfish. Go to Layout and select Rounder Edges, this will leave the corners empty and select Vertical. Then go to Color menu and select WB (White text on Black background). If you’re not happy with your word cloud, then you can go to Layout and choose Re-layout with current settings.
Step 4 Save the Cloud as a PDF. There is no save option in Wordle, but luckily there is a Print one. We are not printing it but the only way to save it is as a PDF. Click the Print button on Wordle and in the Print dialog, choose Save as PDF. Save your word cloud as a PDF file and hit OK. Name your file "Cloud01.pdf and hit Save.
Step 5 Back to Wordle. We’ll need another word cloud. Click the Advanced link again. The first cloud has lines rather than single words. In the second one we’ll use shorter lines or single words. So edit the lyrics and select the more important words and set their size. Hit the GO button to see the result.
The Second Cloud The example font is Scheherazade. Under the Layout menu choose Straighter Edges and choose Half & Half and Set Color to WB. If you’re not happy with your word cloud then you can go to Layout and choose Re-layout with current settings. Then Save the result as a PDF file and name the file Cloud02.pdf.

Step 6 Now open Photoshop and open the "Cloud02.pdf" file. Go to Image > Image Rotation > and rotate the image 180 or 90 degrees, because the PDF generates differently oriented pdf files. Get the Magic Wand Tool, Set Tolerance to 50 and uncheck Contiguous. Click on the white pixels and all the whites will become selected. Now create a new layer and name it "Cloud02" and fill the selection with 55% gray and deselect. We need some space around the canvas so go to Image > Canvas Size, check Relative and set Width and Height to 300 pixels and hit OK. Go to "Layer 1" and fill it with Black.
Step 7 Darken the Edges Apply a Gradient Overlay Layer Style to the "Cloud02" layer using these settings: Blend Mode => Multiply, Opacity => 75%, Gradient => Black,White, => Reverse => Checked, Style => Radial, Align with Layer => Unchecked and Scale => 90%. This will darken the edges.
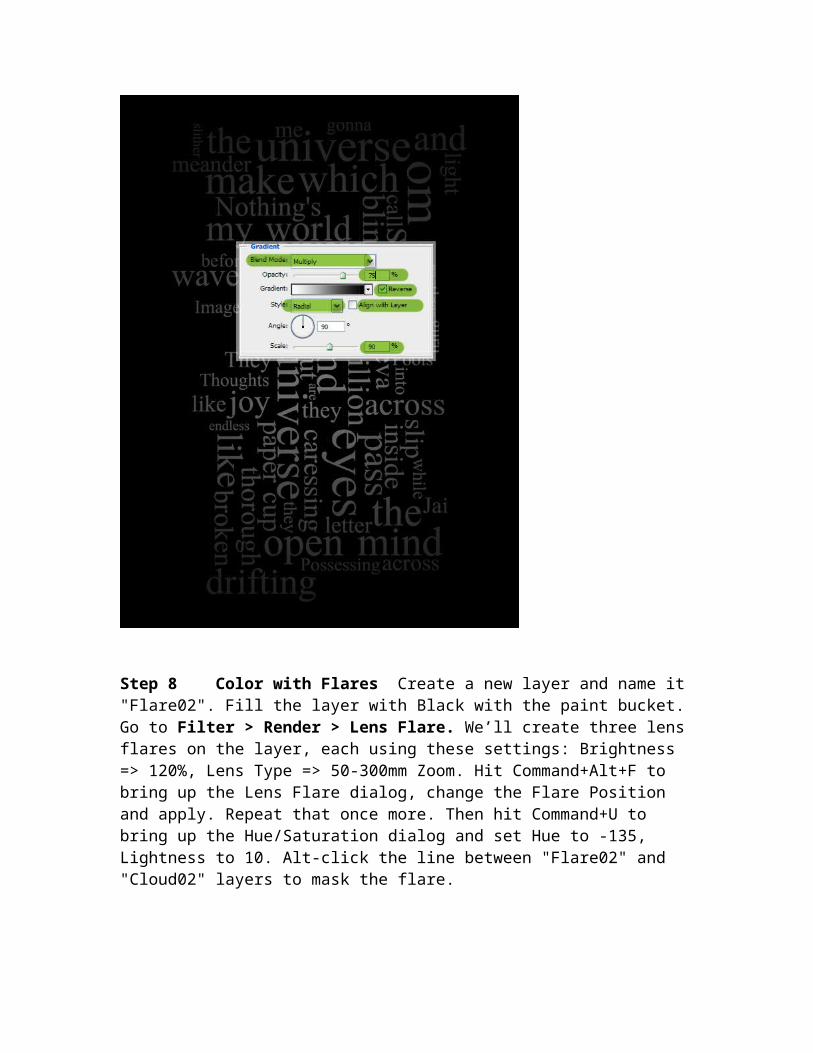
Step 8 Color with Flares Create a new layer and name it "Flare02". Fill the layer with Black with the paint bucket. Go to Filter > Render > Lens Flare. We’ll create three lens flares on the layer, each using these settings: Brightness => 120%, Lens Type => 50-300mm Zoom. Hit Command+Alt+F to bring up the Lens Flare dialog, change the Flare Position and apply. Repeat that once more. Then hit Command+U to bring up the Hue/Saturation dialog and set Hue to -135, Lightness to 10. Alt-click the line between "Flare02" and "Cloud02" layers to mask the flare.
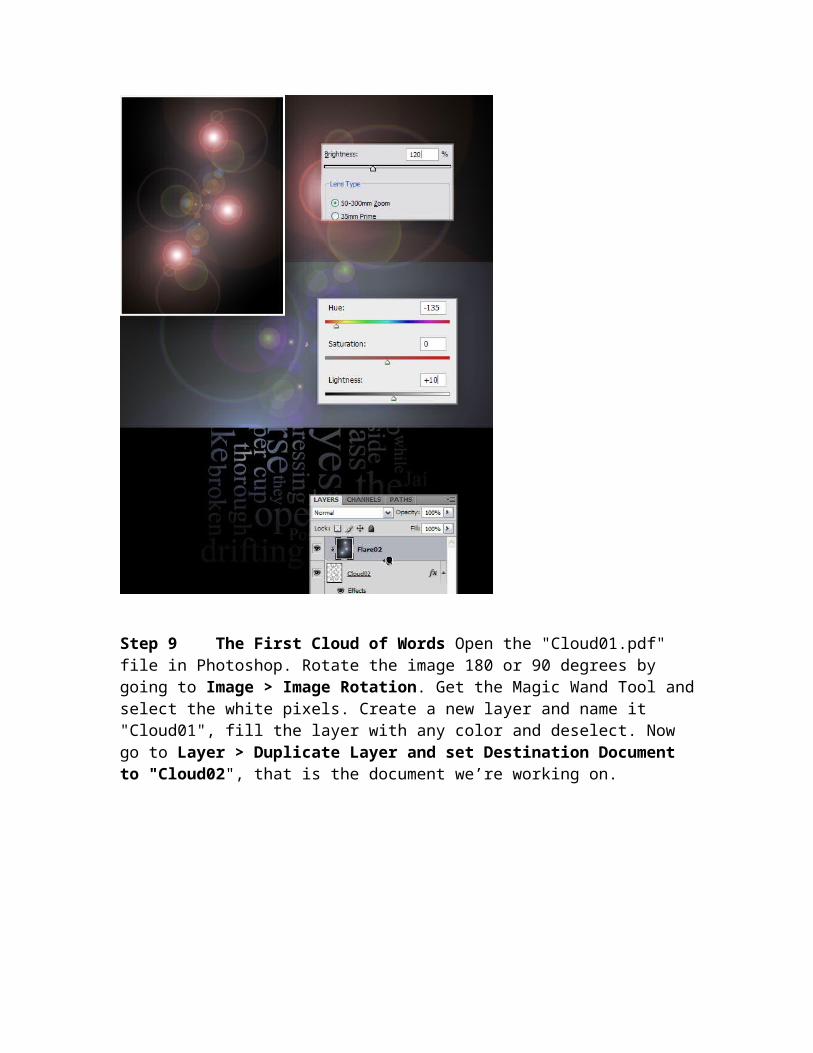
Step 9 The First Cloud of Words Open the "Cloud01.pdf" file in Photoshop. Rotate the image 180 or 90 degrees by going to Image > Image Rotation. Get the Magic Wand Tool and select the white pixels. Create a new layer and name it "Cloud01", fill the layer with any color and deselect. Now go to Layer > Duplicate Layer and set Destination Document to "Cloud02", that is the document we’re working on.
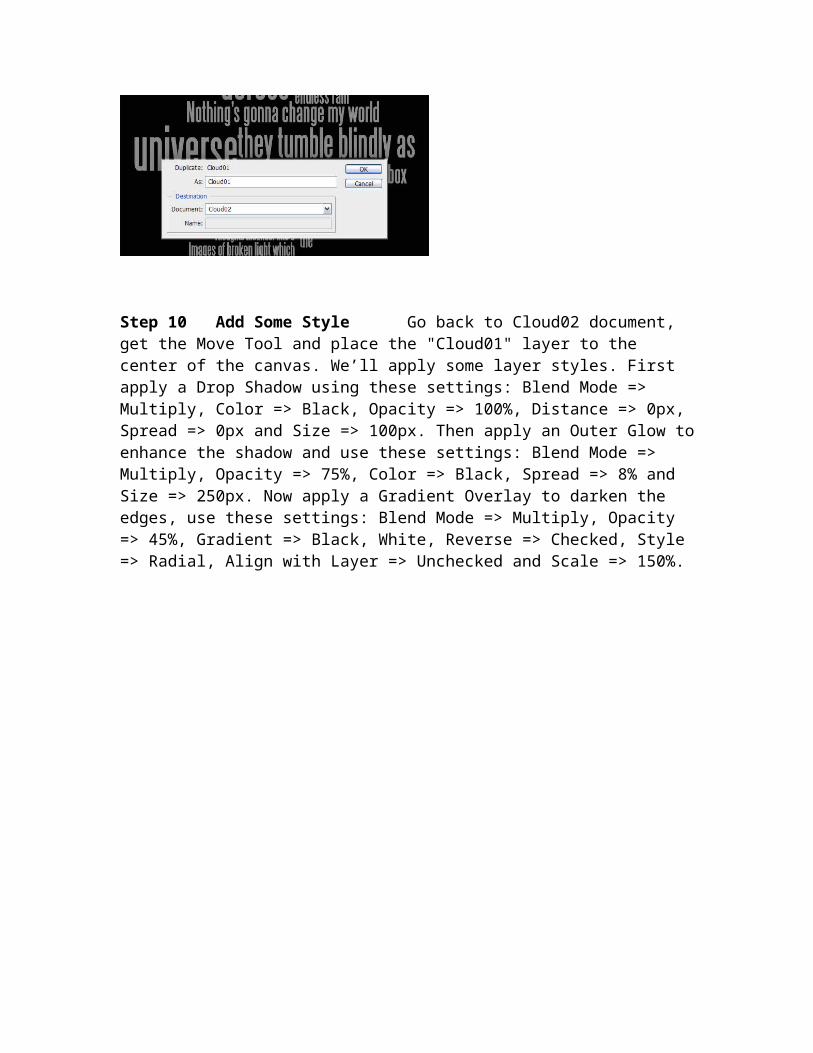
Step 10 Add Some Style Go back to Cloud02 document, get the Move Tool and place the "Cloud01" layer to the center of the canvas. We’ll apply some layer styles. First apply a Drop Shadow using these settings: Blend Mode => Multiply, Color => Black, Opacity => 100%, Distance => 0px, Spread => 0px and Size => 100px. Then apply an Outer Glow to enhance the shadow and use these settings: Blend Mode => Multiply, Opacity => 75%, Color => Black, Spread => 8% and Size => 250px. Now apply a Gradient Overlay to darken the edges, use these settings: Blend Mode => Multiply, Opacity => 45%, Gradient => Black, White, Reverse => Checked, Style => Radial, Align with Layer => Unchecked and Scale => 150%.

Step 11 Some More Flares Create a new layer on top and name it "Flare01", fill it with Black. Place six flares on the layer each using these settings: Brightness => 100%, Lens Type => 50-300mm Zoom. You can place more or less flares depending on how your word cloud looks. Mask the "Flare01" layer as you did at step 9 by Alt-clicking the line between "Flare01" and "Cloud01" layers.
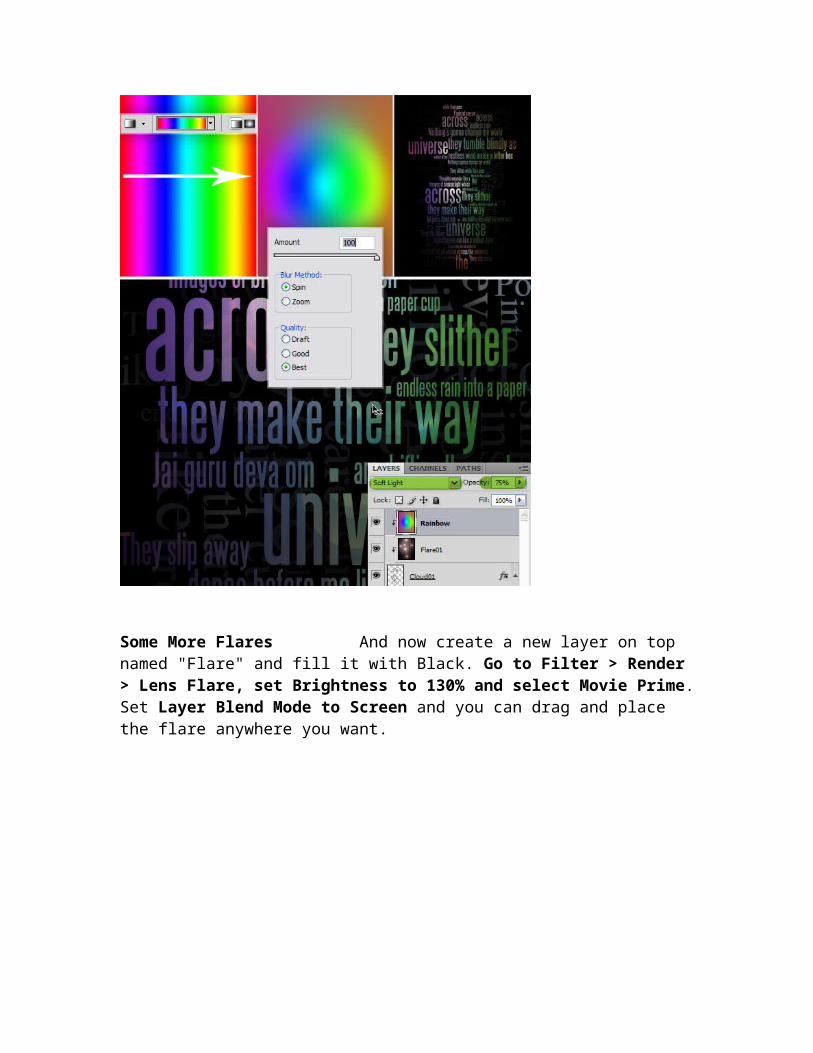
Step 12 Add Some Color Effects. Create another new layer on top and name it "Rainbow". Get the Gradient Tool, pick Spectrum gradient and fill the layer from left to right. Go to Filter > Blur > Radial Blur and use these settings: Amount => 100, Blur Method => Spin, Quality => Best. Hit Command+F to apply the filter again. Alt-click the line between "Flare01" and "Rainbow" layers to mask the rainbow as well. Then set Blend Mode to Soft Light and Layer Opacity to 75%.

Some More Flares And now create a new layer on top named "Flare" and fill it with Black. Go to Filter > Render > Lens Flare, set Brightness to 130% and select Movie Prime. Set Layer Blend Mode to Screen and you can drag and place the flare anywhere you want.
Congratulations This is the final image.