ls1012a ask 1 - nxp semiconductors · 2017-03-10 · ls1012a bhr ask 1.1 freescale semiconductor...
TRANSCRIPT
© 2016 NXP, Inc.
Confidential proprietary
NXP Semiconductors Document Number:
LS1012A ASK RN ASK 1.1
Release Notes
LS1012A ASK 1.1
1. Introduction This document provides Release Notes for the
LS1012ASK Software Package.
1.1. Purpose and scope This release allows building of the LS1012A ASK and
loading of the LS1012A binaries on Freescale RDB
platform.
This includes following:
Code release
• Sources downloaded from Open Source web sites
• LS1012A OpenWrt ASK source patches and
Makefiles
Reference release binaries
• Linux BSP for LS1012A
• Reset Configuration Word (RCW).
• Boot loader code (uBoot)
• PPA Fit Image
• Ramfs file systems Integrated with kernel image
(.itb).
• Roots fs Mounted on SD Card.
• JFFS2 file system bootable from QSPI Flash.
• UBIFS file system bootable from QSPI Flash.
1. Introduction ...................................................... 1 2. Release notes for boot loader ......................... 2 3. Release notes for Linux BSP .......................... 2 4. Release notes for fast path ............................. 3 5. Release notes for OpenWrt ASK .................... 3 6. Building LS1012A OpenWrt ASK .................... 4 7. Release images ................................................ 8 8. Guidelines for flashing or updating flash
partitions........................................................... 9 9. Guideline for testing NAS .............................. 22 10. Guideline for WiFi drivers ............................. 23 11. Guideline for testing System Suspend/Resume
......................................................................... 26 12. Guideline for testing IO expander ................ 27 13. Guideline for testing USB host mode .......... 27 14. Guideline for testing USB gadget mode ...... 27 15. Guideline for testing NFC board PN7150S... 28 16. Guideline for testing SPI-DUART (SC16IS752)
Bridge ............................................................. 29 17. OpenWrt GUI for JFFS2 Filesystem ............. 30 18. Firewall Configuration ................................... 33 19. Known issues ................................................. 33 20. Appendix A (Performance Numbers) ......... 34
Contents

Release notes for boot loader
LS1012A BHR ASK 1.1
NXP Semiconductors Confidential Proprietary 2
Available for LS1012A RDB platfor.
1.2 Release Highlights This is the 5th release (ASK 1.1) for ls1012a BHR & NAS ASK. The OpenWrt and Kernel versions
used are as below:
LS1012A BSP support on Kernel Version 3.19.3.
Latest OpenWrt version used is Chaos Calmer
1.1.1. New in this release
1. Quantena PCIe based WiFi 11ac 4x4 driver support (Available under NDA).
2. WiFi Fast Path Support.
2. Release notes for boot loader This section contains the release notes for boot loader.
2.1. U-Boot The U-Boot code basis is v2016.01. The following LS1012A components are part of U-Boot:
• I2C • QSPI • SDHC-1 • SDHC-2 • PCIe • SATA • Ethernet Driver for PFE. • USB 3.0 • USB 2.0 • Alternate Bank support • Secure Boot • Linux Boot using SD card, TFTP, Y-modem • Linux boot from QSPI
3. Release notes for Linux BSP The Linux code basis for this release is v3.19.3. The following LS1012A components are part of this release.
• BSP for Linux, with following support • PLL/Clock and board specific initializations. • Interrupt controller. • DUART Driver. • Ethernet Driver for PFE. • CMM, FCI, and PFE control driver support. • DSPI Driver. • SATA Driver. • USB 3.0 Host Driver • USB 3.0 Gadget Driver. • USB 2.0 Host Driver • PCIe Host Driver. • QSPI Driver • eSDHC-1, eSDHC-2 memory device support

LS1012A BHR ASK 1.1
Freescale Semiconductor Inc. 3 Freescale confidential proprietary – Non-Disclosure Agreement required
• SDIO WiFi Driver support for Murata/Broadcom module for RDB (Rev-D) • PCIe WiFi driver support (ath9k) for QCA Mini PCIe Module for RDB. • PCIe WiFi driver support Quantena Mini PCIe Module for RDB. • NFC Support. • eDMA Support. • I/O Expander (PCA9555) Driver. • SPI-DUART Bridge(SC16IS752) Driver. • Flextimer. • Power Management Support with System Suspend & Resume. • Jffs2 file system support. • UBIFS file system support. • Samba support with NAS Single Disk with performance optimizations.
4. Release notes for fast path The following components are part of this release:
• CMM application for fast path control • Fast path support for IPv4, IPv6, IPv4/NAT • PPPoE • PPPoE relay • VLAN • Multicast • QoS for egress, ingress (ICC) and exception path • PFE exception path rate limiter • L2 Bridging (Automatic Mode) • WiFi Fast Path
5. Release notes for OpenWrt ASK The ASK is based on OpenWrt Chaos Calmer 15.05 branch, and is prepared with the following toolchain, library,
and binutils:
• GCC 4.8-linaro arm • Glibc 2.19 • Binutils 2.24.3
The following packages are part of the ASK:
• Busybox 1.23.2 • Cmm 2.01 • Dnsmasq 2.73 (DHCP and DNS server) • Dropbear 2015.67 • e2fsprogs_1.42.12 • Ethtool 3.7 • Fci _2.00 • fdisk_2.25.2-4 • Fstools_2015-05-24 • haserl_0.9.32 • hostapd_2015-03-25-1 • i2c-tools 3.1.2 • ip 4.0

Building LS1012A OpenWrt ASK
LS1012A BHR ASK 1.1
NXP Semiconductors Confidential Proprietary 4
• Iptables 1.4.21 • Ip6tables 1.4.21 • jshn 2015-06-14 • jsonfilter 2014-06-19 • libcli 1.9.4 • libgcc_4.8-linaro • libgdbm_1.10 • libip4tc_1.4.21 • libip6tc_1.4.21 • libjson-c_0.12 • libjson-script_2015-06-14 • libmnl_1.0.3-2 • libnetfilter-conntrack_1.0.4 • libnl-tiny_0.1 • libpcap_1.5.3 • libpthread_2.19 • librt_2.19 • libstdcpp_4.8-linaro • libubox_2015-06-14 • libubus_2015-05-25 • libuci_2015-04-09 • libxml2_2.9.2 • libxtables_1.4.21 • mmiotool_1.00 • mtd-utils_1.5.0 • mount-utils • net-tools-mii-tool_1.60 • Netifd 2015-06-08 • odhcp6c_2015-07-13 • odhcpd_2015-05-21 • perf_3.19.3 • pfe_0.0 • ppp_2.4.7 • procd_2015-08-16 • samba4-server • sysstat_10.1.2 • strace_4.8-1 • tcpdump_4.5.1-4 • trace-cmd_v2.4.2-1 • uci_2015-04-09 • ubox_2015-07-14 • ubus_2015-05-25 • uhttpd_2015-08-17 • ubi-utils_1.5.1-2 • vsftpd_3.0.2 • web • zlib_1.2.8
6. Building LS1012A OpenWrt ASK
6.1. LS1012A-RDB To build the image using source released and the dl tar balls provided in the CR release directory, follow the below steps:

LS1012A BHR ASK 1.1
Freescale Semiconductor Inc. 5 Freescale confidential proprietary – Non-Disclosure Agreement required
1. Checkout the release src and dl tar balls from CR folder in the release directory
2. Un-tar the src-openwrt-ls1012a_1.1.rc0.tar.bz2
tar -jxvf src-openwrt-ls1012a_1.1.rc0.tar.bz2
3. Un-tar the dl-openwrt-ls1012a_1.1.rc0.tar.bz2
tar -jxvf dl-openwrt-ls1012a_1.1.rc0.tar.bz2
4. Access the src directory src-openwrt-ls1012a_1.1.rc0-ls1012a-rdb
5. If SDIO WiFi has to be used instead of default PCIe (QCA) WiFi, then follow these steps:
Copy “openwrt-ls1012a_ask_1.0_bcmdhd_sdio_wifi_enable_rdb_nas.patch” from “CR” dir to “src-openwrt-ls1012a_1.1.rc0-ls1012a-rdb” dir.
Apply Patch:
patch –p1 < openwrt-ls1012a_ask_1.0_bcmdhd_sdio_wifi_enable_rdb_nas.patch
6. Create the soft link to the dl directory
ln -s ../dl dl
7. Copy the RDB build config file config-ls1012a-rdb from config directory
cp config/config-ls1012a-rdb .config
8. Execute the make command to compile the build to generate the image
make V=99 (to see the full compilation logs) or make (without compilation logs)
After successful compilation, you can find the following useful images
1. openwrt-ls1012a-hgw-lsrdb.itb is the ITB image for Linux in bin/ls1012a-glibc directory
2. u-boot-qspi_swap.bin is the u-boot image generated in bin/ls1012a-glibc/Uboot-layerscape-ls1012ardb
3. rcw_800_default_swap.bin is the rcw image generated in bin/ls1012a-glibc/rcw/ls1012ardb/R_SPNH_3508
4. ppa_swap.itb is the ppa image generated in bin/ls:1012a-glibc/ppa/ directory
5. openwrt-ls1012a-root.ubi_qspi-nor is the ubifs root filesystem image in bin/ls1012a-glibc directory
6. openwrt-ls1012a-root.jffs2-256k is the jffs2 root filesystem image in bin/ls1012a-glibc directory
7. openwrt-ls1012a-hgw-lsrdb-uImage is the Linux Kernel Image generated in bin/ls1012a-glibc directory
8. openwrt-ls1012a-hgw-lsrdb.dtb is the dtb image generated in bin/ls1012a-glibc directory
6.2. LS1012A-RDB-NAS To build the image using src released and the dl tar balls provided in the CR release directory, follow the below steps:
1. Checkout the release src and dl tar balls from CR folder in the release directory
2. Un-tar the src-openwrt-ls1012a_nas_1.1.rc0.tar.bz2
tar -jxvf src-openwrt-ls1012a_nas_1.1.rc0.tar.bz2

Building LS1012A OpenWrt ASK
LS1012A BHR ASK 1.1
NXP Semiconductors Confidential Proprietary 6
3. Un-tar the dl-openwrt-ls1012a_nas_1.1.rc0.tar.bz2
tar -jxvf dl-openwrt-ls1012a_nas_1.1.rc0.tar.bz2
4. Access the src directory src-openwrt-ls1012a_nas_1.1.rc0-ls1012a-rdb-nas
5. If SDIO WiFi has to be used instead of default PCIe (QCA) WiFi, then follow these steps:
Copy “openwrt-ls1012a_ask_1.0_bcmdhd_sdio_wifi_enable_rdb_nas.patch” from “CR” dir to “src-openwrt-ls1012a_1.1.rc0-ls1012a-rdb” dir.
Apply Patch:
patch –p1 < openwrt-ls1012a_ask_1.0_bcmdhd_sdio_wifi_enable_rdb_nas.patch
6. Create the soft link to the dl directory
ln -s ../dl dl
7. Copy the RDB build config file config-ls1012a-rdb-nas from config directory
cp config/config-ls1012a-rdb-nas .config
8. Execute the make command to compile the build to generate the image
make V=99 (to see the full compilation logs) or make (without compilation logs)
After successful compilation, you can find the following useful images
1. openwrt-ls1012a-nas-lsrdb.itb is the ITB image for Linux in bin/ls1012a-glibc directory
2. u-boot-qspi_swap.bin is the u-boot image generated in bin/ls1012a-glibc/Uboot-layerscape-ls1012ardb
3. rcw_800_default_swap .bin is the rcw image generated in bin/ls1012a-glibc/rcw/ls1012ardb/R_SPNH_3508
4. ppa_swap.itb is the ppa image generated in bin/ls1012a-glibc/ppa/ directory
5. openwrt-ls1012a-root.ubi_qspi-nor is the ubifs root filesystem image in bin/ls1012a-glibc directory
6. openwrt-ls1012a-root.jffs2-256k is the jffs2 root filesystem image in bin/ls1012a-glibc directory
7. openwrt-ls1012a-nas-lsrdb-uImage is the Linux Kernel Image generated in bin/ls1012a-glibc directory
8. openwrt-ls1012a-nas-lsrdb.dtb is the dtb image generated in bin/ls1012a-glibc directory
6.3. Build for USB gadget support 1. Refer sections 6.1 or 6.3 to build for RDB platform. 2. After compilation, open “kernel menuconfig” for platform
make CONFIG_TARGET=platform kernel_menuconfig
3. Enable the gadget support in Linux by enabling the following configurations.

LS1012A BHR ASK 1.1
Freescale Semiconductor Inc. 7 Freescale confidential proprietary – Non-Disclosure Agreement required
4. Execute the make command to compile the build to generate the image
make V=99 (to see the full compilation logs) or make (without compilation logs)
5. Use the generated ITB to boot kernel.

Release images
LS1012A BHR ASK 1.1
NXP Semiconductors Confidential Proprietary 8
6. Copy the following files from the linux source directory to SD card.
fs/configfs/configfs.ko
drivers/usb/./common/usb-common.ko
drivers/usb/gadget/udc/udc-core.ko
drivers/usb/dwc3/dwc3.ko
drivers/usb/gadget/libcomposite.ko
drivers/usb/gadget/function/usb_f_mass_storage.ko
drivers/usb/gadget/legacy/g_mass_storage.ko
NOTE: To test USB gadget mode follow the instructions in section 14.
7. Release images The release contains the following images.
7.1. LS1012ARDB • CR contains the src and dl tar balls.
o src-openwrt-ls1012a_1.1.rc0.tar.bz2 o dl-openwrt-ls1012a_1.1.rc0.tar.bz2
• RSR contains the following release images: 1. itb-openwrt-ls1012a_1.1.rc0-ls1012a-lsrdb 2. openwrt-rootfs-ls1012a_1.1.rc0-ls1012a-rdb.cpio.gz 3. openwrt-rootfs-ls1012a_1.1.rc0-ls1012a-rdb.tar.gz 4. u-boot-2016.01-v201601.00.6-ls1012a-rdb-qspi_swap.bin 5. uImage-openwrt-ls1012a_1.1-rc0-ls1012a-rdb 6. dtb-openwrt-ls1012a_1.1.rc0-ls1012a-rdb 7. ubi-nor-openwrt-ls1012a_1.1-rc0-ls1012a-rdb 8. jffs2-256k-openwrt-ls1012a_1.1.rc0-ls1012a-rdb 9. ppa_swap-ls1012a_1.1-rc0-ls1012a-rdb.itb 10. In rcw directory inside ls1012ardb,inside R_SPNH_3508 directory rcw_800_default_swap.bin 11. In rcw directory inside ls1012ardb,inside R_SPNH_3508 directory rcw_800_sdhc2_swap.bin(It is
used only when Internal sdio wifi card is connected to SDHC2) 12. In rcw directory inside ls1012ardb,inside R_SPNH_3508 directory rcw_800_nfc_swap.bin(It is used
only when NFC PN7150S board is connected)
7.2. LS1012ARDB-NAS • CR contains the src and dl tar balls.
o src-openwrt-ls1012a_nas_1.1.rc0.tar.bz2 o dl-openwrt-ls1012a_nas_1.1.rc0.tar.bz2
• RSR contains the following release images: 1. itb-openwrt-ls1012a_nas_1.1.rc0-ls1012a-rdb-nas 2. openwrt-rootfs-ls1012a_nas_1.1.rc0-ls1012a-rdb-nas.cpio.gz 3. openwrt-rootfs-ls1012a_nas_1.1.rc0-ls1012a-rdb-nas.tar.gz 4. u-boot-2016.01-v201601.00.6-ls1012a-rdb-nas-qspi_swap.bin 5. uImage-openwrt-ls1012a_nas_1.1.rc0-ls1012a-rdb-nas 6. dtb-openwrt-ls1012a_nas_1.1.rc0-ls1012a-rdb-nas 7. jffs2-256k-openwrt-ls1012a_nas_1.1.rc0-ls1012a-rdb-nas 8. ppa_swap-ls1012a_nas_1.1.rc0-ls1012a-rdb-nas.itb 9. In rcw directory inside ls1012ardb,inside R_SPNH_3508 directory rcw_800_default_swap.bin 10. In rcw directory inside ls1012ardb,inside R_SPNH_3508 directory rcw_800_sdhc2_swap.bin(It is
used only when Internal sdio wifi card is connected to SDHC2)

LS1012A BHR ASK 1.1
Freescale Semiconductor Inc. 9 Freescale confidential proprietary – Non-Disclosure Agreement required
11. In rcw directory inside ls1012ardb,inside R_SPNH_3508 directory rcw_800_nfc_swap.bin(It is used only when NFC PN7150S board is connected)
8. Guidelines for flashing or updating flash partitions
8.1. QSPI Flash Layout
Image Size Start Address
RCW+PBI 1 MB 0x4000_0000
U-boot boot loader + PPFE binary 1 MB 0x4010_0000
U-boot Env 1MB 0x4020_0000
PPA FIT Image 2 MB 0x4050_0000
Kernel ITB 59MB 0x40A0_0000
8.2. DDR memory reserved range
Following DDR address range is used by PFE, should not be used for other usage like tftp download etc.
PFE DDR memory range: 0x83800000 – 0x84400000
8.3. Switch Settings
S.No. Platform Board Version Switch Settings 1. RDB RevB SW1: 1010_0110
SW2: 0000_0000
8.4. U-boot Environment Variables
The following is the default u-boot environment configuration
baudrate=115200
bootargs=console=ttyS0,115200 root=/dev/ram0 earlycon=uart8250,mmio,0x21c0500
bootcmd=pfe stop;sf probe 0:0; sf read $kernel_load $kernel_start $kernel_size && bootm $kernel_load
bootdelay=10
console=ttyAMA0,38400n8
eth1addr=00:11:22:33:44:55
eth2addr=00:15:2a:6e:3e:78
eth3addr=00:15:2a:6e:3e:79
ethact=pfe_eth0
ethaddr=00:11:22:33:44:55
fdt_high=0xffffffffffffffff
fdtcontroladdr=bfc78348
hwconfig=fsl_ddr:bank_intlv=auto
initrd_high=0xffffffffffffffff
ipaddr=192.168.1.2
kernel_addr=0x100000

Guidelines for flashing or updating flash partitions
LS1012A BHR ASK 1.1
NXP Semiconductors Confidential Proprietary 10
kernel_load=0xa0000000
kernel_size=0x2800000
kernel_start=0xa00000
loadaddr=0x80100000
ramdisk_addr=0x800000
ramdisk_size=0x2000000
scsidevs=0
serverip=192.168.1.1
stderr=serial
stdin=serial
stdout=serial
verify=no
NOTE: Default env setting sets bootargs for RAM based file system.
8.4.1. Changing the Env Variable
Any env variable can be changed using following command:
setenv <Variable Name> <Variable Value> Ex:
setenv bootargs ttyS0,115200 root=/dev/ram0 earlycon=uart8250,0x21c0500,115200
8.5. Set the IP address Change the IP address (in environment variable) using following command:
=>setenv serverip 192.168.5.124; setenv ipaddr 192.168.5.136.setenv ethact pfe_eth0
Connect the ethernet cable to eth1 port of LS1012A to your Local PC
8.6. Flashing & Booting pre-built RamDisk ASK Images using TFTP
NOTE-1: This section only explains the example of flashing RAM based filesystem. For Flash Based file
system, please refer section “8.8. JFFS2 Read-Write File System” & “8.9. Flashing & Booting pre-built
JFFS2 ASK Images using TFTP or SD Card” & “8.10. UBIFS Read-Write File System” & “8.11.
Flashing & Booting pre-built UBIFS ASK Images using TFTP or SD Card”
NOTE-2: For Image names in the below sections please refer “Section 7.1” for LS1012A-RDB,
“Section 7.2” for LS1012ARDB-NAS.
NOTE-3: -- The steps in the sections 8.6.4 are to be followed only for LS1012A-RDB and
LS1012ARDB-NAS.
8.6.1. RCW Flashing
=> tftp 0xa0000000 rcw_800_default_swap.bin

LS1012A BHR ASK 1.1
Freescale Semiconductor Inc. 11 Freescale confidential proprietary – Non-Disclosure Agreement required
Speed detected 3e8 Using pfe_eth0 device TFTP from server 192.168.1.1; our IP address is 192.168.1.2 Filename 'rcw_800_default_swap.bin'. Load address: 0xa0000000 Loading: # 1000 Bytes/s done Bytes transferred = 128 (80 hex)
=>sf probe 0:0 SF: Detected S25FS512S_256K with page size 512 Bytes, erase size 128 KiB, total 64 MiB
=> sf erase 0x0 +$filesize SF: 1048576 bytes @ 0x0 Erased: OK
=> sf write 0xa0000000 0x0 $filesize device 0 offset 0x0, size 0x1000 SF: 4096 bytes @ 0x0 Written: OK
Note:
rcw_800_sdhc2_swap.bin should be flashed only when internal sdio wifi card
connected to SDHC2 is being used. (This is not applicable for RDB Rev-B &
Rev-C boards).
rcw_800_nfc_swap.bin should be flashed only when NFC PN7150S board is
connected
8.6.2. U-boot Flashing
=> tftp 0xa0000000 u-boot-2016.01-v201601.00.6-ls1012a-rdb-qspi_swap.bin
Speed detected 3e8 Using pfe_eth0 device TFTP from server 192.168.1.1; our IP address is 192.168.1.2 Filename ‘u-boot-2016.01-v201601.00.5-ls1012a-rdb-qspi_swap.bin ‘. Load address: 0xa0000000 Loading: ################################### 4.9 MiB/s Done
=> sf erase 0x100000 +$filesize SF: 1048576 bytes @ 0x100000 Erased: OK
=> sf write 0xa0000000 0x100000 $filesize device 0 offset 0x100000, size 0x7c450 SF: 509008 bytes @ 0x100000 Written: OK
8.6.3. PPA FIT Image Flashing
=> tftp 0xa0000000 ppa_swap-ls1012a_1.1.rc0-ls1012a-rdb.itb Using pfe_eth0 device TFTP from server 192.168.1.1; our IP address is 192.168.1.2 Filename ‘ppa_swap-ls1012a_1.0.rc0-ls1012a-rdb.itb '. Load address: 0xa0000000 Loading: ################################### 4.9 MiB/s Done
=> sf erase 0x500000 +$filesize SF: 2097152 bytes @ 0x500000 Erased: OK
=> sf write 0xa0000000 0x500000 $filesize device 0 offset 0x500000, size 0x14bc8

Guidelines for flashing or updating flash partitions
LS1012A BHR ASK 1.1
NXP Semiconductors Confidential Proprietary 12
SF: 84936 bytes @ 0x500000 Written: OK
8.6.4. Linux Flashing
=> tftp 0xa0000000 itb-openwrt-ls1012a_1.1.rc0-ls1012a-lsrdb
Speed detected 3e8 Using pfe_eth0 device TFTP from server 192.168.1.1; our IP address is 192.168.1.2 Filename ‘itb-openwrt-ls1012a_1.0.rc0-ls1012a-lsrdb. Load address: 0xa0000000 Loading: ################################################################# ################################################################# ################################################################# ################################################################# ################################################################# ################################################################# ################################################################# ################################################################# ################################################################# ################################################################# ################################################################# ################################################################# ################################################################# ################################################################# ################################################################# ################################################################# ################################################################# ################################################################# ################################################################# ################################################################# ################################################################# ################################################################# ################################################################# ################################################################# ################################################################# ################################################################# ################################################################# ################################### 6.2 MiB/s done Bytes transferred = 26269411 (190d6e3 hex)
=> sf erase 0xa00000 +$filesize SF: 22733663 bytes @ 0xa00000 Erased: OK
=> sf write 0xa0000000 0xa00000 $filesize device 0 offset 0xa00000, size 0x22733663 SF: 22733663 bytes @ 0xa00000 Written: OK
8.6.5. Booting Linux with auto-boot
Follow following steps to boot using auto boot: 1. Make sure all required image are flashed on the board-using step 8.6.1 to 8.6.4. 2. Make sure following env setting is saved:
bootargs=console=ttyS0,115200 root=/dev/ram0 earlycon=uart8250,mmio,0x21c0500
bootcmd=pfe stop;sf probe 0:0; sf read $kernel_load $kernel_start $kernel_size && bootm $kernel_load
3. Power cycle the board to boot it until the boot prompt.

LS1012A BHR ASK 1.1
Freescale Semiconductor Inc. 13 Freescale confidential proprietary – Non-Disclosure Agreement required
8.6.6. Booting Linux without auto-boot
Follow following steps to boot Linux manually (this will be required if user wants to change the itb
image and boot): 1. Press enter at u-boot prompt to stop autoboot. 2. Make sure following env setting is saved:
bootargs=console=ttyS0,115200 root=/dev/ram0 earlycon=uart8250,mmio,0x21c0500
bootcmd=pfe stop;sf probe 0:0; sf read $kernel_load $kernel_start $kernel_size && bootm $kernel_load
3. Load new itb image to DDR using TFTP => tftp 0xa0000000 itb-openwrt-ls1012a_1.0.rc.0-ls1012a-rdb
4. or load the itb image to DDR from QSPI flash. => sf probe 0:0; sf read $kernel_load $kernel_start $kernel_size
5. Issue following command before booting Linux to get network support in Linux. =>pfe stop
6. Boot Linux =>bootm $kernel_load
8.7. Flashing & Booting pre-built Ramdisk ASK Images from SD Card
In this method, Instead of TFTP, loading of files can be performed using SD card.
NOTE-1: This section only explains the example of flashing RAM based filesystem. For Flash Based file
system, please refer section “8.8. JFFS2 Read-Write File System” & “8.9. Flashing & Booting pre-built
JFFS2 ASK Images using TFTP or SD Card” & “8.10. UBIFS Read-Write File System” & “8.11.
Flashing & Booting pre-built UBIFS ASK Images using TFTP or SD Card”
NOTE-2: For Image names in the below sections please refer “Section 7.1” for LS1012A-RDB,
“Section 7.2” for LS1012ARDB-NAS.
NOTE-3: -- The steps in the sections 8.7.4 are to be followed only for LS1012A-RDB and
LS1012ARDB-NAS.
8.7.1. Loading Images on SD Card
Load all the images required for flashing on to SD card from Local PC using following procedure: 1. Put the SD card in SD card slot of LS1012
=> fatls mmc 0 22733663 itb-openwrt-ls1012a_1.1.rc0-ls1012a-lsrdb 560200 u-boot-2016.01-v201601.00.2-ls1012a-rdb.bin 128 rcw_800_default_swap.bin 3file(s), 0 dir(s)
2. Load to the DDR address the required image and from there same above steps can be followed to flash them on the QSPI flash
8.7.2. RCW Flashing => fatload mmc 0 0xa0000000 rcw_800_default_swap.bin
reading rcw_800_swap.bin 128 bytes read in 13 ms (8.8 KiB/s)
=>sf probe 0:0 SF: Detected S25FS512S_256K with page size 512 Bytes, erase size 128 KiB, total 64 MiB
=> sf erase 0x0 +$filesize

Guidelines for flashing or updating flash partitions
LS1012A BHR ASK 1.1
NXP Semiconductors Confidential Proprietary 14
SF: 4096 bytes @ 0x0 Erased: OK
=> sf write 0xa0000000 0x0 $filesize device 0 offset 0x0, size 0x1000 SF: 4096 bytes @ 0x0 Written: OK
rcw_800_sdhc2_swap.bin should be flashed only when Internal sdio wifi card connected to SDHC2 is being used)
8.7.3. U-boot Flashing
=> fatload mmc 0 0xa0000000 u-boot-2016.01-v201601.00.6-ls1012a-rdb-qspi_swap.bin reading u-boot-2016.01-v201601.00.5-ls1012a-rdb-qspi_swap.bin 560200 bytes read in 44 ms (11 MiB/s)
=> sf erase 0x100000 +$filesize SF: 1048576 bytes @ 0x100000 Erased: OK
=> sf write 0xa0000000 0x100000 $filesize device 0 offset 0x100000, size 0x7c450 SF: 560200 bytes @ 0x100000 Written: OK
8.7.4. PPA FIT Image Flashing => fatload mmc 0 0xa0000000 ppa_swap-ls1012a_1.1.rc0-ls1012a-rdb.itb reading ppa_swap.itb 84936 bytes read in 25 ms (3.2 MiB/s) => sf erase 0x500000 +$filesize
SF: 84936 bytes @ 0x500000 Erased: OK
=> sf write 0xa0000000 0x500000 $filesize device 0 offset 0x500000, size 0x14bc8 SF: 84936 bytes @ 0x500000 Written: OK
8.7.5. LINUX
=> fatload mmc 0 0xa0000000 itb-openwrt-ls1012a_1.1.rc0-ls1012a-lsrdb reading itb-openwrt-ls1012a_1.0.rc0-ls1012a-lsrdb 26269411 bytes read in 1349 ms (18.6 MiB/s)
=> sf erase 0xa00000 +$filesize SF: 22733663 bytes @ 0xa00000 Erased: OK
=> sf write 0xa0000000 0xa00000 $filesize device 0 offset 0xa00000, size 0x15AE35F SF: 22733663 bytes @ 0xa00000 Written: OK
8.7.6. Booting Linux with auto-boot
Follow following steps to boot using auto boot:
1. Make sure all required image are flashed on the board using step 8.6.1 to 8.6.4.
2. Make sure following env setting is saved:
bootargs=console=ttyS0,115200 root=/dev/ram0 earlycon=uart8250,mmio,0x21c0500
bootcmd=pfe stop;sf probe 0:0; sf read $kernel_load $kernel_start $kernel_size && bootm $kernel_load
3. Power cycle the board to boot it until the boot prompt.
8.7.7. Booting Linux without auto-boot
Follow following steps to boot Linux manually (this will be required if user wants to change the itb
image and boot): 1. Press enter at u-boot prompt to stop autoboot.

LS1012A BHR ASK 1.1
Freescale Semiconductor Inc. 15 Freescale confidential proprietary – Non-Disclosure Agreement required
2. Make sure following env setting is saved:
bootargs=console=ttyS0,115200 root=/dev/ram0 earlycon=uart8250,mmio,0x21c0500
bootcmd=pfe stop;sf probe 0:0; sf read $kernel_load $kernel_start $kernel_size && bootm $kernel_load
3. Load new itb image to DDR from SD Card
=> fatload mmc 0 0xa0000000 itb-openwrt-ls1012a_1.0.rc.0-ls1012a-rdb
4. or load the itb image to DDR from QSPI flash.
=> sf probe 0:0; sf read $kernel_load $kernel_start $kernel_size
5. Issue following command before booting Linux to get network support in Linux.
=>pfe stop
6. Boot Linux
=>bootm $kernel_load
8.8. JFFS2 Read-Write File System
8.8.1. QSPI Flash Layout for JFFS2 File System
For the Usage of JFFS2 Filesystem,the following is the QSPI Flash Layout:
8.9. Flashing & Booting pre-built JFFS2 ASK Images using TFTP or SD Card
JFFS2 is the read/write file system that can used on QSPI Flash.
NOTE-1: This section only explains the example of flashing JFFS2 based filesystem. For RAM Based
file system, please refer “Section 8.6” & “Section 8.7”
NOTE-2: For Image names in the below sections please refer “Section 7.1” for LS1012A-RDB,
“Section 7.2” for LS1012ARDB-NAS.
8.9.1. RCW Flashing
Refer “Section 8.6.1. RCW Flashing” or “Section 8.7.2. RCW Flashing” for flashing RCW if not flashed
already.
Image Size Start Address
RCW+PBI 1 MB 0x4000_0000
U-boot boot loader + PPFE binary
1 MB 0x4010_0000
U-boot Env 3MB 0x4020_0000
PPA FIT Image 2 MB 0x4050_0000
ROOT_FS 32MB 0x4070_0000
DTB 1MB 0x4270_0000
uImage 14MB 0x4280_0000

Guidelines for flashing or updating flash partitions
LS1012A BHR ASK 1.1
NXP Semiconductors Confidential Proprietary 16
8.9.2. U-boot Flashing
Refer “Section 8.6.2. U-boot Flashing” or “Section 8.7.3. U-boot Flashing” for flashing u-boot if not
flashed already.
8.9.3. PPA FIT Image Flashing
Refer “Section 8.6.3. PPA FIT Image Flashing” or “Section 8.7.4. PPA FIT Image Flashing” for flashing
PPA FIT Image if not flashed already.
8.9.4. Rootfs Flashing
Any of the two alternative methods given below can be used to flash rootfs binary.
8.9.4.1. Using TFTP
=>sf probe 0:0 =>tftp 0xa0000000 jffs2-256k-openwrt-ls1012a_1.1.rc0-ls1012a-rdb =>sf erase 0x700000 0x2000000 =>sf write 0xa0000000 0x700000 $filesize
8.9.4.2. Using SD Card =>fatload mmc 0 0xa0000000 jffs2-256k-openwrt-ls1012a_1.1.rc0-ls1012a-rdb =>sf erase 0x700000 0x2000000 =>sf write 0xa0000000 0x700000 $filesize
8.9.5. DTB Flashing
Any of the two alternative methods given below can be used to flash dtb binary.
8.9.5.1. Using TFTP =>tftp 0xa0000000 dtb-openwrt-ls1012a_1.1.rc0-ls1012a-rdb =>sf erase 0x2700000 0x100000 =>sf write 0xa0000000 0x2700000 $filesize
8.9.5.2. Using SD Card =>fatload mmc 0 0xa0000000 dtb-openwrt-ls1012a_1.1.rc0-ls1012a-rdb =>sf erase 0x2700000 0x100000 =>sf write 0xa0000000 0x2700000 $filesize
8.9.6. uImage Flashing
Any of the two alternative methods given below can be used to flash uImage binary.
8.9.6.1. Using TFTP =>tftp 0xa0000000 uImage-openwrt-ls1012a_1.1.rc0-ls1012a-rdb =>sf erase 0x2800000 0xE00000 =>sf write 0xa0000000 0x2800000 $filesize

LS1012A BHR ASK 1.1
Freescale Semiconductor Inc. 17 Freescale confidential proprietary – Non-Disclosure Agreement required
8.9.6.2. Using SD Card =>sf probe 0:0 =>fatload mmc 0 0xa0000000 uImage-openwrt-ls1012a_1.1.rc0-ls1012a-rdb =>sf erase 0x2800000 0xE00000 =>sf write 0xa0000000 0x2800000 $filesize
8.9.7. U-boot Env Commands
For JFFS2 Filesystem to work, following are the UBOOT ENV Commands:
=>setenv bootargs ‘console=ttyS0,115200 root=/dev/mtdblock4 rootdelay=5
mtdparts=1550000.quadspi:1M(RCW)ro,1M(u-boot)ro,3M(env),2M(PPA-FIT)ro,32M(rootfs),1M(dtb),14M(kernel)
rw rootfstype=jffs2 earlycon=uart8250,mmio,0x21c0500’
=>setenv bootcmd ‘pfe stop;sf probe 0:0;sf read 0x8007ffc0 0x2800000 0x900000;sf read 0x82000000 0x2700000
0x100000;bootm 0x8007ffc0 - 0x82000000’
=>setenv mtdparts ‘1550000.quadspi:1M(RCW)ro,1M(u-boot)ro,3M(env),2M(PPA-
FIT)ro,32M(rootfs),1M(dtb),14M(kernel)’
=>setenv mtdids ‘qspi0=1550000.quadspi’
=>save
8.9.8. Booting Linux with auto-boot
Follow the following steps to boot using auto boot: 1. Make sure all required image are flashed on the board-using step 8.6.1 to 8.6.4. 2. Make sure following env setting is saved:
bootargs= console=ttyS0,115200 root=/dev/mtdblock4 rootdelay=5
mtdparts=1550000.quadspi:1M(RCW)ro,1M(u-boot)ro,3M(env),2M(PPA-FIT)ro,32M(rootfs),1M(dtb),14M(kernel)
rw rootfstype=jffs2 earlycon=uart8250,mmio,0x21c0500
bootcmd= pfe stop;sf probe 0:0;sf read 0x8007ffc0 0x2800000 0x900000;sf read 0x82000000 0x2700000
0x100000;bootm 0x8007ffc0 - 0x82000000
3. Power cycle the board to boot it until the boot prompt.
8.10. UBIFS Read-Write File System
8.10.1. QSPI Flash Layout for UBIFS File System
For the Usage of UBIFS Filesystem,the following is the QSPI Flash Layout:
Image Size Start Address
RCW+PBI 1 MB 0x4000_0000
U-boot boot loader + PPFE binary
1 MB 0x4010_0000
U-boot Env 3MB 0x4020_0000
PPA FIT Image 2 MB 0x4050_0000
ROOT_FS 32MB 0x4070_0000
DTB 1MB 0x4270_0000

Guidelines for flashing or updating flash partitions
LS1012A BHR ASK 1.1
NXP Semiconductors Confidential Proprietary 18
8.11. Flashing & Booting pre-built UBIFS ASK Images using TFTP or SD Card
UBIFS is the read/write file system that can used on QSPI Flash.
NOTE-1: This section only explains the example of flashing UBIFS. For RAM Based file system, please
refer “Section 8.6” & “Section 8.7”
NOTE-2: For Image names in the below sections please refer “Section 7.1” for LS1012A-RDB,
“Section 7.2” for LS1012ARDB-NAS.
8.11.1. RCW Flashing
Refer “Section 8.6.1. RCW Flashing” or “Section 8.7.2. RCW Flashing” for flashing RCW if not flashed
already.
8.11.2. U-boot Flashing
Refer “Section 8.6.2. U-boot Flashing” or “Section 8.7.3. U-boot Flashing” for flashing u-boot if not
flashed already.
8.11.3. PPA FIT Image Flashing
Refer “Section 8.6.3. PPA FIT Image Flashing” or “Section 8.7.4. PPA FIT Image Flashing” for flashing
PPA FIT Image if not flashed already.
8.11.4. Rootfs Flashing
Any of the two alternative methods given below can be used to flash rootfs binary.
8.11.4.1. Using TFTP
=>sf probe 0:0 =>tftp 0xa0000000 ubi-nor-openwrt-ls1012a_1.1.rc0-ls1012a-rdb =>sf erase 0x700000 0x2000000 =>sf write 0xa0000000 0x700000 $filesize
8.11.4.2. Using SD Card =>fatload mmc 0 0xa0000000 ubi-nor-openwrt-ls1012a_1.1.rc0-ls1012a-rdb =>sf erase 0x700000 0x2000000 =>sf write 0xa0000000 0x700000 $filesize
8.11.5. DTB Flashing
Any of the two alternative methods given below can be used to flash dtb binary.
uImage 14MB 0x4280_0000

LS1012A BHR ASK 1.1
Freescale Semiconductor Inc. 19 Freescale confidential proprietary – Non-Disclosure Agreement required
8.11.5.1. Using TFTP =>tftp 0xa0000000 dtb-openwrt-ls1012a_1.1.rc0-ls1012a-rdb =>sf erase 0x2700000 0x100000 =>sf write 0xa0000000 0x2700000 $filesize
8.11.5.2. Using SD Card =>fatload mmc 0 0xa0000000 dtb-openwrt-ls1012a_1.1.rc0-ls1012a-rdb =>sf erase 0x2700000 0x100000 =>sf write 0xa0000000 0x2700000 $filesize
8.11.6. uImage Flashing
Any of the two alternative methods given below can be used to flash uImage binary.
8.11.6.1. Using TFTP =>tftp 0xa0000000 uImage-openwrt-ls1012a_1.1.rc0-ls1012a-rdb =>sf erase 0x2800000 0xE00000 =>sf write 0xa0000000 0x2800000 $filesize
8.11.6.2. Using SD Card =>fatload mmc 0 0xa0000000 uImage-openwrt-ls1012a_1.1.rc0-ls1012a-rdb =>sf erase 0x2800000 0xE00000 =>sf write 0xa0000000 0x2800000 $filesize
8.11.7. U-boot Env Commands
For UBIFS Filesystem to work, following are the UBOOT ENV Commands:
=>setenv bootargs ‘console=ttyS0,115200 mtdparts=1550000.quadspi:1M(RCW)ro,1M(u-
boot)ro,3M(env),2M(PPA-FIT)ro,32M(rootfs),1M(dtb),14M(kernel) rw rootfstype=ubifs root=ubi0:rootfs
ubi.mtd=4 earlycon=uart8250,mmio,0x21c0500’
=>setenv bootcmd ‘pfe stop;sf probe 0:0;sf read 0x8007ffc0 0x2800000 0x900000;sf read 0x82000000 0x2700000
0x100000;bootm 0x8007ffc0 - 0x82000000’
=>setenv mtdparts ‘1550000.quadspi:1M(RCW)ro,1M(u-boot)ro,3M(env),2M(PPA-
FIT)ro,32M(rootfs),1M(dtb),14M(kernel)’
=>setenv mtdids ‘qspi0=1550000.quadspi’
=>save
8.11.8. Booting Linux with auto-boot
Follow the following steps to boot using auto boot: 4. Make sure all required image are flashed on the board-using step 8.6.1 to 8.6.4. 5. Make sure following env setting is saved:
bootargs= console=ttyS0,115200 mtdparts=1550000.quadspi:1M(RCW)ro,1M(u-boot)ro,3M(env),2M(PPA-
FIT)ro,47M(rootfs),1M(dtb),9M(kernel) rw rootfstype=ubifs root=ubi0:rootfs ubi.mtd=4
earlycon=uart8250,mmio,0x21c0500

Guidelines for flashing or updating flash partitions
LS1012A BHR ASK 1.1
NXP Semiconductors Confidential Proprietary 20
bootcmd= pfe stop;sf probe 0:0;sf read 0x8007ffc0 0x2800000 0x900000;sf read 0x82000000 0x2700000
0x100000;bootm 0x8007ffc0 - 0x82000000
6. Power cycle the board to boot it until the boot prompt.
8.12. Read-Write File System on SD-CARD
On Sd Card, to deploy the Read-write filesystem, Following is the procedure
NOTE-1: For Image names in the below sections please refer “Section 7.1” for LS1012A-RDB,
“Section 7.2” for LS1012ARDB-NAS.
8.12.1. RCW Flashing
Refer “Section 8.6.1. RCW Flashing” or “Section 8.7.2. RCW Flashing” for flashing RCW if not flashed
already.
8.12.1. U-boot Flashing
Refer “Section 8.6.2. U-boot Flashing” or “Section 8.7.3. U-boot Flashing” for flashing u-boot if not
flashed already.
8.12.1. PPA FIT Image Flashing
Refer “Section 8.6.3. PPA FIT Image Flashing” or “Section 8.7.4. PPA FIT Image Flashing” for flashing
PPA FIT Image if not flashed already.
8.12.2. Flash Uimage and DTB on QSPI Flash
8.12.2.1. Flashing DTB: =>sf probe 0:0 =>tftp 0xa0000000 dtb-openwrt-ls1012a_1.1.rc0-ls1012a-rdb =>sf erase 0x2700000 0x100000 =>sf write 0xa0000000 0x2700000 $filesize
8.12.2.2. Flashing uImage: =>sf probe 0:0 =>tftp 0xa0000000 uImage-openwrt-ls1012a_1.1.rc0-ls1012a-rdb =>sf erase 0x2800000 0xE00000 =>sf write 0xa0000000 0x2800000 $filesize
8.12.3. Procedure to ramboot: setenv bootargs ‘console=ttyS0,115200 root=/dev/ram0 earlycon=uart8250,0x21c0500,115200’ tftp 0xa0000000 openwrt-ls1012a-hgw-lsrdb.itb bootm 0xa0000000
LS1012A BHR ASK 1.1
Freescale Semiconductor Inc. 21 Freescale confidential proprietary – Non-Disclosure Agreement required
This will boot the box.
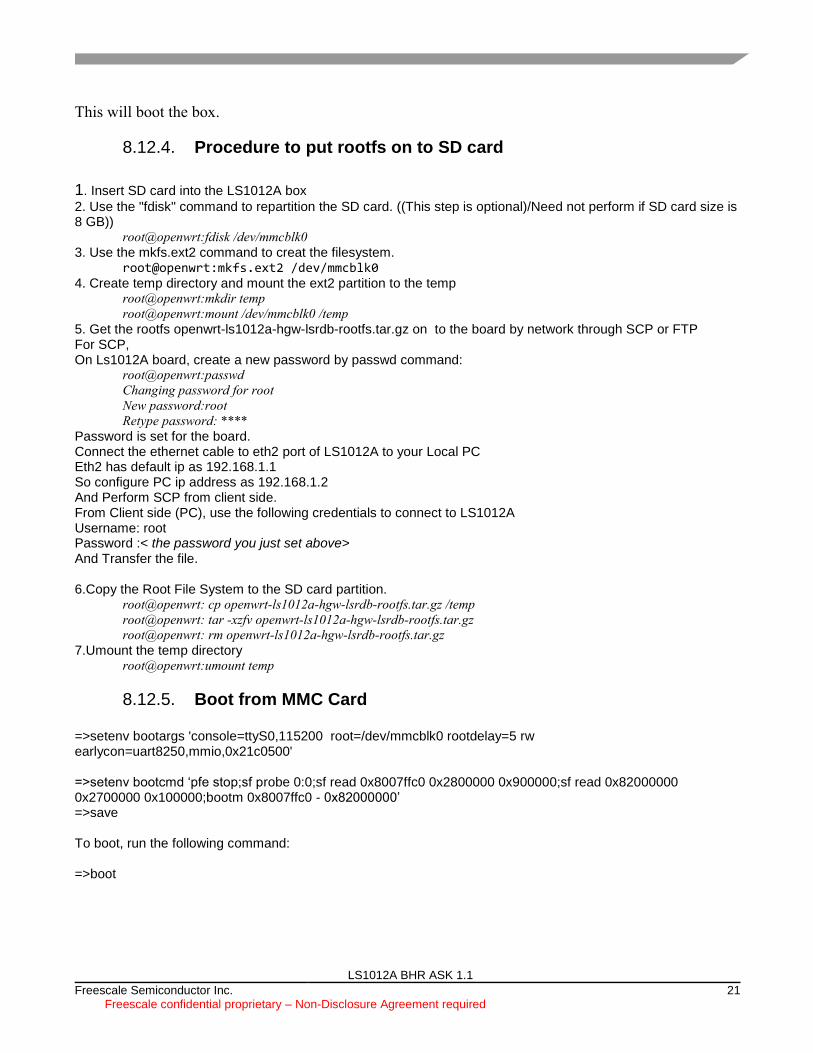
8.12.4. Procedure to put rootfs on to SD card
1. Insert SD card into the LS1012A box
2. Use the "fdisk" command to repartition the SD card. ((This step is optional)/Need not perform if SD card size is 8 GB))
root@openwrt:fdisk /dev/mmcblk0
3. Use the mkfs.ext2 command to creat the filesystem. root@openwrt:mkfs.ext2 /dev/mmcblk0
4. Create temp directory and mount the ext2 partition to the temp root@openwrt:mkdir temp
root@openwrt:mount /dev/mmcblk0 /temp
5. Get the rootfs openwrt-ls1012a-hgw-lsrdb-rootfs.tar.gz on to the board by network through SCP or FTP For SCP, On Ls1012A board, create a new password by passwd command:
root@openwrt:passwd
Changing password for root
New password:root
Retype password: ****
Password is set for the board. Connect the ethernet cable to eth2 port of LS1012A to your Local PC Eth2 has default ip as 192.168.1.1 So configure PC ip address as 192.168.1.2 And Perform SCP from client side. From Client side (PC), use the following credentials to connect to LS1012A Username: root Password :< the password you just set above> And Transfer the file. 6.Copy the Root File System to the SD card partition.
root@openwrt: cp openwrt-ls1012a-hgw-lsrdb-rootfs.tar.gz /temp
root@openwrt: tar -xzfv openwrt-ls1012a-hgw-lsrdb-rootfs.tar.gz
root@openwrt: rm openwrt-ls1012a-hgw-lsrdb-rootfs.tar.gz
7.Umount the temp directory root@openwrt:umount temp
8.12.5. Boot from MMC Card =>setenv bootargs 'console=ttyS0,115200 root=/dev/mmcblk0 rootdelay=5 rw earlycon=uart8250,mmio,0x21c0500' =>setenv bootcmd ‘pfe stop;sf probe 0:0;sf read 0x8007ffc0 0x2800000 0x900000;sf read 0x82000000 0x2700000 0x100000;bootm 0x8007ffc0 - 0x82000000’ =>save To boot, run the following command: =>boot

Guideline for testing NAS
LS1012A BHR ASK 1.1
NXP Semiconductors Confidential Proprietary 22
8.13. Board Recovery Steps
It is suggested that testing be conducted on bank 2 to avoid constant u-boot erase problem as it takes considerable effort to recover the board with both banks or bank 1 erased.
Please follow the following steps to use bank 2:
1. Connect to the board LS1012ARDB-11. 2. To check which bank you are in, give reset command or power-cycle the board and check the u-boot logs
. You will get some prints like “Board: LS1012ARDB Version: RevB, boot from QSPI: bank1 “in the logs. 3. Now if you are in bank 1 give the following command to shift to bank 2 “ i2c mw 0x24 0x7 0xfc; i2c mw
0x24 0x3 0xf5 “. To check bank give “reset” command. 4. To move back to bank 1 from bank 2 , power on/off the board or use the following command “i2c mw 0x24
0x3 0xf4 “ and then give “reset” command.
Using bank 2 would ensure that the board is always operational. If bank 2 is erased use the following command in exact order to reprogram it:
1. If bank 2 is erased, power on/off the board. It will lead you back to bank 1. 2. Give the following commands in specified order:
1. sf probe 0:0; sf read 80000000 0x0 0x40000; (it probes qspi and reads the rcw from 0x0 location on bank 1 and copies 0x40000 bytes of it to 0x80000000 location in DDR)
2. i2c mw 0x24 0x7 0xfc; i2c mw 0x24 0x3 0xf5; (it switches from bank 1 to bank 2) 3. sf probe 0:0; sf erase 0 40000; (probe qspi flash on bank 2 and erase 0x40000 bytes from 0x0
location) 4. sf write 80000000 0 40000; (write 0x40000 bytes from 0x80000000 location in DDR to 0 location
in QSPI bank 2). 5. i2c mw 0x24 0x3 0xf4 (move back to bank 1) 6. sf probe 0:0; sf read 0x80000000 0x100000 0x80000; (probe qspi flash in bank 1 and read uboot
from 0x100000 offset in QSPI and copy 0x80000 bytes to 0x80000000 in DDR) 7. i2c mw 0x24 0x7 0xfc; i2c mw 0x24 0x3 0xf5; (switch to bank 2) 8. sf probe 0:0; sf erase 0x100000 0x80000; (probe QSPI flash of bank 2 and erase 0x80000 bytes
from 0x100000 offset ) 9. sf write 80000000 0x100000 0x80000; (write 0x80000 bytes from 0x80000000 location in DDR to
0x100000 offset in QSPI) 10. reset
9. Guideline for testing NAS
NOTE: Use NAS Build images only to test this feature.
Samba package is provide in this release for NAS. NAS can be tested from a Windows PC using
robocopy command.
Following are the steps to run the samba:
1. Mount the hard drive
e.g: mount /dev/sda1 /share1
2. Edit the /etc/samba/smb.conf to add the share :

LS1012A BHR ASK 1.1
Freescale Semiconductor Inc. 23 Freescale confidential proprietary – Non-Disclosure Agreement required
[share_nas]
path = /share1
valid users = root
guest ok = Yes
read only = No
3. Start the samba
smbd –D –s /etc/smb.conf
4. Enable LRO
ethtool -K eth0 lro on
ethtool -K eth2 lro on
5. From the Windows PC, map the samba share as the network drive (through windows
explorer or use “net use” command), open the command line and run robocopy command to
do read or write
Read: robocopy z: . <file>
Write: robocopy . z: <file>
10. Guideline for WiFi drivers
10.1. SDIO WiFi(RDB)
NOTE-1: This is only applicable for Rev-D RDBs.
NOTE-1: This feature is by default disabled. To enable this please refer “Section-6 Building
LS1012A OpenWrt ASK”. Refer “Section-6.1.5” for HGW build and “Section-6.2.5” for NAS build.
1. Connect the Antenna to the module prescribed for SN8000.
2. Run following command to initialize on board SN8000 SDIO WiFi connected on SDHC-1 in AP
mode: insmod lib/modules/3.19.3/bcmdhd.ko
nvram_path=/lib/firmware/bcm/SN8000_BCM43362/bcmdhd.SN8000.SDIO.cal
firmware_path=/lib/firmware/bcm/SN8000_BCM43362/fw_bcmdhd_apsta.bin
Following print should be visible on the console:
/SN8000_BCM43362/bcmdhd.SN8000.SDIO.cal firmware_path=/lib/firmware/bcm/SN8000_B
CM43362/fw_bcmdhd_apsta.bin
dhd_module_init in
Power-up adapter 'DHD generic adapter'
wifi_platform_bus_enumerate device present 1
F1 signature OK, socitype:0x1 chip:0xa962 rev:0x1 pkg:0x9
DHD: dongle ram size is set to 245760(orig 245760) at 0x0
wifi_platform_get_mac_addr
CFG80211-ERROR) wl_setup_wiphy : Registering Vendor80211)
wl_create_event_handler(): thread:wl_event_handler:70d started
CFG80211-ERROR) wl_event_handler : tsk Enter, tsk = 0xffffffc021241980
dhd_attach(): thread:dhd_watchdog_thread:70e started
dhd_attach(): thread:dhd_dpc:70f started

Guideline for WiFi drivers
LS1012A BHR ASK 1.1
NXP Semiconductors Confidential Proprietary 24
dhd_deferred_work_init: work queue initialized
dhdsdio_write_vars: Download, Upload and compare of NVRAM succeeded.
dhd_bus_init: enable 0x06, ready 0x06 (waited 0us)
wifi_platform_get_mac_addr
Firmware up: op_mode=0x0002, MAC=00:0b:6c:42:1f:6f
dhd_preinit_ioctls buf_key_b4_m4 set failed -23
Firmware version = wl0: Apr 30 2015 11:17:10 version 5.90.231 FWID 01-0
dhd_preinit_ioctls wl ampdu_hostreorder failed -23
dhd_wlfc_init(): successfully enabled bdcv2 tlv signaling, 79
dhd_wlfc_init(): wlfc_mode=0x0, ret=-23
Dongle Host Driver, version 1.141 (TOB) (r)
Compiled from
Register interface [wlan0] MAC: 00:0b:6c:42:1f:6f
3. Run following command for interface UP: ifconfig wlan0 <ip address> netmask <ip mask> up e.g. “ifconfig wlan0 192.168.4.1 netmask 255.255.255.0 up”
4. Run following to configure AP: hostapd -B ./etc/hostapd.conf
To change AP configuration, edit “/etc/hostapd.conf “ as per the need. Following print should be
visible on the console after running above command:
Configuration file: ./etc/hostapd.conf
CFG80211-ERROR) wl_cfg80211_del_station : Disconnect STA : ff:ff:ff:ff:ff:ff scb_val.val 3
Using interface CFG80211-ERROR) wl_cfg80211_set_channel : wlan0 with hwaddr 00:0b:6c:42:1f:6f and ssid
"ls1012a_ap"
netdev_ifidx(4), chan_type(1) target channel(1)
CFG80211-ERROR) wl_cfg80211_parse_ies : No WPSIE in beacon
CFG80211-ERROR) wl_cfg80211_parse_ies : No WPSIE in beacon
_dhd_wlfc_mac_entry_update():1649, entry(32)
wlan0: interface state UNINITIALIZED->ENABLED
wlan0: AP-ENABLED
5. After Step 4, AP should be visible to nearby STA devices with SSID “ls1012a_ap”. A lap top
can be connected and data transfer etc can be tested.
10.2. QCA PCIe WiFi (Ath9k)
NOTE: This is enabled by default in the release. If SDIO WiFi is enabled by applying patch
“openwrt-ls1012a_ask_1.0_bcmdhd_sdio_wifi_enable_rdb_hgw.patch” for HGW and “openwrt-
ls1012a_ask_1.0_bcmdhd_sdio_wifi_enable_rdb_hgw.patch” for NAS releases, then this feature will
no longer be available.
1. Connect QCA Mini PCIe WiFi module (which is compatible with ath9k driver) to the mini PCIe
slot on the RDB.
2. Boot the system.
3. Drivers comes up with system boot. Print similar to given below should be visible on console:

LS1012A BHR ASK 1.1
Freescale Semiconductor Inc. 25 Freescale confidential proprietary – Non-Disclosure Agreement required
cfg80211: Calling CRDA to update world regulatory domain
cfg80211: World regulatory domain updated:
cfg80211: DFS Master region: unset
cfg80211: (start_freq - end_freq @ bandwidth), (max_antenna_gain, max_eirp), (dfs_cac_time)
cfg80211: (2402000 KHz - 2472000 KHz @ 40000 KHz), (N/A, 2000 mBm), (N/A)
cfg80211: (2457000 KHz - 2482000 KHz @ 40000 KHz), (N/A, 2000 mBm), (N/A)
cfg80211: (2474000 KHz - 2494000 KHz @ 20000 KHz), (N/A, 2000 mBm), (N/A)
cfg80211: (5170000 KHz - 5250000 KHz @ 80000 KHz), (N/A, 2000 mBm), (N/A)
cfg80211: (5250000 KHz - 5330000 KHz @ 80000 KHz, 160000 KHz AUTO), (N/A, 2000 mBm), (0 s)
cfg80211: (5490000 KHz - 5730000 KHz @ 160000 KHz), (N/A, 2000 mBm), (0 s)
cfg80211: (5735000 KHz - 5835000 KHz @ 80000 KHz), (N/A, 2000 mBm), (N/A)
cfg80211: (57240000 KHz - 63720000 KHz @ 2160000 KHz), (N/A, 0 mBm), (N/A)
4. Run following command for interface UP: ifconfig wlan0 <ip address> netmask <ip mask> up e.g. “ifconfig wlan0 192.168.4.1 netmask 255.255.255.0 up”
5. Run following to configure AP: hostapd -B ./etc/hostapd.conf
To change AP configuration, edit “/etc/hostapd.conf “ as per the need. Following print should be
visible on the console after running above command:
Configuration file: ./etc/hostapd.conf
CFG80211-ERROR) wl_cfg80211_del_station : Disconnect STA : ff:ff:ff:ff:ff:ff scb_val.val 3
Using interface CFG80211-ERROR) wl_cfg80211_set_channel : wlan0 with hwaddr 00:0b:6c:42:1f:6f and ssid
"ls1012a_ap"
netdev_ifidx(4), chan_type(1) target channel(1)
CFG80211-ERROR) wl_cfg80211_parse_ies : No WPSIE in beacon
CFG80211-ERROR) wl_cfg80211_parse_ies : No WPSIE in beacon
_dhd_wlfc_mac_entry_update():1649, entry(32)
wlan0: interface state UNINITIALIZED->ENABLED
wlan0: AP-ENABLED
6. After Step 4, AP should be visible to nearby STA devices with SSID “ls1012a_ap”. A lap top
can be connected and data transfer etc can be tested.
10.3. Quantenna PCIe 11ac 4x4 NOTE: Quantenna PCIe 11ac 4x4 AP mode driver binary is available under NDA. Please contact
support team to get the driver.
1. Connect Quantenna Mini PCIe WiFi module to the mini PCIe slot on the RDB.
2. Boot the system with UBIFS/JFFS as rootfs.
3. Get the following ipk files from NDA folder and copy them to the rootfs.
quantenna_37.4.0.62.1-2.00.1-1_ls1012a.ipk
kmod-quantenna_3.19.3+37.4.0.62.1-2.00.1-1_ls1012a.ipk
4. Install both ipk files with following commands.

Guideline for testing System Suspend/Resume
LS1012A BHR ASK 1.1
NXP Semiconductors Confidential Proprietary 26
root@OpenWrt:/# opkg install quantenna_37.4.0.62.1-2.00.1-1_ls1012a.ipk
root@OpenWrt:/# kmod-quantenna_3.19.3+37.4.0.62.1-2.00.1-1_ls1012a.ipk
5. Reboot the system with the command “reboot”
6. Interface with name “host0” can be seen on successful loading of the driver.
7. Run following command for interface UP: ifconfig host0 <ip address> netmask <ip mask> up e.g. “ifconfig wlan0 192.168.2.1 netmask 255.255.255.0 up”
8. Refer quantenna documentation to configure AP and STA.
10.4. Setting up WiFi fast path
To enable WiFi fast path following steps needs to be done.
1. Configure/modify cmm config file to fast forward the wifi interface. Following lines should be
present in /etc/config/fastforward file for the each wifi interface needs to be fast forward.
#WiFi fastforward configuration for Quantenna driver
config wifi_fastforward
option ifname host0
option direct_path_rx 0
2. After modifying /etc/config/fastforward reboot the system.
3. For wifi fast-forwarding in bridge mode set following, default configuration is route mode.
root@OpenWrt:/# echo 1 > /sys/devices/platform/90500000.pfe/vwd_bridge_hook_enable
4. For wifi fast-forwarding in route mode set following.
root@OpenWrt:/# echo 1 > /sys/devices/platform/90500000.pfe/vwd_route_hook_enable
5. Now the wifi traffic will be fast-forwarded.
11. Guideline for testing System Suspend/Resume
1. Sleep and Wake up by FTM timer Start a FTM timer. It will trigger an interrupt to wake up the system in 5 seconds.
echo 5 > /sys/devices/platform/29d0000.ftm0/ftm_alarm && echo mem > /sys/power/state

LS1012A BHR ASK 1.1
Freescale Semiconductor Inc. 27 Freescale confidential proprietary – Non-Disclosure Agreement required
12. Guideline for testing IO expander
1. Export gpios 447 to 443 echo 447 > /sys/class/gpio/export
echo 446 > /sys/class/gpio/export
echo 445 > /sys/class/gpio/export
echo 444 > /sys/class/gpio/export
echo 443 > /sys/class/gpio/export
2. Verify direction of the gpios cat /sys/class/gpio/gpio447/direction
cat /sys/class/gpio/gpio446/direction
cat /sys/class/gpio/gpio445/direction
cat /sys/class/gpio/gpio444/direction
cat /sys/class/gpio/gpio443/direction
3. Read the gpios and verify cat /sys/class/gpio/gpio447/value
cat /sys/class/gpio/gpio446/value
cat /sys/class/gpio/gpio445/value
cat /sys/class/gpio/gpio444/value
cat /sys/class/gpio/gpio443/value
13. Guideline for testing USB host mode
1. Insert USB flash drive into USB 3.0 port.
Print similar to below will appear as soon as the storage device is detected.
root@OpenWrt:/# usb 1-1: new high-speed USB device number 2 using xhci-hcd
usb-storage 1-1:1.0: USB Mass Storage device detected
scsi host1: usb-storage 1-1:1.0
scsi 1:0:0:0: Direct-Access Netac OnlyDisk PMAP PQ: 0 ANSI: 4
sd 1:0:0:0: Attached scsi generic sg0 type 0
sd 1:0:0:0: [sda] 7823360 512-byte logical blocks: (4.00 GB/3.73 GiB)
sd 1:0:0:0: [sda] Write Protect is off
sd 1:0:0:0: [sda] No Caching mode page found
sd 1:0:0:0: [sda] Assuming drive cache: write through
sda:
sd 1:0:0:0: [sda] Attached SCSI removable disk
2. Mount the drive and use. root@OpenWrt:/# mount /dev/sda /mnt/
root@OpenWrt:/# cd /mnt/
14. Guideline for testing USB gadget mode
1. Refer section 6.4 to build USB gadget driver.

LS1012A BHR ASK 1.1
NXP Semiconductors Confidential Proprietary 28
2. Boot to Linux prompt.
3. Mount the SD card to copy kernel objects that generated from the steps mentioned in section 6.4.
4. Insert the kernel objects in the mentioned order.
insmod usb/configfs.ko
insmod usb/usb-common.ko
insmod usb/udc-core.ko
insmod usb/dwc3.ko
insmod usb/libcomposite.ko
insmod usb/usb_f_mass_storage.ko
insmod usb/g_mass_storage.ko file=/dev/mmcblk0 stall=n
5. LS1012A platform is now ready to work as a mass storage device. Connect the cable to a
windows host machine and use as a storage device.
6. Use the following commands to remove objects after use.
rmmod g_mass_storage.ko
rmmod usb_f_mass_storage.ko
rmmod libcomposite.ko
rmmod dwc3.ko
rmmod udc-core.ko
rmmod usb-common.ko
rmmod configfs.ko
15. Guideline for testing NFC board PN7150S
Connect PN7150S board to Arduino connectors (J16,J17,J18,J19,J20) on LS1012A-RDB. On PN7150S
board solder a wire between pins corresponding to J16[2] and J17[8].
1. Power ON the board and from U-Boot, flash rcw_800_nfc_swap.bin. Refer section 8.6.1.
2. Reset the board and stop at U-Boot prompt.
3. Run the U-Boot command to set ioexpander GPIOs for NFC. i2c md 0x24 0x2; i2c mw 0x24 0x2 0xf7; 2c md 0x24 0x2;
4. Boot to Linux prompt.
5. Copy linux_libnfc-nci.tar.gz tarball from RSR/ls1012a-rdb/ directory to LS1012A-RDB
filesystem.
6. SD card can be used to transfer files from PC to RDB.
Use the following commands to untar and copy files to their corresponding locations in the filesystem.
mount /dev/mmcblk0 /mnt/; cd /mnt/
tar -xvf linux_libnfc-nci.tar.gz
cd linux_libnfc-nci/

LS1012A BHR ASK 1.1
Freescale Semiconductor Inc. 29 Freescale confidential proprietary – Non-Disclosure Agreement required
cp libnfc_nci_linux* /usr/lib/
export LD_LIBRARY_PATH=/
cp libnfc-nxp.conf /etc/.
mkdir -p /etc/conf/
cp libnfc-nxp.conf /etc/conf/.
mkdir -p /etc/conf/PN7150
cp libnfc-nxp.conf /etc/conf/PN7150/.
8. Insert the kernel object to enable NFC board. insmod ./pn5xx_i2c.ko
9. Run the demo application to poll and detect the NFC card ./nfcDemoApp poll
10. Bring the NFC card near to the PN7150S board. This card comes along with PN7150S kit.
Upon detection of the card, the tag is read and displayed similar to the below prints.
Note: - The detection of spurious interrupts is a known issue, which will be resolved in the next release.
Waiting for a Tag/Device...
NFC Tag Foundpn54x_dev_read: SPURIOUS INTERRUPTS DETECTED for irq 508
Type : 'Type A - Mifare Ul'
NFCID1 : '04 5C 47 D2 9C 39 80 '
pn54x_dev_read: SPURIOUS INTERRUPTS DETECTED for irq 508
pn54x_dev_read: SPURIOUS INTERRUPTS DETECTED for irq 508
pn54x_dev_read: SPURIOUS INTERRUPTS DETECTED for irq 508
pn54x_dev_read: SPURIOUS INTERRUPTS DETECTED for irq 508
pn54x_dev_read: SPURIOUS INTERRUPTS DETECTED for irq 508
Record Found :
NDEF Content Max size : '868 bytes'
NDEF Actual Content size : '29 bytes'
ReadOnly : 'FALpn54x_dev_read: SPURIOUS INTERRUPTS DETECTED for irq
508
SE'
pn54x_dev_read: SPURIOUS INTERRUPTS DETECTED for irq 508
Type : 'URI'
URI : 'http://www.nxp.com/demoboard/OM5578'
29 bytes of NDEF data received :
D1 01 19 55 01 6E 78 70 2E 63 6F 6D 2F 64 65 6D 6F 62 6F 61 72 64 2F 4F 4D 35 35 37 38
16. Guideline for testing SPI-DUART (SC16IS752) Bridge
The two UARTs are registered as serial devices /dev/ttySC0 and /dev/ttySC1.
This can be tested with KW41 and this section will be updated when KW41 is enabled.

OpenWrt GUI for JFFS2 Filesystem
LS1012A BHR ASK 1.1
NXP Semiconductors Confidential Proprietary 30
17. OpenWrt GUI for JFFS2 Filesystem
Give the ip address of the eth2 192.168.1.1 in the browser
The following screen appears
To change the Network configuration, click on Network

LS1012A BHR ASK 1.1
Freescale Semiconductor Inc. 31 Freescale confidential proprietary – Non-Disclosure Agreement required
The following page appears
Make the corresponding changes in the respective fields and click on save and click on apply

OpenWrt GUI for JFFS2 Filesystem
LS1012A BHR ASK 1.1
NXP Semiconductors Confidential Proprietary 32
The above is the dhcp page in the network section.

LS1012A BHR ASK 1.1
Freescale Semiconductor Inc. 33 Freescale confidential proprietary – Non-Disclosure Agreement required
18. Firewall Configuration In the current release by default no firewall rules are configured including NAT. To enable NAT
following firewall rules needs to be configured.
iptables -P INPUT DROP iptables -A INPUT –i eth2 -j ACCEPT iptables -P FORWARD DROP iptables -t nat -A POSTROUTING -o eth0 -j MASQUERADE iptables -A FORWARD -i eth0 -o eth2 -m state --state RELATED,ESTABLISHED -j ACCEPT iptables -A FORWARD -i eth2 -o eth0 -j ACCEPT
19. Known issues
Know issues in this release are:
1. UDP Slow Path (self traffic) Rx performance is low. 2. NAS Stability issue, at times network interface goes down. A reboot will be needed to recover. 3. SDIO WiFi is not supported in default release images and build. Support for this is provided in a separate
patch. Please refer “Section-10” of this document for the details. 4. GUI support is only available for JFFS2, UBIFS and SD Card based file system. It is not supported for
RAM based filesystem. 5. QoS in exception path (Ethernet to Host) doesn’t works for certain values. 6. PPPoE relay connection is not expiring. 7. pfe.ko kernel module unload is not working. 8. Some buffalo USB flashes does not work consistently. 9. Quantenna 11ac driver crashes while rebooting the system. 10. Occasional Kernel crash in auto bridge module.

Appendix A (Performance Numbers)
LS1012A BHR ASK 1.1
NXP Semiconductors Confidential Proprietary 34
20. Appendix A (Performance Numbers)
20.1. Fast Path Performance Following tests are done with Spirent Test center.
WAN => eth0@1G
LAN => eth2@1G
20.1.1. IPv4 UDP Routing (Uni-Directional)
LAN to WAN
Frame Size Fps Mbps
64 1488004 1,000
128 844595 1,000
256 452899 1,000
390 304878 1,000
512 234962 1,000
1024 119732 1,000
1280 96154 1,000
1518 81274 1,000
WAN to LAN
Frame Size Fps Mbps
64 1488095 1,000
128 844595 1,000
256 452899 1,000
390 304878 1,000
512 234962 1,000
1024 119732 1,000
1280 96154 1,000
1518 81274 1,000
20.1.2. IPv4 UDP Routing (Bi-Directional)
Frame Size Fps Mbps
64 2976189 2,000
128 1689089 2,000
256 905797 2,000
390 609756 2,000
512 469925 2,000
1024 239464 2,000
1280 192308 2,000
1518 162549 2,000
LS1012A ASK 1.0
Freescale Semiconductor Inc. 35 Freescale confidential proprietary – Non-Disclosure Agreement required
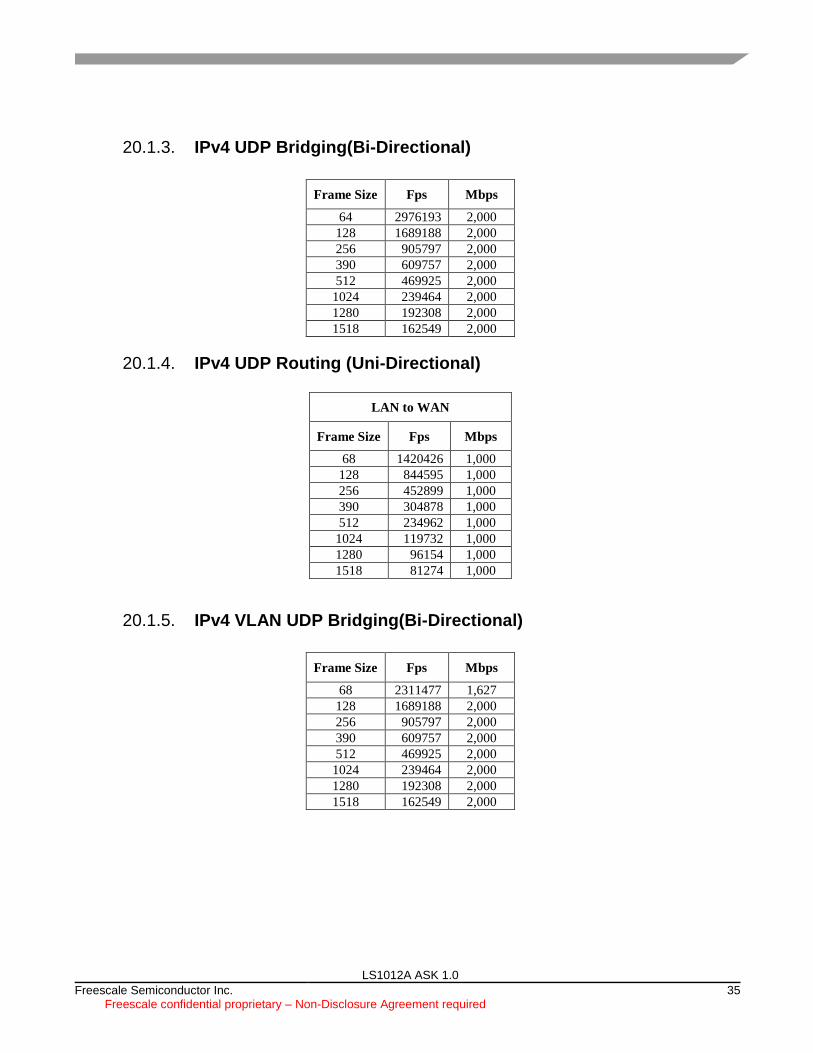
20.1.3. IPv4 UDP Bridging(Bi-Directional)
Frame Size Fps Mbps
64 2976193 2,000
128 1689188 2,000
256 905797 2,000
390 609757 2,000
512 469925 2,000
1024 239464 2,000
1280 192308 2,000
1518 162549 2,000
20.1.4. IPv4 UDP Routing (Uni-Directional)
LAN to WAN
Frame Size Fps Mbps
68 1420426 1,000
128 844595 1,000
256 452899 1,000
390 304878 1,000
512 234962 1,000
1024 119732 1,000
1280 96154 1,000
1518 81274 1,000
20.1.5. IPv4 VLAN UDP Bridging(Bi-Directional)
Frame Size Fps Mbps
68 2311477 1,627
128 1689188 2,000
256 905797 2,000
390 609757 2,000
512 469925 2,000
1024 239464 2,000
1280 192308 2,000
1518 162549 2,000

Appendix A (Performance Numbers)
LS1012A BHR ASK 1.1
NXP Semiconductors Confidential Proprietary 36
20.1.6. IPv6 UDP Routing (Uni-Directional)
LAN to WAN
Frame Size Fps Mbps
86 1179245 1,000
128 844595 1,000
256 452899 1,000
390 304878 1,000
512 234962 1,000
1024 119732 1,000
1280 96154 1,000
1518 81274 1,000
WAN to LAN
Frame Size Fps Mbps
86 1179245 1,000
128 844595 1,000
256 452899 1,000
390 304878 1,000
512 234962 1,000
1024 119732 1,000
1280 96154 1,000
1518 81274 1,000
20.1.7. IPv6 UDP Routing (Bi-Directional)
Frame Size Fps Mbps
86 2358493 2000
128 1689189 2,000
256 905797 2,000
390 609756 2,000
512 469925 2,000
1024 239464 2,000
1280 192308 2,000
1518 162549 2,000
20.1.8. IPv6 UDP Bridging(Bi-Directional)
Frame Size Fps Mbps
86 2358493 2000
128 1689193 2,000

LS1012A ASK 1.0
Freescale Semiconductor Inc. 37 Freescale confidential proprietary – Non-Disclosure Agreement required
256 905797 2,000
390 609756 2,000
512 469925 2,000
1024 239464 2,000
1280 192308 2,000
1518 162549 2,000
20.1.9. IPv6 VLAN UDP Routing (Uni-Directional)
LAN to WAN
Frame Size Fps Mbps
128 844595 1,000
256 452899 1,000
390 304878 1,000
512 234962 1,000
1024 119732 1,000
1280 96154 1,000
1518 81274 1,000
20.1.10. IPv6 VLAN UDP Routing (Bi-Directional)
Frame Size Fps Mbps
128 1689193 2,000
256 905797 2,000
390 609756 2,000
512 469925 2,000
1024 239464 2,000
1280 192308 2,000
1518 162549 2,000
20.2. Slow Path (To the board) performance
Slow path performance measured with iperf3 tool between PC and DUT on LAN interface.
20.2.1. IPv4 TCP performance.
On DUT following TCP tuning parameter is configured.
# echo 212992 > /proc/sys/net/ipv4/tcp_limit_output_bytes
Iperf3 command used on sender side.
#iperf3 -c IP_address -i1-t 10 -w 100000

Appendix A (Performance Numbers)
LS1012A BHR ASK 1.1
NXP Semiconductors Confidential Proprietary 38
Iperf3 command used on receiver side.
#iperf3 -s -i1
TCP Mbps
Tx 940
Rx 564
20.2.2. IPv4 UDP Performance
Iperf3 command used on sender side.
#iperf3 -u -c IP_address -i1-t 10 -b1000M
Iperf3 command used on receiver side.
#iperf3 -s -i1
UDP Mbps
Tx 937
Rx 195
20.2.3. Quantenna mPCIe 11ac 4x4 WiFi Performance with WiFi offload.
Tests are done with IXA setup using dual ethernets ports pumping 600Mbps on each interface.
Transport
Protocol WiFi Receiver WiFi Transmitter
Mbps CPU% Mbps CPU%
UDP 1240 88 1120 67


© 2016 Freescale Semiconductor, Inc. Confidential Proprietary
How to Reach Us:
Home Page: nxp.com Web Support:
nxp.com/support
14 October 2016
Information in this document is provided solely to enable system and software implementers to use Freescale products. There are no express or implied copyright licenses granted hereunder to design or fabricate any integrated circuits based on the information in this document. Freescale reserves the right to make changes without further notice to any products herein. Freescale makes no warranty, representation, or guarantee regarding the suitability of its products for any particular purpose, nor does Freescale assume any liability arising out of the application or use of any product or circuit, and specifically disclaims any and all liability, including without limitation consequential or incidental damages. “Typical” parameters that may be provided in Freescale data sheets and/or specifications can and do vary in different applications, and actual performance may vary over time. All operating parameters, including “typicals,” must be validated for each customer application by customer’s technical experts. Freescale does not convey any license under its patent rights nor the rights of others. Freescale sells products pursuant to standard terms and conditions of sale, which can be found at the following address: nxp.com/SalesTermsandConditions. Freescale, the Freescale logo, AltiVec, C–5, CodeTest, CodeWarrior, ColdFire, ColdFire+, C–Ware, Energy Efficient Solutions logo, Kinetis, mobileGT, PowerQUICC, Processor Expert, QorIQ, Qorivva, StarCore, Symphony, and VortiQa are trademarks of Freescale Semiconductor, Inc., Reg. U.S. Pat. & Tm. Off. Airfast, BeeKit, BeeStack, CoreNet, Flexis, MagniV, MXC, Platform in a Package, QorIQ Qonverge, QUICC Engine, Ready Play, SafeAssure, SafeAssure logo, SMARTMOS, Tower, TurboLink, Vybrid, and Xtrinsic are trademarks of Freescale Semiconductor, Inc. All other product or service names are the property of their respective owners. © 2016 Freescale Semiconductor, Inc.