looking to put a new - projects.hobbylobby.com
TRANSCRIPT

Looking to Put a New
on Your Crafts?STAMP
BLOCK PRINTING
HOLDS ALL OF
THE ANSWERS!
Here we’ll provide you with a few basics to get you started, from a quick overview
of tools to inspiring project ideas.
around the block{CREAT IVE INSP IRAT IONS FROM HOBBY LOBBY®}free

STAMP OFF THE OLD BLOCK
We thought this box could use some block printing! First, we jazzed up the bare wood container (available in the Crafts Department) with acrylic paint. Then, we personalized it with a hand-carved linoleum stamp. To get the look, print a monogram with a standard word-processing program. Use graphite paper to transfer the letters to unmounted linoleum, and carve as shown. Tip: What’s with the backwards lettering? Your block stamp will print a mirror image of your carving, so it’s crucial to trace your monogram accordingly.
While carving your handmade stamp blocks, it’s a good idea to protect your hands with nitrile-covered gloves. You’ll find them in the Crafts Department, near the stained glass supplies.
2 Hobby Lobby Product Inspirations

supplies:
1. Place graphite paper (dark side down) on a linoleum block. Then, place your pre-printed monogram over the graphite paper, and follow the lines with a pencil. Use a ruler when applicable. Tip: If you want to use your monogram more than once, we suggest transferring it to tracing paper before tracing onto graphite paper.
2. Use a linoleum cutter to carefully carve out the linoleum around the design.
3. It’s helpful to use a craft knife to cut around the edges of the design—you can use a ruler to keep your lines straight. The defined border will make it easier to precisely cut out the design.
4. Your completed stamp should look something like this.
5. Use a paintbrush to dust away any shavings.
8. Carefully (but firmly) press the stamp to the box.
6. Use a roller to apply ink to the stamp.
7. If you wish, mark the box for precise placement.
• Pre-Printed Monogram Design (mirror image, as shown)
• Tracing Paper (optional)• Graphite Paper• Pencil• Ruler• Linoleum Sheet• Block Printing Starter Kit
(linoleum cutter, roller, tray and block printing ink)
• Craft Knife• Paintbrush• Pre-Painted Wooden Box
Hobby Lobby Product Inspirations 3

» ON A ROLL Take your quirky sense of style for a ride with some
wheel-spinning handmade art. Basic black mat board is the base for this simple design. We used a custom-created block stamp to transfer our bicycle image to individual cardstock squares. Then we adhered the cardstock to the mat board as shown.
« PLAYING
TAG Who to? It’s up to you! Label your handouts with sweet, handmade tags. Simply draw or trace your design, and use graphite paper to transfer it to a mounted linoleum block. Then carve it out—use a larger head to scoop out wide areas of background, and use a smaller head around the teeny details. Tip: For bold, crisp images like the ones shown here, place quilt batting under the cardstock as you stamp. The extra spring helps the ink to cover more completely.
4 Hobby Lobby Product Inspirations

« FOREVER FLOWERS Create trendy floral wall décor with an unfinished wooden plaque (hand painted with acrylic paint) and special block printing ink. After tracing and carving a design onto a linoleum block, stamp the illustration with alternating colors of ink. Work in layers, stamping one color at a time and rinsing the block with water before switching hues. Here we started with lights as a base and worked up to the darkest flowers.
BY THE BLOCK Carve out a little custom art! You’re the designer when it comes to our easy to master block-printing supplies. Need a repeating pattern? Carve basic branches and petals into compact pre-mounted linoleum. Want a larger than life print? Choose a full-size square of flexible linoleum—it’ll cover a bigger canvas in one press, and it’s carveable on both sides. Tip: When carving your stamps, cut around the edges of the design with a craft knife. This makes scooping out the linoleum much easier!
«
DARK SIDE How will you stamp your ready-to-embellish space? You can start by choosing a positive or negative approach. To stamp the negative space, as we’ve done with the plaques on the right and left of this photo, carve out the actual image you wish to stamp, leaving the background intact. To stamp the positive space (see the plaque in the middle) carve out the area around the image.
Hobby Lobby Product Inspirations 5

1. Create your design—if you're not comfortable with freehand drawing, you can look to stencils or clip art.
2. Trace the design onto tracing paper.
3. Place graphite paper (dark side down) on a linoleum block. Place your traced design over the graphite paper, and follow the lines with a pencil.
7. When you’re finished, your image will be the only raised portion of the stamp.
5. Use a linoleum cutter to carefully carve out the linoleum around the design.
4. As you press firmly, the design will be transferred to the linoleum.
6. Use a paintbrush to dust
away any shavings.
8. Use a roller to apply ink to the stamp.
9. Carefully (but firmly) press the stamp to the surface of the plaque.
10. For the look shown here, stamp from lightest to darkest color, washing the stamp thoroughly with water before each color change.
6 Hobby Lobby Product Inspirations

PROUD AS A PEACOCKStrut your stuff in this block printed peacock tee! Just trace your design onto a mounted linoleum block before carving and stamping. For this fabulously feathered look, we traded our block printing ink for acrylic paint mixed with fabric medium. We used a light coat of paint for the background feathers and a heavier coat for the ones up front.
Hobby Lobby Product Inspirations 7

WRAP IT UPIt’s okay to judge these presents by their paper. The block-printed gift wrap is a present in itself! To get the look, use a handmade linoleum block stamp on simple brown craft paper. And use any color or pattern that
floats our custom-designed, one-of-a-kind, totally gorgeous boat! Tip: If you’re using a mix of smallish shapes, let one block do double duty, as shown. There’s no need to make an individual stamp for each illustration.
8 Hobby Lobby Product Inspirations

3. Place graphite paper (dark side down) on a linoleum block. Place your traced design over the graphite paper, and follow the lines with a pencil.
6. Use a paintbrush to dust away any shavings.
8. Use the roller to apply paint to the raised portion of the stamp.
7. Apply paint to the roller—use
a mixture of white and blue paint for the look shown here.
2. Trace the design onto tracing paper.
1. Create your design—if you aren’t comfortable with freehand drawing, you can look to stencils or clip art.
9. Carefully (but firmly) press the stamp to basic brown craft paper.
5. Use a linoleum cutter to carefully carve out the linoleum around the design. Remember to carve out any details that should appear as negative space (like the veins in this leaf).
4. As you press firmly,
the design will be transferred to the linoleum.
10. Stamp in layers until you’ve achieved the desired look. When your work is dry, wrap your gift and embellish with burlap and twine.
Hobby Lobby Product Inspirations 9
5. Use a linoleum cutter to carefully carve out the linoleum around the design. Remember to carve out any details that should appear as negative space (like the veins in this leaf).
Wrap it upIt’s okay to judge these presents by their paper. The block-printed giftwrap is a present in itself! To get the look, use a handmade linoleum block stamp on simple brown craft paper. And use any color or pattern that floats your custom-designed, one-of-a-kind, totally gorgeous boat!
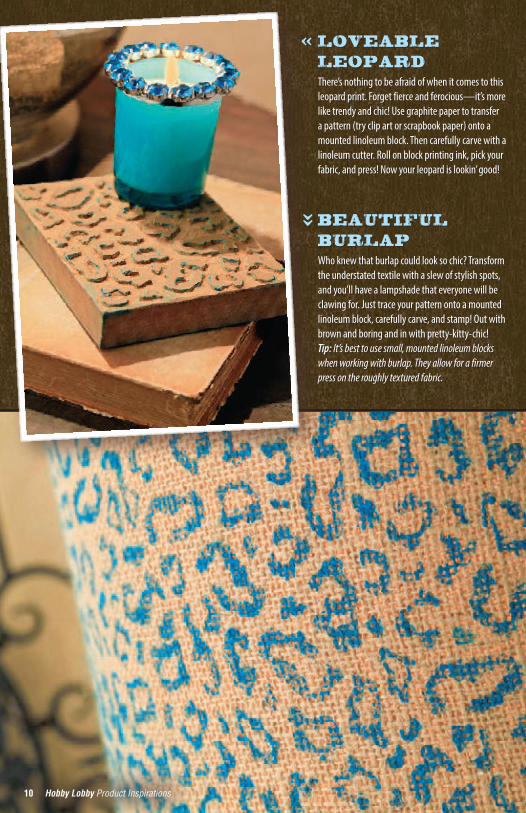
« LOVEABLE
LEOPARD
There’s nothing to be afraid of when it comes to this leopard print. Forget fierce and ferocious—it’s more like trendy and chic! Use graphite paper to transfer a pattern (try clip art or scrapbook paper) onto a mounted linoleum block. Then carefully carve with a linoleum cutter. Roll on block printing ink, pick your fabric, and press! Now your leopard is lookin’ good!
BEAUTIFUL
BURLAP
Who knew that burlap could look so chic? Transform the understated textile with a slew of stylish spots, and you’ll have a lampshade that everyone will be clawing for. Just trace your pattern onto a mounted linoleum block, carefully carve, and stamp! Out with brown and boring and in with pretty-kitty-chic! Tip: It’s best to use small, mounted linoleum blocks when working with burlap. They allow for a firmer press on the roughly textured fabric.
«
10 Hobby Lobby Product Inspirations

Hobby Lobby Product Inspirations 11
template (for “Forever Flowers” & “By the Block” on pages 5 & 6)

12 Hobby Lobby Product Inspirations
template (for “On a Roll” & “Playing Tag” on page 4)

Hobby Lobby Product Inspirations 13
template (for “Wrap It Up” on pages 8 & 9)
14 Hobby Lobby Product Inspirations
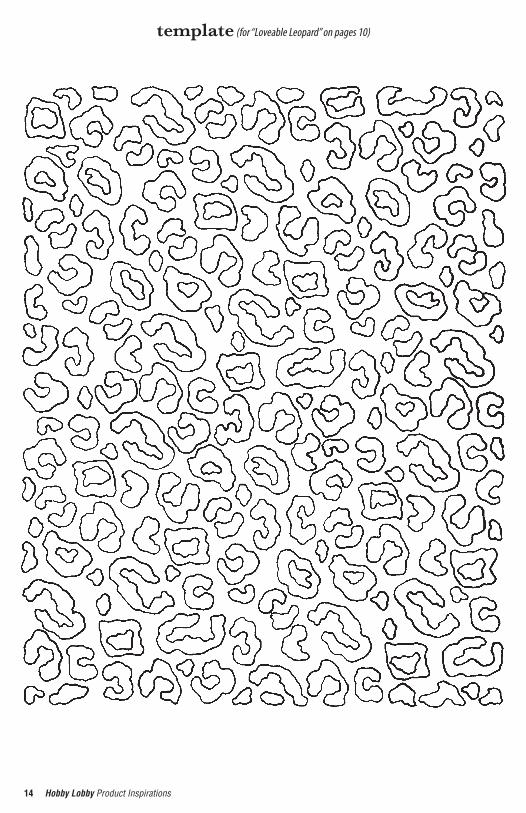
template (for “Loveable Leopard” on pages 10)

©2011 Hobby Lobby® - Photography by Sanford Mauldin.
www.hobbylobby.com www.getinspiredbyhl.com Art - 763847
DO NOT ALLOW CHILDREN TO COMPLETE PROJECTS ALONE. ADULT SUPERVISION REQUIRED.
template (for “Proud as a Peacock” on page 7)