lookinbody 3.0 help index - bodyanalyse.no help.pdf · therefore, it might not appear exactly as...
TRANSCRIPT

LookinBody 3.0 Help Index
Use Help Index as indicated below.
Introducing Lookin'Body 3.0.
Chapter 1 Product Installation
1. Preparing Installation
2. Installation Tips
3. Program Screen Composition
4. Program Main Screen
Chapter 2 Body Composition Data
1. Screen Composition
2. Body Composition Items
3. Comparison View
Chapter 3 Results View
1. Results Form
2. Results Form Comparison
3. Cumulative Results Sheet
Chapter 4 Reference Materials
1. Screen Composition
2. Modify Reference Materials
Chapter 5 Tools
1. Personal Information/Member Management
2. E-mail
3. Configuration
4. Send in Excel
5. Print
Customer Support
Lookin'Body Help InBody Exclusive Data Management System
\LB30HELP.chm::/...

Use the following help guide.
The following Help Index illustrates all the functions of Lookin'Body in an easy-to-follow manner. A few
instructions below will allow you to make the most out of the Help Index.
1. Thoroughly read the Users Guide before using the program.
2. Make sure you fully understand the instructions referring to the subsequent materials, pictures and guide
illustrations.
3. Refer to help indexes before requesting A/S.
4. Please be aware of warning or caution signs. Followings are the different signs being used.
This Help Index is written for the prevailing Windows XP platform. Even if you have a different PC platform,
the basic operation is quite similar. If you have a problem installing the system, please refer to the telephone
number located at the back of the User Guide to contact our Customer Support Department or your PC
manufacturer.
Very important: it might affect the results, so it requires your special attention.
It minimizes the possibility of malfunctioning that might occur when using the program or
handling the InBody main system.
Useful information for utilizing the program.

Introducing Lookin'Body 3.0 Many thanks to you for purchasing Lookin'Body 3.0. We at Biospace Co., Ltd. have led the body composition analysis market with our product, InBody, the High Precision Body Composition Analyzer and we have endeavored to provide a total solution to the health care field. As one of our achievements, we released Lookin'Body 1.0, InBody data management system, in 2000, to get the most use out of InBody test results. Now we have upgraded our product installing more convenient and diverse functions and contents to proudly present Lookin'Body 3.0 to the market. Lookin'Body 3.0 helps you effectively control your weight through scientific analyses and diet/daily habit surveys based on InBody test results. This product departs from the simple diet and workout instructions provided by the existing programs, and extends to become a guide that leads you to manage a healthy life by suggesting a weight control program taking into account your own life style. Lookin'Body will continue to make improvements to become the best program that can give you the necessary information by consistently incorporating your needs. Based on the excellence of our technology, our manpower and InBody, the High Precision Body Composition Analyzer, Biospace will strive to grow as a proud health care company in the competitive global market .
Kichul Cha, CEO of Biospace Co., Ltd

1. Preparing Installation
1) Product Composition
The Product basically contains the following. Please check if you have all the pieces before you install the
product. If any pieces are missing, contact our customer services department using the number provided at the
back of the User Guide.
(1) Program CD
(2) User Guide (included in the program CD)
(3) USB HardLock Key
(4) Serial Cable (RS-232C) or USB Cable
( It might differ according to the version of InBody. )
2) System Requirement
The system requirements that provide optimal operating platform for Lookin'Body are as follows. Contact your
PC manufacturer as to the specific capacity details.
Operating System : Windows 2000, XP or compatible
CPU : IBM-PC or compatible, Intel Pentium III 700 MHz or higher
Hard Disk Drive : More than 300 Mbyte
Main Memory (RAM) : 256MB or higher recommended
Graphic Card & Monitor : Supporting 800 X 600 of resolution and 16bit color or higher recommended
Input Devices : Keyboard, Mouse
Com Port : Serial Port (RS-232C) or USB Port

2. Installation Tip
1) Connecting InBody and PC
Connect serial cable provided at the purchase for data communication between InBody CPU and PCs. No need to distinguish which end
to connect because both ends of the cable are the same. For a stable communication between InBody and Lookin'Body, be sure to connect
communication port and cable and screw them tight using fix screws.
( According to InBody, communication is possible through Serial, USB and LAN )
2) Lookin'Body Installation
(1) Insert the program CD to CD-ROM drive.
(2) Launch Windows Explorer.
(3) Find the CD drive in Windows Explorer.
(4) Double click on 'Setup.exe' file and run the file.
Caution for shocks and do not bend cable.
Close all programs currently running to avoid the clash that might occur
between programs during the installation. Close all the stay-in memory
programs such as 'V3' and 'Antivirus' before installation.

(5) Install Wizard will launch.
(6) If you would like to continue with the installation, click next. You will be prompted with a program license agreement. This is
important information, so please read and click on 'Yes' if you agree and continue with the installation. If you have questions as to user's
right agreement, refer to the number located at the back of the users guide to contact our customer services department.

(7) Type in name (user name), company (company name) and the product serial number. Product serial number is located at the back
of the CD case. This product serial number is required for product installation and A/S registration, so please keep it in some place safe
and do not show it to others.
(8) Select the installation choices. If you want to install the database on the current computer, select 'Server Installation'. If you plan to
use a database installed on another computer, select 'Client Installation'.
Lookin'Body is protected by the Copyright Act. You are liable for the illegal
distribution of the product serial number.

(9) Type in IP Address and Password where database is to be installed. If you want to use a Lookin'Body 3.0 database installed in
another computer, type in the IP address and password of that computer.
(10) Designate the installation route and folder name, and then click 'Next'.

(11) This screen lets you add the program folders to the Window 'Start' Menu and name the folders. To continue with the installation,
click on 'Next' button.
(12) It is installing the program. The installation time required differs according to PC capacity. Please stand by until the program is
successfully installed.

(13) When the program installation is completed, you will be prompted with the screen as below. Click 'OK' button.
3) Launch Lookin'Body
(1) Launch Lookin'Body
When the installation is completed, launch the program to make sure it is successfully installed. Click on 'Lookin'Body 3.0' icon in the
'Lookin'Body 3.0' folder located on desktop or window 'start' menu to launch the program.
You must restart the computer after Lookin'Body installation. Launch Lookin'Body
program after you restart the computer.
This User Guide is written out for the prevailing Windows XP platform.
Even if you have a different PC platform, the basic operation is quite similar.
If you have a problem installing the system, please refer to the telephone
number located at the back of User Guide to contact our Customer Support
Department or your PC manufacturer.

(2) Communication Port Configuration
Lookin'Body uses serial port, LAN and USB to communicate with InBody. The following is the process with which you can check if the
PC you are using has a serial port that can communicate with InBody.
As shown below, click on Windows' 'Start' menu and then launch the control panel.

Click on 'Performance and Maintenance' item.
Click on 'Hardware' item on 'System Property'
Click on 'Tools Manager' box of 'Tools Manager' located as the second item.
Double click on 'Port' among items of Tools Manager to make sure Com Port exists. If you don't have Com Port, you cannot

communicate with InBody. Please contact your PC manufacturer.
Check the usable Com Port and its actual location at the back of PC. Normally the port should be located as shown below. You must
setup the Com Port at Lookin'Body Com Port Configuration Program after installing the program.
Launch Lookin'Body Communication Program located in Tray Icon. By clicking right mouse button, highlight 'Lookin'Body S Show'.
As shown below, it will display Lookin'Body Communication Program on the screen. According to communication methods and

equipment used, continue with the configuration as follows.
a. Communication Method
* Serial Port : highlight 'RS232C'. When selecting 'Automatic Port Search', it will be configured with the serial port being
automatically used by Lookin'Body S. When selecting 'Manual Port Search', you can select the serial port that you are using.
* LAN : Select 'Ethernet'.
* USB : Select 'Automatic Port Search'. Lookin'Body S will automatically connect to InBody.
b. Equipment Used : Select Height Measurement Device or Blood Pressure Monitor if you mean to use those equipments connected to
Lookin'Body.
Normally, 'Com1' is selected. If 'Com1' is in use, select another Com Port. Generally, PC has four ports of 'Com1 through Com4'.
However, certain PCs might carry only two ports of 'Com1 through Com2'. Please contact your PC manufacturer to inquire about the com
ports.
4) Program Remove
This shows the process of removing the program. Simple 'delete' of a program might cause your computer to slow down or other clashes
leaving the program information at Operating Program. Please refer to the instructions below when removing a program.
(1) Follow the route of 'Start' - 'Control Panel' -'Program Add/Remove'. You will be prompted with the following screen. Select
'Lookin'Body 3.0' from the list of the installed programs.
You must select 'Lookin'Body' to communicate with Lookin'Body 3.0.

(2) Continue with removing the program by clicking 'Enter' when prompted with the message box that warns the removal of the program.
(3) Lookin'Body will automatically proceed with the program removal process.
(4) When the removal process is completed, you will be prompted with the message box notifying the completion of the program removal
process. Press 'Enter'.
Installed programs show the information of the programs that are installed in
the PC currently in use. Therefore, it might not appear exactly as below.
Even if a program is removed, database files that were used still remain in the
system. When reinstalling the program, you will be using the existing database
if you don't delete the folder containing the database. In case of removing the
folder, you should seriously consider whether you will need the database later.

3. Program Screen Composition
* menu and screen can differ a little according to InBody models : InBody720, InBody520, InBody330, InBody220.
1) InBody Test Button
Used when starting test InBody on Lookin'Body.
2) Search Window
It searches the examinees with name, registration number, age, etc.
3) Toolbox
It consists of home, personal information, e-mail, configuration setup, send in Excel, Help and Print buttons.
4) Body Composition Data Button Collection
Used to view detailed results among InBody test results items.
5) Comparison View Button Collection
Used to view Comparison View of detailed results.

6) Results Form View Menu
It consists of Results Form, Results Form View and Cumulative Results Form buttons.
7) Reference Material View Menu
It allows you to search various clinical information related to the InBody test.
8) Customer Reservation Status
It shows the reservation status of clients who selected the reservation option, providing a bird's eye view on the reservation status, which makes it
easy to manage client relations.
9) Logo Screen
This screen allows you to insert your own logo. After installation of Lookin'Body 3.0, the page displays the illustration of 'How to Use Lookin'Body
Step by Step'. If you have the specially designed logo or any other image you want to insert in a file, you can modify this option at Configuration
Setup.

4. Program Main Screen
Main screen of Lookin'Body shows different views depending on the existence of searchable data and that of the examinee's test results.
1) In case of no searchable data
When launching the program for the first time with no searchable database, the screen consists of health care news, client reservation status and logo
images configured by setup menu from the toolbox as below.
2) In case of the examinee without test results
When there are searchable data without test results, the screen shows 'personal information' window displaying detailed information of the examinee,
and 'customer management' window allowing you to effectively manage the customer, as shown below.

3) In case of the examinee with the test results
With the existence of the searchable data and test results in the system, the screen displays, on its bottom left, the first item of results under the 'body
composition data results items collection' located on the center of the upper screen, as shown below. The initial setup shows 'body composition
analysis' item. On the bottom right is shown the detailed explanations of each result of the items.

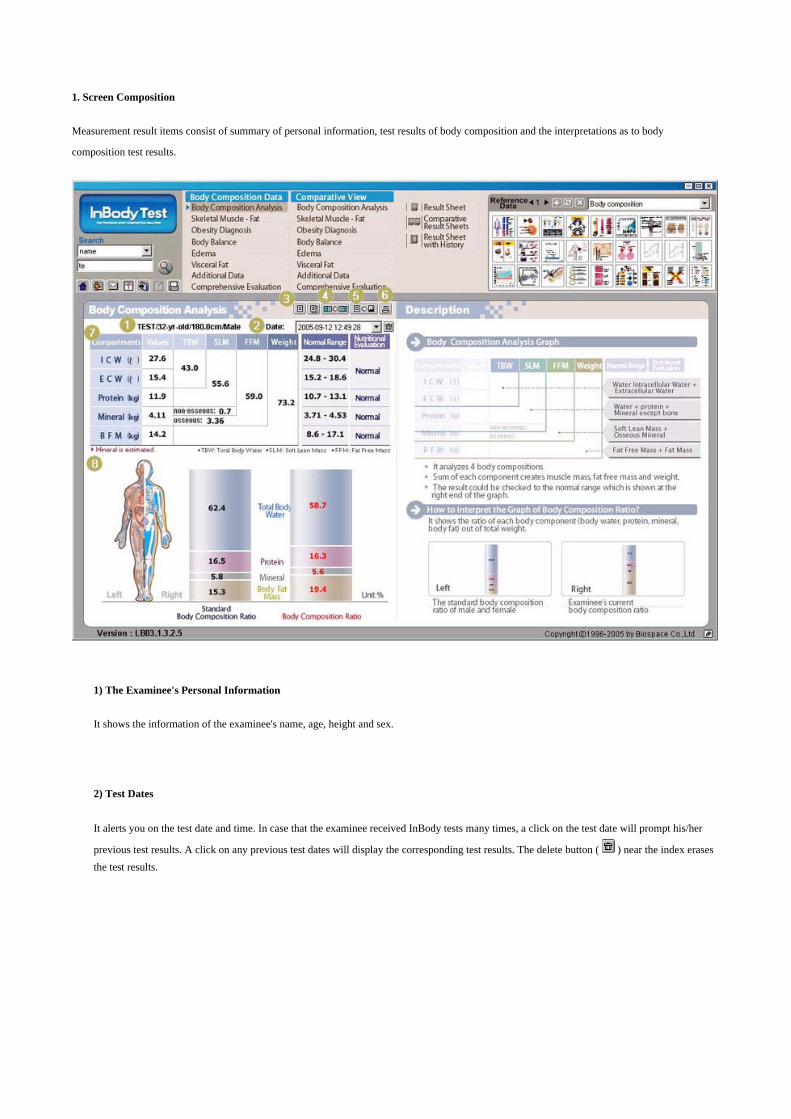
1. Screen Composition
Measurement result items consist of summary of personal information, test results of body composition and the interpretations as to body
composition test results.
1) The Examinee's Personal Information
It shows the information of the examinee's name, age, height and sex.
2) Test Dates
It alerts you on the test date and time. In case that the examinee received InBody tests many times, a click on the test date will prompt his/her
previous test results. A click on any previous test dates will display the corresponding test results. The delete button ( ) near the index erases the test results.

3) Results View / Accumulated Results View
Accumulated Results View button ( ) prompts you with accumulated graphs and visuals that contain the test results conducted so far. To go
back to the result of any particular test date, click on the Results View button ( ).
4) Send Comparison Data ( )
It saves the current test results to be used as comparison data.
5) Save Body Composition Display Image ( )
It saves the current body composition analysis display in an image file. The saved image file can be effectively used when making printouts or
educational materials.
6) Print Body Composition Display ( )
It prints out the current body composition analysis display as shown on the screen.
7) InBody Test Results are the same as Exclusive Results Form.
It shows InBody test results table and graph that carries the same shape as InBody Exclusive Results Form.
8) Easily understandable Interpretation on Test Results
The examinee's InBody test results are displayed as an easily-recognizable image for anyone, which helps in consultation.

2. Test Results Items
Test results items consist of the following 8 menus. Among these, research items refer to the items required for the analysis, such as obesity degree, BCM,
BMR, etc. Total evaluation directs you to body form evaluation and the notable details according to body parts based on the measured data.
1) Body Composition Analysis
The human body is composed of body water, protein, mineral and fat; the total of these factors constitutes a body weight. A healthy body maintains the
consistent body composition rate. Normally men have a higher ratio of muscle to fat compared to women. Standard body fat ratio is 15% for men and
23% for women. 'Body composition analysis' item shows measurements as to body composition factors including ICW (Internal Cellular Water), ECW
(Extra Cellular Water), Protein, Mineral and Fat with the examinee's standing in comparison with the average standard. On the bottom of the screen the
results illustrate the body composition rates of both the standard body form and the examinee's body form in bar graphs. Comparing the length of
composition bars, you can evaluate whether the examinee's body composition maintains a balanced rate.
(1) ICW : Indicates the volume of Intracellular Water.
(2) ECW : Indicates the volume of Extracellular Water.
(3) Protein : Indicates the weight of Protein Mass.
(4) Mineral : Indicates the weight of Mineral Mass.
(5) BFM : Indicates the weight of Fat Mass.
(6) SLM : Indicates the total weight of Skeletal Muscle Mass.
(7) FFM : Indicates the subtracted Fat Free Mass from the the total weight.

(8) Weight : I ndicates the sum of Fat Free Mass and Fat Mass.
2) Skeletal Muscle-Fat
Bar graphs and numbers display the results. The numbers located at the tip of bar graphs are the measured values, and the length of bar graphs shows
percentage of the standard values. 100% means the standard body's composition. Skeleton muscle-fat results screen shows images that illustrate the ratio
of body fat weight and skeleton muscle weight. As it shows the standard ratio of skeleton muscle-fat that the examinee should achieve in comparison
with the examinee's current ratio, you can evaluate the status of the examinee's skeleton muscle-fat and body fat as to evaluate whether they are well
balanced or not.
(1) Body Weight
Standard body weight is calculated by the height. The calculation of standard or ideal weight uses the standard formula of [height-100] X 0.9 and
also often uses the method of BMI. InBody has adopted both the standard weight calculation and BMI standard method with the appropriate
application toward both adults and children.
(2) Skeletal Muscle Mass
Skeletal Muscle Mass refers to the muscle mass that can change via workout, and they are usually the muscle mass parts of arms and legs. Standard
100% refers to the standard skeletal muscle mass on a body of standard weight.

(3) Body Fat Mass
Body fat mass refers to the total mass of subcutaneous fat, visceral fat, and intramuscular fat. Bar graphs illustrate the ratio of current body fat to
ideal body fat. 100% refers to the body fat mass when the examinee weighs the standard weight with the standard body fat ratio. Scales of bar
graphs account for the standard body fat ratios of men and women.
3) Obesity Diagnosis
Obesity Diagnosis shows obesity rate and body fat distribution by overweight test and the actual body composition test. The length and numbers of bar
graphs all stand for the absolute value. The bottom of the results screen shows each image compared after the obesity diagnosis based on BMI and body
fat ratio that are among the obesity diagnosis items. By showing the results through images, it helps you easily determine your body composition.
(1) BMI (Body Mass Index, kg/m2)
Body Mass Index is the overweight index determined only with height and weight. The standard BMI for men is 22 kg/m2 , whereas for women 21
kg/m2, and the average range is between 18.5 kg/m2 and 25.0 kg/m2.
BMI (kg/m2) = Weight (kg)/ Height (m 2)

(2) PBF (Percent Body Fat)
As an item that diagnoses obesity using body composition test, it shows the ratio of body fat to body weight. The standard ratio is 15% for men and
23% for women, and the average ratio ranges between 10 ~ 20% for men and 18 ~ 28% for women.
(3) WHR (Waist-Hip Ratio)
WHR shows the abdominal obesity rate, ratio of waist circumference to hip circumference. Abdominal obesity rate has intimate correlations with
visceral fat. The average rate ranges between 0.75 ~ 0.85 for men and 0.70 ~ 0.80 for women, and the abdominal obesity is diagnosed when men
show rate of over 0.90 and women over 0.85.
4) Lean Balance
Bar graphs and numbers illustrate the results of body balance. The tips of the bar graphs show the measurement figures and the length of the bars shows
the percentage of the current height to standard height of the ideal weight. The values noted at the bottom of bar graphs along with the length of the bars
are the percentages of the standard figures at the current weight. Thus 100% stands for the optimal state of the examinee. The average ranges from 80%
to 120%. Body water weight per body part is noted in ratio to average water weight per body part of the average weight body. On the right side of the
screen is shown the Body Shape Graph of a quadrangle connecting points of arm and leg muscle weights. A blue quadrangle showing the upper bar
graph of body balance and a red quadrangle showing the lower bar graph let you evaluate the development and balance of upper and lower body.
5) Edema
The edema results display lets you see the examinee's edema status at once. It is easy to see edematous conditions of each body part with the edema
index and graphs of different body segments. The bottom of the results screen shows the examinee's edema evaluation, which can help a lot when you
don't get much time for a consultation.


6) Visceral Fat / Growth Curve
The visceral fat area shows when you are older than 18 years old. With that, you can see not only whether the examinee's visceral fat area size is
exceeding the danger level of 100cm2 but also visceral fat distribution status among the age group of the examinee, which allows you to determine the
examinee's relative status as to visceral fat.
* For those under 18 years old, a growth curve is displayed instead of visceral fat. Growth curve showing a child's height and weight allows you to
understand better the growth status of the child. Red '+' sign refers to height and blue '+' mark refers to weight. It helps to figure out how a child is
growing as to height and weight within the scope of the same age group and you can determine whether the child is experiencing appropriate growth.
7) Additional Data
It is important to check on the accumulated results of the research items rather than one-time test results. By clicking on the accumulated results button,
you are directed to a table of figures according to test dates. The change in body cellular weight, AMC and AC provides a useful index to monitor
nutrition status.

8) Total Evaluation
It shows the collective results of InBody. It offers the examinee's body shape and also the images illustrating edema status, body strength, and body
balance, which enables much easier body composition consultation.

(1) Body Shape Evaluation
You can learn the appropriate weight control amount according to your weight, muscle and fat weight. InBody also provides the fitness score that
allows you to check on your body composition status all at once. For the average person, the fitness score ranges between 70 and 90, and athletes or
people with developed muscles show scores of over 90. Fitness score can be a means to improve on your dietary habits and check on the effects and
progress of workouts.
(2) Details on Body Parts
You can see the all-around evaluation as to abdominal obesity, edema, body strength and body balance.

3. Comparison View
Comparison View is a new function that only Lookin'Body 3.0 provides. You can compare the results from past tests with current test results of an
examinee, and it also allows you to compare the examinee's results with those of other examinees. It stores the examinee's test results by age, height,
sex, etc. as comparison data that in turn retrieves the data of other examinees who show similar readings as to age, height and sex to let you make a
comparison analysis. This function helps you set your body composition goals from the comparison analysis. In addition, by clicking on a
comparison data send button ' ' you can set the examinee's results as comparison data. Comparison data offers registration of pictures to the
system along with the data, which you can refer to when you set your goals.
1) Comparison Data Search Box
This function allows you to search comparison data by name, registration number, age, etc. in addition to the data automatically displayed
through its comparison view.
2) Personal Information and Test Date in Comparison Data
It retrieves comparison data of name, age, height, sex and test date. Click on the view button ' ' to modify the comparison data and change
the test date.
3) Comparison Data Remove ( )

It cancels comparison data setup. After removal, you cannot find it in the comparison data search.
4) Comparison Data Fix ( )
While the comparison view automatically provides comparison data according to the examinee's sex, age, height, etc., it displays the comparison
data the user has fixed.
5) Comparison Data Setup ( )
6) Comparison Data Picture View ( )
Clicking on the button will display the pictures of the comparison data. If no picture is registered on the system, you will be prompted with the
box that allows you to register pictures.
7) InBody Evaluation Results Display
It displays InBody Evaluation results of comparison data.
It sets up the range of comparison data provided automatically. Sample Data is the
basic data provided initially, and Detailed Data refers to body composition data the
user accumulated voluntarily. You can set the range of sex, height, weight, age and
fitness scores in detail. If you narrow your selections and ranges of data, you can
get more detailed comparison data.

1. Results Form
Lookin'Body 3.0 allows you to see InBody results form on the screen. You can view the results form in full screen and so body composition consultation can
be carried out right from the screen without any additional printouts. You can get the full screen view of not only the body composition results form and
results forms comparison but also the cumulative results form. You can still search the data with the full screen view of the results forms that will come in
handy during consultation.
1) Results Form Maximize/Minimize View Button ( )
This is for the view of the results form in full screen. If you click the button again at full screen view, it will reduce the display size.
2) The Examinee's Personal Information and Test Dates
It retrieves the examinee's personal information. Where there are multiple InBody tests conducted, clicking on View button ' ' will retrieve the
previous test results.
3) Results Form
It displays the same results form as the exclusive result form of InBody.

4) Magnifying Button ( )
This is for the magnifying the view of result form content. You can enlarge the image as big as the actual exclusive results form by clicking on the
magnifying button.

2. Results Sheet Comparison
You can print out the same results sheet as the one produced by InBody tests. It offers Body Composition Analysis, skeletal muscle-fat, obesity diagnosis,
body balance, visceral fat and other evaluations. You can view the examinee's basic results sheet on the left and other comparable examinees' results sheets
on the right side of the screen.
1) Comparison Data Search Window
In addition to the basic data automatically compared and displayed on the screen, this window allows you to search comparison data you want to
view according to their names, registration numbers, ages, etc.
2) Personal Information and Test Dates of Comparison Data
It displays name, age, height, gender and test dates information of Comparison Data. Clicking on View button ' ' allows you to modify the comparison data and reschedule test dates.
3) Comparison Toolbox
It consists of removal, fix, setup and picture view of comparison data.

4) Results Sheet Enlarged/Reduced View button ( )
This is for the view of the result sheet in full screen. If you click the button again at full screen view, it will change the view to reduced size
5) InBody Test Results Screen
Displays InBody test result of comparison data.

3. Cumulative Results Sheet
It offers easy-to-see graphs and tables illustrating changes in body composition based on the first InBody test results by clicking on Cumulative Results Sheet button.
Cumulative results are displayed by order of test dates.
1) Results Sheet Enlarged/Reduced View Button ( )
This is for the view of the result sheet in full screen. If you click the button again in full screen view, it will change the view to reduced size.
2) Examinee's Personal Information
Retrieves an examinee's personal information.
3) Cumulative Results
Displays cumulative results graph that contains the history of all InBody test results of all items.
4) Magnifying View
Used when you want to magnify the view of results sheet content.

1. Screen Composition
Lookin'Body 3.0 provides over 30 interpretation materials as to body composition tests, which allows you to search and show diverse clinical information at
consultation to help the clients understand better. For example, when explaining body composition test results, you can search body composition elements
and evolution of bones by aging and when explaining obesity diagnosis results, you can show different types of obesity. When explaining visceral fat, you
can show abdominal fat distribution status to help them realize where they stand as to their bodily health.
1) Page Index
Using arrows, you can move around back and forth through the reference material index pages.
2) Add Reference Materials
Users can add more reference materials by clicking on Add button ( ).
3) Modify Reference Material
Users can modify reference materials by clicking on Modify button ( ).

4) Delete Reference Material
Users can delete reference materials input by clicking on Delete button ( ).
5) Reference Material Index
It displays the index of reference materials that are on the same page. The selected reference material will display on the screen.
6) Reference Material Image Index
The selected image will prompt the display of its reference content on the screen.
7) Reference Material Screen
It displays the selected reference materials.

2. Modifying Reference Material
You can add more reference materials or modify those you added earlier.
1) Title
Type in the titles of reference materials.
2) Reference Material Summary Input
Type in the summaries of reference materials.

3) Image Search
You can select an image for a reference material by clicking on Image Search button.
4) Save
It saves the reference material the user has typed in.
5) Cancel
It cancels the reference material the user has input and modified.

1. Personal Information/Member Management
Allows you to add InBody examinees and modify their information.
1) Required Information
It is the required information of examinees for InBody test. You can take pictures yourself with PC Cam or use image files to upload the pictures.
2) Additional (Optional) Information
You can input more information of examinees to better manage your clients - for instance, their (emergency) contact numbers, membership types,
occupation, illnesses and any other particulars. Input of reservation date retrieves client reservation status displayed on the standby screen.
3) InBody Tests
Displays the history of InBody tests. It allows you to easily plan InBody test schedules referring to the first test date, number of tests and the last
test date.
4) Member Management Window

It searches information of examinees according to registration number, name, age, height, frequency, reservation date, PBF, BMI, and WHR.
You must designate search range as 'minimum range, maximum range' to search PBF, BMI and WHR.
ex) When searching an examinee with 0.85~0.9 of WHR: input '0.85, 0.9' in the corresponding boxes and click 'Search'.
5) How to Perform InBody Tests
(1) Input the examinee's information and click on the Save button to save the information inputted and complete the new member registration.
(2) Click on InBody Test button to make the program ready for tests. Proceed with InBody Test. You can freely use Lookin'Body 3.0 even while
the InBody test is in process. To check the test status, click on Lookin'BodyS icon ' ' located on Windows Menu Display Alert Bar. It will display the status.
(3) When the InBody test is completed, the examinee's results will automatically appear on the screen.
* Even if you perform the InBody test while Lookin'Body 3.0 is closed, it will display the window that prompts you to save data. Therefore, there
is no risk of losing data, as InBody transfers the data to the connected computer if Lookin'Body 3.0 is running or not at the time of tests.
2. E-mail
"E-mail" is one of the functions Lookin'Body 3.0 provides for systematic client management. It offers the basic writing function and easy-to-write system
through Mail Composition function. If you select client name, text box, image box, body test results, body composition results, background image and drag
them to the mail text area, you will be greeted with the ready-made mail text. The frequently used content of mail can be saved separately to be retrieved
later whenever the user needs to use them.

3. Configuration
Configures Lookin'Body 3.0 Program.

1) Logo Screen Configuration
Configures logo image that appears on the stand-by screen. The illustration of 'how to use Lookin'Body 3.0 step by step' is initially programmed
to appear, but you can change it to a logo of your company if you have it in image file.
2) Database Route
Input the IP address of the computer where database is installed.
3) Select Print Paper
Select the paper you want to use for printing. You can choose from standard A4 and InBody exclusive results sheets.
4) Setup Print Location
In case of using InBody exclusive results sheet, you can decide where you want the content printed on the exclusive results sheet.
5) Type in Company Name using Results Sheet
Input the information of the company using results sheets. You can note names of users or company, address, telephone number and the name of
doctor.

6) Select Unit
You can select "cm/kg" or "inch/lb".
7) Other Tools/Setup Functions
You can setup as to whether you would like to use following features and tools: Automatic Extensometer BSM330, Blood Pressure Screen, Daily
Habit Survey, LBS, Automatic File Backup, Automatic Print Option of Results Sheets and Automatic Registration of Numbers.
8) Comparison View Setup
Sets up the range of comparison data automatically searched and retrieved. You can also set up the ranges in more details as to gender, height,
weight, age, and fitness score.
9) Member Configuration
At the screen prompting input of additional information of examinees' personal information registration, you can configure detailed items of
membership types, occupation, illnesses, etc.
4. Send in Excel
InBody test results saved in Lookin'Body 3.0 can be converted to Excel file. Select the items you want converted. If you want all items converted, click on
'Select All'. If you want data of certain period converted among InBody test results, check Date Search and then designate the next period.

1) Data Items
Select items you want saved as an Excel file. You can select among Skeletal Muscle Fat, Weight Control, Impedance, User Information, Edema,
Body Balance and Body Composition.
2) Data Sub-Items
Select Sub-items that you want saved as an Excel file. Each data item will get different sub-items.
3) Search Conditions
'Select All' button will select all data items. Cancel button will deselect all data items. You can search according to InBody test dates through
Date Search.
4) Data Convert
You can save them as an Excel file now that you have selected all data items of your choice. Clicking on Data Convert button will open a
window that prompts you to select the Excel files you want saved. Input of file name will save data items in corresponding Excel files.
5. Print
You can select and print several different kinds of results sheets of Lookin'Body 3.0. After you select print paper and number of copies, click 'Print' and the
designated printer will print the results sheets. You can change the printer by clicking on Printer Setup button. Preview button allows you to view results
sheets in print preview on screen before you print. If you have not yet set up the printer for the computer where Lookin'Body 3.0 is installed, you must first
install printer drive before you enjoy printing and preview options.

1) Personal Information
Displays examinees' basic personal information and test dates and times.
2) Number of Copies
Select the number of copies you want to print out.
3) In Result Sheet Format
It prompts to print the contents in InBody Sheet Format according to different versions of InBody being used.
4) Select Result Sheet
Select a result sheet you want printed. You can choose from Basic Result Sheet, Result Interpretation, Nutrition Guide, Exercise Planner and
Cumulative Result Sheet. You should save nutrition guide and exercise planner at the corresponding menus to print them out.
5) Select Printer
Select the printer you are going to use. Clicking on Configuration button allows you to select another printer modifying previous configuration.
6) Preview
Preview button allows you to preview results sheets on screen before you print them out.
7) Print
It prompts print with a click of the print button.