ninja - downloads.globaliptel.comdownloads.globaliptel.com/ninja/manuals/help.pdf · ninja besitzt...
TRANSCRIPT
Ninja (X-TAPI Lite 4.0) (c) 2007 Global IP Telecommunications Ltd. All rights reserved. www.globaliptel.com
Ninja
SIP Phone Version 1.6.x
DEUTSCH Seite 1 - 20 ENGLISCH Page 21 - 38 Requirements: Win2000 or higher, Pentium processor with min 256 MB RAM You can find the latest Version at http://downloads.globaliptel.com/ninja/manual Sie finden die jeweils letzte Version unter http://downloads.globaliptel.com/ninja/manual „Diese Kurzanleitung ist während der RC Phase stetig und ständig in Ausarbeitung und ist hinsichtlich des RC Status als vorläufig und unvollständig zu betrachten.“ “This manual is continuously under construction during the RC phase. To that effect regard that manual as interim and as unformed.”
Ninja (X-TAPI Lite 4.0) (c) 2007 Global IP Telecommunications Ltd. All rights reserved. www.globaliptel.com
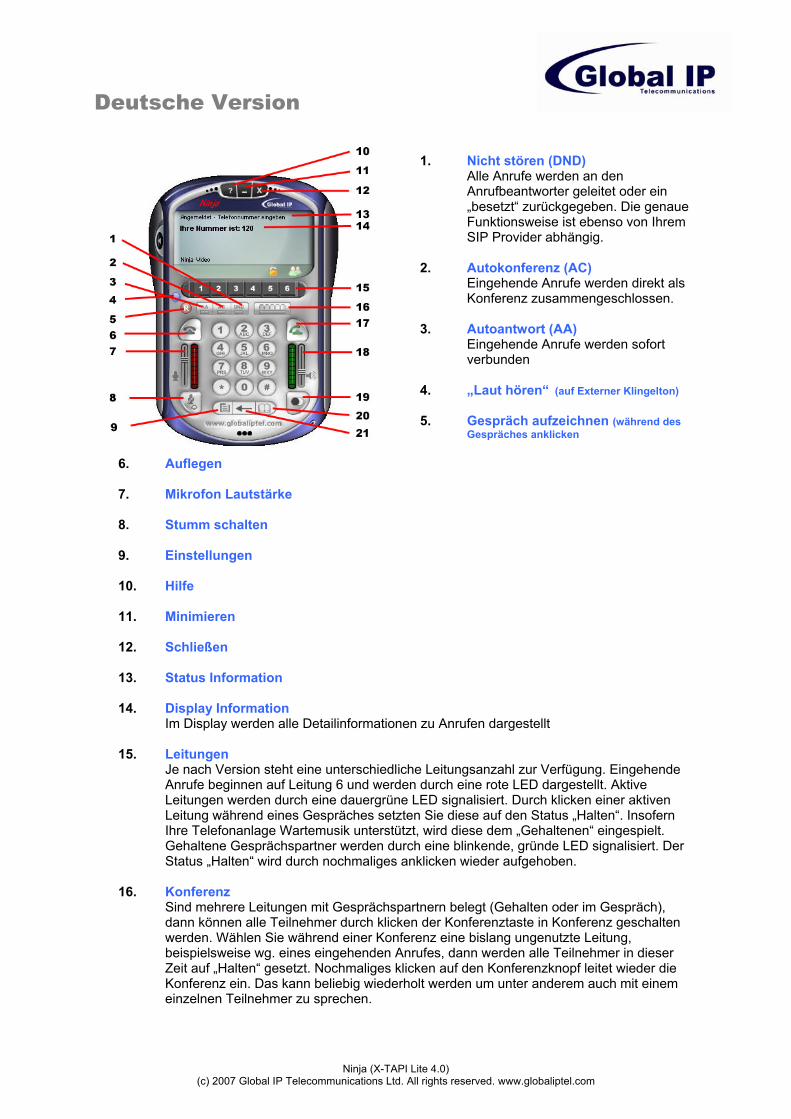
Deutsche Version
1. Nicht stören (DND)
Alle Anrufe werden an den Anrufbeantworter geleitet oder ein „besetzt“ zurückgegeben. Die genaue Funktionsweise ist ebenso von Ihrem SIP Provider abhängig.
2. Autokonferenz (AC) Eingehende Anrufe werden direkt als Konferenz zusammengeschlossen.
3. Autoantwort (AA) Eingehende Anrufe werden sofort verbunden
4. „Laut hören“ (auf Externer Klingelton)
5. Gespräch aufzeichnen (während des Gespräches anklicken
6. Auflegen 7. Mikrofon Lautstärke
8. Stumm schalten
9. Einstellungen
10. Hilfe
11. Minimieren
12. Schließen
13. Status Information
14. Display Information
Im Display werden alle Detailinformationen zu Anrufen dargestellt
15. Leitungen Je nach Version steht eine unterschiedliche Leitungsanzahl zur Verfügung. Eingehende Anrufe beginnen auf Leitung 6 und werden durch eine rote LED dargestellt. Aktive Leitungen werden durch eine dauergrüne LED signalisiert. Durch klicken einer aktiven Leitung während eines Gespräches setzten Sie diese auf den Status „Halten“. Insofern Ihre Telefonanlage Wartemusik unterstützt, wird diese dem „Gehaltenen“ eingespielt. Gehaltene Gesprächspartner werden durch eine blinkende, gründe LED signalisiert. Der Status „Halten“ wird durch nochmaliges anklicken wieder aufgehoben.
16. Konferenz Sind mehrere Leitungen mit Gesprächspartnern belegt (Gehalten oder im Gespräch), dann können alle Teilnehmer durch klicken der Konferenztaste in Konferenz geschalten werden. Wählen Sie während einer Konferenz eine bislang ungenutzte Leitung, beispielsweise wg. eines eingehenden Anrufes, dann werden alle Teilnehmer in dieser Zeit auf „Halten“ gesetzt. Nochmaliges klicken auf den Konferenzknopf leitet wieder die Konferenz ein. Das kann beliebig wiederholt werden um unter anderem auch mit einem einzelnen Teilnehmer zu sprechen.

Ninja (X-TAPI Lite 4.0) (c) 2007 Global IP Telecommunications Ltd. All rights reserved. www.globaliptel.com
17. Wählen
18. Lautsprecher Lautstärke
19. Wahlwiederholung Es wird immer die zuletzt gewählte Rufnummer gewählt
20. Ruflisten & Kontakte
21. Display löschen
1. Bannen Wird verwendet um einen Anrufer dauerhaft zu blockieren. Anrufe werden automatisch als „Bitte nicht stören“ gehandhabt. Der Status wird in einer „Blockierte Rufnummern“ Liste geführt und kann durch herauslöschen wieder freigegeben werden.
2. Ignorieren Eingehende Anrufer werden mit dieser Funktion einmalig „ignoriert“ und der Anrufer erhält den Status „Klingelzeichen“ zurückgegeben.
3. Weiterleiten ohne Rückfrage Nach erfolgreicher Gesprächsannahme erhalten Sie das Transfer Symbol dargestellt. Durch einmaliges anklicken wird der Teilnehmer auf „Halten“ gesetzt und Sie erhalten innerhalb des Displays die Eingabemöglichkeit einer Zielrufnummer. Mittels bestätigen durch drücken der „Return“ (Enter) Taste oder durch drücken der „Annehmen“ oder „Auflegen“ Taste wir das Gespräch ohne weitere Rückfrage an die Zielrufnummer weiterverbunden.
4. Weiterleiten mit Rückfrage
Nach erfolgreicher Gesprächsannahme erhalten Sie das Rücksprache Symbol dargestellt. Durch anklicken wird der Teilnehmer auf „Halten“ gesetzt und das Telefon fordert Sie auf, eine Rufnummer für „Rücksprache“ zu wählen. Insofern Sie mit der Zielperson einen Transfer vereinbart haben, klicken Sie während des Gespräches mit der Zielperson zur Bestätigung die Transfer Taste. Nachdem Sie das Gespräch mit dem Rückspracheteilnehmer beendet haben, leitet das Telefon das Gespräch an die Zielperson mit akustischem Signal weiter. Während der Rufphase wird der zu Transferierende Teilnehmer durch ein rot blinkendes Leitungssignal angezeigt. Durch klicken auf dessen Leitung kann das Gespräch jederzeit zurückgeholt werden.
5. Weiterleiten zum Anrufbeantworter Eingehende Anrufe können durch klicken auf das Symbol direkt zu Anrufbeantworter geleitet werden.
6. Encryption / Verschlüsselung – vorgesehen in Q2’08 in einer höheren Ninja Version Das offene Schlosssymbol zeigt den Status eines unverschlüsselten Gespräches an. Durch klicken wird der Versuch unternommen das Gespräch zu verschlüsseln (detaillierte Informationen in der Version Ninja Crypt).
7. Outlook öffnen

Ninja (X-TAPI Lite 4.0) (c) 2007 Global IP Telecommunications Ltd. All rights reserved. www.globaliptel.com
Proxy Server Aktivieren Wählen Sie “Ja” zum aktivieren des SIP Accounts Proxy Name Vergeben Sie einen aussagekräftigen Name des Proxy zur Anzeige in der linken Navigation Domain/Realm Feld für die Eingabe einer Domäne des Netzwerkbereiches Proxy Server Proxy Adresse als IP oder URL. Der Proxy-Registrar ist der Server, der das Einbuchen von Internet-Telefonen und die Verwaltung der bei der Registrierung übermittelten Daten übernimmt.
SIP Port Der vom Provider zur Registrierung vorgegebene Port. In der Regel 5060. Outbound Proxy Proxy Adresse als IP oder URL mit Nummer des Proxy-Ports. Der Outbound-Proxy ist der Server, der die Gespräche zwischen den Gesprächsteilnehmern vermittelt. Outbound Proxy Port Der von Ihrem Provider angegebene SIP Port. Anmeldedaten Display Name Der Name, der angezeigt werden soll, wenn Sie einen Anruf tätigen (Ihr Anruferidentifikationsname) – Leerzeichen sind erlaubt. User Name Ihr Benutzername / SIP-Account-Name, der von Ihrem VoIP Provider zugewiesen wurde. Passwort Ihr SIP-Account-Passwort. Auth User Ein möglicher, zusätzlicher von Ihrem Provider zugewiesener Benutzername.

Ninja (X-TAPI Lite 4.0) (c) 2007 Global IP Telecommunications Ltd. All rights reserved. www.globaliptel.com
Audio Codecs Aktivieren und deaktivieren Sie Sprachcodecs durch setzen eine Häkchens. Die Reihenfolge zur Nutzung der Sprachcodecs ist mittels der Pfeiltasten vorzunehmen. Insofern Ihr VoIP Provider unter Hilfenahme seines Servers eine feste Reihenfolge verlangt, so bleiben möglicherweise alle Einstellungen ohne Auswirkung! Andernfalls übermittelt das Telefon die bevorzugte Reihenfolge, die dann von dem Server automatisch angenommen werden kann. Durch klicken auf den Knopf „Voreinstellungen“ wird als Standardwert die „idealen“ Codec Reihenfolge für Schmal- oder Breitbandumgebung hinterlegt. Verwende lokale IP Wenn der SIP Server sich im lokalen Netz befindet, dann wählen Sie bitte „JA“ aus der Pulldown Liste um ein korrektes auflösen der Domainnamen oder IPs zu ermöglichen. Rufzeichen Einige SIP Provider spielen eigene „Rufzeichen“ bei Anrufen ab. Sie können die lokale Signalisierung Providerabhängig hier deaktivieren.
Ninja (X-TAPI Lite 4.0) (c) 2007 Global IP Telecommunications Ltd. All rights reserved. www.globaliptel.com
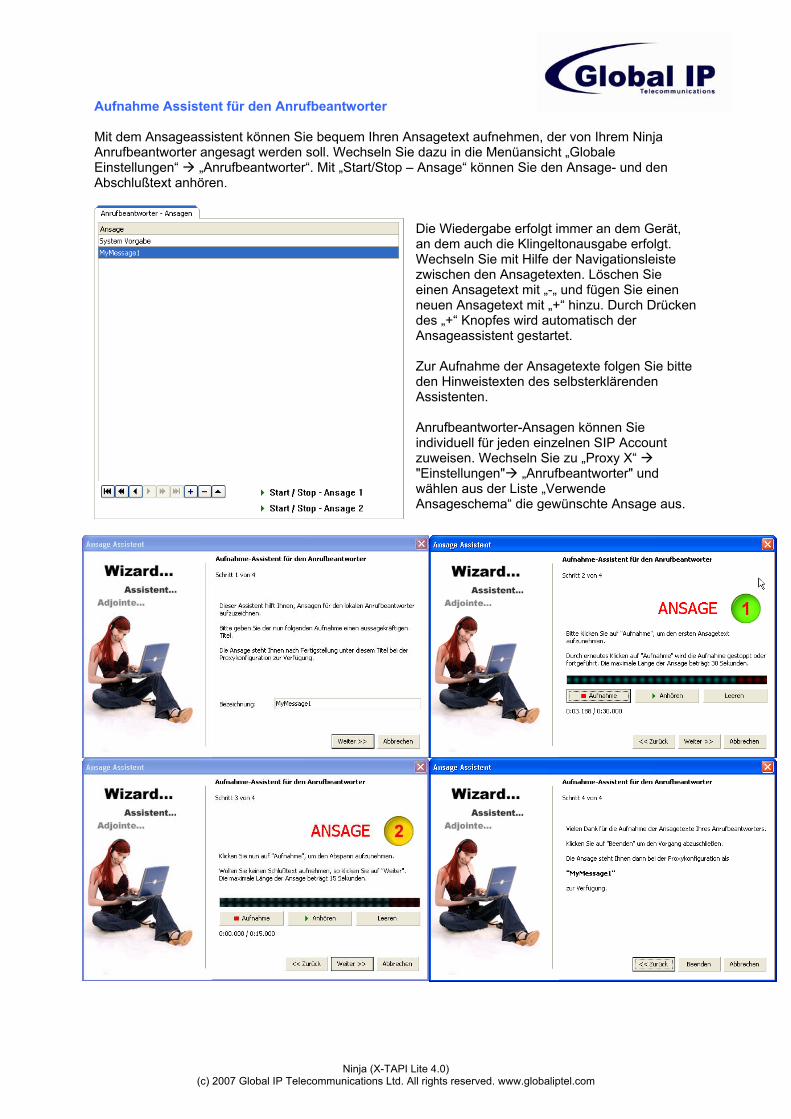
Aufnahme Assistent für den Anrufbeantworter Mit dem Ansageassistent können Sie bequem Ihren Ansagetext aufnehmen, der von Ihrem Ninja Anrufbeantworter angesagt werden soll. Wechseln Sie dazu in die Menüansicht „Globale Einstellungen“ „Anrufbeantworter“. Mit „Start/Stop – Ansage“ können Sie den Ansage- und den Abschlußtext anhören.
Die Wiedergabe erfolgt immer an dem Gerät, an dem auch die Klingeltonausgabe erfolgt. Wechseln Sie mit Hilfe der Navigationsleiste zwischen den Ansagetexten. Löschen Sie einen Ansagetext mit „-„ und fügen Sie einen neuen Ansagetext mit „+“ hinzu. Durch Drücken des „+“ Knopfes wird automatisch der Ansageassistent gestartet. Zur Aufnahme der Ansagetexte folgen Sie bitte den Hinweistexten des selbsterklärenden Assistenten. Anrufbeantworter-Ansagen können Sie individuell für jeden einzelnen SIP Account zuweisen. Wechseln Sie zu „Proxy X“ "Einstellungen" „Anrufbeantworter" und wählen aus der Liste „Verwende Ansageschema“ die gewünschte Ansage aus.

Ninja (X-TAPI Lite 4.0) (c) 2007 Global IP Telecommunications Ltd. All rights reserved. www.globaliptel.com
Anrufbeantworter aktivieren Aktivieren Sie die Anrufbeantworterfunktion durch Anhaken der Checkbox „Anrufbeantworter aktiv“. Wählen Sie die gewünschte Anzahl Sekunden, die verstreichen soll ehe der Anrufbeantworter den Anruf annimmt. Verwende Online-Anrufbeantworter Wenn Sie einen externen Online-Anrufbeantworter verwenden möchten, dann hinterlegen Sie bitte die SIP URL, an die der Anruf weitergeleitet werden soll. Die Weiterleitung erfolgt mittels „Blind Transfer“. Alternativ kann hier auch eine Zielrufnummer als Weiterleitung hinterlegt werden. Verwende lokalen Anrufbeantworter Das Softphone verwendet den eingebauten Anrufbeantworter. Wählen Sie je SIP Account ein Ansageschema aus, das Sie zuvor aufgenommen haben. Die Aufnahmedauer je Anruf kann zwischen 1 und 3 Minuten variiert werden. Standardansagen werden in der ausgewählten Sprache des Softphones abgespielt. Individuelle Ansagen gelten immer für alle Spracheinstellungen.

Ninja (X-TAPI Lite 4.0) (c) 2007 Global IP Telecommunications Ltd. All rights reserved. www.globaliptel.com
Audio Einstellungen Die Übersicht stellt in den ersten beiden Zeilen die exakte Systemeinstellung für Audio Geräte dar. Wählen Sie als Eingabe- und Ausgabegerät die gewünschten Geräte. Die „Laustärke Telefon“ für Ein- und Ausgabegeräte sind ausschließlich global zu betrachten und reguliert die Gesamtlautstärke des Telefons für Mikrofon und Lautsprecher ohne die Systemeinstellungen zu verstellen.
Ninja (X-TAPI Lite 4.0) (c) 2007 Global IP Telecommunications Ltd. All rights reserved. www.globaliptel.com
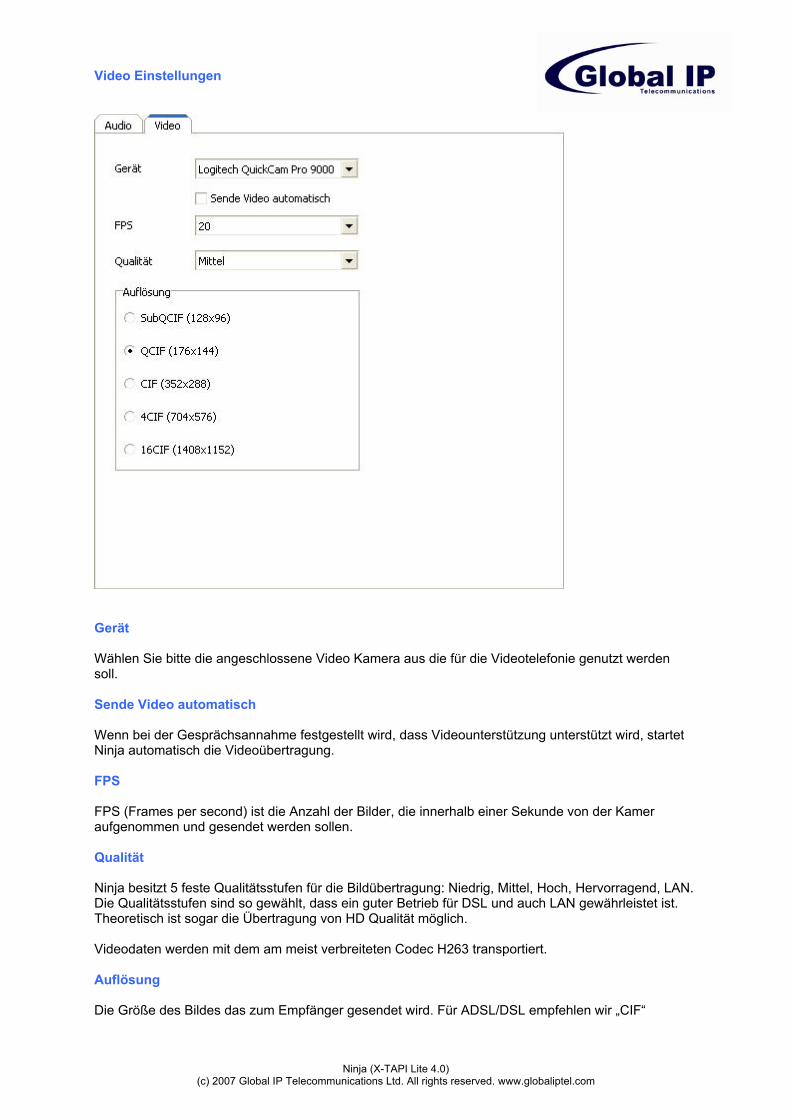
Video Einstellungen
Gerät Wählen Sie bitte die angeschlossene Video Kamera aus die für die Videotelefonie genutzt werden soll. Sende Video automatisch Wenn bei der Gesprächsannahme festgestellt wird, dass Videounterstützung unterstützt wird, startet Ninja automatisch die Videoübertragung. FPS FPS (Frames per second) ist die Anzahl der Bilder, die innerhalb einer Sekunde von der Kamer aufgenommen und gesendet werden sollen. Qualität Ninja besitzt 5 feste Qualitätsstufen für die Bildübertragung: Niedrig, Mittel, Hoch, Hervorragend, LAN. Die Qualitätsstufen sind so gewählt, dass ein guter Betrieb für DSL und auch LAN gewährleistet ist. Theoretisch ist sogar die Übertragung von HD Qualität möglich. Videodaten werden mit dem am meist verbreiteten Codec H263 transportiert. Auflösung Die Größe des Bildes das zum Empfänger gesendet wird. Für ADSL/DSL empfehlen wir „CIF“
Ninja (X-TAPI Lite 4.0) (c) 2007 Global IP Telecommunications Ltd. All rights reserved. www.globaliptel.com
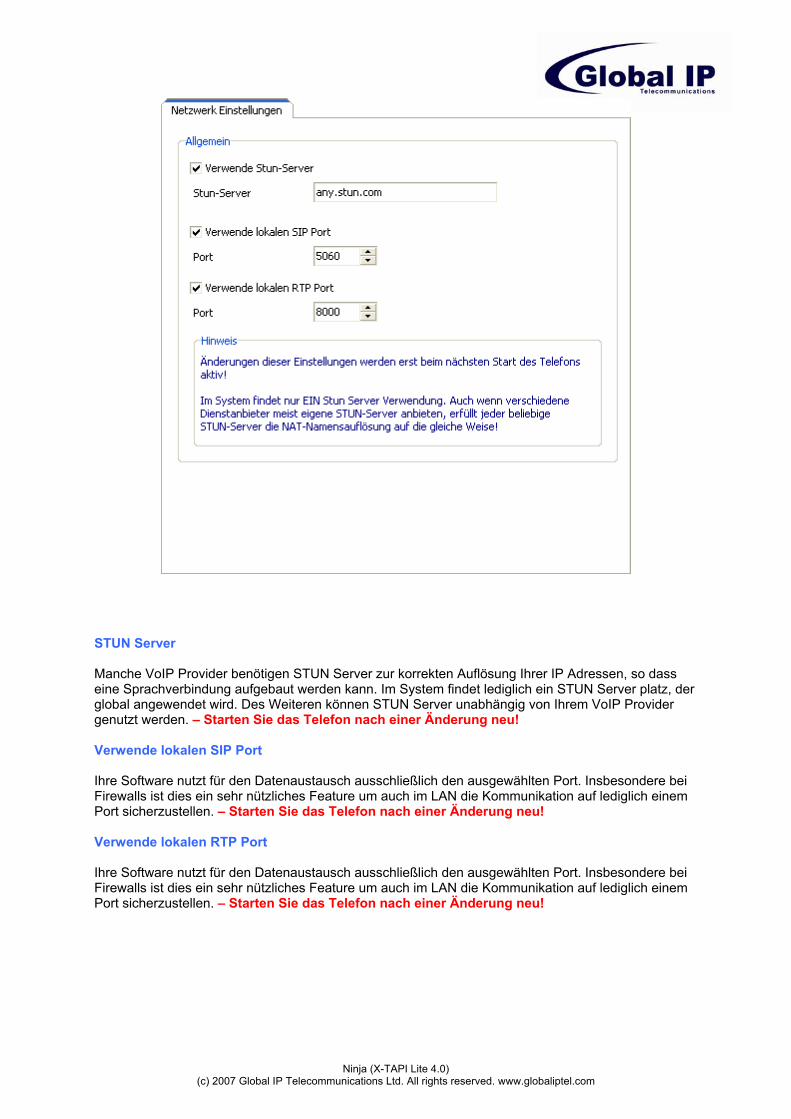
STUN Server Manche VoIP Provider benötigen STUN Server zur korrekten Auflösung Ihrer IP Adressen, so dass eine Sprachverbindung aufgebaut werden kann. Im System findet lediglich ein STUN Server platz, der global angewendet wird. Des Weiteren können STUN Server unabhängig von Ihrem VoIP Provider genutzt werden. – Starten Sie das Telefon nach einer Änderung neu! Verwende lokalen SIP Port Ihre Software nutzt für den Datenaustausch ausschließlich den ausgewählten Port. Insbesondere bei Firewalls ist dies ein sehr nützliches Feature um auch im LAN die Kommunikation auf lediglich einem Port sicherzustellen. – Starten Sie das Telefon nach einer Änderung neu! Verwende lokalen RTP Port Ihre Software nutzt für den Datenaustausch ausschließlich den ausgewählten Port. Insbesondere bei Firewalls ist dies ein sehr nützliches Feature um auch im LAN die Kommunikation auf lediglich einem Port sicherzustellen. – Starten Sie das Telefon nach einer Änderung neu!

Ninja (X-TAPI Lite 4.0) (c) 2007 Global IP Telecommunications Ltd. All rights reserved. www.globaliptel.com
Telefonverhalten Anzeigen bei eingehendem Anruf Bei eingehendem Anruf gelangt das Telefon in den Vordergrund. Minimieren bei Auflegen Bei Auflegen wir das Telefon in den Hintergrund gelegt. Lokale DTMF erzeugen Es werden auf Ihrem Lautsprecher DTMF Töne wiedergegeben. DTMF senden Es werden DTMF Töne beim klicken der Ziffern übermittelt. Auto Answer beibehalten Der letzte Speicherzustand von Autoantwort bleibt auch nach Beenden des Telefones bestehen.
Anklopfen Signalisiert ein “Anklopfen” im Hörer. Ist die Funktion deaktiviert, dann wird dem Anrufer ein „besetzt“ übermittelt falls Sie am telefonieren sind. Zeige Alertbox Zeigt bei einem eingehenden Anruf eine Infobox mit den Anruferdetails, wenn das Telefon keinen Fokus besitzt, ohne dass die Box selbst den Fokus erhält. Sie können somit bequem in einer Applikation (eMail, Textverarbeitung) während eines Anrufes weiterarbeiten. Autokonferenz beibehalten Der letzte Speicherzustand von Autokonferenz bleibt auch nach Beenden des Telefones bestehen. Bitte nicht stören (DND) beibehalten Der letzte Speicherzustand von DND bleibt auch nach Beenden des Telefones bestehen. Stumm beibehalten Der letzte Speicherzustand von „Stumm“ bleibt auch nach Beenden des Telefones bestehen. Klingeltöne Durch markieren der Klingeltöne „Standard“, „Wave 1“ und „Wave 2“ ändern Sie den Klingelausgabeton, dessen Laustärke durch das rechte Volumemeter geändert werden kann. Durch klicken des Lautsprechersymbols erhalten Sie den Klingelton auf den ausgewählten Lautsprecher ausgegeben. Wählen Sie „Benutzerdefiniert“ um eigene WAV als Klingelton zu hinterlegen. AEC Acoustic Echo Cancellation, technisches Verfahren zur akustischen Echoreduktion. Mit zu- und abnehmenden Werten kann eine Reduktion von Echo Effekten herbeigeführt werden.
Ninja (X-TAPI Lite 4.0) (c) 2007 Global IP Telecommunications Ltd. All rights reserved. www.globaliptel.com
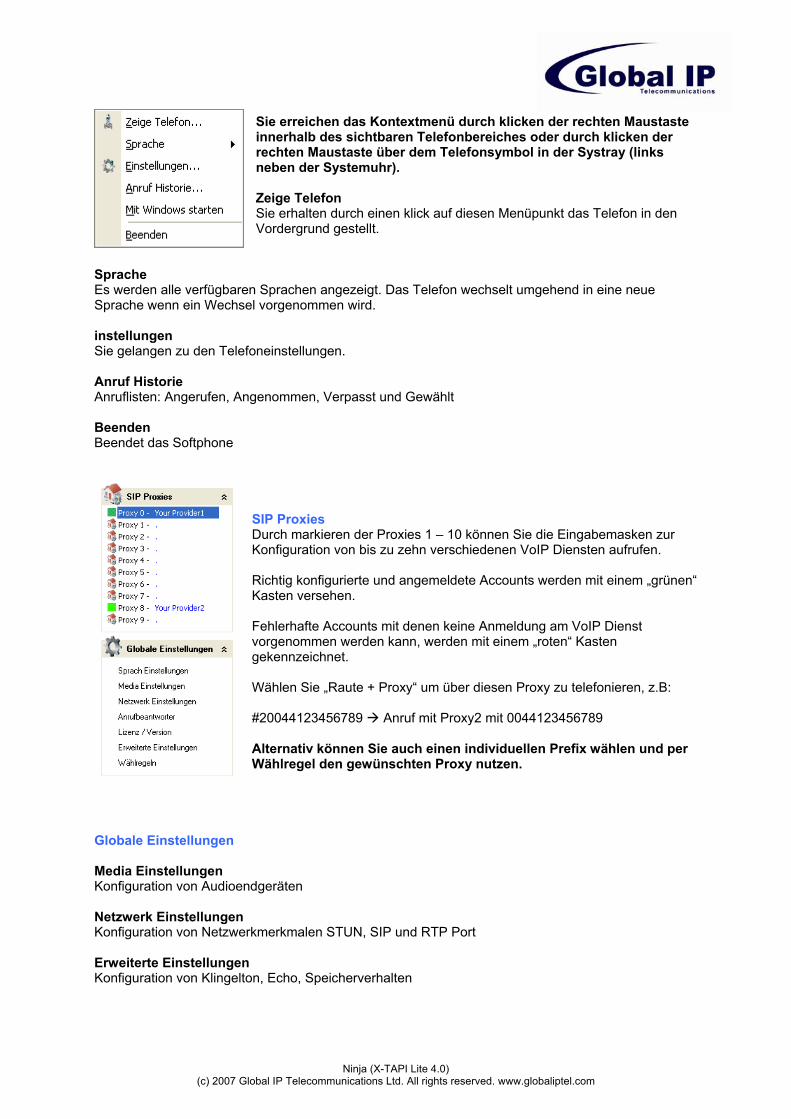
Sie erreichen das Kontextmenü durch klicken der rechten Maustaste innerhalb des sichtbaren Telefonbereiches oder durch klicken der rechten Maustaste über dem Telefonsymbol in der Systray (links neben der Systemuhr). Zeige Telefon Sie erhalten durch einen klick auf diesen Menüpunkt das Telefon in den Vordergrund gestellt.
Sprache Es werden alle verfügbaren Sprachen angezeigt. Das Telefon wechselt umgehend in eine neue Sprache wenn ein Wechsel vorgenommen wird. instellungen Sie gelangen zu den Telefoneinstellungen. Anruf Historie Anruflisten: Angerufen, Angenommen, Verpasst und Gewählt Beenden Beendet das Softphone
SIP Proxies Durch markieren der Proxies 1 – 10 können Sie die Eingabemasken zur Konfiguration von bis zu zehn verschiedenen VoIP Diensten aufrufen. Richtig konfigurierte und angemeldete Accounts werden mit einem „grünen“ Kasten versehen. Fehlerhafte Accounts mit denen keine Anmeldung am VoIP Dienst vorgenommen werden kann, werden mit einem „roten“ Kasten gekennzeichnet. Wählen Sie „Raute + Proxy“ um über diesen Proxy zu telefonieren, z.B: #20044123456789 Anruf mit Proxy2 mit 0044123456789 Alternativ können Sie auch einen individuellen Prefix wählen und per Wählregel den gewünschten Proxy nutzen.
Globale Einstellungen Media Einstellungen Konfiguration von Audioendgeräten Netzwerk Einstellungen Konfiguration von Netzwerkmerkmalen STUN, SIP und RTP Port Erweiterte Einstellungen Konfiguration von Klingelton, Echo, Speicherverhalten

Ninja (X-TAPI Lite 4.0) (c) 2007 Global IP Telecommunications Ltd. All rights reserved. www.globaliptel.com
Lizenzen Folgen Sie zur Lizenzierung der Software den Hinweistexten der Software. Beachten Sie bitte, dass bei dem Export Ihrer Lizenzdaten alle eingerichteten SIP Konten als auch Ihr Lizenzschlüssel gespeichert werden. Bewahren Sie die Sicherung sicher auf!
Systeminformationen In dieser Rubrik werden alle wichtigen und aussagekräftigen Systeminformationen Ihres Computers dargestellt.

Ninja (X-TAPI Lite 4.0) (c) 2007 Global IP Telecommunications Ltd. All rights reserved. www.globaliptel.com
Anruf Ruflisten, Kontakte, MWI, Blockliste Wechseln Sie durch Anklicken der oberen Reiter „Kontakte“ , „Anruf Historie“, „MWI“ und „Geblockt“ zwischen den jeweiligen Ansichten.
Anruf Historie Alle Anrufe werden, nach der Uhrzeit sortiert, absteigend aufgelistet und in „eingehende“, „ausgehende“, „verpasste“ und „nicht erreichte“ Anrufe untergliedert. Klicken Sie auf einen der rechten Reiter um eine der vorgenannten Kategorien einzusehen. Durch einen Doppelklick auf einen Eintrag in der Rufliste wird die Rufnummer automatisch gewählt. Anrufe mit Sprachnachrichten werden durch ein Lautsprechersymbol gekennzeichnet. Nutzen Sie die linke untere Navigation um die Dateneinträge zu verwalten und die rechte Navigation um Sprachnachrichten abzuspielen oder zu löschen.
Kontakte Legen Sie Kontakte an, indem Sie auf „+“ klicken. Bestätigen Sie nach Eingabe der Daten deren Speicherung durch Anklicken des grünen Häkchens. Um einen Kontakt anzurufen, wählen Sie zunächst aus der ersten Listbox den gewünschten SIP Account mit dem telefoniert werden soll und mit der zweiten Listbox die Zielrufnummer. Klicken Sie auf „Wählen“ um den Anruf einzuleiten.
Ninja (X-TAPI Lite 4.0) (c) 2007 Global IP Telecommunications Ltd. All rights reserved. www.globaliptel.com
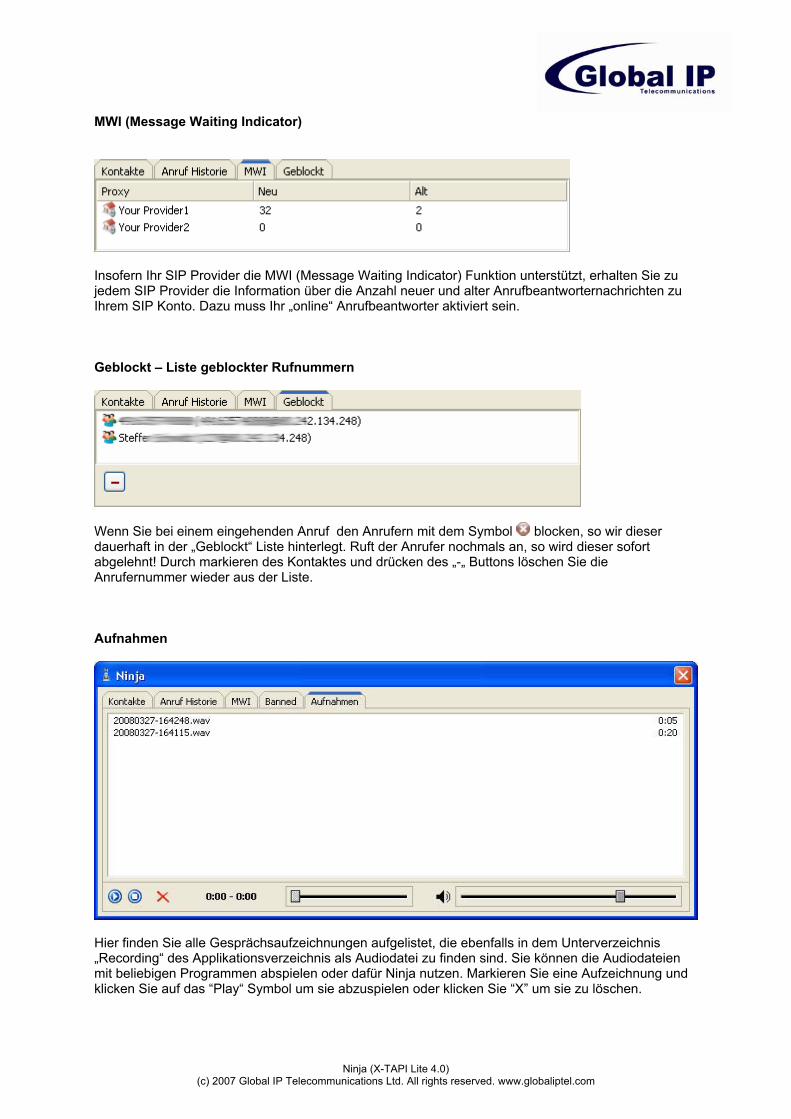
MWI (Message Waiting Indicator)
Insofern Ihr SIP Provider die MWI (Message Waiting Indicator) Funktion unterstützt, erhalten Sie zu jedem SIP Provider die Information über die Anzahl neuer und alter Anrufbeantworternachrichten zu Ihrem SIP Konto. Dazu muss Ihr „online“ Anrufbeantworter aktiviert sein. Geblockt – Liste geblockter Rufnummern
Wenn Sie bei einem eingehenden Anruf den Anrufern mit dem Symbol blocken, so wir dieser dauerhaft in der „Geblockt“ Liste hinterlegt. Ruft der Anrufer nochmals an, so wird dieser sofort abgelehnt! Durch markieren des Kontaktes und drücken des „-„ Buttons löschen Sie die Anrufernummer wieder aus der Liste. Aufnahmen
Hier finden Sie alle Gesprächsaufzeichnungen aufgelistet, die ebenfalls in dem Unterverzeichnis „Recording“ des Applikationsverzeichnis als Audiodatei zu finden sind. Sie können die Audiodateien mit beliebigen Programmen abspielen oder dafür Ninja nutzen. Markieren Sie eine Aufzeichnung und klicken Sie auf das “Play“ Symbol um sie abzuspielen oder klicken Sie “X” um sie zu löschen.
Ninja (X-TAPI Lite 4.0) (c) 2007 Global IP Telecommunications Ltd. All rights reserved. www.globaliptel.com
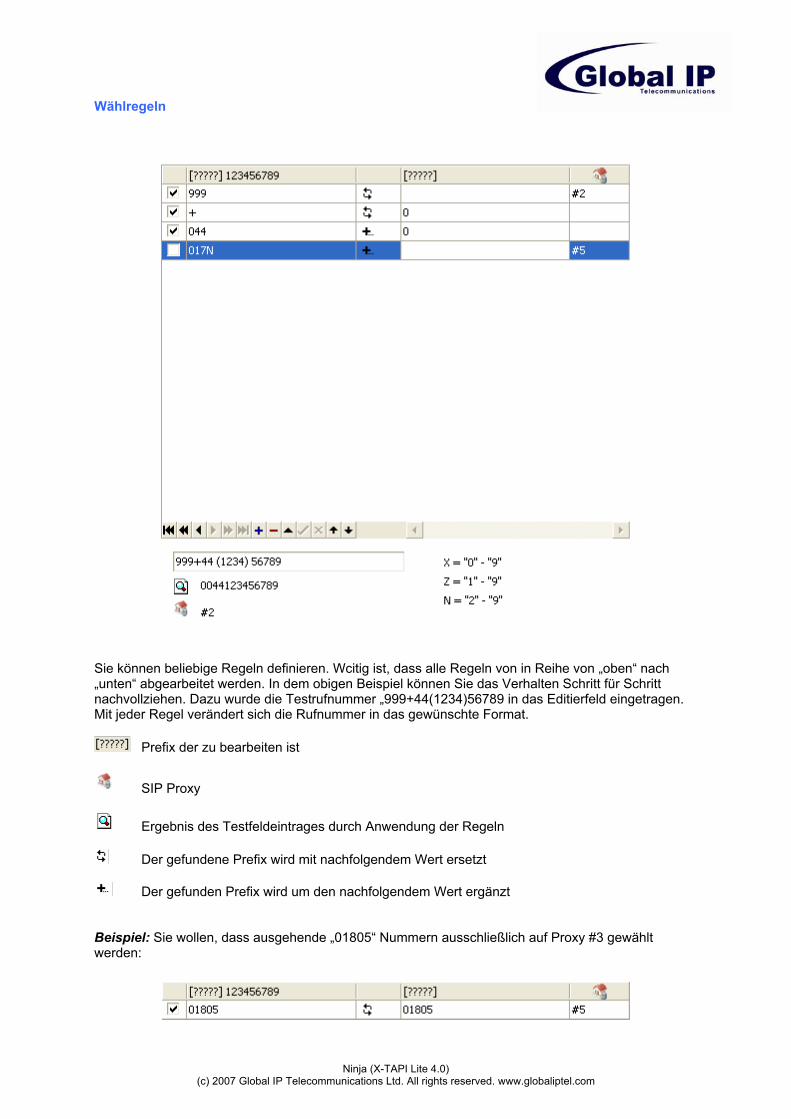
Wählregeln
Sie können beliebige Regeln definieren. Wcitig ist, dass alle Regeln von in Reihe von „oben“ nach „unten“ abgearbeitet werden. In dem obigen Beispiel können Sie das Verhalten Schritt für Schritt nachvollziehen. Dazu wurde die Testrufnummer „999+44(1234)56789 in das Editierfeld eingetragen. Mit jeder Regel verändert sich die Rufnummer in das gewünschte Format.
Prefix der zu bearbeiten ist
SIP Proxy
Ergebnis des Testfeldeintrages durch Anwendung der Regeln
Der gefundene Prefix wird mit nachfolgendem Wert ersetzt
Der gefunden Prefix wird um den nachfolgendem Wert ergänzt Beispiel: Sie wollen, dass ausgehende „01805“ Nummern ausschließlich auf Proxy #3 gewählt werden:
Ninja (X-TAPI Lite 4.0) (c) 2007 Global IP Telecommunications Ltd. All rights reserved. www.globaliptel.com
- TAPI - Was ist TAPI ? Das Telephony Application Programming Interface (TAPI) ist eine Programmierschnittstelle für Telefonieanwendungen. Die Schnittstelle wurde 1993 von Microsoft und Intel eingeführt. Ab Microsoft Windows 95 wurde TAPI fest ins Betriebssystem verankert. Anwendungen für TAPI sind zum Beispiel Softwaretelefone, Videokonferenzprogramme oder Callcenter-Systeme. TAPI-Treiber sind auch in Verbindung mit ISDN-Telefonanlagen zur Konfiguration und Rufbehandlung mittels CTI gebräuchlich. Wie wird TAPI installiert ? Der Ninja TSP Treiber (Tapi Service Provider) wird mit der Installation automatisch auf Ihrem System installiert. Danach kann von TAPI kompatiblen Geräten (z.B Software) der NINJA TSP Treiber als Telefonleitung gewählt werden. Das ist von Hersteller zu Hersteller unterschiedlich. Bitte informieren Sie sich, wo genau in Ihrer Software (z.B. Kundenverwaltung) der TAPI Support konfiguriert wird. Der Name unseres TSP Treibers lautet: X-Phone Multi Line WICHTIG: Ninja ist nicht mit der Vorgängerversion „X-Pro Multi Line kompatibel“ ! Von Ninja erkannte Anrufe werden direkt über unseren TSP (Telephony Service Provider) an alle TAPI unterstützenden Applikationen (Outlook Plugin, CRM Software) weitergereicht. Softwarelösungen von Drittanbietern können mit den weitergereichten Informationen beispielsweise Kontaktfenster öffnen oder automatische Telefonnotizen erstellen. Sie finden die jeweils letzte Version unter http://downloads.globaliptel.com/ninja/manual Ein Release Candidate (RC) oder Freigabekandidat ist eine abschließende Testversion einer Software. Alle hier bereits integrierten Funktionen sind Leistungen, die die endgültige Version der Software enthalten soll. Das RC 1 beinhaltet eine „Demo“ Soundeinspielung alle 30 Sekunden und kann in vollem Funktionsumfang getestet werden.

Ninja (X-TAPI Lite 4.0) (c) 2007 Global IP Telecommunications Ltd. All rights reserved. www.globaliptel.com
- ANHANG - Verwendung des kostenlosen Outlook AddIn Warum ein Outlook ? Microsoft nutzt bei seinen Windows Veröffentlichungen teilweise sehr verschiedene Wählhilfen (Dialer). Alle Wählhilfen haben jedoch eines gemeinsam, sie unterstützen allesamt keine Identifizierung von eingehenden Anrufe. Aus diesem Grund haben wir ein ADDIN für unsere Software entwickelt, das ein- und ausgehende Anrufe erkennt und folgende Outlook Versionen unterstützt: Outlook 2000 Outlook 2002 (XP) Outlook 2003 Outlook 2007 Exchange Server (Zugriff auf eingebundene Kontaktordner) Das Outlook AddIn zeigt alle Anrufe in einem eigenen Fenster an. Wichtiger Hinweis: Bitte beachten Sie, dass das bereitgestellte Outlook AddIn „Freeware“ ist! Die Bereitstellung erfolgt ohne Gewähr auf Vollständigkeit, Funktionalität. Es wird kein Support für dieses Produkt geleistet. Der Einsatz auf Ihrem PC erfolgt auf eigene Gefahr. Informieren Sie sich auf unseren Webseite www.globaliptel.com oder über neue Versionen. Installation Downloaden Sie die Installationsdatei aus unserem Downloadbereich: http://downloads.globaliptel.com/Ninja/addin/outlookaddin.exe Starten Sie die Anwendung und folgen Sie den Anweisungen während der Installation. Konfiguration Die Konfiguration erfolgt per Setup vollkommen automatisch. Das AddIn ist nach einem Neustart von Outlook sofort verfügbar und einsatzbereit. Sie finden das AddIn als eigene Registerkarte unter Extras/Optionen wieder. Wenn Sie nun Ninja starten und einen Testanruf durchführen, so reagiert Outlook bereits mit der Anzeige des eingehenden Anrufes.

Ninja (X-TAPI Lite 4.0) (c) 2007 Global IP Telecommunications Ltd. All rights reserved. www.globaliptel.com
• TAPI-Line Device Ist in der aktuellen Version an Ninja gebunden und kann nicht verändert
werden. • Ignore SIP-Suffix Sie können entscheiden ob der komplette SIP URI Pfad dargestellt
werden soll oder lediglich die Rufnummer. • Journaling active Mit den Standardeinstellungen werden alle Telefonate direkt in das
Outlook Journal gespeicher. Anrufe werden wie folgt gespeichert: Missed -- Sie haben einen Anruf verpaßt Dialed -- Gewählte Rufnummer ohne Verbindung mit Teilnehmer Answered (IN) -- Sie haben einen Anruf entgegengenommen Answered (OUT) -- Sie haben selbst jemanden angerufen
• Re-Index Contact Info... Neues initialisieren aller Kontakte falls viele Veränderungen durchgeführt wurden und der Dienst keine Kontakte mehr darstellt.
• Rules Führende Zeichnen in der Rufnummer können ersetzt werden Arbeitsweise des Outlook AddIn Das Outlook AddIn bietet Ihnen im zwei neue Buttons mit "Make Call...". Der Button wird verwendet um ausgehende Anrufe zu tätigen und ist ausschließlich in den Kontaktansichten zu sehen. Wenn Sie einen Anruf tätigen wollen so brauchen Sie lediglich den gewünschten Kontakt zu markieren und auf den angezeigten “Make Call…” Button zu klicken. Haben Sie bereits einen Kontakt geöffnet dann wird durch einen klick auf den Button automatisch eine Auswahl der im Kontakt angegebenen Rufnummern zur Wahl bereitgestellt. Ausgehende Anrufe Nachdem Sie einen Kontakt ausgewählt haben und per „Make Call…“ Button zum Anruf vorbereitet haben, öffnet sich ein Fenster mit der Auswahl der dem Kontakt zugeordneten Rufnummern. Bitte wählen Sie die zu wählende Rufnummer aus und bestätigen diese durch klick auf den Button "OK". Nach der Bestätigung des zu tätigenden Anrufes erhalten Sie von dem Outlook AddIn ein Statusfenster angezeigt das Ihnen den ausgehenden Anruf signalisiert. Wird das Gespräch entgegengenommen, so erhalten Sie den Status "CONNECTED" (VERBUNDEN) Das Statusfenster wird während aktiven Gesprächen immer in den Vordergrund gestellt. Es öffnet und schließt sich automatisch sobald keine aktiven Gespräche mehr zu erkennen sind. Klicken Sie auf das rechts oben angezeigte "x", um das Infofenster zu schließen. Über die "Refresh..."-Schaltfläche können Sie den Fensterinhalt aktualisieren. Sobald eine Statusinformation zu sehen ist, haben Sie die Möglichkeit einen dazugehörigen Kontakt anzeigen zu lassen. Markieren Sie dazu den Anrufer / Anzurufenden in der Statusbox und klicken Sie "Show Contact".
Ninja (X-TAPI Lite 4.0) (c) 2007 Global IP Telecommunications Ltd. All rights reserved. www.globaliptel.com
Eingehende Anrufe Wie bei ausgehenden Anrufen erhalten Sie bei eingehenden Anrufen ein Stausfenster dargestellt. Sie erhalten "OFFERING" als Information für den eingehenden Anruf inklusive der Rufnummer des Anrufers. Sobald eine Statusinformation zu sehen ist haben Sie die Möglichkeit einen dazugehörigen Kontakt anzeigen zu lassen. Markieren Sie dazu den Anrufer / Anzurufenden in der Statusbox und klicken "Show Contact". Sie können auch bei anonymen oder unbekannten Anrufen neue Kontakte anlegen. Markieren Sie den Anrufer und klicken anschließend auf "Show Contact...". Sie erhalte ein neues Kontaktfenster mit vorausgefüllter Rufnummer des Anrufers (nur bei Rufnummernübermittlung) Über die "Refresh..."-Schaltfläche können Sie den Fensterinhalt bei Bedarf auch per Hand aktualisieren.. Anrufjournal Alle Anrufe werden automatisch als Journaleintrag in das Outlook Standardjournal geschrieben Sie erhalten alle wichtigen Verbindungsdaten dargestellt und sind mittels gewohnter Outlook Funktionalität kategorisierbar und sortierbar. Sortieren Sie die Anrufe durch klick auf die gewünschte Kopfzeile. Manche Sortierungen sind nicht über den Header erlaubt. Bitte nutzen Sie dafür die bewährte Outlook Gruppierfunktion.
Ninja (X-TAPI Lite 4.0) (c) 2007 Global IP Telecommunications Ltd. All rights reserved. www.globaliptel.com
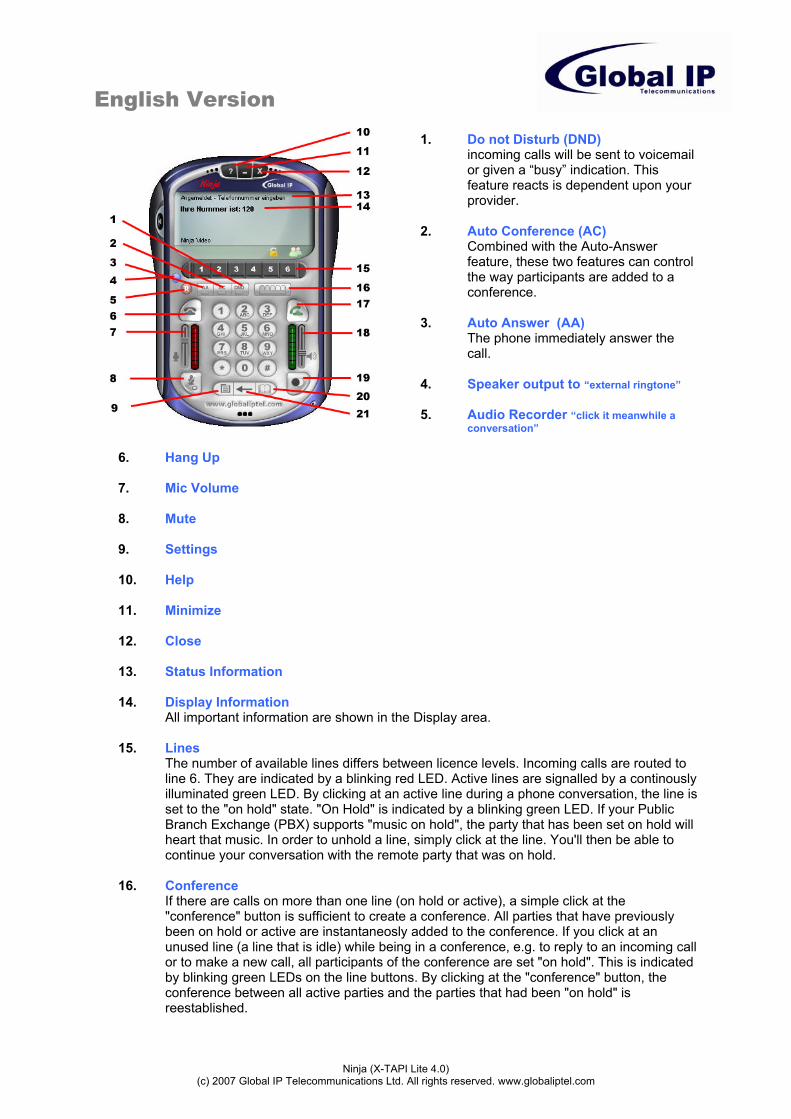
English Version
1. Do not Disturb (DND) incoming calls will be sent to voicemail or given a “busy” indication. This feature reacts is dependent upon your provider.
2. Auto Conference (AC) Combined with the Auto-Answer feature, these two features can control the way participants are added to a conference.
3. Auto Answer (AA) The phone immediately answer the call.
4. Speaker output to “external ringtone”
5. Audio Recorder “click it meanwhile a conversation”
6. Hang Up
7. Mic Volume
8. Mute
9. Settings
10. Help
11. Minimize
12. Close
13. Status Information
14. Display Information All important information are shown in the Display area.
15. Lines The number of available lines differs between licence levels. Incoming calls are routed to line 6. They are indicated by a blinking red LED. Active lines are signalled by a continously illuminated green LED. By clicking at an active line during a phone conversation, the line is set to the "on hold" state. "On Hold" is indicated by a blinking green LED. If your Public Branch Exchange (PBX) supports "music on hold", the party that has been set on hold will heart that music. In order to unhold a line, simply click at the line. You'll then be able to continue your conversation with the remote party that was on hold.
16. Conference If there are calls on more than one line (on hold or active), a simple click at the "conference" button is sufficient to create a conference. All parties that have previously been on hold or active are instantaneosly added to the conference. If you click at an unused line (a line that is idle) while being in a conference, e.g. to reply to an incoming call or to make a new call, all participants of the conference are set "on hold". This is indicated by blinking green LEDs on the line buttons. By clicking at the "conference" button, the conference between all active parties and the parties that had been "on hold" is reestablished.

Ninja (X-TAPI Lite 4.0) (c) 2007 Global IP Telecommunications Ltd. All rights reserved. www.globaliptel.com
17. Dial
18. Speaker Volume
19. Redial It dials always the last dialed number.
20. Call History & Contacts 21. Clear Display
1. Ban This feature blocks a specific caller ID Wir verwendet um einen Anrufer permanently. Incoming calls from banned parties are automatically handled as "Do Not Disturb". Banned parties are listed in a "Banned Parties" List and can be unblocked by simply deleting the corresponding entry.
2. Ignore An incoming call can be ignored for one time with this function. The caller will receive the status "Busy".
3. Blind Transfer During a call, the „transfer“ icon is being displayed. By clicking at the icon, the participant is set „on hold“. Subsequently, enter a destination URI (phone number) and press the return key to transfer the call to the new destination URI. Instead of pressing the return key, you can click at the “make call” or “hangup” button.
4. Callback Transfer
During a call, the „consultation“ icon is as well being displayed. By clicking at the icon, the participant is set „on hold“. The telephone asks you to enter a destination URI (phone number) for a consultation call. If you want to transfer your consultation party to the party on hold, click at the „transfer“ button. After terminating the conversation with your consultation party, the phone forwards the party on hold to the destination URI and gives a short audio signal. During the time the call has not yet been established, the line with the party on hold is blinking red. By clicking at the line you can reestablish the call with the party on hold at any time.
5. Voicebox Transfer Incoming calls can be routed directly to the voice box by clicking at the „voicebox“ icon.
6. Encryption – function will be available in a higher Ninja version in 2Q’08.
The lock displayed in the unlocked state indicates that all voice data for the active call is transmitted in the clear. By clicking at the lock icon, the phone will attempt to encrypt the conversation by negotiating key data with the phone on the remote side. Detailed information will be available with Ninja Crypt.
7. Open Outlook

Ninja (X-TAPI Lite 4.0) (c) 2007 Global IP Telecommunications Ltd. All rights reserved. www.globaliptel.com
Proxy Server Activate Set to „yes“ in order to activate the SIP account Proxy Name Please enter a meaningful name for the SIP Proxy (e.g. OurPBX or SipProvider1) Domain/Realm Domain name of your SIP service provider. This parameter is supplied by your SIP service provider! Proxy Server Proxy server address of the SIP registrar server of your SIP provider. Can be an IP address or a URL that is later parsed by a name server (e.g. sip.mysipprovider.com). A registrar server manages the registering of internet telephones. It communicates
with all registered clients. SIP Port A logical port used to communicate with the SIP registrar server. Most commonly used: Port 5060. Out Bound Proxy Proxy server address (IP or named URI) of the server that handles outbound calls. Outbound Proxy Port Port used by the outbound proxy server of your provider. Credentials Display Name The name that is displayed by the telephones of your remote parties. The display name is your caller ID. It can contain space characters. User Name Your username/user ID of the account at your SIP telephony service provider. This parameter is supplied by your SIP service provider. Password Your password for the SIP account. This parameter is supplied by your SIP service provider.
Ninja (X-TAPI Lite 4.0) (c) 2007 Global IP Telecommunications Ltd. All rights reserved. www.globaliptel.com
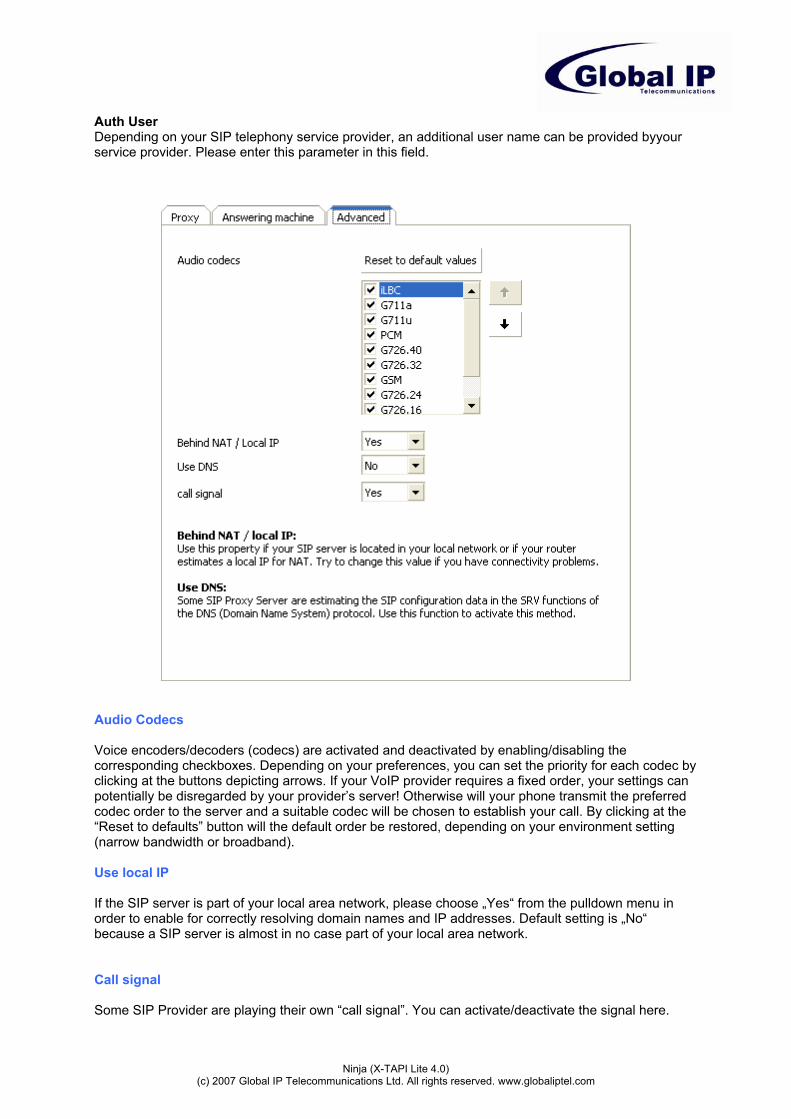
Auth User Depending on your SIP telephony service provider, an additional user name can be provided byyour service provider. Please enter this parameter in this field.
Audio Codecs Voice encoders/decoders (codecs) are activated and deactivated by enabling/disabling the corresponding checkboxes. Depending on your preferences, you can set the priority for each codec by clicking at the buttons depicting arrows. If your VoIP provider requires a fixed order, your settings can potentially be disregarded by your provider’s server! Otherwise will your phone transmit the preferred codec order to the server and a suitable codec will be chosen to establish your call. By clicking at the “Reset to defaults” button will the default order be restored, depending on your environment setting (narrow bandwidth or broadband). Use local IP If the SIP server is part of your local area network, please choose „Yes“ from the pulldown menu in order to enable for correctly resolving domain names and IP addresses. Default setting is „No“ because a SIP server is almost in no case part of your local area network. Call signal Some SIP Provider are playing their own “call signal”. You can activate/deactivate the signal here.

Ninja (X-TAPI Lite 4.0) (c) 2007 Global IP Telecommunications Ltd. All rights reserved. www.globaliptel.com
Answering maschine - Announcements The announcement wizard enables you to create recorded announcements that are played back by the voice box of your Ninja softclient. The wizard is available by clicking at the menu item "global settings" "voice box". You can play back announcement and trailer by clicking at "Start/Stop announcement".
Playback device is the same device as for ringtones. Choose a recorded announcement by using the navigation bar. Recorded announcements can be deleted by clicking at the "-" button and new announcements can be added by clicking at "+". As soon as the "+" button is clicked, the announcement wizard launches automatically. Please follow the instructions in the wizard to record announcements. Recorded announcements can be individually assigned to each SIP account by clicking at "Proxy X" "settings" "voice box" and choose an announcement from the list "announcement plan".
Ninja (X-TAPI Lite 4.0) (c) 2007 Global IP Telecommunications Ltd. All rights reserved. www.globaliptel.com
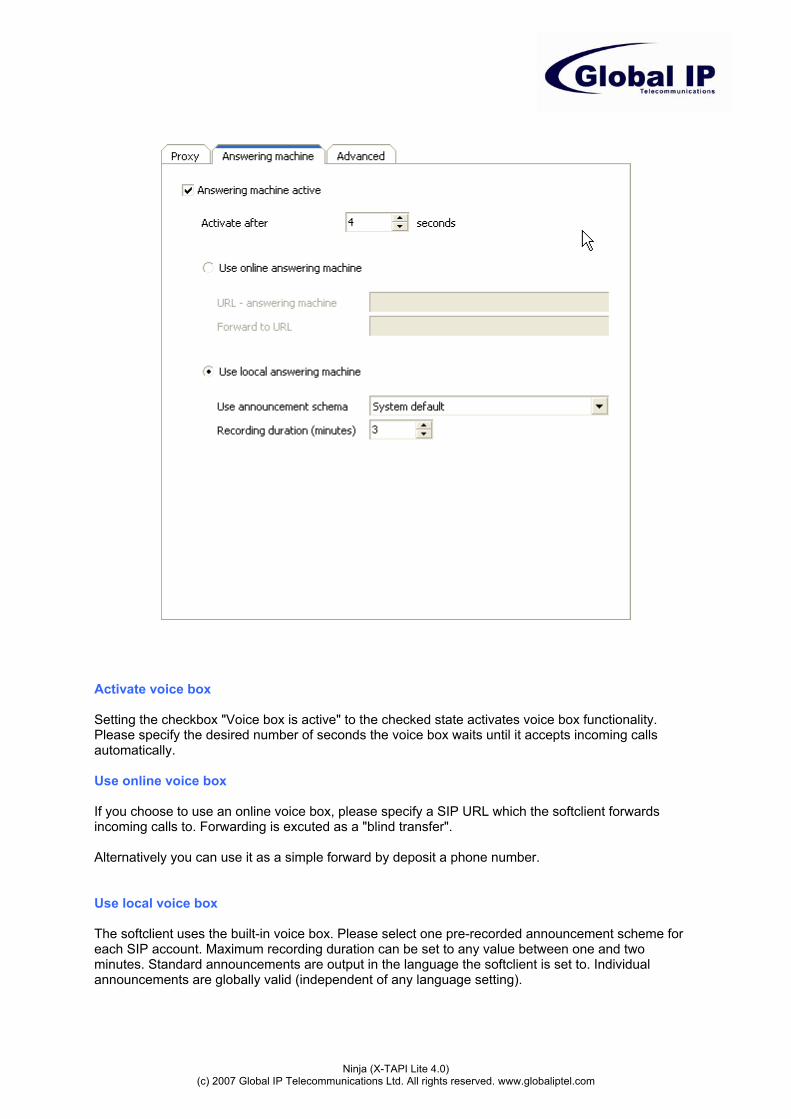
Activate voice box Setting the checkbox "Voice box is active" to the checked state activates voice box functionality. Please specify the desired number of seconds the voice box waits until it accepts incoming calls automatically. Use online voice box If you choose to use an online voice box, please specify a SIP URL which the softclient forwards incoming calls to. Forwarding is excuted as a "blind transfer". Alternatively you can use it as a simple forward by deposit a phone number. Use local voice box The softclient uses the built-in voice box. Please select one pre-recorded announcement scheme for each SIP account. Maximum recording duration can be set to any value between one and two minutes. Standard announcements are output in the language the softclient is set to. Individual announcements are globally valid (independent of any language setting).

Ninja (X-TAPI Lite 4.0) (c) 2007 Global IP Telecommunications Ltd. All rights reserved. www.globaliptel.com
Audio Settings The dialog box contains controls for the precise system settings of your audio devices in the first two lines.. Please choose your preferred devices for audio input and output. The controls in the third line are a speciality. With these controls you can set the overall volume of the telephone for your input as well as for your output WITHOUT affecting system or device settings.
Ninja (X-TAPI Lite 4.0) (c) 2007 Global IP Telecommunications Ltd. All rights reserved. www.globaliptel.com
Video Settings
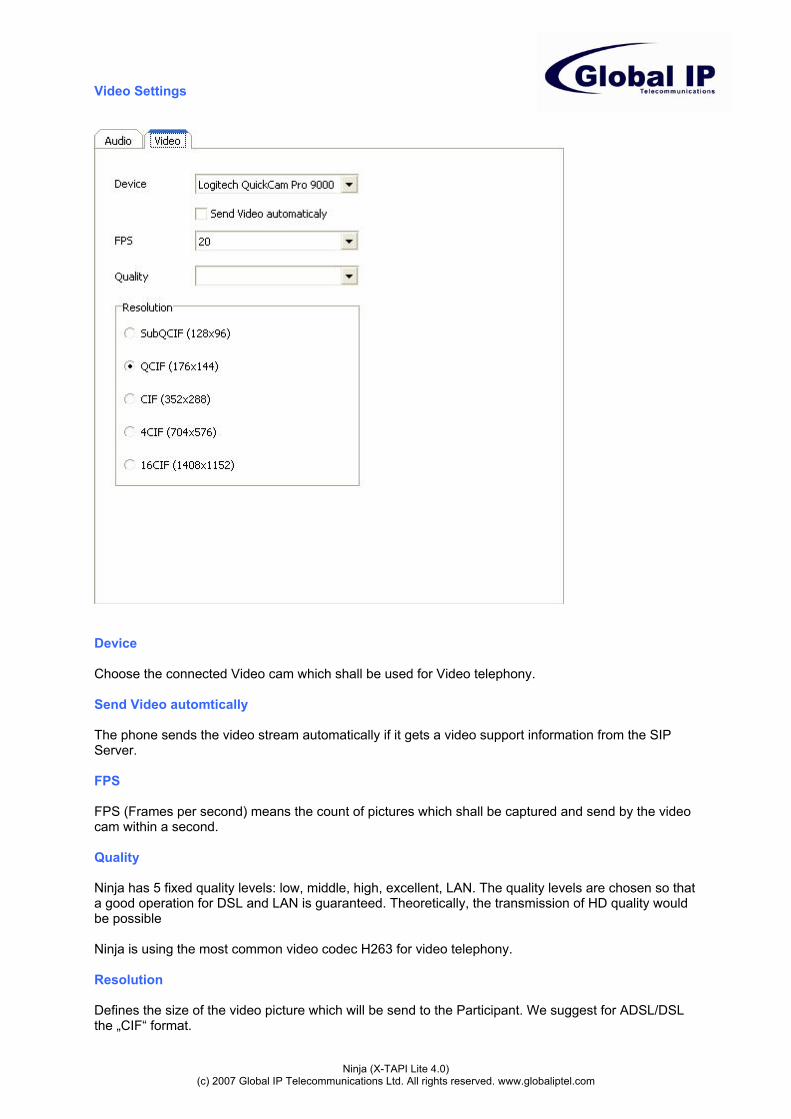
Device Choose the connected Video cam which shall be used for Video telephony. Send Video automtically The phone sends the video stream automatically if it gets a video support information from the SIP Server. FPS FPS (Frames per second) means the count of pictures which shall be captured and send by the video cam within a second. Quality Ninja has 5 fixed quality levels: low, middle, high, excellent, LAN. The quality levels are chosen so that a good operation for DSL and LAN is guaranteed. Theoretically, the transmission of HD quality would be possible Ninja is using the most common video codec H263 for video telephony. Resolution Defines the size of the video picture which will be send to the Participant. We suggest for ADSL/DSL the „CIF“ format.
Ninja (X-TAPI Lite 4.0) (c) 2007 Global IP Telecommunications Ltd. All rights reserved. www.globaliptel.com
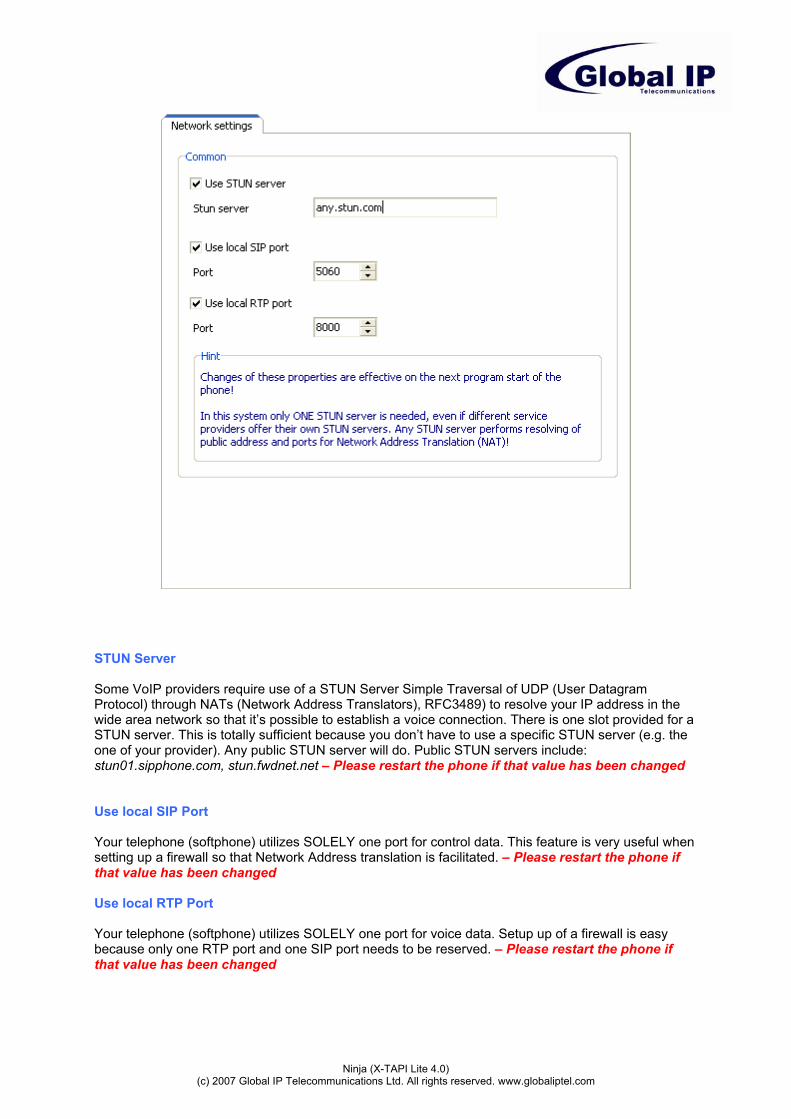
STUN Server Some VoIP providers require use of a STUN Server Simple Traversal of UDP (User Datagram Protocol) through NATs (Network Address Translators), RFC3489) to resolve your IP address in the wide area network so that it’s possible to establish a voice connection. There is one slot provided for a STUN server. This is totally sufficient because you don’t have to use a specific STUN server (e.g. the one of your provider). Any public STUN server will do. Public STUN servers include: stun01.sipphone.com, stun.fwdnet.net – Please restart the phone if that value has been changed Use local SIP Port Your telephone (softphone) utilizes SOLELY one port for control data. This feature is very useful when setting up a firewall so that Network Address translation is facilitated. – Please restart the phone if that value has been changed Use local RTP Port Your telephone (softphone) utilizes SOLELY one port for voice data. Setup up of a firewall is easy because only one RTP port and one SIP port needs to be reserved. – Please restart the phone if that value has been changed
Ninja (X-TAPI Lite 4.0) (c) 2007 Global IP Telecommunications Ltd. All rights reserved. www.globaliptel.com
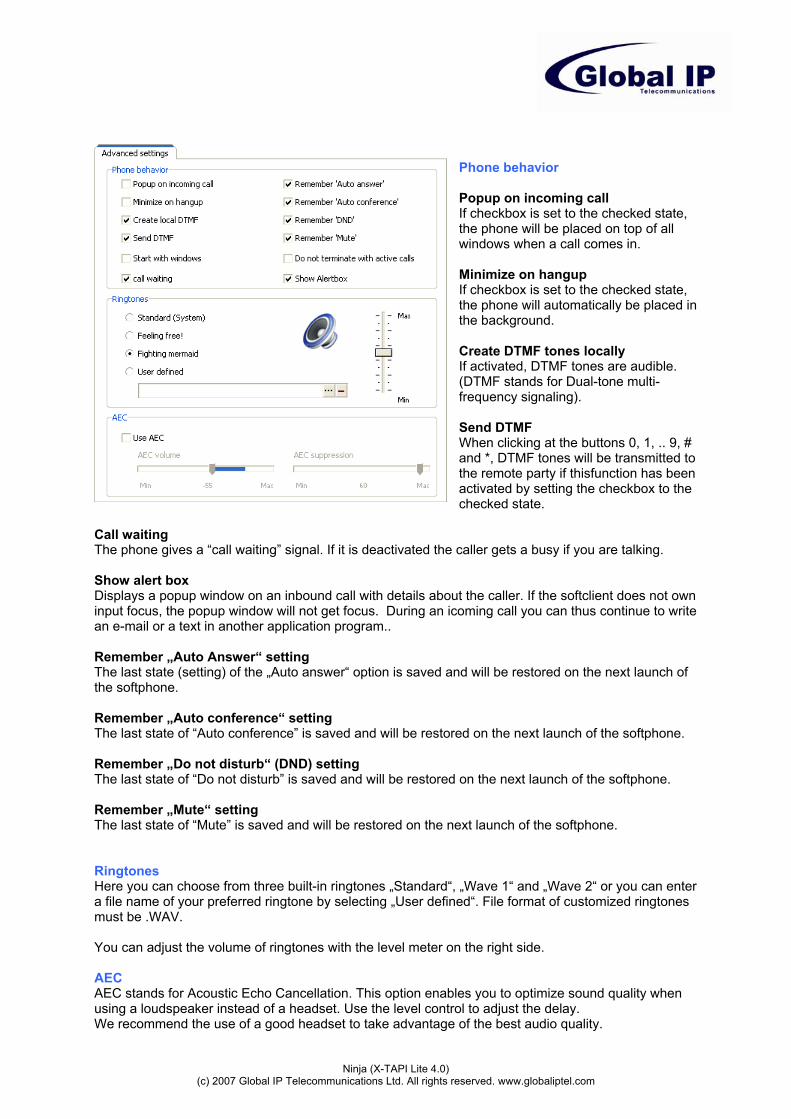
Phone behavior Popup on incoming call If checkbox is set to the checked state, the phone will be placed on top of all windows when a call comes in. Minimize on hangup If checkbox is set to the checked state, the phone will automatically be placed in the background. Create DTMF tones locally If activated, DTMF tones are audible. (DTMF stands for Dual-tone multi-frequency signaling). Send DTMF When clicking at the buttons 0, 1, .. 9, # and *, DTMF tones will be transmitted to the remote party if thisfunction has been activated by setting the checkbox to the checked state.
Call waiting The phone gives a “call waiting” signal. If it is deactivated the caller gets a busy if you are talking. Show alert box Displays a popup window on an inbound call with details about the caller. If the softclient does not own input focus, the popup window will not get focus. During an icoming call you can thus continue to write an e-mail or a text in another application program.. Remember „Auto Answer“ setting The last state (setting) of the „Auto answer“ option is saved and will be restored on the next launch of the softphone. Remember „Auto conference“ setting The last state of “Auto conference” is saved and will be restored on the next launch of the softphone. Remember „Do not disturb“ (DND) setting The last state of “Do not disturb” is saved and will be restored on the next launch of the softphone. Remember „Mute“ setting The last state of “Mute” is saved and will be restored on the next launch of the softphone. Ringtones Here you can choose from three built-in ringtones „Standard“, „Wave 1“ and „Wave 2“ or you can enter a file name of your preferred ringtone by selecting „User defined“. File format of customized ringtones must be .WAV. You can adjust the volume of ringtones with the level meter on the right side. AEC AEC stands for Acoustic Echo Cancellation. This option enables you to optimize sound quality when using a loudspeaker instead of a headset. Use the level control to adjust the delay. We recommend the use of a good headset to take advantage of the best audio quality.

Ninja (X-TAPI Lite 4.0) (c) 2007 Global IP Telecommunications Ltd. All rights reserved. www.globaliptel.com
Context menue in the system tray The context menu is accessible by clicking at the phone icon in the system tray. Alternatively you can access the context menu by clicking at the right mouse key when the mouse pointer is located within the visible area of the softphone. Show phone... The phone is moved to the foreground by clicking here.
Language All available languages are displayed on this option. If you choose a language that differs from the current setting, the phone will immediately redraw with the new language setting.
Settings A click at this option opens the phone settings dialog. Call History Call logs: Outbound, Inbound, Missed and Dialled. Quit Terminate this softphone application. SIP Proxies By selecting an entry from the 10 available slots you’ll access the settings dialog for the corresponding slot. Up to 10 VoIP services can be configured. Correctly setup accounts are marked with a green box. Accounts with erroneous settings are marked with a red box. In these cases it is impossible to log on the SIP proxy of the respective VoIP service provider. Call „POUND + Proxy“ [#1] to initiate the call with the wanted Proxy, e.g.:
#20044123456789 Call with Proxy2 with 0044123456789 Alternatively you can also choose an individual Prefix like „999“ and you manage Proxy with the Dialing Rules. Global Settings Media Settings Configuration of audio devices Network Settings Configuration of network-related parameters like STUN, SIP- and RTP ports Advanced Settings Configuration of ringtones, echo cancellation and memory options.
Ninja (X-TAPI Lite 4.0) (c) 2007 Global IP Telecommunications Ltd. All rights reserved. www.globaliptel.com
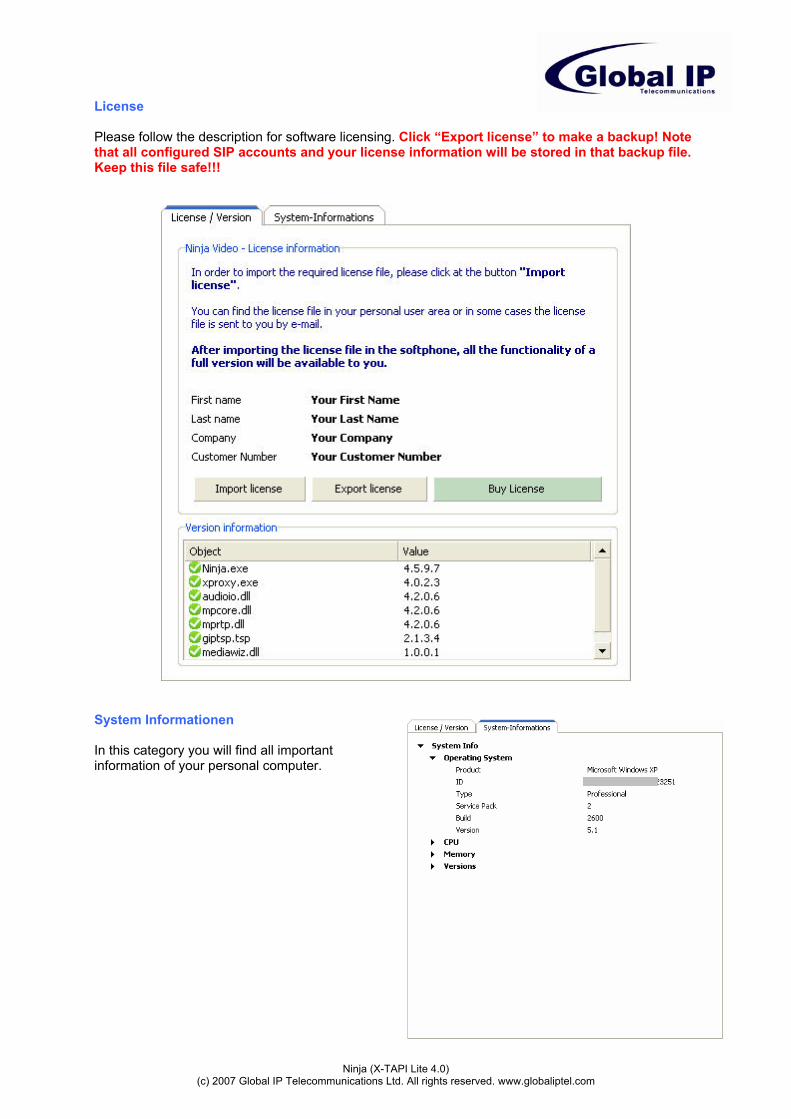
License Please follow the description for software licensing. Click “Export license” to make a backup! Note that all configured SIP accounts and your license information will be stored in that backup file. Keep this file safe!!!
System Informationen In this category you will find all important information of your personal computer.

Ninja (X-TAPI Lite 4.0) (c) 2007 Global IP Telecommunications Ltd. All rights reserved. www.globaliptel.com
Call history, contacts, MWI, Ban list and Recordings Change the list view with a click onto the Tab.
Call history Two tabsheets "contacts" and "call history" are available: Call history: Each and every call is listed in the call history. Entries are sorted by date and time. Incoming calls, as well as outgoing, missed and not established call categories are available. Clicking at one of the tab sheets shows the corresponding history list. A call is established by double-clicking at an entry. Calls with voice messages are marked with a loudspeaker icon. Please use the controls on the lower left side to manage entries and the controls on the lower right side to play back or to delete voice
messages. Contacts New contacts can be added by clicking at the "+" button. Data is stored with a click at the green check icon. In order to call a contact please first select the desired SIP account and subsequently select the number to call. A click at "Make call" initialtes the call.
Ninja (X-TAPI Lite 4.0) (c) 2007 Global IP Telecommunications Ltd. All rights reserved. www.globaliptel.com
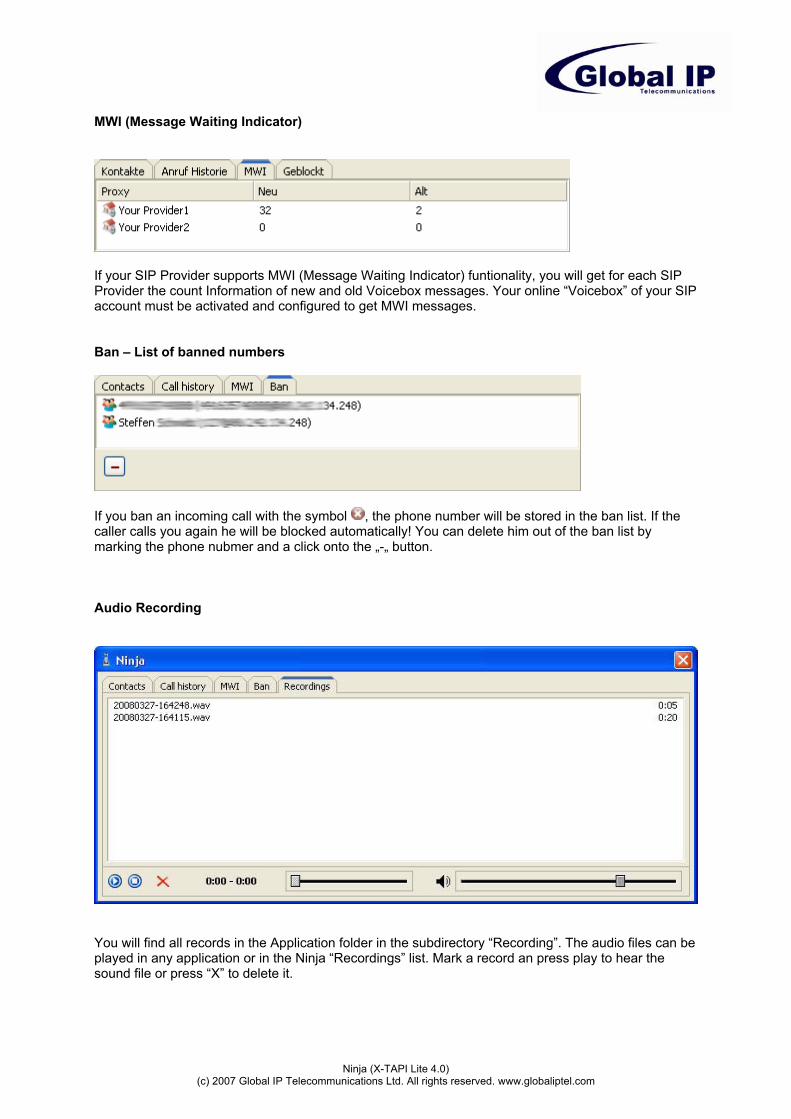
MWI (Message Waiting Indicator)
If your SIP Provider supports MWI (Message Waiting Indicator) funtionality, you will get for each SIP Provider the count Information of new and old Voicebox messages. Your online “Voicebox” of your SIP account must be activated and configured to get MWI messages. Ban – List of banned numbers
If you ban an incoming call with the symbol , the phone number will be stored in the ban list. If the caller calls you again he will be blocked automatically! You can delete him out of the ban list by marking the phone nubmer and a click onto the „-„ button. Audio Recording
You will find all records in the Application folder in the subdirectory “Recording”. The audio files can be played in any application or in the Ninja “Recordings” list. Mark a record an press play to hear the sound file or press “X” to delete it.
Ninja (X-TAPI Lite 4.0) (c) 2007 Global IP Telecommunications Ltd. All rights reserved. www.globaliptel.com
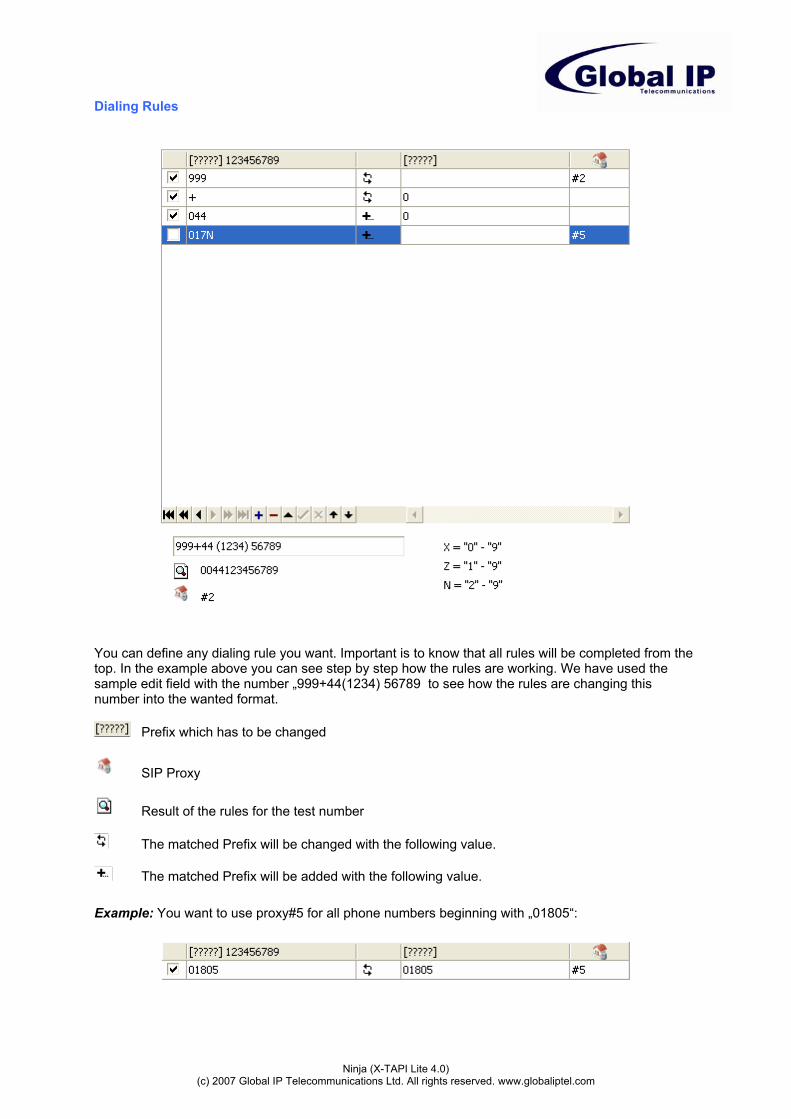
Dialing Rules
You can define any dialing rule you want. Important is to know that all rules will be completed from the top. In the example above you can see step by step how the rules are working. We have used the sample edit field with the number „999+44(1234) 56789 to see how the rules are changing this number into the wanted format.
Prefix which has to be changed
SIP Proxy
Result of the rules for the test number
The matched Prefix will be changed with the following value.
The matched Prefix will be added with the following value. Example: You want to use proxy#5 for all phone numbers beginning with „01805“:
Ninja (X-TAPI Lite 4.0) (c) 2007 Global IP Telecommunications Ltd. All rights reserved. www.globaliptel.com
- TAPI - What is TAPI ? The Telephony Application Programming Interface (TAPI) is a Microsoft Windows API, which provides computer telephony integration and enables PC's running Microsoft Windows to use telephone services. This Interface was developed by Microsoft and Intel. With Microsoft Windows 95, TAPI was integrated into the operating system. Applications like Callcenter Software, Softphones, Videoconferencing Systems or ISDN (well known in Europe) are using TAPI. The TAPI standard supports both connections from individual computers and LAN connections serving any number of computers. How to install TAPI ? The Ninja TSP driver (TSP = TAPI Service Provider) is co-installed on your system during the installation of the Ninja softclient. Subsequently can TAPI compliant software (e.g. Microsoft Outlook) configure and use the Ninja TSP driver as telephone line. The actual configuration process differs between manufacturers. Please refer to the manual of your software (e.g. a Customer Relationship Management software) for details about TAPI configuration. The name of our TSP driver is: X-Phone Multi Line NOTE: Ninja is not compliant with the previous driver version „X-Pro Multi Line kompatibel“ ! Calls that are routed through Ninja are signalled by our TSP (Telephony Service Provider) automatically to all other TAPI compliant applications (Outlook Plugin or other third party CRM software). Third party applications can using information that is offered by Ninja to open contact windows or notice forms. The latest Version of this document is available at http://downloads.globaliptel.com/ninja/manual The term release candidate refers to a version with the potential to be a final product. In this stage, the product features all intended functionalities and is free of known “showstopper” class bugs. At this stage of the release phase, the product is usually complete and fully functional. The RC 1 version plays back every 30 seconds a “TRIAL” sound. It can be tested with all it’s functionality like a full version.
Ninja (X-TAPI Lite 4.0) (c) 2007 Global IP Telecommunications Ltd. All rights reserved. www.globaliptel.com
- ANNEX - Usage of the free Outlook Add In Why Outlook? Microsoft uses different dialers in all their Windows Operating Systems. All these dialers have a commend ground, but they don't support incoming calls. This was the main reason for Global IP Telecommunications to develop an Add In that supports in- and outbound telephony traffic for the most widely used e-mail client in the world . The following versions of MS Outlook are supported: Outlook 2000 Outlook 2002 (XP) Outlook 2003 Outlook 2007 Exchange Server (Outlook connected Folders) The X-Outlook Add-In shows all in- and outbound calls in an own window. IMPORTANT: Please note that the Outlook Add In is “FREEWARE”! The provided features are without any guarantee for completeness or functionality. We do not provide any support for this freeware products! The usage effected by your own risk. Please check our webpage for new versions from time to time. Installation Please download the Outlook Add In Setup from our download area at: http://downloads.globaliptel.com/Ninja/addin/outlookaddin.exe Start the EXE File and follow the setup instructions. Configuration The Outlook Add In configuration will be done automatically with the Setup and is immediately available for outlook. You will find a new tab sheet named "Ninja Tapi" in the Outlook Options. You can start Ninja and make calls. directly after the installation. Outlook will open a window for incoming calls. • TAPI-Line Device This version is bounded to Ninja and can’t be changed. • Ignore SIP-Suffix You can choose if the complete SIP URI shall be shown or only the
number. • Journaling active With the standard settings all calls will be stored in the Outlook
Journalas follows: Missed Dialed Answered (IN) Answered (OUT)
• Re-Index Contact Info... Reinitialize all contacts if you have made a lot of changes. Possibly the AddIn don’t show contacts.
• Rules You can trim leading chars of the phone number by using this rules.
Ninja (X-TAPI Lite 4.0) (c) 2007 Global IP Telecommunications Ltd. All rights reserved. www.globaliptel.com
Functioning of the Outlook Add In With this version of Ninja, MS Outlook integration has been optimized so that users do not need to get used to many new windows. Phone features have been integrated in the familiar Outlook enviroment. The Outlook Add In adds a new buttons “Make call…” to the "contact" form. The button is needed to initiate outgoing calls. If you want to make an outgoing call, please choose a contact and press the “Make call…” button. If a contact card is already open, just press the “Make call…” button. You will get a popup window where you can choose between all available phone numbers of this contact. Outgoing call After choosing a contact and after hitting the “Make call” button in order to make a call, you can choose between available phone numbers. Please confirm your selection with "OK". If the call has been established, "CONNECTED" is displayed as status. The status window opens and closes automatically. It is closed as long as there are no calls. As soon as status information is available, you can open the contact card that is associated with the callee by marking the callee and then clicking at "Show contact". Incoming calls Similar to outgoing calls, a status window is opened for incoming calls. You will get the status "OFFERING" including the phone number of the callee. As soon as status information is available, you can open the contact card that is associated with the callee by marking the callee and then clicking at "Show contact". You are also able to add new contacts for unknown or new callees. Mark the incoming callee and click "Show Contact..." You can refresh the dialog infomation by clicking the "Refresh..."-Button. Journal All incoming and outgoing calls will be stored at the standard Outlook Journal. You get all important Call data which can be sorted or categorizised! Please use the familiar Outlook options to change and modify the Journal. Sort all data with a simple click onto the header or make your own categorie with Outlook's proven group options.