logbook pro desktop documentation -...
TRANSCRIPT

Logbook Pro Desktop
DocumentationAs of 04/19/2018

1 Table of Contents
1 Table of Contents 2
2 Overview 92.1 Startup 10
2.2 PC Versions 10
2.3 License 11
2.4 Copyright 16
3 Quick Tour 173.1 Menus Tour 17
3.2 Toolbars Tour 19
3.3 Configuration (Options) Tour 22
3.4 Data Entry Tour 23
3.5 Printing Tour 24
3.6 Graphs Tour 25
3.7 Explorer Tour 26
3.8 Analyzer Tour 27
3.9 Currency Tour 28
3.10 Import Wizard Tour 30
3.11 Synchronize Wizard Tour 31
3.12 PDA Companion Tour 32
4 Menus 354.1 Menus and Toolbars 35
4.2 Popup Menus 35
4.3 Shortcut Keys 36
5 Toolbars 395.1 Main Toolbar 39

5.2 Side Bar 39
5.3 Status Bar 41
5.4 Enhanced Data Navigator 415.4.1 Bookmarks 42
5.4.2 Find Dialog 43
5.5 Summary Bar 43
5.6 Sub Toolbars 445.6.1 Explorer Toolbar 45
5.6.2 Certificates Toolbar 45
5.6.3 Ratings Toolbar 46
5.6.4 History Toolbar 46
5.6.5 Logbook Toolbars 47
5.6.6 Report Toolbar 49
5.6.7 Graph Toolbar 50
5.6.8 Analyzer Toolbar 51
6 Options 536.1 User Information Options 53
6.2 Custom Options 54
6.3 Autofill Options 56
6.4 Aircraft Options 57
6.5 Certificates Options 58
6.6 Ratings Options 59
6.7 History Options 60
6.8 Flight Log Options 61
6.9 Currency Options 63
6.10 Backup Options 65
7 Certificates 67

8 Ratings 68
9 History 69
10 Explorer 70
11 Logbooks 7411.1 Spreadsheet Style 74
11.2 Windows Style 77
11.3 Transferring Logbooks 78
11.4 Display Configuration 78
11.5 Automated Entries 79
11.6 Popup Summaries 80
11.7 FAR Error Checking 80
11.8 Block Time Entry 81
12 Printing Reports 8212.1 Reports 82
12.2 Cirrus Elite Binder Reports (Obsolete) 86
12.3 Jeppesen Style 87
12.4 Report Combiner 89
12.5 Alternate Printing 90
12.6 Split Reports 91
12.7 FAA 8710 92
13 FAR 121/135/AirlineApps 9413.1 FAR 121 94
13.2 FAR 135 96
13.3 AirlineApps.com Summary 98
14 Graphs 101
15 Analyzer 10515.1 Analyzer Display Configuration 107

15.2 Military Conversions 108
16 Currency 11116.1 Currency Quick Start 111
16.2 Currency Editor 112
16.3 Currency Explorer 115
16.4 Currency Report 116
16.5 Currency Status 117
17 Synchronize Wizard 118
18 Date Filter 120
19 Import 12119.1 Import Wizard 121
19.2 Airline Schedule Importer 125
20 Export 127
21 Backup and Restore 12821.1 Backup to File 128
21.2 Restore from BAK File 130
21.3 Cloud Backup 131
21.4 Cloud Restore 134
22 Database Utilities 136
23 Password Protection 137
24 Web Browser 138
25 PDA Wizard 139
26 Activating Logbook Pro 142
27 About Logbook Pro 144
28 Helpful Links 145

Logbook Pro Desktop by NC Software, Inc. 6 of 142
The most trusted, reliable, and accurate pilot logbook ever!

Logbook Pro Desktop by NC Software, Inc. 7 of 142

Logbook Pro Desktop by NC Software, Inc. 8 of 142

Logbook Pro Desktop by NC Software, Inc. 9 of 142
2 OverviewLogbook Pro is a powerful electronic logbook solution for aviators of all types from the student pilot to the corporate airline pilot to the military aviator. Using the latest in Microsoft Windows technology paired with the most advanced phones and tablets, Logbook Pro brings you the most powerful and customizable electronic software logbook solution available in the world. Taking the electronic logbook concept to the limits, Logbook Pro provides automated data entry allowing you to spend your time flying and not worrying about logging data. Completely customizable, add up to 50 user-defined fields of various types, rename existing fields, completely change the design and layout of the software by the click and dragging of your mouse. Logbook Pro is the most trusted, reliable, and accurate logbook solution available, bar none.
Logbook Pro is built around a high-speed engine providing you state of the art software with maximum capability all wrapped in an easy-to-use interface. Logbook Pro is intuitive and requires no time spent reading user manuals or Help files, simply get started and the features will come naturally. Simple for the basic computer user yet powerful and customizable for the computer savvy. Help is just a keystroke away, should you need an explanation of any area within Logbook Pro, press the F1 key and the documentation will open up to the area you are currently working ready to answer any questions.
Mobile logbook solutions (apps) are available for Palm OS, Pocket PC (Windows Mobile), iPhone, iPod Touch, and iPad, Android phone, Android tablets, Kindle Fire and NOOK tablets. Leave your PC behind and take Logbook Pro on the road entering your flight information while traveling. Simply synchronize your data over the cloud for effortless and highly reliable synchronization.
Be sure to take full advantage of this modern software package. At any time in the program hover the mouse over the toolbar buttons and see informational popup messages explaining what will occur if the button underneath the mouse pointer is clicked. Also note there are shortcut keystrokes at the end of the popup messages or to the right of the menu entry, such as "CTRL+F." This keystroke combination means to hold down the CTRL button on the keyboard and also press the F key. A second major feature to help get the most out of Logbook Pro are popup menus also called context-sensitive menus that appear when right-clicking within the software. Depending on where you right-click your mouse, different menus will appear, helping to provide the user with the most convenient options for the active area.
Logbook Pro is a Shareware application meaning it is available in a Try-Before-You-Buy basis. There are no timeouts within Logbook Pro and the evaluation is fully-functional with only one restriction -- a 50-entry limit on flight entries. Take a test drive as long as desired to be absolutely certain before you buy -- there's no risk so have fun. When ready to purchase, click the option to register from the first window displayed on program startup (evaluation mode only) or click Help...Activate Licenses. The options are self-explanatory from that point. A code will be registered for your system and the software will automatically lift evaluation restrictions and set the edition based on your purchase. There is no need to download/install any additional software; the evaluation edition is the complete package governed until a key code is entered. Registration is secure using our 128-bit high encrypted e-commerce web site. We do not store credit card information for your protection nor share any contact information outside NC Software.
Logbook Pro is a continually evolving software application. Our software products evolve from customer feedback. We invite your feedback and we'll use this valuable feedback to further improve the software and features from customer requests such as yours. Should you require technical support we offer 24/7 technical support via e-mail and web based solutions. From within Logbook Pro click under the Online menu to submit a support request and send us your issue. We will return a case number and answer all support requests typically within a few hours.
We believe in keeping you up-to-date with the latest and greatest version of our software so we added a new feature to help keep your new software up-to-date. From the Online or Help menus, click the option to Check the Web for updates, which will immediately initiate a query to the NC Software servers (Internet connection required) and check for any updates to your existing version.
Logbook Pro Desktop by NC Software, Inc. 10 of 142
We are confident you will get the most out of Logbook Pro. NC Software and its entire team want to thank you for your interest in our software products. Developing for the Future is our motto, we are always looking ahead at how to bring you the latest and greatest keeping pace with the rapidly advancing software industry. Enjoy your new software, we promise a pleasurable experience, and if you have a question, please ask us, our customer service is the absolute best!
• Startup (see page 10)• PC Versions (see page 10)• License (see page 11)• Copyright (see page 16)
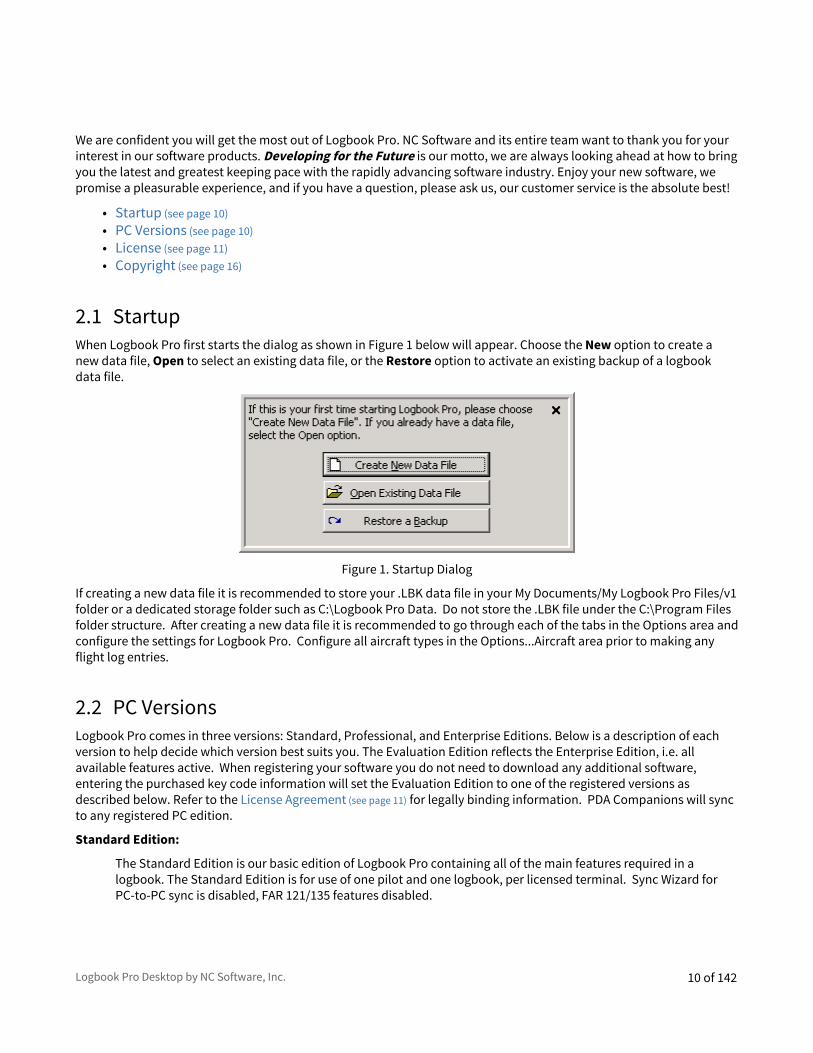
2.1 StartupWhen Logbook Pro first starts the dialog as shown in Figure 1 below will appear. Choose the New option to create a new data file, Open to select an existing data file, or the Restore option to activate an existing backup of a logbook data file.
Figure 1. Startup Dialog
If creating a new data file it is recommended to store your .LBK data file in your My Documents/My Logbook Pro Files/v1 folder or a dedicated storage folder such as C:\Logbook Pro Data. Do not store the .LBK file under the C:\Program Files folder structure. After creating a new data file it is recommended to go through each of the tabs in the Options area and configure the settings for Logbook Pro. Configure all aircraft types in the Options...Aircraft area prior to making any flight log entries.
2.2 PC VersionsLogbook Pro comes in three versions: Standard, Professional, and Enterprise Editions. Below is a description of each version to help decide which version best suits you. The Evaluation Edition reflects the Enterprise Edition, i.e. all available features active. When registering your software you do not need to download any additional software, entering the purchased key code information will set the Evaluation Edition to one of the registered versions as described below. Refer to the License Agreement (see page 11) for legally binding information. PDA Companions will sync to any registered PC edition.
Standard Edition:
The Standard Edition is our basic edition of Logbook Pro containing all of the main features required in a logbook. The Standard Edition is for use of one pilot and one logbook, per licensed terminal. Sync Wizard for PC-to-PC sync is disabled, FAR 121/135 features disabled.

Logbook Pro Desktop by NC Software, Inc. 11 of 142
Professional Edition:
The Professional Edition, our most popular version, represents all the features included in the Standard Edition with the addition of the ability to synchronize multiple computers with one logbook and FAR 121/135 Features for both the PC and PDA.
Licensing allows the use of one pilot logbook on two computers, each additional computer (beyond two) requires a separate Professional Edition license. The Synchronize Wizard is a step-by-step based system guiding the user through the steps in creating a replica of the master logbook for use on a second computer. A pilot can enter data on one computer, i.e. at home, then enter data on a second computer, i.e. a laptop computer on the road. No need to transfer a data file back and forth, enter a few flights on one computer, enter new flights on another computer and at any later time bring the two files together using the Synchronize Wizard and both data files will be brought up-to-date with information contained in the other that the current file does not have. Very powerful capability for using multiple computers for the sole use of one pilots logbook.
Enterprise Edition:
The Enterprise Edition is our most powerful version of Logbook Pro. Licensed for installation on one terminal for the use of an unlimited number of logbooks. Each terminal requires its own unique Enterprise Edition license. This scenario if perfect for corporate environments such as an Airline or Fractional, FBO, or flight school, or a household with more than one pilot. Use the Enterprise Edition to create an unlimited number of logbooks such as with a flight school having all students maintain their logbooks on the computer so the instructor can review their progress at the click of a mouse. Upon graduation, save a backup of the logbook to a floppy and provide to the student, which can subsequently purchase Logbook Pro and open their data for continued use on any of the above PC editions.
Palm and Pocket PC Companion:
The Palm OS and Pocket PC PDA Companions (separate products from Airline Pilot's Daily Aviation Logbook - Sold Separately) closely follow the data entry interface of the Logbook Pro PC product. PDA Companions are "add-only" devices allowing entry of new flight logbook information with subsequent synchronization to the full featured PC logbook upon return from travel. Select report information is downloaded from the PC to PDA at each synchronization for quick reference such as Lookback, Currencies, Summary Bar data, and Flight Log Stats. If the PC license level is at Professional Edition or higher, Lookback data will include FAR 121/135 data.
2.3 LicenseNC SOFTWARE AGREEMENT FOR LICENSED SOFTWARE
IMPORTANT—READ CAREFULLY. This Agreement for Licensed Software (the “Agreement”) is entered into between you (either an individual or single entity) (the “Licensee”) and NC Software, Inc.
BY CLICKING THE ACCEPTANCE BUTTON OR ACCESSING, COPYING, USING OR INSTALLING ANY PART OF THE SOFTWARE, LICENSEE EXPRESSLY AGREES TO BE BOUND BY ALL OF THE TERMS OF THIS AGREEMENT. IF LICENSEE DOES NOT AGREE, YOU MAY NOT ACCESS, COPY USE OR INSTALL ANY PART OF THE SOFTWARE.
The parties agree as follows:
1. Definitions.
Software. The term “Software” shall mean the computer program Logbook Pro in object code only and the user manuals and documentation, if any. The term “Software” includes any corrections, bug fixes, updates or other modifications to such computer program and manuals and documentation.

Logbook Pro Desktop by NC Software, Inc. 12 of 142
Other Software. The terms “Other Software” shall mean any and all services and software programs provided to Licensee under this Agreement, not including the Software, or employed in the use or operation of the Software.
2. Software License.
2.1. Grant. NC Software grants to Licensee a nontransferable, nonexclusive, perpetual license to use the Software solely on the terms and conditions set forth in this Agreement.
2.2. Restrictions on Use. Licensee agrees to use the Software only for Licensee’s own use and not for the benefit of any third-party in a commercial, retail or similar enterprise and shall not permit any other person or entity, including any third-party, parent, subsidiary, or affiliate entity to use the Software. Licensee shall not use, copy, modify, or distribute the Software (electronically or otherwise) or any copy, adaptation, transcription, or merged portion thereof except as expressly authorized under this Agreement. Licensee shall not lend, lease or rent the Software.
2.3. Authorized Installation. Depending upon the version of the Software, the Licensee may install the Software computer program as set forth below:
2.3.1. Logbook Pro Standard Edition. Provided that all required license fees (the “Fees”) are paid for the Logbook Pro Standard Edition, Licensee may install and use one copy of the Software computer program on a single computer (the “Computer”) for its own use in maintaining records for a single pilot without evaluation restrictions. Licensee may temporarily transfer the Software to a back-up computer if the Computer is inoperative for more than 24 hours.
2.3.2. Logbook Pro Professional Edition. Provided that all Fees are paid for the Logbook Pro Professional Edition, the Licensee may install and use a single copy of the Software computer program on two Computers for its own use in maintaining records for a single pilot without evaluation restrictions. Licensee may temporarily transfer the Software to a back-up computer if the Computer is inoperative for more than 24 hours.
2.3.3. Logbook Pro Enterprise Edition. Provided that all Fees are paid for the Logbook Pro Enterprise Edition, the Licensee may install and use a single copy of the Software computer program on one Computer for its own use in maintaining records for multiple pilots without evaluation restrictions. Licensee may temporarily transfer the Software to a back-up computer if the Computer is inoperative for more than 24 hours.
2.3.4. Logbook Pro Palm Companion and Logbook Pro Pocket PC Companion (“the PDA Companion”). Provided that all required license fees (the “Fees”) are paid for the PDA Companion, Licensee may install and use one copy of the Software computer program on a single device (the “Computer”) for its own use in maintaining records for a single pilot without evaluation restrictions. Licensee may temporarily transfer the Software to a back-up device if the Computer is inoperative for more than 24 hours.
2.4. Copies. Licensee may make one backup/archival copy of the Software’s computer program, provided that the copy shall include NC Software’s copyright and any other proprietary notices on the copy. The license for the Software may not be shared or used concurrently. Licensee shall have no other right to copy, in whole or in part, the Software. All copies of the Software made by Licensee are the exclusive property of NC Software.
2.5. Modifications. Licensee agrees that only NC Software shall have the right to alter, enhance or otherwise modify the Software. Licensee shall not decompile or reverse assemble the Software’s computer program or otherwise examine the Software’s computer program for purposes of reverse engineering.
2.6. Other Software. Licensee acknowledges and agrees that the Software may combine, operate or use Other Software in the operation and the use of the Software, but that the Other Software is the property of another or licensor and that Licensee has no right or title, nor will it assert any right or title, in the same except as expressly granted in writing by the terms and conditions of such party’s license or purchase agreement. Other Software provided to Licensee under this Agreement shall be used only in accordance with the applicable license and only in conjunction with the Software and may be terminated at any time in the sole discretion of NC Software or the licensor of the Other Software.

Logbook Pro Desktop by NC Software, Inc. 13 of 142
3. Ownership.
3.1. Intellectual Property. NC Software reserves all rights not expressly granted. Licensee understands that the license granted herein transfers neither title nor proprietary rights to Licensee with respect to the Software. Licensee acknowledges and agrees that NC Software owns all right, title and interest in and to: (a) the Software, related documentation, enhancements, updates and all other proprietary work product or works of authorship developed by NC Software and furnished under this Agreement; and (b) all copyrights, patents, trademarks, service marks, trade secrets and all other intellectual property rights relating thereto.
3.2. Ownership of Customizations. NC Software shall own all right, title and interest (including all associated intellectual property rights) in and to any customizations, enhancements, modifications, improvements, derivations, extensions, or other changes to the Software, including any that result from the joint efforts or collaboration of NC Software and Licensee. In no event, however, shall Licensee have any right to make such changes to the Software.
3.3. Cooperation. Upon NC Software’s request, the Licensee agrees to execute such further instruments and to take such further actions as NC Software may reasonably request, to apply for, register, perfect, confirm and protect NC Software’s rights. The Licensee shall reimburse NC Software for any and all expenses that NC Software may incur (including interest, costs, attorneys’ fees and other legal expenses) in connection with NC Software’s efforts to enforce its rights against the Licensee in the event NC Software prevails against the Licensee with respect to the Software or any of NC Software’s intellectual property rights.
4. Fees and Payment Terms.
4.1. License Fees. Except as otherwise permitted by NC Software in its sole discretion, Licensee shall pay NC Software the Fees for the Software, which shall be payable in full by Licensee no later than upon its agreement to this Agreement and use of the software without Evaluation restrictions. To the extent that any payment made by the Licensee is terminated, charged back or returned for insufficient funds, Licensee shall be responsible for the payment of all bank or credit card fees and the costs of collection, including reasonable attorneys’ fees and costs.
4.2. Taxes. The Fees do not include any amounts for taxes. Licensee shall be responsible for, and shall promptly pay, all applicable taxes levied by any tax authority based upon this Agreement and/or the Software (including, but not limited to, sales and use taxes). All payments due hereunder are net amounts to be received by NC Software, exclusive of all taxes, duties, assessments and similar taxes and duties, and are not subject to offset or reduction because of any costs, expenses, taxes, duties, assessments or liabilities incurred by Licensee or otherwise due as a result of this Agreement.
5. Intellectual Property Rights.
5.1. Notice. Licensee shall give NC Software prompt written notice of any threat, warning, or notice of any claim or action that could have an adverse impact on NC Software’s rights in and to the Software.
5.2. Indemnity. In its sole discretion, NC Software may elect to defend and indemnify Licensee in any claim or action asserted against Licensee by a third-party to the extent that it is based upon a claim that the Software, as provided by NC Software under this Agreement and excluding any Other Software, infringes any U.S. copyright, trademark or trade secret, provided that Licensee (a) promptly notifies NC Software in writing of the claim, (b) grants NC Software sole control of the defense and settlement of the claim, and (c) provides NC Software with all assistance, information and authority reasonably required for the defense and settlement of the claim. If Licensee’s use of the Software is, in the sole opinion of NC Software, likely to be enjoined or is enjoined due to such a claim or action, NC Software may, in its sole discretion: (a) procure for the Licensee the right to use the Software under such terms as may be deemed reasonable by NC Software; (b) replace or modify the Software so that it is not infringing and so that it is substantially equivalent in function to the enjoined use of the Software; or (c) if the options contained in (a) and (b) cannot be

Logbook Pro Desktop by NC Software, Inc. 14 of 142
accomplished in the sole opinion of NC Software, then NC Software may terminate this license and Agreement and refund to the Licensee any Fees paid less a deduction for the use of the Software.
5.3. Exclusions. NC Software will not have any liability for any infringement or misappropriation claim of any kind to the extent that it results from (a) any modification to the Software made by a party other than NC Software if a claim would not have occurred but for such modification, (b) the combination, operation or use of the Software with equipment, devices, software or data other than the Software, (c) Licensee’s failure to use updated or modified versions of the Software provided by NC Software which would avoid a claim, (d) NC Software’s compliance with any design, specification or plan provided by Licensee, (e) the Licensee’s combination, operation or use of the Software outside of the geographical limits of the U.S., or (f) the Licensee’s use of the Software other than in accordance with this Agreement or the applicable documentation.
5.4. Exclusive Remedy. The provisions of Article 5 set forth the NC Software’s sole and exclusive obligations, and Licensee’s sole and exclusive remedies, with respect to infringement or misappropriation of intellectual property rights of any kind by the Software.
6. Confidential Information. The term “Confidential Information” shall mean the Software, excluding information that (a) is publicly available at the time of disclosure, (b) becomes publicly available through no fault of the Licensee, (c) is acquired rightfully by the Licensee from a third party who is not in breach of an agreement to keep such information confidential, or (d) is required to be disclosed by law. Licensee understands that the Software comprises Confidential Information and know-how that are the exclusive property of NC Software and agrees to maintain the secrecy of the Confidential Information and agrees not to use it except as provided herein.
7. Termination.
7.1. Grounds for Termination. This Agreement may be terminated:
7.1.1. by NC Software immediately upon written notice to the Licensee if the Licensee breaches its confidentiality obligations under this Agreement;
7.1.2. by either party immediately upon written notice to the other party if the other party breaches its obligations under this Agreement and fails to cure the breach within fifteen days from the date of the written notice of the breach from the other party;
7.1.3. by NC Software in the event Licensee makes a general assignment for the benefit of creditors, admits its insolvency, files a voluntary petition in bankruptcy or for reorganization under the bankruptcy laws, if a petition in bankruptcy is filed against Licensee, or if a receiver or trustee is appointed for all or any part of the property or assets of Licensee; or
7.1.4. by a written agreement executed by the parties.
7.2. Effect of Termination. Upon termination of the license for Software, Licensee shall immediately cease using the Software and Other Software, if any, and shall either destroy or return the original and all copies, in whole or in part, in any form or media, of the Software. Licensee shall certify such action in writing to NC Software within thirty days after the date of termination.
7.3. Survival of Certain Obligations. Upon termination of this Agreement, the following provisions shall survive any expiration or termination of this Agreement and shall remain in effect until fulfilled: Articles 4, 5, 6, 7, 8, 9, 10, 11 and 12.
8. DISCLAIMER OF WARRANTIES. EXCEPT AS EXPRESSLY PROVIDED HEREIN, THE SOFTWARE AND ANY OTHER SOFTWARE IS PROVIDED “AS IS” AND, TO THE MAXIMUM EXTENT PERMITTED BY LAW, NC Software DISCLAIMS ALL OTHER REPRESENTATIONS AND WARRANTIES, EXPRESS OR IMPLIED, REGARDING THE SOFTWARE, INCLUDING ANY IMPLIED WARRANTIES RELATING TO FITNESS FOR A PARTICULAR PURPOSE, MERCHANTABILITY, NON-INFRINGEMENT OR TITLE, AND WARRANTIES ARISING FROM COURSE OF DEALING, USAGE OR TRADE.

Logbook Pro Desktop by NC Software, Inc. 15 of 142
NC Software DOES NOT WARRANT THAT THE SOFTWARE OR ANY OTHER SOFTWARE IS FREE FROM BUGS, ERRORS, OR OTHER PROGRAM LIMITATIONS. NO ADVICE OR INFORMATION, WHETHER ORAL OR WRITTEN, OBTAINED FROM NC Software OR ELSEWHERE WILL CREATE ANY WARRANTY NOT EXPRESSLY STATED IN THIS AGREEMENT.
LICENSEE ACKNOWLEDGES THAT NC Software IS NOT RENDERING ANY LEGAL, PROFESSIONAL OR AVIATION SERVICES TO LICENSEE. LICENSEE IS RESPONSIBLE FOR KEEPING INFORMED OF ANY CHANGES IN LAWS, REGULATIONS AND OTHER PRACTICES AFFECTING ITS USE OF THE SOFTWARE AND/OR ITS BUSINESS. NC Software DOES NOT WARRANT THAT THAT THE USE OR OPERATION OF THE SOFTWARE AND ANY OTHER SOFTWARE COMPLIES OR WILL ASSIST IN COMPLIANCE WITH ANY STATUTES, REGULATIONS, INDUSTRY STANDARDS OR PROCEDURES, INCLUDING THOSE THAT ARE AVIATION OR FLIGHT RELATED.
9. LIMITATION OF LIABILITY. TO THE MAXIMUM EXTENT PERMITTED BY APPLICABLE LAW, NC Software AND ANY OF ITS AGENTS, SUBSIDIARIES, AFFILIATES, LICENSORS, VENDORS, DEALERS OR SUPPLIERS (together “REPRESENTATIVES”) ARE NOT LIABLE FOR ANY INDIRECT, SPECIAL, INCIDENTAL OR CONSEQUENTIAL DAMAGES (INCLUDING BUT NOT LIMITED TO DAMAGES FOR LOSS OF BUSINESS, PROGRAM OR SYSTEM VIRUSES, LOST OR CORRUPTED DATA, LOST PROFITS, WAGES, INVESTMENTS OR THE LIKE), WHETHER BASED ON BREACH OF CONTRACT, BREACH OF WARRANTY, TORT (INCLUDING NEGLIGENCE), PRODUCT LIABILITY OR OTHERWISE, EVEN IF NC Software OR ITS REPRESENTATIVES HAVE BEEN ADVISED OF THE POSSIBILITY OF SUCH DAMAGES, AND EVEN IF A REMEDY SET FORTH HEREIN IS FOUND TO HAVE FAILED ITS ESSENTIAL PURPOSE. THE LIMITATIONS OF DAMAGES SET FORTH ABOVE ARE FUNDAMENTAL ELEMENTS OF THE BASIS OF THE BARGAIN BETWEEN NC Software AND THE LICENSEE. THE LICENSEE ACKNOWLEDGES THAT NC Software WOULD NOT BE ABLE TO HAVE PROVIDED THE SOFTWARE ON THE TERMS AND CONDITIONS HEREIN WITHOUT SUCH LIMITATIONS. THE ENTIRE LIABILITY OF NC Software AND ITS REPRESENTATIVES FOR ANY REASON UNDER THIS AGREEMENT SHALL NOT EXCEEED THE AMOUNT PAID BY LICENSEE TO NC Software FOR THE SOFTWARE. THE PARTIES EXPRESSLY ACKNOWLEDGE THAT NC Software HAS SET ITS PRICE FOR THE SOFTWARE AND ENTERED INTO THIS AGREEMENT IN RELIANCE UPON THE LIMITATIONS OF LIABILITY SPECIFIED HEREIN, WHICH ALLOCATE THE RISK BETWEEN NC Software AND THE LICENSEE AND FORM A BASIS OF THE BARGAIN BETWEEN THE PARTIES. BECAUSE SOME STATES/JURISDICTIONS DO NOT ALLOW THE EXCLUSION OR LIMITATION OF LIABILITY FOR CONSEQUENTIAL OR INCIDENTAL DAMAGES, THE ABOVE LIMITATION MAY NOT APPLY.
10. Non-Applicability of Uniform Computer Information Transactions Act. Pursuant to Virginia Code § 59.1-501.4, the parties agree that the provisions of the Uniform Computer Information Transactions Act, Virginia Code §§ 59.1-501.1 et seq., do not apply to or govern this Agreement.
11. Notices. Any notice or other communication required or permitted under this Agreement shall be given in writing and delivered when sent by first-class mail, postage pre-paid, or when sent by facsimile or e-mail to the other party’s last known mailing, facsimile or e-mail address and for NC Software to: NC Software, Inc., 2711 Centerville Road, PMB 5115, Suite 120, Wilmington, DE 19808.
12. General Provisions.
12.1. Waiver. No waiver of any breach of any provision of this Agreement shall constitute a waiver of any prior, concurrent or subsequent breach of any provisions hereof, and no waiver shall be effective unless made in writing and signed by an authorized representative of the waiving party.
12.2. Consent to Use of Data. Licensee agrees that NC Software and its affiliates may collect and use technical information to the extent gathered as part of the product support services and/or activation, if any, related to the Software. NC Software may use this information solely to improve our products or to provide customized services to licensee and will not disclose this information in a form that personally identifies Licensee.
12.3. Assignment. Licensee may not assign, sublicense or otherwise transfer its rights, duties or obligations under this Agreement, in whole or in part, to anyone and any attempt to do so shall be deemed a material breach of this Agreement.

Logbook Pro Desktop by NC Software, Inc. 16 of 142
12.4. Reservation of Right to Amend the Agreement. NC Software reserves the right, at any time and from time to time, to update, revise, supplement, and otherwise modify this Agreement and to impose new or additional terms or conditions on the use of the Software. Such updates, revisions, supplements, modifications, and additional rules, policies, terms, and conditions (collectively referred to in this Agreement as “Additional Terms”) will be effective immediately and incorporated into this Agreement. The continued use of the Software will be deemed to constitute acceptance of any and all such Additional Terms. All Additional Terms are hereby incorporated into this Agreement by this reference.
12.5. Export Restrictions. Licensee acknowledges that the Software is of United States origin and is subject to U.S. export jurisdiction. Licensee agrees to comply with all applicable international and national laws that apply to the Software, including the U.S. Export Administration Regulations, as well as end-user, end-use, and destination restrictions issued by U.S. and other governments.
12.6. Consent to Receiving E-Mail. Licensee agrees to receive e-mail from NC Software during the term of the Agreement.
12.7. Force Majeure. If the performance of this Agreement by either party is prevented, hindered, delayed or otherwise made impracticable by reason of any flood, terrorism, riot, fire, acts of the common enemy, judicial or government action, act of God or any other causes beyond the control of either party, that party shall be excused from such to the extent it is prevented, hindered or delayed by such causes.
12.8. Entire Agreement. This Agreement constitutes the complete agreement and statement of all mutual understandings between the parties with respect to the subject matter hereof and supersedes all prior or contemporaneous proposals, communications and understandings, whether oral or written. No statement, representation, warranty, covenant or agreement of any kind not expressly set forth in this Agreement shall affect or be used to interpret, change, restrict, the express terms of this Agreement. Captions and headings used in this Agreement are for reference only, and shall not constitute binding terms and conditions of this Agreement.
12.9. Severability. If any provision of this Agreement is held invalid or unenforceable, that portion shall be construed in a manner to reflect as near as possible the original intention of the parties and the balance of the Agreement shall remain in full force and effect.
12.10. Amendment. No amendment, change, waiver, or discharge hereof shall be valid unless in writing and signed by both parties.
12.11. Applicable Law and Forum. This Agreement shall be governed by and construed in accordance with the laws of the Commonwealth of Virginia, U.S, excluding its conflicts of law rules and the United Nations Convention on the International Sale of Goods. Any action or suit related to this Agreement shall be brought in the state or federal courts sitting in the Commonwealth of Virginia.
12.12. Legal Expenses. If NC Software must bring an action or proceeding to enforce this Agreement or if it substantially prevails in an action or proceeding brought by the Licensee, it shall be entitled to recover its reasonable attorneys’ fees and costs incurred in that action or proceeding, in addition to any other relief to which it may be entitled.
12.13. Read and Understood. LICENSEE ACKNOWLEDGES THAT IT HAS READ AND UNDERSTANDS THIS AGREEMENT AND AGREES TO BE BOUND BY ITS TERMS.
2.4 CopyrightThis computer program is protected by Copyright law and International treaties. Unauthorized use or reproduction of this program, or any portion of it, may result in severe civil and criminal penalties and will be prosecuted to the maximum extent possible under the law.

Logbook Pro Desktop by NC Software, Inc. 17 of 142
3 Quick TourHere you will find a quick tour of the major elements of Logbook Pro Desktop.
• Menus Tour (see page 17)• Toolbars Tour (see page 19)• Configuration (Options) Tour (see page 22)• Data Entry Tour (see page 23)• Printing Tour (see page 24)• Graphs Tour (see page 25)• Explorer Tour (see page 26)• Analyzer Tour (see page 27)• Currency Tour (see page 28)• Import Wizard Tour (see page 30)• Synchronize Wizard Tour (see page 31)• PDA Companion Tour (see page 32)
3.1 Menus TourThe Logbook Pro Quick Tour is designed to introduce you to the major features and functions of the software to get you up and running within minutes. Please follow the tour in its entirety, or if already proficient with computers, read only the sections that interest you.
The menu system is the core of Logbook Pro offering a dynamic system for navigating and manipulating the software. Logbook Pro's menus are "smart" menus, meaning they know where you are working and change to reflect the options available to help you get the job done efficiently and accurately. Take note with Figure 1 below using the File menu as an example. You'll notice the options available based on the current area in use, notice the Print options and Export options are not enabled or in view, as they will be when the areas such as Reports and Graphs are being utilized. Secondly, the far right side of the menu item contains something called a "Shortcut Key" or a combination of keys that will also do the exact same function as clicking the menu item itself, offering for a more efficient, hands on keyboard approach for rapid use.
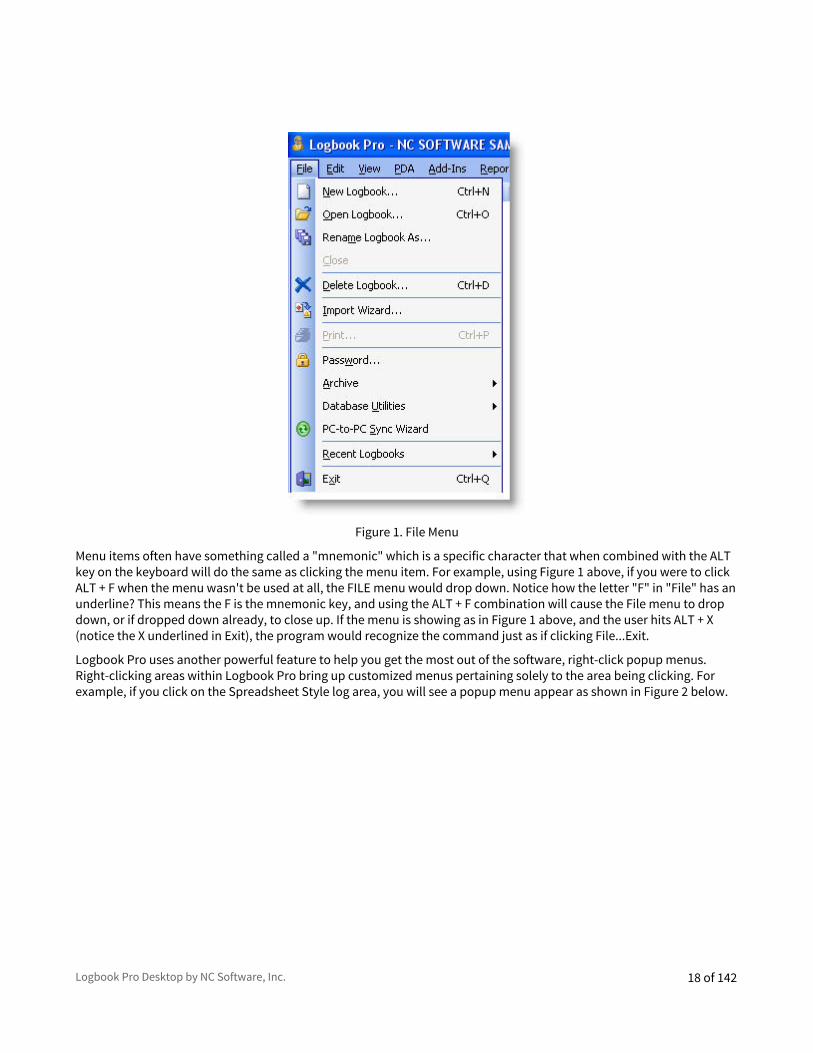
Logbook Pro Desktop by NC Software, Inc. 18 of 142
Figure 1. File Menu
Menu items often have something called a "mnemonic" which is a specific character that when combined with the ALT key on the keyboard will do the same as clicking the menu item. For example, using Figure 1 above, if you were to click ALT + F when the menu wasn't be used at all, the FILE menu would drop down. Notice how the letter "F" in "File" has an underline? This means the F is the mnemonic key, and using the ALT + F combination will cause the File menu to drop down, or if dropped down already, to close up. If the menu is showing as in Figure 1 above, and the user hits ALT + X (notice the X underlined in Exit), the program would recognize the command just as if clicking File...Exit.
Logbook Pro uses another powerful feature to help you get the most out of the software, right-click popup menus. Right-clicking areas within Logbook Pro bring up customized menus pertaining solely to the area being clicking. For example, if you click on the Spreadsheet Style log area, you will see a popup menu appear as shown in Figure 2 below.

Logbook Pro Desktop by NC Software, Inc. 19 of 142
Figure 2. Right-Click Popup Menu
Logbook Pro uses an advanced menu system just as in Microsoft Office. Dynamic smart menus are designed to help the user work in the most efficient way. Take advantage of Logbook Pro easily by exploring the standard Microsoft Windows interface elements such as keyboard shortcuts, right-click popup menus and the smart menu and navigation system Logbook Pro offers.
Next Topic - Toolbars Tour (see page 19)
Menus (see page 35)
3.2 Toolbars TourThe toolbar system is one of the most powerful features of Logbook Pro other than its data handling and analysis features. The ability to use software by pointing and clicking makes the user experience enjoyable as well as ensures the end-user is getting the most of their money and usage from their software.
Logbook Pro offers many options for configuring your screen with numerous toolbar options. Toolbars consist of the bar of icons just below the menu system at the top of the software, the Navigation "Side Bar" that is used exactly like the Outlook Bar in Microsoft Outlook, the Status Bar along the bottom of the screen, and various other toolbars that appear depending on the area the user is currently working. Toolbars have a "handle" on the far left side called a "grab handle" which the user can click and drag (hold the left mouse button down) and reposition the toolbar. The main toolbar can be placed at the top, right, left, or bottom of the screen, as well as right-clicking the toolbar will bring up options such as using a text only or small icon version to maximize screen space. If using a lower screen resolution (1024 x 768 or higher recommended), you can experiment by closing toolbars, hiding the status bar, etc, to get the most out of the screen real estate available. Logbook Pro is built with redundant navigation capabilities. All toolbars could be

Logbook Pro Desktop by NC Software, Inc. 20 of 142
hidden and the entire software navigated strictly from the View menu, or even just using the right-click popup menus. We tailored Logbook Pro for all users, ensuring we accommodated each and every users taste in navigating a standard Windows software application.
The main toolbar is the heart of Logbook Pro's navigation, as shown in Figure 1 below. Use the toolbar to open the various main areas within Logbook Pro. If a toolbar button has a small down arrow to the right, click the arrow segment for more options and more direct navigation within the target area. Notice the two vertical bars at the far left of the toolbar, this is the "grab handle" as noted above. Clicking and dragging this grab handle will allow movement of the toolbar to either float, or dock to one of the four sides of the window.
Figure 1. Main Toolbar
The Navigation bar, as seen in Figure 2 below, offers similar navigation ability as the main toolbar, however is broken down into three major areas; Main, Reports, and Graphs. Again, view for navigation ease or hide to maximize screen real estate. Toolbars, Side Bar, and Status Bar (Figure 3) can be toggled from the View menu.

Logbook Pro Desktop by NC Software, Inc. 21 of 142
Figure 2. Side Bar
The Start Bar and Status Bar are useful as it provides the user navigation of open windows and hints depending on the area and mouse cursor location. For example, as you move from column to column in the Spreadsheet Style log, the Status Bar will provide useful information such as key combinations or explanations of the data expected in the column

Logbook Pro Desktop by NC Software, Inc. 22 of 142
selected. The Status Bar also contains two buttons, Currency and Lookback, which provide details by clicking the corresponding button. Date, Time, Num Lock, and Shift Status are also available on the status bar indicators.
Figure 3. Start Bar and Status Bar
Next Topic - Configuration Tour (see page 22)
Toolbars (see page 39)
3.3 Configuration (Options) TourTo get the most out of Logbook Pro it is important to spend a few minutes going through each of the Options tabs and configuring the software for maximum power. This brief overview will present the major areas within the Options dialog, however, read the Options section of this help file for the complete explanation of all available features.
Figure 1. Options Dialog
The Options dialog has 10 tabs for configuring the main areas of Logbook Pro and allowing user-defined control to enable/disable features within the software. Below is a quick synopsis of the main areas of the Options dialog:
User Info: Enter personalization information such as Name, SSN, Address, etc. Logbook Pro will use this data throughout the program to personalize items such as reports.

Logbook Pro Desktop by NC Software, Inc. 23 of 142
Custom: Contains five tabs within for creating and managing user-defined fields for the Logbook area of Logbook Pro. Create up to 10 user-defined fields in the five areas: Time, Yes/No (checkbox), Counter (Integer), Text, and Expense fields. This is beneficial if the default columns/fields within Logbook Pro do not fit your needs, Logbook Pro has the ability to morph to any users needs.
Autofill: Configurable by Aircraft Type, set checkboxes to tell Logbook Pro which fields to automatically fill with the Duration value on each record from this point forward. For example, if configuring a C-182 by checking the Autofill selection of SOLO, PIC, and Cross Country, each log entry made with C-182 as the Aircraft Type will automatically enter the exact Duration value into the SOLO, PIC, and Cross Country fields. This eliminates redundancy and allows for rapid data entry. A landing type can also be specified; Day, Night, or None.
Aircraft: The most important area to completely configure prior to using Logbook Pro. Logbook Pro will not allow an incomplete entry, one of the required fields is the Aircraft Type. First stop when starting Logbook Pro is to enter all the Types flown. It is recommended to completely fill out the Aircraft section as reports and summaries use the specifications for each Type to determine the sub-level summaries, such as Class, Category, and the remaining aircraft columns. Logbook Pro does not require the input of a Category, Class, or any time that is identified by a column in the Aircraft tab of the Options area. These time calculations reference the Options...Aircraft area at all times, further reducing data entry errors.
Certificates/Ratings/History: Provide options for customizing Font size and color, even and odd row colors, and date formats for the corresponding date columns. The History area provides one addition section for defining the history events that will be used, which is any event that has an expiration such as Biennial, Medical, Instrument Proficiency Check, etc.
Flight Log: The second most important area for configuring, however the defaults are set to the most common options. Read the Flight Log topic in the Options section of this help documentation for a detailed explanation of each feature. Font specifics, color formats, and other options are configurable within this section of the Options dialog.
Currency: This area is to configure the currency engine within Logbook Pro. Set whether the currency engine is running or not, if currencies are not used disable to improve performance. Color codes and reminders can be configured to tailor the currency system to the users preferences.
Backup: Provides options for automated backup and maintenance functions. Backing up regularly is important as any PC is vulnerable to viruses or catastrophic failure at any time.
Next Topic - Data Entry Tour (see page 23)
Options (see page 53)
3.4 Data Entry TourData entry in Logbook Pro is straight-forward throughout. Reference the Status Bar for key shortcuts and information suggested for a particular column. Logbook Pro primarily uses a Spreadsheet Style data entry system which is completely customizable in color, font, and order. Click and drag column headers to rearrange, your settings will be memorized for subsequent uses of Logbook Pro. Columns can be quickly sorted by single-clicking the column header, then reverse order sorting by clicking the column header again.
Logbook Pro does not require a save operation. Once the data meets the minimum requirements, and Logbook Pro will warn the user when information required is missing, the data is automatically saved. Several columns, as shown in Figure 1 (below) have icons to the right of the column identifying clicking this icon will perform an action. The typical down arrow represents a drop down list, however as shown in Figure 1, a popup calendar is available by clicking the small calendar icon in the date column.

Logbook Pro Desktop by NC Software, Inc. 24 of 142
Figure 1. Date Icon
Data entry fields have built in shortcuts, such as in most date fields, typing the letter "t" will set "today's" date. Right-click within fields for additional options.
Next Topic - Printing Tour (see page 24)
Spreadsheet Style (see page 74)
Windows Style (see page 77)
3.5 Printing TourEntering data is of no use if the data cannot be printed. Logbook Pro offers the most powerful reporting capabilities on the market with extensive customization including a powerful report designer allowing the end-user to build his/her own report templates. Reports are date filterable allowing the user to select a date range to capture the data desired, as seen in the date filter selection window in Figure 1 below.
Figure 1. Date Filter
The Date Filter offers a few unique shortcuts worth mentioning at this time. The calendars are standard calendars used in many Windows applications. To rapidly select a different month, click the month name, i.e. "January" in the figure above. This will present a quick selection list of months to choose. The year can be changed also by clicking the year, which will bring up an up/down arrow which can be clicked to rapidly move to another year. The default time frame when showing the Date filter dialog is the beginning of the current year to the present date. To choose a specific date within the month, click the desired date and the value will be shown above the calendar, representing the value selected. If the user decides to cancel the processing, click the close "X" at the top right of the Date Dialog.
Once the date filter is configured, clicking the "Generate Report" button (or hitting ALT + G) will generate the report. A sample output and report toolbar is shown below in Figure 2.

Logbook Pro Desktop by NC Software, Inc. 25 of 142
Figure 2. Sample Report Window
The Report dialog has a custom toolbar across the top which is discussed in detail in the Report section of this help documentation. The most common toolbar items are the print button (also accessed from File...Print), the page setup (to the right of the print icon) and the settings icon (white with hand on top, down arrow on right), and the paging control towards the far right. Reports offer significant high speed output capabilities including the ability to export to many formats such as HTML, Text Delimited, Excel, PDF, RTF, etc.
Next Topic - Graphs Tour (see page 25)
Printing Reports (see page 82)
3.6 Graphs TourGraphical representation is important for rapid visual analysis of logbook data. Logbook Pro offers an extremely sophisticated high speed graphic solution with customizable and interactive capabilities. Graphs may be presented in Vertical or Horizontal bar charts, pie charts, display values or percentages as well as provide the capability for date filtered queries of logbook data. Interactive capabilities provide options for scaling, rotating, zooming, and reposition chart data, as well as the extensive options for color and presentation formatting. Figure 1 below shows an example of a basic graph with the formatting toolbars in view.

Logbook Pro Desktop by NC Software, Inc. 26 of 142
Figure 1. Graph in Bar Chart view
The graph area is very powerful offering options, from either the toolbar or right-click mouse popup menu, options to print, export, or format the chart. Click the Tips button on the right side of the main graph toolbar for key combinations for interactive analysis of the data. As seen in the figure above, hovering the mouse over any segment of the chart itself will yield the numeric value of the item.
Next Topic - Explorer Tour (see page 26)
Graphs (see page 101)
3.7 Explorer TourUsing the same metaphor as the Windows Explorer, the Logbook Pro Explorer provides a quick snapshot view of all data within Logbook Pro. The Logbook Pro Explorer also offers detailed summary information by clicking the summary information nodes under the logbook data section of the tree on the left. As seen in Figure 1 below, the Explorer provides a great level of detail, in this case the Currency summary. Clicking nodes will further branch down the data for further review. All data areas on the right side except the currency area is exportable to Excel, CSV, Text, HTML, etc. for data snapshots or web site posting.

Logbook Pro Desktop by NC Software, Inc. 27 of 142
Figure 1. Logbook Pro Explorer
Next Topic - Analyzer Tour (see page 27)
Explorer (see page 70)
3.8 Analyzer TourThe most powerful feature within Logbook Pro is the extremely powerful Analyzer. The Analyzer is a date filterable pivot-table snapshot of logbook data. Filters can be set for further granularity by any master level filter (any logbook column) or aircraft specific and date filters, across the top of the Analyzer main display. Snapshot data can be exported directly into Microsoft Excel for custom analysis and charting, or printed. Click the plus signs on the left side to view Aircraft Ident specific summaries within each Aircraft Type if desired. The Analyzer also offers a unique Military Conversion system for converting military summaries to airlines compensated values. Presets can be created for each airline to accommodate each airlines specific conversion factor. Click the presets icon on the Analyzer toolbar to display the preset configuration features.
The Analyzer offers numeric or percentage output as well as advanced display configuration to show/hide select columns. The Analyzer is simple to use, high-speed, and very powerful, often used for applications or interview preparation.

Logbook Pro Desktop by NC Software, Inc. 28 of 142
Figure 1. Analyzer
Next Topic - Currency Tour (see page 28)
Analyzer (see page 105)
3.9 Currency TourLogbook Pro offers the most advanced currency editor in the world. A very simple interface makes creating any currency a snap. The currency editor, as shown in Figure 1 below consists of three main areas. The far right area is the "item catalog" consisting of user-defined currency items as well as the catalog of available history events (from the Options...History area). The center section is the assignment section where items are placed in one of two areas; an "All to Pass" group or an "Any to Pass" group, explain a little later. The far left section is the explorer style tree of currencies which may be grouped per the users liking, as seen in the figure below.

Logbook Pro Desktop by NC Software, Inc. 29 of 142
Figure 1. Currency Editor
Logbook Pro calculates currency status in less than two seconds regardless of the complexity using its high-speed currency engine. View currency status in one of three ways: 1) View the Currency Report from the Reports menu, 2) Click the Currency button on the main status bar at the bottom of the screen, and 3) The Logbook Pro Explorer by clicking the Currency node.
Logbook Pro uses AND and OR logic in a simple interface using two main groups. The "All to Pass" group requires each item placed in this group to pass or this All to Pass group will fail. If all items pass, the group passes, if all items fail within the group, the group fails. The "Any to Pass" group is just as it sounds, if any item within the group passes, the group will pass. Overall, if either of the two groups pass, the currency is a pass. Logbook Pro will even provide the user the date the currency will expire when viewing the currency status as well as provide a warning at program start if the reminders are enabled.
Next Topic - Import Wizard Tour (see page 30)
Currency (see page 111)

Logbook Pro Desktop by NC Software, Inc. 30 of 142
3.10 Import Wizard TourMany users already have their data in either a home made logbook such as with Microsoft Excel or Access, a competitive solution, or a Palm/Pocket PC companion logbook. Logbook Pro offers an extremely powerful capability to bring any outside data into Logbook Pro if in the form of TAB or Comma Separated Values (CSV) delimited text data files. If your data can be read by any spreadsheet style program such as Microsoft Excel or Lotus 123, the data can be saved to a delimited text data file for immediate import into Logbook Pro.
Logbook Pro uses an intuitive interface as shown below in Figure 1. Walking the user step-by-step through the process of bringing external data in and mapping fields to the data being imported. More information is available within the Import Wizard details of this help file documentation.
The Import Wizard will only import up to the 50-entry limit of the evaluation edition. To completely import data be sure to import after Logbook Pro has been activated.
Figure 1. Import Wizard
Next Topic - Synchronize Wizard (see page 31)
Import Wizard (see page 121)

Logbook Pro Desktop by NC Software, Inc. 31 of 142
3.11 Synchronize Wizard ToureLogbook Pro is the only logbook solution that offers the ability to keep logbook data synchronized among multiple computers*. For example, if you have a Desktop computer in the office (or at home) and a Laptop computer you take on the road, Logbook Pro offers a very unique feature allowing you to keep data easily synchronized on multiple computers.
Called a Clone-n-Sync process, Logbook Pro designates one logbook a Master and you then create clones (or copies) of this Master, however they are related like a family, they know how they link back to each other. With this unique capability in Logbook Pro you can simultaneously enter data in either logbook, i.e. a few entries at home, a few other entries on the other computer, and at any future time, start the Synchronization Wizard as shown in Figure 1 below and synchronize the two logbooks. Very simple and fast, keep multiple computers up-to-date with ease. This feature is optimal for those that travel as well as those that like to log their flights in two or more places, i.e. at home and at work.
Figure 1. Synchronize Wizard
*PC-to-PC Sync is only enabled in the Professional and Enterprise Editions
Next Topic - PDA Companion Tour (see page 32)
Synchronize Wizard (see page 118)

Logbook Pro Desktop by NC Software, Inc. 32 of 142
3.12 PDA Companion Tour

Logbook Pro Desktop by NC Software, Inc. 33 of 142

Logbook Pro Desktop by NC Software, Inc. 34 of 142
Figure 1. Palm Companion / Pocket PC Companion
Logbook Pro brings the exciting world of the PDA handheld devices for use with the powerful PC version of Logbook Pro. Take the PDA companion (Palm, Pocket PC, iPhone, iPod touch, iPad, Android, Kindle Fire, NOOK) on the road, leaving your PC behind. Add flights using the intuitive simple to use interface then upon returning to your PC, synchronize your PDA data with your PC and your flights, certificates, ratings, history are immediately uploaded to your PC's Logbook Pro.
Four data presentations show you your flight log statistics, lookback information in hours and flights, summary bar data, and currency status as of the last synchronization.
This completes the quick tour and you are now familiar with the major features within Logbook Pro. As you will soon find out, Logbook Pro is extremely simple to use and provides unmatched data analysis and customizability. We are sure you will enjoy every moment with Logbook Pro as we enjoyed developing it. Thank you for taking the time to view this short tour, please click a topic on the left hand side to learn more about specific elements of Logbook Pro.
PDA Wizard (see page 139)
Logbook Pro Desktop by NC Software, Inc. 35 of 142
4 Menus• Menus and Toolbars (see page 35)• Popup Menus (see page 35)• Shortcut Keys (see page 36)
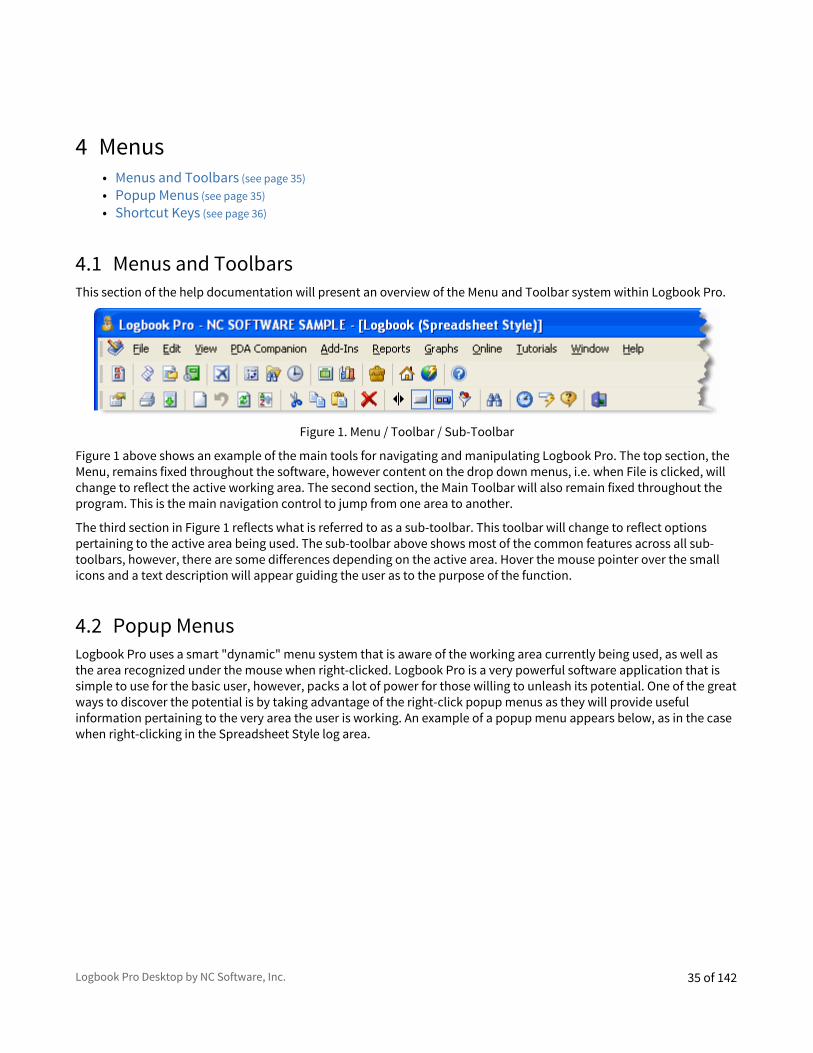
4.1 Menus and ToolbarsThis section of the help documentation will present an overview of the Menu and Toolbar system within Logbook Pro.
Figure 1. Menu / Toolbar / Sub-Toolbar
Figure 1 above shows an example of the main tools for navigating and manipulating Logbook Pro. The top section, the Menu, remains fixed throughout the software, however content on the drop down menus, i.e. when File is clicked, will change to reflect the active working area. The second section, the Main Toolbar will also remain fixed throughout the program. This is the main navigation control to jump from one area to another.
The third section in Figure 1 reflects what is referred to as a sub-toolbar. This toolbar will change to reflect options pertaining to the active area being used. The sub-toolbar above shows most of the common features across all sub-toolbars, however, there are some differences depending on the active area. Hover the mouse pointer over the small icons and a text description will appear guiding the user as to the purpose of the function.
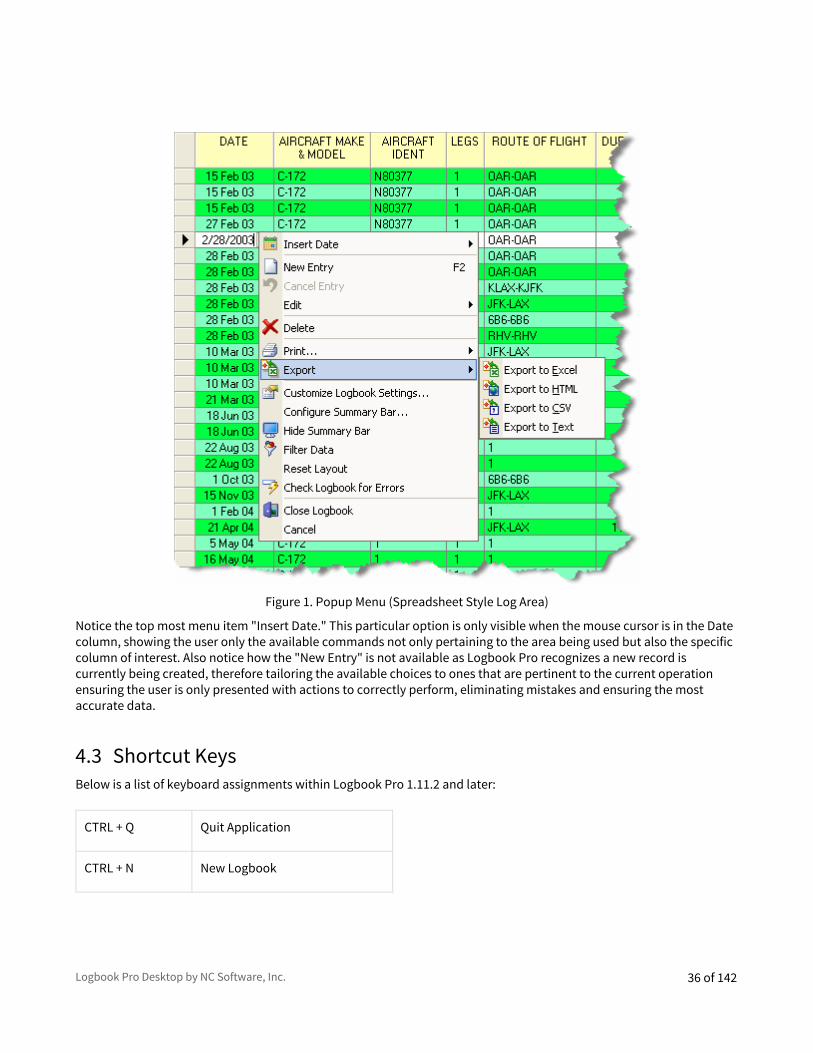
4.2 Popup MenusLogbook Pro uses a smart "dynamic" menu system that is aware of the working area currently being used, as well as the area recognized under the mouse when right-clicked. Logbook Pro is a very powerful software application that is simple to use for the basic user, however, packs a lot of power for those willing to unleash its potential. One of the great ways to discover the potential is by taking advantage of the right-click popup menus as they will provide useful information pertaining to the very area the user is working. An example of a popup menu appears below, as in the case when right-clicking in the Spreadsheet Style log area.
Logbook Pro Desktop by NC Software, Inc. 36 of 142
Figure 1. Popup Menu (Spreadsheet Style Log Area)
Notice the top most menu item "Insert Date." This particular option is only visible when the mouse cursor is in the Date column, showing the user only the available commands not only pertaining to the area being used but also the specific column of interest. Also notice how the "New Entry" is not available as Logbook Pro recognizes a new record is currently being created, therefore tailoring the available choices to ones that are pertinent to the current operation ensuring the user is only presented with actions to correctly perform, eliminating mistakes and ensuring the most accurate data.
4.3 Shortcut KeysBelow is a list of keyboard assignments within Logbook Pro 1.11.2 and later:
CTRL + Q Quit Application
CTRL + N New Logbook

Logbook Pro Desktop by NC Software, Inc. 37 of 142
CTRL + O Open Logbook
CTRL + P Print Area
CTRL + B Backup Logbook
CTRL + X Cut to Clipboard
CTRL + C Copy to Clipboard
CTRL + V Paste from Clipboard
CTRL + SHIFT + F2 Show Windows Calculator
CTRL + Insert Toggle Sidebar
CTRL + E View Explorer
ALT + T Toggle Main Toolbar
CTRL + 1 View Certificates
CTRL + 2 View Ratings
CTRL + 3 View History
CTRL + 4 View Spreadsheet Log
CTRL + 5 View Windows Log
ALT + S Toggle Start Bar
CTRL + S Toggle Status Bar
CTRL + SHIFT + S Synchronize (My Sync/Sync Now)
ALT + U Check for Updates

Logbook Pro Desktop by NC Software, Inc. 38 of 142
F1 View Documentation
Popup dialogs such as approaches, expenses, date pickers, etc. typically have two key assignments:
• ESC will close the dialog without saving changes• ENTER will close the dialog and save changes.

Logbook Pro Desktop by NC Software, Inc. 39 of 142
5 Toolbars• Main Toolbar (see page 39)• Side Bar (see page 39)• Status Bar (see page 41)• Enhanced Data Navigator (see page 41)• Summary Bar (see page 43)• Sub Toolbars (see page 44)
5.1 Main Toolbar
Figure 1. Main Toolbar
The Main Toolbar is the heartbeat of navigating Logbook Pro's main areas. Click any button on the Main Toolbar to jump to the corresponding area. If a button has a small down arrow to the right, click the down arrow for a more granular selection of the target area. The toolbar can be "floated" to the middle working area or "docked" to either the top (default position), left, bottom, or right sides of the main application workspace.
Some menu drop downs are "detachable" and are represented by having a solid bar across the top of the drop down menu. For example, the Logbook Reports list of menu options has a bar across the top, as shown in Figure 2 below. If you click and drag this bar the menu will actually detach and float allowing the user to keep the menu options in view for multiple uses.
Figure 2. Detachable Menu
5.2 Side BarThe Side Bar is an Outlook style shortcut bar allowing for easy navigation throughout the program. The Side Bar can be used in place of, or in conjunction with the Main Toolbar. The Side Bar provides a little bit more detail in navigation

Logbook Pro Desktop by NC Software, Inc. 40 of 142
options exposing more menu options and working areas than the Main Toolbar. The width of the Side Bar is adjustable by moving the mouse pointer over the right edge of the Side Bar until the mouse pointer changes to an E-W sizing arrow, at which point clicking and dragging the right edge will allow the width to be modified. Figure 1 below shows the main Side Bar groups. Click an icon within the Side Bar group to navigate to the target area. If a sub-menu appears, choose an option for a more refined target area.

Logbook Pro Desktop by NC Software, Inc. 41 of 142
Figure 1. Side Bar Groups
5.3 Status Bar
Figure 1. Status Bar
The Status Bar is user selectable to appear at the bottom of the screen. The Status Bar can be hidden from the selection in the View menu. The Status Bar provides the user valuable information related to the active area within Logbook Pro as well as the column that contains the mouse cursor. As shown in Figure 1 above, the far left section of the Status Bar contains useful text information. As columns are changed such as in the Spreadsheet Style logbook area, or fields selected in the Windows Style logbook area, this left section will change to provide useful hints and keyboard shortcuts pertaining to the exact column containing the mouse cursor.
The next panel of the Status Bar is the Currency button (only visible if Currencies are enabled in the Options...Currency area). Click the Currency button to display a popup menu containing the currency groups and then within each group the individual currencies, color coded for expiration data and also contains the expiration dates.
The Lookback button, when clicked, will provide a history of Flights and Hours from the users data. Granular detail down to each month from the current to the previous six months, by month, then additional detail such as last seven days, this year, and last year. A lookback report can also be previewed by clicking the option within the popup menu.
The next series of panels are self-explanatory by the text within, as used in any standard Windows program such as Microsoft Word. The CAPS will be activated when the CAPS LOCK is enabled on the keyboard, and the same with the NUM LOCK and INSERT keys. The Date and Time are shown for reference when making logbook entries.
5.4 Enhanced Data Navigator
Figure 1. Enhanced Data Navigator (EDN)
At the bottom of the Spreadsheet Style entry systems, such as Certificates, Ratings, History, and Spreadsheet Style Logbook areas is an optional enhanced data navigator (EDN), which can be hidden from clicking the icon on the sub-toolbar.
The functions of each button on the EDN are described below:
First Record
Previous Page
Previous Record
New Record

Logbook Pro Desktop by NC Software, Inc. 42 of 142
Cancel Changes
Save Changes
Delete Record
Add Bookmark (see page 42)
Clears Bookmarks
Displays Popup Menu of Bookmarks
Displays Find Dialog (see page 43)
Searches in Up/Previous Direction
Searches in Down/Forward Direction
Next Record
Next Page
Last Record
• Bookmarks (see page 42)• Find Dialog (see page 43)
5.4.1 BookmarksA bookmark is like putting a paper bookmark in a book, saving the exact page to return to the desired location at a later time. Another paradigm is as if putting a thumbtack on the record and saving the place to return to this record at a later time.
When the data entry area is closed, bookmark information is removed.
Back to Enhanced Data Navigator (see page 41)

Logbook Pro Desktop by NC Software, Inc. 43 of 142
5.4.2 Find DialogWhen clicking the search button in the Enhanced Data Navigator, a dialog as shown below appears.
Figure 1. Find Dialog
Select the Column to search (Spreadsheet Style Log used in this example), the data to search for (top left), and the type of search desired.
Back to Enhanced Data Navigator (see page 41)
5.5 Summary BarLogbook Pro allows for instant access of user-defined lookback data either across the bottom of the Spreadsheet Style area (Figure 1) or from the Summary Bar button on the sub-toolbar in the Windows Style area (Figure 2). Right-click the Summary Bar (spreadsheet style area) to configure the fields and time frame for calculations. Figure 3 shows the dialog used to configure the summary bar, allowing up to 10 fields to be displayed as well as the grand total for the field plus three time criteria, in days, the default being 30/60/90 days respectively. Hover the mouse over the respective panel of information for a description of the data, as short titles are used to conserve space.

Logbook Pro Desktop by NC Software, Inc. 44 of 142
Figure 1. Summary Bar on bottom in Spreadsheet Style Log
Figure 2. Summary Bar from Windows Style Sub-Toolbar menu item
Figure 3. Summary Bar Configuration
5.6 Sub Toolbars• Explorer Toolbar (see page 45)• Certificates Toolbar (see page 45)• Ratings Toolbar (see page 46)

Logbook Pro Desktop by NC Software, Inc. 45 of 142
• History Toolbar (see page 46)• Logbook Toolbars (see page 47)• Report Toolbar (see page 49)• Graph Toolbar (see page 50)• Analyzer Toolbar (see page 51)
5.6.1 Explorer Toolbar
Figure 1. Explorer Sub-Toolbar
Left to Right Description of the buttons available on the Explorer Toolbar shown above:
Options: Click to view a drop down menu of configuration settings pertaining to the Explorer
Print: Prints the data shown on the right side of the Explorer, i.e. logbook information, etc.
Export: Click to view a drop down menu of available export options for the node selected
Refresh: Updates the data for the node selected
Collapse Nodes: Collapses all nodes on the left side of the Explorer as if clicking the minus sign next to each node
Expand Nodes: Expands all nodes on the left side of the Explorer as if clicking the plus sign next to each node
Freeze Columns: Columns left of the splitter bar are fixed in position, right side will scroll
Help: Displays the Help Documentation for the Explorer
Close: Closes the Explorer Window
5.6.2 Certificates Toolbar
Figure 1. Certificates Sub-Toolbar
Left to right description of the buttons available on the Certificates Sub-Toolbar:
Options: Click to display a drop down menu of configuration options
Print: Click to display a drop down menu of print options
Export: Click to display a drop down list of export options
Delete: If enabled (record selected), will delete the selected record(s)
Refresh: Updates the display and refreshes the default sort order
Enhanced Data Navigator: Toggles the Enhanced Data Navigator (see page 41) (show/hide)
Help: Displays the help associated to the Certificates working area
Lock: Version 1.10.54 adds a new lock button just to the left of the close button. Click this button (down) to lock the data area and prevent from inadvertent edits. Click again to unlock should you need to make any additions or edits.

Logbook Pro Desktop by NC Software, Inc. 46 of 142
Close: Closes the Certificates Window
5.6.3 Ratings Toolbar
Figure 1. Ratings Sub-Toolbar
Left to right description of the buttons available on the Ratings Sub-Toolbar:
Options: Click to display a drop down menu of configuration options
Print: Click to display a drop down menu of print options
Export: Click to display a drop down list of export options
Delete: If enabled (record selected), will delete the selected record(s)
Refresh: Updates the display and refreshes the default sort order
Enhanced Data Navigator: Toggles the Enhanced Data Navigator (see page 41) (show/hide)
Help: Displays the help associated to the Certificates working area
Lock: Version 1.10.54 adds a new lock button just to the left of the close button. Click this button (down) to lock the data area and prevent from inadvertent edits. Click again to unlock should you need to make any additions or edits.
Close: Closes the Certificates Window
5.6.4 History Toolbar
Figure 1. History Sub-Toolbar
Left to right description of the buttons available on the History Sub-Toolbar:
Options: Click to display a drop down menu of configuration options
Add Events: Shows the Options...History area allowing for the modification of history events
Print: Click to display a drop down menu of print options
Export: Click to display a drop down list of export options
Delete: If enabled (record selected), will delete the selected record(s)
Refresh: Updates the display and refreshes the default sort order
Sort: Click to display a menu of available sort options
Enhanced Data Navigator: Toggles the Enhanced Data Navigator (see page 41) (show/hide)
Help: Displays the help associated to the Certificates working area
Lock: Version 1.10.54 adds a new lock button just to the left of the close button. Click this button (down) to lock the data area and prevent from inadvertent edits. Click again to unlock should you need to make any additions or edits.

Logbook Pro Desktop by NC Software, Inc. 47 of 142
Close: Closes the Certificates Window
5.6.5 Logbook Toolbars
Figure 1. Spreadsheet Style Log Sub-Toolbar
Left to right description of the toolbar shown in Figure 1 above:
Options: Click to view a drop down menu of configurable settings
Print: Click to view a drop down of print options
Export: Click to view a drop down of export options
Date Input: Click to view a drop down of automatic date entry options
New: Click to create a new flight log entry
Cancel: Cancels any changes (skips save operation, restores previous data)
Refresh: Refreshes displayed data and resets sorting to default (date ascending)
Sort: Forces a sort to the default (date ascending)
Cut: Windows Cut to Clipboard
Copy: Windows Copy to Clipboard
Paste: Windows Paste from Clipboard
Delete: Deletes currently selected flight record(s)
Freeze Columns: Displays divider line, all columns to the left of the divider will be frozen, only those to the right will scroll left/right
Summary Bar: Toggles visibility of the Summary Bar (see page 43)
Enhanced Data Navigator: Toggles the Enhanced Data Navigator (see page 41) (show/hide)
Filter Toolbar: Displays/Hides the Filter Toolbar (Figure 2 below)
Find Dialog: Displays find information for quick record finding
Error Analysis: Click to perform an analysis of the logbook data for common errors
Help: Displays help for logbook area
Lock: Version 1.10.54 adds a new lock button just to the left of the close button. Click this button (down) to lock the data area and prevent from inadvertent edits. Click again to unlock should you need to make any additions or edits.
Close: Closes logbook window

Logbook Pro Desktop by NC Software, Inc. 48 of 142
1 http://help.logbookpro.com/Summary_Bar.htm
Figure 2. Spreadsheet Style Log Filter
Date Selector: Click to select a range of dates to filter the logbook data or Custom to select a range of dates
Aircraft: Choose the Aircraft Types to display data
Option Selector: Choose whether to display All Data (Flights and Sim), or just Flights, or Simulator entries, respectively
Figure 3. Windows Style Log Sub-Toolbar
Options: Click to view the available configuration options
Print: Click to view a drop down of print options
Display Approaches: Normally minimized, click to view the approach selector
Find: Snap to a particular record within the logbook
Summary Data: Displays Summary Bar1 information
Error Checking: Initiates an error checking routine to look for common data entry errors
Help: Displays the help documentation for the logbook area
Close: Closes the Windows Log

Logbook Pro Desktop by NC Software, Inc. 49 of 142
Figure 4. Windows Style Log Navigator
First Record: Click to jump to the first logbook entry
Previous Record: Click to move to the previous logbook entry
Flight Selector: Click to view a list of all available flights, select an item in the list to jump the respective logbook entry
Next Record: Click to move to the next logbook entry
Last Record: Click to move to the last logbook entry
5.6.6 Report Toolbar
Figure 1. Report Sub-Toolbar
Left to right description of the Report Sub-Toolbar:
TOC: View the Table of Contents of the report data
Rulers: View rulers on top and left of preview window
Save: Saves current report as a static snapshot of the report for later viewing (disconnected from data, it is a static report)
Open: Opens a previously saved report
Print: Sends the report to the printer
Page Setup: Displays page setup dialog
Export: Click to view a drop down of export options
Copy: Copy current page to Windows Clipboard

Logbook Pro Desktop by NC Software, Inc. 50 of 142
Find: Search report for text patterns
Single Page Preview: Normal one page preview
Two Page Preview: Preview report pages two side by side
Two by Two Page Preview: Preview report pages two pages wide by two pages tall
Settings: Click to view a drop down of configurable options for the current report
Format: Configure the paper color (display only)
Date Filter: Display the date dialog to set a new range and query for another report run (visible on some reports)
Refresh: Updates the report querying database for updated information
Zoom In: Increases zoom percentage
Zoom Out: Decreases zoom percentage
Zoom Percentage: Drop down to select a different zoom percentage, or whole page, page height, to fit options
First Page: Move to first page in report
Previous Page: Move to previous page
Page Navigator: Displays current page number of total pages, drop down to move to a specific page number
Next Page: Move to next page
Last Page: Move to last page of report
Close: Close report
5.6.7 Graph Toolbar
Figure 1. Graph Sub-Toolbar
Left to right description of Graph Sub-Toolbar:
Top row:
Print: Prints graph
Copy: Copies graph to Windows Clipboard, may be pasted into any other program accepting a graphic from the Clipboard
Export: Click to view available export options
Reset: Resets graph to default settings
Refresh: Requires database for updated information
Date Filter: Displays date dialog for date range modifications, updates display with new data available
Legend: Toggles the display of the legend on right side of chart

Logbook Pro Desktop by NC Software, Inc. 51 of 142
Border: Displays border around chart area
Grid Lines: Displays grid lines in chart area background
Values: Displays values at the top of the bar chart, percentages if pie chart displayed
Effect: Click to customize the 3D effect of the plot area
Chart Type: Select Bar or Pie chart
Orientation: If Bar chart displayed, select Vertical (default) or Horizontal layout
Formatting Toolbar: Toggles visibility of formatting toolbar
Tips: Click to view instructions for interactive control of the graph
Close: Close Graph
Formatting Toolbar (bottom row of Figure 1):
Graph Back: Click to choose a background color for the graph background
Plot Area Back: Click to choose the background color for the plot area
Text: Click to choose the Text color
5.6.8 Analyzer Toolbar
Figure 1. Analyzer Sub Toolbar
Left to right description of the Analyzer Toolbar:
Options: Click to view a drop down menu of available configuration options
Date Filter: Displays Date Dialog for selecting a new date range for date filtering
Print: Print the analyzer data (can be printed after clicking the print preview as well)
Print Preview: Preview the analyzer printable output
Open: Restore a layout from file
Save: Save the analyzer layout
Export: Click to view available export options
Refresh: Refreshes data displayed
Collapse: Collapse detail levels (as if clicking minus symbol on each aircraft type)
Expand: Expands all detail (as if clicking plus sign to left of aircraft types)
Totals Format: Displays summary information normally (numeric)
Percentages: Displays summary data as a percentage of the total
Adjusted Totals Configuration: Displays the Military Conversion Adjusted Total preset system

Logbook Pro Desktop by NC Software, Inc. 52 of 142
Master Filter: Click to select a master filter...a field where all data in this field is greater than zero (i.e. has an entry associated)
Preset: When Adjusted Totals Configuration button is depressed, allows selection of different saved conversion presets
Preset Configurator: Click to view the preset configuration system
Help: Displays help for the Analyzer area
Close: Closes the Analyzer Window

Logbook Pro Desktop by NC Software, Inc. 53 of 142
6 Options• User Information Options (see page 53)• Custom Options (see page 54)• Autofill Options (see page 56)• Aircraft Options (see page 57)• Certificates Options (see page 58)• Ratings Options (see page 59)• History Options (see page 60)• Flight Log Options (see page 61)• Currency Options (see page 63)• Backup Options (see page 65)
6.1 User Information Options
Figure 1. User Information

Logbook Pro Desktop by NC Software, Inc. 54 of 142
The User Information area is to allow personalization of Logbook Pro. The personalization information can contain any information as desired, however, is available for branding reports with this personal information, so choose wisely. User information is used throughout the software where personalization options are available, such as the reports section as well as the report combiner. The "Name" field is used as the signature text when generating flight log reports. The "Name" will appear in ALL CAPS below the signature line. The binder format setting will help Logbook Pro provide better results based on the binder format selected such as binder transitions by knowing the capacity of your binder.
Cloud:
For cloud based services such as "Cloud Sync" and "Airline Schedule Importer" synchronization your NC Software Web Site account credentials are required to pull your data stored in the cloud (Internet). Click the Sign In button to connect Logbook Pro to your NC Software Web Site account (Account ID/Username no longer needed). Once you've logged in and connected Logbook Pro to your NC Software account you can click "Test" to test the credentials to ensure you are communicating through the Internet to your personal cloud storage area.
Provide feedback with sound: When checked Logbook Pro will play sounds such as when menus are clicked, buttons clicked, and other informative feedback events. To prevent ALL sounds in Logbook Pro, including the program startup sound, clear this checkbox.
Disable startup sound: When checked Logbook Pro will start up silently skipping the aircraft sound. All other feedback events will be played unless the box above is cleared.
6.2 Custom Options

Logbook Pro Desktop by NC Software, Inc. 55 of 142
Figure 1. User Information
The custom area allows for user-customization of up to 50 custom fields of various types. Careful planning will provide best results. Logbook Pro's logbook area does not require fields such as are in the Options...Aircraft section, i.e. Single-Engine Land, Turbine, Type Rated, Retract, etc. Logbook Pro takes advantage of computing power to bring elements of Logbook Pro's data together to provide output as we are accustomed to such as in the hard copy logbooks. For example, when logging a flight, the minimum columns to be filled in are: Date, Aircraft Type, Aircraft Ident, Route, and Duration (or Flt. Sim). Notice in the logbook areas there are no columns for Single-Engine Land, Multi-Engine Land, etc., as when Logbook Pro generates data for a report or analysis, it refers to the Options...Aircraft area for the Type specified, and pulls this data. Therefore, it is NOT recommended to create these columns using up custom fields for this purpose as it would be redundant. Logbook Pro allows up to 10 fields of each of the types described below to be created.
Time Fields:
Time fields are used to store flight times in the format of Hours.Tenths, i.e. 1.1, 1.5, etc. If adding a field such as "Combat" to log combat hours, or "Photo" to log hours flown on photo flights, use the Time Field and Logbook Pro will provide time summaries of this data.
Yes/No Fields:
Yes/No fields are used to identify whether an event occurred or not on a flight. The columns show up as a check-box in the data entry area with the option of being checked (accomplished) or not checked (not accomplished). An example would be "Had Fun", when you flew and had fun, you would check the check box (all the time of course) and vice-versa.
Counter Fields:
Counter fields are integer based logging, for example, 1, 2, 3, 10 (whole numbers). For Navy pilots they may want to track "Carrier Landings" to keep count of this event in specific. In this case, use a "counter" as this data is an Integer, just as is Day Landings and Night Landings.
Expense Fields:
Track expense information such as Laundry, Taxi Cabs, Meals, whatever expense information is desired. Logbook Pro automatically includes two expense type fields, Per Diem and Flight Cost, so there is no need to use up a custom field as these are already provided. Expense reports can be generated based off of the custom expense field configuration.
Text Fields:
Text fields are just that, a custom field for storing a text entry. For crewed cockpits such as airlines, you may want to keep track of who your Captain or First Officer was for the flight. You can create a custom text field to store just this information, if you do not want to record this type of information in the remarks.
To remove a custom field, click the to the right of the custom field. This will clear the text, purge the logbook of the data and prepare the field for future use. If the text is cleared out of the custom field, the column will disappear, however, the data will remain in the underlying logbook data file.

Logbook Pro Desktop by NC Software, Inc. 56 of 142
6.3 Autofill Options
Figure 1. Autofill Feature
The autofill feature is a powerful capability to minimize flight logging and increasing the automation capability of Logbook Pro. Select an Aircraft Type from the top right of the Autofill tab, in the case above, C172 is selected. Configure each Aircraft Type, as desired, for autofill capability. For each checkbox checked, when a duration value is entered for a flight, the checked fields will automatically be entered with the duration value. For example, if making an entry for a C172 flight, as soon as the duration value is entered, the columns Solo and PIC will be entered. Secondly, the landing type for automatic entry can be specified, in the case above, and Day Landing would be recorded automatically. This feature allows for rapid flight logging by configuring aircraft types for routine data entry.
After configuring the settings for the selected A/C Type, click "Save AutoFill" in the lower right. You can then select the next A/C Type to configure or leave the AutoFill area or close the Options.

Logbook Pro Desktop by NC Software, Inc. 57 of 142
6.4 Aircraft Options
Figure 1. Aircraft Configuration
One of the most important areas to configure in Logbook Pro is the Options...Aircraft area. Add each type of aircraft you currently fly, add additional when the time comes to fly new types. Fill out each column and configure all types completely. Logbook Pro uses this information for reports, data analysis, and other areas within the software.
A unique capability of Logbook Pro is streamlining data input. You will notice there are no columns such as Category and Class in the logbook entry areas, i.e. no Airplane Single-Engine Land, Helicopter, Glider, etc. Logbook Pro only requires five fields for a complete flight entry; Date, Type, Ident, Route, and Duration. When entering the type, Logbook Pro knows everything about this type of aircraft and will refer to the aircraft configuration area for its report generation. On the reports, if a type has Single-Engine Land, the column will appear as the particular type and all specifics is referenced from this area. Unique analysis for aircraft can be generated based off of the information configured here. The next great thing is that if you make a mistake, for example configure a Boeing 747 as Single-Engine land, you don't have to worry about changing your logbook entries, when you change the configuration in the Options...Aircraft, the reports and all data analysis areas will reflect this change automatically.
If you misspell and aircraft type and subsequently make flight entries, do not worry, Logbook Pro is a smart system. Go to the Options...Aircraft area and change the type, for example C1823 to C182 and all of your logbook entries will automatically change C1823 to C182 and you can spend your time flying, not auditing a flawed logbook.
If an item is not listed in the available drop down lists, such as Category, Class, etc, and Logbook Pro allows you to type in this field, enter the value desired and Logbook Pro will store this for future use.
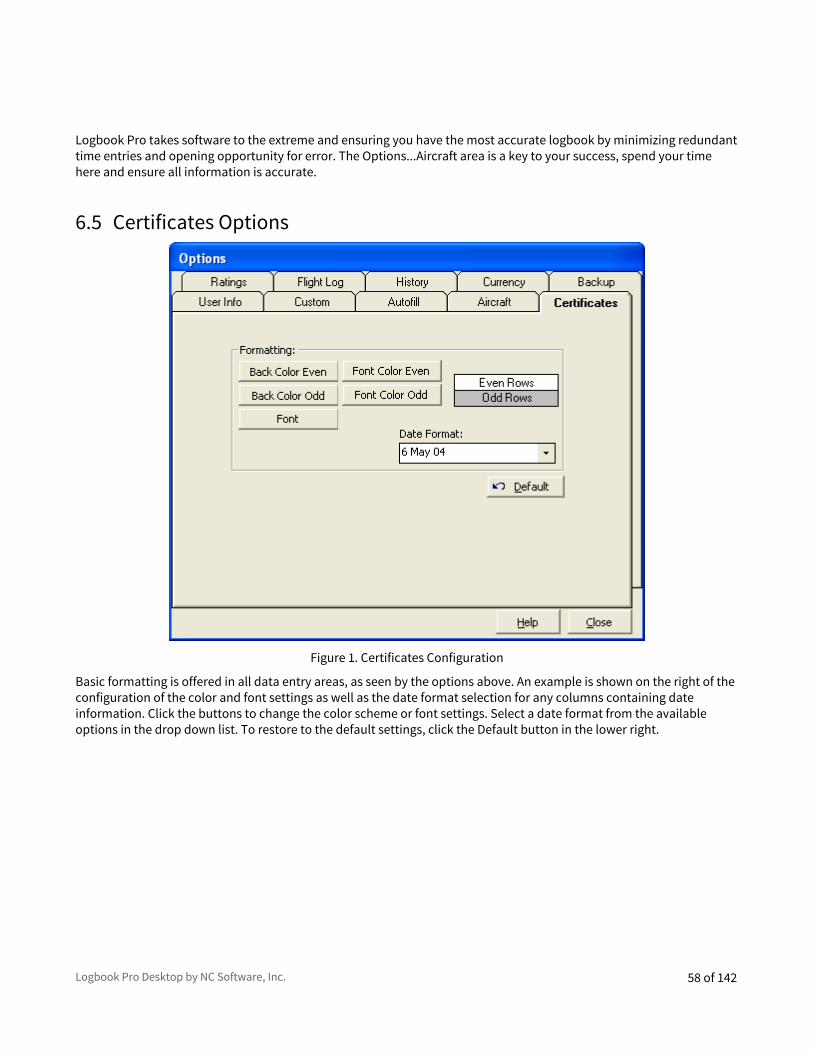
Logbook Pro Desktop by NC Software, Inc. 58 of 142
Logbook Pro takes software to the extreme and ensuring you have the most accurate logbook by minimizing redundant time entries and opening opportunity for error. The Options...Aircraft area is a key to your success, spend your time here and ensure all information is accurate.
6.5 Certificates Options
Figure 1. Certificates Configuration
Basic formatting is offered in all data entry areas, as seen by the options above. An example is shown on the right of the configuration of the color and font settings as well as the date format selection for any columns containing date information. Click the buttons to change the color scheme or font settings. Select a date format from the available options in the drop down list. To restore to the default settings, click the Default button in the lower right.

Logbook Pro Desktop by NC Software, Inc. 59 of 142
6.6 Ratings Options
Figure 1. Ratings Configuration
Basic formatting is offered in all data entry areas, as seen by the options above. An example is shown on the right of the configuration of the color and font settings as well as the date format selection for any columns containing date information. Click the buttons to change the color scheme or font settings. Select a date format from the available options in the drop down list. To restore to the default settings, click the Default button in the lower right.

Logbook Pro Desktop by NC Software, Inc. 60 of 142
6.7 History Options
Figure 1. History Configuration
Basic formatting is offered in all data entry areas, as seen by the options above. An example is shown on the right of the configuration of the color and font settings as well as the date format selection for any columns containing date information. Click the buttons to change the color scheme or font settings. Select a date format from the available options in the drop down list. To restore to the default settings, click the Default button in the lower right.
A History Event is any event that has an expiration. Medicals, Biennials, Check flights, etc. Use the history area to keep information for expiring information. Events must first be defined in the Options...History area before it can be used from the History data entry area. The option to add event exists on the History Sub-Toolbar to bring up the Options dialog for adding new events.
Add events as desired, Logbook Pro ships with the basic events included, such as Medicals and Biennial. Add an event by clicking on the bottom row and entering the information for a new History Event, check the EOM (End-of-Month) checkbox for any events that carry forward to the last day of the calendar month for expiration.
To remove an event, click the row selector to the far left of the row and hit the Delete key on the keyboard, or select the field and right-click, selecting the appropriate option on the popup menu.
The History area offers two sort options, the ability to sort by the Due Date column or the Event Date column. Select the default sort option from the radio buttons on the right lower side of the Options...History area. This is also configurable within the History area using the History Sub-Toolbar.

Logbook Pro Desktop by NC Software, Inc. 61 of 142
6.8 Flight Log Options
Figure 1. Flight Log Options
The Flight Log options area provides a significant amount of the user-selectable functionality and automation within Logbook Pro. Read the descriptions below for more information on the features selectable as shown in Figure 1 above.
Formatting:
The Spreadsheet Style area can be configured for text colors, background colors, both for even and odd rows, font settings, and date formats. Click the buttons to choose the corresponding formatting option as will be reflected by the window on the right showing a sample of the current formatting configuration. Date Formats can be selected for the Flight Date and OUT/IN/Takeoff/Land columns using the corresponding drop down selectors. A sample date is used to show the difference in the date formats.
Default Entry Style:
When clicking the Logbook button on the main toolbar, this option allows the configuration of the default entry style used. For example, if Windows Style is selected in the options window, when clicking the Logbook button on the main toolbar, the Windows Style entry area will open instead of the Spreadsheet Style (default).

Logbook Pro Desktop by NC Software, Inc. 62 of 142
Popup Summary:
Figure 2. Popup Summary
In the Windows Style log is a feature providing summary information for the field below the mouse cursor. In the sample shown in Figure 2 above, the mouse pointer is over the PIC field. Notice the popup summary showing the Grand Total PIC time and then the PIC total for the Aircraft Type currently selected for this flight record. The default summary is to show the Grand Total, however, by unchecking the "Total Time" checkbox, you can configure the summary time frame to be a selectable number of days or month.
Auto-Duration by:
When entering data into the real time fields such as Takeoff to Landing, the time format used is M/d/yy HH:mm. Logbook Pro uses Hours.Tenths throughout for its calculation engine therefore the time must be converted from real time to the decimal format. Logbook Pro can automatically fill in the Duration value, the tenths based on the time difference between Takeoff to Landing, or OUT to IN, as desired.
Windows Style Default Field:
When starting the Windows Style area as well as after the New button is clicked, this setting tells Logbook Pro where to place the cursor for a new entry.
Summary Bar Button:
Click this button to configure the Summary Bar settings. Refer to the Summary Bar (see page 43) of this documentation for more information.
Config Display Button:
Logbook Pro offers the option to hide columns and rename the captions at the top of the column (or field in the Windows Style). Refer to the Display Configuration (see page 78) section of this help documentation for more information.
Default Button:
Resets the Options...Flight Log area to the default color and font formatting.
Show Log at Startup:
If checked, when Logbook Pro first starts will automatically open the default logbook entry style, as configured above.
Double-Click Auto Entry:
Once a Duration value is entered, if enabled, double-click any other time field in either the Spreadsheet Style or Windows Style entry area and the field will automatically receive the same value as the Duration value. Makes data entry simple just by clicking the mouse!
Start Logbook Screens with a New Entry:
When starting up the Logbook areas, this option tells Logbook Pro whether to prepare the entry area for a new entry or start by showing the last record available.
Enable Automatic FAR Error Checking:

Logbook Pro Desktop by NC Software, Inc. 63 of 142
If enabled, will check to ensure no other time fields exceed the Duration time value.
Display Popup Field Summary Data (Windows Style):
Enables or Disables the Popup Summary (see page 61) capability. When using this feature, after each log entry is saved, the summary engine must recalculate the summary information, taking up processing time. If running a slower computer or minimal RAM, disable this feature for improved performance.
Start New Route with Last Fix of Prior Route:
When checked Logbook Pro will determine the last fix of your prior route by going right to left across your previous route to find the first non-letter or number and use that value as the starting fix for your next route and append a hyphen. For example if you enter a route of KDFW-KRIC and then enter another flight log entry, Logbook Pro will determine that KRIC was the last fix and start your next route for you with KRIC-. This can be optioned off by clearing the checkbox for this setting.
Auto Clean entries not having a Duration or Flt Sim value:
Logbook Pro requires a minimum of a Duration of a Flt Simulator entry to recognize the entry as valid. Enable this (default) option to purge any records that do not have a Duration of Flt Sim value. If using Logbook Pro to log ground training, i.e. records that do not contain flight time, it is recommended to disable this purging as the record will be deleted automatically.
6.9 Currency Options

Logbook Pro Desktop by NC Software, Inc. 64 of 142
Figure 1. Currency Configuration
Enable Currency Tracking:
To maximize processing performance within Logbook Pro, disable the currency engine by unchecking the corresponding option. Currency analysis occurs immediately on program startup to generate currency reminders, if necessary. To disable this startup process, deselect this option. With currencies disabled, all currency functionality is turned off.
Enable Reminders:
At program startup, if currencies are enabled, a check currency expirations and history event expirations occurs. If any of these items are due to expire within the warning time frame (default of 14 days), a window will appear reminding you of the impending expiration. Once an item is expired, the reminder is disabled.
Warning (days):
Defines the number of days prior to begin the warning reminders at program startup, as described above, until the item expires. For example, of a Currency expires on 10/14/2001 and the current date is 10/5/2001, this is inside the 14 day prior window and a reminder notification will appear at program startup.
Warning (hours) (not shown):
For FAR 121/135 status reports, defines the number of hours prior to approaching a FAR limit at which the status will be indicated with a warning indicator.
Expired Color:
Defines the color coding used in the Explorer, Popup Currency Notifier, and Reports for expired currencies and items.
Warn Color:
Defines the color coding used in the Explorer, Popup Currency Notifier, and Reports for currencies and items that are about to expire, as defined by the warning time frame as described above.
Pass Color:
Defines the color coding used in the Explorer, Popup Currency Notifier, and Reports for currencies the are not expired and not within the warning time period, as described above.
When using the popup color dialog, select a desired color from the available color swatches. If a custom color is desired, right-click one of the white color swatches near the bottom and a color dialog will appear, allowing subsequent selection of this user-defined color.

Logbook Pro Desktop by NC Software, Inc. 65 of 142
6.10 Backup Options
Figure 1. Backup Configuration
Backing up your data is critical in today's software industry as you can never tell when a virus or catastrophic failure will interrupt your computing experience. Not only is it important to keep your data backed up, but keeping a copy on a floppy, CD-RW, or whatever means, i.e. not on the computer itself is also good practice.
Logbook Pro offers three main options for backing up your data, the option to backup when the program exits, on a specified time interval, or turning off automated options and backing up manually. To learn more about the backup process, view the Backup and Restore Section (see page 128) of this help documentation.
A maintenance routine is also built into Logbook Pro checking to see that your logbook data is compacted for efficiency every 30 days. When 30 days transpires, Logbook Pro will popup a Maintenance Dialog (see page 66) offering the option to proceed with a compact, skip the operation, or disable the automatic maintenance routine. If this routine is disabled and subsequently you decide to enable it again, click the option to "Reset Auto Maintenance System" on the bottom of the Backup section in the Options area, as shown above in Figure 1.
The ability to control the default backup filename format has been added. If checked, Logbook Pro will automatically set a filename appended with the Year, Month, and Day such as MyFile_2003_01_22.bak. This will help to identify when the backup was created in the event a restore is required. If unchecked, the backup filename will not contain the date

Logbook Pro Desktop by NC Software, Inc. 66 of 142
data. Filenames can also be quickly changed, such as to overwrite a prior backup by simply clicking the prior backup. The save dialog will instantly adopt the selected file's filename. A prompt will appear warning of overwriting a prior backup file if one exists with the same name.
Maintenance Dialog:
Figure 1. Maintenance Dialog
Every 30 days, if enabled, Logbook Pro will offer a dialog on program exit to compact your data. Compacting reduces file size and optimizes the database for efficient operation. Two options are available and are self-explanatory, by checking the corresponding checkbox on the lower left and right of the dialog.

Logbook Pro Desktop by NC Software, Inc. 67 of 142
7 CertificatesThe Certificates area is used to log information about any and all certificates received. Enter the Certificate, Date of Original Issue, Certificate Number, and Remarks. Columns can be rearranged by clicking and dragging the column headers and any column sorted by clicking the corresponding column header.
All areas that are spreadsheet style entry systems, as well as the right side views or the Logbook Pro Explorer have a built in printing capability and allow export to numerous formats. To read more on Printing directly from the spreadsheet entry systems (see page 90) or Exporting Data (see page 127), read the associated sections of this help documentation.

Logbook Pro Desktop by NC Software, Inc. 68 of 142
8 RatingsThe Ratings area is used to log all ratings earned. Enter the Category, Class, or Type Rating, Date of Issue, and any corresponding remarks. The remarks column is also useful to log any endorsement data received. Columns can be reordered by clicking and dragging the column header, resized by dragging the right edge of the column, or sorted by clicking the column header.
All areas that are spreadsheet style entry systems, as well as the right side views or the Logbook Pro Explorer have a built in printing capability and allow export to numerous formats. To read more on Printing directly from the spreadsheet entry systems (see page 90) or Exporting data (see page 127), read the associated sections of this help documentation.

Logbook Pro Desktop by NC Software, Inc. 69 of 142
9 HistoryThe History area is a powerful area used to record any events that have an expiration. Whether a medical, biennial, flight check, or any other event that has an expiration, the event should be logged in the History section. History events can be added from Options...History area and can be designated to expire end-of-month or on a specific date. When creating an event, the title, duration, and whether or not EOM is configured. Events must be configured prior to entering an event in the History area. When the mouse pointer is in the Event field, a button on the History toolbar will appear allowing a quick ability to add events. Once the event is added, it will be available in the drop down list of configured events. Select the event, then enter the date the event was accomplished. Logbook Pro will automatically calculate the due date, which can be overridden if desired.
The History display will shade all previously accomplished events to only the most recent event, of a given type, is clearly visible. Expired events will be displayed in red. History items are directly integrated into the Currency Editor and can also be quickly displayed from the Currency button on the status bar.
History events will be evaluated at program startup and if expires within the currency warning time frame (see Currency Options (see page 63)) a reminder window will appear advising the user of the impending expiration.
All areas that are spreadsheet style entry systems, as well as the right side views or the Logbook Pro Explorer have a built in printing capability and allow export to numerous formats. To read more on Printing directly from the spreadsheet entry systems (see page 90) or Exporting data (see page 127), read the associated sections of this help documentation.

Logbook Pro Desktop by NC Software, Inc. 70 of 142
10 ExplorerLogbook Pro offers a unique and simple way to view all of your data within one area, the Logbook Pro Explorer. Modeled after the Windows Explorer interface, the Explorer is used by simply clicking the nodes (text information) on the left side, then view the information on the right side. Display options are available by clicking the Options icon (far left) of the Sub Toolbar (see page 44) such as grid line styles and row shading.
When viewing data, such as logbook data, click a row on the right and the row will become highlighted for easy viewing. Column widths are adjustable just as in the data entry areas by clicking and dragging the row divider to the right of the column desired. The logbook area will configure itself to match that of the Spreadsheet Style log to make the interface simpler to read between data areas. Data cannot be edited in the Explorer, it is only a place for viewing existing data (read-only).
The Explorer offers a powerful capability for analyzing data as well. Figure 1 below shows the summary capability in the logbook area, providing a grand total overall as well as grand total summaries by aircraft type. At the bottom of each node of logbook data is a summary line, showing the totals for each column if the user actually wants to view the data with a summary below.

Logbook Pro Desktop by NC Software, Inc. 71 of 142
Figure 1. Explorer with Summary Info
Currencies can be closely analyzed by viewing the data and determining fail points by clicking the plus symbols to branch down each currency configuration as shown in Figure 2. Color coding applied for easy viewing.

Logbook Pro Desktop by NC Software, Inc. 72 of 142
Figure 2. Explorer Currency Detail
All areas except the currency area benefit from the ability to print and export, should you want to capture the data or transport it to another analytical system such as Microsoft Excel. Enjoy the Logbook Pro Explorer, it is a very powerful system for viewing your data.
Sub Toolbar:
Figure 1. Explorer Sub-Toolbar
Left to Right Description of the buttons available on the Explorer Toolbar shown above:
Options: Click to view a drop down menu of configuration settings pertaining to the Explorer
Print: Prints the data shown on the right side of the Explorer, i.e. logbook information, etc.
Export: Click to view a drop down menu of available export options for the node selected
Refresh: Updates the data for the node selected
Collapse Nodes: Collapses all nodes on the left side of the Explorer as if clicking the minus sign next to each node
Expand Nodes: Expands all nodes on the left side of the Explorer as if clicking the plus sign next to each node

Logbook Pro Desktop by NC Software, Inc. 73 of 142
Freeze Columns: Columns left of the splitter bar are fixed in position, right side will scroll
Help: Displays the Help Documentation for the Explorer
Close: Closes the Explorer Window

Logbook Pro Desktop by NC Software, Inc. 74 of 142
11 Logbooks• Spreadsheet Style (see page 74)• Windows Style (see page 77)• Transferring Logbooks (see page 78)• Display Configuration (see page 78)• Automated Entries (see page 79)• Popup Summaries (see page 80)• FAR Error Checking (see page 80)• Block Time Entry (see page 81)
11.1 Spreadsheet StyleLogbook Pro offers two main styles of data entry, the Spreadsheet Style, as discussed in this section, and the Windows Style (see page 77), discussed in the next section of this help documentation. The Spreadsheet Style is the easiest and default entry method for Logbook Pro's flight data, providing a flexible, configurable, efficient method of data entry.

Logbook Pro Desktop by NC Software, Inc. 75 of 142
Figure 1. Logbook (Spreadsheet Style)
The Spreadsheet Style is easy to use with the minimum field entries of Date, Type, Ident, Route, and Duration (or Sim). You can use the Enter or TAB key to move from column to column, or use the shortcut key "R" to move from any time field to the Remarks field in one keystroke. Hitting the HOME key will move you back to the left side of the screen. The Date Field uses the Date Format as configured in the Flight Log Options (see page 61) section for user-defined formats. To enter Today's date, type in the letter "T" in the date field and today's date will be automatically entered. To enter the previously entered flight date, hit the "P" key on the keyboard. The Aircraft Type field lists the Types as configured in the Aircraft Options (see page 57) area. To add more Types, click the button on the toolbar to add types when this field is selected, or right-click and use the popup menu to choose the option to add additional aircraft types. The Ident field will automatically fill based on the Type selected, if not listed, type in the new Ident manually and it will be available for the corresponding type for future entries.
Logbook Pro uses a new route format for flight logging breaking the traditional From-To style columns in the paper logbook systems. With Logbook Pro's combined format, enter all legs of a day's flights in one entry, separated by
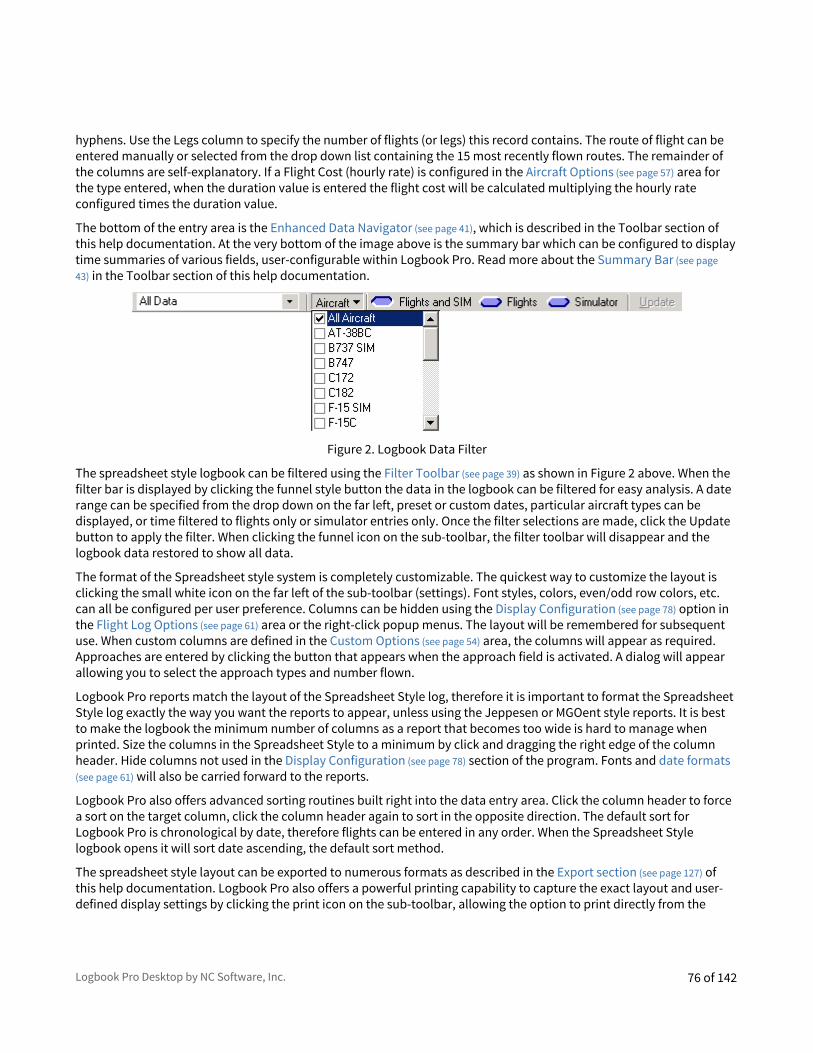
Logbook Pro Desktop by NC Software, Inc. 76 of 142
hyphens. Use the Legs column to specify the number of flights (or legs) this record contains. The route of flight can be entered manually or selected from the drop down list containing the 15 most recently flown routes. The remainder of the columns are self-explanatory. If a Flight Cost (hourly rate) is configured in the Aircraft Options (see page 57) area for the type entered, when the duration value is entered the flight cost will be calculated multiplying the hourly rate configured times the duration value.
The bottom of the entry area is the Enhanced Data Navigator (see page 41), which is described in the Toolbar section of this help documentation. At the very bottom of the image above is the summary bar which can be configured to display time summaries of various fields, user-configurable within Logbook Pro. Read more about the Summary Bar (see page 43) in the Toolbar section of this help documentation.
Figure 2. Logbook Data Filter
The spreadsheet style logbook can be filtered using the Filter Toolbar (see page 39) as shown in Figure 2 above. When the filter bar is displayed by clicking the funnel style button the data in the logbook can be filtered for easy analysis. A date range can be specified from the drop down on the far left, preset or custom dates, particular aircraft types can be displayed, or time filtered to flights only or simulator entries only. Once the filter selections are made, click the Update button to apply the filter. When clicking the funnel icon on the sub-toolbar, the filter toolbar will disappear and the logbook data restored to show all data.
The format of the Spreadsheet style system is completely customizable. The quickest way to customize the layout is clicking the small white icon on the far left of the sub-toolbar (settings). Font styles, colors, even/odd row colors, etc. can all be configured per user preference. Columns can be hidden using the Display Configuration (see page 78) option in the Flight Log Options (see page 61) area or the right-click popup menus. The layout will be remembered for subsequent use. When custom columns are defined in the Custom Options (see page 54) area, the columns will appear as required. Approaches are entered by clicking the button that appears when the approach field is activated. A dialog will appear allowing you to select the approach types and number flown.
Logbook Pro reports match the layout of the Spreadsheet Style log, therefore it is important to format the Spreadsheet Style log exactly the way you want the reports to appear, unless using the Jeppesen or MGOent style reports. It is best to make the logbook the minimum number of columns as a report that becomes too wide is hard to manage when printed. Size the columns in the Spreadsheet Style to a minimum by click and dragging the right edge of the column header. Hide columns not used in the Display Configuration (see page 78) section of the program. Fonts and date formats(see page 61) will also be carried forward to the reports.
Logbook Pro also offers advanced sorting routines built right into the data entry area. Click the column header to force a sort on the target column, click the column header again to sort in the opposite direction. The default sort for Logbook Pro is chronological by date, therefore flights can be entered in any order. When the Spreadsheet Style logbook opens it will sort date ascending, the default sort method.
The spreadsheet style layout can be exported to numerous formats as described in the Export section (see page 127) of this help documentation. Logbook Pro also offers a powerful printing capability to capture the exact layout and user-defined display settings by clicking the print icon on the sub-toolbar, allowing the option to print directly from the

Logbook Pro Desktop by NC Software, Inc. 77 of 142
spreadsheet. Selected rows can be printed by clicking the row selectors at the far left, using standard SHIFT + CLICK's to select a range of rows or CTRL + CLICK's to select non-contiguous rows.
11.2 Windows Style
Figure 1. Logbook Entry (Windows Style)
Logbook Pro offers two unique styles for entering logbook data. The Windows Style, as shown in Figure 1 above, offers a view of all entry fields in one screen, providing a slim/efficient method of data entry. The areas are broken down by types of data, i.e. the basic info across the top, to custom defined fields, which appear when created and configured in the Display Configuration section, to approaches on the bottom left, toggled by clicking the Approach button if not in view, and the flight selector/navigator on the bottom left.
Logbook entries do not require a manual save operation, once the minimum fields are filled in (Date, Type, Ident, Route, and Duration (or Flt Sim)) the data will be saved upon closing the window or when clicking the New button to create a new record. Logbook Pro offers several automation features to make logging data simple, accurate, and efficient. Logbook Pro memorizes your entries from flight to flight, therefore when moving to a field, such as the route, the previous route will be entered for you. All that is needed is to change dates and flight times for the most part and Logbook Pro will work with you to make data entry fast and easy. The Date field will automatically set todays date by hitting the "T" key on the keyboard (T is short for Today) or the "P" key (P is short for Previous) to use the previous entries date.

Logbook Pro Desktop by NC Software, Inc. 78 of 142
There is no reason to enter flights in any order, Logbook Pro will automatically sort the flights by date for you. The Date field also uses a drop down calendar by clicking the icon to the right side of the field. Use the calendar to rapidly select a date for the flight record. The Aircraft Type field references the list of Types configured in the Aircraft Options (see page 57) area, if not in the list, double-click the field to enter new Types in the Options...Aircraft area. The option to add aircraft types will also appear on the sub-toolbar when this field is active with the mouse cursor. Idents will appear based on the aircraft type selected, allowing easy recall of aircraft flown and Idents (or N-Numbers). If the desired Ident (N-Number) is not listed, type it in manually.
The route field is used in a new streamlined method modernizing logbook entries from the standard To-From blocks in paper logbooks. Logbook Pro allows multiple flights in the same day to be entered in one record, particularly useful for corporate pilots flying multiple legs in a day. Use the legs field to determine how many flights were flown and separate the stops in the Route field with hyphens (or any desired separator). Click the drop-down to the right of the route field to recall the 15 previously used routes to rapidly choose a previously flown route.
If custom expense fields were created in the Options...Custom area or custom text fields, click the respective button to enter custom data associated with this flight. If a Flight Cost value was entered for the corresponding Aircraft Type in the Options...Aircraft area, a cost will be entered based on the hourly rate x the Duration. The cost can be overriden if desired. Use the + / - buttons to increase/decrease the value, or type in the amounts manually.
The bottom left of the Windows Style log screen is a navigation system that allows for easy moving about flight entry records using the arrow buttons at either end. The center portion is a popup menu system that displays all flight records with the basic information of Date, Type, Route, and Duration. Select a flight from the list of available flight records and the data will be loaded into view for editing or reference.
11.3 Transferring LogbooksIf you are beginning the use of Logbook Pro from existing paper copy logs, you can do a mass transfer, just as if you were moving from one paper log to another, carrying forward the totals. Realize though that Logbook Pro will provide the best data analysis for the most detail of the flight entries. Logbook Pro can display data by types and even down to the Ident (N-Number) level of detail, as well as route and approach analysis. There are three main ways of bringing your data in from a paper logbook:
1. Enter all flights individually, recommended for the highest fidelity logbook solution and data analysis2. Break down the sums by Aircraft Type and do a lump sum transfer by each Type.3. Make a one line entry carrying forward all totals. Realize this would skew a particular Aircraft Type,
therefore it is recommended to create a fictitious Type called "Transfer" and associate the data to this Type.
11.4 Display ConfigurationLogbook Pro offers powerful customization features allowing each user to morph Logbook Pro into fitting their own needs. Logbook fields can be renamed by changing the captions that appear at the top of the entry area (or field in the Windows Style) and whether the column appears or not (*items only can be hidden in the Windows Style). Other display configuration capabilities are existent inherent to the data entry area, for example columns can be reordered by click and dragging the column to a new position, resized by clicking the dividing line to the right of the respective column and dragging to a new width. Figure 1 below shows the display configuration feature available from the Flight Log Options (see page 61) area or right-click popup menus within the logbook areas.

Logbook Pro Desktop by NC Software, Inc. 79 of 142
Figure 1. Display Configuration
11.5 Automated EntriesAutofill:
Logbook Pro uses an autofill automation routine allowing fast accurate logging, which is configurable by Aircraft Type in the Autofill Options (see page 56) area. When the Duration field is entered, the corresponding fields selected to match the duration, in the Options...Autofill area, will instantly receive the same value as the duration, which can be overridden if desired.
Double-Click Auto Entry:
Logbook Pro takes the computing power of the PC and extends this to allow for accurate and efficient flight logging. If enabled in the Flight Log Options (see page 61) area, Double-Click auto-entry allows you to double-click any field and Logbook Pro will enter the Duration (if a time field) or enter a landing, if the landing field is the target. This enables fast flight logging as once the Duration has been entered, double-click any field in either the Spreadsheet or Windows Style logs to enter the Duration or Landing value.

Logbook Pro Desktop by NC Software, Inc. 80 of 142
11.6 Popup SummariesThe Windows Style log offers a powerful system for showing the Grand Total and time summary by the Aircraft Type showing in the Type field. The popup summary system is configured in the Options...Flight Log area and can be set to show the Grand Total or a total based on a number of days or months, as specified. Figure 1 shows the popup summary, which occurs by hovering the mouse pointer over a time field. As in the example below, the mouse pointer is hovering over the NIGHT field and is showing a Grand Total of 152.4 hours (of Night time) and for the Type (C172) showing in the Type field, a grand total of 0.3 hours.
Figure 1. Popup Summary
11.7 FAR Error CheckingAutomatic error checking is built into Logbook Pro to prevent common errors such as entering a secondary time entry that exceeds that of the flight. Error checking occurs (if optioned in the Flight Log Options (see page 61) area) after every flight entry validating the minimum fields have been logged (Date, Type, Ident, Route, Duration (or Sim)) and that no other time field exceeds that of the Duration.

Logbook Pro Desktop by NC Software, Inc. 81 of 142
11.8 Block Time Entry
Figure 1. Block Time Entry System
When using the Spreadsheet or Windows Style log, the interface as shown in Figure 1 above is used to enter Takeoff, Landing, OUT, and IN times. Data can be typed in manually or you can use up/down arrows to change values, right/left arrows to move to different date or time elements. Click the drop down button to show the calendar, you can click the title on top of the calendar to show the months for quick changes, etc. Date and Time values can also be easily changed by pressing and holding the + or - keys on the keyboard. You can also enter dates directly including the / to change between the sections and the same with the time, for example type in 08 : 19 and the entire hour and minute will enter without having to arrow right/left.
Logbook Pro Desktop by NC Software, Inc. 82 of 142
12 Printing Reports• Reports (see page 82)• Cirrus Elite Binder Reports (Obsolete) (see page 86)• Jeppesen Style (see page 87)• Report Combiner (see page 89)• Alternate Printing (see page 90)• Split Reports (see page 91)• FAA 8710 (see page 92)
12.1 ReportsData in is only as good as data out and Logbook Pro cuts no corners with providing the top of the line reporting capabilities. Using a fast and configurable reporting engine, Logbook Pro enables the user to easily filter data using the Date Filter (see page 120) window preceding all reports and options to configure page numbering, personalization, row shading, borders, and much more. Reports offer export capabilities like no other with ability to export to web page (HTML), Microsoft Excel, Text delimited data files, Rich Text Format, Multi-Page TIFF Images, and the most popular and universal format, Adobe's Acrobat Reader Portable Document Format (PDF). Reports, once run, can be saved in a Logbook Pro native report format (.RDF) allowing the exact report to be called up at a later time, useful for snapshots of your data. Click the save icon on the report toolbar or the option to save the compiled report. At any time within Logbook Pro, choose the option to open a saved report and select the RDF file and the exact report snapshot will be displayed.

Logbook Pro Desktop by NC Software, Inc. 83 of 142
Figure 1. Logbook Pro Report
The report system, as shown in Figure 1 above, is very powerful and configurable, all from the report toolbar and right-click activated popup menu system. Features vary from report to report based on the particular report previewed. Reports, when run, are in a preview mode until you select the option to print. Printing allows the user to print the entire report, page range, or a specific page. Page setup allows complete selection of the target printer, page margin control, and other available print dialog options. The small card with a hand and down arrow is the area to concentrate most of your attention. Within this drop down menu are numerous configuration items from page numbering options, personalization data, row shading, page borders, and much more. Navigating a report is simple using the report table of contents (far left icon on report toolbar) or the page navigation controls on the right side of the report toolbar.
Logbook Pro also offers reports that are grouped by items such as aircraft specifics, month, and year. Preview the different reports to see the numerous report options available. FAA Form 8710 Part III data can be easily printed from the Miscellaneous report menu as well as the Lookback data and a handy Percentages report, showing the percentage of each logged item as a relation to the grand total data.
Several of Logbook Pro's logbook reports such as the Logbook Pro Standard and the Logbook Pro Grouped by reports match the layout of the Spreadsheet Style log area. Allowing complete customization capabilities, format the Spreadsheet Style log, i.e. fonts, colors, sizing columns, hiding columns, etc., and after doing so, the reports mentioned above will also be set to match the set format. Logbook Pro's reports are best formatted by setting the minimum width

Logbook Pro Desktop by NC Software, Inc. 84 of 142
so as to keep your report within two pages wide. A vertical red dashed line will appear signifying a page break between the first and second pages. This vertical red line is an indicator only and does not print out on the final output.
Logbook Pro offers numerous reports for infinite data analysis but also provides a unique ability to combine reports. If creating a formal presentation of your data for an interview, or just great record keeping, use the Report Combiner (see page 89) to select the reports to combine into one printable package. As with all reports, a date dialog will appear offering the ability to filter your data in a desired range.
If the plethora of reports that ship with Logbook Pro are not enough, we even offer a report designer capability allowing you to build an infinite number of your own report templates matching that of the popular Jeppesen Style (see page 87)format. Click the option to create custom templates from the Reports...Flight Log...Jeppesen style menu and a report designer as shown in Figure 2 will appear.
Figure 2. Report Designer

Logbook Pro Desktop by NC Software, Inc. 85 of 142
The report designer takes a typical Jeppesen style layout and allows you to modify it to fit your needs. Click on a desired column then set the items in the far left side of the designer. Items such as the column header caption, data field, data alignment, font settings and the row height of the final output can be set. Click the option to save the template, any name as you desire, and add new templates to meet your needs. After a template is created it will automatically appear in the Reports..menu just below where the custom template menu item appeared. With the custom template system, you can create your own content and modify formatting within the parameters of the left side preferences. Columns cannot be removed, hidden, resized, or reordered.
Using a signature image:
Create a .jpg file the same name as your data file and place the image next to your data file (same folder). For example:
Logbook Pro Data File: C:\Logbook\My Logbook.lbk
Create (or rename) your image file and place such as:
C:\Logbook\My Logbook.jpg
Logbook Pro will detect the existence of this image, if it exists, load it in the signature block for you. The new image signature feature will work in any of the SPLIT SERIES reports (standard or Cirrus Elite). Images are suggested to be not greater than 150dpi. Logbook Pro will automatically zoom the image to fit in the available space.
Figure 3. Option to start groups on a new page
New feature starting with 1.11.1 is the option to break grouped reports starting a new page with each group. After running your grouped report click the report options button and you'll find the "Start Groups on a New Page" menu option which will re-run the report breaking groups on new pages.
We have teamed up with Cirrus Elite Corporation to provide custom reports to fit the Cirrus Elite leather binder solutions. Read about the Cirrus Elite Binder Reports (see page 86) and report system within this help documentation.
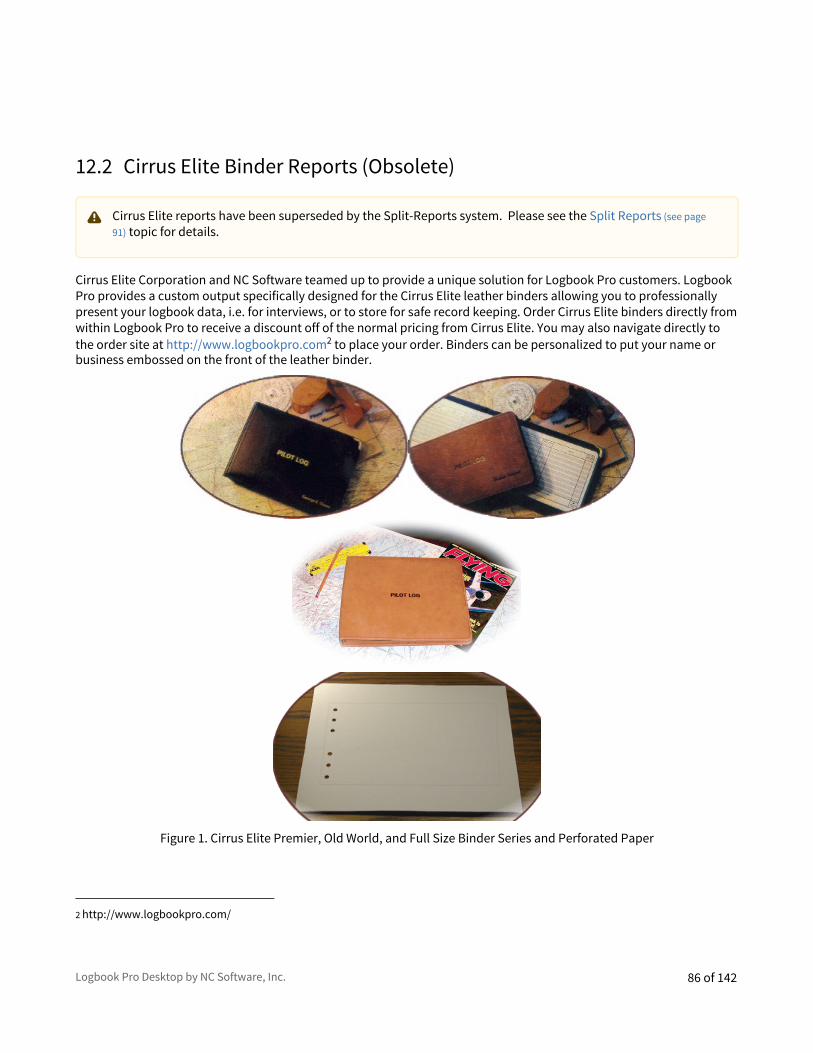
Logbook Pro Desktop by NC Software, Inc. 86 of 142
2 http://www.logbookpro.com/
12.2 Cirrus Elite Binder Reports (Obsolete)
Cirrus Elite Corporation and NC Software teamed up to provide a unique solution for Logbook Pro customers. Logbook Pro provides a custom output specifically designed for the Cirrus Elite leather binders allowing you to professionally present your logbook data, i.e. for interviews, or to store for safe record keeping. Order Cirrus Elite binders directly from within Logbook Pro to receive a discount off of the normal pricing from Cirrus Elite. You may also navigate directly to the order site at http://www.logbookpro.com2 to place your order. Binders can be personalized to put your name or business embossed on the front of the leather binder.
Figure 1. Cirrus Elite Premier, Old World, and Full Size Binder Series and Perforated Paper
Cirrus Elite reports have been superseded by the Split-Reports system. Please see the Split Reports (see page 91) topic for details.

Logbook Pro Desktop by NC Software, Inc. 87 of 142
Just as described in the previous section, custom report templates can be designed to meet your needs. Click the custom template menu option and take complete control of configuring your report. Settings such as data field, column header captions, data alignment, row height, and fonts can be configured. After a custom template is saved it will show as an available option within the report menu section below the custom template designer menu item.
If printing for a duplex (front/back) output, choose the "Position for Duplex Output" to modify the alignment of the left/right pages so they will be aligned to match on the front/back side of the paper. It is recommended to use a heavier bond paper to ensure pages don't tear out inadvertently. There are three report series to choose from, and depending on the binder, select the appropriate report type.
New in version 1.8.11 and later:A new option has been added to start the printout with a cover page, either a preformatted one or a blank page that you can run through the printer at a later time to print your own layout/design. This feature allows the pages to be printed so that it matches that of a hard copy logbook. When launching the report, a dialog will appear explaining the cover page options.
New in 1.9.6 and later: Split-Report (segmented) reports for easy duplex printing and fine margin/page layout control of left and right outputs. This is the recommended report for all binder printouts - use the Split-Report series of reports for optimal printing results
***When printing on the perforated pages it is recommended to test your print setup on plain paper first to avoid wasting the purchased paper.
12.3 Jeppesen StyleMost pilots are familiar with the popular layout of the Jeppesen style hard copy logbooks and Logbook Pro brings this exact layout to you as one of the many printable options. Select the Jeppesen style layout from the Report menu. As with the hard copy logbooks, there is the flexibility to create custom columns, no difference with Logbook Pro, create an unlimited number of custom report templates using the Jeppesen designer by using the "custom template" option in the Jeppesen area of the reports menu.

Logbook Pro Desktop by NC Software, Inc. 88 of 142
Figure 1. Jeppesen Report Layout
In version 1.8.12 and later a new feature has been added to allow for a cover page to be set as the first page of the report. This allows for a professional output and a layout matching that of your paper logbooks, with an open book style, viewing your entire flight data at once. Also with the Jeppesen style layouts there is the option to remove the "gap" between the left and right pages so that you can actually printout the entire page, left to right, on one printout. What some customers do is use this format (without the gap) and export it to Adobe Acrobat Reader (PDF) and then print it on wide paper such as 8 1/2 x 14 and control zooming from powerful programs such as Adobe Acrobat. When running a Jeppesen report, standard or custom template, a dialog such as shown in Figure 2 below will appear after the date filter dialog. Choose one of the three cover page options and if NO COVER is selected, the option to join the left and right side data will appear.

Logbook Pro Desktop by NC Software, Inc. 89 of 142
Figure 2. Cover Page Options Dialog
Using a signature image:
Create a .jpg file the same name as your data file and place the image next to your data file (same folder). For example:
Logbook Pro Data File: C:\Logbook\My Logbook.lbk
Create (or rename) your image file and place such as:
C:\Logbook\My Logbook.jpg
Logbook Pro will detect the existence of this image, if it exists, load it in the signature block for you. The new image signature feature will work in any of the SPLIT SERIES reports (standard or Cirrus Elite). Images are suggested to be not greater than 150dpi. Logbook Pro will automatically zoom the image to fit in the available space.
12.4 Report CombinerWhen preparing for an interview or producing a professional output of your Logbook Pro data, explore the option of using the built in Report Combiner to group desired reports. Figure 1 shows the Report Combiner window where reports can be selected for combining into one output solution.

Logbook Pro Desktop by NC Software, Inc. 90 of 142
Figure 1. Report Combiner
The Report Combiner allows the saving of combinations of reports for later use, called presets. Select the desired reports then click the Save Preset button to save the group for quick recall at a later time. To remove a preset, select the preset from the list on the right and then click the Delete Preset button. When the preset has been activated, or a new group of reports selected, click the Run Report button to view the combined reports. If any report provides the date filter option, the date filter window will appear to capture the data between a selected date range.
12.5 Alternate PrintingLogbook Pro's primary print engine is using the Reports menu and integrated printing system. An alternate method of printing allowing complete capturing of user-defined customizations, including fonts, custom columns, colors, and column order and widths is to print directly from the spreadsheet system. On each entry areas sub-toolbar is a print icon, from which is the option to print directly from the spreadsheet. If only a select number of rows (or single row) is what is to be printed, click the row selector at the far left of the row and if desired, select a range of rows or non-contiguous rows using the standard key strokes to do so, as described below. Once the rows have been selected choose the print option from the sub-toolbar for options to print the selected rows or all rows.
To select a single row, simply click the row selector at the far left. To select a range of rows (contiguous) click the first row indicator, then press and hold the SHIFT key down and left-click the end of the range. The selected range of rows will be selected and available for selected export or printing. To select non-contiguous rows hold the CTRL key down and left-click each desired row selector.

Logbook Pro Desktop by NC Software, Inc. 91 of 142
12.6 Split Reports
Figure 1. Split Report Interface (Combined Tab Showing)
Logbook Pro offers granular control of printing by separating left and right pages of the Jeppesen Style and Cirrus Elite flight log reports. As shown in Figure 1 above, three tabs appear at the bottom of the report when previewed. Each side can be configured separately by clicking the corresponding buttons on the toolbars. The top toolbar provides additional control for the entire report whereas some of the buttons apply only to the viewing side. Depending on

Logbook Pro Desktop by NC Software, Inc. 92 of 142
3 http://www.fineprint.com/4 http://www.logbookpro.com/binders
which side of a layout the pages are to be printed (left/odd, or right/even), the margins may need to be swapped, in other words, the left tab of pages may need "opposing" margins. Experimentation will make this area more clear.
A "combined" tab "interleaves" the left and right pages to create easy duplex reports for equipped printers or for use with third party software such as FinePrint3. An additional button appears on the toolbar for the combined report area "Insert Blank Page" which will insert a leading blank page forcing the output to offset one page for "open-faced" reports such as when viewing traditional paper logs from left to right. When clicking this button, a dialog will appear prompting to swap the margins and typically this should occur for proper layout.
Using a signature image:
Create a .jpg file the same name as your data file and place the image next to your data file (same folder). For example:
Logbook Pro Data File: C:\Logbook\My Logbook.lbk
Create (or rename) your image file and place such as:
C:\Logbook\My Logbook.jpg
Logbook Pro will detect the existence of this image, if it exists, load it in the signature block for you. The new image signature feature will work in any of the SPLIT SERIES reports (standard or Cirrus Elite). Images are suggested to be not greater than 150dpi. Logbook Pro will automatically zoom the image to fit in the available space.
Cirrus Elite offers special heavy bond pre-hole drilled paper for professional quality printing results. Click here4 for more information.
Binder Transitions (new in 1.10.34):
New in 1.10.34 (and later) is the option for binder transitions. Cirrus Elite binders hold a finite amount of pages, approximately 100 printed pages (front and back) for the Full Size Desk/Carry Model, and approximately 80 pages for the Premier and Old-World style binders. Without binder transitions, which are a pair of blank pages inserted at defined points, transitioning your printed materials from one binder to the next is not optimum, i.e. you'll end up with one side of a flight in one binder and the other page representing the remaining data in the next binder. 1.10.34 adds the binder transition system to allow for a smooth transition across binders with the ability to manually print cover page information on each binder's leading blank page that will be produced.
Binder transitions only work in the "Combined" tab (bottom of screen) when the Insert Blank Start Page & Binder Transitions button is clicked on the sub-toolbar just above the report preview. You'll be prompted to swap margins, the recommended option is YES, and then if your report output will exceed the capacity of a binder depending on the binder style you will be prompted to include binder transitions. You can then specify every X number of pages to insert a transition. The blank pages will then be inserted at the defined points and provide for a break in the report output to place segmented information in their respective binders.
Be sure to set the type of binder you own in the User Information Options (see page 53) area so Logbook Pro can properly inform you of transition points based on the capacity of your binder.
12.7 FAA 8710Logbook Pro has the ability to provide a completed FAA 8710 form preserving the standard form data and calculating flight time totals for the lower portion of the form. When running the 8710 report (Reports...Miscellaneous menu) for the first time you will be presented with a dialog to load the defaults and any settings particular to this report

Logbook Pro Desktop by NC Software, Inc. 93 of 142
generation. After the data is initialized, the report will show immediately with your defaults pre-loaded. You can click the "My 8710 Data" button on the report toolbar to change the form data at any time.

Logbook Pro Desktop by NC Software, Inc. 94 of 142
13 FAR 121/135/AirlineApps• FAR 121 (see page 94)• FAR 135 (see page 96)• AirlineApps.com Summary (see page 98)
13.1 FAR 121
Figure 1. FAR 121 Status Report
Logbook Pro can save a lot of time and pain with time calculations when checking time limitations for FAR Parts 121.471, 121.481, 121.483, and 121.485 by simply viewing the FAR 121 Status Report (Figure 1 Above). The report is accessed by clicking Reports...Miscellaneous...FAR 121 Status Report. Reports are color coded: red identifying limit exceeded, yellow for impending limitations as defined by the Warning (hours) setting in the Options...Currency area,

Logbook Pro Desktop by NC Software, Inc. 95 of 142
and green representing within the defined limitation. FAR 121 status is also available by quick check when clicking the "Lookback" button on the main program status bar (Figure 2 below).
Figure 2. FAR 121 Quick Status
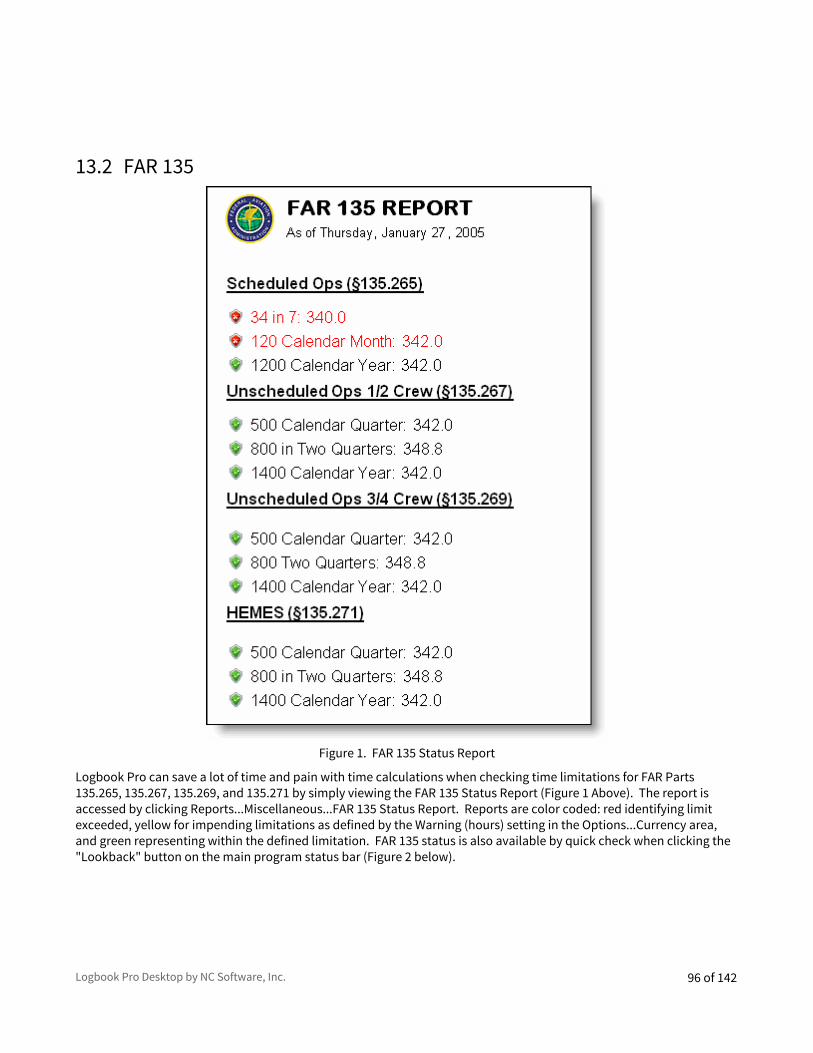
Logbook Pro Desktop by NC Software, Inc. 96 of 142
13.2 FAR 135
Figure 1. FAR 135 Status Report
Logbook Pro can save a lot of time and pain with time calculations when checking time limitations for FAR Parts 135.265, 135.267, 135.269, and 135.271 by simply viewing the FAR 135 Status Report (Figure 1 Above). The report is accessed by clicking Reports...Miscellaneous...FAR 135 Status Report. Reports are color coded: red identifying limit exceeded, yellow for impending limitations as defined by the Warning (hours) setting in the Options...Currency area, and green representing within the defined limitation. FAR 135 status is also available by quick check when clicking the "Lookback" button on the main program status bar (Figure 2 below).

Logbook Pro Desktop by NC Software, Inc. 97 of 142
Figure 2. FAR 135 Quick Status

Logbook Pro Desktop by NC Software, Inc. 98 of 142
13.3 AirlineApps.com Summary

Logbook Pro Desktop by NC Software, Inc. 99 of 142
5 http://AirlineApps.com6 http://AirlineApps.com
The AirlineApps.com5 Summary Report is accessed from the Reports / Miscellaneous / AirlineApps.com6 Summary menu as shown below:

Logbook Pro Desktop by NC Software, Inc. 100 of 142
7 http://logbookpro.com/upgrades8 http://AirlineApps.com
Accessing this report requires the Professional or Enterprise edition license. If you have the Standard Edition license you can upgrade your license by clicking here7. This report heavily depends on your Options / Aircraft configuration and will aid immensely in filling out the application details at AirlineApps.com8.

Logbook Pro Desktop by NC Software, Inc. 101 of 142
14 GraphsLogbook Pro offers the most powerful graphing/charting of any software package. Using a high speed data analysis engine, a visual representation of your data is displayed in approximately one second. Completely interactive, refer to the Tips and Tricks section of this help documentation to learn how the graph can be manipulated in 3D or zooming and scaling effects performed. Graph styles include vertical bar charts, horizontal bar charts, and pie charts. Graphs are completely customizable in formatting from colors, legends, grid lines, and value displays. Logbook Pro offers the continued support for export offering export to JPEG Bitmap graphics (.JPG), Portable Network Graphs (.PNG) and even creates a web page for you, exporting to a .HTM file. Figure 1 below shows an example of a bar chart and the general layout of a graph.
Figure 1. Vertical Bar Chart
The graph toolbar, as well as the right-click popup menu provide a plethora of user-configurable options. When first starting the presentation of graph data, a date filter window, as shown in Figure 2 below, will appear, allowing the complete flexibility in filtering the data per the users desire. A date filter change can occur by clicking the calendar icon on the toolbar allowing the immediate query of a new date range. 3D effects can be modified as well as color formatting, which are remembered for each individual graph displayed, recalled for future calls of the same data.

Logbook Pro Desktop by NC Software, Inc. 102 of 142
Figure 2. Date Filter
The Date Filter as shown in Figure 2 provides easy filtering of the logbook data. The calendars are the same one used on any standard windows application and therefore have the same key shortcuts and capabilities. To rapidly change the month, click the title of the month itself and a drop down of the 12 months will appear, for rapid selection. To rapidly change the year, click the year value itself above the main calendar and a up/down arrow will appear allowing for easy scrolling of the years. Select a particular date from the calendar and the value at the top of the dialog will reflect the value selected.
Pie charts are also viewable by changing the selection from the main graph toolbar, above the graph area. Figure 3 below shows an example of a pie chart.

Logbook Pro Desktop by NC Software, Inc. 103 of 142
Figure 3. Pie Chart
In the pie chart example above, the values button on the toolbar is depressed fixing the values outside each respective data section. In bar chart view, the values are represented as actual values, in pie chart mode, they are represented in percentage, maintaining flexibility for the users needs. Left-clicking and dragging a particular slice allows it to be removed from the pie center, making the data highlighted for analysis purposes. To learn more about the interactive capabilities, such as 3D rotate, zoom, scaling, and moving, see the Tips and Tricks (see page 103) section below.
Tips and Tricks:
Logbook Pro comes equipped with the state of the art graphing/charting tools. By clicking the Tips & Tricks icon on the far right of the Graphs toolbar, a popup menu will appear for reference only, on how to perform these interactive actions. The available power features are as follows:
Rotate 3D: Hold down both left and right mouse buttons and reposition the mouse. The graph plot area will rotate in 3D depending on the direction of mouse movement.

Logbook Pro Desktop by NC Software, Inc. 104 of 142
Move: Press SHIFT and both left and right mouse buttons, as the mouse is moved the plot area will be moved (slid) in the relative direction.
Scale: Press CTRL and both left and right mouse buttons. Moving the mouse up increases the scale and mouse down decreases the scale.
Zoom: Press CTRL and click and drag a bounding region (marquee) to be zoomed.
Drag a Slice: Click and drag a slice from a pie chart out from center.
Reset: Press " R " on the keyboard and the graph will be reset to the default settings.

Logbook Pro Desktop by NC Software, Inc. 105 of 142
15 AnalyzerThe Analyzer is by far the most popular and powerful feature in Logbook Pro for data analysis. Offering advanced filtering to provide the highest fidelity in data analysis as well as pivot-table modifications, the Analyzer has no limits as the data it can provide. Offering a "by Type" analysis of your data, the display can also show detail down to the particular Ident (N-Number) by clicking the + symbol to the left of the Aircraft Type. A high-speed engine provides rapid data analysis in many dimensions, all user-configurable. The Analyzer toolbar contains extensive customizing options as well as the ability to filter your data between select dates. To learn more on using the date filter capability, read the Date Filter (see page 120) section of this documentation. A Master Filter is available on the main toolbar to provide an overall filter, for example, if you only want to view data where you were pilot-in-command, choose PIC from the Analyzer toolbar and the Analyzer will only show values where the PIC field has a value entered. Further filtering can be accomplished by selecting the drop down filters at the top of the Analyzer data area and checking or unchecking the corresponding selection item. In another example, a pilot may want to determine how much Night Cross Country has been logged. To do this simply select a master filter of Night (or Cross Country) then look at the Cross Country column for the grand total of Cross Country flown, at night (since the master filter of Night was set). Setting the master filter of Night causes the analyzer to only show data where flights were accomplished with a night value logged (night flight time), all other columns will reflect the other data summaries, for example night cross country, night solo, etc.
Figure 1. Analyzer

Logbook Pro Desktop by NC Software, Inc. 106 of 142
The Analyzer is a multi-dimensional data display, or a Pivot-Table. The fields across the top (sub filters) and the fields vertical across the left (Type) can be drag and dropped relocated to other areas of the analyzer causing a data display to reflect the pivotable fields. Take the example below where the Year field is placed in the "data" row. Notice how the data is now broken down by year in Figure 2 below, instead of just one lump sum grand total. This drag and drop pivoting capability provides a powerful method of getting data summaries of your logbook.
Figure 2. Analyzer Pivoted (Year Field) and split screen
The data area can be split into multiple scrolling regions by clicking and dragging the splitter at the far right of the horizontal scrollbar or the horizontal splitter at the top of the vertical scroll bar. Click and drag the splitter to place a divider at the desired location. Multiple splitters can be added to divide the data area. To remove a splitter, click and drag it to the far edge of the data where the splitter handle originated.

Logbook Pro Desktop by NC Software, Inc. 107 of 142
Figure 3. Analyzer Print Preview
Analyzer data can be printed using the advanced printing system as shown in Figure 3 above. Click the hammer icon on the print preview toolbar to customize the column widths and other print settings prior to sending the output to the printer.
When using the Analyzer, explore the sub-toolbar and the right-click popup menus. Many options are available for formatting your data and customizing the display as desired. To learn about customizing the display, read the section on the Analyzer Display Configuration (see page 107) system. For more information about the Military Conversion system the Analyzer provides, read the section on Military Conversions (see page 108) in this help documentation.
15.1 Analyzer Display ConfigurationThe Analyzer (see page 105) offers an abundant amount of information and sometimes not all the information displayed is required. Right-click to choose the Display Configuration option from the popup menu, or, choose the corresponding

Logbook Pro Desktop by NC Software, Inc. 108 of 142
option from the settings icon on the Analyzer toolbar. A window will appear allowing you to uncheck any fields you do not want displayed. These columns will be subsequently hidden and can always be restored by following the same process.
Columns typically are automatically sized in width however can be sized manually by clicking and dragging the right edge of the column header. Data summaries can be viewed in either the raw totals (numeric format) or in a percentage of the grand total, for unlimited data analysis capabilities. Data can be easily ported directly into Microsoft Excel, if installed, for advanced graphing or data analysis.
Figure 1. Analyzer Display Configuration
15.2 Military ConversionsThe Analyzer (see page 105) provides a unique capability to provide compensation times or "adjusted values" for converting military flying time for airline applications. When the Analyzer first starts, the bottom of the Date Filter screen presents an option to display adjusted values as well as the ability to configure values, per Aircraft Type, and also the ability to save presets, i.e. one for each airline.

Logbook Pro Desktop by NC Software, Inc. 109 of 142
Figure 1. Custom Date Filter with Analyzer Control
Military conversions are accomplished by Aircraft Type by adding the appropriate correction factor to each flight. For example, if three flights are flown in a F-16 and the correction from Airline XYZ is 0.3, 0.3 will be added to each flight, therefore increasing the total flying time by 0.9. The Analyzer data is printable as well as exportable such as to Microsoft Excel for advanced formatting and data analysis.

Logbook Pro Desktop by NC Software, Inc. 110 of 142
Figure 2. Military Conversion Configuration

Logbook Pro Desktop by NC Software, Inc. 111 of 142
16 Currency• Currency Quick Start (see page 111)• Currency Editor (see page 112)• Currency Explorer (see page 115)• Currency Report (see page 116)• Currency Status (see page 117)
16.1 Currency Quick StartTo learn more about the currency editor and configuring currencies, read the Currency Editor section (see page 112) completely. This topic provides a quick overview of the currency editor for advanced users familiar with advanced software interfaces such as that used in the currency system.
The currency editor is made up of three main areas represented by columns in the currency editor. The far right column contains two sections, one for creating your own custom currency items and the second contains the History events as configured in the Options...History area. The middle section contains the assignment groups, "All to Pass" and "Any to Pass" for defining a currency. The far left column is the explorer style hierarchical view of currencies, grouped by custom group names, if desired.
The first step is to define any custom currency items necessary to define a currency, such as "3 Landings in 90 Days." The next step is to create a currency, clicking the appropriate button above the currency section (far left column). When the currency is selected, the two assignment groups will become activated and ready to store custom currency item assignments or history event assignments. All items that exist in the "All to Pass" group will be checked for expiration data and ALL must pass in this group, just as the title implies, for the currency to pass. The "Any to Pass" group contains items where if any one item passes, the entire group, and subsequently the entire currency passes. If either the "All to Pass" validates as a pass, or the "Any to Pass" validates as a pass, the currency itself will register as a pass.
Experimentation with the currency editor is encouraged. Currency status can be viewed by clicking the preview icon on the top right of the currency editor, using the Logbook Pro Explorer, or the Currency button on the bottom of the screen. Currencies will show an expiration, a color coding, and when Logbook Pro starts, a reminder if the expiration will occur within the reminder period as specified in the Currency Options (see page 63) section.

Logbook Pro Desktop by NC Software, Inc. 112 of 142
16.2 Currency Editor
Figure 1. Currency Editor
The Currency Editor is the most powerful currency system available in any software package, hands down. Logbook Pro using this advanced yet simple to use currency editor enables any pilot to create any currency, for any use anywhere in the world. Currencies are calculated instantaneously in several areas of Logbook Pro: 1) Currency Report, 2) Clicking the Currency Button on the Status Bar, or 3) The Currency area of the Logbook Pro Explorer.
Logbook Pro ships with two factory pre-built currencies, VFR Day and VFR Night. As these are the most common, the secondary purpose is to show the user how a currency is created. This discussion will break down the currency editor into three areas: 1) Currency Items (far right section), 2) Assignment Groups (middle section), 3) Currency Groups and Currencies (left section).
Currency Items:

Logbook Pro Desktop by NC Software, Inc. 113 of 142
The far right section is a very important part to understand completely to assure successful creation of custom currencies. The right section is actually two separate areas, notice the button on the bottom "History Events." Clicking this button will cause all pre-configured History events to be displayed, which can be used in creating a currency. An example will be reviewed shortly. A currency item is a specific definition of a currency component, of which multiple components can be combined to create an overall currency. Take for example Figure 1 above. The example shows a currency item titled "ASEL Taildragger Ldgs" a descriptive comment allowing you to easily determine the specifications by reading the title. A currency item is defined by specifying whether or not the currency expires at the end-of-the month, time unit, time period, requirement, and target field. The currency item can further be constrained by certain aircraft specifics, such as selecting only a certain number of Types, Categories, Classes, etc., as required. Configure each currency item thoroughly and the currency editor will use this to determine an element of the overall currency, checking to see if this item meets the required specifications. An unlimited number of currency items can be created by clicking the New Currency Item from the toolbar above the currency items section. Right-click popup menus are also available for easy control. Once currencies are created, this system makes it very easy to make changes with minimum effort. Since currencies are made up of currency items, anytime a currency item is changed, all currencies that use this item are automatically updated with this change. There is no reason to reconfigure all created currencies, they will reference the configuration at the time they are run and need no attention.
Assignment Groups:
Once currency items have been configured, they can be used as many times as desired for any number of currencies. To activate a currency group so it can accept currency or history items, a currency must be selected on the far left side, otherwise the groups will be deactivated. The middle section is made up two groups; 1) All to Pass, and 2) Any to Pass. These groups can have items added to it which require the logic just as the caption reads. If you have a currency, for example one that requires 6 Approaches in the last 6 Months AND a current Class 1 Medical AND a Biennial Flight Review all to be good for the currency to pass, then these items would be assigned to the ALL to Pass group, meaning just that, each and every currency item must pass within this group for the currency to pass. The ANY to pass group is just that, if any item within this group passes, the currency itself will be a pass. There can be a set of items (or just one item) in both groups, if either the All to Pass group is a pass or the Any to Pass group is a pass, the currency itself will be a pass. You can add Currency Items or History items to the corresponding group by expanding the currency item (click the caption bar) and then click the button with the arrow pointing to the target group, or right-click the item caption and select the appropriate menu option. For History Items, select the item then click the arrow button to assign the item to a assignment group.
Assignment Group Joining with AND/OR logic:
A drop down selector separates the two assignment groups allowing for powerful currency creation. The two choices are:
AND: This setting requires that All to Pass item group passes *AND* the Any to Pass item group passes for the overall currency to pass
OR: This setting requires that either the All to Pass *OR* the Any to Pass group passes for the overall currency to pass.
For example: If you had a currency where A and B and C must all pass as well as X or Y or Z then you would build the currency so that A, B, and C are in the All to Pass group, then select the AND joining selector and put currency items X, Y, and Z in the Any to pass.
Currency Groups and Currencies:
The far left section is an explorer style view organized by user-defined groups and subsequently currency assignments related to each group. To add a group, click the corresponding button on the toolbar or right-click and choose the Add Group option from the popup menu. Enter a unique name (not already used) for the group, then currencies can be assigned to the group. Click the New Currency button to bring up the dialog as shown in Figure 2 below.

Logbook Pro Desktop by NC Software, Inc. 114 of 142
Figure 2. Add/Edit Currency
When double-clicking a currency the same dialog appears as the add currency dialog allowing modification to the currency, i.e. renaming it or assigning to a different or new group. Select the group from the drop down at the bottom, or if not listed, type in the new name and it will be created. Once the dialog is closed (click OK), the currency will appear and be selected ready for assignment of custom currency items or history items.
There is no reason to click a save button, all changes are saved automatically at the time of change. To edit a currency, double-click the currency and the dialog as shown in Figure 2 will appear. To edit a currency name, you can select the currency and hit the F2 key on the keyboard, type in the new name and hit enter. Currencies can be drag and dropped to other currency groups for simple reassignments to other groups. Groups cannot be deleted if it contains currencies, be sure to reassign or delete currencies before attempting to remove a group. Deleting currencies and groups will not affect other currencies or cause any items to be deleted.
As soon as a currency is created it can be immediately evaluated by clicking the Currency button on the status bar, viewing the status by clicking Currency in the Explorer, or running the currency report.
Currencies can be color coded according to colors configured in the Currency Options (see page 63) area. Additionally, a warning time frame can be configured for which a custom color is assigned, as well as a warning window that will appear if a currency or history event is within this warning period at program startup.

Logbook Pro Desktop by NC Software, Inc. 115 of 142
16.3 Currency Explorer
Figure 1. Currency Explorer
Currency Status can be quickly viewed using the Logbook Pro Explorer shown in Figure 1 above. The explorer breaks down the currencies by the assigned groups and then by the currencies within each group. The explorer provides a level of detail that provides the ability to view each assignment group down to the item level, identifying failure points. Thumbs up and the pass color (green in this example) will reflect the passed items and currencies, red and thumbs down reflect failed currency items. Currencies conveniently display when they will expire to allow necessary planning to avoid unwanted expiration.

Logbook Pro Desktop by NC Software, Inc. 116 of 142
16.4 Currency Report
Figure 1. Currency Report
If a hard copy output is required of currency status, a currency report can be generated at any time from the Reports menu or the Currency Report link from the status bar currency button. Just like the Explorer's currency details, color coding and thumbs up/down indicators are provided for instant visual feedback.

Logbook Pro Desktop by NC Software, Inc. 117 of 142
16.5 Currency Status
Figure 1. Currency Popup Status
For instant information on currency status, click the Currency button on the status bar at the bottom of Logbook Pro. A popup menu will appear as shown above with instant view of currencies groups, currencies within each group and a color coded view of the status, including expiration dates. Currencies are calculated at the time the Currency button is clicked thereby providing the most up-to-date currency status.

Logbook Pro Desktop by NC Software, Inc. 118 of 142
17 Synchronize WizardOne of the most popular and powerful features of Logbook Pro is its extremely powerful capability to keep multiple logbook data files synchronized among one another. Take for example a scenario where a corporate pilot has a computer at work and a computer at home. The pilot makes a few entries on the home computer and sometimes makes a few entries on the work computer. A situation often occurs where the pilot can't remember if he/she entered certain flights on one and which flights he/she entered on the other computer. Logbook Pro takes care of this by allowing the user synchronize multiple data files and Logbook Pro does the work in passing entries from one logbook the other has, and vice-versa, in the end, both data files get brought up to the most recent state.
The Synchronize capability is only in the Professional and Enterprise Versions, to read more about the differences in the versions and licensing requirements, read both the PC Version Description (see page 10) area of this documentation and the NC Software, Inc. License Agreement (see page 11).
The concept behind the Synchronizing capability is to have the pilot declare one logbook data file the "Master" log. Logbook Pro creates a "clone" of this master logbook for use on other systems. This Master and Clone are related, they know they belong to one another and will talk to each other to share data. If two logbook data files were not created using the Synchronize Wizard, the data files will not talk to each other, therefore not be able to keep one another synchronized. When new software updates are released, there sometimes is a data structure modification which causes this relationship between the master and any clones to become disconnected. It is imperative, as the warning displays when beginning an upgrade process that all clones are synchronized with the master then delete all clones. Clones must then be recreated after the software has been updated with the newer version. Secondly, all systems that are going to host a master or a clone logbook must have the identical version of Logbook Pro running, i.e. you cannot have 1.5.1 on one system and 1.6 on another, the data will be unreliable and most likely will not synchronize at all.
To begin the Synchronize Wizard (Pro and Enterprise only), click the File...Synchronize Wizard menu selection. A window will appear as shown in Figure 1 below.

Logbook Pro Desktop by NC Software, Inc. 119 of 142
Figure 1. Synchronize Wizard
Choose one of the four options to continue with the desired option. If a clone has been created and used, bring the clone back to the same system as the master log and initiate the top option to sync the master and clones. Follow the steps as shown selecting the master and clone files to be synchronized. It is always recommended, prior to any data modifying operation such as the Synchronizing of data, to create a backup of your data.
If you are creating a clone for the first time, or recreating a clone, select the second option. The process will walk you through the steps to create a clone, ending in _clone.lbk and even the option to save a compressed transfer file (.LBX) to export the data to another system or e-mail to a place of business for use.
The bottom two options are for importing a clone or exporting a clone specific format (.LBX - compressed clone). Follow the steps and the wizard will guide you through all the pertinent information.

Logbook Pro Desktop by NC Software, Inc. 120 of 142
18 Date Filter
Figure 1. Date Filter
In many areas of Logbook Pro the data can be filtered by dates to provide user-definable summaries. Reports, Graphs, Analyzer and other areas provide advanced data filtering. The calendars are the identical ones used in any standard Windows application. The value selected is shown above the calendars, next to the titles "Starting Date" and "Ending Date." Dates can be rapidly changed from year to year or month to month by clicking the Month or Year captions at the top center of the calendar. Clicking the word "January" for example will display a list of months to select. To rapidly change from one year to another, click the year value, i.e. "2001" as shown in Figure 1 above. Doing so will display a up/down arrow for rapid scrolling from one year to another. Select the day of the month by clicking the desired date from the calendar once the month and year have been set. Preset date settings can be set by clicking the "Dates" button to the left of the Generate button.
If you don't need to filter your data by dates click the ALL DATA button on the bottom left and all data will be used. Only use the bottom center button if you are filtering between a starting and ending date.
Shortcut Keys to Rapidly Change Dates:
Page Up / Down - Scrolls the Month
CTRL + Page Up / Down - Scrolls Year

Logbook Pro Desktop by NC Software, Inc. 121 of 142
19 Import• Import Wizard (see page 121)• Airline Schedule Importer (see page 125)
19.1 Import WizardThe ability to import data to Logbook Pro allows for unlimited flexibility in your flight logging needs. Any TAB or Comma Delimited text data file can be easily imported into Logbook Pro's logbook area by following the simple steps of the Import Wizard.. Most Palm and Pocket PC applications allow export to text delimited data files, making the use of any handheld PDA compatible with Logbook Pro. All spreadsheet applications such as Microsoft Excel, Lotus 123, Microsoft Works, Microsoft Access, etc., have the option to export/save data to text delimited data files, which can be subsequently imported into Logbook Pro.
For best results, prepare your data to match as close as possible that of the Spreadsheet Style log area, i.e. columns and data format. Don't worry about having a separate To/From field as Logbook Pro uses one Route field, the Import Wizard will offer the option of merging the two fields to import properly to Logbook Pro's style, allowing for multiple leg entries per record. To initiate the Import Wizard, click the option within the File menu. Importing data can either append (add to) existing data, or completely replace existing logbook data. For valid logbook entries, an aircraft type must exist in the Options...Aircraft area, therefore Logbook Pro will automatically create Aircraft Type entries for you and notify you that the entry needs attention for complete configuration.
To import user-defined fields that are not the default set of fields offered by Logbook Pro, you must first go to Options...Custom and create the fields. Once the custom fields have been defined, they will be available for import targets.

Logbook Pro Desktop by NC Software, Inc. 122 of 142
Figure 1. Import Wizard Step 1
Figure 1 above shows the first screen of the Import Wizard. Choose the file containing the logbook data for import and the options to Backup prior to conducting the transfer (recommended) and the Append or Replace option. Tell Logbook Pro which delimiter is used in the text data file, if not recognized automatically. Click Next to continue with the import process.

Logbook Pro Desktop by NC Software, Inc. 123 of 142
Figure 2. Import Wizard Step 2
The second step of the import process is to verify the data is ready for analysis for the import engine. If the first row contains the column headers, as is shown above, click the checkbox "First Row Contains..." to avoid import errors. If a row is invalid or should not be imported, click the at the far left to remove the row from the import available data. Click next to begin assigning the columns to target fields.

Logbook Pro Desktop by NC Software, Inc. 124 of 142
Figure 3. Import Wizard Step 3
In the Import Destination row, select from the drop down list available by clicking in the respective column. When selecting a target field/column, the Import Column checkbox will be checked. Uncheck any columns that are checked if you desire not to import this column. Once the target columns have been configured, click the Import button to execute the Import process. At this time if set in Step 1, the Backup process will take place. Secondly, if the option to Replace existing data was selected, the data will be purged prior to commencing the configured import.
Once the target columns are set, the import configuration can be saved for reuse. Click the Save Template button to save the exact configuration of the target settings (lower grid). When importing data of the EXACT same source layout, click the Load Template and select a previously saved import file. Warning: Any changes in the source layout, i.e. column order or types, matched up to a import map file (template) that does not align with the source columns can result in erroneous data imports. Carefully review the import column mapping PRIOR to clicking the Import button.
When the import process is complete, a printable summary window will appear identifying any errors or items requiring attention, i.e. if Aircraft Types were added and need further attention/configuration in the Options...Aircraft area.
New in 1.7 and later: Flight Times can be imported from formats of HH:mm (1:30), Raw Minutes (90), or Hours.Tenths (1.5) and times will be converted to the Hours.Tenths format used by Logbook Pro. Select the source format from the three options available, as shown on Figure 1 above.

Logbook Pro Desktop by NC Software, Inc. 125 of 142
9 http://logbookpro.com/schedule
19.2 Airline Schedule Importer
Figure 1. Schedule Importer
Logbook Pro 1.11.0 and later offer a schedule importer synchronization system allowing you to import schedules saved in your "My Schedule Importer" portal at http://logbookpro.com/schedule. To access the system to import schedules directly into Logbook Pro click File...Import Schedule. The schedule importer works with any edition of Logbook Pro, including evaluation which will be restricted by the 50-entry evaluation limit. A subscription is required to import schedules at http://logbookpro.com/schedule which can be purchased for low monthly or annual rates at http://logbookpro.com/si9.

Logbook Pro Desktop by NC Software, Inc. 126 of 142
Defaults (Required):
If your trip data does not contain information about the aircraft type or aircraft ident specify the information to use in the drop down boxes. If the aircraft type is not listed close the dialog and go to Options...Aircraft to add the types you fly. If the ident is not listed from a prior entry you can type the ident in, or enter a temporary value such as a hyphen or "N/A" as this is a required field.
Options:
When importing schedule data the information can be left in leg mode where each from/to pair is a single line entry in Logbook Pro or collate them by flight date and all legs on the same flight date will be combined to a single line entry. When flights are imported AutoFill can be used to auto-populate fields as configured for the aircraft type within the Options...AutoFill area. Clear the "Use AutoFill" checkbox if you do not want AutoFill to be used. If you do not want a Duration entered then check the option "Don't enter Duration" which will also clear the auto-purge option on the bottom of Flight Log Options (see page 61) which will prevent Logbook Pro from removing incomplete flight entries as the duration missing would trigger the purge. If the scheduled flight is a future flight and you do not want the Duration entered until actually flown then this option will help you achieve this.
Field Map:
Trip data contains additional fields which you can map to columns within Logbook Pro. Specify how each of these columns of information should be handled when importing it into Logbook Pro. You can create custom text columns in the Options...Custom (TEXT) area and then they will be available as targets to map the data to. Click the drop down and choose the bottom option to add custom text columns directly from this dialog if needed. You can also choose to have information appended in the remarks column if you do not wish to use custom text fields individually.
Processing Trips:
On the bottom left of the dialog you will see how many trips are stored in your cloud storage. Click "Get My Trips" to download the data to review prior to finalizing the import. Review the trip data in the grid at the bottom and if necessary change the parameters and click Get My Trips again. When ready to finalize the import process click "Import" and the data will be moved into your logbook and removed from cloud storage.
Note: Out, Takeoff, Landing, and In times will be recorded in UTC so you may see the dates in these columns different than the flight date if the UTC date is the next day.

Logbook Pro Desktop by NC Software, Inc. 127 of 142
20 ExportLogbook Pro ships with very powerful export features allowing many options for handling your data. Data can be exported into Microsoft Excel for advanced pivot-table analysis or custom graphing, exported to web pages for publishing to a web server, i.e. a corporate logbook portal, or to text delimited files, etc. The export options can be found under the export icon on the toolbar, or from the File...Export menu choice. Available exports depend on the working area within Logbook Pro; however, below is a list of the common export options per working area:
Data Entry Screens:
Microsoft Excel (.XLS)Web HTML (.HTM)Comma Separated Values (.CSV)TAB Delimited Text (.TXT)
Reports:
Rich Text Format (.RTF)Portable Document Format (.PDF)Microsoft Excel (.XLS)Web HTML (.HTM)TAB Delimited Text (.TXT)Logbook Pro Report Definition Format (.RDF)Multi-Page TIFF Image (.TIF)
Graphs:
JPEG Bitmap (.JPEG)Portable Network Graphic (.PNG)Web Page HTML (.HTM)
For exporting to HTML (from Data Entry areas) that contain a large number of rows, i.e. logbook data, Logbook Pro will offer to break up the data into multiple HTML pages. This is recommended to reduce file size and low bandwidth viewing of data exported to large web files.
EXPORT is available in registered versions only

Logbook Pro Desktop by NC Software, Inc. 128 of 142
21 Backup and Restore• Backup to File (see page 128)• Restore from BAK File (see page 130)• Cloud Backup (see page 131)• Cloud Restore (see page 134)
21.1 Backup to FileVideo Tutorial:
Sorry, the widget is not supported in this export.But you can reach it using the following URL:
http://youtube.com/watch?v=Ohuh9IsYick

Logbook Pro Desktop by NC Software, Inc. 129 of 142
Accessed from the File...Backup menu, backing up your data frequently is recommended as any computer is subject to catastrophic failure or the unfortunate attack of a virus. Backing up your data file will compress your data file into an archive which can be restored in the future using the Restore from BAK File (see page 130) option. If backing up to removable media and Logbook Pro needs more space than available on the media, Logbook Pro will prompt to span the backup across multiple disks, as required. Backing up is simple and only takes a matter of seconds and is recommended monthly at a minimum.
If backing up to removable disk media such as floppy drives or pen drives, you may want to ensure "Disable Removable Disk Spanning Feature" is checked to prevent the backup engine from relabeling your media to support multiple-disk spanning. Only do this if your removable media has sufficient space to store a backup, typically under 1 MB.
*Backing up to CD-R(w) "optical media" is NOT supported. Backups must be made to a hard drive or floppy media, then can be copied to a CD-R(W) external to Logbook Pro using a program such as Nero or Roxio. If optical media is "locked" using DirectCD it "may" work but it not supported by Logbook Pro.
Starting in 1.12.x and later is the option to set a password for your backup. The password IS case sensitive so a password of TEst and teST are different. You will be prompted for a password when restoring a backup that was created with a password. Tech support cannot access a .BAK file protected with a password so be sure to record it in a safe place or use a password you can remember.
After a backup is created you will be shown the location the .BAK file was saved on your hard disk and given the option to open that folder location should you need to have access to the .BAK file immediately.

Logbook Pro Desktop by NC Software, Inc. 130 of 142
21.2 Restore from BAK File
Accessed from the File..Restore or File...Archive...Restore menu, restoring is accomplished by following the steps of locating the archive (.bak) to restore and selecting the location to restore to. If a data file exists that matches that of the one being restored, Logbook Pro will prompt to overwrite the data file. If restoring from a spanned set of disks, follow the on screen prompts as Logbook Pro will start the restore with disk 1, ask for the last disk to determine the end point, then ask to insert the disks in order.
New in 1.11.1 (and later):
Choose from one of the three choices to restore the working (.LBK) file to. The default folder is recommended and is in your My Documents/My Logbook Pro Files/v1 folder area. The second option is to restore the data file to the same folder as the .BAK file that you're restoring. The last option you can choose is a custom location to restore the data file to such as a dedicated data folder or a shared folder on your Intranet.

Logbook Pro Desktop by NC Software, Inc. 131 of 142
10 http://logbookpro.com/cloudbackup
21.3 Cloud Backup
Figure 1. Menu and Toolbar options to launch Backup to Cloud feature
A new feature starting with Logbook Pro PC edition 1.11.7 is the ability to backup your Logbook Pro data and automatically send it to the Cloud Backup service (subscription10 required). Click File..Backup to Cloud (as shown above) and Logbook Pro will first create a backup on your hard drive and then launch the cloud backup client to send the backup to your cloud storage.
After purchasing a subscription login to the backup portal at http://logbookpro.com/backup and you'll find your Account ID and Username. If you're using the cloud sync service or airline schedule importer integration the information is the same as you already have. The Account ID and Username need to be entered in the bottom section

Logbook Pro Desktop by NC Software, Inc. 132 of 142
11 http://logbookpro.com/getnet412 http://logbookpro.com/getnet4
of the User Information Options (see page 53) area. Your computer requires Microsoft .NET Framework version 411 to use this system. If your computer does not have .NET 4 you will be prompted to download and install it from Microsoft. To install .NET 4 now click here12.
Figure 2. Cloud Backup client
After Logbook Pro creates a backup on your hard drive the client will automatically be launched as shown in Figure 2 above. An Internet connection is required. Logbook Pro will communicate with the cloud to retrieve your subscription information. You will then be able to type notes related to the backup if you want and then click "Send to Cloud" to upload the .BAK to your cloud backup account.

Logbook Pro Desktop by NC Software, Inc. 133 of 142
Figure 3. Backup replace option
If you have used all of the available backup slots per your subscription limit, the cloud backup system will automatically replace the oldest backup with your new backup. There is no need to manually remove backups to make room for new submissions. Simply click Send to Cloud and the system will add your new backup to your cloud backup account.

Logbook Pro Desktop by NC Software, Inc. 134 of 142
13 http://logbookpro.com/cloudbackup
21.4 Cloud Restore
Figure 1. Cloud Options on File Menu
As discussed in the Cloud Backup (see page 131) section, you can backup Logbook Pro directly to the cloud backup system (subscription required13). If at a later date you need to restore a backup from the cloud you can use the File...Restorefrom Cloud menu option. Logbook Pro will then communicate with the cloud backup system and retrieve a list of backups you have in your cloud backup storage (Figure 2).

Logbook Pro Desktop by NC Software, Inc. 135 of 142
Figure 2. Cloud Restore
Click each backup listed to read the backup details below the listing. Once ready to restore your backup, select the file and click Restore. The backup will be retrieved and you will then be prompted to choose a restore location as described in the Restore from BAK File (see page 130) section.
Note: You should create a backup of your current data prior to performing any RESTORE operation.

Logbook Pro Desktop by NC Software, Inc. 136 of 142
14 mailto:[email protected]
22 Database UtilitiesCompact:
Accessed from the File...Database Utilities menu, compacting your data is recommended monthly. When data is deleted, it leaves spaces in the data file causing the data engine to work harder to find and display your data. Maintaining a healthier and more optimized/efficient database is accomplished by compacting regularly. Compacting will also reduce file size, saving hard disk space. Compacting is performed prior to backing up; therefore if you backup your data monthly, the data is already being compacted.
Logbook Pro offers an automated maintenance system that will prompt the user at program exit with the option to compact. The maintenance system will appear every 30 days unless configured otherwise. Read the Backup Options (see page 65) documentation to learn about the settings or view the Maintenance Dialog description.
Repair:
If directed to do so by Tech Support, or experiencing erroneous error messages or poor data performance, run the Repair routine from the File...Database Utilities menu. Repairing attempts to repair simple data structure issues and optimizes the data for efficient use. In the event of errors, please contact Tech Support immediately at [email protected]; and if necessary, e-mail a backup of your data file (File...Archive...Backup).

Logbook Pro Desktop by NC Software, Inc. 137 of 142
23 Password Protection
Figure 1. Password Dialog
Password protection is accomplished by clicking the Passwords menu item under the File menu. If a password has not been set previously, a window will appear like that of Figure 1 above. Enter the password and retype the password for confirmation and the password will be set. The password is used at program startup and operations requiring a disconnect and reconnect to the database. To remove a password, click the Passwords menu item from the File menu and follow the instructions as outlined on the dialog. Enter the old password and leave the new password fields blank, the password will be removed.

Logbook Pro Desktop by NC Software, Inc. 138 of 142
15 http://forums.nc-software.com/
24 Web BrowserLogbook Pro provides a built-in web browser with the ability to navigate to resources pertaining to Logbook Pro. Resources are available directly from within Logbook Pro under the Online menu for submitting support requests, visiting the Logbook Pro web site and the valuable free resource, our e-Community15 where friends can help friends get the most out of the software.
When starting the integrated web browser, a window will appear asking you to ensure an Internet connection is present before continuing. If you have an "always on" connection, such as a broadband connection (Cable modem/DSL) then check the box at the bottom to avoid seeing the message in the future.

Logbook Pro Desktop by NC Software, Inc. 139 of 142
16 http://secure.nc-software.com/
25 PDA Wizard
Figure 1. PDA Wizard
The PDA Wizard is the central area to synchronize any PDA that can sync to Logbook Pro. This includes Palm and Pocket PC editions of both Logbook Pro and Airline Pilot's Daily Aviation Logbook (APDL). The first screen that appears is shown above in Figure 1. In order to synchronize PDA's to Logbook Pro requires that both the PC and PDA software is registered. Licenses can be purchased from our Secure Online Store16. Once a license is purchased, click the Activate Licenses button to activate your license which will enable the corresponding sync features. To skip this page in the future, check "Skip this step in the future" and the PDA Wizard will start in the selected PDA area.
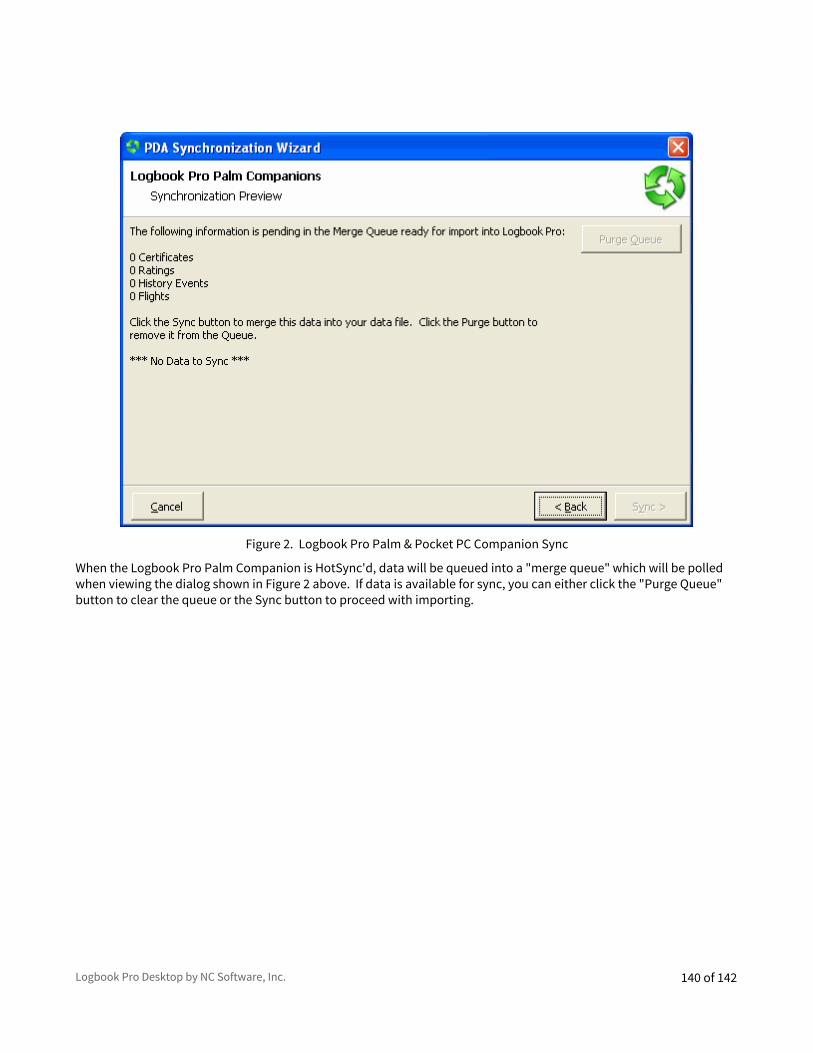
Logbook Pro Desktop by NC Software, Inc. 140 of 142
Figure 2. Logbook Pro Palm & Pocket PC Companion Sync
When the Logbook Pro Palm Companion is HotSync'd, data will be queued into a "merge queue" which will be polled when viewing the dialog shown in Figure 2 above. If data is available for sync, you can either click the "Purge Queue" button to clear the queue or the Sync button to proceed with importing.

Logbook Pro Desktop by NC Software, Inc. 141 of 142
Figure 3. APDL Sync Configuration
Synchronization of APDL is integrated directly in Logbook Pro from the formerly used SingleSync. The PDA Wizard provides flexible options as indicated in the figure above. For Pocket PC's, ensure the device is connected via ActiveSync and the green ActiveSync icon has stopped rotating, indicating synchronization is complete. Palm OS users select the Palm Username from the top left drop down list, if needed.
The PDA Wizard will attempt to pair N-Numbers with a prior entry in Logbook Pro to derive the corresponding A/C Type. However, if not found a default A/C Type must be specified from the drop down list, or manually entered to add the Type to the Options...Aircraft area automatically. The Sync Options section allows you to choose either a "By Leg" or "By LogPage" type of import. By Leg will log each flight on a separate row whereas the By LogPage will combine all flights on the given data into one line in Logbook Pro showing the routing of the day in the Route column. If you'd like your AutoFill settings (Options...AutoFill) applied to imported flights, check the "Enable AutoFill" checkbox. SingleSync generated APDL specific reports which are carried forward in the PDA Wizard. If you would like these legacy reports generated with each sync, check the "Generate APDL Reports" checkbox. You can map four APDL fields to Logbook Pro custom text fields or append the information into the Logbook Pro Remarks column. Set as desired. The Date Filter allows complete control over what is extracted from your PDA. The default option is to get new flight data, however, you can set date or date range as desired. When a prior date from the default is set, the PDA Wizard will first remove APDL flights that fall within this range then reimport them from your device. If any modifications to these line entries were made they will be lost. It is suggested to backup Logbook Pro prior to performing imports as safe practice. Once the configuration is completed, click Sync. Settings are preserved for next time.

Logbook Pro Desktop by NC Software, Inc. 142 of 142
26 Activating Logbook ProRegistering Logbook Pro can be accomplished in several easy ways.
Logbook Pro offers a built in self-contained registration system. If Logbook Pro is not running, startup Logbook Pro. The first screen that appears offers several options for registering (Figure 1). If Logbook Pro is running, choose the Register option under the Help menu.
Figure 1. Registration Dialog
After entering the purchased registration information for Logbook Pro PC, Palm Companion, or Pocket PC Companion products, ensure you are connected to the Internet for a one time activation. Click "Activate" to submit your registration data to NC Software's secure servers and activate your software. The following information is sent to NC software, no other personal data is collected:

Logbook Pro Desktop by NC Software, Inc. 143 of 142
Information contained within dialog in addition to computer machine name and your IP address for verification and license compliance purposes.

Logbook Pro Desktop by NC Software, Inc. 144 of 142
17 http://www.logbookpro.com/
27 About Logbook ProLogbook Pro is the world leading electronic logbook solution. Suited for all aviators from the student pilot to the airline captain, Logbook Pro will surely suit your needs. Intuitive Windows interface is simple to use yet powerful for those wanting the expert level control and customization. To learn more about Logbook Pro, read our Overview (see page 9).
NC Software, Inc. is committed to bringing you the latest and greatest technology for keeping every day tasks simple. Our motto is Developing for the Future and we live by that. Keeping our software development tools up to the latest and greatest helps bring you the most advanced software solutions. We invite any and all feedback, please visit out web site at http://www.logbookpro.com17 and let us know what you think about our software.
Committed to excellence,
Neal CulinerPresident, NC Software, Inc.Developing for the Future

Logbook Pro Desktop by NC Software, Inc. 145 of 142
18 http://helpdesk.nc-software.com/19 http://www.nc-software.com/kb20 http://forums.nc-software.com/21 http://www.logbookpro.com/videos22 http://www.youtube.com/NCSoftwareInc23 http://www.logbookpro.com/affiliate24 http://logbookpro.com/binders25 http://logbookpro.com/Contact26 http://logbookpro.com/sync27 http://logbookpro.com/backup28 http://logbookpro.com/schedule29 http://logbookpro.com/versions.aspx30 http://www.nc-software.com/lists
28 Helpful LinksSupport Resources
• Help Desk18
• Knowledgebase19
• Community Forums20
Other Resources
• Logbook Pro Video Library21
• NC Software YouTube Tutorials22
• Affiliate Program23
• Cirrus Elite Binders24
• Contact Info25
• Cloud Sync Portal26
• Cloud Backup Portal27
• Schedule Importer Portal28
• Check Latest Versions29
• Newsletter Sign-up30