lode runner 2 - manual - pc - the sierra help pages - … · getting started: the immediate way 1....
TRANSCRIPT


WELCOMEWELCOME
In the late eighties the arcades were seeing their bleakest days, and those of us who couldn’t get enoughvideo junk bought home computers for a quick fix. It was during one of these episodes in 1987 on myApple IIgs that I first discovered Lode Runner.
Ironically, I was a late bloomer to the whole Lode Runner scene. The game first appeared four years earlieron the Apple II; I owned an Apple IIgs at the time and could only run genuine Apple II software in adowngraded state called, ‘emulation mode.’
My gs and its 7 MHz of power were state of the art. Who was I to trifle with this silly, outdated gamecalled ‘Lode Runner’ when I could harvest some testosterone with 4 bit graphics and stereo sound? Whywaste my time on such antiquated trivialities? Too much bother for me and my supreme gs! Bah! LodeSchmode!
Well, I did bother, and thanks be to God that I did.
I think about three weeks after I booted the dumb thing I got up to go to the bathroom. I rememberdreaming more than once during that period that I was the Lode Runner. The incessant ‘peyoo-peyoo’ ofthe digging sound effect was more etched into my brain than the ever-popular Thompson Twins of the time(another thanks-be-to-God on that one). It was mythologized on UUnet that I could dig a five-tiered walland live to tell about it. I was this game and this game was I. Yin and yang in spiritual oneness.
Fortunately, I was not alone. Lode Runner-mania has resulted in fifteen years of life and productdevelopment. In all its inceptions, language translations, ports, add-ons and remakes, Lode Runner hassold over three million copies. Three million; it’s pretty amazing. Amazing, once you consider that acollege student created the game during his spare time.
Doug Smith was a sophomore at the University of Washington at the time. Doug created Lode Runner outof his dorm room. In 1983, Broderbund accepted the idea and the rest is commercial history.
Ten years later, in 1993, Doug approached some of his buddies who had just founded a new companycalled Presage. “Hey!” Doug said one evening, “Let’s remake Lode Runner. It’ll be cool!”
So, Presage developed Lode Runner On-Line and shipped it in 1994 through Sierra. It was a hit for thesmall company of computer programmers, and it provided a roadmap for the future.
1997 rolled around and someone whispered the magical word: sequel. This time around though, Presagewas well aware that the beast known as computer entertainment had come alive. How on earth can youtake a 15-year old arcade classic and fulfill current gaming expectations?
The answer is: you don’t change a thing. Sure, the engine pushes the isometric envelope and the graphicsare 16 bit and the character frames alone take up waaay more memory than the first product ever did, butthe game mechanic and its puzzling addiction have remained true to the original.
Run, dig, climb, fall. Collect the gold. Don’t die.
Lode Runner 2 is the latest addition to the family. We hope you enjoy it. If you do, (and we think youwill), just remember to get up and go to the bathroom every once in awhile.
Scott MathewsExecutive ProducerPresage Software

OVERVIEWOVERVIEWWelcome!
Welcome to Lode Runner 2! If you are familiar with Lode Runner 1 or computer games in general, whynot skip this boring manual? All the passion and effort associated with Lode Runner 2 is found in thegame, not in this manual. This is just a bunch of printed words. On paper, nonetheless. Blah, blah, blah.Go play the game.
If you are not familiar, or you just want to pick up a few tips before diving in, then read on.

Getting started: the immediate wayGetting started: the immediate way1. Launch Lode Runner 2.2. Click your mouse all over the screen in rapid succession until something happens that satisfies you.3. At random intervals, bang on the keyboard.4. Thumb through the manual at random. End up on the license agreement page and read most of it, out
of weird curiosity. Mutter, “stupid game,” repeatedly.5. Enjoy!
Getting started: the quick wayGetting started: the quick way1. Install Lode Runner 2 as instructed.2. Launch Lode Runner 2.3. After the opening movie has played, you will be at the main screen.4. Click on the button named ‘single player.’5. Click on the button named, ‘new’6. You are now at the sign-in screen. If you desire, watch the information at the top-half of the screen. It
will show you some character moves and game techniques.7. Type in your name at the black box.8. Select your favorite color from the eight selections. Select your gender.9. Click on the button named ‘start game.’
You are now at the Jump Station! The Jump Station acts as a hub to all five worlds. You will return hereevery time you complete all the levels in one world.
10. Hit the dig key (the default setting is, ‘Q’), to enter the Jump Station.11. Run around and find a door that is to your liking. Run through it (we recommend starting with Jungle
World. Look for the entrance that is covered in foliage).12. Try your hand at the first level by collecting all the gold and finding the door to the next level.
If playing the game is too hard or too confusing, try your hand at the tutorial levels. You can readabout the tutorial levels later on in this manual.
Getting started: The fairly quick wayGetting started: The fairly quick way1. Follow steps one through eight, listed above. You will end up at the sign-in screen.2. Click on the button named ‘select puzzle.’3. You are now at the puzzle selection screen. At the lower left corner of the screen, cycle through the
world types. Select ‘Tutorial World.’4. Click on the smiley face.5. You are back at the sign-in screen. Click on the button named ‘start game.’
You are now at the first tutorial level! The tutorial levels are designed to walk you through the LodeRunner 2 techniques and game mechanics. Read through the section of the manual entitled ‘tutorial’ as youplay through each tutorial level.
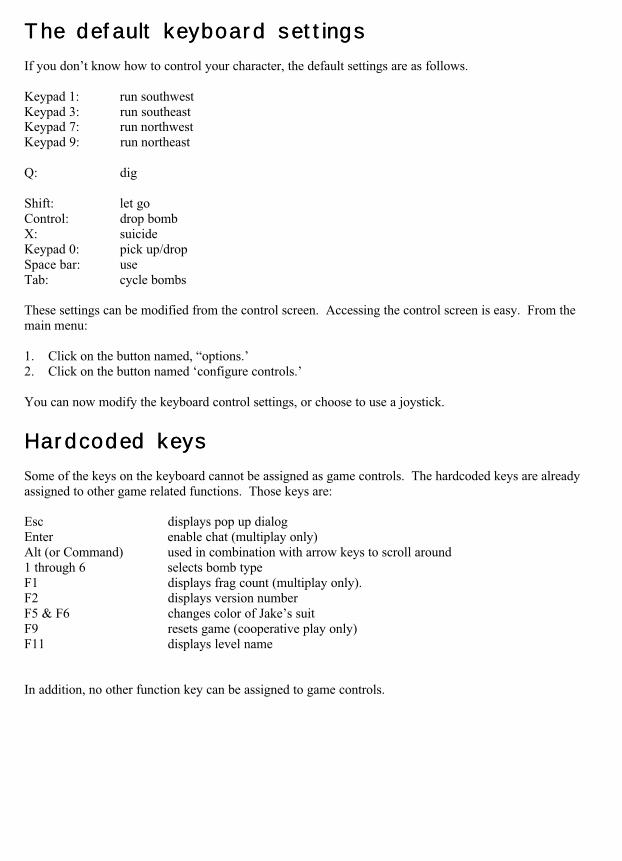
The default keyboard settingsThe default keyboard settingsIf you don’t know how to control your character, the default settings are as follows.
Keypad 1: run southwestKeypad 3: run southeastKeypad 7: run northwestKeypad 9: run northeast
Q: dig
Shift: let goControl: drop bombX: suicideKeypad 0: pick up/dropSpace bar: useTab: cycle bombs
These settings can be modified from the control screen. Accessing the control screen is easy. From themain menu:
1. Click on the button named, “options.’2. Click on the button named ‘configure controls.’
You can now modify the keyboard control settings, or choose to use a joystick.
Hardcoded keysHardcoded keysSome of the keys on the keyboard cannot be assigned as game controls. The hardcoded keys are alreadyassigned to other game related functions. Those keys are:
Esc displays pop up dialogEnter enable chat (multiplay only)Alt (or Command) used in combination with arrow keys to scroll around1 through 6 selects bomb typeF1 displays frag count (multiplay only).F2 displays version numberF5 & F6 changes color of Jake’s suitF9 resets game (cooperative play only)F11 displays level name
In addition, no other function key can be assigned to game controls.

CRUCIAL INFORMATIONCRUCIAL INFORMATIONThe Five WorldsThe Five WorldsThere are five unique worlds in Lode Runner 2. They are:
Jungle WorldWacky WorldGear WorldIndustry WorldMona World
Each world consists of at least fifteen unique puzzles. Within a world, puzzles will become more difficultas you progress. The best world to start with is Jungle World. Once you collect all the gold on a level,the exit portal on that level will open and be accessible. Run through the exit portal to gain access to thenext level in the world.
.

The Jump StationThe Jump StationThe Jump Station acts as a hub to all five worlds. You don’t have to, but you should start a new game atthe Jump Station. When you start a new game at the jump station, you will progress through each of thelevels found in the world you selected. Once you complete an entire world, you will be rewarded beforereturning to the Jump Station. Complete all five worlds from the Jump Station, and you will be rewardedagain.

Viewing an Entire LevelViewing an Entire LevelSome levels in Lode Runner 2 only occupy one screen. That is, they are fixed in location and do not scroll.These types of levels are displayed in their entirety on your monitor.
Other levels in Lode Runner 2 are massive, scrolling levels. If you would like to see other sections of thistype of level without moving Jake around, do the following:
1. Depress and hold the Alt key (or if you’re on a Mac, the Command key)2. With the Alt key depressed, use the keys assigned to directional movement to view the level.3. Once you let go of the Alt key, the camera will snap back to Jake’s location.
While you are viewing a level in this fashion, the game is still active. That is, a wandering monk can stillkill Jake. The best time to review a level using the alt + direction key combo is before Jake enters theworld.
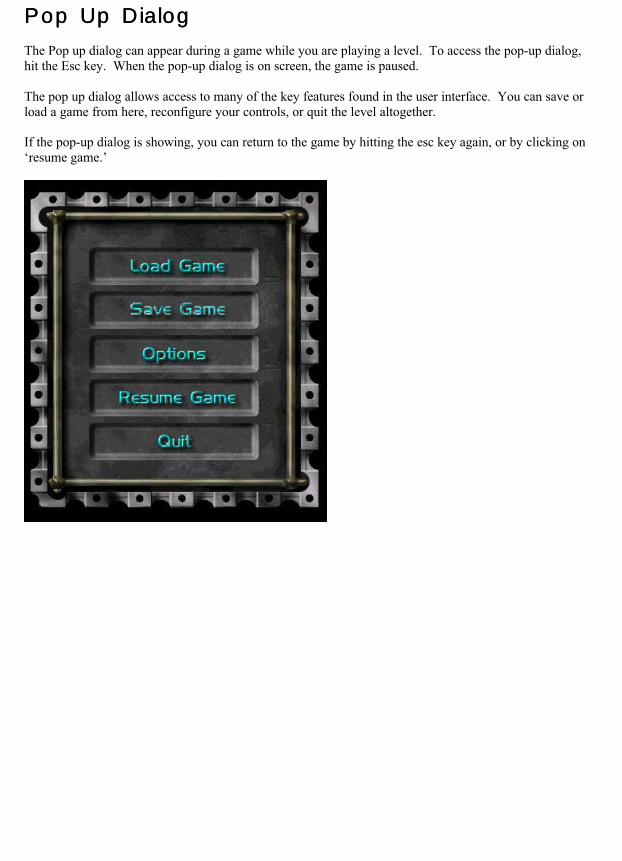
Pop Up DialogPop Up DialogThe Pop up dialog can appear during a game while you are playing a level. To access the pop-up dialog,hit the Esc key. When the pop-up dialog is on screen, the game is paused.
The pop up dialog allows access to many of the key features found in the user interface. You can save orload a game from here, reconfigure your controls, or quit the level altogether.
If the pop-up dialog is showing, you can return to the game by hitting the esc key again, or by clicking on‘resume game.’
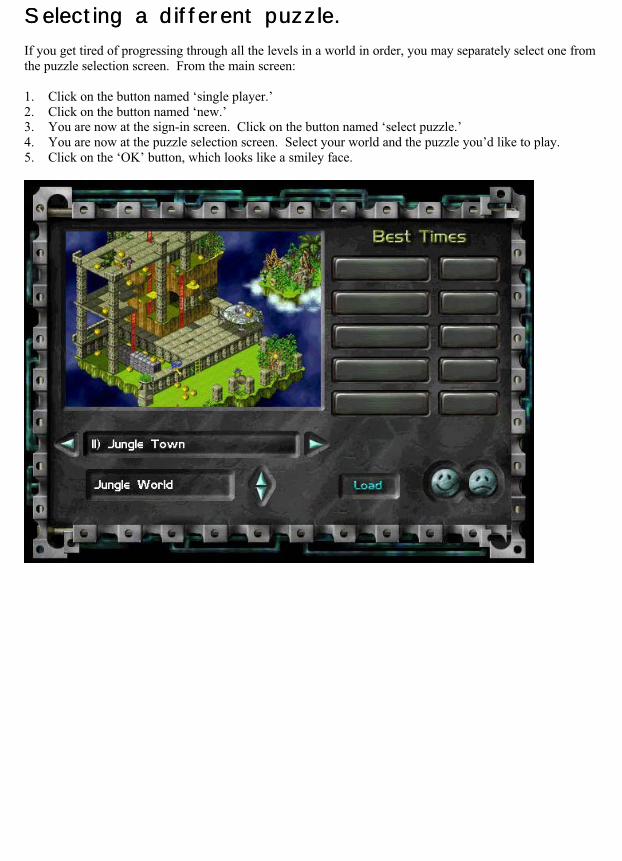
Selecting a different puzzle.Selecting a different puzzle.If you get tired of progressing through all the levels in a world in order, you may separately select one fromthe puzzle selection screen. From the main screen:
1. Click on the button named ‘single player.’2. Click on the button named ‘new.’3. You are now at the sign-in screen. Click on the button named ‘select puzzle.’4. You are now at the puzzle selection screen. Select your world and the puzzle you’d like to play.5. Click on the ‘OK’ button, which looks like a smiley face.

Building your own levelsBuilding your own levelsYou can build your own levels for Lode Runner 2! To do so, you need to run the application calledLR2ED.EXE Instructions on how to build levels are found in the editor workbook. Building levels canbe time-consuming, but is incredibly rewarding for the die-hard Lode Runner fan.

RULESRULESThe object of the gameThe object of the gamePlaying Lode Runner 2 is almost as straightforward as playing classic Lode Runner 1, but there are acouple of new rules you should know first. These new rules will help you navigate through each of the fiveworlds. Read this section thoroughly to get a good grasp of the new aspects found in Lode Runner 2.
If you’d prefer to not read this section and learn by doing, load up the first level in Tutorial World. Playthrough each level found in that world and as you do so, read through the section of this manual entitled,‘tutorial.’
The object of the game is to collect all the gold on a level without dying. Collecting gold can get verytricky; you’re going to need to dig and blast your way through each level in order to collect all the goldfound there. Once you collect all the gold, find the exit portal and go through it. It will take you to the nextlevel. Proceed through all the levels to master the game. Try to complete a level as fast as you can; doingso will record your time as a high score.
As you collect gold, you will encounter monks. These monks are dangerous, and if you come in contactwith them they will kill you. Don’t touch them!
There are five game worlds in Lode Runner 2. Though the gameplay in each of the worlds is similar innature, each has a unique visual flavor. The gold in each world looks a little bit different, as do the exitportals.

What can you do?What can you do?Just as in classic Lode Runner 1, you control a character named Jake Peril. Jake’s got a companion thistime around named Jane, and you can choose that character instead if you like. Jake or Jane can do one ofseven things:
RunDigClimbScaleFallCollect stuffDie
That’s it! Ah, the beauty of simplicity.
Jake and Jane are identical in their capabilities. In this manual, we will always refer to Jake.
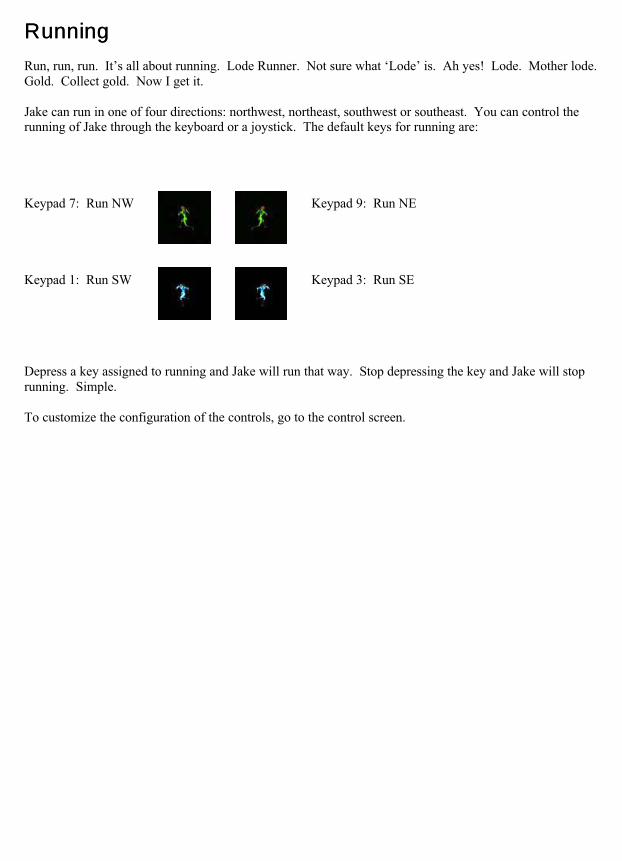
RunningRunningRun, run, run. It’s all about running. Lode Runner. Not sure what ‘Lode’ is. Ah yes! Lode. Mother lode.Gold. Collect gold. Now I get it.
Jake can run in one of four directions: northwest, northeast, southwest or southeast. You can control therunning of Jake through the keyboard or a joystick. The default keys for running are:
Keypad 7: Run NW Keypad 9: Run NE
Keypad 1: Run SW Keypad 3: Run SE
Depress a key assigned to running and Jake will run that way. Stop depressing the key and Jake will stoprunning. Simple.
To customize the configuration of the controls, go to the control screen.

DiggingDigging
No grenade launchers. No chainsaws. Generally nothing which will procure chum from any source. Foo.Only one thing you can do: dig.
When you dig, call first. No, that’s not true. When you dig, you always dig in front of Jake. And youalways dig down and in front of Jake. The default key for digging is set to Q.
Run around and then hit Q. Jake will stop, and then he’ll dig.
After awhile, you’ll want to upgrade your controls by assigning four keys to digging, instead of one. In thisway, Jake will stop running, turn toward the direction you want to dig, and then dig. It’s a faster way todig, and is a crucial element to some of the levels.
To customize the configuration of the dig control, or to upgrade to the advanced, 4-key dig set, go to thecontrol screen.
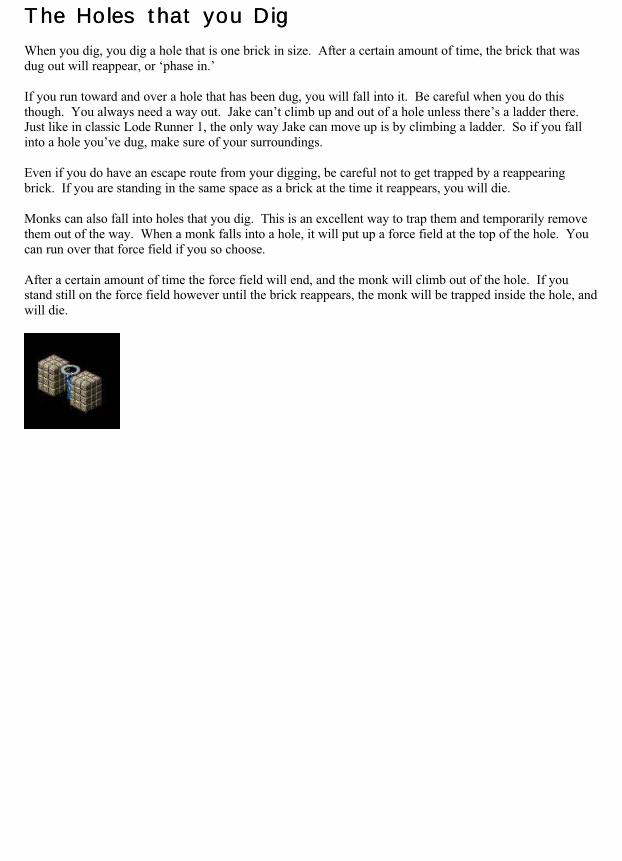
The Holes that youThe Holes that you DigDigWhen you dig, you dig a hole that is one brick in size. After a certain amount of time, the brick that wasdug out will reappear, or ‘phase in.’
If you run toward and over a hole that has been dug, you will fall into it. Be careful when you do thisthough. You always need a way out. Jake can’t climb up and out of a hole unless there’s a ladder there.Just like in classic Lode Runner 1, the only way Jake can move up is by climbing a ladder. So if you fallinto a hole you’ve dug, make sure of your surroundings.
Even if you do have an escape route from your digging, be careful not to get trapped by a reappearingbrick. If you are standing in the same space as a brick at the time it reappears, you will die.
Monks can also fall into holes that you dig. This is an excellent way to trap them and temporarily removethem out of the way. When a monk falls into a hole, it will put up a force field at the top of the hole. Youcan run over that force field if you so choose.
After a certain amount of time the force field will end, and the monk will climb out of the hole. If youstand still on the force field however until the brick reappears, the monk will be trapped inside the hole, andwill die.

UndiggablesUndiggablesSome bricks are undiggable. We refer to them by the catchy name of, ‘undiggable.’
A brick that is undiggable is one that Jake cannot dig down into. If you try to dig a brick of this type,Jake’s gun will just misfire. Undiggable bricks are easy to see: they are covered by a tough-lookinground spot.
You can also spot an undiggable brick from its two facing sides. This will aid you if an undiggable brick isburied deep down in a wall of bricks. Pay close attention to the placement and location of undiggables; theyare a key element to solving a puzzle correctly.
Some other things in the five worlds are also undiggable. Most importantly, bricks that have ladders onthem are undiggable. Other things that are more decorative in nature are also undiggable. Plants, smileyfaces, weird-looking animated contraptions. You’ll get the idea as you play.
All things that are undiggable are also un-bombable. See the section of the manual about bombs for moreinformation.

ClimbingClimbing
We’ve always enjoyed games that mirror the corporate life, don’t you? ‘Lode Merger.’ That’s our nextgame. We swear.
In Lode Runner 2 you climb ladders. Climbing with Jake is easy. Run toward the bottom of a ladder andJake will climb up it. Run toward the top of a ladder and Jake will turn around, and then climb down it.
While Jake is on a ladder, he can jump off of it to either side. To do so, just hit the direction key thatcorresponds to the side you would like Jake to jump off of.
Jake can also dig from a ladder. From the ladder, you can choose to dig to the left or to the right of theladder. Accomplishing this feat depends on how you have set up your controls. If you have the ‘Basic’controls set up, (where only one key is assigned to digging), you must hit the dig key and the direction keyat the same time. If you have the ‘Advanced’ controls set up, (where four separate keys are assigned to eachdirection of digging), you need only hit the key in the direction you wish to dig from the ladder.

ScalingScaling
In Lode Runner 2, scaling is the art of navigating a hand-over-hand bar. It is very easy to perform. Just runup to a protruding hand-over hand bar, and Jake will automatically jump onto it.
Just like running, use the four direction keys to navigate while on a hand-over-hand bar. If you hit the keyassigned to ‘let go,’ (the default setting is the Shift key), Jake will fall from the hand-over-hand bar.
Jake can also dig from a hand-over-hand bar. Just face him in the direction you’d like to dig, and hit thedig key.
Take particular note of hand-over-hand bars that protrude. A protruding hand-over hand bar is one that jutsout into space. It is from this extending piece that Jake can jump onto the hand over hand bar.Alternatively, Jake can mount a hand-over-hand bar by falling down onto it.
Hand-over-hand bars cannot be mounted from the side.
Take special note of the shadows that hand-over-hand bars cast. These shadows will help you indetermining the location of certain hand-over-hand bars.
FallingFallingFalling down. It symbolizes life: Run, Collect objects, Fall down, Die. Might we suggest that you acquirethe LR2 Cliff Notes for further allegorical information.
Falling is a very important element in Lode Runner 2. Some people like to refer to it as ‘jumping,’ but thisis an incorrect reference. Jake can only fall downward. They cannot jump across, or up or otherwisebound across the landscape in similar fashion to Mario, Sonic, Crash, or those other guys.
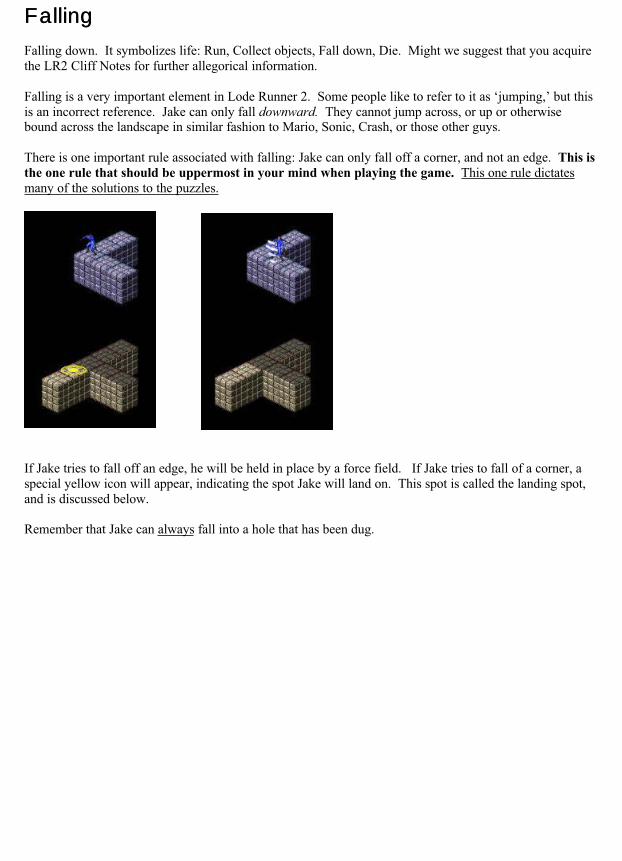
There is one important rule associated with falling: Jake can only fall off a corner, and not an edge. This isthe one rule that should be uppermost in your mind when playing the game. This one rule dictatesmany of the solutions to the puzzles.
If Jake tries to fall off an edge, he will be held in place by a force field. If Jake tries to fall of a corner, aspecial yellow icon will appear, indicating the spot Jake will land on. This spot is called the landing spot,and is discussed below.
Remember that Jake can always fall into a hole that has been dug.

The Landing SpotThe Landing SpotThe landing spot appears as a yellow icon. The icon will always appear when Jake is standing on a corner.However, the shape of the icon depends on what is below Jake at the time.
If Jake were to fall down to another brick, the icon would look like a yellow bulls-eye.
If Jake were to fall down to a hand-over-hand bar, the icon would highlight the hand-over-hand sectionJake would fall onto.
If Jake were to fall down to nothing, the icon would look like a yellow skull. Falling down to nothing, orrather, falling into the void, is a cause for concern. Basically, Jake will die if you force him to fall into thevoid. Try not to do this, okay?
The bulls-eye yellow icon will also appear at the start of a level, just before Jake enters into the level.
Collecting StuffCollecting StuffWhat computer game is complete without the ability to collect stuff? Hah! Lode Runner 2 meets yourneed to accumulate.
Of the things you can collect in Lode Runner 2, there are three classifications:
1. Gold (you know about this)2. Bombs3. Power Ups
Collecting gold and bombs is automatic. That is, Jake only needs to run over them to collect and storethem.
Power ups however must be picked up consciously. Jake can only hold one power up at a time, and thedecision to hold which one is a crucial element to solving some of the levels. To pick up a power up, Jakemust be standing on the same brick as the power up. Depress the key assigned to ‘pick up/drop,’ (thedefault setting is keypad 0), and Jake will pick up the power up.
Depress the same key again and Jake will drop the power up.
Using a power up is also a conscious decision on your part. Just because Jake is holding a power up in hispossession doesn’t mean it is automatically activated or in use.
To use the power up that Jake holds, depress the ‘use’ key (the default key is keypad 5).
Some power ups, like the gasoline can, don’t need to be used. The act of picking them up and holdingthem makes them active. See the section entitled ‘Power Ups’ for further information.
The tally of all gold and bombs collected is indicated on the status bar. The status bar also indicates whichof the power ups Jake is currently holding. See below for further information about the status bar.

DyingDyingThere are four ways to die in Lode Runner 2. If you want Jake to stay alive, heed this wise advice:
• Don’t touch monks. Don’t do it, man.• Don’t get trapped in a hole.• Don’t get in the path of an exploding bomb.• Don’t fall into the void.
Now if you are of a twisted nature, you can always instruct Jake to commit suicide. Doing so will restartthe level and cause Jake to lose one life. Sometimes Jake will get into a situation that makes levelcompletion impossible, and then suicide is necessary.
Any time Jake or Jane dies, they lose one life. If zero lives are reached, the game is over.

MONKSMONKSThroughout the entire Lode Runner line of products, the monks have been the bad guys. Touch them andyou die. No swordplay, no laser beams, just physical contact. Nice and clean that way.
In Lode Runner 2, there are three different kinds of monks. Each type of monk is indicated by the color ofits robe.
Blue MonksBlue MonksBlue monks are blind. Blue for Blind. Blue monks cannot see Jake. They will silently go about theirbusiness and never alter their course to intercept Jake. On any given level, watch the blue monks for a littlewhile. Like an uneducated security guard, blue monks will follow a pattern. Identifying this pattern andnavigating around it are an important part to solving a level safely. Blue monks never chase Jake.
Purple MonksPurple MonksPurple Monks are unpredictable, or Wild. Purple for unPredictable. If Jake gets too close to a purplemonk, it will come after him. Some purple monks follow a pattern, and other purple monks wanderaimlessly about. Watch them carefully, but don’t get too close. Purple monks sometimes chase Jake.
Black MonksBlack MonksBlack monks are evil and aspire to death and trouble. Black for Death. Okay, okay. ‘Black’ and ‘death’don’t start with the same letter. What color starts with ‘D’ anyway? Dorange? You get the idea. Blackmonks are the toughest to deal with. They will constantly chase Jake, no matter where he is on the level.Black monks may get stuck in some places, but in general they are always on Jake’s heels. Be careful ifyou see a black monk on a level. Black monks always chase Jake.
Monks can die in one of two ways: you can blow them up with a bomb, or Jake can stand on top of themwhile they are in a hole. If a monk dies, it will often regenerate back onto the level. Watch out; aregenerating monk can come into the level at an entirely different place from where it started.
Thwart the monks! GO to Tutorial World and select these levels:
Blind MonkWild MonkDeath Monk
BOMBSBOMBSBombs are an integral part to Lode Runner 2. Jake can pick up and carry many bombs and many bombtypes at one time. Of all the bombs collected by Jake, you can choose which bomb to use at any one timevia the status bar.
UsingUsingJake only needs to run over a bomb to pick it up and collect it. Green colored bombs will add one bomb ofthat type to Jake’s inventory. Red colored bombs will add five of that bomb type to Jake’s inventory.
To use a bomb, hit the assigned key on your keyboard (the default setting is the control key). When you doso, Jake will drop a bomb directly in front of him. The bomb will ramp up toward explosion for a shortamount of time and then detonate.
The status bar indicates the inventory Jake holds of each bomb type. There are six types of bombs. Toselect the type of bomb you want to drop, depress the ‘cycle’ key on your keyboard (default setting is theTab key). Alternatively, you can depress keys 1 through 6 on your keyboard to select that bomb type. Thebomb type will highlight on the status bar to confirm your selection.
Jake can drop a bomb over a ledge by facing that ledge. The bomb will fall down until it detonates or hitsthe ground below. Jake need not be standing on a corner to employ this technique; he can be standing onan edge and drop a bomb in this way.
DetonatingDetonatingWhen thinking about bomb explosions, you need to take into consideration the three axes of the coordinateplane: X, Y, and Z.
With the exception of The Sphere, bombs will blow in one or more of the coordinate directions, in astraight line.
Bombs will not blow up anything that is undiggable like bricks with ladders, or hand-over-hand bars, orpower ups. In fact, an undiggable brick will stop short any explosion. Test this out on the tutorial levelentitled, ‘Bombs 101.’
Anything blown up by a bomb will reappear after a certain amount of time, just as if Jake had dug it out.
You can set off and detonate a bomb that is lying on the ground. If a bomb lying on the ground is caught inthe explosion of a second bomb, the first bomb will also detonate. This chain reaction effect is a unique aninteresting way to solve some of the puzzles in Lode Runner 2.
Some bombs on some puzzle levels are suspended in mid air. If Jake can not reach these bombs directly,they can be detonated indirectly from the explosion of another bomb. When the suspended bomb isactivated from the explosion, it will fall to the ground below and detonate.
The color of an explosion will match the color of Jake’s suit, if dropped by Jake directly.
If Jake or a monk is caught in the explosion of a bomb, they will die a quick death. Watch out!
ArmedArmedSome bombs that you encounter will be armed. These bombs will be blinking back and forth and cannot bepicked up by Jake. These bombs are attached to a trip wire, which will be found somewhere else on thelevel. To learn more about trip wires, read the section entitled, ‘Triggers.’
MiscellanyMiscellanyJake can run past a bomb that he dropped. In multiplay, however, Jake’s path will be blocked by anopponent’s dropped bomb.
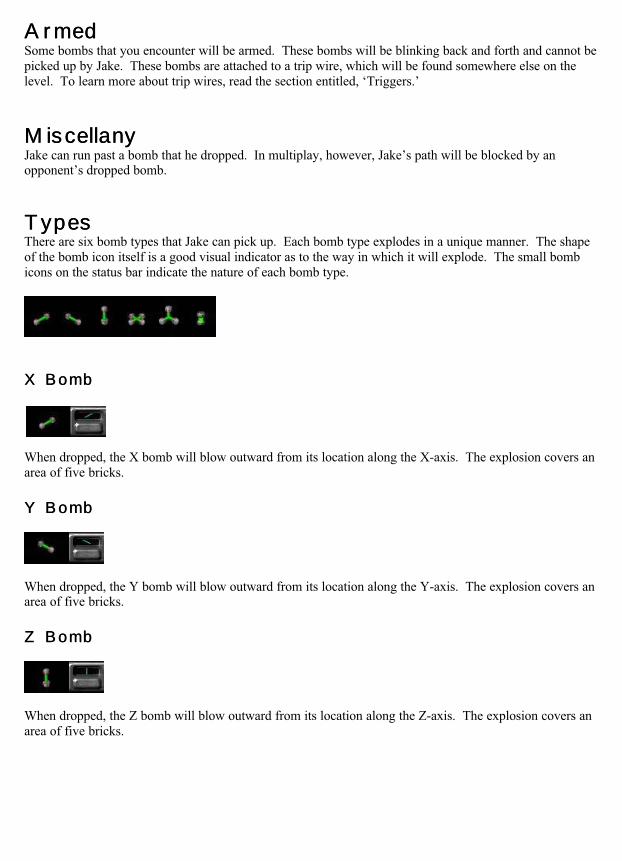
TypesTypesThere are six bomb types that Jake can pick up. Each bomb type explodes in a unique manner. The shapeof the bomb icon itself is a good visual indicator as to the way in which it will explode. The small bombicons on the status bar indicate the nature of each bomb type.
X BombX Bomb
When dropped, the X bomb will blow outward from its location along the X-axis. The explosion covers anarea of five bricks.
Y BombY Bomb
When dropped, the Y bomb will blow outward from its location along the Y-axis. The explosion covers anarea of five bricks.
Z BombZ Bomb
When dropped, the Z bomb will blow outward from its location along the Z-axis. The explosion covers anarea of five bricks.
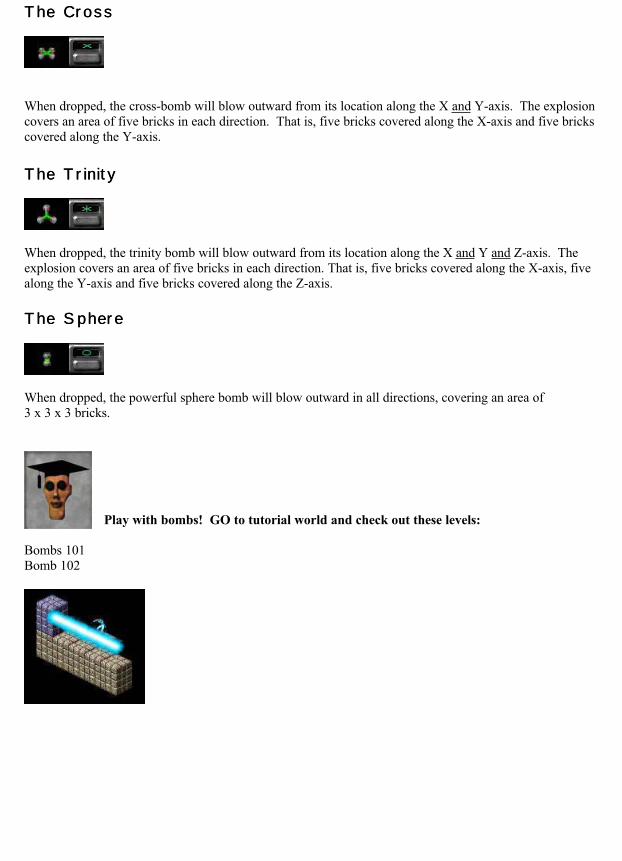
The CrossThe Cross
When dropped, the cross-bomb will blow outward from its location along the X and Y-axis. The explosioncovers an area of five bricks in each direction. That is, five bricks covered along the X-axis and five brickscovered along the Y-axis.
The TrinityThe Trinity
When dropped, the trinity bomb will blow outward from its location along the X and Y and Z-axis. Theexplosion covers an area of five bricks in each direction. That is, five bricks covered along the X-axis, fivealong the Y-axis and five bricks covered along the Z-axis.
The SphereThe Sphere
When dropped, the powerful sphere bomb will blow outward in all directions, covering an area of3 x 3 x 3 bricks.
Play with bombs! GO to tutorial world and check out these levels:
Bombs 101Bomb 102

POWER UPSPOWER UPSPower ups are those objects that can be picked up and used by Jake. There are ten different types of powerups in Lode Runner 2. Each one provides Jake with a unique ability for a limited time. Each power up isrepresented by a unique, rotating object found on any given level.
Picking up, dropping, and usingPicking up, dropping, and usingJake can only hold one power up at a time. To pick up a power up, Jake must be standing on the samebrick that the power up is resting on. To pick up the object, hit the ‘pick up/drop key, (the default keysetting is keypad 0). Once the power up is picked up, it will be displayed in the status bar. To drop thepower up, hit the pick up/drop key again.
Just because Jake is holding a power up in his possession doesn’t mean it is automatically in use. To usethe power up that Jake holds, depress the ‘use’ key (the default key setting is the space bar). Depending onthe type of power up, it will activate and last for a limited time.
When a power up is in use, it will glow in the status bar. If the power up is of a timed nature, you will hearthree beeps as it expires.
One upOne up
If Jake runs over the One Up, you will receive one free life. The One Up is unlike the other power ups inthat it does not need to be picked up or used. Jake only needs to run over it for it to be collected (like apiece of gold).
Gasoline CanGasoline Can
If the Gas Can is picked up, all linear bombs dropped by Jake will explode across a greater area. From theepicenter linear bombs normally cover an area of two bricks in each direction (for a total of five). With theGas Can in Jake’s possession, linear bombs will cover three bricks in each direction, for a total explosionarea of seven bricks.
The Gas Can be picked up a second time to cause bombs to explode across nine bricks. Jake can pick it upa third time to increase explosions to eleven bricks. If Jake drops the gasoline can while this second orthird effect is in place, all explosions will resort back to their normal (five brick) state.
The benefits associated with the Gas Can automatically take effect when it is picked up. That is, it does notneed to be ‘used’ to take effect.
The effects of the Gas Can last until it is dropped.
InvisoInviso
The Inviso power up makes Jake invisible to all monks for a limited time. Jake will appear slightlytransparent during its activation. While activated, all monks will ignore Jake. In addition, Jake can runthrough monks without harm while the Inviso power up is active. During a multiplayer game, Jake will beinvisible to his opponents.
As long as the Inviso power up is displayed in the status bar, it can be activated at any time by hitting the‘use’ key.
The effects of the Inviso last for a limited time.
MorphMorph
The Morph power up transforms Jake into a brick for a limited time. The shape of the brick taken will beidentical to the brick that Jake is standing on at the time of activation. Monks will not be able to kill Jakewhile in brick form. The power up also has some interesting applications during cooperative play.
As long as the Morph power up is displayed in the status bar, it can be activated at any time by hitting the‘use’ key.
The effects of the Morph last for a limited time. You may interrupt or cancel the effects of the Morphwhile it is in use by hitting one of the run keys.
Beach BallBeach Ball
The Beach Ball power up transforms Jake into an invincible machine of destruction. While active, Jake isinvulnerable to the touch of monks or explosions. Any monk or player who comes in contact with Jakeduring this time will be instantly obliterated. The Beach Ball is an interesting power up to use duringcompetitive play.
While the Beach Ball is activated, Jake’s suit will glow in an array of colors.
As long as the Beach Ball power up displayed in the status bar, it can be activated at any time by hitting the‘use’ key. The effects of the Beach Ball last for a limited time.

LandmineLandmine
The Landmine power up allows Jake to drop a special type of bomb. While the Landmine is held, Jake hasthree special bombs in his possession. Using the Landmine will drop one of these special bombs.
The mine dropped occupies one brick and any monk or player that runs into it will die. The mine will notdetonate until a monk or player comes in contact with it. Using the Landmine is an effective strategyduring competitive play.
As long as the Landmine power up is displayed in the status bar, it can be activated at any time by hittingthe ‘use’ key.
Using the Landmine will drop one mine on the brick in which it was used. The power up expires once Jakedies, or until three mines have been dropped.
DetonatorDetonator
The Detonator power up effects the detonation of normal bombs. Usually, a bomb detonates and explodesa short time after Jake drops it. When the Detonator power up is held, bombs will not explode immediately.Rather, they will arm and await your instructions for detonation.
You may arm as many bombs as you like while the Detonator is held. For example, if you pick up threebombs and lay them down while the Detonator is held, those three bombs will be armed. If, five minuteslater, you pick up three more bombs and then lay them down, those three bombs will also be armed.Bombs that are laid down will continue to arm until you decide to use the Detonator.
Using the Detonator causes all armed bombs to explode. Dropping the Detonator also causes all armedbombs to explode. The Detonator can only be used once.
There is a drawback to the Detonator: you cannot drop armed bombs over an edge to an area below.Rather, an armed bomb will occupy the brick Jake is standing in when it is dropped.
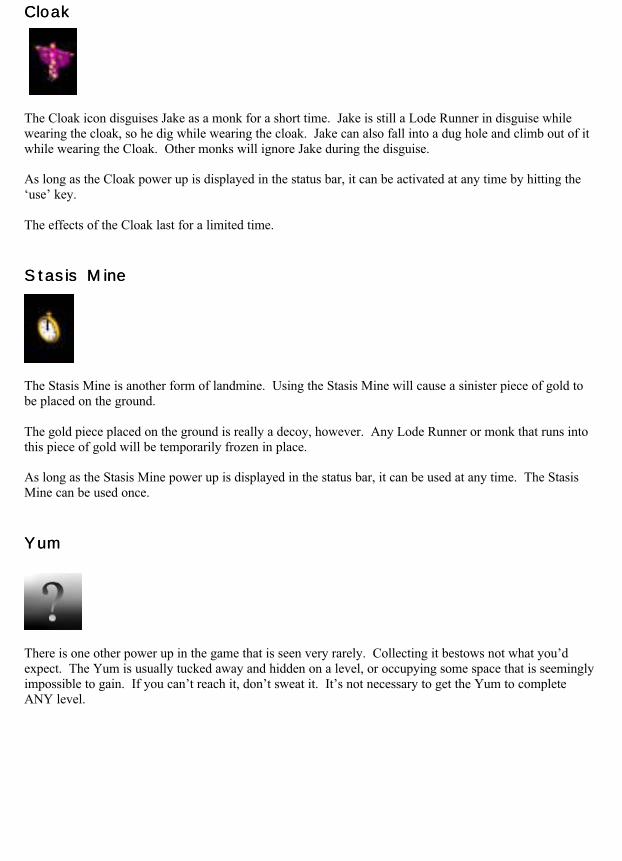
CloakCloak
The Cloak icon disguises Jake as a monk for a short time. Jake is still a Lode Runner in disguise whilewearing the cloak, so he dig while wearing the cloak. Jake can also fall into a dug hole and climb out of itwhile wearing the Cloak. Other monks will ignore Jake during the disguise.
As long as the Cloak power up is displayed in the status bar, it can be activated at any time by hitting the‘use’ key.
The effects of the Cloak last for a limited time.
Stasis MineStasis Mine
The Stasis Mine is another form of landmine. Using the Stasis Mine will cause a sinister piece of gold tobe placed on the ground.
The gold piece placed on the ground is really a decoy, however. Any Lode Runner or monk that runs intothis piece of gold will be temporarily frozen in place.
As long as the Stasis Mine power up is displayed in the status bar, it can be used at any time. The StasisMine can be used once.
YumYum
There is one other power up in the game that is seen very rarely. Collecting it bestows not what you’dexpect. The Yum is usually tucked away and hidden on a level, or occupying some space that is seeminglyimpossible to gain. If you can’t reach it, don’t sweat it. It’s not necessary to get the Yum to completeANY level.
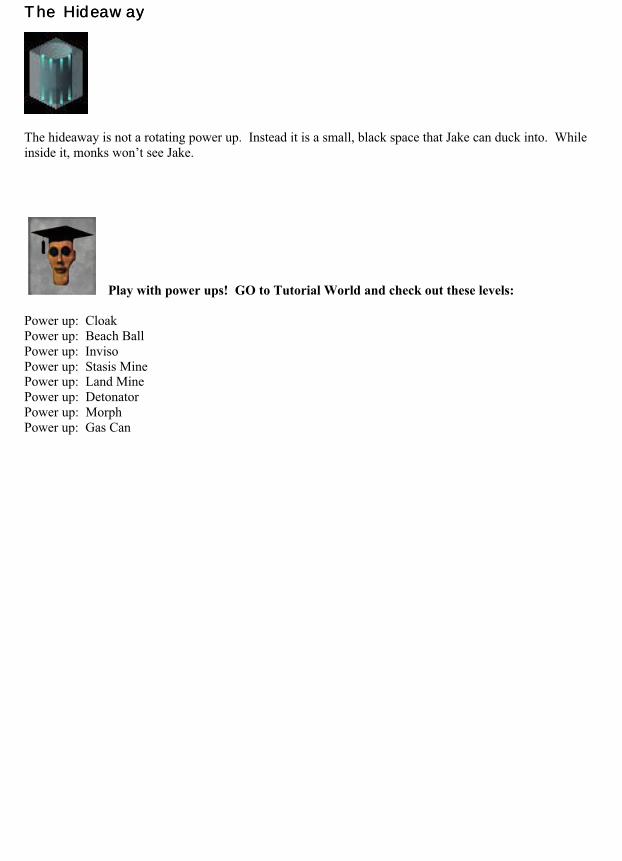
The HideawayThe Hideaway
The hideaway is not a rotating power up. Instead it is a small, black space that Jake can duck into. Whileinside it, monks won’t see Jake.
Play with power ups! GO to Tutorial World and check out these levels:
Power up: CloakPower up: Beach BallPower up: InvisoPower up: Stasis MinePower up: Land MinePower up: DetonatorPower up: MorphPower up: Gas Can

TRIGGERSTRIGGERSTriggers are the newest addition to the Lode Runner universe. When a trigger is activated, it cantemporarily or permanently alter the level that Jake is on.
UsingUsingThe type of trigger found determines how to use it. For wall-based triggers, Jake needs to be standing andfacing the trigger. With Jake positioned so, hit the ‘use’ key on your keyboard (default setting is the spacebar). The trigger will activate.
Other times, Jake need only run over the trigger for it to activate. This technique is employed for floor-based triggers.
ActivationActivationActivating a trigger does one of three things:
1. Detonates a bomb.2. Causes one or more bricks to appear, or ‘phase in’3. Causes one or more bricks to disappear, or ‘phase out.’
Triggers found on a wall can be used again and again. Triggers found on the floor can be used only once.
TypesTypesThere are five types of triggers. Each one does something a little different.
LeverLever
A lever is one type of wall-based trigger. Push the lever up to cause one or more bricks to phase in. Pushthe lever down to cause one or more bricks to phase out.
Levers are on a timer. When you use one, you will hear a ticking sound. That ticking sound is an indicatorthat the bricks effected by the lever are only effected for a short amount of time. This short amount of timeis referred to as the ‘active time.’
For example, if Jake pushes a lever up, one or more bricks will phase in somewhere on the level. But theywill only phase in for the active time amount. The same is true for a lever that is pushed down: bricks willphase out but only for the duration of the active time.
A lever can be used over and over, but not during the active time. That is, a lever that has been pushed upcannot be interrupted during the active time by being pushed down. Indeed, the lever will revert to itsoriginal state on its own at the end of the active time.

SwitchSwitch
A switch is another type of wall-based trigger. Flip the switch up to cause one or more bricks to phase in.Flip the switch down to cause one or more bricks to phase out. Just like levers.
Switches are not on a timer. They act in a very similar fashion to a light switch found in your home. Jakecan stand in front of a switch and flip it up and down all the live long day.Up…..down...up…down…..up……….down...up…...down…………..up. Bricks attached to a switch willcorrespondingly phase in and phase out.
PlatePlate
A plate is a floor-based trigger. As Jake runs over it, one or more bricks will phase in or out. Bricks thatphase in from a plate are permanently in place. Bricks that phase out from a plate are permanentlyremoved.
Consistent with the floor-type of trigger, the plate can only be used once. Once Jake runs over it, the plateis from then on inactive. Running over it again has no effect.
Trip WireTrip Wire
A trip wire is also a floor-based trigger. The trip wire is unique though in that it does not cause bricks tophase in or out. Trip wires cause armed bombs to detonate.
Once Jake runs through a trip wire, one or more armed bombs on the level will detonate. Once the trip wirehas been tripped once, it is thereafter inactive. Running through it again has no effect.
You can distinguish an armed bomb from a normal one. Armed bombs blink and make a high-pitchedclicking sound when Jake is near them. It is the armed bomb that is attached to the trip wire.
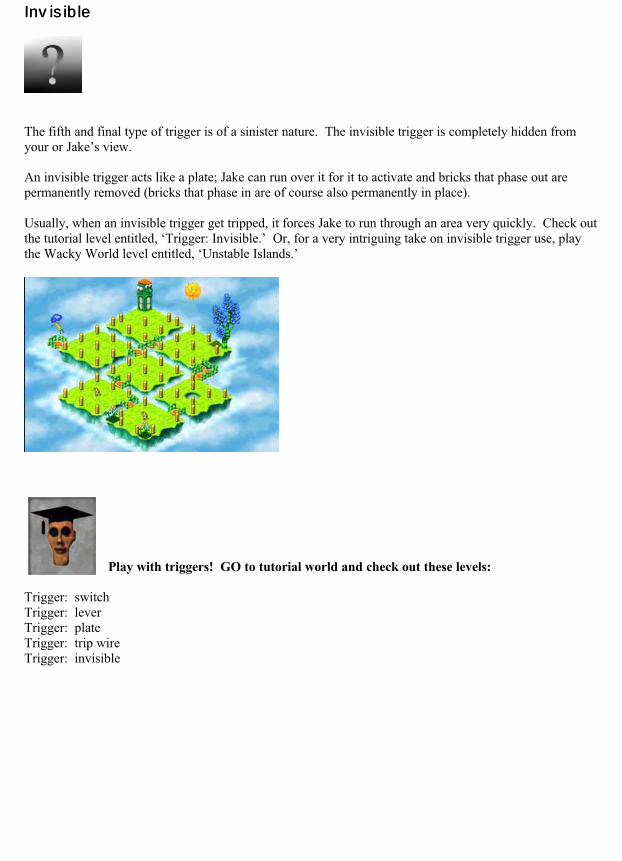
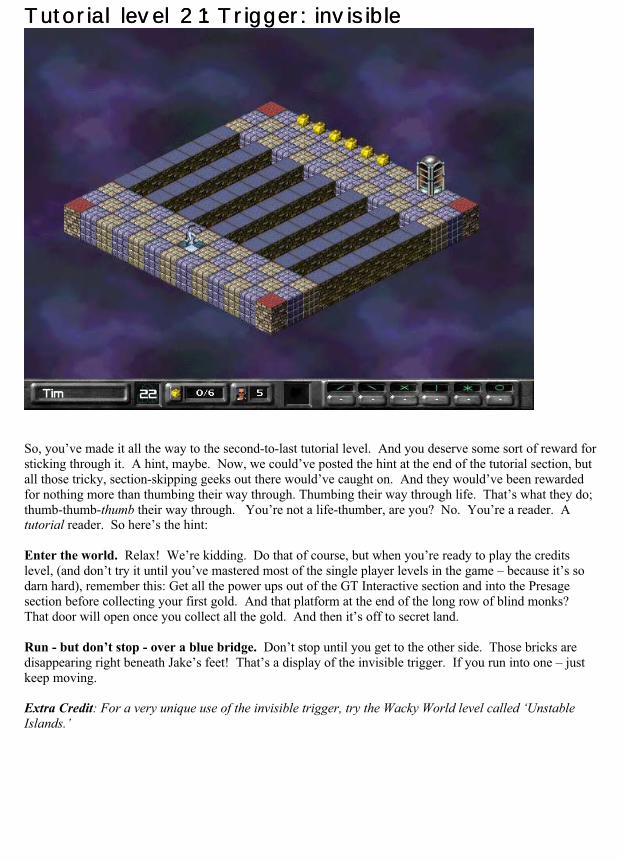
InvisibleInvisible
The fifth and final type of trigger is of a sinister nature. The invisible trigger is completely hidden fromyour or Jake’s view.
An invisible trigger acts like a plate; Jake can run over it for it to activate and bricks that phase out arepermanently removed (bricks that phase in are of course also permanently in place).
Usually, when an invisible trigger get tripped, it forces Jake to run through an area very quickly. Check outthe tutorial level entitled, ‘Trigger: Invisible.’ Or, for a very intriguing take on invisible trigger use, playthe Wacky World level entitled, ‘Unstable Islands.’
Play with triggers! GO to tutorial world and check out these levels:
Trigger: switchTrigger: leverTrigger: plateTrigger: trip wireTrigger: invisible
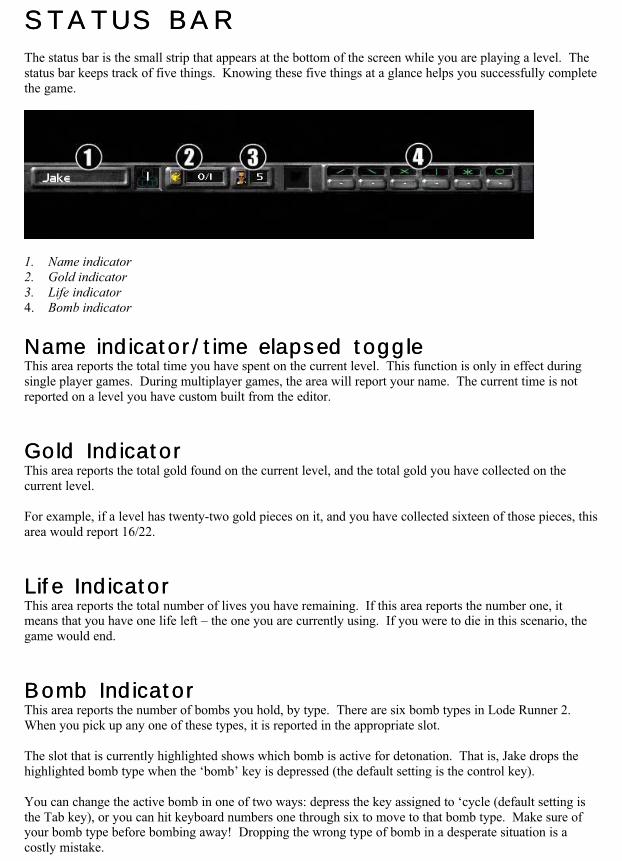
STATUS BARSTATUS BARThe status bar is the small strip that appears at the bottom of the screen while you are playing a level. Thestatus bar keeps track of five things. Knowing these five things at a glance helps you successfully completethe game.
1. Name indicator2. Gold indicator3. Life indicator4. Bomb indicator
Name indicator/timeName indicator/time elapsed toggleelapsed toggleThis area reports the total time you have spent on the current level. This function is only in effect duringsingle player games. During multiplayer games, the area will report your name. The current time is notreported on a level you have custom built from the editor.
Gold IndicatorGold IndicatorThis area reports the total gold found on the current level, and the total gold you have collected on thecurrent level.
For example, if a level has twenty-two gold pieces on it, and you have collected sixteen of those pieces, thisarea would report 16/22.
Life IndicatorLife IndicatorThis area reports the total number of lives you have remaining. If this area reports the number one, itmeans that you have one life left – the one you are currently using. If you were to die in this scenario, thegame would end.
Bomb IndicatorBomb IndicatorThis area reports the number of bombs you hold, by type. There are six bomb types in Lode Runner 2.When you pick up any one of these types, it is reported in the appropriate slot.
The slot that is currently highlighted shows which bomb is active for detonation. That is, Jake drops thehighlighted bomb type when the ‘bomb’ key is depressed (the default setting is the control key).
You can change the active bomb in one of two ways: depress the key assigned to ‘cycle (default setting isthe Tab key), or you can hit keyboard numbers one through six to move to that bomb type. Make sure ofyour bomb type before bombing away! Dropping the wrong type of bomb in a desperate situation is acostly mistake.

USER INTERFACEUSER INTERFACEThe best way to acquire an understanding of the user interface is to use it. Hm. Imagine that. Readingboring instructions about User Interfaces usually doesn’t provide much. Go and surf through each of thescreens you see. It won’t break anything. A couple of rules to keep in mind before you do:
1. Anything that turns red when your mouse cursor is over it means that you can click on it to gosomeplace.
2. If you can click on a word, you can also usually type in the first letter of that word.3. You can always hit the Esc key to take you back one screen.4. If you see a black box anywhere, you can type words into it. Click on it and then begin typing. Hit
enter when you are done.
Clicking on this symbol means that you accept the changes you’ve made on the screen. You’ll move on tothe next screen.
Clicking on this symbol means that you reject the changes you’ve made to the screen. You’ll cancel out ofthe screen and move back to where you where.
Clicking on this symbol takes you back one screen. There’s nothing to change or alter on the screen, sothere’s nothing to reject or accept.
Here’s a breakdown of the major screens you’ll encounter.
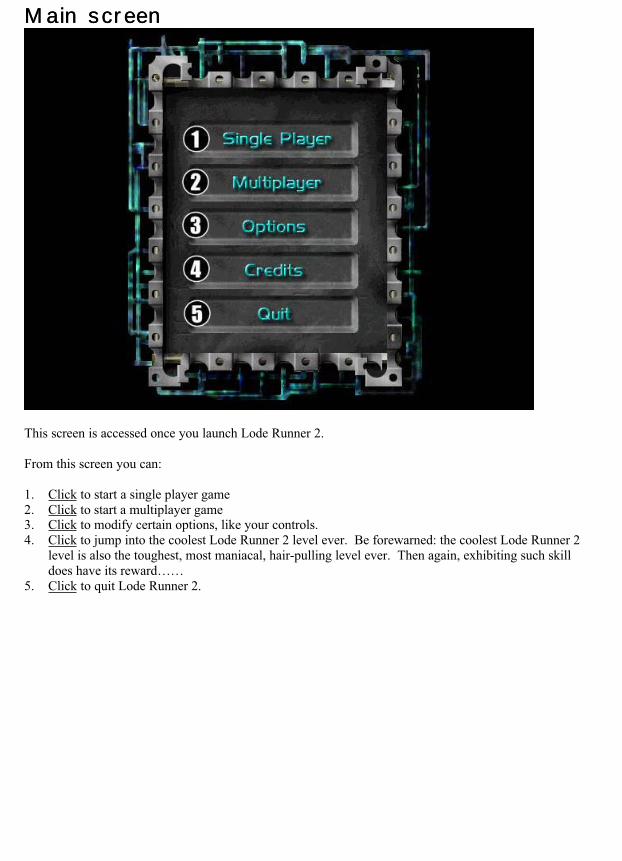
Main screenMain screen
This screen is accessed once you launch Lode Runner 2.
From this screen you can:
1. Click to start a single player game2. Click to start a multiplayer game3. Click to modify certain options, like your controls.4. Click to jump into the coolest Lode Runner 2 level ever. Be forewarned: the coolest Lode Runner 2
level is also the toughest, most maniacal, hair-pulling level ever. Then again, exhibiting such skilldoes have its reward……
5. Click to quit Lode Runner 2.
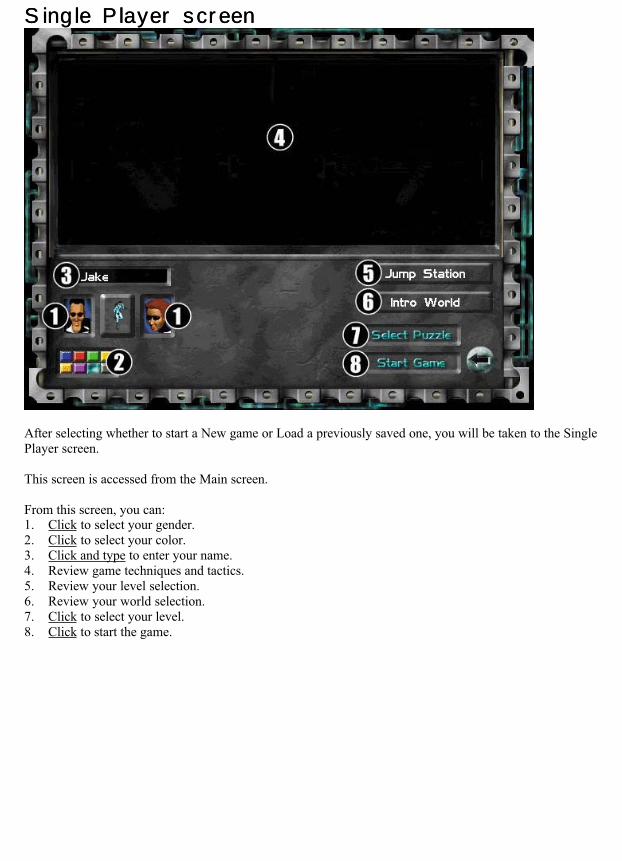
Single Player screenSingle Player screen
After selecting whether to start a New game or Load a previously saved one, you will be taken to the SinglePlayer screen.
This screen is accessed from the Main screen.
From this screen, you can:1. Click to select your gender.2. Click to select your color.3. Click and type to enter your name.4. Review game techniques and tactics.5. Review your level selection.6. Review your world selection.7. Click to select your level.8. Click to start the game.
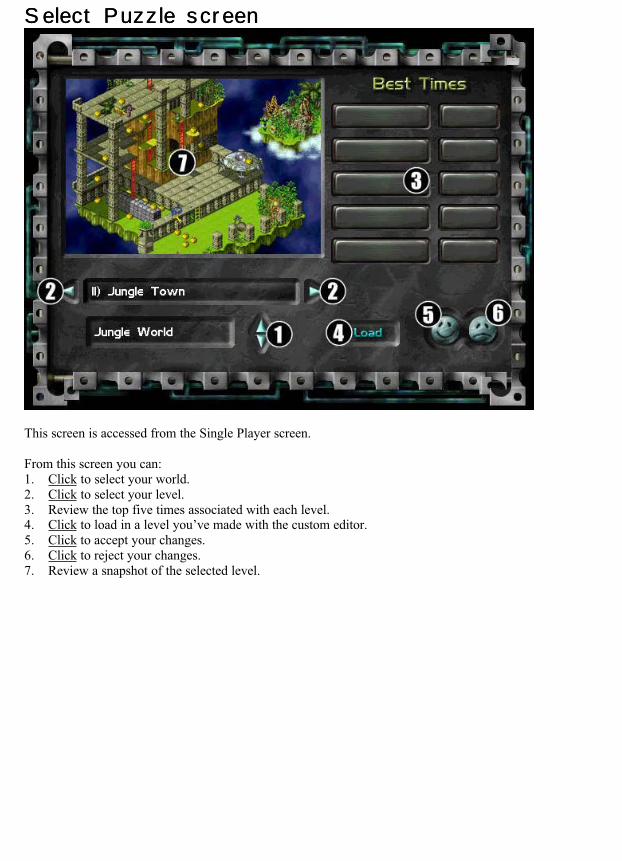
Select Puzzle screenSelect Puzzle screen
This screen is accessed from the Single Player screen.
From this screen you can:1. Click to select your world.2. Click to select your level.3. Review the top five times associated with each level.4. Click to load in a level you’ve made with the custom editor.5. Click to accept your changes.6. Click to reject your changes.7. Review a snapshot of the selected level.

Options screenOptions screen
This screen is accessed from the main menu, or from the pop-up menu during game play
From this screen you can:1. Click, hold, and slide to set the volume level on the music you hear. Happy is loud, sad is mute.2. Click, hold, and slide to set the volume level on the sound effects you hear. Happy is loud, sad is
mute.3. Click to review the best times4. Click to configure controls.

Configure screenConfigure screen
The configure controls screen is an important screen to get to know. From here, you will set your keyboardor joystick controls. Each of the television monitors depicted on screen shows exactly which game abilityis associated with which key.
Click on a television monitor to see the ability animate. Click on a rectangular button next to any of thetelevision monitors to assign a key or joystick button.
There are two options on the screen for digging. Advanced and basic. Basic control assigns one key todigging. Jake will have to face the direction you wish to dig with the basic setting. Under the advancedsetting, there are four keys assigned to digging - one for each direction. Jake can face any direction fordigging and will automatically turn to the desired direction when an advanced dig key is depressed.
The advanced method results in a little faster response for digging; it is a great help in successfullydefeating some of the more difficult dig puzzles.
The Configure screen is accessed from the options screen, or from the pop-up menu during game play.
From this screen you can:
1. Click and type in your desired key setting for each of the controls listed.2. Click and select keyboard controls3. Click and select joystick controls (PC version only)4. Click and return the settings to their defaults.5. Click and select either basic or advanced dig controls.
MULTIPLAYERMULTIPLAYERThe multiplayer experience is one of the newest additions to the Lode Runner universe. Spawning amultiplayer game is relatively simple. One person acts as host, while all the other participants act as guest.The person with the fastest processor should act as host.
The host should follow these steps:
1. From the main screen, click on the multiplayer button2. Click on the ‘host’ button3. Type in a name for your game4. You are now at the multiplayer screen. The host sets certain game parameters to individualize the
multiplayer experience. The host also launches the multiplayer game after everyone else hasconfirmed their join status.
After selecting to Host or Join a multiplayer game and after typing in (host) or selecting (guest) themultiplayer game name, you will be taken to the Multiplayer screen. For further information on how tohost, join and configure a multiplayer game, see the section entitled, ‘Multiplayer.’
Mutliplayer ConsiderationsMutliplayer Considerations
When joining a multiplayer game, after selecting Join you will be presented with a dialog box requesting anIP address of the host. In most cases, you can click OK without entering an IP address and the game willsearch for games on your LAN.
The number of players possible on a network game is dependent on the speed of your network connection,the speed of the computer serving the game, and the speed of the client computers joining the game. Themaximum number of players is eight.
A server with a slow network connection or framerate can deteriorate gameplay for all players. The fastestcomputer with the best possible connection should be used for hosting games.
You may experience a long pause if a player is dumped from the game while you are playing. This is due toa DirectPlay timeout setting.
If at any time during a multiplayer game, you experience a crash, you should reboot your system beforeyou try to restart the game. If you do not reboot your system, you may encounter problems related to theoriginal crash.

Competitive vs. cooperative playCompetitive vs. cooperative playThere are two kinds of multiplay: competitive and cooperative.
CooperativeCooperativeIn cooperative play, two players work together to collect gold and advance through the levels.Players share a pool of lives. Players can restart the level together at any time by hitting F9 on thekeyboard. Doing so costs one life. If only one player commits suicide or dies, that player will restart fromthe beginning, and one life is subtracted from the pool. The level will not reset.
CompetitiveCompetitiveIn competitive play, up to eight players compete against one another in a deathmatch. Gold collecting andadvancing through levels are not a part of competitive play.
During a competitive game, you can hit F1 on the keyboard to see the frag count for all players. A playerearns one point if they directly kill another player with a bomb. One point is subtracted from a player’sscore if they die by any other means (falling into the void, trapped in a hole, suicide, killed by a monk, orkilled by a chain reaction).

The multiplayer screenThe multiplayer screen
After selecting to Host or Join a multiplayer game and after typing in (host) or selecting (guest) themultiplayer game name, you will be taken to the Multiplayer screen. For further information on how tohost, join and configure a multiplayer game, see the section entitled, ‘Multiplayer.’
This screen is accessed from the Main screen
From this screen you can:1. Click to close out a player or slot (host only)2. Review the gender of a player3. Review the color of a player4. Review chat messages5. Click and type to enter a chat message6. Click and type your name7. Click to select your gender8. Click to select your color9. Click to join the multiplayer game10. Click to determine game parameters (host only)11. Review Level type12. Review Level name13. Click to begin a multiplayer game (host only; after all have joined).
The Player ListThe Player ListThis section shows the player’s names, gender and color. The host can click on any player gender button toboot a player or close out an empty slot.

The Join ButtonThe Join ButtonClick on the join button to confirm that you are ready to play. When you do so, a red check mark appearsnext to your name in the player list. The host must also click on the join button for confirmation.
When all players have clicked the join button, the start game button will appear in the lower right of thescreen. Only the host can click on it to start the game.
The chat windowThe chat windowThe chat window displays all the chattiness of the players while they are waiting around for the last idiot tojoin.
The chat barThe chat barClick on the chat bar and type something. Then hit enter. Your message will be sent to the chat windowfor all players to see.
The parametersThe parametersThe parameters define what type of multiplayer game is about to be played. Only the host can alter theseparameters by clicking on the left and right arrows to the side of the parameter listing. There are fiveparameters total.
Competitive vs. CooperativeCompetitive vs. CooperativeThe host can select competitive or cooperative play here. Definitions of both are listed above.Selecting cooperative play closes out all the other parameters.
Team vs. IndividualTeam vs. IndividualIf team play is selected, all those players of the same color are on the same team. Teammates areinvulnerable to the bombs of other teammates.
Individual play is a free-for-all scenario. No one likes you in this mode.
Player Regeneration.Player Regeneration.Player’s can either have one life, or infinite lives. If you die once in the one-life scenario, you are out ofthe game. You can still run around the level in this scenario as a ghost and watch, but you are out of thegame.
Infinite lives lets you come back into the world after you die, fresh and springtime new.
Bomb and power up regenerationWith this parameter set to ‘on,’ (the checkmark), bombs and power ups will regenerate after they are pickedup. A short amount of time will elapse first, and then the item will regenerate.
Bomb depletionThe bomb depletion parameter determines the player’s total bomb count during a game. With theparameter set to, ‘on,’ (the checkmark), bombs act like normal ammunition. Drop one, and you lose onefrom your reserve. If your reserve reaches zero, you are out of bombs and have to go pick up more.

If the parameter is set to, ‘off,’ (the ‘no’ symbol), you will always have at least one bomb. Pick up onebomb and you have one bomb. Drop the bomb. You still have one bomb, but cannot drop another until thefirst explodes. Pick up a second bomb and you now have two. Drop one bomb and then another. You stillhave two bombs, but cannot drop another until the last one explodes.
Chatting during the gameChatting during the gameYou can chat during a game by hitting the enter key. Begin typing at the lower left of the game screen.When done, hit enter again to broadcast your message to all players.
The engine broadcasts some messages, like player death and dropping out.
TUTORIALTUTORIALWelcome to the tutorial! Working through the tutorial is the fastest way to learn about all of the abilitiesand techniques employed by Jake in Lode Runner 2.
With the first tutorial level on screen, proceed through this section of the manual. Don’t be afraid if Jakedies a few times. It doesn’t cost a thing. Experiment and learn by doing!
Throughout the tutorial are sections entitled, ‘Extra Credit.’ These sections call out some of the moreinteresting and esoteric things that Jake can do in the world. You can’t necessarily perform these actions onthe tutorial level listed, but each extra credit section calls out a level where you can.
If you want to be the greatest Lode Runner on the planet, then the extra credit samples are for you.
If you are the type of person who likes to discover things halfway through a game, or come across anew power up after completing 15 levels, then the tutorial is not for you. The tutorial will show youALL the elements found in Lode Runner 2. The benefit to this approach is that you will not becaught off guard at any time throughout the game.
If you choose to work through the tutorial, follow the steps on outlined in the first part of the manual,entitled, ‘getting started: the fairly quick way.’
If you are not sure how to control Jake, you can check the default control settings listed earlier in thismanual under the heading of, ‘the default keyboard settings.’ Alternatively, you could get set up your owncontrols by hitting the Esc key during play and clicking on the ‘options’ button. Then click on the‘configure controls’ button and you are on your way.
The tutorial here assumes that you are playing Jake, and not Jane. Both characters act and react the sameway. Choose your favorite and you’ll be fine.

Tutorial Level 1: RunTutorial Level 1: Run
Welcome to the game. By the way, thanks for purchasing it. About time somebody said that around here.
So! Hit any key that is used in the game. Zoop! Jake, (or Jane), just entered the world and the clock juststarted counting.
Run around a bit. It’s fun. Just depress one of the four keys assigned to running. Or maybe you have ajoypad. Whatever.
Notice the red blocks on the corners of the level? Throughout the tutorial, those red blocks tell yousomething: they’re red in color, and they signify a corner. Yes! Jake can jump off a corner. Go and standon one of the corner blocks.
As Jake stands on the corner and faces out from the level toward nothing, look at the yellow markerhanging there in space. It looks like a skull. Brr. Skull for death. If Jake were to run off one of thesecorners, he’d die. Try it. Run off the corner and die.
You lost a life. Oh, too bad. Come back into the world and try again. Run around some more. Try to runoff the edge of the level. Not a corner, an edge. Pick some brick on an edge, halfway between two redblocks. Face outward and run. Bzzzt. You just ran into the life-saving, friendly neighborhood force field.Edges will do that. Corners allow you to fall down, edges don’t. Important rule when figuring out puzzles.Very important rule.
Run over the gold piece sitting on the level. Tada! Now the door magically opened up. It’ll do that oncethe last, (or only), gold on the level is collected.
Run through the door when you are good and ready. Doing so will record your time for the level andtake you to the next level.
That’s it: Run around, collect gold, don’t die. On to the next level.

Tutorial level 2: ClimbTutorial level 2: Climb
Time to climb! Just like in tutorial level one, you need to hit any assigned key to enter the world.
Run over to the ladders. Keep running until you run up against the ladder that touches the ground.You’ll automatically start to climb.
Using the keys assigned to running, you can play around on the ladders. Climb up or down, or movefrom side to side.
Move to the ladder on the left end of the row. Move left again off that ladder. You’ll spin off the ladderand fall to the ground.
Climb up the ladders and retrieve all the gold. Once you are on the top most edge, you won’t need totake a ladder down. You can go to the red corner bricks and fall down onto the ground. Try that.
Fall to the ground. Notice that the landing spot wasn’t an evil skull – it was a friendly circle of life. (ug.Sorry). Whenever Jake falls down, it will indicate in yellow where he’s about to land. The symbol shownwill tell you and him if it is safe or not.
Extra Credit: Try your hand at digging while Jake is resting on a ladder. With basic controls, you need tohit the dig key and the appropriate run key at the same time. With advanced controls, all it takes is theappropriate dig key. See the level entitled, ‘Shoot for Gold’ in Mona World!
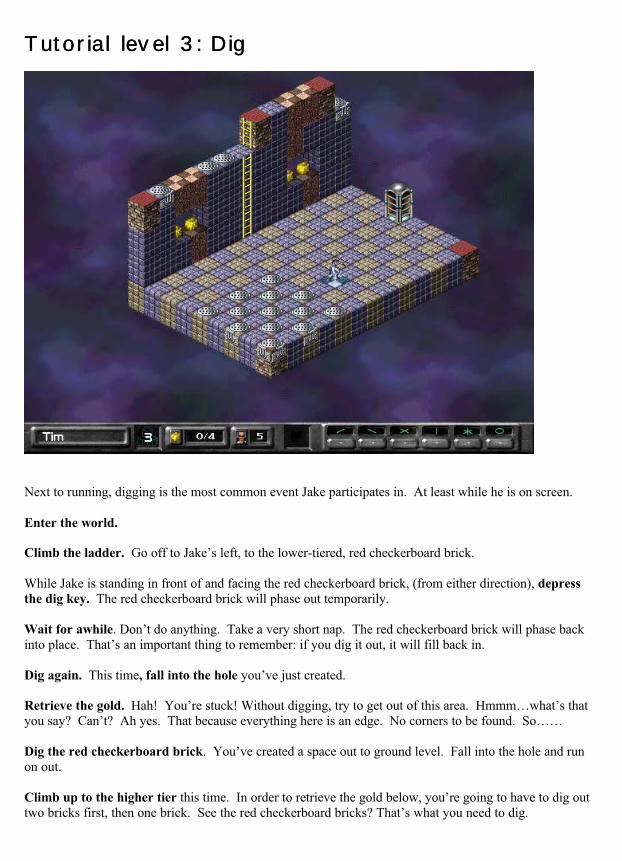
Tutorial level 3: DigTutorial level 3: Dig
Next to running, digging is the most common event Jake participates in. At least while he is on screen.
Enter the world.
Climb the ladder. Go off to Jake’s left, to the lower-tiered, red checkerboard brick.
While Jake is standing in front of and facing the red checkerboard brick, (from either direction), depressthe dig key. The red checkerboard brick will phase out temporarily.
Wait for awhile. Don’t do anything. Take a very short nap. The red checkerboard brick will phase backinto place. That’s an important thing to remember: if you dig it out, it will fill back in.
Dig again. This time, fall into the hole you’ve just created.
Retrieve the gold. Hah! You’re stuck! Without digging, try to get out of this area. Hmmm…what’s thatyou say? Can’t? Ah yes. That because everything here is an edge. No corners to be found. So……
Dig the red checkerboard brick. You’ve created a space out to ground level. Fall into the hole and runon out.
Climb up to the higher tier this time. In order to retrieve the gold below, you’re going to have to dig outtwo bricks first, then one brick. See the red checkerboard bricks? That’s what you need to dig.

Dig two bricks, fall in and then dig one brick. This is a classic Lode Runner puzzle pattern. It can getpretty tricky – some puzzles requiring that you dig all the way up from 4 bricks down to one. And in LodeRunner 2, the bricks don’t always nicely line up in a straight line like they do in this level. Sometimes youneed to dig around a corner or in an “L” shape – there’s many possibilities! You just gotta stare at it andfigger her out…..
Retrieve the last two gold. Don’t forget to dig your way out.
Before going through the door, run over to the shiny manhole-cover things. Those covers representbricks that you cannot dig. They’re called undiggables. Try it.
Try to dig out the undiggable. Jake can’t. His gun will just misfire.
Extra Credit: Graduate to the advanced dig controls! It’ll make some dig puzzles easier. Let’s see you getthat One Up under Nina’s name in the secretive credits level without advanced settings. And remember:digging your way through a level is The Crucial Element to solving all the puzzles in Lode Runner 2.

Tutorial level 4: ScaleTutorial level 4: Scale
This is a fun level! Monkey bars everywhere…. Oh – one important note and then off you go: Look for theshadows that hand-over-hand bars cast. It is an easy way to tell where they are hanging in space.
Enter the world and climb up the ladder.
Run one brick over to Jake’s left. Turn and face the thin metal bar that is anchored in the brick that Jakeis standing on. Notice how the landing spot is now two parallel lines? It’s indicating that if Jake falls fromthis point, (a corner), he’ll land on the hand-over hand bar. Try that.
Fall onto the hand-over-hand bar. Jake is now hanging from the bar. It’s an interesting way to getaround on a level.
Using the keys assigned to running, scale the hand-over-hand bars. Monkey all around. As youapproach the corner of a monkey bar, you can’t fall off, so don’t get all shy on the keyboard.
The yellow landing spot always shows where Jake would land if he let go. Try that. Using the keyassigned to ‘Let Go,’ fall down onto one of the gold pieces.
You can’t fall down directly onto three of the gold pieces on the level. You just have to swing off the endof the bar to reach them. That’s also an important thing to remember: you can swing off the end of a hand-over hand bar.
Look at the bar that is leftmost on screen. At its highest point, it is not anchored into a wall. Climb upthere and have Jake swing onto the hand-over-hand bar. If you can swing off, you can swing on…..
Extra credit: Dig a brick while hanging from a hand-over-hand bar. Just face the brick and dig. Checkout the level called, ‘By a Wire’ in Mona World!
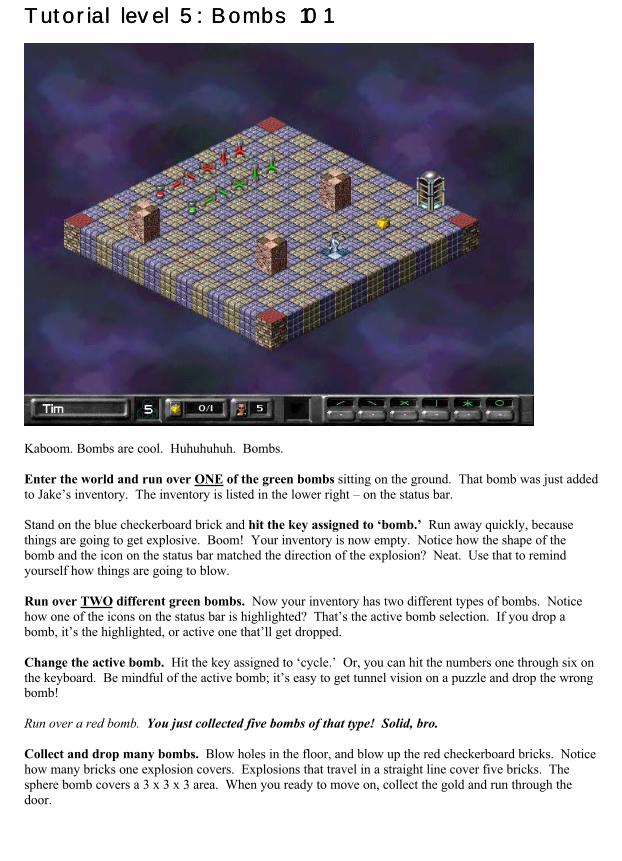
Tutorial level 5: Bombs 101Tutorial level 5: Bombs 101
Kaboom. Bombs are cool. Huhuhuhuh. Bombs.
Enter the world and run over ONE of the green bombs sitting on the ground. That bomb was just addedto Jake’s inventory. The inventory is listed in the lower right – on the status bar.
Stand on the blue checkerboard brick and hit the key assigned to ‘bomb.’ Run away quickly, becausethings are going to get explosive. Boom! Your inventory is now empty. Notice how the shape of thebomb and the icon on the status bar matched the direction of the explosion? Neat. Use that to remindyourself how things are going to blow.
Run over TWO different green bombs. Now your inventory has two different types of bombs. Noticehow one of the icons on the status bar is highlighted? That’s the active bomb selection. If you drop abomb, it’s the highlighted, or active one that’ll get dropped.
Change the active bomb. Hit the key assigned to ‘cycle.’ Or, you can hit the numbers one through six onthe keyboard. Be mindful of the active bomb; it’s easy to get tunnel vision on a puzzle and drop the wrongbomb!
Run over a red bomb. You just collected five bombs of that type! Solid, bro.
Collect and drop many bombs. Blow holes in the floor, and blow up the red checkerboard bricks. Noticehow many bricks one explosion covers. Explosions that travel in a straight line cover five bricks. Thesphere bomb covers a 3 x 3 x 3 area. When you ready to move on, collect the gold and run through thedoor.

Tutorial level 6 – Bombs 102Tutorial level 6 – Bombs 102
Bombs are chain-reactive. Bombs can fall to the ground like Jake. Jake has fun with bombs. Jake likes thebombs.
Enter the world and climb up the ladder. Jake will pick up the bomb that is at the top of the ladder.
Drop that bomb between the red checkerboard brick and the ladder. You’ll see the bomb fall down on theplatform below.
Watch the bomb explode. It’ll blow through the red checkerboard brick, but not the ladder. Undiggablebricks (like those with ladders on them) are unaffected by explosions.
Watch the chain reaction. The explosion from the bomb Jake dropped is setting off an impressive chainreaction. Neat. And, if a red bomb get in the way of a chain reaction, it’ll blow up just like a normal bombof its type. What a waste.
Blow up the bomb in mid-air. See what happened? Bombs that become active at any time in the air willstart to fall. Dormant bombs can lie anywhere, even in mid-air.
Extra credit: Try dropping a bomb and then digging the brick that it rests on. With the right timing, youcan get pretty creative with your explosives. See the level called ‘Timing’ in Gear World!
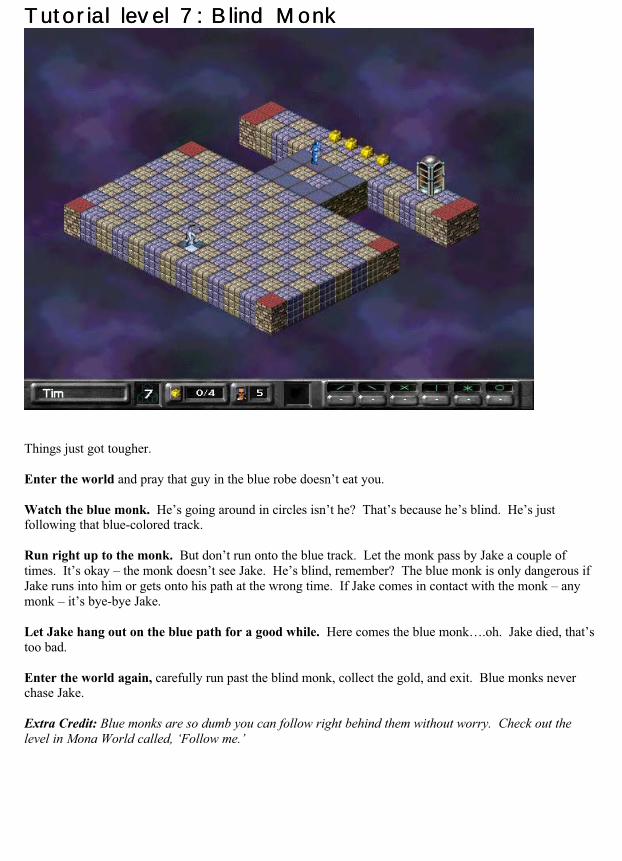
Tutorial level 7: Blind MonkTutorial level 7: Blind Monk
Things just got tougher.
Enter the world and pray that guy in the blue robe doesn’t eat you.
Watch the blue monk. He’s going around in circles isn’t he? That’s because he’s blind. He’s justfollowing that blue-colored track.
Run right up to the monk. But don’t run onto the blue track. Let the monk pass by Jake a couple oftimes. It’s okay – the monk doesn’t see Jake. He’s blind, remember? The blue monk is only dangerous ifJake runs into him or gets onto his path at the wrong time. If Jake comes in contact with the monk – anymonk – it’s bye-bye Jake.
Let Jake hang out on the blue path for a good while. Here comes the blue monk….oh. Jake died, that’stoo bad.
Enter the world again, carefully run past the blind monk, collect the gold, and exit. Blue monks neverchase Jake.
Extra Credit: Blue monks are so dumb you can follow right behind them without worry. Check out thelevel in Mona World called, ‘Follow me.’

Tutorial level 8: Wild MonkTutorial level 8: Wild Monk
More than one type of monk? Hey! This isn’t Lode Runner! Yer right. It’s Lode Runner 2.
Enter the world. Or don’t.
For now, run around on the blue and gray bricks. The wild purple monk is just walking around on hisblue track. Just like the blind monk, the wild monk doesn’t see Jake either. Just yet. If you get close to thewild monk though, he will see Jake and come after him. That’s what the red checkerboard bricks signify.
Run onto the red checkerboard bricks. Now Jake’s in trouble. That wild monk is coming after him. It’sgood time to trap a monk. Well, actually, it’s a good time to run away first. Do that. (Run far enoughaway and that wild monk will go back to his path.)
Dig a hole. In fact, dig lots of holes, if you want. The goal here is to lure the wild monk away from hispath and trap him in the hole. You see, there isn’t a monk alive that can see a hole. Monks are prettydumb. If a monk is heading for a hole, he’ll fall right into it.
Trap the monk in the hole. Anyway you can. This takes a little practice – especially on a wide-open fieldlike this level. Once the monk falls into a hole, he is caught by a round, temporary force field that restsabove his head. Jake can run on top of this force field. Try that.
Run and stop on the monk force field. If Jake stands there long enough, the brick will phase in and killthe monk. Be careful though, after a little time, some monks just regenerate right back into the world. Likethe one on this level.
Trap the monk again. This time, don’t stand on the force field. The monk will eventually climb out ofthe hole. Enough idle watching. Collect the gold. Get out of here. Purple monks sometimes chase Jake.
Extra Credit: Sometimes you need to intentionally lure a wild monk away from his path. See the difficultlevel entitled, ‘Monk Bait’ in Wacky World.

Tutorial level 9: Death MonkTutorial level 9: Death Monk
Blue Monks are wussies.
Enter the world. Before you do, get ready. Because the death monk is comin’. Oh yeah.
All the red checkerboard bricks you see are the black death monk’s domain. Indeed, ALL the blocks on thelevel are the death monk’s domain. The death monk will chase Jake down, no matter where he might be.The blue path don’t mean diddley. Black monks always chase Jake.
Run around and dig lots of holes. Panic and dig in dumb places and run around some more. Panic somemore and jump in your own hole and kill yourself. Try to trap the black monk in a hole, if you can. Or, letthe monk touch you just this once. Go ahead. Try it.

Tutorial level 10: Power up: beach ballTutorial level 10: Power up: beach ball
What sort of a power up is a beach ball? I mean, why couldn’t it be a big Uzi? Don’t you have somethingmore in a tank style? That’d be cool. Dumb game. Dumb inflatable power up. I’m gonna play Duke.
The beach ball is the power up to own these days. Enter the world.
Run over the beach ball in the middle of the level.
Depress the key assigned to ‘pick up.’ Jake now has the beach ball in his possession. He isn’t using ityet, he’s just holding on to it. The square box on the status bar shows that Jake has possession of it. Jakecan only have one power up in his possession at one time.
Depress the pick up key again. This time Jake dropped the beach ball. The key you depressed acts as atoggle: once to pick up, another time to drop. Simple. Pick up the beach ball for a second time.
Run through all the monks. Blow them away. Jake can also take explosions straight in the face. Noharm done. Only thing Jake is vulnerable to at this moment is a brick that phases in on him, or a land mine.Listen for the three chimes; that’ll end Jake’s stint as a superhero.

Tutorial level 11: Power up:Tutorial level 11: Power up: invisoinviso
Invisibility. ‘Nuff said.
You know, off the top of my head, I’d say you know what to do right at first.
Pick up and use the inviso power up. Jake turns slightly transparent. Just like the cloak, you can nowsneak past the monks. What’s the difference between the two? Jump into a competitive deathmatch game,power up the inviso, and ask your opponent if he sees you. Cool.
Run past the monks, collect the gold, on we go.

Tutorial level 12: Power up: stasis mineTutorial level 12: Power up: stasis mine
Enter the world.
Pick up one of the power ups. Run over to the area of the Blue monk, and have Jake face the blue track.
Use the stasis mine. Jake just dropped a piece of gold. But that’s no ordinary piece of gold, Carol. Oh, nono no no. It’s a sinister piece of gold.
Watch the monk walk into the gold. Phloooooo. Oo. The monk is frozen in place for a short while.Jake can do this on himself. It doesn’t accomplish much, but it’s cool to watch. Neat trick on youropponents in deathmatch too.
Extra credit: Try to stasis mine your opponent on a deathmatch level. Wait a moment and then dig beneathhim.

Tutorial level 13: Power up: land mineTutorial level 13: Power up: land mine
You know, you are two thirds of the way into this tutorial now. You deserve some recognition: Yay.Alternatively, you might abandon all these printed words and actually go outside and experience sunlight.Nah.
Enter the world and pick up a power up.
Use the land mine wherever you like. Jake will drop a land mine onto the brick he currently stands on.Each land mine power up provides three mines.
Run into the land mine. Oh, too bad. Do you always follow directions, or what? Well, now you need toreenter the world, because Jake died when you did that.
Place a land mine in the path of the monk. Death to monks. It’s a good thing.

Tutorial level 14: Power up: detonatorTutorial level 14: Power up: detonator
The detonator allows you to set off a number of bombs at once.
Enter the world. Like you did not know.
Pick up the detonator power up. You can only use the detonator power up once, so hold onto it for now.
Run over and pick up a number of bombs.
Drop the bombs throughout the level as you desire. As a bomb is dropped, you will notice that it won’tdetonate immediately. Instead, the bomb dropped by Jake will remain in place, blinking like a little weasel.That blinking indicates that the bomb is armed.
When you’ve dropped as many bombs as you like, get Jake clear of the area and use the detonator.
You might have to wait a second if you have a lower-end machine, but…..BOOM! All the bombs detonatesimultaneously and the detonator is no longer in Jake’s possession.
Now you know what the detonator does.
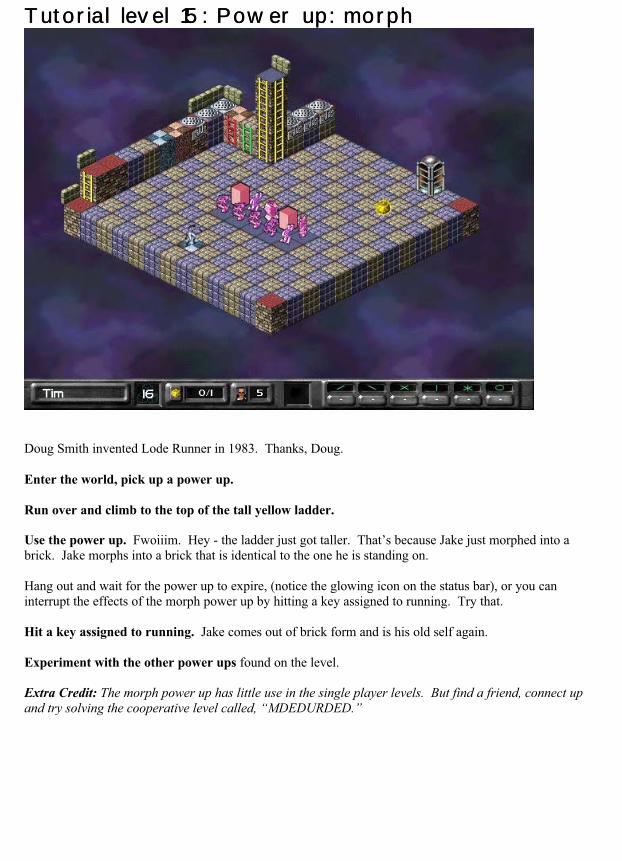
Tutorial level 15: Power up: morphTutorial level 15: Power up: morph
Doug Smith invented Lode Runner in 1983. Thanks, Doug.
Enter the world, pick up a power up.
Run over and climb to the top of the tall yellow ladder.
Use the power up. Fwoiiim. Hey - the ladder just got taller. That’s because Jake just morphed into abrick. Jake morphs into a brick that is identical to the one he is standing on.
Hang out and wait for the power up to expire, (notice the glowing icon on the status bar), or you caninterrupt the effects of the morph power up by hitting a key assigned to running. Try that.
Hit a key assigned to running. Jake comes out of brick form and is his old self again.
Experiment with the other power ups found on the level.
Extra Credit: The morph power up has little use in the single player levels. But find a friend, connect upand try solving the cooperative level called, “MDEDURDED.”
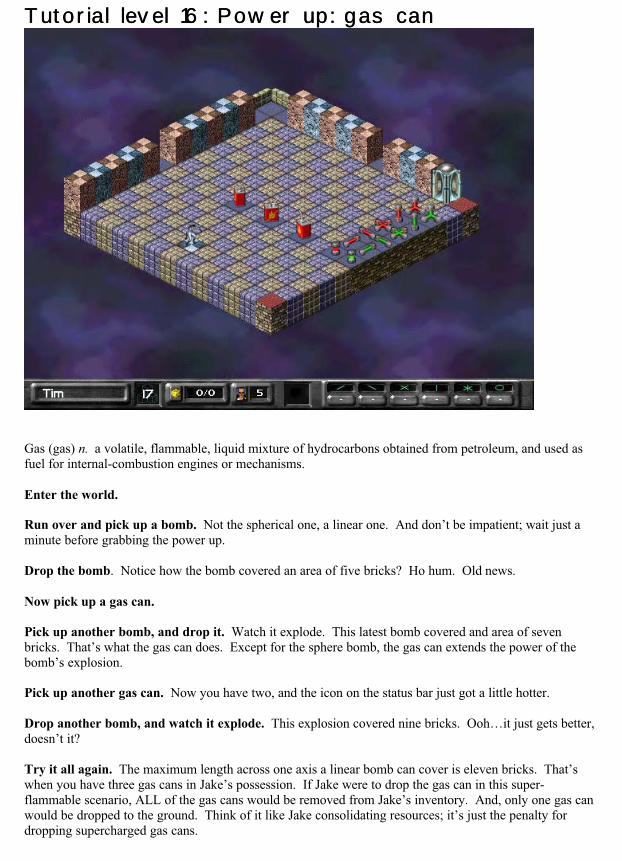
Tutorial level 16: Power up: gas canTutorial level 16: Power up: gas can
Gas (gas) n. a volatile, flammable, liquid mixture of hydrocarbons obtained from petroleum, and used asfuel for internal-combustion engines or mechanisms.
Enter the world.
Run over and pick up a bomb. Not the spherical one, a linear one. And don’t be impatient; wait just aminute before grabbing the power up.
Drop the bomb. Notice how the bomb covered an area of five bricks? Ho hum. Old news.
Now pick up a gas can.
Pick up another bomb, and drop it. Watch it explode. This latest bomb covered and area of sevenbricks. That’s what the gas can does. Except for the sphere bomb, the gas can extends the power of thebomb’s explosion.
Pick up another gas can. Now you have two, and the icon on the status bar just got a little hotter.
Drop another bomb, and watch it explode. This explosion covered nine bricks. Ooh…it just gets better,doesn’t it?
Try it all again. The maximum length across one axis a linear bomb can cover is eleven bricks. That’swhen you have three gas cans in Jake’s possession. If Jake were to drop the gas can in this super-flammable scenario, ALL of the gas cans would be removed from Jake’s inventory. And, only one gas canwould be dropped to the ground. Think of it like Jake consolidating resources; it’s just the penalty fordropping supercharged gas cans.

Tutorial level 17: Trigger: switchTutorial level 17: Trigger: switch
Triggers are the latest and greatest addition to the Lode Runner universe.
Enter the world. Take notice of the two light switches up against the wall over there.
Run over to the ‘down’ switch. Have Jake stand in front of it and face it.
Depress the key assigned to ‘use.’ Click! Some bricks just magically appeared. That’s what switches do– flip a switch up and bricks appear. Flip a switch down and bricks disappear. Flip the switch all day long;the bricks come and go all day long.
Run over, climb the ladder, and pick up the gold. Then run over to the ‘up’ switch.
Face the new switch and press the ‘use’ key.’ Click! Bricks just disappeared. Remember: Flip up tomake bricks appear, (or turn bricks, ‘on’), flip down to make bricks disappear (or turn bricks, off’).
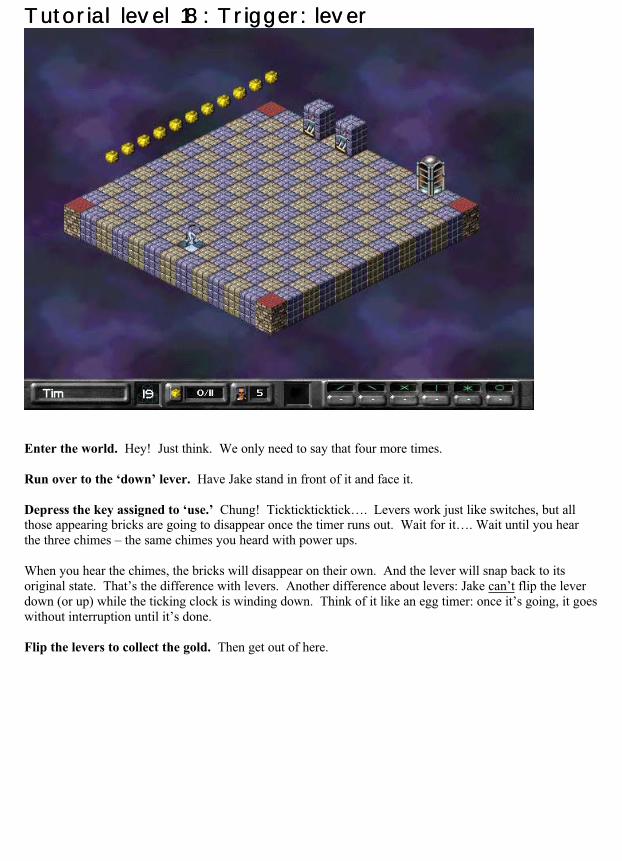
Tutorial level 18: Trigger: leverTutorial level 18: Trigger: lever
Enter the world. Hey! Just think. We only need to say that four more times.
Run over to the ‘down’ lever. Have Jake stand in front of it and face it.
Depress the key assigned to ‘use.’ Chung! Ticktickticktick…. Levers work just like switches, but allthose appearing bricks are going to disappear once the timer runs out. Wait for it…. Wait until you hearthe three chimes – the same chimes you heard with power ups.
When you hear the chimes, the bricks will disappear on their own. And the lever will snap back to itsoriginal state. That’s the difference with levers. Another difference about levers: Jake can’t flip the leverdown (or up) while the ticking clock is winding down. Think of it like an egg timer: once it’s going, it goeswithout interruption until it’s done.
Flip the levers to collect the gold. Then get out of here.

Tutorial level 19: Trigger: plateTutorial level 19: Trigger: plate
Strange plate on the groundWhat is it that you will do?Constant appearance
-Lode Runner haiku.
Enter the world.
Run over the plate you see on the ground, near the upper-left corner. Bricks just appeared. No tickingclock though, and no way to make them reappear. Those bricks will remain on the level permanently. Youcan dig and blow up those bricks just like normal ones.
Now run over the other plate near the lower left corner. Bricks just disappeared. Permanently. That’swhat plates do. They happen once, and they effect permanent change. Kind of like…marriage. Kind of.
Collect the gold and then flip the last plate, near the monk’s enclosure. Some bricks disappeared. Waita little while, and that monk will run over the plate that is in his pen. That’s right - monks can set off aplate just like Jake can.

Tutorial level 20: Trigger: trip wireTutorial level 20: Trigger: trip wire
Trip wires are the latest and greatest addition to computer games. Thank you 3D Realms.
Enter the world. Notice all the armed bombs that are on the level.
Casually run through a red glowing trip wire. As Jake does so, he’ll set off one of the bombs. Andthat’s what trip wires do.
Run through all the trip wires, until you are sated with blood-engorged dominance.
Tutorial level 21: Trigger: invisibleTutorial level 21: Trigger: invisible
So, you’ve made it all the way to the second-to-last tutorial level. And you deserve some sort of reward forsticking through it. A hint, maybe. Now, we could’ve posted the hint at the end of the tutorial section, butall those tricky, section-skipping geeks out there would’ve caught on. And they would’ve been rewardedfor nothing more than thumbing their way through. Thumbing their way through life. That’s what they do;thumb-thumb-thumb their way through. You’re not a life-thumber, are you? No. You’re a reader. Atutorial reader. So here’s the hint:
Enter the world. Relax! We’re kidding. Do that of course, but when you’re ready to play the creditslevel, (and don’t try it until you’ve mastered most of the single player levels in the game – because it’s sodarn hard), remember this: Get all the power ups out of the GT Interactive section and into the Presagesection before collecting your first gold. And that platform at the end of the long row of blind monks?That door will open once you collect all the gold. And then it’s off to secret land.
Run - but don’t stop - over a blue bridge. Don’t stop until you get to the other side. Those bricks aredisappearing right beneath Jake’s feet! That’s a display of the invisible trigger. If you run into one – justkeep moving.
Extra Credit: For a very unique use of the invisible trigger, try the Wacky World level called ‘UnstableIslands.’
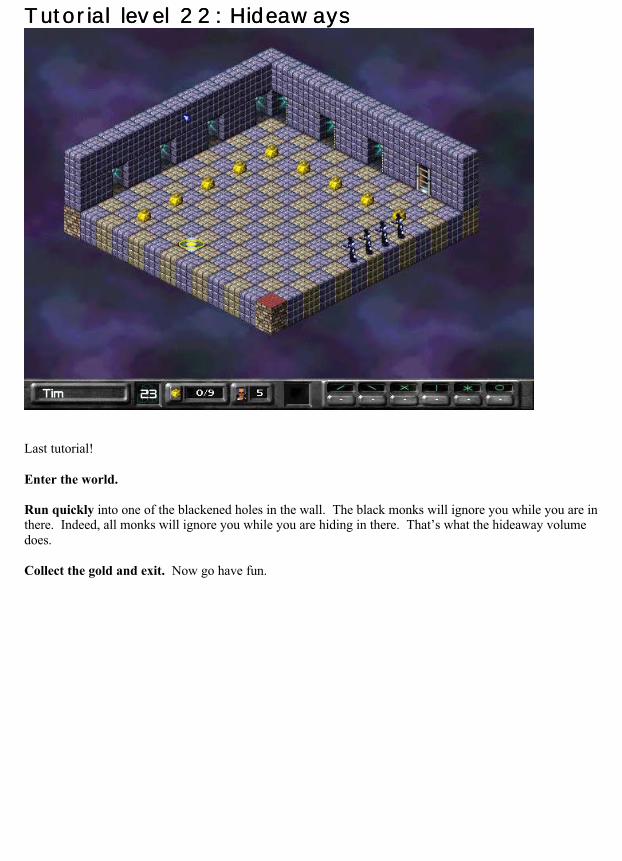
Tutorial level 22: HideawaysTutorial level 22: Hideaways
Last tutorial!
Enter the world.
Run quickly into one of the blackened holes in the wall. The black monks will ignore you while you are inthere. Indeed, all monks will ignore you while you are hiding in there. That’s what the hideaway volumedoes.
Collect the gold and exit. Now go have fun.
General ConsiderationsGeneral ConsiderationsIf you encounter any errors when uninstalling, you can uninstall manually by deleting the folder containingLodeRunner2.
Please make sure you have enough free space on your hard drive in order to play LodeRunner2. You shouldtry to keep at least 20MB of space free on your hard drive for optimal performance.
You should avoid minimizing LodeRunner2 or using ALT + TAB to switch to the desktop while runningthe game. If you do task switch out of LodeRunner2, it should be for a minimum amount of time. Due tothe nature of DirectX and DirectPlay, the game may hang if you minimize for too long.
If you end up at a black screen or the screen appears frozen, press ESC or left mouse click the screen beforetrying anything else. If you get stuck at a black screen, try using ALT+TAB to minimize the game andthen using CTRL-ALT-DELETE, selecting LodeRunner2, and clicking END TASK.
DirectX TroubleshootingDirectX TroubleshootingDirectX version 5.1 or later must be installed on your computer before you can play LodeRunner2. If youdo not have DirectX installed on your computer and you chose not to install DirectX when you installedLodeRunner2, you will receive an error message when you try to run the game. To fix this problem,reinstall LodeRunner2 and install DirectX.
If you experience sound or video problems using DirectX, connect to the DirectX Web(www.microsoft.com/directx/default.asp) site for the latest troubleshooting information.
You should also check with your video or sound card manufacturer for the latest DirectX-compatibledrivers.

Developed and Designed by PresageDeveloped and Designed by Presage
Scott Mathews Producer/Designer
Andrew Howat Lead Programmer/DesignerRichard Carlson ProgrammerScott Shumway ProgrammerCraig Vinet ProgrammerJesse Auerbach Programmer
Garrick Damir Lead ArtistKen Harris AnimatorMike Terpstra Visual EffectsNina Chen-Gentile World ArtistDan Ross World ArtistShawn Kelly Interface ArtistBill Hennes AnimatorSteve Snyder Art Director
Paul Gorman Audio design and productionLeila Alpers Female Lode Runner voice
Jareth "Doc" Modisette Level DesignerRichard Carlson Additional level designEric Simonich Additional level designScott Mathews Additional level designSteve Sefl Additional level design
Craig Vinet Prototype design and productionJesse Auerbach Prototype design and production
Scott Mathews Manual
Melinda Macauley Legal Counsel
Special Thanks: Ed Murphy, Bill Holt, Doug Smith, Cathy
Published by GT InteractivePublished by GT Interactive
Mike Wallis ProducerRobert Wong ProducerHeh-Kyu Sincock Product ManagerMary Steer Director, Product Development ServicesEvan Stein Director, MarketingLance Seymour Public RelationsPete Witcher Manual Layout
Quality Assurance provided by Absolute QualityQuality Assurance provided by Absolute Quality
For Absolute Quality:
Dave Afdahl Lead TesterSean Williams Tester

Technical Support (U.S. & Canada)Assistance Via World Wide Web
Get up-to-the-minute technical information at the GT Interactive Software web-site, athttp://www.gtisonline.com, twenty-four hours a day, seven days a week. Through this site you’ll haveaccess to our FAQ documents, (Frequently Asked Questions) which contain our latest troubleshootinginformation. You’ll have access to our FTP (File Transfer Protocol) area where you can download patchesand new enhancements as soon as they become available, our Hints/Cheat Codes area where you can pickup some tips, an E-Mail area where you can leave us your tech support problems and questions, and otherareas where you can get valuable information on GT Interactive Software products.
Help Via Telephone In The United States & Canada
For phone assistance, call GT Interactive Software’s Tech Support at 425-398-3074. We have anInteractive Voice Response and Faxback system that is available twenty-four hours a day, seven days aweek. If you should need live support, we are available Monday through Friday, 10:00 AM until 10:00 PM(EST). Please note that live Tech Support may be closed on major holidays. We ask that you do thefollowing when calling: be at your computer; have your system information ready for our techniciansincluding system make and model; RAM; video and sound card data and drivers; and any screen or errormessages you’ve encountered and where (if not currently displayed on your screen). It will expedite yourhandling significantly. You may also fax in your Technical Support questions or problems to: (425) 806-0480, or write in to the address below.
Product Return Procedures In The United States & Canada
In the event our technicians at 425-398-3074 determine that you will need to forward materials directly tous, please include a brief letter explaining what is enclosed and why. Make sure you include the ReturnMerchandise Authorization Number supplied you by the technician and your telephone number in case weneed to call you. Any materials not containing this RMA# will be returned to you unprocessed. Your mailshould be sent to the following address:
GT Interactive Software Corp.Attn: TS/CS13110 NE 177th PlaceSuite # B101, Box 180Woodinville, WA 98072-9965
If our technicians determine that the product storage medium is found to be defective within ninety (90)days of original purchase, (unless otherwise provided by applicable law), GTIS will replace the item free ofcharge, to the original purchaser, if the item is accompanied by the original dated receipt and packaging. Ifyou do not have the original receipt, or if the warranty period has expired, GTIS will replace the productstorage medium for a nominal fee.
If your product information contains Technical Support phone numbers for Europe, you must contact thosephone numbers and abide by their warranty policies.

Technical Support (Europe)Help Via Telephone In Europe
Technical Assistance: English speaking customers call 01923 209145
Assistance Technique: Remarque: Notre service de soutien technique se trouve en Angleterre. Clientsfrancophones appelez le 00 44 1923 209148
Technischer Kundendienst: Beachten Sie bitte dass sich unser technischer Kundendienst inEngland befindet. Den deutschsprachigen Kundendienst erreichen Sie unter folgender Nummer:00 44 1923 209151
OtherPlease do not make unauthorized copies The program you’ve purchased wasproduced through the efforts of many people who earn their livelihood from itslawful use. Don’t make copies for others who have not paid for the right to use it. Toreport copyright violations to the Software Publishers Association, call 1-800-388-PIR8 or write:
Software Publishers Association
1101 Connecticut Ave., Suite 901
NW Washington, DC 20036
This program is protected by United States federal and international copyright laws.
All trademarks mentioned in this manual are the property of their respective owners.