load testing user’s guide version 9 - oracle help … 2.8.6 create and verify the load test...
TRANSCRIPT

Oracle® Load TestingLoad Testing User’s Guide
Version 9.20
E15484-04
November 2010

Oracle Load Testing Load Testing User's Guide, Version 9.20
E15484-04
Copyright © 1997, 2010, Oracle and/or its affiliates. All rights reserved.
Primary Author: Rick Santos
Contributing Author: Mary Anna Brown
Contributor:
This software and related documentation are provided under a license agreement containing restrictions on use and disclosure and are protected by intellectual property laws. Except as expressly permitted in your license agreement or allowed by law, you may not use, copy, reproduce, translate, broadcast, modify, license, transmit, distribute, exhibit, perform, publish, or display any part, in any form, or by any means. Reverse engineering, disassembly, or decompilation of this software, unless required by law for interoperability, is prohibited.
The information contained herein is subject to change without notice and is not warranted to be error-free. If you find any errors, please report them to us in writing.
If this software or related documentation is delivered to the U.S. Government or anyone licensing it on behalf of the U.S. Government, the following notice is applicable:
U.S. GOVERNMENT RIGHTS Programs, software, databases, and related documentation and technical data delivered to U.S. Government customers are "commercial computer software" or "commercial technical data" pursuant to the applicable Federal Acquisition Regulation and agency-specific supplemental regulations. As such, the use, duplication, disclosure, modification, and adaptation shall be subject to the restrictions and license terms set forth in the applicable Government contract, and, to the extent applicable by the terms of the Government contract, the additional rights set forth in FAR 52.227-19, Commercial Computer Software License (December 2007). Oracle USA, Inc., 500 Oracle Parkway, Redwood City, CA 94065.
This software is developed for general use in a variety of information management applications. It is not developed or intended for use in any inherently dangerous applications, including applications which may create a risk of personal injury. If you use this software in dangerous applications, then you shall be responsible to take all appropriate fail-safe, backup, redundancy, and other measures to ensure the safe use of this software. Oracle Corporation and its affiliates disclaim any liability for any damages caused by use of this software in dangerous applications.
Oracle is a registered trademark of Oracle Corporation and/or its affiliates. Other names may be trademarks of their respective owners.
This software and documentation may provide access to or information on content, products, and services from third parties. Oracle Corporation and its affiliates are not responsible for and expressly disclaim all warranties of any kind with respect to third-party content, products, and services. Oracle Corporation and its affiliates will not be responsible for any loss, costs, or damages incurred due to your access to or use of third-party content, products, or services.

iii
Contents
Preface ................................................................................................................................................................. ix
Audience....................................................................................................................................................... ixDocumentation Accessibility ..................................................................................................................... xRelated Documents ..................................................................................................................................... xConventions ................................................................................................................................................. xi
1 Introduction
1.1 About Oracle Load Testing........................................................................................................ 1-11.2 Feature Highlights ...................................................................................................................... 1-11.2.1 The Problem with Traditional Load Testing Tools......................................................... 1-21.3 Advantages of Oracle Load Testing......................................................................................... 1-21.3.1 TrueLoad Technology ......................................................................................................... 1-21.3.2 Reuse of Existing scripts ..................................................................................................... 1-31.3.3 User-Defined Virtual User Profiles ................................................................................... 1-31.3.4 Single Point of Control with Distributed Agents............................................................ 1-31.3.5 Data-Driven Load Testing .................................................................................................. 1-31.3.6 Comprehensive Reports and Graphs................................................................................ 1-41.3.7 Real Time Server-Side Statistics Monitoring ................................................................... 1-41.3.8 Optimized for Popular IDEs .............................................................................................. 1-41.3.9 Development-to-Deployment Testing.............................................................................. 1-4
2 Planning for Load Testing
2.1 Goals of Scalability Testing ....................................................................................................... 2-12.2 Phases of Scalability Testing...................................................................................................... 2-22.3 Criteria for Accurate Scalability Testing.................................................................................. 2-22.4 Determine Additional Tools Required to Perform Testing and Diagnosis ........................ 2-32.5 Determining the Hardware Needed to Execute the Tests .................................................... 2-42.6 Who Should be Responsible for Load Testing?...................................................................... 2-52.7 What to Avoid When Testing for Scalability .......................................................................... 2-52.8 Performing Scalability Testing.................................................................................................. 2-52.8.1 Define the Process................................................................................................................ 2-62.8.2 Define the Criteria ............................................................................................................... 2-72.8.3 Planning the Scalability Tests ............................................................................................ 2-82.8.4 Planning the Load Test Scenarios...................................................................................... 2-82.8.5 Create and Verify the Test Scripts ..................................................................................... 2-9

iv
2.8.6 Create and Verify the Load Test Scenarios ...................................................................... 2-92.8.7 Execute the Tests............................................................................................................... 2-102.8.8 Evaluate the Results ......................................................................................................... 2-112.8.9 Generate Analysis Reports .............................................................................................. 2-112.9 Summary ................................................................................................................................... 2-11
3 Basics
3.1 Installing Oracle Load Testing .................................................................................................. 3-13.1.1 Installing Oracle Load Testing........................................................................................... 3-13.1.2 Popup Blockers .................................................................................................................... 3-23.1.3 Port Configuration............................................................................................................... 3-23.1.4 Installing Oracle Load Testing Agent ............................................................................... 3-33.1.4.1 Verify Network Access to Agent Systems ................................................................ 3-33.1.4.2 Configuring Oracle Load Testing Agents ................................................................. 3-43.2 Installing the Linux Agent......................................................................................................... 3-43.3 Adding Repositories................................................................................................................... 3-53.4 Setting Up Servers for ServerStats............................................................................................ 3-53.4.1 Solaris SNMP Server ........................................................................................................... 3-63.4.1.1 Starting the SNMP Agent on Solaris 2.6/2.7 ............................................................ 3-63.4.1.2 Stopping the SNMP Agent.......................................................................................... 3-63.4.1.3 Enabling SNMP Agent on Startup ............................................................................. 3-63.4.2 Oracle SNMP Server............................................................................................................ 3-73.4.2.1 Configure Master Agent .............................................................................................. 3-73.4.2.2 Configure the Encapsulator ........................................................................................ 3-73.4.2.3 Verify the start_peer Script ......................................................................................... 3-73.4.2.4 Start the SNMP Components...................................................................................... 3-83.5 Installing Remote Data Collectors ............................................................................................ 3-83.6 Changing the Web Server Port.................................................................................................. 3-83.7 Using SSL ..................................................................................................................................... 3-93.8 Oracle Application Testing Suite Tools Menu........................................................................ 3-93.9 Administrator ........................................................................................................................... 3-103.9.1 Menu Options.................................................................................................................... 3-103.9.1.1 Tools Menu................................................................................................................. 3-113.9.1.2 Help Menu.................................................................................................................. 3-113.9.1.3 Logout ......................................................................................................................... 3-113.9.2 Users Tab............................................................................................................................ 3-113.9.3 Usage Audit Tab ............................................................................................................... 3-113.9.4 Adding Users..................................................................................................................... 3-123.9.5 Editing Users ..................................................................................................................... 3-123.9.6 Deleting Users ................................................................................................................... 3-133.9.7 Auditing Usage ................................................................................................................. 3-133.10 Main Window Features........................................................................................................... 3-133.10.1 Overview of the Menu Options ...................................................................................... 3-133.10.1.1 Scenario Menu............................................................................................................ 3-133.10.1.2 Session Menu.............................................................................................................. 3-143.10.1.3 ServerStats Menu....................................................................................................... 3-143.10.1.4 Tools Menu................................................................................................................. 3-14

v
3.10.1.5 Manage Menu ............................................................................................................ 3-143.10.1.6 Help Menu.................................................................................................................. 3-143.10.1.7 Logout ......................................................................................................................... 3-153.10.2 Toolbar ............................................................................................................................... 3-153.10.3 Build Scenarios Tab ......................................................................................................... 3-153.10.4 Set Up Autopilot Tab ....................................................................................................... 3-163.10.5 Watch VU Grid Tab ......................................................................................................... 3-173.10.6 View Run Graphs Tab ..................................................................................................... 3-173.10.7 Create Reports Tab ........................................................................................................... 3-173.11 Systems Manager ..................................................................................................................... 3-173.12 Defining Systems ..................................................................................................................... 3-183.12.1 Adding New VU Agent Systems.................................................................................... 3-193.12.2 Adding New System Groups.......................................................................................... 3-193.12.3 Adding Systems to Groups ............................................................................................. 3-203.12.4 Adding New ServerStats Data Collectors ..................................................................... 3-203.12.5 Adding New Monitored Systems................................................................................... 3-213.12.5.1 Configuring JMX Monitors ...................................................................................... 3-213.12.5.2 Adding a Monitored System.................................................................................... 3-233.12.6 Renaming Systems............................................................................................................ 3-303.12.7 Editing Systems................................................................................................................. 3-303.12.8 Deleting Systems............................................................................................................... 3-303.13 Setting Options......................................................................................................................... 3-303.13.1 Custom Browser Options ................................................................................................ 3-303.13.2 Repository Options........................................................................................................... 3-313.13.3 Setting Scenario Defaults ................................................................................................. 3-313.13.4 Setting Autopilot Defaults............................................................................................... 3-393.13.5 Setting Session Start and Stop Options.......................................................................... 3-403.13.6 Setting Session Profile Options....................................................................................... 3-403.13.7 Setting Reporting Options............................................................................................... 3-403.13.8 Setting Data Bank Defaults.............................................................................................. 3-403.13.9 Setting General Options................................................................................................... 3-40
4 Defining Virtual User Scenarios
4.1 Defining Scenarios ...................................................................................................................... 4-14.1.1 Selecting Profiles .................................................................................................................. 4-14.1.2 Specifying Scenario Profile Attributes.............................................................................. 4-24.1.3 Determining the Number of Virtual Users ................................................................... 4-114.1.4 Managing Sessions ........................................................................................................... 4-114.1.5 Using the Data Bank Control .......................................................................................... 4-124.1.6 Using Synchronization Points ........................................................................................ 4-154.2 Using IP Spoofing .................................................................................................................... 4-164.3 Working with Scenario Files .................................................................................................. 4-174.3.1 Saving Scenarios ............................................................................................................... 4-174.3.2 Opening Existing Scenarios............................................................................................. 4-174.3.3 Renaming Scenarios ......................................................................................................... 4-174.3.4 Deleting Scenarios ............................................................................................................ 4-184.3.5 Removing Profiles From a Scenario ............................................................................... 4-18

vi
4.3.6 Running Scenarios from the Command Line ............................................................... 4-194.3.6.1 Error Handling........................................................................................................... 4-194.3.6.2 Examples..................................................................................................................... 4-194.4 Submitting Scenarios to Autopilot ........................................................................................ 4-204.4.1 Submit without Starting the Scenario............................................................................ 4-204.4.2 Submit and Start Scenario in Autopilot......................................................................... 4-20
5 Using the Autopilot
5.1 Specifying Start and Stop Settings............................................................................................ 5-15.1.1 Specifying When to Start Virtual Users............................................................................ 5-15.1.2 Specifying When to Stop Virtual Users ............................................................................ 5-25.2 Specifying Virtual User Rampup.............................................................................................. 5-25.2.1 Specifying How Many Virtual Users to Start at a Time................................................. 5-25.2.2 Examples ............................................................................................................................... 5-35.3 Manually Starting and Stopping the Autopilot...................................................................... 5-35.3.1 Starting the Autopilot ......................................................................................................... 5-35.3.2 Stopping the Autopilot ....................................................................................................... 5-35.4 Working with Virtual Users ...................................................................................................... 5-45.4.1 Overview of the Virtual Users Grid.................................................................................. 5-45.4.2 Controlling Individual Virtual Users................................................................................ 5-45.4.3 Managing Synchronization points .................................................................................... 5-55.4.3.1 Releasing Individual Virtual Users............................................................................ 5-55.4.3.2 Releasing Multiple Virtual Users ............................................................................... 5-55.4.3.3 Releasing Synchronization Points .............................................................................. 5-55.4.4 Modifying Run Attributes .................................................................................................. 5-65.4.5 Viewing Server Warnings................................................................................................... 5-65.4.6 Stopping All Virtual Users ................................................................................................. 5-65.4.7 Stopping the Autopilot From Starting New Virtual Users............................................ 5-65.4.8 Aborting All Virtual Users ................................................................................................. 5-6
6 Using Graphs and Reports
6.1 Setting the Reporting Options................................................................................................... 6-26.2 View Run Graphs Tab ................................................................................................................ 6-46.3 Using the Performance Statistics .............................................................................................. 6-56.4 Using Run Graphs ...................................................................................................................... 6-76.4.1 Viewing Runtime Statistics and Graphs........................................................................... 6-76.4.2 Performance Vs. Users Graph............................................................................................ 6-96.4.3 Errors Vs. Users Graph ....................................................................................................... 6-96.4.4 Performance Vs. Time Graph.......................................................................................... 6-106.4.5 Errors Vs. Time Graph ..................................................................................................... 6-106.4.6 Users Vs. Time Graph ...................................................................................................... 6-106.4.7 Users Vs. Time Graph ...................................................................................................... 6-106.5 Using Data Counters ............................................................................................................... 6-106.5.1 Using Data Counters ........................................................................................................ 6-116.6 Create Reports Tab................................................................................................................... 6-116.6.1 Viewing Reports ............................................................................................................... 6-136.6.2 Exporting Graphs and Data ............................................................................................ 6-13

vii
6.6.3 Exporting CSV Data ......................................................................................................... 6-146.6.4 Exporting to Excel............................................................................................................. 6-156.6.5 Exporting to PNG ............................................................................................................. 6-156.6.6 Exporting to JPG ............................................................................................................... 6-156.6.7 Working With Graph Queries......................................................................................... 6-156.6.7.1 Saving Graph Queries............................................................................................... 6-166.6.7.2 Running a Saved Query............................................................................................ 6-166.6.7.3 Editing Queries .......................................................................................................... 6-166.6.7.4 Deleting Queries ........................................................................................................ 6-176.6.8 Creating Report Templates ............................................................................................. 6-176.6.8.1 Creating a Custom Graph and Session List ........................................................... 6-186.7 Generating Summary Reports................................................................................................ 6-186.7.1 Scenario Reports ............................................................................................................... 6-196.7.2 Session Reports ................................................................................................................. 6-196.7.3 Using Time Range Filters ................................................................................................ 6-196.8 Managing Session Data ........................................................................................................... 6-206.9 Using Raw Data........................................................................................................................ 6-206.9.1 Enabling Raw Data Collection ........................................................................................ 6-216.9.2 Working with Raw Data Files......................................................................................... 6-216.9.3 Creating Tables in an Oracle Database.......................................................................... 6-226.9.4 Importing Raw Data CSV Files ...................................................................................... 6-236.9.5 Example SQL Command File.......................................................................................... 6-236.9.6 Example Counter Definition Control File ..................................................................... 6-246.9.7 Example Counter Data Control File............................................................................... 6-24
7 Using the Virtual User Display
7.1 Starting the VU Display ............................................................................................................. 7-17.2 Overview of the Main Window ................................................................................................ 7-17.2.1 Overview of the Toolbar Options...................................................................................... 7-17.2.2 Overview of the Browser Pane .......................................................................................... 7-27.2.3 Overview of the History List.............................................................................................. 7-27.3 Setting Virtual User Display Limits ......................................................................................... 7-37.4 Opening VU Display Logs......................................................................................................... 7-37.5 Downloading Log Files From the Server................................................................................. 7-3
8 Database and File Management
8.1 Database Management............................................................................................................... 8-18.1.1 Adding an Oracle Database ............................................................................................... 8-18.1.1.1 Additional Steps if Creating a New Schema ............................................................ 8-28.1.2 Selecting the Database to Use ............................................................................................ 8-28.1.3 Removing Databases ........................................................................................................... 8-38.1.4 Updating Databases ............................................................................................................ 8-38.2 Uploading Files ........................................................................................................................... 8-38.3 Downloading Files...................................................................................................................... 8-4

viii
9 Working With Sessions
9.1 Attaching to a Session ................................................................................................................ 9-19.2 Detaching from a Session........................................................................................................... 9-1
A Internet Status Codes
A.1 Server Status Codes ................................................................................................................... A-1A.1.1 Information Codes.............................................................................................................. A-1A.1.2 Success Codes...................................................................................................................... A-1A.1.3 Redirection Codes............................................................................................................... A-2A.1.4 Failure Codes....................................................................................................................... A-2A.1.5 Server Error Codes ............................................................................................................. A-4A.2 Internet Codes ............................................................................................................................ A-4A.2.1 Internet Error Codes........................................................................................................... A-4A.2.2 FTP API Error Codes.......................................................................................................... A-8A.2.3 Gopher API Error Codes ................................................................................................... A-8A.2.4 HTTP API Error Codes ...................................................................................................... A-9A.2.5 Additional Information.................................................................................................... A-10
B Error Messages
B.1 Viewing Error Codes ................................................................................................................. B-1B.2 Error Messages ........................................................................................................................... B-1B.3 RSWISERV Errors ...................................................................................................................... B-3B.4 Obtaining Support Files ............................................................................................................ B-4B.5 Oracle Application Testing Suite Application Service Messages ....................................... B-4B.5.1 Agents are Orphaned ......................................................................................................... B-4B.5.2 Server is Not Initialized ..................................................................................................... B-4B.5.3 Unable to Start Session....................................................................................................... B-5B.6 Problems During Load Testing................................................................................................ B-6B.6.1 Cannot Open Scenario ....................................................................................................... B-6B.6.2 Unable to Start Agent Session........................................................................................... B-6B.6.3 Performance Problems During the Load Test ................................................................ B-7B.6.4 Unexpected Agent Exit in the VU Grid ........................................................................... B-8B.7 Data Collector Startup Errors................................................................................................... B-9
ix
Preface
Welcome to the Oracle Load Testing User's Guide. This guide explains how to get started using the features and options of Oracle Load Testing for load testing of Web-based applications.
AudienceThis guide is intended for Web test engineers who will be conducting load and scalability testing of a Web site or application. The guide does require an understanding of software or Web application testing concepts. Test engineers using Oracle Load Testing should be familiar with Oracle OpenScript scripts and the concepts of Web application testing, load testing, scalability testing, and reporting.
PrerequisitesOracle Load Testing does not require any programming experience to develop load scenarios. However, test engineers performing distributed load testing in a network environment should be familiar with networking concepts and how to verify communication between workstations in a network.
Using This GuideThis guide is organized as follows:
Chapter 1, "Introduction" provides an overview of the major features of Oracle Load Testing.
Chapter 2, "Planning for Load Testing" provides a basic methodology for testing scalability and performance of Web applications throughout the life cycle.
Chapter 3, "Basics" provides descriptions of the Oracle Load Testing main window features and menu options.
Chapter 4, "Defining Virtual User Scenarios" Defining Virtual User Scenarios: explains how to define virtual user scenarios based upon the virtual user profiles.
Chapter 5, "Using the Autopilot" explains how to use the Autopilot to specify start and stop times for scenario profiles and the playback rampup specifications for each Virtual User.
Chapter 6, "Using Graphs and Reports" explains how to view real-time performance, statistics, and error information in graphs and reports.
Chapter 7, "Using the Virtual User Display" explains how to use the virtual user display to view virtual user actions during an Autopilot session.
x
Chapter 8, "Database and File Management" explains how to manage databases for use in Oracle Load Testing and how to upload and download files to and from the Oracle Load Testing Server.
Chapter 9, "Working With Sessions" explains how to attach and detach from running sessions.
Appendix A, "Internet Status Codes" lists the status codes and Internet error codes that can be returned from a server.
Appendix B, "Error Messages" provides a reference error messages and codes generated by Oracle Load Testing.
Documentation AccessibilityOur goal is to make Oracle products, services, and supporting documentation accessible to all users, including users that are disabled. To that end, our documentation includes features that make information available to users of assistive technology. This documentation is available in HTML format, and contains markup to facilitate access by the disabled community. Accessibility standards will continue to evolve over time, and Oracle is actively engaged with other market-leading technology vendors to address technical obstacles so that our documentation can be accessible to all of our customers. For more information, visit the Oracle Accessibility Program Web site at http://www.oracle.com/accessibility/.
Accessibility of Code Examples in DocumentationScreen readers may not always correctly read the code examples in this document. The conventions for writing code require that closing braces should appear on an otherwise empty line; however, some screen readers may not always read a line of text that consists solely of a bracket or brace.
Accessibility of Links to External Web Sites in DocumentationThis documentation may contain links to Web sites of other companies or organizations that Oracle does not own or control. Oracle neither evaluates nor makes any representations regarding the accessibility of these Web sites.
Access to Oracle SupportOracle customers have access to electronic support through My Oracle Support. For information, visit http://www.oracle.com/support/contact.html or visit http://www.oracle.com/accessibility/support.html if you are hearing impaired.
Related DocumentsFor more information, see the following documents in the Oracle Application Testing Suite documentation set:
■ Oracle Application Testing Suite Release Notes
■ Oracle Application Testing Suite Getting Started Guide
■ Oracle Functional Testing OpenScript User’s Guide
■ Oracle Load Testing Load Testing User’s Guide
■ Oracle Load Testing Load Testing ServerStats Guide
■ Oracle Test Manager Test Manager User’s Guide

xi
ConventionsThe following text conventions are used in this document:
Convention Meaning
boldface Boldface type indicates graphical user interface elements associated with an action, or terms defined in text or the glossary.
italic Italic type indicates book titles, emphasis, or placeholder variables for which you supply particular values.
monospace Monospace type indicates commands within a paragraph, URLs, code in examples, text that appears on the screen, or text that you enter.

xii

1
Introduction 1-1
1Introduction
The power of the Internet is that you can make your new Web application available to thousands of users instantaneously. That's also the scary part. Fortune 1000 companies are rapidly exploiting Web technology for business-critical commerce and enterprise applications. Scalability is one of the top concerns most often cited by IT managers as they prepare to deploy new Internet and Intranet applications for their companies. With the myriad of technologies and platforms to choose from, it's no wonder that the biggest concern many developers have is "will the application scale?"
Since much of the technology is new, there is significant risk with any Web project that the application will not perform adequately under real-life conditions. The only way to mitigate this risk is by emulating the load of hundreds or thousands of simultaneous users prior to the application going live.
1.1 About Oracle Load TestingOracle Load Testing provides the easiest and most accurate way to test the scalability of your e-commerce and e-business applications. Oracle Load Testing emulates thousands of "virtual users" accessing your site simultaneously, and measures the effect of the load on application performance.
TrueLoad technology ensures that your tests closely correlate with real user-load so you can confidently use Oracle Load Testing results to help make key decisions about your system's architecture, tuning, and hosting alternatives.
Oracle Load Testing is the load and scalability testing component of the Oracle Application Testing Suite. Oracle Load Testing requires no programming and is operated using an intuitive graphical user interface and scripts. Oracle Load Testing uses the scripts you develop using Oracle OpenScript, which have verification capabilities built in, to emulate the Virtual Users for load testing.
1.2 Feature HighlightsOracle Load Testing offers the following advantages for load testing Web-based applications:
■ Accurately emulates real user interactions and tests for correct responses.
■ Requires no programming and re-uses your functional and regression tests scripts with no modifications.
■ Enables you to vary load conditions on-the-fly to try "what-if" scenarios, and to create comprehensive reports and graphs with the touch of a button.

Advantages of Oracle Load Testing
1-2 Oracle Load Testing - Load Testing User's Guide
■ Allows you to access Oracle Load Testing from any networked machine using a web browser.
■ Allows multiple users to collaborate during testing by connecting to the same in progress test session to view and analyze results.
1.2.1 The Problem with Traditional Load Testing ToolsMost Web load testing tools today are simply HTTP recorders that record the low-level traffic between client browser and web server and then play back many copies of the recording simultaneously. The problem is that most web applications are dynamic, that is, the Web pages change slightly with every request to reflect such things as session IDs and dynamic content. This means that the recording you make now will be useless in five minutes.
In addition, it's very difficult to know if the server is responding correctly. For example, your server could be sending the message "Server Busy" to many users and most load testing tools will never notice the difference.
1.3 Advantages of Oracle Load TestingOracle Load Testing offers several advantages over current load testing tools for Web-based applications, as follows:
■ TrueLoad Technology
■ Reuse of existing scripts
■ User-defined Virtual User Profiles
■ Single Point of Control with Distributed Agents
■ Data-Driven Load Testing
■ Real Time Reports and Graphs
■ Real Time Server-Side Statistics Monitoring
■ Optimized for Popular IDEs
■ Web-based Access
■ Collaborative Testing
1.3.1 TrueLoad TechnologyOracle Load Testing uses innovative TrueLoad technology that closely emulates the traffic from real Web users using real Web browsers. TrueLoad includes the following unique technologies:
Object-Oriented Recording - Unlike HTTP-based tools, Oracle Load Testing records the actual objects used by the Web browser to render a page. These objects are represented graphically in Oracle Load Testing scripts. The scripts that are used for load testing are richer in detail than what is captured with HTTP recorders, and are much easier to understand, maintain, and debug. As the application-under-test evolves during the development cycle, it is very easy to make incremental updates to the script.
Automatic Response Verification - Oracle Load Testing automatically checks for the accuracy of each of the pages returned by the server. If the pages match what is defined in the script, the test will proceed without errors. If pages are returned that do not match the recorded baseline script, then an error will be flagged.

Advantages of Oracle Load Testing
Introduction 1-3
Concurrent Object Requests - Like IE and Netscape, each Oracle Load Testing Virtual User makes concurrent requests to the server using the multi-threading capabilities of the operating system; i.e. one thread gets the page, another gets images, etc. The result is that the intensity of hits generated on the back-end servers is identical to that of a real browser.
Automatic Session Management - Oracle Load Testing automatically recognizes and handles the session variables for popular development environments such as Microsoft ASP/ASP.NET, Weblogic, WebSphere, NetDynamics, ColdFusion, and WebObjects.
TrueLoad technology used in Oracle Load Testing offers the most accurate load simulation available, and produces results that closely correlate with real-life usage.
1.3.2 Reuse of Existing scriptsOracle Load Testing uses the same scripts created for functional testing with Oracle OpenScript to emulate hundreds or thousands of "virtual users." The Oracle Load Testing Build Scenarios tab lets you define any number of custom load scenarios by simply pointing and clicking on the names of the pre recorded scripts and then specifying how many virtual users of each type you wish to run.
You can change the number and type of users on-the-fly to try "what-if" scenarios as you vary the loading conditions or application settings. While running, any virtual user can be "expanded" to be able to view the actual pages seen by virtual users to aid in debugging.
1.3.3 User-Defined Virtual User ProfilesOracle Load Testing also lets you combine multiple scripts as part of a single virtual user "profile." Within these profiles, you can specify scripts to use as prolog, run, epilog, and error scripts.
User-defined profiles can also include synchronization points to create realistic multi-user situations.
1.3.4 Single Point of Control with Distributed AgentsVirtual users can be simulated by a single server or distributed among multiple servers located anywhere on a LAN or WAN. The Oracle Load Testing controller can run virtual user "agents" on distributed client stations from a single location.
Using the Oracle Load Testing Build Scenarios and Set Up Autopilot tabs, you can define any number of custom load scenarios by simply pointing and clicking on the names of the pre-recorded scripts. Oracle Load Testing scenarios define which virtual scripts each agent will run on which workstation, specifies how many virtual users of each type to run, and how virtual users should ramp up.
1.3.5 Data-Driven Load TestingOracle Load Testing easily supports data-driven testing to emulate realistic scenarios in which many different users are accessing different database records simultaneously. The Oracle OpenScript Data Bank Wizard lets you re-use a single recorded script many times with a different data set for each virtual user. For example, you can use different usernames, passwords, account balances, etc. for different virtual users. Data is automatically read in from an external Data Bank and overlaid onto each virtual user.

Advantages of Oracle Load Testing
1-4 Oracle Load Testing - Load Testing User's Guide
1.3.6 Comprehensive Reports and GraphsThe graphing capability in Oracle Load Testing lets you see the results of your Oracle Load Testing tests in real time. Performance data can be accumulated at varying levels of granularity including profiles, scripts, groups of pages, individual pages, and objects on pages. Graphs and reports include response time, error rates, number of users, and statistics such as hits-per-second, and pages-per-second, etc.
In addition, Oracle Load Testing provides for post-run analysis using a comprehensive set of graphs and reports. You can also export data for use in external programs such as Microsoft Excel for further analysis.
1.3.7 Real Time Server-Side Statistics MonitoringThe server-statistics monitoring capability of Oracle Load Testing ServerStats lets you monitor a variety of server-side application, database, system, and Web server statistics. You can configure Oracle Load Testing ServerStats to display real-time performance statistics for the various hosts and services available from the server such as, percentage of CPU usage, memory usage, Web server statistics, etc.
You can monitor specific counters in real time while running a load test. Server statistics can also be saved to the Oracle Load Testing database for later analysis.
1.3.8 Optimized for Popular IDEsOracle Load Testing is optimized for a number of popular Web development environments including NetDynamics, WebObjects, Cold Fusion and Microsoft ASP/ASP.NET, Weblogic, and WebSphere. These tools use variable session ID's and SSL, which pose problems for other load tools. Oracle Load Testing handles these environment features automatically.
1.3.9 Development-to-Deployment TestingLoad and performance testing should not just be a one-time event prior to deployment. Instead it should become an integral part of the process of designing, building, and maintaining Web applications. Load testing can and should be used to validate the system architecture in the early stages of development, to identify bottlenecks and to benchmark the application during its development, and to fine-tune the application for optimal performance prior to deployment. As the application and system infrastructure are modified over time, the standard set of performance benchmark tests developed should be re-run to ensure that performance has not been adversely affected.
Even after the application is deployed, application performance should be continuously monitored to identify slowdowns and performance degradation before users experience problems.
Oracle Load Testing is one component of the Oracle Application Testing Suite, an integrated solution for testing e-Business applications. Designed to deliver an immediate improvement in the quality of your software by offering repeatable, measurable results, the Oracle Application Testing Suite helps you keep pace with the accelerated Web application development cycle.
Oracle Application Testing Suite is fully integrated and is the first Web testing solution to leverage a single set of test assets from development through deployment, ensuring consistency in testing throughout the application life cycle and maximizing the return on investment for automated testing of your Web applications.

2
Planning for Load Testing 2-1
2Planning for Load Testing
This chapter provides a basic methodology for testing the scalability and performance of Web applications throughout the life cycle. It outlines the process for selecting the appropriate tools and the recommended steps to perform effective scalability testing. This chapter is broadly divided into the following sections:
■ Goals and Requirements of Scalability Testing: What should you aim to accomplish as a result of scalability testing for each phase of your Web application development.
■ Methodology: The process and the steps that are required to ensure performance and scalability throughout the application life cycle.
■ Test Planning and Execution: How you should plan and execute scalability testing during each phase of development.
2.1 Goals of Scalability TestingThe primary goals of a load test are as follows:
1. Determine the user limit for the Web application.
■ The user limit is the maximum number of concurrent users that the system can support while remaining stable and providing reasonable response time to users as they perform a variety of typical business transactions.
■ The user limit should be higher than the required number of concurrent users that the application must support when it is deployed.
2. Determine client-side degradation and end user experience under load.
■ Can users get to the Web application in a timely manner?
■ Are users able to conduct business or perform a transaction within an acceptable time?
■ How does the time of day, number of concurrent users, transactions and usage affect the performance of the Web application?
■ Is the degradation "graceful?" Under heavy loading conditions, does the application behave correctly in "slow motion," or do components crash or send erroneous/incomplete pages to the client?
■ What is the failure rate that users observe? Is it within acceptable limits? Under heavy loading conditions do most users continue to complete their business transactions or do a large number of users receive error messages?
3. Determine server-side robustness and degradation.
Phases of Scalability Testing
2-2 Oracle Load Testing - Load Testing User's Guide
■ Does my Web server crash under heavy load?
■ Does my application server crash under heavy load?
■ Do other middle-tier servers crash or slow down under heavy load?
■ Does my database server crash under heavy load?
■ Does my system load require balancing, or if a load balancing system is in place, is it functioning correctly?
■ Can my current architecture be fine-tuned to extract better performance?
■ Should hardware changes be made for improved performance?
■ Are there any resource deadlocks in my system?
2.2 Phases of Scalability TestingThe following are the different phases of load and scalability testing for a Web application:
Architecture Validation - tests the scalability of the architecture early in the development of a Web application, presumably after a prototype of the application has been created that can generate transactions to touch all tiers of the application. This allows the engineering organization to determine the viability of the architectural framework selected to build the Web application.
Performance Benchmarking - sets and creates the benchmark tests for the initial version of the application for all business transactions and gives the engineering and the quality assurance groups a set of metrics to quantify the scalability of the application. Based on the requirements specified, the development group will either maintain this scalability or improve upon it through the subsequent milestones.
Performance Regression - is the phase where the Web application is tested with the established benchmarks to ensure that the changes made to the application do not result in degradation of scalability. These tests are executed when key milestones have been reached or architectural modifications have been made during the development of the application. It is also common that the benchmark tests and the metrics originally set for the application be replaced or augmented with additional tests and newer metrics to reflect the improvements made to the application.
Acceptance and Scalability Fine Tuning - is the final load testing phase prior to the official launch of the Web application where all the different pieces of the Web application - including the hardware, load balancing components and all software components - are integrated and the scalability is validated. Different scenarios of real-life usage are emulated and the scalability of the final configuration is validated. These different scenarios are also used to configure the hardware and software components to yield optimal performance.
24x7 Performance Monitoring - after the application is deployed, it is essential to monitor the performance of the system under the real load generated by actual users so that crashes or slow-downs can be spotted before they become problematic. In this phase, data pertaining to real life usage can be collected to help refine future scalability tests for accurate emulation of load.
2.3 Criteria for Accurate Scalability TestingIn order to emulate a realistic load that will correlate with real-life usage of the application, a load-testing tool must:

Determine Additional Tools Required to Perform Testing and Diagnosis
Planning for Load Testing 2-3
■ produce load that stresses all tiers of a multi-tier application;
■ allow for the simulation of a realistic mix of different groups performing different types of business activities on the site during peak periods;
■ emulate page and resource request patterns produced by popular browsers such as Internet Explorer and Netscape;
■ validate the responses coming back from the Web server for each of the thousands of concurrent users to ensure that the correct pages are being returned by the Web application under stress;
■ allow for easy maintenance of the scripts as the application changes so that scalability can be re-verified each time that the system is changed.
In addition, the following criteria are also important:
■ Dynamic Dial-up of users - this capability allows you to add new users to the load test without stopping the current test. For example, if you are running a 100 user load test and you will dynamically add another 100 users, you don't have to stop the load test and restart a new test with 200 users;
■ Real-Time Virtual User Debugger - the load testing tool should have some capability to allow you to visually monitor the progress of a user at any given point in time when the load test is in progress;
■ Real-Time Graphs that allow you to understand the scalability characteristics of the application as the load test is in progress;
■ allow for distributing load tests from a number of machines on the LAN/WAN with a central point of control;
■ allow the load tests to be executed with recorded think times, random think times (following some kind of statistical distribution), and with no think times;
■ measure response times of entire business transactions in addition to individual objects on pages such as sub-frames and images;
■ allow for simulation of different types of caching behaviors;
■ run data-driven tests to allow for unique concurrent users on the system;
■ allow for complex scheduling to allow for different scenarios of starting, stopping, and ramp-up;
■ provide reports and a performance database to allow for post-run analysis and comparison with previously established benchmarks.
2.4 Determine Additional Tools Required to Perform Testing and Diagnosis
Scalability testing requires several types of software tools for the various levels of testing and reporting/analysis of results. Before you can perform the testing, you need to familiarize yourself with the following software tools that will be used:
Oracle OpenScript - used to create the various scripts that the virtual users will run. The scripts specify the actual steps used in performing the business transactions in the application. Thorough testing of an application may require many different scripts that exercise different areas (i.e. the business transactions). scripts are easily maintained over time as the application changes.
Oracle Load Testing - used to define virtual user profiles and scenarios and to perform the load test. Oracle Load Testing runs the scripts as multiple virtual users that test the

Determining the Hardware Needed to Execute the Tests
2-4 Oracle Load Testing - Load Testing User's Guide
scalability of the application. Oracle Load Testing defines the number and types of virtual users and which script(s) different virtual users run. It also provides real-time reports and graphs for evaluating the progress of the tests and post-analysis reports and graphs for post-run analysis of test results.
Oracle Load Testing ServerStats - provides real time system monitoring for a variety of data sources for monitoring the impact of the load test on the individual servers (Web server, database server, application server, and system counters). For example, the load test many require monitoring software for a Netscape Web server, a ColdFusion application server, a Tuxedo server, and a mainframe data base server.
In addition to Oracle Application Testing Suite, you may need additional software tools for other specialized monitoring or reporting.
Other System Monitoring Tools - You should determine what other software tools may be necessary for monitoring the load test.
Logging Tools - You should determine what software tools will be used for logging transaction and performance data or logging errors.
In addition, you will also need to gather data from other tools that monitor the state of different components in the application architecture. This will allow you to correlate the client-side degradation noticed during the scalability tests to one or more scalability problems with specific components of the application.
2.5 Determining the Hardware Needed to Execute the TestsTo execute a scalability test effectively, the appropriate hardware needed to run the test tools must be procured and configured.
In order to generate the load on the Web application using thousands of concurrent users you must consider the following:
Load Distribution Capability - Does the load test tool allow for load to be generated from multiple machines and controlled from a central point?
Operating System - What operating systems does the load test master and the load generation agents run under?
Processor - What type of CPU is required for the master and virtual user agent?
Memory - How much memory is required for the master and virtual user agent?
To insure that you have the appropriate hardware to execute scalability tests, ask your load testing tool vendor to provide you with the hardware requirements for the load test master and agent machines.
General Rules of Thumb:
■ Windows NT 4.0/2000/2003 are better suited to run load test virtual users than Windows 98/XP, as they are more scalable and more stable operating systems.
■ If the CPU utilization of any workstation in the load test - be it the load master or the load agents running concurrent users - is higher than 70-80%, or the memory consumption is over 85%, the processes running on that workstation will experience operating system resource conflicts and the performance results from that test station will be skewed.
■ You should consider running the load master on a separate machine if possible. The machine that serves as the master typically needs a high performance CPU. The virtual users can run on one or more machines. These machines need to have sufficient memory to run a large number of virtual users.

Performing Scalability Testing
Planning for Load Testing 2-5
■ To determine the number of virtual users that can be run on a machine, you can estimate based on the amount of memory each virtual user would consume. If the virtual users are running as threads within a process, on an average they consume 300-500 KB of memory. If the virtual users are running as separate processes within a process, on an average they consume 1024 - 2048 KB of memory.
■ A hardware configuration document is usually available from each test vendor that explains the hardware requirements for a particular load testing setup.
2.6 Who Should be Responsible for Load Testing?The following groups should have active participation in the load test:
Development Engineers and Architecture Groups - design and perform architecture validation tests and benchmarking criteria for the Web application. They work with the quality assurance groups to fine-tune the application and deployment architecture to perform optimally under load.
In some large software organizations, dedicated performance architecture groups exist that are charged with building and maintaining scalable frameworks.
Quality Assurance Organizations - design and execute development tests to verify correct operation of the application and acceptable performance.
Integration and Acceptance Organizations - design and perform integration tests that ensure all tiers and hardware operates together correctly before acceptance and deployment of the application. In most organizations, the quality assurance groups are charged with this responsibility as well.
Monitoring and Operations Groups - design and perform monitoring tests to ensure that the deployed application is available 24x7 and is not degrading under conditions of load or over long periods of regular usage.
2.7 What to Avoid When Testing for ScalabilityOrganizations performing scalability testing should avoid common pitfalls that guarantee incorrect results and potential failure. These include the following:
■ performing load tests on applications that are changing even as the tests are being performed;
■ performing load tests with applications that are not functionally tested so that even basic capabilities are not operational;
■ performing load tests on certain parts of the application that work and extrapolating the results to the entire application;
■ performing load tests with a smaller number of concurrent users and extrapolating the result for larger numbers.
2.8 Performing Scalability TestingThe general process for performing scalability testing on a Web application is as follows:
1. Define a process that is repeatable for executing scalability tests throughout the application life-cycle.
2. Define the criteria for scalability.
3. Determine the software tools required to run the load test.

Performing Scalability Testing
2-6 Oracle Load Testing - Load Testing User's Guide
4. Determine and configure the hardware and environment needed to execute the scalability tests.
5. Plan the scalability tests.
6. Plan the test scenarios.
7. Create and verify the scripts.
8. Create and verify the load test scenarios.
9. Execute the tests.
10. Evaluate the results against the defined criteria.
11. Generate required reports.
The details for the above steps are explained in the following sections.
2.8.1 Define the ProcessOnce the requirements for a load testing effort are defined, test planners need to define the process. In defining the process, test planners should consider the following issues and questions:
Required Applications - What application(s) will the load testing be performed against?
Scheduling - When will the testing be performed? What are the dates, times, build availability, and testing milestones that need to be met?
Personnel - Who will perform the analysis, planning, test development, test execution, and evaluation? Which internal department personnel (for example, business analysts, network specialists, quality assurance engineers, and developers) will be involved? Will any third-party personnel (for example, tools vendor, Internet Service Provider, or testing lab) be required?
Location - Where will the testing be performed? Will testing be performed internally or at an external location such as at an Internet Service Provider or testing lab?
Testing Environment- What SW/HW environment will the load tests be run against? When specifying the testing environment, you should look for and avoid the following common pitfalls:
■ Application stability - Make sure that the application is not being changed even as the load test is being undertaken. Quite frequently the entire application or parts of it are changed even as the application is being load tested.
■ Deployment environment - Make sure that the environment under which the application is operating when the load test is being performed is very close to the real deployment environment, if not exactly the same. For example, if your requirement states that the load test has to be performed against an HTTPS server that is configured with enough horsepower to sustain heavy loads, you should not run it against a smaller server that is used by the development group.
■ Acceptance environment - As part of the acceptance tests that are run prior to shipping the product, you must make sure that the environment used to perform the load test is exactly the same as the live production environment (as defined in a specification document).
Hardware Allocation - Is the required hardware (network, master load-test computer, agent computers, etc.) allocated and available for use? Testing vendors should be able to help determine the necessary hardware based on some of the following information:

Performing Scalability Testing
Planning for Load Testing 2-7
■ number of virtual users or the desired throughput for the application as a whole (Transactions per second);
■ maximum or acceptable duration for each business transaction;
■ maximum or acceptable duration for delay between business transactions.
2.8.2 Define the CriteriaBefore you can begin planning for load testing, you need to define the criteria that indicate whether or not the application will be accepted and ready for live deployment. When defining the criteria, you should specify the following:
Load to be Simulated - What number of virtual users need to be emulated? This indicates the number of concurrent users on the Web server.
Number of Business Transactions to Simulate - How many business transactions are to be simulated for the load test? This is determined by the analysis of the application during requirements planning and may be specified as transactions-per-second (TPS), transactions-per-hour, or simultaneous user sessions.
Types of Business Transactions to be Simulated - What are the business transactions that need to be simulated (for example, read an account balance, make an account transaction, check account details, check contributions, etc.)?
Criteria for Each Business Transactions - For each business transaction you should determine the following:
■ Acceptable response time under various loads - What is an acceptable response time under various conditions of load. For example, what is the acceptable response time when running 100 virtual users? 200 virtual users? Also, what is the acceptable response time when running the maximum limit of virtual users.
■ Acceptable failure rate - What is the acceptable failure rate for all of the transactions and for each business transactions when under load? For example, zero failures allowed for up to 100 virtual users, 5% failures for 200 virtual users, etc.
■ Categories of users - What are the categories of users to simulate in the various transactions? Are they first time users or are they repeat users? First time users have a higher overhead on the Web server since all the images must be downloaded. You can design and develop tests for both types of users and run combinations of load tests under differing conditions.
■ SSL and HTTP - Does testing require a combination of SSL and plain HTTP, only SSL, or only HTTP?
■ Browsers to simulate - What browsers will be simulated in the load test? Will testing simulate Internet Explorer or Netscape (or both)?
■ Pacing mode - What is the virtual user pacing that will be used for the load test? Will the testing be performed using recorded "think times" (that is, running with delays between pages that correspond to the same natural pauses that occurred while recording the script)? Should you try a worst-case stress test with no delays between pages? Or alternatively, should you use a random distribution of delays representing a range of user-speeds from expert users on T3 connections to novice users on slow modems?
■ Delay Between Business Transaction Runs - What delay time will be included between business transaction tests, if any?

Performing Scalability Testing
2-8 Oracle Load Testing - Load Testing User's Guide
■ With or without images - Will virtual users run with images or without images? Images constitute an additional load on the Web server. In many cases, you may want to perform load testing both with and without images for comparison.
Overall Transactions-Per-Second Throughput Required - What is the overall transactions per second (TPS) throughput required for the load test? This can be computed based on the number of simultaneous business transactions and the duration of typical transactions.
Type of Error Handling - What type of error handling is required when executing the load test? Does the load test need to be stopped on encountering certain types of error or just log the error and continue? What types of error logging do we need to enable for each concurrent user and for the different components in the application architecture?
Type of Transaction and Performance Data Logging - What type of transaction and performance data needs to be logged for the various scripts?
2.8.3 Planning the Scalability TestsDeveloping detailed test plans before you actually create the tests is an important step in making sure the tests conform to the business analysis of the application and the defined criteria.
For each test that will perform a business transaction you need to plan and define the following information:
Steps for Scripts - Each script should have a detailed sequence of steps that define the exact actions a user would perform. Multiple scripts can be used. For example, you can define a specific script that performs user login, several scripts that perform specific business transactions, and another script that logs users off. For each script, you should define the expected results. Oracle OpenScript lets you quickly and easily record scripts that emulate a user's actions.
Run-Time Data - The test plan should specify any run-time data that is needed to interact with the application, for example, login user IDs, passwords, and other run-time data specific to the application.
Data Driven Tests - If the scripts require varying data at run-time, you'll need to have an understanding of all the fields that require this data. You also need to define the data sources and any tool(s) needed to either create fictitious data or extract real data from existing databases.
Oracle OpenScript Data Bank Wizard lets you specify and connect external data sources to the scripts.
2.8.4 Planning the Load Test ScenariosIn addition to the business transaction details for each script, the test plan should also specify the different user groups and test scenarios that will be required for load testing. For each test scenario you need to plan and define the following information:
Type of User - Is this user a first-time user of the application or a repeat user? This is important if the application responds differently for a first-time user than it does for a repeat user and places more stress on the server. Oracle Load Testing scenarios can specify either a first-time user or a repeat user.
Transactions to Perform - Which business transaction(s) will this user perform? In what sequence? If the application requires a first-time user to perform some type of

Performing Scalability Testing
Planning for Load Testing 2-9
registration, then the user profile for first-time users should include a registration script.
Number of Users - How many virtual users with this user profile will run over the same time interval? Oracle Load Testing lets you specify the number of virtual users for each test scenario.
Which System - Which specific computer(s) will be used to generate the load for this user group? Oracle Load Testing can run virtual users on a single system or on multiple, distributed systems running Oracle Load Testing agents. Oracle Load Testing can specify which virtual user scenarios run on which workstations.
Which Browser - Which browser will this user group emulate? Oracle Load Testing can specify virtual user scenarios emulate either Internet Explorer or Netscape.
Pacing mode - What pacing mode will be used for the user group? Will the testing be performed using recorded think times, a range of times, or as fast as possible? Oracle Load Testing virtual user scenarios let you specify recorded, random, or no pacing.
Delay Between Business Transaction Runs - What delay time will be included between business transactions, if any? Oracle Load Testing lets you specify the amount of delay time between transaction runs.
With or Without Images - Will the user group run with images or without images? You may want to create different user groups that perform load testing both with and without images for comparison. Oracle Load Testing provides this capability.
2.8.5 Create and Verify the Test ScriptsAfter planning the scripts, you will use Oracle OpenScript to create and verify each script.
Create the Scripts - This process is defined by Oracle OpenScript (recording user actions) and the individual test plans for each script. When creating the script, you specify the following information as defined in the test plan:
■ user actions to perform
■ timers
■ tests to perform
■ data sources
Verify the Scripts - Once each script is created, you should verify that the script performs as expected and produces the desired result. Each script should be verified independent of any other scripts and in a controlled manner to simplify script debugging.
2.8.6 Create and Verify the Load Test ScenariosOnce the individual scripts have been created and verified, you can create and verify the load test scenarios. It will save you a lot of time and aggravation if you perform a number of simple verification steps before your full-blown load test.
Verify scripts with Multiple Virtual Users - Before combining multiple scripts into a single load test scenario, you should verify that you can successfully run a single script as multiple virtual users. Each script should perform as expected as defined by the criteria for the application.
Oracle Load Testing Autopilot lets you run multiple scenarios with different virtual user characteristics.

Performing Scalability Testing
2-10 Oracle Load Testing - Load Testing User's Guide
Verify distributed test execution on multiple machines - You should verify the load test tool's ability to execute the individual scripts properly in a distributed environment if you plan to use multiple CPU's for load generation. This usually involves a master system controlling the virtual user execution on multiple workstations on the network. This can help you isolate any installation or networking-related issues.
Verify real-life scenarios that include one of each user group - Before executing the full load test you should create and verify a scenario that includes one virtual user of each user group you wish to run at the same time. That is, before you run a test with 20 VU's of group A, and 20 VU's of group B, and 60 VU's of group C, you should first run one VU of group A, one VU of group B, and one VU of group C, and make sure that the results are as expected.
Create real-life scenarios - This process should be defined in the test plans for each scenario. When creating the individual scenarios, you specify the following information as defined in the test plan:
■ type of user
■ pacing mode
■ navigation/transactions to perform
■ delay between transaction runs
■ number of users of each type
■ with or without images
■ system used for load generation
■ error log settings
■ browser emulation
2.8.7 Execute the TestsOnce you have created and verified the basic load test scenarios above, you can begin to run the load test scenarios with many virtual users, and expect that the test results will be valid.
Run basic tests to ensure scaling - run tests with a minimal amount of virtual users to ensure that the system scales up correctly.
■ Run individual business transactions - Run each of the different business transactions starting with 10 virtual users scaling up to 25 - 50 virtual users.
■ Run combinations of business transactions - Run a combination of different business transaction scripts starting with 5 virtual users scaling up to 25 virtual users.
If the above two scenarios execute without any problems, the next step is to execute the full load test with the full number of virtual users of each user-group type.
Run the real-life scenarios - Run each of the real scenarios as outlined in the previous steps:
■ Increase the scenarios up to the required number of simultaneous virtual users;
■ Monitor for any errors in the system.
Re-Run these scenarios with a real user - While the load test is running, a real person should access the system through a standard browser and report performance observations:

Summary
Planning for Load Testing 2-11
■ Observe the degradation times for a real user;
■ Observe any errors if they are being reported back in the browser.
2.8.8 Evaluate the ResultsFor each of the load test scenarios, examine the following performance data and validate the results against the expected criteria:
■ Response times for groups of users at the different numbers of virtual users;
■ System throughput at various numbers of virtual users;
■ Any errors that may have occurred.
View Run graph options let you evaluate performance in real-time.
Save the erroneous HTML when problems occur to help the development group debug the errors.
2.8.9 Generate Analysis ReportsDocument the performance by generating the various reports that may be required for acceptance and deployment of the application. The following are some examples of the types of reports that can be generated from a load test:
■ Performance vs. Time
■ Statistics vs. Time
■ Users vs. Time
■ Errors vs. Users
■ Statistics vs. Users
■ Errors vs. Time
■ Any other error reports that may be required for the development group to debug and fix any problems that may have occurred.
Oracle Load Testing graphs in the Create Reports tab let you view performance and error data from the load test in multiple formats.
2.9 SummaryLoad testing throughout the development cycle has become an essential part of the process of designing scalable, reliable Web applications. Developers and QA professionals now rely on load testing tools as a means to validate system architectures, tune applications for maximum performance, and assess the impact of hardware upgrades. Consequently, it is critical that the load test results can be used with confidence as the basis for key decisions about application readiness and potential changes to the system's hardware and software. Using the methodology embodied in this guide along with accurate load testing tools such as Oracle Load Testing, you now have a systematic approach to ensure the performance of your Web applications. With load testing established as a routine part of the application lifecycle you can be sure to avoid costly "scalability surprises" when your application goes live for the first time or after any subsequent release.

Summary
2-12 Oracle Load Testing - Load Testing User's Guide

3
Basics 3-1
3Basics
This chapter explains how to get started using Oracle Load Testing. It explains how to install and start the program, and the features of the main window.
3.1 Installing Oracle Load TestingThe installation for Oracle Load Testing depends upon how you plan the virtual user test configuration. At a minimum, you need to install Oracle Load Testing on a single system that can access the Web application. If you are performing distributed testing in a networked environment, you need to install at least one station with Oracle Load Testing to use as a "Master" station and install the Oracle Load Testing Agent (or another seat of Oracle Load Testing) on the client machines to use as virtual user Agent stations.
The following sections explain the procedures for installing Oracle Load Testing and the Oracle Load Testing Agent.
3.1.1 Installing Oracle Load TestingThe Oracle Load Testing setup procedure installs both Oracle Load Testing Server and Oracle Load Testing Agent. You should not install Oracle Load Testing Agent separately on the same system. To install Oracle Load Testing:
1. Go to: http://www.oracle.com/technology/software/products/app-testing/index.html.
2. Download the Oracle Application Testing Suite product from the Oracle Web site and save it to a temporary directory on your hard disk. See the Oracle Application Testing Suite Release Notes for additional information about the product zip files.
3. Unzip the download file and then run setup.bat.
4. Follow the setup instructions to install the Oracle Application Testing Suite.
During the Oracle Application Testing Suite installation, you will be required to enter a master password to be used with Oracle Application Testing Suite products. Remember this password. It will be required to log in to the Administrator, Oracle Load Testing, and Oracle Test Manager.
Note: A product establishes its Default Repository in $installDir/OFT, where $installDir is the directory where Oracle Application Testing Suite is installed or, if Oracle Application Testing Suite is not installed, where OpenScript is installed.

Installing Oracle Load Testing
3-2 Oracle Load Testing - Load Testing User's Guide
5. Select Oracle Load Testing from the Oracle Application Testing Suite start menu to start the Oracle Load Testing user interface.
Oracle Load Testing starts in an existing browser if one is available. To set Oracle Load Testing to always start in a new browser window, change the Reuse windows for launching shortcuts setting in Internet Explorer to be deselected. In IE, select Internet Options from the Tools menu then click the Advanced tab to change the setting under Browsing from the Advanced tab to access this setting.
3.1.2 Popup BlockersPopup blockers must be turned off for Oracle Load Testing to operate. To turn off popup blockers:
Firefox - Select Options from the Tools menu. Uncheck Block Popup Windows.
Internet Explorer - Select Pop-up Blocker from the Tools menu. If the pop-up blocker is on, select Turn Off Pop-up Blocker.
3.1.3 Port ConfigurationIf you are using a firewall between the Oracle Load Testing Server machine and the agent machines, port 9001 must be open in your firewall software itself and on the agent machines. To change this port on the agent machine, change the wrapper.app.parameter.2 setting in the <installdir>\agentmanager\bin\AgentManagerService.conf file. In addition, change the port in the system configuration in Oracle Load Testing by selecting Systems from the Manage menu then selecting VU Agent Systems. Select the agent machine that is running on a different port, click Edit, and change the default port 9001 to the port that you set in the AgentManagerService.conf file.
To run Oracle Load Testing, it is recommended that you have the following general communication ports open before starting the Oracle Load Testing Application Service.
http=8088agent=9001dataCollector=7073webservice=8083https=8089
To change the ports:
1. Go to http://localhost:8088/console to start the WebLogic Console.
2. Log in as administrator using the password you defined during the Oracle Application Testing suite installation procedure.
3. In the Domain Structure, select Environment under "oats" and then select Servers.
4. Select AdminServer(Admin).
5. Change the port and release the config.
See the Oracle WebLogic Server documentation for additional information about using the Console application.
The following ports are used between the Oracle Load Testing Server and the Agent Machine itself:
■ 9001
■ 7073 - Data Collector

Installing Oracle Load Testing
Basics 3-3
■ 8088 for running OpenScript scripts only
3.1.4 Installing Oracle Load Testing AgentThe Oracle Load Testing Agent is a subset of the full Oracle Load Testing installation. You should not install the Oracle Load Testing Agent if you have Oracle Load Testing installed on the system. You install Oracle Load Testing Agent on the agent systems (which should be Windows 2000/2003 machines) when you want to run distributed load tests in a network environment and you want the agent systems to have more system resources available for running virtual users. To install the Oracle Load Testing Agent:
1. Run the downloaded setup.bat installation program from the download zip file.
2. Follow the setup procedure to the Select Components and Installation Directory screen.
3. Clear all check boxes except the Remote Agent check box.
4. Click Next as necessary to complete the installation.
5. Verify network access from Oracle Load Testing system to the Agent systems and configure the Agent Systems as explained in the next sections.
6. Configure the agent system.
7. Define the system in Oracle Load Testing by selecting Systems from the Manage menu.
Once the Oracle Load Testing Agent is installed and the Agent systems are configured, you do not need to start or run an application. When you define your Oracle Load Testing testing scenarios, you specify which Agent machine to use to run the virtual users in the System field of the Build Scenarios tab. Oracle Load Testing automatically accesses and starts the Agent when you start the Autopilot.
3.1.4.1 Verify Network Access to Agent SystemsOnce you have the Oracle Load Testing and Agent software installed on the individual systems, you should verify network access between the Oracle Load Testing system and each Agent system. This section provides basic tips and techniques to make sure that Oracle Load Testing can successfully communicate with each Agent system.
1. Make sure that you have the Oracle Load Testing Agent software loaded on the Agent system(s) and that it is the same version as the Oracle Application Testing Suite software that is loaded on the Oracle Load Testing system. The systems you plan to use as agents must have either the Oracle Load Testing Agent software or the full Oracle Application Testing Suite installed to work as agents. Do not install both the Oracle Load Testing Agent software and the Oracle Application Testing Suite software on the same system. Otherwise, resource conflicts between the two programs may occur.
2. Make sure you can successfully Ping all of the Agent systems from the Oracle Load Testing system. The names you use to Ping the systems are the same names that you will specify for the Agent systems in the Oracle Load Testing system. If you cannot successfully Ping the Agent systems, contact your network administrator to resolve the issue. If you cannot Ping the agent systems from the Oracle Load Testing system, you will not be able to run the agents from the Oracle Load Testing system.
3. In the Oracle Load Testing system, add a script to the Configure Parameters of the Scenario list. Enter the machine name or IP address of the Agent system where
Installing the Linux Agent
3-4 Oracle Load Testing - Load Testing User's Guide
you want to run the script into the System field on the Build Scenarios tab of Oracle Load Testing.
3.1.4.2 Configuring Oracle Load Testing AgentsIf you need to change the account that the agent service, and thus the agent itself uses, you must specify the login information. You may need to do this:
■ When testing with client side certificates. They are typically installed on agent machines and may only be accessible when logged in as that user.
■ When the system account has a proxy server configuration setup for use by the machine's local Internet Explorer.
To configure Oracle Load Testing agents:
1. Open Administrative Tools in the Control Panel then open Services. The Services dialog box displays.
2. Select Oracle Load Testing Agent Service.
3. Select Properties from the Action menu.
4. Click the Log On tab.
5. Select This account to specify the login information:
■ This Account - specify the account or use the Browse button to navigate to the account.
■ Password - specify the login password.
■ Confirm Password - confirm the login password.
6. Click OK.
If the password for this account changes, you must change the password using this procedure.
3.2 Installing the Linux AgentThe Linux agent is not part of the standard Oracle Application Testing Suite product download Zip file. To install the Linux agent:.
1. Go to: http://www.oracle.com/technology/software/products/app-testing/index.html
2. Download the oats-linux-agent-x.xx.xxxx.zip from the Web site.
3. Copy oats-linux-agent-x.xx.xxxx.zip to your Linux machine.
4. Enter the following commands. <installdir> should be the location where you want to install the agent.
unzip oats-linux-agent-x.xx.xxxx.zip -d <installdir>cd <installdir>/agentmanager/binchmod +x install.sh
5. Start the AgentManager with the following command:
./install.sh [existing-username]
Once the Linux agent is installed, define the remote agent system in the Oracle Load Testing Systems Manager.

Setting Up Servers for ServerStats
Basics 3-5
When you define your Oracle Load Testing testing scenarios, you specify which Agent machine to use to run the virtual users in the System field of the Build Scenarios tab. Oracle Load Testing automatically accesses and starts the Agent when you start the Autopilot.
3.3 Adding RepositoriesRepositories specify the location to use to store scripts and related asset files. Repositories also provide a way to share files between OpenScript and Oracle Load Testing. Oracle Load Testing requires that all assets live inside of a named Repository. Oracle Load Testing will not be able to find an asset located in the local file system outside of a repository. Any shared directory can be used as a repository. However, all repositories shared between Oracle Load Testing, Oracle Test Manager, OpenScript, and team members must share the same repository name. For example, if one member of a team calls a shared repository SharedRepo1, but another member of a team calls the same shared repository Shared_Repository_1, it is possible that some script assets may not be found when the team members share scripts.
To reduce the chance of local repository name conflicts, it is recommended that you create a new local repository named something unique to the user, such as <machineName>.<windowsUserName>.MyRepository. Store in this folder all scripts that are not intended to be shared among team members.
Best Practices:
■ Always store scripts and assets (i.e. databanks, .jar files, etc.) inside named repositories.
■ Avoid selecting the Save path relative to current script option in OpenScript when saving scripts.
■ Establish a consistent repository naming scheme across all Oracle Load Testing, Oracle Test Manger, and OpenScript installations.
■ Avoid using the repository named "Default" for storing local scripts. Use "machineName.Default" instead.
To add a repository:
1. Select Options from the Tools menu.
2. Select Repositories in the left pane.
3. Click New. A new entry is made in the table.
4. Enter the name of the repository.
5. Enter the location of the repository.
3.4 Setting Up Servers for ServerStatsBefore ServerStats can monitor server-side statistics, the server(s) that you plan to monitor must be configured so that the ServerStats client has remote access to the server(s).
Note: When using OpenScript scripts with Oracle Load Testing, the repository names you specify should match the repository name specified in OpenScript (including case).

Setting Up Servers for ServerStats
3-6 Oracle Load Testing - Load Testing User's Guide
This section explains the server-side requirements for ServerStats remote access.
3.4.1 Solaris SNMP ServerThe ServerStats Solaris SNMP client gathers performance statistics from a Solaris SNMP agent. ServerStats uses Sun Microsystems' proprietary SNMP extensions to report on the overall status of a machine and its individual processes.
The Solaris SNMP agent is installed and enabled by default on versions 2.6 and above of Solaris and is officially part of the Solstice Enterprise Agents suite:
http://www.sun.com/software/entagents/.
3.4.1.1 Starting the SNMP Agent on Solaris 2.6/2.7To start the SNMP agent on Solaris:
1. Verify the Solaris SNMP agent is installed and that you have the following files and directories.
The above directory and file locations apply to the default installation of Solaris and SNMP. Refer to the Solaris installation documentation for additional information about installing Solstice Enterprise Agents suite.
2. Start the Solaris SNMP agent.
If the snmpdx process is not already running, execute the following command to start the Solaris SNMP agent:
/etc/init.d/init.snmpdx start
Verify that snmpdx and mibiisa are in the process list.
3.4.1.2 Stopping the SNMP AgentTo stop the SNMP server at any time, execute the following command:
/etc/init.d/init.snmpdx stop
3.4.1.3 Enabling SNMP Agent on StartupTo enable SNMP at startup, make a new entry in the /etc/rc*.d directories, or run the startup command from your local initialization script.
Refer to the Solaris documentation for more information on installing, configuring and running the SNMP agent. Online information can be found at:
http://www.sun.com/software/entagents/docs.html
Files and Directories Description
/usr/lib/snmp/snmpdx Sun Solstice Enterprise Master Agent
/usr/lib/snmp/mibiisa Sun SNMP Agent
/etc/init.d/init.snmpdx Initialization script
/etc/snmp/conf configuration files directory
/var/snmp/mib/snmpdx.mib Master agent MIB file
/var/snmp/mib/sun.mib Sun agent MIB file

Setting Up Servers for ServerStats
Basics 3-7
3.4.2 Oracle SNMP ServerThe ServerStats Oracle SNMP client gathers performance statistics from the Oracle Enterprise Manager Intelligent Agent. The Oracle Intelligent Agent uses the Simple Network Management Protocol (SNMP). The agent exposes an extensive set of statistics through SNMP. The ServerStats Oracle SNMP client reports on statistics relating to I/O, load, and query activity.
You must configure Oracle SNMP support before starting the Intelligent Agent. Note that all configuration files for the following steps are located in the $ORACLE_HOME/network/snmp/peer directory.
This section provides basic instructions for configuring Oracle SNMP access. Additional documentation for the Oracle Enterprise Manager Intelligent Agent is located on the Oracle Documentation CD in the Server section (see section 4-19 of the Oracle8 Installation Guide). The installation documentation for the specific platforms describe how to start the agent on Windows and Linux.
3.4.2.1 Configure Master AgentIn the CONFIG.master file, make the following change:
Search for the line beginning with MANAGER.
Change the ipaddr field, coded as 130.35.10.210, to the hostname or IP address of the Oracle server to monitor using ServerStats.
You can also make other changes to the CONFIG.master file, as documented within the file.
3.4.2.2 Configure the EncapsulatorAdd the following line to the snmpd.conf file:
trap hostname_or_IP_address
where hostname_or_IP_address represents the hostname or IP address of the Oracle server to monitor using ServerStats.
In the CONFIG.encap file, you can optionally modify the port number, which is set to 161 in the default file. If you modify the port number, you must also modify the port number for NEW_SNMPD_PORT in the start_peer script.
NEW_SNMPD_PORT is the port on which the snmpd agent (the native Solaris 2.x SNMP agent) listens. Make sure this is the same port as specified in the CONFIG.encap file. NEW_TRAPD_PORT is the PEER encapsulator port to which the snmpd agent sends traps.
NEW_SNMPD_PORT and NEW_TRAPD_PORT in the start_peer script must have different port numbers. You may also modify the NEW_TRAPD_PORT port number.
3.4.2.3 Verify the start_peer ScriptThe start_peer script contains a line like the following:
SNMPD = snmpd_executable_path
If the snmpd executable on your system is not in the location indicated by the start_peer script, edit snmpd_executable_path to indicate the correct location of the snmpd executable.

Installing Remote Data Collectors
3-8 Oracle Load Testing - Load Testing User's Guide
3.4.2.4 Start the SNMP ComponentsPerform the following steps to start the SNMP components:
Verify that the SNMP components, master_peer, encap_peer, and snmpd, are not running:
$ ps -aef | grep peer
$ ps -aef | grep snmp
If any of the components are running, log in as the root user and use the kill command to terminate the processes before proceeding.
As the root user, run the start_peer script to start the PEER master agent, PEER encapsulator, and native Solaris 2.x SNMP agent:
# cd $ORACLE_HOME/network/snmp/peer
# ./start_peer -a
3.5 Installing Remote Data CollectorsYou can use remote data collectors for collecting ServerStats data. To install a remote data collector:
1. Run setup.bat installation program from the download zip file.
2. Follow the setup procedure to the Select Components and Installation Directory screen.
3. On the Select Components and Installation Directory dialog box, deselect all options except for Oracle Load Testing DataCollector.
4. Follow the setup instructions to install the remote data collector.
5. In Oracle Load Testing, select Systems from the Manage menu to display the System Manager.
6. Select ServerStats Data Collectors and click New. The Add ServerStats Data Collector Dialog Box is displayed.
7. Enter the name, host name or IP address, and port number to use for the remote data collector.
8. Click OK.
9. Click Close.
10. The remote data collector will be available to use when adding or editing monitors in a ServerStats configuration. Select the remote data collector in the Data Collector section of the Edit Monitor and Add Monitor: Step 2 of 3 dialog boxes.
3.6 Changing the Web Server PortThe default Oracle Load Testing web server port is 8088. You can change this to another port. The port number must be changed in the WebLogic Console and the Oracle Application Testing Suite configuration.
Warning: If you do not have the native Solaris 2.x SNMP agent on your system, you must not use the PEER encapsulator. To start the master agent only, run start_peer -m.

Oracle Application Testing Suite Tools Menu
Basics 3-9
To change the port in the WebLogic Console:
1. Go to http://localhost:8088/console to start the Oracle WebLogic Server Administration Console.
2. Log in as an administrator (the default username is "oats") using the password you defined during the Oracle Application Testing Suite installation procedure.
3. In the Domain Structure, select Environment under "oats" and then select Servers.
4. Select AdminServer(Admin).
5. Change the port and release the configuration.
See the Oracle WebLogic Server Administration Console documentation for additional information about using the Console application.
To change the port in the Oracle Application Testing Suite configuration:
6. Open the file <installdir>\config\oats-config.xml in a text editor.
7. Change the port number from 8088 to the new value in all property keys where the port number is used.
8. Save the file.
9. Open the Control Panel and then open Services in the Administrative Tools.
10. Restart the "Oracle Application Testing Suite Application Service" service.
11. Login to Oracle Load Testing and select Systems from the Manage menu and then select ServerStats Data Collectors.
12. Select your Oracle Load Testing server system, click Edit, enter the changed port number, and click Save.
If you are using remote data-collectors (non-localhost), Steps 11 and 12 should not be performed.
3.7 Using SSLYou can set up Oracle Load Testing to use SSL (Secure Sockets Layer). The procedure is comprised of the following steps:
1. Go to http://localhost:8088/console to start the WebLogic Console.
2. Log in as "oats" using the password you defined during the Oracle Application Testing suite installation procedure.
3. In the Domain Structure, select Environment under "oats" and then select Servers.
4. Select AdminServer(Admin).
5. Select the SSL tab.
See the Oracle WebLogic Server documentation for additional information about using the Console application.
3.8 Oracle Application Testing Suite Tools MenuThe Oracle Application Testing Suite tools menu has options for viewing version information, restarting and stopping the Oracle Application Testing Suite Application service, and creating support files for troubleshooting. Select Tools from the Oracle Application Testing Suite start menu. This menu has the following options:

Administrator
3-10 Oracle Load Testing - Load Testing User's Guide
About Oracle Application Testing Suite - displays the About Oracle Application Testing Suite dialog box that shows copyright and version information. It also has information about your system.
Create Support File - for troubleshooting purposes, creates the OATSSupport.zip file and places it on your desktop. From there you can email it to your support representative. This file contains the log files used for troubleshooting.
Oracle Application Testing Data Migration Tool - opens the Data Migration Utility for migrating data from Oracle Test Manager or Oracle Load Testing in MS Access or SQL Server databases to Oracle Database 11g.
Oracle Application Testing Database Configuration - opens the database configuration utility for adding or removing database connections for Oracle Load Testing and Oracle Test Manger.
Oracle Load Testing Agent Authentication Manager - opens the Agent Authentication Manager for defining authentication profiles for multiple load testing agent machines.
Oracle Test Manager - Win32 Client - opens the Oracle Test Manager Windows 32-bit client application. The Windows 32-bit client application contains a subset of the features in the Oracle Test Manager Web application.
Restart Oracle Application Testing Suite Application Service - stops and restarts the Oracle Application Testing Suite Application service.
Stop Oracle Application Testing Suite Application Service - stops the Oracle Application Testing Suite Application Service.
3.9 AdministratorUsing the Administrator you create user accounts, assign them user names and passwords, and assign the type of access that they have in Oracle Load Testing, none, full control, or view only. When Oracle Load Testing login is enabled, users must login to access Oracle Load Testing.
A default administrator account is created at installation. The username and password are specified during the installation process. You can change the password after logging in to the Administrator.
To start the Administrator:
1. Enter http://<machine>:8088/admin in your browser where machine is where the Oracle Application Testing Suite is installed or select the Administrator from the Oracle Application Testing Suite start menu.
2. Enter your password.
3. Select the load testing database that you want to access.
4. If you want to change the administrator password, click the User tab, select the Administrator user, and click Edit.
5. Enter the new password, verify it, and click OK.
3.9.1 Menu OptionsThis section describes the menus and options available in the Administrator.

Administrator
Basics 3-11
3.9.1.1 Tools MenuUnlock Locked Records - unlocks locked records in the database. This is an emergency feature to be used to clear out locks in the database when the product fails and leaves entries locked for editing.
Purge Deleted Records - physically removes all deleted data from the database. Deleted items are marked as such and are not shown in the user interface; however, they are kept in the database until the database is purged.
Setup E-mail Config - displays the Setup E-mail Configuration dialog box for configuring the mail server to use for e-mail notifications.
Manage Default Reports - displays the Manage Default Reports dialog box for selecting which default reports will be visible to individual users.
3.9.1.2 Help MenuContents - displays the online help table of contents.
About Admin - displays version and copyright information.
3.9.1.3 LogoutExits the Administrator.
3.9.2 Users TabThe Users tab is where you add, edit, and delete users and specify what Oracle Load Testing features they can access.
Add - displays the Add User dialog box for adding new users.
Edit - displays the Edit User dialog box for the selected user.
Delete - deletes the selected user.
Username - displays the user name for logging in to Oracle Load Testing.
First Name - displays the user's first name.
Last Name - displays the user's last name.
E-Mail - displays the user's e-mail address.
Access - displays the type of access the user has in Oracle Load Testing.
Administrator Access - displays whether the user can access the Administrator.
3.9.3 Usage Audit TabThe Usage Audit tab is where you review and audit the load testing sessions stored in the Oracle Load Testing database.
OLT Databases - lists the installed Oracle Load Testing Databases available for auditing.
User Name - shows the name of the user who ran the load test. "Anonymous" indicates the login feature was disabled for the instance of Oracle Load Testing that ran the test and there is no username associated with the test. "Command Line" indicates the load test ran from the command line interface.
Session Name - shows the name of the load testing session.
Start Time - shows the start date and time for the load testing session.

Administrator
3-12 Oracle Load Testing - Load Testing User's Guide
End Time - shows the end date and time for the load testing session.
Duration (HH:MM:SS) - shows the duration of the load testing session in hours, minutes, and seconds.
Machine Name - shows the name of the machine on which the load testing session was run.
Max VU Count - shows the maximum count of Virtual Users that were run for the load testing session.
3.9.4 Adding UsersTo add a user:
1. Click Add.
First Name - enter the user's first name.
Last Name - enter the user's last name.
E-Mail - enter the user's e-mail address.
Username - enter the user's username.
Password - enter the user's password.
Confirm Password - re-enter the user's password.
Enable E-mail notification - select this option to enable email notification when new issues are created and when the owner or assigned to fields are changed for issues.
Enable Administrator Access - gives this user the ability to log on to the Oracle Test Manager Administrator for managing the database.
2. Enter the user's information.
3. Select or clear the E-Mail notification and Administrator access options.
4. Click OK.
3.9.5 Editing UsersTo edit a user:
1. Select the user whose information you want to change.
2. Click Edit.
First Name - enter the user's first name.
Last Name - enter the user's last name.
E-Mail - enter the user's e-mail address.
Username - enter the user's username.
Password - enter the user's password.
Confirm Password - re-enter the user's password.
Enable E-mail notification - select this option to enable email notification when new issues are created and when the owner or assigned to fields are changed for issues.
Enable Administrator Access - gives this user the ability to log on to the Oracle Test Manager Administrator for managing the database.

Main Window Features
Basics 3-13
3. Make any changes.
4. Click OK.
3.9.6 Deleting UsersTo delete a user:
1. Select the user you want to delete.
2. Click Delete.
3. Click Yes when asked to confirm the deletion.
3.9.7 Auditing UsageTo audit usage:
1. Click the Usage Audit tab.
2. Select the database. The session information appears in the right pane of the Usage Audit tab. See Section 3.9.3, "Usage Audit Tab" for additional information.
3.10 Main Window FeaturesThe Oracle Load Testing main window is where you perform the majority of your load/performance testing activities. The main window consists of the menu bar, toolbar, and five dialog tabs.
3.10.1 Overview of the Menu OptionsThe Oracle Load Testing main menu has the following options:
■ Scenario
■ Session
■ ServerStats
■ Tools
■ Manage
■ Help
■ Logout
The following sections explain each of the menu options.
3.10.1.1 Scenario MenuThese menu options let you work with scenario files. The following options are available:
New- creates a new Oracle Load Testing scenario.
Open- opens an existing Oracle Load Testing scenario to run or modify.
Save- saves any changes to the currently open Oracle Load Testing scenario. If the scenario has not been saved before, Oracle Load Testing asks for a filename.
Save As - saves the currently open Oracle Load Testing scenario using a different filename.

Main Window Features
3-14 Oracle Load Testing - Load Testing User's Guide
3.10.1.2 Session MenuThe Sessions Menu options let you manage sessions. The following options are available:
Attach - opens a dialog box for selecting another running session that you want to view.
Detach - detaches from the current session.
Stop - stops the current session.
Terminate Idle Agents - stops all idle agent processes running on your agent systems.
3.10.1.3 ServerStats MenuThe ServerStats Menu options let you configure ServerStats configurations, metric profiles, and metrics, as well as start the virtual user display.
Configurations - opens a dialog box for managing ServerStats configurations.
Metric Profiles - opens a dialog box for configuring ServerStats metric profiles.
Metrics - opens a dialog box for configuring ServerStats metrics.
ServerStats Display - opens the ServerStats Status dialog box that shows the results and status of ServerStats monitors.
3.10.1.4 Tools MenuThe following options are available:
Options - opens a dialog box for setting the Oracle Load Testing preferences.
VU Display - starts the virtual user display, which lets you monitor the progress of virtual users and view any errors virtual users may run into during playback.
Sync Point Status - opens a dialog box that displays the status of all sync points and lets you release individual sync points or all sync points.
Upload File - opens a dialog box for uploading a file to the repository.
Download File - opens a dialog box for downloading a file to the local system.
3.10.1.5 Manage MenuThe following options are available:
Systems- opens a dialog box for adding, editing, and deleting systems that can be configured as VU Agents, Data Collectors, or Monitored Systems.
Databases - opens a dialog box for adding, editing, and deleting databases.
Sessions- opens a dialog box for editing and deleting sessions from the database.
Scenarios - displays a dialog box for editing and deleting scenarios.
Graphs - displays the Graph Query Manager for editing and deleting saved graph queries.
3.10.1.6 Help MenuThe following options are available.
Contents - opens the help system contents.
About - provides version, licensing, and serial number information.

Main Window Features
Basics 3-15
3.10.1.7 LogoutExits Oracle Load Testing.
3.10.2 ToolbarThe toolbar has the following buttons:
New Scenario - Creates a new Oracle Load Testing scenario.
Open Scenario - Opens an existing Oracle Load Testing scenario to run or modify.
Save Scenario - Saves any changes to the currently open Oracle Load Testing scenario. If the scenario has not been saved before, Oracle Load Testing asks for a filename.
Start Load Test - Submits the current scenario to the Autopilot and automatically starts the scenario.
Stop All Virtual Users - Stops all virtual users that are running in the current scenario.
Abort All Virtual Users - Aborts all virtual users that are running in the current scenario.
Pause Autopilot - Pauses the autopilot.
3.10.3 Build Scenarios Tab The Build Scenarios tab is where you specify which scripts and user-defined profiles to include in the scenario.
The Select scripts list shows the Oracle OpenScript scripts in the current repository/workspace.
The Configure parameters of the scenario list shows the scripts and user-defined profiles selected for the current Oracle Load Testing scenario. You can configure each using the options provided here.
You can change the fields that are displayed and the default values for each field by selecting Options from the Tools menu then selecting Scenario Defaults and checking or unchecking the Show field.
Path - shows the directory path of the selected repository. The default repository is the OFT folder in your installation directory. New repositories can be created by selecting Options from the Tools menu then selecting Repositories.
<Script list> - a list of Oracle OpenScript scripts that are available to include in virtual user scenarios.
Configure parameters of the scenario - a list of scripts selected to be in the load scenario. The fields displayed here can be customized by selecting Options from the Tools menu then selecting Scenario Defaults. Select the fields you want to display by checking the field's corresponding checkbox in the Show column.
# VUs - specifies the number of virtual users to run for the selected profile. For each virtual user, Oracle Load Testing runs a separate instance of the script(s) specified in the virtual user profile.
System - specifies the machine on which the virtual users will run. When running virtual users across systems on a LAN/WAN, select the system name of a system running either Oracle Load Testing Server or Oracle Load Testing Agent from the option dropdown. Systems are defined using the VU Agents option in the System Manager. Initially, you must define the machine names or IP addresses of the

Main Window Features
3-16 Oracle Load Testing - Load Testing User's Guide
system(s). Once the name(s) or IP addresses have been specified, you can select the system name from the drop-down list for future load tests.
When determining the number of virtual users to run per process or system, you need to include the Client overhead in the resource allocation. Each VU requires approximately 350 KB-500 KB of memory to run. When calculating the available memory to run VUs on an agent system, you must account for a 20-30% client system overhead. Therefore, you only have 70-80% of the physical memory (RAM) available to run VUs.
Iteration Delay - specifies the amount of time (in seconds) to wait between iterations of virtual user runs. You specify the number of iterations using the Autopilot.
VUs Pacing - specifies the script playback delay between pages for each virtual user. This is the amount of time the user looks at a page before making the next request and is commonly referred to as "think time." There are four options:
■ Recorded - uses the delay times that were recorded in the Oracle OpenScript script. You can set minimum and maximum delay times (in seconds) that override the script delay times in the Minimum and Maximum edit boxes.
■ Recorded/Random - uses random delay times based upon the recorded user delay. Oracle Load Testing sets the low end of the random range as the actual recorded user delay minus the Lower percentage setting. Oracle Load Testing sets the high end of the random range as the actual recorded user delay plus the Upper percentage setting. For example, if the actual recorded delay time was 100 seconds and the Lower and Upper settings are 10% and 25% respectively, Oracle Load Testing uses random delay times between 90 and 125 seconds.
■ Random - uses random times for Virtual User pacing. You can set minimum and maximum delay times for random delay in the Minimum and Maximum fields.
■ No Delay - plays back the scripts at the fastest possible speed with no time between page requests.
Each line also includes the following buttons:
Edit Scenario Details - Displays the Edit Scenario Details dialog box for configuring the parameters script in the scenario.
Data Bank Control - Displays the Data Bank Control dialog box for configuring the Data Bank options for individual scripts.
Delete - Deletes the selected profile from the scenario.
Configure Sync Point - Displays the Sync Point Status dialog box for configuring the Synchronization point parameters for the scripts in the scenario.
For information about the Selected VU Profile settings see Chapter 4, "Defining Virtual User Scenarios".
3.10.4 Set Up Autopilot Tab The Set up Autopilot tab is where the information needed to control the running of the scenario is specified. The Autopilot controls the starting and stopping of the scenario, the frequency with which new virtual users are started and the number of virtual users that are started from among the profiles submitted to it.
You specify the start and stop times, and the virtual user rampup specifications for the Submitted Scenario Profile. The Set up Autopilot tab also shows the list of virtual user profiles submitted in the Oracle Load Testing scenario and the available ServerStats Configurations for monitoring back-end systems during a load test.

Systems Manager
Basics 3-17
The Timing and event controls section is where you specify when the Scenario profiles should start and when they should end and the rate at which the virtual users within the Scenario profile list should start.
The ServerStats Configuration section is where you specify an Oracle Load Testing ServerStats configuration to run during the load test. Each ServerStats configuration contains a collection of monitors for monitoring performance of back-end systems during a load test to identify bottlenecks.
The Submitted Scenario Profiles list shows the virtual user profiles submitted to the Autopilot as part of the Oracle Load Testing scenario. The list also shows the number of virtual users specified for each profile, the number of virtual users remaining to be started, and other details of the Scenario run.
For information about using the Autopilot, see Chapter 5, "Using the Autopilot".
3.10.5 Watch VU Grid Tab The virtual user grid lists the currently running virtual users and the profile and playback details associated with each.
For information about using the virtual users grid, see Chapter 5, "Using the Autopilot".
3.10.6 View Run Graphs Tab The View Run Graphs tab is where you can view runtime graphs and reports. These graphs are only available for the running load test session. Use the Create Reports tab to view reports and graphs after the load test has finished running.
The View Run Graphs tab is refreshed according to what is set in the Graph refresh interval setting in the reporting options (select Options from the Tools menu).
To stop the display from being refreshed click the Pause button.
To resume refreshing the display, click the Resume button. Note that exiting the tab and returning to the tab will also resume refreshing the display.
The Overview tab shows a thumbnail view of each graph. Click on a thumbnail to see a full view of that graphs or reports.
Click the New Graph tab to create a custom run time graph.
For information about reports and graphs, see Chapter 6, "Using Graphs and Reports".
3.10.7 Create Reports TabThe Create Reports tab is where you can view reports and graphs for sessions for which you have saved data for reporting.
For information about reports and graphs, see Chapter 6, "Using Graphs and Reports".
3.11 Systems ManagerThe System Manager, accessed by selecting Systems from the Manage menu, lets you add and remove Systems and create System groups.
The Systems Manager lets you configure four types of systems and groups and has the following options for each:

Defining Systems
3-18 Oracle Load Testing - Load Testing User's Guide
VU Agent Systems - these are systems that you want to use as remote virtual user agents for running virtual users during a load test. These systems appear in the Systems option of the Build Scenario tab.
■ New - displays the Add System dialog box for adding a new VU Agent system.
■ Edit - displays the Edit System dialog box for configuring the system name, IP address Start parameters.
■ Delete - deletes the selected systems. To select more than one system, hold down the CTRL key.
■ Name - lists the available systems.
VU Agent System Groups - system groups let you distribute virtual users across multiple VU Agent systems that have been grouped.
■ New - displays the Add System Group dialog box for configuring a new system group.
■ Edit - displays the Edit System Group dialog box for adding or deleting systems from the group.
■ Delete - deletes the selected system groups. To select more than one system group, hold down the CTRL key.
■ Name - lists the system groups that are available.
ServerStats Data Collectors - these are systems that you want to use as remote data collectors for gathering ServerStats data.
■ New - displays the Add System dialog box for adding a new ServerStats data collector.
■ Edit - displays the Edit System dialog box for editing the selected data collector.
■ Delete - deletes the selected data collectors. To select more than one data collector, hold down the CTRL key.
■ Name - lists the available data collectors.
Monitored Systems - these are systems that you want to monitor with ServerStats.
■ New - displays the Add System dialog box for adding a new system that you want to monitor using ServerStats.
■ Edit - displays the Edit System dialog box for editing the selected system.
■ Delete - deletes the selected systems. To select more than one system, hold down the CTRL key.
■ Name - lists the available systems.
For more information about using the System Manager, see Section 3.12, "Defining Systems".
3.12 Defining SystemsBefore you can select systems in Oracle Load Testing Scenarios, you must define the machines that are Oracle Load Testing agent systems. The Oracle Load Testing System
Note: Systems and system groups appear in the System list on the Build Scenarios tab.

Defining Systems
Basics 3-19
Manager lets you define system names or IP addresses and create system groups that the Oracle Load Testing scenarios can use as agents.
In addition, if you are using Oracle Load Testing ServerStats you must define the data collector systems and systems being monitored.
3.12.1 Adding New VU Agent SystemsTo add a new VU Agent system:
1. Select Systems from the Manage menu to display the Systems Manager.
2. Select VU Agent System.
3. Click New to display the Add VU Agent System dialog box.
General - enter the system information.
■ Name - enter the system name.
■ Host Name or IP - enter the host name or IP address of the system.
Start - enter the system information.
■ Port - enter the port number to use.
■ Username - enter the username to use for authentication.
■ Password - enter the password to use for authentication.
Test - checks to see whether the Oracle Load Testing server can contact the system and displays an informational message indicating if the system is available.
4. Enter the name of the system in the Name field, and enter the name or IP address of the system in the Host Name or IP field.
5. Enter the port and authentication settings.
6. Click OK.
7. Click Close.
3.12.2 Adding New System GroupsTo add a new system group:
1. Select Systems from the Manage menu.
2. Select VU Agent System Groups.
3. Click New to display the Add System dialog box.
Name - enter the name of the system group.
Note: See the installation section at the beginning of this chapter for more information about installing the Oracle Load Testing Agent software on each system and verifying network access between the Oracle Load Testing system and each agent system.
Note: Systems and system groups appear in the Systems list on the Build Scenarios tab.

Defining Systems
3-20 Oracle Load Testing - Load Testing User's Guide
Systems - lists the systems that are available to add to the group. Select the systems that you want to add and deselect the systems you want to remove.
4. Enter the name of the group in the Name field.
5. Select the systems you want to add from the Systems list.
6. Click OK.
3.12.3 Adding Systems to GroupsTo add systems to groups:
1. Select Systems from the Manage menu.
2. Select VU Agent System Groups.
3. Either select the group you want to change and click Edit or click New to create a new group.
4. Select the systems you want to add from the Systems list.
5. Click OK.
6. Click Close.
3.12.4 Adding New ServerStats Data CollectorsTo add a new ServerStats Data Collector:
1. Select Systems from the Manage menu to display the Systems Manager.
2. Select ServerStats Data Collector.
3. Click New to display the Add ServerStats Data Collector dialog box.
General - enter the system information.
■ Name - enter the name of the data collector.
■ Host Name or IP - enter the host name or IP address of the data collector.
Remote Data Collector - - enter the port information.
■ Port - enter the port number to use.
Test - checks to see whether the Oracle Load Testing server can contact the system and displays an informational message indicating if the system is available.
4. Enter the name of the system in the Name field, and enter the name or IP address of the system in the Host Name or IP field.
5. Click OK.
6. Click Close.
Note: Systems and system groups appear in the Systems list on the Build Scenarios tab.
Note: Systems and system groups appear in the Systems list on the Build Scenarios tab.

Defining Systems
Basics 3-21
3.12.5 Adding New Monitored SystemsMonitored systems are those systems that will be monitored using ServerStats. In addition to defining the system, you can have Oracle Load Testing discover the components that are available for monitoring, manually add new component types and components, and configure the data sources to use. Information that is configured here will be available when you configure ServerStats.
3.12.5.1 Configuring JMX MonitorsA data collector can only monitor one type of JMX monitor at a time. To monitor more than one type of JMX monitor at the same time, you must use a separate data collector for each. All JMX monitors require some set up. Following are the broad steps followed by the specific procedures:
WebLogic 9.0
1. Copy configuration jar files to the data collector machines
WebSphere 6.0, 5.1, 5.0
1. Copy configuration jar files to the data collector machines
2. Update the properties file
WebSphere 6.1, 7.0
1. Copy configuration jar files to the data collector machines
2. Copy keystore/trust store files
The following are the default values for the monitored system:
Port: 8880 (default)
Username: admin (check with the JMX system administrator for changes to the username)
Password: password (check with the JMX system administrator for changes to the password)
Trust Store File: C:\keys\DummyClientTrustFile.jks
Trust Store Password: WebAS
Key Store File: C:\keys\DummyClientKeyFile.jks
Key Store Password: WebAS
WebLogic 8.0, 8.1
1. Copy configuration jar files to the data collector machines
2. Create jar files
3. For WebLogic 8.1, update the properties file
Copying the JMX Server Installation Jar Files
Before these server types can be used, the JMX agent needs one or more specific configuration jar files to be copied from the JMX server installation to the <installdir>\DataCollector\classes directory on all machines that will be used as data collectors for sampling from that server. The default <installdir> is C:\OracleATS. The
Note: Systems and system groups appear in the Systems list on the Build Scenarios tab.
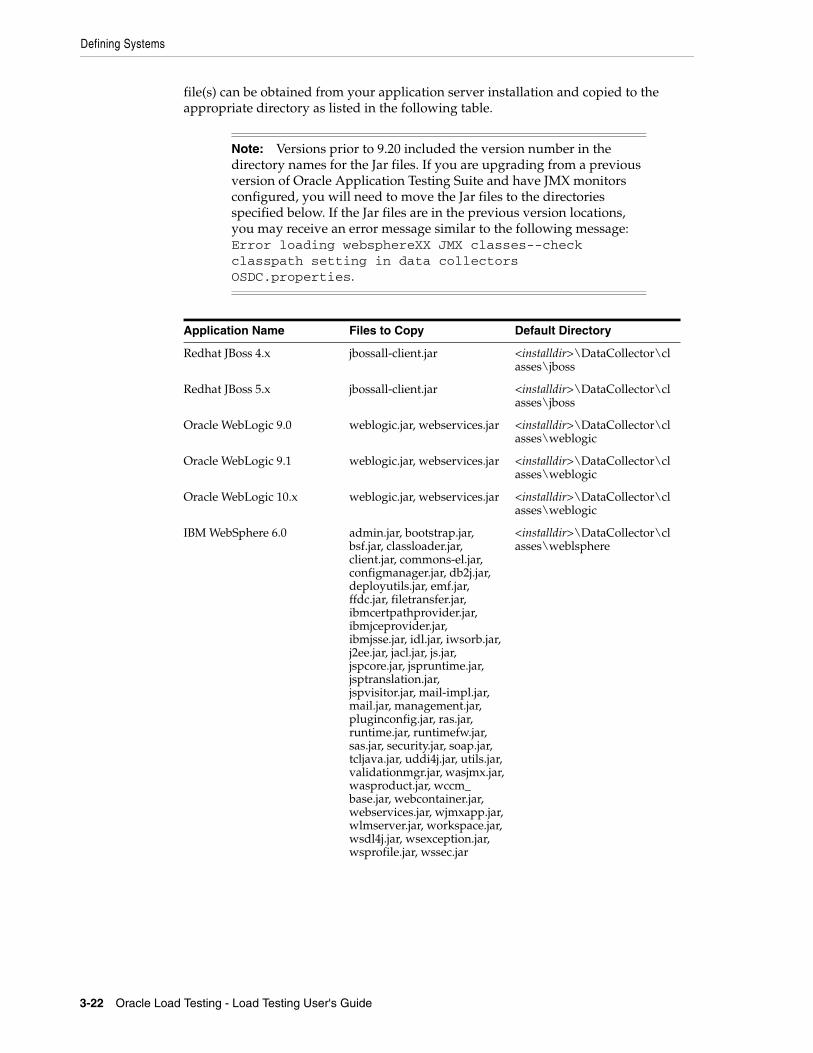
Defining Systems
3-22 Oracle Load Testing - Load Testing User's Guide
file(s) can be obtained from your application server installation and copied to the appropriate directory as listed in the following table.
Note: Versions prior to 9.20 included the version number in the directory names for the Jar files. If you are upgrading from a previous version of Oracle Application Testing Suite and have JMX monitors configured, you will need to move the Jar files to the directories specified below. If the Jar files are in the previous version locations, you may receive an error message similar to the following message: Error loading websphereXX JMX classes--check classpath setting in data collectors OSDC.properties.
Application Name Files to Copy Default Directory
Redhat JBoss 4.x jbossall-client.jar <installdir>\DataCollector\classes\jboss
Redhat JBoss 5.x jbossall-client.jar <installdir>\DataCollector\classes\jboss
Oracle WebLogic 9.0 weblogic.jar, webservices.jar <installdir>\DataCollector\classes\weblogic
Oracle WebLogic 9.1 weblogic.jar, webservices.jar <installdir>\DataCollector\classes\weblogic
Oracle WebLogic 10.x weblogic.jar, webservices.jar <installdir>\DataCollector\classes\weblogic
IBM WebSphere 6.0 admin.jar, bootstrap.jar, bsf.jar, classloader.jar, client.jar, commons-el.jar, configmanager.jar, db2j.jar, deployutils.jar, emf.jar, ffdc.jar, filetransfer.jar, ibmcertpathprovider.jar, ibmjceprovider.jar, ibmjsse.jar, idl.jar, iwsorb.jar, j2ee.jar, jacl.jar, js.jar, jspcore.jar, jspruntime.jar, jsptranslation.jar, jspvisitor.jar, mail-impl.jar, mail.jar, management.jar, pluginconfig.jar, ras.jar, runtime.jar, runtimefw.jar, sas.jar, security.jar, soap.jar, tcljava.jar, uddi4j.jar, utils.jar, validationmgr.jar, wasjmx.jar, wasproduct.jar, wccm_base.jar, webcontainer.jar, webservices.jar, wjmxapp.jar, wlmserver.jar, workspace.jar, wsdl4j.jar, wsexception.jar, wsprofile.jar, wssec.jar
<installdir>\DataCollector\classes\weblsphere
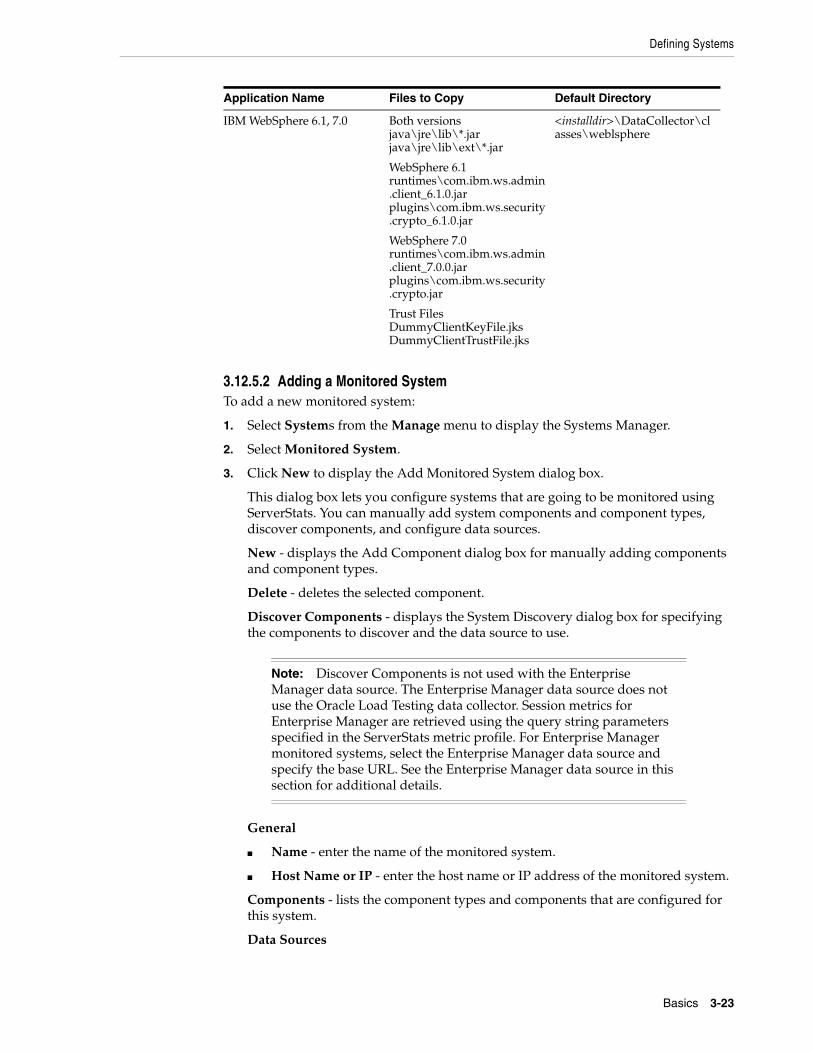
Defining Systems
Basics 3-23
3.12.5.2 Adding a Monitored SystemTo add a new monitored system:
1. Select Systems from the Manage menu to display the Systems Manager.
2. Select Monitored System.
3. Click New to display the Add Monitored System dialog box.
This dialog box lets you configure systems that are going to be monitored using ServerStats. You can manually add system components and component types, discover components, and configure data sources.
New - displays the Add Component dialog box for manually adding components and component types.
Delete - deletes the selected component.
Discover Components - displays the System Discovery dialog box for specifying the components to discover and the data source to use.
General
■ Name - enter the name of the monitored system.
■ Host Name or IP - enter the host name or IP address of the monitored system.
Components - lists the component types and components that are configured for this system.
Data Sources
IBM WebSphere 6.1, 7.0 Both versions java\jre\lib\*.jar java\jre\lib\ext\*.jar
WebSphere 6.1 runtimes\com.ibm.ws.admin.client_6.1.0.jar plugins\com.ibm.ws.security.crypto_6.1.0.jar
WebSphere 7.0 runtimes\com.ibm.ws.admin.client_7.0.0.jar plugins\com.ibm.ws.security.crypto.jar
Trust Files DummyClientKeyFile.jks DummyClientTrustFile.jks
<installdir>\DataCollector\classes\weblsphere
Note: Discover Components is not used with the Enterprise Manager data source. The Enterprise Manager data source does not use the Oracle Load Testing data collector. Session metrics for Enterprise Manager are retrieved using the query string parameters specified in the ServerStats metric profile. For Enterprise Manager monitored systems, select the Enterprise Manager data source and specify the base URL. See the Enterprise Manager data source in this section for additional details.
Application Name Files to Copy Default Directory

Defining Systems
3-24 Oracle Load Testing - Load Testing User's Guide
Following are the options for each type of monitored system. You only need to specify the settings for the type of monitored system you are adding. For example, if the monitored system is a database, then you need to specify the database settings. You can also configure this information from ServerStats when you configure the monitor.
Enterprise Manager - specifies the Enterprise Manager instance from which to retrieve session metrics. The Enterprise Manager data source is a special case in that it does not use the Oracle Load Testing data collector. Session metrics are accessed directly from an Enterprise Manager instance. Specify the base URL as follows:
■ Enterprise Manager URL - enter the base URL of the Enterprise Manager instance from which to retrieve Weblogic Domain Metrics or Weblogic JVM Metrics. For example, https://<machine name or IP>.us.oracle.com:7799/em. The metrics specified for each ServerStats Enterprise Manager metric profile will be used as query string parameters for this URL when accessing Enterprise Manager Diagnostic metrics from the Oracle Load Testing reports. See the Oracle Load Testing ServerStats User’s Guide for information about configuring Enterprise Manager metrics and configurations.
Database - refer to the JDBC-ODBC documentation for information on configuring your database data source, or refer to:
http://java.sun.com/j2se/1.4.2/docs/guide/jdbc/bridge.html.
Oracle Load Testing uses a JDBC driver to connect to your database. When you select any driver other than Custom, the appropriate settings for that driver are automatically provided. Use these guidelines to select and configure the appropriate driver for your database.
For monitoring enterprise level databases, the native drivers (Oracle Thin JDBC driver) is recommended over the JDBC:ODBC Bridge option. The following are the driver options:
■ Oracle Thin JDBC Driver - This driver option applies to Oracle databases. This driver is installed automatically as part of Oracle Load Testing Data collectors.
■ Sun JDBC:ODBC Bridge Driver - This driver option is available as an option for SQL and Oracle databases and any other database for which you have an ODBC driver. This bridge driver is installed automatically as part of Oracle Load Testing.
– SQL Database - The SQL Server ODBC driver is installed with MSDE and Microsoft SQL Server. If you do not have either of these on the Oracle Load Testing server and you are using a remotely installed SQL database for Oracle Load Testing, you need to install the SQL Server ODBC driver on the Oracle Load Testing machine and set up an ODBC DSN. The ODBC driver is included with the SQL Server Client utilities.
– Oracle Database - You must set up an Oracle ODBC on the Oracle Load Testing machine in order to use this driver.
■ Driver - Select a driver type from the list: Oracle Thin JDBC driver, Sun JDBC:ODBC Bridge, or Custom. You must have the appropriate driver installed on the Oracle Load Testing machine to set up a Database monitor.
■ Driver String - This information will vary depending on the type of database that you are monitoring. If you selected any option other than Custom, the
Defining Systems
Basics 3-25
appropriate string is automatically displayed. For example, this is the string for the Oracle Thin JDBC driver:
oracle.jdbc.driver.OracleDriver
If you selected a Custom driver type, you can type in the Driver String yourself.
■ Connect String - For most drivers, this string is constructed from the information you supplied in the previous fields. The structure of the Connect String is different for each driver type, but Oracle Load Testing builds this string for all driver types except a Custom driver type. For a Custom driver setting, type in the Connect String.
■ Host - Specify the host name of the machine running the database. This is not required for a JDBC:ODBC or Custom driver setting.
■ Instance - Specify the SQL server named instance that you want to use. If nothing is specified, Oracle Load Testing uses the default instance as set up on your server. Refer to your database administrator for details.
■ Port - Oracle Load Testing displays the default port for the driver you selected. For example, the default port for an Oracle Thin JDBC driver is 1521. Modify the port number if necessary. This is not required for a JDBC:ODBC or Custom driver setting.
■ Database Name or Database SID - For the Oracle Thin JDBC driver, provide the database or server ID.
■ Username - enter the username for connecting to the database, if required.
■ Password - enter the password for connecting to the database, if required.
IBM WebSphere PMI
■ Port - enter the port number for the connection.
JMX
■ Server Type - select the JMX server type you are using. The following is a list of supported types. Other types may be supportable. Contact support for more information.
– Oracle WebLogic 10.x
– Oracle WebLogic 9.1
– Oracle WebLogic 9.0
– IBM WebSphere 7.0
– IBM WebSphere 6.1
– IBM WebSphere 6.0
– IBM WebSphere 5.1
– IBM WebSphere 5.0
– Redhat JBoss 4.x
– Redhat JBoss 5.x
■ Port - enter the port number for the connection.
■ Username - enter the username for logging on to the server.
■ Password - enter the password for logging on to the server.
Defining Systems
3-26 Oracle Load Testing - Load Testing User's Guide
■ Trust Store File Name - enter the client-side trust store path and file name.
■ Trust Store Password - enter the trust store file password.
■ Key Store File Name - enter the client-side key store path and file name.
■ Key Store Password - enter the key store file password.
Perfmon (Windows Performance Monitor) - authentication can be left blank if the system being monitored has a data collector running on it. Authentication is required when the system being monitored is remote to the data collector.
■ Username - enter the username for logging on to the system.
■ Password - enter the password for logging on to the system.
■ Domain Name - enter the domain or machine name of the user name account.
SNMP
■ Port - enter the port number for the connection.
■ Community String - the access key required for remote access. The Community String is typically "public" unless otherwise configured by the System Administrator. Contact the Administrator to find out the Community String required for remote access to the system.
■ SNMP Version - enter the SNMP version.
Url
■ System Homepage - enter the URL of the page you want to monitor.
Virtual Agent
■ Remote Port - Specifies the port number. The default port for Telnet is 23, and the default port for SSH is 22.
■ Remote Protocol - Specifies the protocol to use to execute the command, Local Machine, Telnet, or SSH. You can use the Local protocol to monitor a remote machine if you have a Data Collector installed on that machine. Plink must be installed in the datacollector\bin directory on the machine on which you are running the Data Collector. This is only required if you intend to use the SSH connection method.
■ Remote Username - Specify a user name to log into an account on the host system.
■ Remote Password - Specify the password required to log into the User Name account on the system.
■ Command Prompt - Specify the prompt for the host machine. If you do not specify a prompt, Oracle Load Testing will attempt to infer the prompt by parsing the screen output. The default command prompt for the root user is #. For other users that have not configured a custom prompt, the default is $.
■ Operating System - Specifies the operating system of the host machine.
Test - checks to see whether the Oracle Load Testing server can contact the system and displays an informational message indicating if the system is available.
Note: Refer to your system administrator for information on configuring your server.

Defining Systems
Basics 3-27
4. Enter the name of the system in the Name field, and enter the name or IP address of the system in the Host Name or IP field.
5. Enter data source information for the type of system you are adding.
6. Click Discover Components to find the components available on this system. Components that are found will be available in ServerStats. If you do not discover components when setting up the monitored system, you can discover them later when you set up your ServerStats monitor. The System Discovery dialog box is displayed.
Select Data Sources - select the data sources you want to use for discovery. When you select a data source, the components that it can discover are selected in the Select Component Types to Discover list.
Select Component Types to Discover - deselect component types that you do not want to discover.
7. Select the data sources you want to use for discovery. The components types that this data source can discover are automatically selected in the Select Component Types to Discover list.
8. Deselect and component types that you do not want to discover and click OK. The Discovery Setup dialog box for the data sources you selected is displayed. For example, if you selected Perfmon, the following dialog box is displayed.
This dialog box has the following options based on the selected data sources.
Database - refer to the JDBC-ODBC documentation for information on configuring your database data source, or refer to:
http://java.sun.com/j2se/1.4.2/docs/guide/jdbc/bridge.html.
Oracle Load Testing uses a JDBC driver to connect to your database. When you select any driver other than Custom, the appropriate settings for that driver are automatically provided. Use these guidelines to select and configure the appropriate driver for your database.
For monitoring enterprise level databases, the native drivers (Oracle Thin JDBC driver) is recommended over the JDBC:ODBC Bridge option. The following are the driver options:
■ Oracle Thin JDBC Driver - This driver option applies to Oracle databases. This driver is installed automatically as part of Oracle Load Testing Data collectors.
■ Sun JDBC:ODBC Bridge Driver - This driver option is available as an option for SQL and Oracle databases and any other database for which you have an ODBC driver. This bridge driver is installed automatically as part of Oracle Load Testing.
– SQL Database - The SQL Server ODBC driver is installed with MSDE and Microsoft SQL Server. If you do not have either of these on the Oracle Load Testing server and you are using a remotely installed SQL database for Oracle Load Testing, you need to install the SQL Server ODBC driver on the Oracle Load Testing machine and set up an ODBC DSN. The ODBC driver is included with the SQL Server Client utilities.
– Oracle Database - You must set up an Oracle ODBC on the Oracle Load Testing machine in order to use this driver.

Defining Systems
3-28 Oracle Load Testing - Load Testing User's Guide
■ Driver - Select a driver type from the list: Oracle Thin JDBC driver, Sun JDBC:ODBC Bridge, or Custom. You must have the appropriate driver installed on the Oracle Load Testing machine to set up a Database monitor.
■ Driver String - This information will vary depending on the type of database that you are monitoring. If you selected any option other than Custom, the appropriate string is automatically displayed. For example, this is the string for the Oracle Thin JDBC driver:
oracle.jdbc.driver.OracleDriver
If you selected a Custom driver type, you can type in the Driver String yourself.
■ Connect String - For most drivers, this string is constructed from the information you supplied in the previous fields. The structure of the Connect String is different for each driver type, but Oracle Load Testing builds this string for all driver types except a Custom driver type. For a Custom driver setting, type in the Connect String.
■ Host - Specify the host name of the machine running the database. This is not required for a JDBC:ODBC or Custom driver setting.
■ Instance - Specify the SQL server named instance that you want to use. If nothing is specified, Oracle Load Testing uses the default instance as set up on your server. Refer to your database administrator for details.
■ Port - Oracle Load Testing displays the default port for the driver you selected. For example, the default port for an Oracle Thin JDBC driver is 1521. Modify the port number if necessary. This is not required for a JDBC:ODBC or Custom driver setting.
■ Database Name or Database SID - For the Oracle Thin JDBC driver, provide the database or server ID.
■ Username - enter the username for connecting to the database, if required.
■ Password - enter the password for connecting to the database, if required.
Perfmon (Windows Performance Monitor) - authentication can be left blank if the system being monitored has a data collector running on it. Authentication is required when the system being monitored is remote to the data collector.
■ Username - enter the username for logging on to the system.
■ Password - enter the password for logging on to the system.
■ Domain Name - enter the domain or machine name of the user name account.
SNMP
■ Port - enter the port number for the connection.
■ Community String - the access key required for remote access. The Community String is typically "public" unless otherwise configured by the System Administrator. Contact the Administrator to find out the Community String required for remote access to the system.
■ SNMP Version - enter the SNMP version.
9. Enter the discovery information and click OK. The Discovery Status dialog box is displayed showing the progress of the discovery process.

Defining Systems
Basics 3-29
This dialog box displays the progress of the discovery process. It also displays any errors encountered. The message, "Discovery Done," is displayed when discovery is complete.
10. When Discovery Done is displayed, click OK. If previously configured components could not be found, the Confirm Remove Components dialog box is displayed. If the configuration of previously configured components has changed, the Confirm Replace Components dialog box is displayed.
Check All - checks all of the listed components. Checked components will be removed or replaced.
Uncheck All - unchecks all of the listed components.
<components> - lists the previously configured components that either were not found or whose configuration has changed.
11. Deselect any components that you do not want to remove or replace and click OK.
12. The discovered components are added to the Components tree. Click on a component to view it's data source configuration. Click Delete to remove the data source. Click Add to add an available data source.
13. Click New to manually add component types and components. The Add Component dialog box is displayed.
Add Type
■ Component Type - select this option to add a new component type. This is the only option available from the system node.
■ Component - select this option to add components for the selected component type.
Definition
■ Component Type - when adding a new component type, enter a meaningful name for the component type. When adding a new component, this field defaults to the component type that was selected when you clicked the Add button.
■ Component - enter a meaningful name that allows you to identify the specific component you are adding.
Data Sources to Add to Component - select the data sources to add to this component.
14. Select whether you are adding a component or component type.
15. Specify the component type, if necessary, and the component. Select the data sources to apply to this component and click OK.
16. The data sources available for this component are displayed on the right. Enter the appropriate information. Click Delete to remove a data source. Click Add to add an available data source.
17. Click OK.
18. Click Close.
Note: Systems and system groups appear in the Systems list on the Build Scenarios tab.

Setting Options
3-30 Oracle Load Testing - Load Testing User's Guide
3.12.6 Renaming SystemsTo rename a system:
1. Select Systems from the Manage menu.
2. Click the type of system that you are renaming.
3. Select the system you want to rename.
4. Click Edit.
5. Enter the new name in the Name field. All instances of the system (within groups) are also renamed automatically.
6. Click OK.
7. Click Close.
3.12.7 Editing SystemsTo edit a system:
1. Select Systems from the Manage menu.
2. Select the system you want to edit.
3. Click Edit to display the Edit System dialog box for that type of system.
4. Make any changes.
5. Click OK.
6. Click Close.
3.12.8 Deleting SystemsTo delete a system:
1. Select Systems from the Manage menu.
2. Click the type of system you want to delete.
3. Select the systems you want to delete. To select more than one system, hold down the CTRL key.
4. Click Delete. All instances of the system (within groups) are also deleted automatically.
5. Click OK.
3.13 Setting OptionsYou can set Oracle Load Testing options for custom browsers, repositories, scenario defaults, session start and stop, session profile, and reporting options using Options from the Tools menu. Selecting this option opens the Options dialog box.
3.13.1 Custom Browser OptionsThe following custom browser options are available:
New - displays a new line in the table.
Delete - deletes the selected browser.

Setting Options
Basics 3-31
Name - any name for the customized browser emulator. This name will appear in the Browser Emulation list in the Edit Scenario Details dialog box.
User Agent String - specifies the string to send to the server as the User Agent header string for the customized browser emulator.
3.13.2 Repository OptionsRepositories give you the ability to share files. Any shared network directory can be used as a repository. Since the Oracle Application Testing Suite Application Service runs as the local SYSTEM user, there may be a policy restricting access to your network share. You can fix this by doing one of the following:
■ Ensure that both sharing permissions and security permission on the remote network directory allows for other SYSTEM users to gain access. The least restrictive setting is to allow the windows user "Everyone" to be given permission.
■ Configure the Oracle Application Testing Suite Application Service to run under a specific user account rather than the local System user account. Refer to "Configuring Oracle Load Testing Agents" earlier in this chapter.
New - adds a new entry to the table.
Delete - deletes the selected repository.
Name - enter the name of the repository.
Path - enter the path of the repository. If the path you specify is a shared network drive, the Oracle Load Testing Server must have access to that drive. By default, the Oracle Load Testing Server runs under the "Local System" account. You may need to change this to a user account in the Services panel.
To add a repository:
1. Select Options from the Tools menu.
2. Click Repositories.
3. Click New. A new entry is made in the table.
4. Enter the name of the repository.
5. Enter the location of the repository.
3.13.3 Setting Scenario DefaultsYou can change the default settings for profiles using the Scenario Defaults dialog box. Changes made are applied to profiles as they are added to the scenario. Note that changes are not applied to profiles that are already in the scenario. To apply changes to profiles already in the scenario, remove them from the scenario on the Build Scenarios tab, then add them back.
Each setting in the right panel has two columns:
Show - when checked, this field is displayed on the Build Scenarios tab.
Default Value - shows the value to which the option is set when a new script or user-defined profile is added to a scenario.
Note: If you plan to use OpenScript scripts with Oracle Load Testing, the repository names you specify should match the repository name specified in OpenScript (including case).

Setting Options
3-32 Oracle Load Testing - Load Testing User's Guide
Main - the main settings are as follows:
■ # VUs - specifies the number of virtual users to run for the selected profile. For each virtual user, Oracle Load Testing runs a separate instance of the script(s) specified in the virtual user profile.
■ System - specifies the machine on which the virtual users will run. When running virtual users across systems on a LAN/WAN, enter the machine name of a system running either Oracle Load Testing or Oracle Load Testing Agent. Systems are defined using the Systems Manager. Initially, you must define the machine names or IP addresses of the system(s) in the Systems Manager. Once the name(s) or IP addresses have been specified, you can select the system name from the drop-down list for future load tests.
When determining the number of virtual users to run per process or system, you need to include the Client overhead in the resource allocation. Each VU in Thin or Java Client requires approximately 350 KB-500 KB of memory to run. When calculating the available memory to run VUs on an agent system, you must account for a 20-30% client system overhead. Therefore, you only have 70-80% of the physical memory (RAM) available to run VUs.
■ Iteration Delay - specifies the amount of time (in seconds) to wait between iterations of virtual user runs. You specify the number of iterations using the Autopilot.
■ VU Pacing (Think Time) - specifies the script playback delay for each virtual user. There are four options:
– Recorded - uses the delay times that were recorded in the Oracle OpenScript script. You can set minimum and maximum delay times (in seconds) that override the script delay times in the Minimum and Maximum edit boxes.
– Recorded/Random - uses random delay times based upon the recorded user delay. Oracle Load Testing sets the low end of the random range as the actual user delay minus the Lower percentage setting. Oracle Load Testing sets the high end of the random range as the actual user delay plus the Upper percentage setting. For example, if the actual recorded delay time was 100 seconds and the Lower and Upper settings are 10% and 25% respectively, Oracle Load Testing uses random delay times between 90 and 125 seconds.
– Random - uses random times for Virtual User pacing. You can set minimum and maximum delay times for random delay in the Minimum and Maximum edit boxes.
– No Delay - plays back the scripts at the fastest possible speed.
■ Use Data Bank - when true, scripts that have Oracle OpenScript Data Banks will use the Data Banks as part of the virtual user playback. When false, scripts playback using the recorded data rather than the Data Bank.
Browser Settings - the browser settings are as follows:
■ Browser Emulation - specifies the type of browser to emulate. Default is the browser used to record the script.
■ Connection Speed Emulation - specifies the line speed to simulate for the virtual user's Internet connection. Set the speed to a specific number if you want the
Note: For OpenScript scripts, the VU Pacing overrides the times specified in think() and beginStep() methods.
Setting Options
Basics 3-33
virtual user to simulate a dial-up connection using a modem, DSL, or other speed. Set the speed to True Line Speed if you want the virtual user to run using the actual connection speed.
■ Cache Emulation - specifies the type of user to simulate. This is useful for simulating different profiles of virtual users. A first time user places more of a load on the Web server because pages and image are not yet cached. A repeat user places less of a load on the server as only newer pages are requested and brought down from the Web server. There are three options:
– Do Not Cache - cache is not used.
– 1st Time - the virtual users are considered to be using the Web site or application for the first time for each iteration so no cache is used. The cache is used during the iteration.
– Repeat - the virtual users are considered to have visited or used the Web site or application previously. Pages and images are retrieved from the cache.
■ Maximum In-Memory Cache Size - specifies the maximum amount of in-memory storage to allocate for cached document contents. This setting applies to all virtual users in the process, even though each virtual user keeps its own cached documents. After the in-memory cache is exhausted, document contents will be cached to a temporary folder on disk in <installDir>\agent\cache. There is no upper bound on how much disk storage may be used to store cached documents. The disk cache is cleared every time the agent process starts. The default value is 128MB.
■ Use IP Spoofing - when true, Oracle Load Testing uses different IP addresses for Virtual User agents. Each virtual user must get a defined IP address. You must define the IP addresses available for use by Oracle Load Testing Agents in the TCP/IP network protocols of the system. All IP addresses must be added to each Agent system. See Section 4.2, "Using IP Spoofing" for additional information.
■ Enable Cookies - when true, the virtual user profiles will use cookies. Use this setting if your Web application uses cookies to manage session and other context information.
Extensibility - the extensibility settings are as follows:
■ Execute User Defined Tests - when true, Oracle Load Testing runs Oracle OpenScript Text Matching and Server Response tests.
VU Display - the VU Display settings are as follows:
■ View All Responses - select when you want to display all responses, on error, always, never.
■ Show Request Headers - select when you want to display request headers, on error, always, or never. When displayed, request header information for Web page resources requested by the selected Virtual User appear in the Virtual User Display history list.
■ Show Response Headers - select when you want to display response headers, on error, always, or never. When displayed, the Response header information for Web page resources requested by the selected Virtual User appear in the Virtual User Display history list.
Reporting - the Reporting settings are as follows:
■ Auto Generate Timers For All Pages - when true, Oracle Load Testing automatically adds timers for each OpenScript script page for reporting. The

Setting Options
3-34 Oracle Load Testing - Load Testing User's Guide
timers are used in Oracle Load Testing to provide performance monitoring and timing information for each page of the script(s) played back by a scenario.
■ Auto Generate Timers For All Step Groups - when true, Oracle Load Testing automatically adds timers for each OpenScript Step Group for reporting. The timers are used in Oracle Load Testing to provide performance monitoring and timing information for each Step Group the script(s) played back by a scenario.
■ Auto Generate Timers For All Resources - when true, Oracle Load Testing automatically adds timers for all resources for monitoring and reporting purposes. Resources include images and other objects downloaded from the server as specified by the OpenScript Download Manager section of the Scenario Defaults.
Error Handling - the Error Handling settings are as follows:
■ Object Download Errors Are Fatal - when true, a Web page object download error is considered a fatal error that ends the current iteration.
■ Zero Length Download Errors Are Fatal - when true, a server response that indicates zero bytes length is considered a fatal error. Set this setting to false if your scripts are recorded as Siebel scripts.
■ On Error Stop Virtual User - when true, all virtual users are stopped if an error is encountered.
■ Stop Remaining Iterations on Failure - when true, all remaining iterations for a virtual user are stopped if an error is encountered.
■ Socket Timeout - specifies the maximum amount of time a virtual user waits for a socket connection before timing out.
■ Request Timeout - specifies the maximum amount of time a virtual user waits to access a page before timing out.
Advanced - the Error Handling settings are as follows:
■ Maximum Users Per Process - sets the maximum number of virtual users per single agent process. When running virtual users as threads in a single process, Maximum Users Per Process sets the maximum number of virtual user threads in a single process. Oracle Load Testing spawns new processes if the number of virtual users exceeds the maximum number in any single process and runs the additional virtual uses as threads in the new process.
The default setting is unlimited virtual users per agent process.
■ Maximum HTTP Connections Per User - specifies the maximum number of server connections per process per server. Each VU makes multiple connections to request additional resources for images and additional frames for example. Setting this option specifies a limit on the total number of connections that the VU s can make to the server. The default setting is "Default," which means use the default connection limits as configured on the agent machine. (See Microsoft KBase article Q183110 for more information.)
■ Ignore HTTP Proxy Settings - specifies whether to ignore the agent machine's default proxy setting as defined in Internet Explorer.
Java Client Preferences - When a setting is set to the default value, this means that the value that will be used is what is set in the OracleATS\OFT\jagent\ JavaAgent.properties file, unless a value is not set in the JavaAgent.properties file. In this case, the Java Agent uses the internal default value.

Setting Options
Basics 3-35
■ Persist Raw Data - when true, Oracle Load Testing saves every single measured data point in a set of CSV files. The files are saved locally on the agent machines in directories specified as follows:
<oats_install>/agent/rawdata/<controller-identifier>/<session_name>/<agent-id>/<YYYY-MM-DD HH:mm:ss>
See Section 6.9, "Using Raw Data" for additional information about the counter files and how to use the raw data.
■ Report Counters - when true, Oracle Load Testing counters are reported.
■ Maximum Bytes of VU Display - when you select other, enter the number of bytes to send to the VU display per item, that is, a request is one item, a response is an item, and content is an item. The default in the JavaAgent.properties file is-1, which returns everything. The value entered roughly equates to the number of characters.
■ Report Sender Interval - when you select other, enter the time in milliseconds for how frequently the agent reports its status and accrued counters. The default in the JavaAgent.properties file is 5000.
■ Maximum JVM Heap Size (MB) - specifies the maximum size of the JVM heap. The default is 256MB. This value cannot be more than 90% of the total memory size.
■ Proxy Host - select other to enter the proxy host and override the system-specified proxy host.
■ Proxy Port - select other to enter the proxy port and override the system-specified proxy port.
■ Non Proxy Hosts - select other to enter non-proxy hosts. Delimit multiple hosts with a bar (|).
■ Enable GZIP - when true, support for gzip compression is enabled. The browser Request includes the Accept-Encoding: gzip header indicating a gzip compressed page response will be accepted. If the server uses gzip compression, the response includes the Content-Encoding: gzip header indicating the returned page is in gzip compressed format. The browser unzips the compressed file before rendering the HTML page. Gzip compression is typically used to provide faster transfer of large HTML pages between the browser and the server.
■ Enable Deflate - when true, support for deflate compression is enabled. The browser Request includes the Accept-Encoding: deflate header indicating a deflate compressed page response will be accepted. If the server uses deflate compression, the response includes the Content-Encoding: deflate header indicating the returned page is in deflate compressed format. The browser inflates the compressed file before rendering the HTML page. Deflate compression is typically used to provide faster transfer of large HTML pages between the browser and the server.
■ Language - specifies which language to use for script playback. When you select Other, enter the language to override the Accept-Language header. The default is the locale assigned by the JVM.
■ HTTP Version - select the HTTP protocol version to specify in the GET or POST request/response between client and server. The HTTP/1.0 protocol is an early implementation of the Hypertext Transfer Protocol. HTTP/1.1 is a standards-based enhancement to the HTTP/1.0 protocol. See the Key Differences

Setting Options
3-36 Oracle Load Testing - Load Testing User's Guide
between HTTP/1.0 and HTTP/1.1 at http://www8.org/w8-papers/5c-protocols/key/key.html
■ Accept String - this setting specifies what the Accept: HTTP header value looks like. When you select other, enter the string. The default in the JavaAgent.properties file is: text/html, image/gif, image/jpeg, */*. If you modify a navigation in a script by adding a custom Accept: header, the custom header value from the script is used instead.
■ Enable Keep Alive - when true, the Connection: Keep-Alive header is set to indicate requests should use a persistent connection. The "Keep-Alive" keyword indicates that the request should keep the connection open for multiple requests. For HTTP/1.0, the socket connection is kept open until either the client or the server drops the connection. For HTTP/1.1 all connections are kept alive unless a Connection: close header is specified.
■ Preserve Connections Between Iterations - used to preserve connections between Virtual User agents and the browser between successive iterations of the script. Set to True if the browser should attempt to reuse any open browser connections if possible between iterations. Each virtual user maintains its own set of connections that it never shares with other virtual users. The default value is True, preserve connections between iterations.
■ Preserve Variables Between Iterations - used to preserve or automatically clear variables added in the Run section of OpenScript scripts between successive iterations of the Run section.
■ Preserve Cookies Between Iterations - used to preserve or automatically clear cookies added in the Run section of OpenScript scripts between successive iterations of the Run section.
■ Max Number of Keep Alive Requests - select other to specify the maximum number of requests to make on a keep alive connection before closing it.
■ Download Local Files - when true, the Java Agent retrieves the requested local file contents.
■ Max Content Download Size - specifies the maximum size for downloads. You can specify Unlimited or Other. If you select Other, specify the maximum size in kilobytes.
■ SSL Version - select the Secure Socket Layer version to use for the proxy server. When recording a secure site in the browser, the user only sees the Proxy Recorder's certificate not the secure web site's certificate. The Browser, Proxy Recorder, and Secure Server each have their own private and public keys which are used to encrypt/decrypt data.
– SSL: Use Secure Socket Layer protocol with the proxy server. OpenScript uses Sun Java Secure Socket Extension (JSSE). Sun JSSE by default supports SSLv2, ASSLv3, ASSL, ATLSv1, ATLS, and SSL_TLS.
– SSL without TLS: Use Secure Socket Layer without Transport Layer Security. In some cases, a JSSE issue may cause a TLS Protocol connect failure. Use this option if a protocol connect failure occurs when using the SSL option.
■ Ignored Url - specify the Urls, separated by commas, that should not be requested. This setting only applies to certain OpenScript scripts.
■ Additional Arguments - specifies custom OpenScript script.java code arguments. You can create your own settings in OpenScript scripts. For example, you can create custom settings in OpenScript script.java code, as follows:

Setting Options
Basics 3-37
if (getSettings().get("MyCustomSetting").equals("abc")) {info("We're running in ABC mode.");
}
You can then set the additional arguments in the Additional Arguments field as follows:
-MyCustomSetting abc
■ Global Headers - specifies any custom "Global Headers" string to use in the Request header for script playback. The format is in the form: name1:value1;name2:value2;name3:value3. For example: x-oracle-slm-message-id: bcn=<beacon_name>; svc=<service_name>.
■ Replace URLs - specifies the URL replacement string in the form: originalURL1=replacementURL1,originalURL2=replacementURL2,[...]. During playback, anytime the agent makes a request to a URL starting with a segment, originalURL, the agent replaces the original URL segment with replacementURL. This feature is only supported for Load Test scripts.
– originalURL - Specify the starting segment of the URL:port that appears in the script that should be replaced. This value is case-sensitive.
– replacementURL - Specify the new starting segment URL:port that the agent requests instead of originalURL.
For both parameters, if the protocol is omitted, HTTP protocol is assumed. If no port is specified after the host, port 80 is assumed for HTTP protocol, and port 443 is assumed for HTTPS protocol. URLs are replaced after all correlations are applied. One or more URL replacement pairs may be specified, separating each replacement pair with a comma. The following examples show the format of Replace URLs strings:
test_server:7789=production_server:7789
test:7789=prod:7789,https://stage.oracle.com/main=https://prod.oracle.com/home
OpenScript Error Recovery - General - the General Error Recovery settings are as follows:
■ File Not Found - specifies the error recovery action if a file is not found.
■ Segment Parser Error - specifies the error recovery action if the XPath Segment Parser cannot verify the correctness of an XPath.
■ Create Variable Fail - specifies the error recovery action if a script fails to create a variable.
■ Encryption Service not Initialized - specifies the error recovery action when the password encryption service was not initialized.
■ Binary Decoding Error - specifies the error recovery action if a binary post data parameter error occurs.
■ Variable Not Found - specifies the error recovery action if a variable cannot be found when parsing transformed strings.
■ Child Script Failed - specifies the error recovery action if an error occurs in a script that is a child of another script.
■ Unexpected Script Error - specifies the error recovery action if any unexpected script error occurs.

Setting Options
3-38 Oracle Load Testing - Load Testing User's Guide
■ Call Function Failed - specifies the error recovery action if an error occurs in a script that calls a function of another script.
OpenScript Error Recovery - HTTP - the HTTP Module Error Recovery settings are as follows:
■ HTML Parsing Error - specifies the error recovery action if an HTML parsing error occurs.
■ Text Match Fail - specifies the error recovery action if a text matching test fails.
■ Solve Variable Fail - specifies the error recovery action if the value of any variable cannot be solved.
■ Response Time Error - specifies the error recovery action if a Server Response Time test fails.
■ Invalid HTTP Response - specifies the error recovery action if the sever returns an invalid HTTP response.
■ Invalid URL - specifies the error recovery action if the server returns an Invalid URL response code.
■ Zero Downloads Fatal - specifies the error recovery action if a server response indicates zero bytes length.
■ Client Certificate Keystore Error - specifies the error recovery action if the Client Certificate Keystore indicates an error.
OpenScript Error Recovery - Oracle Forms Load - the Oracle Forms Load Test Module Error Recovery settings are as follows:
■ Forms Connect Error - specifies the error recovery action if a server connection error occurs.
■ Forms I/O Communication Error - specifies the error recovery action if a read/write or communication error occurs with an Oracle Forms message.
■ Forms Playback Error - specifies the error recovery action if an error occurs during forms playback.
■ Forms Component not Found - specifies the error recovery action if a component of a form is not found.
■ Forms Content Match Failed - specifies the error recovery action if a content matching test fails.
OpenScript Download Manager - the OpenScript Download Manager settings are as follows:
■ Use OpenScript Download Manager - when true, the Download Manager is enabled during playback. When false, the Download Manager is not enabled during playback.
■ Ignored Urls (Using Regex): Specifies the Regular Expression(s) string to use to ignore specific resources. For example, the expression Login_Banner(.+?) would not download resources such as Login_Banner1.gif and Login_Banner2.gif. Multiple Regular Expressions can be separated using a comma (,).
■ CSS Resource - when true, css resources in <Link> tags are downloaded during playback. When false, css resources are not downloaded during playback.
■ Image Resource - when true, image resources in <Img> tags, in the "background" attribute of a tag, or in <style> tags with "background:url" patterns are

Setting Options
Basics 3-39
downloaded during playback. When false, image resources are not downloaded during playback.
■ Embeded Object Resource - when true, object resources in <Embed> tags or in <Object> tags are downloaded during playback. When false, object resources are not downloaded during playback.
■ Script Resource - when true, script resources in <Script> tags are downloaded during playback. When false, script resources are not downloaded during playback.
■ Applet Resource - when true, applet resources in <Applet> tags are downloaded during playback. When false, applet resources are not downloaded during playback.
Forms LT Playback - the Oracle EBS/Forms load testing playback settings are as follows:
■ Capture Message Details: Specifies if forms message details are captured during playback. When selected, OpenScript captures and stores Forms message requests, responses, and information about all loaded Forms components during playback. This information is useful to have when debugging the script.
OpenScript displays captured details in the "Messages" and "Object Details" tabs of the Details view. Oracle Load Testing displays this information in the Virtual User Display based on the "Virtual User Display" settings.
Capturing message details is a memory-intensive operation. During heavy load testing, it is recommended to clear this setting to reduce the amount of heap space required by the agent.
Databank Configuration - the Databank Configuration load testing playback settings are as follows:
■ Databank Setup Timeout: Specifies how much time to spend preparing a databank for use before timing out. The value is in seconds. This setting includes the total time to do all of the following activities:
If using a Database-backed databank:
– Connect to the database
– Query
– Read records, write into the file
– Create the index simultaneously
– Disconnect
If using a CSV-backed databank:
– Time required to parse the CSV file and create the index
If using Random Unique:
– Time to shuffle the index
■ Read Timeout - specifies the amount of time to wait for a databank read or get operation for a script at run-time before timing out.
3.13.4 Setting Autopilot DefaultsThe Autopilot Defaults options let you specify the default settings for the Set up Autopilot tab. Refer to Chapter 6 for a description of these options.

Setting Options
3-40 Oracle Load Testing - Load Testing User's Guide
3.13.5 Setting Session Start and Stop OptionsSessions specify the scope for Oracle Load Testing data collection and reporting. The data collected while the Autopilot is running virtual users is shown in the virtual user grid, runtime performance statistics and load graphs, and can be saved to a database for post-testing analysis in the Analyze Results tab.
You can specify default settings for how sessions start and end data collection by selecting Options from the Tools menu then selecting Start and Stop. See Chapter 5 for a description of these options.
3.13.6 Setting Session Profile OptionsThese options specify the default characteristics for graphing and reporting. Unique session profiles are created for multiple instances of a script if the selected settings have different values.
For example, if you are running two profiles emulating different browsers, check the Cache Emulation attribute to view separate plot lines in the graphs for each browser.
3.13.7 Setting Reporting OptionsUse these options to specify the parameters for refresh intervals and for creating profile timer names when generating timers for all resources. See Chapter 8 for a description of these fields.
3.13.8 Setting Data Bank DefaultsThese options set the Data Bank control defaults that will be displayed when you click the Configure Data Bank button for a script or profile on the Build Scenarios tab.
Record buffer size - specifies the number of Data Bank records allocated to each Oracle Load Testing agent.
Data Usage - lets you select which records to use.
■ Sequential - Use Starting Record Only - specifies that each virtual user takes the starting record in the Data Bank and keeps on using that same record for each iteration. Use this setting if you want each virtual user to keep the same data for each iteration.
■ Sequential - Loop Records Continuously - specifies that the virtual users cycle through the Data Bank records until the load test finishes.
■ Unique - Stop After All Records Used - specifies that the virtual users use all of the records in the Data Bank and then stop. For example, if the virtual users start at record 50 of 100, they run from 50 to 100, then loop back and run from record 1 to 49 and then stop.
■ Unique - Stop After Last Record Used - specifies that the virtual users stop when the end of the Data Bank has been reached regardless of the starting point in the Data Bank. For example, if the virtual users start at record 50 of 100 records, they run from record 50 to record 100 and then stop.
3.13.9 Setting General OptionsThese options specify the general settings for validation, restarts, and timeouts.

Setting Options
Basics 3-41
Validate hostname/ip when user adds a system - checks to see if the Oracle Load Testing server can connect to the specified system. If it cannot, Oracle Load Testing displays a dialog box asking you if you want to proceed anyway.
Validate monitors when user adds or modifies a monitor - checks to see if the monitor can be applied to the target system when you create a monitor.
When Oracle Load Testing Server IP address changes - specifies the action to take if the Oracle Load Testing Application Server IP address changes, as follows:
■ Restart Application Service - restarts the Oracle Load Testing Application Service when the server IP address changes.
■ Stop Application Service - stops the Oracle Load Testing Application Service when the server IP address changes.
Polling interval for network status check - specifies the interval, in seconds, for checking the network status.
Databank timeout - specifies the time, in seconds, to wait for databanking operations before timing out.

Setting Options
3-42 Oracle Load Testing - Load Testing User's Guide

4
Defining Virtual User Scenarios 4-1
4Defining Virtual User Scenarios
This chapter explains how to define virtual user scenarios based upon the virtual user profiles.
4.1 Defining ScenariosVirtual user scenarios specify the following attributes for each profile:
■ number of virtual users to simulate
■ the system on which the virtual users will run
■ which browser to emulate
■ the delay time between virtual user iterations
■ pacing of the scripts
■ type of user to simulate
■ object downloading
■ use of Data Banks
■ use of synchronization points
■ error handling for virtual users
■ setting up virtual users for viewing in the Virtual User Display component
The following sections explain how to specify virtual user scenarios.
4.1.1 Selecting ProfilesOnce you have a set of virtual user profiles, you can define Oracle Load Testing scenarios to run performance and load testing on your Web pages or application. Virtual user profiles can be either default profiles (basic Oracle OpenScript scripts) or user-defined profiles created in Oracle Load Testing.
To add profiles to the Scenario Profiles list:
1. If necessary, open a saved Scenario file.
2. Select the Build Scenarios tab.
3. Select the repository and workspace containing the profile you want to add.
4. Select the profile you want to add.

Defining Scenarios
4-2 Oracle Load Testing - Load Testing User's Guide
5. Click the Add to Scenario button or double-click the profile name in the profile list.
4.1.2 Specifying Scenario Profile AttributesOnce you select the scripts and user-defined profiles to include in the scenario, you can specify the Scenario parameters for each one. To set the parameters for a specific script or user defined profile.
1. If necessary, open a saved Scenario file.
2. Select the Build Scenarios tab.
3. Select the scripts and user-defined profiles to include in the Scenario.
4. Click the Scenario Detail button to display the Edit Scenario Details dialog box.
Right Click Menu - lets you copy and paste settings from one script or user defined profile to another. Right click on the script or user defined profile whose settings you want to copy and click Copy. Right click on the script or user defined profile that you want to copy the settings to and click Paste.
Main - the main settings are as follows:
■ # VUs - specifies the number of virtual users to run for the selected profile. For each virtual user, Oracle Load Testing runs a separate instance of the script(s) specified in the virtual user profile.
■ System - specifies the machine on which the virtual users will run. When running virtual users across systems on a LAN/WAN, enter the machine name of a system running either Oracle Load Testing or Oracle Load Testing Agent. Systems are defined using the Systems Manager. Initially, you must define the machine names or IP addresses of the system(s) in the Systems Manager. Once the name(s) or IP addresses have been specified, you can select the system name from the drop-down list for future load tests.
When determining the number of virtual users to run per process or system, you need to include the Client overhead in the resource allocation. Each VU requires approximately 350 KB-500 KB of memory to run. When calculating the available memory to run VUs on an agent system, you must account for a 20-30% client system overhead. Therefore, you only have 70-80% of the physical memory (RAM) available to run VUs.
■ Iteration Delay - specifies the amount of time (in seconds) to wait between iterations of virtual user runs. You specify the number of iterations using the Autopilot.
Note: For databank settings to work properly, the name of the profiles added to the scenario should be unique.
Note: A subset of the parameters in this dialog box can be specified directly in the Build Scenarios tab. To specify which parameters are displayed in the Build Scenarios tab, select Options from the Tools menu then select Scenario Defaults and select the fields you want to display by selecting the Show checkbox for each field.

Defining Scenarios
Defining Virtual User Scenarios 4-3
■ VU Pacing (Think Time) - specifies the script playback delay for each virtual user. There are four options:
– Recorded - uses the delay times that were recorded in the Oracle OpenScript script. You can set minimum and maximum delay times (in seconds) that override the script delay times in the Minimum and Maximum edit boxes.
– Recorded/Random - uses random delay times based upon the recorded user delay. Oracle Load Testing sets the low end of the random range as the actual user delay minus the Lower percentage setting. Oracle Load Testing sets the high end of the random range as the actual user delay plus the Upper percentage setting. For example, if the actual recorded delay time was 100 seconds and the Lower and Upper settings are 10% and 25% respectively, Oracle Load Testing uses random delay times between 90 and 125 seconds.
– Random - uses random times for Virtual User pacing. You can set minimum and maximum delay times for random delay in the Minimum and Maximum edit boxes.
– No Delay - plays back the scripts at the fastest possible speed.
■ Use Data Bank - when true, scripts that have Oracle OpenScript Data Banks will use the Data Banks as part of the virtual user playback. When false, scripts playback using the recorded data rather than the Data Bank.
Browser Settings- the browser settings are as follows:
■ Browser Emulation - specifies the type of browser to emulate.
■ Connection Speed Emulation - specifies the line speed to simulate for the virtual user's Internet connection. Set the speed to a specific number if you want the virtual user to simulate a dial-up connection using a modem, DSL, or other speed. Set the speed to True Line Speed if you want the virtual user to run using the actual connection speed.
■ Cache Emulation - specifies the type of user to simulate. This is useful for simulating different profiles of virtual users. A first time user places more of a load on the Web server because pages and image are not yet cached. A repeat user places less of a load on the server as only newer pages are requested and brought down from the Web server. There are three options:
– Do Not Cache - cache is not used.
– 1st Time- the virtual users are considered to be using the Web site or application for the first time for each iteration so no cache is used. The cache is used during the iteration.
– Repeat - the virtual users are considered to have visited or used the Web site or application previously. Pages and images are retrieved from the cache.
■ Maximum In-Memory Cache Size - specifies the maximum amount of in-memory storage to allocate for cached document contents. This setting applies to all virtual users in the process, even though each virtual user keeps its own cached documents. After the in-memory cache is exhausted, document
Note: For OpenScript scripts, the VU Pacing overrides the times specified in think() and beginStep() methods.
Defining Scenarios
4-4 Oracle Load Testing - Load Testing User's Guide
contents will be cached to a temporary folder on disk in <installDir>\agent\cache. There is no upper bound on how much disk storage may be used to store cached documents. The disk cache is cleared every time the agent process starts. The default value is 128MB.
■ Use IP Spoofing - when true, Oracle Load Testing uses different IP addresses for Virtual User agents. Each virtual user must get a defined IP address. You must define the IP addresses available for use by Oracle Load Testing Agents in the TCP/IP network protocols of the system. All IP addresses must be added to each Agent system. See Section 4.2, "Using IP Spoofing" for additional information.
■ Enable Cookies - when true, the virtual user profiles will use cookies. Use this setting if your Web application uses cookies to manage session and other context information.
Extensibility - the extensibility settings are as follows:
■ Execute User Defined Tests - when true, Oracle Load Testing runs Oracle OpenScript Text Matching and Server Response tests.
VU Display - the VU Display settings are as follows:
■ View All Responses - select when you want to display all responses, on error, always, never.
■ Show Request Headers - select when you want to display request headers, on error, always, or never. When displayed, request header information for Web page resources requested by the selected Virtual User appear in the Virtual User Display history list.
■ Show Response Headers - select when you want to display response headers, on error, always, or never. When displayed, the Response header information for Web page resources requested by the selected Virtual User appear in the Virtual User Display history list.
Reporting- the Reporting settings are as follows:
■ Auto Generate Timers For All Pages - when true, Oracle Load Testing automatically adds timers for each OpenScript script page for reporting. The timers are used in Oracle Load Testing to provide performance monitoring and timing information for each page of the script(s) played back by a scenario.
■ Auto Generate Timers For All Step Groups - when true, Oracle Load Testing automatically adds timers for each OpenScript Step Group for reporting. The timers are used in Oracle Load Testing to provide performance monitoring and timing information for each Step Group the script(s) played back by a scenario.
■ Auto Generate Timers For All Resources - when true, Oracle Load Testing automatically adds timers for all resources for monitoring and reporting purposes. Resources include images and other objects downloaded from the server as specified by the OpenScript Download Manager section of the Scenario Defaults.
Error Handling - the Error Handling settings are as follows:
■ Object Download Errors Are Fatal - when true, a Web page object download error is considered a fatal error that ends the current iteration.

Defining Scenarios
Defining Virtual User Scenarios 4-5
■ Zero Length Download Errors Are Fatal - when true, a server response that indicates zero bytes length is considered a fatal error. Set this setting to false if your scripts are recorded as Siebel scripts.
■ On Error Stop Virtual User - when true, a virtual user is stopped if an error is encountered.
■ Stop Remaining Iterations on Failure - when true, all remaining iterations for a virtual user are stopped if an error is encountered.
■ Socket Timeout - specifies the maximum amount of time a virtual user waits for a socket connection before timing out.
■ Request Timeout - specifies the maximum amount of time a virtual user waits to access a page before timing out.
Advanced - the Error Handling settings are as follows:
■ Maximum Users Per Process - sets the maximum number of virtual users per single agent process. When running virtual users as threads in a single process, Maximum Users Per Process sets the maximum number of virtual user threads in a single process. Oracle Load Testing spawns new processes if the number of virtual users exceeds the maximum number in any single process and runs the additional virtual uses as threads in the new process.
The default setting is unlimited virtual users per agent process.
■ Maximum HTTP Connections Per User - specifies the maximum number of server connections per process per server. Each VU makes multiple connections to request additional resources for images and additional frames for example. Setting this option specifies a limit on the total number of connections that the VU s can make to the server. The default setting is "Default," which means use the default connection limits as configured on the agent machine. (See Microsoft KBase article Q183110 for more information.)
■ Ignore HTTP Proxy Settings - specifies whether to ignore the agent machine's default proxy setting as defined in Internet Explorer.
Java Client Preferences - When a setting is set to the default value, this means that the value that will be used is what is set in the OracleATS\OFT\jagent\ JavaAgent.properties file, unless a value is not set in the JavaAgent.properties file. In this case, the Java Agent uses the internal default value.
■ Persist Raw Data - when true, Oracle Load Testing saves every single measured data point in a set of CSV files. The files are saved locally on the agent machines in directories specified as follows:
<oats_install>/agent/rawdata/<controller-identifier>/<session_name>/<agent-id>/<YYYY-MM-DD HH:mm:ss>
See Section 6.9, "Using Raw Data" for additional information about the counter files and how to use the raw data.
■ Report Counters - when true, Oracle Load Testing counters are reported.
■ Maximum Bytes of VU Display - when you select other, enter the number of bytes to send to the VU display per item, that is, a request is one item, a response is an item, and content is an item. The default in the JavaAgent.properties file is-1, which returns everything. The value entered roughly equates to the number of characters.

Defining Scenarios
4-6 Oracle Load Testing - Load Testing User's Guide
■ Report Sender Interval - when you select other, enter the time in milliseconds for how frequently the agent reports its status and accrued counters. The default in the JavaAgent.properties file is 5000.
■ Maximum JVM Heap Size (MB) - specifies the maximum size of the JVM heap. This value cannot be more than 90% of the total memory size.
■ Proxy Host - select other to enter the proxy host and override the system-specified proxy host.
■ Proxy Port - select other to enter the proxy port and override the system-specified proxy port.
■ Non Proxy Hosts - select other to enter non-proxy hosts. Delimit multiple hosts with a bar (|).
■ Enable GZIP - when true, support for gzip compression is enabled. The browser Request includes the Accept-Encoding: gzip header indicating a gzip compressed page response will be accepted. If the server uses gzip compression, the response includes the Content-Encoding: gzip header indicating the returned page is in gzip compressed format. The browser unzips the compressed file before rendering the HTML page. Gzip compression is typically used to provide faster transfer of large HTML pages between the browser and the server.
■ Enable Deflate - when true, support for deflate compression is enabled. The browser Request includes the Accept-Encoding: deflate header indicating a deflate compressed page response will be accepted. If the server uses deflate compression, the response includes the Content-Encoding: deflate header indicating the returned page is in deflate compressed format. The browser inflates the compressed file before rendering the HTML page. Deflate compression is typically used to provide faster transfer of large HTML pages between the browser and the server.
■ Language - when you select other, enter the language to override the Accept-Language header. The default is the locale assigned by the JVM.
■ HTTP Version - select the HTTP protocol version to specify in the GET or POST request/response between client and server. The HTTP/1.0 protocol is an early implementation of the Hypertext Transfer Protocol. HTTP/1.1 is a standards-based enhancement to the HTTP/1.0 protocol. See the Key Differences between HTTP/1.0 and HTTP/1.1 at http://www8.org/w8-papers/5c-protocols/key/key.html
■ Accept String - this setting controls what the Accept: HTTP header value looks like. When you select other, enter the string. The default in the JavaAgent.properties file is: text/html, image/gif, image/jpeg, */*. If you modify a navigation in a script by adding a custom Accept: header, the custom header value from the script is used instead.
■ Enable Keep Alive - when true, the connection request header is set to Connection: Keep-Alive. For HTTP/1.0, the socket connection is kept open until either the client or the server drops the connection. For HTTP/1.1 all connections are kept alive unless a Connection: close header is specified.
■ Preserve Connections Between Iterations - used to preserve connections between Virtual User agents and the browser between successive iterations of the script. Set to True if the browser should attempt to reuse any open browser connections if possible between iterations. Each virtual user maintains its own set of connections that it never shares with other virtual users. The default value is True, preserve connections between iterations.

Defining Scenarios
Defining Virtual User Scenarios 4-7
■ Preserve Variables Between Iterations - used to preserve or automatically clear variables added in the Run section of OpenScript scripts between successive iterations of the Run section.
■ Preserve Cookies Between Iterations - used to preserve or automatically clear cookies added in the Run section of OpenScript scripts between successive iterations of the Run section.
■ Max Number of Keep Alive Requests - select other to specify the maximum number of requests to make on a keep alive connection before closing it.
■ Download Local Files - when true, the Java Agent retrieves the requested local file contents.
■ Max Content Download Size - specifies the maximum size for downloads. You can specify Unlimited or Other. If you select Other, specify the maximum size in kilobytes.
■ SSL Version - select the Secure Socket Layer version to use for the proxy server. When recording a secure site in the browser, the user only sees the Proxy Recorder's certificate not the secure web site's certificate. The Browser, Proxy Recorder, and Secure Server each have their own private and public keys which are used to encrypt/decrypt data.
– SSL: Use Secure Socket Layer protocol with the proxy server. OpenScript uses Sun Java Secure Socket Extension (JSSE). Sun JSSE by default supports SSLv2, ASSLv3, ASSL, ATLSv1, ATLS, and SSL_TLS.
– SSL without TLS: Use Secure Socket Layer without Transport Layer Security. In some cases, a JSSE issue may cause a TLS Protocol connect failure. Use this option if a protocol connect failure occurs when using the SSL option.
■ Ignored Url - specify the Urls, separated by commas, that should not be requested. This setting only applies to certain OpenScript scripts.
■ Additional Arguments - specifies custom OpenScript script.java code arguments. You can create your own settings in OpenScript scripts. For example, you can create custom settings in OpenScript script.java code, as follows:
if (getSettings().get("MyCustomSetting").equals("abc")) {info("We're running in ABC mode.");
}
You can then set the additional arguments in the Additional Arguments field as follows:
-MyCustomSetting abc
■ Global Headers - specifies any custom "Global Headers" string to use in the Request header for script playback. The format is in the form: name1:value1;name2:value2;name3:value3. For example: x-oracle-slm-message-id: bcn=<beacon_name>; svc=<service_name>.
■ Replace URLs - specifies the URL replacement string in the form: originalURL1=replacementURL1,originalURL2=replacementURL2,[...]. During playback, anytime the agent makes a request to a URL starting with a segment, originalURL, the agent replaces the original URL segment with replacementURL. This feature is only supported for Load Test scripts.

Defining Scenarios
4-8 Oracle Load Testing - Load Testing User's Guide
– originalURL - Specify the starting segment of the URL:port that appears in the script that should be replaced. This value is case-sensitive.
– replacementURL - Specify the new starting segment URL:port that the agent requests instead of originalURL.
For both parameters, if the protocol is omitted, HTTP protocol is assumed. If no port is specified after the host, port 80 is assumed for HTTP protocol, and port 443 is assumed for HTTPS protocol. URLs are replaced after all correlations are applied. One or more URL replacement pairs may be specified, separating each replacement pair with a comma. The following examples show the format of Replace URLs strings:
test_server:7789=production_server:7789
test:7789=prod:7789,https://stage.oracle.com/main=https://prod.oracle.com/home
OpenScript Error Recovery - The OpenScript Error Recovery categories lets you specify error recovery actions for exceptions that occur during playback. You can set the error recovery action for individual playback exceptions. You can set the action as Fail, Warn, or Ignore, as follows:
■ Fail: Report the error as failure and stop script execution.
■ Warn: Report the error as a warning and continue script execution.
■ Ignore: Ignore the error and continue script execution.
Error Recovery playback preferences specified in the OpenScript Preferences are stored on the local machine and only apply when the script is played back from inside OpenScript on that machine. If you upload your script to Oracle Load Testing on another server and your script depends on an error recovery setting being a certain way in order for it to work, then you can set the error recovery setting in the OpenScript script Java code.
In OpenScript scripts, error settings can be turned on and off at any time, overriding the default Oracle Load testing and OpenScript Preferences using script Java code. For example:
getSettings().setErrorRecovery("http.zeroLengthDownloads", "IGNORE");// user code executed in script, such as http.get(), http.post(), ...getSettings().setErrorRecovery("http.zeroLengthDownloads", "FAIL");
See the OpenScript documentation for a list of error recovery settings.
OpenScript Error Recovery - General - the General Error Recovery settings are as follows:
■ File Not Found - specifies the error recovery action if a file is not found.
■ Segment Parser Error - specifies the error recovery action if the XPath Segment Parser cannot verify the correctness of an XPath.
■ Create Variable Fail - specifies the error recovery action if a script fails to create a variable.
■ Encryption Service not Initialized - specifies the error recovery action when the password encryption service was not initialized.
■ Binary Decoding Error - specifies the error recovery action if a binary post data parameter error occurs.

Defining Scenarios
Defining Virtual User Scenarios 4-9
■ Variable Not Found - specifies the error recovery action if a variable cannot be found when parsing transformed strings.
■ Child Script Failed - specifies the error recovery action if an error occurs in a script that is a child of another script.
■ Unexpected Script Error - specifies the error recovery action if any unexpected script error occurs.
■ Call Function Failed - specifies the error recovery action if an error occurs in a script that calls a function of another script.
OpenScript Error Recovery - HTTP - the HTTP Module Error Recovery settings are as follows:
■ HTML Parsing Error - specifies the error recovery action if an HTML parsing error occurs.
■ Text Match Fail - specifies the error recovery action if a text matching test fails.
■ Solve Variable Fail - specifies the error recovery action if the value of any variable cannot be solved.
■ Response Time Error - specifies the error recovery action if a Server Response Time test fails.
■ Invalid HTTP Response - specifies the error recovery action if the sever returns an invalid HTTP response.
■ Invalid URL - specifies the error recovery action if the server returns an Invalid URL response code.
■ Zero Downloads Fatal - specifies the error recovery action if a server response indicates zero bytes length.
■ Client Certificate Keystore Error - specifies the error recovery action if the Client Certificate Keystore indicates an error.
OpenScript Error Recovery - Oracle Forms Load - the Oracle Forms Load Test Module Error Recovery settings are as follows:
■ Forms Connect Error - specifies the error recovery action if a server connection error occurs.
■ Forms I/O Communication Error - specifies the error recovery action if a read/write or communication error occurs with an Oracle Forms message.
■ Forms Playback Error - specifies the error recovery action if an error occurs during forms playback.
■ Forms Component not Found - specifies the error recovery action if a component of a form is not found.
■ Forms Content Match Failed - specifies the error recovery action if a content matching test fails.
OpenScript Download Manager - the OpenScript Download Manager settings are as follows:
■ Use OpenScript Download Manager - when true, the Download Manager is enabled during playback. When false, the Download Manager is not enabled during playback.
■ Ignored Urls (Using Regex): Specifies the Regular Expression(s) string to use to ignore specific resources. For example, the expression Login_Banner(.+?) would not download resources such as Login_Banner1.gif and

Defining Scenarios
4-10 Oracle Load Testing - Load Testing User's Guide
Login_Banner2.gif. Multiple Regular Expressions can be separated using a comma (,).
■ CSS Resource - when true, css resources in <Link> tags are downloaded during playback. When false, css resources are not downloaded during playback.
■ Image Resource - when true, image resources in <Img> tags, in the "background" attribute of a tag, or in <style> tags with "background:url" patterns are downloaded during playback. When false, image resources are not downloaded during playback.
■ Embeded Object Resource - when true, object resources in <Embed> tags or in <Object> tags are downloaded during playback. When false, object resources are not downloaded during playback.
■ Script Resource - when true, script resources in <Script> tags are downloaded during playback. When false, script resources are not downloaded during playback.
■ Applet Resource - when true, applet resources in <Applet> tags are downloaded during playback. When false, applet resources are not downloaded during playback.
Forms LT Playback - the Oracle EBS/Forms load testing playback settings are as follows:
■ Capture Message Details: Specifies if forms message details are captured during playback. When selected, OpenScript captures and stores Forms message requests, responses, and information about all loaded Forms components during playback. This information is useful to have when debugging the script.
OpenScript displays captured details in the "Messages" and "Object Details" tabs of the Details view. Oracle Load Testing displays this information in the Virtual User Display based on the "Virtual User Display" settings.
Capturing message details is a memory-intensive operation. During heavy load testing, it is recommended to clear this setting to reduce the amount of heap space required by the agent.
Databank Configuration - the Databank Configuration load testing playback settings are as follows:
■ Databank Setup Timeout: Specifies how much time to spend preparing a databank for use before timing out. The value is in seconds. This setting includes the total time to do all of the following activities:
If using a Database-backed databank:
– Connect to the database
– Query
– Read records, write into the file
– Create the index simultaneously
– Disconnect
If using a CSV-backed databank:
– Time required to parse the CSV file and create the index
If using Random Unique:

Defining Scenarios
Defining Virtual User Scenarios 4-11
– Time to shuffle the index
■ Read Timeout - specifies the amount of time to wait for a databank read or get operation for a script at run-time before timing out.
5. Select the script or user defined profile that you want to edit from the list.
6. Set the attributes.
7. Repeat steps 5 and 6 for each script and user defined profile or use the copy and paste functions on the right click menu to copy settings from one script or user defined profile to another.
8. Click OK.
4.1.3 Determining the Number of Virtual UsersThe number of virtual users that can run reliably and provide accurate performance data for your application depends upon several factors:
■ Resources required by the application;
■ Number of machines being used for the load test;
■ Amount of memory on each machine;
■ Operating system being used;
■ CPU utilization.
The general rules of thumb for determining the number of virtual users are as follows:
■ Keep CPU usage below 90% for each system in the load test, including the Oracle Load Testing system and each agent system.
■ Keep memory consumption for each workstation in the load test below 70-75% of the physical amount of memory in each workstation. That is, keep the number of virtual users below where page swapping of memory takes place.
■ If you need to run more virtual users for your load test than CPU usage or memory limits provide for, you should add more physical memory to a system, or add additional agent systems.
You can use system performance monitoring tools, such as Performance Monitor or Task Manager in Windows 2000/2003, to determine system resource usage.
4.1.4 Managing SessionsSessions specify the scope for Oracle Load Testing data collection and reporting. The data collected while the Autopilot is running virtual users is shown in the virtual user grid, Oracle Load Testing ServerStats runtime performance statistics and load graphs, and can be saved to a database for post-testing analysis.
You can specify default settings for how sessions start and end data collection using Options from the Tools menu then selecting Session Start/Stop. Selecting this option opens the Session Start and Stop Options dialog box:
Define how a session starts - defines actions for a new session.
■ Save data for reporting - specifies if virtual user data is saved for real-time and post testing analysis reports. There are three options:
– No - the virtual user data is not saved. There will be no real-time or post-run graphs.

Defining Scenarios
4-12 Oracle Load Testing - Load Testing User's Guide
– Yes - the virtual user data is saved to the database. You can use Create Reports tab at a later time to generate reports and graphs for analysis.
– Ask - Oracle Load Testing prompts you to save the data each time you start a new Autopilot session.
■ Auto assign session name - when selected, the specified session name prefix, plus a four-digit increment number, is assigned when a new session starts.
■ Session Name Prefix - specifies a fixed name to add before the session name. Enter a name to use or "Default". Oracle Load Testing adds the increment number to the name you define. When set to "Default," the name is "session" (for example, session0001).
Define How a Session Ends - defines how a session ends. When a session ends, Oracle Load Testing stops updating runtime data in the performance statistics, load graphs, and the database (if Save data for reporting is used). Subsequent Autopilot runs start a new session for data collection and reporting purposes.
■ Stop session on last VU completion - when selected, the session ends when the last virtual user has finished the run in the Autopilot.
■ Stop attached session after browser closes - when there is an attached session, stops the session when the session timeout is reached after the browser is closed. When not checked and the browser is closed, the session continues to run until it's normal stopping time or until you reattach to the session and stop it manually. The default session timeout is ten minutes.
■ Terminate all agents at end of session - when selected, all Oracle Load Testing Agents automatically close when a session ends.
Agent error handling - defines how to handle agents that encounter errors.
■ Stop ramp-up on agent error - when selected, the autopilot stops submitting new virtual users if any virtual users fail to complete the initialization process. This may happen due to complications when starting the agent process or failures during script pre-run verification. This does not stop the test and previously running users continue to execute until the end of the session.
■ Drop failed agents from session - when selected, the autopilot stops submitting new users to the agent machine that had the failure if a virtual users fails to start or is set to orphaned for any reason.
4.1.5 Using the Data Bank ControlYou can use the Data Bank Control to view Data Bank records and set Oracle Load Testing preferences.
To use the Data Bank control:
1. Add a script or profile that uses a Data Bank to the Configure parameters of the scenario list.
2. Click the Edit Scenario Details button.
3. In the Main section, set the Use Data Bank field to True.
Note: If you have added the same profile to the scenario multiple times, the databank settings for the first instance of the profile in the scenario will apply to all instances of the profile in the scenario.
Defining Scenarios
Defining Virtual User Scenarios 4-13
4. Select other Scenario Profile options as needed to configure how each Oracle Load Testing agent uses Data Bank records.
5. Click OK to exit the dialog box.
6. Click the Configure Data Bank button.
The scripts and Data Bank names are listed on the left. Select which Data Bank to view.
Databank Source - this section shows the following information about the selected databank:
■ Type - shows the type of the selected databank file. Databanks can be CSV text files or databases.
■ Source - shows the path and filename of CSV text files or the database source of database databanks. While there is not a maximum file size, the recommended maximum sizes is 200 MB. The only limitation is how long it takes to generate the index. The databank must be indexable within 30 seconds, by default. This setting is configurable in the "Databank Timeout" setting in the General Options. See Section 3.13.9, "Setting General Options" for additional information about setting the Databank Timeout.
■ Records - shows the number of records in the databank.
Preview - shows the Data Bank variables, values, and types, as follows:
■ Name - lists the names of the Data Bank variables.
■ Value - list the values of the Data Bank variables.
■ Type - shows the type of Data Bank variable: Internal, External, or Not Mapped.
Databank Settings - this section specifies the settings to use for the selected databank:
■ Advance to Next Record - specifies when the virtual user should advance to the next databank record during script playback. The following options are available:
– When Script Requests a Record - the databank record advances every time a script explicitly requests a record during script playback. A record request corresponds to the script Java code calling the getDatabank(alias).getNextRecord() method. This is the default behavior.
– Each Iteration of Script - the databank record advances before a script containing the databank starts another playback iteration.
– Each Occurrence - the databank record advances when a script refers to a databank column (i.e. databank field) in the script. A record request corresponds to the script Java code evaluating a parameterized value such as {{db.fmstocks_data.ticker}}. For example, if you have an employee databank with a firstName field and the firstName column is specified as the Column value in the OpenScript script, the databank record advances only when the {{db.employees.firstName}} value in the script Java code is evaluated on script playback.
– Keep the First Record Assigned - the databank record does not advance once a virtual user gets a record from the databank, it uses that record forever and never requests another record. This option applies to scenarios running more than one virtual user. Virtual users may still request an

Defining Scenarios
4-14 Oracle Load Testing - Load Testing User's Guide
individual record using getRecord(n), getLastRecord(), or getFirstRecord().
■ Select Next Record - specifies how a new record is selected from the databank when the databank record advances. The following options are available:
– Sequentially - the databank records increment one by one in sequential order from the start of the specified range. When multiple virtual users are running, records are distributed in sequential order across all virtual users.
– Random - the databank records are selected at random from the databank. The same record may be used multiple times before all records are exhausted. Random record selection is only provided for databanks that can be indexed. When configuring databank settings, if the databank file is too large to index, the Random or Shuffle options may not be available. The When Out of Records and Let Each User Iterate Over Records Independently settings do not apply when Random is selected.
– Shuffle - the databank records are selected at random from the databank ensuring that once a record is selected, it is never selected again. The setting works similar to selecting a random card from a deck until no cards are left. Shuffle mode only supports databanks containing fewer than 200,000 records. For databanks containing more than 200,000 records, you can shuffle the values in the actual data file or you should use the Random mode.
– Use Seed - specifies a randomization seed value to use when using the Random or Shuffle modes. Use the same seed across multiple tests to create the same sequence of random numbers for all tests. If 0 or not specified, a seed is generated automatically based on the current time.
■ When Out of Records - specifies the action the virtual user takes if all databank records in the specified range have been used and a new record is requested. The following options are available:
– Loop Over Range - loops back to the first record in the range after all records in the range are used and continues distributing records. Use the Maximum Iterations settings to prevent the virtual user from running forever.
– Stop the User - the virtual user immediately stops running the next time a record is requested from the databank after all records in the range are used. The virtual user will stop regardless of how many iterations are specified by the Maximum Iterations settings.
– Keep the Same Record - continues to use the last record requested after all records in the range are used. No additional records are requested from the databank. Any calls in the Java code to getNextDatabankRecord() are ignored after all records are used. Custom Java code may be used in the script to have Virtual users request an individual record using getRecord(n), getLastRecord(), or getFirstRecord().
■ Let Each User Iterate Over Records Independently - when selected, each Virtual User cursors through records independently. For example, VU 1 gets records 1, 2, 3, [...] and VU 2 gets records 1, 2, 3, [...]. This option only applies for scenarios running more than one virtual user.
This option only applies for databanks that can be indexed. When configuring databank settings, if the databank file is too large to index, the Let Each User Iterate Over Records Independently option may not be available.

Defining Scenarios
Defining Virtual User Scenarios 4-15
7. Make sure the script or profile is selected in the tree view.
8. Use the arrow buttons to change the record data.
9. Click OK.
4.1.6 Using Synchronization Points A sync point allows multiple virtual users to synchronize their actions and interactions with the application under test. Sync points provide the ability to create realistic multi-user situations that may expose resource conflicts such as deadlocks. When you specify a sync point, multiple virtual users executing the script will reach this sync point at various times depending on a number of factors (for example, the speed of the machine).
Sync points cause each virtual user to wait until all virtual users have reached that sync point. Each of the virtual users notifies the master upon reaching the sync point. The master waits for all of the virtual users to notify it and then issues the go-ahead for all the virtual users to continue past that sync point.
Sync points are added to individual scripts (parent or child scripts) when they are created in OpenScript. The execution parameters for sync points are defined in the Oracle Load Testing application.
To add a sync point to an OpenScript script:
1. Create or open a script in OpenScript.
2. Select the script node were you want to add the sync point.
3. Select Add from the Script menu then select Other.
4. Select the Synchronization Point node and click OK.
5. Enter a name for the synchronization point and click OK.
6. Save the script in OpenScript.
To define the sync point execution parameters in Oracle Load Testing:
1. Start Oracle Load Testing.
2. Select the script with the sync point and add it to the scenario.
3. Click the Configure Sync Point icon.
4. Expand the script name, select the name of the sync point in the left pane, and specify the execution parameters for the sync point in the right pane, as follows:
Name - specifies the name of the Synchronization point. This is the same name as specified for the sync point in the OpenScript script.
Group type - specifies how to determine when to release virtual users based on the following options:
■ All users in scenario - calculates when to release virtual users based on all virtual users whether or not they are running.
■ Running users - calculates when to release virtual users based on the number of running users only.
Release trigger - specifies the percentage of virtual users that must be waiting before they are released. For example, if ten virtual users are running and the release trigger is set to fifty percent, then the waiting virtual users are released when five of them are waiting. Setting the value greater than one hundred percent causes the virtual users to wait until they are manually released.

Using IP Spoofing
4-16 Oracle Load Testing - Load Testing User's Guide
Open gate time - specifies the amount of time to keep the release open after it has been triggered.
Maximum Wait - specifies, per individual virtual user, the maximum amount of time, in seconds, that the synchronization point will wait before releasing the virtual user.
5. Repeat these steps to specify the execution parameters for other sync points in the same or other scripts.
6. Click the OK button when you have finished specifying sync point execution parameters. The sync point execution parameters will be saved as part of the virtual user scenario.
To check the sync point status or release sync points for running virtual users:
1. Start a virtual user scenario with one or more scripts containing sync points.
2. Select Sync Point Status from the Tools menu.
-or-
Click the Watch VU Grid tab and right-click on a running virtual user.
4.2 Using IP SpoofingOracle Load Testing can use IP spoofing to assign different IP addresses to virtual users. Each virtual user must get a defined IP address when using IP spoofing.
Before virtual users can use IP spoofing, you must define the IP addresses available for use by Oracle Load Testing in the TCP/IP network protocols of the workstation.
You define the IP addresses using the Advanced IP Addressing options of the TCP/IP properties of the Network Protocols. On Windows NT systems, the Network Protocols are accessed using the Control Panel, as follows:
The general procedure is as follows:
1. Open the TCP/IP Network Protocols.
2. In IP Address, select Specify an IP Address.
3. In the Advanced IP Address settings, add the IP Address and Subnet Mask.
4. Enter as many IP addresses/Subnet Masks as you have available for use by Oracle Load Testing virtual users.
5. Repeat the above steps on each Oracle Load Testing Agent system.
6. In the Edit Scenario Details dialog box, set Use IP Spoofing to True in the Browser Settings section.
7. If you are using WinInet, set the Maximum Users Per Process to one in the Advanced section.
8. Submit and Start the scenario in the Autopilot.
The virtual users on each Agent machine will use the defined IP addresses in the order they were defined in the TCP/IP network protocols. For example the first virtual user uses the first IP address (index value 0), the second virtual user uses the second IP address (index value 1), and so on. If there are more virtual users than available IP addresses, Oracle Load Testing loops back to the first IP address and goes through the list of IP addresses repeatedly until all virtual have been assigned an IP address.
Working with Scenario Files
Defining Virtual User Scenarios 4-17
4.3 Working with Scenario FilesOnce you select virtual user profiles and set the attributes, you can save the Scenario to a file for future use. Oracle Load Testing automatically assigns the name Scenario### for the scenario.
4.3.1 Saving ScenariosTo save a Scenario:
1. Select Save or Save As from the Scenario menu or click the toolbar button.
Repository - a list of repositories. Select the repository in which you want to save the scenario.
Workspace - lists the workspaces available in the selected repository.
<Scenario list> - lists the scenarios in the selected workspace.
Name - enter the name for the scenario.
2. If the Save As dialog box appears, specify a file name in the Name field.
3. Select the repository and workspace where you want to save the scenario.
4. Click OK.
4.3.2 Opening Existing ScenariosIf you have previously defined a scenario and saved it to a file, you can open the scenario for use in Oracle Load Testing.
To open an existing Scenario:
1. Select Open from the Scenario menu. Oracle Load Testing opens a dialog for selecting the scenario file. Scenario files have a .scn filename extension.
Repository - a list of repositories.
Workspace - lists the workspaces available in the selected repository.
<Scenario list> - lists the scenarios in the selected workspace.
2. Select the Repository and Workspace containing the scenario you want to open.
3. Select the scenario and click OK.
4.3.3 Renaming ScenariosTo rename a scenario:
Note: Oracle Load Testing uses layering on the TCP/IP stack to perform IP spoofing with virtual users. While virtual users are running, the Oracle Load Testing layer is at the top of the TCP/IP stack. If an unusual event (for example, a restart) occurs while the system is running Oracle Load Testing virtual users with IP spoofing, other applications that use the TCP/IP stack may be affected. If this occurs, use regsvr32.exe to unregister the file sporder.dll.
Note: Oracle Load Testing saves the current Autopilot settings as part of a saved scenario.

Working with Scenario Files
4-18 Oracle Load Testing - Load Testing User's Guide
1. Select Scenario from the Manage menu to display the Scenario Manager.
Repository - a list of repositories.
Workspace - lists the workspaces available in the selected repository.
Edit - opens the Edit Scenario Dialog Box for editing the selected scenario.
Delete - deletes the selected scenario.
Name - lists the scenarios in the selected workspace.
2. Select the scenario you want to edit.
3. Click Edit to display the Edit Scenario dialog box.
Name - enter a name for the scenario.
4. Enter a new name for the scenario.
5. Click OK.
6. Click Close to exit the Scenario Manager.
4.3.4 Deleting ScenariosTo delete a scenario:
1. Select Scenarios from the Manage menu to display the Scenario Manager.
Repository - a list of repositories.
Workspace - lists the workspaces available in the selected repository.
Edit - opens the Edit Scenario Dialog Box for editing the selected scenario.
Delete - deletes the selected scenarios. To select more than one scenario, hold down the CTRL key.
Name - lists the scenarios in the selected workspace.
2. Select the scenarios you want to delete. To select more than one scenario, hold down the CTRL key.
3. Click Delete.
4. Click Yes to confirm the deletion.
5. Click Close to exit the Scenario Manager.
4.3.5 Removing Profiles From a ScenarioTo remove profiles from the Scenario Profiles list:
1. If necessary, open a saved Scenario file.
2. Select the Build Scenarios tab.
3. Select the profile in the Configure parameters of the scenario list.
4. Click the Delete button.
5. Save the scenario by selecting Save from the Scenario menu.

Working with Scenario Files
Defining Virtual User Scenarios 4-19
4.3.6 Running Scenarios from the Command LineYou can run and stop scenario files using the command line Java file OLTCommandLine.jar located in the \lib directory under the installation directory. Use the following command syntax to start a scenario:
cd installdir\lib
OLTCommandLine.jar -run -session=sessionName -scenarioFile=PATH_TO_OLT_SCENARIO_DIR\scenarioFile.scn -OLTServer=hostName:portnumber -user=username -password=password [-log=logfilename]
Use the following command syntax to stop a scenario:
cd installdir\lib
OLTCommandLine.jar -stop -session=sessionName -OLTServer=hostName:portnumber -user=username -password=password
The following are the command parameters:
run - Executes the selected scenario until the stop command is issued or the stop conditions specified in the scenario are reached.
session - specifies the name to use for the session. If you do not do not provide a session name, Oracle Load Testing generates a session name.
scenarioFile - the scenario file to load. Specify the full path and file name of the scenario file. Scenario files have a .scn extension.
stop - shuts down the specified session. The Stop command is not required if the specified Scenario being run has a Stop condition of some defined time or number of iterations saved in the Autopilot settings. You can not use both "-Run" and "-Stop" in the same command.
session - specify the session to be shut down. The session name is automatically generated when you run the scenario. You can get the session name from the console or the log file specified with the scenario run command line parameters.
OLTServer - specify the Weblogic server name which hosts Oracle Load Testing. The port number is required.
user - specify the admin user name of the Weblogic server. The default username is "oats".
password - specify the admin user password of the Weblogic server.
log (Optional) - redirects console output to logfilename. Specify the path and file name to use for the log file.
4.3.6.1 Error HandlingIf the OLT server is not running, an error will occur.
If the scenario file does not exist, an error will occur.
If the scenario file is not a correct xml, an error will occur.
4.3.6.2 ExamplesThe following example command line starts the test1 scenario:
cd C:\OracleATS\libOLTCommandLine.jar -run -scenarioFile="C:\OracleATS\OFT\Default!\test1.scn" -OLTServer=localhost:8088 -user=oats -password=password1 -log C:\OracleATS\OFT\Default!\mylog.log
Submitting Scenarios to Autopilot
4-20 Oracle Load Testing - Load Testing User's Guide
The following example command line stops SESSION0001:
OLTCommandLine.jar -stop -session="SESSION0001" -OLTServer=localhost:8088 -user=oats -password=password1
4.4 Submitting Scenarios to AutopilotOnce you have defined a scenario and set the profile attributes, you submit the scenario to the Oracle Load Testing Autopilot.
4.4.1 Submit without Starting the ScenarioSubmitting the scenario to the Autopilot without starting allows you to specify the start and stop times for running the scenario profiles.
To submit a Scenario without starting the Autopilot click the Add to Autopilot button.
Oracle Load Testing automatically opens the Autopilot tab with the scenario loaded.
4.4.2 Submit and Start Scenario in AutopilotIf you want to use the default Autopilot settings and start the Scenario, you can submit scenarios and automatically start the Autopilot in one step.
To submit a Scenario and start the Autopilot click the Run Test button.
Oracle Load Testing automatically opens the Autopilot tab with the scenario loaded and starts the virtual user run. If you have the Save data for reporting option set to Yes or Ask in the Session Start/Stop options, the Save Session dialog box opens with the following options:
Save data for reporting - specifies if virtual user data is saved for real-time and post testing analysis reports. The following options are available:
■ No - the virtual user data is not saved. There will be no real-time or post-run graphs.
■ Yes - the virtual user data is saved to the database. You can use Create Reports tab at a later time to generate reports and graphs for analysis.
Perform baseline for Oracle DB - specifies if an Oracle Database snapshot is taken before the load test session. This option only appears if the session has a ServerStats configuration with Oracle Database Metrics applied when load test is launched. Oracle metrics are identified by the database driver connection properties. If you add an Oracle Database metric after the load test is running, there is no way to take snapshots during the load test. The following options are available:
■ No - no database snapshot will be taken during the load test.
■ Yes - a database snapshot and baseline will be created during the load test. An Oracle Database "snapshot" is a PL/SQL call that causes the database to record a timestamp during the gathering of performance data. A "baseline" is a PL/SQL call that uses the ID of two snapshots, which causes the data recorded between the snapshots to be persisted indefinitely rather than expiring after a user-configured persistence interval (the default is 8 days). The snapshot and baseline allow you to retrieve Enterprise Manager drilldown information for a load test session long after the session has been run. When Yes is selected, two snapshots - one at the beginning and one at the end of a load test session - and a baseline cause the data gathered during the session to be persisted indefinitely.

5
Using the Autopilot 5-1
5Using the Autopilot
This chapter explains how to use the Autopilot to specify start and stop times for scenario profiles and the rampup specifications for each virtual user. Default values can be set by selecting Options from the Tools menu then select Autopilot Defaults.
Before you can use the Autopilot, you must first define virtual user profiles and scenarios and submit the scenario profiles to the Autopilot. Chapter 4 explains how to define virtual user profiles. Chapter 5 explains how to define scenarios and submit them to the Autopilot.
5.1 Specifying Start and Stop SettingsThe Start the load test and Stop the load test groups of the Set Up Autopilot tab is where you specify when to start and stop running of virtual user scenarios.
5.1.1 Specifying When to Start Virtual UsersThe Start the load test selector specifies when to start running virtual user scenarios and has the following options:
■ When the start button is pressed - starts running the scenario as soon as you start the Autopilot.
■ After a delay of - allows you to specify an amount of time to wait before starting the virtual user scenario. Selecting this option enters a default time in the associated editbox in the format: hh:mm:ss. Change the amount of time as necessary. The Autopilot waits the specified amount of time after you start the Autopilot to start running the virtual users.
■ At specific time - allows you to specify the time to start running the virtual user scenario. Selecting this option enters a default time in the associated editbox in the format: hh:mm:ss. Change the time as necessary. The Autopilot waits until the specified time after you start the Autopilot to start running the virtual users.
■ Synchronize VU start up - fully initializes the first group of virtual users in their respective agent processes before actually beginning the iteration. This procedure attempts to eliminate any startup overhead that may amplify the iteration performance times of the virtual users' first iterations.
Note: Changing the autopilot defaults does not affect the current scenario. The changed autopilot defaults go into effect when you start a new scenario.
Specifying Virtual User Rampup
5-2 Oracle Load Testing - Load Testing User's Guide
5.1.2 Specifying When to Stop Virtual UsersThe Stop the load test selector specifies when to stop virtual user scenarios that are currently running and has the following options:
■ When the stop button is pressed - repeats running of the virtual user scenario continuously until you manually stop the virtual users.
■ After each user plays - allows you to specify the number of times the virtual users iterate over the scripts submitted to the Autopilot. Selecting this option enters a default number of iterations in the associated edit box. Change the iteration count as necessary. The virtual users run the scenario profiles the specified number of times and then stops automatically after the count is reached.
■ After a delay of - allows you to specify an amount of time to continue running the virtual user scenario. Selecting this option enters a default time in the associated editbox in the format: hh:mm:ss. Change the amount of time as necessary. The Autopilot runs the scenario profiles for the specified amount of time and then automatically stops running the scenario.
■ At specific time - allows you to specify the time to stop running the virtual user scenario. Selecting this option enters a default time in the associated edit box in the format: hh:mm:ss. Change the time as necessary. The Autopilot plays back the scenario profiles until the specified time and then automatically stops running the scenario.
5.2 Specifying Virtual User RampupThe Rampup Specification group is where you specify the rate at which the Autopilot starts running virtual users.
The Add per Step and After every settings work together to specify the start rate of the virtual users.
5.2.1 Specifying How Many Virtual Users to Start at a TimeAdd per step specifies the start rate for virtual users.
■ users - specifies the number of the virtual users to start at a time based upon the After setting. Selecting this option enters a default number of virtual users, which is the total number, in the associated editbox. Change the number as required.
■ percent - specifies a percentage of the virtual users to start at a time based upon the After setting. Selecting this option enters a default percentage in the associated editbox. Change the percentage as required.
After every specifies how often the specified number or percentage of virtual users start running and has the following options:
■ seconds - specifies the number of seconds to wait before starting the specified number or percentage of virtual users. Selecting this option enters a default number of seconds. Change the number as required.
■ iterations - specifies the number of scenario iterations to wait before starting the specified number or percentage of virtual users. Selecting this option enters a default number of iterations. Change the number as required.

Manually Starting and Stopping the Autopilot
Using the Autopilot 5-3
5.2.2 ExamplesExample: If you specify the percentage as 10% and the After every setting is set to delay of 10 seconds, the Autopilot starts running ten percent of the virtual users submitted to the Autopilot every ten seconds until all virtual users are running.
Example: If you specify the number as 5 and the After every setting is set to 1 iteration, the Autopilot starts running five virtual users after each run of the scenario profiles until all virtual users are running.
Example: if you specify the iteration count as 1 and the Add per step setting is set to 5 users at a time, the Autopilot first starts five virtual users. After the first five complete one iteration of the profile, the Autopilot starts another five virtual users. The Autopilot starts five additional virtual user after each iteration until all virtual users are running.
Example: If you specify the delay as 120 seconds and the Add per step setting is set to 10% percent seconds, the Autopilot starts running ten percent of the virtual users every 120 seconds until all virtual users are running.
5.3 Manually Starting and Stopping the AutopilotOnce you have submitted scenario profiles and set the Autopilot options, you can manually start and stop the Autopilot using the following:
■ Autopilot buttons
■ Toolbar
You need to manually stop the Autopilot to submit more scenario profiles or stop any new virtual users from being started.
5.3.1 Starting the AutopilotTo start the Autopilot manually:
1. Click the Run Test button.
2. If the Deferred Start options appear, allow the delay to continue until the start time.
or:
Click Run Test to start the start running the scenario immediately.
or
Click Stop from the Session menu to cancel the start.
5.3.2 Stopping the AutopilotTo stop running the scenario profiles submitted to the Autopilot click the Stop button.
This stops Autopilot from starting any new virtual users.
Note: The Autopilot starts running the virtual users based upon the Start the load test settings and the Virtual User (VU) ramp-up settings.
If you set the Start option to either At Specified Time or After Delay Of, Oracle Load Testing displays the remaining time until the Autopilot starts in the status bar.

Working with Virtual Users
5-4 Oracle Load Testing - Load Testing User's Guide
5.4 Working with Virtual UsersOnce you start running virtual users using the Autopilot, the Virtual User Grid tab lists the running virtual users and shows the run details for each.
You can sort the data by a column by clicking on the column title.
5.4.1 Overview of the Virtual Users GridThe virtual users grid has the following columns:
Items - displays the currently selected item. Enter the item number you want to view and click Enter to go directly to that item.
arrows - use the arrows to go the first page, previous page, next page, and last page in the virtual user grid.
VU-Id - the ID number for the virtual user.
Profile - shows the name of the user profile being run by the virtual user.
Status - shows the current status for the virtual user.
Iterations - shows the number of times the virtual user has attempted to play back the run section of the user profile/script. The Iterations count will be incremented for each new iteration attempted. The iteration count is updated when the iteration ends. An iteration could end if the script fails, if the user calls "return" from inside the master script's run() method, or if the iteration completes all the way through successfully, for example.
When databanking with Stop After Last Record Used, the script will not stop immediately after the last record is requested. It is not known how many requests in the future would rely on the values of the last requested record. Therefore, the user does not abort until after the user attempts to request a record after the last record was already requested.
Failed - shows the number of failures that occurred for the virtual user.
Last Run Time - shows the average elapsed time it took for the virtual user to execute the scripts in the run section of the profile.
Current Page - shows the title of the web page or application currently being accessed by the virtual user.
System - shows the name of the system on which the virtual user is running.
Data Bank - shows the record of data from the Oracle OpenScript Data Bank, if any, used by the script during playback.
Current Error - provides a description of the error encountered on the most current completed iteration by the virtual user while executing the scripts. If the next iteration passes, this column is cleared.
Previous Error - shows a description of the previous error that occurred while the Virtual User was running.
OLT Server Warnings - this button is displayed when a virtual agent encounters a server error. Click it to view errors.
5.4.2 Controlling Individual Virtual UsersYou can control the running of specific running virtual users using the virtual users grid.
Working with Virtual Users
Using the Autopilot 5-5
1. Define virtual user profiles.
2. Specify the Scenario.
3. Submit the Scenario to the Autopilot.
4. Start the Autopilot.
5. Select the virtual user row in the Watch VU Grid tab.
6. Click the right mouse-button to open the popup menu.
7. Select options, as follows:
■ Modify Run Attributes - opens a dialog box for changing the profile attributes for the selected virtual user.
■ Start Viewing - opens the Virtual User Display window for viewing the playback actions of the virtual user.
■ Stop Viewing - closes the Virtual User Display window.
■ Stop - stops running the selected virtual user. Stopping allows the virtual user to finish executing the script, complete the run section but not run another iteration.
■ Abort - aborts running the selected virtual user. Abort stops execution after the current page in the script and terminates execution altogether.
■ Release Sync - releases the virtual user from any synchronization point that may have been reached during the execution.
5.4.3 Managing Synchronization pointsIf you create user-defined profiles that include synchronization points, you can manually release one or more virtual users from any synchronization point. You can release specific virtual users, specific synchronization points, or all virtual users and synchronization points.
5.4.3.1 Releasing Individual Virtual UsersTo release an individual virtual user from a synchronization point:
1. Select the virtual user in the Virtual User grid.
2. Click the right-mouse button and select Release Sync.
5.4.3.2 Releasing Multiple Virtual UsersTo release multiple virtual users from a synchronization point:
1. Select the virtual users in the Virtual User grid.
2. Click the right-mouse button and select Release Sync.
5.4.3.3 Releasing Synchronization PointsTo release synchronization points:
1. Select Sync Point Status from the Tools menu to display the Sync Point Status dialog box.
Release - releases the virtual users from the selected synchronization point that may have been reached during the execution.
Release All - releases all virtual users waiting at synchronization points.

Working with Virtual Users
5-6 Oracle Load Testing - Load Testing User's Guide
Sync Name - displays the name of the synchronization point.
Users At - displays the number of users waiting at the synchronization point.
Status - displays the user's status.
2. Select the Sync Point that you want to release and click Release or click Release All to release all Sync Points.
3. Click Close.
5.4.4 Modifying Run AttributesYou can modify the profile run attributes for specific virtual users running in the virtual user grid.
1. Select the virtual user row in the virtual user grid.
2. Click the right mouse button to open the popup menu.
3. Select Modify Run Attributes. Oracle Load Testing opens a dialog box for modifying the attributes.
4. Select options, as follows:
■ <check box> - select the checkbox in front of the field that you want to change to make the field available to change.
■ View All Responses - select when you want to display all virtual user responses, on error, always, or never.
■ Show Request Headers - select when you want the Request header information for Web page resources requested by the selected Virtual User to appear in the Virtual User Display history list, on error, always, or never.
■ Show Response Headers - select when you want the Response header information for Web page resources requested by the selected Virtual User to appear in the Virtual User Display history list, on error, always, or never.
5.4.5 Viewing Server WarningsThe Oracle Load Testing Server Warnings dialog box displays errors encountered by virtual agents. When an error is encountered, the OLT Server Warnings button is displayed at the bottom right-hand corner of the Watch VU Grid. Click on it to display this dialog box.
5.4.6 Stopping All Virtual UsersTo stop all running Virtual Users after they have finished, click the Stop button. The virtual users will complete the current iteration of the script and then stop.
To immediately stop all running Virtual Users click the Abort button.
5.4.7 Stopping the Autopilot From Starting New Virtual UsersTo stop the Autopilot from starting new Virtual Users click the Pause button
5.4.8 Aborting All Virtual UsersTo abort all running Virtual Users click the Abort All Virtual Users button.

Working with Virtual Users
Using the Autopilot 5-7
The virtual users stop immediately without completing the current iteration of the script.

Working with Virtual Users
5-8 Oracle Load Testing - Load Testing User's Guide

6
Using Graphs and Reports 6-1
6Using Graphs and Reports
Oracle Load Testing lets you evaluate the performance of your Web application in real time using Performance Statistics and graphs on the View Run Graphs tab. You can create custom graphs on the Create Reports tab for post-run analysis for sessions where data has been saved. The following default reports and graphs are available on the View Run Graphs tab:
■ Performance Statistics - shows a summary of performance statistics data generated by running virtual users.
■ Performance Vs. Users - shows the average run time of the script for each running virtual user in each profile. If you have multiple profiles in the running Scenario, the Performance Vs. Users graph shows separate bars for each scenario profile running in the Autopilot. For example, if you run 100 VUs and ramp 10 at a time, you will see the average response time plotted at 10 VUs, 20 VUs, 30 VUs, etc. up to 100 VUs.
■ Users Vs. Time - shows the relative time when the virtual users for each profile started running. The graph represents the Autopilot ramp up times and the number of virtual users ramped up for each profile.
■ Performance Vs. Time - shows the average virtual user run time over a period of time. If you have multiple profiles in the running Scenario the Performance Vs. Time graph shows separate plot lines for each scenario profile running in the Autopilot.
■ Statistics Vs. Time - shows averages for virtual user hits, pages, transactions, and Kilobytes per second over time. The Average Statistic values are a graphical representation of the Average Value data from the Performance Statistics over time. The plot points are updated while the Autopilot runs the virtual users.
■ Errors Vs. Time - shows the number of failed transactions-per-second for virtual user over a period of time. If you have multiple profiles in the running Scenario the Errors Vs. Time graph shows separate plot lines for each scenario profile running in the Autopilot. The failed transactions-per-second depends upon the number of virtual users being run by individual profiles and the number of server requests (page, image, frame, etc.) that fail during the Oracle Load Testing session.
■ Errors Vs. Users - the number of failed transactions-per-second for each virtual user profile. If you have multiple profiles in the running Scenario the Errors Vs. Users graph shows separate plot lines for each scenario profile running in the Autopilot. The failed transactions-per-second depends upon the number of virtual users being run by individual profiles and the number server requests (page, image, frame, etc.) that fail during the Oracle Load Testing session.
The graph adds plot points based upon the number of running virtual users as the Autopilot ramps up to the total number of virtual users for all scenario profiles.

Setting the Reporting Options
6-2 Oracle Load Testing - Load Testing User's Guide
■ Performance, Users vs. Time - this graph combines the Performance vs. Time and the Users vs. Time graphs.
■ Trans/sec, Users vs. Time - this graph combines the transactions per second statistic from the Statistics vs. Time graph and the Users vs. Time graph.
You can view the graphs while the virtual users are running or after they have been stopped or have finished. The performance data is reported at the conclusion of each iteration. When the running virtual users complete the first iteration, the first set of performance data is captured. The graphs and performance statistics that you see are updated in real time based on the Graph refresh interval setting in Reports Options to give you a snapshot of the load test results. However, there is a small amount of processing time required to generate the graphs/statistics and print them to the screen. The default refresh is 15 seconds. If you run long or over night tests, you should increase the refresh interval to 60 seconds or longer.
If you run a very quick Autopilot session, the View Run Graphs tab may not have enough time to update the screen with the real time data. However, if you use the Session Start/Stop options to save the data for reporting, the data is stored in the database.
In addition to real-time data shown, Oracle Load Testing can generate a summary report and save data to the database for post-testing analysis. The Latest Load Session reports let you generate a summary of performance and error statistics data for the virtual user session. You can use the Create Reports tab to generate a variety of reports and graphs from the data stored in the database.
6.1 Setting the Reporting OptionsTo set the Oracle Load Testing Report options:
1. Select Options from the Tools menu.
2. Select Start and Stop.
3. Set the Save data for reporting option to either Yes or Ask.
4. Select Reporting to set additional options.
Intervals - the Intervals options are as follows:
■ Reporting data collection interval - specifies how often the aggregate Oracle Load Testing agent performance data is collected for reporting to the Oracle Load Testing database.
■ User Interface refresh interval - specifies how often to refresh the user interface including the VU grid, ServerStats Display, and Sync Point Status.
■ Graph refresh interval - specifies how often to redisplay graphs in the View Run Graphs tab.
■ VU Display auto display interval - specifies how often to refresh the virtual user display when Auto mode is being used.
Note: For OpenScript scripts, steps run in the Initialize and Finish sections do not contribute to the overall script execution time reported in Oracle Load Testing reports. The time taken for the Initialize and Finish sections are not included in the script times so as not to skew the average time when the script runs for multiple iterations.

Setting the Reporting Options
Using Graphs and Reports 6-3
VU Grid - the VU Grid options are as follows:
■ Maximum number of rows per page - specifies the maximum number of rows to display on a page on the Watch VU Grid tab. The value must be between 10 and 100, inclusive.
VU Display - the VU Display options are as follows:
■ Maximum total storage size - specifies the maximum amount of data, in bytes, to send to the VU Display. Indicates the maximum number of bytes the Virtual User Display log file (.XML) will store for all items in the history list. The default value is 10 MB for each session. The size of the log file is affected by the size of the Web pages. The HTML source for each page is stored in the log file.
■ Maximum number of rows per page - specifies the maximum number of rows per page to display in the VU display. The value must be between 10 and 100, inclusive.
Performance Statistics and Session Report - specifies the default setting for Performance Statistics and Session Reports, as follows:
■ Show Server Times Only - specifies that only server response time is included in performance statistics and session reports.
■ Show End-to-End Times (include think times) - specifies that think time is included in performance statistics and session reports.
Custom Graphs - the Custom Graphs option is as follows:
■ Maximum Data Series Per Graph - specifies the maximum number of data series that can be graphed. The default is 20.
Report Template - the Report Template option is as follows:
■ Delete temporary images/data generated during report template - when selected, any temporary images or data generated by report templates is automatically deleted.
5. Enter the how often you want data to be collected in the Reporting data collection interval field.
6. Enter the how often you want to refresh the user interface in the User interface refresh interval field. This includes the VU grid, ServerStats Status Display, and the Sync Point Status display.
7. Enter the how often you want to refresh the report display in the Graph refresh interval field.
8. Specify how you want timer names to be displayed.
9. Specify whether to include think time in the profile time.
10. Specify the maximum number of data series to include per graph.
11. Click OK.
12. Start an Oracle Load Testing Autopilot session.
13. If you set the Save data for reporting option to Ask, Oracle Load Testing opens a dialog box for selecting the Oracle Load Testing session name and indicating whether you want to save the data.

View Run Graphs Tab
6-4 Oracle Load Testing - Load Testing User's Guide
6.2 View Run Graphs TabThe View Run Graphs tab is where you can view runtime reports. These graphs are only available while the load test is running. Use the Create Reports tab to view reports and graphs after the load test has finished running.
The View Run Graphs tab is refreshed according to what is set in the Graph Refresh Interval setting in the reporting options.
To stop the display from being refreshed, click the Pause button.
To resume refreshing the display, click the Resume button. Note that exiting the tab and returning to the tab will also resume refreshing the display.
Reports & Graphs - displays options for creating a new graph and viewing default graphs.
■ New Graph - displays a new tab with filters for customizing the graph. The tab label is the name you enter in the Graph Name field in the Filters section.
■ Overview - shows a thumbnail view of all graphs. Click on a thumbnail to enlarge it. The Overview tab includes the Default Graphs selector list and the Show Chart Statistics button, as follows:
– Default Graphs - select a graph and click Add Data Series to view a default graph.
– Show Chart Statistics - toggles the chart statistics table view on and off. The chart statistics show the Data Series and values for each series.
■ Reports - displays the performance statistics for the session.
Custom graph tabs have the following options:
■ Remove Graph - the (X) button on the tab deletes the selected graph.
■ Session - displays the session that is running.
■ Available Data Series - shows a list of session data generated by Oracle Load Testing and ServerStats. The data series listed is a subset of all of the available data series. Click Show All to display all available data series.
Default Graphs - select a graph and click Add Data Series to view a default graph.
Oracle Database Diagnostics - groups a set of Oracle Database profile metrics on the same graph. These metrics appear only if an Oracle Database ServerStats configuration is used with the session run. The graphs and metrics are as follows:
■ PGA/SGA - groups "Program Global Area (PGA)", "Shared Global Area (SGA)" and "Total Global Area" metrics.
■ CPU vs. DB Sessions - groups "Average active sessions on CPU", "CPU recursive usage", and "CPU parse time usage" metrics.
■ Transaction Overview - groups "User login rates per second" and "User Transaction Commit Rate" metrics.
■ DB Throughput - groups "Physical I/O per second" and "Physical I/O requests total" metrics.
Session Counters - the counters that are available for the overall session.
<profiles> - the counters that are available for each Oracle Load Testing virtual user profile.

Using the Performance Statistics
Using Graphs and Reports 6-5
■ Profile Nodes - list the counters for virtual user profiles available to include in the report graphs. The profile is the name of the virtual user profile(s) that were run in the Autopilot session. Select the counter(s) and click the Add Data Source button or double-click to add counters to the Selected Data Series list.
■ Timer Nodes - list the page timers available to include in the report graphs. Timers correspond to the individual pages of the script(s) run by the virtual user profile. They allow you to view the performance of a specific page download within a test run, allowing you to identify bottlenecks. The timer is the name of the virtual user profile(s) that were run by the Autopilot session. The timers consist of the virtual user profile name/Script name and the page number of the script. The timers are added to the session data when you select the Auto generate timers for all resources check box in Options from the Tools menu then selecting Scenario Defaults. Select the timer(s) and click the arrow button or double-click with the mouse to add timer(s) to the Selected Data Series list.
■ ServerStats Nodes - list the Oracle Load Testing ServerStats counters available to include in the report graph. The ServerStats counters are based upon the data source(s) and counters that were included in the ServerStats Data Source configuration when the Oracle Load Testing session was run. Select the counter(s) and click the Add Data Series button or double-click with the mouse to add counter(s) to the Selected Data Series list.
ServerStats Monitors - shows the ServerStats counter configuration.
[>] Add Data Series - adds the selected data series to the graph. You can move the mouse over a data series line in the graph to view details about specific data points in the graph.
Show Legend - opens a view of the names and plot line color of each data series in the graph. click a data series in the legend popup to show or hide plot lines in the graph. Double click a data series in the legend popup to show/hide the y-axis scale on the right side of the graph.
Show Chart Statistics - toggles the chart statistics table view on and off. The chart statistics show the Data Series and values for each series.
Show Graph Options - opens the options for customizing, exporting, opening saved queries, and saving queries.
Clear Graph - removes all data series from the graph.
Zoom - toggles the zoom tool on and off.
■ zoom in - click and drag a bounding box over the area of the graph. The zoom indicator shows on the graph when zoomed in from full size.
■ zoom out - press and hold the Ctrl key and click the mouse button to zoom out one step to the previous zoomed size. Press and hold the Ctrl key and double-click the mouse button to zoom out to the full size.
6.3 Using the Performance StatisticsYou can view the Performance Statistics report by selecting the View Run Graphs - Reports tab or the Create Reports tab for sessions for which data has been saved, when you start an Oracle Load Testing session.
View - specifies which performance times to show in the report.
■ Show Server Times Only - when selected, only server response time is included in performance statistics and session reports.

Using the Performance Statistics
6-6 Oracle Load Testing - Load Testing User's Guide
■ Show End-to-End Times (include think times) - when selected, think time is included with server times in performance statistics and session reports.
Detail Level - lets you specify the amount of detail shown in the report. This field is only displayed for the Performance Statistics report when viewed in the View Run Graphs tab.
The statistics show the values for the following performance categories:
<Session Name> Current
■ Active Virtual Users - the number of virtual users currently running in the Autopilot. Clicking the link opens a Users vs. Time graph in a new sub-tab.
■ Virtual Users with Errors - the number of virtual users with errors. Clicking the link opens a Errors vs. Users graph in a new sub-tab.
■ Transactions Per Second - the number of times the virtual user played back the script per second. Clicking the link opens a Trans/sec, Users vs. Time graph in a new sub-tab.
■ Pages Per Second - the number of pages returned by the server per second. A "page" consists of all of the resources (i.e. page HTML, all images, and all frames) that make up a Web page. Clicking the link opens a Pages/sec, Users vs. Time graph in a new sub-tab.
■ Hits Per Second - the number of resource requests to the server per second. Each request for a page, individual images, and individual frames is counted as a "hit" by Oracle Load Testing. If Oracle Load Testing does not request images from the server (as specified in the Download Manager), images are not included in the hit count. The Hits Per Second and Pages Per Second counts will be the same if images are not requested and there are no frames in the page. Clicking the link opens a Hits/sec, Users vs. Time graph in a new sub-tab.
■ Kilobytes Per Second - the number of kilobytes transferred between the server and browser client per second. Clicking the link opens a KB/sec, Users vs. Time graph in a new sub-tab.
<Session Name> Totals
■ Transactions - the total number of times the virtual user played back the virtual user profile.
■ Transactions with Errors - the total number of virtual user profile iterations that had errors.
■ Pages - the total number of number of pages returned by the server.
■ Hits - the total number of resource requests to the server.
■ Kilobytes - the total number of kilobytes transferred between the server and browser client.
Performance by Profile and Timer - this section appears when the Detail Level is set to Summary + Profile Timers or Full View.
■ <Profile Name> - the latest, minimum, maximum, and average performance for the virtual user profile in seconds.
■ <Timer Name> - the latest, minimum, maximum, and average performance for the server response timers in seconds. Server Response timers are added to scripts using Oracle OpenScript.
■ Min - the minimum performance for the virtual user profile or server response timer in seconds.

Using Run Graphs
Using Graphs and Reports 6-7
■ Max - the maximum performance for the virtual user profile or server response timer in seconds.
■ Avg - the average performance for the virtual user profile or server response timer in seconds.
■ Pass - the number that passed.
■ Fail - the number that failed.
■ Std Dev - the number of seconds that the performance of virtual user profiles or server response timers deviated from the mean (average value).
■ 90th % - shows the number of seconds that the performance of ninety percent of the virtual users or server response timers was at or below.
6.4 Using Run GraphsThe Load graphs lets you view real-time performance, statistical, and error information about the virtual users being run by the Autopilot. The default Oracle Load Testing graphs automatically start and consist of the following types of runtime graphs:
■ Performance Vs. Users
■ Errors Vs. Users
■ Performance Vs. Time
■ Errors Vs. Time
■ Users Vs. Time
■ Statistics Vs. Time
6.4.1 Viewing Runtime Statistics and GraphsTo view runtime statistics:
1. Click the View Run Graphs tab. The Overview tab is displayed showing a small view of the default graphs. This is useful for getting an at-a-glance view of all of the run graphs.
2. Click the graph you want to view to enlarge it and display it in the Reports tab. You can switch between Load graphs using the Default Reports selector list at the bottom of the Overview tab.
To create a custom graph:
1. Click Graph.
2. In the Available Data Series section, select the data you want to view. Use Ctrl-click and Shift-click to select multiple data series. If you do not see the data series you are looking for, click Show All to display all available data series.
3. Click the [>] Add Data Series button to add the data series to the graph.
4. Click the Show Legend button to open a view of the names and plot line color of each data series in the graph.
■ Click a data series in the legend popup to show or hide plot lines in the graph.
■ Double-click a data series in the legend popup to show/hide the y-axis scale on the right side of the graph.

Using Run Graphs
6-8 Oracle Load Testing - Load Testing User's Guide
■ Click the Show Legend button again to close the legend view.
5. Click the Show Chart Statistics button to toggle the chart statistics table view on and off. The chart statistics show the Data Series and values for each series, as follows:
■ Minimum - shows the maximum value for the data series.
■ Maximum - shows the minimum value for the data series.
■ Average - shows the average value for the data series.
6. Click the Show Graph Options button to open the options for customizing, exporting, opening saved queries, and saving queries.
Customize options - these options let you customize the current graph.
■ Graph Tab
– Graph Title - enter the name of the graph. This name is displayed in the tab in the Reports & graphs section.
– Data Series - lists the data series contained in the graph. The (x) button marks the Data Series for removal. Click the Apply button to Refresh the graph and remove the selected Data Series.
– Data Series Name - displays the name of the data series that is displayed when you place the mouse over the data series in the graph.
– Data Series Label - displays the label displayed in the legend.
■ X-Axis Tab
Scale - specifies the x-axis data range format. Changing the scale causes the graph to be refreshed from the server.
– Absolute Time - when selected, the generated report tables and graphs are based upon the actual start and end date and times of the profile/timer.
– Relative Time - when selected, the generated report tables and graphs are based upon relative time. Profiles/Timers are graphed from a shared zero point. This option can be used to compare two or more metrics from different sessions in the same scale.
– Users - when selected, the generated report tables and graphs are based upon users.
Range Filter - specifies a filter for data coming from the server for a particular session. For example, if a session has two hours of data and filter is set to get a one hour time slice, the graph will only show the one hour time slice. Alternatively, you can use the Graph Zoom feature to avoid having to reload the data from the server. The Filter icon appears on the graph when the Range filter is set.
– Manual - when selected, the Range Filter minimum and maximum values are enabled. Edit the minimum and maximum values to specify the data points slice to include in the new graph. Click Apply to generate a new graph that includes only the data points between the minimum and maximum values.
– Format - shows the Range format to use to filter the graph data. The format is based upon the Scale setting.
Using Run Graphs
Using Graphs and Reports 6-9
– Minimum - enter the minimum X-axis value. This field is only available when Manual is selected.
– Maximum - enter the maximum X-axis value. This field is only available when Manual is selected.
Session Details
– Start Time - displays the date and time that the session started.
– End Time - displays the date and time that the session ended.
– Duration - displays the length of the session.
■ Y-Axis Tab
Scale - specifies the y-axis data range format. Changing the scale causes the graph to be refreshed from the server.
– Linear - displays the Y-axis linearly.
– Logarithmic -displays the Y-axis logarithmically.
Threshold Line - displays a threshold line on the graph at the configured location.
– Displays - when selected the threshold line will be included in the graph.
– Value - enter the value of the threshold line, that is, the point on the Y-axis at which you want the line to be displayed.
– Label - enter the label to display in the legend.
7. Enter a name for the graph.
8. Select how to plot the graph in the X-Axis and Y-Axis tabs.
9. Click Apply. Each custom report is displayed under a separate tab so that you can select the one you want to view. Click Remove Graph to delete the graph and its tab.
6.4.2 Performance Vs. Users GraphThis graph plots the average run time for the number of active virtual users.
If you have multiple profiles in the running Scenario the Performance Vs. Users graph shows separate plot lines for each scenario profile running in the Autopilot.
The Average Performance values are a graphical representation of the Average Value data for the Elapsed time entries shown in the Performance Statistics view. The graph adds plot points based upon the number of running virtual users as the Autopilot ramps up to the total number of virtual users for all scenarios.
The plot points are added in the same manner as the Elapsed time entries in the Performance Statistics report.
6.4.3 Errors Vs. Users GraphThis graph plots the number of failed transactions-per-second for each Virtual User profile.
If you have multiple profiles in the running Scenario the Errors Vs. Users graph shows separate plot lines for each scenario profile running in the Autopilot.
Using Data Counters
6-10 Oracle Load Testing - Load Testing User's Guide
The failed transactions-per-second depends upon the number of virtual users being run by individual profiles and the number server requests (page, image, frame, etc.) that fail during the Oracle Load Testing session.
6.4.4 Performance Vs. Time GraphThis graph plots the average run time for virtual users over a period of time.
If you have multiple profiles in the running Scenario the Performance Vs. Time graph shows separate plot lines for each scenario profile running in the Autopilot.
The Average Run Time values are a graphical representation of the Average Value data for the Elapsed time entries shown in the Performance Statistics report that are plotted over time.
6.4.5 Errors Vs. Time GraphThis graph plots the number of failed transactions per second for virtual users profiles over time.
If you have multiple profiles in the running Scenario the Errors Vs. Time graph shows separate plot lines for each scenario profile running in the Autopilot.
The failed transactions-per-second depends upon the number of virtual users being run by individual profiles and the number server requests (page, image, frame, etc.) that fail during the Oracle Load Testing session.
6.4.6 Users Vs. Time GraphThis graph plots the number of active virtual users over a period of time.
If you have multiple profiles in the running Scenario the Users Vs. Time graph shows separate plot lines for each scenario profile running in the Autopilot.
6.4.7 Users Vs. Time GraphThis graph plots the average hits, transactions and kilobytes per second over a period of time.
The Average Statistic values are a graphical representation of the Average Value data from the Performance Statistics tab over time. The plot points are updated while the Autopilot runs the virtual users.
6.5 Using Data CountersOracle Load Testing automatically generates a set of counters for Oracle Load Testing virtual user data that can be selected in the Available Data Series field in the Filters section. The Oracle Load Testing data includes overall data for the session at the top of the list followed by a folder for each Virtual User profile included in the Configure parameters of the scenario list of the Build Scenarios tab, similar to the following:
Oracle Load Testing also generates counters for each ServerStats monitor in the selected ServerStats configuration. You can create a new graph to monitor any of the counters in the list during the Load Test to view both VU performance and ServerStats monitor performance.

Create Reports Tab
Using Graphs and Reports 6-11
6.5.1 Using Data CountersThe Virtual User profile folders contain the data counters and page timer folders for the specific profile in the load testing Scenario.
You can create a new ServerStats chart to monitor any of the counters in the list during the Load Test.
The page timer folders contain the performance data for the individual pages of scripts used as a Virtual User profile, similar to the following:
You can create a new ServerStats chart to monitor any of the timers in the list during the Load Test.
6.6 Create Reports TabThe Create Reports tab is where you can view historical reports and graphs for sessions for which you have saved data for reporting. This tab has the following options:
Reports & Graphs - displays default and custom graphs, and gives options for exporting graphs.
■ New Graph - opens a blank tab and displays the filter options for creating a new graph.
■ Overview - displays a thumbnail view of each created graph.
■ Reports - displays the Session Performance Report. These reports can be exported to CSV or printed.
■ Graph <#> - displays custom graphs that you have created. These graphs can be exported in CSV, Excel, PDF, or JPG format.
The Reports tab has the following options:
■ Session - lets you select the session for which you want to view the session report.
■ Report - if you have created custom report templates, they are listed here so that you can select them and display a report using the template. Refer to Creating Report Templates later in this chapter for instructions on how to create a report template. The default is the session report.
■ Filter - opens a dialog box for specifying custom date and time range filter options. The filter options specify a specific date and time range to include in the report. When no date and time filter is specified, the report displays the session report for the entire session duration.
■ Delete - deletes the selected template.
■ Generate - generates the report based on the session and report template selected.
■ Show Server Times Only - when selected, only server response time is included in performance statistics and session reports.
■ Show End-to-End Times (include think times) - when selected, think time is included with server times in performance statistics and session reports.
■ Export to CSV - opens the data in a separate browser window in comma separated value format.
■ Print/Save HTML - opens the session report in a separate browser window. From there you can either print the report or save it in HTML format.
Custom graph tabs have the following options:

Create Reports Tab
6-12 Oracle Load Testing - Load Testing User's Guide
■ Remove Graph - deletes the selected graph.
■ Session - lets you select the session for which you want to view data series.
■ Available Data Series - shows a list of session data generated by Oracle Load Testing and ServerStats. The data series listed is a subset of all of the available data series. Click Show All to display all available data series.
■ Default Graphs - select a graph and click Add Data Series to view a default graph.
■ Oracle Database Diagnostics - groups a set of Oracle Database profile metrics on the same graph. These metrics appear only if an Oracle Database ServerStats configuration is used with the session run. The graphs and metrics are as follows:
– PGA/SGA - groups "Program Global Area (PGA)", "Shared Global Area (SGA)" and "Total Global Area" metrics.
– CPU vs. DB Sessions - groups "Average active sessions on CPU", name="Oracle: CPU recursive usage", and "CPU parse time usage" metrics.
– Transaction Overview - groups "User login rates per second" and "User Transaction Commit Rate" metrics.
– DB Throughput - groups "Physical I/O per second" and "Physical I/O requests total" metrics.
■ Session Counters - the counters that are available for the overall session.
■ <profiles> - the counters that are available for each Oracle Load Testing virtual user profile.
– Profile Nodes - list the counters for virtual user profiles available to include in the report graphs. The profile is the name of the virtual user profile(s) that were run in the Autopilot session. Select the counter(s) and click the Add Data Source button or double-click to add counters(s) to the Selected Data Series list.
– Timer Nodes - list the page timers available to include in the report graphs. Timers correspond to the individual pages of the script(s) run by the virtual user profile. They allow you to view the performance of a specific page download within a test run, allowing you to identify bottlenecks. The timer is the name of the virtual user profile(s) that were run by the Autopilot session. The timers consist of the virtual user profile name/Script name and the page number of the script. The timers are added to the session data when you select the Auto generate timers for all resources check box in Options from the Tools menu then selecting Scenario Defaults. Select the timer(s) and click the arrow button or double-click with the mouse to add timer(s) to the Selected Data Series list.
– ServerStats Nodes - list the ServerStats counters available to include in the report graph. The ServerStats counters are based upon the data source(s) and counters that were included in the ServerStats Data Source configuration when the Oracle Load Testing session was run. Select the counter(s) and click the Add Data Series button or double-click with the mouse to add counter(s) to the Selected Data Series list.
■ ServerStats Monitors - shows the ServerStats counter configuration.
■ [>] Add Data Series - the [>] button adds the selected data series to the graph. You can move the mouse over a data series line in the graph to view details about specific data points in the graph.

Create Reports Tab
Using Graphs and Reports 6-13
■ Show Legend - opens a view of the names and plot line color of each data series in the graph. click a data series in the legend popup to show or hide plot lines in the graph. Double click a data series in the legend popup to show/hide the y-axis scale on the right side of the graph.
■ Show Chart Statistics - toggles the chart statistics table view on and off. The chart statistics show the Data Series and values for each series.
■ Show Graph Options - opens the options for customizing, exporting, opening saved queries, and saving queries.
■ Clear Graph - removes all data series from the graph.
■ Zoom - toggles the zoom tool on and off.
– zoom in - click and drag a bounding box over the area of the graph. The zoom indicator shows on the graph when zoomed in from full size.
– zoom out - press and hold the Ctrl key and click the mouse button to zoom out one step to the previous zoomed size. Press and hold the Ctrl key and double-click the mouse button to zoom out to the full size.
6.6.1 Viewing ReportsYou can quickly view session data by creating custom graphs.
1. Click the Create Reports tab. A blank tab is displayed for creating a new graph.
2. Select the session you want to graph.
3. Select the data you want to view in the Available Data Series field. Use Ctrl-click and Alt-Click to select multiple data series.
4. Click Add Data Series.
5. Repeat for all of the data series you want to graph.
6. Click the Show Graph Options button to display the Graph Options for naming the graph and selecting how to plot the graph.
7. Click OK.
8. Each custom report is displayed under a separate tab so that you can select the one you want to view. Click the Remove Graph button located on the graph's tab to delete the graph and its tab. Click the Show Graph Options button and use the export options to save a graph or the graph data to a file.
You can save this query as described later in this chapter for later use against another session.
6.6.2 Exporting Graphs and DataThe graph export options let you specify export options for the current graph.
To export graph image or data:
1. Create a graph report.
2. Click the Show Graph Options button on the right of the graph.
3. Select Export. The Export options are as follows:
Format - specifies the file format to export.
■ PNG - when selected, the exported graph image is saved in Portable Network Graphics file format. Specify the size of the image file.

Create Reports Tab
6-14 Oracle Load Testing - Load Testing User's Guide
■ JPG - when selected, the exported graph image is saved in Joint Photographic Experts Group compression file format. Specify the size and quality level of the image file.
■ CSV - when selected, the exported graph data is saved in Comma Separated Value file format. You can open the file in Microsoft Excel or save it to a file.
■ XLS - when selected, the exported graph data is saved in Microsoft Excel file format. You can open the file in Microsoft Excel or save it to a file.
Size - specifies the pixel size of exported PNG and JPG image files.
Quality - specifies the quality level of exported JPG image files. The quality level dictates the ratio between file size and image clarity. A lower quality level produces a smaller file size but the image may lose clarity. A higher quality level produces a higher clarity image but with a larger file size. Experimentation may be the best way to determine the best acceptable quality level for your image file size and clarity requirements if the default quality level is insufficient.
6.6.3 Exporting CSV DataWhen you export generated data from a report, Oracle Load Testing creates a comma separated value (.csv) file containing the raw data used to generate reports. The first line of the file contains the field names separated by commas. Each additional line contains the data values separated by commas. The following is an example of a .csv file from a Performance vs. Time report:
Time,Entire Job,tutor1,tutor4,04-09-2001 15:59:48,,.6,,04-09-2001 16:00:00,,,.13,04-11-2001 17:08:04,,1.15,,04-11-2001 17:08:29,1.39,,.24,04-11-2001 17:09:19,,.98,,04-11-2001 17:09:25,,,.12,This example includes the following fields:
TimeEntire Jobtutor1tutor4The additional lines of the .csv file list the actual data (the time values followed by the number of seconds).
The .csv file for each type of report will contain the type of data specific to the report type.
You can export the raw data used to generate reports to a comma separated value (.csv) file. To export generated report data:
1. Create a report.
2. Click the Show Graph Options button on the right of the graph.
3. Select Export.
4. Select CSV format and click Export. The File Download dialog box is displayed.
5. Click Open to open the file in Excel in CSV format. Click Save to save the file in CSV format.
6. If you chose to save the file, the Save As dialog box is displayed. Enter a new name for the file or accept the default, select the location to save to, and click Save.

Create Reports Tab
Using Graphs and Reports 6-15
6.6.4 Exporting to ExcelTo export as an Excel Workbook file:
1. Create a report.
2. Click the Show Graph Options button on the right of the graph.
3. Select Export.
4. Select XLS format and click Export. The File Download dialog box is displayed.
5. Click Open to open the chart in Excel. Click Save to save the chart in Excel format.
6. If you choose to save the file, the Save As dialog box is displayed. Enter a name for the file or accept the default, select the location to save the file, and click Save.
6.6.5 Exporting to PNGYou can export reports to a PNG file. To export to a PNG file:
1. Create a report.
2. Click the Show Graph Options button on the right of the graph.
3. Select Export.
4. Select PNG format and set the size.
5. Click Export.
6. Enter a name for the file and click Save.
6.6.6 Exporting to JPGYou can export reports to a JPG file. To export to a JPG file:
1. Generate a report.
2. Click the Show Graph Options button on the right of the graph.
3. Select Export.
4. Select JPEG format and set the size and quality level.
5. Click Export.
6. Enter a name for the file and click Save.
6.6.7 Working With Graph QueriesA graph query consists of the sessions, data series, and X and Y-axis settings. Once you select this information you can save it and reuse it later in the following ways:
■ save a graph of a single session and apply it to a new session to create a new graph.
■ save a graph of a baseline session and a run session and apply it to a new run session to create a new graph with the original baseline.
■ save a graph of a single session and apply it to a new session and add the counters to the current graph definition.
Note: The Oracle Load Testing Server must have Microsoft Excel installed to export to Excel format.

Create Reports Tab
6-16 Oracle Load Testing - Load Testing User's Guide
6.6.7.1 Saving Graph QueriesTo save a graph query:
1. Select the sessions and data series that you want to graph.
2. Click the Show Graph Options button on the right of the graph.
3. Select Save Query and enter a name for the query.
<query list> - lists the existing saved queries.
Name - enter a name for the new query or select an existing query to overwrite it.
4. Click Save.
5. To create a new query, enter a name for the query and click Save. To overwrite an existing query, select the query and click Save, then click Yes when asked to confirm.
6.6.7.2 Running a Saved QueryTo run a saved query:
1. Click the Show Graph Options button on the right of the graph.
2. Click Open Query.
<Query List> - lists the existing queries. Select the query that you want to run.
Session - select the session against which you want to run the query.
Add to Current Graph - when selected, the new session data is added to the graph. When deselected, the graph is cleared and the new session data is displayed.
3. Select the query you want to use.
4. Select the session against which you want to run the query.
5. Select whether or not to add this session data to the current graph.
6. Click OK.
7. A warning message is displayed if some of the data series cannot be applied to the selected session. If this happens, click OK to continue.
8. The new graph is generated.
6.6.7.3 Editing QueriesTo edit a query:
1. Click Graphs from the Manage menu.
Edit - displays the Edit Graph Query dialog box.
Delete - deletes the selected query.
Clone - displays the Edit Graph Query dialog box with the configuration of the selected query. This lets you copy the selected query and edit it to create a new query.
Query Name - lists the existing queries.
2. Select the query you want to change and click Edit.
3. Make and changes and click OK.
4. Click Close to exit the Graph Query Manager dialog box.
Create Reports Tab
Using Graphs and Reports 6-17
6.6.7.4 Deleting QueriesTo delete a query:
1. Click Graphs from the Manage menu.
2. Select the query you want to delete and click Delete.
3. Click Yes to confirm the deletion.
4. Click Close to exit the Graph Query Manager dialog box.
6.6.8 Creating Report TemplatesYou can create custom report templates that you can upload to Oracle Load Testing. These templates are shown on the Reports tab in the Create Reports tab. Once uploaded you can select a session, select the report template, and generate the report.
Report templates are created using the Oracle Load Testing Report Generator tool in Microsoft Word. This tool can be installed on any Windows machine that has Microsoft Word. Oracle Application Testing Suite does not have to be installed to use the tool.
Once installed, report templates are created in Microsoft Word and then uploaded to Oracle Load Testing. Then generated reports are displayed in Microsoft Word.
To install the Report Generator tool:
1. Close Microsoft Word.
2. Run the OLTOfficeToolbarInstaller.exe program located in the OracleATS/OFT folder in the Oracle Application Testing Suite installation directory.
The Insert OLT Data button is added to the toolbar in Microsoft Word.
You can now create report templates. Report templates can contain text, graphics, Oracle Load Testing graphs and session data. In addition, you can include custom Java code. To create a report template:
1. Click the Insert OLT Data button to display the following dialog box.
This dialog box has the following options:
Graphs - lists the default Oracle Load Testing graphs or a custom list of graphs if you have created a template.properties file.
Optional Settings - leave these settings blank to use the defaults.
■ Title - enter a title for the graph.
■ Height - enter a height for the graph.
■ Width - enter a width for the graph.
Session data - select the session data that you want to display, session name, overview, page data, or profile data. The generated data is comma-separated so that you can easily convert it to a table by selecting Convert from the Table menu then select Text to Table.
Custom code - this section can be used to create Java code using the methods that are available in the Report Generator API. Documentation for this API can be accessed from the online help table of contents.
Note: To move to the next line use CTRL-Enter not Enter. Enter exits the dialog box.

Generating Summary Reports
6-18 Oracle Load Testing - Load Testing User's Guide
2. Select the graph or session data that you want to display or enter custom code.
3. Click Insert. A field code is inserted into the document and it is displayed as a comment. To edit the field code, select it, right-click on it and select Edit Field.
4. In the template, press Enter to move to the next line.
5. When you are finished creating the template, click Close to exit the Insert Oracle Load Testing Reference dialog box.
6. Click Save from the File menu. Enter a name for the file and save it as file type .rtf. The file can be saved to any location.
You can now upload the file to Oracle Load Testing and start generating reports. To upload the file:
1. In Oracle Load Testing, select Upload File from the Tools menu.
2. In the Type field, select Report Template.
3. Click Browse.
4. Select the report template and click Open.
5. Click Upload.
6. Click Close. The template will be listed on the Reports tab in the report list.
7. To generate a report, select the session, select the template, and click Generate. The report is generated and displayed in Word.
6.6.8.1 Creating a Custom Graph and Session ListYou can change the list of graphs and session data that is available in the Insert OLT Reference dialog box by creating a template.properties file in the installdir/data/olt/reports folder. If this file exists, the graphs and session data listed in it are used. If it does not exist, the defaults are used. This file lists the graphs and session data that you want to make available. For example:
[GRAPH]Performance vs. Time@<%out.write(session.getGraph('Performance vs. Time'))%>Errors vs. Time@<%out.write(session.getGraph('Errors vs. Time'))%>Statistics vs. Time@<%out.write(session.getGraph('Statistics vs. Time'))%>[SESSION]Session Name@<%=session.getName()%>Overview@<%=session.getOverview()%>
6.7 Generating Summary ReportsYou can generate summary reports containing statistical information about the last data collection and reporting session and the Scenario Profile settings.
On the Create Reports tab, select the Reports tab and then select the session for which you want to view reports and click Generate. The Session Performance report is displayed followed by the Oracle Load Testing Scenario report.
■ Scenario Report - displays a summary of Scenario settings and options that were used to run virtual users.
■ Session Report - displays a summary of performance and error statistics data for the virtual user session.
The following sections explain more about the summary reports.

Generating Summary Reports
Using Graphs and Reports 6-19
6.7.1 Scenario ReportsThe generated report file is the same name as the Scenario in Oracle Load Testing (i.e. the Scenario Description field of the Scenario tab).
To save the report, click Print /Save: HTML. The report is displayed in a separate browser window. Select Save As from the File menu to save the report in HTML or text format.
You can print the report by clicking Print/Save HTML. The report is displayed in a new browser window. Select Print from the File menu. A print dialog box opens for setting the printer options. The available options are specific to the type of printer. Set the options and click the appropriate OK or Print button.
To save the Scenario as a different name:
1. Select Save As from the Scenario menu.
2. Enter a new Name in the Name field of the Save Scenario dialog box.
3. Select the workspace to save the report in and click OK.
6.7.2 Session ReportsTo save the report, click Print/Save: HMTL. The report is displayed in a separate browser window. Select Save As from the File menu to save the report in HTML or text format.
You can print the report by clicking Print Friendly. Select Print from the File menu. A print dialog box opens for setting the printer options. The available options are specific to the type of printer. Set the options and click the appropriate OK or Print button.
6.7.3 Using Time Range FiltersThe filter options specify a specific date and time range to include in the report. When no date and time filter is specified, the report displays the session report for the entire session duration.
To specify a custom date and time range filter:
1. Click the Create Reports tab, then click the Reports tab.
2. Select the session and click Generate.
3. After the report loads, click the Filter icon. The following options are available:
Time Range - specifies the date and time range to use to filter the report.
■ Custom (M/d/yyyy HH:mm:ss) - when selected, the minimum and maximum date and time ranges can be set for the filter.
■ Minimum - specifies the start date and time for the data to include in the report. The specified minimum must be within the Session Start Time and the Session End time.
■ Maximum - specifies the end date and time for the data to include in the report. The specified maximum must be within the Session Start Time and the Session End time.
Session Details - shows the date and time range details for he session data.
■ Session Start Time - shows the date and time when the session was started.
■ Session End Time - shows the date and time when the session ended.

Managing Session Data
6-20 Oracle Load Testing - Load Testing User's Guide
■ Duration - shows the length of time the session was running.
4. Select the Custom option and set the minimum and maximum date and time values to the time range to include in the report.
5. Click OK to generate a new report that include only the data between the minimum and maximum date and times.
6.8 Managing Session DataTo delete session data from the database or edit your session file names and descriptions:
1. Select Sessions from the Manage menu to display the Session Manager.
This dialog box lets you manage session data in the database.
Edit - displays the Edit Session dialog box for changing the name and description of the session.
Delete - deletes the entire selected session data from the database. To select more than one session, hold down the CTRL key.
Delete VU Display Data - deletes only the VU display data for the selected sessions. To select more than one session, hold down the CTRL key.
Session Name - the names of the virtual user sessions run by the Oracle Load Testing Autopilot. Oracle Load Testing lets you specify a name for the session data when you start the Autopilot to play back virtual users.
Start Time - shows the date and time of day the virtual user session was started.
End Time - shows the date and time of day the virtual user session ended.
Description - shows the status of the session. One of the following status entries may appear:
■ [Blank] - the session data was stored to the database successfully.
■ start of session - the session database is currently being accessed by an Oracle Load Testing session.
■ end of session - the data for the session has been committed to the database and is ready for reporting.
■ saving data - session data is being saved.
VU Data - indicates whether VU data was saved for this session.
2. Select the Session Name to delete. To select more than one session, hold down the CTRL key.
3. Click Delete to delete the session or click Delete VU Display Data to delete the VU display log only.
6.9 Using Raw DataThis section explains how to use the raw data files that can be generated by a load test session. The raw data provides the ability to upload non-aggregated data collected from all Virtual Users running in a load test across all Load Agent machines for reporting.

Using Raw Data
Using Graphs and Reports 6-21
A database administrator can then create tables in an Oracle database (Oracle RDBMS only) and import the CSV files into the tables. Database administrators and end users can execute SQL queries against the raw data tables to generate reports.
6.9.1 Enabling Raw Data CollectionTo enable raw data collection by default:
1. Select Options from the Tools menu.
2. Select Scenario Defaults.
3. Set the Persist Raw Data setting to True in the Java Client Preferences section of the default settings.
4. Be sure to set the Persist Raw Data setting to False after completing the raw data collection load test session.
To enable raw data collection for a specific session:
1. Add the script to a Scenario.
2. Select the Configure all parameters button next to the first script/profile.
3. Set the Persist Raw Data setting to True in the Java Client Preferences section of the default settings.
6.9.2 Working with Raw Data FilesWhen raw data collection is enabled, Oracle Load Testing saves every single measured data point in a set of CSV files. However, ServerStats data is not included in the CSV files as the data is not present on the agent. The files are saved locally on the agent machines in directories specified as follows:
<oats_install>/agent/rawdata/<controller-identifier>/<session_name>/<agent-id>/<YYYY-MM-DD HH:mm:ss>
All raw data files in the agent machine directories remain there and are not delivered to the Oracle Load Testing controller, reconciled between the agents of the same session, or manipulated in any way after the capture is complete. Management of the raw data files must be performed manually.
The files are as follows:
Caution: The raw data files generated during a load session can increase in size rapidly causing file size and disk space issues on the agent machine. A brief 15 minute load test session can produce files of approximately 40MB. When running load test sessions with the Persist Raw Data setting enabled, be sure to plan for file size and disk space issues.
Note: The options for the first script in the session govern the settings for same options for the other scripts in the same session (even though user interface shows different values for the options in different scripts).
Using Raw Data
6-22 Oracle Load Testing - Load Testing User's Guide
■ counter_definitions.csv - for every session where the Persist Raw Data option is enabled, for every agent where the session is running, every counter definition will be saved in this CSV file. This file has the following fields:
– ID - a unique identifier for each counter definition record in the file.
– SOURCE_ID - the ID of the virtual user. For example, if a session is running 10 virtual users, there will be source IDs numbered 1 through 10.
– SESSION_NAME - the name of the load test session.
– PROFILE_NAME - the name of the profile run in the load test session.
– TIMER_NAME - the name of the Oracle Load Testing timer.
– COUNTER_NAME - the name of the Oracle Load Testing counter.
– AGGREGATION_TYPE_NAME - the aggregation type for each counter as follows:
* 0, Current - the counter is a current value counter.
* 1, Cumulative - the counter is a cumulative value counter.
* 2, Average - the counter is an average value counter.
* 3, Min - the counter is a minimum value counter.
* 4, Max - the counter is a maximum value counter.
* 5, No data - the counter has no data.
* 6 Last - the counter is a last value counter.
– CONTROLLER_TIME_DELTA_MS - this is a time stamp offset value for multiple agent machines. It is used to indicate the difference between time stamps (AGENT_TME_MS) on different agent machines and the Oracle Load Testing controller. For example if the controller has a time stamp of "1" and an agent machine has a time stamp of 2, the delta would be 1. if another agent machine has a timestamp of 3 the delta would be 2. Typically in milliseconds.
■ counter_data.csv - for every session where the Persist Raw Data option is enabled, for every agent where the session is running, every counter value for every counter will be saved in this CSV file.
There are some conditions in which all of the data is not captured for the particular session. How quickly a session is shutdown may affect the raw data capture. This file has the following fields:
– ID - corresponds to the Counter Definition ID in the counter_definitions.csv file.
– AGENT_TIME_MS - a timestamp indicating the first time an agent starts reporting. It indicates the time, in EPOCH time, when a session request arrived on an agent.
– VALUE - the value for the counter. The AGGREGATION_TYPE_NAME values in the counter_definitions.csv file specifies the type of value.
6.9.3 Creating Tables in an Oracle DatabaseOnce you have generated the raw data files by running an Oracle Load Testing scenario with the Persist Raw Data setting enabled, you can crate tables in an Oracle Database for the counter definitions and counter data CSV files. This section explains the basic procedure for creating tables. Section 6.9.5, "Example SQL Command File"
Using Raw Data
Using Graphs and Reports 6-23
provides an example of the SQL commands required to create the tables in the database.
1. Create a SQL command file or use the RawTables.sql command file provided with the Oracle Application Testing Suite installation.
2. Copy your command file or the RawTables.sql file to Oracle Home\BIN.
3. Connect to the Oracle Load Testing database schema (e.g. olt/password) using SQL Plus.
4. Enter following command in SQLPlus (use the appropriate path for where your SQL command file is located):
@C:\OracleATS\oxe\app\oracle\product\10.2.0\server\BIN\RawTables.sql
6.9.4 Importing Raw Data CSV Files Once the raw data tables have been created in the database, you can import the counter definitions and counter data CSV files into the database. This section explains the basic procedure for importing the CSV files into the database.
1. Create a control file to import the counter definitions CSV file or use the RawDataDef.ctl command file provided with the Oracle Application Testing Suite installation. Section 6.9.6, "Example Counter Definition Control File" provides an example of the control file required to import the counter definitions CSV file into the database.
2. Create a control file to import the counter data CSV file or use the RawData.ctl command file provided with the Oracle Application Testing Suite installation. Section 6.9.7, "Example Counter Data Control File" provides an example of the control file required to import the counter data CSV file into the database.
3. Copy your control files or the RawDataDef.sql and RawData.ctl files to Oracle Home\BIN.
4. Execute the following commands:
sqlldr olt/yourpassword control=RawDataDef.ctlsqlldr olt/yourpassword control=RawData.ctl
6.9.5 Example SQL Command FileThis section provides an example of the SQL commands used to create tables in an Oracle database.
CREATE TABLE counterRun_rawdata (counterHdrID int NULL,counterVal float NULL,counterTS timestamp(3) NULL,iteration int NULL,numberVus int NULL,errFlag int NULL
);
CREATE TABLE counterHdr (counterHdrID int NOT NULL,sessionRunID int NULL,source int NULL,machineName nvarchar2 (255),counterName nvarchar2 (255),

Using Raw Data
6-24 Oracle Load Testing - Load Testing User's Guide
objName nvarchar2 (255),instName nvarchar2 (255),niceName nvarchar2 (255),aggregationType int NULL,CONSTRAINT counterHdr_PK PRIMARY KEY (counterHdrId)
);
create or replace FUNCTION GETSESSIONID( SessionName1 IN VARCHAR2) RETURN NUMBER AS
ID number(38):=0;BEGIN--dbms_output.put_line('before 1' || length(SessionName1)|| ' ' || SessionName1);select sessionrunid into ID from sessionrun where sessionname =trim(SessionName1);--dbms_output.put_line('end');RETURN ID;EXCEPTION
WHEN OTHERS THEN-- DBMS_OUTPUT.put_line(sqlerrm);-- dbms_output.put_line(dbms_utility.format_error_backtrace);
RETURN 0;END GETSESSIONID;/
6.9.6 Example Counter Definition Control FileThis section provides an example of a control file used to input a counter definition CSV file into an Oracle Database (use the appropriate path for where your control file is located).
Options (Skip = 1)Load Datainfile 'C:\OracleATS\oxe\app\oracle\product\10.2.0\server\BIN\counter_definitions.csv'replace into table COUNTERHDR fields terminated by "," OPTIONALLY ENCLOSED BY '"'(
COUNTERHDRID,source, sessionrunid "getSessionID(:sessionrunid)", objname,INSTNAME,COUNTERNAME,AGGREGATIONTYPE "decode(trim(:AGGREGATIONTYPE),'Average',2,'Cumulative',
1,'Current',0,'Min',3,'Max' ,4,'No data',5,'Last' ,6,-1)" ,NICENAME "decode(:COUNTERNAME, null, :COUNTERNAME, :COUNTERNAME)"
)
6.9.7 Example Counter Data Control FileThis section provides an example of a control file used to input a counter data CSV into an Oracle Database (use the appropriate path for where your control file is located).
Options (Skip = 1)infile 'C:\OracleATS\oxe\app\oracle\product\10.2.0\server\BIN\counter_data.csv'replace into table COUNTERRUNfields terminated by "," OPTIONALLY ENCLOSED BY '"'(
COUNTERHDRID,

Using Raw Data
Using Graphs and Reports 6-25
COUNTERTS "new_time( to_date('01011970', 'ddmmyyyy') + 1/24/60/60 * :COUNTERTS/1000, 'GMT', 'GMT')",
COUNTERVAL)

Using Raw Data
6-26 Oracle Load Testing - Load Testing User's Guide

7
Using the Virtual User Display 7-1
7Using the Virtual User Display
The virtual user display lets you monitor the progress of virtual users as they are running or view errors as they occur.
The following is a summary of the virtual user display features:
■ View virtual user playback as pages are accessed and displayed;
■ View only selected virtual user pages;
■ View only pages with errors.
7.1 Starting the VU DisplayTo start the Virtual User display:
1. Specify Scenarios.
2. Submit the Scenario to the Autopilot.
3. Start the Autopilot.
4. Select VU Display from the Tools menu.
7.2 Overview of the Main WindowThe main window of the virtual user display is where you select the virtual user actions to view. The main window has the following parts:
■ Toolbar
■ Browser pane
■ History list
7.2.1 Overview of the Toolbar OptionsThe virtual user display window has the following toolbar options:
Open VU Display Log - Opens an existing virtual user error log.
Download log file from server - Downloads an existing VU display log from the server to the local drive.
Clear Display - Clears the Virtual User Display.
Render HTML - Displays actual pages as accessed by the virtual user.
View Source - Displays the source HTML for pages accessed by the virtual user.

Overview of the Main Window
7-2 Oracle Load Testing - Load Testing User's Guide
Auto Mode - Displays pages as they are received by the viewer.
Manual Mode - The VU Display stays on the selected page and does not go to the next page; however, it continues to collect pages.
Refresh On - Allows the viewer to collect new pages that are being accessed by the virtual user.
Refresh Off - Stops the viewer from accepting new pages being accessed by the virtual user.
Navigate to First Page - Displays the first page in the history list.
Navigate to Previous Page - Navigates to the previous page in the history list.
Navigate to Next Page - Navigates to the next page in the history list.
Navigate to Last Page - Displays the last page of the history list.
7.2.2 Overview of the Browser PaneThe browser pane lets you view the pages being accessed by the virtual user. You can toggle between viewing the page or the HTML source for the page.
The Download Manager settings and the Use Download Manager option in the Edit Scenario Details dialog box determines if images are included separately in the history list.
7.2.3 Overview of the History ListThe history list of the Virtual User Display window shows the pages accessed by the virtual users.
When viewing pages in manual mode, you can select any page in the history list to view the page in the browser.
The runtime history list has the following columns:
Id - shows a sequential identification number for the history entry. You can use the identification number to locate specific entries in the list.
Current Page - shows the profile name, and the page of the script being accessed by the virtual user.
URL - shows the Uniform Resource Locator for the page being accessed by the virtual user.
Content Type - shows the content type specification of the page being accessed by the virtual user.
VU ID - shows which virtual user accessed the page.
Iterations - shows the number of the iteration run.
Data Bank - shows data accessed from the page.
Error- shows any error encountered on the page by the virtual user.
Time- shows the date and time of day the page was accessed by the virtual user.
Size- shows the file size of the page being accessed by the virtual user.

Downloading Log Files From the Server
Using the Virtual User Display 7-3
7.3 Setting Virtual User Display LimitsYou can use the Maximum total storage size setting in the Reporting Options dialog box to limit the total number of bytes that the VU display keeps in memory and on disk at any point during the load test.
1. Select Options from the Tools menu.
2. Select Reporting.
3. Enter a new value in the Maximum total storage size field.
4. Click Apply.
5. Click OK to exit the Options dialog box.
7.4 Opening VU Display LogsYou can open and existing VU display log for viewing in the VU display. To open a VU display log:
1. Click Open VU Display Log.
Select from Server - lets you open a log file that is saved on the server. Select the session from the list.
Select from local machine - lets you open a log file that has been saved on the local machine. Click Browse to navigate to the file.
2. Select whether you want to open a log file on the server or on the local machine.
3. Select the log that you want to execute in the virtual user display. If you are opening a log file from the local machine either enter it's path or click Browse to navigate to the file.
4. Click OK.
7.5 Downloading Log Files From the ServerYou can download VU display log files from the Oracle Load Testing server to your local hard drive. To download log files:
1. Click Save to Local. The File Download dialog box is displayed.
2. Click Save. The Save As dialog box is displayed.
3. Navigate to the location where you want to save the file.
4. Click Save.
5. Click Close when the download is complete.

Downloading Log Files From the Server
7-4 Oracle Load Testing - Load Testing User's Guide

8
Database and File Management 8-1
8Database and File Management
This chapter describes the how to upload and download files to and from the server, how to manage the Oracle Load Testing database, and how to select the database to use.
8.1 Database ManagementThe Oracle Load Testing database is used to store the results of your load test sessions. You use the Oracle Application Testing Suite Database Configuration to configure databases for use in Oracle Load Testing. The Databases option on the Manage menu in Oracle Load Testing is used to set the current database to use. The Database Manager dialog box has the following options:
Name - displays the ODBC System Data Source name of the database.
Description - displays a description of the database.
Type - displays the type of database.
Connection String - displays the connection string.
8.1.1 Adding an Oracle DatabaseTo add an Oracle database:
1. Select Programs from the Start menu then select Oracle Application Testing Suite Database Configuration from the Oracle Application Testing Suite - Tools menu.
2. Select Oracle Load Testing.
3. Click New.
4. Select Use existing schema or Create new schema & tables.
This dialog box has the following options:
System user credentials - specify the login authentication credentials if you select to create a new schema and tables, as follows:
■ User name - enter the login user name for the database system.
■ Password - enter the login password for the database system.
Connection details - enter the Oracle database connection information.
■ Name - enter the name of the database This name appears in the Database selection lists for Oracle Test Manager and as the ODBC Data Source name.
■ Description - enter any description text to identify the database.

Database Management
8-2 Oracle Load Testing - Load Testing User's Guide
■ Host - enter the host name of the machine on which the database server is running.
■ Port - enter the port number that you want to communicate with. If you are running multiple instances of the database on the same host, specify the port number you want to communicate with.
■ SID - enter the System Identifier for the Oracle database.
■ User name - enter the login user name for the database.
■ Password - enter the login password for the database.
5. Enter the database information.
6. Click Save.
7. If creating a new schema, enter the password for both the Administrator and default accounts and click OK.
8. Click Close.
9. Either restart the computer or restart the Oracle Application Testing Suite Application service by going to the Control Panel Administrative Tools and open Services and restart the Oracle Application Testing Suite Application Service.
8.1.1.1 Additional Steps if Creating a New SchemaThe following additional steps need to be followed if you create a new database schema and set it as the current database.
1. Log into the Oracle Load Testing application.
2. Select Systems from the Manage menu and then select VU Agent Systems.
3. Reset the password for the VU agent system(s).
4. Select Systems from the Manage menu and then select ServerStats Data Collectors.
5. Enter in the master password and click Save.
6. Add back all Managed Systems that are used in ServerStats configurations saved on the machine.
7. Add back all VU agent systems.
8. Select Tools from the Oracle Application Testing Suite start menu.
9. Select Oracle Load Testing Agent Authentication Manager from the Tools menu.
10. Reset the password in the Agent Authentication Manager.
8.1.2 Selecting the Database to Use1. Select Programs from the Start menu then select Oracle Application Testing Suite
Database Configuration from the Oracle Application Testing Suite - Tools menu.
2. Select Oracle Load Testing as the product type.
3. Select the database you want to use to store Oracle Load Testing data.
4. Click Set current.
5. Click Close.
6. Restart Oracle Load Testing.

Uploading Files
Database and File Management 8-3
8.1.3 Removing DatabasesYou can remove databases from Oracle Test Manager. Doing so does not delete the database files. It removes the database from the database selection lists so that the database is no longer available in Oracle Test Manager. The database cannot be deleted if it is open in Oracle Test Manager.
To remove a database from Oracle Test Manager:
1. Select Programs from the Start menu then select Oracle Application Testing Suite Database Configuration from the Oracle Application Testing Suite - Tools menu.
2. Select the database that you want to remove.
3. Click Remove.
4. Click Yes to confirm the deletion.
8.1.4 Updating DatabasesYou can change the name, location, and login information for databases that you are using in Oracle Test Manager.
1. Select Programs from the Start menu then select Oracle Application Testing Suite Database Configuration from the Oracle Application Testing Suite - Tools menu.
2. Select the database that you want to update.
3. Click Update.
4. Make any changes.
5. Click OK.
8.2 Uploading FilesYou can upload files from the local machine to the Oracle Load Testing server. This can be useful if you are accessing Oracle Load Testing on a remote machine via the Web UI and want to upload scripts from your local Oracle OpenScript.
1. Select Upload File from the Tools menu.
File Type - select the type of file.
■ Type - lists the types of files that can be uploaded.
File to Upload - the options listed here depend on the type of file being uploaded.
■ <extension> - enter the file you want to upload.
■ Browse - opens the Choose File dialog box for browsing and selecting a file.
Destination - the options displayed here depend on the type of file you are uploading and only apply to certain file types.
■ Repository - select the repository where you want to upload the file.
■ Workspace - select the workspace where you want to upload the file.
2. Select the type of file that you want to upload.
Note: If you are uploading a ServerStats Metric Profile, the metrics associated with the profile must be uploaded separately.

Downloading Files
8-4 Oracle Load Testing - Load Testing User's Guide
3. Enter the file name or click Browse to locate the file.
4. Select the destination location to which you want to copy the file.
5. Click OK.
6. Click OK.
8.3 Downloading FilesYou can download files from the server to the local machine. This is useful if you want to access a script from the Oracle Load Testing Server and edit it on your local machine.
1. Select Download File from the Tools menu.
File Type - select the type of file you want to download from the Oracle Load Testing server to the local machine.
Repository - a list of repositories from which you can download files.
Workspace - lists the workspaces available in the selected repository.
<file list> - lists the files of the selected type in the selected workspace that are available to download.
2. Select the type of file that you want to download.
3. Select the Repository and Workspace in which the file is located if applicable to the type of file you are downloading.
4. Select the file you want to download. If you are downloading scripts, the Download Multiple Files dialog box is displayed.
This dialog box lists script parts available for downloading for the selected script. Select the part you want to download and click Close.
5. Select the script part that you want to download. Script parts must be downloaded separately.
6. The File Download dialog box is displayed.
7. Click Save to open the Save As dialog box.
8. Select the location where you want to save the file and click Save.
9. Click Close in the Download Complete dialog box.
10. If you are downloading scripts, select another script part to download or click Close to exit the Download Multiple Files dialog box.
11. Select another file to download or click Close to exit the Download File dialog box.

9
Working With Sessions 9-1
9Working With Sessions
This chapter describes the how to attach to and detach from sessions that are running on the Oracle Load Testing server. This enables a tester to share real-time test results and to collaborate with team members during testing.
9.1 Attaching to a SessionYou can attach to another running session on the Oracle Load Testing Server. To attach to a session:
1. Select Attach from the Sessions menu.
<session list> - lists all sessions that are running on the Oracle Load Testing Server. Select a session and click OK.
Attach mode - select how you want to attach to the session:
■ View Only - select this option to attach to the session in view only mode. This mode allows you access to graphs.
■ Full Control - select this option to attach to the session with full control. This option allows you to control tests.
2. Select the session to which you want to attach.
3. Select the mode in which you want to attach.
4. Click OK.
9.2 Detaching from a SessionIf you have attached to a session, you will need to detach from it to run a separate test.
To detach from a session, select Detach from the Sessions menu.

Detaching from a Session
9-2 Oracle Load Testing - Load Testing User's Guide

A
Internet Status Codes A-1
AInternet Status Codes
This appendix lists the Internet status codes that can be returned in a response by a server.
A.1 Server Status CodesThe following are the numeric codes that may be returned as Internet Status and error codes in the Oracle Load Testing Autopilot and the Oracle OpenScript Resource Validation test.
A.1.1 Information Codes
100 ContinueThe client can continue the request to the server.
101 Switching ProtocolsThe server has changed the application protocol being used on this connection at the request of the client via the Upgrade message header field.
A.1.2 Success Codes
200 OKThe request completed successfully.
201 CreatedThe request has been fulfilled and resulted in a new resource being created.
202 AcceptedThe request has been accepted for processing, but the processing has not been completed.
203 Non-Authoritative InformationThe returned meta information in the entity-header is not the definitive set as available from the origin server, but is gathered from a local or a third-party copy.
204 No ContentThe server has fulfilled the request but does not need to return new information.

Server Status Codes
A-2 Oracle Load Testing - Load Testing User's Guide
205 Reset ContentThe server has fulfilled the request and the client should reset the document view which caused the request to be sent to allow the user to initiate another input action.
206 Partial ContentThe server has fulfilled the partial GET request for the resource.
A.1.3 Redirection Codes
300 Multiple ChoicesThe requested resource corresponds to ambiguous or multiple choices.
301 Moved PermanentlyThe requested resource has been assigned a new permanent Uniform Resource Identifier (URI) and any future references to the resource should use one of the returned URIs.
302 Moved TemporarilyThe requested resource resides temporarily under a different Uniform Resource Identifier (URI).
303 See OtherThe response to the request can be found under a different Uniform Resource Identifier (URI) and should be retrieved using a GET method on that resource.
304 Not ModifiedThe client requested a resource that has not been modified.
305 Use ProxyThe requested resource must be accessed through the proxy given by the Location field.
306 Not UsedUsed in a previous version of the HTTP specification but is no longer used and the code is reserved.
307 Temporary Redirect The requested resource resides temporarily under a different Uniform Resource Identifier (URI).
A.1.4 Failure Codes
400 Bad RequestThe request could not be understood by the server due to invalid syntax.
401 UnauthorizedThe requested resource requires user authentication.
402 Payment RequiredNot implemented. Reserved for future use.

Server Status Codes
Internet Status Codes A-3
403 ForbiddenThe server understood the request, but is refusing to fulfill it.
404 Not FoundThe server has not found anything matching the Request-URI (Uniform Resource Identifier).
405 Method Not AllowedThe method in the Request-Line is not allowed for the resource identified by the Request-URI.
406 Not AcceptableThe response from the request has content characteristics that are not acceptable to the accept headers sent by the client.
407 Proxy Authentication RequiredThe client must first authenticate itself with the proxy.
408 Request Time-outThe client did not produce a request within server timeout limit.
409 ConflictThe request could not be completed due to a conflict with the current state of the resource. The user should resolve the conflict and resubmit the request.
410 GoneThe requested resource is no longer available at the server and no forwarding address is known.
411 Length RequiredThe server refuses to accept the request without a defined Content-Length.
412 Precondition FailedThe precondition given in one or more of the request-header fields evaluated False when tested on the server.
413 Request Entity Too LargeThe server is refusing to process a request because the request entity is larger than the server is willing or able to process.
414 Request-URI Too LongThe server is refusing to service the request because the Request-URI is longer than the server is willing to interpret.
415 Unsupported Media TypeThe server is refusing to service the request because the entity of the request is in a format not supported by the requested resource for the requested method.

Internet Codes
A-4 Oracle Load Testing - Load Testing User's Guide
416 Requested Range Not SatisfiableA request included a Range request-header field, and none of the range-specifier values in this field overlap the current extent of the selected resource, and the request did not include an If-Range request-header field.
417 Expectation FailedThe expectation given in an Expect request-header field could not be met by this server, or, if the server is a proxy, the server has unambiguous evidence that the request could not be met by the next-hop server.
A.1.5 Server Error Codes
500 Internal Server ErrorThe server encountered an unexpected condition that prevented it from fulfilling the request.
501 Not ImplementedThe server does not support the functionality required to fulfill the request.
502 Bad GatewayThe server, while acting as a gateway or proxy, received an invalid response from the upstream server it accessed in attempting to fulfill the request.
503 Service UnavailableThe server is currently unable to handle the request due to a temporary overloading or maintenance of the server.
504 Gateway Time-outThe server, while acting as a gateway or proxy, did not receive a time out while waiting for a response from the upstream server specified by the URI (e.g. HTTP, FTP, LDAP) or some other auxiliary server (e.g. DNS) it needed to access in attempting to complete the request.
505 HTTP Version not supportedThe server does not support, or refuses to support, the HTTP protocol version that was used in the request message.
A.2 Internet CodesThis section lists the Internet, FTP, Gopher, and HTTP API error codes.
A.2.1 Internet Error Codes
12001 Out of Handles No more Internet handles could be generated at this time.
12002 TimeoutThe request has timed out.

Internet Codes
Internet Status Codes A-5
12003 Extended ErrorAn extended error was returned from the server. This is typically a string or buffer containing a verbose error message.
12004 Internal ErrorAn internal error has occurred.
12005 Invalid URLThe Uniform Resource Locator (URL) is invalid.
12006 Unrecognized SchemeThe Uniform Resource Locator (URL) scheme could not be recognized or is not supported.
12007 Name Not ResolvedThe server name could not be resolved.
12008 Protocol Not FoundThe requested protocol could not be located.
12009 Invalid OptionA request to InternetQueryOption or InternetSetOption specified an invalid option value.
12010 Bad Option LengthThe length of an option supplied to InternetQueryOption or InternetSetOption is incorrect for the type of option specified.
12011 Option Not SettableThe request option cannot be set, only queried.
12012 ShutdownThe Win32 Internet function support is being shut down or unloaded.
12013 Incorrect User NameThe request to connect and log on to an FTP server could not be completed because the supplied user name is incorrect.
12014 Incorrect PasswordThe request to connect and log on to an FTP server could not be completed because the supplied password is incorrect.
12015 Login FailureThe request to connect to and log on to an FTP server failed.
12016 Invalid OperationThe requested operation is invalid.

Internet Codes
A-6 Oracle Load Testing - Load Testing User's Guide
12017 Operation CanceledThe operation was canceled, usually because the handle on which the request was operating was closed before the operation completed.
12018 Incorrect Handle TypeThe type of handle supplied is incorrect for this operation.
12019 Incorrect Handle StateThe requested operation cannot be carried out because the handle supplied is not in the correct state.
12020 Not Proxy RequestThe request cannot be made via a proxy.
12021 Registry Value Not FoundA required registry value could not be located.
12022 Bad Registry ParameterA required registry value was located but is an incorrect type or has an invalid value.
12023 No Direct AccessDirect network access cannot be made at this time.
12024 No ContextAn asynchronous request could not be made because a zero context value was supplied.
12025 No CallbackAn asynchronous request could not be made because a callback function has not been set.
12026 Request PendingThe required operation could not be completed because one or more requests are pending.
12027 Incorrect FormatThe format of the request is invalid.
12028 Item Not FoundThe requested item could not be located.
12029 Cannot ConnectThe attempt to connect to the server failed.
12030 Connection AbortedThe connection with the server has been terminated.
12031 Connection ResetThe connection with the server has been reset.

Internet Codes
Internet Status Codes A-7
12032 Force RetryCalls for the Win32 Internet function to redo the request.
12033 Invalid Proxy RequestThe request to the proxy was invalid.
12034 Need UIA user interface or other blocking operation has been requested.
12035 Not DefinedThis error code is not defined in WININET.
12036 Handle ExistsThe request failed because the handle already exists.
12037 Sec Cert Date InvalidSSL certificate date that was received from the server is bad. The certificate is expired.
12038 Sec Cert CN InvalidSSL certificate common name (host name field) is incorrect.
12039 HTTP to HTTPS on RedirThe application is moving from a non-SSL (Secure Socket Layer) to an SSL connection because of a redirect.
12040 HTTPS to HTTP on RedirThe application is moving from an SSL (Secure Socket Layer) to a non-SSL connection because of a redirect.
12041 Mixed SecurityIndicates that the content is not entirely secure. Some of the content being viewed may have come from unsecured servers.
12042 Chg Post is Non SecureThe application is posting and attempting to change multiple lines of text on a server that is not secure.
12043 Post is Non SecureThe application is posting data to a server that is not secure.
12044 Client Auth Cert NeededAn SSL protected resource on a Web server requires a valid client certificate.
12045Invalid CAA server SSL certificate was issued by an unknown or invalid certificate authority.
12046 Client Auth Not SetupClient authorization is not setup up on this computer.

Internet Codes
A-8 Oracle Load Testing - Load Testing User's Guide
12047 Async Thread FailedThe application could not start an asynchronous thread.
12048 Redirect Scheme ChangeThe function could not handle the redirection, because the scheme changed (for example, HTTP to FTP).
12049 Dialog PendingAnother thread has a password dialog box in progress.
12050 Retry DialogThe dialog box should be retried.
12051 Not DefinedThis error code is not defined in WININET.
12052 HTTPS to HTTP Submit RedirThe data being submitted to an SSL connection is being redirected to a non-SSL connection.
12053 Insert CDROMThe request requires a CD-ROM to be inserted in the CD ROM drive to locate the resource requested.
A.2.2 FTP API Error CodesThe following are the error codes returned by the Internet API used to access FTP protocols.
12110 Transfer in ProgressThe requested operation cannot be made on the FTP session handle because an operation is already in progress.
12111 FTP DroppedThe FTP operation was not completed because the session was aborted.
12112 No Passive ModePassive mode is not available on the server.
A.2.3 Gopher API Error Codes
12130 Protocol ErrorAn error was detected while parsing data returned from the Gopher server.
12131 Not FileThe request must be made for a file locator.
12132 Data ErrorAn error was detected while receiving data from the Gopher server.

Internet Codes
Internet Status Codes A-9
12133 End of DataThe end of the data has been reached.
12134 Invalid LocatorThe supplied locator is not valid.
12135 Incorrect Locator TypeThe type of the locator is not correct for this operation.
12136 Not Gopher PlusThe requested operation can only be made against a Gopher+ server or with a locator that specifies a Gopher+ operation.
12137 Attribute Not FoundThe requested attribute could not be located.
12138 Unknown LocatorThe locator type is unknown.
A.2.4 HTTP API Error Codes
12150 Header Not FoundThe requested header could not be located.
12151 Downlevel ServerThe server did not return any headers.
12152 Invalid Server ResponseThe server response could not be parsed.
12153 Invalid HeaderThe supplied header is invalid.
12154 Invalid Query RequestThe request made for HTTP Query Info is invalid.
12155 Header Already ExistsThe header could not be added because it already exists.
12156 Redirect FailedThe redirection failed because either the scheme changed (for example, HTTP to FTP) or all attempts made to redirect failed (default is five attempts).
12157 Security Channel ErrorThe application experienced an internal error loading the SSL libraries.
12158 Unable to Cache FileThe function was unable to cache the file.

Internet Codes
A-10 Oracle Load Testing - Load Testing User's Guide
12159 TC/PIP not InstalledThe required protocol stack is not loaded and the application cannot start WinSock.
12160 Not RedirectedThe HTTP request was not redirected.
12161 Cookie Needs ConfirmationThe HTTP cookie requires confirmation.
12162 Cookie DeclinedThe HTTP cookie was declined by the server.
12163 DisconnectedThe Internet connection has been lost.
12164 Server UnreachableThe Web site or server indicated is unreachable.
12165 Proxy Server UnreachableThe designated proxy server cannot be reached.
12166 Bad Auto Proxy ScriptThere was an error in the automatic proxy configuration script.
12167 Unable to Download ScriptThe automatic proxy configuration script could not be downloaded.
12168 Redirect Needs ConfirmationThe redirection requires user confirmation.
12169 Sec Invalid CertSSL certificate is invalid.
12170 Sec Cert RevokedSSL certificate was revoked.
12171 Failed Due to Security CheckThe function failed due to a security check.
A.2.5 Additional InformationFor additional information about HTTP Status Codes and the Win32 Internet API Constants, see the following Web resources:
Section 10 of the Hypertext Transfer Protocol - HTTP/1.1 Request for Comments, 2616:
http://www.w3.org/Protocols/rfc2616/rfc2616-sec10.html
MSDN Knowledge Base article Q193625:
http://support.microsoft.com/directory/article.asp?ID=KB;EN-US;Q193625

B
Error Messages B-1
BError Messages
This appendix lists the error messages that can be generated by Oracle Load Testing and possible remedies.
B.1 Viewing Error CodesThe error codes and messages appear either as message boxes or in the Current Error or Previous Error columns of the Oracle Load Testing Autopilot Virtual User grid.
Current Error and Previous Error show errors encountered by running VUs during a test. Current Error is for the current iteration. Previous Error is for the last iteration.
The following sections list the errors and meanings.
B.2 Error Messages
Failed to create serverOracle Load Testing was unable to create an Agent process to run Virtual Users. Try the following:
1. Make sure that you have the Oracle Load Testing Agent software loaded on the Agent system(s) and that it is the same version as the Oracle Application Testing Suite software that is loaded on the Oracle Load Testing system. The systems you plan to use as agents must have either the Oracle Load Testing Agent software or the full Oracle Application Testing Suite installed to work as agents. Do not install both the Oracle Load Testing Agent software and the Oracle Application Testing Suite software on the same system. Otherwise, resource conflicts between the two programs may occur.
2. Make sure you can successfully Ping all of the Agent systems from the Oracle Load Testing system. The names you use to Ping the systems are the same names that you will specify for the Agent systems in the Oracle Load Testing system. If you cannot successfully Ping the Agent systems, contact your network administrator to resolve the issue. If you cannot Ping the Agent systems from the Oracle Load Testing system, you will not be able to run the agents from the Oracle Load Testing system.
3. Make sure that the same user is logged on both the Oracle Load Testing system and all of the Agent systems. All of the Agent systems must be logged in to be controlled by the Oracle Load Testing system. You may be able to log in as a different user on the Agent systems as long as the user login has the same administrative privileges as the user logged in on the Oracle Load Testing system.

Error Messages
B-2 Oracle Load Testing - Load Testing User's Guide
4. If the Oracle Load Testing and Agent systems are not participating in the Domain security model, both the Oracle Load Testing and the Agent systems must log in as Administrator and have the exact same password.
5. From the Oracle Load Testing system, try mapping a drive on each of the Agent systems using Windows Explorer. Depending on how your network is setup, the Oracle Load Testing systems may not be allowed to start up processes on the Agent systems. The easiest way around this is to map a drive to the Agent system in order to authenticate with Windows.
6. In the Oracle Load Testing system, add a script to the Configure Parameters of the Scenario list. Add the Agent system on which you want to run the script using the Systems Manager, then select the system from the System field on the Build Scenarios tab.
This error may also indicate a problem with Registry entries for Oracle Application Testing Suite components. Try uninstalling and reinstalling the Oracle Application Testing Suite. If reinstalling does not fix the problem, contact Customer Support.
Failed to findOracle Load Testing is unable to find the navigation between two pages recorded to the script. These errors can occur in Oracle Load Testing for a variety of reasons, even if the script played back correctly in Oracle OpenScript. Oracle OpenScript uses a thick client browser mode exclusively when recording and playing back scripts.
Typically, "failed to find" errors are related to dynamically generated HREFs recorded to a script that is played back in Oracle Load Testing. For example HREFs containing:
■ session information
■ inline JavaScript
■ other dynamically changed attributes
may cause "failed to find" errors in Oracle Load Testing depending upon the specific techniques used for links in the Web page source and Oracle Load Testing current settings.
If you experience "failed to find" errors in Oracle Load Testing, try running the Scenario/Script with one Virtual User. If the Scenario/Script runs in Oracle Load Testing, it will be possible to run small load tests with that Scenario/Script.
To resolve "failed to find" errors, contact Customer Support for assistance with adjusting Oracle Load Testing settings for your specific situation. Note that the solution to one "failed to find" situation may not resolve other "failed to find" situations. You should contact Customer Support every time you encounter a "failed to find" error that you cannot resolve.
Failed to match...Oracle Load Testing found the navigation path (an internal representation of a clicked link that Oracle OpenScript records to the script) between two pages recorded to the script, but was unable to match one or more partial components of the navigation path.
"failed to match" errors are also related to dynamically generated HREFs recorded to a script that is played back in Oracle Load Testing.
To resolve "failed to match" errors, contact Customer Support for assistance with adjusting Oracle Load Testing settings for your specific situation. Note that the solution to one "failed to match" situation may not resolve other "failed to match"
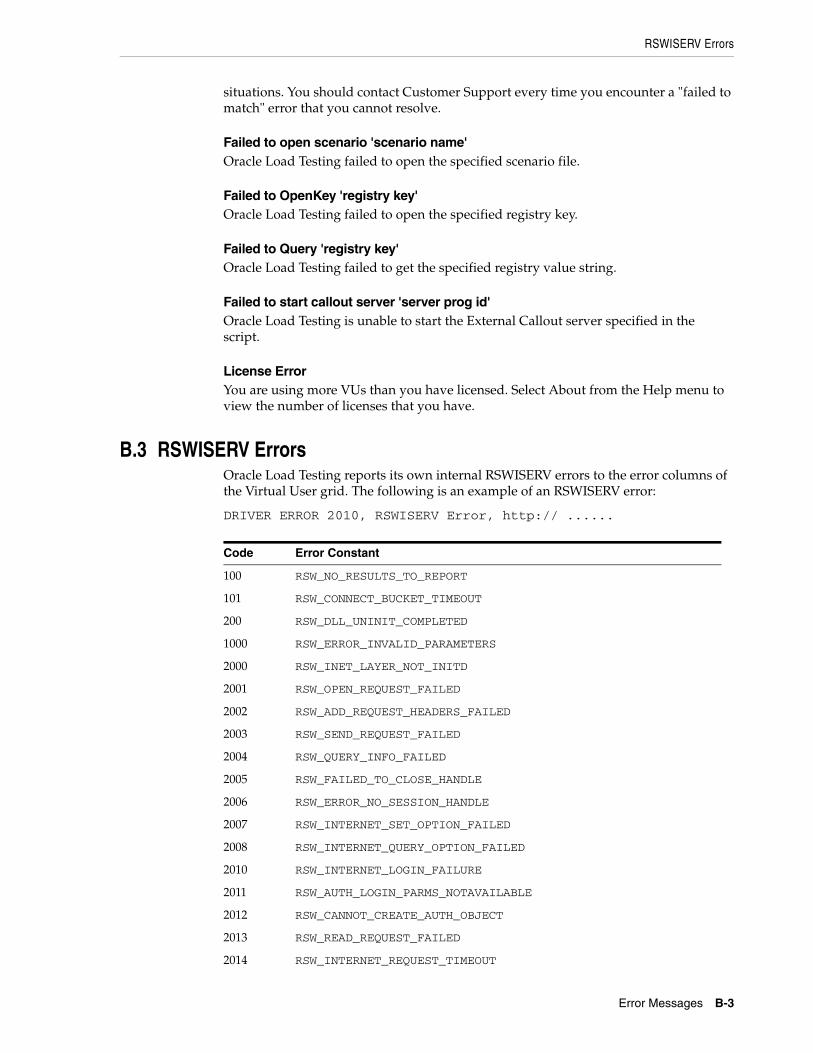
RSWISERV Errors
Error Messages B-3
situations. You should contact Customer Support every time you encounter a "failed to match" error that you cannot resolve.
Failed to open scenario 'scenario name'Oracle Load Testing failed to open the specified scenario file.
Failed to OpenKey 'registry key'Oracle Load Testing failed to open the specified registry key.
Failed to Query 'registry key'Oracle Load Testing failed to get the specified registry value string.
Failed to start callout server 'server prog id'Oracle Load Testing is unable to start the External Callout server specified in the script.
License ErrorYou are using more VUs than you have licensed. Select About from the Help menu to view the number of licenses that you have.
B.3 RSWISERV ErrorsOracle Load Testing reports its own internal RSWISERV errors to the error columns of the Virtual User grid. The following is an example of an RSWISERV error:
DRIVER ERROR 2010, RSWISERV Error, http:// ......
Code Error Constant
100 RSW_NO_RESULTS_TO_REPORT
101 RSW_CONNECT_BUCKET_TIMEOUT
200 RSW_DLL_UNINIT_COMPLETED
1000 RSW_ERROR_INVALID_PARAMETERS
2000 RSW_INET_LAYER_NOT_INITD
2001 RSW_OPEN_REQUEST_FAILED
2002 RSW_ADD_REQUEST_HEADERS_FAILED
2003 RSW_SEND_REQUEST_FAILED
2004 RSW_QUERY_INFO_FAILED
2005 RSW_FAILED_TO_CLOSE_HANDLE
2006 RSW_ERROR_NO_SESSION_HANDLE
2007 RSW_INTERNET_SET_OPTION_FAILED
2008 RSW_INTERNET_QUERY_OPTION_FAILED
2010 RSW_INTERNET_LOGIN_FAILURE
2011 RSW_AUTH_LOGIN_PARMS_NOTAVAILABLE
2012 RSW_CANNOT_CREATE_AUTH_OBJECT
2013 RSW_READ_REQUEST_FAILED
2014 RSW_INTERNET_REQUEST_TIMEOUT

Obtaining Support Files
B-4 Oracle Load Testing - Load Testing User's Guide
B.4 Obtaining Support FilesYou can obtain support and log files to help troubleshooting by selecting Create Support File from the Tools submenu under the Oracle Application Testing Suite start menu. The OATSSupport.zip file will appear on your desktop.
B.5 Oracle Application Testing Suite Application Service MessagesThis section lists the Oracle Application Testing Suite Application Service Messages with possible causes and resolutions.
B.5.1 Agents are OrphanedSymptoms: Agents are orphaned, messages take forever to be dismissed, or session prematurely stops.
When it Occurs: Mostly during the test.
Cause(s): Communication line is interrupted between Oracle Load Testing, and Oracle Application Testing Suite Application Service, Agents.
Resolution: Check the following:
1. Make sure you can ping the machines where Oracle Load Testing, Oracle Application Testing Suite Application Service, and Agents are installed. Verify that the network is up and functional.
2. Go to <installdir>\logs directory and check the log files to see if there are any exceptions indicating the nature of the problem, for example, multiple sockets error with the subsequent forced session termination.
3. Go to System Log on the Event Viewer and check for Network Warnings.
B.5.2 Server is Not InitializedSymptoms: "Server is not initialized". Messages take forever to be dismissed in the System Manager.
When it Occurs: Always before Test Run:
Cause(s): Oracle Application Testing Suite Application Service is not running or is having problems. The location for Oracle Load Testing is incorrect.
Resolution: Check the following: Check the following:
1. Make sure that right Host\Port number is being used.
3000 RSW_UNABLE_TO_CREATE_EVENT
3001 RSW_UNABLE_TO_CREATE_THREAD
3002 RSW_UNABLE_TO_CREATE_NEW_REQUEST
3003 RSW_UNABLE_TO_CREATE_NEW_THEAD_ENTRY
3004 RSW_UNABLE_TO_CREATE_MUTEX
3005 RSW_UNABLE_TO_CREATE_NEW_OBJECT
3006 RSW_UNABLE_TO_ALLOCATE_NEW_MEMORY
Code Error Constant

Oracle Application Testing Suite Application Service Messages
Error Messages B-5
2. Make sure that the Oracle Application Testing Suite Application Service is running: go to Services on that machine and check for "Oracle Application Testing Suite Application Service is started".
3. Stop and Start the server.
4. Go to <installdir>\logs directory and look at AdminServer log file to see if there are any exceptions indicating the nature of the problem, for example, the machine is disconnected from the network, etc.
B.5.3 Unable to Start SessionSymptoms: There is no page when you start Oracle Load Testing.
When it Occurs: When attempting to start Oracle Load Testing.
Cause(s): This problem can occur when:
■ The Oracle Application Testing Suite Application Service has not been started.
■ There is a port conflict.
■ The installation was not good.
■ CPU usage is at 100% because old messages from the last run are still there.
Resolution: Check the following:
To verify that the Oracle Application Testing Suite Application Service and the Oracle Load Testing Agent Service are running:
1. Close all Oracle Application Testing Suite products.
2. Open Services from the Administrative Tools in the Windows Control Panel.
3. Verify that the Oracle Load Testing Agent and Oracle Application Testing Suite services are running.
4. If necessary, restart the Oracle Load Testing Agent and Oracle Application Testing Suite services.
5. Restart the Oracle Application Testing Suite application and start the session.
To check for error messages in the server log, look in the following file located in the installation directory: C:\OracleATS\logs\wls_oats.log
Oracle Load Testing uses the following ports by default at startup: 8088, 7073, and 9001 on the target agent machine. Port conflicts are indicated by a message similar to the following:
java.net.BindException: Address already in use: JVM_Bind
in the following files located in the installation directory:
C:\OracleATS\logs\wls_oats.log
C:\OracleATS\logs\servers\AdminServer\logs\*.log
C:\OracleATS\\logs\agentmanager.log
To see whether a port is available:
■ Type netstat -a at the command prompt or
■ Download and run the tcpview utility from
http://www.sysinternals.com/Utilities/TcpView.html
To delete old messages when CPU usage is 100%:

Problems During Load Testing
B-6 Oracle Load Testing - Load Testing User's Guide
1. Open Services from the Administrative Tools in the Windows Control Panel. and stop the Oracle Application Testing Suite Application Service.
2. Delete everything in the <installdir>\oats\servers\AdminServer\data\store\default directory.
3. Restart the Oracle Application Testing Suite Application Service.
Additional items to check:
■ Make sure the service is bounded into the correct IP address if there are multiple NICs. Type ipconfig/all in a command prompt to see how many interfaces you have.
If the problem continues, contact Customer Support.
B.6 Problems During Load TestingThis section lists the possible problems during load testing with possible causes and resolutions.
B.6.1 Cannot Open ScenarioSymptoms: The scenario cannot be opened or scripts are missing.
Cause(s): This problem can occur when:
■ The network drive cannot be accessed because the Oracle Application Testing Suite Application Service is running under a different user account than the agent.
■ The saved scenario does not contain the required script or databank files. This can happen when the scenario has been copied from another machine.
■ The repository and workspace structure is not the same as the recorded scenario. This can happen when the scenario has been copied from another machine.
Resolution: Check the following:
1. Check for error messages in the server log, in the following file located in the installation directory: <installdir>\oats\servers\AdminServer\logs\AdminServer.log
If there are errors refer to the instructions in the "Unable to Start Oracle Load Testing Session" section.
2. Check the account that the agent is running under using Services.msc.
3. Verify that the network path is available to this account. Select Log On in the Services under in the Administrative Tools of the Control Panel.
4. Log on as this user account. See Section 3.1.4.2, "Configuring Oracle Load Testing Agents" for instructions on changing the user account.
5. Ensure that the workspace and repository structure are the same on the machine running the test as on the machine from which the scenario was copied.
Ensure that all script and databank files are present. Copy any missing script and databank files from the original machine to the new machine.
B.6.2 Unable to Start Agent SessionSymptoms: The session cannot be started.
Cause(s): This problem can occur when:

Problems During Load Testing
Error Messages B-7
■ The install was bad, leaving JMSWrapper.dll unregistered.
■ There is a database error.
■ There are agent manager configuration problems.
■ There are connection problems between machines, such as dual NICs and firewalls.
■ The session timeout setting is too low.
■ The Oracle Load Testing version is incompatible between the server and the agent.
Resolution: Check the following:
1. Check for error messages in the server log, in the following file located in the installation directory: <installdir>\logs\agentmanager.log
If there are errors, refer to the instructions under "Unable to Start Session" on page B-5.
To register JMSWrapper.dll:
1. Open a command prompt.
2. Set path=<installdir>\jdk\jre\bin;<installdir>\jdk\jre\bin\client;%path%
3. Type the following command: Regsvr32 jmswrap.
To check for a database error:
1. Open the database management user interface.
2. Check for database errors.
To change the default agent time out value:
1. Stop the Oracle Application Testing Suite Application Service.
2. Change the setting oracle.load.agent.timeout.default. The default value for this setting is located in the DEFAULT_GENERAL_SETTINGS table in the OATS schema in the OATS database. Any customer-set value is located in the GENERAL_SETTINGS table of the schema.
3. Change the oracle.load.agent.timeout.default entry to a new value in seconds.
4. Restart the Oracle Application Testing Suite Application Service.
If the machines are running different Oracle Load Testing versions, install the same version on all machines.
B.6.3 Performance Problems During the Load TestSymptoms: The user interface froze during the load test and no longer responds.
Cause(s): This can occur when:
■ CPU usage is at 100%
■ Memory is out of range
Resolution: Check the following:
1. Check for error messages in the server log, in the following file located in the installation directory:
<installdir>\logs\wls_oats.log
If there are errors refer to the instructions under "Unable to Start Session."

Problems During Load Testing
B-8 Oracle Load Testing - Load Testing User's Guide
2. Go to <installdir>\oats\servers\AdminServer\logs directory and look at AdminServer.log file to see if there are any exceptions indicating the nature of the problem, for example, multiple sockets error with the subsequent forced session termination.
3. Go to System Log on the Event Viewer and check for Network Warnings.
To delete old messages when CPU usage is 100%:
1. Open Services in the Administrative Tools of the Windows Control Panel and stop the Oracle Application Testing Suite Application Service.
2. Delete everything in the
<installdir>\oats\servers\AdminServer\data\store\default directory.
To increase memory if there is an out of memory error, follow these steps:
1. Stop Oracle Application Testing Suite Application Service.
2. Open Regedit and locate key HKEY_LOCAL_MACHINE\SYSTEM\CurrentControlSet\Services\Oracle Application Testing Suite Application Service\Parameters.
3. In the string value CmdLine locate arguments -Xms256m -Xmx1024m (NOTE: Actual values may differ).
Argument -Xms specifies the amount of memory available to Weblogic Server, while -Xmx specifies the maximum
4. After setting the desired values for both minimum and maximum memory limits, close regedit and restart the machine.
B.6.4 Unexpected Agent Exit in the VU GridThe Oracle Load Testing Agent service is responsible for starting agent processes, monitoring when they shut down, and terminating them when asked to do so by the Oracle Load Testing controller. Whenever Agent notices that a process terminates, it asks Windows for the exit code of that process. This is the exit code value reported to Oracle Load Testing and logged in the <installdir>\logs\agentmanager.log file.
One of the following values is returned:
■ The exit value specified in the ExitProcess or TerminateProcess function.
■ The return value from the main or WinMain function of the process.
■ The exception value for an unhandled exception that caused the process to terminate.
The following are known causes for commonly seen exit codes:
Unexpected Agent Exit. Code = 143This code is returned when terminating a JavaAgent process by closing its console window manually, or by terminating the application using the Task Manager's Applications tab.
Unexpected Agent Exit. Code = 1This code is returned when WgPro.exe or JavaAgent.exe is terminated directly using the Windows Task Manager Processes tab.

Data Collector Startup Errors
Error Messages B-9
Unexpected Agent Exit. Code = 0This code is returned when the agent form is closed manually or using the Task Manager Applications tab.
Exit code 0 is always reported if a JavaAgent process terminates itself normally. This can happen, for example, if a user callback code were to call System.exit(1).
B.7 Data Collector Startup ErrorsThis section uses the following terminology:
Server - the server that the user pointed his/her browser at. For example, Oracle Application Testing Suite Application Service on the server machine.
Remote Data Collection Server (or RDCS) - the Weblogic server running on the machine where the user is trying to start a data collector. This may or may not be the same Weblogic instance as the server. This is also known as the Oracle Application Testing Suite Application Service on the data collection machine.
Agent Manager - the agent launching service running on the machine where the user is trying to start a data collector. This is also known as Oracle Load Testing Agent Service.
Data Collector (or DC) - the data collection process started by Agent Manager.
Ds.dcStartupFailedThis error occurs if Agent Manager was unable to launch the DC process. This may happen when the remote data collection machine does not have data collectors installed. Verify that the software is installed correctly by checking for the presence of the DataCollector directory in the install tree and that the executables are there.
Ds.dcStartErrorThis error occurs if the remote data collection server has trouble communicating with Agent Manager. This may be caused by the following:
■ Agent Manager is not running - verify that the Oracle Load Testing Agent Service is running and start it, if necessary.
■ Remote Data Collection machine does not have data collectors installed - Verify that the software is installed correctly by checking for the presence of the DataCollector directory in the install tree and that the executables are there.
Ds.dcNotAvailableThis occurs most often if the DC was started, but is unable to communicate with the RDCS, or if the DC took more than the timeout interval to contact the RDCS. This may be caused by the following:
■ DC machine is slow - extend the timeout interval. The data collector startup timeout is controlled on the RDCS by the oracle.datacollector.startup.timeout=90000 in the oracle.properties file.
■ DC and RDCS disagree on the port number for communication - the DC determines the port number of the RDCS from DataCollector\bin\hwmagent.txt:SERVER localhost:7073. The RDSC port number is assigned in oracle.properties:oracle.port.dataCollector=7073.

Data Collector Startup Errors
B-10 Oracle Load Testing - Load Testing User's Guide
errorCreatingDSClientThis occurs if the server has problems communicating with the RDCS. If the server and RDCS are the same, this error should not occur. It can be caused by the following:
■ RDCS is not running - verify that the Oracle Application Testing Suite Application Service is running on the DC machine.
■ Basic network connectivity between the server and RDCS - check that the basic network connectivity between the server and RDCS. If there is a firewall between them, ports may need to be opened or, if the firewall uses NAT, it may not work at all.
Index-1
Index
Numerics1st Time setting, 3-33, 4-3
AAbort All Virtual Users toolbar button, 3-15about, 1-1About menu option, 3-14Absolute Time setting, 6-8Accept String setting, 3-36, 4-6Acceptable failure rate
defining test criteria, 2-7Acceptable response time under various loads
defining test criteria, 2-7Acceptance and Scalability Fine Tuning, 2-2Acceptance environment
defining test process, 2-6Active Virtual Users, 6-6Add Data Series button, 6-5, 6-7, 6-12Add to Autopilot button, 4-20Additional Arguments setting, 3-36, 4-7Administrator, 3-10
adding users, 3-12auditing usage, 3-13deleting users, 3-13editing users, 3-12Help menu options, 3-11logging in, 3-10Logout menu option, 3-11starting, 3-10Tools menu options, 3-11Usage Audit tab, 3-11Users tab, 3-11
Administrator Accessenabling, 3-12
Advance to Next Record setting, 4-13Advanced settings, 3-34, 4-5advantages, 1-2Agent error
dropping failed agents, 4-12stopping rampup, 4-12
Agent error handling setting, 4-12agents
configuring, 3-4error handling, 4-12
installing, 3-3terminating, 4-12verifying network access, 3-3
All users in scenario setting, 4-15analysis reports
generating, 2-11application service messages, B-4Application stability
defining test process, 2-6Architecture Validation, 2-2Attach menu option, 3-14Auto assign session name setting, 4-12Auto Generate Timers For All Pages setting, 3-33,
4-4Auto Generate Timers For All Resources
setting, 3-34, 4-4Auto Generate Timers For All Step Groups
setting, 3-34, 4-4Auto Mode toolbar button, 7-2Automatic Response Verification, 1-2Automatic Session Management, 1-3Autopilot
defaults, 3-39pausing, 3-15, 5-6setting rampup, 5-2setting start and stop, 5-1starting, 5-3starting and stopping manually, 5-3stopping, 5-3using, 5-1
Bbasics, 3-1Binary Decoding Error setting, 3-37, 4-8Browser Emulation setting, 3-32, 4-3Browser options
setting, 3-30Browser pane, 7-2Browser Settings, 3-32, 4-3Browsers to simulate
defining test criteria, 2-7Build Scenarios tab, 3-15

Index-2
CCache Emulation setting, 3-33, 4-3Call Function Failed setting, 3-38, 4-9Cannot Open Scenario, B-6Categories of users
defining test criteria, 2-7Child Script Failed setting, 3-37, 4-9Clear Display toolbar button, 7-1Clear Graph button, 6-5, 6-13Client Certificate Keystore Error setting, 3-38, 4-9Command Prompt setting, 3-26Community String setting, 3-26, 3-28Components
discovering, 3-27starting SNMP, 3-8
Concurrent Object Requests, 1-3CONFIG.encap file, 3-7CONFIG.master file, 3-7Configurations menu option, 3-14Connect String setting, 3-25, 3-28Connection Speed Emulation setting, 3-32, 4-3Contents menu option, 3-14CPU vs. DB Sessions graph, 6-4Create Reports tab, 3-17, 6-11Create Variable Fail setting, 3-37, 4-8Criteria for Each Business Transactions
defining test criteria, 2-7CSV data
exporting, 6-14Custom Browsers, 3-30Custom Graphs setting, 6-3
Ddata collectors
adding, 3-20startup errors, B-9
data countersusing, 6-10
Data Driven Tests, 2-8Data Migration Utility, 3-10Data Series Label setting, 6-8Data Series list, 6-8Data Series Name setting, 6-8Data Sources, 3-23Data Usage setting, 3-40Databank Configuration settings, 3-39, 4-10Databanks
configuring, 4-13default settings, 3-40using the control, 4-12
databanksadvance records settings, 4-13next record settings, 4-14out of records settings, 4-14settings, 4-13
databasedeleting session data, 6-20downloading files, 8-4managing, 8-1
purging records, 3-11selecting, 8-2unlocking records, 3-11uploading files, 8-3
Database Name or Database SID setting, 3-25, 3-28databases
deleting, 8-3removing, 8-3updating, 8-3
Databases menu option, 3-14data-driven testing, 1-3DB Throughput graph, 6-4default administrator account, 3-10defining systems, 3-18Delay Between Business Transaction Runs, 2-7, 2-9Deployment environment
defining test process, 2-6Detach menu option, 3-14Detail Level options, 6-6Development Engineers and Architecture
Groups, 2-5Discover Components, 3-23distributed agents, 1-3Do Not Cache setting, 3-33, 4-3Download File menu option, 3-14Download Local Files setting, 3-36, 4-7Download log file from server toolbar button, 7-1Driver setting, 3-24, 3-28Driver String setting, 3-24, 3-28Drop failed agents from session setting, 4-12Duration details, 6-9
EEach Iteration of Script setting, 4-13Each Occurrence setting, 4-13Edit Scenario Details button, 4-12E-mail notification
enabling, 3-12Enable Cookies setting, 3-33, 4-4Enable Deflate setting, 3-35, 4-6Enable GZIP setting, 3-35, 4-6Enable Keep Alive setting, 3-36, 4-6encap_peer component, 3-8Encryption Service not Initialized setting, 3-37, 4-8End Time details, 6-9Enterprise Manager server, 3-24Enterprise Manager URL setting, 3-24error codes, A-1
viewing, B-1Error Handling settings, 3-34, 4-4error messages, B-1
application service, B-4cannot open scenario, B-6server not initialized, B-4unable to start agent session, B-6unable to start session, B-5
Errors Vs. Time graph, 6-1, 6-10Errors Vs. Users graph, 6-1, 6-9, 6-10Excel files

Index-3
exporting, 6-15Execute User Defined Tests setting, 3-33, 4-4exporting graphs, 6-14Extensibility settings, 3-33, 4-4
Ffailed to find error messages, B-2failed to match error messages, B-2failed to open error messages, B-3Failure codes, A-2features, 1-1file management, 8-1File Not Found setting, 3-37, 4-8filters
using, 6-19Firefox browser, 3-2firewall considerations, 3-2Forms Component not Found setting, 3-38, 4-9Forms Connect Error setting, 3-38, 4-9Forms Content Match Failed setting, 3-38, 4-9Forms I/O Communication Error setting, 3-38, 4-9Forms LT Playback settings, 3-39, 4-10Forms Playback Error setting, 3-38, 4-9FTP API Error codes, A-8
GGeneral options settings, 3-40Global Headers setting, 3-37, 4-7Gopher API Error codes, A-8Graph refresh interval setting, 3-17, 6-2Graph Title setting, 6-8graphs
creating, 6-13Errors Vs. Time graph, 6-1, 6-10Errors Vs. Users graph, 6-1, 6-9exporting data, 6-13exporting images, 6-13exporting to CSV file, 6-11exporting to Excel, 6-15exporting to JPG, 6-15exporting to PNG, 6-15load test, 6-7Oracle Database Diagnostics, 6-4Performance Vs. Time graph, 6-1, 6-10Performance Vs. Users graph, 6-1, 6-9setting maximum data series, 6-3setting options, 6-8setting refresh interval, 6-2showing chart statistics, 6-8Statistics Vs. Time graph, 6-1, 6-10Users Vs. Time graph, 6-1, 6-10using, 6-1working with queries, 6-15
Graphs menu option, 3-14Group type setting, 4-15
HHardware Allocation
defining test process, 2-6Help menu, 3-14history list in VU Display, 7-2Hits Per Second statistics, 6-6Host setting, 3-25, 3-28HTML Parsing Error setting, 3-38, 4-9HTTP
defining test criteria, 2-7HTTP API Error codes, A-9HTTP Version setting, 3-35, 4-6
IIBM WebSphere server, 3-25Ignore HTTP Proxy Settings setting, 3-34, 4-5Ignored Url setting, 3-36, 4-7images
using in tests, 2-9Information codes, A-1installing, 3-1
agents, 3-3Linux agent, 3-4Oracle Load Testing, 3-1Remote Data Collectors, 3-8
Instance setting, 3-25, 3-28Integration and Acceptance Organizations, 2-5Internet codes, A-4Internet error codes, A-4Internet Explorer browser, 3-2Internet Status codes, A-1introduction, 1-1, 2-1Invalid HTTP Response setting, 3-38, 4-9Invalid URL setting, 3-38, 4-9IP spoofing
using, 4-16ipaddr field, 3-7Iteration Delay setting, 3-32
JJava Client Preferences settings, 3-34, 4-5JMX monitors
configuring, 3-21JPG files
exporting, 6-15
KKeep the Same Record setting, 4-14Key Store File Name setting, 3-26Key Store Password setting, 3-26Kilobytes Per Second statistics, 6-6
LLanguage setting, 3-35, 4-6Let Each User Iterate Over Records Independently
setting, 4-14Linear scale setting, 6-9Linux agent
installing, 3-4
Index-4
Load Distribution Capability, 2-4load test scenarios
creating, 2-9planning, 2-8verifying, 2-9
load testingcriteria for, 2-7goals of, 2-1phases of, 2-2planning for, 2-1process, 2-6
load testing problems, B-6Load to be Simulated
defining test criteria, 2-7Logarithmic scale setting, 6-9Logging Tools, 2-4Login, 3-4Logout, 3-15Loop Over Range setting, 4-14
MMain Window
Build Scenarios, 3-15features, 3-13
Manage Default Reports menu option, 3-11Manage menu, 3-14Manual Mode toolbar button, 7-2Manual range filter, 6-8master_peer component, 3-8Max Content Download Size setting, 3-36, 4-7Max Number of Keep Alive Requests setting, 3-36,
4-7Maximum Bytes of VU Display setting, 3-35, 4-5Maximum HTTP Connections Per User setting, 3-34,
4-5Maximum In-Memory Cache Size setting, 3-33, 4-3Maximum JVM Heap Size (MB) setting, 3-35, 4-6Maximum number of rows per page setting, 6-3Maximum range filter, 6-9Maximum total storage size setting, 6-3Maximum Users Per Process setting, 3-34, 4-5, 4-16Memory
determining requirements, 2-4Menu options
Abort, 5-5About, 3-14Attach, 3-14Autopilot Defaults, 5-1Configurations, 3-14Contents, 3-14Databases, 3-14Detach, 3-14Download File, 3-14Graphs, 3-14Manage Default Reports, 3-11Metric Profiles, 3-14Metrics, 3-14Modify Run Attributes, 5-5New, 3-13
Open, 3-13Options, 3-14overview, 3-13Purge Deleted Records, 3-11Release Sync, 5-5Save, 3-13Save As, 3-13Scenarios, 3-14ServerStats Display, 3-14Sessions, 3-14Setup E-mail Config, 3-11Start Viewing, 5-5Stop, 3-14, 5-5Stop Viewing, 5-5Sync Point Status, 3-14Systems, 3-14Terminate Idle Agents, 3-14Unlock Locked Records, 3-11Upload File, 3-14VU Display, 3-14
Metric Profiles menu option, 3-14Metrics menu option, 3-14Minimum range filter, 6-9Modify Run attributes, 5-6monitored systems, 3-18
adding, 3-21, 3-23Monitoring and Operations Groups, 2-5
NNavigate toolbar buttons, 7-2New menu option, 3-13New Scenario toolbar button, 3-15NEW_SNMPD_PORT, 3-7NEW_TRAPD_PORT, 3-7No Delay setting, 3-32, 4-3Non Proxy Hosts setting, 3-35, 4-6Number of Business Transactions to Simulate
defining test criteria, 2-7Number of Users, 2-9
OObject Download Errors Are Fatal setting, 3-34, 4-4Object-Oriented Recording, 1-2OLT Server Warnings button, 5-4, 5-6On Error Stop Virtual User setting, 3-34, 4-5Open gate time setting, 4-16Open menu option, 3-13Open Scenario toolbar button, 3-15Open VU Display Log toolbar button, 7-1OpenScript Download Manager settings, 3-38, 4-9OpenScript Error Recovery settings, 4-8
General, 3-37, 3-38, 4-8, 4-9Operating System
determining requirements, 2-4Operating System setting, 3-26options
Autopilot defaults, 3-39Browser, 3-30

Index-5
databank defaults, 3-40general, 3-40reporting, 3-40, 6-2repository, 3-31scenario defaults, 3-31session profiles, 3-40session start and stop, 3-40setting, 3-30
Options menu option, 3-14Oracle Application Testing Suite Application Service
stopping, 3-10Oracle Database setting, 3-24, 3-27Oracle Functional Testing, 2-3Oracle Load Testing, 2-3
advantages of, 1-2Oracle Load Testing Agent Authentication
Manager, 3-10Oracle Load Testing Agent Service, 3-4Oracle Load Testing DataCollector, 3-8Oracle Load Testing Server Settings options, 3-41Oracle Load Testing ServerStats, 2-4Oracle SNMP server, 3-7
configuring encapsulator, 3-7configuring master agent, 3-7starting SNMP components, 3-8verifying start_peer script, 3-7
Oracle Thin JDBC Driver, 3-24, 3-27Other System Monitoring Tools, 2-4Overall Transactions-Per-Second Throughput
Required, 2-8
PPacing mode, 2-9
defining test criteria, 2-7Pages
returned by server, 6-6Pages Per Second statistics, 6-6Password setting, 3-25Pause Autopilot toolbar button, 3-15PEER master agent, 3-8Perfmon authentication, 3-26, 3-28Perform baseline for Oracle DB setting, 4-20Performance Benchmarking, 2-2Performance Data Logging, 2-8Performance Monitoring, 2-2Performance Problems During the Load Test, B-7Performance Regression, 2-2Performance Statistics, 6-1, 6-5Performance Vs. Time graph, 6-1Performance Vs. Users graph, 6-1, 6-9Performance, Users vs. Time graph, 6-2Persist Raw Data setting, 3-35, 4-5Personnel
defining test process, 2-6PGA/SGA graph, 6-4PNG files
exporting, 6-15Polling interval for network status check
setting, 3-41
popup blockers, 3-2port
changing, 3-8Port setting, 3-25, 3-28preferences
setting, 3-30Preserve Connections Between Iterations
setting, 3-36, 4-6Preserve Cookies Between Iterations setting, 3-36,
4-7Preserve Variables Between Iterations setting, 3-36,
4-7Processor
determining requirements, 2-4profiles
selecting, 4-1Proxy Host setting, 3-35, 4-6Proxy Port setting, 3-35, 4-6Purge Deleted Records menu option, 3-11
QQuality Assurance Organizations, 2-5queries, 6-15
deleting, 6-17editing, 6-16running saved queries, 6-16saving, 6-16
RRampup Specification, 5-2Random setting, 3-32, 4-3Randomly setting, 4-14Range Filter settings, 6-8Range Format, 6-8Record buffer size setting, 3-40Recorded setting, 3-32, 4-3Recorded/Random setting, 3-32Recorded/Rnd setting, 4-3Redirection codes, A-2Refresh Off toolbar button, 7-2Refresh On toolbar button, 7-2Relative Time setting, 6-8Release trigger setting, 4-15releasing
synchronization points, 5-5Virtual Users, 5-5
Remote Data Collectorsinstalling, 3-8
Remote Password setting, 3-26Remote Port setting, 3-26Remote Protocol setting, 3-26Remote Username setting, 3-26Render HTML toolbar button, 7-1Repeat setting, 3-33, 4-3Replace URLs setting, 3-37, 4-7Report Counters setting, 3-35, 4-5Report Sender Interval setting, 3-35, 4-6report template

Index-6
deleting temporary images/data, 6-3Report Template setting, 6-3Reporting data collection interval setting, 6-2Reporting options, 3-40Reporting settings, 3-33reports
Create Reports tab, 6-11creating custom graph and session list, 6-18creating templates, 6-17exporting to CSV data, 6-14exporting to Excel files, 6-15exporting to JPG files, 6-15exporting to PNG files, 6-15generating, 2-11generating summary reports, 6-18including think time, 6-3managing default, 3-11performance statistics, 6-5saving data, 6-2saving data for, 4-11, 4-20scenario summary, 6-19session summary, 6-19setting options, 4-4, 6-2using, 6-1viewing, 6-13
reports and graphs, 1-4repositories
adding, 3-5repository options, 3-31Request Timeout setting, 3-34, 4-5Required Applications
defining test process, 2-6Response Time Error setting, 3-38, 4-9Restart Application Service setting, 3-41RSWISERV errors, B-3Rules of Thumb, 2-4Run Test button, 4-20, 5-3Running users setting, 4-15Run-Time Data, 2-8runtime reports
viewing, 6-7
SSave As menu option, 3-13Save menu option, 3-13Save Scenario toolbar button, 3-15scalability tests
planning, 2-8Scenario Default options, 3-31Scenario menu, 3-13Scenario reports, 6-19scenarios
defining, 4-1deleting, 4-18opening existing, 4-17removing profiles, 4-18renaming, 4-17saving, 4-17specifying profile attributes, 4-2
submitting to Autopilot, 4-20using synchronization points, 4-15working with files, 4-17
Scenarios menu option, 3-14Scheduling
defining test process, 2-6scripts
creating, 2-9reusing, 1-3
Segment Parser Error setting, 3-37, 4-8Select Next Record setting, 4-14Sequential - Loop Records Continuously
setting, 3-40Sequential - Use Starting Record Only setting, 3-40Sequentially setting, 4-14Server Error codes, A-4Server not initialized, B-4, B-5server statistics, 1-4Server Status codes, A-1Server Type setting, 3-25Server Warnings
viewing, 5-6servers
Oracle SNMP server, 3-7setting up, 3-5Solaris SNMP server, 3-6
ServerStatsdata collectors, 3-8, 3-18data counters, 6-11Oracle SNMP server, 3-7page timers, 6-11setting up servers, 3-5Solaris SNMP, 3-6
ServerStats Configuration, 3-17ServerStats Display menu option, 3-14ServerStats menu, 3-14ServerStats Monitors options, 3-41Session Details, 6-9Session menu, 3-14Session Name Prefix setting, 4-12Session Profile options, 3-40Session reports, 6-19
using filters, 6-19Session Start and Stop options, 3-40, 4-11sessions
attaching to, 9-1defining how to end, 4-12defining how to start, 4-11deleting, 6-20detaching from, 9-1managing, 4-11viewing performance statistics, 6-6working with, 9-1
Sessions menu option, 3-14Set Up Autopilot tab, 3-16Setup E-mail Config menu option, 3-11Show Chart Statistics button, 6-5, 6-8, 6-13Show End-to-End Times option, 6-6Show Graph Options button, 6-5, 6-8, 6-13Show Legend button, 6-5, 6-7, 6-13

Index-7
Show Request Headers setting, 3-33, 4-4, 5-6Show Response Headers setting, 3-33, 4-4, 5-6Show Server Times Only option, 6-5Shuffle setting, 4-14SID setting, 8-2SNMP Agent
enabling on startup, 3-6starting, 3-6stopping, 3-6
SNMP Community String setting, 3-26SNMP server, 3-6SNMP Version setting, 3-28snmpd component, 3-8Socket Timeout setting, 3-34, 4-5Solaris SNMP Server, 3-6Solve Variable Fail setting, 3-38, 4-9SQL Database setting, 3-24, 3-27SSL
defining test criteria, 2-7using, 3-9
SSL Version setting, 3-36, 4-7Start Load Test toolbar button, 3-15Start Time details, 6-9start_peer script, 3-8Statistics Vs. Time graph, 6-1, 6-10Stop All Virtual Users toolbar button, 3-15Stop Application Service setting, 3-41Stop attached session after browser closes
setting, 4-12Stop menu option, 3-14Stop ramp-up on agent error setting, 4-12Stop Remaining Iterations on Failure setting, 3-34,
4-5Stop session on last VU completion setting, 4-12Stop the User setting, 4-14Submitted Scenario Profiles, 3-17Success codes, A-1summary reports, 6-18Sun JDBC
ODBC Bridge Driver, 3-24, 3-27support files, B-4
creating, 3-10supported IDEs, 1-4Synchronization points
naming, 4-15synchronization points
adding to profiles, 4-15managing, 5-5releasing, 5-5using, 4-15
System Identifier setting, 8-2System Monitoring Tools, 2-4systems
adding new groups, 3-19adding to groups, 3-20defining, 3-18deleting, 3-30editing, 3-30renaming, 3-30
Systems Manager, 3-17
Systems Manager., 3-4Systems Manager options, 3-41Systems menu option, 3-14
TTCP/IP Properties, 4-16templates
creating, 6-17Terminate all agents at end of session setting, 4-12Terminate Idle Agents menu option, 3-14test execution
verifying on multiple machines, 2-10test results
evaluating, 2-11Testing Environment
defining test process, 2-6tests
executing, 2-10Text Match Fail setting, 3-38, 4-9Threshold Line settings, 6-9Throughput Required, 2-8Timing and event controls, 3-17Toolbar, 3-15, 7-1Tools menu, 3-9, 3-14Transaction Overview graph, 6-4Transactions Per Second statistics, 6-6Transactions statistics, 6-6Transactions to Perform, 2-8Transactions with Errors statistics, 6-6Trans/sec, Users vs. Time graph, 6-2TrueLoad technology, 1-2Trust Store File Name setting, 3-26Trust Store Password setting, 3-26Type of Error Handling, 2-8Type of Transaction, 2-8Type of User, 2-8Types of Business Transactions to be Simulated
defining test criteria, 2-7
UUnable to Start Agent Session, B-6Unexpected Agent Exit in the VU Grid, B-8Unexpected Script Error setting, 3-37, 4-9Unique - Stop After All Records Used setting, 3-40Unique - Stop After Last Record Used setting, 3-40Unlock Database Records menu option, 3-11Upload File menu option, 3-14Use Data Bank setting, 3-32, 4-3, 4-12Use IP Spoofing setting, 3-33, 4-4, 4-16User Agent String, 3-31User Interface refresh interval setting, 6-2Username setting, 3-25users
adding, 3-12deleting, 3-13editing, 3-12number of, 2-9types of, 2-8

Index-8
Users setting, 6-8Users Vs. Time graph, 6-1, 6-10
VValidate hostname/ip when user adds a system
setting, 3-41Validate monitors when user adds or modifies a
monitor setting, 3-41Variable Not Found setting, 3-37, 4-9View All Responses setting, 3-33, 4-4, 5-6View Run Graphs tab, 3-17, 6-4View Source toolbar button, 7-1Virtual Agent authentication, 3-26Virtual User profiles
selecting, 4-1user-defined, 1-3
Virtual User scenariosdefining, 4-1specifying profile attributes, 4-2
Virtual Usersaborting all, 5-6controlling, 5-4determining how many, 4-11modifying run attributes, 5-6pacing, 3-16pausing, 5-6releasing, 5-5selecting scenarios, 4-1specifying how many, 5-2specifying rampup, 5-2specifying start time, 5-1specifying stop time, 5-2stopping all, 5-6synchronizing start up, 5-1using the display, 7-1using the grid, 5-4verifying multiple, 2-9with Errors statistics, 6-6working with, 5-4
VU Agent System Groups, 3-18VU Agent Systems, 3-18
adding, 3-19changing port settings, 3-2
VU Displayauto display interval setting, 6-2Browser pane, 7-2downloading log files, 7-3exit codes, B-8history list, 7-2main window, 7-1menu option, 3-14opening log files, 7-3setting limits, 7-3setting options, 3-33, 4-4starting, 7-1toolbar, 7-1using, 7-1
VU Pacing (Think Time) setting, 3-32, 4-3
WWatch VU Grid tab, 3-17web server port, 3-8WebLogic, 3-21WebSphere, 3-21When Oracle Load Testing Server IP address changes
setting, 3-41When Out of Records setting, 4-14When Script Requests a Record setting, 4-13
XX-Axis Scale settings, 6-8
YY-Axis Scale settings, 6-9
ZZero Downloads Fatal setting, 3-38, 4-9Zero Length Download Errors Are Fatal
setting, 3-34, 4-5Zoom tool, 6-5, 6-13