load cel l am p l if ier hx711 b r eakou t hooku p g u id e
TRANSCRIPT
26/5/2017 Load Cell Amplifier HX711 Breakout Hookup Guide learn.sparkfun.com
https://learn.sparkfun.com/tutorials/loadcellamplifierhx711breakouthookupguide 1/8
Load Cell Amplifier HX711 Breakout Hookup Guide
CONTRIBUTORS: SARAH ALMUTLAQ, ALEX THE GIANT
FAVORITE 0
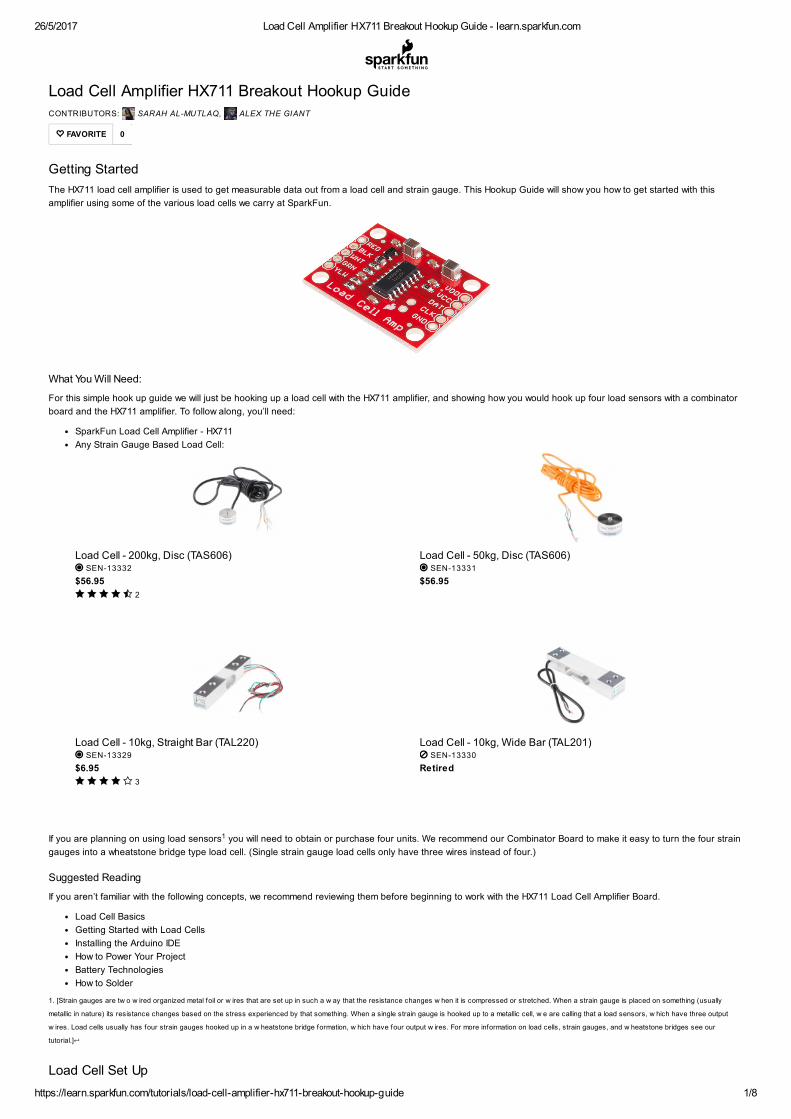
Getting StartedThe HX711 load cell amplifier is used to get measurable data out from a load cell and strain gauge. This Hookup Guide will show you how to get started with thisamplifier using some of the various load cells we carry at SparkFun.
What You Will Need:
For this simple hook up guide we will just be hooking up a load cell with the HX711 amplifier, and showing how you would hook up four load sensors with a combinatorboard and the HX711 amplifier. To follow along, you’ll need:
SparkFun Load Cell Amplifier HX711Any Strain Gauge Based Load Cell:
If you are planning on using load sensors you will need to obtain or purchase four units. We recommend our Combinator Board to make it easy to turn the four straingauges into a wheatstone bridge type load cell. (Single strain gauge load cells only have three wires instead of four.)
Suggested Reading
If you aren’t familiar with the following concepts, we recommend reviewing them before beginning to work with the HX711 Load Cell Amplifier Board.
Load Cell BasicsGetting Started with Load CellsInstalling the Arduino IDEHow to Power Your ProjectBattery TechnologiesHow to Solder
Load Cell Set Up
Load Cell 200kg, Disc (TAS606) SEN13332
$56.95 2
Load Cell 50kg, Disc (TAS606) SEN13331
$56.95
Load Cell 10kg, Straight Bar (TAL220) SEN13329
$6.95 3
Load Cell 10kg, Wide Bar (TAL201) SEN13330
Retired
1
1. [Strain gauges are tw o w ired organized metal foil or w ires that are set up in such a w ay that the resistance changes w hen it is compressed or stretched. When a strain gauge is placed on something (usually
metallic in nature) its resistance changes based on the stress experienced by that something. When a single strain gauge is hooked up to a metallic cell, w e are calling that a load sensors, w hich have three output
w ires. Load cells usually has four strain gauges hooked up in a w heatstone bridge formation, w hich have four output w ires. For more information on load cells, strain gauges, and w heatstone bridges see our
tutorial.]

26/5/2017 Load Cell Amplifier HX711 Breakout Hookup Guide learn.sparkfun.com
https://learn.sparkfun.com/tutorials/loadcellamplifierhx711breakouthookupguide 2/8
A selection of different load cells
Depending on the type of load cell you are using, the configuration of how it should be hooked up to plates or surfaces will change. Below are a few different types ofsetups.
Bar load cell between a two plate configuration
S load cell configuration
Possible four disc load cell configuration in something like a bathroom scale
Bar strain gauge based load cells
Usually with larger, nonpush button bar load cells you will want to hook up the load cell between two plates in a “Z” shape, with fitting screws and spacers so that thestrain can be correctly measured as shown below:
26/5/2017 Load Cell Amplifier HX711 Breakout Hookup Guide learn.sparkfun.com
https://learn.sparkfun.com/tutorials/loadcellamplifierhx711breakouthookupguide 3/8
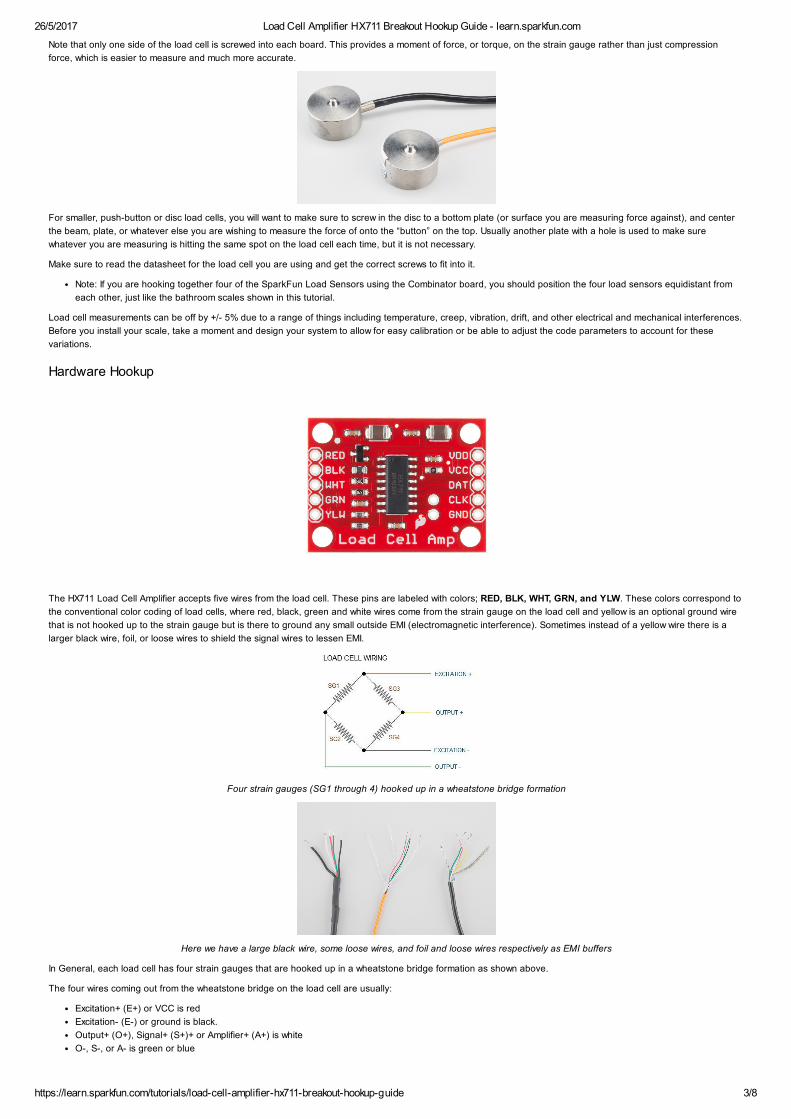
Note that only one side of the load cell is screwed into each board. This provides a moment of force, or torque, on the strain gauge rather than just compressionforce, which is easier to measure and much more accurate.
For smaller, pushbutton or disc load cells, you will want to make sure to screw in the disc to a bottom plate (or surface you are measuring force against), and centerthe beam, plate, or whatever else you are wishing to measure the force of onto the “button” on the top. Usually another plate with a hole is used to make surewhatever you are measuring is hitting the same spot on the load cell each time, but it is not necessary.
Make sure to read the datasheet for the load cell you are using and get the correct screws to fit into it.
Note: If you are hooking together four of the SparkFun Load Sensors using the Combinator board, you should position the four load sensors equidistant fromeach other, just like the bathroom scales shown in this tutorial.
Load cell measurements can be off by +/ 5% due to a range of things including temperature, creep, vibration, drift, and other electrical and mechanical interferences.Before you install your scale, take a moment and design your system to allow for easy calibration or be able to adjust the code parameters to account for thesevariations.
Hardware Hookup
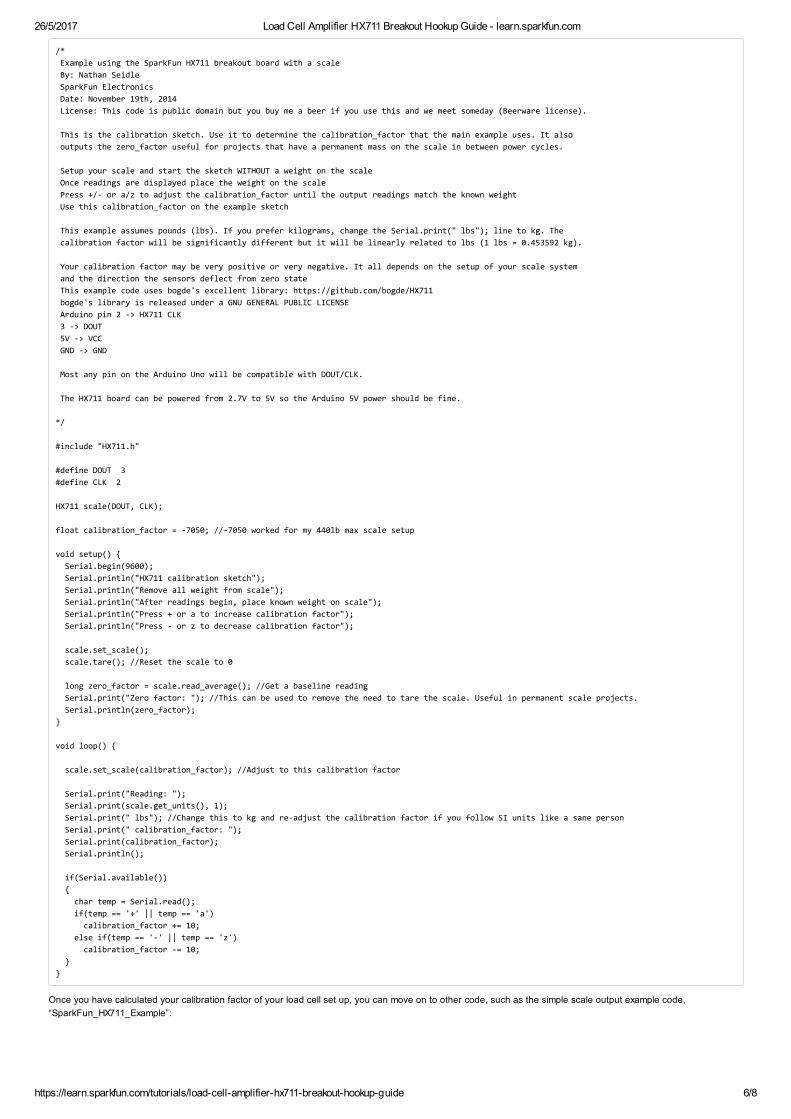
The HX711 Load Cell Amplifier accepts five wires from the load cell. These pins are labeled with colors; RED, BLK, WHT, GRN, and YLW. These colors correspond tothe conventional color coding of load cells, where red, black, green and white wires come from the strain gauge on the load cell and yellow is an optional ground wirethat is not hooked up to the strain gauge but is there to ground any small outside EMI (electromagnetic interference). Sometimes instead of a yellow wire there is alarger black wire, foil, or loose wires to shield the signal wires to lessen EMI.
Four strain gauges (SG1 through 4) hooked up in a wheatstone bridge formation
Here we have a large black wire, some loose wires, and foil and loose wires respectively as EMI buffers
In General, each load cell has four strain gauges that are hooked up in a wheatstone bridge formation as shown above.
The four wires coming out from the wheatstone bridge on the load cell are usually:
Excitation+ (E+) or VCC is redExcitation (E) or ground is black.Output+ (O+), Signal+ (S+)+ or Amplifier+ (A+) is whiteO, S, or A is green or blue

26/5/2017 Load Cell Amplifier HX711 Breakout Hookup Guide learn.sparkfun.com
https://learn.sparkfun.com/tutorials/loadcellamplifierhx711breakouthookupguide 4/8
Some load cells might have slight variations in color coding such as blue instead of green or yellow instead of black or white if there are only four wires (meaning nowire used as an EMI buffer). You might have to infer a little from the colors that you have, but in general you will usually see these colors.
If the readings from the HX711 are opposite of what you are expect (for example the values decrease as you increase weight) simply reverse the O+/O wires.
Once the load cell is is hooked up to the amplifier, you can hook up VDD, VCC, DAT, CLK, and GND to a microcontroller such as a RedBoard or Arduino board.
Note VCC is the analog voltage to power the load cell. VDD is the digital supply voltage used to set the logic level.
PRO TIP: In many cases, you can just short VCC and VDD together. If your microcontroller uses 3.3V logic however, you'll want to connect VCC to 5V and VDDto 3.3V.
Load cell wires hooked up to the HX711 Amplifier board
The example code has DAT and CLK hooked up to pin 3 and 2 respectively, but this is easily changed in the code. Any GPIO pin will work for either. Then VCC andVDD just need to be hooked up to 2.75V and GND to ground on your microcontroller.
Fritzing diagram of HX711 amplifier connected to a RedBoard
Now, if you would like to set up four single load sensors with our combinator board and amplifier, connect the five pins labeled RED, BLK, WHT, GRN, YLW on thecombinator to the matching pins on the amplifier. Next, connect each of the four load sensors to the following pins:
Load Sensor → Load Combinator BoardRed → CBlack → White → +
The combinator board also has room for an 8 pin RJ45 socket, which can be used to connect your project via Ethernet cables for long distance applications.
Another nice thing about our combinator board is that most home scales use four single strain gauge load sensors, so this is a handy board for hacking your ownscales at home!
Hacked home scale’s four load sensors hooked up to our combinator board

26/5/2017 Load Cell Amplifier HX711 Breakout Hookup Guide learn.sparkfun.com
https://learn.sparkfun.com/tutorials/loadcellamplifierhx711breakouthookupguide 5/8
Example of a single strain gauge, or load sensor. Here RED is the center tap
For load sensors, there isn’t a set color coded standard. Comparing the scale pictured above with the load sensor schematic, while the black wires matched, the redand white wires were swapped. Also, only two of the four sensors used a white wire for the ‘center tap’ of the load sensor, the other two used green. I connected theblack wires to “”, the red to “+”, and the white and green wires to “C”.
To determine how to hook up your single strain gauge load cells to the combinator, measure the resistance between the three wires. You should find a largerresistance (close to double) between a pair. In our example the resistance between red and black was 1.6 kΩ, and the resistance between white/green and red was800 Ω. Therefore, the center tap to the strain gauge is the white/green wire. The center tap or center pin of your strain gauge connects to the “C” pin on thecombinator. The larger resistance wires (red and black in this example) connect to the “+” and “” pins on the combinator.
The combinator board hooks up the four load sensors in such a way that two resistors in the wheatstone bridge configuration are constant values and the other twoare variable in this way:
To hook up the combinator board to the HX711 match the RED, BLK, WHT, and GRN pins
Once you have the combinator board successfully soldered to the twelve wires, you can now connect it to the HX711 amplifier board via the 4 standard load cell wires.You can use short jumper wires or if your electronics are a long distance away from your scale consider using an RJ45 connector and an ethernet cable to connectthe combinator to the HX711 amplifier.
Arduino CodeNow that you have your load cell, amplifier, and microcontroller hooked up, you can add your code and start calibrating your setup.
You can download the most uptodate code from the link below.
GITHUB REPOSITORY
The example code also depends on this excellent library from bogde:
HX711 LIBRARY
Note: This example assumes you are using the latest version of the Arduino IDE on your desktop. If this is your first time using Arduino, please review our tutorialon installing the Arduino IDE.If you have not previously installed an Arduino library, please check out our installation guide.
The first thing you will want to work with is the calibration code: “SparkFun_HX711_Calibration”:
26/5/2017 Load Cell Amplifier HX711 Breakout Hookup Guide learn.sparkfun.com
https://learn.sparkfun.com/tutorials/loadcellamplifierhx711breakouthookupguide 6/8
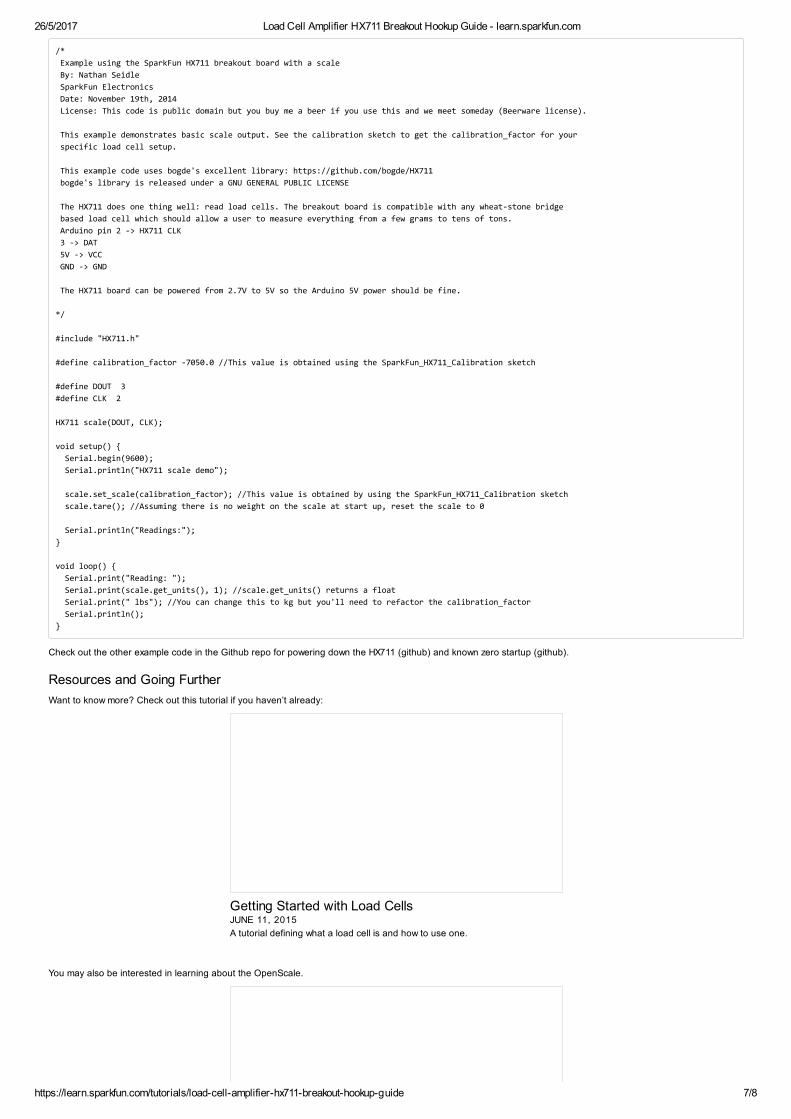
/* Example using the SparkFun HX711 breakout board with a scale By: Nathan Seidle SparkFun Electronics Date: November 19th, 2014 License: This code is public domain but you buy me a beer if you use this and we meet someday (Beerware license). This is the calibration sketch. Use it to determine the calibration_factor that the main example uses. It also outputs the zero_factor useful for projects that have a permanent mass on the scale in between power cycles. Setup your scale and start the sketch WITHOUT a weight on the scale Once readings are displayed place the weight on the scale Press +/‐ or a/z to adjust the calibration_factor until the output readings match the known weight Use this calibration_factor on the example sketch This example assumes pounds (lbs). If you prefer kilograms, change the Serial.print(" lbs"); line to kg. The calibration factor will be significantly different but it will be linearly related to lbs (1 lbs = 0.453592 kg). Your calibration factor may be very positive or very negative. It all depends on the setup of your scale system and the direction the sensors deflect from zero state This example code uses bogde's excellent library: https://github.com/bogde/HX711 bogde's library is released under a GNU GENERAL PUBLIC LICENSE Arduino pin 2 ‐> HX711 CLK 3 ‐> DOUT 5V ‐> VCC GND ‐> GND Most any pin on the Arduino Uno will be compatible with DOUT/CLK. The HX711 board can be powered from 2.7V to 5V so the Arduino 5V power should be fine. */ #include "HX711.h" #define DOUT 3 #define CLK 2 HX711 scale(DOUT, CLK); float calibration_factor = ‐7050; //‐7050 worked for my 440lb max scale setup void setup() Serial.begin(9600); Serial.println("HX711 calibration sketch"); Serial.println("Remove all weight from scale"); Serial.println("After readings begin, place known weight on scale"); Serial.println("Press + or a to increase calibration factor"); Serial.println("Press ‐ or z to decrease calibration factor"); scale.set_scale(); scale.tare(); //Reset the scale to 0 long zero_factor = scale.read_average(); //Get a baseline reading Serial.print("Zero factor: "); //This can be used to remove the need to tare the scale. Useful in permanent scale projects. Serial.println(zero_factor); void loop() scale.set_scale(calibration_factor); //Adjust to this calibration factor Serial.print("Reading: "); Serial.print(scale.get_units(), 1); Serial.print(" lbs"); //Change this to kg and re‐adjust the calibration factor if you follow SI units like a sane person Serial.print(" calibration_factor: "); Serial.print(calibration_factor); Serial.println(); if(Serial.available()) char temp = Serial.read(); if(temp == '+' || temp == 'a') calibration_factor += 10; else if(temp == '‐' || temp == 'z') calibration_factor ‐= 10;
Once you have calculated your calibration factor of your load cell set up, you can move on to other code, such as the simple scale output example code,“SparkFun_HX711_Example”:
26/5/2017 Load Cell Amplifier HX711 Breakout Hookup Guide learn.sparkfun.com
https://learn.sparkfun.com/tutorials/loadcellamplifierhx711breakouthookupguide 7/8
/* Example using the SparkFun HX711 breakout board with a scale By: Nathan Seidle SparkFun Electronics Date: November 19th, 2014 License: This code is public domain but you buy me a beer if you use this and we meet someday (Beerware license). This example demonstrates basic scale output. See the calibration sketch to get the calibration_factor for your specific load cell setup. This example code uses bogde's excellent library: https://github.com/bogde/HX711 bogde's library is released under a GNU GENERAL PUBLIC LICENSE The HX711 does one thing well: read load cells. The breakout board is compatible with any wheat‐stone bridge based load cell which should allow a user to measure everything from a few grams to tens of tons. Arduino pin 2 ‐> HX711 CLK 3 ‐> DAT 5V ‐> VCC GND ‐> GND The HX711 board can be powered from 2.7V to 5V so the Arduino 5V power should be fine. */ #include "HX711.h" #define calibration_factor ‐7050.0 //This value is obtained using the SparkFun_HX711_Calibration sketch #define DOUT 3 #define CLK 2 HX711 scale(DOUT, CLK); void setup() Serial.begin(9600); Serial.println("HX711 scale demo"); scale.set_scale(calibration_factor); //This value is obtained by using the SparkFun_HX711_Calibration sketch scale.tare(); //Assuming there is no weight on the scale at start up, reset the scale to 0 Serial.println("Readings:"); void loop() Serial.print("Reading: "); Serial.print(scale.get_units(), 1); //scale.get_units() returns a float Serial.print(" lbs"); //You can change this to kg but you'll need to refactor the calibration_factor Serial.println();
Check out the other example code in the Github repo for powering down the HX711 (github) and known zero startup (github).
Resources and Going FurtherWant to know more? Check out this tutorial if you haven’t already:
You may also be interested in learning about the OpenScale.
Getting Started with Load CellsJUNE 11, 2015A tutorial defining what a load cell is and how to use one.

26/5/2017 Load Cell Amplifier HX711 Breakout Hookup Guide learn.sparkfun.com
https://learn.sparkfun.com/tutorials/loadcellamplifierhx711breakouthookupguide 8/8
Need even more? Check out this awesome article wheatstone bridges and load cell types.
For some inspiration, check out the SparkFun IoT Beehive:
The Internet of Bees: Adding Sensors to Monitor Hive Health
And stay up to date with the OpenScale by following it on GitHub:
Internet of Bees GitHub Repository
OpenScale Applications and Hookup GuideJULY 22, 2016OpenScale allows you to have a permanent scale for industrial and biologicalapplications. Learn how to use the OpenScale board to read and configureload cells.