lner vacuum brake fitted tube wagon - jimmcgeown.com
TRANSCRIPT

LNER
Vac
uum
Bra
ke F
itted
Tub
e W
agon
Prot
otyp
e. T
his
desi
gn o
f 30
-foot
long
wag
on w
as b
uilt
by t
he
LNE
R in
the
mid
thirt
ies
for t
raffi
c in
ste
el tu
bes.
BR
con
tinue
d th
e de
sign
with
a n
umbe
r of w
agon
s la
stin
g in
to th
e 19
90’s
. K
it. T
he m
ain
cons
truct
ion
is s
traig
htfo
rwar
d bu
t the
re a
re lo
ts o
f de
tail
over
lays
for t
he h
inge
s et
c.
This
is a
goo
d ki
t for
thos
e w
ho e
njoy
etc
hed
bras
s.
Whe
els,
3’1
”, Th
ree
hole
dis
c ar
e re
quire
d to
com
plet
e (S
late
r’s
Pla
stik
ard
Cat
N
o 71
22,
Old
R
oad,
D
arle
y D
ale,
M
atlo
ck,
Der
bysh
ire, D
E4
2ER
, Tel
epho
ne 0
1629
734
053)
Jim
McG
eow
n, C
onno
isse
ur M
odel
s, 1
New
ton
Cot
tage
s,
Nr W
eobl
ey, H
eref
ords
hire
, HR
4 8Q
X, T
elep
hone
015
44 3
1826
3

GENERAL INSTRUCTIONS
Please read this section carefully, especially if this is your first etched brass kit. Many modellers fight shy of working in this medium, but the basic skills are relatively easy to acquire. Once you’ve learned how to form and solder brass, you’ll find all kinds of modelling possibilities will open up for you.
Assembling an etched kit involves exactly the same skills that a scratchbuilder uses – the only difference is that the cutting out of the parts is already done for you. Some filing and trimming will, however, be necessary from time to time. Where this is the case, I have highlighted it in the instructions.
The main skill to master is soldering and I would recommend a Weller 40 Watt soldering iron. This has a 6mm diameter, removable copper bit. The bit is shaped like a screwdriver and has a bright coating of solder (tinned). This combination of iron and bit shape is ideal for running fillet joints and has a good reserve of heat, that is necessary for soldering small parts on to large components. Note the shape and condition of a new bit, as this won’t last long and will need restoring back to this condition.
It is important to keep the bit clean and in good condition as you work. Get a soldering iron stand containing a damp sponge; old oxidized solder is wiped off on this before picking up fresh solder for each joint. If you haven’t made a joint for some time you may find that a hard black crust has formed on the bit. Remove this with a brass wire brush (suede brush) and then feed some multicore solder onto each side of the bit to restore a bright surface (referred to as wetting or tinning the bit). After about 8 hours use you will find the bit is in poor condition, with holes and a ragged edge. File the bit back to its original shape using a hand bastard file and then polish the surfaces on emery cloth. Coat the bit with Fluxite Soldering Paste (traditionally used by plumbers) and this will prevent the bare copper oxidizing as the iron heats up. Then feed multicore solder onto the bit to form a generous coating and leave to bubble away for a couple of minutes before wiping excess off to give a bit almost as good as new.
A smaller Antex 25 Watt iron with a 3.2mm screwdriver bit is very useful for small assemblies and detail work such as handrails, but will have insufficient heat reserve for main assembly work. The Antex has a plated iron bit, after a little use with 145° solder a grey oxide appears on the bit that will prevent you from picking up the solder. Touch the bit to some multicore solder and it will flash over the bit, wetting it so that you can continue picking up 145° solder. I have found no problems with mixing the two solders in this way.
I use 145° solder for virtually all assembly work. I prefer it in wire form, available from Branchlines, but it is also produced in stick form by Carrs. I find that its lower working temperature helps to give a quick clean joint. Limiting the build up of heat in components, which may cause distortion. I find that I can hold parts together with my finger ends and make a joint before heat reaches my fingers or other etched parts drop off.
I use 60/40, tin/lead, fluxed multicore electrical solder (melting point about 190°) mainly to keep the iron bits in good condition. As it gives a slightly stronger joint than 145° I sometimes use it for small spot joints on handrail wire, lamp brackets etc, but still use extra liquid flux.
For all brass and nickel silver work I use Carrs green label liquid flux. You will soon get the feel for how much to use but more problems are caused by too little flux than too much.
Before soldering components together, thoroughly clean both surfaces along the join line with a glass fibre burnishing brush. Using your tweezers or a knife blade etc, hold the parts together in the correct position and, with an old paintbrush, run some flux along the area to be joined. Still keeping the parts correctly aligned, pick up a small quantity of solder on the tip of your iron and carry it to the joint (unlike electrical soldering, when you feed solder into the joint). Hold the iron against the joint just long enough for the solder to flash between the parts. Don’t let go of the parts until the solder has cooled – this takes from five to ten seconds. To run a fillet of solder along a joint, wait until the solder flashes between the parts and then pull the molten solder along
Page 2

the joint with the iron tip. Don’t load the iron tip with a lot of extra solder, but work the joint in 1” lengths, bringing in small quantities of solder. Brass is a very forgiving material and if you get something out of alignment, use heat from the iron to desolder the joint before starting again. For complicated assemblies, it is a good idea to only tack solder parts together. You can then make adjustments by desoldering until you are happy with the location of parts and then solder solid.
When you need to laminate two or more layers of brass together, align the parts and carefully clamp them together, either in the vice or by holding them with miniature crocodile clips. Run flux around the edges, and then go around with the soldering iron. Clean up thoroughly afterwards.
To fit small parts and overlays on to a larger assembly, such as strapping to a wagon side, when you need to prevent finely detailed areas such as planking becoming clogged up with solder. Tin the back of the small component first, then hold in place on the model and apply flux. Carefully wipe the tip of your iron on a sponge to remove any solder from it (dry iron), and then touch it against the parts to be joined. After a few seconds you’ll see molten solder bubbling from the edges. Remove the iron, still holding the parts in place, and allow the joint to cool. An alternative is to use solder paint (I would recommend Carrs 188 solder paste). As the name suggests, this is a flux and solder in one. Simply apply a thin coat of solder paint to the back of the component instead of tinning. Still apply a small amount of liquid flux before you solder the part into place.
Any surplus solder should be removed using a craft knife, I find No 10 curved scalpel blades ideal, then burnish clean with a glass fibre brush. With practice, you’ll learn how to use the minimum amount of solder to do the job. Flux is corrosive so, after each soldering session, give your model a good scrub with washing up liquid or Jif. After a day or two, any remaining flux residues will show as a green film, which should be washed away.
To cut parts from the fret, use a sharp Stanley knife on a piece of hardboard or a pointed scalpel blade on a block of softwood. Remove tags and burrs with a fine file.
Three-dimensional parts are formed by folding. On an etched brass kit, the fold lines are normally half-etched on the inside of the fold. You’ll be able to fold most parts using smooth-jawed pliers. For longer parts folding bars are desirable.
Other useful tools include a bench vice, a good pair of tweezers, a set of Swiss files (get a full set of cheap ones and then buy quality replacements for the three that you use the most), a pin vice with a selection of drills from 0.5mm to 2.1mm plus a few larger sizes that you use regularly (2.6mm for axle bearings etc), some square-nosed pliers and some very pointed-nosed ones, preferably with smooth jaws. Buy cheap tools first and duplicate the most used ones with quality.
Try to complete all high-temperature soldering before attaching any of the cast whitemetal parts. These can be attached with two-part epoxy resin such as Devcon or Araldite Rapid. Ensure the surfaces to be glued are clean and free of grease.
A better alternative is to solder your white metal castings using Carrs 70 degree low melt solder and Carrs red label white metal flux. The iron should be run at a much lower heat so that you do not melt the castings. I have a domestic light dimmer switch and plug socket fixed to a piece of wood, wired up with a lead and 3 amp mains plug to the input side of the dimmer switch and the output of the dimmer switch into the plug socket (remember to continue the earth). Plug your 40 Watt iron (25 Watt iron won’t work) with a clean and freshly tinned bit into this and experiment with adjusting the switch until you find the range of temperature at which the solder melts, but a scrap casting does not. Note as the iron is running at a lower voltage it will take longer to heat up, so when you think the adjustment is correct do check a few minutes later on another scrap casting to see that it doesn't melt. Then scribe a mark on the switch knob to indicate this position.
When attaching white metal fittings to brass the surface of the brass must be tinned with 145° solder, to allow the solder to grip. The surface of the casting at the joint should be burnished bright. The casting can then be soldered into place with 70° solder and fillets of solder run into any gaps with no risk of melting the casting.
Page 3

Page 4
Live
ry.
Bod
ywor
k -
red
oxid
e. S
oleb
ars,
run
ning
gea
r an
d bu
ffer
beam
s -
blac
k. In
side
woo
dwor
k -
dirty
woo
d (H
umbr
ol N
o110
). Le
tterin
g - w
hite
. R
efer
ence
s. A
pic
toria
l rec
ord
of L
NE
R W
agon
s, P
eter
Ta
tlow
, OP
C, I
SB
N 0
-928
88-9
2-7.
Tra
nsfe
rs f
or L
NE
R &
BR
let
terin
g ar
e av
aila
ble
from
the
His
toric
al
Mod
el R
ailw
ay S
ocie
ty,
Bria
n W
ebb
(vol
unte
er s
ales
0ffi
cer)
, 8
Gilp
in
Gre
en,
Har
pend
en,
Her
ts A
L5 5
NR
(S
AE
for
lis
t &
ord
er f
orm
, ht
tp://
ww
w.h
mrs
.org
.uk/
trans
fers
/list
.php
) or
st
ocke
d by
so
me
spec
ialis
t re
taile
rs.
Thes
e ar
e P
ress
fix t
ype
and
you
will
requ
ire s
heet
12
LNE
R
good
s ve
hicl
es o
r she
et 2
5 B
R re
venu
e w
agon
.

Page 5
LNER Fitted Tube Wagon Etched Parts Identification
Please Note. The following exploded drawings were prepared for the pipe wagon kit. They accurately show construction method but may not exactly match the parts you are using (all the tube wagon parts are longer).

Page 6
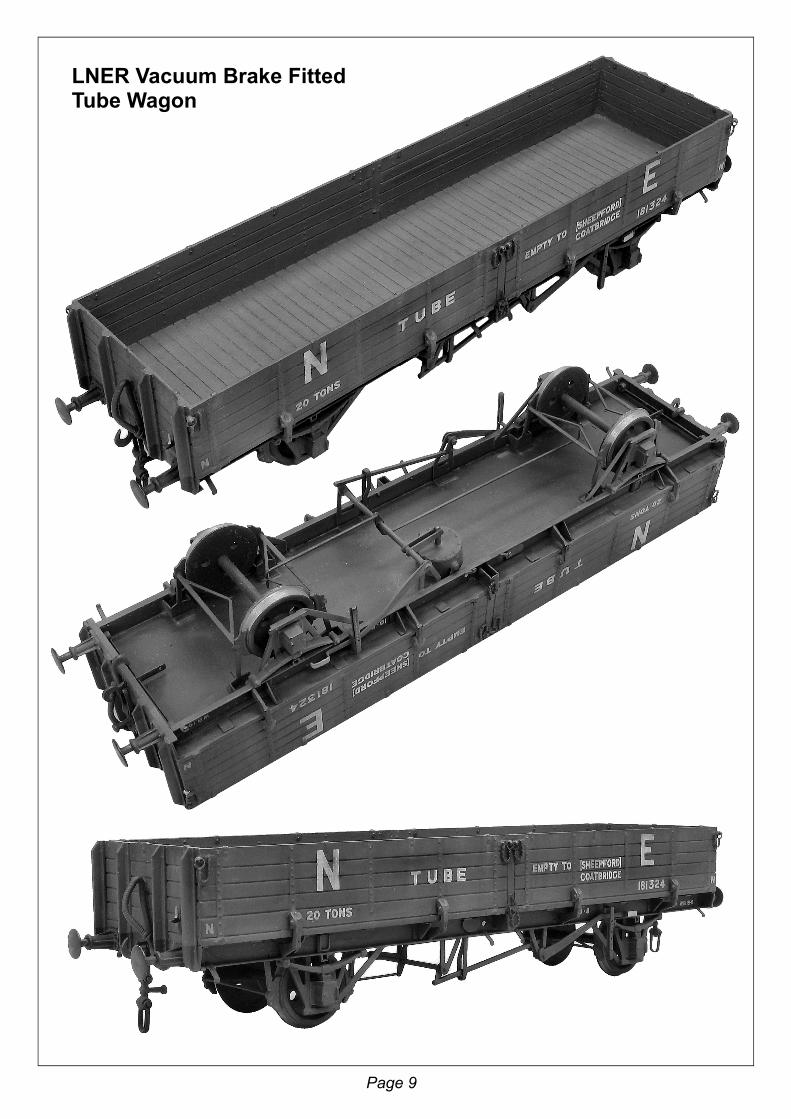
LNER Vacuum Brake Fitted Tube Wagon

Page 7

Page 8
LNER Fitted Tube Wagon Parts Identification and Suggested
Assembly Order
1. Emboss inside rivet detail and fold up the main body (part 1). Then solder the four corners solid. Laminate the sides (parts 2) and ends (parts 3) to the main body. Now fit the hinge and strapping detail (parts A, B, C, D, E & F) to the body sides (note etched marks to help with component location).
2. Emboss rivet detail and fold up buffer beams (parts 4). Fit to underside of body and then fit coupling plate (part 5).
3. Emboss rivet detail on solebars (parts 6) and then fold up. Detail solebar by fitting triangular brackets (parts 7 note embossed rivets required), bolted strips (parts G note etched location marks), door spring stops (parts H fit into holes), axlebox stops (parts J fit into half etch rebates) and bolted plates (parts K fit level with end of solebar). Now fit solebar to underside of body (note etched marks on underside of floor to help with location of solebar rear face). Fold up and fit (part 8) and then bolted plates (parts L).
4. Fold up and fit to the floor underside two vee hangers (parts 9) at the vac cylinder end of the wagon (note etched marks for positioning). Laminate the two parts of the cross link (parts 10) together. Then use this to position the third vee hanger. Now fit parts, 11, 12, 13 & 14 as shown in the diagram (note cast vac cylinder sits at a slight angle).
5. Fold up brake pin guide (part 15 note bottom fold is a curved bend) and then fit to solebar. Bend the brake lever (part 16) as shown in the diagram (note etched dots to help determine the position of bends). Then fit into pin guide and over brass rod. Fit lamp brackets (parts 17).
6. Tack solder two axleguards to one solebar (note etched centre lines to help). Fit wheelsets and second set of axleguards to other solebar (check axles are parallel). Place on a flat surface and adjust until wagon sits without rocking. When happy solder solid.
7. Laminate the two parts of the brake hangers together (parts 18). Then fold up and fit to the floor to line up with the wheels. Spring brake yokes (parts 19) between brake hangers. Make brake pull rods from 0.7mm brass wire.
8. Drill out buffers to accept spindle. Fit collar to end and fit into buffer beam. Make up coupling hooks then fit into slots in buffer beam and retain with spring wire. Fit remaining castings with reference to the drawings and photographs.
9. Fold up and fit axleguard bracing stays (parts 20) so that they fit behind the cast axleguard and run at an angle up to the back face of the solebar.
10. You may wish to represent the side securing pins and retaining chain using soft wire.
To Make Side Chains
Use soft wire and form ring around drill shank.
Then twist wire together.
Then form to shape and fit to wagon
Note cast door controllers
Page 9
LNER Vacuum Brake Fitted Tube Wagon