lms_manual_v_1
DESCRIPTION
Laboratory Management SystemTRANSCRIPT

Geological Survey of India
Manual prepared by S. Chattopadhyay, Geologist Sr. Geodata Division, CHQ, Kolkata
USER MANUAL
LABORATORY MANAGEMENT SYSTEM
Version I
2009

Geological Survey of India
Manual prepared by S. Chattopadhyay, Geologist Sr. Geodata Division, CHQ, Kolkata
LABORATORY MANAGEMENT SYSTEM This module captures the entire workflow of the laboratories which handle samples. The labs covered by LMS are :
1. Geochemical (Geo Chem) 2. Geotechnical (Geo Tech) 3. Geophysics (Geophysics) 4. Geochronology and Isotope Geology (GIG) 5. EPMA 6. Gem testing (Gem) 7. SEM-EDX 8. Petrology 9. Palaeontology (Paleontology) 10. Mineral Physics 11. Coal Petrology
LMS handles basically 3 types of samples :
1. Internal – those generated from FSP and comes through item execution menu of FSP (Forward Sample to Lab)
2. Commercial – those samples received directly by Labs from Private parties and analysed on payment basis
3. Assistance – Special Cases of outside samples where charges are waived (from University students/other Government Departments etc).
The general work flow is as follows :
Receiving of samples in Lab X by the Lab
Director
Allotment to Lab
Analyst
Data Entry by Lab Analyst
Test Finish by Lab
Director
Normal workflow as above Diversion to Lab Y
Returned to sender
Rejected
Report

Geological Survey of India
Manual prepared by S. Chattopadhyay, Geologist Sr. Geodata Division, CHQ, Kolkata
The General Menu of LMS is as follows
The full menu of LMS may be reconstructed as below
1. Workflow in GGeeoocchheemmiiccaall Laboratory - Commercial/Assistance Samples 1a) Receiving Samples : Geochemical Only a Lab Director can receive samples.
The Menu Receive Commercial �Geochemical Opens a Search Screen to search/check whether the particular sample/batch of samples has/have already been entered. If not, the Director clicks the Add Record button and the screen RECEIVE COMMERCIAL/ ASSISTANCE SAMPLES opens.

Geological Survey of India
Manual prepared by S. Chattopadhyay, Geologist Sr. Geodata Division, CHQ, Kolkata
1. SITE ID – particular Lab site to be selected from the Organogram Tree by clicking the search button next to the field. Mandatory
2. Lab Director’s Note – Lab Director may add a note here. Optional 3. Approving Authority – The approving authority (DDG/HOD etc) to be typed here. Mandatory. 4. Date of Approval – To be selected from the calendar. Mandatory.

Geological Survey of India
Manual prepared by S. Chattopadhyay, Geologist Sr. Geodata Division, CHQ, Kolkata
5. Ref. No. – Reference Number of the letter approving the particular sample. To be typed. Mandatory.
6. Nature of sample – To be selected from the Dropdown Menu. Options are : Bedrock, Soil, Stream s Sediment, Water, Gas. Mandatory.
7. Suggested Analysis Method – To be selected from the dropdown menu as per the requirement of the Sender of the samples. Optional.
8. Adopted Analysis Method – To be selected from dropdown menu as per the availability/ suitability of the instruments. Optional.
9. Mode of Collection - To be selected from the dropdown list. Optional. 10. Target Date – Date by which the analysis is required by the sender. To be selected from
Calendar. Optional. 11. Determinant – On clicking the search button at the right hand side of the field, a Look up
Table opens. Required elements/radicals are to be selected from that LUT by ticking the radio buttons and then clicking Select and then Done. On clicking the Done button, the LUT closes and the values thus selected are indicated in the field. Mandatory.
12. Media of Sampling – To be selected from the dropdown list. Optional. 13. Powdered Sample – To be selected from one of the two radio buttons, Yes or No. Optional. 14. Mesh Size – If the sample is powdered, the particular size (American Scientific Test Mesh
unit) is to be indicated. Optional. 15. Field Location – The location from which the sample has been collected. To be typed.
Optional. 16. Block – The particular Block in the field from which the sample has been collected. Used
mainly in case of Drill core Samples. To be typed. Optional. 17. Bore Hole No – If the sample is Drill Core sample, this may be typed. Optional. 18. Money Receipt No – To be filled up in case TR5 No is not available. Optional. 19. Amount – The amount of basic charges. In case of Assistance samples, the field remains
disabled. Mandatory. 20. Tax – the rate of tax percentage to be entered here. Optional. 21. Mode of Payment – To be selected from the dropdown list. Options are Cheque, Draft and
Cash. Mandatory. 22. Bank Name – In case of Cheque or Draft, Bank’s Name is to be entered here. Optional. 23. Draft/Cheque No – To be typed . Optional. 24. Draft/Cheque Date – To be selected from the Calendar. Optional. 25. Branch – Branch of the Bank pertaining to Draft/cheque to be typed. Optional. 26. Indenter’s Name – Name of the Indenter of the sample. Mandatory. 27. Phone No – Phone No of the indenter. Optional. 28. Fax No – Fax No of the indenter. Optional. 29. Address – Address of the Indenter. To be typed. Mandatory. 30. Email – E Mail ID of the Indenter. To be typed. Optional.
When all the details of RECEIVE COMMERCIAL/ ASSISTANCE SAMPLES screen is filled up, the
Save button at the top left corner is pressed to save the sample/batch of samples details. On saving this data successfully, a unique Reference ID is generated, which should be noted for future reference. Moreover, the 2 of the 4 buttons become enabled, namely, Add Record and Receive. However, the sample/ batch of samples are not yet ready to be received by the lab (and hence on clicking the Receive button at this stage, an error message will be displayed) because uptil now, the individual sample details have not been filled up. To enter the sample details, the Lab Director now presses the Add Record button at the bottom of the screen that opens another screen Sample Details Screen.

Geological Survey of India
Manual prepared by S. Chattopadhyay, Geologist Sr. Geodata Division, CHQ, Kolkata
1. Sample No – The individual sample number to be typed here. Mandatory. 2. Priority – Priority of the particular sample to be selected from a dropdown list; there are two
options – normal and urgent. Mandatory. 3. Rock Type – To be selected here from a dropdown list; options are Igneous, Sedimentary,
Metamorphic and Unclassified. Optional. 4. Condition of the samples - To be selected from a dropdown list; options are Very Good,
Good, Moderate and Bad. Optional. 5. Formation – Stratigraphic Position of the bed from which the sample has been collected.
Optional. 6. Depth Range – Position of the sample in the drill core, in case of Borehole samples.
Optional. 7. Status – the status of the sample. If everything is acceptable, the status should be selected
as Received. Mandatory. 8. Remarks – Remarks, if any, to be entered here. Optional. 9. Lower Detection Limit – Lower Detection Limit of the Instrument/method. Optional.
Once all the above details are filled up, it may be saved, and the Lab Director may exit from the screen. The sample is now available in the sample details part of RECEIVE COMMERCIAL/ ASSISTANCE SAMPLES. If more samples are to be added under the same batch, the Add Record button may be used as many times. Once every detail of sample batch and samples have been duly entered, the Lab director receives the sample by pressing the Receive button. The message displayed is “The samples has been successfully received.” 1b) Allotment of Samples : Geochemical After receiving the samples, the Lab Director allots the samples to one or more Lab Analysts. The whole sample/batch of sample may be allotted to one Lab Analysts or different persons may be allocated different samples or even different determinants. To allot samples to the Lab Director now selects the Allotment �Geochemical Menu, which opens the following search screen

Geological Survey of India
Manual prepared by S. Chattopadhyay, Geologist Sr. Geodata Division, CHQ, Kolkata
The Options for the Search Screen are Lab No that can be searched from a look up table, Received Date that can be selected from a calendar and Reference ID that can be searched from a LUT. Since the unique Reference ID is already known, the sample/batch of samples can be found by a simple search. Even if it is not known, a blank search would display all the samples received by the Lab.
On selecting the Reference ID, the LUT disappears and the Screen shows the Reference ID and Lab No. as below

Geological Survey of India
Manual prepared by S. Chattopadhyay, Geologist Sr. Geodata Division, CHQ, Kolkata
The Search button at the top left hand corner is now pressed to select the sample and the View Record Button is pressed as below :
The Allotment Screen for this particular sample/batch of samples is now open To allocate a sample/part of a sample to a particular officer, the Add Record button is now pressed.
The Allotment Details Screen now opens as below

Geological Survey of India
Manual prepared by S. Chattopadhyay, Geologist Sr. Geodata Division, CHQ, Kolkata
1. Lab Lot – For Batch of samples. Lab Director to type a, b, c, etc. Mandatory 2.&3.Serial No. from / Serial No. to – Number from which to which to be allotted to a particular
officer. Mandatory 4. Allotted to – The search button at the RHS opens a LUT that displays the entire list of
subordinate officers under the Lab Director, from which he can select one. Mandatory 5. Allotment Date – The Date on which the sample is allotted. Normally the sam day, but could
be different depending on the circumstances. To be selected from the Calendar. Mandatory 6. Target Date – By which date the analysis should be complete. Must be a future date from the
Allotment date. To be selected from the Calendar. Mandatory 7. Analysis Method – to be selected from a Dropdown menu. Mandatory 8. Determinant – To be selected from a Look up table as before. Mandatory 9. Instrument - To be selected from a Look up table as before. Optional
Once the information in this screen is duly filled up, the data is saved and the Notify Analyst button becomes enabled. Pressing the button will generate a notification message, that is automatically delivered to the Lab Analyst. 1c) Data Entry : Geochemical Lab Analyst logs on to portal and Goes to Transactional Application � Employee Self Service � Work List � My Work List � selects Pending Notification in Status � Search. This action will return the Notifications he has received from different sources. He selects the Notification from the Lab Director and notes the Reference ID. He then Goes to Transactional Application � LMS � Data Entry � Geochemical to open the ANALYTICA DATA ENTRY – GEOCHEMICAL screen

Geological Survey of India
Manual prepared by S. Chattopadhyay, Geologist Sr. Geodata Division, CHQ, Kolkata
With the help of already known Reference ID the Lab Analyst now searches and finds the sample, and analyse it in the Lab. He then selects it again in the same screen and presses View Record button.
1. Radio Button – Select it to make the row enabled for data entry. Mandatory 2. Detection Limit – Choose from Drop Down; choices are Exact value, Lower Detection Limit,
Upper Detection Limit, Traces. Optional. 3. Report Value – Analysis results, when the samples is analysed to have certain exact value
Mandatory 4. UoM – Unit of Measurement. Select from the dropdown; options are ppm, ppb, %, Ratio.
Mandatory After the data entry is complete, the Lab Analyst saves the data to complete his/her job. The Lab Director logs in and with the help of Reference ID finds and checks the data. If the results are satisfactory, he locks the result by pressing the Test Finished button. The workflow is now complete. 1d) Report : Geochemical Only the Lab Analysts and Lab Director are authorized to generate the report. To generate a report, Lab Director goes to LMS � Report � Geochemical. A menu will open with 5 options – Common, NGCM Report, Sophisticated Instrument, Monthly and Quarterly.

Geological Survey of India
Manual prepared by S. Chattopadhyay, Geologist Sr. Geodata Division, CHQ, Kolkata
For data entry report, Common is selected and the GENERATE REPORT screen opens
1. Laboratory Name – To be selected from a Look Up Table 2. Report name – To be selected from a Look Up Table 3. Reference ID – To be selected by Search 4. Lab No – Automatically gets populated as soon as Reference ID is selected. However, one
can select it if known. After selecting the necessary criteria, the Generate Report button is pressed to generate the relevant report is standard GSI report proforma in .pdf format.

Geological Survey of India
Manual prepared by S. Chattopadhyay, Geologist Sr. Geodata Division, CHQ, Kolkata
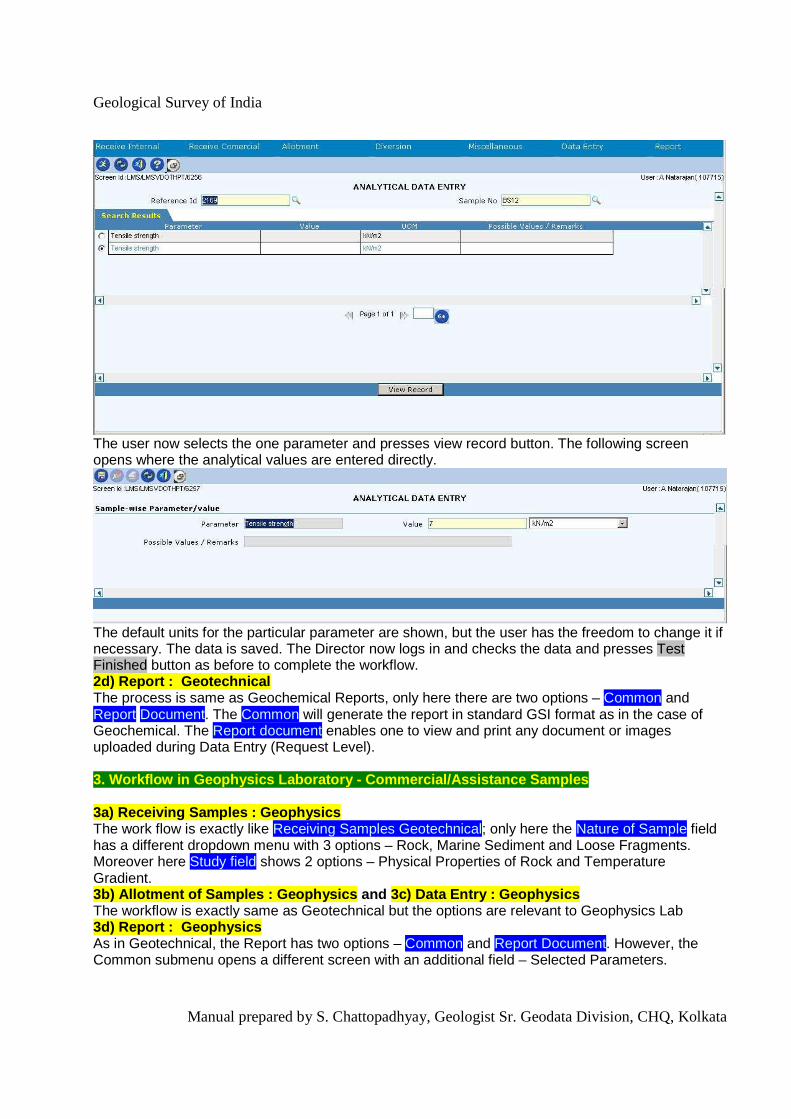
2. Workflow in Geotechnical Laboratory - Commercial/Assistance Samples 2a) Receiving Samples : Geotechnical The work flow is exactly like Receiving Samples Geochemical; only here the Nature of Sample field has a different dropdown menu with 10 options – Disturbed Soil, Undisturbed Soil, Regular Rock, Irregular Rock, Rock Core, Coarse Aggregate, Fine Aggregate, Rock Bulk, Core Disturbed, Core Undisturbed. Moreover here Study field shows 4 options – Soil Test, Rock Test, Coarse Aggregate Test and Fine Aggregate Test. 2b) Allotment of Samples : Geotechnical The work flow is exactly like Allotment Samples Geochemical; only here the Instrument field in ALLOTMENT DETAILS screen has a different dropdown with relevant list of the instruments to choose from. 2c) Data Entry : Geotechnical Here the Data entry is done at 2 levels – Request level Data and Consolidated Data. First the lab Analyst goes to Request level data and finds his desired sample with the help of Reference ID. The View Record button opens the following screen
1. Test Method – Select from the dropdown. Mandatory. 2. Upload – to upload any document/image related to the data entry. Clicking this button will
open a browser, the user can browse and select his desired file and then upload it to portal 3. View – to view the uploaded file 4. Select parameter – once the data entry in this screen is complete, the user presses this
button which opens a LUT showing relevant parameters. These parameters can be selected by ticking in the radio-buttons provided against each. Once the parameters are selected, the user presses the Done button and the LUT automatically closes.
Next the User goes to Consolidated data. It opens with a search screen with 2 mandatory fields, Reference ID and Sample No. Both these fields are to be filled up with the help of LUTs. Now on clicking the Search button the CONSOLIDATED DATA ENTRY screen opens – displaying the already selected Parameters in REQUEST LEVEL DATA ENTRY screen above.
Geological Survey of India
Manual prepared by S. Chattopadhyay, Geologist Sr. Geodata Division, CHQ, Kolkata
The user now selects the one parameter and presses view record button. The following screen opens where the analytical values are entered directly.
The default units for the particular parameter are shown, but the user has the freedom to change it if necessary. The data is saved. The Director now logs in and checks the data and presses Test Finished button as before to complete the workflow. 2d) Report : Geotechnical The process is same as Geochemical Reports, only here there are two options – Common and Report Document. The Common will generate the report in standard GSI format as in the case of Geochemical. The Report document enables one to view and print any document or images uploaded during Data Entry (Request Level). 3. Workflow in Geophysics Laboratory - Commercial/Assistance Samples 3a) Receiving Samples : Geophysics The work flow is exactly like Receiving Samples Geotechnical; only here the Nature of Sample field has a different dropdown menu with 3 options – Rock, Marine Sediment and Loose Fragments. Moreover here Study field shows 2 options – Physical Properties of Rock and Temperature Gradient. 3b) Allotment of Samples : Geophysics and 3c) Data Entry : Geophysics The workflow is exactly same as Geotechnical but the options are relevant to Geophysics Lab 3d) Report : Geophysics As in Geotechnical, the Report has two options – Common and Report Document. However, the Common submenu opens a different screen with an additional field – Selected Parameters.

Geological Survey of India
Manual prepared by S. Chattopadhyay, Geologist Sr. Geodata Division, CHQ, Kolkata
1 to 4 as before, the user will search and find (type in case of 3) Selected Parameters – On clicking the button, the following screen opens
1. Parameters – Select relevant parameters one by one 2. Right – takes the Parameter Selected from Left Pane to Right Pane 3. Left – Opposite of Right, done if one Parameter is wrongly taken to right 4. All right – takes all the Parameters to Right at one go. 5. All left – to undo the above process (4). 6. Up – Arranges the Parameter(s) within the list so the User gets his desired report 7. Down – Opposite process of above (6) 8. Done – when every Parameter is satisfactorily selected and arranged 9. Exit – Takes one to the original screen.
Now the user clicks the Button to generate the report 4. Workflow in GIG Laboratory - Commercial/Assistance Samples Workflow of Receiving Samples in Geochronology and Isotope Geology Lab follows the same pattern, only the nature of Samples and Study vary, as relevant to the laboratory. Data entry process is also similar, only the Lab Specific Info part in Request Level data entry screen is enabled with 3

Geological Survey of India
Manual prepared by S. Chattopadhyay, Geologist Sr. Geodata Division, CHQ, Kolkata
Optional fields – Age, No. of Electron Micrographs and No. of Micro Analysis Location/Spot, which the user may fill up by typing. 5. Workflow in EPMA Laboratory - Commercial/Assistance Samples Workflow of Receiving Samples in EPMA Lab follows the same pattern, only the nature of Samples and Study vary, as relevant to the laboratory. In Allotment screen, however, there are two additional fields depicting time schedule [from ---- Hr to ---- Hr, in 24-Hour Format]. Although most of the data/results of EPMA analysis is machine generated and hence to be uploaded directly, there is still the provision for Parameter Selection and corresponding data entry. The parameters available are – No of samples, No of Points analysed, No. of BSE images, Elements Analysed, Rock Types Analysed, Mineral Analysed, Automode/Manual, Sample Condition. This will be available in Standard Report format on clicking Report � Common.
6. Workflow in Gem Testing Laboratory - Commercial/Assistance Samples Workflow of Receiving Samples in EPMA Lab follows the same pattern generally. However, Gem has some variation from the other labs as mentioned below.

Geological Survey of India
Manual prepared by S. Chattopadhyay, Geologist Sr. Geodata Division, CHQ, Kolkata
1. The samples received normally, but on successful receiving of a sample, a new button Receipt becomes enabled. Clicking this button will generate a receipt as per the standard GTL format so that it can be signed and handed over to the Indenter as a receipt for the gem.
2. After receiving the sample successfully, there is no provision for allotment and any Lab Analyst or even the Director can do the data entry directly.
3. There is no dual level entry of data – instead a single data entry screen called Gem Detail accommodates all the data as shown below :
1. Mineral – To be selected from a list of 1225 minerals available in LUT. 2. Description – Already defined during receipt. However it can be changed here in case some
error is detected. Mandatory. 3. Weight – Already defined during receipt. However it can be changed here in case some error
is detected. Mandatory. 4. Colour - Already defined during receipt. However it can be changed here in case some error
is detected. Mandatory. 5. Lustre – to be typed. Optional 6-8 Length, Width, Thickness – may be defined here. Optional 10. Transparency – to be selected from a dropdown. Mandatory 11. Specific Gravity – To be typed. Optional. 12. Refractive Index - To be typed. Optional. 13. Pleochroism – to be selected from a dropdown menu. Mandatory. 14. Growth Lines - to be selected from a dropdown menu. Mandatory. 15. Inclusions – to be described here; can accommodate up to 200 characters. Optional 16. Luminescence - To be typed. Optional. 17. Other Characteristics – to be described here; can accommodate up to 200 characters.
Optional 18. Natural/Synthetic – to be defined here from a dropdown. Mandatory. 19. Identified by – Name of the analyst. Mandatory. 20. Remarks – Remarks to be described here. Mandatory 21. Basic charge – Basic charge for the particular gem. Mandatory. 22. Name of the mineral/Gem – to be typed here. Optional. 23. Status of the gem sample – to be selected from the dropdown list. Mandatory.

Geological Survey of India
Manual prepared by S. Chattopadhyay, Geologist Sr. Geodata Division, CHQ, Kolkata
If there is a photo of the gem, it will be uploaded in the Data entry screen using Upload button. Once all the data is duly entered and saved, and all the files uploaded, the Director presses the button Test Finished. The workflow is complete now. 6d) Report : Gem GTL has 5 different types of reports :- Mineralogical Report, Monthly Report, Mineral Summary, Collection Detail, Gem Image. Mineralogical Report Like any other Lab Report, this is generated by searching with the help of the same options. Monthly report The search input screen for this report is as below
The user selects the month from and month to of certain years and the Lab name. It returns a month-wise report as below :
Mineral Summary The search input screen for this report is as below
The Search options are Lab name, From Date, To Date, Identified by, Mineral and Natural/Synthetic. A search would generate the following report :

Geological Survey of India
Manual prepared by S. Chattopadhyay, Geologist Sr. Geodata Division, CHQ, Kolkata
Collection Detail The search input screen for this report is as below :
The user selects the Start Date, End date and the Lab name. It returns a consolidated report as below :
Gem Image The search input screen for this report is as below :

Geological Survey of India
Manual prepared by S. Chattopadhyay, Geologist Sr. Geodata Division, CHQ, Kolkata
On selecting the proper Reference Id for which the image has been uploaded, the report returns the image of the gem. This image can be printed and supplied to the Indenter. 7. Workflow in SEM-EDX Laboratory - Commercial/Assistance Samples Workflow of Receiving Samples in SEM-EDX Lab follows the same pattern, only the nature of Samples and Study vary, as relevant to the laboratory. The process of Allotment of Samples is also exactly the same as in other laboratories. Similarly the Data Entry procedure is also in two levels – Request level data and consolidated data, with parameter selection facility. Reports are also similar. 8. Workflow in Palaeontology Laboratory - Commercial/Assistance Samples Workflow for sample receiving is a bit different in case of Palaeontology Laboratory. Since there is no batch of samples, the samples are received one at a time using a single screen as below :
Here, instead of adding Sample Details record separately, the screen captures all the relevant information. Accordingly, a Sample No field is available, as marked by red box in the above screen shot. Accordingly, the Allotment is also done in one level and the Lab Director can allocate the samples directly. The Data Entry procedure is also done in two levels – Request level data and

Geological Survey of India
Manual prepared by S. Chattopadhyay, Geologist Sr. Geodata Division, CHQ, Kolkata
consolidated data, with uploading facility. Although, there is provision for parameter selection, no parameter-entry has been requested yet and hence there is no Common report. Only the uploaded file can be viewed through Report Document submenu of Report. 9. Workflow in Petrology Laboratory - Commercial/Assistance Samples Workflow is similar to that of Palaeontology Laboratory 10. Workflow in Mineral Physics Laboratory - Commercial/Assistance Samples Workflow is similar to that of GIG Laboratory 11) Workflow in Coal Petrology Laboratory - Commercial/Assistance Samples Workflow is similar to that of GIG Laboratory INTERNAL SAMPLES Workflow for internal samples is similar to that of commercial samples. However, Internal Samples can only be generated from FSP (FSP � Item Execution �Forward Samples to Labs). But the sample(s) has to be entered in the Field Diary first. Once the samples are forwarded to a particular lab, The Lab Director gets a Notification message along with the Reference ID (Employee Self Service � Pending Notification � Search). The Lab Director goes to Receive Internal and with the help of that Reference ID, searches and finds the sample/batch of samples. It may be noted that most of the information about the samples are already filled up and Lab Director can receive it directly. The rest of the workflow (allotment – data entry – report) follows the same pattern as in case of Commercial Samples.