lc deploy clientsdev
TRANSCRIPT

Microsoft Lync Server 2010 Client and Device Deployment Guide
Microsoft Lync Server 2010Published: March 2012

This document is provided “as-is”. Information and views expressed in this document, including
URL and other Internet Web site references, may change without notice.
Some examples depicted herein are provided for illustration only and are fictitious. No real
association or connection is intended or should be inferred.
This document does not provide you with any legal rights to any intellectual property in any
Microsoft product. You may copy and use this document for your internal, reference purposes.
Copyright © 2012 Microsoft Corporation. All rights reserved.

Contents
Deploying Clients and Devices....................................................................................................1
Configure the Meeting Join Page.............................................................................................1
Deploying Lync 2010 and the Online Meeting Add-in for Lync 2010........................................2
Preparing to Install Lync 2010..............................................................................................3
Configuring Client Bootstrapping Policies for Lync 2010...................................................3
Configuring Key Server Settings for Lync 2010.................................................................4
Configuring Supported Client Versions..............................................................................5
Installing Lync 2010..............................................................................................................5
IT-Managed Installation of Lync 2010................................................................................5
User-Managed Installation of Lync 2010...........................................................................7
Verifying Lync 2010 Installation.........................................................................................7
Uninstalling Lync 2010..........................................................................................................8
Configuring Enhanced Presence Privacy Mode....................................................................8
Customizing Lync 2010.........................................................................................................9
Adding Commands to Lync 2010 Menus.........................................................................10
Integrating a Third-Party Collaboration Application with Lync 2010.................................13
Configuring Custom Presence States..............................................................................18
Customizing the Lync 2010 Help Menu...........................................................................19
Adding a Custom Link to Lync 2010 Error Messages......................................................20
Adding Custom Text to Instant Messages.......................................................................21
Starting Lync 2010 from Another Application...................................................................21
Customizing the Online Meeting Add-in for Lync 2010.......................................................23
Lync 2010 Compatibility......................................................................................................25
Lync 2010 Integration.........................................................................................................30
Deploying Lync 2010 Attendant..............................................................................................37
IT-Managed Installation of Lync 2010 Attendant.................................................................38
User-Managed Installation of Lync 2010 Attendant.............................................................39
Lync 2010 Attendant Group Policy......................................................................................40
Deploying Lync 2010 Attendee...............................................................................................42
Deploying Lync 2010 Group Chat..........................................................................................43
Overview of Lync 2010 Group Chat Planning and Deployment..........................................44
Lync 2010 Group Chat Terminology and Concepts.............................................................44
Lync 2010 Group Chat Group Policy..................................................................................46
Preparing to Install Lync 2010 Group Chat.........................................................................48
System Requirements for Lync 2010 Group Chat Computers.........................................48
Software Requirements for Lync 2010 Group Chat Installation.......................................49
Lync 2010 Group Chat and Privacy Mode.......................................................................49
Installing Lync 2010 Group Chat.........................................................................................50
Configuring Lync 2010 Group Chat to Connect to Lync Server 2010, Group Chat.............50
Configure Lync 2010 Group Chat Automatically..............................................................50
Configure Lync 2010 Group Chat Manually.....................................................................51
Uninstalling Lync 2010 Group Chat....................................................................................52

Instant Messaging with Lync 2010 Group Chat and Lync 2010..........................................52
Additional Resources for Lync 2010 Group Chat................................................................53
Deploying Lync 2010 Phone Edition.......................................................................................53
Checklist for Deploying Lync 2010 Phone Edition...............................................................54
Using DHCP to Assign IP Addresses to Devices................................................................56
Using DHCPUtil...............................................................................................................58
Configuring DHCP Options to Enable Sign-in for IP Phones..............................................68
Using NTP to Set the Correct Time and Date for Devices..................................................71
Provisioning IP Phones.......................................................................................................72
Setting Up Authentication on the New IP Phones............................................................72
Configuring Common Area Phones.................................................................................73
Configuring the New IP Desk Phones.............................................................................77
Certificates for Lync 2010 Phone Edition............................................................................77
Configure Enhanced 9-1-1..................................................................................................80
Configure an E9-1-1 Voice Route....................................................................................81
Create Location Policies..................................................................................................82
Configure Site Information for E9-1-1..............................................................................84
Add a Location Policy to a Network Site..........................................................................84
Associate Subnets with Network Sites for E9-1-1...........................................................85
Configure the Location Database....................................................................................85
Populate the Location Database.....................................................................................85
Validate Addresses..........................................................................................................88
Publish the Location Database........................................................................................88
Configure Advanced E9-1-1 Features.............................................................................89
Configure an SNMP Application......................................................................................89
Configure a Secondary Location Information Service......................................................89
Setting Up the Authentication PIN for IP Phones................................................................90
End-User Documentation about Lync 2010 Phone Edition.................................................90
Device Update Web Service...............................................................................................90
Appendix: Configuring DHCP Options on DHCP Servers other than Windows DHCP Server
........................................................................................................................................ 91
Deploying Lync Web App.......................................................................................................93
Deploying Mobile Clients........................................................................................................93
Deploying Lync for Windows Phone...................................................................................94
Installing Lync for Windows Phone..................................................................................94
Removing Lync for Windows Phone................................................................................95
Deploying Lync for Android.................................................................................................95
Installing Lync for Android................................................................................................95
Removing Lync for Android..............................................................................................96
Deploying Lync for iPhone and iPad...................................................................................96
Installing Lync for iPhone and iPad.................................................................................96
Removing Lync for iPhone and iPad...............................................................................97
Deploying Lync for Nokia....................................................................................................97
Installing Lync for Nokia...................................................................................................97
Removing Lync for Nokia.................................................................................................99

Deploying Clients and DevicesThis section outlines the procedures for deploying Microsoft Lync Server 2010 clients and
devices.
In This Section
Configure the Meeting Join Page
Deploying Lync 2010 and the Online Meeting Add-in for Lync 2010
Deploying Lync 2010 Attendant
Deploying Lync 2010 Attendee
Deploying Lync 2010 Group Chat
Deploying Lync 2010 Phone Edition
Deploying Lync Web App
Deploying Mobile Clients
See Also
Planning for Clients and Devices in Lync Server 2010
Configure the Meeting Join PageYou can control the Microsoft Lync Server 2010 clients that are available for joining scheduled
Lync Server 2010 meetings by configuring the meeting join page. When a user clicks a meeting
link in a meeting request, the meeting join page detects whether a Lync Server client is already
installed on the user’s computer. If a client is already installed, the default client opens and joins
the meeting. If a client is not installed, the meeting join page displays options for joining the
meeting with alternate clients.
The meeting join page always contains the option to use Microsoft Lync Web App. In addition to
this option, you can decide whether to show links for downloading Microsoft Lync 2010 Attendee
or using a previous version of Microsoft Office Communicator (Microsoft Office Communicator
2007 R2 or Microsoft Office Communicator 2007).
The meeting join scenarios are as follows:
If Microsoft Lync 2010 or Microsoft Lync 2010 Attendant is installed, the client starts and joins
the meeting.
If neither Lync 2010 nor Lync 2010 Attendant is installed and Lync 2010 Attendee is installed,
Lync 2010 Attendee starts and joins the meeting.
If no Lync Server client is installed, the meeting join page opens and gives the user the
following options:
Use Lync Web App.
Download Lync 2010 Attendee. (This link is hidden by default.)
1
Use a previous version of Office Communicator. (This link is hidden by default.)
For the scenario in which no client is installed, you can configure the meeting join page by using
the Microsoft Lync Server 2010 Control Panel (the Web Service page in the Security group). You
can also configure the same settings by using the New-CsWebServiceConfiguration or Set-
CsWebServiceConfiguration Lync Server Management Shell cmdlets with the
ShowDownloadCommunicatorAttendeeLink and ShowJoinUsingLegacyClientLink parameters.
To configure the meeting join page by using the Lync Server 2010 Control Panel
1. Open a browser window, and then enter the Admin URL to open the Lync Server Control
Panel. For details about the different methods you can use to start Lync Server Control
Panel, see Open Lync Server Administrative Tools.
2. In the left navigation bar, click Security.
3. Click Web Service.
4. Select or clear the Show Lync Attendee download link check box, depending on
whether you want to give users the option to download and join meetings by using Lync
2010 Attendee.
5. Select or clear the Show the link for user to join meeting using legacy client check
box, depending on whether you want users to be able to join meetings by using a
previous version of Communicator.
To configure the meeting join page by using Lync Server Management Shell
1. Start the Lync Server Management Shell: Click Start, click All Programs, click Microsoft
Lync Server 2010, and then click Lync Server Management Shell.
2. Run the following cmdlet:
Get-CsWebServiceConfiguration
This cmdlet returns the web service configuration settings.
3. Run the following command, with the ShowDownloadCommunicatorAttendeeLink and
ShowJoinUsingLegacyClientLink parameters set to True or False, depending on your
preference (for details about the parameters for this cmdlet, see the Lync Server
Management Shell documentation):
Set-CsWebServiceConfiguration -Identity global -
ShowDownloadCommunicatorAttendeeLink $True -
ShowJoinUsingLegacyClientLink $True
2

Microsoft Lync Server 2010 Client and Device Deployment Guide
Deploying Lync 2010 and the Online Meeting Add-in for Lync 2010The topics in this section describe how to deploy Microsoft Lync 2010 in your organization. The
Online Meeting Add-in for Microsoft Lync 2010, which supports meeting management from within
the Microsoft Outlook messaging and collaboration client, installs automatically with Lync 2010.
These topics assume that you have already completed a fresh installation of Microsoft Lync
Server 2010 or a migration from a previous version of Microsoft Office Communications Server
(Microsoft Office Communications Server 2007 R2 or Microsoft Office Communications Server
2007).
In This Section
Preparing to Install Lync 2010
Installing Lync 2010
Uninstalling Lync 2010
Configuring Enhanced Presence Privacy Mode
Customizing Lync 2010
Customizing the Online Meeting Add-in for Lync 2010
Lync 2010 Compatibility
Lync 2010 Integration
See Also
Planning for Clients and Devices in Lync Server 2010
Preparing to Install Lync 2010
Before you install Microsoft Lync 2010 on users’ computers, follow the steps described in this
section.
In This Section
Configuring Client Bootstrapping Policies for Lync 2010
Configuring Key Server Settings for Lync 2010
Configuring Supported Client Versions
Configuring Client Bootstrapping Policies for Lync 2010
Before you deploy Microsoft Lync Server 2010 clients, you should check and, if necessary,
configure the policies and in-band provisioning settings described in Key Client Policies and
Settings in the Planning documentation.
There are several client bootstrapping policies that you should configure before users sign in to
the server for the first time. Because these policies take effect before the client signs in and
begins receiving in-band provisioning settings from the server, you can use Group Policy to
configure them. One way to define Group Policy settings is by using an administrative template
3

Microsoft Lync Server 2010 Client and Device Deployment Guide
(.adm) file, which contains specific information about the Group Policy settings the client
implements, where policies are stored, and how to configure policies.
Policies configured on the server take precedence over Group Policy settings and client options
configured by the user. The following table summarizes the order in which settings take
precedence when a conflict occurs.
Group Policy Precedence
Precedence Location or Method of Setting
1 Lync Server 2010 in-band provisioning
2 HKEY_LOCAL_MACHINE\Software\Policies\Microsoft\Communicator
3 HKEY_CURRENT_USER\Software\Policies\Microsoft\Communicator
4 The Lync - Options dialog box in Microsoft Lync 2010
To define Group Policy settings by using the Lync 2010 administrative template file
1. Download the Microsoft Lync 2010 Client Group Policy Documentation from the Microsoft
Download Center at http://go.microsoft.com/fwlink/?LinkId=245824. Copy the
Communicator.adm file to the %windir%/inf folder.
2. Use the Microsoft Management Console (MMC) Group Policy Object Editor to enable or
disable specific policy settings.
Note:
You can deploy Lync 2010 Group Policy without affecting users who are running
previous versions of Microsoft Office Communicator (Microsoft Office
Communicator 2007 R2 or Microsoft Office Communicator 2007).
Configuring Key Server Settings for Lync 2010
In addition to client bootstrapping policies, there are certain essential Microsoft Lync Server 2010
settings that can significantly impact client functionality and should be configured before client
deployment. You can use Lync Server Management Shell cmdlets to modify these settings.
For details about these key settings, see Key Client Policies and Settings in the Planning
documentation.
To use cmdlets to configure conferencing settings for Lync 2010
1. Start the Lync Server Management Shell: Click Start, click All Programs, click Microsoft
Lync Server 2010, and then click Lync Server Management Shell.
2. Run the following cmdlet:
Get –CsConferencingConfiguration
4

Microsoft Lync Server 2010 Client and Device Deployment Guide
This cmdlet returns the conferencing configuration settings.
3. Run the following cmdlet with the parameters and values you want to change (for details
about the parameters for this cmdlet, see the Lync Server Management Shell
documentation):
Set-CsConferencingConfiguration
Note:
You can create additional sets of conferencing configuration settings for specific
sites. Use the New- CsConferencingConfiguration cmdlet with a site identity.
When you create new conferencing configuration settings for sites, the site
settings take precedence over the global settings. For details, see the Lync
Server Management Shell documentation.
See Also
Configuring Client Bootstrapping Policies for Lync 2010
Configuring Supported Client Versions
In Microsoft Lync Server 2010, you can set up client version policies to specify the versions of
Lync Server 2010 clients that are supported in your environment. Additionally, you can use the
global client version configuration to specify a default action for clients that do not already have a
version policy defined and, therefore, are not explicitly supported or restricted.
You can also use client version policies to manage Lync Server client updates. When you set a
client version policy and use the options Allow and upgrade and Block and upgrade, clients will
receive updated software from the Windows Server Update Service (if you are using this service)
or from Microsoft Update.
See Also
Specify the Client Versions Supported in Your Organization
Modify the Default Action for Clients Not Explicitly Supported or Restricted
Installing Lync 2010
To deploy Microsoft Lync 2010, you can perform an IT-managed rollout or allow your end users to
install Lync 2010 individually. The method you choose depends on the size and security
requirements of your organization, the deployment methods you already have in place, and the
experience level of your users, among other factors. The following sections discuss these
methods in more detail.
In This Section
IT-Managed Installation of Lync 2010
User-Managed Installation of Lync 2010
Verifying Lync 2010 Installation
5

Microsoft Lync Server 2010 Client and Device Deployment Guide
IT-Managed Installation of Lync 2010
Microsoft Lync 2010 setup files are provided as executable (.exe) programs. The Lync 2010 setup
executable program is the recommended method for installing clients because it performs the
following actions:
Checks for prerequisites, and informs the user of applications that must close
Installs the required versions of Microsoft Visual C++ components and the Microsoft
Silverlight browser plug-in
Uninstalls Microsoft Lync 2010 Attendee
Uninstalls previous versions of Microsoft Office Communicator (Microsoft Office
Communicator 2007 R2 and Microsoft Office Communicator 2007)
Uninstalls previous versions of the Office Communicator multi-user language pack
Notifies the user that Windows Media Player 11 must be installed for recording features to
work properly
You can deploy Lync 2010 in a managed-desktop environment by using the following methods:
Microsoft Systems Management Server (SMS) 2003 or Microsoft System Center
Configuration Manager 2007 R2. Use these products for more complex software installation
scenarios, where scheduling, inventory, reporting, status, and support for an installation
across a wide area network (WAN) are required. For details, see the System Center TechNet
Library at http://go.microsoft.com/fwlink/?Linkid=140326.
Windows logon script. The logon script performs an unattended installation of Lync 2010
when a user logs on. You can use Group Policy objects to direct logon scripts to specific
devices or users.
Active Directory Domain Services (AD DS) Group Policy. You can create a Group Policy
object to deploy Lync 2010 to specific users or computers based on group memberships. For
details about how to use Group Policy, see the Windows Server Group Policy TechNet Library
at http://go.microsoft.com/fwlink/?linkid=141034. If you want to use Group Policy to deploy
clients, you must extract the Windows Installer (.msi) file from the executable program and
use the Group Policy setting UseMSIForLyncInstallation to allow the .msi to run on client
computers. Because the .exe setup program performs additional checks and software
updates, you must also address all other actions listed previously that are typically performed
by the .exe setup program.
Note:
You can extract the .msi file by running the client installation executable on a
supported Windows client, which creates the Lync.msi file in %Program Files%\
OCSetup\Lync.msi or %Program Files(x86)%\OCSetup\Lync.msi. For details and
additional required steps, see Microsoft Knowledge Base article 2477965, “The
installation of Lync 2010 by using Windows Installer (MSI) fails,” at
http://go.microsoft.com/fwlink/?LinkId=208249.
Installing on Computers with Multiple Users
After Lync 2010 is installed on an individual computer, it is available to all users of that computer.
Lync 2010 cannot be installed on a per-user basis on an individual computer.
6

Microsoft Lync Server 2010 Client and Device Deployment Guide
Lync 2010 Setup Command-Line Arguments
When using a script to deploy Lync 2010, you can use the Lync 2010 setup program command-
line arguments listed in the following table.
Note:
You must be logged on as a member of the Administrators group in order to install Lync
2010.
Command-Line Argument Description
/Silent Suppresses the installation user interface, and
uses default values for other installation options
(for example, installation directory). This
argument can be used along with the /Install,
/Uninstall, and /Repair arguments.
/Install (Default) Installs the client.
/Uninstall Removes previous versions of Office
Communicator and add-ins.
/Repair Reinstalls the client to repair any installation
issues.
/InstallDir Specifies the installation directory.
/help Displays the Help text in a dialog box.
/reg:[FileName] Registers the settings in the specified file
during installation. This registry file is then used
during run time.
/uninstalladdin Removes the Conferencing Add-in for Microsoft
Office Outlook, which is the previous version of
the add-in (used for scheduling Microsoft Office
Live Meeting server- and service-based
meetings).
/fulluisuppression Enables Lync 2010 to run in user interface
suppression mode.
User-Managed Installation of Lync 2010
You can deploy Microsoft Lync 2010 in your organization by using a file server on your network as
a software distribution point for the Lync 2010 setup files. At rollout time, you can send an email to
users explaining the installation process and provide a link to the distribution point.
See Also
7

Microsoft Lync Server 2010 Client and Device Deployment Guide
IT-Managed Installation of Lync 2010
Verifying Lync 2010 Installation
Verifying Lync 2010 Installation
To complete a quick check of address book and telephony integration on a client computer, locate
a contact name, and then try to send an instant message to the contact or call the contact from
within Microsoft Lync 2010.
Uninstalling Lync 2010
You can uninstall Microsoft Lync 2010 manually or by using a script. For details about command-
line arguments, see IT-Managed Installation of Lync 2010.
Important:
If you want to use a script with the /uninstalladdin argument to remove previous versions
of the add-in, be sure to precede it with a command that closes Microsoft Outlook. If
Outlook is open on the user’s computer, the add-in will fail to uninstall.
To uninstall Lync 2010 manually
1. Log on to your computer as a member of the Administrators group.
2. Click Start, click Control Panel, and then click Programs and Features.
3. Click Microsoft Lync 2010.
4. Click Uninstall at the top of the window.
Configuring Enhanced Presence Privacy Mode
With enhanced presence privacy mode, users can restrict their presence information so that it is
visible only to the contacts listed in their Microsoft Lync 2010 Contacts list. The
CsPrivacyConfiguration Lync Server Management Shell cmdlet EnablePrivacyMode parameter
controls this option. When EnablePrivacyMode is set to True, the option to restrict presence
information to contacts becomes available in the Lync 2010 Status options. When
EnablePrivacyMode is set to False, users can choose either to always allow everyone to see their
presence information or to adhere to any future changes the administrator makes to the privacy
mode.
Important
Lync 2010 privacy settings are not honored by previous versions (Microsoft Office Communicator
2007 R2 or Microsoft Office Communicator 2007). If previous versions of Office Communicator
are allowed to sign in, a Lync 2010 user’s status, contact information, or picture could be viewed
by someone who has not been authorized to view it. Additionally, a Lync 2010 user’s privacy
settings are reset if he or she later signs in with previous version of Communicator.
For these reasons, in a migration scenario, before you enable Lync 2010 enhanced presence
privacy mode:
8

Microsoft Lync Server 2010 Client and Device Deployment Guide
Ensure that every user has Lync 2010 installed.
Define a client version policy rule to prevent previous versions of Communicator from signing in.
To enable enhanced presence privacy mode
1. Start the Lync Server Management Shell: Click Start, click All Programs, click Microsoft
Lync Server 2010, and then click Lync Server Management Shell.
2. Run the following command:
Get-CsPrivacyConfiguration | Set-CsPrivacyConfiguration -
EnablePrivacyMode $True
This command enables privacy mode for all the privacy configuration settings currently in
use in the organization.
Customizing Lync 2010
This section describes how to use client policies and XML files to add the following custom
features to Microsoft Lync 2010:
Menu commands that pass contextual information to an external application
Presence states specific to your organization
Help menu modifications that link to your organization’s version of Lync 2010 Help
A Help or troubleshooting link that appears at the end of every Lync 2010 error message
Warnings or disclaimers that appear in the Conversation window at the start of an instant
messaging (IM) session
Important
Lync 2010 does not support adding custom tabs to the Lync main window. Feedback from
customers and developers indicated that using a custom command to pass contextual information
to an external application was a more usable and more discoverable integration option for end
users.
For details about adding custom commands to Lync 2010, see Adding Commands to Lync 2010
Menus and Integrating a Third-Party Collaboration Application with Lync 2010.
This section also describes how to initiate a Lync 2010 conversation from another application by
using Lync 2010 command-line parameters.
For details about additional ways to customize Lync 2010, see the resources listed in the
following table.
To do this Use this tool Find out more
Add Lync 2010
functionality to a
custom application
Lync Controls “Lync Controls” in the Microsoft Lync 2010
SDK at http://go.microsoft.com/fwlink/?
linkid=201995
9

Microsoft Lync Server 2010 Client and Device Deployment Guide
To do this Use this tool Find out more
Integrate a web
application with the
Lync Conversation
window
Lync Extensibility
window
“Launching Applications in the Lync
Extensibility Window” in the Lync SDK at
http://go.microsoft.com/fwlink/?linkid=201995
Automate the Lync
2010 user interface
from another
application
Microsoft Lync 2010
API Automation class
“Extensibility API Concepts” in the Lync SDK
at http://go.microsoft.com/fwlink/?
linkid=201995
Modify Lync 2010
behavior, available
features, and default
settings
Microsoft Lync Server
2010 management
tools
Lync Server Management Shell
documentation
In This Section
Adding Commands to Lync 2010 Menus
Integrating a Third-Party Collaboration Application with Lync 2010
Configuring Custom Presence States
Customizing the Lync 2010 Help Menu
Adding a Custom Link to Lync 2010 Error Messages
Adding Custom Text to Instant Messages
Starting Lync 2010 from Another Application
Adding Commands to Lync 2010 Menus
You can add custom commands to Microsoft Lync 2010 menus and pass the SIP Uniform
Resource Identifier (URI) of the current user and selected contacts to the application that the
custom command starts.
The custom commands that you add can appear on one or more of the following menus:
The Tools menu, on the menu bar in the Lync main window
The shortcut menu for contacts in the Contacts list
The Actions menu, on the menu bar, in the Conversation window
The shortcut menu for people listed in the Conversation window participant list
The options menu in a contact card
You can define custom commands for two types of applications—applications that do either of the
following:
Apply only to the current user and are started on the local computer.
Involve additional users, such as an online collaboration program, and must be started on
each user's computer.
10

Microsoft Lync Server 2010 Client and Device Deployment Guide
The custom command can be invoked in the following ways:
Select one or more users, and then choose the custom command.
Start a two-party or multiparty conversation, and then choose the custom command.
To add a custom command
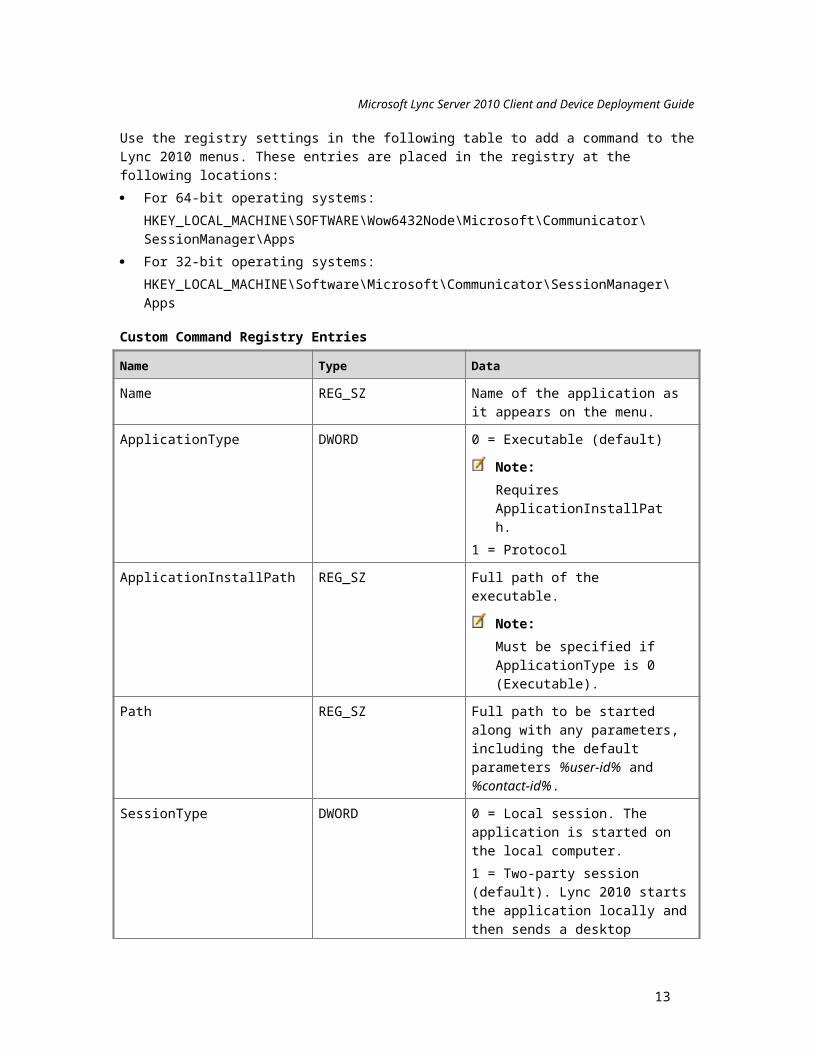
Use the registry settings in the following table to add a command to the Lync 2010 menus. These
entries are placed in the registry at the following locations:
For 64-bit operating systems:
HKEY_LOCAL_MACHINE\SOFTWARE\Wow6432Node\Microsoft\Communicator\
SessionManager\Apps
For 32-bit operating systems:
HKEY_LOCAL_MACHINE\Software\Microsoft\Communicator\SessionManager\Apps
Custom Command Registry Entries
Name Type Data
Name REG_SZ Name of the application as it appears
on the menu.
ApplicationType DWORD 0 = Executable (default)
Note:
Requires
ApplicationInstallPath.
1 = Protocol
ApplicationInstallPath REG_SZ Full path of the executable.
Note:
Must be specified if
ApplicationType is 0
(Executable).
Path REG_SZ Full path to be started along with any
parameters, including the default
parameters %user-id% and
%contact-id%.
SessionType DWORD 0 = Local session. The application is
started on the local computer.
1 = Two-party session (default). Lync
2010 starts the application locally and
then sends a desktop notification to
11
Microsoft Lync Server 2010 Client and Device Deployment Guide
Name Type Data
the other user. The other user clicks
the notification to start the application
on their computer.
2 = Multiparty session. Lync 2010
starts the application locally and then
sends desktop notifications to the
other users. The other user clicks the
notification to start the specified
application on his or her computer.
ExtensibleMenu REG_SZ A list of the menus where this
command will appear, separated by
semi-colons. Possible values are:
MainWindowActions
MainWindowRightClick
ConversationWindowActions
ConversationWindowRightClick
ContactCardMenu
If ExtensibleMenu is not defined, the
default values of
MainWindowRightClick and
ConversationWindowActions are
used.
For example, the following Registry Editor (.REG) file shows the results of adding a Contoso
Sales Contact Manager menu item to Actions menu in the Conversation window:
Windows Registry Editor Version 5.00
[HKEY_LOCAL_MACHINE\Software\Microsoft\Communicator\SessionManager\Apps\
{1F9F07C6-7E0B-462B-AAD7-98C6DBEA8F69}]
"Name"="Contoso Sales Contact Manager"
"HelpMessage"="The Contoso Sales Contact Manager is not installed.
Contact the Help Desk for more information."
"ApplicationType"=dword:00000000
"ApplicationInstallPath"="C:\\cscm.exe"
"Path"="C:\\cscm.exe %user-id% %contact-id%"
"SessionType"=dword:00000001
"ExtensibleMenu"="ConversationWindowActions;MainWindowRightClick"
To access a custom command
12

Microsoft Lync Server 2010 Client and Device Deployment Guide
To access a custom command after it is added, do one of the following, depending on the
ExtensibleMenu values you define:
MainWindowActions In the Lync main window, press the Alt key to show the menu bar,
click Tools, and then click your custom command.
MainWindowRightClick In the Lync main window, right-click a contact, and then click your
custom command.
ConversationWindowActions In the Conversation window, press the Alt key to show the
menu bar, click Actions, and then click your custom command.
ConversationWindowRightClick In the Conversation window, right-click a contact name,
and then click your custom command.
ContactCardMenu In a person’s contact card, click the options menu , and then click your
custom command.
Integrating a Third-Party Collaboration Application with Lync 2010
You can integrate Microsoft Lync 2010 with any third-party online collaboration application by
adding the same registry settings as those used by Microsoft Office Live Meeting 2007.
The integration process described in this topic is the one used for Office Live Meeting 2007.
Therefore, some steps might not apply to other online collaboration applications.
You can use Lync 2010 to start data conferencing sessions hosted on an in-house server, an
Internet-based service, or both. The collaboration or data conferencing session can be started
from the Contacts list or from an existing instant messaging, voice, or video session. Lync 2010
acts only as the vehicle for starting the application. Any existing Lync 2010 conversations remain
active after the online collaboration session has begun.
The following sections describe how Lync 2010 is integrated with Internet-based and server-
based collaboration applications.
Integrating an Internet-Based Collaboration Application with Lync 2010
Generally, the steps involved in integrating a third-party collaboration application are as follows:
1. Information about the application is added to the registry.
2. The organizer signs in to Lync 2010 and selects contacts for data sharing and collaboration.
Or, the organizer may already be in a conversation and decide to add data conferencing.
3. Lync 2010 reads the registry, starts the collaboration application, and then sends a custom
SIP message—an appINVITE—to the selected participants.
4. Participants accept the invitation, and the collaboration application is started on each
person’s computer. Lync 2010 uses the registry to determine which collaboration application
to use, and then starts that application by using the parameters included in the appINVITE
message.
The following table describes the registry entries required to integrate an Internet-based
collaboration application with Lync 2010. These entries are placed in the registry in the following
locations:
For 64-bit operating systems:
13
Microsoft Lync Server 2010 Client and Device Deployment Guide
HKEY_LOCAL_MACHINE\SOFTWARE\Wow6432Node\Microsoft\Communicator\
SessionManager\Apps
For 32-bit operating systems:
HKEY_LOCAL_MACHINE\Software\Microsoft\Communicator\SessionManager\Apps
Registry Entries for an Internet-based Collaboration Application
Name Type Data
Name REG
_SZ
The application name for Lync 2010 menus.
SmallIcon REG
_SZ
Path to 16-pixel x 16-pixel icon, BMP or PNG.
LargeIcon REG
_SZ
Path to 28-pixel x 28-pixel icon, BMP or PNG.
Path REG
_SZ
Participant path for starting the online collaboration application.
OriginatorPat
h
REG
_SZ
Organizer path for starting the online collaboration application. This path
can contain one or more custom parameters as defined in the
Parameters subkey. For example,
https://meetserv.adatum.com/cc/%param1%/join?id=%param2%&role=present&pw=%param3%
SessionType DWO
RD
0 = Local session. The application is started on the local computer.
1 = Two-party session (default). Lync 2010 starts the application locally,
and then sends a system notification to the other user. The other user
clicks the notification and starts the specified application on their
computer.
2 = Multiparty session. Lync 2010 starts the application locally, and then
sends system notifications to the other users, prompting them to start the
specified application on their own computer.
LiveServerInt
egration
DWO
RD
0 or not present = The application has its own conferencing mechanisms
and does not require Microsoft Office Communications Server 2007 R2
(default).
1 = Integrates with an in-house server.
ApplicationTy
pe
DWO
RD
1 = Sets the application type to protocol. The other possible values do
not apply in this case. If not present, ApplicationType is set to 0
(executable).
ExensibleMen
u
REG
_SZ
A list of the menus where this command will appear, separated by semi-
colons. Possible values are:
MainWindowActions
14

Microsoft Lync Server 2010 Client and Device Deployment Guide
Name Type Data
MainWindowRightClick
ConversationWindowActions
ConversationWindowRightClick
ContactCardMenu
If ExtensibleMenu is not defined, the default values of
MainWindowRightClick and ConversationWindowActions are used.
ButtonPriority DWO
RD
0 = Application is displayed on the button (default).
The following table describes the registry entries for parameters. These entries are place at
HKEY_CURRENT_USER\Software\Microsoft\Communicator\SessionManager\Apps\Parameters.
Registry Entries for an Internet-based Collaboration Application
Name Type Data
Param1 REG_SZ Used in tokenized format
(%Parm1%) to add user-specific
values to the OriginatorPath
registry key.
Param2 REG_SZ See Param1.
Param3 REG_SZ See Param1.
The following example registry settings integrate ADatum Collaboration Client with Lync 2010:
Windows Registry Editor Version 5.00
[HKEY_LOCAL_MACHINE\SOFTWARE\Microsoft\Communicator\SessionManager]
[HKEY_LOCAL_MACHINE\SOFTWARE\Microsoft\Communicator\SessionManager\Apps]
[HKEY_LOCAL_MACHINE\SOFTWARE\Microsoft\Communicator\SessionManager\Apps\
{C3F6E17A-855F-44a0-B90D-C0B92D38E5F1}]
"Path"="https://meetingservice.adatum.com/cc/%param1%/meet/%param2%"
"OriginatorPath"="https://meetserv.adatum.com/cc/%param1%/join?id=
%param2%&role=present&pw=%param3%"
"SessionType"=dword:00000002
"ApplicationType"=dword:00000001
"LiveServerIntegration"=dword:00000000
"Name"="ADatum Online Collaboration Service"
"Extensiblemenu"="MainWindowActions;MainWindowRightClick;ConversationWin
dowActions;ConversationWindowRightClick"
15

Microsoft Lync Server 2010 Client and Device Deployment Guide
[HKEY_CURRENT_USER\Software\Microsoft\Communicator\SessionManager]
[HKEY_CURRENT_USER\Software\Microsoft\Communicator\SessionManager\Apps]
[HKEY_CURRENT_USER\Software\Microsoft\Communicator\SessionManager\Apps\
Parameters]
[HKEY_CURRENT_USER\Software\Microsoft\Communicator\SessionManager\Apps\
Parameters\{C3F6E17A-855F-44a0-B90D-C0B92D38E5F1}]
"Param1"="meetserv"
"Param2"="admin"
"Param3"="abcdefg123"
Integrating a Server-Based Collaboration Application with Lync 2010
The settings to add commands for starting a server-based collaboration application from within
Lync 2010 are similar to those described in the previous section, Integrating an Internet-Based
Collaboration Application with Lync 2010. However, the OriginatorPath is not required, and some
values are changed. Registry entries are placed in the following locations:
For 64-bit operating systems:
HKEY_LOCAL_MACHINE\SOFTWARE\Wow6432Node\Microsoft\Communicator\
SessionManager\Apps
For 32-bit operating systems:
HKEY_LOCAL_MACHINE\Software\Microsoft\Communicator\SessionManager\Apps
Registry Entries for a Server-based Collaboration Application
Name Type Data
Name REG_SZ Name of the application as it appears
on the menu.
ApplicationType DWORD Value = 1. Sets the application type to
protocol. The other possible values
do not apply in this case. If not
present, ApplicationType is set to 0
(executable).
Path REG_SZ Protocol used to start the
collaboration application. For Live
Meeting 2007 the value of Path is set
to meet:%conf-uri%.
SessionType DWORD 0 = Local session. The application is
started on the local computer.
1 = Two-party session (default). Lync
2010 starts the application locally,
16

Microsoft Lync Server 2010 Client and Device Deployment Guide
Name Type Data
and then sends a system notification
to the other user. The other user
clicks the notification and starts the
specified application on their
computer.
2 = Multiparty session. Lync 2010
starts the application locally, and then
sends system notifications to the
other users, prompting them to start
the specified application on their
computer.
LiveServerIntegration DWORD 1 = Hosted on the in-house server.
MCUType REG_SZ DATA = The type of server.
ExtensibleMenu REG_SZ A list of the menus where this
command will appear, separated by
semi-colons. Possible values are:
MainWindowActions
MainWindowRightClick
ConversationWindowActions
ConversationWindowRightClick
ContactCardMenu
If ExtensibleMenu is not defined, the
default values of
MainWindowRightClick and
ConversationWindowActions are
used.
The following example adds commands to start ADatum Collaboration Client from within Lync
2010:
Windows Registry Editor Version 5.00
[HKEY_LOCAL_MACHINE\SOFTWARE\Microsoft\Communicator\SessionManager]
[HKEY_LOCAL_MACHINE\SOFTWARE\Microsoft\Communicator\SessionManager\Apps]
[HKEY_LOCAL_MACHINE\SOFTWARE\Microsoft\Communicator\SessionManager\Apps\
{27877e66-615c-4582-ab88-0cb2ca05d951}]
"Path"="meet:%conf-uri%"
"SessionType"=dword:00000002
"LiveServerIntegration"=dword:00000001
17

Microsoft Lync Server 2010 Client and Device Deployment Guide
"ApplicationType"=dword:00000001
"Name"="ADatum Collaboration Client"
"MCUType"="Data"
"Extensiblemenu"="MainWindowActions;MainWindowRightClick;ConversationWin
dowActions;ConversationWindowRightClick"
Configuring Custom Presence States
To define custom presence states in Microsoft Lync 2010, create an XML custom presence
configuration file, and then specify its location by using the Lync Server Management Shell
cmdlets New-CSClientPolicy or Set-CSClientPolicy with the parameter CustomStateURL.
Configuration files have the following properties:
Custom presence states can be configured with the Available, Busy, and Do Not Disturb
presence indicators.
The availability attribute determines which presence indicator is associated with the status
text of the custom state. In the example later in this topic, the status text Working from Home
is displayed to the right of the green (Available) presence indicator.
The maximum length of the status text is 64 characters.
A maximum of four custom presence states can be added.
Valid address types for the CustomStateURL parameter are FILE:, HTTP:, and HTTPS:.
Examples of valid addresses are as follows:
http://lspool.corp.contoso.com/LSFileShare/ClientConfigFolder/Presence.xml
https://lspool.corp.contoso.com/ClientConfigFolder/CustomPresence.xml
file:///c:/LSFileShare/ClientConfigFolder/Group_1_Pres.xml
file://\\lspool.corp.contoso.com\LSFileShare\ClientConfigFolder\Presence.xml
Localize your custom presence state by specifying one or more locale ID (LCID) schema in the
XML configuration file. The example later in this topic shows localization into English - United
States (1033), Norwegian - Bokmål (1044), French - France (1036), and Turkish (1055). For a list
of LCIDs, see Locale IDs Assigned by Microsoft at http://go.microsoft.com/fwlink/?
Linkid=157331.
To add custom presence states to Lync 2010
1. Create an XML configuration file that uses the format of the following example:
<?xml version="1.0"?>
<customStates
xmlns="http://schemas.microsoft.com/09/2009/communicator/customStates
"
<customState ID="1" availability="online">
<activity LCID="1033">Working from Home</activity>
<activity LCID="1044">activity 2 for 1044</activity>
18

Microsoft Lync Server 2010 Client and Device Deployment Guide
<activity LCID="1055">activity 3 for 1055</activity>
</customState>
<customState ID="2" availability="busy">
<activity LCID="1033">In a Live Meeting</activity>
<activity LCID="1036">Equivalent French String for - In a Live
Meeting </activity>
</customState>
<customState ID="3" availability="busy">
<activity LCID="1033">Meeting with Customer</activity>
<activity LCID="1055">meeting with client</activity>
<activity LCID="1036">Equivalent French String for - Meeting with
Customer</activity>
</customState>
<customState ID="4" availability="do-not-disturb">
<activity LCID="1033">Interviewing</activity>
</customState>
</customStates>
2. Save the XML configuration file to a location on a trusted network site or on the local
computer. In this example, the file is named Presence.xml and saved to the network share \\
server\comshare.
3. In the Lync Server Management Shell, define the location of your XML configuration file by
using a command similar to the following:
New-CsClientPolicy -Identity ContosoCustomStates
-CustomStateURL "file://\\server\comshare\Presence.xml"
Note:
To start the Lync Server Management Shell, click Start, click All Programs, click
Microsoft Lync Server 2010, and then click Lync Server Management Shell.
4. Use the Grant-CSClientPolicy cmdlet to assign this new policy to users.
For details, see New-CsClientPolicy and Grant-CsClientPolicy in the Lync Server Management
Shell documentation.
Notes:
By default, Microsoft Lync Server 2010 updates client policies and settings every three hours.
If Group Policy settings used by previous versions of Microsoft Office Communicator (Microsoft
Office Communicator 2007 R2 or Microsoft Office Communicator 2007) are present, Lync 2010
recognizes them. However, server-based client policies take precedence. For details, see
Migrating User Settings to Lync Server 2010 in the Migration documentation.
Customizing the Lync 2010 Help Menu
You can customize the Microsoft Lync 2010 Help menu by adding a custom command that opens
your organization’s Help or by redirecting Lync 2010 Help and the F1 key to an internal website.
19

Microsoft Lync Server 2010 Client and Device Deployment Guide
To add a command to the Lync 2010 Help menu
To add your own command to the Lync 2010 Help menu, use the HelpMenuText and
HelpMenuURL Group Policy settings. For details, see Key Client Policies and Settings.
The following example shows a Contoso Help Desk command added to the Lync 2010 Help
menu:
Windows Registry Editor Version 5.00
[HKEY_LOCAL_MACHINE\SOFTWARE\Policies\Microsoft\Communicator]
"HelpMenuText"="Contoso Help Desk"
"HelpMenuURL"="http://contoso/help/Contso_Help_Desk.htm"
To redirect Lync 2010 Help to your internal website
To redirect Lync 2010 Help and the Lync 2010 F1 key to an internal website, use the New-
CSClientPolicy or Set-CSClientPolicy Lync Server Management Shell cmdlets with the
EnableEnterpriseCustomizedHelp and CustomizedHelpUrl parameters.
For example:
New-CsClientPolicy -Identity ContosoLyncHelp -
EnableEnterpriseCustomizedHelp $True -CustomizedHelpUrl
"http://contoso/help/ContosoLyncHelp.htm"
Use Grant-CSClientPolicy to assign this new policy to users. For details, see New-
CsClientPolicy and Grant-CsClientPolicy in the Lync Server Management Shell documentation.
Adding a Custom Link to Lync 2010 Error Messages
Customize Microsoft Lync 2010 error messages by adding a link to your own troubleshooting or
Help desk information. To do this, use the New-CSClientPolicy or Set-CSClientPolicy Lync
Server Management Shell cmdlets with the CustomLinkInErrorMessages parameter. The text of
the custom link is “Click here for support topics from your administrator,” and it cannot be
customized.
For example, the following command causes the custom link to appear in the footnote area of
every Lync 2010 error message and sets the link destination to
http://contoso.com/help/LyncHelpDesk.aspx:
New-CsClientPolicy -Identity LyncErrorLink -CustomLinkInErrorMessages
"http://contoso/help/LyncHelpDesk.aspx"
Use Grant-CSClientPolicy to assign this new policy to users. For details, see New-
CSClientPolicy and Grant-CSClientPolicy in the Lync Server Management Shell
documentation.
20

Microsoft Lync Server 2010 Client and Device Deployment Guide
Adding Custom Text to Instant Messages
Add a disclaimer or warning to the beginning of every Microsoft Lync 2010 instant messaging (IM)
conversation by using the New-CSClientPolicy or Set-CSClientPolicy Lync Server
Management Shell cmdlets with the IMWarning parameter.
The command in the following example adds a security reminder at the top of the Conversation
window whenever a new IM conversation begins:
New-CsClientPolicy -Identity IMSecurityNotice -IMWarning
"Remember, security is everyone’s responsibility. Keep it confidential.”
Use Grant-CSClientPolicy to assign this new policy to users. For details, see New-
CSClientPolicy and Grant-CSClientPolicy in the Lync Server Management Shell
documentation.
Starting Lync 2010 from Another Application
You can use command-line parameters to quick-start Microsoft Lync 2010. For example, if a user
clicks a phone number in another application, the application can start an instance of Lync 2010
and initiate a call to that number.
Lync 2010 can also recognize a semicolon-delimited list of contact names for multiparty
conferencing.
If Lync 2010 is configured to automatically sign in when started, then starting Lync 2010 with
command-line parameters will open the Lync main window. If Lync is not configured to
automatically sign in when started, the sign-in window opens.
The following table shows the available parameters.
Lync 2010 Command-Line Parameters
Extension Format of Data Action
tel: tel URI Opens the Conversation window for an audio
call but does not dial the specified number.
callto: tel:, sip:, or typeable tel
URI
Opens the Conversation window for an audio
call but does not dial the specified number.
sip: SIP URI Opens the Conversation window with the
specified SIP Uniform Resource Identifier (URI)
in the participant list.
Sips: SIP URI If Lync 2010 is configured to use the Transport
Layer Security (TLS) protocol, functions exactly
like sip:. If TLS is not being used, displays a
dialog box informing the user that a higher level
of security is required.
conf: SIP URI of conference
to join
If URI is self, instantiates the focus and brings
up roster-only view. Otherwise, brings up roster
21

Microsoft Lync Server 2010 Client and Device Deployment Guide
Extension Format of Data Action
view but does not send INVITE.
im: SIP URI Displays an instant messaging (IM)-only
Conversation window with the SIP URI.
Accepts multiple SIP URIs specified inside
angle brackets (<>) without any separator.
im:<sip:user1@host><sip:user2@host>
The following table provides examples of these command-line parameters.
Command-Line Parameter Examples
Instance Results
Tel:+14255550101 Opens a phone-
only view with
+14255550101.
Callto:tel:+ 14255550101 Opens a phone-
only view with
+14255550101.
Callto:sip:[email protected] Opens a phone-
only view with
kazuto@litwarein
c.com.
sip:[email protected] Opens a
Conversation
window with
kazuto@litwarein
c.com.
conf:sip:[email protected];gruu;opaque=app:conf:focus:id:BDD5MWV0B0S
GRLMV2006121201144110
Opens a
Conversation
window in phone-
only view with a
Join Conference
button.
Customizing the Online Meeting Add-in for Lync 2010
You can customize the Online Meeting Add-in for Microsoft Lync 2010 in the following ways:
22

Microsoft Lync Server 2010 Client and Device Deployment Guide
By adding custom text to a meeting request by using a Microsoft Exchange Server 2010 or
Microsoft Exchange Server 2007 Hub Transport Server transport rule
By configuring available meeting options and meeting-option defaults by using Microsoft Lync
Server 2010 in-band provisioning
In addition, users can change the language of the meeting invitation to English, when non-English
versions of the Microsoft Outlook messaging and collaboration client and Microsoft Lync 2010 are
installed.
Note:
Use the information in this topic to customize the Online Meeting Add-in for Microsoft
Lync 2010 Attendant, as well.
Adding Custom Text to a Meeting
You can add a custom message to a meeting request by defining a transport rule on your
Exchange Server 2010 or Exchange 2007 Hub Transport Server.
Every Lync 2010 meeting request contains a hidden text identifier, [!OC([1033])!]. In the
Exchange Management Console on the Hub Transport Server, define a transport rule that
searches for this identifier by using the option when the Subject field or the body of the
message contains specific words. Then enter the custom text you want to be displayed.
For details, see “Transport Rule Actions” in the Exchange Server TechNet Library at one of the
following locations:
For Exchange 2010, see http://go.microsoft.com/fwlink/?LinkId=202494.
For Exchange 2007, see http://go.microsoft.com/fwlink/?LinkId=202498.
Configuring Available Meeting Options and Default Options
You can change the access and presenter meeting options that are available to individuals or
groups in your organization and the defaults for these options by configuring Lync Server 2010 in-
band provisioning settings.
Notes:
Configuring meeting options on the server does not change the options for meetings that are
already scheduled.
Changes made to server settings can take up to three hours to affect all the clients on your
network.
The Online Meeting Add-in for Lync 2010 defaults are best for quick scheduling of small-group
collaboration and sharing sessions. However, you can change the default options to match the
business and security needs of specific groups or sites in your organization.
The following tables describe the in-band server settings that control the state and availability of
access and presenter meeting options, either when scheduling a meeting by using the Online
Meeting Add-in for Lync 2010 or when changing meeting options during a Lync 2010 meeting. For
details about Lync 2010 meeting options, see “Set meeting or conference call options” in the Lync
2010 Help and How-to at http://go.microsoft.com/fwlink/?LinkId=202493. For details about the in-
23

Microsoft Lync Server 2010 Client and Device Deployment Guide
band server settings, see New-CsConferencingPolicy and New-CsMeetingConfiguration in the
Lync Server Management Shell documentation.
CSConferencingPolicy Meeting Option Parameters
Parameter Default Description
AllowAnonymousParticipantsInMeetings True If False, the access option
Everyone including
people outside my
company (no restrictions)
is unavailable.
AllowIPAudio True If False, the access option
People dialing in by
phone bypass the lobby is
unavailable.
EnableDialInConferencing True If False, the access option
People dialing in by
phone bypass the lobby is
unavailable.
AllowAnonymousUsersToDialOut False If True, unauthenticated
users can join the meeting
by having Lync Server call
them.
CSMeetingConfiguration Meeting Option Parameters
Parameter Default Description
PstnCallersBypassLobby True If False, the access option People
dialing in by phone bypass the lobby is
unavailable.
DesignateAsPresenter Company The other settings are None and
Everyone. If None, the presenter option
Organizer only is the default. If
Everyone, the presenter option Everyone
including people outside my
organization (there are no restrictions)
is the default.
EnableAssignedConferenceType True If False, the creation of meetings that
have a set conference ID specific to the
organizer is disabled. If True, the same
conference ID is used for every meeting
24

Microsoft Lync Server 2010 Client and Device Deployment Guide
Parameter Default Description
where the organizer has not changed the
default meeting options.
AssignedConferenceTypeByDefault True If False, each new meeting is given a
unique meeting ID.
Note:
This parameter has no effect if
EnableAssignedConferenceType
is set to False.
AdmitAnonymousUsersByDefault True If False, the access option Everyone
including people outside my company
(no restrictions) is unavailable. This
global setting is used if no specific
conferencing policy has been created.
Changing the Language of the Meeting Invitation to English
Meeting organizers can change the language of the meeting invitation to English, when a non-
English or multiple-language version of Outlook is installed. If the organizer selects this option, all
participants receive the meeting invitation in English. It is not possible to customize the language
of the invitation based on the preference or installed language of the person who receives the
invitation.
Lync 2010 Compatibility
This section describes the compatibility of Microsoft Lync 2010 with various versions of Microsoft
Office suites, Microsoft Exchange Server, Windows operating systems, and selected public
instant messaging (IM) clients.
Office and Lync 2010
The following table describes the Lync 2010 features that are supported by various versions of
Office.
Lync 2010 and Microsoft Office Compatibility
Feature Microsoft Office 2003 with
Service Pack 3 (SP3)
(required) or the latest
service pack
(recommended)
Microsoft Office 2007 Microsoft Office 2010
Presence status in the
Microsoft Outlook To
and Cc fields
Presence status appears
on hover
Presence status is
always shown
Presence status is
always shown
25

Microsoft Lync Server 2010 Client and Device Deployment Guide
Feature Microsoft Office 2003 with
Service Pack 3 (SP3)
(required) or the latest
service pack
(recommended)
Microsoft Office 2007 Microsoft Office 2010
Reply with conference
call from the
availability menu
No Yes Yes (from the contact
card)
Presence status in a
meeting request on
the Scheduling
Assistant tab
No Yes Yes
Reply with IM, or call
from the toolbar or
ribbon in a received
No Yes Yes
Presence status in the
Outlook From field
Yes Yes Yes
Reply with IM or voice
from availability menu
Yes Yes Yes (from the contact
card)
IM and presence in
Microsoft Word and
Microsoft Excel files
(smart tags enabled)
Yes Yes Microsoft Word only
IM and presence in
Microsoft SharePoint
sites (Outlook must be
installed)
Yes Yes Yes
The following features are available only with Office 2010 and Lync:
New contact card with expanded options, such as video call and desktop sharing
Quick search from the Find a Contact field in Outlook
Reply with an IM or call from the Outlook Home ribbon in the Mail, Calendar, Contacts, and
Tasks folders
Lync Contacts list in Outlook To-Do Bar
Office Backstage (File tab) presence status, program sharing, and file transfer
Presence menu in Microsoft Office SharePoint Workspace 2010 (formerly Microsoft Office
Groove 2007)
Presence menu extensibility
26

Microsoft Lync Server 2010 Client and Device Deployment Guide
Exchange Server and Lync 2010
The following table describes Lync 2010 support for various versions of Exchange Server.
Outlook must be installed on the client computer to handle Extended MAPI calls, and some
features require the use of Exchange Web Services (EWS).
Lync 2010 and Exchange Server Compatibility
Exchange Server version Lync 2010 support
Exchange Server 2010 Same as Exchange Server 2007 support, with
the addition of Exchange contact sync.
Note:
For details, see Lync 2010 Integration.
Exchange Server 2007 with Service Pack 1
(SP1) (required) or the latest service pack
(recommended)
The following features are available only
through EWS:
Read or delete items in the Conversation
History folder
Read or delete voice mail items
Display extended free/busy information and
meeting subject and location
Note:
For a complete list of the
communication interfaces that are used
by Lync 2010, see Lync 2010
Integration.
Public folders are optional in Exchange Server
2007 with Service Pack 1 (SP1) (required) or
the latest service pack or release
(recommended).
Exchange Server 2003 Outlook MAPI only. EWS-only features are not
available (see the previous row).
Windows and Lync 2010
The following table indicates whether Lync is supported in various versions of Windows.
Lync 2010 and Windows Compatibility
Windows version Lync 2010 support
The 32-bit versions of the Windows 7 operating
system
Supported
The 64-bit versions of the Windows 7 operating Supported in Windows on Windows 64 mode
27

Microsoft Lync Server 2010 Client and Device Deployment Guide
Windows version Lync 2010 support
system
The 32-bit editions of the Windows Vista
operating system
Supported
The 64-bit editions of the Windows Vista
operating system
Supported in Windows on Windows 64 mode
The 32-bit version of the Windows XP
Professional operating system with Service
Pack 3 (SP3)
Supported
Note:
Windows Installer 3.1 and Microsoft
Core XML services (MSXML) 6.0 with
Service Pack 1 (SP1) must be installed
before deploying Lync 2010.
The 32-bit editions of the Windows Server 2008
R2 operating system with Service Pack 2 (SP2)
Supported
The 64-bit editions of the Windows Server 2008
R2 operating system with Service Pack 2 (SP2)
Supported in Windows on Windows 64 mode
The 32-bit editions of the Windows Server 2008
operating system with Service Pack 2 (SP2)
Supported
The 64-bit editions of the Windows Server 2008
operating system with Service Pack 2 (SP2)
Supported in Windows on Windows 64 mode
The 32-bit versions of the Windows Server
2003 R2 operating system with Service Pack 2
(SP2)
Supported
The 64-bit versions of the Windows Server
2003 R2 operating system
Not supported
The 32-bit versions of the Windows Server
2003 operating system with Service Pack 2
(SP2)
Supported
The 64-bit versions of the Windows Server
2003 operating system
Not supported
Windows 2000 Not supported
28

Microsoft Lync Server 2010 Client and Device Deployment Guide
Macintosh and Lync 2010
Lync and Microsoft Lync 2010 Attendee are available only for Windows. However, Microsoft Lync
Server 2010 supports the following clients on computers that are running Macintosh operating
systems.
Lync 2010 and Macintosh Compatibility
Client Description Platform requirements
Microsoft Lync for Mac
2011
Lync Server 2010 client available through
volume licensing. For details about supported
features, see Client Comparison Tables and
“Compare Lync for Mac 2011 with
Communicator for Mac and Lync 2010 for
Windows” at http://go.microsoft.com/fwlink/?
LinkId=229179. For additional details, see
“Lync for Mac 2011 Deployment Guide” at
http://go.microsoft.com/fwlink/?LinkId=229178.
Mac OS 10.5.8 or the
latest service pack or
release (Intel-based)
Super VGA 1280 x
800
Safari 5 or any of the
Safari 5.x releases
Microsoft
Communicator for Mac
2011
Lync Server 2010 client available through
volume licensing. For details about supported
features, see Client Comparison Tables. For
additional details, see “Communicator for Mac
2011 Deployment Guide” at
http://go.microsoft.com/fwlink/?LinkID=205317.
Mac OS 10.5.8 or the
latest service pack or
release (Intel-based)
Super VGA 1280 x
800
Safari 5 or any of the
Safari 5.x releases
Microsoft Lync Web
App
Web-based conferencing client. For details
about supported features, see Client
Comparison Tables.
Mac OS 10.4.8 the
latest service pack or
release (Intel-based)
Safari 4 or any of the
Safari 4.x releases
Public Instant Messaging Clients and Lync 2010
If you have configured your server for public IM connectivity, Lync supports the following
capabilities with public IM networks. Presence status is filtered to those presence states
supported by the public IM client.
Lync 2010 and Public IM Clients Compatibility
Client Supported Capabilities
Windows Live Messenger IM, basic presence, audio/video (A/V)*
AOL IM and basic presence
Yahoo! IM and basic presence
29

Microsoft Lync Server 2010 Client and Device Deployment Guide
*A/V is supported with the latest version of Windows Live Messenger. If you are implementing
audio/video (A/V) federation with Windows Live Messenger, you must also modify the Lync
Server encryption level. By default, the encryption level is Required. You must change this setting
to Supported by using the Lync Server Management Shell. For details, see Prepare for Support of
Public IM Connectivity in the Deployment documentation.
Lync 2010 Integration
This topic details how Microsoft Lync 2010 integrates with the following versions of Microsoft
Office and Microsoft Exchange Server:
Microsoft Office 2010 suites
Microsoft Office 2007 suites
Microsoft Exchange Server 2010
Microsoft Exchange Server 2007 Service Pack 2 (SP2)
Note:
Microsoft Outlook 2003 with the latest service pack and earlier versions of Exchange are
compatible with Lync 2010 but do not support the full degree of integration described in
this topic. For details, see Lync 2010 Compatibility.
Integrating Lync and Office provides users with in-context access to the instant messaging (IM),
enhanced presence, telephony, and conferencing capabilities of Lync.
Office users can access Lync features from within the Microsoft Outlook messaging and
collaboration client and other Office programs or from a SharePoint Server page. Users can also
view a record of Lync conversations in the Outlook Conversation History folder.
This topic provides details about:
Planning for integration between Lync, Outlook, and other Office programs.
Exchange Server interfaces that are used by Lync and Outlook to access and update shared
information.
In-band provisioning settings that you can use to control the level of Lync integration with
Outlook.
Lync integration with other Office programs.
Suggestions for avoiding common Lync integration issues.
Planning for Lync 2010 Integration
Review the following configuration issues to ensure that you have everything required for
integration between Lync and other Office programs:
Configure integration between Microsoft Lync Server 2010 and Exchange Server.
Review the integration features that can be configured during Lync deployment by using in-
band server settings. For details, see the "Controlling Outlook and Exchange Integration"
section later in this topic.
30

Microsoft Lync Server 2010 Client and Device Deployment Guide
Note that you don’t have to do a separate installation of the Online Meeting Add-in for
Microsoft Lync 2010. It is installed automatically at the same time as Lync.
In organizations that have more than one version of Communicator or Office installed, review
the compatibility tables in Lync 2010 Compatibility.
Review the list of suggestions for preventing common integration errors in the "Common Lync
2010 and Outlook Integration Issues" section later in this topic.
For integration with Office 2007 to work correctly, you might need to install an update to
Outlook 2007. For details about the Outlook update, see Microsoft Knowledge Base article
936864, "Description of the 2007 Office hotfix package" at http://go.microsoft.com/fwlink/?
LinkID=143112.
Integration and Exchange Server
To support Lync integration, both Lync and Outlook read and write information directly to
Exchange Server. This section discusses the Exchange Server interfaces used by Lync and
Outlook.
To display information about a contact in an email message, Outlook first looks for the contact’s
SIP address locally and then makes a remote procedure call (RPC) to Exchange Server if
required. During a single Outlook session, the number of RPC calls decreases as more SIP
addresses are cached.
In Lync, the integration features that use either MAPI or Exchange Web Services (EWS) to make
calls directly to the Exchange Server are as follows:
Access conversation history and voice mail
Play back voice mail message
Display free/busy information and working hours
Display meeting subject, time, and location
Display Out of Office status and note
Exchange contact sync
Search Outlook personal contacts
Notes:
Outlook 2007 makes RPC calls to resolve SIP addresses only if the Display online status next
to a person name option is selected. To view this option in Outlook 2007, on the Tools menu,
click Options, click Other, and then look under Person Names.
In Outlook 2010, on the File tab, click Options, click Contacts, and then look under Online
status and photographs.
Exchange Server Communication Interfaces
The following table describes the communication interfaces that Lync uses to access and update
features shared with Outlook. Exchange Server calls are made either directly, through EWS or
MAPI, or indirectly, through the Outlook Object Model.
31

Microsoft Lync Server 2010 Client and Device Deployment Guide
Exchange Server Communication Interfaces Used by Lync 2010
Communication interface Function
Outlook Object Model Send email message
Schedule a meeting
Open voice mail folder
Open the Conversation History folder
MAPI only Communicate with Exchange delegates
EWS (persistent subscription) if available,
otherwise MAPI
Create the Conversation History folder
Handle voice mail notifications
Handle missed Conversation notifications
Read Contacts folder
Find related conversations
Open contact card
Create a personal Outlook contact
Open voice mail
Write contacts (on demand) (EWS and
Exchange Server 2010 SP1 only)
Write Conversation History items (on demand)
EWS only (persistent subscription) Read or delete Conversation History items
Read or delete voice mail items
EWS (polling) if available, otherwise MAPI Read free/busy times
Read Out of Office message
EWS only (polling) Read working hours information
Handle Exchange contact sync
Publishing Free Busy Information
A Lync user cannot access another user’s availability and schedule directly, so free/busy and Out
of Office details are published as part of a contact’s extended presence information. This works
as follows:
1. On User A’s computer, Lync uses EWS calls to determine the user’s own free/busy and Out of
Office status.
2. Lync then updates User A’s enhanced presence data with this information.
3. Other Lync and Office users can now view User A’s schedule details and Out of Office status,
if applicable.
32

Microsoft Lync Server 2010 Client and Device Deployment Guide
The availability of free/busy and Out of Office information about a contact is also controlled by a
user’s privacy relationship settings. For details, see Lync 2010 New Features in the Getting
Started documentation.
Note:
If EWS is not available, Lync 2010 uses MAPI to obtain free/busy information.
Controlling Outlook and Exchange Integration
All the Outlook 2010 or Outlook 2007 integration features are enabled by default but can be
controlled individually from within Lync or through Lync Server 2010 in-band policies.
The following table lists the in-band server policies that you can use to enable or disable
individual integration features either during deployment or later, as part of a maintenance or
upgrade cycle.
For details about configuring Lync users and settings, see Overview of Client Policies and
Settings. For details about the policies described in the following table, see New-CsClientPolicy
or Set-CsClientPolicy in the Operations documentation.
Outlook and Exchange Integration Policies
Policy Description
CalendarStatePublicationInterval Specifies the amount of time, in seconds, that
Lync waits before retrieving calendar
information from Outlook and adding this data
to your presence information.
DisableCalendarPresence Disables the loading of free or busy data from
Outlook.
DisableFreeBusyInfo Prevents Lync from displaying Outlook
information about free/busy states to other
contacts.
DisableMeetingSubjectAndLocation Prevents Lync from publishing the subject and
location information of a meeting. This value is
not used if DisableCalendarPresence is set or if
the Update my status based on calendar
data option is not set.
DisableOnlineContextualSearch When set to True, disables the Find Previous
Conversations menu option that appears when
you right-click a user in your Contacts list.
DisablePresenceNote Prevents users from selecting or clearing of the
corresponding user setting, and disables
retrieval of the Outlook Out of Office message.
EnableCallLogAutoArciving Controls the automatic saving of information
about incoming and outgoing phone calls.
33
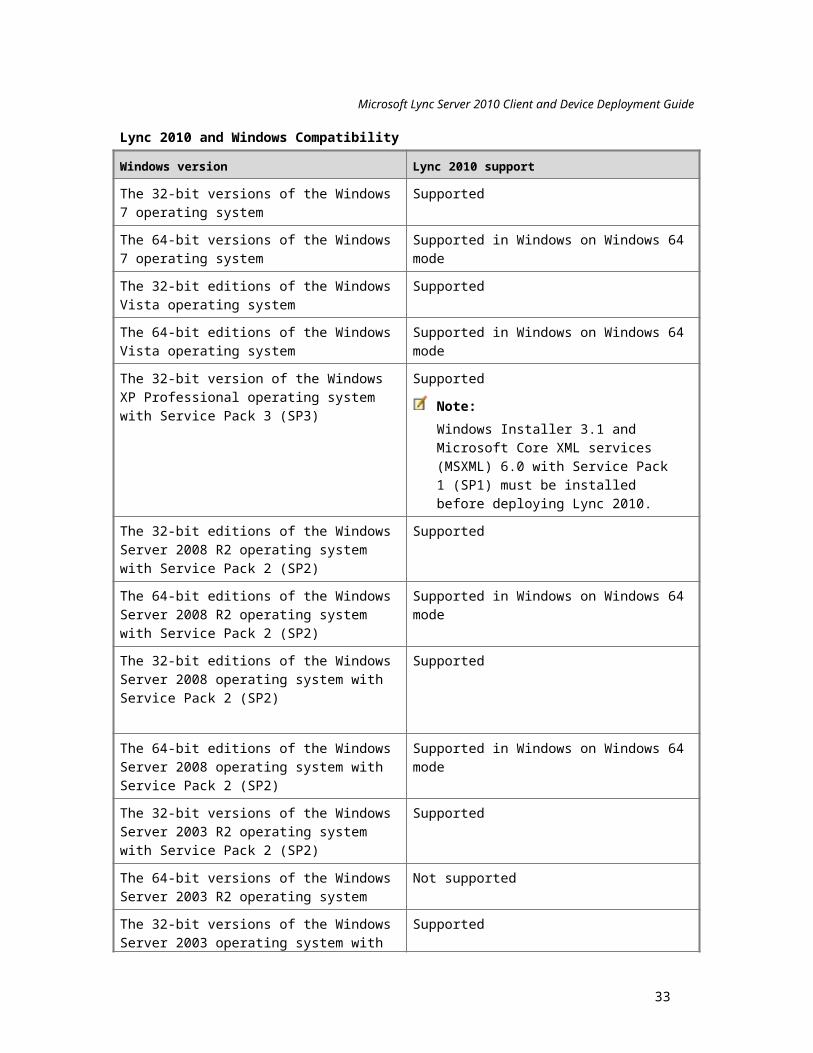
Microsoft Lync Server 2010 Client and Device Deployment Guide
Policy Description
When set to False, the corresponding user
dialog box setting is unavailable.
EnableExchangeContactSync When set to True (the default value), Lync
creates a corresponding personal contact in
Outlook for each person on a user’s Lync
Contacts list.
EnableExchangeDelegateSync When set to True, enables delegates that a
user has configured in Exchange to schedule
meetings for that user.
EnableIMAutoArchiving Controls automatic archiving of instant
messages to the Outlook Conversation History
folder. When set to False, the corresponding
user setting is unavailable, but users can still
manually save individual conversations.
ExcludedContactFolders Indicates which Outlook contact folders (if any)
should not be searched any time Lync searches
for new contacts.
MAPIPollInterval For users of Microsoft Exchange Server 2003,
specifies how often Lync retrieves calendar
data from the Exchange public folders.
WebServicePollInterval For users of Microsoft Exchange Server 2007
and later versions of the product, specifies how
often Lync retrieves calendar data from EWS.
Many aspects of Lync and Outlook integration are controlled by Outlook and not by Lync Server.
The following new Outlook 2010 integration features, which appear when Lync is present, are
examples of this:
New contact card with expanded options, such as video call and desktop sharing
Quick search from the Find a Contact field in Outlook
Reply with an instant message or call from the Outlook Home ribbon in the Mail, Calendar,
Contacts, and Tasks folders
Lync Contacts list in the Outlook To-Do Bar
Some Office-based integration features can be controlled by using Office Group Policy objects
(GPOs). For details, see “Determine which features to enable or customize in Outlook 2010” at
http://go.microsoft.com/fwlink/?LinkID=201591 or “Office Customization Tool in the 2007 Office
system” at http://go.microsoft.com/fwlink/?LinkID=201599.
34

Microsoft Lync Server 2010 Client and Device Deployment Guide
Integration with Office Programs
The Office Sharing Add-in for Lync adds collaboration and sharing features to Microsoft Word
word-processing program, Microsoft PowerPoint presentation graphics program presentation
graphics program, and Microsoft Excel. The add-in is installed automatically on computers where
Office 2010 or Office 2007 is also installed. The add-in is not compatible with Microsoft Office
2003.
The sharing add-in allows Office 2010 or Office 2007 users to initiate a Lync collaboration or IM
session from within an Office file. The table describes the added options.
Lync 2010 Collaboration Features in Word, PowerPoint, and Excel
Option Description
In Office 2010, click the File tab, and then click
Send by Instant Message.
In Office 2007 and Office 2010, click the
Review tab, and then click Send by IM.
Initiates an IM session with the contacts the
user chooses. The document the user is
working on is included as an attachment, and
changes or feedback must be incorporated
manually.
In Office 2010, click the File tab, and then click
Share Document Window.
In Office 2007 and Office 2010, click Share
Now.
Initiates a program sharing session with the
contacts the user chooses. Others can view the
document the user is working on (but not your
desktop) and request permission to make
changes.
Two additional Lync integration features are specific to Office 2010:
File tab presence (click Info, and then look under Related People)
Availability menu in Microsoft Office SharePoint Workspace 2010 (formerly Microsoft Office
Groove 2007)
Integration with SharePoint Server
With Lync and Microsoft SharePoint Server integration, Lync users can do the following:
Use the Skill view, in Lync search results, to search Microsoft SharePoint Server 2010 My
Site pages for people with specific skills or expertise
Access their SharePoint Server 2010 My Site profile page from the Lync - Options dialog box
On a SharePoint Server page, view a user’s Lync presence indicator and its associated menu
or contact card
Configuring Lync 2010 Skill Search
When you configure Lync Skill Search, users can search SharePoint Server 2010 My Site pages
for names, keywords, or specific skills. You can also add a link at the bottom of the Lync search
results window that opens the search results in SharePoint.
To configure Lync 2010 Skill Search
1. Use the cmdlet New-CsClientPolicy or Set-CsClientPolicy with the
35

Microsoft Lync Server 2010 Client and Device Deployment Guide
SPSearchExternalURL and SPSearchInternalURL parameters.
2. Use Grant-CsClientPolicy to assign the new policy or policies to users.
When you define at least one of the parameters, the Skill button appears in the Lync main window
as soon as a user begins typing in the search box.
Note:
For a consistent user experience, users outside the firewall see the Skill button even if
you defined only an internal SharePoint URL. If the SharePoint Server cannot be
accessed, an appropriate error message appears.
To add or remove a SharePoint link in the Skill Search results
1. Use the cmdlet New-CsClientPolicy or Set-CsClientPolicy with the
SPSearchCenterExternalURL and SPSearchCenterInternalURL parameters.
2. Use Grant-CsClientPolicy to assign the new policy or policies to users.
Depending on the user’s location, SPSearchCenterExternalURL and
SPSearchCenterInternalURL add a link to the bottom of the Skill Search results that says, “View
results in SharePoint…” Users can click the link and then refine their search results by using the
advanced search capabilities of SharePoint Server.
For details about configuring Skill Search and adding a SharePoint Server link to the search
results, see New-CsClientPolicy, Set-CsClientPolicy, and Grant-CsClientPolicy in the Operations
documentation.
Adding a My Site Link to the Lync - Options Dialog Box
If your organization supports pictures in Lync, you can provide users with a link that allows them
to change their default corporate picture on SharePoint Server 2010 My Site. The link appears in
Lync, in the My Picture options.
To add or remove the My Site link
1. Use the cmdlet New-CsClientPolicy or Set-CsClientPolicy with the
ShowSharepointPhotoEditLink parameter.
2. Use Grant-CsClientPolicy to assign the policy to users.
For details about adding a My Site link to the My Picture options, see New-CsClientPolicy, Set-
CsClientPolicy, and Grant-CsClientPolicy in the Operations documentation.
Viewing Lync 2010 Presence in SharePoint
Users must have Office 2010, Office 2007, or Microsoft Office 2003 with the latest service pack
installed to view extended presence information on a SharePoint Server page.
To display the presence indicator and its associated contact card (in Office 2010) or menu (in
Office 2007 and Office 2003), SharePoint uses the Microsoft ActiveX control name.dll. The
ActiveX control makes calls directly to the Microsoft Lync 2010 API, and then Lync makes MAPI
or Exchange calls to supply the requested information.
36

Microsoft Lync Server 2010 Client and Device Deployment Guide
For details about how presence is displayed on a SharePoint Server page, see "How to add
presence/pawn to SharePoint contacts list" on the Microsoft Developer Network (MSDN) at
http://go.microsoft.com/fwlink/?LinkId=147181.
Smart Tags in Office 2007 and Office 2003
For the presence button and menu to appear next to (or above) a contacts name in Microsoft
Office Word 2007, Microsoft Office Word 2003, Microsoft Office Excel 2007, or Microsoft Office
Excel 2003, smart tags must be enabled.
For details about how to enable smart tags from within Word or Excel, see Microsoft Knowledge
Base article 300950, "How to troubleshoot custom Smart Tags in Office," at
http://go.microsoft.com/fwlink/?LinkId=147183.
For details about how to do large-scale customization of end-user settings in your organization by
using Office 2007 Group Policy settings, see "Group Policy overview (2007 Office system)" at
http://go.microsoft.com/fwlink/?LinkId=147185.
Note:
Smart tags are supported in Microsoft Word 2010 but do not appear with the dotted
purple underline present in previous versions of Word. Microsoft Excel 2010 does not
support smart tags.
Common Lync 2010 and Outlook Integration Issues
This section lists some common configuration issues that might prevent Lync integration with
Outlook from working as expected.
In organizations that have Office 2010, Office 2007 or Office 2003 installed, verify that you
have deployed the most current version of the Microsoft Office Compatibility Pack for Word,
Excel, and PowerPoint file formats. You can download "Microsoft Office Compatibility Pack
for Word, Excel, and PowerPoint File Formats” from the Microsoft Download Center at
http://go.microsoft.com/fwlink/?LinkId=147186.
Check that end-user integration settings in both Outlook and Lync, which are generally
enabled by default when Lync is installed, are set correctly:
In Outlook, verify that the Display online status next to a name option is selected by
doing one of the following:
-To view this option in Outlook 2007, on the Tools menu, click Options, click Other, and
then look under Person Names.
-To view this option in Outlook 2010, click the File tab, click Options, click Contacts, and
then look under Online status and photographs.
In Lync, verify that Microsoft Exchange or Microsoft Outlook is selected as the user’s
personal information manager.
Deploying Lync 2010 AttendantThe Microsoft Lync 2010 Attendant .msi file is included on the Microsoft Lync Server 2010
distribution disk. You can deploy Lync 2010 Attendant to receptionists or other users who manage
37

Microsoft Lync Server 2010 Client and Device Deployment Guide
multiple calls in your organization by using any method that supports a Windows Installer
package (.msi file). You can perform an IT-managed rollout or enable your end users to install
Lync 2010 Attendant individually. The method that you select depends on the size and security
requirements of your organization, the deployment methods that you already have, and the
experience level of the users.
Additionally, you can control key features and settings by using installation scripts or Active
Directory Domain Services (AD DS) Group Policy.
In This Section
IT-Managed Installation of Lync 2010 Attendant
User-Managed Installation of Lync 2010 Attendant
Lync 2010 Attendant Group Policy
Note:
For details about customizing the Online Meeting Add-in for Lync 2010 Attendant, see
Customizing the Online Meeting Add-in for Lync 2010.
IT-Managed Installation of Lync 2010 Attendant
Depending on the complexity of the installation scenario, there are several options for installing
Microsoft Lync 2010 Attendant.
Microsoft Systems Management Server (SMS) 2003 or Microsoft System Center
Configuration Manager 2007. Use these products for more complex software installation
scenarios, where scheduling, inventory, reporting, status, and support for an installation
across a wide area network (WAN) are required. For details, see the System Center TechNet
Library at http://go.microsoft.com/fwlink/?Linkid=140326.
Active Directory Domain Services (AD DS) Group Policy. You can create a Group Policy
object to deploy Lync 2010 Attendant to specific users or computers based on group
memberships. For details about how to use Group Policy, see the Windows Server Group
Policy TechNet Library at http://go.microsoft.com/fwlink/?linkid=141034.
Windows logon script. The logon script performs an unattended installation of Lync 2010
Attendant when a user logs on. You can use Group Policy objects to direct logon scripts to
specific devices or users.
Additionally, if you are deploying Lync 2010 Attendant on computers that are running Windows
Vista operating systems and you want to use the logging capability to debug issues, the users
must be part of the performance log users group. Lync 2010 Attendant does not add the computer
user account automatically to the performance log users group. You must manually add the
computer user account to this group.
Windows Installer Command-Line Parameters
During deployment, you can use Windows Installer command-line parameters to suppress the
installation user interface and generate a log file.
Suppressing the Installation User Interface
38

Microsoft Lync Server 2010 Client and Device Deployment Guide
When you deploy Lync 2010 Attendant, you can suppress the installation user interface by using
the Windows Installer command-line parameter /qn in your script, as follows:
msiexec /qn /i attendantconsole.msi
Windows Installer command-line parameters are not case-sensitive. For details, see “Command-
Line Options” in the Microsoft Developer Network (MSDN) Library at
http://go.microsoft.com/fwlink/?linkid=143014.
Generating a Log File
You can generate a log file during Lync 2010 Attendant set up by adding /l*v followed by a file
name to the Windows Installer command line. The asterisk specifies that all possible errors,
warnings, and status messages are written to the log file, and the v specifies that all messages
are verbose.
The Lync 2010 Attendant setup file, attendantconsole.msi, generates the log file %TEMP%\
Install.log, and an uninstall generates the file %TEMP%\Uninstall.log.
For example:
msiexec /qn /i Attendantconsole.msi
In addition to /l*v , other log file flags are possible. For example, /lem generates a log file that
contains only errors and out-of-memory or fatal exit information. For a complete list of log file
options, see “Normal Logging (Windows)” in the MSDN Library at http://go.microsoft.com/fwlink/?
linkid=141036.
Event trace log (ETL) files, which can be generated on your computer in the <username>/Tracing
folder, enable administrators and Microsoft support technicians to troubleshoot issues. ETL files
are not created by default. To generate ETL files, enable the Turn on Logging in Attendant
option in the Options dialog box. This logging option is off by default.
The log file for Lync 2010 Attendant is overwritten every time Lync 2010 Attendant is started.
Notes:
You can uninstall Microsoft Office Communications Server 2007 R2 Attendant by including the
following command line in your script:
msiexec /x attendantconsole.msi
User-Managed Installation of Lync 2010 Attendant
Microsoft Lync 2010 Attendant can be installed by using a file server on your network as a
software distribution point for the Lync 2010 Attendant Windows Installer package. At rollout time,
you can send an email message to users that explains the installation process and provides a link
to the distribution point.
Note:
The Microsoft .NET Framework 3.5 must be installed on the users' computers before
Lync 2010 Attendant can be installed.
To install Lync 2010 Attendant on a desktop computer
39

Microsoft Lync Server 2010 Client and Device Deployment Guide
1. Double-click AttendantConsole.msi.
2. Click Next.
3. Read the Microsoft Software License Terms, and then click Next.
4. Select the I accept the terms in the License Agreement check box, and then click Next.
5. Choose a destination folder, or accept the default, and then click Next.
6. Click Install to begin the installation.
7. After the setup files are installed, click Next.
8. Click Finish to complete the installation.
Lync 2010 Attendant Group Policy
One way to provide the appropriate registry settings for each user when you are deploying
Microsoft Lync 2010 Attendant is to define Group Policy settings. You can deploy Lync 2010
Attendant Group Policy settings without affecting users who are running previous versions of
Attendant.
This table introduces the Lync 2010 Attendant Group Policy settings.
Group Policy Settings for Lync 2010 Attendant
Policy Name Display Name Definition
AttendantSafeTransfer Attendant - Safe
Transfer
Enables or disables the safe transfer
feature in Lync 2010 Attendant and
prevents the user from changing this
setting in Attendant Options. With
Safe Transfer enabled, transfers
reappear in the incoming area with a
Failed Transfer notification when they
do not reach their intended recipient.
If this policy is set to zero, Safe
Transfer is turned off, and the user
setting in the Options dialog box is
disabled.
If this policy is set to a nonzero
value, Safe Transfer is turned on,
and the user setting in the Options
dialog box is disabled.
If this policy is not set, the user can
change the setting in the Options
dialog box.
DisableMusicOnHold Attendant - Music On
Hold Disabled
Enables or disables Music on Hold in
Lync 2010 Attendant and prevents
40

Microsoft Lync Server 2010 Client and Device Deployment Guide
Policy Name Display Name Definition
the user from changing the setting in
Attendant Options.
If this policy is set to a nonzero
value, Music on Hold is disabled, and
the user setting in the Options dialog
box is disabled.
If this policy is not set or set to zero,
Music on Hold can be configured by
the user (the default is no music on
hold), unless MusicOnHoldAudioFile
is set.
Note: When MusicOnHoldDisabled is
set to a nonzero value, and
MusicOnHoldAudioFile is also set,
Music on Hold is disabled
(MusicOnHoldDisabled takes
precedence).
MusicOnHoldAudioFile Attendant - Music On
Hold Audio File
Enables or disables the ability for the
user to specify the Music on Hold file
in Attendant Options.
If this policy is set, the string
specifies the file to use for Music on
Hold. Music on Hold is forced on with
this audio file, and the option is
disabled. The file that is specified for
Music on Hold must be available to
all computers on which this policy
applies. You can put this file on a file
share that these computers can
access.
If this policy is not set, the user can
change the setting in the Options
dialog box, unless
MusicOnHoldDisabled is set.
Note:
When MusicOnHoldDisabled
is set to a nonzero value and
MusicOnHoldAudioFile is
also set, Music on Hold is
disabled
41

Microsoft Lync Server 2010 Client and Device Deployment Guide
Policy Name Display Name Definition
(MusicOnHoldDisabled takes
precedence).
Note:
The DisableBalloonWarning setting is obsolete in Lync 2010 Attendant.
Deploying Lync 2010 AttendeeIf you plan to make Microsoft Lync 2010 Attendee available to users, decide whether you want to
deploy Lync 2010 Attendee in advance or make it available on the meeting join page for users to
download as needed.
IT-Managed Installation of Lync 2010 Attendee
You can deploy Lync 2010 Attendee in a managed-desktop environment by using the following
methods:
Microsoft Systems Management Server (SMS) 2003 or Microsoft System Center
Configuration Manager 2007 R2. Use these products for more complex software installation
scenarios, where scheduling, inventory, reporting, status, and support for an installation
across a wide area network (WAN) are required. For details, see the System Center TechNet
Library at http://go.microsoft.com/fwlink/?Linkid=140326.
Windows logon script. The logon script performs an unattended installation of Lync 2010
Attendee when a user logs on. You can use Group Policy objects to deploy logon scripts to
specific devices or users.
Active Directory Domain Services (AD DS) Group Policy. You can create a Group Policy
object to deploy Lync 2010 Attendee to specific users or computers based on group
memberships. For details about how to use Group Policy, see the Windows Server Group
Policy TechNet Library at http://go.microsoft.com/fwlink/?linkid=141034. However, the setup
file for Lync 2010 Attendee is provided as an executable (.exe) program. Because .exe
programs cannot be deployed by using Group Policy, you must take additional steps to
prepare the Lync 2010 Attendee setup file for Windows Installer by creating a .zap file. For
details about creating .zap files, see "Packaging Software for Deployment" at
http://go.microsoft.com/fwlink/?LinkId=201091 and "Step-by-Step Guide to Software
Installation and Maintenance" at http://go.microsoft.com/fwlink/?LinkId=201092.
User-Managed Installation of Lync 2010 Attendee
You can configure the meeting join page to make Lync 2010 Attendee available for download. If a
user has not installed Microsoft Lync 2010 and he or she clicks a meeting URL, the meeting join
42

Microsoft Lync Server 2010 Client and Device Deployment Guide
page appears. The meeting join page always contains the option to use Microsoft Lync Web App.
In addition to this option, you can configure the meeting join page to show the download link for
Lync 2010 Attendee. For details about configuring the options available on the meeting join page,
see Configure the Meeting Join Page.
Lync 2010 Attendee setup files are available from the Microsoft Download Center at the following
locations.
Administrator-level installation is available at http://go.microsoft.com/fwlink/?LinkID=201479.
A user with an administrator account on the computer can install Lync 2010 Attendee so that
all users of the computer can join Lync 2010 meetings.
User-level installation is available at http://go.microsoft.com/fwlink/?LinkID=201478. If the
user is not an administrator on the computer, but an administrator has allowed the user to
perform installations, the user can install Lync 2010 Attendee for his or her own use.
To install Lync 2010 Attendee on a computer, Lync 2010 must not already be installed. The user
must have either administrator rights and permissions on the computer or the user rights and
permissions required to perform installations on the computer.
Deploying Lync 2010 Group ChatMicrosoft Lync 2010 Group Chat is the Group Chat client. This client—together with Microsoft
Lync Server 2010, Group Chat—enables communication in real time by using Group Chat
sessions with persistent content that is retained after a session ends. It allows for the instant
exchange of business expertise across an organization and with external partners so that it is
possible to maintain a continuous flow of information among project members.
The following topics describe how to deploy Lync 2010 Group Chat in your organization. These
topics outline deployment considerations for Group Chat. They should be used with the Microsoft
Lync Server 2010 Deployment documentation, available from the Lync Server 2010 TechNet
Library at http://go.microsoft.com/fwlink/?LinkId=202714.
In This Section
Overview of Lync 2010 Group Chat Planning and Deployment
Lync 2010 Group Chat Terminology and Concepts
Preparing to Install Lync 2010 Group Chat
Installing Lync 2010 Group Chat
Configuring Lync 2010 Group Chat to Connect to Lync Server 2010, Group Chat
Uninstalling Lync 2010 Group Chat
Instant Messaging with Lync 2010 Group Chat and Lync 2010
Additional Resources for Lync 2010 Group Chat
43

Microsoft Lync Server 2010 Client and Device Deployment Guide
Overview of Lync 2010 Group Chat Planning and Deployment
Deploying Microsoft Lync 2010 Group Chat includes the following tasks:
Preparing to Install Lync 2010 Group Chat
Installing Lync 2010 Group Chat
Configuring Lync 2010 Group Chat to Connect to Lync Server 2010, Group Chat
See Also
Uninstalling Lync 2010 Group Chat
Additional Resources for Lync 2010 Group Chat
Lync 2010 Group Chat Terminology and Concepts
Active Directory Domain Services (AD DS)
Directory services program that stores information and settings of an organization in a
central database. Microsoft Lync Server 2010, Group Chat synchronizes with AD DS to
maintain current user information.
Chat History
Feature that provides content history of logged chat rooms, including contextual chat
history (messages from previous sessions still shown in the message area on logged
chat rooms) and searchable history (messages no longer shown on logged chat rooms,
but still available to search).
Chat Room Server
Server that provides core functionality for Microsoft Lync 2010 Group Chat, except for
file posting, which is managed through Web Services.
Compliance
Lync 2010 Group Chat feature that, if configured, archives a comprehensive record of
both logged and unlogged Lync Server 2010, Group Chat activity. All data (Group Chat
Server, files, stories, images, and other data) that is posted by a user can be recorded
as events and archived.
Note:
Instant messaging (IM) content is not archived, unless archiving is configured in Microsoft Lync
Server 2010, in which case, it is archived by the Microsoft Lync Server 2010, Archiving Server.
The Lync Server 2010, Archiving Server supports archiving of IM content, conferencing (meeting)
content, or both. For details about Archiving Server, see Planning for Archiving in the Planning
documentation.
Compliance Adapters
Feature that is configured to specify how compliance data is managed by Lync Server
2010, Group Chat, including the folder where compliance output is retained, whether full
user details are included in the output, and the window of time used to split output into
multiple files.
44

Microsoft Lync Server 2010 Client and Device Deployment Guide
Compliance Repository
Folder where copies of all files in the file repository are stored as part of the compliance
system.
Federated Group Chat
Group Chat feature that enables members of different organizations to post and access
Group Chat content in Group Chat rooms.
File Repository
Root directory where uploaded Group Chat files are stored.
Group Chat
The Group Chat client that is used to post and access chat room content—including
files, links, and text—and to exchange instant messages between two users.
Group Chat Feature
Feature that enables multiple members of a Group Chat room to post persistent Group
Chat content for access by other members of the Group Chat room and to view Group
Chat content posted by other members. The Group Chat feature requires deployment of
Group Chat and Group Chat Server.
Group Chat Rooms
Topic-specific chat rooms (similar to discussion forums) for Group Chat sessions.
Group Chat Server
Program that provides the server-side Group Chat features, including Group Chat
Server, Lookup Servers, database access, and optional Compliance Servers, and
administration and configuration tools that are used to enable Group Chat users to post
Group Chat content and share it with other users.
Instant Messaging (IM)
Feature available in Group Chat, Lync Server 2010, and other software that enables two
individual users to communicate with each other in real time. In Group Chat, IM content
is not persistent—unlike Group Chat content in a Group Chat room, it is available only
to the two participating clients during the session. Lync Server is responsible for all the
IM in Group Chat.
Lync Server
The Microsoft product that provides enterprise-ready IM, presence, and conferencing in
a single offering. Group Chat Server uses Lync Server as its IM backbone. Lync Server
provides authentication, message delivery, and session management, and user
presence and user ID information for instant messages. It also enables federated Group
Chat conversations and is responsible for archiving all IM it processes, including Group
Chat Server instant messages.
Persistence
Group Chat feature that enables Group Chat content to be retained after the end of a
45

Microsoft Lync Server 2010 Client and Device Deployment Guide
Group Chat session and accessed on an ongoing basis.
Presence
Real-time connection status information for users.
Server Pool
A group that consists of multiple Lookup Servers and Chat Room Servers that supports
communication and the sharing of data between servers and the implementation of
optional load balancing and failover.
Session
The time period during which Group Chat is connected to Group Chat Server.
SQL Server Database
The database in Microsoft SQL Server database software that stores persistent data,
including backchat, chat rooms, categories, rights, and permissions.
Web Services
The service that is used to post files to chat rooms. Internet Information Services (IIS)
hosts Web Services.
Lync 2010 Group Chat Group Policy
Microsoft Lync 2010 Group Chat Group Policy settings can be configured manually by using the
registry or by using Group Policy objects (GPOs). One way to define Group Policy Settings for
Group Chat is by using the GroupChatConsole.adm administrative template, which is included on
your distribution disk.
Group Chat Group Policies are summarized in the following table.
Group Chat Group Policies
Policy Name Definition
ConfigurationMode Specifies the host, protocol, and port that
Group Chat uses to connect to Microsoft Lync
Server 2010.
DisableIM Specifies IM feature settings for all Group Chat
client software.
DisableNTCredentials Forces the user to provide logon credentials
rather than automatically using Windows
credentials to authenticate the user by using
NTLM or Kerberos protocol.
46

Microsoft Lync Server 2010 Client and Device Deployment Guide
Policy Name Definition
DisableUserColors Specifies user Colors feature settings for all
Group Chat client software
LookupServerUri This policy allows the URI of the Lookup Server
that will vend Channel Server URIs to be
specified.
The Lookup Server’s URI is generally assumed
based on the user’s SIP URI, which is not
reliable if users are allowed to have multiple
namespaces for their SIP URIs.
PolicyAdministration This policy allows account information to be
configured by the Microsoft Lync Server
2010 Group Chat Administration Tool.
Options: Select the Auto detect global
catalog check box, or enter the global catalog’s
fully qualified domain name (FQDN) in the
provided field.
Important:
IMPORTANT: If the Auto-detect global
catalog check box is not selected, a
value MUST be entered into the
Global Catalog FQDN field.
Check the Allow Non SSL Active Directory
Connections check box to allow non-SSL
connections. SSL provides encrypted
connections.
Set the Maximum Search Result Count value.
Clicking the arrow controls of the number field
increases or decreases the number in
increments of 100. It can also be manually
entered. This defines the maximum return
when an Active Directory search, such as a
user search, is performed.
This value applies only to the Administration
Tool. User searches through the desktop client
are limited to 20 users returned.
PolicyAllowAccountConfigurationEdit Enabling this policy allows users to configure
accounts in addition the one specified by this
GPO so that they can log on to different
servers. Disabling this policy prevents users
47

Microsoft Lync Server 2010 Client and Device Deployment Guide
Policy Name Definition
from creating and editing custom accounts.
PolicyFileTransferPermissions Specifies peer-to-peer file transfer permissions
for all Group Chat client software. This setting
pertains only to instant messaging. If IM
features are disabled, this setting has no effect.
PolicyLoginAccountName This Group Policy specifies a name for the new
account. This name appears in the Group Chat
client logon form as an available account.
PresencePollFrequencySeconds Specifies the presence polling frequency in
seconds. This setting pertains only to chat
room participants.
Preparing to Install Lync 2010 Group Chat
Before you install Microsoft Lync 2010 Group Chat, you need to verify that the computer on which
it is going to be installed meets system requirements and that the required environment with the
proper software requirements has been set up. See the following topics for details.
System Requirements for Lync 2010 Group Chat Computers
Software Requirements for Lync 2010 Group Chat Installation
Lync 2010 Group Chat and Privacy Mode
See Also
Planning for Group Chat Server
System Requirements for Lync 2010 Group Chat Computers
System Component Group Chat Requirement
Operating system For details, see the Server and Tools Operating
System Support in the Supportability
documentation.
Computer/processor 1-gigahertz (GHz) or faster processor, Intel
Pentium-compatible
Memory 1 gigabyte (GB) of RAM
Disk space for installation 30.3 megabytes (MB)
Display resolution Required: Super VGA 800 x 600;
Recommended: Super VGA 1024 x 768 or
higher resolution
Bandwidth requirements Minimum of 56 kilobits per second (Kbps)
48

Microsoft Lync Server 2010 Client and Device Deployment Guide
System Component Group Chat Requirement
Security Administrator rights and permissions, or, in
Windows 7 Standard User Mode, administrator
credentials, to install Microsoft Lync 2010
Group Chat
Other Requirements The requirements and product functionality
listed here can vary according to the system
configuration and the type of operating system.
See Also
Software Requirements for Lync 2010 Group Chat Installation
Software Requirements for Lync 2010 Group Chat Installation
Microsoft Lync 2010 Group Chat requires the following software:
Microsoft .NET Framework 3.5 SP1
Microsoft Visual C++ Runtime 2 (versions 2.0.50727.761 and earlier are not supported)
If Visual C++ Runtime 2 is not present on the computer, the Lync 2010 Group Chat installation
program installs it during installation. If .NET Framework 3.5 SP1 is not on the computer, you are
prompted to download and install it before proceeding.
Lync 2010 Group Chat and Privacy Mode
When Microsoft Lync 2010 Group Chat is not the primary instant messaging (IM) and presence
client and is running side-by-side with Microsoft Lync 2010, Lync 2010 Group Chat will not violate
the Lync 2010 presence privacy mode.
Presence privacy mode works with Group Chat as follows:
Lync 2010 stops Group Chat from doing any access control entry (ACE) bootstrapping when
running side-by-side with Lync 2010.
Group Chat can still display presence and can read and edit the Buddy List. If Group Chat
stops IM, presence, and Buddy List operations when running with Lync 2010, Group Chat
stops bootstrapping as well.
If Group Chat is running with IM and presence mode enabled, it bootstraps the default ACEs,
thus effectively overriding presence privacy mode. Presence privacy mode will not work in
this scenario.
If Microsoft Lync Server 2010 is running in presence privacy mode, Group Chat must be
configured with its IM and presence mode disabled, or Group Chat reverts out of presence
privacy mode.
Notes:
You must run Group Chat on the same computer as Lync 2010 for them to work side-by-side in
presence privacy mode.
49

Microsoft Lync Server 2010 Client and Device Deployment Guide
You can run Group Chat without Lync 2010 and still run Lync 2010 in presence privacy mode on
another computer, as long as you keep IM disabled on the computer running Group Chat. We do
not recommend this scenario.
Installing Lync 2010 Group Chat
The following procedure describes how to install Microsoft Lync 2010 Group Chat.
To install Group Chat
1. Start ClientSetup.exe from the Microsoft Download Center at
http://go.microsoft.com/fwlink/?LinkID=203410.
2. On the Welcome page, click Next.
3. On the License Agreement page, review the agreement and, to accept the terms and
continue with the installation, click I accept the terms in the license agreement, and
then click Next.
4. On the Microsoft Lync Server 2010 Group Chat Setup page, leave the default location
as is or specify a different location, and then c lick Next.
5. On the Confirm Installation page, click Next.
Configuring Lync 2010 Group Chat to Connect to Lync Server 2010, Group Chat
You can connect Microsoft Lync 2010 Group Chat to Microsoft Lync Server 2010, Group Chat by
using either of the following methods:
Configure Lync 2010 Group Chat Automatically (recommended)
Configure Lync 2010 Group Chat Manually
Configure Lync 2010 Group Chat Automatically
Automatic configuration is the recommended way to connect Microsoft Lync 2010 Group Chat to
Microsoft Lync Server 2010, Group Chat. If you have configured automatic client sign-in for
Microsoft Lync Server 2010, you use the same Domain Name System (DNS) records for Lync
Server 2010, Group Chat.
The Lync Server 2010 documentation provides specific instructions for creating the DNS records
required for automatic client sign-in. For details about using Microsoft Lync Server 2010,
Standard Edition, see DNS Requirements for Automatic Client Sign-In. For details about using a
Front End pool with Microsoft Lync Server 2010, Enterprise Edition, see Configure DNS Records
for a Front End Pool.
To log on with automatic configuration
1. Click Start, point to All Programs, and then click Microsoft Lync Server 2010, Group
Chat.
50

Microsoft Lync Server 2010 Client and Device Deployment Guide
2. In the Microsoft Lync Server 2010, Group Chat Group Chat Login dialog box, in the
Account list, keep the default setting of Automatic Configuration.
3. Type your SIP Uniform Resource Identifier (URI), Windows logon, and Windows
password, and then click Sign In.
The SIP URI and logon will pre-populate the next time that you sign in to Lync 2010 Group Chat.
Configure Lync 2010 Group Chat Manually
If the Domain Name System (DNS) has not been configured to return the appropriate SRV
records, manually enter the account configuration information used to install the servers.
Note:
We recommend automatically configuring account information for Microsoft Lync 2010
Group Chat. For details, see Configure Lync 2010 Group Chat Automatically.
To log on with manual configuration
1. Click Start, point to All Programs, and then click Microsoft Lync Server 2010, Group
Chat.
2. In the Microsoft Lync Server 2010, Group Chat Login dialog box, in the Account list,
click Edit Accounts.
Note:
If the Edit Accounts dialog box is read-only, the system administrator has
configured another account by using Group Policy objects, making that the only
account available.
3. In the Edit Accounts dialog box, click Add.
4. In Display Name, type a name for the new account. This name is used on the Accounts
menu of the Group Chat Login dialog box the next time that you sign in to Lync 2010
Group Chat.
5. To use single sign on (SSO), select the Use my Windows credentials to log in
automatically check box.
6. Type the Microsoft Lync Server 2010 host name, by doing one of the following:
If you are installing Group Chat in a Microsoft Lync Server 2010, Group Chat
environment that is running Microsoft Lync Server 2010, Enterprise Edition, type the
pool name.
If you are installing Group Chat in a Lync Server 2010, Group Chat environment that
is running Microsoft Lync Server 2010, Standard Edition, enter the fully qualified
domain name (FQDN) of the Standard Edition server.
Port resets to the correct value.
7. In Chat Room Domain, type the domain portion of the Lookup Server's SIP Uniform
Resource Identifier (URI).
8. If using the default SIP URI (OCSChat@<domainName>.com), select the Use Default
51

Microsoft Lync Server 2010 Client and Device Deployment Guide
Server Address check box. Otherwise, type the SIP URI of the Lookup Server (specified
during server installation).
9. When all the settings are as you want them, click OK.
The name of the newly-created configuration is added to the Accounts box.
Uninstalling Lync 2010 Group Chat
To uninstall Microsoft Lync 2010 Group Chat, use Programs and Features (on a computer running
Windows 7 operating system operating systems) or Add or Remove Programs (on a computer
running Windows Vista operating system operating systems).
After Lync 2010 Group Chat is uninstalled, several files remain on the computer. By default, these
files are in the Application Data folder. For example, if you use the default location on a computer
that is running Windows 7 Professional, the files are at the following location: C:\Documents and
Settings\<NT username>\Application Data\ (where <NT username> is the user name used to sign
into Group Chat).
Note:
The Application Data folder and the folders that it contains could be hidden.
The following items in the Application Data folder for Group Chat are not removed when Group
Chat is uninstalled:
Accounts folder. Contains sign-in accounts and identifies the default account.
Logs folder. Contains Group Chat logs.
Preferences folder. Contains local copies of preferences.
Sounds folder. Contains sound files.
GroupChatConsoleLogger.xml file. Controls the logging level of Group Chat.
Note:
The location of these files meets the standards as set forth in “Designed for Windows XP
Application Specification” at http://go.microsoft.com/fwlink/?linkid=140662. These are files
that are meant to be retained in the original location when a user is deleted or moved.
Instant Messaging with Lync 2010 Group Chat and Lync 2010
Microsoft Lync 2010 Group Chat and Microsoft Lync 2010 are both included with Microsoft Lync
Server 2010. Because the two clients share several capabilities, it is helpful to know how the two
interact. The behavior of the two clients depends on which one is designated as the preferred
client.
For example, when Lync 2010 Group Chat is the preferred client, Contacts lists appear and can
be updated within Group Chat. Lync 2010 also updates its Contacts lists with these updates. If
Lync 2010 is the preferred client, Group Chat does not display the Contacts list and because it is
not available, no instant messages or instant messaging (IM) conversations can be initiated
through Group Chat's Contacts list. However, you can double-click participants in a chat room
and initiate IM conversations by using Lync 2010.
52

Microsoft Lync Server 2010 Client and Device Deployment Guide
In a scenario where Group Chat is not the primary IM client, there are two differences to note.
First, a Contacts list which would appear in the My Chat panel if Group Chat were the primary IM
client does not appear. Second, participants in the particular chat room that you are in still have
presence information associated with them. You can still initiate IM conversations with them. To
do this, double-click the participant's name, which opens a Lync 2010 Conversation window.
Additional Resources for Lync 2010 Group Chat
For additional information about Microsoft Lync 2010 Group Chat communications software, see
the following resources:
Planning for Group Chat Server in the Planning documentation.
New Group Chat Server Features describes the new Microsoft Lync Server 2010, Group Chat
features associated with Lync 2010 Group Chat.
See Also
Deploying Group Chat Server
Deploying Lync 2010 Phone EditionThis guide covers how to provision and deploy Microsoft Lync 2010 Phone Edition and the new
line of IP phones: the Aastra 6721ip common area phone, Aastra 6725ip desk phone, HP 4110 IP
Phone (common area phone), HP 4120 IP Phone (desk phone), Polycom CX500 IP common
area phone, Polycom CX600 IP desk phone, and Polycom CX3000 IP conference phone.
For information about supported phones, see Planning for Devices in the Planning
documentation. Be aware that mobile phones are outside the scope of the planning
documentation and this section.
In This Section
Checklist for Deploying Lync 2010 Phone Edition
Using DHCP to Assign IP Addresses to Devices
Configuring DHCP Options to Enable Sign-in for IP Phones
Using NTP to Set the Correct Time and Date for Devices
Provisioning IP Phones
Certificates for Lync 2010 Phone Edition
Configure Enhanced 9-1-1
Setting Up the Authentication PIN for IP Phones
End-User Documentation about Lync 2010 Phone Edition
Device Update Web Service
Appendix: Configuring DHCP Options on DHCP Servers other than Windows DHCP Server
53

Microsoft Lync Server 2010 Client and Device Deployment Guide
Checklist for Deploying Lync 2010 Phone Edition
When deploying IP phones in your organization, use this checklist to guide you through the
process.
Tips:
For the best audio quality, consider deploying Direct Access, instead of remote access, to remote
users who are using USB devices.
Plan for the Migration and Coexistence of Devices
If you are migrating devices from a previous version (Microsoft Office Communications Server
2007 R2 or Microsoft Office Communications Server 2007) to Microsoft Lync Server 2010, move
the user accounts from the previous version to Lync Server 2010. After you have moved to Lync
Server and the user accounts have been moved to Lync Server, the next time the device receive
an update, it will restart and automatically migrate from the previous version to Lync Server.
Select Devices and Documentation
1. Decide how many devices to deploy and what kind. For details, see Choosing New Devices
in the Planning documentation.
2. If you’re buying new phones, identify and purchase the devices that you want. For details,
see Choosing New Devices in the Planning documentation.
3. Identify the documentation that users can read to guide them through setup. For details, see
relevant Quick Start and Work Smart guides.
Confirm Prerequisites
1. Deploy Microsoft Lync Server 2010, Front End Server, and check that Web Services is
running.
2. Deploy Microsoft Lync Server 2010, Mediation Server or gateways for telephony. For details,
see Deploying Enterprise Voice.
3. Set up your network for external access, if you’re allowing it. For details, see System and
Infrastructure Requirements for Devices in the Planning documentation.
4. Set up dial plans and call routes for users.
5. Enable Enterprise Voice for users. For details, see Deploying Enterprise Voice.
Tips:
Run a script to verify that users are enabled correctly for Enterprise Voice. For a list of all enabled
users, at the command prompt, run:
Get-CsUser | Where-Object {$_.EnterpriseVoiceEnabled –eq $True} | Select Identity, EnterpriseVoiceEnabled
For a list of all users that includes information about which users are enabled, at the command
prompt, run:
54

Microsoft Lync Server 2010 Client and Device Deployment Guide
Get-CsUser | select DisplayName, EnterpriseVoiceEnabled
Perform Pre-Deployment Tasks
1. Create the required DNS and DHCP records. For details, see System and Infrastructure
Requirements for Devices in the Planning documentation.
2. Adjust dial plans and outbound call routes for users, and set up voice policies, as needed. For
details, see Create a Dial Plan and Configuring Voice Policies, PSTN Usage Records, and
Voice Routes. Set up the appropriate voice policies for users, or review default polices by
running the Grant cmdlet for the policy. For details about the Lync Server Management
Shell, at the command prompt, run:
Get-Help Grant-CsClientPolicy –Full
3. If you’re deploying common area phones, create a contact object for each device, and
configure the phones. For details, see Configuring Common Area Phones.
4. Set up test devices.
Provision and Prepare Users
1. Run a script to verify that users are enabled correctly for Enterprise Voice, if you’re using it.
For a list of all enabled users, at the command prompt, run:
Get-CsUser | Where-Object {$_.EnterpriseVoiceEnabled –eq $True} |
Select Identity, EnterpriseVoiceEnabled
For a list of all users that includes information about which users are enabled, at the
command prompt, run:
Get-CsUser | select DisplayName, EnterpriseVoiceEnabled
2. Set the in-band policies, with logging levels, for devices.
3. If you are deploying any of the new IP phones (the Aastra 6721ip common area phone,
Aastra 6725ip desk phone, HP 4110 IP Phone [common area phone], HP 4120 IP Phone
[desk phone], Polycom CX500 IP common area phone, Polycom CX600 IP desk phone,
and/or Polycom CX3000 IP conference phone), assign an authentication personal
identification number (PIN) to each user, or decide to let users set the PIN for themselves. An
administrator can set the PIN from the Microsoft Lync Server 2010 Control Panel or from Lync
Server Management Shell (by using the Set –CSClientPIN cmdlet); for details, see Set-
CsClientPin in the Lync Server Management Shell documentation. A user can set the PIN by
visiting the Dial-in Conferencing Settings and PIN Management page.
4. Download the latest software updates from the Microsoft website, and deploy them to test
devices
5. Or, ensure that users can access the documentation that you are providing about how to use
the device. For details, see relevant Quick Start and Work Smart guides.
Set up Devices
1. If the devices are being deployed externally, make sure that the devices have been logged on
to the network successfully before being used externally. Devices must download certificates
internally once before they can be used externally. For details, see the “Connection Process
55

Microsoft Lync Server 2010 Client and Device Deployment Guide
for External IP Phones” section in Device Connection Process in the Troubleshooting
documentation.
2. Give the user the device, documentation, and PIN, if available.
3. Check call detail recording (CDR) to make sure that the user has received and made calls
and successfully logged in while in the corporate environment. For details, see Call Detail
Recording (CDR) Database Schema in the Reference documentation.
Support and Monitor the Deployment
1. Use Quality of Experience (QoE) reports. For details, see Quality of Experience (QoE)
Database Schema in the Reference documentation.
2. Generate device update reports by using the IP Phone Inventory tool.
3. Use other monitoring tools, including CDR reports. For details, see Call Detail Recording
(CDR) Database Schema in the Reference documentation.
4. Check the Microsoft website every three months for updates.
Using DHCP to Assign IP Addresses to Devices
All computers that are on a TCP/IP network must have an IP address on the network to work
correctly. You can manually configure IP addresses at each computer, or you can install a
Dynamic Host Configuration Protocol (DHCP) server that can assign IP addresses to each client
computer or device on the network. No manual configuration is required on the IP phones
because the phones can receive only DHCP-assigned IP addresses.
Overview of DHCP
DHCP provides an automated way to distribute and update IP addresses and other configuration
information on a network. A DHCP server provides this information to a DHCP client through the
exchange of a series of messages, known as the DHCP conversation or the DHCP transaction. If
the DHCP server and DHCP clients are located on different subnets, a DHCP relay agent is used
to facilitate the conversation.
A DHCP client is any network-enabled device that allows you to communicate with a DHCP
server to obtain dynamic, leased IP configuration and related, optional information. Unified
communications (UC) phones are DHCP clients.
Required Ports
Make sure that the following ports are open to allow a hardware load balancer:
On a Registrar: 5061, 5063 (for SIP connections)
On Web Services: 80 (HTTP) and 443 (HTTPS)
On a hardware load balancer: 444 (for HTTPS between server components), and make sure
that source network address translation (SNAT) is allowed through.
User Provisioning
Ensure that users have been provisioned and enabled on Microsoft Lync Server 2010. This can
be done in the Microsoft Lync Server 2010 Control Panel.
56

Microsoft Lync Server 2010 Client and Device Deployment Guide
In Lync Server 2010 Control Panel, go to the Users tab and search for the user. Double-click the
user to see if he or she is enabled and have telephony type Enterprise Voice. Both of these
values need to be set for the user to be able to connect to Lync Server 2010 and make phone
calls.
Dial-in Page
After the users have been provisioned, they will go to the dial-in page to set-up their PIN. For
information about how to create a simple URL for the user dial-in page, see, Deploying Lync 2010
Phone Edition.
DHCP Search Options
A DHCP client and DHCP server are defined as follows.
DHCP client is network host using DHCP to obtain configuration parameters such as a
network address.
DHCP server is a network host that returns configuration parameters to DHCP clients.
A list of Domain Name System (DNS) suffixes should be added to use in completing unqualified
DNS names that are used to search and submit DNS queries at the client for resolution. For
DHCP clients, this can be set by assigning the DNS domain name option (option 15) and
providing a single DNS suffix for the client to append and use in searches.
In some circumstances it is preferable that a DHCP client be configured with the domain search
list. Multiple DNS suffixes are supported with the use of DHCP search option 119.
DHCP search option 119 is passed from the DHCP server to the DHCP client to specify the
domain search list used when resolving host names with DNS. DHCP search option 119 applies
only to DNS; it does not apply to other name resolution mechanisms.
DHCP Options for the Domain Search List
DHCP Option Description
15 Specifies the connection-specific DNS domain
suffix to be used by the DHCP client
119 Specifies the domain search list to be used
when resolving host names with DNS
To enable search option 119 for a Windows Server DHCP server, do the following:
1. Open DHCP server: Click Start, point to Settings, click Control Panel, double-click
Administrative Tools, and then double-click DHCP.
2. In the console tree, click the applicable DHCP server.
3. On the Action menu, click Set Predefined Options.
4. In Predefined Options and Values, click Add (Option Class Standard), and click OK.
5. In Name, type DNS Search List.
6. Set Code to 119 and Data Type string (it is not an <ServerRole> pool), and click OK.
57

Microsoft Lync Server 2010 Client and Device Deployment Guide
7. Right-click Scope Options, click Configure Options, and select the Option 119 DNS
Search List check box.
8. Type a list of domain suffixes in your organization separated by a semi-colons (For example,
contoso.com; dev.contoso.com).
9. Click OK.
See Also
Configuring DHCP Options to Enable Sign-in for IP Phones
Using DHCPUtil
This topic describes how to use DHCPUtil.
DHCPConfigScript.bat
DHCPUtil does not configure the DHCP servers by itself. It delegates that responsibility to a script
which can be changed to suit the organization’s need. After it calculates the values for various
options, DHCPUtil passes these values to a script, which can then take appropriate action.
DHCPConfigScript.bat is one such script and is the one that ships with DHCPUtil. (It is in the
same location as DHCPUtil.) This script uses netsh dhcp server commands that configure
DHCP server with the options required for Microsoft Lync Server 2010 deployment.
Note:
DHCPConfigScript.bat cannot be used against any DHCP server other than the DHCP
server feature included with Windows Server operating systems, unless you modify it.
Here is what the script contains:
netsh dhcp server delete optionvalue 120
netsh dhcp server delete optiondef 120
netsh dhcp server delete class MSUCClient
if /i %1 EQU Cleanup goto :EOF
netsh dhcp server add optiondef 120 UCSipServer Binary 0 comment="Sip
Server Fqdn"
netsh dhcp server set optionvalue 120 Binary %3
netsh dhcp server add class MSUCClient "UC Vendor Class Id" "%2" 1
netsh dhcp server add optiondef 1 UCIdentifier Binary 0
Vendor=MSUCClient comment="UC Identifier
"netsh dhcp server set optionvalue 1 Binary vendor=MSUCClient %4
netsh dhcp server add optiondef 2 URLScheme Binary 0 Vendor=MSUCClient
comment="URL Scheme"
netsh dhcp server set optionvalue 2 Binary vendor=MSUCClient %5
netsh dhcp server add optiondef 3 WebServerFqdn Binary 0
Vendor=MSUCClient comment="Web Server Fqdn"
netsh dhcp server set optionvalue 3 Binary vendor=MSUCClient %6
58

Microsoft Lync Server 2010 Client and Device Deployment Guide
if nt %7 == NULL (netsh dhcp server add optiondef 4 WebServerPort Binary
0 Vendor=MSUCClient comment="Web Server Port")
if not %7 == NULL (netsh dhcp server set optionvalue 4 Binary
vendor=MSUCClient %7)
netsh dhcp server add optiondef 5 CertProvRelPath Binary 0
Vendor=MSUCClient comment="Cert Prov Relative Path"
netsh dhcp server set optionvalue 5 Binary vendor=MSUCClient %8
The first three commands clean up a DHCP server so that values for various options can be set
correctly. If the script is run in cleanup mode, no further action is taken. Otherwise, the definition
for option 120 is created and set to the supplied value.
Next, a vendor with vendor class identifier MS-UC-Client (%2 will always have this value) is
created. Then, the script sets sub-options for option 43 one at a time. You’ll notice that the
following sub-options are created for the vendor class:
netsh dhcp server add optiondef 3 WebServerFqdn Binary 0
Vendor=MSUCClient comment="Web Server Fqdn"
For details about netsh dhcp, see Deploying Lync 2010 Phone Edition, Configuring DHCP
Options to Enable Sign-in for IP Phones, and the MSDN Library at
http://go.microsoft.com/fwlink/?LinkId=205011.
Configuring DHCP Server by Using DHCPUtil
At the command prompt, run:
DHCPUtil -SipServer <FQDN of the Sip Server> [-WebServer <FQDN of the
web server> |
-CertProvUrl <Url of the Certificate Provisioning Service>] [-
RunConfigScript [<Path of the script>]]
Only the last parameter RunConfigScript is not part of DHCPConfigScript.bat. This parameter
causes DHCPUtil to generate the values for option 120 and 43 and then pass the values to the
configuration script. If RunConfigScript is specified without any path, then DHCPConfigScript.bat
is run. If a valid file path is specified, then that file is run. This file can be a script or an executable.
The following parameters are passed to the script, in this order:
Mode: Possible values are Cleanup and Configure
Value of the vendor class identifier
Value of option 120
Value of sub-option 1 for option 43
Value of sub-option 2 for option 43
Value of sub-option 3 for option 43
Value of sub-option 4 for option 43
Value of sub-option 5 for option 43
59

Microsoft Lync Server 2010 Client and Device Deployment Guide
Administrators can use the content in this topic to write custom scripts. For example, to configure
a DHCP server, the following command needs to be run on the DHCP server:
DHCPUtil.exe -SipServer sip.contoso.com -WebServer web.contoso.com –
RunConfigScript
This will invoke DHCPConfigScript.bat with the appropriate parameters, which in turn will invoke
various netsh dhcp server commands.
You might also want to edit DHCPConfigScript.bat (or, write a different one) so that it can run
netsh commands to a remote DHCP server, thereby removing the need to run DHCPUtil on the
DHCP server itself.
Testing DHCP Server Configuration
DHCPUtil can also be used to test the configuration on DHCP server. In this scenario, DHCPUtil
sends out DHCP packets, as Lync Server 2010 clients would do, and then parses the received
packet. If an appropriate response is received, the retrieved values are shown as follows:
DHCPUtil –EmulateClient
Note that this may require appropriate exclusions in the firewall and that generally, this won’t work
if run on the DHCP server. It should be run on a computer that is served by the DHCP server
whose configuration is to be tested.
To enable exclusions, run the following commands from an administrator command prompt:
netsh advfirewall firewall add rule name="DHCPClientIn" dir=in
action=allow localport=68 protocol=udp
netsh advfirewall firewall add rule name="DHCPClientOut" dir=out
action=allow localport=68 protocol=udp
After you’re done, run the following commands (from an elevated command prompt) to remove
the exclusions:
netsh advfirewall firewall delete rule name="DHCPClientIn"
netsh advfirewall firewall delete rule name="DHCPClientOut"
Output: Starting Discovery
Sending Packet (Size: 280, Network Adapter: 192.168.0.244, Attempt Type:
Broadcast only)
--Begin Packet--
DHCP: INFORM (xid=D2FFB17A)
DHCP: Op Code (op) = 1
DHCP: Hardware Type (htype) = 6
DHCP: Hops (hops) = 0
DHCP: Transaction ID (xid) = 3539972474
DHCP: Seconds (secs) = 0
DHCP: Flags (flags) = 0000
DHCP: Client IP Address (ciaddr) = 192.168.0.244
60

Microsoft Lync Server 2010 Client and Device Deployment Guide
DHCP: Your IP Address (yiaddr) = 0.0.0.0
DHCP: Server IP Address (siaddr) = 0.0.0.0
DHCP: Relay IP Address (giaddr) = 0.0.0.0
DHCP: Client HW Address (chaddr) = 122222222222
DHCP: Server Host Name (sname) =
DHCP: Boot File Name (file) =
DHCP: Magic Cookie = 99.130.83.99
DHCP: Option Field
DHCP: DHCP MESSAGE TYPE( 53) = (Length: 1) DHCP INFORM
DHCP: Server Identifier( 54) = (Length: 0) 0.0.0.0
DHCP: Client Identifier( 61) = (Length: 7) """"" (01122222222222)
DHCP: SIP Server( 120) = (Length: 0) enc:0 ()
DHCP: Host Name( 12) = (Length: 6) Client
DHCP: Vendor Identifier( 60) = (Length: 12) MS-UC-Client
DHCP: Param Req List( 55) = (Length: 2) 120 43
DHCP: Vendor Info( 43) = (Length: 0) ()
DHCP: End of this option field
--End Packet--
Received Packet
Sender:192.168.0.238:67, Size:365
--Begin Packet--
DHCP: ACK (xid=D2FFB17A)
DHCP: Op Code (op) = 1
DHCP: Hardware Type (htype) = 6
DHCP: Hops (hops) = 0
DHCP: Transaction ID (xid) = 3539972474
DHCP: Seconds (secs) = 0
DHCP: Flags (flags) = 0000
DHCP: Client IP Address (ciaddr) = 192.168.0.244
DHCP: Your IP Address (yiaddr) = 0.0.0.0
DHCP: Server IP Address (siaddr) = 0.0.0.0
DHCP: Relay IP Address (giaddr) = 0.0.0.0
DHCP: Client HW Address (chaddr) = 122222222222
DHCP: Server Host Name (sname) =
61

Microsoft Lync Server 2010 Client and Device Deployment Guide
DHCP: Boot File Name (file) =
DHCP: Magic Cookie = 99.130.83.99
DHCP: Option Field
DHCP: DHCP MESSAGE TYPE( 53) = (Length: 1) DHCP ACK
DHCP: Server Identifier( 54) = (Length: 4) 192.168.0.238
DHCP: Client Identifier( 61) = (Length: 0) ()
DHCP: SIP Server( 120) = (Length: 18) enc:0 sip.contoso.com
(0003736970076578616D706C6503636F6D00)
DHCP: Host Name( 12) = (Length: 0)
DHCP: Vendor Identifier( 60) = (Length: 0)
DHCP: Param Req List( 55) = (Length: 0) 0 0
DHCP: Vendor Info( 43) = (Length: 87) MS-UC-
Clienthttps web.contoso.com
443/CertProv/CertProvisioningService.svcÜ NAP
(010C4D532D55432D436C69656E7402056874747073030F7765622E6578616D706C652E6
36F6D040334343305252F4365727450726F762F4365727450726F766973696F6E696E675
36572766963652E737663DC034E4150)
DHCP: End of this option field
--End Packet--
Result: Success
DHCP Server : 192.168.0.238
Sip Server : sip.contoso.com
CertProv Url :
https://web.contoso.com:443/CertProv/CertProvisioningService.svc
When there is a success result, the output shows the DHCP server that responded, the value for
SIP server, and the certificate provisioning service URL.
Configuring DHCP Servers Manually
After you have the values for various options (generated using DHCPUtil), you need to manually
do the same tasks that the script does using netsh dhcp server commands.
To create the definition for option 120
1. Open the DHCP Management console.
2. Go to appropriate domain.
3. Right-click IPv4.
4. Click Set Predefined Options to open the Predefined Options and Values dialog box.
5. Click Add to open the Option Type dialog box.
62

Microsoft Lync Server 2010 Client and Device Deployment Guide
6. Do the following:
In Name, type the SIP server name.
In Data type, click Binary.
In Code, type 120.
In Description, type SIP Server List.
7. Click OK to accept and close the dialog box.
To set the value for option 120
1. In the navigation tree, under IPv4, click Server Options.
2. Right-click Server Options, and click Configure Options to open the Server Options dialog
box.
3. Select the 120 Sip Server check box. This lets you edit the value in the Data Entry box.
4. Carefully enter the value generated by DHCPUtil.
5. Click OK to accept and close the dialog box.
63

Microsoft Lync Server 2010 Client and Device Deployment Guide
To create a new vendor class with the value MS-UC-Client
1. Right-click IPv4 again, and click Define Vendor Classes… to open the DHCP Vendor
Classes dialog box.
2. Click Add to open the New Class dialog box.
3. Do the following:
In Display Name, type MSUCClient.
In Description, type the UC Vendor Class Id.
Under ASCII, click MS-UC-Client.
4. Click OK to accept and close the dialog box.
64

Microsoft Lync Server 2010 Client and Device Deployment Guide
To create a definition for each of the sub-options in option 43, for the vendor class created
in the previous procedure
1. Right-click IPv4, and click Set Predefined Options to open the Predefined Options and
Values dialog box.
2. In Option Class, click MSUCClient.
3. Click Add to open the Option Type dialog box.
4. Do the following: (the following example is for sub-option 1 only)
In Name, type UCIdentifier.
In Data type, click Binary. (This is true for all five sub-options.)
In Code, click 1. (Other sub-options will have corresponding code, such as 2, 3, 4 or 5.)
In Description, type UC Identifier.
5. Click OK to accept and close the dialog box.
6. Repeat this process for all five sub-options.
65
Microsoft Lync Server 2010 Client and Device Deployment Guide
To set the values for each of the sub-options
1. Under IPv4, click Server Options.
2. Right-click Server Options, and click Configure Options to open Server Options dialog
box.
3. Click the Advanced tab.
4. In the Vendor class box, click MSUCClient.
5. Check each sub-option, and fill in appropriate values.
6. Click OK to accept values and close the dialog box.
66

Microsoft Lync Server 2010 Client and Device Deployment Guide
Manual configuration of the DHCP server is now complete. You can test the configuration using
DHCPUtil –EmulateClient.
Cleaning up Lync Server 2010 Related Configuration from DHCP Server
Use the DHCPUtil command DHCPUtil –CleanDHCPConfig to clean up Lync Server
configuration information from the DHCP server.
This command should be run on the DHCP server and requires that DHCPConfigScript.bat be in
the same directory as DHCPUtil. As is the case with RunConfigScript, administrators can modify
DHCPConfigScript.bat so that the netsh commands are issued to remote DHCP servers. This
removes the need to run DHCPUtil on the DHCP server itself.
To clean up the configuration manually, the DHCP server administration console can be used.
The value for option 120 and new vendor class and various sub-options for option 43
(corresponding to Vendor MS-UC-Client) are required to clean up configuration.
Enabling Lync Server 2010, DHCP Server
You can use Microsoft Lync Server 2010, DHCP Server to supply DHCP options 43 and 120 to
phones during bootstrapping, for example, in a branch office where the local DHCP server might
be unable to provide these options. We do not recommend using Lync Server 2010, DHCP
Server for data centers, which should be configured manually.
67

Microsoft Lync Server 2010 Client and Device Deployment Guide
Note that Lync Server, DHCP Server does not participate in the IP acquisition process and can be
used alongside other DHCP servers in your organization.
To enable Lync Server, DHCP Server on a single Registrar, run the following command:
Note:
If you enable DHCP Server on a Lync Server that’s in a different subnet from the devices
running Lync 2010 Phone Edition, you might need to configure appropriate BOOTP relay
agents to forward the DHCP packets to the Lync Server, DHCP Server. For details about
how to do this, see the next section.
Set-CSRegistrarConfiguration –Identity <Service Identity of the
Registrar> -EnableDHCPServer $true
If service-level Registrar configuration for this Registrar doesn’t exist, run this cmdlet also:
New-CSRegistrarConfiguration –Identity <Service Identity of the
Registrar> -EnableDHCPServer $true
Note:
To disable DHCP Server, use the Set-CsRegistrarConfigurationcmdlet again, and set the
value for EnableDHCPServer to $false.
Configuring Microsoft BOOT Relay Agents
For details, see Configure the DHCP Relay Agent at http://go.microsoft.com/fwlink/?
LinkId=205013.
The following two pages in the TechNet Library are particularly useful:
"Configure global DHCP Relay Agent properties" at http://go.microsoft.com/fwlink/?
LinkId=205015
"Enable the DHCP Relay Agent on a router interface" at http://go.microsoft.com/fwlink/?
LinkId=205016
Make sure that the Boot Threshold and Hop Count Threshold are configured correctly; otherwise
the relay agent will drop the packets.
The packets sent by Lync Server Clients have the secs parameter (seconds elapsed since the
client started discovery process; for details, see RFC 2131) set to 0, so Boot Threshold in the
DHCP relay agents must be set to 0.
Configuring DHCP Options to Enable Sign-in for IP Phones
The Aastra 6725ip desk phone, HP 4120 IP Phone (desk phone), and Polycom CX600 IP desk
phone are the new IP desk phones for Microsoft Lync Server 2010. Unlike the older Polycom
CX700 IP desk phone, a user cannot enter his or her user name and password on the phone to
sign in. This is because there is no alphanumeric keypad on the new phones. Instead, the phone
uses Dynamic Host Configuration Protocol (DHCP) options query results during the startup
process to identify and connect to Lync Server 2010. A user can then enter his or her phone
number or extension and authentication personal identification number (PIN) on the phone, and
the phone will be able to connect to Lync Server. This authenticates the user and allows him or
her to sign in.
68

Microsoft Lync Server 2010 Client and Device Deployment Guide
To enable phones to discover Lync Server and to connect, ensure that the following options are
set up on the organization’s DHCP servers.
Option Description Note
43 (vendor
class ID:
MS-UC-
Client)
Lync
Server pool
certificate
provisionin
g service
URL
*Specify the internal URL in the form
https://lyncsvrWebPoolFQDN:443/CertProv/CertProvisioningService.s
vc.
120 Fully
qualified
domain
name
(FQDN) for
the
certification
authority
(CA) pool
Registrar
*Specify the FQDN of the pool that will be the first logon server for the
phone. Typically this is a Director pool. If you don’t deploy a Director
pool, this is the Front End pool FQDN.
43 (vendor
class ID:
CPE-
OCPHONE
)
Virtual local
area
network
(VLAN) ID
If you do not use a VLAN for unified communications (UC), or if you
use Link Layer Discovery Protocol (LLDP)-enabled switches in the
enterprise to provide VLAN IDs, do not set this option.
Note that option 43 is not an independent option. Depending on the
vendor class ID it is configured for, the option might have different
values. The client identifies the vendor for which it wants the
information as option 60 in the DHCP request.
42 Time
server
This option needs to be configured only in an intranet-only
environment or a PIN authentication scenario to resolve the time
server address.
For a central location that is typically serviced by a data center, configure the DHCP options on
the DHCP servers in the data center. For branch sites where a Survivable Branch Appliance is
deployed, you can configure a DHCP server, if it is available in the branch, or enable Lync Server
DHCP. When Lync Server DHCP is enabled, Lync Server replies back to the DHCP options
queries for DHCP options 120 and 43. Note that Lync Server DHCP is not a full DHCP server. It
does not provide leases. It provides only the options described in the previous table.
Option 120 contains the Lync Server Registrar pool FQDN servers that Lync Server clients can
connect to. For example, if contoso.com is the SIP Server, the value for option 120 would be as
69

Microsoft Lync Server 2010 Client and Device Deployment Guide
follows: 0 7 ‘e’ ‘x’ ‘a’ ‘m’ ‘p’ ‘l’ ‘e’ 3 ‘c’ ‘o’ ‘m’. Note that Lync Server supports encoding only types
“0” and “1.”
Note:
For more details about Options 120 and 43, see Appendix: Configuring DHCP Options on
DHCP Servers other than Windows DHCP Server.
To configure the DHCP server to allow IP phones to discover Lync Server 2010
1. Add DHCPUtil.exe and DHCPConfigScript.bat on a network share that can be accessed
from the DHCP server.
2. On the DHCP server, run the following at the command prompt:
\\<FileShare>\DHCPUtil.exe -SipServer <Lync Server Pool FQDN > -
WebServer <Lync Server Internal Web FQDN> -RunConfigScript.
The Lync Server internal web FQDN is the FQDN of the web components that run on the
Lync Server Front End pool. This is typically specified by using Topology Builder as part
of pool properties. If you do not use Domain Name System (DNS) load balancing for the
pool, the Lync Server internal web FQDN is the same as the Lync Server pool FQDN.
3. Validate that the DHCP options entries were created and that a client computer can
discover Lync Server by running DHCPUtil.exe -EmulateClient on the client computer.
If it returns without errors, the entries were created correctly.
Currently this can be run only when there is one active network adapter.
DHCPConfigScript.bat essentially does the following:
netsh dhcp server add optiondef 120 UCSipServer Binary 0 comment="Sip
Server FQDN"
netsh dhcp server set optionvalue 120 Binary <value of option 120>
netsh dhcp server add class MSUCClient "UC Vendor Class Id" "MS-UC-
Client" 1
netsh dhcp server add optiondef 1 UCIdentifier Binary 0
Vendor=MSUCClient comment="UC Identifier"
netsh dhcp server set optionvalue 1 Binary vendor=MSUCClient <value of
sub-option 1>
netsh dhcp server add optiondef 2 URLScheme Binary 0 Vendor=MSUCClient
comment="URL Scheme"
netsh dhcp server set optionvalue 2 Binary vendor=MSUCClient <value of
sub-option 2>
70

Microsoft Lync Server 2010 Client and Device Deployment Guide
netsh dhcp server add optiondef 3 WebServerFqdn Binary 0
Vendor=MSUCClient comment="Lync Server Internal Web Fqdn"
netsh dhcp server set optionvalue 3 Binary vendor=MSUCClient <value of
sub-option 3>
netsh dhcp server add optiondef 4 WebServerPort Binary 0
Vendor=MSUCClient comment="Lync Server Internal Web Fqdn Port"
netsh dhcp server set optionvalue 4 Binary vendor=MSUCClient <value of
sub-option 4>
netsh dhcp server add optiondef 5 CertProvRelPath Binary 0
Vendor=MSUCClient comment="Cert Prov Relative Path"
netsh dhcp server set optionvalue 5 Binary vendor=MSUCClient <value of
sub-option 5>
Using NTP to Set the Correct Time and Date for Devices
Network Time Protocol (NTP) is the default time synchronization protocol used by the Windows
Time Service in Windows Server operating systems. NTP is a fault-tolerant, highly scalable time
protocol and is the protocol used most often for synchronizing computer clocks by using a
designated time reference. Microsoft Lync 2010 Phone Edition requires NTP to set the correct
time and date for phones running Lync 2010 Phone Edition.
The NTP provider in the Windows Time service consists of the following two parts:
NtpServer output provider. This is a time server that responds to client time requests on the
network.
NtpClient input provider. This is a time client that obtains time information from another
source, either a hardware device or an NTP server, and can return time samples that are
useful for synchronizing the local clock.
Although the actual operations of these two providers are closely related, they appear
independent to the time service. By default, when a computer that is running Windows Server is
connected to a network, it is configured as an NTP client.
Lync Phone Edition searches for an NTP server in Domain Name System (DNS) by searching for
the following:
NTP SRV record (User Datagram Protocol, or UDP, port 123)
_ntp._udp.<SIP domain> pointing to NTP Server
If Lync Phone Edition cannot find the NTP SRV record, it will attempt to use
http://time.windows.com as an NTP server by searching for the following:
NTP A record
71
Microsoft Lync Server 2010 Client and Device Deployment Guide
time.windows.com
To set Group Policy for Windows Time Service global configuration settings
1. From the Microsoft Management Console (MMC), click Active Directory Users and
Computers.
2. Right-click the domain that contains your NTP server, and then click Properties.
3. Click the Group Policy tab, make sure the Default Domain Policy is highlighted, and
then click Edit.
4. Click Computer Configuration, click Administrative Templates, click System, and
then click Windows Time Service.
5. Click Time Providers, double-click Enable Windows NTP Server in the right pane, click
the Enabled button, and then click OK.
6. From the Group Policy Object Editor menu, click File, and then click Exit.
Provisioning IP Phones
IP phones must be provisioned on the corporate network, and then the root certificate chain must
be downloaded to the phone.
Note:
If you are deploying IP phones as common area phones, set up the phone for
authentication, and then validate that everything is working. If you’re deploying common
area phones, use the Lync Server Management Shell commands to configure them.
In This Section
Setting Up Authentication on the New IP Phones
Configuring Common Area Phones
Configuring the New IP Desk Phones
See Also
Planning for Devices
Lync Server Management Shell
Setting Up Authentication on the New IP Phones
The new line of IP phones consists of the following phones:
Aastra 6721ip common area phone
Aastra 6725ip desk phone
HP 4110 IP Phone (common area phone)
HP 4120 IP Phone (desk phone)
Polycom CX500 IP common area phone
Polycom CX600 IP desk phone
72

Microsoft Lync Server 2010 Client and Device Deployment Guide
Polycom CX3000 IP conference phone
For details about the new phones, see Choosing New Devices in the Planning documentation.
When setting up IP phones, personal identification number (PIN) authentication needs to be
enabled on Microsoft Lync Server 2010 communications software, and an appropriate PIN policy
need to be in place. This allows authentication to be automatic when a user signs in to the phone.
Authentication is the process of validating user credentials.
To check to see if PIN authentication is enabled, in the Microsoft Lync Server 2010 Control Panel,
click the Security group, and then click Web Service. There will be a mark next to PIN
authentication if it is enabled. You can edit the PIN policy in the Security group, by clicking PIN
Policy.
You can also use Lync Server Management Shell to enable PIN authentication. Run:
Set-CsWebServiceConfiguration –Identity Global –UsePinAuth $true
And you can use Lync Server Management Shell to check whether PIN authentication is enabled.
Run:
Get-CsWebServiceConfiguration | Select UsePinAuth
Configuring Common Area Phones
Before you deploy common area phones, you can configure call control behavior. For example,
you might want to allow call transfers from a common area phone in a conference room but not
from a common area phone in a lobby. You can also set up common area phones to block
external use and compromised accounts and as hot-desk phones, that is, phones on which users
can log on to their own user account and, after they are logged on, use Microsoft Lync Server
2010 features and their own user profile settings.
To do configure call control behavior, complete the following steps:
1. Create a new contact object for each common area phone. If an Active Directory Domain
Services (AD DS) object already exists, ensure that this object is not SIP enabled. If the
object is SIP enabled, then use the Lync Server Management Shell cmdlet Disable-csUser
to remove Lync Server 2010 attributes, before using the cmdlet New-
csCommonAreaPhone. For details about New-csCommonAreaPhone, see Step 1 later in
this topic.
2. Create required policies for all common area phone usage scenarios. For information about
creating three most relevant policies on common area phones, see Step 2 later in this topic.
(Note that other policies may be relevant to your organization.)
Important:
Before you complete these steps, make sure that all of the required components are in
place and that you meet the system and infrastructure requirements. For details, see
Required Lync Server 2010 Components for Devices and System and Infrastructure
Requirements for Devices in the Planning documentation.
Step 1: Create and Configure a New Contact Object
To create a new instance of a common area phone, use the New-CsCommonAreaPhone
cmdlet. For example, run:
73

Microsoft Lync Server 2010 Client and Device Deployment Guide
New-CsCommonAreaPhone -LineUri "tel:+14255551212" -RegistrarPool "ocs-
w14-se.ocspm-topo.net" -OU "OU=PM Users,DC=ocspm-topo,DC=net" -
Description "Room number 30-1000" -DisplayName "Building 30 Lobby" -
DisplayNumber “1 (425) 555-0112”
Note:
The format of the phone number provided for the parameter DisplayNumber will be
used on the common area phone’s screen if it is not a normalized number. If the provided
number format cannot be normalized, for example, it does not have a normalization rule,
then the common area phone’s screen will display the number with the lineURI format
instead.
This cmdlet creates a new contact object in AD DS for the specified phone. Like user accounts,
these contact objects can be assigned policies and voice plans. As a result, you will be able to
maintain control over common area phones even though those phones are not associated with an
individual user.
For details about creating contact objects for common area phones, from the Lync Server
Management Shell, run:
Get-Help New-CsCommonAreaPhone –Full | more
If you are deploying many common area phones, you may want to write a Windows PowerShell
command-line interface script to create multiple new objects at the same time by using a table as
an input for batch processing. Include entries for phone number, location, voice policy, client
policy, and any other policy and object settings that you want applied.
Notes:
For details about the Lync Server Management Shell and individual cmdlets, see Lync Server
Management Shell in the Operations documentation.
For information about monitoring and troubleshooting common area phones, see Managing and
Troubleshooting Devices in the Operations documentation.
Step 2: (Optional) Create Required Policies
Creating specific policies for common area phones is optional. If you do not create a new policy
for a common area phone, the phone will automatically use the policy defined for the site that the
phone contact object is homed on. If no site policy exists, the global policy will be used. But, if
your organization has specific requirements for common area phones, use the Lync Server
Management Shell cmdlets described in this section to create the client, voice, and conferencing
policies (the three policies most relevant to common area phones) that will apply to the common
area phone account being created. Create a policy for each usage scenario. For example, all
lobby phones can have lobby-specific policies, or phones in executive meeting rooms can have a
less restrictive set of policies than phones in regular meeting room phones.
If you create a new policy or want to use an existing per-user policy, you must grant that policy to
any contact objects (phones) that you want that policy applied to. To do this, use the Grant
cmdlet of the policy. For example, to grant the client policy that we created earlier in this topic to
the phone created in Step 1, run the following command:
74

Microsoft Lync Server 2010 Client and Device Deployment Guide
Grant-CsClientPolicy –Identity "Building 30 Lobby" -PolicyName
ADClientPolicy
Notes:
For details about granting client policies, run Get-Help Grant-CsClientPolicy –Full | more from the Lync Server Management Shell.
For details about additional polices, see Lync Server Management Shell in the Operations
documentation.
Client Policy
To create a new client policy, use the New-CSClientPolicy cmdlet. For example, to create a
policy for common area phones that are used as hot-desk phones, run a command such as the
following:
New-CsClientPolicy –Identity HotDeskPhonesPolicy –EnableHotdesking $True
–HotdeskingTimeout 00:30:00
This example creates a new client policy with the identity HotDeskPhonesPolicy. We’ve set the
EnableHotdesking parameter to True ($True), which allows users to log on to the common area
phone using their Microsoft Lync Server 2010 account. We’ve also set the HotdeskingTimeout
parameter to 00:30:00, which means users will be logged off after of 30 minutes of inactivity.
Notes:
The minimum value that may be set for the HotdeskingTimeout is 30 seconds, and the default is 5
minutes.
Other properties of a client policy that may be most relevant to common area phones include
ShowRecentContact, DisableFreeBusyInfo, and AddressBookAvailability.
Voice Policy
To create a new voice policy, use the New-CsVoicePolicy cmdlet. For example, run:
New-CsVoicePolicy -Identity CAPvoicepolicy –PstnUsages
@{add="Internal","Local"} -AllowSimulRing $False -AllowCallForwarding
$False -Name CAPvoicepolicy -EnableDelegation $False -
EnableTeamCall $FALSE -EnableCallTransfer $False
This example creates a new voice policy with the identity CAPvoicepolicy. This new policy sets
several properties that would most likely apply to common area phones. It turns off simultaneous
ring (AllowSimulRing $False), so calls to the phone that this policy is applied to cannot
simultaneously ring on another phone, such as a mobile phone. It also turns off call forwarding
(AllowCallForwarding $False), call delegation (EnableDelegation $False), the ability to transfer
calls (EnableCallTransfer $False), and the ability to set up a team of users whose phones will ring
when this phone does (EnableTeamCall $False).
Notes:
As shown in the preceding example, the following voice policy settings are recommended for
common area phones:
75

Microsoft Lync Server 2010 Client and Device Deployment Guide
AllowCallForwarding : False
EnableDelegation : False
EnableTeamCall : False
EnableCallTransfer : False
To see a list of all available voice policy properties and their descriptions, run Get-Help New-
CsVoicePolicy –Full from the Lync Server Management Shell.
Conferencing Policy
To create a new conferencing policy, use the New-CsConferencingPolicy cmdlet. For example,
run:
New-CsConferencingPolicy -Identity CAPconferencingpolicy -AllowIPAudio
$false -AllowIPVideo $False -EnableFileTransfer $False -
EnableP2PFileTransfer $False -EnableDataCollaboration $False
This is an example of a conferencing policy with settings that could be applicable to a common
area phone. This example creates a conferencing policy with an identity CAPconferencingpolicy.
This new policy disables the following:
The ability to use audio in a conference (AllowIPAudio $False)
The ability to transfer files as part of the conference (EnableFileTransfer $False)
Peer-to-peer file transfers during the conference (EnableP2PFileTransfer)
Notes:
The following conferencing policy settings are typically set for common area phones, but these
and others can be changed depending on your organization’s needs. For example, if the phone is
in the lobby, you might want to prevent audio and video conferencing (setting AllowIPAudio and
AllowIPVideo to False), but if you have the phone in a conference room, you might want to allow
them (setting them to True).
AllowIPAudio : False
AllowIPVideo : False
EnableFileTransfer : False
EnableP2PFileTransfer : False
EnableDataCollaboration : False
To see a list of all available voice policy properties and their descriptions, run Get-Help New-
CsConferencingPolicy –Full | more from the Lync Server Management Shell.
PIN Policy
You must enable personal identification number (PIN) authentication on Lync Server 2010, and
an appropriate PIN policy must be in place. This allows authentication to be automatic when a
common area phone.
You set the PIN policy in Microsoft Lync Server 2010 Control Panel, on the PIN Policy page of the
Security group. Also in the Security group, on the Web Service page, you can verify that PIN
authentication is enabled in the global policy.
76

Microsoft Lync Server 2010 Client and Device Deployment Guide
Note:
After you configure common area phones, provision them by installing them where they
will be used and just sign in. If the phone will be used at a hot-desk phone, the phone
must be provisioned according to the process described in Setting Up Authentication on
the New IP Phones.
Configuring the New IP Desk Phones
Because the Active Directory Domain Services (AD DS) object for the user already exits, you just
need to provision the phone number and extension. To provision a user’s phone number and
extension, use the Lync Server Management Shell user-management cmdlets, for example, Set-
CsUser, or the Microsoft Lync Server 2010 Control Panel.
If you want to use Lync Server Management Shell, use commands based on the following
examples:
To provision a user's phone number, at a command prompt, run:
set-CSUser -identity "David Campbell" -LineURI " TEL:+14255550125"
To provision a user's phone number with an extension, at a command prompt, run:
set-CSUser -identity "Jamie Campbell" -LineURI "TEL:
+14255550129;ext=51297"
In addition to provisioning the phone number and extension, the authentication personal
identification number (PIN) must be set. The user can set the PIN on the Dial-in Conferencing
webpage. An administrator can set the PIN in Lync Server 2010 Control Panel or from the Lync
Server Management Shell by using the Set –CSClientPIN cmdlet.
The phone unlock PIN is set by the user when the phone first starts up. This PIN is unique to the
phone, and if the user forgets it, it cannot be reset by the administrator. Instead, the user will have
to sign out, by unlocking the phone and then selecting Switch User from the Menu, and then
sign-in again. Doing so gives the user the opportunity to set the phone unlock PIN.
Certificates for Lync 2010 Phone Edition
Microsoft Lync Server 2010 relies on certificates for server authentication and to establish a chain
of trust between clients and servers and among the different server roles. The Windows Server
operating system provides the infrastructure for establishing and validating this chain of trust.
Certificates are digital IDs. They identify a server by name and specify its properties. To ensure
that the information on a certificate is valid, the certificate must be issued by a certification
authority (CA) that is trusted by clients or other servers that connect to the server. If the server
connects only with other clients and servers on a private network, the CA can be an enterprise
CA. If the server interacts with entities outside the private network, a public CA might be required.
Even if the information on the certificate is valid, there must be some way to verify that the server
presenting the certificate is actually the one represented by the certificate. This is where the
Windows public key infrastructure (PKI) comes in.
Each certificate is linked to a public key. The server named on the certificate holds a
corresponding private key that only it knows. A connecting client or server uses the public key to
77

Microsoft Lync Server 2010 Client and Device Deployment Guide
encrypt a random piece of information and sends it to the server. If the server decrypts the
information and returns it as plain text, the connecting entity can be sure that the server holds the
private key to the certificate and is therefore the server named on the certificate.
Root CA Certificate for Lync Phone Edition
Communication between Microsoft Lync 2010 Phone Edition and Lync Server 2010 is by default
encrypted using Transport Layer Security (TLS) and secure real-time transport protocol (SRTP).
For this reason, the device running Lync 2010 Phone Edition needs to trust certificates presented
by Lync Server. If computers running Lync Server use public certificates, they will most likely be
automatically trusted by the device because the device contains the same list of trusted CAs as
Windows CE. However, because most Lync Server deployments use internal certificates for the
internal Lync Server server roles, there is a need to install the root CA certificate from the internal
CA to the device. It is not possible to manually install the root CA certificate on the device, so it
needs to come from the network. Lync Phone Edition is able to download the certificate by using
two methods.
First, the device searches for Active Directory Domain Services (AD DS) objects of the category
certificationAuthority. If the search returns any objects, the device uses the attribute caCertificate.
That attribute is assumed to hold the certificate, and the device installs the certificate.
The root CA certificate must be published in the caCertificate for Lync Phone Edition. To have the
root CA certificate add to the caCertificate attribute, use the following command:
certutil -f -dspublish <Root CA certificate in .cer file> RootCA
If the search for Active Directory objects of the category certificationAuthority does not return any
objects or if the returned objects have empty caCertificate attributes, the device searches for
Active Directory objects of the category pKIEnrollmentService in the configuration naming
context. Such objects exist if Certificate AutoEnrollment has been enabled in Active Directory. If
the search returns any objects, the device uses the attribute dNSHostName that was returned to
reference the CA and then uses the web interface of Windows Certificate Services to retrieve the
root CA certificate using the following HTTP get- command:
http://<dNSHostname>/certsrv/certnew.p7b?ReqID=CACert&Renewal=-1&Enc=b64
If neither of these methods succeeds, the device presents the error message "Cannot validate
server certificate," and the user cannot use it.
Considerations for Issuing Certificates to Lync Phone Edition
The following is a list of considerations for issuing certificates to Lync Phone Edition:
By default, Lync Phone Edition uses TLS and SRTP, which require that:
-Trust certificates are presented by Lync Server and Microsoft Exchange Server.
-The root CA chain certificate resides on the device.
You cannot manually install certificates on the device.
Set options to do the following:
-Use public certificates.
-Preload the public certificates onto the device.
-Use organization certificates.
78

Microsoft Lync Server 2010 Client and Device Deployment Guide
-Receive the root CA chain from the network.
Finding the organization Root CA Chain
Lync Phone Edition can find the certificate by using either the PKI auto-enrollment object in AD
DS or a well-known distinguished name (DN). Here are the details:
To enable PKI auto-enrollment by using the organization CA, the device makes a Lightweight
Directory Access Protocol (LDAP) request to find the pKIEnrollmentService/CA server
address and eventually downloads the certificate by using HTTP to Windows CA /certsrv site
by using user’s credentials.
To use the certutil -f -dspublish “.cer file location" root CA to upload certificates to the
configuration NC, use the following DN:
Cn=Certificate Authorities, cn=Public Key Services, CN=Services, cn=Configuration, dc=<AD
domain>
Note:
The LDAP request is BaseDN: CN=Configuration, dc= <Domain> Filter:
(objectCategory=pKIEnrollmentService), and the searched for attribute is dNSHostname.
Be aware that the device downloads the certificate using HTTP get- command
http://<dNSHostname>/certsrv/certnew.p7b?ReqID=CACert&Renewal=-1&Enc=b64.
Trusted Authorities Cache
The following table describes the public certificates that Lync Phone Edition trusted.
Public Trusted Certificates
Vendor Certificate Name Expiry Date Key length
Comodo AAA Certificate Services 12/31/2020 2048
Comodo AddTrust External CA Root 5/30/2020 2048
Cybetrust Baltimore CyberTrust Root 5/12/2025 2048
Cybetrust GlobalSign Root CA 1/28/2014 2048
Cybetrust GTE CyberTrust Global Root 8/13/2018 1024
VeriSign Class 2 Public Primary
Certification Authority
8/1/2028 1024
VeriSign Thawte Premium Server CA 12/31/2020 1024
VeriSign Thawte Server CA 12/31/2020 1024
VeriSign Comodo 1/7/2010 1000
VeriSign Class 3 Public Primary
Certification Authority
8/1/2028 1024
Entrust Entrust.net Certification
Authority (2048)
12/24/2019 2048
79

Microsoft Lync Server 2010 Client and Device Deployment Guide
Vendor Certificate Name Expiry Date Key length
Entrust Entrust.net Secure Server
Certification Authority
5/25/2019 1024
Equifax Equifax Secure Certificate
Authority
8/22/2018 1024
GeoTrust GeoTrust Global CA 5/20/2022 2048
Go Daddy Go Daddy Class 2
Certification Authority
6/29/2034 2048
Go Daddy http://www.valicert.com/ 6/25/2019 1024
Go Daddy Starfield Class 2 Certification
Authority
6/29/2034 2048
Configure Enhanced 9-1-1
Enhanced 9-1-1 (E9-1-1) is an emergency notification feature that associates the calling party’s
telephone number with a civic or street address. Using this information, the Public Safety
Answering Point (PSAP) can immediately dispatch emergency services to the caller in distress.
In order to support E9-1-1, Microsoft Lync Server 2010 communications software must be able to
correctly associate a location with a client, and then to ensure that this information is used to
route the emergency call to the nearest PSAP.
For details about deploying E9-1-1, see Emergency Services (E9-1-1).
Important:
Lync Server 2010 only supports using E9-1-1 with certified emergency services providers
located inside of the United States. Before deploying E9-1-1, you will need to configure
an SIP connection to a certified emergency services Provider. For details, see Enhanced
9-1-1 (E9-1-1) and Mediation Server. For details about configuring trunk connections, see
Configure Media Bypass on a Trunk.
In This Section
Configure an E9-1-1 Voice Route
Create Location Policies
Configure Site Information for E9-1-1
Configure the Location Database
Configure Advanced E9-1-1 Features
80

Microsoft Lync Server 2010 Client and Device Deployment Guide
Configure an E9-1-1 Voice Route
In order to deploy E9-1-1, you will first need to configure an emergency call voice route. For
details about creating voice routes, see Create a Voice Route. You may define more than one
route if, for example, your deployment includes a primary and a secondary SIP trunk.
Notes:
In order to include location information in an E9-1-1 INVITE, you must first configure SIP trunk
that connects to the Emergency Services Service Provider to support receiving location
information. To do this, set the EnablePIDFLOSupport flag on the Set-CsTrunkConfiguration
cmdlet to True. The default value for EnablePIDFLOSupport is False. For example: Set-CsTrunkConfiguration Service:PstnGateway:192.168.0.241 –EnablePIDFLOSupport $true.
It is not necessary to enable receiving locations for fallback PSTN gateways.
For details about working with voice routes, see the Lync Server Management Shell
documentation for the following cmdlets:
Set-CsPstnUsage
Get-CsPstnUsage
New-CsVoiceRoute
Get-CsVoiceRoute
Set-CsVoiceRoute
Remove-CsVoiceRoute
To configure an E9-1-1 Voice Route
1. Log on to the computer with an account that is a member of the
RTCUniversalServerAdmins groups or a member of the CsVoiceAdministrator
administrative role.
2. Start the Lync Server Management Shell: Click Start, click All Programs, click
Microsoft Lync Server 2010, and then click Lync Server Management Shell.
3. Run the following cmdlet to create a new PSTN usage record.
This must be the same name that you will use for the PSTN setting in the Location Policy.
While your deployment will have multiple phone usage records, the following example
uses “Emergency Usage”. For details, see Configuring Voice Policies and PSTN Usage
Records to Authorize Calling Features and Privileges.
Set-CsPstnUsage -Usage @{add='EmergencyUsage'}
4. Run the following cmdlet to create a new voice route using the PSTN usage record
created in the previous step.
The number pattern must be the same number pattern that is used in the Emergency
Dial String setting in the location policy. A “+” sign is needed because Microsoft Lync
2010 adds “+” to emergency calls. "Co1-pstngateway-1" is the SIP trunk service ID for
the Emergency Service Provider. The following example names the voice route
“EmergencyRoute”.
81

Microsoft Lync Server 2010 Client and Device Deployment Guide
New-CsVoiceRoute -Name "EmergencyRoute" -NumberPattern "^\+911$" -
PstnUsages @{add="EmergencyUsage"} -PstnGatewayList @{add="co1-
pstngateway-1"}
5. Optionally, we recommend that you run the following cmdlet to create a local route for
calls that are not handled by the Emergency Server Provider’s SIP Trunk. This route will
be used if the connection to the Emergency Service Provider is not available.
The following example assumes that user has “Local” usage in their voice policy.
New-CsVoiceRoute -Name "LocalEmergencyRoute" -NumberPattern "^\
+911$" -PstnUsages @{add="Local"} -PstnGatewayList @{add="co1-
pstngateway-2"}
Create Location Policies
Lync Server uses a Location Policy to enable Lync 2010 clients for E9-1-1 during client
registration. A Location Policy contains the settings that define how E9-1-1 will be implemented.
You can edit the global Location policy and create new tagged Location policies. A client obtains a
global policy when not located within a subnet with an associated location policy, or when the
client has not been directly assigned a location policy. Tagged policies are assigned to subnets or
users.
To create a location policy you must use an account that is a member of the
RTCUniversalServerAdmins group or is a member of the CsVoiceAdministrator administrative
role or has equivalent user rights.
For a complete description of Location policies, see Location Policy Definition. Cmdlets in this
procedure use a location policy defined using the following values:
Element Value
EnhancedEmergencyServicesEnabled True
LocationRequired Yes
UseLocationForE911Only False
PstnUsage EmergencyUsage
EmergencyDialString 911
EmergencyDialMask 112
NotificationUri sip:[email protected]
ConferenceUri sip:[email protected]
ConferenceMode twoway
82

Microsoft Lync Server 2010 Client and Device Deployment Guide
For details about working with location policies, see the Lync Server Management Shell
documentation for the following cmdlets:
New-CsLocationPolicy
Get-CsLocationPolicy
Set-CsLocationPolicy
Remove-CsLocationPolicy
Grant-CsLocationPolicy
To create location policies
1. Start the Lync Server Management Shell: Click Start, click All Programs, click Microsoft
Lync Server 2010, and then click Lync Server Management Shell.
Note:
CsLocationPolicy will fail if the setting for PstnUsage is not already in the Global
list of PstnUsages.
2. Optionally, run the following cmdlet to edit the global Location Policy:
Set-CsLocationPolicy –Identity Global –
EnhancedEmergencyServicesEnabled $true –LocationRequired “yes” –
PstnUsage “emergencyUsage” –EmergencyDialString “911” –
ConferenceMode “twoway” –ConferenceUri "sip:
[email protected]" –EmergencyDialMask “112”
NotificationUri "sip:[email protected]" -
UseLocationForE911Only $true
3. Run the following to create a tagged Location Policy.
New-CsLocationPolicy -Identity Tag:Redmond –
EnhancedEmergencyServicesEnabled $true -LocationRequired "yes" -
UseLocationForE911Only $false -PstnUsage "EmergencyUsage" -
EmergencyDialString "911" -EmergencyDialMask "112" -
NotificationUri "sip:[email protected]" -ConferenceUri "sip:
[email protected]" -ConferenceMode "twoway"
4. Run the following cmdlet to apply the tagged Location Policy created in step 3 to a user
policy.
(Get-CsUser | where { $_.Name -match “UserName” }) | Grant-
CsLocationPolicy -PolicyName Redmond
83

Microsoft Lync Server 2010 Client and Device Deployment Guide
Configure Site Information for E9-1-1
To define a location policy for subnets, you must first apply a location policy to a network site, and
then add the subnets to the network site. For details about network sites, see Sites.
Note:
If you create network sites for another Voice feature and you want to configure E9-1-1
using the same sites, then you can modify the sites to be used for E9-1-1.
In This Section
Add a Location Policy to a Network Site
Associate a Subnet with a Network Site
Add a Location Policy to a Network Site
The following examples show how to add the Redmond location policy defined in Create
Location Policies to an existing network site, and how to create a new network site which uses
the Redmond location policy.
For details about working with network sites, see the Lync Server Management Shell
documentation for the following cmdlets:
New-CsNetworkSite
Get-CsNetworkSite
Set-CsNetworkSite
Remove-CsNetworkSite
To assign a location policy to an existing network site
Start the Lync Server Management Shell: Click Start, click All Programs, click Microsoft
Lync Server 2010, and then click Lync Server Management Shell.
Run the following cmdlets to modify an existing network site.
Assign the Redmond tagged Location policy to an existing network site named ns2.
Set-CsNetworkSite -Identity "ns2" -NetworkRegionID "nr1" -
LocationPolicy "Redmond"
To assign a location policy to a new network site
Start the Lync Server Management Shell: Click Start, click All Programs, click Microsoft
Lync Server 2010, and then click Lync Server Management Shell.
Run the following cmdlet to create a new network site.
Create a new network site in the network region and assign the Redmond tagged
Location policy.
New-CsNetworkSite -Identity "ns1" -NetworkRegionID "nr1" -
LocationPolicy "Redmond"
84

Microsoft Lync Server 2010 Client and Device Deployment Guide
Associate Subnets with Network Sites for E9-1-1
Every subnet in your network must be associated with a specific network site. This is because
subnet information is used to determine the network site on which an endpoint is located.
E9-1-1 does not have any special requirements for associating subnets with network sites. To
create an association between the subnets and network sites in your topology, follow the
procedures in Associate a Subnet with a Network Site.
Configure the Location Database
In order to enable clients to automatically detect their location within a network, you first need to
configure the location database. If you do not configure a location database, and Location
Required in the location policy is set to Yes or Disclaimer, the user will be prompted to manually
enter a location.
To configure the location database, you will perform the following tasks:
1. Populate the database with a mapping of network elements to locations.
2. Validate the addresses against the master street address guide (MSAG) maintained by the
emergency services provider.
3. Publish the updated database.
Note:
Alternately, you can define a secondary location source database that can be used in
placed of the location database. For details, see Configure a Secondary Location
Information Service.
In This Section
Populate the Location Database
Validate Addresses
Publish the Location Database
Populate the Location Database
In order to automatically locate clients within a network you first need to populate the location
database with a network wiremap, which maps network elements to civic addresses. You can use
subnets, wireless access points, switches, and ports to define the wiremap.
You can add addresses to the location database individually, or in bulk using a CSV file
containing the column formats described in the following table.
Netwo
rk
Eleme
nt
Required Columns
Wirel
ess
acces
s
<BSSID>,<Description>,<Location>,<CompanyName>,<HouseNumber>,<HouseNumber
Suffix>,<PreDirectional>,…
…
85

Microsoft Lync Server 2010 Client and Device Deployment Guide
Netwo
rk
Eleme
nt
Required Columns
point <StreetName>,<StreetSuffix>,<PostDirectional>,<City>,<State>,<PostalCode>,<Country
>
Subn
et
<Subnet>,<Description>,<Location>,<CompanyName>,<HouseNumber>,<HouseNumbe
rSuffix>,<PreDirectional>,…
…
<StreetName>,<StreetSuffix>,<PostDirectional>,<City>,<State>,<PostalCode>,<Country
>
Port <ChassisID>,<PortIDSubType>,<PortID>,<Description>,<Location>,<CompanyName>,<
HouseNumber>,<HouseNumberSuffix>,…
…
<PreDirectional>,<StreetName>,<StreetSuffix>,<PostDirectional>,<City>,<State>,<Posta
lCode>,<Country>
Switc
h
<ChassisID>,<Description>,<Location>,<CompanyName>,<HouseNumber>,<HouseNu
mberSuffix>,<PreDirectional>,…
…
<StreetName>,<StreetSuffix>,<PostDirectional>,<City>,<State>,<PostalCode>,<Country
>
If you do not populate the location database, and the Location Required in the Location Policy is
set to Yes or Disclaimer, the client will prompt the user to enter a location manually.
For details about populating the location database, see the Lync Server Management Shell
documentation for the following cmdlets:
Get-CsLisSubnet
Set-CsLisSubnet
Remove-CsLisSubnet
Get-CsLisWirelessAccessPoint
Set-CsLisWirelessAccessPoint
Remove-CsLisWirelessAccessPoint
Get-CsLisSwitch
Set-CsLisSwitch
Remove-CsLisSwitch
Get-CsLisPort
Set-CsLisPort
Remove-CsLisPort
86

Microsoft Lync Server 2010 Client and Device Deployment Guide
To add network elements to the location database
1. Run the following cmdlet to add a subnet location to the location database.
Set-CsLisSubnet -Subnet 157.56.66.0 -Description "Subnet 1" –
Location Location1 –CompanyName “Litware” –HouseNumber 1234 –
HouseNumberSuffix “” –PreDirectional “” –StreetName 163rd –
StreetSuffix Ave –PostDirectional NE –City Redmond –State WA –
PostalCode 99123 –Country US
Alternately, you can run the following cmdlets to bulk update subnet locations using a file
named ‘subnets.csv’.
$g = Import-Csv subnets.csv
$g | Set-CsLisSubnet
2. Run the following cmdlet to add wireless locations to the location database.
Set-CsLisWirelessAccessPoint -BSSID 0A-23-CD-16-AA-2E -Description
"Wireless1" –Location Location2 –CompanyName “Litware” –
HouseNumber 2345 –HouseNumberSuffix “” –PreDirectional “” –
StreetName 163rd –StreetSuffix Ave –PostDirectional NE –City
Bellevue –State WA –PostalCode 99234 –Country US
Alternately, you can run the following cmdlets to bulk update wireless locations using a
csv file named ‘waps.csv’.
$g = Import-Csv waps.csv
$g | Set-CsLisWirelessAccessPoint
3. Run the following cmdlet to add switch locations to the location database.
Set-CsLisSwitch-ChassisID 0B-23-CD-16-AA-BB -Description "Switch1"
–Location Location1 –CompanyName “Litware” –HouseNumber 1234 –
HouseNumberSuffix “” –PreDirectional “” –StreetName 163rd –
StreetSuffix Ave –PostDirectional NE –City Redmond –State WA –
PostalCode 99123 –Country US
Alternately, you can run the following cmdlets to bulk update switch locations using a csv
file named ‘switches.csv’.
$g = Import-Csv switches.csv
$g | Set-CsLisSwitch
4. Run the following cmdlet to add port locations to the location database
Set-CsLisPort -ChassisID 0C-23-CD-16-AA-CC -PortID 0A-abcd -
Description "Port1" –Location Location2 –CompanyName “Litware” –
HouseNumber 2345 –HouseNumberSuffix “” –PreDirectional “” –
StreetName 163rd –StreetSuffix Ave –PostDirectional NE –City
Bellevue –State WA –PostalCode 99234 –Country US
The default for PortIDSubType is LocallyAssigned. You can also set it to InterfaceAlias
87

Microsoft Lync Server 2010 Client and Device Deployment Guide
and InterfaceName
Alternately, you can run the following cmdlets to bulk update port locations using a csv file
named ‘ports.csv’.
$g = Import-Csv ports.csv
$g | Set-CsLisPort
Validate Addresses
Before publishing the Location database you must validate new locations against the Master
Street Address Guide (MSAG) maintained by the emergency services provider.
For details about emergency service providers, see Choosing an Emergency Services Service
Provider.
For details validating addresses, see the Lync Server Management Shell documentation for the
following cmdlets:
Get-CsLisServiceProvider
Set-CsLisServiceProvider
Remove-CsLisServiceProvider
Get-CsLisCivicAddress
Test-CsLisCivicAddress
To validate addresses located in the location database
1. Start the Lync Server Management Shell: Click Start, click All Programs, click
Microsoft Lync Server 2010, and then click Lync Server Management Shell.
2. Run the following cmdlets to configure the emergency service provider connection.
$pwd = Read-Host –AsSecureString <password>
Set-CsLisServiceProvider -ServiceProviderName Provider1 -
ValidationServiceUrl <URL provided by provider> -CertFileName
<location of certificate provided by provider> -Password $pwd
3. Run the following cmdlet to validate the addresses in the location database.
Get-CsLisCivicAddress | Test-CsLisCivicAddress –
UpdateValidationStatus
You can also use the Test-CsLisCivicAddress cmdlet to validate individual
addresses.
Publish the Location Database
The new locations added to the Location database will not be made available to the client until
they have been published.
88

Microsoft Lync Server 2010 Client and Device Deployment Guide
For details, see the Lync Server Management Shell documentation for the following cmdlet:
Publish-csLisConfiguration
To publish the location database
Start the Lync Server Management Shell: Click Start, click All Programs, click
Microsoft Lync Server 2010, and then click Lync Server Management Shell.
Run the following cmdlet to publish the location database.
Publish-csLisConfiguration
Configure Advanced E9-1-1 Features
Microsoft Lync Server 2010 communications software includes the following features that you can
use to customize your E9-1-1 deployment:
A web service interface to connect the Location Information Server to an SNMP application.
A web service interface to connect to a Secondary Location Source database.
In This Section
Configure an SNMP Application
Configure a Secondary Location Information Service
Configure an SNMP Application
Microsoft Lync Server 2010 communications software includes a standard web service interface
that you can use to connect the Location Information Server to Simple Network Management
Protocol (SNMP) applications that match MAC addresses with port and switch information.
If a SNMP application is installed, and the Location Information Server fails to find a match in the
Location database the Location Information Server will automatically query the application using
the MAC address provided by the client. The Location Information Server will then use the port
and switch information returned by the SNMP application to requery the Location database.
For details, see the Lync Server Management Shell documentation for the following cmdlet:
Set-CsWebServiceConfiguration
To configure the SNMP application URL
1. Start the Lync Server Management Shell: Click Start, click All Programs, click
Microsoft Lync Server 2010, and then click Lync Server Management Shell.
2. Run the following cmdlet to configure the URL for the SNMP application.
Set-CsWebServiceConfiguration –MACResolverUrl “<SNMP application
url>”
89
Microsoft Lync Server 2010 Client and Device Deployment Guide
Configure a Secondary Location Information Service
Microsoft Lync Server 2010 provides a web service interface that you can use to point the
Location Information Server to a Secondary Location Source (SLS) database. The web service
interface connecting to the SLS database must conform to Location Information Server WSDL. If
both a Location database and Secondary Location database are configured, the Location
Information Server will first query the Location database, and if no match is found, proxy the
Location Request from the client to the SLS database. If the location exists in the SLS, the
Location Information Server then proxies the location back to the client.
For details, see the Lync Server Management Shell documentation for the following cmdlet:
Set-CsWebServiceConfiguration
To configure Secondary Location database
1. Start the Lync Server Management Shell: Click Start, click All Programs, click Microsoft
Lync Server 2010, and then click Lync Server Management Shell.
2. Run the following cmdlet to configure the URL for the location of the Secondary Location
database.
Set-CsWebServiceConfiguration –SecondaryLocationSourceURL “<web
service url>”
Setting Up the Authentication PIN for IP Phones
You will need to provision the authentication personal identification number (PIN) for the user on
an Aastra 6725ip desk phone, HP 4120 IP Phone (desk phone), or Polycom CX600 IP desk
phone. The PIN can be configured by an administrator or set by the user on the Dial-In
Conferencing page. An administrator can set the PIN from Microsoft Lync Server 2010 Control
Panel or from the Lync Server Management Shell (Set -CSClientPIN).
On the Aastra 6725ip, HP 4120, or Polycom CX600, do the following:
Enter the phone number and authentication PIN.
Enter the phone number or extension and authentication PIN.
This allows the phone to discover Microsoft Lync Server 2010, connect, and then authenticate by
using the PIN. After authentication, a Lync Server 2010 signed certificate is downloaded to the
phone, cached, and then used for subsequent authentication.
End-User Documentation about Lync 2010 Phone Edition
End-user training and documentation about devices running Microsoft Lync 2010 Phone Edition is
coming soon.
To help users ensure audio quality and verify that their devices are set-up correctly, see the FAQ
about audio quality at http://go.microsoft.com/fwlink/?LinkId=205856.
90

Microsoft Lync Server 2010 Client and Device Deployment Guide
Device Update Web Service
Microsoft Lync Server 2010 includes the Device Update Web service, which is automatically
installed as part of the Web Services role. This service lets you download updates from Microsoft,
test them, and then deploy the updates to all the IP phones in your organization. You can also
use Device Update Web service to roll back devices to previous software versions. We
recommend that you check for updates every three months.
For details about the Device Update Web service process and features, see Updating Devices in
the Operations documentation.
Appendix: Configuring DHCP Options on DHCP Servers other than Windows DHCP Server
You can use the DHCPUtil.exe tool to configure DHCP options on a Windows DHCP server. (If
you plan to use other DHCP servers in your deployment, check the DHCP server documentation
about how to configure the options.) The following section describes the DHCP options that you’ll
configure and how you can use DHCPUtil.exe to obtain the byte values that are required to set
the DHCP option values.
DHCP Option 120
Important details about DHCP option 120 include:
The encoding type is 0.
Following the encoding type, the general pattern is the length of a portion of the fully qualified
domain name (FQDN) followed by ASCII codes for the corresponding characters (for
example, 97 for “a”).
Each character is actually 1 byte with a value that is equal to the ASCII code for the
respective character.
Note:
You can use DHCPUtil.exe to obtain the value for DHCP option 120. Note that
DHCPUtil supports specifying no more than one Microsoft Lync Server 2010 Front
End pool FQDN.
For details about DHCP option 120, see RFC 3361.
DHCP Option 43
Lync Server 2010 and the IP phone clients use DHCP option 43 by including a new vendor class
identifier. This is specified as DHCP option 60 (for details, see RFC 2132, Section 9.13). To
discover Lync Server Windows Certificate Services, the IP phones set DHCP option 60, which is
the vendor class identifier, to MS-UC-Client (case-sensitive).
The IP phone makes two DHCP option 43 requests: a VLAN ID request (vendor class ID: CPE-
OCPHONE) and a certificate provisioning service URL request (vendor class ID: MS-UC-Client).
The certificate provisioning service URL request is made up of the following vendor-specific sub-
91

Microsoft Lync Server 2010 Client and Device Deployment Guide
options. For devices to discover the Lync Server Certificate Provisioning service, these sub-
options must be configured:
Note:
You can use DHCPUtil.exe to obtain the value for these sub-options. See the next section
for details.
Id= 1, value =4D532D55432D436C69656E74, description = MS-UC-Client
Id=2, value=6874747073<Can vary with deployment, but generally is constant >,
description=URL Scheme
Id=3, value=<varies with deployment>, description=Lync Server Internal Web FQDN
Id=4, value=343433 (Can vary with deployment, but generally is constant), description=Lync
Server Web Server Port
Id=5,value=< /CertProv/CertProvisioningService.svc -
2F4365727450726F762F4365727450726F766973696F6E696E67536572766963652E73766
3>, description=Relative Path to the Lync Server Certificate Provisioning service
Using DHCPUtil.exe to obtain DHCP Option 120 and 43 values
To use DHCPUtil.exe to obtain the value for various sub-options for option 43, do the following:
1. Install Microsoft Visual C++ 2008 Redistributable Package (x86) to run DHCPUtil.exe for
DHCP options.
2. At a command prompt, run:
DHCPUtil.exe -SipServer <Lync Server Pool FQDN > -WebServer <Lync
Server Internal Web FQDN> -RunConfigScript
The Lync Server internal web FQDN is the FQDN of the web components that run on the Lync
Server Front End pool. This is typically specified by using Topology Builder as part of the pool
properties. If you do not use Domain Name System (DNS) load balancing for the pool, the Lync
Server internal web FQDN is the same as the Lync Server pool FQDN.
Use the values generated by DHCPUtil.exe to configure your DHCP server. For example:
Sip Server FQDN: ocspool1.contoso.com
Certificate Provisioning Service URL:
https://ocspool1.contoso.com:443/CertProv/CertProvisioningService.svc
DHCP Option 120 Value:
00076578616D706C6503636F6D00
DHCP Option 43 Value:
Vendor Class Identifier: MS-UC-Client
Option 43 (for vendor=MS-UC-Client):
sub-option 1 <UC Identifier>: 4D532D55432D436C69656E74
sub-option 2 <URL Scheme>: 6874747073
92

Microsoft Lync Server 2010 Client and Device Deployment Guide
sub-option 3 <Web Server FQDN>:
6F6373706F6F6C312E636F6E746F736F2E636F6D
sub-option 4 <Port>: 343433
sub-option 5 <Relative Path for Cert Prov>:
2F4365727450726F762F4365727450726F766973696F6E696E67536572766963652E7376
3
See Also
Configuring DHCP Options to Enable Sign-in for IP Phones
Deploying Lync Web AppMicrosoft Lync Web App is an Internet Information Services (IIS) web client that installs with
Microsoft Lync Server 2010 and is enabled by default. No additional steps are necessary to either
enable Lync Web App on the server or deploy the web client to users. When users click a meeting
URL, they are presented with the meeting join page, which provides the option to join the meeting
by using Lync Web App.
Your main consideration during client deployment is whether to install the following software
prerequisites for Lync Web App in advance or to allow users to install them as needed:
The Microsoft Silverlight 4.0 browser plug-in is required for Lync Web App. You can deploy
Silverlight 4.0 to client computers, or you can allow users to be prompted for installation
when they first start Lync Web App.
The sharing feature in Lync Web App requires a Microsoft ActiveX control. The first time users
initiate a sharing session, they will be prompted to download the required ActiveX control.
See Also
Lync Web App Supported Platforms
Configure the Meeting Join Page
Deploying Mobile ClientsThe topics in this section describe how to deploy mobile access clients for Lync Server 2010 in
your organization.
In This Section
Deploying Lync for Windows Phone
Deploying Lync for Android
Deploying Lync for iPhone and iPad
Deploying Lync for Nokia
93

Microsoft Lync Server 2010 Client and Device Deployment Guide
Deploying Lync for Windows Phone
This section describes how to deploy Microsoft Lync 2010 for Windows Phone for your mobile
users.
In This Section
Installing Lync for Windows Phone
Removing Lync for Windows Phone
Installing Lync for Windows Phone
Microsoft Lync 2010 for Windows Phone is a user-installable application that is available in the
Windows Phone Marketplace.
Installing Lync for Windows Mobile
You can instruct your users to install Lync 2010 for Windows Phone on their devices by directing
them to the Windows Phone Marketplace at http://go.microsoft.com/fwlink/?linkid=231901.
Verifying Mobile Client Installation
After you configure the client and sign in successfully, use the following tests to verify that your
installation of Lync 2010 is working correctly on your mobile device.
Search for a contact in the corporate directory
1. In the Contacts list, tap Search at the bottom.
2. Search for a contact that exists only in the global address list.
3. Verify that the contact name appears in the search results.
Test IM and presence
1. In the Contacts list, tap a contact.
2. In the contact card, tap the IM icon.
3. Verify that an IM window appears and you can type and send an IM.
Test dial-out conferencing
1. In Outlook, schedule a Lync meeting.
2. On the mobile device, open the meeting invitation.
3. Click the link in the meeting to join.
4. Answer the call from the conference service and verify that you are connected to meeting
audio.
Test push notifications
1. On user A’s mobile device, sign in to Lync with user A’s account.
2. Open another application on the mobile device.
3. On a different client, sign in to Lync with user B’s account.
94

Microsoft Lync Server 2010 Client and Device Deployment Guide
4. Send an IM from user B to user A.
5. Verify that the IM notification appears on user A’s mobile device.
Removing Lync for Windows Phone
To remove the Microsoft Lync 2010 for Windows Phone application from the mobile device,
perform the following steps:
1. On the mobile device, from the start screen, swipe to see the application list.
2. Tap and hold the Lync application, and then select Uninstall.
Deploying Lync for Android
This section describes how to deploy Microsoft Lync 2010 for Android for your mobile users.
In This Section
Installing Lync for Android
Removing Lync for Android
Installing Lync for Android
Microsoft Lync 2010 for Android is a user-installable application that is available in the Android
Market.
Installing Lync for Android
You can instruct your users to install Lync 2010 for Android by directing them to the Market
application from their phone. The Android Market is also available online at
http://market.android.com. .
Verifying Mobile Client Installation
After you configure the client and sign in successfully, use the following tests to verify that your
installation of Lync 2010 is working correctly on your mobile device.
Search for a contact in the corporate directory
1. In the Contacts list, tap Menu, and then tap Search.
2. Search for a contact that exists only in the global address list (GAL).
3. Tap Search the company directory.
4. Verify that the contact name appears in the search results.
Test IM and presence
1. In the Contacts list, tap a contact.
2. In the contact card, tap the IM icon.
3. Verify that an IM window appears and you can type and send an IM.
95

Microsoft Lync Server 2010 Client and Device Deployment Guide
Test dial-out conferencing
1. In Outlook, schedule a Lync meeting.
2. On the mobile device, open the meeting invitation.
3. Click the link in the meeting to join.
4. Answer the call from the conference service and verify that you are connected to the
meeting audio.
Removing Lync for Android
To remove the Microsoft Lync 2010 for Android application from the mobile device, perform the
following steps:
1. On the mobile device, open the tool for managing applications
2. Select the Lync application, and then select Uninstall.
Deploying Lync for iPhone and iPad
This section describes how to deploy Microsoft Lync 2010 for iPhone and Microsoft Lync 2010 for
iPad for your mobile users.
In This Section
Installing Lync for iPhone and iPad
Removing Lync for iPhone and iPad
Installing Lync for iPhone and iPad
Microsoft Lync 2010 for iPhone and Microsoft Lync 2010 for iPad are user-installable applications
that are available in the Apple App Store.
Installing Lync for iPhone and Lync for iPad
You can instruct your users to install Lync 2010 for iPhone and Lync 2010 for iPad by directing
them to the App Store from their devices. The App Store for each device is also available online.
Lync for iPhone is available in the App Store at < http://www.apple.com/iphone/from-the-app-
store/>
Lync for iPad is available in the App Store at < http://www.apple.com/ipad/from-the-app-
store/>
Verifying Mobile Client Installation
After you configure the client and sign in successfully, use the following tests to verify that your
Lync installation is working correctly on your mobile device.
Search for a contact in the corporate directory
1. In the Contacts list, tap inside the search bar at the top, and begin typing the name of a
contact that exists only in the global address list (GAL).
2. Verify that the contact name appears in the search results.
96

Microsoft Lync Server 2010 Client and Device Deployment Guide
Test IM and presence
1. In the Contacts list, tap a contact.
2. In the contact card, tap the IM icon.
3. Verify that an IM window appears and you can type and send an IM.
Test dial-out conferencing
1. In Outlook, schedule a Lync meeting.
2. On the mobile device, open the meeting invitation.
3. Click the link in the meeting to join.
4. Answer the call from the conference service and verify that you are connected to the
meeting audio.
Test push notifications.
1. On user A’s mobile device, sign in to Lync with user A’s account.
2. Open another application on the mobile device.
3. On a different client, sign in to Lync with user B’s account.
4. Send an IM from user B to user A.
5. Verify that the IM notification appears on user A’s mobile device.
Removing Lync for iPhone and iPad
To remove Microsoft Lync 2010 for iPhone or Microsoft Lync 2010 for iPad from the device,
perform the following steps:
1. On the mobile device home screen, tap and hold the Lync icon.
2. When the tiles begin to shake and the X appears, tap the X to delete the application.
Deploying Lync for Nokia
This section provides information about how to deploy Microsoft Lync 2010 for Nokia to enable
mobile phones to function as unified communications (UC) endpoints. Deployment of Lync 2010
for Nokia requires first deploying mobile access for Lync Server 2010, and then installing and
configuring Lync 2010 for Nokia.
In This Section
Installing Lync for Nokia
Removing Lync for Nokia
Installing Lync for Nokia
Microsoft Lync 2010 for Nokia is distributed bundled with other Microsoft Office mobile
applications. It is pre-installed on most Nokia smartphones. If it is not pre-installed, Microsoft
97
Microsoft Lync Server 2010 Client and Device Deployment Guide
Office mobile applications are also available in the Nokia Store. Users can download and install
the Lync application on their phones. You can instruct your users to install Lync for Nokia on their
devices by directing them to the Nokia store at http://store.nokia.com/.
Installing Lync for Nokia
Instruct your users to install Lync for Nokia on their devices from the Nokia store at
http://store.nokia.com/.
To install directly to the phone
1. From your phone, press the Menu key, and then click Nokia Store.
2. Locate Microsoft Office Apps, and then click Download to install the application on
your phone.
To install from the computer
1. From your computer, go to http://store.nokia.com/, and sign in to your account. If you do
not have an account, create one first.
2. At the Nokia Store, search for “Lync.” In the search results, locate the Microsoft Apps
bundle, which contains the Lync for Nokia application. Click Send to mobile.
3. From your phone, open the link that was sent from the Nokia Store, and follow the
instructions to install the application.
Verifying Mobile Client Installation
After you configure the client and sign in successfully, use the following tests to verify that your
installation of Lync is working correctly on your mobile device.
Search for a contact in the corporate directory
1. In the Contacts tab, tap the Search button in bottom toolbar.
2. Search for a contact that exists only in the global address list (GAL).
3. Verify that the contact name appears in the search results.
Test IM and presence
1. In the Contacts tab, expand a contact group, and select a contact.
2. In the contact card Send IM section, select the Lync ID of the contact.
3. Verify that an IM window appears and you can type and send an IM.
Test dial-out conferencing
1. In Outlook, schedule a Lync meeting.
2. On the mobile device, open the meeting invitation in the phone calendar.
3. Click the link in the meeting to join.
4. Answer the call from the conference service and verify that you are connected to the
98

Microsoft Lync Server 2010 Client and Device Deployment Guide
meeting audio.
Removing Lync for Nokia
To remove Microsoft Lync 2010 for Nokia from the device, perform the following steps:
1. On the mobile device, press the Menu key to open the Applications Menu.
2. Select and hold the Lync application. In the pop-up menu, select Remove.
99