land record system (lrs) - scionapps.scionresearch.com/lrs/resources/lrs_user_guide.pdf · 3 using...
TRANSCRIPT

Land Record System (LRS)
Funded by
A collaboration between


MyLand - Land Record System User Guide
© 2013 New Zealand Forest Research Institute Ltd i
Land Record System User Guide
© 2013 New Zealand Forest Research Institute Ltd. All Rights Reserved Except as expressly provided below no part of this manual may be reproduced, copied, transmitted, disseminated, downloaded or stored in any storage medium, for any purpose without the express prior written consent of New Zealand Forest Research Institute Ltd. New Zealand Forest Research Institute Ltd hereby grants permission to download a single copy of this manual and of any revision to this manual onto a hard drive or other electronic storage medium to be viewed and to print one copy of this manual or of any revision hereto, provided that such electronic or printed copy of this manual or revision must contain the complete text of this copyright notice and provided further that any unauthorised commercial distribution of this manual or any revision hereto is strictly prohibited. Information in this document is subject to change without notice. New Zealand Forest Research Institute Ltd reserves the right to change or improve its products and to make changes in the content without obligation to notify any person or organisation of such changes or improvements. New Zealand Forest Research Institute Ltd Te Papa Tipu Innovation Park 49 Sala Street, Rotorua 3010 Private Bag 3020 Rotorua 3046 New Zealand Telephone: +64 7 343 5899 Facsimile: +64 7 348 0952 Email: [email protected]
Date: June 2013
Acknowledgements
Our sincere thanks to Ministry of Primary Industries for providing funding for the development of the MyLand – Land Record System (LRS).
A special thanks to those who contributed to this project - their help and suggestions, and the considerable amount of time they willingly contributed are gratefully acknowledged. New Zealand Forest Research staff: Luke Bettis, Wayne Schou, Bryan Graham, Sarah Orton, Albert Jovner, Graham West. Client: Patrick Milne (Farm Forestry Association), Rhys Miller (Consultant).

MyLand - Land Record System User Guide
ii © 2013 New Zealand Forest Research Institute Ltd
Table of Contents
1 INTRODUCTION ....................................................................................................... 1
TERMINOLOGY .............................................................................................................................. 1 SYSTEM REQUIREMENTS ............................................................................................................... 1
2 GETTING STARTED ................................................................................................ 3
USER REGISTRATION .................................................................................................................... 3 EDIT USER ACCOUNT DETAILS ...................................................................................................... 4 PASSWORD RESET ....................................................................................................................... 5 ACCESS MYLAND - LRS ................................................................................................................ 6 INSTALLING MICROSOFT SILVERLIGHT ............................................................................................ 6 MAIN USER INTERFACE ................................................................................................................. 7
Map Layers .............................................................................................................................. 8 Advanced Toolbar .................................................................................................................... 8 Navigation Tools ...................................................................................................................... 9 I want to … ............................................................................................................................ 10 Other Buttons ........................................................................................................................ 11
3 USING THE LAND RECORD SYSTEM .................................................................. 12
PROPERTY ................................................................................................................................. 12 Create a Property .................................................................................................................. 12 Edit a Property ....................................................................................................................... 14
LAND UNIT ................................................................................................................................. 16 Create a Land Unit ................................................................................................................. 16 Edit a Land Unit ..................................................................................................................... 18 Select a Land Unit ................................................................................................................. 19
EVENT .................................................................................................................................... 19 Create an Event ..................................................................................................................... 20 Edit an Event ......................................................................................................................... 22 Select an Event ...................................................................................................................... 23
NOTES .................................................................................................................................... 25 Add a Note ............................................................................................................................. 25 View and Edit a Note ............................................................................................................. 26 Delete a Note ......................................................................................................................... 27
DOCUMENTS .............................................................................................................................. 28 Add a Document .................................................................................................................... 28 View a Document ................................................................................................................... 29 Delete a Document ................................................................................................................ 30
REPORTS ................................................................................................................................... 30 View a Report ........................................................................................................................ 30

MyLand - Land Record System User Guide
© 2013 New Zealand Forest Research Institute Ltd 1
1 Introduction
MyLand – Land Record System (LRS) is a web-based integrated land management tool developed by New Zealand Forest Research with input from Farm Forest Association. The Ministry of Primary Industry has provided funding for the development of the MyLand - LRS.
MyLand – LRS helps landowners to maintain a true and accurate record of how they managed their land. Users can easily locate properties, identify and digitise land units such as paddocks, stands, reserves and capture planned and actual events against these land units.
Through the use of MyLand - LRS, landowners can provide records and evidence on how the land was utilised and what events has occurred on the land in time.
Terminology
Term Description
Electronic Document
Is any electronic media content other than computer system files that are to be imported and attached to a data object and will be used in either an electronic form or as printed output.
Event A planned occurrence of a regime that has happened or took place that impacts the growth and quality of a crop and requires recording for referencing purpose.
GIS Geographic Information System
Land Unit Area that define the actual productive (commercial) and non-productive (non-commercial) land of a property.
Property An area of land and its building, used for growing crops and trees, and rearing animals.
Spatial Layers Cartographic representation of related data features such as paddock slopes, paddock soil types, etc. that can be visualised with GIS tools and technologies
Stand
A stand is a special type of management unit wholly contained within a
compartment. Its basic intention is "an area of land containing a Crop of trees that is
to be managed in the same way and will produce a homogeneous yield".
System Requirements
The recommended system requirements for running the MyLand - LRS are:
A duel core processor of higher;
4GB of RAM;
A screen resolution of 1024 x 768 or greater.
The system will run on lower computer specifications, but performance may not be optimal.

MyLand - Land Record System User Guide
2 © 2013 New Zealand Forest Research Institute Ltd
In order to access the MyLand - LRS, you need to have a computer running a web browser that is currently connected to the internet. We recommend that you have a broadband internet connection for optimal performance. The MyLand - LRS has been tested using Internet Explorer version 8 (IE8). Use of other untested browsers may affect the usability and functionality of the MyLand - LRS.
Depending on whether the computer used to access the MyLand - LRS has Windows Updates enabled, you may be prompted to install Microsoft Silverlight the first time the MyLand - LRS is accessed.

MyLand - Land Record System User Guide
© 2013 New Zealand Forest Research Institute Ltd 3
2 Getting Started
Getting started provides guidance on how to set your system up to make use of the MyLand – LRS, how to become an authenticated user and how to manage your user account details. This chapter also provides an explanation of the user interface, available tools and the use thereof.
User Registration
You must create a user account to become authentic user of MyLand - LRS.
1. To register click on the Register hyperlink in Step 1.
2. Enter the required user account registration details and click on the Register button.

MyLand - Land Record System User Guide
4 © 2013 New Zealand Forest Research Institute Ltd
Edit User Account Details
You will be able to update your user account details to reflect the correct state.
1. To update the user account details click on the Manage Your Account hyperlink in Step 4.
2. Enter the required user name and password and click on the Log in button.
3. Edit and update the required user details and click on the Save button.

MyLand - Land Record System User Guide
© 2013 New Zealand Forest Research Institute Ltd 5
Password Reset
If your user password is forgotten you can reset your user password via e-mail.
1. To reset the user password click on the Manage Your Account hyperlink in Step 4.
2. Click on the Reset password hyperlink.
3. Enter the email as stored in the user account and click on the Send button.
Warning
To reset a password via e-mail, you must enter a valid e-mail address as contained in your user account.

MyLand - Land Record System User Guide
6 © 2013 New Zealand Forest Research Institute Ltd
Info
You will receive an email containing a hyperlink, clinking on this hyperlink will display the Password Reset web page.
Enter a new password to gain access to MyLand – LRS.
Access MyLand - LRS
Access to MyLand – LRS is obtained through the MyLand – LRS welcome page.
1. To access MyLand - LRS click on the Start Land Record System button in Step 2.
Info
If you are a first time user you will be prompted to install Microsoft Silverlight, if not already installed on you systems. (Refer Installing Microsoft Silverlight.)
OR
If you are a first time and existing user with installed Microsoft Silverlight you will be directed to the MyLand – LRS web page.
Installing Microsoft Silverlight
MyLand - LRS has been designed using Microsoft Silverlight and if this has not been previously been installed on your system, you will be prompted to install Microsoft Silverlight.
1. Click on the Click now to install button.

MyLand - Land Record System User Guide
© 2013 New Zealand Forest Research Institute Ltd 7
2. Click on the Save File button and browse to a suitable location on your system to save the installer.
3. After the success saving of the Silverlight.exe file browse to the saved location, and double click on the Silverlight.exe file.
4. Click on the Install now button.
Info
An Installation successful message will be displayed after the successful installation of Microsoft Silverlight.
5. Click on the Close button.
Info
You will be redirected to the MyLand – LRS welcome page to access MyLand – LRS. (Refer Access MyLand – LRS)
Main User Interface
The user interface for the MyLand - LRS has five main components:
Map Panel Enables you interacts with the map by zooming or panning and digitising, spatial objects.
Information Panel Lists different kinds of information when you interact with the map. For example, it displays Map Layers where you can select different layers to hide or show on the map or it displays a list of map features in the Results List when you perform a search or use the Identify tool or displays the information of the spatial objects captured within the

MyLand - Land Record System User Guide
8 © 2013 New Zealand Forest Research Institute Ltd
MyLand - LRS.
Information Panel Toolbar
Contains icons that you can use to control the information listed in the Information Panel.
Toolbar Icon Shows or hides the toolbar when clicked.
Toolbar Contains numerous tools that are grouped into tabs by function.
Search Box Provides you with the ability to search for features on the map.
Map Layers
The map layers used in MyLand - LRS can be sorted into two categories - Operational Layers and Graphics Layers.
Operational Layers: provided for the User Parcel Name NZ Street Address QEII Covenant BaseMap Simplified BaseMap
Graphics Layers: created by the User Road Patch Property Boundary
Advanced Toolbar
The Advanced Toolbar can be found on the main screen by clicking on the Show the toolbar toggle button:
For more information about the Advanced Toolbar and its five Tabs click on the Help icon and in the Content pane select The Viewer Interface >>> The Toolbar.
Search Box
Map Panel
Toolbar Icon
Toolbar
Information Panel
Information Panel Toolbar

MyLand - Land Record System User Guide
© 2013 New Zealand Forest Research Institute Ltd 9
Land Records Tab
Contains the tools required to operate MyLand – LRS. This tab is unique to MyLand – LRS so there are no additional Help files.
Getting Around Tab
For more information about the features on the Getting Around Tab click
on the Help icon and in the Content pane select The Viewer Interface >>> The Toolbar >>> Getting Around Tab.
Maps and Data Sources Tab
For more information about the features on the Maps and Data Sources
Tab click on the Help icon and in the Content pane select The Viewer Interface >>> The Toolbar >>> Map & Sources Tab
Tasks Tab For more information about the features on the Tasks Tab click on the
Help icon and in the Content pane select The Viewer Interface >>> The Toolbar >>> Task Tab.
Analysis Tab
For more information about the features on the Analysis Tab click on the
Help icon and in the Content pane select The Viewer Interface >>> The Toolbar >>> Analysis Tab.
Navigation Tools
Most of the Navigation Tools can be found in the Getting Around tab of the Advanced Toolbar (See Advanced Toolbar section for more information).
There are 2 additional Navigation Tools available that could be found at the locations indicated by the red rectangles:

MyLand - Land Record System User Guide
10 © 2013 New Zealand Forest Research Institute Ltd
Zoom bar If you slide the scale towards the end with a plus, they will find themselves Zooming In closer to the Map. If you slide the scale towards the minus end, you will Zoom Out. Double left clicking on a point on the map will also enable the User to Zoom In.
Scale Bar and Co-ordinates
As you move your mouse over the map the co-ordinates constantly change to provide the correct co-ordinate values. The Scale Bar remains constant, providing you with a sense of distance on the map. The arrow (red box) to the side of the Scale Bar and Co-ordinates allows you to show or hide the X / Y values as you wish.
I want to …
Most of the Navigation Tools can be found in the Getting Around tab of the Advanced Toolbar (See Advanced Toolbar section for more information).
There are 2 other Navigation Tools that are available to you. They can be found at the following locations:
You can use the I want to... button to select an option from the drop down list.
Create a printable map Currently not available to Users
Create a report Currently not available to Users
Zoom Bar
Scale Bar and Co-ordinates

MyLand - Land Record System User Guide
© 2013 New Zealand Forest Research Institute Ltd 11
Draw on the map This takes you to the Drawing Tools section on the Tasks tab of the main Tool Bar
Measure Distance This takes you to the Measure Distance button on the Analysis tab of the main Tool Bar
Share current map Currently not available to Users
Return to initial map extent This button will, when clicked, return you to the initial extent of your map.
Turn map data on / off This option will take the user to the Map Layers tab, where they can turn map layers on or off by checking or un-checking the tick-box next to the layer
Add map layer Currently not available to Users
Show / hide advanced toolbar
This option will either expand or collapse the advanced toolbar
View Results Currently not available to Users
View Selected Currently not available to Users
Open URL Currently not available to Users
For more information about the "I want to..." menu click on the Help icon and in the Content pane select
The Viewer Interface >>> I Want To Menu.
Other Buttons
There are a few other buttons on the Main User Interface that require an explanation:
Use this tool for … To …
Show help topics button - located in the top right hand corner of the screen.
Clicking on this file enables you to access files that will aid you with getting an
understanding about features found in the MyLand - LRS.
Located at the bottom of the MyLand - LRS / Map Layers Frame these buttons
allows you to easily switch between available map layers and MyLand - LRS
content.

MyLand - Land Record System User Guide
12 © 2013 New Zealand Forest Research Institute Ltd
3 Using the Land Record System
MyLand - LRS allows you to locate and capture details on a property, land unit and events taking place against a land unit. The spatial interface of MyLand - LRS enables you to digitise a land unit and events and capture data associated with the land unit and events.
The following pages will guide you through the process of creating and defining properties, land units and events.
Note that reporting are limited to a summary report.
Property
Properties are defined by the legal Certificate of Titles (CT) that is a proof of ownership.
This section will be dealing with the:
Creating a Property
Editing a Property
Create a Property
Creating First Property
Info
To create properties follow the instructions as displayed in the Information Panel.
1. Click on the Create Property Boundary button.
Info
A Certificate of Title (CT) form will appear at the top of the Map Panel.
2. Click on a parcel displayed in the map that forms part your property.
Info
To add additional CT’s to the list click on the Add CT for every CT to be added.

MyLand - Land Record System User Guide
© 2013 New Zealand Forest Research Institute Ltd 13
Info
The outer boundaries of the selected CT’s are represented by yellow lines.
3. Click on the Create Property button to complete process.
Info
The Property form will appear in the Information Panel.
4. Enter the required property details and information and click on the Save button.

MyLand - Land Record System User Guide
14 © 2013 New Zealand Forest Research Institute Ltd
Info
The outer boundary of the property is represented by a blue line.
Creating Additional Properties
Info To create a second property click on the Manage Properties icon. A list of
your current properties will appear in the Information Panel.
1. Click on the Add button.
Info
A set of instructions for creating a property will appear in the place of the list of your current properties.
Follow these set of instructions and the process for Creating First Property.
Edit a Property
Info
The boundary of your property can be edit by adding or removing the CT’s that forms part of your legal property.
1. On the Property form click on the Certificate of Titles accordion.

MyLand - Land Record System User Guide
© 2013 New Zealand Forest Research Institute Ltd 15
2. Click on the Edit button
Info
The Certificate of Title (CT) form will be displayed at the top of the Map Panel listing the current selected CT’s.
3. Click on the Add CT or Remove button to add or remove CT’s to or from the CT list.
4. Click on the Update Property button when adding and removing CT’s is completed.

MyLand - Land Record System User Guide
16 © 2013 New Zealand Forest Research Institute Ltd
Info
The outer boundary of the property, represented as a blue line, is adjusted as per add and removed CT’s to the CT list.
Land Unit
Land units define the areas for stands, paddocks and reserves, which are represented as polygons on the map. This section will be dealing with the:
Creating a land unit.
Editing a land unit.
Selecting a land unit.
Create a Land Unit
Creating First Land Unit
Info
When saving a newly created property the Property form will be replaced by a set of instructions on how to create a land unit.
1. Select from the dropdown list the type of land unit that is to be created.
2. Digitise the land unit on the map within the boundaries of your selected property.

MyLand - Land Record System User Guide
© 2013 New Zealand Forest Research Institute Ltd 17
Tip
To accurately digitise a land unit within the property boundary hold down the Ctrl key
to have a hallow displayed around the mouse pointer.
While holding down the Ctrl key move the mouse pointer over the property boundary
until a black plus sign appears and click to create a point for the land unit boundary.
Continue the above process until the boundary of the land unit that forms part of the property boundary is completed.
3. Double click to complete the digitizing of the land unit.
Info
The Land Unit Details form will appear in the Information Panel.
4. Enter the required land unit details and click on the Save button.

MyLand - Land Record System User Guide
18 © 2013 New Zealand Forest Research Institute Ltd
Creating additional Land Units
1. To add additional land units click on the New Land Unit icon.
Info
A set of instructions for creating a land unit will appear in the Information Panel.
Follow these set of instructions and the process for Creating First Land Unit.
Edit a Land Unit
1. To edit the boundary of a land unit click on the Edit icon and then click on the land unit to be edited.
Info
A set of instructions on how to edit the shape of the selected land unit will appear in the Information Panel.

MyLand - Land Record System User Guide
© 2013 New Zealand Forest Research Institute Ltd 19
Info
The boundary of the selected land unit will be represented as a red line with the points as white squares.
The shape of the selected land unit can be adjusted by:
Moving an existing point on the land unit boundary line to a new location.
Adding a new point to the land unit boundary line that is to be moved to a certain location.
Removing an existing point from the land unit boundary line.
Select a Land Unit
1. To view the details of a land unit click on the Select icon and then click on the land unit for, which you want to view the details.
Info
The background colour of the land unit will change in colour when selected.
Info
The Land Unit Details form for the selected land unit will appear in the Information Panel.
Event
Events represent the actions that are to take place or have taken place on the land units such as stands, paddocks and reserves. This section will be dealing with the:
Creating an event.
Editing an event.
Selecting an event.

MyLand - Land Record System User Guide
20 © 2013 New Zealand Forest Research Institute Ltd
Create an Event
Creating an Event on a Land Unit
Info
Before an event can be created against a land unit ensure that the land unit is selected, refer to Select a Land Unit.
1. After the land unit is selected click on the Create Event icon.
Info
The Create New Event form will be displayed in the Map Panel.
2. Select the required event type from the dropdown list and event status before clicking on the Create button.
Info
The Event form for the selected event type will be displayed in the Information Panel.
3. Enter the required event details and click on the Save button.

MyLand - Land Record System User Guide
© 2013 New Zealand Forest Research Institute Ltd 21
Info
The boundary of planned events will be presented with an orange line.
The boundary for actual events will be presented with a yellow line.
Info
To concert a planned event to an actual event click on the Convert to Actual … button displayed next to the Planned tab in the Event Details form.
Greeting and Event for an Area
1. Click on the Create Shape Event icon.
Info
A set of instructions on how to create a shape event will appear in the Information Panel.
2. Select the required event type from the dropdown list and event status before starting to digitise the shape event on the map within the boundaries of your selected property.
3. Double click to complete digitising the event.

MyLand - Land Record System User Guide
22 © 2013 New Zealand Forest Research Institute Ltd
Info
The Event form for the selected event type will be displayed in the Information Panel.
4. Enter the required event details and click on the Save button.
Info
The boundary of planned events will be presented with an orange line.
The boundary for actual events will be presented with a yellow line.
Info
To concert a planned event to an actual event click on the Convert to Actual … button displayed next to the Planned tab in the Event Details form.
Edit an Event
Info
Before an event can be edited ensure the event is selected and the Event Details form is displayed in the Information Panel, refer to Select an Event.
1. Click on the “Edit” icon before clicking on the shape of the selected event.

MyLand - Land Record System User Guide
© 2013 New Zealand Forest Research Institute Ltd 23
Info
The boundary of the selected event will be represented as a red line with the points as white squares.
The shape of the selected event can be adjusted by:
Moving an existing point on the event boundary line to a new location.
Adding a new point to the event boundary line that is to be moved to a certain location.
Removing an existing point from the event boundary line.
Select an Event
Info
Events can be selected in two ways:
Through the Land Unit form; or
Through the Show Event icon.
Selecting an Event through the Land Unit Form
Info
Before an event can be selected ensure that the land unit is selected, refer to Select a Land Unit.
The Land Unit form for the selected land unit will be displayed in the Information Panel.
1. On the Land Unit form click on the Events accordion.
Info
The list of events associated with the selected land unit will be displayed.

MyLand - Land Record System User Guide
24 © 2013 New Zealand Forest Research Institute Ltd
2. To view the content of the event:
Double click on the required event; or
Click on the required event and then on the Open button.
Info
The Event form for the selected event will be displayed in the Information Panel.
Selecting an Event through the Show Event icon
1. To select an event click on the Show Event icon before clicking on the required land unit.
Info
A list of associated events for the selected land unit will be displayed in the Information Panel.
2. To view the content of the event:

MyLand - Land Record System User Guide
© 2013 New Zealand Forest Research Institute Ltd 25
Double click on the required event; or
Click on the required event and then on the Open button.
Notes
Notes can be added to any object such as a property, land unit, event, etc. to provide additional information.
This section will be dealing with the:
Adding a note.
Viewing and Editing a note.
Deleting a note.
Add a Note
Info
Before a note can be added ensure that the land unit is selected, refer to Select a Land Unit.
The Land Unit form for the selected land unit will be displayed in the Information Panel.
1. On the Land Unit form click on the Notes accordion.
2. Click on the Add button.
Info
The New Note form will be displayed in the Map Panel.
MyLand - Land Record System User Guide
26 © 2013 New Zealand Forest Research Institute Ltd
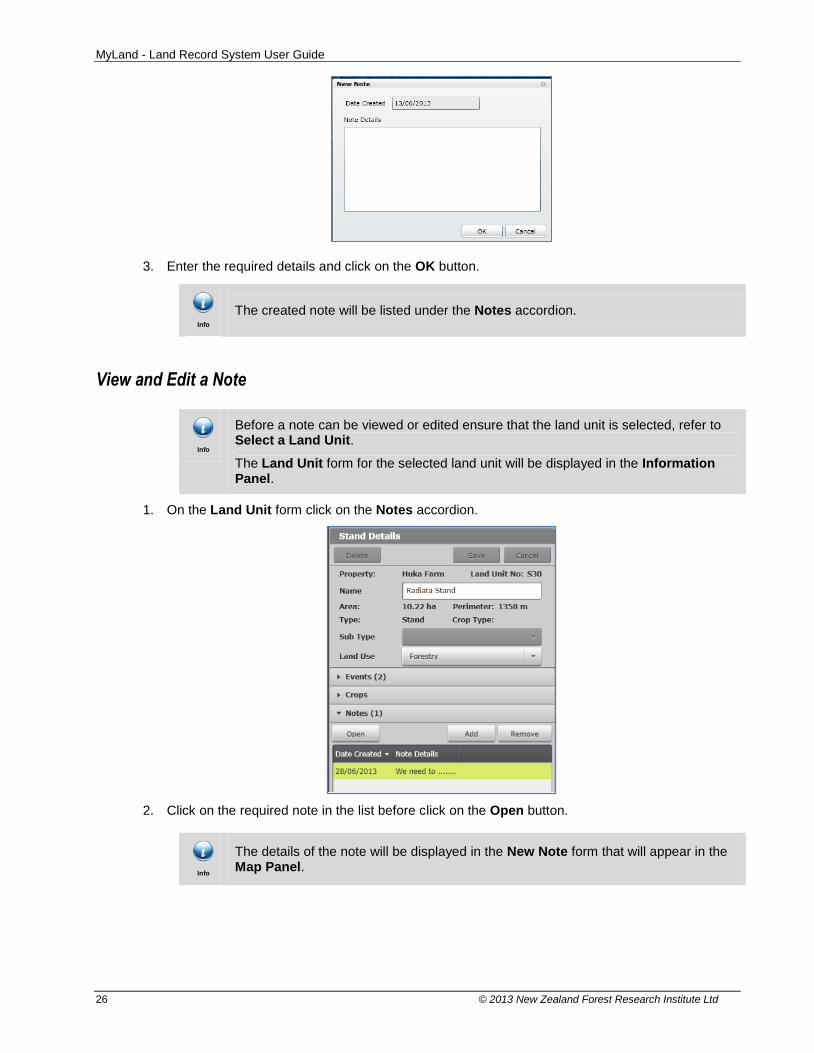
3. Enter the required details and click on the OK button.
Info
The created note will be listed under the Notes accordion.
View and Edit a Note
Info
Before a note can be viewed or edited ensure that the land unit is selected, refer to Select a Land Unit.
The Land Unit form for the selected land unit will be displayed in the Information Panel.
1. On the Land Unit form click on the Notes accordion.
2. Click on the required note in the list before click on the Open button.
Info
The details of the note will be displayed in the New Note form that will appear in the Map Panel.
MyLand - Land Record System User Guide
© 2013 New Zealand Forest Research Institute Ltd 27
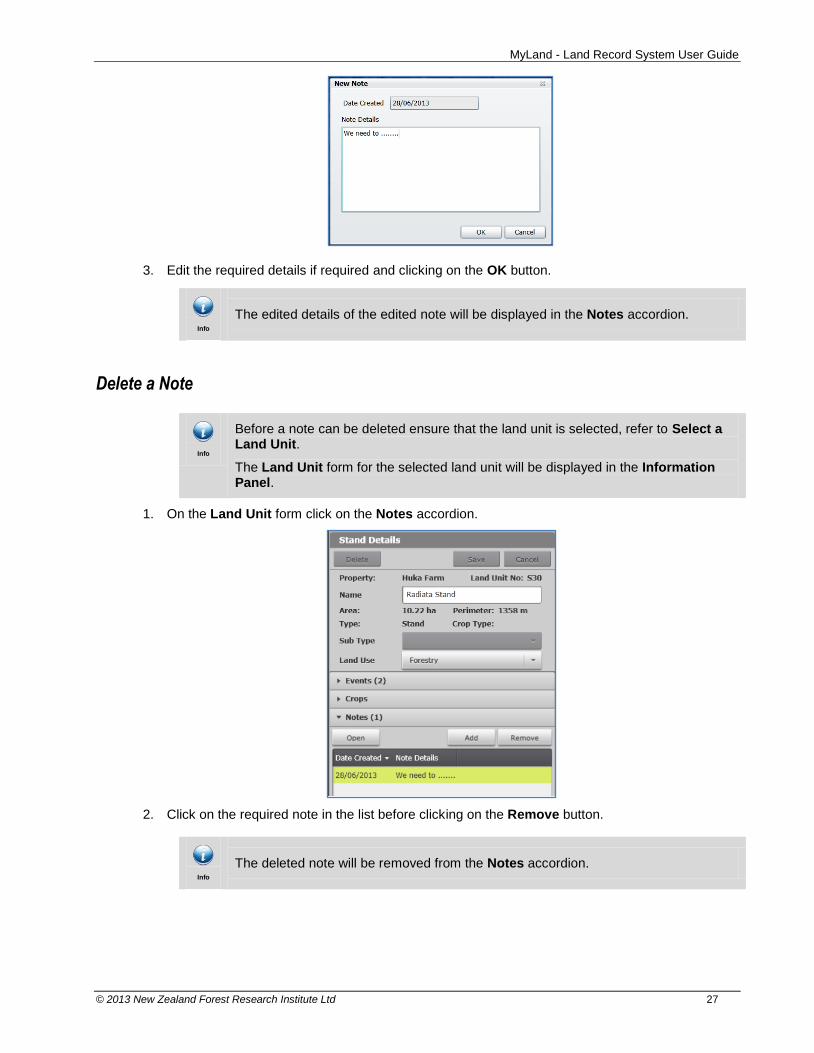
3. Edit the required details if required and clicking on the OK button.
Info
The edited details of the edited note will be displayed in the Notes accordion.
Delete a Note
Info
Before a note can be deleted ensure that the land unit is selected, refer to Select a Land Unit.
The Land Unit form for the selected land unit will be displayed in the Information Panel.
1. On the Land Unit form click on the Notes accordion.
2. Click on the required note in the list before clicking on the Remove button.
Info
The deleted note will be removed from the Notes accordion.

MyLand - Land Record System User Guide
28 © 2013 New Zealand Forest Research Institute Ltd
Documents
Electronic documents can be added to any object such as a property, land unit, event, etc. for reference
purposes
This section will be dealing with the:
Adding a document.
Viewing a document.
Deleting a document.
Add a Document
Info
Before a document can be added ensure that the land unit is selected, refer to Select a Land Unit.
The Land Unit form for the selected land unit will be displayed in the Information Panel.
1. On the Land Unit form click on the Documents accordion.
2. Click on the Add button.
Info
The New Document form will be displayed in the Map Panel.

MyLand - Land Record System User Guide
© 2013 New Zealand Forest Research Institute Ltd 29
3. In the Document field browse to the location of the document on your system and select the
required document.
Info
Enter the title of the document in the Document Details field.
4. Enter the title of the document in the Document Details field and click on the OK button.
Info
The added document will be listed under the Documents accordion.
View a Document
Info
Before a document can be viewed ensure that the land unit is selected, refer to Select a Land Unit.
The Land Unit form for the selected land unit will be displayed in the Information Panel.
1. On the Land Unit form click on the Documents accordion.
2. Click on the required document in the list before clicking on the View button.

MyLand - Land Record System User Guide
30 © 2013 New Zealand Forest Research Institute Ltd
Info
The content of the document will be displayed in a separate browser web page.
Delete a Document
Info
Before a document can be deleted ensure that the land unit is selected, refer to Select a Land Unit.
The Land Unit form for the selected land unit will be displayed in the Information Panel.
3. On the Land Unit form click on the Documents accordion.
4. Click on the required document in the list before clicking on the Remove button.
Info
The deleted document will be removed from the Documents accordion.
Reports
MyLand - LRS provides a range of reports that provides the details and information of your properties in a
table format.
This section will be dealing with the:
Viewing of reports
View a Report
1. To view a report click on the Show Reports icon.

MyLand - Land Record System User Guide
© 2013 New Zealand Forest Research Institute Ltd 31
Info
The Reports message box will be displayed in the Map Panel.
5. Click on the required report.
Info
The content of the selected report is displayed in the Map Panel.