lamotte soil test kit garden guide - afghan agriculturegently crush soil to remove lumps. soil ph:...
TRANSCRIPT

LaMotte
Soil Test Kit Garden Guide
www.lamotte.com

Mineral Needle Color Stem Appearance RootsNitrogen deficiency
Light or pale green color
Slender, may be succulent Small roots
Phosphorus deficiency Yellow color Short, slender stems Small roots
Potassium Deficiency
Cotyledons red or chocolate brown
Shoot dieback; stunted growth
Small roots, poor growth
Visual Symptoms of Element Deficiencies

Nutrient Requirements of a Seedling:
The minimum quantity of nutrients the plant will absorb to attain the desired morphological size and physiological condition.
Soil Analysis:
The major tool for determining the range of critical and acceptable values of soil fertility, and for maintaining optimum levels of nutrients.

Four Tests: pH, Phosphorus, Nitrogen, Potassium
Soil TextureOrganic Matter (%) N (%) pH P (kg/ha) K (kg/ha)
Sandy 1.5 0.07% 5.5 - 7.5 50 - 100 75 - 125Loamy 2.0 0.10% 5.5 - 7.5 75 - 100 125 - 175Clay >3 0.15% 5.5 - 7.5 75 - 125 150 - 250
Recommended Nutrient Levels for Seedling Production

Soil Sample:
1. Must be representative of nursery2. Establish sampling areas3. In one field, collect from 5 areas and
mix all samples4. Sample at the root zone5. Keep samples free of foreign objects6. Keep soil management records
Soil Preparation:
1. Spread out sample2. Allow soil sample to dry overnight3. Remove all twigs, etc.4. Gently crush soil to remove lumps

Soil pH: Why It’s Important
1. Numerical scale 1 – 142. Measures acidity – alkalinity3. Conifers 5.5 – 6.5 pH4. Deciduous 6.5 - 8 pH

Soil pH Test:1. Fill test tube (0755) to line 4 with pH Indicator (5701). Squeeze bottle gently.
Soil pH Test:2. Use .5 g spoon (0698) to add three measures of soil
sample to test tube solution.

Soil pH Test:3. Cap and mix gently for one minute.
Soil pH Test:4. Allow test tube to stand for 10 minutes to let soil settle.
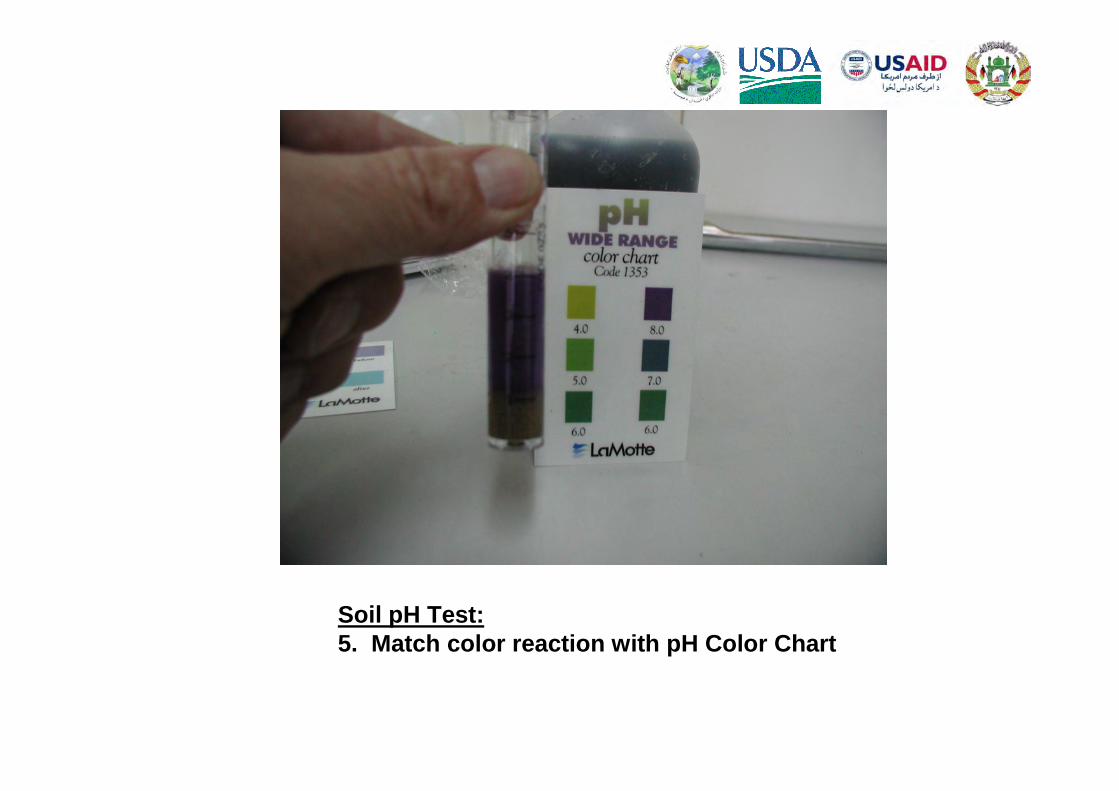
Soil pH Test:5. Match color reaction with pH Color Chart

Phosphorus: Why It’s Important
1. Vital for root formation2. Essential for development of cell tissue3. Vital for development of healthy seeds and fruits

Soil Phosphorus Test:1. Fill test tube (0755) to line 6 with Phosphorus Extracting Solution (5704)
Soil Phosphorus Test:2. Use .5 g spoon (0698) to add three measures of soil sample to test tube solution.

Soil Phosphorus Test:3. Cap and mix gently for one minute.
Soil Phosphorus Test:4. Remove cap. Allow to stand, and soil to settle, until liquid above the soil is clear.

Soil Phosphorus Test:5. Use one pipet (0364) to transfer the clear liquid to a second clean test tube. To avoid agitation of the soil, squeeze bulb of pipet before inserting into liquid. Release bulb slowly to draw clear liquid into pipet. Do not pull any soil. Fill second tube to line 3.

Soil Phosphorus Test:6. Add six drops of Phosphorus Indicator Reagent (5705) to soilextract in the second tube.

Soil Phosphorus Test:7. Cap and mix thoroughly.
Soil Phosphorus Test:8. Add one Phosphorus Test Tablet (5707).

Soil Phosphorus Test:9. Cap and mix until tablet dissolves. A blue color will develop.
Soil Phosphorus Test:10. Match color with
Phosphorus Chart (1372).
• Low: 0 – 50 kg/ha• Medium: 50 – 100 kg/ha• High: >100 kg/ha

Nitrogen: Why It’s Important
1. Part of every living cell (proteins)2. Directly involved in photosynthesis3. Stimulates above-ground growth

Soil Nitrogen Test:1. Fill test tube (0755) to line 7 with Nitrogen Extracting Solution (5702)
Soil Nitrogen Test:2. Use .5 g spoon (0698) to add two measures of soil samples.

Soil Nitrogen Test:3. Cap and mix gently for one minute.
Soil Nitrogen Test:4. Remove Cap and allow soil to settle.

Soil Nitrogen Test:5. Use a clean pipet(0364) to transfer the clear liquid to a second test tube. To avoid agitation of the soil, squeeze bulb of pipetbefore inserting tip into liquid. Release bulb slowly to draw clear liquid into pipet. Do not pull up any soil. Fill second tube to line 3 with liquid.

Soil Nitrogen Test:6. Use .25 g spoon (0695) to add two measures of Nitrogen Indicator Powder (5703) to soil extract in second tube.
Soil Nitrogen Test:7. Cap and gently mix. Wait 5 minutes for pink color to develop above the powder.

Soil Nitrogen Test:8. Match test color
with Nitrogen Color Chart (1371)
• Low: 0 – 30 kg/ha
• Medium: 30 – 60 kg/ha
• High: >60 kg/ha

Potassium: Why It’s Important
1. Promotes photosynthesis and efficient use of water
2. Strengthens natural mechanisms for disease resistance, drought tolerance, transplanting shock

Soil Potassium Test:1. Fill test tube (0755) to line 7 with Potassium Extraction Solution
Soil Potassium Test:2. Use .5 g spoon (0698) to add 4 measures of soil sample to test tube.

Soil Potassium Test:3. Cap and shake vigorously for one minute
Soil Potassium Test:4. Remove cap and allow soil to settle.

Soil Potassium Test:5. Use a clean pipet(0364) to transfer the clear liquid to a second clean test tube. Be careful not to pull up any soil into pipet. Fill second tube to line 5 with the liquid. Note: If additional extract is needed to fill the tube to line 5, repeat steps 1 through 4.

Soil Potassium Test:6. Add one Potassium Indicator Tablet (5708) to soil extract in second tube.
Soil Potassium Test:7. Cap and mix until tablet dissolves. A purplish color will appear.
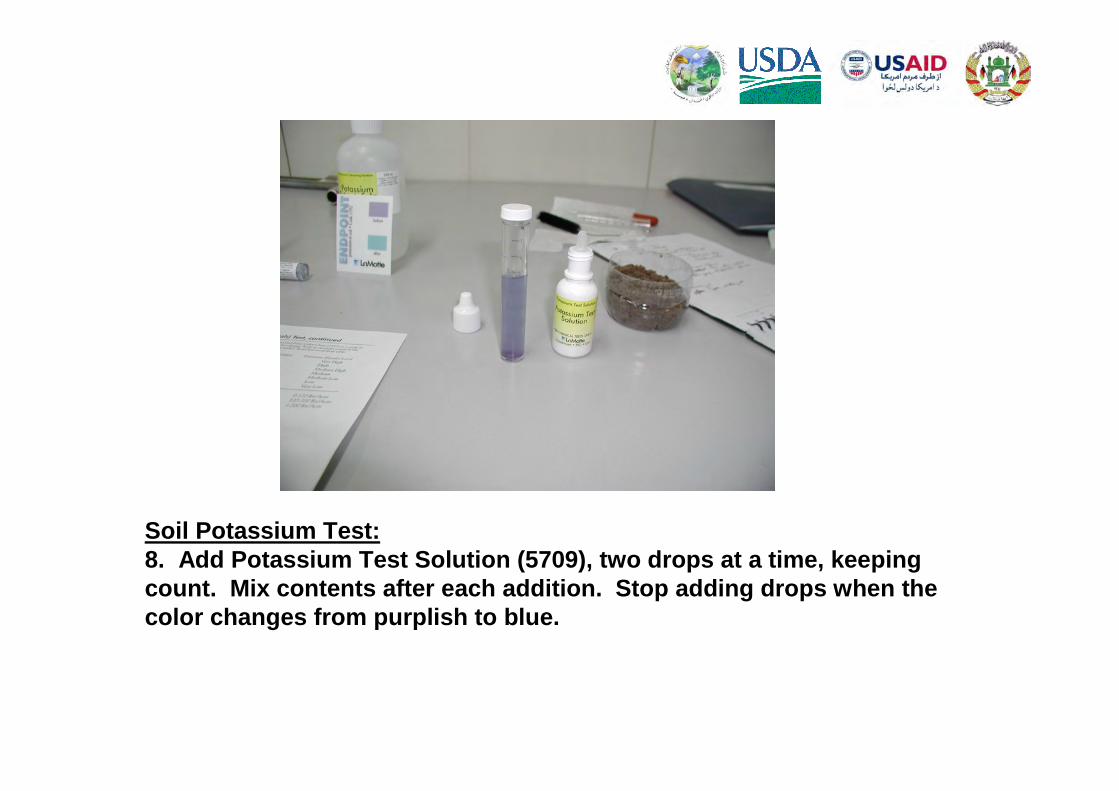
Soil Potassium Test:8. Add Potassium Test Solution (5709), two drops at a time, keeping count. Mix contents after each addition. Stop adding drops when the color changes from purplish to blue.

Soil Potassium Test:9. Use potassium End Color Chart (1352) as a
guide in reading this color change. Keep an accurate count of the number of drops added. Read test results from table.
Number of Drops Potassium Level0-8 Very high10 High12 Medium High14 Medium16 Medium Low18 Low20 or more Very low
• Low: 1 – 120 kg/ha• Medium: 120 – 200 kg/ha• High: >200 kg/ha
4 Drops
8 Drops
12 Drops

Sanitation:
1. Wash all equipment after each use.2. Dirty equipment could influence results

Sources of Soil Enrichment:
1. Commercial Fertilizers2. Organic Fertilizers
Compound Formula Nitrogen ContentAmmonium
nitrate (NH4) N03 33.5%Ammonium
sulfate (NH4)2 SO4 21%Diammonium
phosphate (NH4)2 HPO4 21%Anhydrous ammonium Liquid NH3 82%
Urea CO (NH2)2 45%Calcium Nitrate Ca (NO3)2 15%Mixed fertilizers,
as 10-10-10 10%