laboratory #8: structural geology – thinking in 3dcneal/planetearth/lab-structural/lab-8... · 2...
TRANSCRIPT

1
Name: ______________________________ Lab day: Tuesday Wednesday Thursday
ENVG /SC 10110-20110L Planet Earth Laboratory
Laboratory #8: Structural Geology – Thinking in 3D
http://www.nd.edu/~cneal/PhysicalGeo/Lab-Structural/index.html Readings: Laboratory Manual at the lab web site: 110 points total. Tools needed for this lab: scissors, protractor, ruler, pencil, and an eraser!!! Introduction: This week we continue our shift from the study of minerals and rocks to the study of geologic and topographic maps. Geologists use maps to (1) simplify data in a systematic fashion for easier understanding of geologic features that are large (or small but complex) in scale, (2) to study geologic features when they cannot study them directly in the field, (3) to simplify the transfer of information between researchers. We will use three types of maps: geologic maps, geologic cross-sections, and block diagrams. Geologic maps illustrate the geology at the earth’s surface, or how the geology would look from the air if it was possible to remove all vegetation, soil and regolith. Geologic cross-sections illustrate how the geology would look if we could take a cross-section through the earth’s surface; road-cuts through hills are an example of a geologic cross-section. Block diagrams are a combination of geologic maps and cross-sections, illustrating both surface features and cross-sections through the earth.
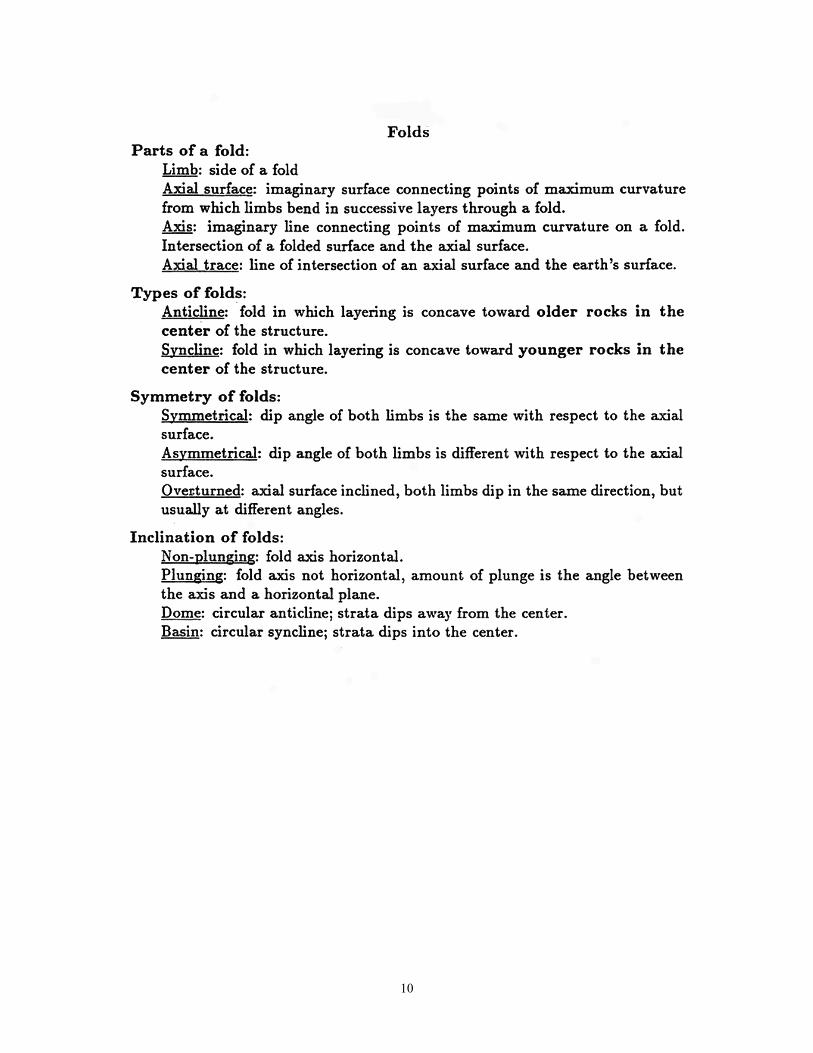
Structural geology is the study of the ways in which rocks or sediments are primarily arranged and secondarily deformed on the Earth. Stress (force per unit area) may deform (or strain) rocks either by bending (seen as folds) or breaking (as in faults). The geometry of folds and faults is controlled by the amount of force involved, the direction of the applied force (compressional, tensional, and shearing), and by the types of rocks involved (some rocks are more likely to perform plastically than others). A number of the important terms used in structural geology are defined on the last 3 pages of this lab handout.
Also, check out the lab website for more hints and information. USE A PENCIL FOR THIS LAB! BE SURE TO LABEL THE BACK OF EACH BLOCK WITH YOUR NAME AND LAB DAY

2
Part I Symbols for Strike and Dip (see Figs. 14.3 & 14.4, page 241, in your Lab Manual). 1) Using the symbols on the last 3 pages of this handout, and using your protractor/ruler, draw
the appropriate symbols for the following attitudes (see Pages 8 & 9 of this lab). Assume NORTH is at the top of the page (6 points).
A. Strike: NW, Dip: NE B. Strike: NE, Dip: SE C. Horizontal bedding D. Strike: N, Dip: W (but overturned) E. Strike: NE, Dip: NW F. Strike: SW, Dip: vertical Part II Faults in Cross-Section and Map View (e.g., Fig. 14.11, Page 246, in your Lab Manual). 1) For each of the following three cross-sections and one map view of faults:
a) Draw arrows indicating how the blocks either side of the fault have moved (the arrows should be drawn next to the fault face). (4 points – I point for each diagram)
b) Indicate (if possible) the direction of dip of the fault plane (i.e., north, south, east, west). If you can’t tell, say so! (4 points)
c) Identify the type of fault the diagram represents (normal, reverse, right or left-lateral strike-slip). (4 points)

3
Part III Folds and Faults in Block Diagrams (see Fig. 14.9, page 245, in your Lab Manual).
1) Label the block diagrams below, indicating whether they are synclines, anticlines, plunging synclines and plunging anticlines (1 point each). Then label which bed(s) is/are oldest and which is/are youngest as seen in each block diagram. (3 points each) Assume the beds are not over-turned. (16 points total).

4
2) The following questions are also drawn from your lab manual.
Complete the blank sides in the two block diagrams (5 pts each). See Figure 14.5 (page 242) of your Lab manual for an example. Also look at Figures 14.9 and 14.10, page 245, in your lab manual Use a protractor to measure the angles of beds and the fault where appropriate. Lowest numbers (i.e., 2) correspond to the oldest rocks. Answer the following questions:
a) In Figure A, what geologic structure is shown? HINT: Draw in the axial plane on the upper surface before you start. ____________________________________________________(3 pts) (see Fig. 14.9, page 245 in your lab manual)
b) What kind of fault is shown in Figure B, and what kind of geologic structure does the fault cross-cut? (see Fig. 14.10, page 245, in your lab manual). Bed 7 is the youngest, bed 2 the oldest. NOTE THAT THE WAY TO REPRESENT THE DIP OF A FAULT IS SHOWN IN THIS DIAGRAM.
__________________________________ (2 pts for the structure; 2 pts for the fault)

5
3) The following questions are drawn from your lab manual. The questions refer to the block diagrams on pages 6 and 7 of this handout. Cut out the diagrams before starting the problems. Assume no overturned beds. MAKE SURE YOUR NAME AND LAB DAY ARE CLEARLY WRITTEN ON THE BACK OF EACH BLOCK DIAGRAM.
3a) Refer to Block A with Side 1 up (26 pts Total)
i) Fill in the blank faces on the sides and bottom (Side 2) of the block. In order to keep track of the layers I have labeled them as “A”, “B”, “C”, etc. Be sure to include these labels when filling in the blank faces. (10 pts.)
ii) Put strike and dip symbols at the spaces indicated with dots on Sides 1 and 2. (6 pts) iii) Illustrate the position of the axial surface of the fold by sketching its trace on the top of
the block. The trace is an imaginary line that outlines the axial surface. The axial surface most nearly divides a fold into two equal parts). (2 pts)
iv) Label all oldest and youngest beds present on Sides 1 and 2 on the block. Make sure the T.A.s and I will be able to find your answers. (6 pts)
v) What type of fold is this (as seen from Side 1)? Label the type of fold right on the block. Make sure the T.A.s and I will be able to find your answer. (2 pts)
3b) Refer to Block C with Side 1 up (32 pts Total). NOTE: The color block in your lab manual is incorrect.
i) Fill in the blank faces on the sides and base of the block. Be sure to include these labels when filling in the blank faces. (20 pts) ii) Put strike and dip symbols at the spaces indicated with dots on Side 1. (4 pts) iii) Give a dip symbol with angle of dip for the fault on the block. (2 pts) iii) Indicate the relative movement of the fault by placing arrows on opposite sides of the
fault on the side faces. (2 pts) iv) Label the hanging wall and footwall on the top and side faces right on the block. (4 pts)

6

7

8

9
10