laboratory 1 layers, planes, tissues, cavities, and...
TRANSCRIPT

Today’s labfunctional cand the omesothelium In today’s will practice
1.2.1. Over 200 basic tissue
1. Epi2. Co3. Mu4. Ne
1.1 O
oratory revieharacteristics
rganization o.
laboratory, w knot-tying,
1.2. Bre
Four
cell types ha types.
thelium nnective tissuscle tissue sprvous tissue s
Laboratory 1
Layers, Planes, Tissues, Cavities, and Linings
T. Van Houten and R. F. Hoyt, Jr.
bjectives and Clinical Correlations
w considers the general organization of the body. Review topics include the structural and of epithelium and connective tissue, the three anatomical layers surrounding the body, f deeper structures into compartments limited by deep fascia, and cavities lined by
e will apply knowledge of anatomical layers and tissue properties to wound closure. We basic sutures, and several skin flap procedures.
efore You Come to Laboratory please ad the following review and consult your atlas.
basic tissue types
ve been differentiated in the human body (so far). All cells are classified as one of four
e ecialized for contraction. pecialized for the initiation, transmission, and reception of nerve impulses. T

Layers, Planes, Tissues, Cavities, and Wrappings Clinically Based Anatomy Page 1-2 1997. All rights reserved.
1.2.1.1. Epithelium. All epithelium consists of sheets of cells with specialized intercellular junctions and scant intracellular matrix (Figure 1.1). All epithelial cells exhibit polarity. The apical surfaces of epithelial cells face a space, either an inside space, like a lumen or cavity, or an outside space, like the world (and outer space). The basal surfaces of epithelial cells rest on a basement membrane overlying the connective tissue of the lamina propria. Epithelium is avascular, and metabolic support to epithelial cells arrives by diffusion from the vascular lamina propria.
Figure 1.1. Types of epithelium (from Cormack, DH. Essential Histology, JB Lippincott, 1984.
Functional specializations of epithelial cells determine the character of the exchange between the inner or outer space and the underlying tissue.
A few clinical anatomy notes on epithelium Most tumors in children arise from hematopoietic or nervous tissue. Most tumors in adults arise from epithelial tissue. The percentage of tumors of epithelial origin rises to 90% by age 45. Epithelium subjected to abnormal stress can undergo metaplasia. In heavy smokers, pseudostratified respiratory epithelium changes to stratified squamous non-keratinized epithelium. In women with vaginal prolapse, vaginal stratified squamous non-keratinized epithelium becomes keratinized. In individuals with chronic vitamin A deficiency, urinary transitional epithelium changes to stratified squamous epithelium.

Clinically Based Anatomy Layers, Planes, Tissues, Cavities, and Wrappings 1997. All rights reserved. Page 1-3 1.2.1.1 Connective Tissue. All connective tissue consists of cells dispersed in an abundant extracellular matrix with few, if any, intercellular junctions (Figure 1.2). The extracellular matrix of all connective tissue consists of the ground substance, a hydrated meshwork of glycosaminoglycans, and fibers and/or crystals embedded in the ground substance. The cells in different types of connective tissue manufacture ground substance and fibers with the appropriate chemical and mechanical properties for the functional requirements of the particular connective tissue type.
General connective tissue. Sheets of general connective tissue support body tissues and organize them into layers, compartments, and spaces. The formative cells of general connective tissue are fibroblasts. Loose connective tissue consists of a sparse network of collagen, reticular, and elastic fibers, many adipocytes (fat cells), and cells of the immune system in an abundant watery extracellular matrix. Loose connective tissue forms a demonstrable layer underlying the skin (superficial fascia). In deeper regions, loose connective tissue serves as packing material around organs and neurovascular bundles. Dense connective tissue con-tains many more collagen and elastic fibers relative to the amount of ground substance than loose connective tissue. Dense connective tissue forms the deeper dermal layer of the skin, flat sheets of deep fascia, tendons, ligaments, the capsules and septa of organs, and the adventitia (supporting layer) of blood vessels.
Figure 1.2. Cells and fibers of loose connective tissue (from Cormack, DH. Essential Histology, JB Lippincott, 1984.
A few clinical anatomy notes on general connective tissue Connective tissue layers and partitions are both functionally and clinically significant. The planes between connective tissue layers are useful for both anatomical and surgical dissection. Major nerves and blood vessels generally follow connective tissue planes, so careful dissection between connective tissue layers is the best technique for sparing and preserving neurovascular structures. Wherever possible, surgeons use areolar connective tissue planes to dissect organs to be removed or “mobilized” from neighboring structures. Dense connective tissue planes often provide a natural barrier to fluids, infection, or neoplastic processes; for example, the dense capsule surrounding the prostate limits the spread of early prostate cancer to the rectum and vice versa. In established infections, however, lytic enzymes produced by pathogenic bacteria can breach deep connective tissue barriers. Pathologically weak dense connective tissue, as in Ehlers-Danlos syndrome, occasionally poses a hazard in anastomosing large vessels, or even in ligating them. Sutures placed in dense connective tissue are the primary method for closing traumatic injuries and surgical incisions. Dense connective tissue structures from one site may be recruited as heterogenous grafts for surgical repair of injured connective tissue structures at other sites.

Layers, Planes, Tissues, Cavities, and Wrappings Clinically Based Anatomy Page 1-4 1997. All rights reserved.
Specialized structural connective tissue. The specialized structural connective tissues are cartilage and bone. The cells of specialized structural connective tissue are chondrocytes and osteocytes. Variation in the composition of the ground substance, and the fibers and/or crystals embedded in the ground substance, give different structural connective tissues their distinctive mechanical properties.
1.2.2. Three surrounding layers Three surrounding layers. The body is everywhere surrounded by three anatomical layers (Figures 1.3 and 1.4). The absolute and relative thickness of the three layers vary from region to region. The three surrounding layers of the body are:
1. Skin 2. Superficial fascia, and 3. Deep fascia
1.2.2.1. Skin In most first-year anatomy courses, skin is treated as little more than a nuisance. In fact, the skin is the largest organ of the body, accounting for approximately 8% to 10% of total body mass. Skin performs a variety of important functions. Skin protects the body from mechanical and chemical insults, from dehydration, and from infectious
microorganisms. The immunosurveillance function of skin involves a network of lymphatic vessels in the dermis. Skin is also a site for initiation of the primary immune response.
Skin actively assists in thermoregulation through vascular mechanisms and sweat glands.
Human skin synthesizes vitamin D, cytokines, and growth factors. The endocrine and thermoregulatory functions of skin require an ample network of cutaneous arteries and veins.
Skin is also a major sensory organ with general sensory nerve endings and specialized receptors for touch, temperature, pain, and other sensations. The trigeminal nerve carries sensation from the face and scalp, dorsal rami of spinal nerves carry sensation from the skin adjacent to the dorsal midline, and ventral rami of spinal nerves carry sensation from everywhere else.
The skin covering most of the body is relatively thin and contains hair follicles (thin skin). The skin covering the hands and feet is thick and hairless (thick or glabrous skin). Skin varies in thickness from about 1.5 mm on the eyelids to about 4.0 mm on the soles of the feet. An incision 2 mm in depth barely scratches the surface of the plantar heel, but extends into the important neurovascular structures of the palmar wrist.

Clinically Based Anatomy Layers, Planes, Tissues, Cavities, and Wrappings 1997. All rights reserved. Page 1-5
Figure 1.3. Anatomical layers in the arm and thigh (modified from axial sections in the Visible Human Project).

Layers, Planes, Tissues, Cavities, and Wrappings Clinically Based Anatomy Page 1-6 1997. All rights reserved.
Figure 1.4. Anatomical layers in two regions with cavities, head and thorax .

Clinically Based Anatomy Layers, Planes, Tissues, Cavities, and Wrappings 1997. All rights reserved. Page 1-7
s
Skin consists of two layers (Figure 1.5). An outer epidermal layer of stratified squamous epithelium. The epidermis is avascular and not innervated.
Hair follicles, sweat glands, and sebaceous glands are epidermal structures that invade the underlying dermis and subdermal connective tissue.
An inner dermal layer of connective tissue separated from the epidermis by a thin basal lamina. Elastic fibers
and collagen fibers form a woven meshwork within the ground substance of the dermis. Two layers can be differentiated within the dermis: 1) a thin superficial papillary layer, and 2) a thick reticular layer deep to the papillary zone. Thin bundles of smooth muscle, the arrector pili muscles, run obliquely in the dermis from the bases of the hair follicles. Sebaceous glands are tucked between the arrector pili muscles and the hair follicles.
Figure 1.5. Layers of the skin (From Lawrence, PF, Essentials of Surgical Specialties, Williams and Wilkins, 1993).
An underlying layer of superficial fascia, the subdermis or hypodermis, consisting of loose irregular connective tissue, blends with the reticular layer of the dermis. The superficial fascia contains a variable (sometimes very large) number of adipose cells. Skin tension lines. Variations in skin tension, and the orientation of collagen and elastic fibers within the dermis, form skin tension lines or relaxed skin tension lines (RSTLs), often visible as creases or wrinkles1. Lacerations or surgical incisions within, or parallel to, skin tension lines heal with less noticeable scars than incisions acros skin tension lines. And, incisions within creases are less noticeable anyway. The orientation of
1 Langer first described skin tension lines in 1861, and they are often called Langer’s lines.

Layers, Planes, Tissues, Cavities, and Wrappings Clinically Based Anatomy Page 1-8 1997. All rights reserved.
skin tension lines generally runs perpendicular to the orientation of the underlying muscle fibers. Surgical incisions follow skin tension lines whenever this orientation is consistent with adequate site exposure. All scars tend to contract through their long axes, and large longitudinal scars across joints can restrict range of motion. Incisions following skin tension lines obliquely or transversely across joints heal with less scarring and interfere less with joint range of motion. A diagram of skin tension lines appears in Figure 1.6.
Innervatioand sympathetic within the dermisympathetic fiberfascia, then brancVeins and lympha Every spinal nervthere is considerdamage to the co
Figure 1.6. Diagram of skin tension lines (from Schwartz, SI, GT Shires, and FC Spencer, Principles of Surgery, McGraw-Hill, 1994).
n and blood supply of the skin. Cutaneous nerves, carrying somatic afferent postganglionic efferent fibers, enter the dermis from the underlying superficial fascia, branch
s, and form a delicate nerve plexus in the dermal papillary zone deep to the epidermis. Small s also run in the adventitia of the arteries. Blood vessels enter the dermis from the superficial h, and form vascular plexuses in both the reticular and papillary zones of the dermis (Figure 1.5). tic vessels leave the dermis and enter the superficial fascia.
e carries sensation from a specific skin territory known as a dermatome (Figure 1.7). Although able overlap between adjacent dermatomes, sensory loss from a particular dermatome suggests rresponding spinal nerve.

Clinically Based Anatomy Layers, Planes, Tissues, Cavities, and Wrappings 1997. All rights reserved. Page 1-9
Figure 1.7. Diagram of dermatomes. symphysis. (Drawing from Frick, LeonhMedical Publishers, 1991).
Wound healing. Traumatic wounds and surg
1. Inflammatory phase. In uncontaminated wmatory phase of wound healing lasts approxvasodilation, and phagocytic removal of debinflammatory phase is prolonged in contaminaDevitalized tissue in wounds serves as a environment that inhibits vigorous leukocyte which facilitates their function in devitalized tithe inflammatory phase by debriding devitalizwhen possible, also limits this phase of healing
2. Proliferative phase. The proliferative phase connective tissue, fibroblasts rapidly synthevascularity also increases. New epidermalapproximately 1mm/day. The proliferative phlarger the gap between the wound edges, thesmall wounds and some contaminated woundwith sutures, staples, or tape. Ancient su
T4 is nipple, T10 is navel, T12 is pubic ardt, and Stark. Human Anatomy, Thieme
ical incisions heal in three phases. ounds with the edges coapted (approximated), the inflam-imately four days. Leukocyte activity, histamine secretion, ris by macrophages occur during this initial phase. The ted wounds or in wounds not debrided of devitalized tissue. bacterial growth medium and also creates an anaerobic function. Neutrophils are capable of glycolytic respiration ssue. One strategy for minimizing scar formation is to limit ed tissue and removing contamination. Closing the wound, .
of healing lasts approximately six weeks. In the subdermal size ground substance and woven collagen fibers, and
tissue advances from the wound edges at the rate of ase is prolonged when wound edges are not coapted. The longer it takes to fill with new epidermal tissue. Although s may be left open, the edges of most wounds are coapted rgeons sometimes used ant pincers for wound coaption.

Layers, Planes, Tissues, Cavities, and Wrappings Clinically Based Anatomy Page 1-10 1997. All rights reserved.
Epithelialization is the late limiting step in wound healing. Careful coaption enhances epithelialization by approximating epithelial surfaces.
3. Maturation phase. The maturation phase of healing lasts between six and eighteen months. During this phase, collagen fibers laid down during the proliferative phase are remodeled by intermolecular cross-links. Remodeling improves the appearance of the scar, but its tensile strength remains relatively unchanged2, and seldom exceeds 80% of the tensile strength of the normal tissue.
Another mechanism of healing is wound contraction. This is particularly important in open wounds especially in areas such as the perineum where the underlying connective tissues is loose. Wound contraction is mediated by fibromyocytes in the wound.
A few clinical anatomy notes on skin repair The length and orientation of scars may be changed simultaneously by the use of Z-plasty incisions in which the positions of adjacent triangular skin flaps are transposed (Figure 1.8). Z-plasty incisions can also be used to reposition scars within skin tension lines. 60o angles provide optimal lengthening.
Figure 1.8. Diagram of Z-plasty (modified from Schwartz, SI, GT Shires, and FC Spencer, P inciples of Surgery, McGraw-Hill, 1994).
r
Flaps are viable tissue sections with an intact blood supply transferred from donor sites to injury sites in reconstructive surgery. The blood vessels supplying the tissue section form its pedicle. In local transfers, flaps

Clinically Based Anatomy Layers, Planes, Tissues, Cavities, and Wrappings 1997. All rights reserved. Page 1-11
A few clinical anatomy notes on skin repair (continued)
are rotated or tunneled to another location with their original blood supply (and possibly their nerve supply) intact. An example of local transfer is shown in Figure 1.9. In distant transfers, the original blood vessels are detached and the vessel stumps sutured microsurgically to other vessels at the injury site. These surgical techniques exploit the anatomical principle that skin receives its blood supply from underlying muscle tissue.
1O 1O
1O 1O
2O 2O
2O 2O
A B
C D Figure 1.9. Local transfer of a bilobed surgical flap. A). Incisions are made to excise the skin lesion and to mobilize the surgical flaps. B). The skin lesion is excised, the primary flap is rotated around the pedicle to cover the wound left by removing the skin lesion, and the secondary flap is rotated to cover the lesion left by mobilizing the primary flap. C). The flaps are sutured in place. D). The margins of the wound left by mobilizing the secondary flap are sutured closed. Traumatic injuries or surgical sites with widely separated edges (recipient sites) may be covered by skin grafts removed from donor sites, usually taken from the same patient. Whole thickness skin grafts include the epidermis and the entire thickness of the dermis. Split thickness skin grafts include the epidermis and a variable amount of dermis (Figure 1.10).
Figure 1.10. Diagram of full thickness and several split thickness skin grafts (from Schwartz, Shires, and Spencer, Principles of Surgery, McGraw-Hill, 1994).

Layers, Planes, Tissues, Cavities, and Wrappings Clinically Based Anatomy Page 1-12 1997. All rights reserved.
1.2.2.2. Superficial fascia Superficial fascia forms a continuous layer of loose connective tissue surrounding the body and blending with the overlying dermis and underlying deep fascia (Figures 1.3 and 1.4). Superficial fascia varies regionally in thickness and contains a variable (sometimes very large) number of adipose cells. Like all loose connective tissue, superficial fascia consists of a watery extracellular matrix, collagen and elastin fibers, and adipocytes. The fibers in superficial fascia are oriented to resist both tension and compression. Two regions may be distinguished within the layer of superficial fascia, and the distinction between these layers is particularly conspicuous over the surface of the anterior trunk and perineum:
The fatty layer of superficial fascia closer to the dermis has numerous adipocytes and fewer fibers relative to the watery matrix.
The deeper membranous layer of superficial fascia closer to the deep fascia has fewer adipocytes and more fibers, and it forms a discernable tissue sheet. This membranous layer is demonstrable over the anterior trunk as Scarpa’s fascia.
Superficial fascia performs a variety of important functions.
Superficial fascia forms a slippage plane between the skin and deep fascia which allows skin mobility. The muscles of facial expression are embedded in the superficial fascia and attach to the skin of the face and neck.
Superficial fascia provides thermal insulation and the adipocytes in the superficial fascia can provide a reserve metabolic energy supply.
Cutaneous nerves, blood vessels, and lymphatic vessels travel through the superficial fascia from the deep fascia to reach the skin.
A set of superficial veins (without arterial counterparts) drains the skin, runs in the superficial fascia, and enters the deeper veins (with arterial counterparts). The superficial veins are accompanied by a set of lymphatic vessels which drain to superficial lymph node groups. Infections in superficial structures can often be differentiated from infections in deeper structures on the basis of the affected lymph node groups.
1.2.2.3. Deep fascia Like superficial fascia, deep fascia also forms a continuous layer around the body, but the arrangement of deep fascia is more complex than that of superficial fascia (Figures 1.3 and 1.4).
Deep fascia splits to surround other structures and groups of structures wherever it encounters them, then rejoins to form a single layer where no structures intervene. An even greater variety of regional names, both Latin and eponymous, have been applied to deep fascia, further obscuring the basic unity of this layer, so watch out.
Unlike superficial fascia, deep fascia attaches directly to bone, blending with the periosteum. In the limbs, where deep fascia surrounds large muscle groups, fascial septa pass inward from the internal surface of the deep fascia to attach to bone.
Deep fascia generally consists of dense connective tissue. The deep fascia surrounding muscle groups in the limbs and trunk is substantial, tough, and relatively inelastic. The collagen and elastic fibers in deep fascia are oriented primarily to resist tensile stress. Bundles of collagen fibers are often visible to the unaided eye, particularly in regions where tensile stresses are high. Examples of highly reinforced areas are the iliotibial tract in the lower limb,
Clinically Based Anatomy Layers, Planes, Tissues, Cavities, and Wrappings 1997. All rights reserved. Page 1-13 and the retinacula confining tendons at the wrist and ankle. The deep fascia enclosing the viscera is more attenuated and it grades into loose connective tissue over their surfaces.
Deep fascia serves a variety of important functions.
The deep fascia of the limbs and trunk is important biomechanically because it restrains muscles and tendons, provides attachment for some muscles, and influences their direction of pull.
The inelastic sheath of deep fascia surrounding the limbs, in conjunction with valves in the deep veins of the limbs, enables limb muscle contractions to assist venous blood returning to the heart.
The deep fascia of the limbs is important clinically because swelling within the compartments limited by inelastic deep fascia can compress the vessels and nerves located within the compartment, causing compartment syndrome. Reduced blood flow to nerves, muscles, and other structures within the affected compartment can cause severe pain and can lead to tissue death. Compartment syndrome is an orthopedic emergency.
Deep fascia organizes the muscles of the body into groups which share important functions, innervation, and blood supply. Deep fascia also surrounds important visceral structures in the head and neck.
1.2.2.4. Body cavities The muscles and bones of the head and trunk surround cavities containing important structures; the brain and the thoracic, abdominal, and pelvic viscera, respectively. The trunk surrounds a central cavity partitioned by the thoracic diaphragm into the thoracic and abdominopelvic cavities. All body cavities are lined by several slippery layers. Three layers of connective tissues line the cranial cavity (dura, pia, and arachnoid mater) (Figure 1.4), two layers of mesothelium line the thoracic cavity (parietal and visceral pleura) (Figure 1.4), and two layers of mesothelium line the abdominopelvic cavity (parietal and visceral peritoneum).
1.2.8. Refences and additional readings 1Schwartz, SI, GT Shires, and FC Spencer. 1994. Principles of Surgery, Sixth Edition. New York, McGraw-Hill,
pages 2025 to 2040. 2Lawrence, PF. 1992. Essentials of Surgical Specialties. Philadelphia: Williams and Wilkins, pages 127-139. Johnson and Johnson. Wound Closure Manual. Ethicon. 1994.

Layers, Planes, Tissues, Cavities, and Wrappings Clinically Based Anatomy Page 1-14 1997. All rights reserved.
1.3. Before You Put Your Gloves On please complete the following exercises.
Pinch a fold of your skin in each of the following areas, noting the relative thickness of the skin and the extent to which the skin adheres to the underlying superficial fascia.
Scalp Face Chest over the sternum Dorsal surface of the hand Palmar surface of the hand
Which of these skin folds consists of glabrous skin? On yourself or your (willing) lab partner, trace the course of the superficial veins from the dorsal aspect of the hand as far proximally as you can (Netter, Second Edition, Plates 449, 448, and 452). Identify the
Dorsal venous arch Cephalic vein on the radial side of the forearm. Basilic vein on the ulnar side of the forearm.
The superficial veins run in which layer of the body? Are there any cephalic or basilic arteries? On yourself or your lab partner, test cutaneous sensation in the following areas (Netter, Second Edition, Plates 451 and 450). In testing sensation, work from distal to proximal within the sensory field.
C5 dermatome T1 dermatome Skin supplied by the medial antebrachial cutaneous nerve. Skin supplied by the intercostobrachial nerve.
16.4. Before You Begin Dissection please , mark the following anatomical landmarks, structures to be spared and incisions to be completed.
1.4. Knots, sutures, and skin flaps In today’s laboratory, we will apply our knowledge of anatomical layers, and the tissue properties of these layers, to wound closure. We will practice knot-tying, five basic sutures, and four ways to use skin flaps to close skin defects. For this exercise, you will need pigs’ feet and/or ears, a sharp scalpel, small dissecting scissors, tissue forceps, a needle driver, a marking pen, a small ruler (or calibrated scalpel handle), and several packets of suture material.

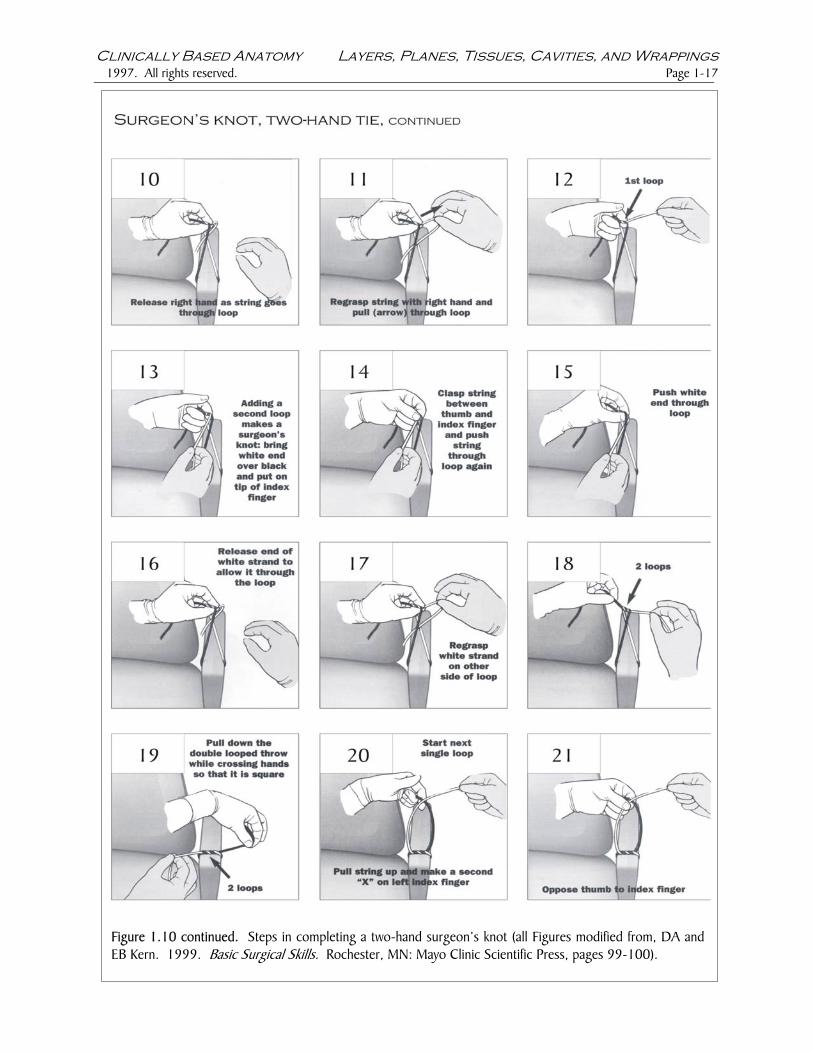
Clinically Based Anatomy Layers, Planes, Tissues, Cavities, and Wrappings 1997. All rights reserved. Page 1-15 1.4.1. Knots Two ways to tie a surgeon’s knot. A surgeon’s knot resembles the familiar square knot except that the first throw consists of two loops instead of the single loop used for a square knot (Figure 1.10). Initially, many students find it strange to tie familiar knots using unfamiliar motions. The ability to tie secure knots quickly and skillfully is an essential clinical skill, and the time spent practicing surgical knot-tying is well-rewarded.
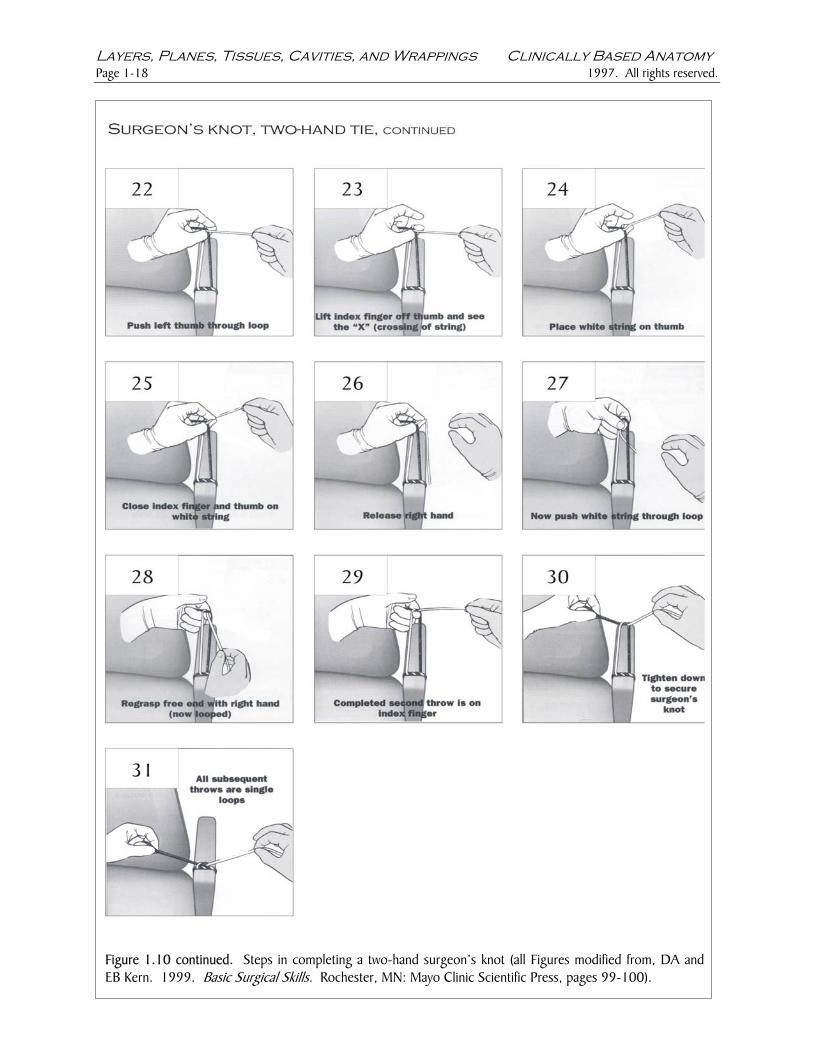
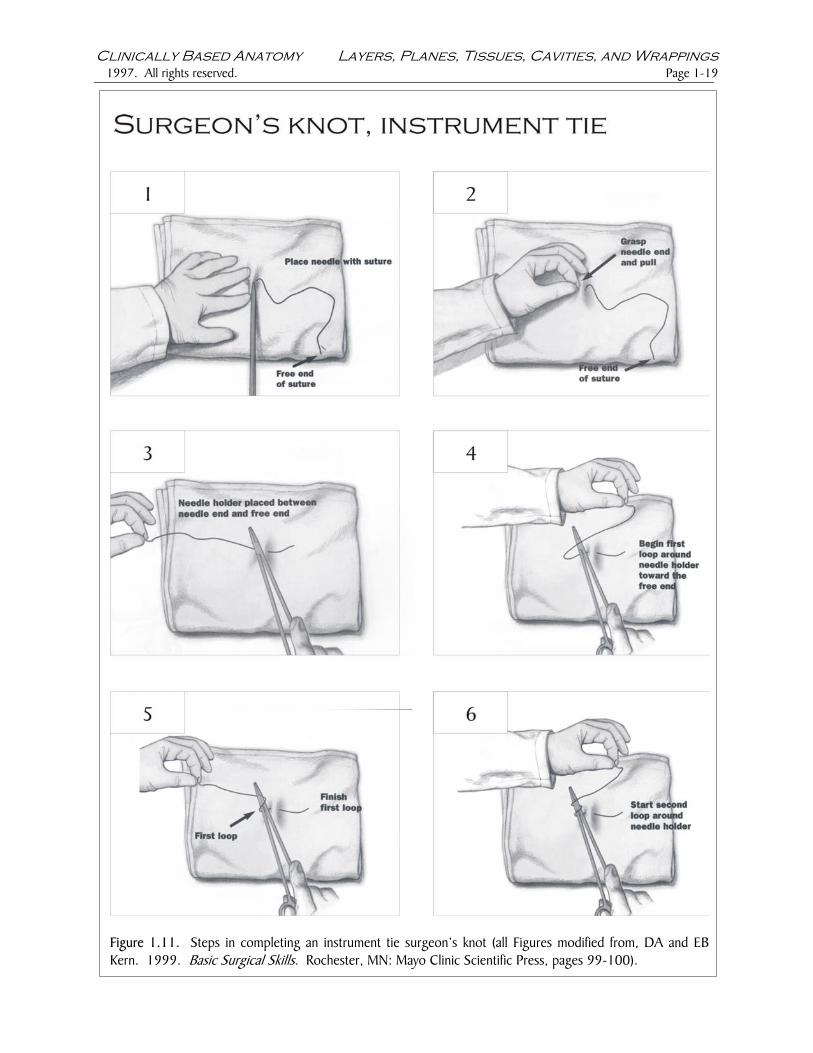
Two-hand tie. Practice tying five two-hand surgeon’s knots, using your knot board, or a chair arm, as shown in Figure 1.10. Complete five or six throws per knot. Instrument tie. When you have completed the five two-hand ties, complete 10 instrument tie surgeon’s knots using your knot board, or a towel, as shown in Figure 1.11.

Layers, Planes, Tissues, Cavities, and Wrappings Clinically Based Anatomy Page 1-16 1997. All rights reserved.
Figure 1.10. Steps in completing a two-hand surgeon’s knot (all Figures modified from, DA and EB Kern. 1999. Basic Surgical Skills. Rochester, MN: Mayo Clinic Scientific Press, pages 99-100).
.
Clinically Based Anatomy Layers, Planes, Tissues, Cavities, and Wrappings 1997. All rights reserved. Page 1-17
Figure 1.10 continued. Steps in completing a two-hand surgeon’s knot (all Figures modified from, DA and EB Kern. 1999. Basic Surgical Skills. Rochester, MN: Mayo Clinic Scientific Press, pages 99-100).
Layers, Planes, Tissues, Cavities, and Wrappings Clinically Based Anatomy Page 1-18 1997. All rights reserved.
Figure 1.10 continued. Steps in completing a two-hEB Kern. 1999. Basic Surgical Skills. Rochester, MN
and surgeon’s knot (all Figures modified from, DA and: Mayo Clinic Scientific Press, pages 99-100).
Clinically Based Anatomy Layers, Planes, Tissues, Cavities, and Wrappings 1997. All rights reserved. Page 1-19
Figure 1.11. Steps in completing an instrument tie surgeon’s knot (all Figures modified from, DA and EBKern. 1999. Basic Surgical Skills. Rochester, MN: Mayo Clinic Scientific Press, pages 99-100).

Layers, Planes, Tissues, Cavities, and Wrappings Clinically Based Anatomy Page 1-20 1997. All rights reserved.
Figure 1.11 continued. Steps in completing an instruand EB Kern. 1999. Basic Surgical Skills. Rochester
ment tie surgeon’s knot (all Figures modified from, DA , MN: Mayo Clinic Scientific Press, pages 99-100).

Clinically Based Anatomy Layers, Planes, Tissues, Cavities, and Wrappings 1997. All rights reserved. Page 1-21
Figure 1.11 continued. Steps in completing an instruand EB Kern. 1999. Basic Surgical Skills. Rochester
ment tie surgeon’s knot (all Figures modified from, DA , MN: Mayo Clinic Scientific Press, pages 99-100).

Layers, Planes, Tissues, Cavities, and Wrappings Clinically Based Anatomy Page 1-22 1997. All rights reserved.
Figure 1.11 continued. Steps in completing an instrument tie surgeon’s knot (all Figures modified from, DAand EB Kern. 1999. Basic Surgical Skills. Rochester, MN: Mayo Clinic Scientific Press, pages 99-100).
.
1.4.2. Sutures The basic rules of wound closure should be observed when practicing wound closure on the pigs’ ears and feet provided for today’s laboratory, and when working with the cadavers in the anatomy lab.
Tissue trauma should be minimized. Scalpel blades and scissors should be sharp. Traction and undermining should be gentle. Nerves and blood vessels should be preserved. Skin incisions should be made with a sharp scalpel blade and generallyplaced perpendicular to the skin surface to enable precise approximation of the wound edges. The needle driver should be correctly armed. Arm the needle holder by grasping the needle as shown in Figure 1.12. The needle holder should grasp the needle about 1/3 of the way between the swaged end and the tip. Why is the needle curved?
Figure 1.12. Arming the needle holder (from the Johnson and Johnson Wound Closure Manual, 1994).

Clinically Based Anatomy Layers, Planes, Tissues, Cavities, and Wrappings 1997. All rights reserved. Page 1-23
Needles should be positioned perpendicular to the skin surface for each bite (Figure 1.13). Rotation of your forearm and the needle driver should follow the arc of the needle.
Figure 1.13. Correct position of the needle tip and a review of anatomic layers.
Anatomic layers should be closed separately. In today’s laboratory, we will begin practicing three sutures placed in the full thickness of skin (both dermis and epidermis), one suture placed in the dermis only, and one suture used to close potential dead spaces in the superficial fascia. Wound edges should be under appropriate tension with the edges slightly everted. Gently undermining skin edges, in the plane between the dermis and superficial fascia, often enables better approximation of the wound edges with less tension. The wound edges should be slightly everted, not inverted or overlapped. Sutures tied too tightly will be uncomfortable and can lead to tissue strangulation. Sutured wounds should lie flat with no puckers or standing cones (‘dog ears’). Knots should be secure and flat. Knots and knot tails should be placed as far as possible from the wound edges.
Three skin sutures Interrupted sutures. These useful sutures require only one bite of the needle per suture (Figure 1.14). Interrupted sutures should extend through both epidermis and dermis, but not into superficial fascia. Make at least two incisions in the pig foot or ear and practice closing both incisions with interrupted sutures. Apply the ‘principle of halving’, and place your first interrupted suture (central suture) in the middle of the incision. Your next suture should be placed halfway between the central suture and one end of the incision. Subsequent sutures should similarly be placed at halfway points until the sutures are completed and evenly placed (Figure 1.14). After you have completed both closures, remove the sutures from one closure, following the instructions in Figure 1.15.

Layers, Planes, Tissues, Cavities, and Wrappings Clinically Based Anatomy Page 1-24 1997. All rights reserved.
F 1
igure 1.14. Steps in completing interrupted sutures (all Figures modified from, DA and EB Kern. 999. Basic Surgical Skills. Rochester, MN: Mayo Clinic Scientific Press, pages 99-100).

Clinically Based Anatomy Layers, Planes, Tissues, Cavities, and Wrappings 1997. All rights reserved. Page 1-25
Figure 1.14 continued. Steps in completing interrupted sutures (all Figures modified from Sherris, DAand EB Kern. 1999. Basic Surgical Skills. Rochester, MN: Mayo Clinic Scientific Press, pages 99-100).

Layers, Planes, Tissues, Cavities, and Wrappings Clinically Based Anatomy Page 1-26 1997. All rights reserved.
Rbfor H(Fmin
Figure 1.15. Steps in removing interrupted sutures (all Figures modified from Sherris, DA and EB Kern. 1999. Basic Surgical Skills. Rochester, MN: Mayo Clinic Scientific Press, pages 99-100.
unning suture. The running suture (‘baseball stitch”) requires many needle bites with the suture carried etween the bites and only the two ends of the suture knotted (Figure 1.16) Make at least two incisions in the pig ot or ear and practice closing both incisions with a running suture. After you have completed both closures,
emove the sutures from one closure, following the instructions in Figure 1.17.
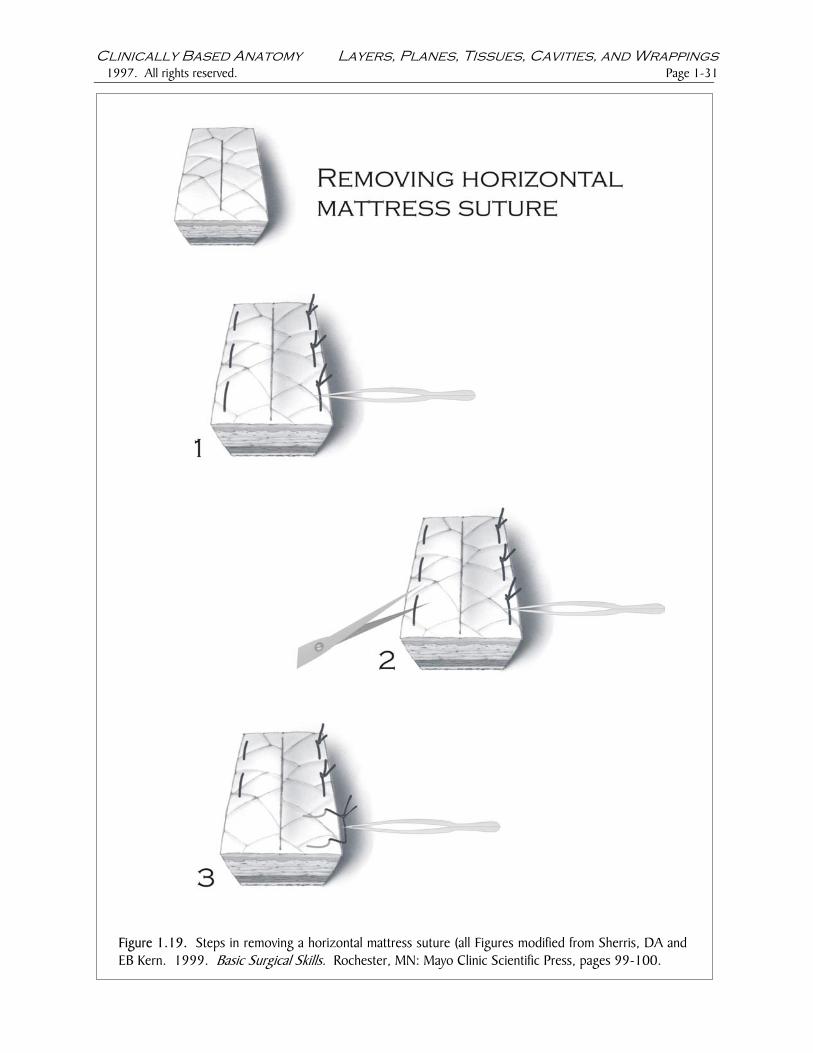
orizontal mattress suture. The horizontal mattress suture requires two needle bites per suture igure 1.18) Make at least two incisions in the pig foot or ear and practice closing both incisions with horizontal attress sutures. After you have completed both closures, remove the sutures from one closure, following the structions in Figure 1.19.

Clinically Based Anatomy Layers, Planes, Tissues, Cavities, and Wrappings 1997. All rights reserved. Page 1-27
Figure 1.16. Steps in completing a running suture (all Figures modified from Sherris, DA and EB Kern. 1999. Basic Surgical Skills. Rochester, MN: Mayo Clinic Scientific Press, pages 99-100.

Layers, Planes, Tissues, Cavities, and Wrappings Clinically Based Anatomy Page 1-28 1997. All rights reserved.
Figure 1.16 continued. Steps in completing a running suture (all Figures modified from Sherris, DA and EB Kern. 1999. Basic Surgical Skills. Rochester, MN: Mayo Clinic Scientific Press, pages 99-100.
.

Clinically Based Anatomy Layers, Planes, Tissues, Cavities, and Wrappings 1997. All rights reserved. Page 1-29
Figure 1.17. Steps in removing a running suture (all Figures modified from Sherris, DA and EB Kern. 1999. Basic Surgical Skills. Rochester, MN: Mayo Clinic Scientific Press, pages 99-100.

Layers, Planes, Tissues, Cavities, and Wrappings Clinically Based Anatomy Page 1-30 1997. All rights reserved.
Figure 1.18. Steps in completing a horizontal mattress suture (all Figures modified from Sherris, DA and EB Kern. 1999. Basic Surgical Skills. Rochester, MN: Mayo Clinic Scientific Press, pages 99-100.
Clinically Based Anatomy Layers, Planes, Tissues, Cavities, and Wrappings 1997. All rights reserved. Page 1-31
Fig EB
ure 1.19. Steps in removing a horizontal mattress suture (all Figures modified from Sherris, DA andKern. 1999. Basic Surgical Skills. Rochester, MN: Mayo Clinic Scientific Press, pages 99-100.

Layers, Planes, Tissues, Cavities, and Wrappings Clinically Based Anatomy Page 1-32 1997. All rights reserved.
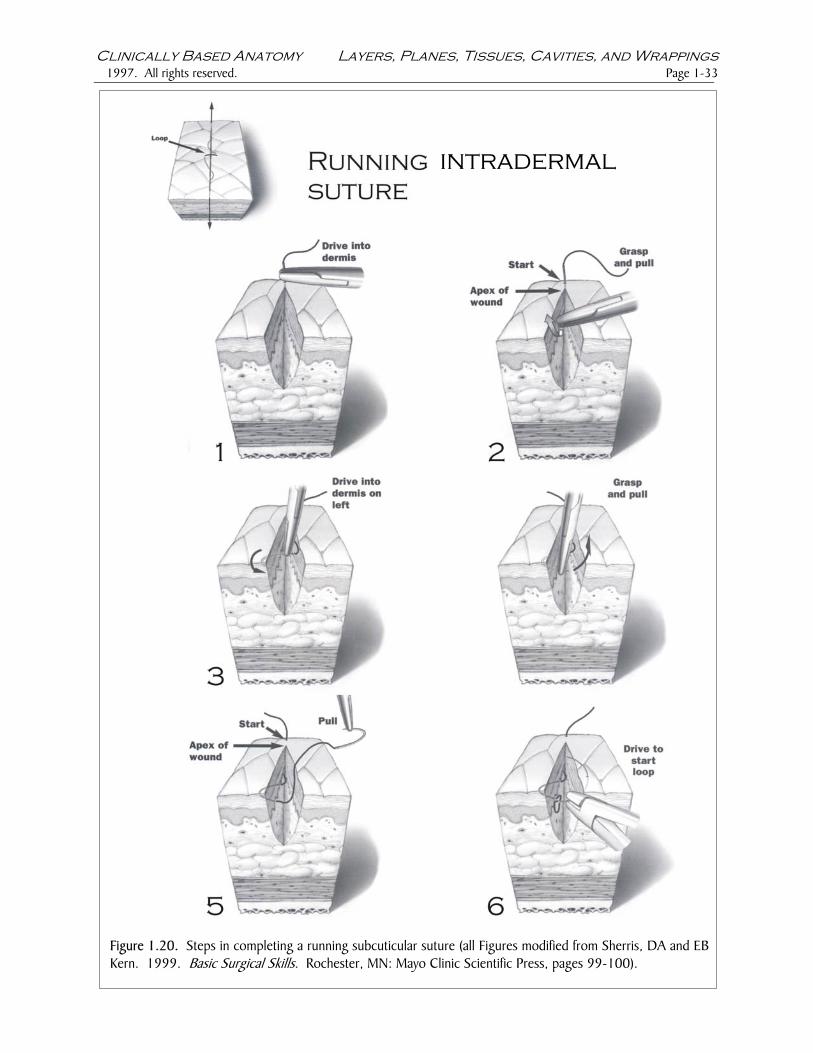
Two sutures in deeper layers Running subcuticular suture. Subcuticular sutures are placed in the dermis only and, except for an optional central suture and the suture ends, the needle bites do not extend into the epidermis (cuticle) (Figure 1.20). Running subcuticular sutures reduce the likelihood of keloid scar formation, and they are relatively quick and easy to remove. Make at least two incisions in the pig foot or ear, and practice closing both incisions with running subcuticular sutures (Figure 1.20). After you have completed both closures, remove the sutures from one closure, following the instructions in Figure 1.21). Superficial fascia suture. This suture may be used to eliminate dead space resulting from a wound extending into the superficial fascia. Dead spaces are open areas within a wound where tissues are not closely approximated. Seromas or hematomas may form in dead spaces as serous fluid or blood accumulates, and bacterial overgrowth may ensure. Make at least two incisions in the pig foot or ear and practice closing both incisions with a superficial fascia suture (Figure 1.22).
Clinically Based Anatomy Layers, Planes, Tissues, Cavities, and Wrappings 1997. All rights reserved. Page 1-33
FiguKern
re 1.20. Steps in completing a running subcuticular suture (all Figures modified from Sherris, DA and EB. 1999. Basic Surgical Skills. Rochester, MN: Mayo Clinic Scientific Press, pages 99-100).
.
intradermal

Layers, Planes, Tissues, Cavities, and Wrappings Clinically Based Anatomy Page 1-34 1997. All rights reserved.
Figure DA and
1.20 continued. Steps in completing a running subcuticular suture (all Figures modified from Sherris, EB Kern. 1999. Basic Surgical Skills. Rochester, MN: Mayo Clinic Scientific Press, pages 99-100).
intradermal

Clinically Based Anatomy Layers, Planes, Tissues, Cavities, and Wrappings 1997. All rights reserved. Page 1-35
FiguKern
re 1.21. Steps in removing a running subcuticular suture (all Figures modified from Sherris, DA and EB . 1999. Basic Surgical Skills. Rochester, MN: Mayo Clinic Scientific Press, pages 99-100).
intradermal

Layers, Planes, Tissues, Cavities, and Wrappings Clinically Based Anatomy Page 1-36 1997. All rights reserved.
Figure 1.22. Steps in closing dead space within the superficial fascia (all Figures modified from Sherris, DAand EB Kern. 1999. Basic Surgical Skills. Rochester, MN: Mayo Clinic Scientific Press, pages 99-100).

Clinically Based Anatomy Layers, Planes, Tissues, Cavities, and Wrappings 1997. All rights reserved. Page 1-37
Figure 1Sherris, 99-100
.22 continued. Steps in closing a dead space within superficial fascia (all Figures modified fromDA and EB Kern. 1999. Basic Surgical Skills. Rochester, MN: Mayo Clinic Scientific Press, pages).

Layers, Planes, Tissues, Cavities, and Wrappings Clinically Based Anatomy Page 1-38 1997. All rights reserved.
1.4.3. Flaps Skin flaps may be used to close defects resulting from skin excision following removal of a lesion or the revision of jagged wound edges to provide better approximation and closure. Viable skin flaps remain connected to skin adjacent to the wound, and they receive their blood supply, and often their innervation, through a vascular pedicle continuous with the intact skin. Elliptical excision. An elliptical excision is shown in Figure 1.23. To complete your own elliptical excision on the pig foot or ear, draw a small ‘lesion’ with your marker pen, draw a correctly-proportioned ellipse around the ‘lesion’, and use your scalpel to incise the skin and excise the ‘lesion’ (Figure 1.23). Working in the plane between the skin and superficial fascia, use your scalpel or dissecting scissors to undermine the skin edges for 1-2 cm on either side of the wound. Approximate the edges of the wound using forceps or a skin hook. Place a suture centrally, and close the defect using interrupted sutures placed according to the principle of halving.
Figure 1.23. Steps in completing an elliptical excision and closure of the defect (Figure modified fromSherris, DA and EB Kern. 1999. Basic Surgical Skills. Rochester, MN: Mayo Clinic Scientific Press, pages99-100.

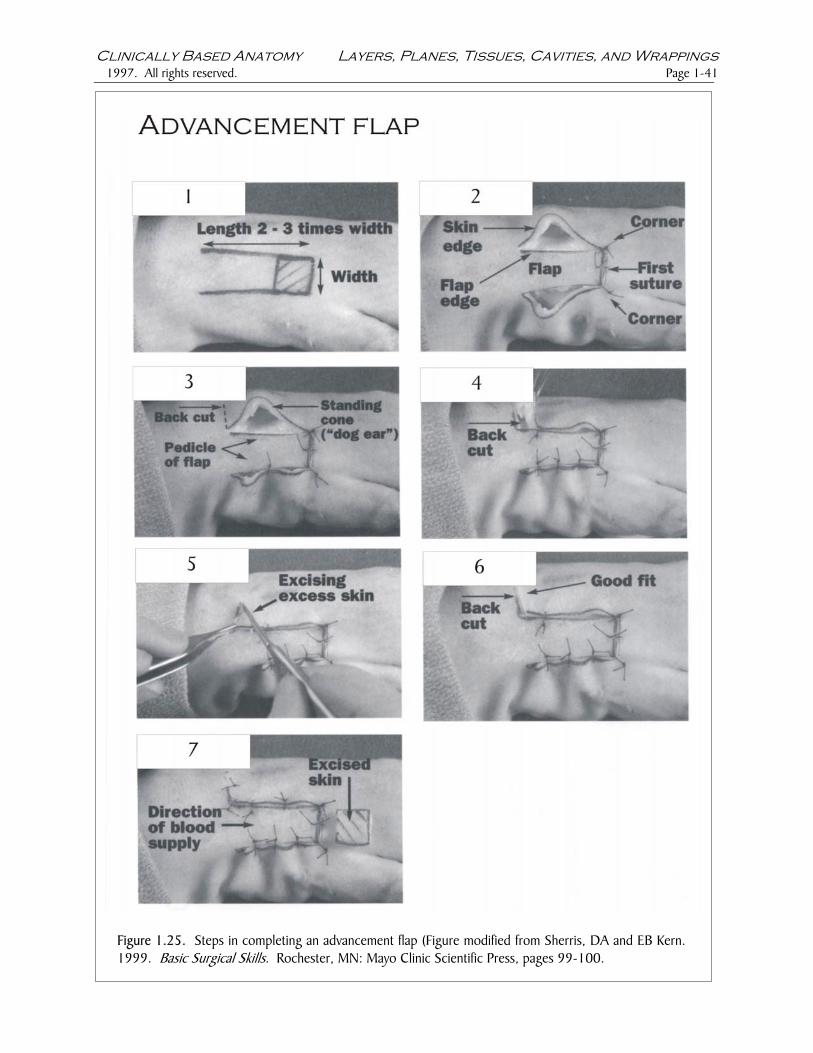
Clinically Based Anatomy Layers, Planes, Tissues, Cavities, and Wrappings 1997. All rights reserved. Page 1-39 Rotation flap. A rotation flap is shown in Figure 1.23. To complete your own rotation flap, draw a small ‘lesion’ on the pig foot with your marker pen, draw a correctly-proportioned rotation flap adjacent to the ‘lesion’, and use your scalpel to incise the skin and excise the ‘lesion’ (Figure 1.23). Working in the plane between the skin and superficial fascia, use your scalpel or dissecting scissors to undermine the skin edges for 1-2 cm on either side of the wound. Approximate the edges of the wound using forceps or a skin hook. Place your first suture in the corner of the rotation flap, then secure the edges of the rotation flap using interrupted sutures placed according to the principle of halving. Advancement flap. An advancement flap is shown in Figure 1.24. To complete your own advancement flap, draw another small lesion on the pig foot, draw a correctly proportioned advancement flap adjacent to the ‘lesion’, and use your scalpel to incise the skin and excise the ‘lesion’ (Figure 1.24). Working in the plane between the skin and superficial fascia, use your scalpel or dissecting scissors to undermine the skin edges for 1-2 cm on either side of the wound. Approximate the edges of the wound, and use your first suture to secure the middle of the short edge of the advancement flap (Figure 1.24). Use sutures to secure the corners of the short edge of the advancement flap. Close the lower edge of the advancement flap with interrupted sutures placed according to the principle of halving. Beginning at the upper corner of the short edge of the advancement flap, secure the upper edge of the advancement flap by placing evenly spaced interrupted sutures. This will eventually produce a standing cone (‘dog ear’) of redundant skin. Resolve the standing cone by following the steps in Figure 1.26, and complete your closure of the advancement flap. Z-plasty. A Z-plasty is shown in Figure 1.24. Z-plasty incisions produce two adjacent triangular flaps each with its own vascular pedicle. The triangular flaps are transposed in order to simultaneously lengthen scars and reorient their long axes. The apical angles of the Z-plasty triangles should be no less than 30o and and no more than 60o degrees. Triangles with apical angles more acute than 30 o may undergo apical necrosis at the triangle tips; triangles with apical angles more obtuse than 60o may be difficult to rotate. On the pig foot, draw a dotted line 3 cm long to represent the original scar. Draw the other limbs of the Z-plasty incisions using appropriate lengths and angles according to Figure 1-24. Undermine the edges of the two triangular flaps using a scalpel or small scissors. Transpose the two triangular flaps and secure the apex of each triangle with an interrupted suture. Complete your closure of the Z-plasty with additional interrupted sutures placed according to the principle of halving. The length of your Z-plasty ‘scar’ should exceed the length of the original scar by 25%. Whenever possible, practice your knots, sutures, and flaps in the lab.

Layers, Planes, Tissues, Cavities, and Wrappings Clinically Based Anatomy Page 1-40 1997. All rights reserved.
Figure 1.24. Steps in completing a rotation flap (FiguBasic Surgical Skills. Rochester, MN: Ma
re modified from Sherris, DA and EB Kern. 1999. yo Clinic Scientific Press, pages 99-100.
Clinically Based Anatomy Layers, Planes, Tissues, Cavities, and Wrappings 1997. All rights reserved. Page 1-41
Figure 1.25. Steps in completing an advancement flap (Figure modified from Sherris, DA and EB Kern. 1999. Basic Surgical Skills. Rochester, MN: Mayo Clinic Scientific Press, pages 99-100.

Layers, Planes, Tissues, Cavities, and Wrappings Clinically Based Anatomy Page 1-42 1997. All rights reserved.
Figure 1.26. Steps in resolving a standing cone (‘dog ear” (Figure modified from Sherris, DA and EBKern. 1999. Basic Surgical Skills. Rochester, MN: Mayo Clinic Scientific Press, pages 99-100).

Clinically Based Anatomy Layers, Planes, Tissues, Cavities, and Wrappings 1997. All rights reserved. Page 1-43
Figure 1.27. Steps in completing a Z-plasty (Figure modified from Sherris, DA and EB Kern. 1999. Basic Surgical Skills. Rochester, MN: Mayo Clinic Scientific Press, pages 99-100).