lab 03 - coexistence and upgrading from exchange 2007 to exchange 2010
TRANSCRIPT
8/10/2019 Lab 03 - Coexistence and Upgrading From Exchange 2007 to Exchange 2010
http://slidepdf.com/reader/full/lab-03-coexistence-and-upgrading-from-exchange-2007-to-exchange-2010 1/24
Exchange 2010 Ignite Lab 3:
Coexistence and Upgrading fromExchange Server 2007 to Exchange
2010
8/10/2019 Lab 03 - Coexistence and Upgrading From Exchange 2007 to Exchange 2010
http://slidepdf.com/reader/full/lab-03-coexistence-and-upgrading-from-exchange-2007-to-exchange-2010 2/24
DISCLAIMER
© 2009 Microsoft Corporation. All rights reserved.
Microsoft®, Internet Explorer, and Windows® are either registered trademarks or
trademarks of Microsoft Corporation in the United States and/or other countries.
The names of actual companies and products mentioned herein may be the trademarks of
their respective owners.
THE CONTENTS OF THIS PACKAGE ARE FOR INFORMATIONAL AND TRAINING PURPOSES ONLY AND
ARE PROVIDED " AS IS" WITHOUT WARRANTY OF ANY KIND, WHETHER EXPRESS OR IMPLIED,
INCLUDING BUT NOT LIMITED TO THE IMPLIED WARRANTIES OF MERCHANTABILITY , FITNESS FOR A
PARTICULAR PURPOSE, AND NON-INFRINGEMENT.
No part of the text or software included in this training package may be reproduced or
transmitted in any form or by any means, electronic or mechanical, including
photocopying, recording, or any information storage and retrieval system, without
permission from Microsoft®. Because Microsoft must respond to changing market
conditions, it should not be interpreted to be a commitment on the part of Microsoft, and
Microsoft cannot guarantee the accuracy of any information presented after the date of
publication. The names of actual companies and products mentioned herein may be the
trademarks of their respective owners.
To obtain authorization for uses other than those specified above, please visit the Microsoft
Copyright Permissions Web page at http://www.microsoft.com/about/legal/permissions
This content is proprietary and confidential, and is intended only for users described in the
content provided in this document. This content and information is provided to you under
a Non-Disclosure Agreement and cannot be distributed. Copying, disclosing all or anyportion of the content and/or information included in this document is strictly prohibited.
8/10/2019 Lab 03 - Coexistence and Upgrading From Exchange 2007 to Exchange 2010
http://slidepdf.com/reader/full/lab-03-coexistence-and-upgrading-from-exchange-2007-to-exchange-2010 3/24
1 © 2009 Microsoft Corporation. All rights reserved.
Lab: Coexistence and Upgrading from Exchange Server
2007 to Exchange 2010
During this lab, you will follow-up the Exchange installation by changing the Domain Name
System (DNS) records to point to the new Microsoft® Exchange 2010 server. You will
configure the existing Send connectors to use the new server and install a wildcard
certificate for use with Internet Information Services (IIS) and Exchange. You will then test
Microsoft Office Outlook Web App (OWA) and Simple Mail Transfer Protocol (SMTP) mail
flow from outside the organization. Next, you will move mailboxes and public folders from
Exchange Server 2007 to Exchange 2010 and test the migrations. Finally, you will remove the
Exchange Server 2007 server from the organization.
Estimated time to complete this lab: 45 minutes
What you will learn
After completing the exercises, you will be able to:
Modify DNS records associated with Exchange.
Update Send and Receive connectors.
Request and install a certificate on Exchange 2010.
Test OWA and SMTP mail flow from outside the organization.
Move user mailboxes.
Move public folders.
Remove the last Exchange Server 2007 server from the organization.
8/10/2019 Lab 03 - Coexistence and Upgrading From Exchange 2007 to Exchange 2010
http://slidepdf.com/reader/full/lab-03-coexistence-and-upgrading-from-exchange-2007-to-exchange-2010 4/24
© 2009 Microsoft Corporation. All rights reserved. 2
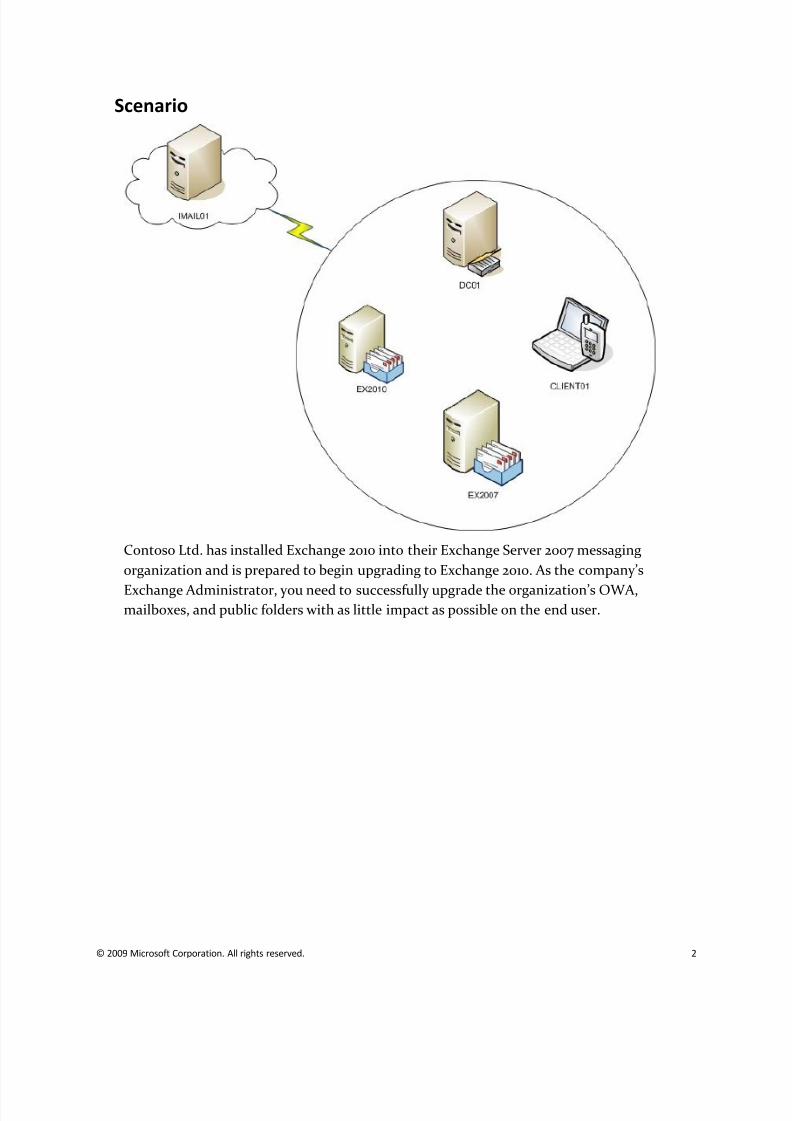
Scenario
Contoso Ltd. has installed Exchange 2010 into their Exchange Server 2007 messaging
organization and is prepared to begin upgrading to Exchange 2010. As the company’s
Exchange Administrator, you need to successfully upgrade the organization’s OWA,mailboxes, and public folders with as little impact as possible on the end user.
8/10/2019 Lab 03 - Coexistence and Upgrading From Exchange 2007 to Exchange 2010
http://slidepdf.com/reader/full/lab-03-coexistence-and-upgrading-from-exchange-2007-to-exchange-2010 5/24
3 © 2009 Microsoft Corporation. All rights reserved.
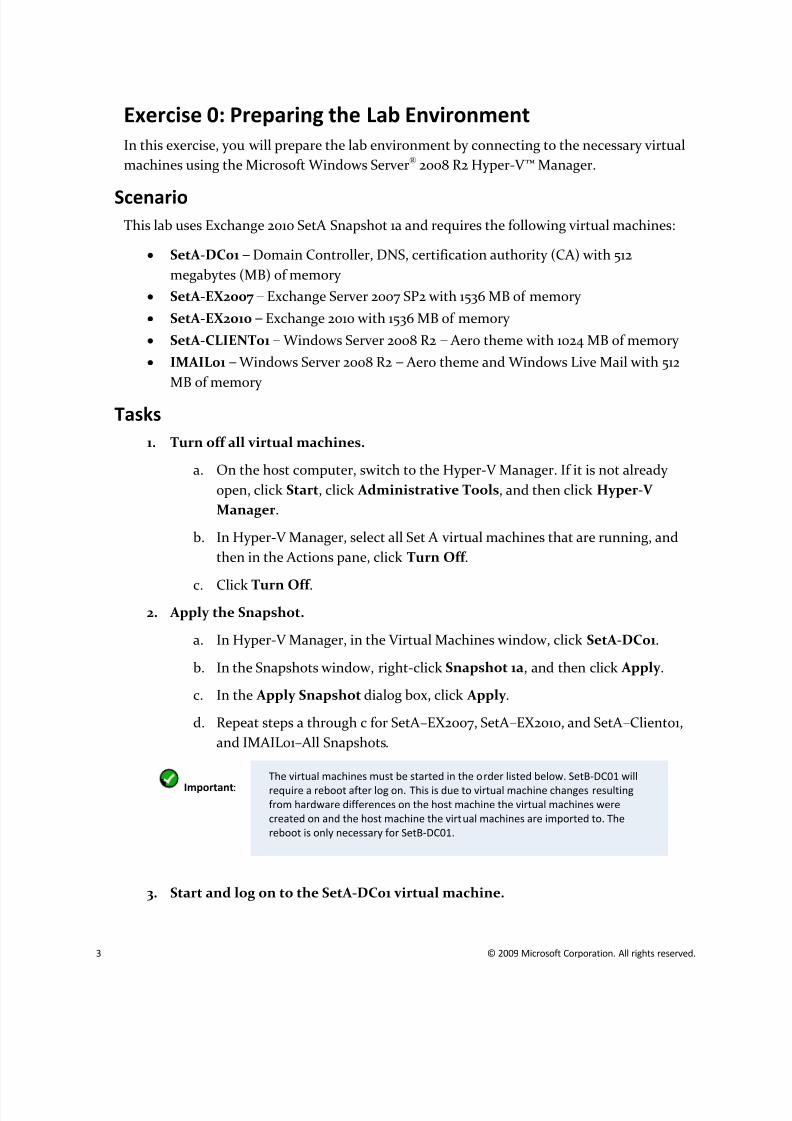
Exercise 0: Preparing the Lab Environment
In this exercise, you will prepare the lab environment by connecting to the necessary virtual
machines using the Microsoft Windows Server® 2008 R2 Hyper-V ™ Manager.
ScenarioThis lab uses Exchange 2010 SetA Snapshot 1a and requires the following virtual machines:
SetA-DC01 – Domain Controller, DNS, certification authority (CA) with 512
megabytes (MB) of memory
SetA-EX2007 – Exchange Server 2007 SP2 with 1536 MB of memory
SetA-EX2010 – Exchange 2010 with 1536 MB of memory
SetA-CLIENT01 – Windows Server 2008 R2 – Aero theme with 1024 MB of memory
IMAIL01 – Windows Server 2008 R2 – Aero theme and Windows Live Mail with 512
MB of memory
Tasks
1.
Turn off all virtual machines.
a.
On the host computer, switch to the Hyper-V Manager. If it is not already
open, click Start, click Administrative Tools, and then click Hyper-V
Manager.
b. In Hyper-V Manager, select all Set A virtual machines that are running, and
then in the Actions pane, click Turn Off .
c.
Click Turn Off .2.
Apply the Snapshot.
a. In Hyper-V Manager, in the Virtual Machines window, click SetA-DC01.
b. In the Snapshots window, right-click Snapshot 1a, and then click Apply .
c. In the Apply Snapshot dialog box, click Apply .
d. Repeat steps a through c for SetA –EX2007, SetA –EX2010, and SetA –Client01,
and IMAIL01– All Snapshots.
Important:
The virtual machines must be started in the order listed below. SetB-DC01 will
require a reboot after log on. This is due to virtual machine changes resulting
from hardware differences on the host machine the virtual machines were
created on and the host machine the virtual machines are imported to. The
reboot is only necessary for SetB-DC01.
3.
Start and log on to the SetA-DC01 virtual machine.
8/10/2019 Lab 03 - Coexistence and Upgrading From Exchange 2007 to Exchange 2010
http://slidepdf.com/reader/full/lab-03-coexistence-and-upgrading-from-exchange-2007-to-exchange-2010 6/24
© 2009 Microsoft Corporation. All rights reserved. 4
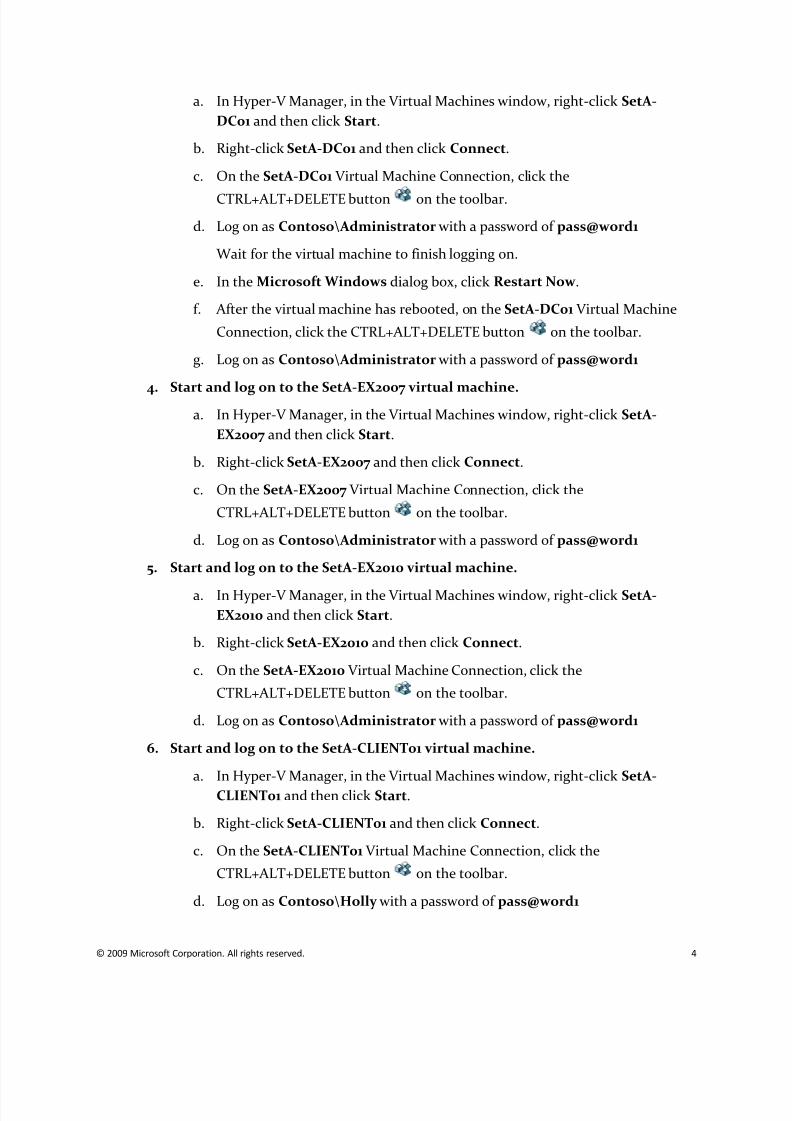
a. In Hyper-V Manager, in the Virtual Machines window, right-click SetA-
DC01 and then click Start.
b. Right-click SetA-DC01 and then click Connect.
c. On the SetA-DC01 Virtual Machine Connection, click the
CTRL+ALT+DELETE button on the toolbar.
d. Log on as Contoso\Administrator with a password of pass@word1
Wait for the virtual machine to finish logging on.
e. In the Microsoft Windows dialog box, click Restart Now.
f. After the virtual machine has rebooted, on the SetA-DC01 Virtual Machine
Connection, click the CTRL+ALT+DELETE button on the toolbar.
g. Log on as Contoso\Administrator with a password of pass@word1
4.
Start and log on to the SetA-EX2007 virtual machine.a. In Hyper-V Manager, in the Virtual Machines window, right-click SetA-
EX2007 and then click Start.
b. Right-click SetA-EX2007 and then click Connect.
c. On the SetA-EX2007 Virtual Machine Connection, click the
CTRL+ALT+DELETE button on the toolbar.
d. Log on as Contoso\Administrator with a password of pass@word1
5.
Start and log on to the SetA-EX2010 virtual machine.
a.
In Hyper-V Manager, in the Virtual Machines window, right-click SetA-
EX2010 and then click Start.
b. Right-click SetA-EX2010 and then click Connect.
c. On the SetA-EX2010 Virtual Machine Connection, click the
CTRL+ALT+DELETE button on the toolbar.
d. Log on as Contoso\Administrator with a password of pass@word1
6.
Start and log on to the SetA-CLIENT01 virtual machine.
a. In Hyper-V Manager, in the Virtual Machines window, right-click SetA-
CLIENT01 and then click Start.
b. Right-click SetA-CLIENT01 and then click Connect.
c.
On the SetA-CLIENT01 Virtual Machine Connection, click the
CTRL+ALT+DELETE button on the toolbar.
d. Log on as Contoso\Holly with a password of pass@word1
8/10/2019 Lab 03 - Coexistence and Upgrading From Exchange 2007 to Exchange 2010
http://slidepdf.com/reader/full/lab-03-coexistence-and-upgrading-from-exchange-2007-to-exchange-2010 7/24
5 © 2009 Microsoft Corporation. All rights reserved.
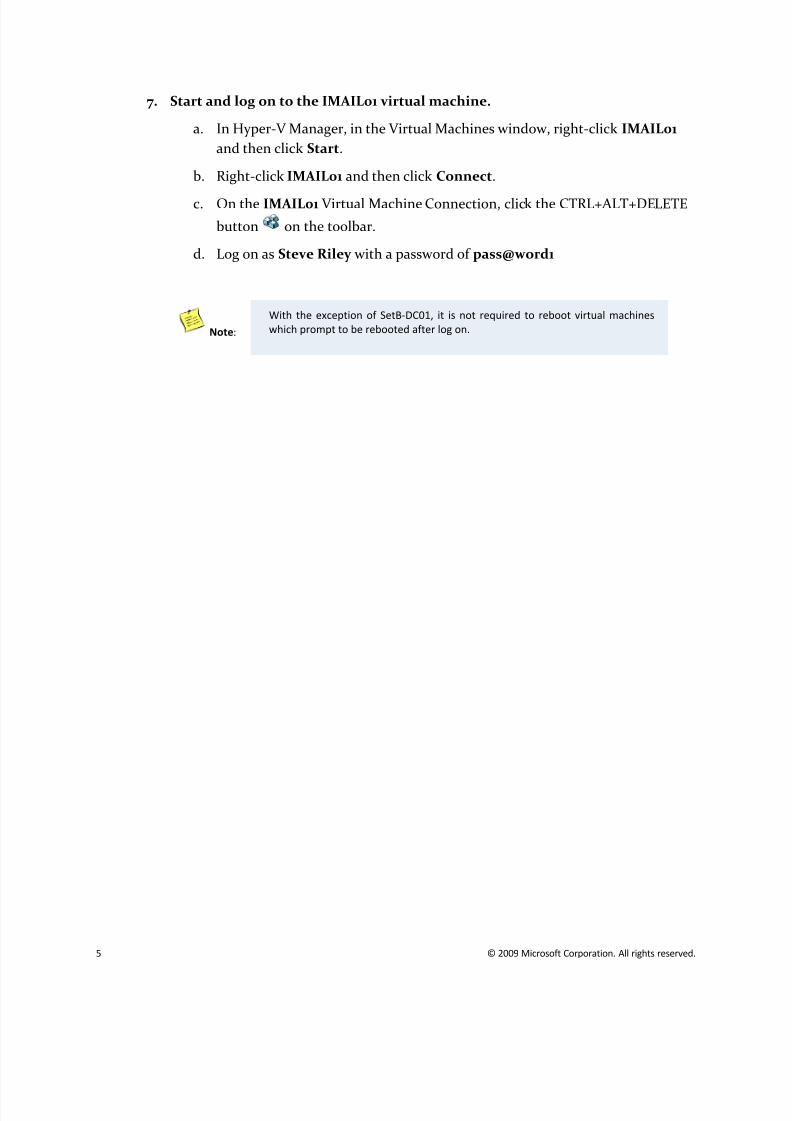
7.
Start and log on to the IMAIL01 virtual machine.
a. In Hyper-V Manager, in the Virtual Machines window, right-click IMAIL01
and then click Start.
b. Right-click IMAIL01 and then click Connect.
c.
On the IMAIL01 Virtual Machine Connection, click the CTRL+ALT+DELETE
button on the toolbar.
d. Log on as Steve Riley with a password of pass@word1
Note:
With the exception of SetB-DC01, it is not required to reboot virtual machines
which prompt to be rebooted after log on.
8/10/2019 Lab 03 - Coexistence and Upgrading From Exchange 2007 to Exchange 2010
http://slidepdf.com/reader/full/lab-03-coexistence-and-upgrading-from-exchange-2007-to-exchange-2010 8/24
© 2009 Microsoft Corporation. All rights reserved. 6
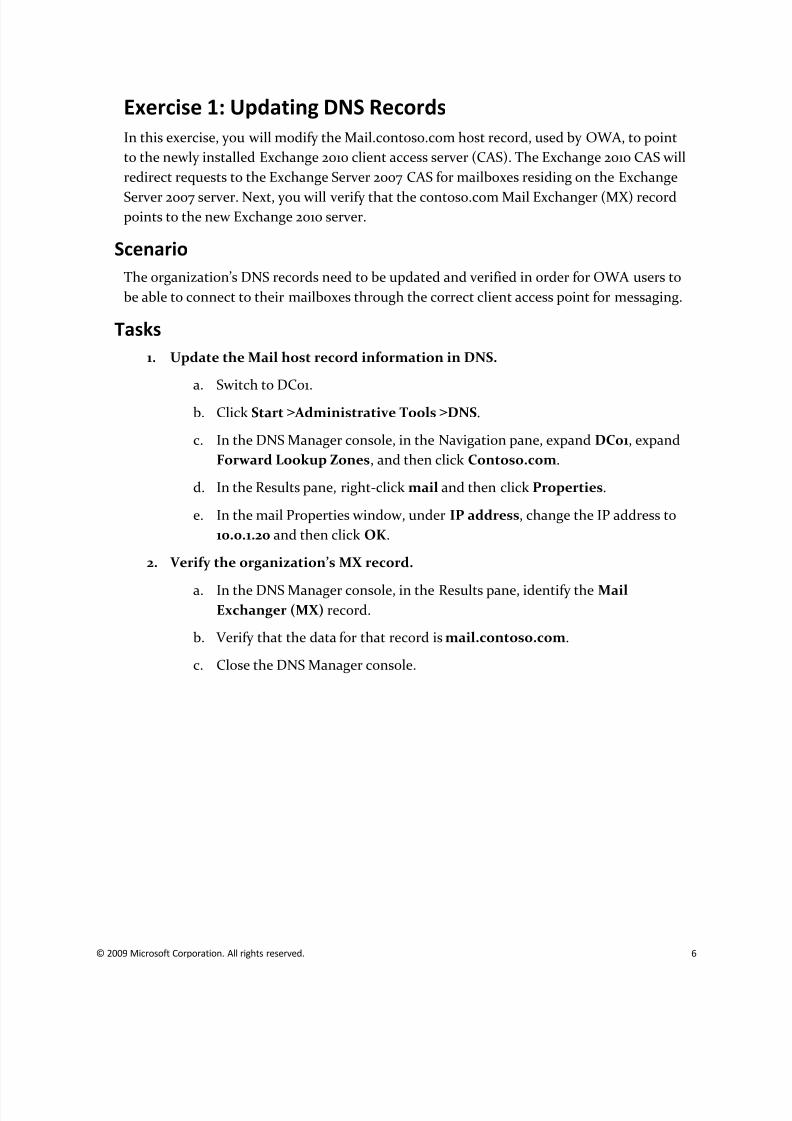
Exercise 1: Updating DNS Records
In this exercise, you will modify the Mail.contoso.com host record, used by OWA, to point
to the newly installed Exchange 2010 client access server (CAS). The Exchange 2010 CAS will
redirect requests to the Exchange Server 2007 CAS for mailboxes residing on the Exchange
Server 2007 server. Next, you will verify that the contoso.com Mail Exchanger (MX) recordpoints to the new Exchange 2010 server.
Scenario
The organization’s DNS records need to be updated and verified in order for OWA users to
be able to connect to their mailboxes through the correct client access point for messaging.
Tasks
1.
Update the Mail host record information in DNS.
a.
Switch to DC01.b. Click Start > Administrative Tools >DNS.
c. In the DNS Manager console, in the Navigation pane, expand DC01, expand
Forward Lookup Zones, and then click Contoso.com.
d. In the Results pane, right-click mail and then click Properties.
e. In the mail Properties window, under IP address, change the IP address to
10.0.1.20 and then click OK.
2.
Verify the organization’s MX record.
a.
In the DNS Manager console, in the Results pane, identify the MailExchanger (MX) record.
b. Verify that the data for that record is mail.contoso.com.
c. Close the DNS Manager console.
8/10/2019 Lab 03 - Coexistence and Upgrading From Exchange 2007 to Exchange 2010
http://slidepdf.com/reader/full/lab-03-coexistence-and-upgrading-from-exchange-2007-to-exchange-2010 9/24
7 © 2009 Microsoft Corporation. All rights reserved.
Exercise 2: Updating the Send and Receive Connectors in
Exchange 2010
Because there is no Edge Transport server installed in this virtual environment, you will
make changes to the Hub Transport server role in order to accept mail fromunauthenticated (untrusted) sources. You will then update the organization’s Send and
Receive connectors to enable inbound and outbound e-mail.
Scenario
Because the new Exchange environment will be external-facing, the Send and Receive
connectors need to be configured to allow for messaging to and from external domains.
Tasks
1.
Allow inbound e-mail from external domains.
a.
Switch to EX2010.
b. Click Start >All Programs >Microsoft Exchange Server 2010 >Exchange
Management Console.
c. In the Exchange Management Console, in the Navigation pane, click
Microsoft Exchange On-Premises.
Wait for the console to initialize.
d. Expand Microsoft Exchange On-Premises> Server Configuration, and
then click Hub Transport.
e.
In the Work pane, under Receive Connectors, right-click Default EX2010
and then click Properties.
f. In the Default Ex2010 Properties window, click the Permission Groups tab.
g. Select the Anonymous users check box to allow this Hub Transport server
to receive e-mail from external SMTP servers, and then click OK.
2.
Modify Send connectors to use Exchange 2010.
a.
In the Exchange Management Console, expand Organization
Configuration, click Hub Transport, and then click the Send Connectors
tab.
b. Right-click the External Mail Connector send connector, and then click
Properties.
c. Click the Source Server tab, click EX2007, and then click Remove .
d. Click Add, click EX2010, click OK, and then click OK again.
8/10/2019 Lab 03 - Coexistence and Upgrading From Exchange 2007 to Exchange 2010
http://slidepdf.com/reader/full/lab-03-coexistence-and-upgrading-from-exchange-2007-to-exchange-2010 10/24
© 2009 Microsoft Corporation. All rights reserved. 8
Exercise 3: Create a Certificate Request and Install a
Certificate in Exchange 2010
In this exercise, you will create a new certificate request for Exchange 2010, install and
assign services to the new certificate using the Exchange Management console.
Scenario
Contoso Ltd. needs to secure their Exchange 2010 server. You must generate a certificate
request using the Exchange Management Console and complete the certificate request by
importing the new certificate and assigning the appropriate services to the certificate.
Tasks
1.
Create a new certificate request using the Exchange Management Console.
a. In the Exchange Management Console, in the Navigation pane, click Server
Configuration.
b. In the Actions pane, click New Exchange Certificate.
c.
On the Introduction page, in the Enter a friendly name for the
certificate, type mail.contoso.com and click Next.
d. On the Domain Scope page, click Next.
e. On the Exchange Configuration page, expand Client Access server
(Outlook Web App) by clicking the down arrows .
f.
Select the check boxes for both Outlook Web App is on the Intranet andOutlook Web App is on the Internet.
g. Expand Client Access server (Exchange ActiveSync®).
h. Verify that Exchange ActiveSync is enabled is selected.
i. Expand Client Access server (Web Services, Outlook Anywhere, and
Autodiscover).
j. Verify that Autodiscover used on the Internet is selected.
k. On the Exchange Configuration page, click Next.
l.
On the Certificate Domains page, select ex2007.contoso.com and click
Remove the selected items and click Next.
m. On the Organization and Location page, in the Organization field, type
Contoso Ltd.
n. In the Organizational unit field, type IT.
8/10/2019 Lab 03 - Coexistence and Upgrading From Exchange 2007 to Exchange 2010
http://slidepdf.com/reader/full/lab-03-coexistence-and-upgrading-from-exchange-2007-to-exchange-2010 11/24
9 © 2009 Microsoft Corporation. All rights reserved.
o. In the Country/region drop-down list, select United States.
p. In the City/locality field, type Redmond.
q. In the State/province field, type WA .
r. Under the Certificate Request File Path, click Browse.
s. In the Save As window, in the File name field, type C:\ContosoMailcert
and click Save.
t. On the Organization and Location page, click Next.
u. On the Certificate Configuration page, click New.
v. On the Completion page, click Finish.
2.
Submit a certificate request to an online certificate authority.
a. Open Windows Explorer and navigate to C:\.
b.
Double-click ContosoMailcert.req.
c. In the Windows dialog box, select Select a program from a list of
installed programs and click OK.
d. In the Open with window, click Notepad and then click OK.
e. In Notepad, in the menu, click Edit and then click Select All.
f. In the menu, click Edit and then click Copy .
g. Close Notepad and Windows Explorer.
h.
Click Start and then click Internet Explorer.i. In the address field, type http://dc01.contoso.com/certsrv and press
ENTER.
j. On the Active Directory Certificate Services home page, under Select a task,
click Request a certificate.
k. On the Request a Certificate page, click the advanced certificate request
link.
l. On the Advanced Certificate Request page, click the Submit a certificate
request by using a base-64-encoded CMC or PKCS #10 file link.
m. On the Submit a Certificate Request or Renewal Request page, right-click in
the Saved Request field and click Paste.
n.
Under Certificate Template, click the drop-down list, click Web Server,
and then click Submit.
o. On the Certificate Issued page, select Base 64 Encoded and click the
Download certificate link.
8/10/2019 Lab 03 - Coexistence and Upgrading From Exchange 2007 to Exchange 2010
http://slidepdf.com/reader/full/lab-03-coexistence-and-upgrading-from-exchange-2007-to-exchange-2010 12/24
© 2009 Microsoft Corporation. All rights reserved. 10
p. In the File Download – Security Warning dialog box, click Save.
q. In the Save As window, in the File name field, type
C:\ContosoMailcert.cer and click Save.
r. Close the Download complete dialog box and close Internet Explorer.
3.
Import a certificate using the Exchange Management Console.
a. In the Exchange Management Console, in the Work pane, click the
Mail.contoso.com certificate. If the certificate is not visible, click Refresh
in the Actions pane.
b. In the Actions pane, under Mail.contoso.com, click Complete Pending
Request.
c. On the Introduction page, under Select a certificate to map to this
certificate request, click Browse.
d.
Navigate to C:\, click ContosoMailcert.cer, and then click Open.
e. On the Introduction page, click Complete.
f. On the Completion page, click Finish.
4.
Assign services to the certificate.
a. In the Work pane, under Exchange Certificates, select the
Mail.contoso.com certificate.
b. In the Actions pane, under Mail.contoso.com, click Assign Services to
Certificate.
c.
On the Select Servers page, verify that EX2010 is listed, and then click Next.
d. On the Select Services page, select the Internet Information Services
check box, and then click Next.
e. On the Assign Services page, click Assign.
f.
On the Completion page, click Finish.
g. In the Work pane, notice that the Mail.contoso.com certificate is now
assigned to the IIS service.
8/10/2019 Lab 03 - Coexistence and Upgrading From Exchange 2007 to Exchange 2010
http://slidepdf.com/reader/full/lab-03-coexistence-and-upgrading-from-exchange-2007-to-exchange-2010 13/24
11 © 2009 Microsoft Corporation. All rights reserved.
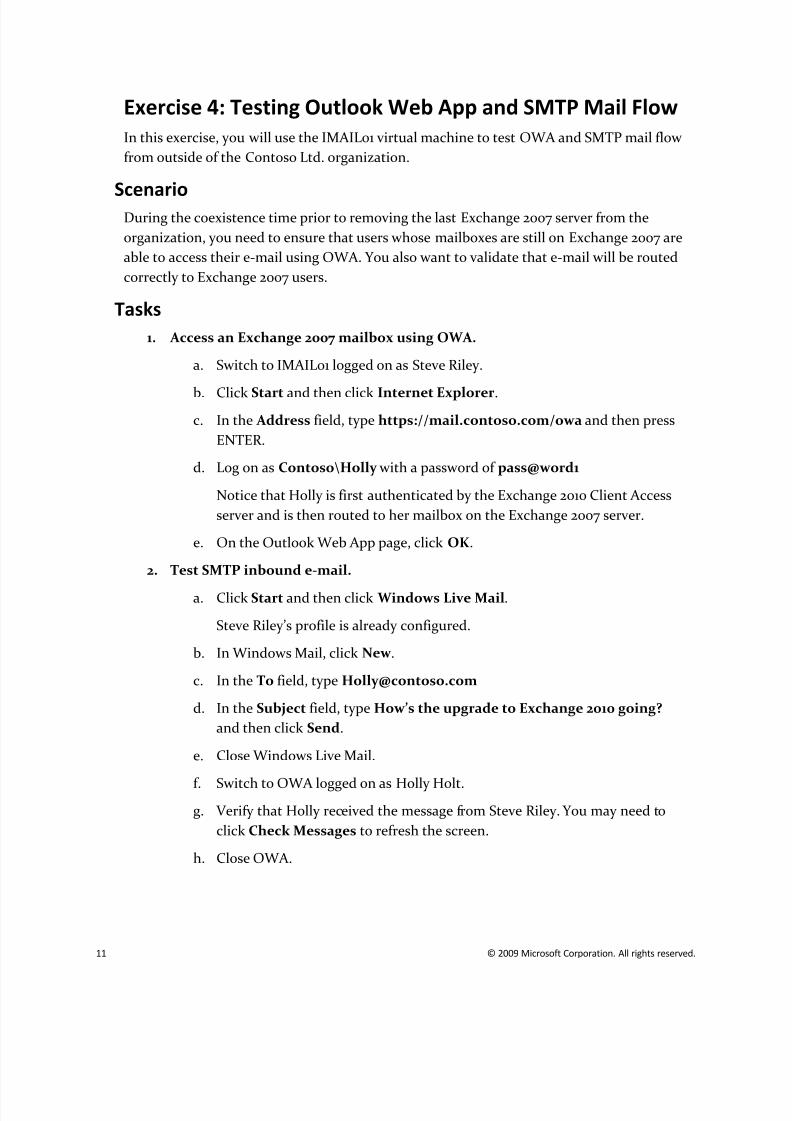
Exercise 4: Testing Outlook Web App and SMTP Mail Flow
In this exercise, you will use the IMAIL01 virtual machine to test OWA and SMTP mail flow
from outside of the Contoso Ltd. organization.
ScenarioDuring the coexistence time prior to removing the last Exchange 2007 server from the
organization, you need to ensure that users whose mailboxes are still on Exchange 2007 are
able to access their e-mail using OWA. You also want to validate that e-mail will be routed
correctly to Exchange 2007 users.
Tasks
1.
Access an Exchange 2007 mailbox using OWA.
a. Switch to IMAIL01 logged on as Steve Riley.
b.
Click Start and then click Internet Explorer.
c. In the Address field, type https://mail.contoso.com/owa and then press
ENTER.
d. Log on as Contoso\Holly with a password of pass@word1
Notice that Holly is first authenticated by the Exchange 2010 Client Access
server and is then routed to her mailbox on the Exchange 2007 server.
e. On the Outlook Web App page, click OK.
2.
Test SMTP inbound e-mail.
a.
Click Start and then click Windows Live Mail.
Steve Riley’s profile is already configured.
b. In Windows Mail, click New.
c. In the To field, type [email protected]
d. In the Subject field, type How’s the upgrade to Exchange 2010 going?
and then click Send.
e. Close Windows Live Mail.
f.
Switch to OWA logged on as Holly Holt.
g. Verify that Holly received the message from Steve Riley. You may need to
click Check Messages to refresh the screen.
h. Close OWA.

8/10/2019 Lab 03 - Coexistence and Upgrading From Exchange 2007 to Exchange 2010
http://slidepdf.com/reader/full/lab-03-coexistence-and-upgrading-from-exchange-2007-to-exchange-2010 14/24
© 2009 Microsoft Corporation. All rights reserved. 12
Exercise 5: Moving Exchange Server 2007 User Mailboxes
In this exercise, you will move user mailboxes from Exchange Server 2007 to Exchange 2010
and test user connectivity.
ScenarioThe environment is prepared for moving users’ mailboxes to the new Exchange 2010
Mailbox server. To validate the move, you will have a user create new Outlook and public
folder items so that you validate the items exist after the mailbox move is complete.
Tasks
1.
Create new items in Holly Holt’s mailbox.
a. On Client01, logged on as Holly Holt, click Start and then click Microsoft
Outlook 2010 (Beta).
b.
In the Navigation pane, right-click Inbox and then click New Folder.
c. In the Create New Folder window, in the Name field, type Messages from
Steve and then click OK.
d. In the Navigation pane, right-click the Messages from Steve folder and
then click Show in Favorites.
e. In the Inbox, drag and drop the message from Steve Riley to the Messages
from Steve folder.
f. In the Navigation pane, click the Messages from Steve folder.
g.
Right-click the message from Steve Riley , click Rules, and then clickCreate Rule.
h. On the Create Rule page, under When I get e-mail with all of the selected
conditions, select the From Steve Riley check box.
i.
Under Do the following, select the Move the item to folder check box.
j. In the Rules and Alerts window, expand Inbox, click the Messages from
Steve folder, and then click OK.
k. In the Create Rule window, click OK.
l.
In the Success dialog box, click OK.
m. In the Navigation pane, click Calendar.
n.
In the Outlook ribbon bar, click New Meeting.
o. In the To field, type [email protected]; Mike Ray
p. In the Subject field, type Review Sales Goals.
8/10/2019 Lab 03 - Coexistence and Upgrading From Exchange 2007 to Exchange 2010
http://slidepdf.com/reader/full/lab-03-coexistence-and-upgrading-from-exchange-2007-to-exchange-2010 15/24
13 © 2009 Microsoft Corporation. All rights reserved.
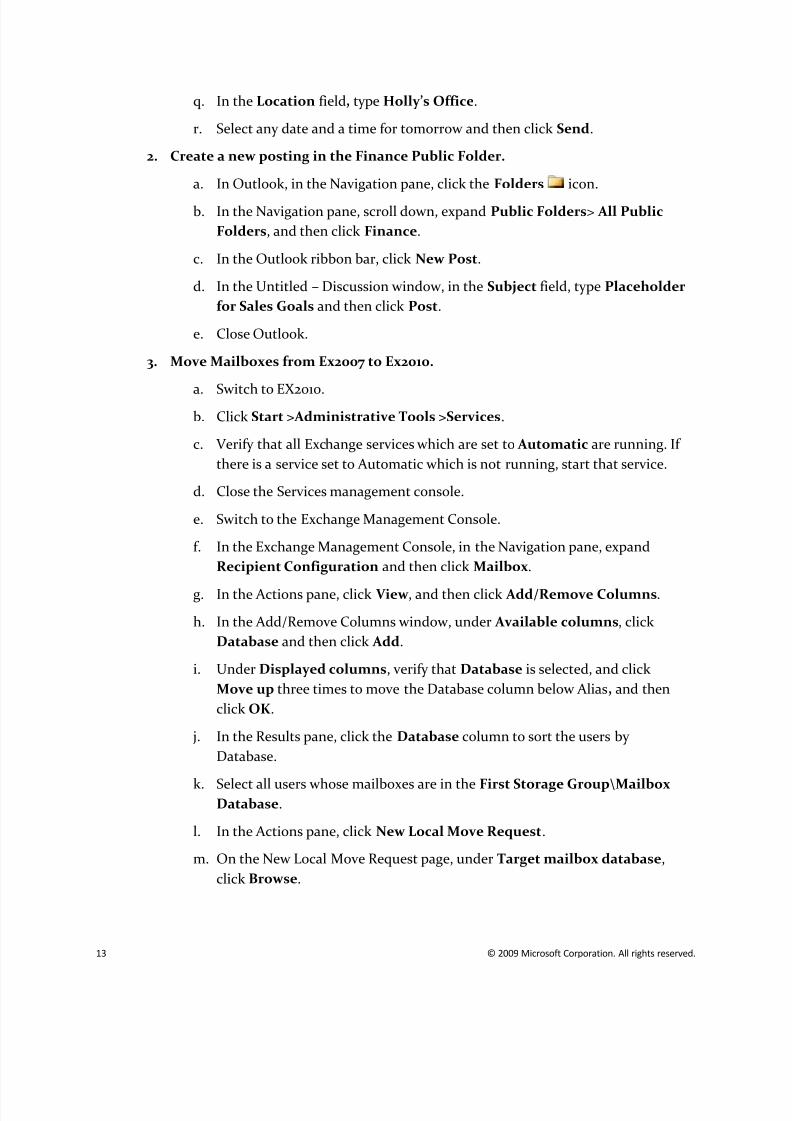
q. In the Location field, type Holly’s Office.
r. Select any date and a time for tomorrow and then click Send.
2.
Create a new posting in the Finance Public Folder.
a. In Outlook, in the Navigation pane, click the Folders icon.
b. In the Navigation pane, scroll down, expand Public Folders> All Public
Folders, and then click Finance.
c. In the Outlook ribbon bar, click New Post.
d. In the Untitled – Discussion window, in the Subject field, type Placeholder
for Sales Goals and then click Post.
e. Close Outlook.
3.
Move Mailboxes from Ex2007 to Ex2010.
a.
Switch to EX2010.b. Click Start >Administrative Tools >Services.
c. Verify that all Exchange services which are set to Automatic are running. If
there is a service set to Automatic which is not running, start that service.
d. Close the Services management console.
e. Switch to the Exchange Management Console.
f. In the Exchange Management Console, in the Navigation pane, expand
Recipient Configuration and then click Mailbox.
g.
In the Actions pane, click View, and then click Add/Remove Columns.
h. In the Add/Remove Columns window, under Available columns, click
Database and then click Add.
i. Under Displayed columns, verify that Database is selected, and click
Move up three times to move the Database column below Alias, and then
click OK.
j. In the Results pane, click the Database column to sort the users by
Database.
k.
Select all users whose mailboxes are in the First Storage Group\MailboxDatabase.
l. In the Actions pane, click New Local Move Request.
m. On the New Local Move Request page, under Target mailbox database,
click Browse.
8/10/2019 Lab 03 - Coexistence and Upgrading From Exchange 2007 to Exchange 2010
http://slidepdf.com/reader/full/lab-03-coexistence-and-upgrading-from-exchange-2007-to-exchange-2010 16/24
© 2009 Microsoft Corporation. All rights reserved. 14
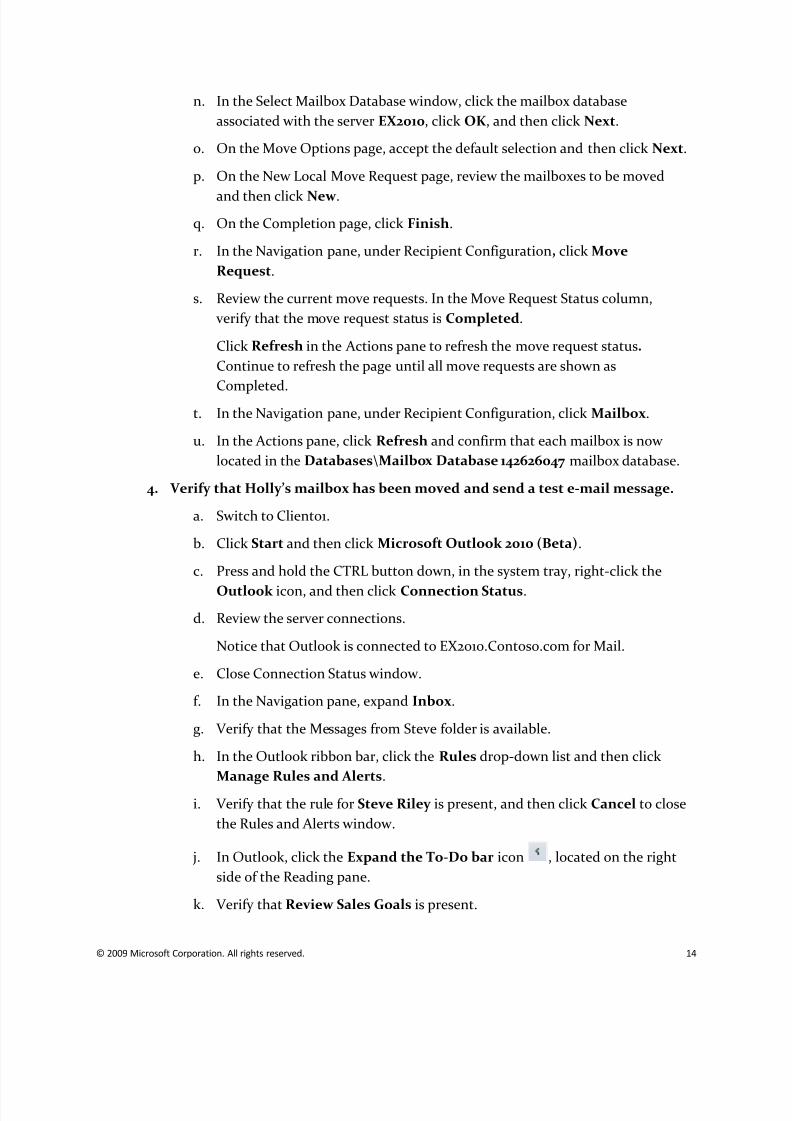
n. In the Select Mailbox Database window, click the mailbox database
associated with the server EX2010, click OK, and then click Next.
o. On the Move Options page, accept the default selection and then click Next.
p. On the New Local Move Request page, review the mailboxes to be moved
and then click New.
q. On the Completion page, click Finish.
r. In the Navigation pane, under Recipient Configuration, click Move
Request.
s. Review the current move requests. In the Move Request Status column,
verify that the move request status is Completed.
Click Refresh in the Actions pane to refresh the move request status.
Continue to refresh the page until all move requests are shown as
Completed.t. In the Navigation pane, under Recipient Configuration, click Mailbox.
u. In the Actions pane, click Refresh and confirm that each mailbox is now
located in the Databases\Mailbox Database 142626047 mailbox database.
4.
Verify that Holly’s mailbox has been moved and send a test e-mail message.
a. Switch to Client01.
b. Click Start and then click Microsoft Outlook 2010 (Beta).
c. Press and hold the CTRL button down, in the system tray, right-click the
Outlook icon, and then click Connection Status.
d.
Review the server connections.
Notice that Outlook is connected to EX2010.Contoso.com for Mail.
e. Close Connection Status window.
f.
In the Navigation pane, expand Inbox.
g. Verify that the Messages from Steve folder is available.
h. In the Outlook ribbon bar, click the Rules drop-down list and then click
Manage Rules and Alerts.
i. Verify that the rule for Steve Riley is present, and then click Cancel to close
the Rules and Alerts window.
j. In Outlook, click the Expand the To-Do bar icon , located on the right
side of the Reading pane.
k. Verify that Review Sales Goals is present.
8/10/2019 Lab 03 - Coexistence and Upgrading From Exchange 2007 to Exchange 2010
http://slidepdf.com/reader/full/lab-03-coexistence-and-upgrading-from-exchange-2007-to-exchange-2010 17/24
15 © 2009 Microsoft Corporation. All rights reserved.
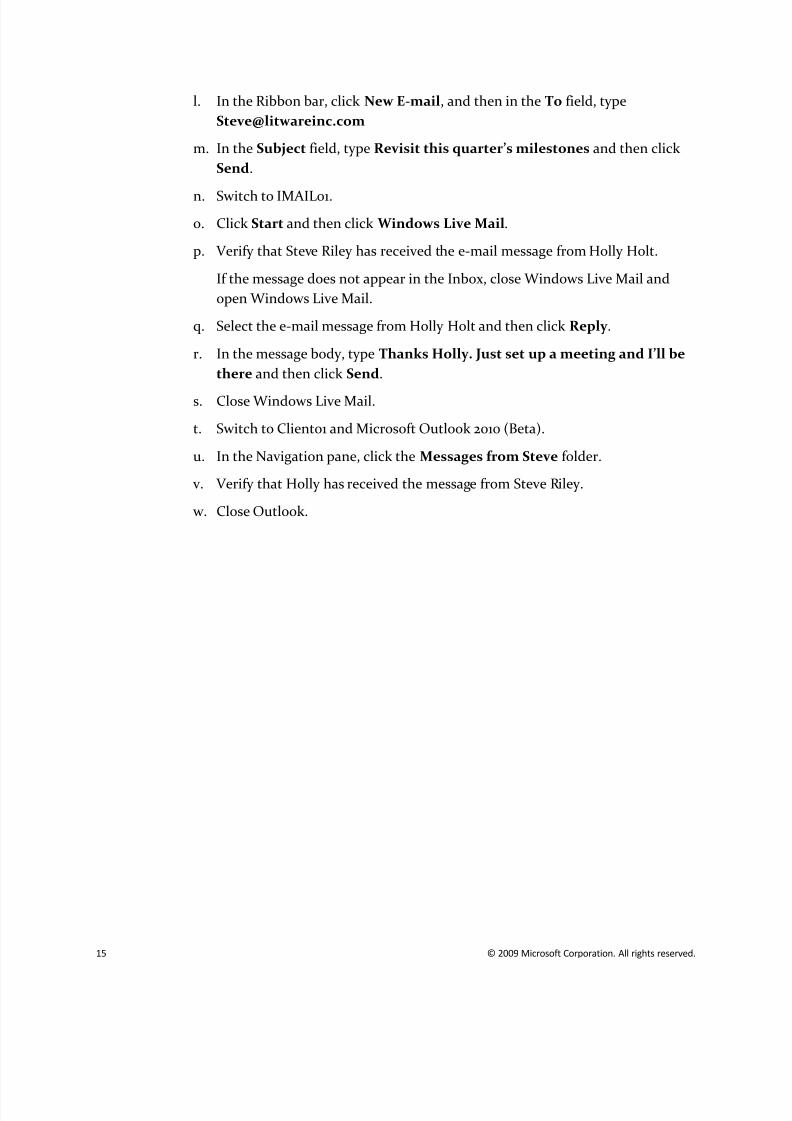
l. In the Ribbon bar, click New E-mail, and then in the To field, type
m. In the Subject field, type Revisit this quarter’s milestones and then click
Send.
n.
Switch to IMAIL01.
o. Click Start and then click Windows Live Mail.
p. Verify that Steve Riley has received the e-mail message from Holly Holt.
If the message does not appear in the Inbox, close Windows Live Mail and
open Windows Live Mail.
q. Select the e-mail message from Holly Holt and then click Reply .
r. In the message body, type Thanks Holly. Just set up a meeting and I’ll be
there and then click Send.
s.
Close Windows Live Mail.
t.
Switch to Client01 and Microsoft Outlook 2010 (Beta).
u. In the Navigation pane, click the Messages from Steve folder.
v. Verify that Holly has received the message from Steve Riley.
w.
Close Outlook.
8/10/2019 Lab 03 - Coexistence and Upgrading From Exchange 2007 to Exchange 2010
http://slidepdf.com/reader/full/lab-03-coexistence-and-upgrading-from-exchange-2007-to-exchange-2010 18/24
© 2009 Microsoft Corporation. All rights reserved. 16
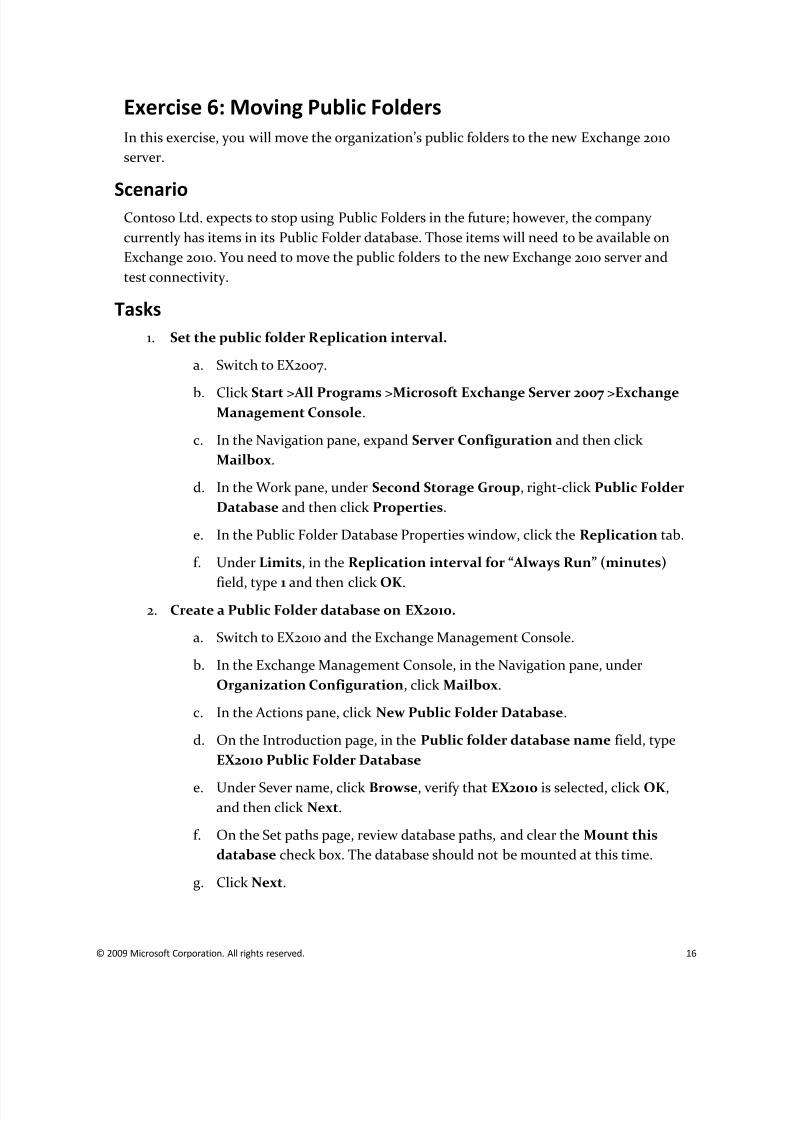
Exercise 6: Moving Public Folders
In this exercise, you will move the organization’s public folders to the new Exchange 2010
server.
ScenarioContoso Ltd. expects to stop using Public Folders in the future; however, the company
currently has items in its Public Folder database. Those items will need to be available on
Exchange 2010. You need to move the public folders to the new Exchange 2010 server and
test connectivity.
Tasks
1. Set the public folder Replication interval.
a. Switch to EX2007.
b.
Click Start >All Programs >Microsoft Exchange Server 2007 >ExchangeManagement Console.
c. In the Navigation pane, expand Server Configuration and then click
Mailbox.
d. In the Work pane, under Second Storage Group, right-click Public Folder
Database and then click Properties.
e. In the Public Folder Database Properties window, click the Replication tab.
f. Under Limits, in the Replication interval for “Always Run” (minutes)
field, type 1 and then click OK. 2. Create a Public Folder database on EX2010.
a. Switch to EX2010 and the Exchange Management Console.
b. In the Exchange Management Console, in the Navigation pane, under
Organization Configuration, click Mailbox.
c. In the Actions pane, click New Public Folder Database.
d. On the Introduction page, in the Public folder database name field, type
EX2010 Public Folder Database
e.
Under Sever name, click Browse, verify that EX2010 is selected, click OK,and then click Next.
f. On the Set paths page, review database paths, and clear the Mount this
database check box. The database should not be mounted at this time.
g. Click Next.
8/10/2019 Lab 03 - Coexistence and Upgrading From Exchange 2007 to Exchange 2010
http://slidepdf.com/reader/full/lab-03-coexistence-and-upgrading-from-exchange-2007-to-exchange-2010 19/24
17 © 2009 Microsoft Corporation. All rights reserved.
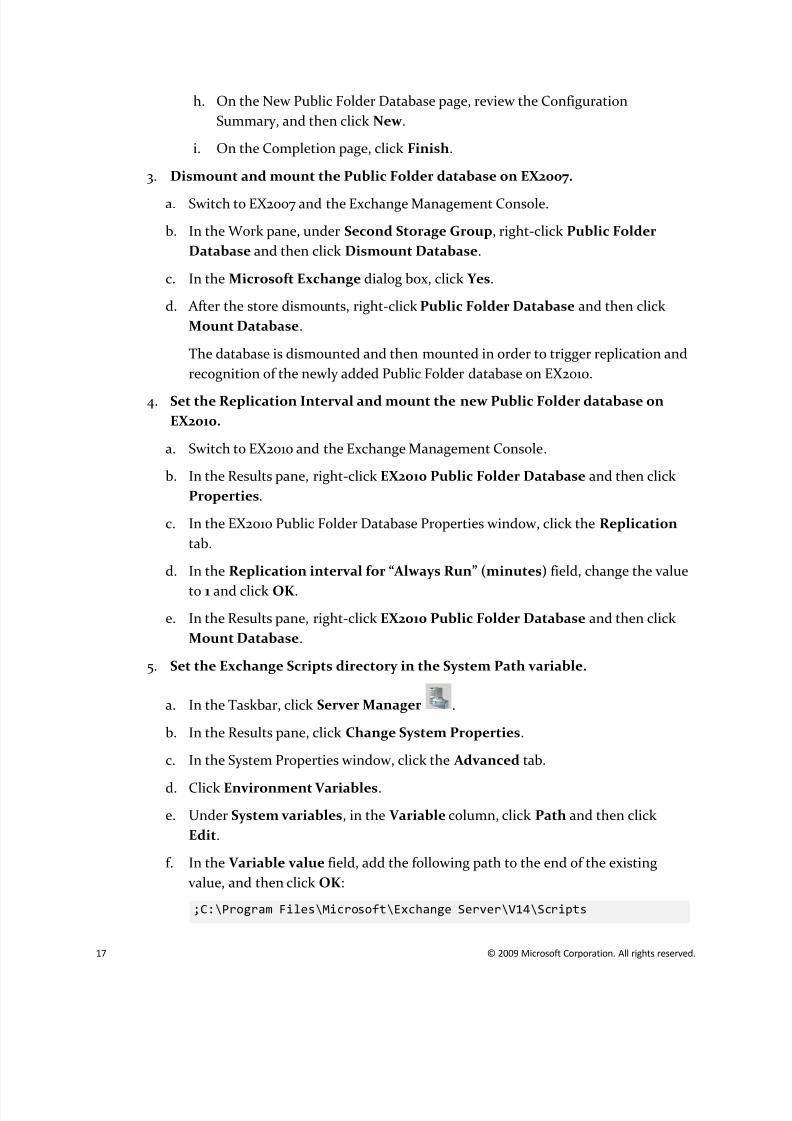
h. On the New Public Folder Database page, review the Configuration
Summary, and then click New.
i. On the Completion page, click Finish.
3. Dismount and mount the Public Folder database on EX2007.
a.
Switch to EX2007 and the Exchange Management Console.
b. In the Work pane, under Second Storage Group, right-click Public Folder
Database and then click Dismount Database.
c. In the Microsoft Exchange dialog box, click Yes.
d. After the store dismounts, right-click Public Folder Database and then click
Mount Database.
The database is dismounted and then mounted in order to trigger replication and
recognition of the newly added Public Folder database on EX2010.
4.
Set the Replication Interval and mount the new Public Folder database on
EX2010.
a. Switch to EX2010 and the Exchange Management Console.
b. In the Results pane, right-click EX2010 Public Folder Database and then click
Properties.
c. In the EX2010 Public Folder Database Properties window, click the Replication
tab.
d. In the Replication interval f or “Always Run” (minutes) field, change the value
to 1 and click OK.
e.
In the Results pane, right-click EX2010 Public Folder Database and then click
Mount Database.
5. Set the Exchange Scripts directory in the System Path variable.
a. In the Taskbar, click Server Manager .
b. In the Results pane, click Change System Properties.
c. In the System Properties window, click the Advanced tab.
d.
Click Environment Variables.
e. Under System variables, in the Variable column, click Path and then click
Edit.
f. In the Variable value field, add the following path to the end of the existing
value, and then click OK:
;C:\Program Files\Microsoft\Exchange Server\V14\Scripts

8/10/2019 Lab 03 - Coexistence and Upgrading From Exchange 2007 to Exchange 2010
http://slidepdf.com/reader/full/lab-03-coexistence-and-upgrading-from-exchange-2007-to-exchange-2010 20/24
© 2009 Microsoft Corporation. All rights reserved. 18
Important:Ensure that you type the path exactly as shown above including the semicolon.
g. Click OK to close the Environment Variables window.
h. Click OK to close the System Properties window.
i. Close Server Manager.
6. Discover Public Folder replicas.
a. Click Start >All Programs >Microsoft Exchange Server 2010 >Exchange
Management Shell.
b. At the PS Prompt, type the following and then press ENTER:
Get-PublicFolder –Server EX2007 -Recurse | FL Name,Replicas
Notice that all replicas are currently located on EX2007.
7. Move all public folders to Exchange 2010.
a.
At the PS Prompt, type the following and then press ENTER:
Moveallreplicas.ps1 –Server EX2007 –NewServer EX2010
b. At the PS Prompt, type the following and then press ENTER:
Get-PublicFolder -Recurse | FL Name,Replicas
Verify that the public folders are now located on EX2010. You might need to wait
a few minutes and then run the cmdlet again to display the correct results.
If the Public Folders are still listed as being located on EX2007, run the
MoveAllReplicas.ps1 script from step a and then run the cmdlet in step b.
8. Verify that the contents of the public folders have been moved.
a. At the PS Prompt, type the following and then press ENTER:
Get-PublicFolderStatistics
b.
Switch to the Exchange Management Console.
c. In the Navigation pane, click Toolbox.
d. In the Results pane, double-click Public Folder Management Console.
Wait for the Public Folder Management Console to initialize. This may take
several minutes.

8/10/2019 Lab 03 - Coexistence and Upgrading From Exchange 2007 to Exchange 2010
http://slidepdf.com/reader/full/lab-03-coexistence-and-upgrading-from-exchange-2007-to-exchange-2010 21/24
19 © 2009 Microsoft Corporation. All rights reserved.
e. In the Public Folder Management Console, in the Navigation pane, click
Default Public Folders.
f. In the Results pane, right-click Finance and then click Properties.
g. In the Finance Properties window, click the Replication tab.
h.
Verify that EX2010 is the only server listed for content replication and click
OK.
i. Close the Public Folder Management Console.
9. Verify public folder access using OWA.
a. Click Start and then click Internet Explorer.
b. In the Address field, type https://mail.contoso.com/owa and then press
ENTER.
c. Log on as Contoso\Holly with a password of pass@word1
d. In the Navigation pane, click Public Folders.
e. Click the Finance public folder.
f. Verify that the post Holly created earlier is located in the folder.
g. Close OWA.
8/10/2019 Lab 03 - Coexistence and Upgrading From Exchange 2007 to Exchange 2010
http://slidepdf.com/reader/full/lab-03-coexistence-and-upgrading-from-exchange-2007-to-exchange-2010 22/24
© 2009 Microsoft Corporation. All rights reserved. 20
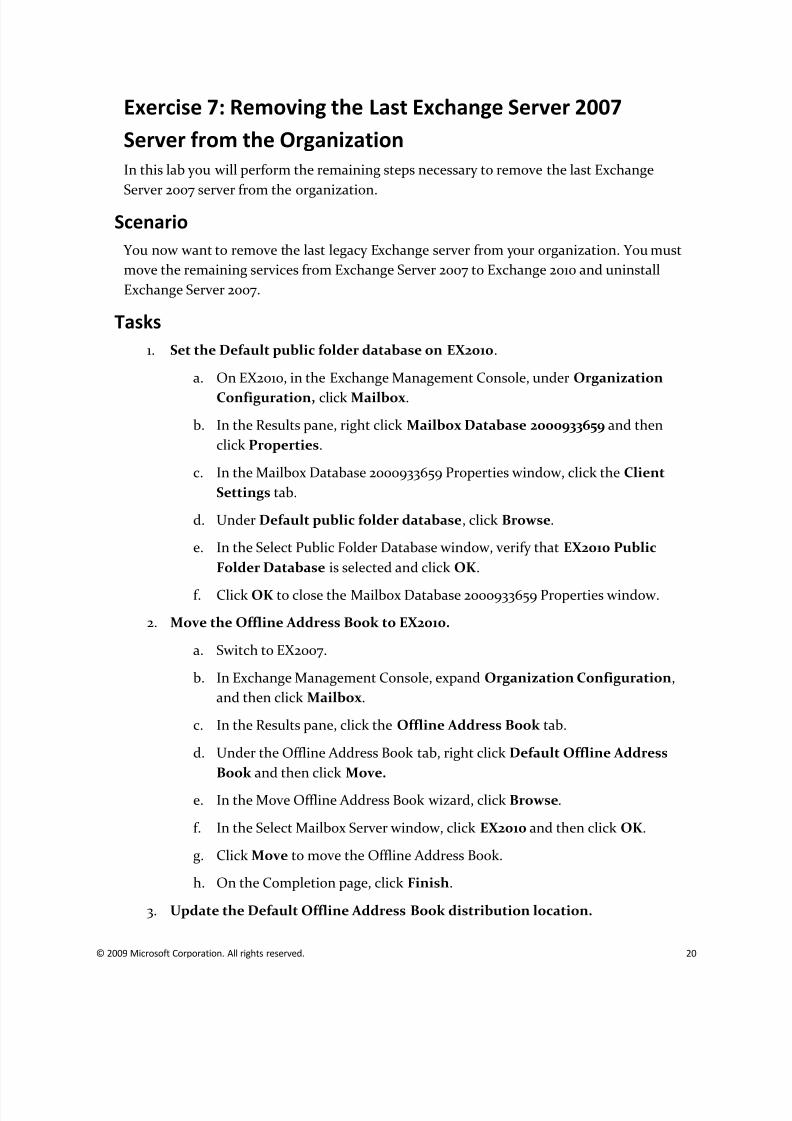
Exercise 7: Removing the Last Exchange Server 2007
Server from the Organization
In this lab you will perform the remaining steps necessary to remove the last Exchange
Server 2007 server from the organization.
Scenario
You now want to remove the last legacy Exchange server from your organization. You must
move the remaining services from Exchange Server 2007 to Exchange 2010 and uninstall
Exchange Server 2007.
Tasks
1. Set the Default public folder database on EX2010.
a. On EX2010, in the Exchange Management Console, under Organization
Configuration, click Mailbox.
b. In the Results pane, right click Mailbox Database 2000933659 and then
click Properties.
c. In the Mailbox Database 2000933659 Properties window, click the Client
Settings tab.
d. Under Default public folder database, click Browse.
e. In the Select Public Folder Database window, verify that EX2010 Public
Folder Database is selected and click OK.
f.
Click OK to close the Mailbox Database 2000933659 Properties window.
2. Move the Offline Address Book to EX2010.
a. Switch to EX2007.
b. In Exchange Management Console, expand Organization Configuration,
and then click Mailbox.
c. In the Results pane, click the Offline Address Book tab.
d. Under the Offline Address Book tab, right click Default Offline Address
Book and then click Move.
e. In the Move Offline Address Book wizard, click Browse.
f. In the Select Mailbox Server window, click EX2010 and then click OK.
g. Click Move to move the Offline Address Book.
h. On the Completion page, click Finish.
3. Update the Default Offline Address Book distribution location.
8/10/2019 Lab 03 - Coexistence and Upgrading From Exchange 2007 to Exchange 2010
http://slidepdf.com/reader/full/lab-03-coexistence-and-upgrading-from-exchange-2007-to-exchange-2010 23/24
21 © 2009 Microsoft Corporation. All rights reserved.
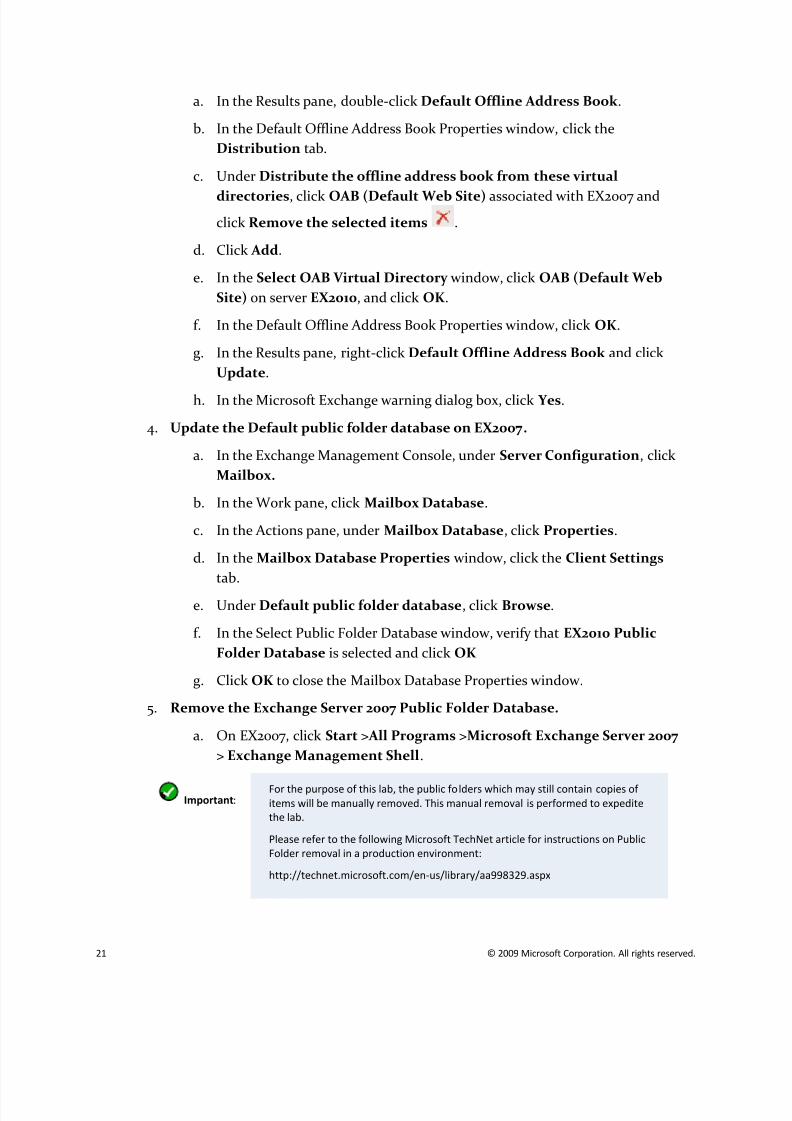
a. In the Results pane, double-click Default Offline Address Book.
b. In the Default Offline Address Book Properties window, click the
Distribution tab.
c. Under Distribute the offline address book from these virtual
directories, click OAB (Default Web Site) associated with EX2007 and
click Remove the selected items .
d. Click Add.
e. In the Select OAB Virtual Directory window, click OAB (Default Web
Site) on server EX2010, and click OK.
f. In the Default Offline Address Book Properties window, click OK.
g. In the Results pane, right-click Default Offline Address Book and click
Update.
h.
In the Microsoft Exchange warning dialog box, click Yes.
4. Update the Default public folder database on EX2007.
a.
In the Exchange Management Console, under Server Configuration, click
Mailbox.
b. In the Work pane, click Mailbox Database.
c. In the Actions pane, under Mailbox Database, click Properties.
d. In the Mailbox Database Properties window, click the Client Settings
tab.
e. Under Default public folder database, click Browse.
f. In the Select Public Folder Database window, verify that EX2010 Public
Folder Database is selected and click OK
g. Click OK to close the Mailbox Database Properties window.
5. Remove the Exchange Server 2007 Public Folder Database.
a. On EX2007, click Start >All Programs >Microsoft Exchange Server 2007
> Exchange Management Shell.
Important:For the purpose of this lab, the public folders which may still contain copies ofitems will be manually removed. This manual removal is performed to expedite
the lab.
Please refer to the following Microsoft TechNet article for instructions on Public
Folder removal in a production environment:
http://technet.microsoft.com/en-us/library/aa998329.aspx
8/10/2019 Lab 03 - Coexistence and Upgrading From Exchange 2007 to Exchange 2010
http://slidepdf.com/reader/full/lab-03-coexistence-and-upgrading-from-exchange-2007-to-exchange-2010 24/24
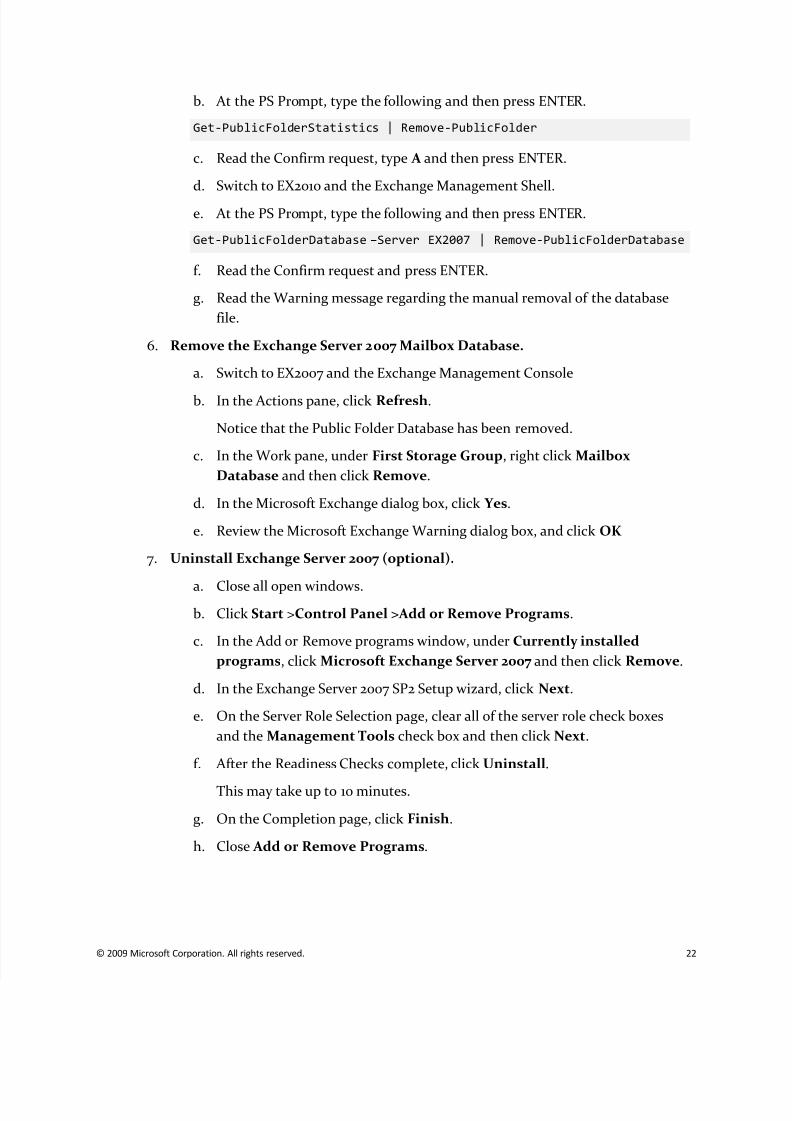
b. At the PS Prompt, type the following and then press ENTER.
Get-PublicFolderStatistics | Remove-PublicFolder
c. Read the Confirm request, type A and then press ENTER.
d. Switch to EX2010 and the Exchange Management Shell.
e. At the PS Prompt, type the following and then press ENTER.
Get-PublicFolderDatabase –Server EX2007 | Remove-PublicFolderDatabase
f. Read the Confirm request and press ENTER.
g. Read the Warning message regarding the manual removal of the database
file.
6. Remove the Exchange Server 2007 Mailbox Database.
a. Switch to EX2007 and the Exchange Management Console
b.
In the Actions pane, click Refresh.
Notice that the Public Folder Database has been removed.
c. In the Work pane, under First Storage Group, right click Mailbox
Database and then click Remove.
d. In the Microsoft Exchange dialog box, click Yes.
e. Review the Microsoft Exchange Warning dialog box, and click OK
7.
Uninstall Exchange Server 2007 (optional).
a.
Close all open windows.b. Click Start >Control Panel >Add or Remove Programs.
c.
In the Add or Remove programs window, under Currently installed
programs, click Microsoft Exchange Server 2007 and then click Remove.
d. In the Exchange Server 2007 SP2 Setup wizard, click Next.
e. On the Server Role Selection page, clear all of the server role check boxes
and the Management Tools check box and then click Next.
f. After the Readiness Checks complete, click Uninstall.
This may take up to 10 minutes.
g. On the Completion page, click Finish.
h. Close Add or Remove Programs.