lab 01 - portal.ucp.edu.pk
TRANSCRIPT
Lab 01
Topic Introduction to Microsoft Word
Objective To introduce the importance of MS. Word.
To make an effective lab report.
Introduction
Microsoft Word is a word processing software package. You can use it to type letters, reports, research
papers, chapters of book and other documents. It gives you the ability to use your home computer as well as
your business computer for desktop publishing. The main window of the MS.
Opening a Document
In addition to creating new documents, you'll often need to open a document that was previously saved.
1. Navigate to Backstage view, then click Open.
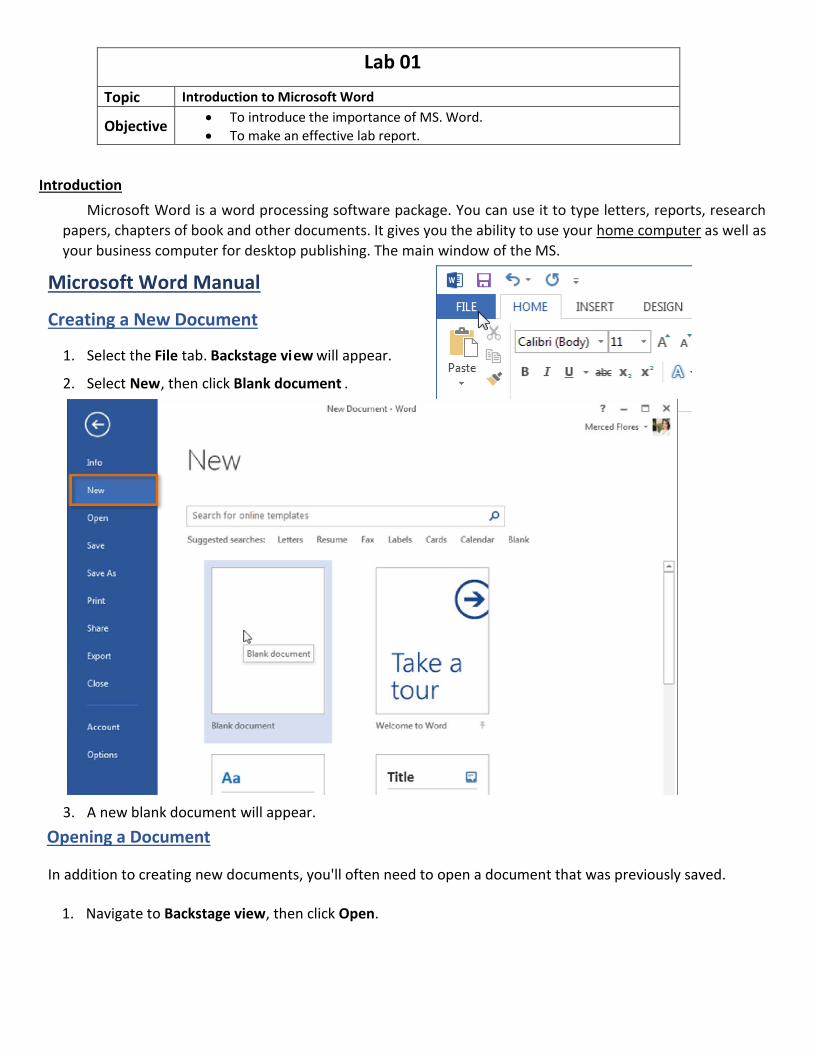
Microsoft Word Manual
Creating a New Document
1. Select the File tab. Backstage vi ew will appear.
2. Select New , then click Blank document .
3. A new blank document will appear.

2. Select Computer and then click Browse. Alternatively, you can choose OneDrive
(previously known as SkyDrive) to open files stored on your OneDrive.
3. The Open dialog box appears.
Locate and select your document,
then click Open.
Working with Templates
A template is a predesigned document you can use to create a new document quickly. Templates often
include custom formatting and designs, so they can save you a lot of time and effort when starting a new
project.
To create a new document from a template:
1. Click the File tab to access Backstage view.

2. Select New. Several templates will appear below the Blank document option.
3. Select a template to review it.
4. A preview of the template will appear, along with additional information about how the template can be
used.
5. Click Create to use the selected template.

6. A new workbook will appear with the selected template.
Text Basics
If you're new to Microsoft Word, you'll need to learn the basics of working with text so you can type,
reorganize, and edit text. Basic tasks include the ability to add, delete, and move text, as well as the
ability to find and replace specific words or phrases. Using the insertion point to add text
The insertion point is the blinking vertical line in your document. It indicates where you can enter
text on the page. You can use the insertion point in a variety of ways:
• Blank document: When a new blank document opens, the insertion point is located in the top left
corner of the page. If you wish, you can begin typing from this location.

• Adding spaces: Press the space bar to add spaces after a word or in between text.
• New paragraph line: Press Enter on your keyboard to move the insertion point to the next
paragraph line.
• Manual placement: After you've started typing, you can use the mouse to move the insertion point
to a specific place in your document. Simply click the location in the text where you wish to place
it.
In a new blank document, you can double-click the mouse to move the insertion point elsewhere
on the page.
To select text:
Before applying formatting to text, you'll first need to select it.
1. Place the insertion point next to the text you wish to select.
2. Click the mouse, and while holding it down drag your mouse over the text to select it.
3. Release the mouse button. You have selected the text. A highlighted box will appear over the selected
text.

When you select text or images in Word, a hover toolbar with command shortcuts appears. If the toolbar
does not appear at first, try moving the mouse over the selection.
Other shortcuts include double-clicking a word to select it and triple-clicking to select a sentence or paragraph.
You can also select all of the text in the document by pressing Ctrl+A on your keyboard.
To delete text:
There are several ways to delete, or remove, text:
• To delete text to the left of the insertion point, press the Backspace key on your keyboard.
• To delete text to the right of the insertion point, press the Delete key on your keyboard.
• Select the text that you wish to remove, then press the Delete key.
Copying & Pasting Text
Word allows you to copy text that is already in your document and paste it to other areas of the
document, which can save you time. If there is text that you wish to move from one area of the
document to another, you can cut and paste or drag and drop the text.
To copy and paste text:
Copying text creates a duplicate of the text.
1. Select the text you wish to copy.

2. Click the Copy command on the Home tab. You can also right-click the selected text and
select Copy .
3. Place the insertion point where you wish the text to appear.
4. Click the Paste command on the Home tab.
5. The text will appear.

To cut and paste text:
*You can access the cut, copy, and paste commands by using keyboard
shortcuts. Press Ctrl+X to cut, Ctrl+C to copy, and Ctrl+V to paste.
You can also cut, copy, and paste by right-clicking your document and
choosing the desired action from the drop-down menu. When you use
this method to paste, you can choose from three options that
1. Select the text you wish to cut.
2. Click the Cut command on the Home tab. You can also right - click the
selected text and select Cut .
3. Place your insertion point where you wish the text to appear.
4. Click the Paste command on the Home tab. The text will appear.

determine how the text will be formatted: Keep Source Formatting,
Merge Formatting, and Keep Text Only. You can hover the mouse over
each icon to see what it will look like before you click on it.
Formatting Text
Formatted text can draw the reader's attention to specific parts of a document and emphasize
important information. In Word, you have many options for adjusting the font of your text, including
size, color, and inserting special symbols. You can also adjust the alignment of the text to change
how it is displayed on the page. To change the font:
By default, the font of each new document is set to Calibri. However, Word provides a variety of other fonts
you can use to customize text and titles.
1. Select the text you wish to modify.
2. On the Home tab, click the drop-down arrow next to the Font box. A menu of font styles will
appear.
3. Move the mouse over the various font styles. A live preview of the font will appear in the
document. Select the font style you wish to use.
4. The font will change in the document

o Font size box: When the font size you need is not available in
the Font size drop-down arrow, you can click the Font size box
and type the desired font size. Then press Enter.
To change the font size: 1. Select the text you wish to modify.
2. Select the desired font size formatting
option:
Font size drop down arrow: on the home tab,
click the font size dropdown arrow. A menu of
font size will appear. When you move the mouse
over the various font size, a live preview of font
size will appear in the document

o Grow and shrink font commands: Click
the Grow Font or Shrink Font commands
to change the font size.
3. The font size will change in the document.
To change the font color:
1. Select the text you wish to modify.
2. On the Home tab, click the Font Color drop-
down arrow. The Font Color menu appears.
3. Move the mouse over the various font colors.
A live preview of the color will appear in the
document.
4. Select the font color you wish to use. The font color will change in the document.
Your color choices aren't limited to the drop-down menu that appears. Select More Colors... at the bottom
of the menu to access the Colors dialog box. Choose the color that you want, then click OK.
Working with Paragraphs
Changing Alignment
By default, Word aligns text to the left margin in new documents. However, there may be times when you
want to adjust text alignment to the center or right.
1. Select the text you wish to modify.
2. On the Home tab, select one of the four alignment options from the Paragraph group.

Line Spacing
As you design your document and make formatting decisions, you will need to consider line and paragraph
spacing. You can increase spacing to improve readability or reduce it to fit more text on the page.
About line spacing
Line spacing is the space between each line in a paragraph. Microsoft Word allows you to customize
the line spacing to be single-spaced (one line high), double-spaced (two lines high), or any other
amount you want. The default spacing in Word 2013 is 1.08 lines, which is slightly larger than single
spaced.
To format line spacing:
1. Select the text you wish to format.
2. On the Home tab, click the Line and Paragraph Spacing command. A drop-down menu will appear.
3. Move the mouse over the various options. A live preview of the line spacing will appear in the document.
Select the line spacing you wish to use.
4. The line spacing will change in the document.

Fine-tuning line spacing
Your line spacing options aren't limited to the ones in the Line and Paragraph Spacing menu. To adjust
the spacing with more precision, select Line Spacing Options from the menu to access the Paragraph
dialog box. You'll then have a few additional options you can use to customize the spacing:
• Exactly:
When you choose this option, the line spacing is measured in points, just like font sizes. Generally,
the spacing should be slightly larger than the font size. For example, if you're using 12-point text, you
could use15-point spacing.
• At least:
Like the Exactly option, this option lets you choose how many points of spacing you want. However, if
you have different sizes of text on the same line, the spacing will expand to fit the larger text.
• Multiple:
This option lets you type in the number of lines of spacing you want. For example, choosing Multiple
and changing the spacing to 1.2 will make the text a little more spread out than single-spaced text.
If you want the lines to be closer together, you can choose a smaller value like 0.9.
Bulleted & Numbered Lists
Bulleted and numbered lists can be used in your documents to outline, arrange, and emphasize text.
In this lesson, you will learn how to modify existing bullets, insert new bulleted and numbered lists,
select symbols as bullets, and format multilevel lists.
To create a bulleted list:
1. Select the text you wish to format as a list.
2. On the Home tab, click the drop-down arrow next to the Bullets command. A menu of bullet styles
will appear.

3. Move the mouse over the various bullet styles. A live preview of the bullet style will appear in the
document. Select the bullet style you wish to use.
4. The text will be formatted as a bulleted list.
To create a numbered list:
When you need to organize text into a numbered list, Word offers several numbering options. You can format
your list with numbers, letters, or Roman numerals.
1. Select the text you wish to format as a list.
2. On the Home tab, click the drop-down arrow next to the Numbering command. A menu of numbering
styles will appear.
3. Move the mouse over the various numbering styles. A live preview of the numbering style will appear
in the document. Select the numbering style you wish to use.

4. The text will format as a numbered list.

Keyboard Shortcuts
CTRL + S = Save
CTRL + P = Print
CTRL + A = Select All
CTRL + C = Copy
CTRL + V = Paste
CTRL + Z = Undo
CTRL + Y = Redo
CTRL + F = Find
CTRL + H = Replace
CTRL + L = Align Left
CTRL + R = Align Right
CTRL + E = Align Center
CTRL + J = Align Justify
CTRL + B = Bold
CTRL + I = Italic
CTRL + U = Underline
CTRL + [ = Font Size Grow
CTRL + ] = Font Size Shrink