kronos scheduler user guide - skilled nursing carekronos scheduler user guide | v1.01 | updated...
TRANSCRIPT

Page | 1 Kronos Scheduler User Guide | v1.01 | Updated 2018/07/31
Kronos
Scheduler
User Guide

Page | 2 Kronos Scheduler User Guide | v1.01 | Updated 2018/07/31

Page | 3 Kronos Scheduler User Guide | v1.01 | Updated 2018/07/31
Table of Contents
Section Page
Kronos Schedule Basics
Shift Codes 4
Job Path & Job Codes 5
Job Path + Codes Examples 6
Accessing the Schedule
Self Service 8
Mobile App 9
Viewing the Schedule
Self Service 10
Mobile App 11
Requests
Requests for Shifts
Request for Shift Types Explained 12
Picking up Open Shifts
Self Service 13
Mobile App 15
Shift Swap / Trades
Self Service 17
Mobile App 19
Request To Cover
Self Service 22
Mobile App 24
Time off Requests
Time Off Request Types Explained 27
Making a Time Off Request
Self Service 28
Mobile App 31
Notifications 34

Page | 4 Kronos Scheduler User Guide | v1.01 | Updated 2018/07/31
Kronos Schedule Basics
Shift Codes Shift codes or shift times are typically displayed in a very standard format. For example:
8:00AM – 4:30PM or 10:00PM-6:30AM
However in certain views a shortened version of the shift code has been developed by
MSLCC to display the shift times in as few characters as possible. This allows even the most
detailed views to still contain a mostly human understandable shift label. These codes are
displayed in certain tables and long duration view schedules.
The custom codes make are made up of 4 parts.
1. The 2 digit hour of the shift start time in 24 hour format.
2. 1 letter representing the a=:00, b=:15, c=:30, d=:45 minute start time of the shift
3. The 2 digit hour of the shift end time in 24 hour format.
4. 1 letter representing the a=:00, b=:15, c=:30, d=:45 minute end time of the shift
Code examples:
Standard Format Shift Code
8:00AM – 4:30PM 08a16c
10:00PM-6:30AM 22a06c
2:15PM-10:45PM 14b22d
4:30PM-9:30PM 16c21c
10:30PM-7:00AM 22c07a
5:30AM-2:00PM 05c14a
7:00AM-9:00AM 07a09a

Page | 5 Kronos Scheduler User Guide | v1.01 | Updated 2018/07/31
Job Path & Job Codes Jobs will be displayed on the schedule to indicate what job you are assigned to. If you work
the same position every day or have a set schedule you may never need to know what job
code applies to you. However many of you transfer from unit to unit or job to job frequently
and with expansion into a second site knowing where you are assigned to work for a shift is
important. The job path plus the job code tell you where and what job you are assigned to
for that shift.
String Breakdown:
Organization / Facility / Department / *Area / Job
*Area can be multiple levels
Kronos will display a job string in the form of:
MSLCC/HVIEW SNF/NUR/NE/CNA
Explained:
Missouri Slope / Hillview Skilled Nursing Facility / Nursing / North East Unit / CNA
As you can see with this break down you can tell what facility your shift is in, what
department you are working, what area you are working in and the job you are assigned.
It is important to note that in certain cases, when you are
scheduled to your home Job, Kronos may not display your
Job path.
You will want to ensure your home unit is known to you for these cases. If you don’t know
what your home position is inquire with your supervisor, scheduler or MSLCC HR.
If you are assigned a shift that is not your home job, the shift will be tagged with “transfer” or
“(x)”. The job you are transferred to will be indicated on the shift when these are present.
The following page will cover a few more Job path examples.

Page | 6 Kronos Scheduler User Guide | v1.01 | Updated 2018/07/31
Job Path + Codes Combination Examples MSLCC/HVIEW SNF/ACT/ACTASST
Missouri Slope / Hillview Skilled Nursing Facility / Activities / Activities Assistant
MSLCC/HVIEW SNF/HSKP/WV/CSTDN Missouri Slope / Hillview Skilled Nursing Facility / Housekeeping / Westview / Custodian
MSLCC/HVIEW SNF/LAUND/LNDRA
Missouri Slope / Hillview Skilled Nursing Facility / Laundry / Laundry Aide
MSLCC/HVIEW SNF/MAINT/MTASST Missouri Slope / Hillview Skilled Nursing Facility / Maintenance / General Maintenance
MSLCC/HVIEW SNF/NUTR SVC/WEST/COOK Missouri Slope / Hillview Skilled Nursing Facility / Nutritional Services / West Kitchen / Cook
MSLCC/HVIEW SNF/NUTR SVC/EDR/DTAIDE Missouri Slope / Hillview Skilled Nursing Facility / Nutritional Services / East Dining Room / Dietary Aide
MSLCC/HVIEW SNF/NUR/NC/LT/CNA
Missouri Slope / Hillview Skilled Nursing Facility / Nursing / NC / Low Tub / CNA
MSLCC/HVIEW SNF/NUR/SE/WP/CNA
Missouri Slope / Hillview Skilled Nursing Facility / Nursing / SE / Whirlpool / CNA
MSLCC/HVIEW ALF/ENRICH/ENASST
Missouri Slope / Hillview Assisted Living Facility / Enrichment / Enrichment Assistant
MSLCC/HVIEW ALF/NRSG/MAI
Missouri Slope / Hillview Assisted Living Facility / Nursing / Medication Assistant I
MSLCC/WASH ALF/NRSG/Nurse
Missouri Slope / Washington Assisted Living Facility / Nursing / Nurse
MSLCC/WASH SNF/ NUTR SVC/CAFE/DTAIDE Missouri Slope / Washington Skilled Nursing Facility / Nutritional Services / Cafeteria / Dietary Aide
Page | 7 Kronos Scheduler User Guide | v1.01 | Updated 2018/07/31
Schedule Periods Schedule periods will be 6 weeks long. Due to the nature of Self-Scheduling, departments
that utilize Self-Scheduling features may or may not follow a standard 6 week scheduling
period.
Request Periods Request periods (ability to submit PTO or self-scheduling requests) will be open and closed
per department policies. These periods will open X amount of days before the open of
schedule period and close X amount of days before the schedule is posted.
Check your department specific policies here:
http://portal.mslcc.com/?page_id=20737 (Search “Request”)

Page | 8 Kronos Scheduler User Guide | v1.01 | Updated 2018/07/31
Accessing the Schedule
You can use the Employee Self Service webpage on a PC or Kronos Mobile app to access
your schedule and requests.
How to Access the Schedule in Self Service 1. Login to the Employee Self Service page (https://mslcc.kronos.net)
Full login instructions available at https://ess.mslcc.com
2. On the Self Service Page select “My Schedule” from the widget menu

Page | 9 Kronos Scheduler User Guide | v1.01 | Updated 2018/07/31
How to Access the Schedule in Kronos Mobile
1. Login to the Kronos Mobile App on your device
Full App install / login instructions available at https://ess.mslcc.com
2. On the Self Service Page select “Schedule” from the widget menu

Page | 10 Kronos Scheduler User Guide | v1.01 | Updated 2018/07/31
Viewing the Schedule
Schedule Calendar Legend for Self Service Please review the following legend on all the options available to view and use the
schedule.
Schedule Requests Icons:
Pending Request | Approved Request | Refused Request

Page | 11 Kronos Scheduler User Guide | v1.01 | Updated 2018/07/31
Schedule Calendar Legend for Kronos Mobile Please review the following legend on all the options available to view and use on the
mobile schedule. The schedule itself on mobile is more basic, the other features are located
in a different area of the mobile app. More on that in later sections.
Schedule Overview: Per Shift View:
Mobile Request Icons:
Approved | Offered / Submitted | Refused

Page | 12 Kronos Scheduler User Guide | v1.01 | Updated 2018/07/31
Requests
Request for Shift Types Explained Using the Kronos Scheduler you will be able to make the following schedule request types.
Open Shifts – Shifts that are on the schedule but not yet filled by an employee. These
are commonly considered holes in the schedule and need to be filled for proper
coverage. Once successfully requested your schedule will automatically and
immediately update with the shift. The open shift will also disappear from the list of
open shifts.
Shift Swap/Trade – Shifts which one employee exchanges with another employee. For
example Employee A is scheduled to work Monday, but can’t this week. Employee A
can work Friday instead. A shift swap is sent to employee B to exchange their Friday
shift with Employee A’s Monday shift. Before any change is made Employee A must
make the request and Employee B must approve the request. If Employee B does not
act on or approve the request to swap, no change is made. Employee A will still be
scheduled to work the Monday shift. However if Employee B approves the swap, each
employee’s schedule will automatically and immediately update with the swapped
shifts.
Request to Cover – Very similar to shift swaps, however a Cover is a one way swap.
Employee A has a shift they need covered. Employee B is available to work the shift.
Employee A can request Employee B cover the shift. If Employee B does not act on or
approve the request to cover, no change is made. Employee A will still be scheduled
to work the shift. However if Employee B approves the request to cover, the request will
then be sent to Employee A’s Manager for approval. If the manager rejects the
request, no change is made. If the manager approves the request the shift will
automatically and immediately move off of Employee A’s schedule and onto
Employee B’s Schedule.
o After the request is completed you will not automatically receive PTO for your
empty shift. You will need to make a Make a Time Off Request for PTO as well if
you wish to use PTO for the covered time.
Request Self Schedule – For self-scheduling departments only. These requests allow you
to pick up multiple open shifts in a single request. This is similar to the open shift request
however an open shift request allows you to pick up one shift per request. If you are
needing to enroll yourself in multiple open shifts, you want to use this function.

Page | 13 Kronos Scheduler User Guide | v1.01 | Updated 2018/07/31
How to Request Shifts (Open Shifts) in Self Service
Open shifts can be picked up for jobs you are able to perform
The system WILL filter out JOBS you are not able to pickup
The system WILL NOT filter out special SHIFTS you are not able pickup (needs special training, minor rules)
1. From “My Schedule”, if there are open shifts on a day to pick up, you can hover
over the right side of the open shift bar on a particular day. You will see a listing of
the shift times available
2. You can click this arrow to see more details and select a shift.

Page | 14 Kronos Scheduler User Guide | v1.01 | Updated 2018/07/31
3. Select the open shift you wish to take.
4. Press submit to complete the transaction
5. If there are no conflicts or violations, the shift will be automatically assigned to you

Page | 15 Kronos Scheduler User Guide | v1.01 | Updated 2018/07/31
How to Request Shifts (Open Shifts) in Kronos Mobile
1. From the mobile home screen select
“Requests”
2. Select the + icon in the Request
Manager
Page | 16 Kronos Scheduler User Guide | v1.01 | Updated 2018/07/31
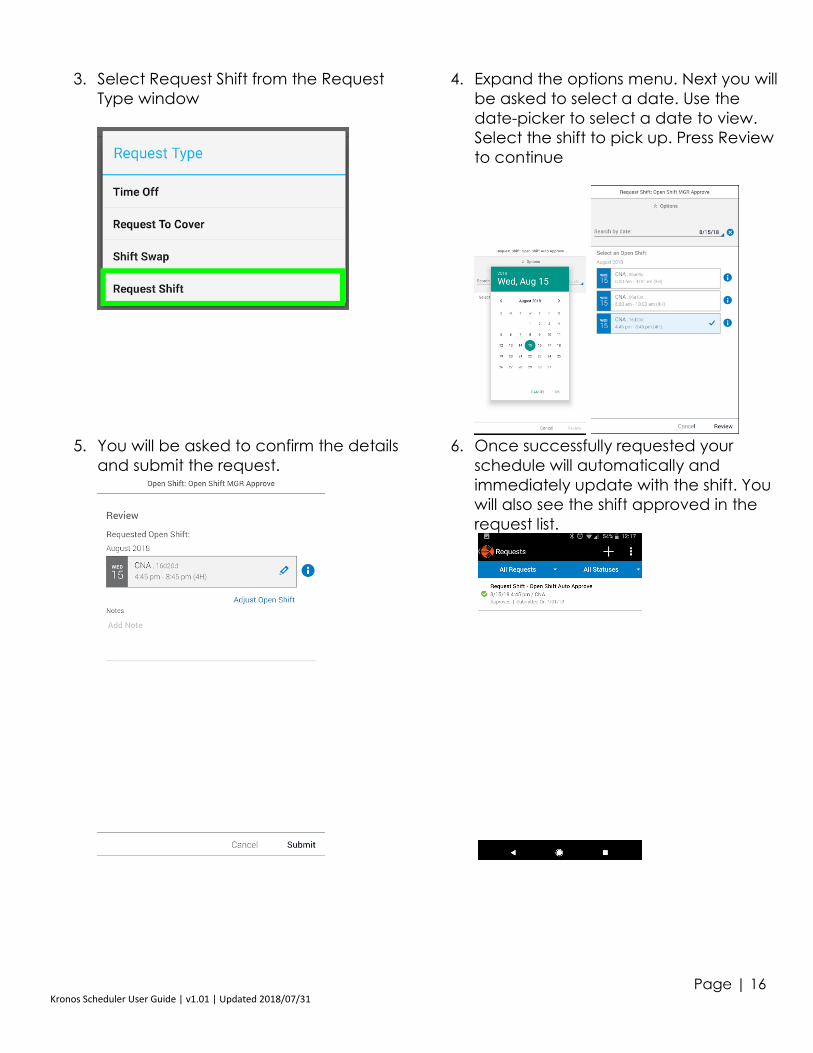
3. Select Request Shift from the Request
Type window
4. Expand the options menu. Next you will
be asked to select a date. Use the
date-picker to select a date to view.
Select the shift to pick up. Press Review
to continue
5. You will be asked to confirm the details
and submit the request.
6. Once successfully requested your
schedule will automatically and
immediately update with the shift. You
will also see the shift approved in the
request list.

Page | 17 Kronos Scheduler User Guide | v1.01 | Updated 2018/07/31
How to Request Shifts (Shift Swap/Trade) in Self Service [Person A]
Shift swaps can be performed between jobs you are able to perform
The system WILL filter out JOBS you are not able to swap to
The system WILL NOT filter out SHIFTS you are not able swap to (needs special training, minor rules)
Self-Service or the Mobile App can be used to complete Person parts A or B
1. From “My Schedule”, Select the day you wish to swap
2. Select the “More Button”
3. Select Request Shift Swap
4. Ensure the Dates and times are correct
5. Select the person to propose the swap to
6. Select Submit when finished
7. The Person B will be notified of the Shift Swap/Trade via the Kronos Mobile App, Email and Kronos Inbox
Person B needs to accept the purposed Shift Swap/Trade before any schedule is modified

Page | 18 Kronos Scheduler User Guide | v1.01 | Updated 2018/07/31
How to Request Shifts (Shift Swap/Trade) in Self Service [Person B] Person B needs to accept the purposed Shift Swap/Trade before any schedule is modified
1. The swap appears on Person B’s Schedule, select the Shift Swap offer
2. Person B can select Details to view the Swap/Trade Request details
3. Select Accept or Refuse the request to complete the swap/trade request. Confirm the accept
or refuse on the Accept Request popup.
If Accepted the Schedule automatically updates for both parties.
If Refused, nothing changes.
In both cases Person A & B will be notified via the Kronos Mobile App, Email and Kronos Inbox

Page | 19 Kronos Scheduler User Guide | v1.01 | Updated 2018/07/31
How to Request Shifts (Shift Swap/Trade) in Kronos Mobile [Person A]
1. From the mobile home screen select
“Requests”
2. Select the + icon in the Request
Manager

Page | 20 Kronos Scheduler User Guide | v1.01 | Updated 2018/07/31
3. Select Shift Swap from the Request Type
window
4. Expand the options menu. Next you will be
asked to select a date. Use the date-picker
to select a date to view. The select the shift
you wish to trade. Tap Apply to continue.
5. Next select the shift of Person B with whom
you want to swap. Select the date to view
all shifts on that day or you can also search
by employee. Tap Review to continue
By Job By Employee
6. You will be asked to confirm the details and
submit the request. Afterwards you can see
the status of your request on the main
request page
Person B needs to accept the purposed Swap/Trade before any schedule is modified

Page | 21 Kronos Scheduler User Guide | v1.01 | Updated 2018/07/31
How to Request Shifts (Shift Swap/Trade) in Kronos Mobile [Person B]
Person B needs to accept the purposed Shift Swap/Trade before any schedule is modified
1. Person B’s Request page will show the
offered trade
2. Person B will be shown the proposed trade
details. They can accept or decline the
trade here.
3. Once you make a selection you will be
asked to confirm your choice.
4. Person B’s Request page will show the
offered trade as Accepted or Refused
If Accepted the Schedule automatically updates for both parties.
If refused, nothing changes.

Page | 22 Kronos Scheduler User Guide | v1.01 | Updated 2018/07/31
How to Request Shifts (Request to Cover) in Self Service [Person A]
Requests to Cover can be performed between jobs Person B is able to perform
The system WILL filter out JOBS which are not able to cover for you
The system WILL NOT filter out the SHIFTS Person B is not able to cover (needs special training, minor rules)
Self-Service or the Mobile App can be used to complete Person parts A or B
After the request is completed you will not automatically receive PTO for your empty shift. You will need
to make a Make a Time Off Request for PTO as well if you wish to use PTO for the covered time.
1. From “My Schedule”, Select the day you need covered
2. Select the “More Button”
3. Select “Request to Cover”
4. Ensure the Dates and times are correct
5. Select the person(s) to propose the cover to. You can select multiple people if you
wish.
6. Select Submit when finished
7. Person B will be notified of the Request to Cover via the Kronos Mobile App, Email and Kronos Inbox.
Person B must accept the purposed Request to Cover before any schedule is modified

Page | 23 Kronos Scheduler User Guide | v1.01 | Updated 2018/07/31
How to Request Shifts (Request to Cover) in Self Service [Person B]
Person B must accept the purposed Request to Cover before any schedule is modified
1. The cover offer will appear on Person B’s Schedule, Select the Cover offer
2. Person B can select Details to view the Cover Request details
3. Select Accept or Refuse the request to complete the request to cover. Confirm the accept or
refuse on the Accept Request popup.
4. Requests to Cover require manager approval. The request is now awaiting approval from
Person A’s supervisor / scheduler.
If Accepted by the manager the Schedule automatically updates for both parties.
If refused, nothing changes.
In both cases Person A & B will be notified via the Kronos Mobile App, Email and Kronos Inbox
After the request is completed you will not automatically receive PTO for your empty shift. You will need to make a Make
a Time Off Request for PTO as well if you wish to use PTO for the covered time.
Page | 24 Kronos Scheduler User Guide | v1.01 | Updated 2018/07/31
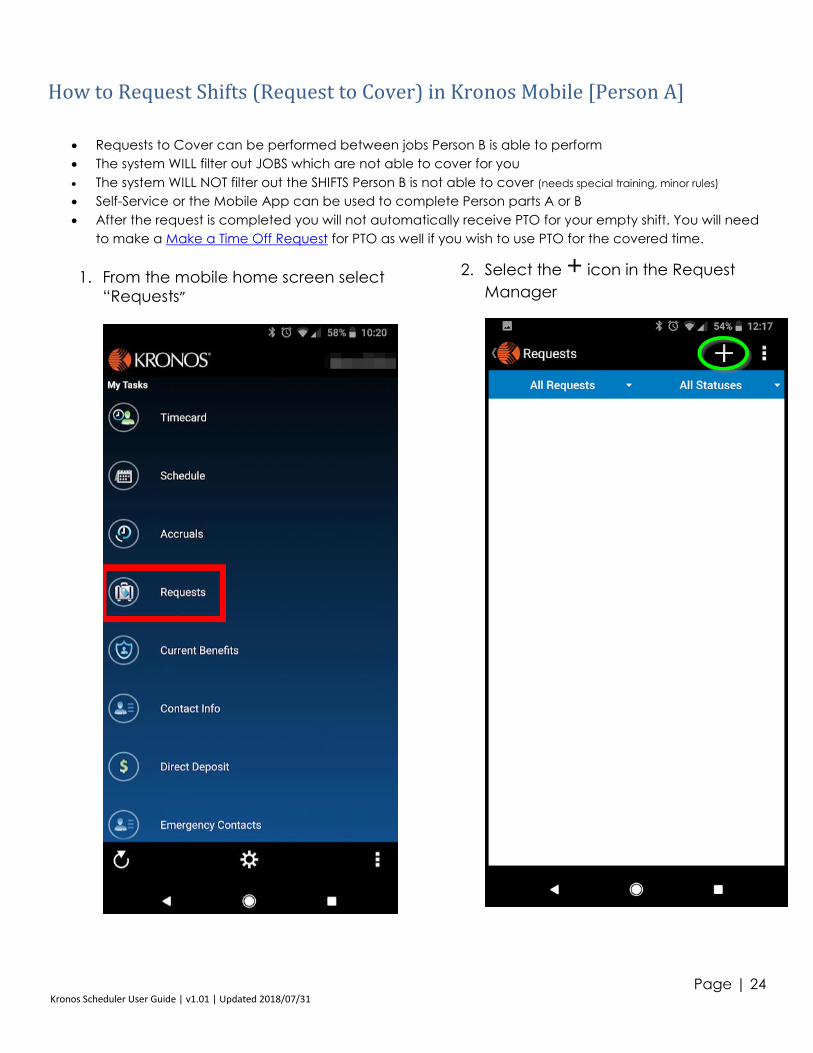
How to Request Shifts (Request to Cover) in Kronos Mobile [Person A]
Requests to Cover can be performed between jobs Person B is able to perform
The system WILL filter out JOBS which are not able to cover for you
The system WILL NOT filter out the SHIFTS Person B is not able to cover (needs special training, minor rules)
Self-Service or the Mobile App can be used to complete Person parts A or B
After the request is completed you will not automatically receive PTO for your empty shift. You will need
to make a Make a Time Off Request for PTO as well if you wish to use PTO for the covered time.
1. From the mobile home screen select
“Requests”
2. Select the + icon in the Request
Manager

Page | 25 Kronos Scheduler User Guide | v1.01 | Updated 2018/07/31
3. Select Request to Cover from the Request
Type window
4. Expand the options menu. Next you will be
asked to select a date. Use the date-picker
to select a date to view. Then select the
shift you need covered. Select Apply to
continue.
5. Select the person(s) to propose the cover
to. You can select multiple people if you
wish. Tap Review to continue
6. You will be asked to confirm the details and
submit the request. Afterwards you can see
the status of your request on the main
request page

Page | 26 Kronos Scheduler User Guide | v1.01 | Updated 2018/07/31
How to Request Shifts (Request to Cover) in Kronos Mobile [Person B]
Person B needs to accept the purposed Request to Cover before any schedule is modified
1. Person B’s Request page will show the
pending offer to cover
2. Person B will be shown the proposed
cover details. They can accept or
decline the cover here.
3. Once you make a selection you will be
asked to confirm your choice.
4. Person B’s Request page will show the
offered trade as Submitted or Refused
5. Requests to Cover require manager approval. The request is now awaiting approval from Person
A’s supervisor / scheduler.
If Accepted by the manager the Schedule automatically updates for both parties.
If refused, nothing changes.
In both cases Person A & B will be notified via the Kronos Mobile App, Email and Kronos Inbox. After the request is completed you will not automatically receive PTO for your empty shift. You will need to make a Make a Time Off
Request for PTO as well if you wish to use PTO for the covered time.
6. Person B will be shown the
proposed trade details. They
can accept or decline the
trade here.

Page | 27 Kronos Scheduler User Guide | v1.01 | Updated 2018/07/31
Time off Requests
Time Off Request Types Explained Using the Kronos Scheduler you will be able to make the following Time Off Requests.
PTO – Uses PTO you have available at the time of the request. The accrual will be
deducted from your balance once the PTO request is approved. You must have the
accrual balance available at the time of the request or the request will not be
allowed.
o Remember when using the PTO request your PTO balance will be deducted
once the PTO is requested and approved, not when the PTO is actually used. If
you are requesting PTO weeks, months, or possibly even years in advance there
will be a significant gap in time between when the PTO is deducted from your
accrual balance and when it is used.
o It is suggested that you use this request if you have the balance available to you
when you make the request. That ensures you will have the PTO available when
the time comes to use it.
PTO Pending – Requests PTO for the future, you must have accrual balance to cover
when the date of the request comes. Otherwise you could go unpaid during your
leave. No worries, your requested leave will not automatically be cancelled with an
insignificant or 0 balance. But you may not have adequate benefit time to pay you
during that time off.
o Any PTO pending will be converted to available PTO hours once the date of the
request is in the current schedule or pay period.
o It is suggested that you use this request if you have a low or 0 balance and need
to take PTO in the future. Another case would be if you need to avoid
completely depleting your PTO balance with a significant amount of PTO
requests in the future.
Request off Schedule – Requests a day to not be scheduled. For example Person A is
not able to work this Friday but can work all other days of the week to reach their
guaranteed hours. Person A would “Request Off Schedule” for Friday. The Manager or
Scheduler would then be alerted to not schedule Person A for that Friday but they
could be scheduled all other days of the week.
o This request type does not use any accrual balances.
o This request can be used in self scheduling departments, but due to the nature
of self-scheduling, there is no need to.

Page | 28 Kronos Scheduler User Guide | v1.01 | Updated 2018/07/31
Making a Time Off Request in Self Service
1. From “My Schedule”, Select a day in which you want to make a request
2. Select the “Request Time Off
3. The Request Time Off window will appear, the date fields will be preloaded with the date you selected
on the schedule

Page | 29 Kronos Scheduler User Guide | v1.01 | Updated 2018/07/31
4. Select the Type of request you want from the dropdown. (The following steps apply to all request types. See Time Off Requests Explained section of this user guide for details on each request type)
5. Confirm the Start and End date are correct for the request you want to make. If you are requesting all or
part of a single day the start and end date should be the same. Otherwise you can select a range of
consecutive dates.
I. Single Day example:
II. Multiple Day example:
6. The Pay Code field will update as the Type dropdown is changed. It is advised that you do not change
the pay code field when making a request.
7. There are some different steps for Full and Partial Day requests
I. Simple - If you require a full day for your request leave the Time Unit drop down as “Full Day”
II. Advanced - If you are requesting a partial day:
i. Set Time Unit to “Hours”
ii. Enter a desired Start Time like “8am” or “1215pm”
iii. Enter the amount of hours you need for your request.
8. Optional - If you need to make additional requests you can click “Add another time-off period” and
repeat these steps 5-7 on the new row.

Page | 30 Kronos Scheduler User Guide | v1.01 | Updated 2018/07/31
9. Important - The system will state that notes are optional, which is true for Kronos itself. However MSLCC
requires notes on all Time off Requests. If you do not include notes your request will be declined and you
will need to resubmit it with notes briefly explaining to what the time off request is for. This is equivalent to
the “Reason” field on the existing Time off request form we use now.
10. Press Submit to complete your request.
All Time off request require manager / scheduler approval before they appear on your schedule
You will be notified via the Kronos Mobile App, Email and Kronos Inbox if the request is accepted or
refused
You can view or retract your pending requests on the schedule:
Once Approved your shift will be automatically converted to the request type you submitted:

Page | 31 Kronos Scheduler User Guide | v1.01 | Updated 2018/07/31
Making a Time Off Request in Kronos Mobile
1. From the mobile home screen select
“Requests”
2. Select the + icon in the Request
Manager

Page | 32 Kronos Scheduler User Guide | v1.01 | Updated 2018/07/31
3. Select “Time Off” from the Request Type window
4. Select the Type of Time Off wish to request.
Tap Apply to continue (The following steps apply to all request types. See Time Off Requests
Explained section of this user guide for details on each request type)
5. Enter the dates for your request.
Leave Pay Code as is.
Tap Review to continue.
6. MSLCC requires notes on all Time off Requests. If you
do not include notes your request will be refused
and you will need to resubmit it with notes briefly
explaining to what the time off request is for. This is
equivalent to the “Reason” field on the existing Time
off request form we use now. Press Submit when
complete
All Time off request require manager / scheduler approval before they appear on your schedule.
Page | 33 Kronos Scheduler User Guide | v1.01 | Updated 2018/07/31
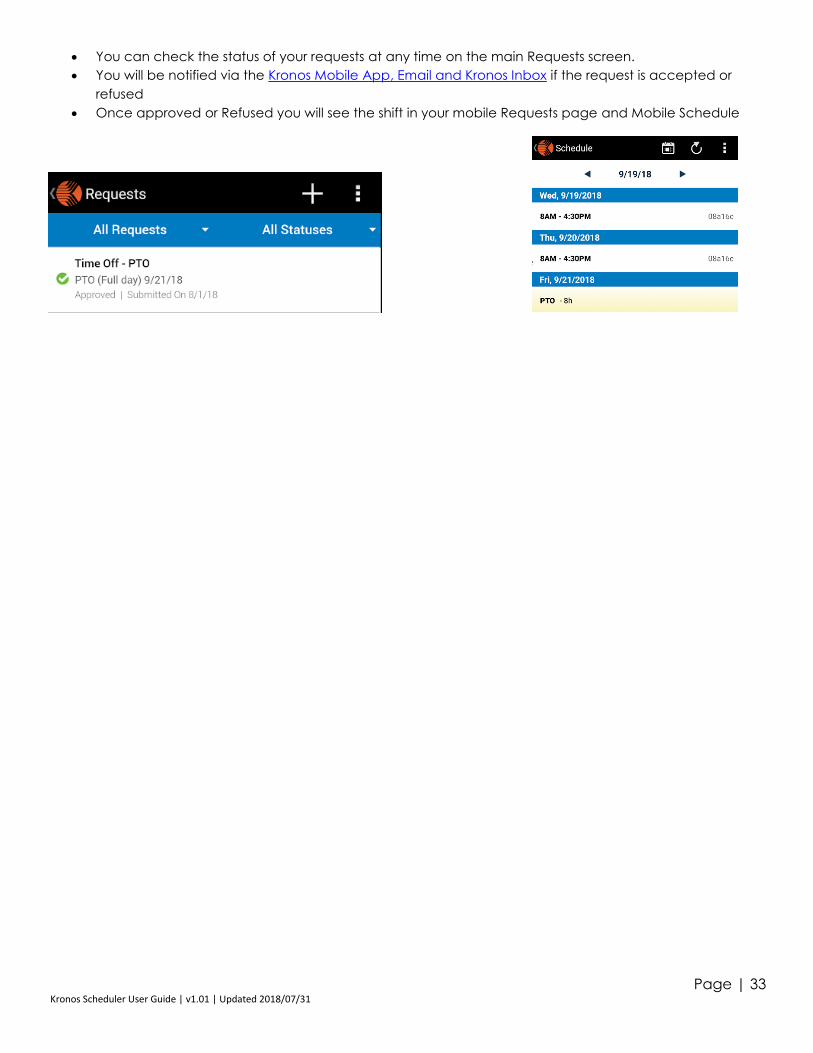
You can check the status of your requests at any time on the main Requests screen.
You will be notified via the Kronos Mobile App, Email and Kronos Inbox if the request is accepted or
refused
Once approved or Refused you will see the shift in your mobile Requests page and Mobile Schedule

Page | 34 Kronos Scheduler User Guide | v1.01 | Updated 2018/07/31
Notifications
You can check the status of your requests, get updates, messages, or confirmations in a variety of ways for shifts
and time off requests. Check these locations regularly as you may receive requests from other staff.
Mobile Alerts Kronos Mobile App -> Alerts will display at the top of the main page -> keep clicking thru to view details
Mobile Request History Kronos Mobile App -> Requests
Email Updates will be sent to your primary email on file
Kronos My Inbox - Self Service -> My Inbox -> Messages