kodi guide 2015
DESCRIPTION
all about kodiTRANSCRIPT


A G U I D E T O C U S T O M I Z I N G K O D I 1 5 I S E N G A R D
The latest Kodi 15 Isengard (was XBMC) is a great media center software. However, like many other open source projects, it is driven by a very technical community, and it is not necessarily user-friendly enough for the average person to use and customize.
I have spent countless hours crawling forums and websites, trying to get the live TV setup, premium online content, automatic light control,and all the other settings right.
In this eBook guide, I will walk you through the relevant customizationtips and tricks I have used with my own HTPC system to take the new Kodi 15 Isengard installation to the next level.
If you are not sure how to get started with your Kodi installation, you can follow these steps to make your Kodi Entertainment Center morestunning looking and user-friendly.
Good luck with your HTPC project,
Tuukka Komssi (Author at mymediaexperience.com)
2

A G U I D E T O C U S T O M I Z I N G K O D I 1 5 I S E N G A R D
Table of Contents
Install Kodi and Configure Basic Settings:
• Configure Kodi settings
Configure Media Sharing Options:
• Set up a media library
• Enable AirPlay
• Add Netflix, Hulu, and other premium channels
• Change media library views
• Create custom playlists and filters
• Show movies as collections
Install Must Have Add-ons:
• Watch videos with YouTube
• Access all music with Spotify
• Enjoy HiFi music with Tidal
• Turn your media library as an EPG with PseudoTV Live
• Improve your TV viewing experience with LazyTV add-on
• View photos with an Apple TV like screensaver
3

A G U I D E T O C U S T O M I Z I N G K O D I 1 5 I S E N G A R D
Watch and Record Live TV:
• Install PVR back-end software
• Enable PVR support (watch live TV on Kodi)
• Use HDHomeRun LiveTV add-on
Make Kodi Look More Beautiful:
• Install a new skin (theme)
• Customize your main menu
Stream Content from Media Servers:
• Integrate with Plex Media Server
• Integrate with Emby (was MediaBrowser)
Play Games:
• Integrate Steam Big Picture with Kodi
Final Touches:
• Modify playback settings for better picture quality
• Dim your lights with the ambilight add-on
• Add user profiles to tailor settings
• Copy your Kodi settings to other devices
4

A G U I D E T O C U S T O M I Z I N G K O D I 1 5 I S E N G A R D
5

A G U I D E T O C U S T O M I Z I N G K O D I 1 5 I S E N G A R D
Disable RSS feed
In the Kodi main menu, go to System > Settings.
Select the Appearance tab to configure appereance settings.
In the skin tab, scroll down and disable show RSS news feed.
Now, go back to the main menu by pressing the back key on the remote control or ESC-key on the keyboard.
6
A G U I D E T O C U S T O M I Z I N G K O D I 1 5 I S E N G A R D
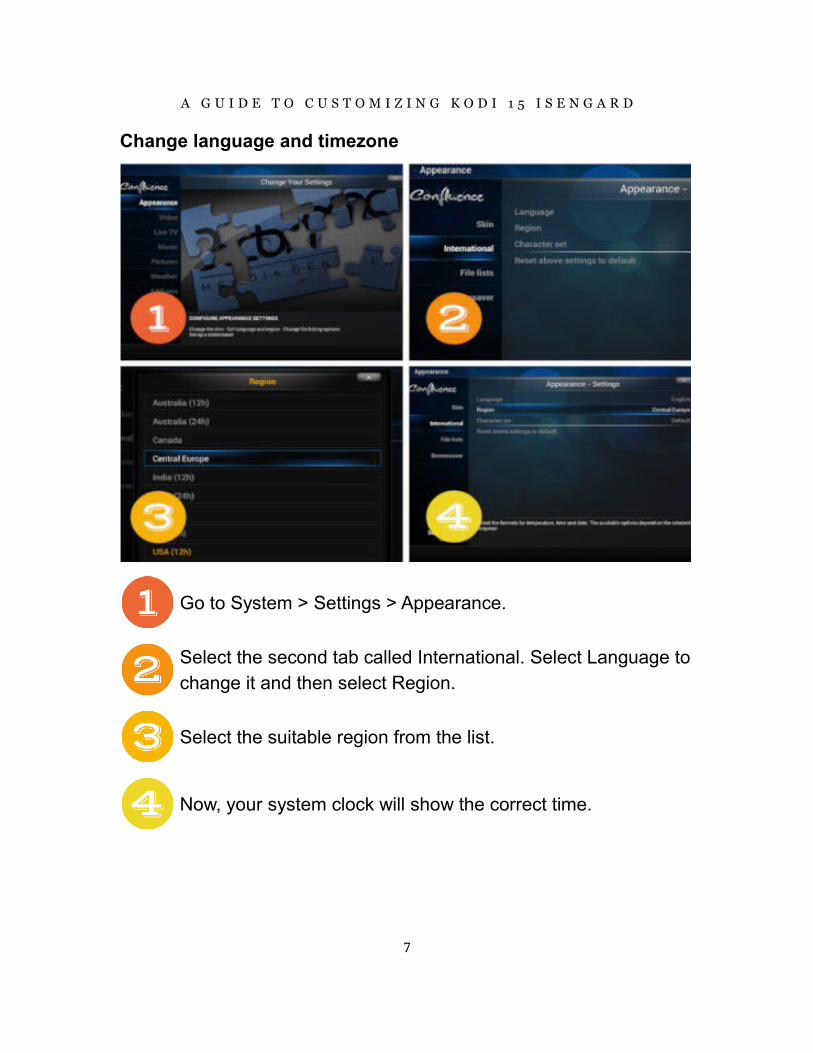
Change language and timezone
Go to System > Settings > Appearance.
Select the second tab called International. Select Language tochange it and then select Region.
Select the suitable region from the list.
Now, your system clock will show the correct time.
7

A G U I D E T O C U S T O M I Z I N G K O D I 1 5 I S E N G A R D
Configure Weather settings
Go to System > Settings > Weather.
Select “Service for Weather Information”.
Select “Get More…”
Select “Yahoo! Weather” add-on.
8

A G U I D E T O C U S T O M I Z I N G K O D I 1 5 I S E N G A R D
Select “Install”.
After installation is completed, go back to System > Settings >General > Service for weather information and select “Yahoo! Weather” from the list.
Next, in the General tab, select “Settings”.
In the location setup, choose the Location 1 and enter the name of the nearest town. Press “OK”, once you have locatedyour city.
9

A G U I D E T O C U S T O M I Z I N G K O D I 1 5 I S E N G A R D
How to enable audio if it is not working
Go to System > System > Audio output. Make sure that the “Settings level” at the bottom of the screen is set at least to “Standard” level.
Set the Audio output device to the output you are using.
10

A G U I D E T O C U S T O M I Z I N G K O D I 1 5 I S E N G A R D
11

A G U I D E T O C U S T O M I Z I N G K O D I 1 5 I S E N G A R D
Set Up a Media Library
Go to videos in the home screen menu and select “Files”.
Select “Add Videos” and “Browse” in the add video source.
Browse to the folder where your media files are stored. If yourfiles are located on a network attached storage, you will need to add the SMB or NFS share from the NAS server.
Rename the media source, if needed, and select “OK”.
12

A G U I D E T O C U S T O M I Z I N G K O D I 1 5 I S E N G A R D
In the set content window, you can set the type of media. Kodiwill automatically scrape the movie, TV show, or music information after you have set up the media content.
If your movies are located in separate folders, enable “Movies are in separate folders that match the movie title”.
Confirm Yes in the Change content question.
Now, you can go back to main menu where you will find a new“Movies” menu with your recently added movies.
13

A G U I D E T O C U S T O M I Z I N G K O D I 1 5 I S E N G A R D
Enable AirPlay
First, go to the “Services” tab under the “System” menu. Then,navigate to the “Zeroconf” settings menu and enable “Announce these services to other systems” via zeroconf.
Next, go to Airplay and enable the “Allow Kodi to receive AirPlay content”.
14

A G U I D E T O C U S T O M I Z I N G K O D I 1 5 I S E N G A R D
Add Netflix, Hulu, and Other Premium Channels
In Kodi, go to “Videos” menu > “Files” and select “Add videos…”
In the Video source settings, browse for the media locations.
Select UPnP Devices and then “PlayOn” (your computer name) and then select “OK”.
Go to “Videos > Files > PlayOn (your computer name)” and start browsing through the list of media services.
15

A G U I D E T O C U S T O M I Z I N G K O D I 1 5 I S E N G A R D
Change media library views
Go to movie, music, or photo library.
Open the panel by pressing the left key to view options.
Click “View” to change the view to thumbnail, poster, fanart, and many other ways your media will be presented.
You can also change the way media is sorted by changing the“Sort by” option.
16

A G U I D E T O C U S T O M I Z I N G K O D I 1 5 I S E N G A R D
Create Custom Playlists and Filters
Select videos and go back to root folder by clicking the “..”.
Select “Playlists”.
Select “New smart playlist…”
Select the type of the media, for example movie, and enter a title for the smart playlist, such as, “Kids Videos”.
17

A G U I D E T O C U S T O M I Z I N G K O D I 1 5 I S E N G A R D
Click “New rule…” and set the criteria for the filter. For example, I selected all movies where genre is equal to animation.
Select “OK” to save your new smart playlist.
Now you can see your new playlist in the file browser.
Here is an example of how my Kids Videos playlist looks like.
18

A G U I D E T O C U S T O M I Z I N G K O D I 1 5 I S E N G A R D
Show movies as collections
Go to System > Settings > Video > Library. Enable “Group movies in sets”.
Go back to your movie library, and you will find that all sequelshave been grouped as collections.
19

A G U I D E T O C U S T O M I Z I N G K O D I 1 5 I S E N G A R D
20

A G U I D E T O C U S T O M I Z I N G K O D I 1 5 I S E N G A R D
Watch videos with YouTube
Go to “System > Add-ons.
Go to “Install from repository > Kodi Add-on repository > Video Add-ons” to, for example, add YouTube add-ons.
Click on the add-on and select install to download it.
You can go back to videos menu, and you will find the new YouTube add-on under the Video Add-ons folder.
21

A G U I D E T O C U S T O M I Z I N G K O D I 1 5 I S E N G A R D
Access all music with Spotify
Go to “System > Add-ons.
Select “Install from zip file”.
Browse the folder where you have stored the downloaded file.Select the zip file, and Kodi will automatically install Spotimc.
You can go back to music menu, and you will find the new Spotimc add-on under the Music Add-ons folder.
22

A G U I D E T O C U S T O M I Z I N G K O D I 1 5 I S E N G A R D
Enjoy HiFi music with Tidal
Go to “System” > “Add-ons” > “Install from repository” > “Kodi Add-on repository” > “Music Add-ons” > Select “Tidal”.
Select “Install” and Kodi will download and install this add-on. Now, you can go to “Music” > “Music Add-ons” > “Tidal”. Press“C-key” to access the context menu and select “Add-on settings”. Select the quality and then input your Tidal username and password.
23

A G U I D E T O C U S T O M I Z I N G K O D I 1 5 I S E N G A R D
Turn your media library as an EPG with PseudoTV Live
Go to “System > Add-ons and select “Install from zip file”. Browse the folder where you have stored the downloaded zip file. Select the zip file, and Kodi will install PseudoTV.
Go back to Programs menu and launch the PseudoTV.
PseudoTV for to first time will prepopulate the EPG based on your media library. Press the ENTER-key to access the EPG.
Press the ESC-key to exit the PseudoTV. Customize the settings by pressing the C-key on in the Programs menu.
24

A G U I D E T O C U S T O M I Z I N G K O D I 1 5 I S E N G A R D
Improve your TV viewing experience with LazyTV add-on
Go to “System” > “Add-ons” > “Install from repository” > “Kodi Add-on repository” > “Program Add-ons” > Select “LazyTV”. Select “Install” and Kodi will install it.
Now, go to “Programs” > “LazyTV”. Press “C-key” to access the context menu and select “Add-on settings”.
In the settings screen, select whether LazyTV will automatically produce a list of next episodes for each TVSeries, or it will create and launch a randomized playlist.
Now, launch the LazyTV add-on and start watching proposed TV shows. Once a TV show is finished, the LazyTV will suggest the next episode for you to watch.
25

A G U I D E T O C U S T O M I Z I N G K O D I 1 5 I S E N G A R D
View photos with an Apple TV like screensaver
Go to System > Appearance > Screensaver and select Screensaver mode. Select “Get more…” and install MultiSlideshow Screensaver from the list.
Go back to System > Appearance > Screensaver and select Screensaver mode. Enable Multi Slideshow.
Below the Screensaver mode, select “Settings”. In the mode tab, change the screensaver to AppleTVLike. Next, go to Image Source tab and set the source.
Now, you can test the screensaver by selecting the Preview.
26

A G U I D E T O C U S T O M I Z I N G K O D I 1 5 I S E N G A R D
27

A G U I D E T O C U S T O M I Z I N G K O D I 1 5 I S E N G A R D
Enable PVR support (watch live TV on Kodi)
In Kodi, go to “Settings” > “Kodi” > “TV” > “Enable” the PVR features. Next, select your preferred software from the PVR client list. Click “Enable” start Argus TV client. You can also configure your TV server’s IP address if you use remote computer.
Now, Kodi should start importing the EPG from clients. Go back to the main menu and choose live TV to start watching the video stream.
28

A G U I D E T O C U S T O M I Z I N G K O D I 1 5 I S E N G A R D
Use HDHomeRun LiveTV add-on
Go to “Settings” > “Add-ons” > “Install from repository” > “KodiAdd-on repository” > “Video Add-ons” > “HDHomeRun”.
Select “Install” and then go to “Videos” > “Video Add-ons” > “HDHomeRun Live TV” to watch TV streams.
In order to add live TV to the home menu, go to “Settings” > “Appearance” > “Skin – Settings” > “Home – Customize HomeMenu”. Go to the “Live TV” and “Choose shortcut”. Select “Add-on” > “Video Add-on” > “HDHomeRun Live TV”.
Now, you can launch the Live TV shortcut to watch TV.
29

A G U I D E T O C U S T O M I Z I N G K O D I 1 5 I S E N G A R D
30

A G U I D E T O C U S T O M I Z I N G K O D I 1 5 I S E N G A R D
Install a new skin (theme)
31

A G U I D E T O C U S T O M I Z I N G K O D I 1 5 I S E N G A R D
Go to System > Appearance.
In the Skin tab, click “Skin” which shows Confluence.
Click “Get More…” to show the list of all available skins.
Select “Mimic” skin from the list.
Select “Install” to start downloading the skin.
Click “Yes” to change to the new skin once prompted.
32

A G U I D E T O C U S T O M I Z I N G K O D I 1 5 I S E N G A R D
Customize your main menu
33
A G U I D E T O C U S T O M I Z I N G K O D I 1 5 I S E N G A R D
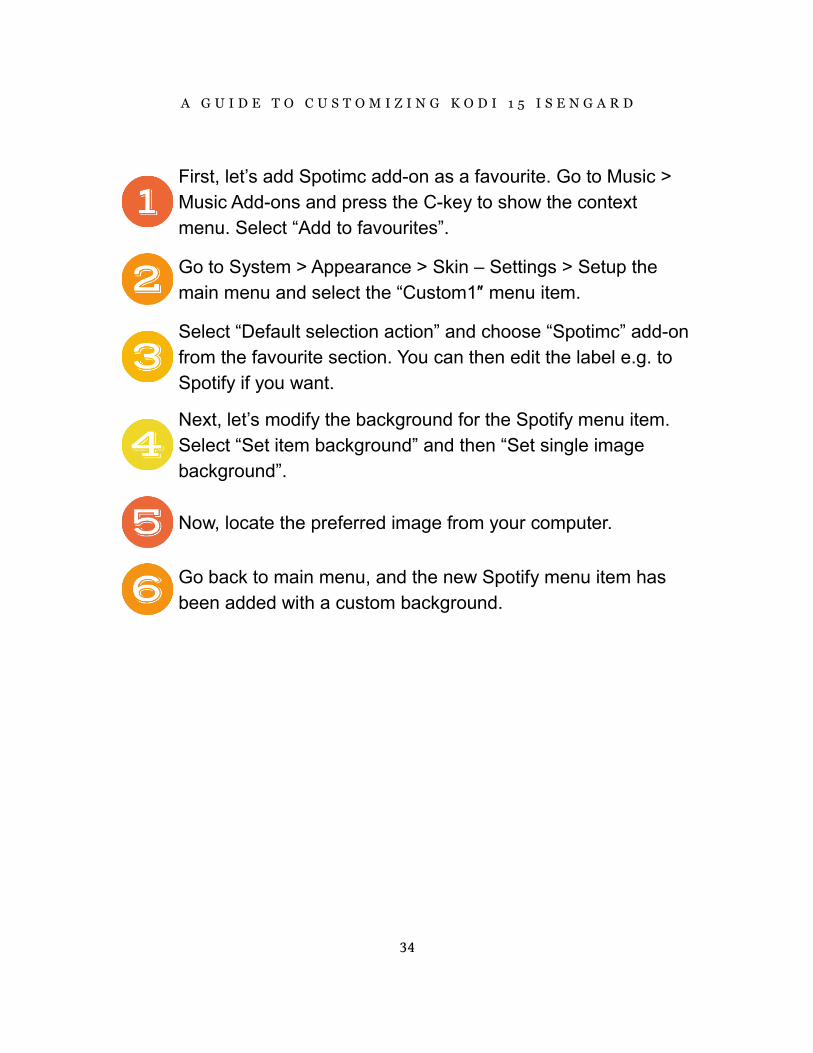
First, let’s add Spotimc add-on as a favourite. Go to Music > Music Add-ons and press the C-key to show the context menu. Select “Add to favourites”.
Go to System > Appearance > Skin – Settings > Setup the main menu and select the “Custom1″ menu item.
Select “Default selection action” and choose “Spotimc” add-onfrom the favourite section. You can then edit the label e.g. to Spotify if you want.
Next, let’s modify the background for the Spotify menu item. Select “Set item background” and then “Set single image background”.
Now, locate the preferred image from your computer.
Go back to main menu, and the new Spotify menu item has been added with a custom background.
34

A G U I D E T O C U S T O M I Z I N G K O D I 1 5 I S E N G A R D
35

A G U I D E T O C U S T O M I Z I N G K O D I 1 5 I S E N G A R D
Integrate with Plex Media Server
36
A G U I D E T O C U S T O M I Z I N G K O D I 1 5 I S E N G A R D
Go to Settings > Kodi > Add-ons.
Select “Install from zip file” and locate the file“helix.zip”.
Now, select “Install from repository” > “Plexbmc add-ons for Kodi” > Video Add-ons > Plexbmc.
Select “Install” to download and install Plexbmc.
To change the Plexbmc settings, go to Settings > Kodi > Plexbmc settings. You can change the settings such as selecting server or changing playback quality settings. Remember to add the myplex user name and password.
Now, you can go to Plex from the main menu under the Settings.
37

A G U I D E T O C U S T O M I Z I N G K O D I 1 5 I S E N G A R D
Integrate with Emby (was MediaBrowser) Server
Go to “System > Add-ons and select “Install from zip file”. Browse the folder where you have stored the downloaded repository.emby.kodi-1.0.0.zip to install repository. Then, go to “Add-ons” > “Install from repository” > “Kodi Emby Addons” > “Program add-ons” > select “Emby”. Click install.
Once the installation is complete, you can go to add-on settings to change your media server’s IP address if needed. Now, all media content from Emby will be integrated with Kodi’s media library.
38

A G U I D E T O C U S T O M I Z I N G K O D I 1 5 I S E N G A R D
39

A G U I D E T O C U S T O M I Z I N G K O D I 1 5 I S E N G A R D
Integrate Steam Big Picture with Kodi
In Kodi, go to System > Add-ons > Install from ZIP file and install script.steam.launcher-3.1.1.zip
Go back to home menu and select the Programs (Apps in Mimic skin) menu. Press the C-key over Steam to enter add-on settings in the context menu.
Set the Kodi and Steam location under Windows. Save SteamLauncher settings.
Now, you are ready to launch Steam for the first time.
40

A G U I D E T O C U S T O M I Z I N G K O D I 1 5 I S E N G A R D
41

A G U I D E T O C U S T O M I Z I N G K O D I 1 5 I S E N G A R D
Modify playback settings for better picture quality
Go to “System” and set the “Settings level” to “Advanced” or “Expert”. Then, continue to “Video” > “Acceleration” and set the “Render method” as “Software”. Then, uncheck the “Allow hardware acceleration”.
Next, play a video file and press “Enter” key to open the on-screen menu. Then, open the “Video Settings” menu (a film reel icon). Scroll down and enable “Post-processing”. Finally, continue scrolling and select “Set as default for all videos” to save the settings.
42

A G U I D E T O C U S T O M I Z I N G K O D I 1 5 I S E N G A R D
Dim your lights with the ambilight add-on
Download the XBMC add-on script.module.requests add-on. In Kodi, go to System > Add-ons > Install from zip file. Select the script.module.requests-master.zip file.
Download XBMC Hue Ambilight add-on. Go to System > Add-ons > Install from zip file. Select the script.xbmc.hue.ambilight-master.zip file.
Restart Kodi and go to System > Add-ons > Enabled add-ons -> Services -> XBMC Philips Hue.
Select “Click me for automatic configuration”. Save configuration by selecting the OK button.
43

A G U I D E T O C U S T O M I Z I N G K O D I 1 5 I S E N G A R D
Add user profiles to tailor settings
Go to “Profiles” sub-menu under the “System” home menu.
Enable “Login screen” under the Login tab.
Go to “Profiles” and select “Add profile..”. Next, you can type anew profile name and choose a profile picture. Click OK and then choose whether you want to copy default settings and sources or start fresh.
Next time you start up Kodi, you will be prompted by the login screen to select your Kodi user profile to login and continue.
44

A G U I D E T O C U S T O M I Z I N G K O D I 1 5 I S E N G A R D
Copy your Kodi settings to other devices
Go to “System” > “Add-ons” > “Install from repository” > “Kodi Add-on repository” > “Program add-ons” > select “Backup”. Click install.
Next, go to “Programs” and launch “Backup” add-on. Choose “Open Settings”.
In the “General” settings, type the remote path where Kodi settings will be copied. Then in the “File Selection” choose what data you wish to be copied.
Finally, launch Backup add-on again and choose “Backup” to copy settings to the remote path.
45

A G U I D E T O C U S T O M I Z I N G K O D I 1 5 I S E N G A R D
What's Next?
46
Click Here to Get Started >
Over 25,000 amazing HTPC hobbyists are receiving my
email course.