kitchen and bath design tutorial - chief architect … cabinets 1 chapter 5: kitchen and bath design...
TRANSCRIPT

Adding Cabinets
1
Chapter 5:
Kitchen and BathDesign Tutorial
This tutorial continues where the Materials Tutorial left off. You should save this tutorial using a new name to archive your previous work.
The tools and techniques used to design kitchens and bathrooms are very similar. This tutorial focuses on kitchen design. When you’re finished you can use what you’ve learned to finish up the bathrooms as well. In this tutorial you will learn about: • Adding Cabinets• Placing Appliances• Editing Cabinets and Appliances
• Creating a Cabinet Island• Editing Cabinets and Appliances• Working in 3D Views
Adding CabinetsBegin by selecting File> Save As , and name the plan BeachHouse - Kitchen Bath Tutorial.
To place a base cabinet
1. Zoom in on the Kitchen area in floor plan view.
2. Select Build> Cabinet> Base Cabinet .3. Click to place a base cabinet anywhere in the kitchen.
Users Guide.book Page 1 Wednesday, May 28, 2014 12:07 PM

2
Home Designer Suite 2015 User’s Guide
Once a cabinet is placed, it can be edited like other objects.
To select and edit a cabinet1. Cabinets can be selected using one of the following methods.
• Click on the cabinet while the Select Objects tool is active.
• Click on the cabinet while any of the Cabinet Tools are active. • Right-click on the cabinet when another tool is active.
2. When the cabinet is selected, edit handles, a front indicator, and a temporary dimension display. As with other objects, the arrow that displays when the pointer is held over an edit handle indicates what edit function that edit handle will perform. See “Editing Box-Based Objects” on page 98 of the Reference Manual.
• Move a cabinet using the Move edit handle. By default, you can move a cabinet parallel to its sides or its front and back edges. To allow unrestricted movement, hold down the Ctrl key or click and drag using the right mouse button.
• Resize two sides of a cabinet using a Resize edit handle, located in each corner. • Extend a cabinet’s edge on one side using an Extend edit handle. • Rotate a cabinet using the Rotate edit handle, which is always offset to one side.• A temporary dimension updates as the cabinet is moved or resized.
3. When a cabinet is selected, you can also click the Open Object edit button to open its specification dialog and make a wide variety of changes to the cabinet. For more information, see “Cabinet Specification Dialog” on page 280 of the Reference Manual.
To lay out base cabinets for this tutorial1. Place and position six base cabinets and edit their widths as shown in the following image:
Resize edit handles
Rotate edit handle
Move edit handle
Front indicator
Extend edit handle
Users Guide.book Page 2 Wednesday, May 28, 2014 12:07 PM

Adding Cabinets
3
• Two of the cabinets are 36", two are 24" wide, one is 33" and one is 27" wide.• A cabinet snaps to another if they are in alignment, facing the same direction, and of
the same type.
To create corner cabinets 1. Select the 36" wide base cabinet on the left.
2. Click the Open Object edit button to open the Base Cabinet Specification dialog. On the General panel:
• Specify a Width greater than the Depth. The selected cabinet’s width should already have been changed to 36", which works well with a 24" depth. If it isn’t, change it to 36" now.
• Click the Special drop-down list and select "Corner". • On the Front panel, uncheck the box beside Diagonal Door. • Click OK to change the cabinet into a corner cabinet.
Note: The display of cabinet module lines has been turned on in the followingimages. See “Displaying Cabinets” on page 276 of the Reference Manual formore information.
Users Guide.book Page 3 Wednesday, May 28, 2014 12:07 PM

4
Home Designer Suite 2015 User’s Guide
3. With the cabinet still selected, use its Rotate edit handle to rotate it so its back faces the wall corner if necessary.
4. A different approach can be used to create a corner cabinet in the right corner. Begin by
selecting the cabinet on the right and pressing the Delete key or clicking the Delete edit button.
5. Select Build> Cabinet> Base Cabinet , then move your mouse pointer into the corner. When the cabinet preview changes to a corner cabinet, click once.
6. Uncheck Diagonal Door for this new cabinet as described in step #2, above.
To place wall cabinets
1. Select Build> Cabinet> Wall Cabinet .2. Click above the left corner base cabinet to place a wall cabinet as shown.
To move a row of cabinets, select one cabinet, then click and drag the Moveedit handle towards the other cabinets. The selected cabinet will push theothers. See “Bumping/Pushing” on page 106 of the Reference Manual.
Users Guide.book Page 4 Wednesday, May 28, 2014 12:07 PM

Adding Cabinets
5
3. Click the Open Object edit button to open the Wall Cabinet Specification dialog:• On the General panel, specify a Width of 33".• On the Door/Drawer panel, change the Door Style to "Framed", and check the box
beside Glass Doors.• Click OK to apply these changes to the wall cabinet.
4. With the wall cabinet still selected:
• Click the Copy/Paste edit button.• Click near the opposite wall to place a second wall cabinet identical to the first.
• With the new cabinet still selected, click the Center Object edit button.• Move your mouse pointer over the original wall cabinet so that it becomes
highlighted.• When you see a dashed horizontal line running through the original wall cabinet, click
once. The dashed line is a centering axis, and the new cabinet will become aligned with the original.
With the wall cabinets in place, you may want to add soffits to enclose the space between them and the ceiling.
Note: The display of cabinet face indicator lines has been turned on in the follow-ing images. See “Displaying Cabinets” on page 276 of the Reference Manual formore information.
Users Guide.book Page 5 Wednesday, May 28, 2014 12:07 PM

6
Home Designer Suite 2015 User’s Guide
To place soffits
1. Select Build> Cabinet> Soffit then click above the wall cabinets to place soffits.2. Adjust their width and orientation to match the wall cabinets below.
For more information about cabinets, see “Cabinets” on page 271 of the Reference Manual.
Placing AppliancesAppliances come in two basic varieties, freestanding and built-in. For more information about library objects such as appliances, see “The Library” on page 341 of the Reference Manual.
To place a freestanding appliance
1. Select View> Library Browser to open the Library Browser.2. In the Core Catalog, browse to Architectural> Appliances> Refrigerators, locate a
refrigerator, and select it for placement.3. On the left side of the kitchen, click in the empty space below the base corner cabinet to
place the refrigerator.
When objects are very close to one another or occupy the same verticalspace in floor plan view, it may be difficult to select the intended object. You
can select an objects, then click the Select Next Object edit button or pressthe Tab key to select a neighboring object. The Status Bar indicates which objectis currently selected.
Users Guide.book Page 6 Wednesday, May 28, 2014 12:07 PM
Editing Cabinets and Appliances
7
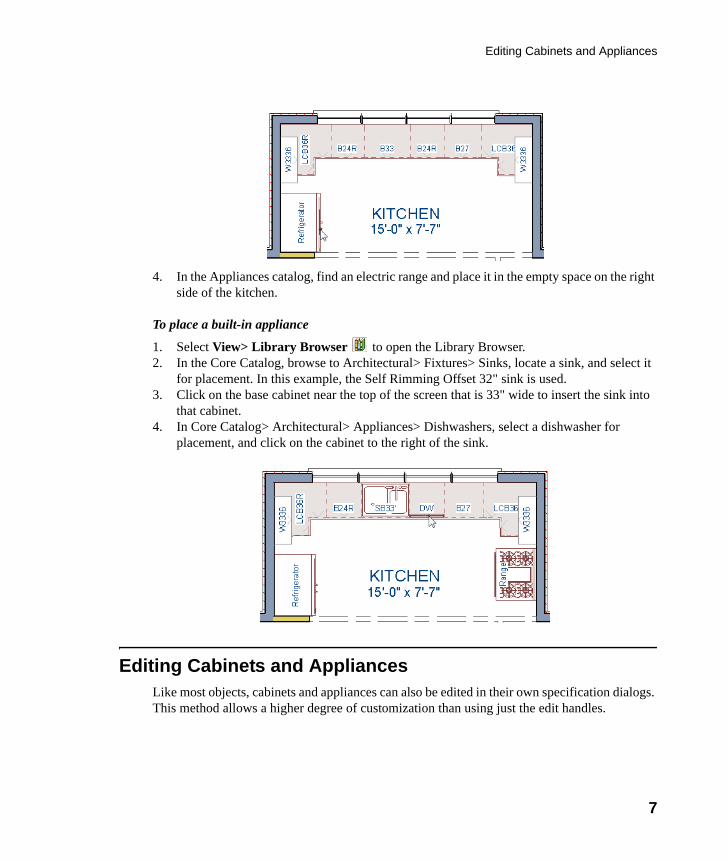
4. In the Appliances catalog, find an electric range and place it in the empty space on the right side of the kitchen.
To place a built-in appliance
1. Select View> Library Browser to open the Library Browser.2. In the Core Catalog, browse to Architectural> Fixtures> Sinks, locate a sink, and select it
for placement. In this example, the Self Rimming Offset 32" sink is used.3. Click on the base cabinet near the top of the screen that is 33" wide to insert the sink into
that cabinet.4. In Core Catalog> Architectural> Appliances> Dishwashers, select a dishwasher for
placement, and click on the cabinet to the right of the sink.
Editing Cabinets and AppliancesLike most objects, cabinets and appliances can also be edited in their own specification dialogs. This method allows a higher degree of customization than using just the edit handles.
Users Guide.book Page 7 Wednesday, May 28, 2014 12:07 PM

8
Home Designer Suite 2015 User’s Guide
To edit cabinets in the Cabinet Specification dialog
1. Select the cabinet to the left of the sink and click the Open Object edit button to open the Base Cabinet Specification dialog.
2. Click on the drawer in the preview image on the right side of the dialog. Notice that clicking anywhere on the preview takes you to the Front panel.
3. Click the Add New button to open the New Cabinet Face Item dialog.
4. Click the Item Type drop-down list and select Cutting Board, assign an Item Height of 1 inch, and click OK to return to the Cabinet Specification dialog.
5. A new Cutting Board face item, as well as a new Separation, will be added below the drawer that you selected.
6. Click on the Cutting Board in the preview, then click the Move Up button three times to move the cutting board above the drawer.
7. Select the Separation and click the Move Up button three times, as well.8. Click OK to close the Base Cabinet Specification dialog.
These steps can be used to create a wide variety of cabinet front configurations, such as a bank of drawers.
To edit appliances in the Fixture Specification dialog
1. Select the refrigerator and click the Open Object edit button to open the Fixture Specification dialog.
2. On the General panel, change the Depth to 28 and click OK.
Finally, add some narrow base cabinets to fill in the gaps beside the appliances. You can also add a wall cabinet and soffit above the range.
Users Guide.book Page 8 Wednesday, May 28, 2014 12:07 PM

Creating a Cabinet Island
9
Creating a Cabinet Island
To create a cabinet island
1. Select Build> Cabinet> Base Cabinet .2. Click to place a base cabinet in the kitchen area, and select it.
3. Click the Open Object edit button to open the Base Cabinet Specification dialog.• On the General panel, specify a Width of 33" and a Depth of 27".• On the Front panel, create three Double Drawers with an Item Height of 8 1/2".
• On the Door/Drawer panel, set the Drawer Handle to Knob.• Click OK to close the dialog and apply your changes.
Users Guide.book Page 9 Wednesday, May 28, 2014 12:07 PM

10
Home Designer Suite 2015 User’s Guide
4. With the Base Cabinet still selected, click the Copy/Paste edit button, then • Click and drag the Move edit handle downward on screen until the preview outline
snaps directly below the existing cabinet. • Release the mouse button to create a copy of the original cabinet, as in the image
below:
For the next portion of this tutorial, the display of cabinet labels is turned off. To do this, select
Tools> Display Options . In the Display Options dialog, locate the "Cabinets, Labels" layer, remove the checkmark in the Disp column, and click OK.
Next a countertop for a breakfast bar can be created using a specially edited base cabinet.
To place a cabinet that will become a countertop
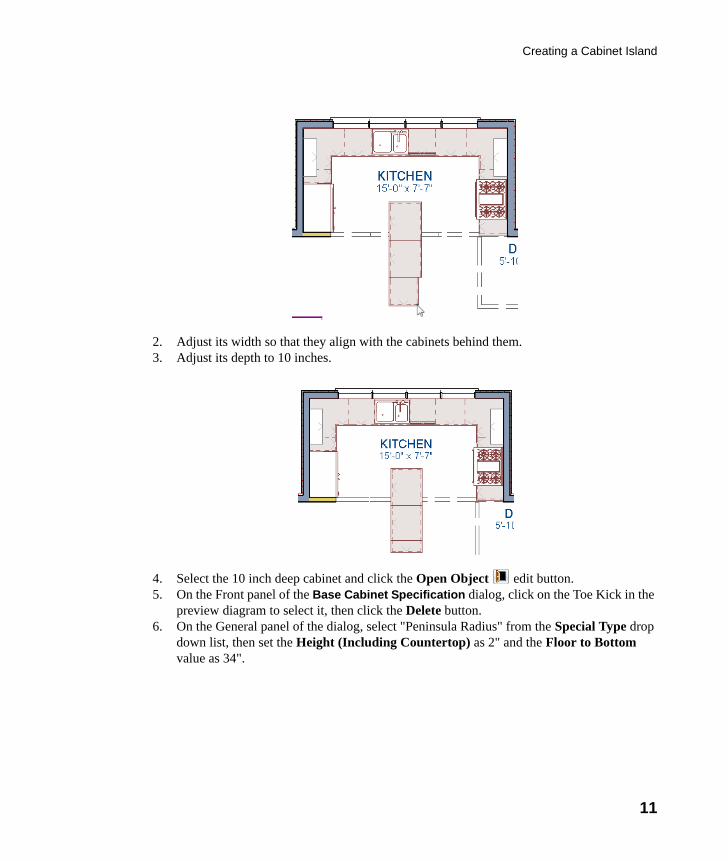
1. In floor plan view, place a Base Cabinets and orient it so that its back is to the side of the lower base cabinet, near the dining room.
Users Guide.book Page 10 Wednesday, May 28, 2014 12:07 PM
Creating a Cabinet Island
11
2. Adjust its width so that they align with the cabinets behind them.3. Adjust its depth to 10 inches.
4. Select the 10 inch deep cabinet and click the Open Object edit button. 5. On the Front panel of the Base Cabinet Specification dialog, click on the Toe Kick in the
preview diagram to select it, then click the Delete button.6. On the General panel of the dialog, select "Peninsula Radius" from the Special Type drop
down list, then set the Height (Including Countertop) as 2" and the Floor to Bottom value as 34".
Users Guide.book Page 11 Wednesday, May 28, 2014 12:07 PM

12
Home Designer Suite 2015 User’s Guide
7. Press the Tab key and notice that the preview image on the right side of the dialog updates to show a countertop with a narrow band of cabinet material beneath it, then click OK.
8. Create a Camera view to see the results.
Users Guide.book Page 12 Wednesday, May 28, 2014 12:07 PM

Working in 3D Views
13
Working in 3D ViewsLike other objects, cabinets can be edited in 3D views. This method of editing is very powerful and allows objects to be edited easily in vertical space. Next we’ll edit wall cabinets and add a range hood. For more information about working in 3D views, see “Working in 3D” on page 394 of the Reference Manual.
To create a 3D view
1. Select 3D> Create Camera View> Full Camera , then click and drag a camera arrow towards the group of cabinets that includes the electric range.
2. Zoom in on the kitchen.
To edit the cabinets in a 3D view
1. Click the Select Objects button, then click on the wall cabinet above the range, which should have double doors and be slightly wider than the base cabinet below it.
2. Click on the cabinet’s bottom edit handle and drag it upwards.
Users Guide.book Page 13 Wednesday, May 28, 2014 12:07 PM

14
Home Designer Suite 2015 User’s Guide
3. When the temporary dimension indicates that the cabinet height is 18 inches, release the mouse button.
To place a range hood1. Find a range hood in the Fixtures catalog and select it for placement.2. Click above the range to place the hood.3. If necessary, you can adjust its position and size using its edit handles.
Finishing TouchesA wide variety of furniture, accessories, and other items is available in the Library Browser at Core Catalogs> Interiors, which you can use to furnish this and other plans.
To view our kitchen using the Cross Section Slider and Final View
1. In floor plan view, click Fill Window .
Users Guide.book Page 14 Wednesday, May 28, 2014 12:07 PM

Working in 3D Views
15
2. Create a Full Camera view that starts from the exterior and release the mouse button in the kitchen. See “To create a camera view” on page 38.
3. Use the Mouse-Orbit Camera tool to adjust the camera’s perspective. If you want, you can turn off the display of the backdrop in the 3D Backdrop dialog. For more information, see “Backdrop Dialog” on page 382 of the Reference Manual.
4. Select 3D> Cross Section Slider to open the Cross Section Slider dialog.
5. Select the flat cut line and use the Position slider to specify the location of the cutting plane. See “Cross Section Slider” on page 393 of the Reference Manual.
6. Select 3D> Final View to create a higher quality final view.
7. Be sure to Save your work.
If you would like, you can continue working on this plan in the Landscaping Tutorial.
Users Guide.book Page 15 Wednesday, May 28, 2014 12:07 PM