keeping moving - exercise and parkinson's booklet...
TRANSCRIPT

Exercise and Parkinson’sKeeping Moving

About the Parkinson’s Disease SocietyThe Parkinson’s Disease Society (PDS) works with people with Parkinson’s, their carers, families and friends, and health and social care professionals to provide support, information and advice. We are committed to investing in research, education and campaigning to improve the lives of people affected by the condition. The PDS has over 30,000 members, and more than 330 branches, support groups and special interest groups throughout the UK.
For more details on the friendly support, relevant information and expert advice that becoming a member can provide, including details of our membership magazine, The Parkinson, please call 020 7932 1344 or email [email protected]
Parkinson’s Disease Society215 Vauxhall Bridge RoadLondon SW1V 1EJHelpline: 0808 800 0303 Text Relay: 18001 0808 800 0303 (for textphone users only). (The Helpline is a confidential service.Calls are free from UK landlines and some mobile networks.)Email: [email protected]
Keeping Moving

Exercise and Parkinson’sby Richard Webber and Bhanu Ramaswamy
Keeping Moving

AcknowledgementsThe PDS would like to thank Richard Webber and Bhanu Ramaswamy for their help with this booklet and the accompanying dvd.
We would also like to that all the participants of the PDS Sheffield Branch exercise class held at the Burton Street Project, particularly the models for the photographs and those who demonstrated the exercises on the dvd – Christine Ashmore, Roger Davis, Ray Fisher, George Graves, Alf Maddock, Doreen Marsden, Eric Shipley, Harry Wall, Denise Webster and Pauline Womersley.
Thank you to Roger Davis for taking the photos used in this booklet.

Contents
6 General information
9 Personal experiences
13 Getting on and off the floor
17 Relaxation
20 Exercises in lying position
32 Exercises in sitting position
36 Exercises in standing position
48 Finishing the exercises: a few last words

6
General informationParkinson’s is a progressive condition that can result in the loss of smooth and controlled movement of your muscles and joints, as well as causing problems in maintaining a good posture, and with balance, general mobility and confidence. This can limit some activities of daily living. The positive benefits of following a regular exercise regime include maintaining your abilities, strengthening your muscles, increasing mobility in your joints and building up your general fitness and health. This will improve your capability to keep independent for as long as possible. Exercise is also very good for your general wellbeing and mood.
The exercises in this booklet were designed for a class that was supervised by physiotherapists. As with all forms of exercise when you have Parkinson’s, you should consult your GP first to ensure your ability to undertake the programme. If you are confused by any of the exercises, try to contact a chartered physiotherapist for advice. Referral is usually through your GP or hospital doctor (See the PDS information sheet Physiotherapy (code FS42). If you are already working with a physiotherapist, you may find it helpful to discuss these exercises with them.
The purpose of these exercises is primarily to work on your posture and balance by improving the connection between your mind and your body when you move. The emphasis is on rotational movements (as used in activities such as turning in bed, looking around, walking etc) and on keeping your posture erect during activities so that you are better balanced when you move.
What you need for this exercise programmeExercises in lying position – floor mat and pillows (floor mats can be obtained from sports shops) Exercises in sitting position – chair

7
Exercises in standing position – just ensure that you have enough space to swing your arms around and a chair behind you if you have problems with balance or low blood pressure.
Loose-fitting clothes are recommended and we suggest that women may prefer to wear trousers rather than a skirt for ease of movement. For the best results, do the exercises in bare feet. If you find it difficult getting your shoes on and off, you can do the exercises in a comfortable pair of shoes.
Doing the exercisesThe exercises start off simply (in the lying position), and involve only one part of your body. This allows you to concentrate initially on that part of your body, controlling the movement in as slow and co-ordinated a manner as you can manage. They progress to more complex exercises, going from sitting up into standing, thus demanding more concentration, flexibility, balance and co-ordination, while controlling your posture.
When you do the exercises for the first time, you may find it helpful to have another person with you, in case you feel unsteady, need the exercises to be read out to you or would just like someone to keep you company while you do the exercises!
BreathingWhen an exercise involves movement co-ordinated with breathing, remember not to carry the movement out when breathing in. First breathe out slowly, and then on the breath in, think about the movement you are about to perform and mentally prepare for it. Breathe out again slowly and, as you do so, perform the actual movement required by the exercise.
If you can, take the breath in through your nose, making it slow enough as to fill the bottom of your lungs, so that you feel your rib cage gently pushing out to the side. As you breathe out, let

8
the breath out slowly through your mouth. Never force the breath in or out, and keep your shoulders as relaxed as possible, otherwise you just add tension to the movement, making it less smooth and controlled. Try to use the relaxation part of the programme to practice your breathing.
Further advice on breathing and problems with facial expression can be obtained from a speech and language therapist. See the PDS information sheet Speech and Language Therapy (code FS07). All of the exercises can be adapted. For instance, if you cannot get onto the floor, do the lying exercises on your bed. If you cannot stand for an exercise, do them while sitting up straight in a chair, but don’t lean against the chair back. You may wish to perform some of the standing exercises while holding onto a chair or rail for your own safety.
On the whole, the exercise programme should take about an hour and is best done at a time of day when your medication is working fully and you feel at your best. It has proved to be of most benefit to those in the earlier stages of Parkinson’s, although anyone can try the exercises. We recommend watching the dvd through once before attempting the exercises. This will help you to familiarise yourself with them first.
However, always be sensible when you carry out an exercise, and be aware of your own limitations. If you are doing the exercises without the accompanying dvd, you may find it helpful when you first try this programme to have someone with you to read the instructions while you are performing them.
Remember that your condition may alter if you are tired, if your Parkinson’s becomes more pronounced or if your medications are changed. If you have any concerns at all about continuing with the exercise programme, please consult your GP, especially if you are experiencing symptoms such as dizziness or a low blood pressure.
9
Personal experiencesDenise Webster and Roger Davis, who appear in the dvd that accompanies this booklet, share their personal experiences of exercise and how it helps them cope with their Parkinson’s.
Denise Webster I’ve always been interested in exercise and am a great believer in its benefits – both physical and psychological. I was a competitive swimmer for many years and as a teenager reached several national finals.
At the time of my diagnosis, I was working part-time and my employers of 20 years very kindly arranged for me to see a neuro-physiotherapist. This was to be my introduction to physiotherapy and specialist exercising.
The exercises we use in the dvd have made me aware of my gait, posture and balance. I have now been exercising regularly for six years and am convinced that my symptoms are not as obvious and that the progression of my Parkinson’s is slower than some who have been diagnosed more recently and have not taken up the exercises.
Initially, the exercises appear very subtle. I can recall at my first session, feeling a little disappointed because I was never even slightly out of breath, let alone ‘feeling the burn’! However, as I left at the end of the class, I knew I was walking better and felt less stiff.
I think that if you can do the exercises with someone else, it is more enjoyable. They may also notice if you are not doing them correctly. It need not necessarily be someone with Parkinson’s, as I feel anyone can benefit from doing them.
One suggestion I would make to anyone doing the exercises on their own is to try to have a large mirror in view. Quite often, the reflection in the mirror is quite different to the way you think you

10
are doing the movement. Personally, I have a tendency to lean backwards or raise my shoulders.
My personal favourite is the relaxation part of the session. I find this to be particularly beneficial and enjoyable. As a wife and mum of two teenage sons, it’s nice to take time out and concentrate on specific areas of the body, while listening to soothing background music. I find it releases tension in my body that I am often not conscious of before the session.
Obviously some days/hours are better than others and, likewise, motivation and energy levels fluctuate. I am not super-human but I keep in mind the long-term benefits of doing the exercises and try to do something every day.
On watching the dvd, it may appear we were not enjoying ourselves. However, on the day of the recording, we felt responsible for getting an important message across and were being very careful not to catch anyone’s eye, especially Bhanu’s as, like me, she is one of the world’s great gigglers! We were in artificial surroundings and we were there to do a demonstration for the dvd. The exercises classes are fun as well as beneficial and we always have a laugh.
At the moment, there is no cure for Parkinson’s but I feel we can slow down its progression and alleviate its symptoms with ever improving medical advances, correct exercise and postural awareness.

11
Roger Davis Respect for the head of the family, particularly at the dining table, went out of the window long ago – certainly more than a decade and a few odd years past. It had been something of a longstanding joke for everyone in the house (except me, that is) to say with monotonous regularity, “Dad’s teeth are clattering again” whenever my teacup made contact with my glasses.
Actual diagnosis of Parkinson’s did not bring any immediate problems in its wake and I still enjoyed regular high walks in the Peak District. But I was gradually forced to admit that tall stiles in stone walls, and others enjoying a touching familiarity with rusty barbed wire, rotting wooden posts and stinging nettles were no longer for me.
The realisation that I had a never-tiring and ever-watchful companion in Parkinson’s came on a hot afternoon in a pool on the Costa del Sol when my daughter (yes, one of those who at one time giggled at my clattering teeth) grabbed a panicking waving arm when I was one stroke from the side.
One stroke? It could have been the width of the Atlantic Ocean for all I knew when the old brain cells failed to pass certain vital messages to my muscles.
A useful spell of hydrotherapy followed and I later enjoyed physiotherapy sessions lying on a blanket and a thin gym mat on the floor of an old Victorian school hall in the Burton Street area of Sheffield. The same premises where scenes from The Full Monty had been filmed!
The reason for this possibly masochistic form of activity was to gain the benefit of a remarkable relaxation and exercise programme presented in their spare time by two young physiotherapists, Richard Webber and Bhanu Ramaswamy.
12
They can win you over with a smile or call you to order with a look or a word that an army drill sergeant could well use to control a group of rebellious squaddies.
I find that the discipline is necessary to keep the body working in reasonable order, as it can be difficult to maintain without the knowledge that the duo will soon be watching you again.
They are certainly helping me to keep my wide range of interests going. I still write on local activities, help with the British Legion’s Poppy Day appeals by visiting my old office and collecting as much as £148 in a morning. I am editorial contributor to the newsletter of the Sheffield Branch of the Royal Artillery Association, actively support a local scout group, recently formed a daytime pensioners’ leisure club, can still enjoy a few hours of basic gardening and belong to the South Yorkshire Badger Group and the British Hedgehog Society.
At 71, I can still take reasonable photographs and those printed in this booklet are my own work, with some taken at floor level.
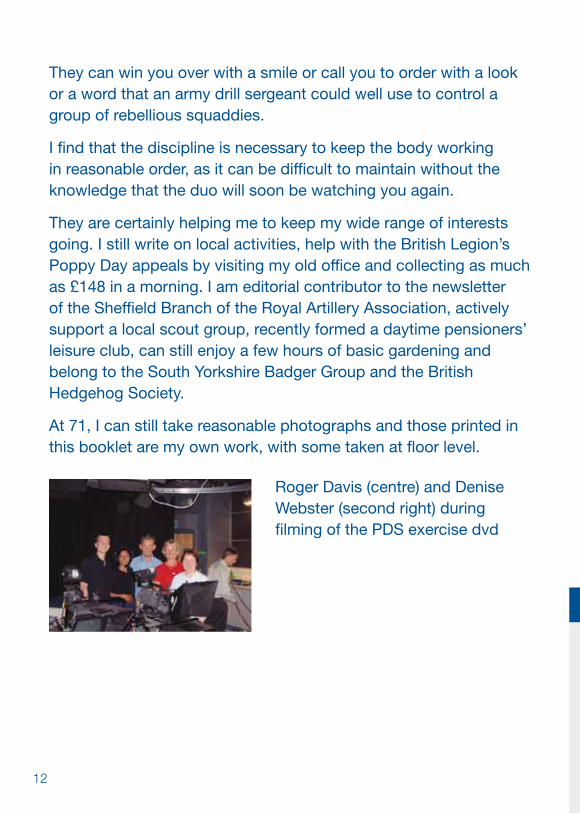
Roger Davis (centre) and Denise Webster (second right) during filming of the PDS exercise dvd
Points to remember
• Before you attempt to get on to the floor, don’t forget to have a pillow (or two) and a blanket by the mat or space where you are going to exercise as some people find that they like to be warm for the relaxation part.
• Following the relaxation and floor exercises, remember to get off the floor slowly, as you might be a little dizzy.
Getting on and off the floorThe first part of this programme starts with floor exercises. Some people may experience problems getting down onto the floor, up off the floor, or both!
Remember that you should not attempt to get on and off the floor if you have severe arthritis, unsteadiness and pain, or an unstable or new (within the last six months) knee/hip replacement.
Most people have their own tried and tested method of getting on and off the floor, but one method recommended by physiotherapists is the ‘backward chaining’ method. It is called this because the sequence of getting onto the floor is broken down into a series of tasks, and you begin to train in this method by learning the last task in the series first. As this step is mastered, you proceed to the next task, and so on until the entire sequence can be performed. (See pages 14–16 for details.)
Don’t worry if it takes you a few attempts to master one task, some people have taken up to two weeks to get through the whole procedure. If you are trying this for the first time, we would suggest that you have someone with you. If you have no one around to ensure your safety and you are worried about getting on and off the floor, be sensible. You might be better off doing the exercises on a firm bed, or even while sitting in a chair.
13

14
1 The first step is to make sure you can get onto and off one knee. If you have one, it is best to lower your weakest leg down to the floor first, as your arms and stronger leg will hold up your weight. Before you proceed to the next step, make sure you can get back up from this position.
2 Take this a step further and now make sure that you can get down onto one knee, and then onto two. Again, make sure you can get back up from this position before you continue.
1
2

15
3 Once kneeling, proceed to walk backwards on your knees until your arms are both on the floor, as if ready to crawl. If you are happy that your arms will bear your weight, go onto the next part. Otherwise get back up onto the chair and rest.
4 Once in the crawling position, move backwards to the place you are going to lie down, ensuring you have space enough to stretch your arms and legs out fully.
3
4

16
5 Now lower yourself slowly down onto one hip. It may stretch a little, but so long as it is not painful, carry on, making sure that you can get up from this position before you proceed to the last part.
6 And finally, lower yourself down fully, roll over onto your back and make yourself comfortable, ready to start the programme.
5
6

17
RelaxationWe use relaxation for many reasons and for this exercise programme, the purpose is to get you in the right mind for the exercises. To start with, we need to stop the mind from thinking about what chores still need doing in the house and to focus in on how our bodies are feeling. Thinking about your breathing helps the body and mind to relax so we shall start and finish with that. The relaxation part should take about five minutes in total, but on some days, it may take a little longer to settle your body.
Starting position: Start by lying on your back with your knees bent and your feet flat on the floor about hip-width apart. Rest your arms down by your side, with your hands on the mat or resting lightly on your belly. Have enough pillows behind your head so that you are as flat as you can go without being uncomfortable or having to tilt your head backwards (you should be looking straight up to the ceiling).
Relaxation position

18
Instructions 1 Begin by breathing in and out slowly.
2 As you breathe in, notice how your ribcage is pushed out to the side. Neither your shoulders, nor the top half of your chest should expand.
3 As you breathe out allow your whole body to sink further into the mat and pillow.
We recommend that you do this for two minutes, taking four to five breaths to release each body part in turn, starting from the feet upwards as follows.
Feet: Allow them to sink into the ground as though they were resting on sand.
Legs: Allow your hips to sink into your pelvis and imagine that your knees are supported by a bar and that the bar is taking all the weight of the legs.
Bottom: Allow your bottom to sink further into the mat with each out breath.
Back: Let your back sink into the mat and become longer with each out breath.
Shoulders: Allow your chest to open wider with each out breath. Feel the tension release from your shoulders and arms, allowing them to rest on the mat.
Head: Allow your head to sink further into the mat with each out breath, letting your neck become longer and stretching your whole spine away from the pelvis. (You should feel at least two inches longer by the time you finish!)
Face: Your brow should become wide and free of furrows. Let your jaw relax and your tongue rest in the back of your mouth.

19
Toes and fingers: Relax your toes and fingers making sure the soles of your feet are flat on the floor, and your hands are resting palm faced downwards, either across your stomach or beside you on the mat.
Breathing: once your body is relaxed, continue to focus on the breathing to allow the mind to relax as well. Your breaths should naturally become a little slower and feel a little deeper, but take care not to force the air in or out.
As you breathe in, try to visualise your lungs filling with air, and as you breathe out, feel yourself sinking further into the mat and pillow.
A speech and language therapist can advise further on breathing. See the information sheet Speech and Language Therapy (FS07).
Some people may worry that they will find the relaxation exercises so relaxing that they fall asleep. Please do not worry if this happens, but do try to stay alert to concentrate and get the most out of this programme.
20
Exercises in lying positionNeck rolls The neck muscles play an important role in telling the mind what position the head is in and whether it is in line with the rest of the body. The head will often dictate how the rest of your body should move. It can only do this properly if it is able to move freely. This exercise will help release tension around the shoulders and neck, helping the head to move more freely during other movements. Throughout this exercise, focus on keeping your neck long and your head relaxed. At no time allow your head to lift off the pillow or your neck to kink. Try not to force the muscles to stretch by effort. Let them lengthen as gravity takes the head further to one side. The rest of your body, especially the shoulders, should remain relaxed and still.
Starting position: Lie on your back with knees bent up and feet flat on the floor a few inches apart. Allow your arm to rest with your palms facing downwards on the floor beside you.
Instructions 1 Take a slow breath in.
2 As you breathe out, allow your head to roll to the left.
3 Take a slow breath in while you think about the muscles on the right of your neck lengthening.
4 As you breathe out, allow your head to roll over to the right side.
5 Take a slow breath in while you think about the muscles on the left of your neck lengthening.
6 Repeat five times on each side, allowing the head to roll a little further each time.
7 At the end of the exercise, make sure that your head is fully relaxed on the pillow, looking up towards the ceiling.

21
Pelvic tilt This exercise will help to increase the range and smoothness of movement in the pelvis and the lumbar region, an area that becomes particularly stiff in people with Parkinson’s. Our centre of gravity, or balance point, lies within this area. Improved smooth movement at the pelvis can therefore help with the maintenance of a better posture, with balance and other activities requiring the transfer of weight, such as sitting to standing, walking and dancing.
Starting position: Lie on your back with knees bent up and feet flat on the floor a few inches apart. Place your hands palm down on the floor beside you.
Instructions 1 Take a long slow breath in.
2 As you breathe out, begin to tilt the pelvis towards you, lifting your bottom slightly off the mat. The movement should cause your back to be pushed further into the mat as you move.
3 Continue to curl your spine up, one segment at a time, lifting it off the mat. Focus on the curling of the spine, not the lifting of it.
4 When you have gone as far as you can manage, hold this position while you take a long slow breath in.
5 As you breathe out, allow the spine to uncurl and rest back down on the mat one segment at a time. The last thing to touch back down should be your bottom.
6 Continue the movement by tilting the pelvis away from you and arching the back without lifting your bottom off the mat.
7 At the end of the movement, take a long slow breath in.
8 Do this exercise for at least two minutes. Remember to not force the movement but to allow it to happen smoothly with the mind focused and relaxed.

22
The next three exercises help you to develop control of the trunk muscles by focusing on a simple movement while keeping the rest of your body still. The abdominal muscles around the trunk act as a stable base from which movements of the limbs can occur without disturbing balance or posture. Your focus should be on not allowing your pelvis to tip to the side of the moving leg, as described in each exercise. Therefore, only move each leg as far as you can without the pelvis or other leg moving. If you are very stiff, you may find your other leg is pulled over too, so concentrate hard on keeping this in the starting position during the exercise.
Knee opening Starting position: Lie on your back with knees bent up and feet flat on the floor a few inches apart. Place your hands palm down on the floor beside you.
Instructions 1 Take a long slow breath in to prepare for the exercise.
2 As you breathe out, tighten your tummy muscles slightly and allow your left knee to drop out to the side. The right leg should not move.
3 At the end of the movement take a long slow breath in.
4 As you breathe out, bring your left knee back up to the starting position.
5 Take a long slow breath in.
6 As you breathe out, tighten your tummy muscles slightly and allow your right knee to drop out to the side.
7 At the end of the movement take a long slow breath in and, on the breath out, bring your right knee back up to the starting position.
8 Do this exercise for about two minutes.

23
Knee opening

24
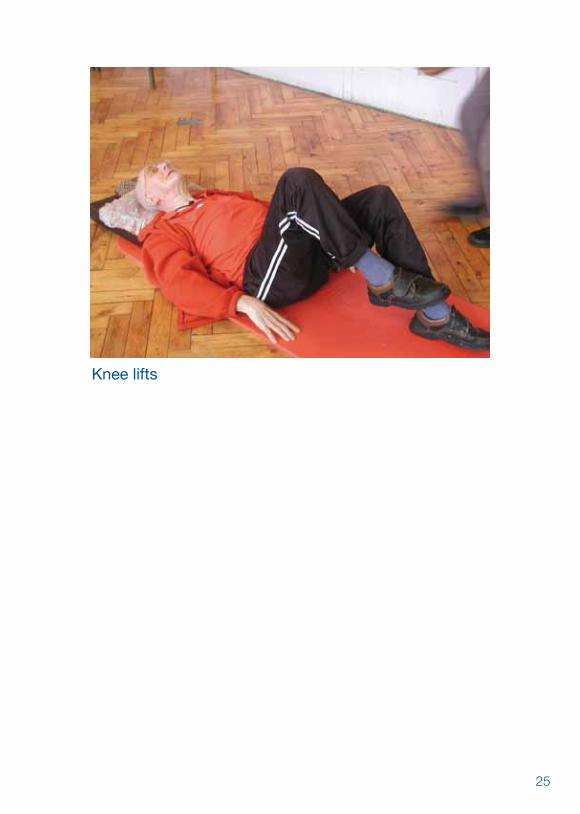
Knee lifts This second exercise is a little harder than the first one, as you are now lifting one leg off the floor, demanding more control from your trunk. Again, your focus should be on not allowing your pelvis to be drawn into the movement of the knee. Therefore, only move your knee as far as you can up toward your chest without movement occurring elsewhere.
Starting position: Lie on your back with knees bent up and feet flat on the floor a few inches apart. Place your hands palm down on the floor beside you.
Instructions 1 Take a long slow breath in.
2 As you breathe out, tighten your tummy muscles slightly and lift your right foot off the floor, bringing your knee up towards your chest.
3 At the end of the movement, take a long slow breath in.
4 As you breathe, out bring your knee back down.
5 Take a long slow breath in.
6 As you breathe out, tighten your tummy muscles slightly and lift your left foot off the floor and bring your left knee up towards your chest.
7 At the end of the movement, take a long slow breath in.
8 Do this exercise for about two minutes.
25
Knee lifts
26
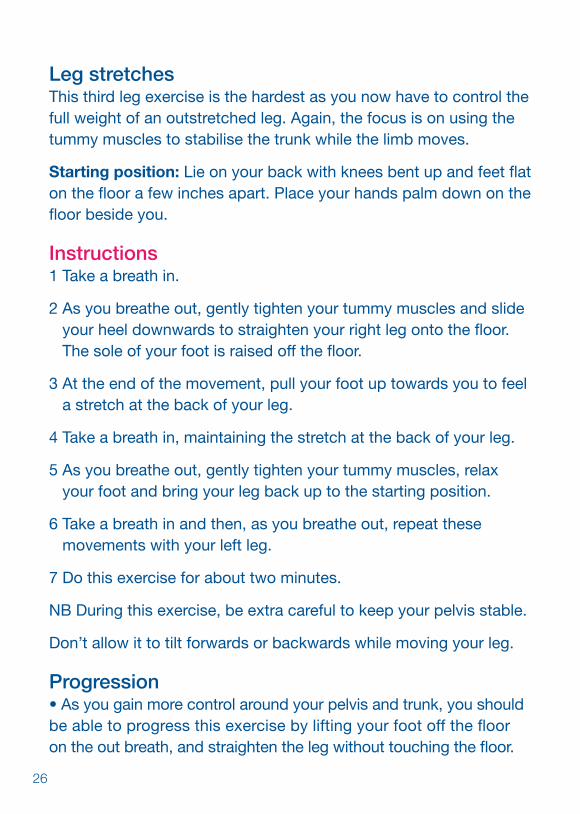
Leg stretches This third leg exercise is the hardest as you now have to control the full weight of an outstretched leg. Again, the focus is on using the tummy muscles to stabilise the trunk while the limb moves.
Starting position: Lie on your back with knees bent up and feet flat on the floor a few inches apart. Place your hands palm down on the floor beside you.
Instructions 1 Take a breath in.
2 As you breathe out, gently tighten your tummy muscles and slide your heel downwards to straighten your right leg onto the floor. The sole of your foot is raised off the floor.
3 At the end of the movement, pull your foot up towards you to feel a stretch at the back of your leg.
4 Take a breath in, maintaining the stretch at the back of your leg.
5 As you breathe out, gently tighten your tummy muscles, relax your foot and bring your leg back up to the starting position.
6 Take a breath in and then, as you breathe out, repeat these movements with your left leg.
7 Do this exercise for about two minutes.
NB During this exercise, be extra careful to keep your pelvis stable.
Don’t allow it to tilt forwards or backwards while moving your leg.
Progression • As you gain more control around your pelvis and trunk, you should be able to progress this exercise by lifting your foot off the floor on the out breath, and straighten the leg without touching the floor.

27
Leg stretches

28
Arm reaching Over time, the upper spine becomes more flexed, the shoulders rounded and forwards and the chest closed in. The purpose of this exercise is to reverse the process by stretching out the chest and retraining the muscles that help control posture in this area.
Starting position: Lie on your back with knees bent up and feet flat on the floor a few inches apart. Arms are by your side with elbows on the floor. Raise the forearms so that the elbows are bent to 90°, your fingers point at the ceiling and your palms face each other.
Instructions 1 Take a long, slow breath in.
2 As you breathe out, stretch up to the ceiling with your left hand straightening your arm, allowing your shoulder blade to come around the chest wall and your shoulder to come off the mat.
3 Do not allow your shoulder to hunch up towards the ear.
4 At the end of the movement, take a long, slow breath in.
5 As you breathe out, allow your shoulder to drop down onto the mat opening up your chest.
6 When your shoulder is down, allow the rest of your arm to return to the starting position.
7 Take a breath in and, as you breathe out, repeat the movement with your right arm.
8 Each time your shoulder drops back down, focus on the feeling of openness and increased width across the chest.
9 Repeat this exercise for about two minutes.

29
Arm reaching

30
Arm and leg stretch This exercise is a little more complex as it combines two body parts. Parkinson’s affects a part of the brain that deals with managing more than one thing at a time. For this reason, you may find yourself getting confused during this exercise and having to concentrate very hard to get the pattern of movement. Please persevere as we have found that, with practice, people do get better at it. Hopefully, by practising this exercise, you will improve the brain’s ability to do more than one thing at a time. It also helps stretch out the body and strengthens trunk stability.
Starting position: Lie on your back with knees bent up and feet flat on the floor a few inches apart. Place your hands palm down on the floor beside you.
Instructions 1 Breathe in and prepare to move your left leg as well as your
right arm.
2 As you breathe out, slowly straighten your left leg until it is flat on the floor, not allowing the right leg to move, and, at the same time, raise your right arm up above your head until it too is as flat to the floor as you can make it. You should feel a good stretch diagonally across your body.
3 Breathe in and prepare to move your limbs back again.
4 As you breathe out, slowly raise your left leg, returning it back to the starting position while bringing your right arm back down to your side.
5 Now repeat the same process with the right leg and left arm.
6 Repeat the exercise three to four times, making sure that the arm and leg start and finish each movement at the same time.

31
Arm and leg stretching

32
Exercises in sitting position Now we have worked on the limbs to gain range and control of movement in lying, we shall move onto exercises in sitting. Once our bodies come into an upright position, it is too easy to let gravity take over and for us to slouch, especially when we are tired. This is particularly the case in people with Parkinson’s and, over time, if not corrected, your posture can become very flexed, not only affecting your balance, but also how you sit, talk, eat etc. A good posture, therefore, allows the body to work more efficiently.
Sitting posture The aim of this exercise is to help develop a mental picture of a good posture and to train the muscles responsible for maintaining your posture during periods of rest or activity.
Starting position: Sit on a sturdy stool or chair in such a position that you are not leaning against the back of it. Your legs should be bent to 90° at the hip and knees, with your feet flat on the floor a comfortable distance apart. Your arms are by your side or resting on your lap.
Instructions 1 Breathe in and prepare to straighten your back and neck.
2 As you breathe out, slowly straighten up from the bottom of your back upwards, until you are as tall as you can be, as if someone is pulling you up by a string attached to the top of your head! Do not tip your head back, but instead allow your neck to become long and straight. Your shoulders should rest backwards and downwards without forcing them back into a ‘sergeant major’ style.
3 Breathe in and prepare to slump down.
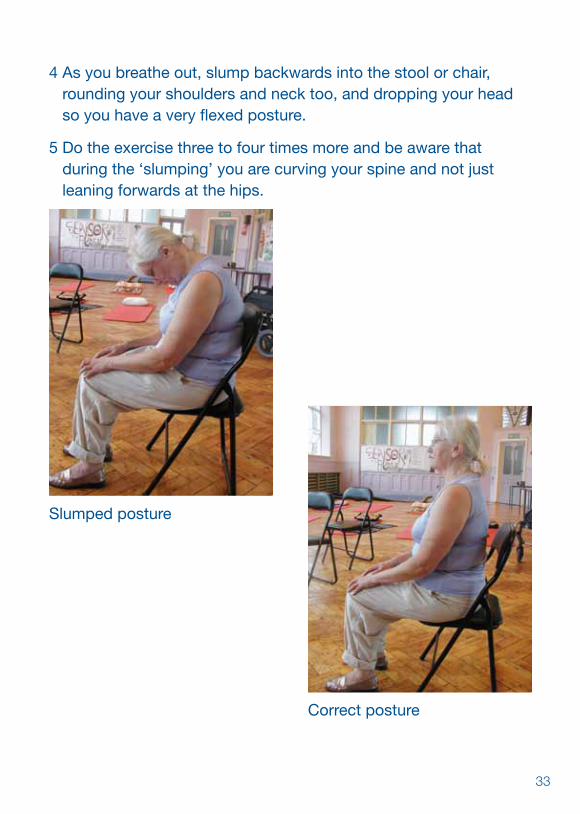
33
4 As you breathe out, slump backwards into the stool or chair, rounding your shoulders and neck too, and dropping your head so you have a very flexed posture.
5 Do the exercise three to four times more and be aware that during the ‘slumping’ you are curving your spine and not just leaning forwards at the hips.
Slumped posture
Correct posture
34
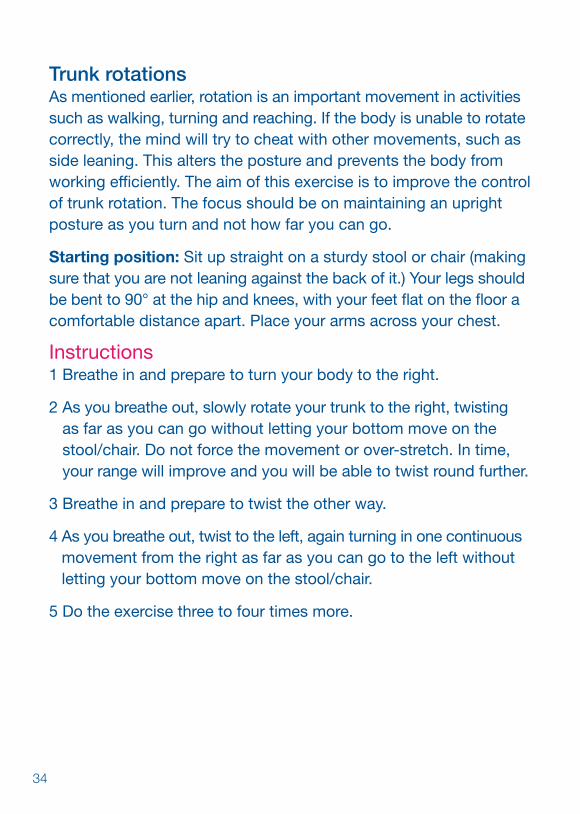
Trunk rotations As mentioned earlier, rotation is an important movement in activities such as walking, turning and reaching. If the body is unable to rotate correctly, the mind will try to cheat with other movements, such as side leaning. This alters the posture and prevents the body from working efficiently. The aim of this exercise is to improve the control of trunk rotation. The focus should be on maintaining an upright posture as you turn and not how far you can go.
Starting position: Sit up straight on a sturdy stool or chair (making sure that you are not leaning against the back of it.) Your legs should be bent to 90° at the hip and knees, with your feet flat on the floor a comfortable distance apart. Place your arms across your chest.
Instructions 1 Breathe in and prepare to turn your body to the right.
2 As you breathe out, slowly rotate your trunk to the right, twisting as far as you can go without letting your bottom move on the stool/chair. Do not force the movement or over-stretch. In time, your range will improve and you will be able to twist round further.
3 Breathe in and prepare to twist the other way.
4 As you breathe out, twist to the left, again turning in one continuous movement from the right as far as you can go to the left without letting your bottom move on the stool/chair.
5 Do the exercise three to four times more.

35
Trunk rotations

36
Exercises in standing positionIn standing, the feet provide the brain with a lot of information, including whether you are standing straight and how you need to move about your ankle to maintain your balance. The aim of this set of three exercises is to enhance the connection between the feet and the brain. By the end of it you should feel like a sturdy oak with the feet firmly rooted to the floor!
You should feel more confident to carry out tasks in standing too.
NB With the exercises in standing, you may find that you need to hold onto the back of a chair or a rail. If you are uncertain of your balance, have someone with you when you first attempt the exercises. Hopefully, as the weeks progress and your confidence and balance improve, you should be able to let go of the support and depend only on your legs. Be sensible and only progress as your body allows. You may also want to have a sturdy chair behind you so that you can sit and rest when you need to.
Rocking forwards and backwards on your feet Be careful with this exercise as people with Parkinson’s have a tendency to lose their balance backwards. If you are at all unsteady, hold a chair or rail for support.
Starting position: Stand up, with your feet a comfortable distance apart, arms down by your side, bottom tucked in, tummy and chest gently forward and up. Your shoulders should be relaxed, resting backwards and down, and your head balanced on the top.
37
Instructions 1 Slowly rock forwards feeling your weight pushing through the
balls of your feet, and then backwards towards your heels. As you do this, you should neither allow your heels nor toes to come off the floor; you control the movement by keeping the whole of your foot in contact with the floor.
2 As you do this three to four times more, gradually make the movement smaller and smaller, until you have found the balance point on your feet.
3 Just stand for half a minute and get used to this position of balance while you check that you are still maintaining a good posture.
Rocking sideways on your feet
Instructions 1 Repeat the previous exercise but, this time, the movement is
a rocking from side to side, so that your weight moves from the outside border of one foot to the inside.
2 Again, gradually make the movement smaller and smaller so that by the fourth or fifth rocking movement, you have found the balance point on your feet.
3 Just stand for half a minute and get used to this position of balance while you check that you are still maintaining a good posture.
Circling around your feet
Instructions 1 In the same starting position, you are now going to combine
the above two exercises by keeping your feet in full contact with the ground, while making a circling movement with your whole body. As you do this exercise, try not to bend forwards at the hips, but keep your body straight and allow the movement to come from your ankles.

38
2 Circle about four or five times in one direction, gradually increasing the size of the circles. Do not allow the circles to become too large so that you lose your balance.
3 Then change direction, this time gradually reducing the size of the circles until you have found the balance point on your feet again.
4 Just stand for half a minute and get used to this position of balance while you check that you are still maintaining a good posture.
Some people with Parkinson’s may find the next two exercises difficult, as you have to control separate movements with each arm. Try them a few times but, if after five or six attempts, you still cannot do the exercises, leave them out or concentrate on the movement of just one arm at a time.
Rolling a beach ball The aim of this exercise is to help the arms to move more freely while maintaining good posture in standing.
Starting position: Stand up with your feet a comfortable distance apart. Place your arms up in front of you and close to your chest as if your right hand is on top of a large ball, and your left hand is holding it from the bottom.
Instructions 1 Slowly roll your hands round so that your left hand is now on top
of the imaginary beach ball, and your right hand is holding it up from the bottom.
2 Repeat this process a few times, keeping the balance point you felt in the last exercise on your legs while you move your arms.
3 Remember to be aware that only your arms should move and that your shoulders must not lift up towards your ears. Make sure that you don’t drop the ball and keep an upright posture too!
NB Your palms should always face each other.

39
Rolling a beach ball

40
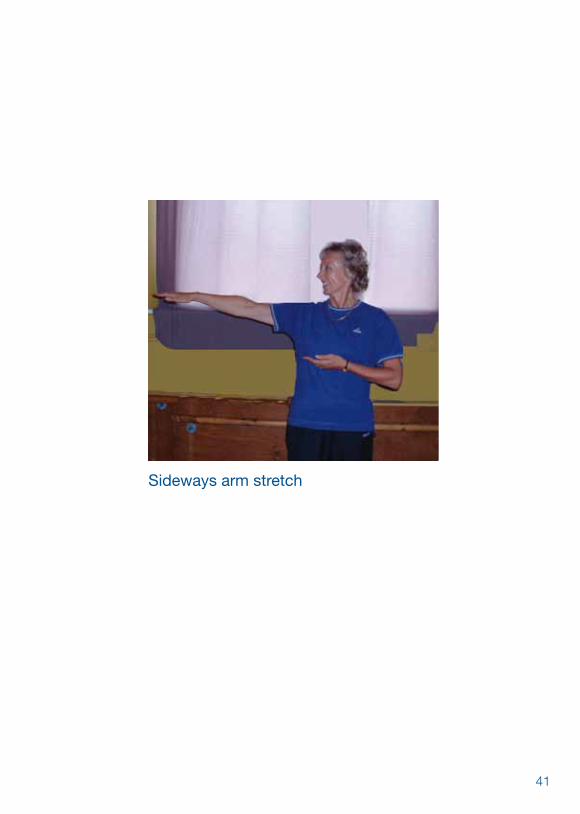
Sideways arm stretch This exercise takes the movement in standing one step further by involving the co-ordination of head movement with arm movement, while maintaining a good, upright posture. Maintaining balance will also be harder as you will need to maintain good alignment of your head and not allow it to tip to one side. As you reach your arm away from the body you should feel a stretch right down to the fingertips.
The increased movement and awareness of movement should help you to maintain a more upright and relaxed upper half of the body. This exercise can be frustrating if you find it very difficult doing more than one thing at once. If so, miss it out, and concentrate more on the exercises you find most beneficial.
Starting position: Stand up, with your feet a comfortable distance apart. Straighten your right arm to shoulder height and out to your right with palm facing downward, and look at your right hand. Remember not to raise your shoulder when lifting your arm; it should remain relaxed. Bring your left arm up to mid chest level with palm facing upwards.
Instructions 1 Take a breath in. Then, as you breathe out, swap arm positions so
that your right arm is reaching out to the side at shoulder height palm facing down. Your left arm will come in front of your chest with your palm facing up. As you do this keep your eyes on the hand that is furthest away, i.e. so you have now turned your head to look at the left outstretched hand. Try to keep your arms up as near to horizontal as possible, without having to hunch your shoulders.
2 As you take a breath in, feel your arm stretching away from the body but do not allow your body to move.
3 Repeat this movement four times, each way stretching your arm out straighter each time.
41
Sideways arm stretch
42
Trunk rotation in standing This exercise returns again to the idea of rotating the trunk while maintaining good posture. All of the movement should be occurring above the middle of your body with the pelvis staying still. If you have difficulty in keeping your pelvis forward during the exercise, stand up against the back of a chair. It will serve as a reminder if your hips try to swivel along with your chest.
Starting position: Stand with your feet a comfortable distance apart.
Hold your hands up at shoulder height so you can see them both out of the corners of your eyes. The relative positions of your head and hands must stay constant throughout the exercise. This will ensure that the movement is occurring in your middle and not your neck or shoulders. Having your hands at this height gives you a visual cue as to when the body is trying to cheat.
Instructions 1 Breathe in and as you breathe out, turn the top of your body
slowly to the right, maintaining an upright posture.
2 At the end of the movement, breathe in and then breathe out as you turn to the left.
3 Repeat this movement five time in each direction, going a little further each time.
Progression • As you turn to the left at the end of the trunk movement, step
your left foot round, so your toes face outwards to the left and at 90° to the right foot. As you turn back towards the right bring the foot back into parallel with the right foot. At the end of the trunk movement to the right step the right foot so your toes face outwards to the left at 90° to the left foot.

43
• Make sure you have fully turned the trunk before stepping.
• If you find it difficult stepping the foot, try swivelling on your heel to turn the foot so that it is at 90° to the other one.
Trunk rotations
Modified trunk rotations

44
Stepping The aim of this exercise is to control the way you step. It will help you to overcome problems you may experience of a quickening in your steps as you are walking, or if you have difficulty in initiating your steps.
Starting position: Stand with a good posture with your feet a comfortable distance apart. If you are not feeling very steady, hold onto a rail or the back of a sturdy chair until you become better at the exercise and confident enough to let go.
Instructions 1 Move the weight of your body onto your left leg.
2 Bend your right leg at the knee and hip so you come up onto your right toes.
3 When the weight is fully on the left leg and your right one feels light, lift it off the floor and slowly step it forwards.
4 As it is swinging forwards, pull your toes up so that it is your heel that lands on the ground first.
5 Slowly lower your toes down and gently allow your weight to transfer forwards onto the whole of the foot, with your right knee bending slightly as you do this. Do not let the left heel come off the ground and try not to let your body lean forwards at the hip.
6 Slowly return the weight back over the left foot until there is no weight on the right and it feels light and free enough to lift back to the starting position.
7 Swap legs and repeat this exercise four or five more times.

45
Progression To progress with this exercise, you can:
• slow down the action, which demands more of your balance
• move the stepping leg forwards more to create a bigger step, or higher as if stepping onto a step, or sideways as if avoiding a puddle
• practice stepping backwards
NB If you find it hard to lift one leg off the floor for this exercise, it may be that you have not transferred enough weight onto the standing leg or that you are not stood upright on that leg.
Stepping

46
Standing bend and stretch The aim of this last exercise is to improve your ability to come from sitting to standing and from standing to sitting. It also provides a good stretch to the body as a whole in standing. Because of this, it is one of the hardest exercises to perform, so be sensible and only do it if you feel steady enough. Again, you can choose to hold onto the back of a sturdy chair or rail for your own safety, or ensure that someone is present the first few times you attempt the exercise.
Starting position: Stand with a good posture and your feet a comfortable distance apart.
Instructions 1 Take a slow, deep breath in and raise your arms up to the ceiling,
reaching as high as they will stretch. Keep your spine straight, and don’t be tempted to lean backwards.
2 On your breath out, lower your arms, look down and bend at your knees and hips, as if you are about to sit down in a chair. Try to keep your head forwards of your feet but your bottom pushed back to counter-balance your position so that you do not fall forwards.
3 Breathe in, straighten back up slowly and stretch up to the ceiling again.
4 Repeat this exercise three to four more times and each time bend a little lower as you gain more control over the movement.
NB Although you are aiming to touch the floor, do not force yourself to bend lower than you feel able. It does not matter if you can touch the floor, as long as you are performing the exercise slowly and correctly.

47
Stretch
Bend

48
Finishing the exercises: a few last words You have now finished the exercises in the booklet. Although they were designed to make you move by working with as relaxed a posture as possible, you may find that you are tired and stiff in some areas, especially parts of the body not used to being worked in this manner. This can sometimes create a little tension.
As a way to unwind, stand up tall with your feet at hip distance apart (provided you are steady enough on your feet), or sit on a stool with no arms to it, and end the programme by twisting round from one side to the other. Let the momentum from your arms swinging freely aid the rotating action.
Do not do this if you feel dizzy.
Keep practising the exercises and feel free to do other forms of exercise, whether just walking, cycling, swimming, golfing, etc to keep your body fit.
In addition to this, you may need to practise more specific exercises for areas of your body that require a little more individual attention. You can ask your physiotherapist for more advice.
All that remains is for you to try the exercise programme and reap the benefits. Enjoy!
PDS Publications Response Form Keeping MovingTo ensure that the PDS is providing as good a service as possible, we like to find out what readers think of publications. The Society would be extremely grateful if you would take the time to complete this form and return it to PDS National Office (contact details overleaf).
Many thanks.
Are you: (please circle)Someone with Parkinson’s: I have had Parkinson’s for ______ years.A carer for someone with Parkinson’s. A relative of someone with Parkinson’sA friend of someone with Parkinson’sA professional working with people with Parkinson’s
Where did you get the publication from? (please circle)Sharward Services / Information day / PDS branch / My hospitalMy GP’s practice / Pharmacy/Chemist / Website / Other
How useful have you found the publication? (please circle a number: 1 is not very useful, 7 is very useful)
1 2 3 4 5 6 7
Which section did you find most helpful?___________________________________________________________
___________________________________________________________
Which section did you find least helpful?___________________________________________________________
___________________________________________________________
Are there topics you felt should have been covered but weren’t?___________________________________________________________
___________________________________________________________

Any other comments? ________________________________________________________
________________________________________________________________________________________
Is there another related topic which you think the PDS should provide a booklet/information sheet on?
___________________________________________________________
Many thanks for your help. You do not have to fill out your details below, but if you do so, it will help us ensure we give a better service in future.
Name: ____________________________________________________
Date of birth: ______________________________________________
Address: __________________________________________________
_______________________________________ Postcode: __________
Tel: _______________________________________________________
Fax: _______________________________________________________
Email: _____________________________________________________
Are you a PDS member? (please circle) Yes No
Would you like information on becoming a PDS member? Yes No
The Parkinson’s Disease Society of the United Kingdom is registered under the Data Protection Act and all information you supply through this response form will be treated under the terms of the Act. The PDS will hold this data on its own database, and will not release it to any commercial organisation. The information supplied will be used for monitoring services.
Please cut out your completed form and post it to: Publications Department, Parkinson’s Disease Society,
215 Vauxhall Bridge Road, London SW1V 1EJ. Or fax it to: 020 7233 9908. Many thanks for your help.

51
How you can help usWe are totally dependent on voluntary donations so if you would like to make a contribution, it would be gratefully received. Any money received will help us support others affected by Parkinson’s through information, care and research. To make a donation, please call 020 7932 1303, visit www.parkinsons.org.uk/donate or write to Parkinson’s Disease Society, 215 Vauxhall Bridge Road, London SW1V 1EJ. Thank you.

This booklet has been written as an accompaniment to the PDS exercise dvd Keeping Moving (V011). You will get the most benefit from the exercises if you use the dvd for guidance.
However, this booklet is also available as a separate item for those who do not have a dvd player or are in a class with a physiotherapist who uses the PDS Keeping Moving exercise dvd.
© Parkinson’s Disease Society of the United Kingdom, 2009Charity registered in England and Wales No. 258197 and in Scotland No. SC037554.
A company limited by guarantee, Registered No. 948776 (London)Registered Office 215 Vauxhall Bridge Road, London SW1V 1EJ
Tel 020 7931 8080 Fax 020 7233 9908PDS Helpline (free) 0808 800 0303 Text Relay 18001 0808 800 0303 (for textphone users only).
(The Helpline is a confidential service. Calls are free from UK landlines and some mobile networks)Email [email protected] website www.parkinsons.org.uk
Designed and produced by PDS Information Resources
Code B074 revised April 2009