k55 manual
DESCRIPTION
DIY KIT 55 OWNER MANUALTRANSCRIPT
Arbelos Geiger Counter • K55-LND712by Atomic.dave [email protected]
This is a one of a kind custom hand-made Geiger Counter built by Atomic.Dave. It is based on a kit designed by JohnGiametti (username: Brohogan) All information for this kit is available at the developer’s website. As I have said before, thisis more of a kit for someone who knows a little bit about electronics but doesn’t have the time or patience to build it, orwould rather someone else do all the dirty work. Having been built by me, of course there will be some imperfections, al-though as minimal as possible.
DIY GEIGER COUNTER DEVELOPERS WEBSITE:http://www.sites.google.com/site/diygeigercounter/
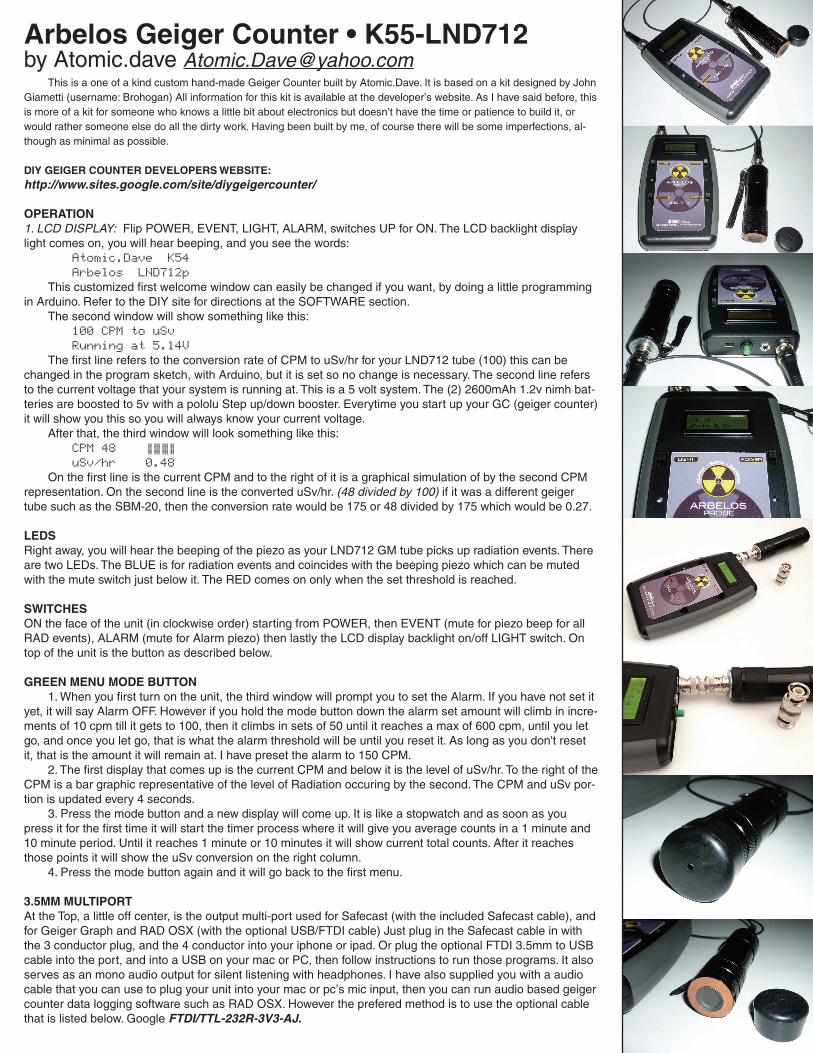
OPERATION1. LCD DISPLAY: Flip POWER, EVENT, LIGHT, ALARM, switches UP for ON. The LCD backlight displaylight comes on, you will hear beeping, and you see the words:
Atomic.Dave K54 Arbelos LND712p
This customized first welcome window can easily be changed if you want, by doing a little programmingin Arduino. Refer to the DIY site for directions at the SOFTWARE section.
The second window will show something like this:100 CPM to uSv Running at 5.14V
The first line refers to the conversion rate of CPM to uSv/hr for your LND712 tube (100) this can bechanged in the program sketch, with Arduino, but it is set so no change is necessary. The second line refersto the current voltage that your system is running at. This is a 5 volt system. The (2) 2600mAh 1.2v nimh bat-teries are boosted to 5v with a pololu Step up/down booster. Everytime you start up your GC (geiger counter)it will show you this so you will always know your current voltage.
After that, the third window will look something like this:CPM 48 || ||| ||| ||uSv/hr 0.48
On the first line is the current CPM and to the right of it is a graphical simulation of by the second CPMrepresentation. On the second line is the converted uSv/hr. (48 divided by 100) if it was a different geigertube such as the SBM-20, then the conversion rate would be 175 or 48 divided by 175 which would be 0.27.
LEDSRight away, you will hear the beeping of the piezo as your LND712 GM tube picks up radiation events. Thereare two LEDs. The BLUE is for radiation events and coincides with the beeping piezo which can be mutedwith the mute switch just below it. The RED comes on only when the set threshold is reached.
SWITCHESON the face of the unit (in clockwise order) starting from POWER, then EVENT (mute for piezo beep for allRAD events), ALARM (mute for Alarm piezo) then lastly the LCD display backlight on/off LIGHT switch. Ontop of the unit is the button as described below.
GREEN MENU MODE BUTTON1. When you first turn on the unit, the third window will prompt you to set the Alarm. If you have not set it
yet, it will say Alarm OFF. However if you hold the mode button down the alarm set amount will climb in incre-ments of 10 cpm till it gets to 100, then it climbs in sets of 50 until it reaches a max of 600 cpm, until you letgo, and once you let go, that is what the alarm threshold will be until you reset it. As long as you don't resetit, that is the amount it will remain at. I have preset the alarm to 150 CPM.
2. The first display that comes up is the current CPM and below it is the level of uSv/hr. To the right of theCPM is a bar graphic representative of the level of Radiation occuring by the second. The CPM and uSv por-tion is updated every 4 seconds.
3. Press the mode button and a new display will come up. It is like a stopwatch and as soon as youpress it for the first time it will start the timer process where it will give you average counts in a 1 minute and10 minute period. Until it reaches 1 minute or 10 minutes it will show current total counts. After it reachesthose points it will show the uSv conversion on the right column.
4. Press the mode button again and it will go back to the first menu.
3.5MM MULTIPORTAt the Top, a little off center, is the output multi-port used for Safecast (with the included Safecast cable), andfor Geiger Graph and RAD OSX (with the optional USB/FTDI cable) Just plug in the Safecast cable in withthe 3 conductor plug, and the 4 conductor into your iphone or ipad. Or plug the optional FTDI 3.5mm to USBcable into the port, and into a USB on your mac or PC, then follow instructions to run those programs. It alsoserves as an mono audio output for silent listening with headphones. I have also supplied you with a audiocable that you can use to plug your unit into your mac or pc’s mic input, then you can run audio based geigercounter data logging software such as RAD OSX. However the prefered method is to use the optional cablethat is listed below. Google FTDI/TTL-232R-3V3-AJ.
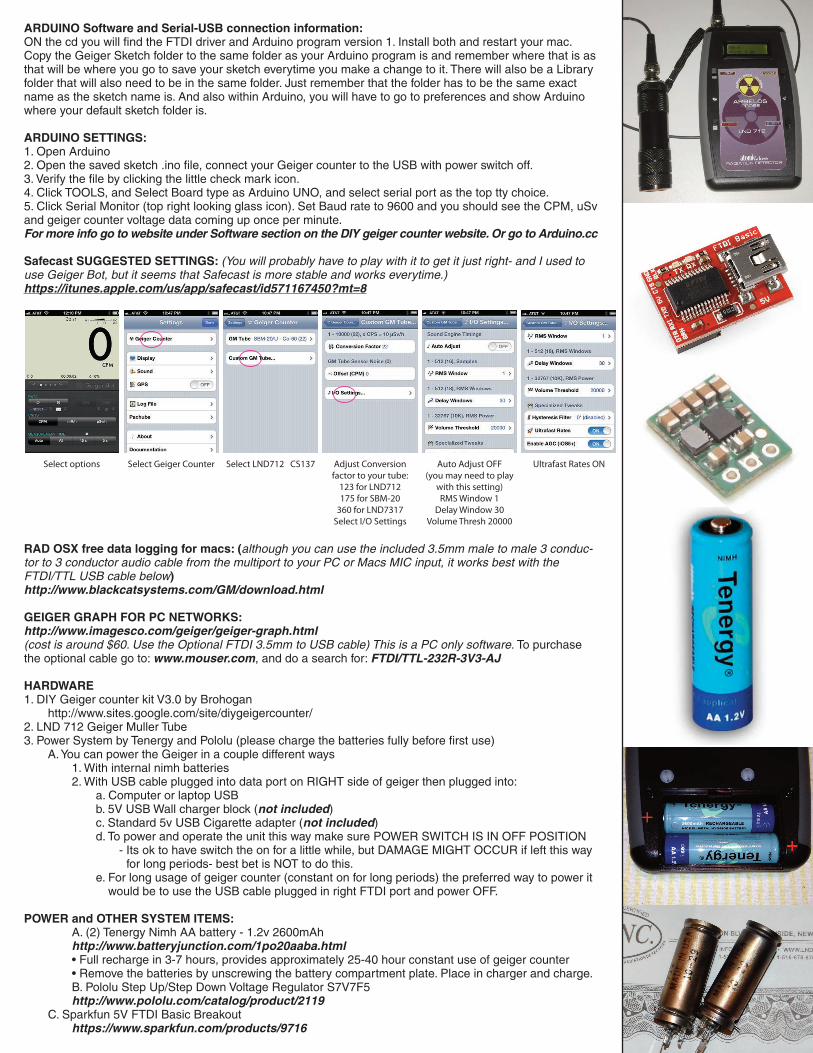
ARDUINO Software and Serial-USB connection information:ON the cd you will find the FTDI driver and Arduino program version 1. Install both and restart your mac.Copy the Geiger Sketch folder to the same folder as your Arduino program is and remember where that is asthat will be where you go to save your sketch everytime you make a change to it. There will also be a Libraryfolder that will also need to be in the same folder. Just remember that the folder has to be the same exactname as the sketch name is. And also within Arduino, you will have to go to preferences and show Arduinowhere your default sketch folder is.
ARDUINO SETTINGS:1. Open Arduino2. Open the saved sketch .ino file, connect your Geiger counter to the USB with power switch off.3. Verify the file by clicking the little check mark icon.4. Click TOOLS, and Select Board type as Arduino UNO, and select serial port as the top tty choice.5. Click Serial Monitor (top right looking glass icon). Set Baud rate to 9600 and you should see the CPM, uSvand geiger counter voltage data coming up once per minute.For more info go to website under Software section on the DIY geiger counter website. Or go to Arduino.cc
Safecast SUGGESTED SETTINGS: (You will probably have to play with it to get it just right- and I used touse Geiger Bot, but it seems that Safecast is more stable and works everytime.)https://itunes.apple.com/us/app/safecast/id571167450?mt=8
RAD OSX free data logging for macs: (although you can use the included 3.5mm male to male 3 conduc-tor to 3 conductor audio cable from the multiport to your PC or Macs MIC input, it works best with theFTDI/TTL USB cable below)http://www.blackcatsystems.com/GM/download.html
GEIGER GRAPH FOR PC NETWORKS: http://www.imagesco.com/geiger/geiger-graph.html(cost is around $60. Use the Optional FTDI 3.5mm to USB cable) This is a PC only software. To purchasethe optional cable go to: www.mouser.com, and do a search for: FTDI/TTL-232R-3V3-AJ
HARDWARE1. DIY Geiger counter kit V3.0 by Brohogan
http://www.sites.google.com/site/diygeigercounter/2. LND 712 Geiger Muller Tube3. Power System by Tenergy and Pololu (please charge the batteries fully before first use)
A. You can power the Geiger in a couple different ways 1. With internal nimh batteries2. With USB cable plugged into data port on RIGHT side of geiger then plugged into:
a. Computer or laptop USBb. 5V USB Wall charger block (not included)c. Standard 5v USB Cigarette adapter (not included)d. To power and operate the unit this way make sure POWER SWITCH IS IN OFF POSITION
- Its ok to have switch the on for a little while, but DAMAGE MIGHT OCCUR if left this wayfor long periods- best bet is NOT to do this.
e. For long usage of geiger counter (constant on for long periods) the preferred way to power itwould be to use the USB cable plugged in right FTDI port and power OFF.
POWER and OTHER SYSTEM ITEMS:A. (2) Tenergy Nimh AA battery - 1.2v 2600mAhhttp://www.batteryjunction.com/1po20aaba.html• Full recharge in 3-7 hours, provides approximately 25-40 hour constant use of geiger counter• Remove the batteries by unscrewing the battery compartment plate. Place in charger and charge.B. Pololu Step Up/Step Down Voltage Regulator S7V7F5http://www.pololu.com/catalog/product/2119
C. Sparkfun 5V FTDI Basic Breakouthttps://www.sparkfun.com/products/9716
Select options Select Geiger Counter Select LND712 CS137 Adjust Conversion factor to your tube:
123 for LND712175 for SBM-20
360 for LND7317Select I/O Settings
Auto Adjust OFF(you may need to play
with this setting) RMS Window 1
Delay Window 30Volume Thresh 20000
Ultrafast Rates ON
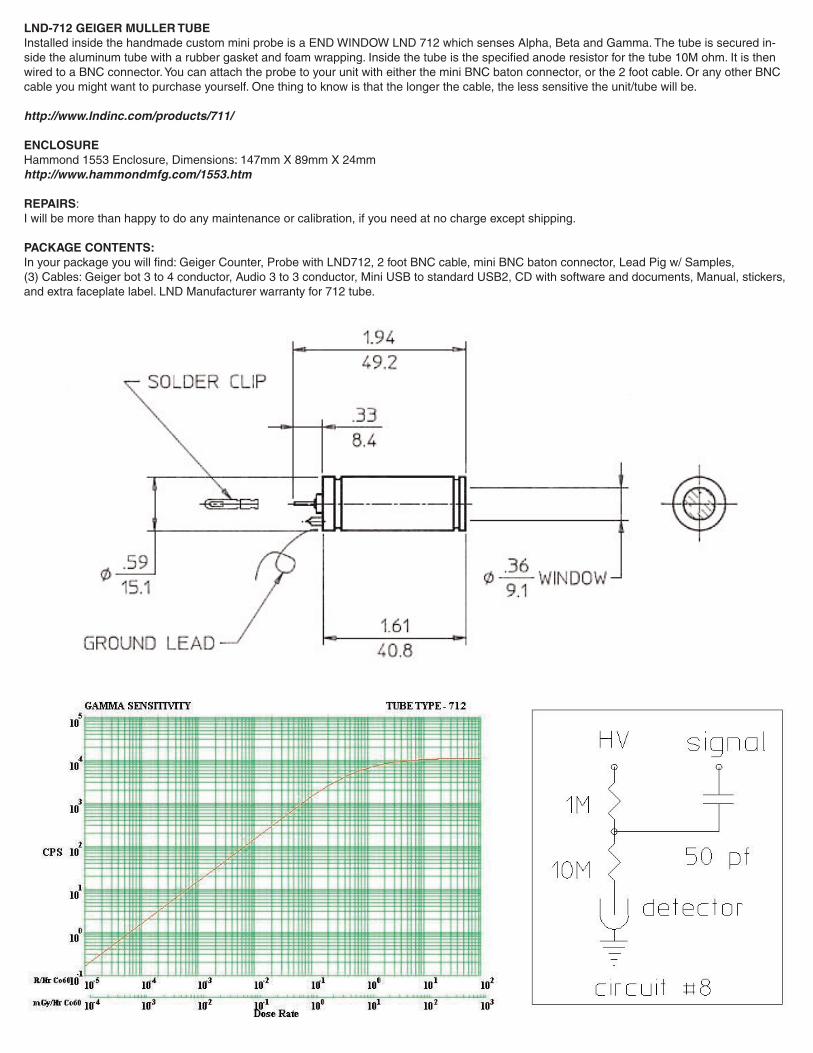
LND-712 GEIGER MULLER TUBEInstalled inside the handmade custom mini probe is a END WINDOW LND 712 which senses Alpha, Beta and Gamma. The tube is secured in-side the aluminum tube with a rubber gasket and foam wrapping. Inside the tube is the specified anode resistor for the tube 10M ohm. It is thenwired to a BNC connector. You can attach the probe to your unit with either the mini BNC baton connector, or the 2 foot cable. Or any other BNCcable you might want to purchase yourself. One thing to know is that the longer the cable, the less sensitive the unit/tube will be.
http://www.lndinc.com/products/711/
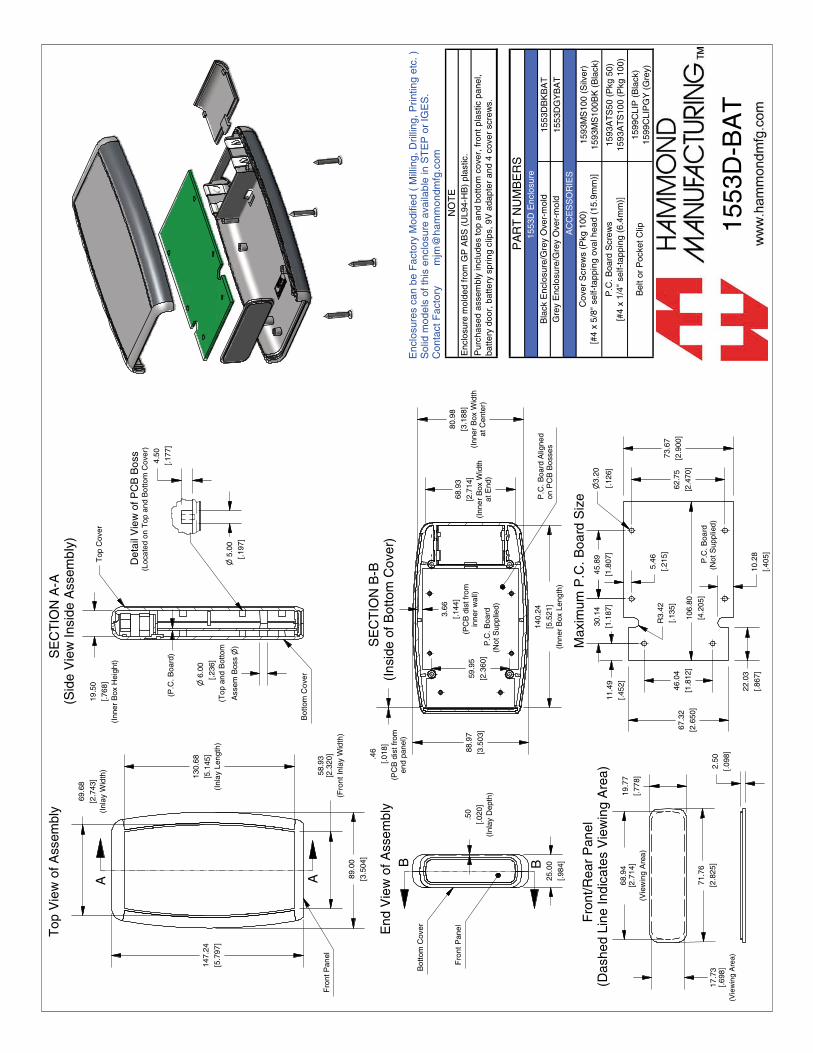
ENCLOSUREHammond 1553 Enclosure, Dimensions: 147mm X 89mm X 24mmhttp://www.hammondmfg.com/1553.htm
REPAIRS:I will be more than happy to do any maintenance or calibration, if you need at no charge except shipping.
PACKAGE CONTENTS:In your package you will find: Geiger Counter, Probe with LND712, 2 foot BNC cable, mini BNC baton connector, Lead Pig w/ Samples, (3) Cables: Geiger bot 3 to 4 conductor, Audio 3 to 3 conductor, Mini USB to standard USB2, CD with software and documents, Manual, stickers,and extra faceplate label. LND Manufacturer warranty for 712 tube.
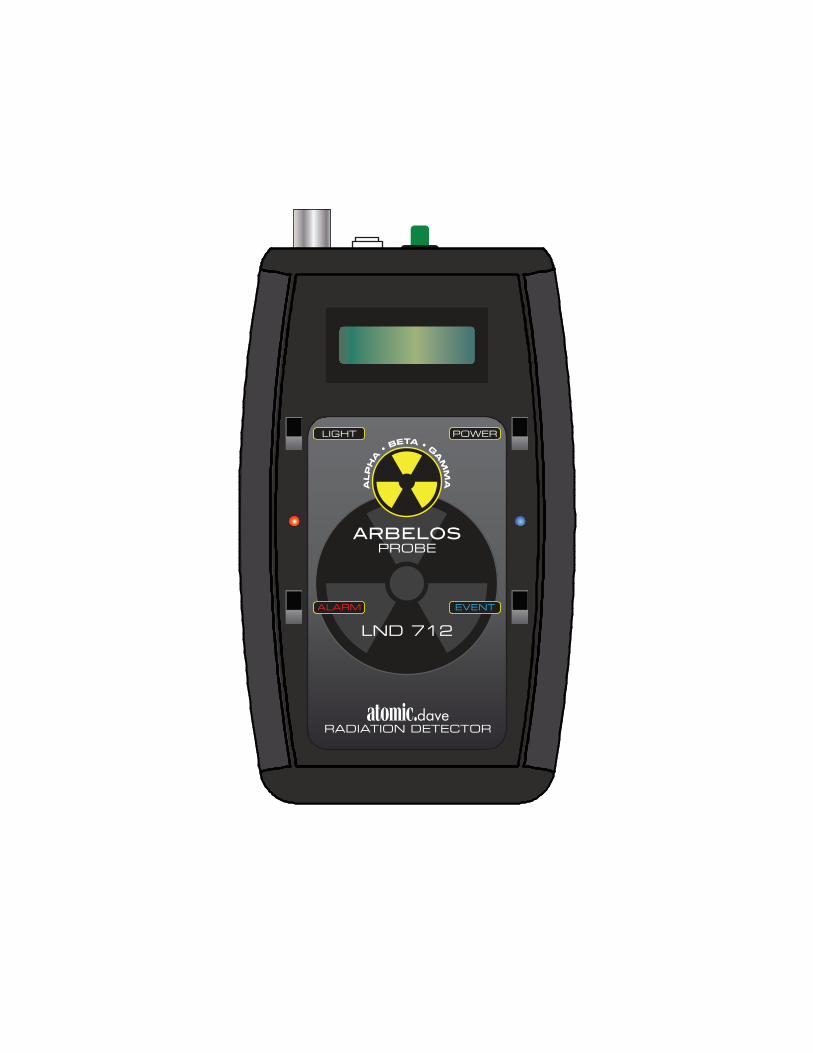
atomic.daveRADIATION DETECTOR
POWERLIGHT
LND712
ARBELOSPROBE
LND 712
EVENTALARM
ALPHA
BETA GAM
MA
1553
DB
KB
AT
1553
DG
YB
AT
1593
MS
100
(Silv
er)
1593
MS
100B
K (
Bla
ck)
1593
AT
S50
(P
kg 5
0)15
93A
TS
100
(Pkg
100
)
1599
CLI
P (
Bla
ck)
1599
CLI
PG
Y (
Gre
y)
NO
TE
Enc
losu
re m
olde
d fr
om G
P A
BS
(U
L94-
HB
) pl
astic
.
Pur
chas
ed a
ssem
bly
incl
udes
top
and
botto
m c
over
, fro
nt p
last
ic p
anel
, ba
ttery
doo
r, b
atte
ry s
prin
g cl
ips,
9V
ada
pter
and
4 c
over
scr
ews.
PA
RT
NU
MB
ER
S15
53D
Enc
losu
re
AC
CE
SS
OR
IES
Bla
ck E
nclo
sure
/Gre
y O
ver-
mol
dG
rey
Enc
losu
re/G
rey
Ove
r-m
old
Cov
er S
crew
s (P
kg 1
00)
[#4
x 5/
8" s
elf-
tapp
ing
oval
hea
d (1
5.9m
m)]
P.C
. Boa
rd S
crew
s[#
4 x
1/4"
sel
f-ta
ppin
g (6
.4m
m)]
Bel
t or
Poc
ket C
lip
A A
B B
Top
Vie
w o
f Ass
embl
yS
EC
TIO
N A
-A(S
ide
Vie
w In
side
Ass
embl
y)
1553
D-B
AT
Det
ail V
iew
of P
CB
Bos
s(L
ocat
ed o
n T
op a
nd B
otto
m C
over
)
End
Vie
w o
f Ass
embl
yS
EC
TIO
N B
-B(I
nsid
e of
Bot
tom
Cov
er)
Fro
nt/R
ear
Pan
el(D
ashe
d Li
ne In
dica
tes
Vie
win
g A
rea)
Max
imum
P.C
. Boa
rd S
ize
130.
68
[5.1
45]
(Inl
ay L
engt
h)
147.
24
[5.7
97]
Fro
nt P
anel
19.5
0
[.768
](I
nner
Box
Hei
ght)
6.00
[.236
](T
op a
nd B
otto
m
Ass
em B
oss
)5.
00
[.197
]
4.50
[.177
]
25.0
0
[.984
]
.50
[.020
](I
nlay
Dep
th)
Bot
tom
Cov
er
Fro
nt P
anel
Bot
tom
Cov
er
80.9
8
[3.1
88]
(Inn
er B
ox W
idth
at C
ente
r)
.46
[.018
](P
CB
dis
t fro
m
end
pane
l)
68.9
3
[2.7
14]
(Inn
er B
ox W
idth
at E
nd)
3.66
[.144
](P
CB
dis
t fro
min
ner
wal
l)59
.95
[2.3
60]
140.
24
[5.5
21]
(Inn
er B
ox L
engt
h)
88.9
7
[3.5
03] 67
.32
[2.6
50]
73.6
7
[2.9
00]
46.0
4
[1.8
12]
11.4
9
[.452
]
30.1
4
[1.1
87]
45.8
9
[1.8
07]
62.7
5
[2.4
70]
5.46
[.215
]
22.0
3
[.867
]10
.28
[.405
]
R3.
42
[.135
]
3.20
[.126
]
(P
.C. B
oard
)
P.C
. Boa
rd A
ligne
d on
PC
B B
osse
s
P.C
. Boa
rd(N
ot S
uppl
ied)
P.C
. Boa
rd(N
ot S
uppl
ied)
106.
80
[4.2
05]
69.6
8
[2.7
43]
(Inl
ay W
idth
)
Enc
losu
res
can
be F
acto
ry M
odifi
ed (
Mill
ing,
Dril
ling,
Prin
ting
etc.
)S
olid
mod
els
of th
is e
nclo
sure
ava
ilabl
e in
ST
EP
or
IGE
S.
Con
tact
Fac
tory
mjm
@ha
mm
ondm
fg.c
om
19.7
7
[.778
]
2.50
[.098
]
17.7
3[.6
98]
(Vie
win
g A
rea)
68.9
4[2
.714
](V
iew
ing
Are
a)
71.7
6
[2.8
25]
89.0
0
[3.5
04]
58.9
3[2
.320
](F
ront
Inla
y W
idth
)
Top
Cov
er

1K O
HM
RESI
STO
R
56K
OH
MRE
SIST
OR
3.5m
mSo
cket
MU
LTI-S
OFT
WA
REO
UTP
UT
PORT
.1 u
F Ca
p
.1 u
F Ca
p
1N41
48di
ode
New
Hav
enA
dap
ter b
oard
MD
fly 2
x 1
6 m
ini L
CD
10K
Pot
– +
46
810
1214
16
13
57
911
13 1
5
345678 9 11 12 13
2
LED
Out
put
–+
R14
27K
ohm39
K0 o
hm
R11
14 16 17 18 19
MOME
NTAR
Y SW
ITCH
FOR
ALAR
M OR
MEN
U SE
LECT
ON/O
FF Sw
itch
for E
vent
Piez
o
10
SLID
E M
UTE
ON
/OFF
SW
ITCH
ALA
RM H
OO
KUP
3V L
ED
_30
0 O
HM
RESI
STO
R2
15
EVEN
TLE
D27
0 O
HM
RESI
STO
R
+ –
+–
+
–
5v S
tep
UP/
DN
Boo
st
9V
atomi
c.dav
eR
AD
IATIO
N D
ETEC
TO
R
PO
WER
LIG
HT
LN
D712
AR
BELO
SPR
OB
E
6107
EVEN
TA
LA
RM
ALPHA
B
ETA
G
AMMA