k-bus universal interfaces user manual-ver. 1 · this manual provides detailed technical...
TRANSCRIPT

Guangzhou Video-Star Eletronnics Co.,Ltd.
http://www.video-star.com.cn
K-BUS Universal Interfaces
User manual-Ver. 1
KU/I0401.1
Intelligent Installation Systems

2
Contents
1. General------------------------------------------------------------------------------------------------------------ 3
1.1 Product and functional overview ----------------------------------------------------------------------------- 3
2. Technical data --------------------------------------------------------------------------------------------------- 3
3. Dimension and Connection diagram ------------------------------------------------------------------------ 4
3.1 Dimension drawing --------------------------------------------------------------------------------------------- 4
3.2 Connection diagram --------------------------------------------------------------------------------------------- 5
4. Project design and programming ---------------------------------------------------------------------------- 5
4.1 Overview of the functions-------------------------------------------------------------------------------------- 5
4.2 Description of setting the system parameter in part of device channel --------------------------------- 6
4.2.1 Parameter window “General Setting” ------------------------------------------------------------------ 6
4.2.2 Parameter window “Switch X” -------------------------------------------------------------------------- 7
4.2.3 Parameter window “Switch/dimming, X” ----------------------------------------------------------- 12
4.2.4 Parameter window “Value/force output, X” --------------------------------------------------------- 14
4.2.5 Parameter window “Scene control, X” --------------------------------------------------------------- 17
4.2.6 Parameter window “Switching sequence, X” ------------------------------------------------------- 21
4.2.7 Parameter window “Counter, X” ---------------------------------------------------------------------- 23
4.2.8 Parameter window “Multiple operation, X” --------------------------------------------------------- 27
4.2.9 Parameter window “Shutter control, X” ------------------------------------------------------------- 29
4.3 Description of setting the system parameter in part of LED channel --------------------------------- 31
4.3.1 Parameter window “Flashing, X” --------------------------------------------------------------------- 32
4.3.2 Parameter window “Switch, X” ----------------------------------------------------------------------- 33
4.3.3 Parameter window “Control by input, X” ----------------------------------------------------------- 35
4.3.4 Parameter window “Indicate object in, X” ---------------------------------------------------------- 35
4.3.5 Parameter window “Indicate object out, X” --------------------------------------------------------- 36
4.3.6 Parameter window “Indicate object in and out, X” ------------------------------------------------ 37
5. Description of communication object ---------------------------------------------------------------------- 38
5.1 Communication object “swicth” ---------------------------------------------------------------------------- 39
5.2 Communication object “switch/dimming” ---------------------------------------------------------------- 39
5.3 Communication object “value/force output” -------------------------------------------------------------- 40
5.4 Communication object “scene control” -------------------------------------------------------------------- 40
5.5 Communication object “switch sequence” ---------------------------------------------------------------- 41
5.6 Communication object “counter” --------------------------------------------------------------------------- 42
5.7 Communication object “multiple operation” ------------------------------------------------------------- 43
5.8 Communication object “shutter control” ------------------------------------------------------------------ 43
5.9 Communication object “LED X—flashing” -------------------------------------------------------------- 44
5.10 Communication object “LED X—SWITCH” ----------------------------------------------------------- 45

3
1. General
The Universal Interfaces can install to be system with EIB/KNX bus and other device, which
are mainly use in building control system. The functions are both simple to operate and intuitive,
users can program it according to the requirement to implement the function systematically.
This manual provides detailed technical information about the Universal Interfaces for users
as well as assembly and programming details, and explains how to use the Universal Interfaces by
the application examples.
1.1 Product and functional overview
The Universal Interfaces achieve the functional applications via conventional push
buttons/switches, communicate by technical binary, which are used to control the devices such as
the Dimmer Actuator/the Relay Actuator, to control domestic appliance indirectly. At the same
time, they also enable the control of LEDs. The extremely compact design enables the device to be
inserted in a conventional 60 mm wiring box.
The Universal Interfaces connect to the bus though the EIB connection terminals and have no
use for additional supply voltage. It is available to assign the physical address and set the
parameters by Engineering design tools ETS with VD2/VD3 (higher than edition ETS2v1.3).It is
able to install VD3 file if use ETS3 software.
The Universal Interfaces have many functions that can be used in a wide variety of
application areas. The following list provides an overview:
Switching and dimming function.
Control of blinds and shutters.
Sending of values e.g. temperature values、water line.
Invocate and storing of scenes.
Trigger an LED for reporting an operation.
Operation of various loads by multiple push button actions.
Operation of several loads in a fixed switching sequence.
Standard counting and differential counting.
Each channel of a device can adopt any of the functions described above.
2. Technical data
Power supply Bus voltage 21~30V DC, via the EIB bus
Input/output 4 channels Can be individually parameterized as inputs or
outputs
Bus length ≤10M
Input Scanning voltage 20 V DC
Input current 5 mA

4
Output Output voltage 5V DC
Output current max.2.5mA, limited via series resistor of 2 KΩ
Safety Short-circuit-proof, overload protection, reverse
voltage protection
Operating and
display elements
(Red) LED and push
button
for assigning the physical address
(Green) LED flashing Indicate the application layer works normally
Connections Input/output 2*5-pin cables, approx. 30 cm long, can be extended
to max. 10 m
EIB bus via bus connecting terminal
Ambient
temperature
range
Operation -5℃…45℃
Storage -25℃…55℃
Transport -25℃…70℃
Miscellaneous Type of protection IP20 (EN60529) when installed
Protection class Ⅲ
CE norm in accordance with the EMC guideline and the low
voltage guideline
Certification EIB-certified
Mounting in switch box, 60 mm
Dimensions 46×46×11.7mm
Weight 0.05 KG
3. Dimension and Connection diagram
3.1 Dimension drawing

5
3.2 Connection diagram
4. Project design and programming
4.1 Overview of the functions
Application program Number of
communication objects
Max. number of
group address
Max. number of
associations
Binary Input display, 4f/1 40 80 80
The following functions can be set separately for each input:
Switch sensor: For switching the lighting or scanning a floating contact; Distinction between
short/long operation and cyclical sending of the contact state are possible.
Switch/dimming sensor: For switching/dimming the lighting; There are start/stop dimming
and stepwise dimming, as well as dimming via a single push button are possible.
Value/Forced operation: For sending the valued of different data types(e.g. temperature
values). It is possible to send different values or data types for short/long operation, possible to
activate/deactivate the forced operation of actuators.
Control scene: For recalling and storing the states of several actuator groups. The actuator
groups can either be controlled via max. 5 individual objects or via an 8 bit scene object.
Switching sequence: For the operation of several actuator groups in a preselected sequence, e.g.
the latching relay.
Counter: For counting input pulses. Various data types of the counter can be set. It is able to
set the counting rate, whether to sending the current counting values cyclically and the differential
counter when enables an additional counter. The differential counter can be reset and run out in
report, thereby, it is convenient to count the daily consumption.
Push button with multiple operations: For triggering various functions depending on the
frequency of the operation. A long operation can also be detected and a function can be triggered.
Shutter sensor: For movement and adjustment of a shutter or blind. Eight present operation modes
are possible in total.
Control LED: For controlling a light-emitting diode, switching and flashing. As the switch,

6
it is with time limit that turns off automatically after a preset time; as the flash, it is able to set the
flashing rates.
4.2 Description of setting the system parameter in part of device channel
Parameters and objects in the device application are outlined in this section. Parameters and
objects which are assigned to each channel, are equivalent and described in the following sections
using output A as an example.
4.2.1 Parameter window “General Setting”
Parameters for the functions which affect the complete device can be set via the Fig. 1.
Fig. 1 parameter window “General Setting”
Parameter “Limit number of Tele.”
It is use to limit the number of sending telegrams to decrease the burthen of bus. It is possible
to set how many telegrams can be sent within an adjustment period.
Options: Yes
No
Parameter “Period”
It is able to set the limit time of sending telegrams.
Options: 100ms
500ms
1s
……
1min
10min

7
Parameter “Max. Number Tele. Within a period [1…255]”
It is able to set the Max. number of sending telegrams within a setting period.
Options: 1~255
4.2.2 Parameter window “Switch X”
Parameter window “Switch X” can be shown in Fig.2 and Fig.4. Fig.2 do not distinguish
between long and short operation while Fig.4 opposite.
Fig.2 Parameter window “Switch X”(do not distinguish between long and short operation)
Parameter “function of the channel”
The parameter determines the function option in the channel; the current option is “switch”.
If “No function” is selected, it means the channel is disabled.
Options: No function
Switch
Switch/Dimming
Value/Forced output
Scene control
Switching sequence
Counter
Multiple operations
Shutter Control
Parameter “Distinction between long and short operation”
This parameter sets whether the input distinguishes between a short and long operation. If
“yes” is selected, there is a waiting period after the opening/closing of the contact to determine
whether the operation is long or short. Only then is a possible reaction triggered. The following
drawing clarifies the function:

8
Options: Yes
No
Note: The long operation in the below chapters are the same with here.
Parameter “Cyclic send Tele. „Tele. Switch‟”
This parameter is visible if there is no distinction between a short and long operation. It is
able to set whether to send the current value of object “Tele. Switch, X” cyclically on the bus.
Options: No
Always
If switch off
If switch on
If the parameter value “always” is selected, the object sends cyclically on the bus, regardless
of its value is 0 or 1. If the parameter value “if switch off” or “if switch on” is set, only the
corresponding object value is sent cyclically.
Parameter “Reaction on closing the contact (rising edge)”/ “Reaction on opening the contact
(fall edge)”
This parameter is visible if there is no distinction between a short and long operation. It can
be set the operation to open and close the contact.
Options: No action
Off
On
Toggle
Stop cyclic transmission
If the parameter “Toggle” is selected, negate the operation, that means negate the current
value. For example, if “On” is selected, when negate it will carry out “Off” operation. If the
parameter “Stop cyclic transmission” is selected, it will stop the cyclical sending telegram till
there is a new object value to be sent. If the parameter “No action” is selected, it will not
implement any operation.
Parameter “Interval of Tele. Cyclic send: Base× Factor”
This parameter is used to set the interval time between two telegrams that are sent cyclically,
it is visible if cyclical sending has been set. Transmission cycle time =Base× Factor.
Base options: 1s
10s
…
1h

9
Factor options: 1…255
Parameter “Send object value after voltage recovery (if yes not equal toggle)”
It can be set whether to send the value of the object “Tele. Switch, X” on the bus after voltage
recovery, this parameter is visible if there is no distinction between a short and long operation.
Options: Yes
No
If the parameter “Yes” is selected, it will send the current value of the object “Tele. Switch,
X” on the bus. Only when the value “Toggle” has not been set in either of the two parameters
“Reaction on opening/closing the contact”, the value of the object “Tele. Switch, X” can be send
on the bus. If one of the two parameters has the value “TOGGLE”, no values are sent in general
on the bus after bus voltage recovery. If “No reaction” or “Stop cyclic transmission” is selected,
there is no values are sent on the bus either.
Parameter “LED function set”
This parameter set the LED direction to indicate the status according to the object “Tele.
Switch, X”. There are A, B, C, D 4 LEDs to choose, each LED has 2 options. If the parameter
“LED X accord to switch value” is selected, LED indicate status is the same with the current value
of the object “Tele. Switch, X”; if the parameter “LED X toggle by switch value” is selected, LED
indicate status is negate to the current value of the object “Tele. Switch, X”.
Options: No action
LED A accord to switch value
LED A toggle by switch value
……
LED D accord to switch value
LED D toggle by switch value
Note: If the four channels invocate the same option, the priority of channel A is the highest, it
will indicate the status according to the value of the object “Tele. Switch, X” in channel A. Then
the priority of channel B is higher, then it‟s C, the last is D. The priority of LED X in function
channel in the device is higher than the LED X channel, the LED X can not be implement any
operation in channel LED X which is used in the function channel in the device. If the parameter
“LED function” is set “LED A accord to switch value” or “LED A toggle by switch value” options,
the operation had been set in LED A can not be carry out.
Parameter “Debounce time”
It can set the vibration time to prevent unwanted multiple operation by bouncing of contacts
in vibration time, which means the effective time of the contact operation.
Options: 10ms
20ms
……
150ms
Min. operation
The “minimum operation” time can only be set when there is no distinction between a short
and a long operation. This parameter is different from others, the effective time of the contact
operation is not only means the effective time when contact close, but also the contact open. The
parameter window can be shown in Fig. 3:

10
Fig. 3 Parameter window “X-Mini Time”
Parameter “Minimum operation time: Base × Factor”
The effective time of the contact operation is: Base × Factor
Base options: 100ms
…..
1min
Factor options:1~255
Note: The parameter window and the explanation of parameter “Min. operation” in the
“Debounce time” in the below chapters are the same with here.

11
Fig. 4 Parameter window “Switch X” (distinguish between a short and long operation)
Parameter “Connect contact type”
This parameter is visible when there is a distinction between a short and long operation, it is
used to define whether the contact is a normally open contact or a normally close contact in
general.
Options: Normally open
Normally close
The parameter introduced in this chapter is use “Normally open” as the example; the
normally close is just opposite.
Parameter “Reaction on short operation” or “Reaction on long operation”
This parameter is visible when there is a distinction between a short and long operation. It is
able to set the operation when preset a short and long operation. When the button operation is
confirm to a short or a long operation, the object value will be update immediately.
Options: No action
Off
On
Toggle
Parameter “Long operation after: Base× Factor”
This parameter is visible if there is a distinction between a short and long operation. The
period TL is defined here, after which an operation is interpreted as “long”. TL = Base× Factor
Base options: 100s
1s
……
1h

12
Factor options: 2~255
Parameter “Number of objects for short/long object operation”
This parameter is visible if there is a distinction between a short and long operation. It is able
to set one or two communication objects, when one communication object is set, long and short
operation share one communication object; when two communication objects are set, long and
short operation use one communication object separately.
Options: 1 object
2 objects
4.2.3 Parameter window “Switch/dimming, X”
Parameter window “Switch/dimming, X” will be shown in Fig. 5, it is visible when Function
of the channel “Switch/Dimming” is selected. The function enables the operation of dimmable
lighting. 1 button operation is also possible.
Fig. 5 Parameter window “Switch/Dimming”
Parameter “Connect contact type”
This parameter defines whether the contact at the input is a normally open contact or a
normally closed contact.
Options: Normally open
Normally open
The parameter introduced in this chapter is use “Normally open” as the example, the
normally close is just opposite.
Parameter “Dimming functionality”
This parameter determines whether the lighting is only dimmed or whether it should also be
switched.
Options: Dimming and switching

13
Only dimming
If the parameter “Only dimming” is selected, there is no distinction between a short and long
operation. The dimming command is therefore carried out immediately after the push button
action; there is no delay to determine whether the operation is long or short. If the parameter
“Dimming and switching” is selected, the push button action need to delay to determine whether
the operation is long or short. In this case, the lighting is dimmed via a long operation and
switched via a short operation.
Parameter “Reaction on short operation”
This parameter is visible if the value “Dimming and switching” has been set in the parameter
“Dimming functionality”. It is able to set the operation after triggered the object “Switch, X”,
that‟s a short operation.
Options: No action
Off
On
Toggle
Parameter “Reaction on long operation”
This parameter is visible if the value “Dimming and switching” has been set in the parameter
“Dimming functionality”. It is able to set a dim brighter or a dim darker after a long operation.
Options: Dimming brighter
Dimming darker
Dim brighter/darker with start brighter
Dim brighter/darker with start darker
The parameter “Dim brighter/darker with start darker” is selected, it can be dim brighter or
dim darker after a long operation, it is just dim darker first and the latter operation negate.
Note: The long and short operation is individual; they are not operation on one object.
Parameter “Long operation after”
This parameter is visible if the value “Dimming and switching” has been set in the parameter
“Dimming functionality”. The period TL is defined here, after which an operation is interpreted as
“long”.
Options: 0.3s
0.5s
……
10s
Parameter “Reaction on operation”
This parameter is visible if the value “Only dimming” has been set in the parameter
“Dimming functionality”. There is no distinction between a short and long operation. The
operation and the option of the parameter “Reaction on long operation” are the same. It is able to
set a dim brighter or a dim darker after a long operation.
Options: Dimming brighter
Dimming darker
Dim brighter/darker with start brighter
Dim brighter/darker with start darker
Parameter “Dimming mode”
This parameter defines the dimming mode is start-stop dimming or steps dimming.

14
Options: Start-stop dimming
Steps dimming
If “Start-stop dimming” is selected, the dimming mode is start-stop dimming; it begins the
dimming process with a dim darker or brighter telegram and ends the dimming process with a stop
telegram. Cyclical sending of the dimming telegram is not required in this case.
If “Step dimming” is selected, the dimming mode is step dimming, the dimming telegram is sent
cyclically during a long operation. Once the operation has finished, a stop telegram ends the
dimming process.
Parameter “Brightness change on every sent”
This parameter is only visible for “Dimming steps”. It can be set, which change in brightness
(percentage value) causes a dimming telegram to be sent cyclically.
Options: 100%
50%
……
1.56%
Parameter “Interval of Tele. Cyclic send”
This parameter is only visible for “Dimming steps”. It is able to set the interval of telegram
cyclic sending after a long operation.
Options: 0.3s
0.5s
……
10s
Parameter “Debounce time”
It can set the vibration time to prevent unwanted multiple operation by bouncing of contacts
in vibration time, that means the effective time of the contact operation.
Options: 10ms
20ms
……
150ms
Min. operation
A minimum operation time can only be set if the value“Only dimming” has been set in the
parameter “Dimming functionality”. The parameter window will be shown in Fig. 3.
4.2.4 Parameter window “Value/force output, X”
Parameter window “Value/force output , X” will be shown in Fig. 6 and Fig. 7, in Fig. 6
there is a distinction between a short and long operation while in Fig.7 is just opposite.

15
Fig. 6 Parameter window “Value/force output, X” (distinguish with a short and long operation)
Fig. 7 Parameter window “Value/force output, X” (do not distinguish with a short and long operation)
Parameter “Connect contact type”
This parameter defines whether the contact at the input is a normally open contact or a

16
normally closed contact.
Options: Normally open
Normally closed
The parameter introduced in this chapter is use “Normally open” as the example; the
normally close is just opposite.
Parameter “Distinction between long and short operation”
This parameter sets whether the input distinguishes between a short and long operation. If
“yes” is selected, there is a waiting period after the opening/closing of the contact to determine
whether the operation is long or short.
Options: Yes
No
Parameter “Reaction on operation”
This parameter is visible if there is no distinction between a short and a long operation. It
defines the data type that is sent when the contact is pressed.
Options: No reaction
1 bit value [0, 1]
……
4 byte value [0…4294967295]
Parameter “Reaction on short operation”/ “Reaction on long operation”
This parameter is visible if there is no distinction between a short and long operation. It
defines the data type that is sent after a short or long operation.
Options: 1 bit value [0, 1]
……
4 byte value [0…4294967295]
Parameter “Output value […]”
This parameter defines the value which is sent on operation. The value range is dependent on
the selected data type. Two values can be set here when there is a distinction between a short and
long operation.
Parameter “Long operation after: Base× Factor [0…255]
This parameter is visible if there is a distinction between a short and long operation. The
period TL is defined here, after which an operation is interpreted as “long”. TL = Base x Factor.
Base options: 100s
1s
…..
1h
Factor options:2~255
Parameter “Send object value after voltage recovery”
This parameter defines whether to send object value of “Tele. Value, X” on the bus after the
voltage recovery. This parameter is visible if there is no distinction between a short and long
operation. If “yes” is selected, the device sends the object “Tele. Value, X” on the bus after bus
voltage recovery.
Options: Yes
No
Parameter “Debounce time”

17
It can set the vibration time to prevent unwanted multiple operation by bouncing of contacts
in vibration time, which means the effective time of the contact operation.
Options: 10ms
20ms
……
150ms
Min. operation
A minimum operation time can only be set if there is no distinction between a short and long
operation. The parameter window will be shown in Fig. 3.
4.2.5 Parameter window “Scene control, X”
Parameter window “Scene control, X” will be shown in Fig. 8, it will be visible when the
function channel “Scene control” is selected. This function enables the states of several actuator
groups to be recalled and stored.
Fig. 8 Parameter window “Scene control, X”

18
Fig. 9 Parameter window “8 bit scene”
Parameter “Connect contact type”
This parameter defines whether the contact at the input is a normally open contact or a
normally closed contact.
Options: Normally open
Normally closed
The parameter introduced in this chapter is use “Normally open” as the example, the
normally close is just opposite.
Parameter “Control the scene by”
It is possible to select whether the scene control is carried out via “5 separate objects” or
whether values that are stored in the actuators are recalled and saved via an “8 bit scene”.
Options: 5 separate objects
8 bit scene
If the parameter “5separate objects” is selected, it will activate the control of the groups of
the actuator, these 5 objects‟ parameter window will be shown in Fig. 10; If the parameter “8 bit
scene” is selected, it can control the scene such as the scene function in dimming actuator、switch
actuator, the parameter window will be shown in Fig. 9.
Parameter “No. of scene [0…63]
This parameter will be visible when the scene control is “8 bit scene”, it can be set the No. of
scene. The No. range is 0~63.
Parameter “Reaction on short operation”
This parameter defines whether a short operation of the input causes a light scene to be
recalled or no reaction takes place.
Options: No reaction

19
Recall scene
Parameter “Store scene”
This parameter defines how the saving of the current scene.
Options: No
On long operation
With object value= „1‟
On long operation and object value= „1‟
Different type of scene control makes the saving of the current scene different. The following
table provides an overview:
Control the scene via “5 separate objects”:
Parameter value Behaviour
On long operation As soon as a long operation is detected, the
object “Store scene, X” sends the value “1” on
the bus and the object “Output 1bit/8bit, group
A…E” send read out telegram. The objects
“Output 1bit/8bit, group A…E” can be
modified via the bus for the duration of the long
operation.
Once the long operation has finished, the
object“Store scene, X” sends the value “0” on
the bus and the current object values can‟t be
modified
On the long operation, If the object “Store
scene, X” receives the value “0” on the bus,
even the long operation has not finished ,the
current object value also can‟t be modified
If object value= „1‟ If the object “Store scene, X” receives the value
“1”, the object values “Output 1bit/8bit, group
A…E” are read out via the bus. While the
object value is “1”, the objects “Output
1bit/8bit, group A…E” can be modified via the
bus.
On receipt of the object value “0”, the current
object values can‟t be modified
On long operation and object value= „1‟ If the object “Store scene, X” receives the value
“1” on the bus, on the next long operation, the
object “Output 1bit/8bit, group A…E” read out
the telegram. The objects “Output 1bit/8bit,
group A…E” can be modified via the bus for
the duration of the long operation. After the end
of the long operation, the object values can‟t be
modified, the object “store scene, X” will send
value „0‟

20
On the long operation, If the object “Store
scene, X” receives the value “0” on the bus,
even the long operation has not finished ,the
current object value also can‟t be modified
Provided that a “1” has not been received at the
object “Store scene, X”, a long operation is
interpreted in the same way as a short
operation.
Control the scene via “8 bit scene”:
Parameter value Behaviour
On long operation After a long operation, the object “8 bit scene”
sends a save command on the bus and thereby
triggers the storing of the current scene in the
actuators e.g. dimming actuator, switch
actuator.
If object value= „1‟ If the object “Store scene, X” receives the value
“1”, the object “8 bit scene” sends a save
command on the bus and save the current
scene.
On long operation and object value= „1‟ If the object “Store scene, X” receives the value
“1” on the bus, the next long push button action
triggers the sending of a save command via the
object “8 bit scene”, the current scene will be
saved. When the object “store scene, X”
receives the value “0”, end up the saving the
value of current scene.
Provided that a “1” has not been received at the
object “Store scene” since the last save, a long
operation is interpreted in the same way as a
short operation.
Parameter “Long operation after”
This parameter is visible when the parameter “Store scene” is “On long operation” or “On
long operation and object value= „1‟”, it is defines the period here, after which an operation is
interpreted as “long”.
Options: 0.3s
0.5s
……
10s
Parameter “Debounce time”
It can set the vibration time to prevent unwanted multiple operation by bouncing of contacts
in vibration time, that means the effective time of the contact operation.
Options: 10ms
20ms
21
……
150ms
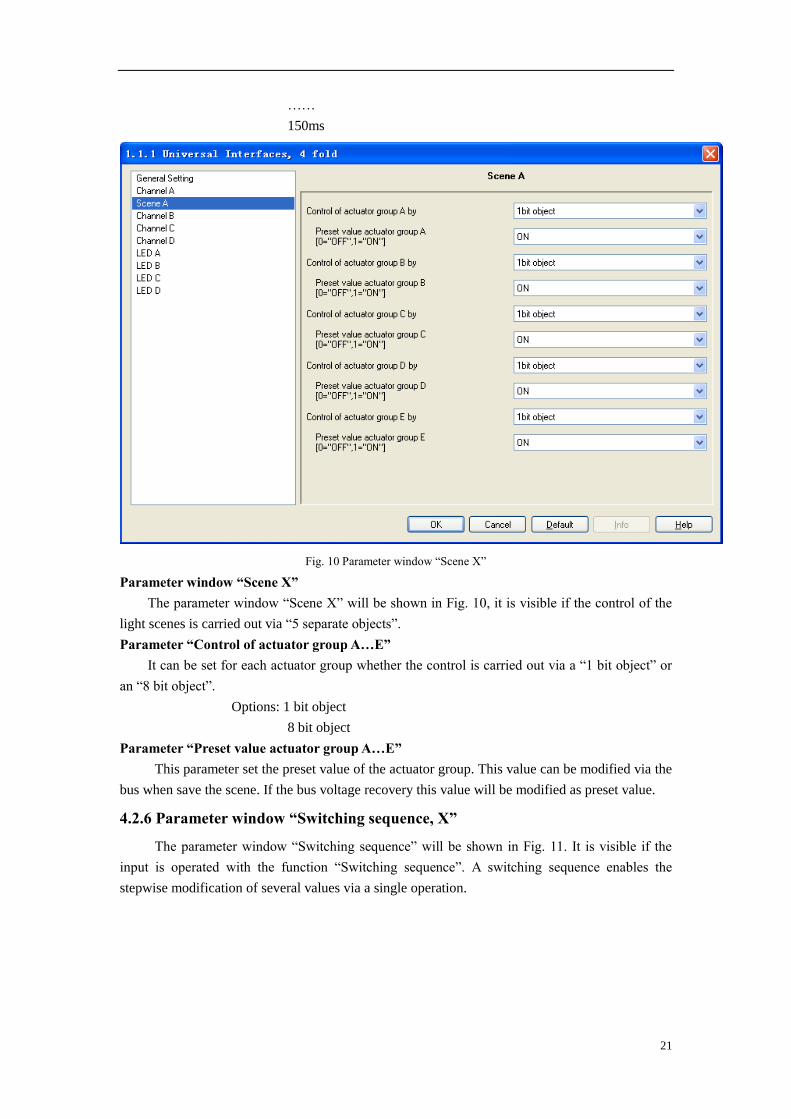
Fig. 10 Parameter window “Scene X”
Parameter window “Scene X”
The parameter window “Scene X” will be shown in Fig. 10, it is visible if the control of the
light scenes is carried out via “5 separate objects”.
Parameter “Control of actuator group A…E”
It can be set for each actuator group whether the control is carried out via a “1 bit object” or
an “8 bit object”.
Options: 1 bit object
8 bit object
Parameter “Preset value actuator group A…E”
This parameter set the preset value of the actuator group. This value can be modified via the
bus when save the scene. If the bus voltage recovery this value will be modified as preset value.
4.2.6 Parameter window “Switching sequence, X”
The parameter window “Switching sequence” will be shown in Fig. 11. It is visible if the
input is operated with the function “Switching sequence”. A switching sequence enables the
stepwise modification of several values via a single operation.

22
Fig.11 Parameter window “switching sequence, X”
Parameter “Connect contact type”
This parameter defines whether the contact at the input is a normally open contact or a
normally closed contact.
Options: Normally open
Normally closed
The parameter introduced in this chapter is use “Normally open” as the example, the
normally close is just opposite.
Parameter “No. of objects”
This parameter defines the number of objects, which is the number of levels, it is identical to
the number of communication objects.
Options: 2level
3level
4level
5level
For example, parameter “3level” means there are 3 communication objects: “level-1”,
“level-2”, “level-3”. The first operation modified the value of “level-1”, the second operation
modified the value of “level-2”, the third operation modified the value of “level-3”, the fourth
from modified the value of “level-3”……, the switch sequence is: 000,001,011,111,011……The
data send on the bus is the value of the communication object that after modified, which is the
alterative data. The communication object “level increment/decrement, X” is used to increase or
decrease the switch level, „1‟ means increase 1 level and „0‟ means decrease.
Different options have different communication objects and different switch levels, but their
management are similar in the case of the same switch sequence type.

23
Parameter “Type of switching sequence”
The switching sequence can be selected here. Each sequence has other object values for each
switching level.
Options: Sequentially on/off (one push button)
Sequentially on/off (several push buttons)
All combinations
Take “3level” as the example to explain the difference between them (send the modified data
on the bus, data “0”= OFF, “1”=ON):
Type of switching sequence Example
Sequentially on/off (one push button) …-000-001-011-111-011-001-…
Sequentially on/off (several push buttons) 000-001-011-111or 111-011-001-000
All combinations …-000-001-011-010-110-111-101-100-… (Gray
code)
Parameter “Function on operation”
Only visible in the switching sequence “Sequentially on/off (several push buttons)”. It can be
set whether an operation of the push button switches up or down a level.
Options: Switch upwards
Switch downwards
The implement direction of the parameter “Switch upwards” is “000-001-011-111”, the
implement direction of the parameter “Switch downwards” is “111-011-001-000”.After the bus
voltage recovery, the current value is 000, if the parameter “Switch downwards” is selected, the
effect will be invisible when operation, then it is possible to operation after switch up a few levels
by the object “level increment/decrement, X”.
Parameter “Sequence is …”
This parameter indicate the manage process when there are different type of switching
sequence.
Parameter “Debounce time/Min. Time”
It can set the vibration time to prevent unwanted multiple operation by bouncing of contacts
in vibration time, which means the effective time of the contact operation.
Options: 10ms
20ms
……
150ms
Min. operation
The parameter window “Min. operation” will be shown in Fig. 3.
4.2.7 Parameter window “Counter, X”
The parameter window “Counter, X” will be shown in Fig. 12. It is visible when the input is
operated with the function “Counter”.
Using the “Counter” function, the device is able to count the number of pulse edges at the
input. A “differential counter” is therefore available if required in addition to the standard counter.
Both counters are triggered by counting pulses but otherwise operate independently of each other.
The counter always has the same data width as the differential counter.
The function is similar with the differential counter and the standard counter. The different is

24
the differential counter can reset the counter value (count from 0) and overflow by the bus counter
report.
Attention: When disable the function, both key scanning and object in/out are disabled. Any
key status change will be ignored.
Fig.12 Parameter window “Counter, X”
Parameter “Pulse detection on”
The type of input signal is defined in this parameter. It can be set whether the contact is a
normally open contact (pulse trailing edge) or a normally closed contact (pulse rising edge).
Options: Closing contact (rising edge)
Opening contact (falling edge)
The parameter introduced in this chapter is use “Closing contact (rising edge)” as the
example, the operation of opening contact is just opposite.
Parameter “LED status on pulse detection”
This parameter defines the indication of LED, whether to be on, off or no action when detect
there is pulse input.
Options: LED A ON
LED A OFF
……
DED D OFF
No action
Note: If the four channels invocate the same option, the priority of channel A is the highest, it
will carry out the preset operation when detected pulse input. Then the priority of channel B is
higher, then it‟s C, the last is D. The priority of LED X in function channel in the device is higher
than the LED X channel, the LED X can not be implement any operation in channel LED X which

25
is used in the function channel in the device. If the parameter “LED status on pulse detection” is
set “LED A ON” or “LED A OFF” options, the operation had been set in LED A can not be carry
out.
Parameter “Date width of counter”
The data type of the counter (absolute counter and differential counter) is defined in this
parameter. The data type specifies the counting range for the counter.
The type of the objects “Output counter value……” and “Differential counter …” is adapted
to the data type of the parameter setting.
Options: 8bit [0…255]
16bit [-32768…32767]
16bit [0…65535]
32bit [-2147483648…2147483647]
Parameter “Counter starts at”
The starting value of the absolute counter is defined in this parameter. When the bus power
on, it will calculate the new counter value from this preset starting value.
Parameter “Debounce time”
It can set the vibration time to prevent unwanted multiple operation by bouncing of contacts
in vibration time, which means the effective time of the contact operation.
Options: 10ms
20ms
……
150ms
Min. operation
The parameter window “Min. operation” will be shown in Fig. 3.
Parameter “Send object value after voltage recovery”
This parameter defines whether to send the current value when the bus voltage recovery. If
the differential counter has been enabled, it is also sent on the bus and it is reset to zero. If the bus
voltage failure, the standard counter and the differential counter are reset to the starting value, the
standard counter will calculate from the preset starting value.
Options: Yes
No
Parameter “Enable additional options (factor/divider. Cyclical send)”
Additional functions are possible here. If this parameter is set to “yes”, the parameter window
Fig.13 is displayed.
Options: Yes
No

26
Fig.13 Parameter window “Counter-X”
Parameter “Divider: number of input pulse for one counter step[1…32767]”
It can be set via this parameter how many pulses are necessary to generate a counting pulse.
The range of pulse importability: 1…32767.
Parameter “Factor: one counter step changes counter value by [-32768…32767]”
This parameter defines how much the counter and differential counter should be increased
by in the event of a counting pulse. Range:-32768…32767
Parameter “Send counter value cyclically”
This parameter defines whether to send the current value cyclically. If this parameter has the
value “yes”, the values of the counter and the differential counter are sent cyclically on the bus.
Options: Yes
No
Parameter “Base”/ “Factor [1…255]”
It is visible if the parameter “Send counter value cyclically” is “Yes”. This parameter is used
to set the interval time between two telegrams that are sent cyclically, Transmission cycle time
=Base× Factor.
Base options: 1s
10s
…
1h
Factor options: 1…255
Parameter “Enable different counter”
This parameter defines whether to enable the differential counter function, if “Yes” is
selected, it will enable.

27
Options: Yes
No
Parameter “Over-/under run of differential at […]”
This parameter is visible if the parameter “Enable differential counter” is set to “yes”.
It can be set in this parameter which value generates an overflow of the differential counter.
The overflow object will send a overflow value “1” on the bus when in the event of an overflow.
4.2.8 Parameter window “Multiple operation, X”
The parameter window “Multiple operation, X” will be shown in Fig.14. It is visible if the
input is operated with the function “Multiple operation”. Enable the function, if the input is
operated several times within a certain period, a specified object value can be modified depending
on the number of operations. This enables e.g. different light scenes to be implemented with
multiple push button actions.
Fig.14 Parameter window “Multiple operation”
Parameter “Connect contact type”
This parameter defines whether the contact at the input is a normally open contact or a
normally closed contact.
Options: Normally open
Normally closed
The parameter introduced in this chapter is use “Normally open” as the example, the
normally close is just opposite.
Parameter “Max. number of operations [=Num. of objects]”
This parameter specifies the maximum permitted number of operations. This number is
identical to the number of communication objects “Output X-fold”.
Options: Single operation

28
2-fold operation
3-fold operation
4-fold operation
Parameter “Value send (object “Tele. Operation …-fold”)”
It can be set here which object value should be sent.
Options: On
Off
Toggle
The current object value is inverted in the “Toggle” setting.
Parameter “Value on every operation send”
This parameter defines whether to send the operation value.
Options: Yes
No
If “yes” is entered in this parameter, the associated object value is updated and sent after each
operation in the case of multiple push button actions. Example: For three-fold operations, the
objects “output 1-fold” (after the first operation), “output 2-fold” (after the second operation) and
“output 3-fold” (after the third operation) are sent. If “No” is selected, the current value will be
send on the bus until the last operation delay (the delay time is the interval time between two
operations).
Parameter “Max. time between two operation”
This parameter sets the interval between two operations. If there are no further operations
within this period, the object “output 1-fold” is sent again.
Options: 0.3s
0.5s
…
10s
Parameter “Additional object for long operation”
This parameter defines whether to activate the long operation. If a long operation is carried
out after one or several short operations within the maximum period, the short operations are
ignored.
Options: Yes
No
Parameter “Long operation after”
This parameter is visible if long operation activate. The period is defined here, after which an
operation is interpreted as “long”.
Options: 0.3s
0.5s
…
10s
Parameter “Value send (object “Tele. Long Operation”)”
This parameter is visible if long operation activate. This parameter defines the value sent by
the object “output long-fold” on the bus when it is set long operation.
Options: On
Off

29
Toggle
The current object value is inverted in the “Toggle” setting.
Parameter “Debounce time”
It can set the vibration time to prevent unwanted multiple operation by bouncing of contacts
in vibration time, which means the effective time of the contact operation.
Options: 10ms
20ms
……
150ms
4.2.9 Parameter window “Shutter control, X”
The parameter window “Shutter control, X” will be shown in Fig.15. It is visible if the
channel function “Shutter control” is selected. When enable this function, it is possible to control
the shutter by one button/switch or two button/switch operation.
Fig.15 Parameter window “Shutter control, X”
Parameter “Connect contact type”
This parameter defines whether the contact at the input is a normally open contact or a
normally closed contact.
Options: Normally open
Normally closed
The parameter introduced in this chapter is use “Normally open” as the example, the
normally close is just opposite.
Parameter “Operation functionality type”
This parameter defines the types of the shutters operation, detailed description of the type
and function as the following table:

30
1-push-button,short=stepping, long=moving
Short operation Alternate implement “Stop/Adjust upward” or “Stop/Adjust
downward” operation
(alternate send the value of the object “0”and“1”)
Long operation Alternate implement “Move up” or “Move down” operation
(alternate send the value of the object “0”and“1”)
1-push-button, short=moving, long=stepping
Short operation Alternate implement “Move up” or “Move down” operation
(alternate send the value of the object “0”and“1”)
Long operation Alternate implement “Stop/Adjust upward” or “Stop/Adjust
downward” operation
(alternate send the value of the object “0”and“1”)
1-push-button-operation, moving
Operation When operation,send the command in sequence:
…… - >Move up - >Stop/Adjust upward - >Move down
->Stop/Adjust downward->……
1-switch-operation, moving
Operation start
(press the button)
Alternate implement “Move up” or “Move down” operation
(alternate send the value of the object “0”and“1”)
Operation end
(Release the button)
Stop/Adjust
2-push-button, standard
Short operation “Stop/Adjust upward” or “Stop/Adjust downward” ( set by
parameter)
Long operation “Move up” or “Move down”(set by parameter)
2-push-button, moving[shutter]
Operation When operation,send the command in sequence:
……->Move up->Stop/Adjust upward->……or
……->Move down->Stop/Adjust downward->……
(Move up/down set by parameter)
2-push-button, stepping
Operation “Stop/ Adjust upward” or “Stop/ Adjust downward”( set by
parameter)
(keep pressing the button can send cyclic)
2-switch-operation, moving[shutter]
Operation start “Move up” or “Move down”(set by parameter)
Operation end “Stop / Adjust upward” or “Stop / Adjust downward”( the sending
value is identical to the value that the operation starting)
Parameter ““ Tele. STOP/adjust adj.” Cyclical send”
It is visible if the shutter control type is “1-push-button, short=moving,
long=stepping”and“2-push-button, stepping”. It is able to set the interval time of sending the
object “stop/adjust adj.” cyclical.

31
Options: 0.3s
0.5s
…
10s
Parameter “Reaction on short operation”
It is visible if the shutter control type is “2-push-button, standard”. This parameter defines the
operation with short operation.
Options: Stop/adjust up
Stop/adjust down
Parameter “Reaction on long operation”
It is visible if the shutter control type is “2-push-button, standard”. This parameter defines the
operation with long operation.
Options: Move up
Move down
Parameter “Reaction on operation”
It is visible if the shutter control type is“2-push-button, moving[shutter]” 、
“2-switch-operation, moving[shutter]”and“2-push-button, stepping”. It is defines the action when
operation. Different control type makes different operate action. The former two control type is
move up and down; the last control type is stop reaction.
Options: Move up
Move down
Options: Stop/adjust up
Stop/adjust down
Parameter “Long operation after”
This parameter is visible if long operation activate. The period is defined here, after which an
operation is interpreted as “long”.
Options: 0.3s
0.5s
…
10s
Parameter “Debounce time”
It can set the vibration time to prevent unwanted multiple operation by bouncing of contacts
in vibration time, which means the effective time of the contact operation.
Options: 10ms
20ms
……
150ms
4.3 Description of setting the system parameter in part of LED channel
The LED priority in the channel LED part is lower than the LED in device channel. When
enable the LED setting in device channel, the LED in LED channel will not action.

32
4.3.1 Parameter window “Flashing, X”
The parameter window will be shown in Fig.16. It is able to set the LED flash function and
turn on the LED for long time simultaneously.
Fig.16 Parameter window “Flashing, X”
Parameter “Function of the LED channel”
This parameter defines the function of the LED channel. The default parameter is “Flashing”
function. If “No action” is selected, it means this channel disable.
Options: No action
Flashing
Switch
Control by input
Indicate object in
Indicate object out
Indicate object in and out
Parameter “LED Flashing, if”
This parameter defines the mode of opening the LED flashing.
Options: Object “LED flashing”=0
Object “LED flashing”=1
Parameter “Time limit of LED control”
This parameter defines whether to enable the function to restrict the flashing of the LED.
Options: Yes
No
Parameter “Time limit: Base× Factor
This parameter is visible if the time limit is active. It is defines the time of LED flashing:

33
Base× Factor.
Base options: 1s
10s
…
1h
Factor options: 1…255
Parameter “Send status by object “Tele. Status””
This parameter defines whether to send the LED status report on the bus.
Options: Yes
No
If “Yes” is selected, the object “Send its status, X” will send value “1” when LED flashing; it
will send value “0” when LED stop flashing.
Parameter “State of LED on bus voltage recovery”
It is defines the state of LED when the bus voltage recovery.
Options: On
Off
Parameter “LED is switched ON/OFF for”
It is defines the time of the LED switched on/off when LED flashing.
Options: 600ms
800ms
……
60s
4.3.2 Parameter window “Switch, X”
The parameter window “Switch, X” will be shown in Fig.17 to defines the switch function
of LED. The LED will switch off automatic and it can keep switching on after the LED is switch
on for a while.

34
Fig.17 Parameter window “Switch, X”
Parameter “LED is switch ON, if”
This parameter defines the mode to switch on the LED.
Options: Object “Tele. Switch”=0
Object “Tele. Switch”=1
Parameter “Time limit of LED control”
This parameter defines whether to enable the function to restrict the time to switch on the
LED.
Options: Yes
No
Parameter “Time limit: Base× Factor
This parameter is visible if the time limit is active. It is defines the time of LED flashing:
Base× Factor. After this period, the LED switches off automatically.
Base options: 1s
10s
…
1h
Factor options: 1…255
Parameter “Send status by object “Tele. Status””
This parameter defines whether to send the LED status report on the bus.
Options: Yes
No
If “Yes” is selected, the object “Send its status, X” will send value “1” when LED switch on;
it will send value “0” when LED switch off.

35
Parameter “State of LED on bus voltage recovery”
It is defines the state of LED when the bus voltage recovery.
Options: On
Off
4.3.3 Parameter window “Control by input, X”
The parameter window “Control by input, X” will be shown in Fig.18, the LED is used to
indicate the button input.
Fig.18 Parameter window “Control by input, X”
4.3.4 Parameter window “Indicate object in, X”
The parameter window “Indicate object in, X” will be shown in Fig.19, the LED is used to
indicate the input of the communication object.

36
Fig.19 Parameter window “Indicate object, X”
Parameter “LED on time”
This parameter defines the indicative time of LED when there is input of communication
object, which means the switch on time.
Options: 100ms
200ms
……
60s
4.3.5 Parameter window “Indicate object out, X”
The parameter window “Indicate object out, X” will be shown in Fig.20, the LED is used to
indicate the output of the communication object.

37
Fig.20 Parameter window “Indicate object out, X”
Parameter “LED on time”
This parameter defines the indicative time of LED when there is output of communication
object, which means the switch on time.
Options: 100ms
200ms
……
60s
4.3.6 Parameter window “Indicate object in and out, X”
The parameter window “Indicate object in and out, X” will be shown in Fig. 21, the LED is
used to indicate the input and output of the communication object.

38
Fig.21 Parameter window “Indicate object in and out, X”
Parameter “LED on time”
This parameter defines the indicative time of LED when there is input or output of
communication object, which means the switch on time.
Options: 100ms
200ms
……
60s
5. Description of communication object
The communication object is the medium to communicate other device on the bus, which
means only the communication object can communicate with bus. The communication object and

39
the object in each channel are the same, then use channel A as the example to introduce the
function of each communication object.
5.1 Communication object “swicth”
Fig.5.1 Communication object “Switch”
Note: “C” in “Flag” column in the below table means enable the communication function of the object;
“W” means it is able to modify the other devices‟ value by the communication objects; “R” means the value of the
object can be read by the other devices; “T” means the object has the transmission function; “U” means the value
of the object can be modified by other devices.
No. Function Object name Data Flags
0 CH X Disable Disable, X 1Bit C,W
When enable the channel function, this communication object will be active to disable/enable the channel
function. The communication object will disable this function if receive a telegram with logic value “0” while it
will enable the channel function if receive a telegram “1”. The control telegram sent by all objects are
ineffectiveness when the channel function disable. The channel function default to enable when the bus voltage
recovery.(All communication object “Disable” in channel function operate equally.)
1 CH X Switch Switch, X 1Bit C,W,T
This communication object is visible if the channel function “Switch” is enable. It is visible no matter to
distinguish short/long operation or not. Operate with button input(or a short operation) the object value to carry out
the relevant action, such as ON、OFF、TOGGLE.
2 CH X Switch-long Switch-long, X 1Bit C,T
This communication object is visible if parameter “Number of objects for short/long object operation” is “2
objects” and it is distinguish with long and short operation. Operate with a long operation to input the object value
to carry out the relevant action, such as ON、OFF、TOGGLE.
Form 1 Communication object “Switch”
5.2 Communication object “switch/dimming”
Fig.5.2 Communication object “Switch/dimming”

40
No. Function Object name Data Flags
1 CH X Switch Switch, X 1bit C,W,T
It is visible if parameter “Dimming functionality” selected “Dimming and switching”. Operate with a short
operation to input the object value to carry out the relevant action, such as ON、OFF、TOGGLE.
2 CH X Dimming Dimming, X 4bit C,T
This communication object input by a long operation to send the command to dim up or dim down. It can
control the dimming device on bus to carry out relative dimming. It will send a stop command to stop dimming
when the long operation is end.
Form 2 Communication object “Switch/dimming”
5.3 Communication object “value/force output”
There are many data types and communication objects, it will not list in Fig.5.3. This
different data types communication object have the same operation that are transmit the input
object value, which the range of transmit object value are different. It is possible to distinguish a
long/short operation or not, the two objects enable when distinguished.
Fig. 5.3 Communication object “Value/Forced output”
No. Function Object name Data type Flags
1 CH X Value 1bit
(1bit/2bit/……/4byte)
Output 1bit, X
(1bit/2bit/……/4byte)
1bit
(1bit/2bit/……/4byte) C,T
This communication object is used to transmit the input value. It is only transmit the object value in short
operation if distinguish a long and short operation. The value range is depend on the data type, if the data type of
the communication object is different, the importability range of the object value is different. The data type depend
on parameter “Reaction on (short) operation”.
2 CH X Value 1bit-long
(1bit/2bit/……/4byte)
Output 1bit-long, X
(1bit/2bit/……/4byte)
1bit
(1bit/2bit/……/4byte) C,T
This communication object is visible if there is a distinction between long and short operation, it is used to
transmit the object input value in long operation. The value range is depending on the data type, if the data type of
the communication object is different, the importability range of the object value is different. The data type
depends on parameter “Reaction on long operation”.
Form 3 Communication object “Value/Forced output”
5.4 Communication object “scene control”
The communication object “Scene control” will be shown in Fig.5.4; it is including the
actuator group and the communication object in the scene control mode. The control mode of
actuator group control by 5 independent communication object, it is control by 1bit and 8bit data.
The scene control mode control by a 8 bit data.

41
Fig. 5.4 Communication object “Scene control”
No. Function Object name Data type Flags
1~5 CH X 1bit/8bit,
Group-A…E
Output 1bit/8bit,
Group-A…E,X
1bit/1byte C,W,T,U
It is visible if parameter “Control the scene” selected “5 separate”. It is used to control the actuator group, it
can control by a 1 bit or 8 bit data (set by parameter). When saving the scene, the value of object “output 1bit/8bit,
group A…E” will be read and storage by bus. When the bus voltage recovery, the value of the object resume to the
default value and the new storage value will be lost.
1 CH X 8bit Scene Output 8bit scene, X 1 byte C,T
This communication object is visible if parameter “Control the scene” selected “8bit scene”,it is used to
control the scene. It is possible to invocate or save the scene by a 8 bit command sent by this object. The definition
of the 8-bit command will be described below (This object is only to communicate “C” and transmit “T”, do not
have the function modify “W” and update “U”):
Assuming an 8-bit command (binary coding) as:FXNNNNNN
F: invocate the scene with “0”; save the scene with “1”;
X:0
NNNNNN:scene number(0…63)。
6 CH X Store scene Store scene, X 1bit C,W,T
This parameter trigger the scene storage or indicate the accomplish of the scene by bus, decided by the mode
of the scene storage. The detail storage process will be described in the scene storage parameter chapter.
Form 4 Communication object “Scene control”
5.5 Communication object “switch sequence”
The communication object “Switching sequence” will be shown in Fig.5.5. It can modify the
object value with an operation step by step. Each object corresponding to one switch level.
Fig.5.5 Communication object “Switching sequence”

42
No. Function Object name Data type Flags
1~5 CH X level-1(1~5) Output level-1(1~5), X 1bit C,T
The number of the communication object (maximum 5) which the levels of switch set by parameter “No. of
object”. The communication object sent on bus is the object which is modified, which the value of the
communication object had been changed. The detail process will be described in the switching sequence parameter
chapter.
6 CH X level increment/decrement level increment/decrement, X 1bit C,W
The communication object “level increment/decrement, X” is used to increase/decrease the level of the
switch. It will increase one level when sending “1” and decrease a level when sending “0”. The detail process will
be describe in the switching sequence parameter chapter.
Form 5 Communication object “Switching sequence”
5.6 Communication object “counter”
The communication object “Counter” will be shown in Fig.5.6. Including standard counter
and differential counter communication object, both these communication objects are initiated
counter by one operation and the counter range are the same, but the counting are independent of
each other.
Fig.5.6 Communication object “Counter”
No. Function Object name Data type Flags
1 CH X Counter value
Output counter value 1byte,
X
(1byte/2byte/4byte)
1Byte
(1byte/2byte/4byte) C,W,T
This communication object is used to transmit the current counting value of the standard counter, and it can
modify the counting value simultaneously. Different data type makes the different counting range, it is defines by
parameter “Date width of counter”.
2 CH X Differential
Counter
Differential Counter 1byte, X
(1byte/2byte/4byte)
1Byte
(1byte/2byte/4byte) C,W,T
It is visible if enable the parameter “Enable differential counter”. This communication object is used to
transmit the current counting value of the differential counter, and it can modify the counting value simultaneously.
Different data type makes the different counting range, it is defines by parameter “Date width of counter”.
3 CH X Request Counter
value
Request Counter value, X 1Bit C,W
This communication object is used to ask for the current counting value of the standard counter and the
differential counter. The communication object “CH X Counter value” and “CH X Differential Counter” will
transmit the current counting value if receive a logic value “1”, it will no reaction if receive a logic value “0”
telegram.
4 CH X Differential
overflow
Differential counter overflow,
X
1Bit C,T

43
It is visible if enable the parameter “Enable differential counter”. Once the counting of the differential counter
exceed the overflow value preset by parameter “Over-/under run of differential at [0…255]”,it will send telegram
“1” on bus to report the overflow.
5 CH X Rst Differential
Counter
Reset Differential Counter, X 1Bit C,W
It is visible if enable the parameter “Enable differential counter”. It is used to reset the counting value of the
differential counter, which counting from 0.It will reset the counting value if receive a logic value “1”telegram,
and it will no reaction if receive a “0”.
Form 6 Communication object “Counter”
5.7 Communication object “multiple operation”
The communication object “Multiple Operation” will be shown in Fig.5.7. The value of the
designate operation object will be modify if detect multiple operation in period.
Fig.5.7 Communication object “Multiple operation”
No. Function Object name Data type Flags
1~4 CH X 1-fold(1~4) Output 1-fold,
X(1~4)
1Bit C,T
The number of the communication object (maximum 4) is set by parameter “Max. number of
operations(=Num. of objects)”. If there are multiple operation, multiple objects will send the relevant telegram on
bus, which the telegram set by parameter “value send (object “Tele. Operation…-fold”)”. The detail operation
process will be describe in the multiple operation parameter chapter.
5 CH X Long-fold Output Long-fold, X 1Bit C,T
It is visible if parameter “Additional object for long operation” selected “yes”. Once detected a long operation
the object will send telegram on bus, the telegram is set by parameter “value send (object “Tele. Long
operation”)”.
Form 7 Communication object “Multiple operation”
5.8 Communication object “shutter control”
The communication object “Shutter Control” will be shown in Fig.5.8
Fig.5.8 Communication object “Shutter control”
No. Function Object name Data type Flags
1 CH X shutter
UP/DOWN
Output shutter UP/DOWN, X 1Bit C,T
This communication object move up/down the shutter by sending command by bus. It will move down if the
communication object send a “1” telegram, it will move up if sending a “0”.

44
2 CH X Stop/adjust adj Output Stop/adjust adj, X 1Bit C,T
It will stop/adjust the shutter by sending command by bus. It will stop/ adjust down if sending a “1” telegram,
and it will stop/adjust up if sending “0”.
3 CH X Upper limit
position
Upper limit position, X 1Bit C,W
It is used to limit the upper moving. It is limit the upper moving if the object receive a logic value “1”, and
negate it if receive “0”.
4 CH X Lower limit
position
Lower limit position, X 1Bit C,W
It is used to limit the lower moving. It is limit the lower moving if the object receive a logic value “1”, and
negate it if receive “0”.
Form 8 Communication object “Shutter control”
5.9 Communication object “LED X—flashing”
The communication object “LED X—Flashing” will be shown in Fig.5.9.
Fig.5.9 Communication object “LED X-Flashing”
No. Function Object name Data type Flags
28 LED X Flashing LED. Flashing, X 1Bit C,W
It is used to control the LED flashing. It will start flashing if receive “1” or “0” telegram (defines by “LED
flashing, if”), the flashing time set by parameter. And it will stop LED if receive “0” or “1”.
29 LED X Permanent on LED permanent on,
X
1Bit C,W
It is used to open LED for a long period and its priority is higher than the communication object “LED.
Flashing, X”. It will open LED if receive telegram “1”, negate priority and the LED resume the foregoing
operation if receive “0”.
30 LED X Send its status Send its status, X 1Bit C,T
It is visible if “Send status by object “Tele. Status”” selected “Yes”,it is used to send the status of LED.
Sending “1” means LED open or flashing, and sending “0” means the LED is stop. The object LED. Flashing, X”
will send telegram “1” if sending open flashing requirement every time.
Form 9 Communication object “LED X-Flashing”

45
5.10 Communication object “LED X—SWITCH”
The communication object “LED X—Switch” will be shown in Fig.5.10
Fig.5.10 Communication object “LED X-Switch”
No. Function Object name Date type Flags
28 LED X Switch LED. switch, X 1Bit C,W
This communication object is used to open LED. It will open LED if the object receive a “1” or “0” telegram
(defines by “LED is Switch ON,if”),the open time can be set by parameter;it will stop LED if receive “0” or “1”.
29 LED X Permanent
on
LED permanent on,
X
1Bit C,W
It is used to open LED for a long period and its priority is higher than the communication object “LED.
switch, X”. It will open LED if receive telegram “1”, negate priority and the LED resume the foregoing operation
if receive “0”.
30 LED X Send its
status
Send its status, X 1Bit C,T
It is visible if “Send status by object “Tele. Status”” selected “Yes”,it is used to send the status of LED.
Sending “1” means LED open, and sending “0” means the LED is stop. The object LED. switch, X” will send
telegram “1” if sending open requirement every time.
Form 10 Communication object “LED X-Switch”