jolly holidays ebook from red heart yarn - wordpress.com...jolly holidays ebook from red heart yarn...
TRANSCRIPT

Jolly Holidays eBook from Red Heart Yarn
Find more crochet and knitting patterns, yarn inspiration and creative ideas at www.redheart.com. 2
Jolly Holidays eBook from Red Heart Yarn
Find more crochet and knitting patterns, yarn inspiration and creative ideas at www.redheart.com. 3
Jolly Holidays eBook from Red Heart Yarn
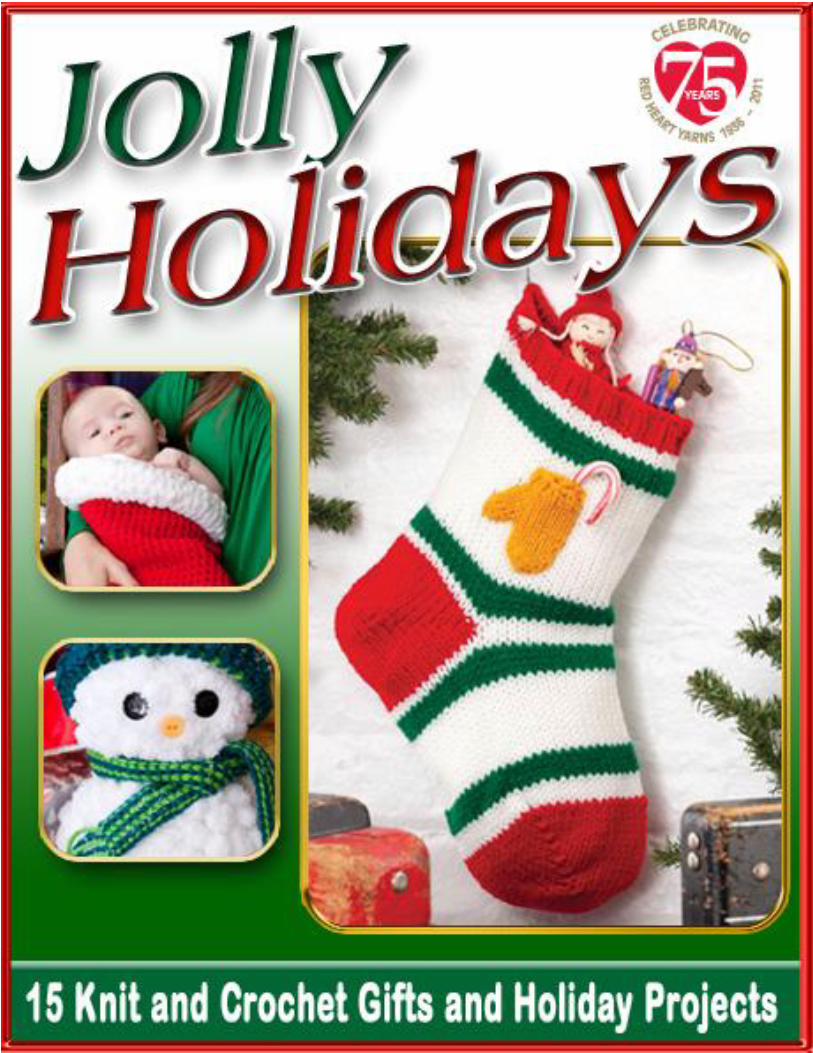
15 Knit and Crochet Gifts and Holiday Projects
Copyright 2011 by Prime Publishing LLC All rights reserved. No part of this book may be reproduced or transmitted in any form or by
any means, electronic or mechanical, including photocopying, recording, or by any information storage or retrieval system, without written permission from the publisher, except in the case
of brief quotations embodied in critical articles and reviews.
Trademarks are property of their respective holders. When used, trademarks are for the benefit of the trademark owner only.
Published by Prime Publishing LLC, 3400 Dundee Road, Northbrook, IL 60062 – www.primecp.com
Free Craft Projects
Jolly Holidays eBook from Red Heart Yarn
Find more crochet and knitting patterns, yarn inspiration and creative ideas at www.redheart.com. 4
Letter from the Editors
Jolly Holidays to You! Here at Red Heart Yarn, we love the holidays and we know you do too. You love knitting and crocheting festive decorations for your home. You spend your spare time creating gifts for your friends and family. And you make cozy hats, scarves, and wristers to keep you and yours warm in the wintery season. So we rounded up our very favorite projects just for you. We have Bright Knit Hats and Mittens Holiday Decorations (pg. 8) and Simple Striped Santa Stockings (pg. 17) to decorate your home. The Holiday Crocheted Granny Square Throw (pg. 19) and Happy Holiday Turtleneck Bottle Cozy (pg. 23) make great gifts. If there are youngsters on your list, try the Huggable Happy-Colors Penguin (pg. 24) or for the very young, make a Santaland Holiday Baby Cocoon (pg. 22) for baby. If you need some snuggly gifts, we’ve got some trendy hats like the Easy-to-Crochet Petite-Brimmed Cap (pg. 32), a Shimmering Lacy Bobble Scarf and matching Wristlets (pg. 30), and another great pair of Cozy Knit Watercolor Wristers (pg. 28) - otherwise known as fingerless gloves. You’re going to love these projects as much as we do at Red Heart. And you’ll love creating them with our wonderful yarn, in all the textures and colors you can imagine. Sincerely,
Red Heart Yarn www.redheart.com

Jolly Holidays eBook from Red Heart Yarn
Find more crochet and knitting patterns, yarn inspiration and creative ideas at www.redheart.com. 5
Jolly Holidays Table of Contents
Abbreviations .................................. 5
Holiday Decorations ........................ 6 Polka Dot Mushroom Ornaments ................... 6 Bright Knit Hats and Mittens Holiday
Decorations ................................................. 8 Traditional Holiday Stocking with
Tiny Mitten Pocket .................................... 11 Easy Yarn Snowman with Crocheted
Hat and Scarf ............................................. 13 Crocheted Christmas Tree Duo ..................... 15 Simple Striped Santa Stockings ..................... 17
Great Gifts ......................................19 Holiday Crocheted Granny Square Throw .... 19 A Creative Case for Crochet Hooks ............... 21 Santaland Holiday Baby Cocoon ................... 22 Happy Holiday Turtleneck Bottle Cozy ......... 23 Huggable Happy-Colors Penguin .................. 24
Hats, Wristers, and a Scarf ...........28 Cozy Knit Watercolor Wristers ..................... 28 Quick and Easy Knit in the Round Hat .......... 29 Shimmering Lacy Bobble
Scarf and Wristlets .................................... 30 Easy-to-Crochet Petite-Brimmed Cap .......... 32
Abbreviations A, B, C – Color A, Color B, Color, C, etc. ch – chain dc – double crochet dec – decrease dtr – double treble crochet hdc – half double crochet inc – increase K – knit k2tog – knit next two stitches together mm – millimeters P – purl p2tog – purl next two stitches together rnd – round
sc – single crochet sp(s) – space(s) st(s) – stitch(es) St st – stockinette stitch (knit right side rows,
purl wrong side rows) tog – together tr – treble (or triple) crochet yo – yarn over * or ** – repeat whatever follows the * or **
as indicated [ ] – work directions in brackets the number of times specified
Jolly Holidays eBook from Red Heart Yarn
Find more crochet and knitting patterns, yarn inspiration and creative ideas at www.redheart.com. 6
Holiday Decorations
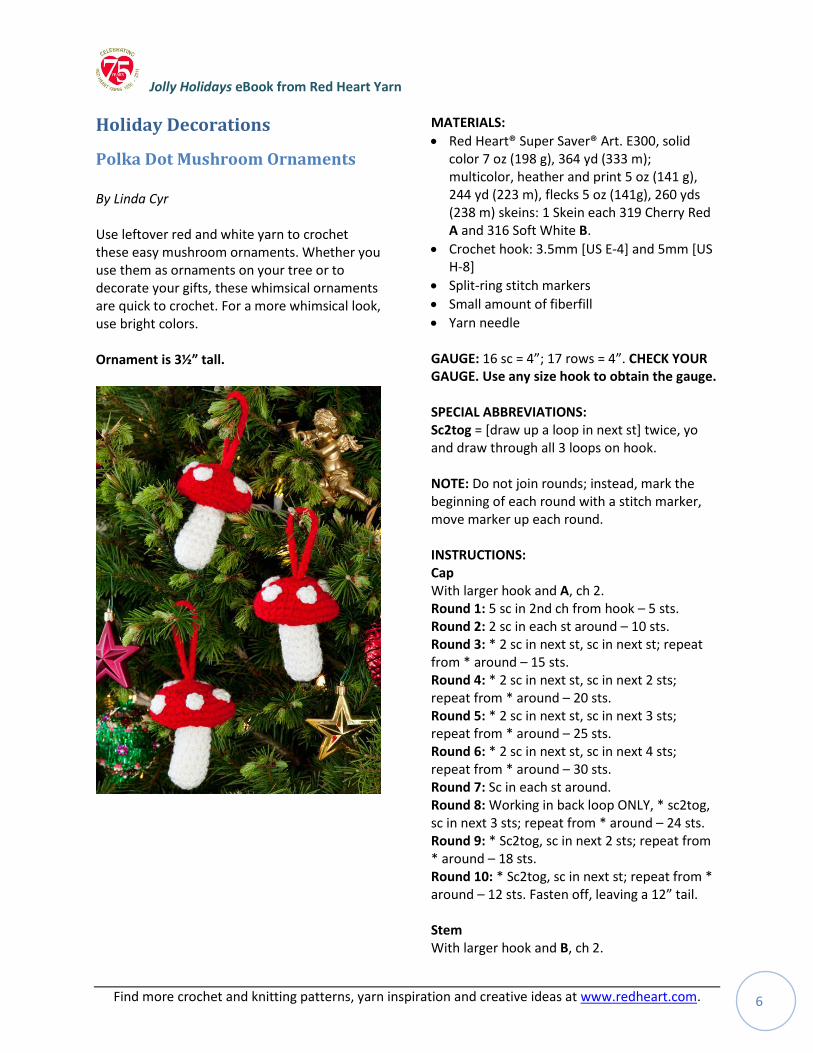
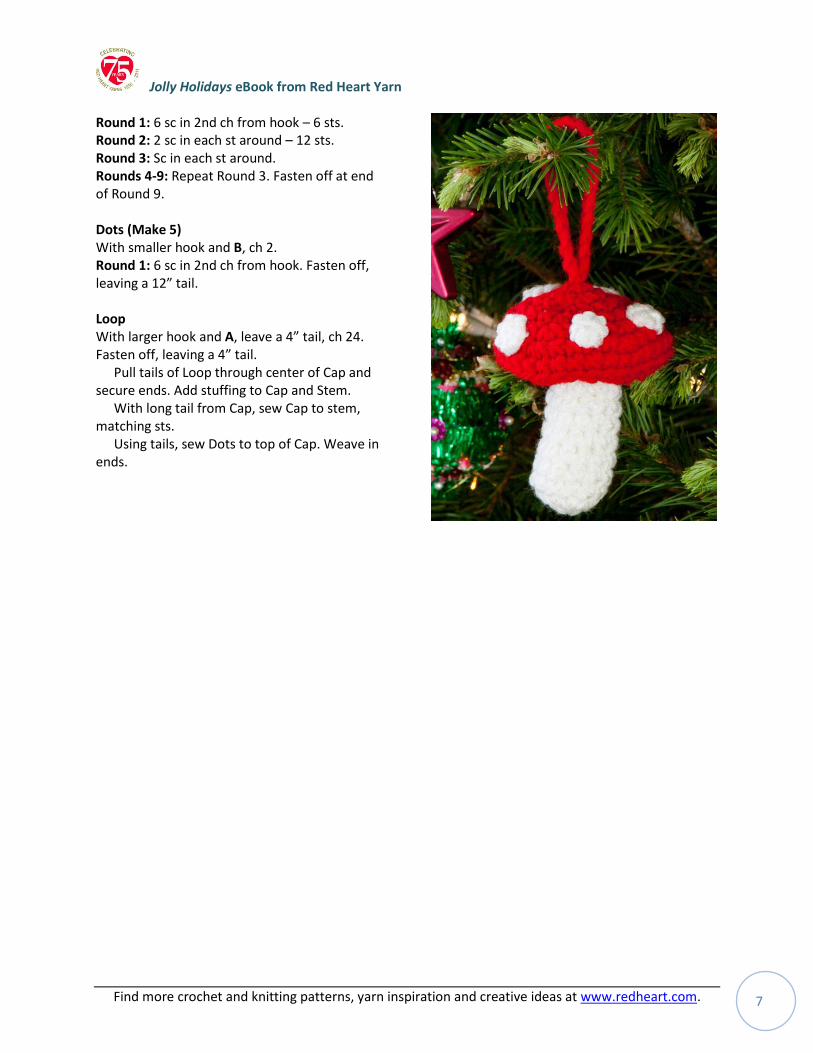
Polka Dot Mushroom Ornaments By Linda Cyr Use leftover red and white yarn to crochet these easy mushroom ornaments. Whether you use them as ornaments on your tree or to decorate your gifts, these whimsical ornaments are quick to crochet. For a more whimsical look, use bright colors. Ornament is 3½” tall.
MATERIALS:
Red Heart® Super Saver® Art. E300, solid color 7 oz (198 g), 364 yd (333 m); multicolor, heather and print 5 oz (141 g), 244 yd (223 m), flecks 5 oz (141g), 260 yds (238 m) skeins: 1 Skein each 319 Cherry Red A and 316 Soft White B.
Crochet hook: 3.5mm [US E-4] and 5mm [US H-8]
Split-ring stitch markers
Small amount of fiberfill
Yarn needle GAUGE: 16 sc = 4”; 17 rows = 4”. CHECK YOUR GAUGE. Use any size hook to obtain the gauge. SPECIAL ABBREVIATIONS: Sc2tog = [draw up a loop in next st] twice, yo and draw through all 3 loops on hook. NOTE: Do not join rounds; instead, mark the beginning of each round with a stitch marker, move marker up each round. INSTRUCTIONS: Cap With larger hook and A, ch 2. Round 1: 5 sc in 2nd ch from hook – 5 sts. Round 2: 2 sc in each st around – 10 sts. Round 3: * 2 sc in next st, sc in next st; repeat from * around – 15 sts. Round 4: * 2 sc in next st, sc in next 2 sts; repeat from * around – 20 sts. Round 5: * 2 sc in next st, sc in next 3 sts; repeat from * around – 25 sts. Round 6: * 2 sc in next st, sc in next 4 sts; repeat from * around – 30 sts. Round 7: Sc in each st around. Round 8: Working in back loop ONLY, * sc2tog, sc in next 3 sts; repeat from * around – 24 sts. Round 9: * Sc2tog, sc in next 2 sts; repeat from * around – 18 sts. Round 10: * Sc2tog, sc in next st; repeat from * around – 12 sts. Fasten off, leaving a 12” tail. Stem With larger hook and B, ch 2.
Jolly Holidays eBook from Red Heart Yarn
Find more crochet and knitting patterns, yarn inspiration and creative ideas at www.redheart.com. 7
Round 1: 6 sc in 2nd ch from hook – 6 sts. Round 2: 2 sc in each st around – 12 sts. Round 3: Sc in each st around. Rounds 4-9: Repeat Round 3. Fasten off at end of Round 9. Dots (Make 5) With smaller hook and B, ch 2. Round 1: 6 sc in 2nd ch from hook. Fasten off, leaving a 12” tail. Loop With larger hook and A, leave a 4” tail, ch 24. Fasten off, leaving a 4” tail.
Pull tails of Loop through center of Cap and secure ends. Add stuffing to Cap and Stem.
With long tail from Cap, sew Cap to stem, matching sts.
Using tails, sew Dots to top of Cap. Weave in ends.
Jolly Holidays eBook from Red Heart Yarn
Find more crochet and knitting patterns, yarn inspiration and creative ideas at www.redheart.com. 8
Bright Knit Hats and Mittens
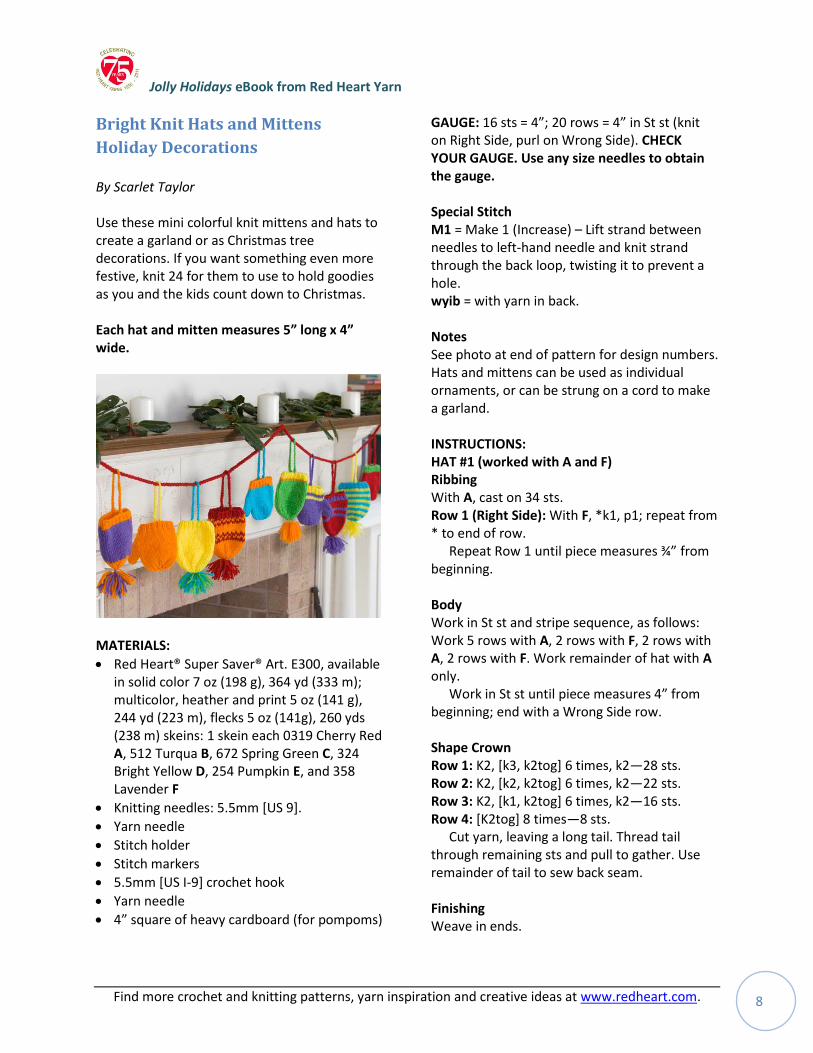
Holiday Decorations By Scarlet Taylor Use these mini colorful knit mittens and hats to create a garland or as Christmas tree decorations. If you want something even more festive, knit 24 for them to use to hold goodies as you and the kids count down to Christmas. Each hat and mitten measures 5” long x 4” wide.
MATERIALS:
Red Heart® Super Saver® Art. E300, available in solid color 7 oz (198 g), 364 yd (333 m); multicolor, heather and print 5 oz (141 g), 244 yd (223 m), flecks 5 oz (141g), 260 yds (238 m) skeins: 1 skein each 0319 Cherry Red A, 512 Turqua B, 672 Spring Green C, 324 Bright Yellow D, 254 Pumpkin E, and 358 Lavender F
Knitting needles: 5.5mm [US 9].
Yarn needle
Stitch holder
Stitch markers
5.5mm [US I-9] crochet hook
Yarn needle
4” square of heavy cardboard (for pompoms)
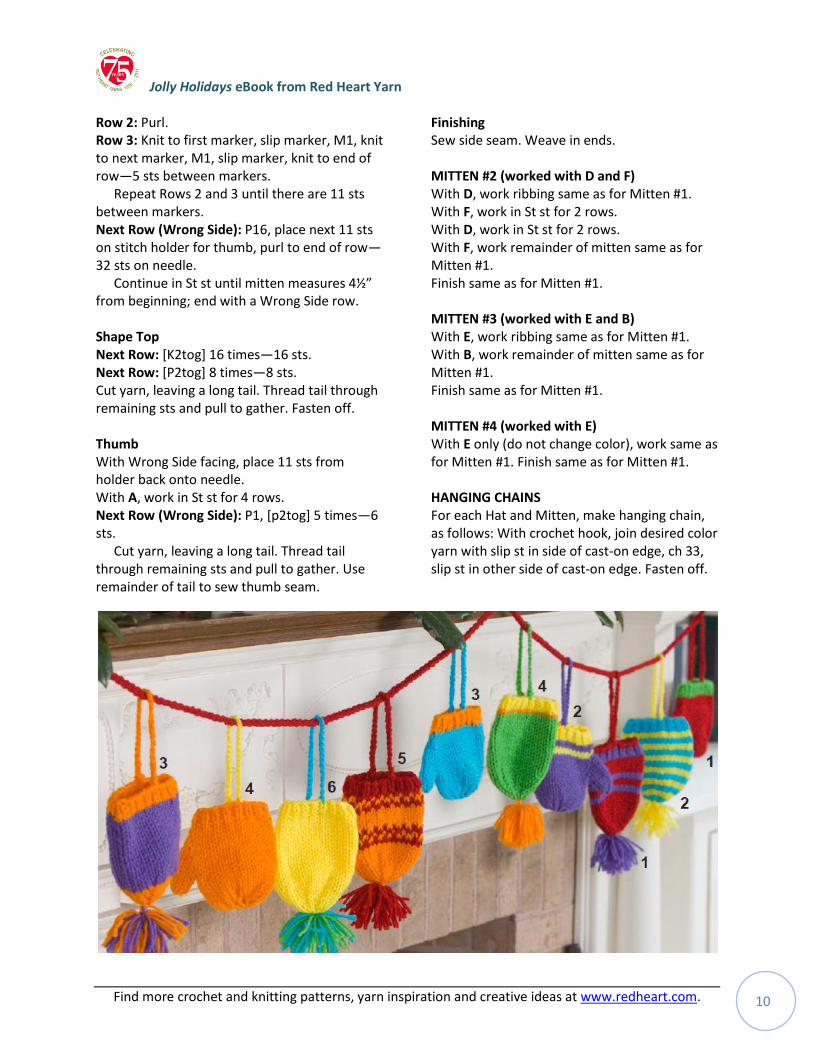
GAUGE: 16 sts = 4”; 20 rows = 4” in St st (knit on Right Side, purl on Wrong Side). CHECK YOUR GAUGE. Use any size needles to obtain the gauge. Special Stitch M1 = Make 1 (Increase) – Lift strand between needles to left-hand needle and knit strand through the back loop, twisting it to prevent a hole. wyib = with yarn in back. Notes See photo at end of pattern for design numbers. Hats and mittens can be used as individual ornaments, or can be strung on a cord to make a garland. INSTRUCTIONS: HAT #1 (worked with A and F) Ribbing With A, cast on 34 sts. Row 1 (Right Side): With F, *k1, p1; repeat from * to end of row.
Repeat Row 1 until piece measures ¾” from beginning. Body Work in St st and stripe sequence, as follows: Work 5 rows with A, 2 rows with F, 2 rows with A, 2 rows with F. Work remainder of hat with A only.
Work in St st until piece measures 4” from beginning; end with a Wrong Side row. Shape Crown Row 1: K2, [k3, k2tog] 6 times, k2—28 sts. Row 2: K2, [k2, k2tog] 6 times, k2—22 sts. Row 3: K2, [k1, k2tog] 6 times, k2—16 sts. Row 4: [K2tog] 8 times—8 sts.
Cut yarn, leaving a long tail. Thread tail through remaining sts and pull to gather. Use remainder of tail to sew back seam. Finishing Weave in ends.
Jolly Holidays eBook from Red Heart Yarn
Find more crochet and knitting patterns, yarn inspiration and creative ideas at www.redheart.com. 9
Pompom Note: Pompom can be made with any color(s) desired. Wrap yarn around 4” piece of cardboard 20 times. Slip wraps from cardboard and tie a length of yarn tightly around center of wraps. Cut ends of wraps, fluff and trim. Attach pompom to top of hat. HAT #2 (worked with B and D) Ribbing With B only (do not change color after cast-on), work ribbing same as for Hat #1. Body Work in St st and stripe sequence, as follows: Work *2 rows with D, 2 rows with B; repeat from * until piece measures 4” from beginning; end with a Wrong Side row. Shape Crown With B, work crown and finish hat same as for Hat #1. HAT #3 (worked with E and F) Ribbing With E only (do not change color after cast-on), work ribbing same as for Hat #1. Body With F, work in St st until piece measures 4” from beginning; end with a Wrong Side row. Shape Crown With E, work crown and finish hat same as for Hat #1. HAT #4 (worked with D, E, and C) Ribbing With D only (do not change color after cast-on), work ribbing same as for Hat #1. Body With E, work in St st for 1 row. With C, work in St st until piece measures 4” from beginning; end with a Wrong Side row.
Shape Crown With C, work crown and finish hat same as for Hat #1. HAT #5 (worked with A and E) Ribbing With A only (do not change color after cast-on), work ribbing same as for Hat #1; end with a Wrong Side row. Body Row 1 (Right Side): *With E, k1; slip 1 with yarn in back (wyib); repeat from * to end of row. Row 2: With E, purl. Row 3: *With A, k1; slip 1 wyib; repeat from * to end of row. Row 4: With A, purl. Rows 5–8: With E, work even in St st. Rows 9 and 10: Repeat Rows 3 and 4. Repeat Rows 1–10 until piece measures 4” from beginning; end with a Wrong Side row. Shape Crown With E, work crown and finish hat same as for Hat #1. HAT #6 (worked with D) Ribbing With D only (do not change color), work ribbing, body and crown same as for Hat #1. Finish same as for Hat #1. MITTEN #1 (worked with C and A) Ribbing With C, cast on 33 sts. Row 1 (Right Side): K1, *p1, k1; repeat from * to end of row. Row 2: P1, *k1, p1; repeat from * to end of row. Repeat Rows 1 and 2 until piece measures ¾” from beginning; end with a Wrong Side row. Change to A and work in St st for 4 rows. Shape Thumb Row 1 (Right Side): K16, place marker, M1, k1, M1, place marker, knit to end of row—3 sts between markers.
Jolly Holidays eBook from Red Heart Yarn
Find more crochet and knitting patterns, yarn inspiration and creative ideas at www.redheart.com. 10
Row 2: Purl. Row 3: Knit to first marker, slip marker, M1, knit to next marker, M1, slip marker, knit to end of row—5 sts between markers.
Repeat Rows 2 and 3 until there are 11 sts between markers. Next Row (Wrong Side): P16, place next 11 sts on stitch holder for thumb, purl to end of row—32 sts on needle.
Continue in St st until mitten measures 4½” from beginning; end with a Wrong Side row. Shape Top Next Row: [K2tog] 16 times—16 sts. Next Row: [P2tog] 8 times—8 sts. Cut yarn, leaving a long tail. Thread tail through remaining sts and pull to gather. Fasten off. Thumb With Wrong Side facing, place 11 sts from holder back onto needle. With A, work in St st for 4 rows. Next Row (Wrong Side): P1, [p2tog] 5 times—6 sts.
Cut yarn, leaving a long tail. Thread tail through remaining sts and pull to gather. Use remainder of tail to sew thumb seam.
Finishing Sew side seam. Weave in ends. MITTEN #2 (worked with D and F) With D, work ribbing same as for Mitten #1. With F, work in St st for 2 rows. With D, work in St st for 2 rows. With F, work remainder of mitten same as for Mitten #1. Finish same as for Mitten #1. MITTEN #3 (worked with E and B) With E, work ribbing same as for Mitten #1. With B, work remainder of mitten same as for Mitten #1. Finish same as for Mitten #1. MITTEN #4 (worked with E) With E only (do not change color), work same as for Mitten #1. Finish same as for Mitten #1. HANGING CHAINS For each Hat and Mitten, make hanging chain, as follows: With crochet hook, join desired color yarn with slip st in side of cast-on edge, ch 33, slip st in other side of cast-on edge. Fasten off.
Jolly Holidays eBook from Red Heart Yarn
Find more crochet and knitting patterns, yarn inspiration and creative ideas at www.redheart.com. 11
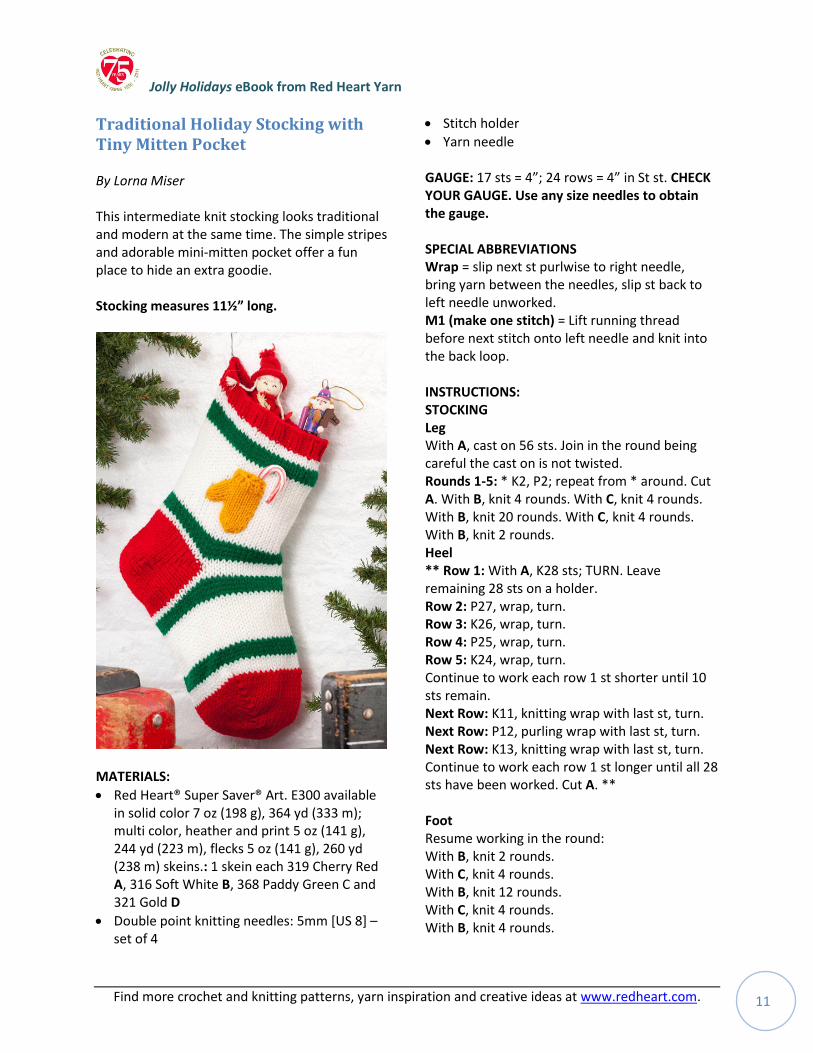
Traditional Holiday Stocking with Tiny Mitten Pocket By Lorna Miser This intermediate knit stocking looks traditional and modern at the same time. The simple stripes and adorable mini-mitten pocket offer a fun place to hide an extra goodie. Stocking measures 11½” long.
MATERIALS:
Red Heart® Super Saver® Art. E300 available in solid color 7 oz (198 g), 364 yd (333 m); multi color, heather and print 5 oz (141 g), 244 yd (223 m), flecks 5 oz (141 g), 260 yd (238 m) skeins.: 1 skein each 319 Cherry Red A, 316 Soft White B, 368 Paddy Green C and 321 Gold D
Double point knitting needles: 5mm [US 8] – set of 4
Stitch holder
Yarn needle
GAUGE: 17 sts = 4”; 24 rows = 4” in St st. CHECK YOUR GAUGE. Use any size needles to obtain the gauge. SPECIAL ABBREVIATIONS Wrap = slip next st purlwise to right needle, bring yarn between the needles, slip st back to left needle unworked. M1 (make one stitch) = Lift running thread before next stitch onto left needle and knit into the back loop. INSTRUCTIONS: STOCKING Leg With A, cast on 56 sts. Join in the round being careful the cast on is not twisted. Rounds 1-5: * K2, P2; repeat from * around. Cut A. With B, knit 4 rounds. With C, knit 4 rounds. With B, knit 20 rounds. With C, knit 4 rounds. With B, knit 2 rounds. Heel ** Row 1: With A, K28 sts; TURN. Leave remaining 28 sts on a holder. Row 2: P27, wrap, turn. Row 3: K26, wrap, turn. Row 4: P25, wrap, turn. Row 5: K24, wrap, turn. Continue to work each row 1 st shorter until 10 sts remain. Next Row: K11, knitting wrap with last st, turn. Next Row: P12, purling wrap with last st, turn. Next Row: K13, knitting wrap with last st, turn. Continue to work each row 1 st longer until all 28 sts have been worked. Cut A. ** Foot Resume working in the round: With B, knit 2 rounds. With C, knit 4 rounds. With B, knit 12 rounds. With C, knit 4 rounds. With B, knit 4 rounds.
Jolly Holidays eBook from Red Heart Yarn
Find more crochet and knitting patterns, yarn inspiration and creative ideas at www.redheart.com. 12
Toe With A work same as heel from ** to ** on first 28 sts. Cut yarn. Graft or sew last row of toe to last round of B worked on foot. Mitten With D, cast on 16 sts. Join in the round being careful the cast on is not twisted. Rounds 1 and 2: * K1, P1; repeat from * around. Knit 2 rounds. Thumb Gusset Round 1: K7, M1, K2, M1, K7 – 18 sts. Round 2: Knit. Round 3: K7, M1, K4, M1, K7 – 20 sts. Round 4: Knit.
Round 5: K7, M1, K6, M1, K7 – 22 sts. Round 6: Knit. Divide for Hand K7, slip next 8 sts onto holder for thumb, K7. Knit 6 rounds even on these 14 sts. Next Round: [K2tog] 7 times. Cut yarn. Thread through all sts and fasten off. Thumb Place 6 sts back on needles. Knit 4 rounds. Next Round: [K2tog] 3 times. Cut yarn. Thread through all sts and fasten off. Sew mitten to front of stocking.
Jolly Holidays eBook from Red Heart Yarn
Find more crochet and knitting patterns, yarn inspiration and creative ideas at www.redheart.com. 13
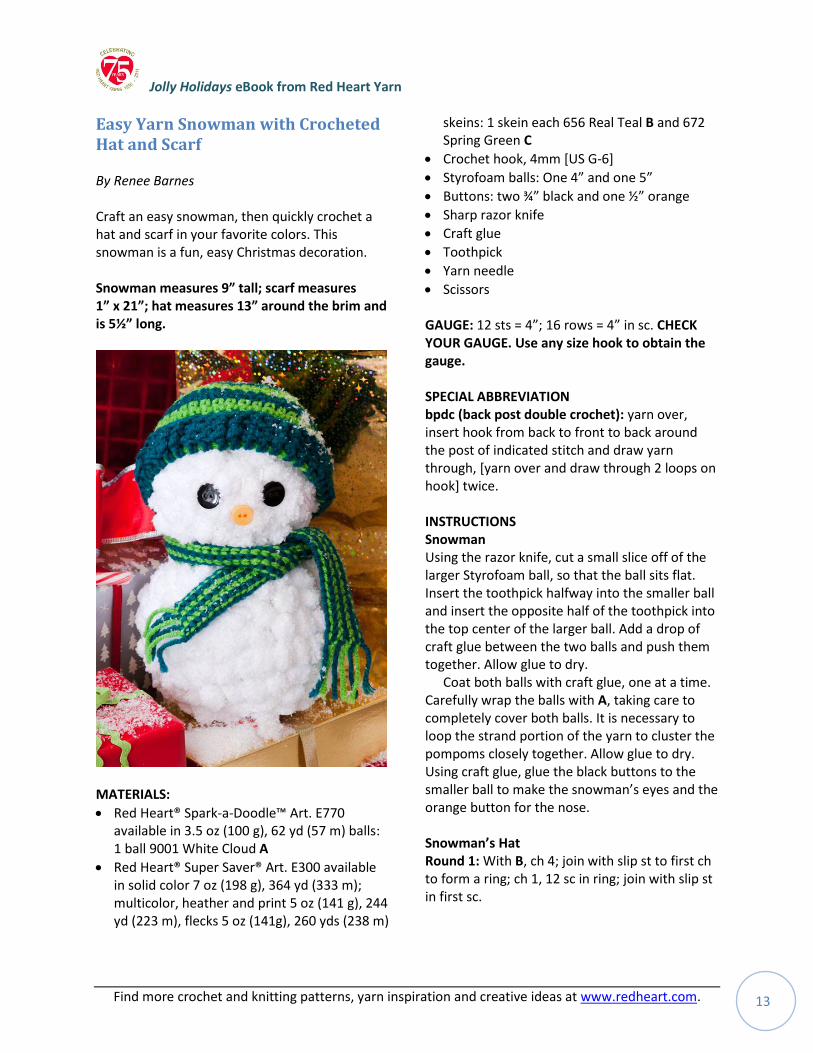
Easy Yarn Snowman with Crocheted Hat and Scarf By Renee Barnes Craft an easy snowman, then quickly crochet a hat and scarf in your favorite colors. This snowman is a fun, easy Christmas decoration. Snowman measures 9” tall; scarf measures 1” x 21”; hat measures 13” around the brim and is 5½” long.
MATERIALS:
Red Heart® Spark-a-Doodle™ Art. E770 available in 3.5 oz (100 g), 62 yd (57 m) balls: 1 ball 9001 White Cloud A
Red Heart® Super Saver® Art. E300 available in solid color 7 oz (198 g), 364 yd (333 m); multicolor, heather and print 5 oz (141 g), 244 yd (223 m), flecks 5 oz (141g), 260 yds (238 m)
skeins: 1 skein each 656 Real Teal B and 672 Spring Green C
Crochet hook, 4mm [US G-6]
Styrofoam balls: One 4” and one 5”
Buttons: two ¾” black and one ½” orange
Sharp razor knife
Craft glue
Toothpick
Yarn needle
Scissors GAUGE: 12 sts = 4”; 16 rows = 4” in sc. CHECK YOUR GAUGE. Use any size hook to obtain the gauge. SPECIAL ABBREVIATION bpdc (back post double crochet): yarn over, insert hook from back to front to back around the post of indicated stitch and draw yarn through, [yarn over and draw through 2 loops on hook] twice. INSTRUCTIONS Snowman Using the razor knife, cut a small slice off of the larger Styrofoam ball, so that the ball sits flat. Insert the toothpick halfway into the smaller ball and insert the opposite half of the toothpick into the top center of the larger ball. Add a drop of craft glue between the two balls and push them together. Allow glue to dry.
Coat both balls with craft glue, one at a time. Carefully wrap the balls with A, taking care to completely cover both balls. It is necessary to loop the strand portion of the yarn to cluster the pompoms closely together. Allow glue to dry. Using craft glue, glue the black buttons to the smaller ball to make the snowman’s eyes and the orange button for the nose. Snowman’s Hat Round 1: With B, ch 4; join with slip st to first ch to form a ring; ch 1, 12 sc in ring; join with slip st in first sc.
Jolly Holidays eBook from Red Heart Yarn
Find more crochet and knitting patterns, yarn inspiration and creative ideas at www.redheart.com. 14
Round 2: Ch 1, [sc in next sc, 2 sc in next sc] 6 times; join – 18 sc. Drop B and carry up wrong side of work. Round 3: With C, ch 1, sc in each sc around; join. Round 4: Ch 1, [2 sc in next sc, sc in next sc] 9 times; join – 27 sc. Drop C; pick up B. Round 5: With B, ch 1, sc in first sc, [2 sc in next sc, sc in next sc] 13 times; join – 40 sc. Round 6: Ch 1, sc in each sc around; join. Drop B; pick up C. Rounds 7 and 8: With C, ch 1, sc in each sc around; join. Drop C; pick up B. Rounds 9 and 10: With B, ch 1, sc in each sc around; join. Drop B; pick up C. Rounds 11-16: Repeat Rounds 7-10, then Rounds 7 and 8 once more. Round 17: With B, ch 3, skip first sc, dc in next sc and in each sc around; join in top of ch-3.
Rounds 18 and 19: Ch 3, dc in next dc, bpdc around next 2 sts, [dc in next 2 dc, bpdc around next 2 sts] 9 times; join in top of ch-3. Fasten off at end of Round 19. Weave in ends. Snowman’s Scarf Leave 2” yarn tails when joining and fastening off. With B, ch 85. Fasten off. Row 1 (Right Side): With C, slip st in each st across. Fasten off. Row 2: With right side facing, join B; slip st in each st across. Fasten off. Rows 3-6: Repeat Rows 1 and 2 twice. Trim yarn tails on both ends to 1½” for fringe. Finishing Place hat and scarf on prepared snowman.
Jolly Holidays eBook from Red Heart Yarn
Find more crochet and knitting patterns, yarn inspiration and creative ideas at www.redheart.com. 15
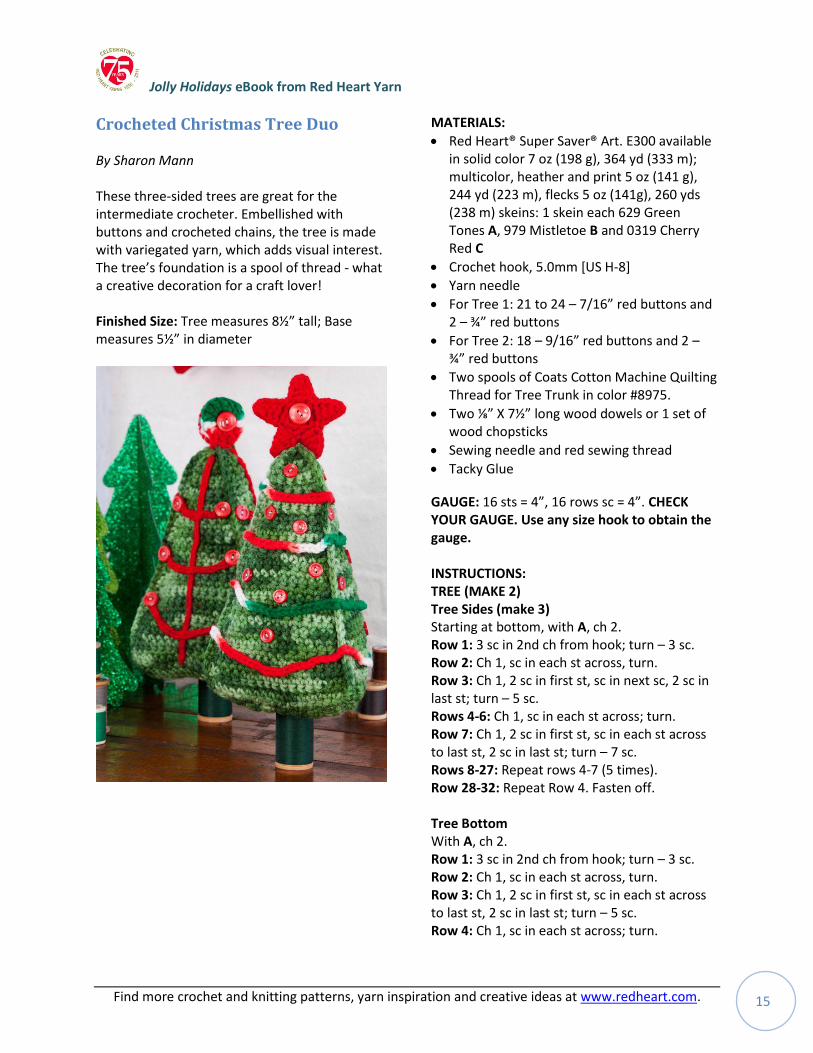
Crocheted Christmas Tree Duo By Sharon Mann These three-sided trees are great for the intermediate crocheter. Embellished with buttons and crocheted chains, the tree is made with variegated yarn, which adds visual interest. The tree’s foundation is a spool of thread - what a creative decoration for a craft lover! Finished Size: Tree measures 8½” tall; Base measures 5½” in diameter
MATERIALS:
Red Heart® Super Saver® Art. E300 available in solid color 7 oz (198 g), 364 yd (333 m); multicolor, heather and print 5 oz (141 g), 244 yd (223 m), flecks 5 oz (141g), 260 yds (238 m) skeins: 1 skein each 629 Green Tones A, 979 Mistletoe B and 0319 Cherry Red C
Crochet hook, 5.0mm [US H-8]
Yarn needle
For Tree 1: 21 to 24 – 7/16” red buttons and 2 – ¾” red buttons
For Tree 2: 18 – 9/16” red buttons and 2 – ¾” red buttons
Two spools of Coats Cotton Machine Quilting Thread for Tree Trunk in color #8975.
Two ⅛” X 7½” long wood dowels or 1 set of wood chopsticks
Sewing needle and red sewing thread
Tacky Glue
GAUGE: 16 sts = 4”, 16 rows sc = 4”. CHECK YOUR GAUGE. Use any size hook to obtain the gauge. INSTRUCTIONS: TREE (MAKE 2) Tree Sides (make 3) Starting at bottom, with A, ch 2. Row 1: 3 sc in 2nd ch from hook; turn – 3 sc. Row 2: Ch 1, sc in each st across, turn. Row 3: Ch 1, 2 sc in first st, sc in next sc, 2 sc in last st; turn – 5 sc. Rows 4-6: Ch 1, sc in each st across; turn. Row 7: Ch 1, 2 sc in first st, sc in each st across to last st, 2 sc in last st; turn – 7 sc. Rows 8-27: Repeat rows 4-7 (5 times). Row 28-32: Repeat Row 4. Fasten off. Tree Bottom With A, ch 2. Row 1: 3 sc in 2nd ch from hook; turn – 3 sc. Row 2: Ch 1, sc in each st across, turn. Row 3: Ch 1, 2 sc in first st, sc in each st across to last st, 2 sc in last st; turn – 5 sc. Row 4: Ch 1, sc in each st across; turn.
Jolly Holidays eBook from Red Heart Yarn
Find more crochet and knitting patterns, yarn inspiration and creative ideas at www.redheart.com. 16
Rows: 5-16: Repeat rows 3 and 4 (6 times) – 17 sc at end of last row. Fasten off, leaving a sewing length. Finishing With wrong sides facing, sew bottom edge of 3 tree sides to the edges of tree bottom. With right side facing, sc 2 tree sides together. Add stuffing and sc the last 2 trees side together, adding additional stuffing as needed. Weave in ends. Tree 1 Embellishments Star (make 2) With C, Ch 4, slip st in first ch to form ring. Round 1: Ch 1, work 10 sc in ring; join with a slip st in first sc – 10 sc. Round 2: Ch 1, sc in first sc, *ch 5, sc in 2nd ch from hook, hdc in next ch, dc in next 2 ch, skip next sc in round 1**, sc in next sc, repeat from * around ending last repeat at **, join with a slip st in first sc – 5 points. Fasten off, leaving a sewing length.
With right sides facing, sew two stars together, matching sts. Sew star to top of tree. With sewing needle and thread, sew one ¾” button to center of each side of star.
Weave in ends.
Garland With B, make 4 chains in different lengths for garland to wrap around tree. Fasten off, leaving a sewing length. Start at the bottom or top, placing garland chains 1½” apart. Sew garlands in place. With sewing needle and thread, sew 7/16” buttons between garland, on each side of tree.
Tree 2 Embellishments Circle (make 2) With B, ch 2 Round 1: 6 sc in 2nd, ch from hook; join with a slip st in first sc – 6 sc. Round 2: Ch 3 (counts as dc), dc in first sc, 2 dc in each sc around; join with a slip st in top of beginning ch-3 – 12 dc. Fasten off leaving a sewing length.
With right sides facing, sew circles together, matching sts.
Sew assembled circle to top of tree. With sewing needle and thread, sew one ¾” button to center of each side of circle. Weave in ends.
Center Tree Stem (make 3) With C, ch 33. Fasten off, leaving a sewing length. Tree Branches (make 3 in each length) Branch 1: With C, ch 15. Fasten off, leaving a sewing length. Branch 2: With C, ch 19. Fasten off, leaving a sewing length. Branch 3: With C, ch 23. Fasten off, leaving a sewing length.
Sew one stem to the center of each side of tree.
Sew the tree branches to the stem in a triangular shape as pictured. Sew one 9/16” button at ends of each branch. Tree Trunk (for both trees) Insert wood dowel into thread spool. Add glue to the top of the spool. Insert the remaining wood dowel into the center bottom of the tree and glue the spool to the tree.
Jolly Holidays eBook from Red Heart Yarn
Find more crochet and knitting patterns, yarn inspiration and creative ideas at www.redheart.com. 17
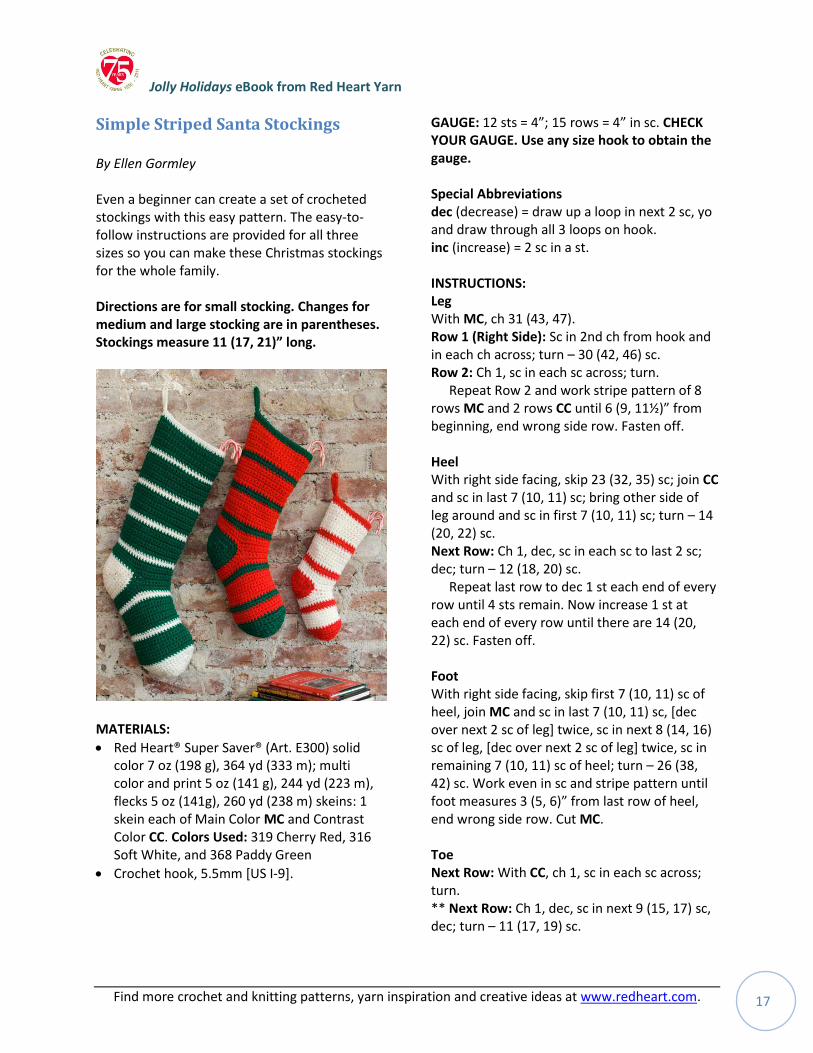
Simple Striped Santa Stockings By Ellen Gormley Even a beginner can create a set of crocheted stockings with this easy pattern. The easy-to-follow instructions are provided for all three sizes so you can make these Christmas stockings for the whole family. Directions are for small stocking. Changes for medium and large stocking are in parentheses. Stockings measure 11 (17, 21)” long.
MATERIALS:
Red Heart® Super Saver® (Art. E300) solid color 7 oz (198 g), 364 yd (333 m); multi color and print 5 oz (141 g), 244 yd (223 m), flecks 5 oz (141g), 260 yd (238 m) skeins: 1 skein each of Main Color MC and Contrast Color CC. Colors Used: 319 Cherry Red, 316 Soft White, and 368 Paddy Green
Crochet hook, 5.5mm [US I-9].
GAUGE: 12 sts = 4”; 15 rows = 4” in sc. CHECK YOUR GAUGE. Use any size hook to obtain the gauge. Special Abbreviations dec (decrease) = draw up a loop in next 2 sc, yo and draw through all 3 loops on hook. inc (increase) = 2 sc in a st. INSTRUCTIONS: Leg With MC, ch 31 (43, 47). Row 1 (Right Side): Sc in 2nd ch from hook and in each ch across; turn – 30 (42, 46) sc. Row 2: Ch 1, sc in each sc across; turn.
Repeat Row 2 and work stripe pattern of 8 rows MC and 2 rows CC until 6 (9, 11½)” from beginning, end wrong side row. Fasten off. Heel With right side facing, skip 23 (32, 35) sc; join CC and sc in last 7 (10, 11) sc; bring other side of leg around and sc in first 7 (10, 11) sc; turn – 14 (20, 22) sc. Next Row: Ch 1, dec, sc in each sc to last 2 sc; dec; turn – 12 (18, 20) sc.
Repeat last row to dec 1 st each end of every row until 4 sts remain. Now increase 1 st at each end of every row until there are 14 (20, 22) sc. Fasten off.
Foot With right side facing, skip first 7 (10, 11) sc of heel, join MC and sc in last 7 (10, 11) sc, [dec over next 2 sc of leg] twice, sc in next 8 (14, 16) sc of leg, [dec over next 2 sc of leg] twice, sc in remaining 7 (10, 11) sc of heel; turn – 26 (38, 42) sc. Work even in sc and stripe pattern until foot measures 3 (5, 6)” from last row of heel, end wrong side row. Cut MC. Toe Next Row: With CC, ch 1, sc in each sc across; turn. ** Next Row: Ch 1, dec, sc in next 9 (15, 17) sc, dec; turn – 11 (17, 19) sc.
Jolly Holidays eBook from Red Heart Yarn
Find more crochet and knitting patterns, yarn inspiration and creative ideas at www.redheart.com. 18
Dec 1 st each end of every row until 3 sc remain. Fasten off. **
With wrong side facing, join CC in next sc of last long row. Repeat from ** to **. Finishing: Sew toe, foot, heel, and back seams. Top Edging and Hanging Loop: With right side facing, attach CC at back seam. Round 1: Ch 1, sc in each st of beginning ch around; join with a slip st to first sc. Round 2: Ch 1, sc in each sc around; join; ch 12, slip st in same st as joining; slip st in each ch of ch-12. Fasten off.
Weave in ends.
Jolly Holidays eBook from Red Heart Yarn
Find more crochet and knitting patterns, yarn inspiration and creative ideas at www.redheart.com. 19
Great Gifts
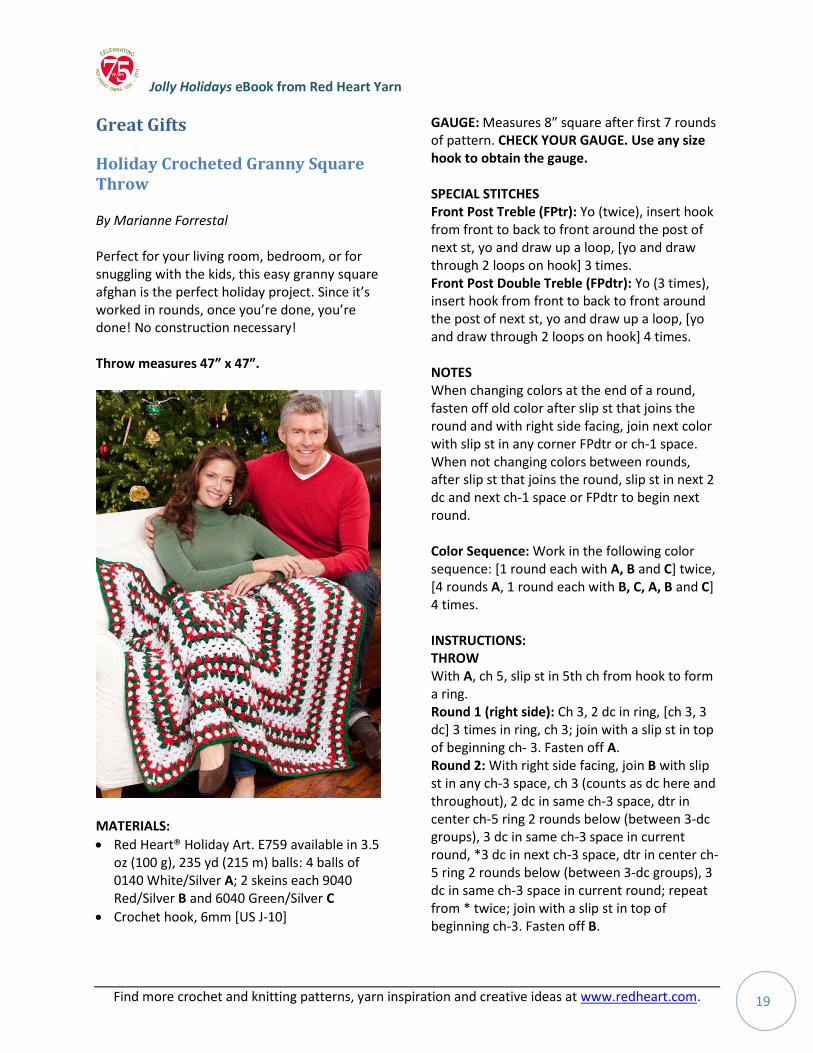
Holiday Crocheted Granny Square Throw By Marianne Forrestal Perfect for your living room, bedroom, or for snuggling with the kids, this easy granny square afghan is the perfect holiday project. Since it’s worked in rounds, once you’re done, you’re done! No construction necessary! Throw measures 47” x 47”.
MATERIALS:
Red Heart® Holiday Art. E759 available in 3.5 oz (100 g), 235 yd (215 m) balls: 4 balls of 0140 White/Silver A; 2 skeins each 9040 Red/Silver B and 6040 Green/Silver C
Crochet hook, 6mm [US J-10]
GAUGE: Measures 8” square after first 7 rounds of pattern. CHECK YOUR GAUGE. Use any size hook to obtain the gauge. SPECIAL STITCHES Front Post Treble (FPtr): Yo (twice), insert hook from front to back to front around the post of next st, yo and draw up a loop, [yo and draw through 2 loops on hook] 3 times. Front Post Double Treble (FPdtr): Yo (3 times), insert hook from front to back to front around the post of next st, yo and draw up a loop, [yo and draw through 2 loops on hook] 4 times. NOTES When changing colors at the end of a round, fasten off old color after slip st that joins the round and with right side facing, join next color with slip st in any corner FPdtr or ch-1 space. When not changing colors between rounds, after slip st that joins the round, slip st in next 2 dc and next ch-1 space or FPdtr to begin next round. Color Sequence: Work in the following color sequence: [1 round each with A, B and C] twice, [4 rounds A, 1 round each with B, C, A, B and C] 4 times. INSTRUCTIONS: THROW With A, ch 5, slip st in 5th ch from hook to form a ring. Round 1 (right side): Ch 3, 2 dc in ring, [ch 3, 3 dc] 3 times in ring, ch 3; join with a slip st in top of beginning ch- 3. Fasten off A. Round 2: With right side facing, join B with slip st in any ch-3 space, ch 3 (counts as dc here and throughout), 2 dc in same ch-3 space, dtr in center ch-5 ring 2 rounds below (between 3-dc groups), 3 dc in same ch-3 space in current round, *3 dc in next ch-3 space, dtr in center ch-5 ring 2 rounds below (between 3-dc groups), 3 dc in same ch-3 space in current round; repeat from * twice; join with a slip st in top of beginning ch-3. Fasten off B.
Jolly Holidays eBook from Red Heart Yarn
Find more crochet and knitting patterns, yarn inspiration and creative ideas at www.redheart.com. 20
Round 3: With right side facing, join C with a slip st in any corner dtr, ch 3, (2 dc, ch 1, 3 dc) in same st, *dc between next two 3-dc groups, FPtr around the post of center st of 3-dc group 2 rounds below (round 1), dc in same place as last dc**, (3 dc, ch 1, 3 dc) in next dtr; repeat from * twice; repeat from * to ** once, join with a slip st in top of beginning ch-3. Fasten off C. Round 4: With right side facing, join A with a slip st in any corner ch-1 space, ch 3, 2 dc in same ch-1 space, FPdtr around the post of next FPdtr 2 rounds below, 3 dc in same ch-1 space, *[3 dc between next 3-st groups] twice**, 3 dc in next ch-1 space, FPdtr around the post of next FPdtr 2 rounds below, 3 dc in same ch-1 space; repeat from * twice, repeat from * to ** once; join with a slip st in top of beginning ch-3. Fasten off A. Round 5: With right side facing, join B with slip st in any corner FPdtr, ch 3, (2 dc, ch 1, 3 dc) in same st, *3 dc between next two 3-dc groups, dc between next two 3-dc groups, FPtr around the post of next FPtr 2 rounds below, dc in same place as last dc, 3 dc between next two 3-dc groups**, (3 dc, ch 1, 3 dc) in next FPdtr; repeat from * twice; repeat from * to ** once; join with a slip st in top of beginning ch-3. Fasten off B. Round 6: With right side facing, join C with a slip st in any ch-1 space, ch 3, 2 dc in same ch-1 space, FPdtr around the post of next FPdtr 2 rounds below, 3 dc in same ch-1 space, *[3 dc between next two 3-st groups] across to next corner ch-1 space**, 3 dc in next corner ch-1 space, FPdtr around the post of next FPdtr 2 rounds below, 3 dc in same ch-1 space; repeat from * twice; repeat from * to ** once; join with a slip st in top of beginning ch-3. Fasten off C. Round 7: With right side facing, join A with a slip st in any corner FPdtr, ch 3, (2 dc, ch 1, 3 dc) in same st, *[3 dc between next two 3-dc groups] twice, dc between next two 3-dc groups, FPtr around the post of next FPtr 2 rounds below, dc in same place as last dc, [3 dc between next two 3-dc groups] twice**, [3 dc,
ch 1, 3 dc] in next FPdtr; repeat from * twice; repeat from * to ** once; join with a slip st in top of beginning ch-3.
Continue in color sequence as established throughout. Slip st to or rejoin new color in corner FPdtr or ch-1 space each round as required. Round 8: Repeat Round 6. Round 9: Ch 3, [2 dc, ch 1, 3 dc] in same corner FPdtr, *[3 dc between next two 3-dc groups, dc between next two 3-dc groups, FPtr around the post of center st of 3-st group two rounds below, dc in same place as last dc] 3 times, 3 dc between next two 3-dc groups**, (3 dc, ch 1, 3 dc) in next FPdtr, repeat from * twice, repeat from * to ** once; join with a slip st in top of beginning ch-3. Round 10: Repeat round 6. Round 11: Ch 3, [2 dc, ch 1, 3 dc] in same corner FPdtr, *3 dc between next two 3-dc groups, [3 dc between next two 3-dc groups, dc between next two 3-dc groups, FPtr around the post of center st of 3-st group two rounds below, dc in same place as last dc] 3 times, [3 dc between next two 3-dc groups] twice**, (3 dc, ch 1, 3 dc) in next FPdtr, repeat from * twice, repeat from * to ** once; join with a slip st in top of beginning ch-3. Round 12: Repeat round 6. Round 13: Ch 3, [2 dc, ch 1, 3 dc] in same corner FPdtr, *[3 dc between next two 3-dc groups, dc between next two 3-dc groups, FPtr around the post of center st of 3-st group two rounds below, dc in same place as last dc] 5 times, 3 dc between next two 3-dc groups**, (3 dc, ch 1, 3 dc) in next FPdtr, repeat from * twice, repeat from * to ** once; join with a slip st in top of beginning ch-3. Rounds 14-41: Maintaining color sequence as established, repeat Rounds 10-13 seven times, increasing two repeats between [ ] on every odd numbered round. Round 42: Repeat Round 6. Fasten off C. Weave in ends.
Jolly Holidays eBook from Red Heart Yarn
Find more crochet and knitting patterns, yarn inspiration and creative ideas at www.redheart.com. 21
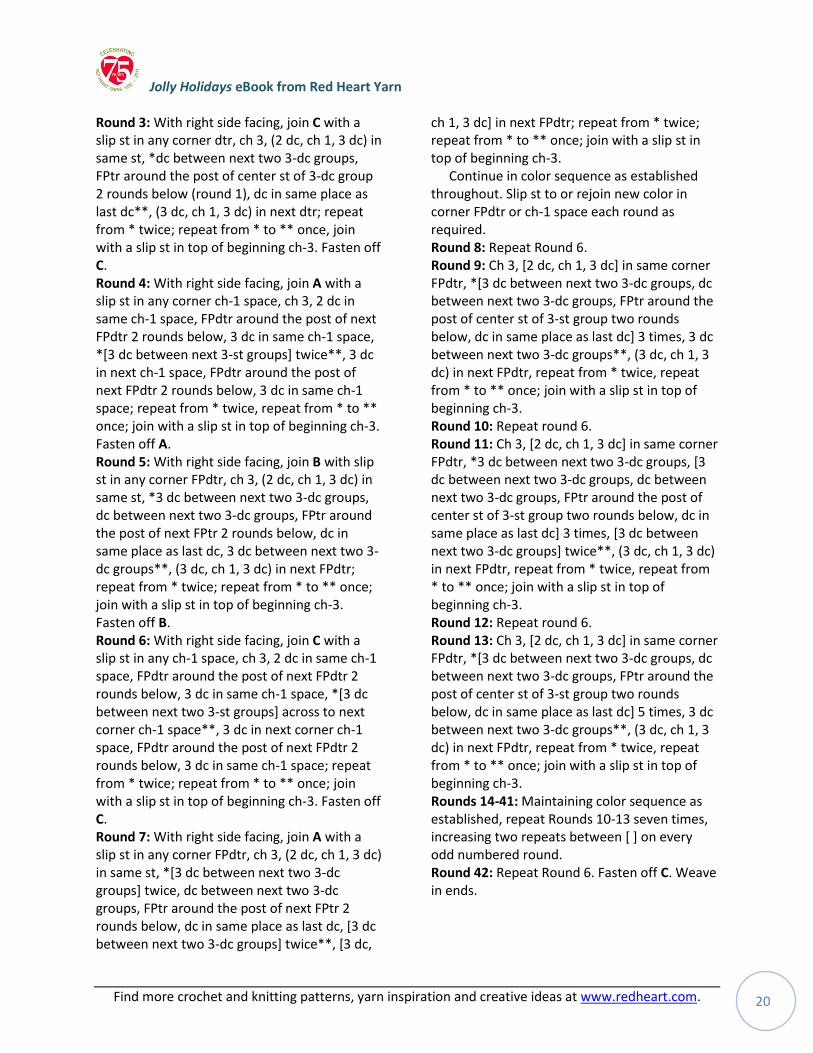
A Creative Case for Crochet Hooks By Kim Kotary This easy crochet hook case is fun and fast to crochet. The pockets keep your hooks separated and it’s a great crocheted gift for your crocheting friends. Finished Measurement: 6” x 7”, folded closed.
MATERIALS:
Red Heart® Super Saver® Art. E300 available in solid color 7 oz (198 g), 364 yd (333 m); multi color, heather and print 5 oz (141 g), 244 yd (223 m), flecks 5 oz (141g), 260 yds (238 m) skeins: 1 skein 629 green tones
Crochet hook: 5mm [US H-8]
Button, ⅜” diameter
Yarn needle GAUGE: 13 sc = 4”. CHECK YOUR GAUGE. Use any size hook to obtain the gauge given.
Special Abbreviations Foundation Single Crochet (fsc): *Insert hook in ch, draw up a loop, ch in new loop, yo, draw through 2 loops on hook (counts as 1 ch and 1 sc); repeat from * to make required number of sts. NOTE: Single crochets are worked in space between stitches unless otherwise indicated. INSTRUCTIONS: Flap Row 1 (Right Side): Ch 2, beginning in 2nd ch from hook, work 20 fsc. Row 2: Ch 1, turn, sc between each st across, turn – 20 sc.
Repeat Row 2 until piece measures 3” from beginning, end with a right side row. Top Fold Row (Wrong Side): Ch 1, turn, working in front loop only, sc in each st across – 20 sc.
Repeat Row 2 until piece measures 7” from Top Fold Row, end with a right side row. Bottom Fold Row (Wrong Side): Ch 1, turn, working in front loop only, sc in each st across – 20 sc.
Repeat Row 2 until piece measures 5” from Bottom Fold Row, end with a right side row. Fasten off. Finishing Fold bottom to right side along Bottom Fold Row. Working through both layers, work sc to join layers together along one side edge to Bottom Fold Row, working in back loops only, slip st in each st across, work sc to join layers together along opposite side edge. Fasten off.
With right side facing, join yarn at edge of Flap and work backwards sc around to center of Row 1, ch 21, slip st in 2nd ch from hook and each ch across to Flap edge for Tie, work in backwards sc around to opposite edge of Flap. Fasten off.
Weave in ends. Sew button on bottom section opposite Tie. Divide bottom in desired number of pockets
and mark. Work running stitches through both layers to secure pockets.

Jolly Holidays eBook from Red Heart Yarn
Find more crochet and knitting patterns, yarn inspiration and creative ideas at www.redheart.com. 22
Santaland Holiday Baby Cocoon By Kristine Mullen Crochet an adorable holiday cocoon for baby’s first Christmas. Whether you use it for baby’s holiday photos or to keep baby cozy at all season, this easy-to-crochet cocoon is darling. One size fits most. Finished Size: 20” circumference x 18” long.
MATERIALS:
Red Heart® Super Saver® Art. E300 available in solid color 7 oz (198 g), 364 yd (333 m); multicolor, heather and print 5 oz (141 g), 244 yd (223 m), flecks 5 oz (141g), 260 yds (238 m) skeins: 1 Skein 319 Cherry Red A
Red Heart® Spark-a-Doodle™ Art.E770 available in 3.5 oz (100 g), 62 yd (57 m) balls: 1 Ball 9001 White Cloud B
Crochet hooks: 6mm [US J-10] and 5.5mm [US I-9]
Stitch marker
Yarn needle
GAUGE: 10 sc = 4” using A and smaller hook. CHECK YOUR GAUGE. Use any size hook to obtain the gauge. NOTE: Work in space between sts where indicated. Ch 2 at beginning of each round does not count as a st. INSTRUCTIONS: COCOON BODY With smaller hook and A, ch 5, slip stitch in first ch to form ring. Round 1: Ch 2, work 10 dc in ring, slip stitch in first dc – 10 dc. Round 2: Ch 2, dc in first dc, dc in next space between dcs, *dc in next dc, dc in next space between dcs; repeat from * around, slip stitch in first dc – 20 dc. Round 3: Ch 2, *dc in next space, 2 dc in next space; repeat from * around, slip stitch in first dc – 30 dc. Round 4: Ch 2, dc each space around, slip stitch in top of beginning ch – 30 dc. Round 5: Ch 2, *dc in next 2 spaces, 2 dc in next space; repeat from * around, slip stitch in top of beginning ch – 40 dc. Round 6: Ch 2, dc in each space around, slip stitch in top of beginning ch. Round 7: Ch 2, *dc in next 3 spaces, 2 dc in next space; repeat from * around, slip stitch in top of beginning ch – 50 dc. Round 8: Ch 2, dc in each space around, slip stitch in top of beginning ch – 50 dc.
Repeat Round 8 until piece measures 16” from beginning. Fasten off. BORDER Round 1: With wrong side facing and larger hook, join B in first st, ch 1, sc in each st around. Place marker for beginning of round. Rounds 2-6: Sc in each st around, working with yarn between pompoms and pushing pompoms to right side of Body. Fasten off. Turn right side out. Weave in ends.
Jolly Holidays eBook from Red Heart Yarn
Find more crochet and knitting patterns, yarn inspiration and creative ideas at www.redheart.com. 23
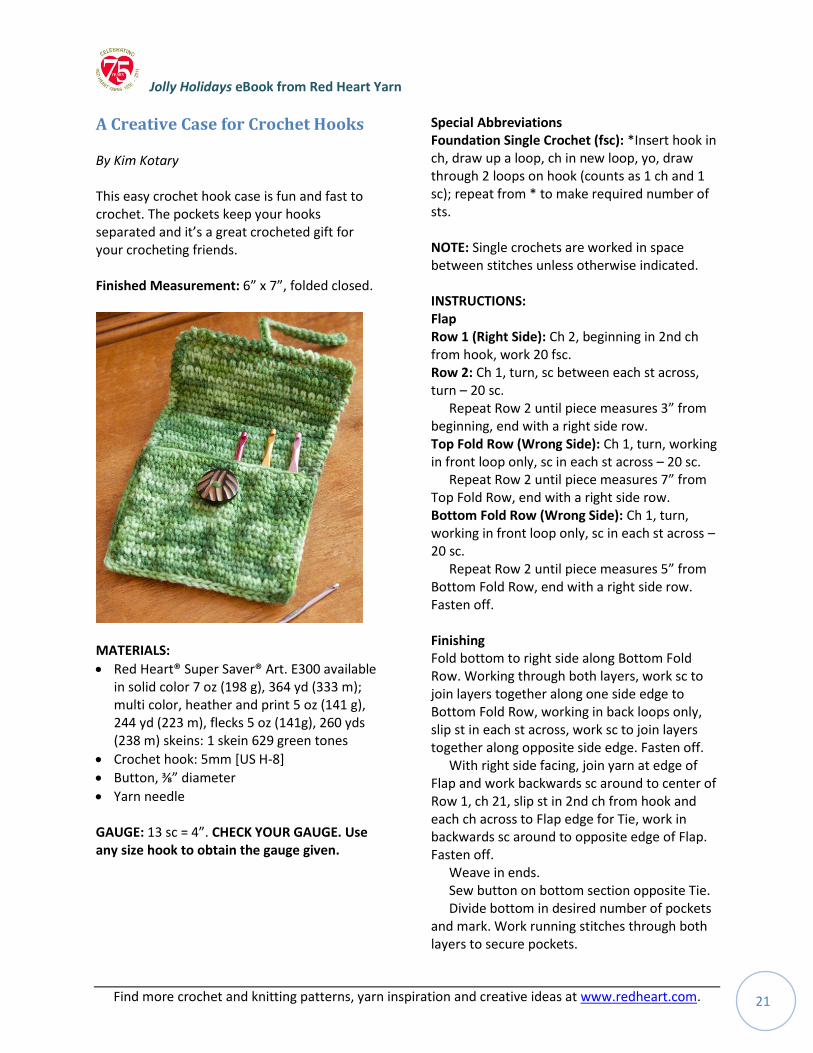
Happy Holiday Turtleneck Bottle Cozy By Diane Marsh Package your holiday gift of spirits in this charming hand-knit sweater - no shaping required. Any host or hostess will be so impressed with the adorable turtleneck wrapped around their favorite wine.
MATERIALS:
Red Heart® Holiday Art. E759 available in 3.5 oz (100 g), 235 yd (215 m) balls.: 1 ball 9040 Red/Silver
Knitting needles: 3.75mm [US 5] and 3.25 [US 3]
Double pointed knitting needles: 3.25 [US 3]
Crochet Hook: 4mm [US G-6]
Yarn needle
GAUGE: 18 sts = 4”; 32 rows = 4” in St st. CHECK YOUR GAUGE. Use any size needles to obtain the gauge. INSTRUCTIONS: Cover With larger needles, cast on 46 sts. Work in St st, begin Knit row, until 7” from beginning, end Purl row. Eyelet Row: K6, [yo] twice, K6, [yo] twice, K22, [yo] twice, K6, [yo] twice, K6 – 54 sts. Next Row: P5, [P2tog] twice, P4, [P2tog] twice, P20, [P2tog] twice, P4, [P2tog] twice, P5 – 46 sts. Next Row: Knit. Next Row: Purl. Change to smaller needles. Top Ribbing Row 1 (Right Side): K2, * P2, K2; repeat from * across. Row 2: P2, * K2, P2; repeat from * across.
Repeat Rows 1 and 2 until 12” from beginning, end Row 1.
Bind off in pattern leaving 18” yarn end. Sew back seam. Lower Edge Round 1: With right side facing and crochet hook, join yarn in any st at lower edge; ch 1, sc around the bottom; join with a slip st in first sc. Round 2: Ch 1, working from left to right, work Reverse sc around; join. Fasten off. Weave in ends. Cord With 2 double pointed needles cast on 5 sts. * K5 but do not turn work, push sts to opposite end of needle, draw yarn firmly behind needle; repeat from * until cord measures 26”. Bind off. Finishing Slip cord through eyelets. Tie knots in ends of cord.
Jolly Holidays eBook from Red Heart Yarn
Find more crochet and knitting patterns, yarn inspiration and creative ideas at www.redheart.com. 24
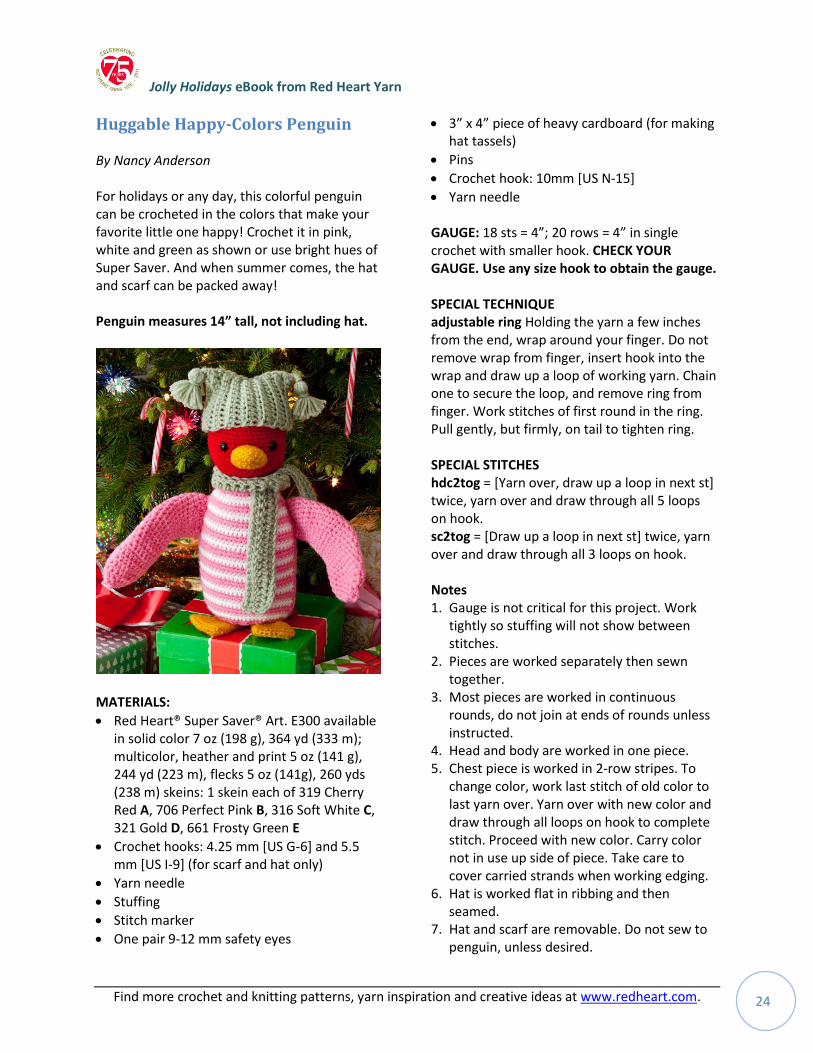
Huggable Happy-Colors Penguin By Nancy Anderson For holidays or any day, this colorful penguin can be crocheted in the colors that make your favorite little one happy! Crochet it in pink, white and green as shown or use bright hues of Super Saver. And when summer comes, the hat and scarf can be packed away! Penguin measures 14” tall, not including hat.
MATERIALS:
Red Heart® Super Saver® Art. E300 available in solid color 7 oz (198 g), 364 yd (333 m); multicolor, heather and print 5 oz (141 g), 244 yd (223 m), flecks 5 oz (141g), 260 yds (238 m) skeins: 1 skein each of 319 Cherry Red A, 706 Perfect Pink B, 316 Soft White C, 321 Gold D, 661 Frosty Green E
Crochet hooks: 4.25 mm [US G-6] and 5.5 mm [US I-9] (for scarf and hat only)
Yarn needle
Stuffing
Stitch marker
One pair 9-12 mm safety eyes
3” x 4” piece of heavy cardboard (for making hat tassels)
Pins
Crochet hook: 10mm [US N-15]
Yarn needle GAUGE: 18 sts = 4”; 20 rows = 4” in single crochet with smaller hook. CHECK YOUR GAUGE. Use any size hook to obtain the gauge. SPECIAL TECHNIQUE adjustable ring Holding the yarn a few inches from the end, wrap around your finger. Do not remove wrap from finger, insert hook into the wrap and draw up a loop of working yarn. Chain one to secure the loop, and remove ring from finger. Work stitches of first round in the ring. Pull gently, but firmly, on tail to tighten ring. SPECIAL STITCHES hdc2tog = [Yarn over, draw up a loop in next st] twice, yarn over and draw through all 5 loops on hook. sc2tog = [Draw up a loop in next st] twice, yarn over and draw through all 3 loops on hook. Notes 1. Gauge is not critical for this project. Work
tightly so stuffing will not show between stitches.
2. Pieces are worked separately then sewn together.
3. Most pieces are worked in continuous rounds, do not join at ends of rounds unless instructed.
4. Head and body are worked in one piece. 5. Chest piece is worked in 2-row stripes. To
change color, work last stitch of old color to last yarn over. Yarn over with new color and draw through all loops on hook to complete stitch. Proceed with new color. Carry color not in use up side of piece. Take care to cover carried strands when working edging.
6. Hat is worked flat in ribbing and then seamed.
7. Hat and scarf are removable. Do not sew to penguin, unless desired.
Jolly Holidays eBook from Red Heart Yarn
Find more crochet and knitting patterns, yarn inspiration and creative ideas at www.redheart.com. 25
INSTRUCTIONS: HEAD AND BODY Beginning at top of head, with smaller hook and A, make an adjustable ring. Round 1: Work 6 sc in ring—6 sc. Do not join, work in continuous rounds (spirals). Place a marker for beginning of round. Move marker up as each round is completed. Round 2: Work 2 sc in each sc around—12 sc. Round 3: [2 sc in next sc, sc in next sc] 6 times—18 sc. Round 4: [2 sc in next sc, sc in next 2 sc] 6 times—24 sc. Round 5: [2 sc in next sc, sc in next 3 sc] 6 times—30 sc. Round 6: [2 sc in next sc, sc in next 4 sc] 6 times—36 sc. Round 7: [2 sc in next sc, sc in next 5 sc] 6 times—42 sc. Round 8: [2 sc in next sc, sc in next 6 sc] 6 times—48 sc. Rounds 9–20: Sc in each sc around. Round 21: [Sc in next 6 sc, sc2tog] 6 times—42 sts. Round 22: [Sc in next 5 sts, sc2tog] 6 times—36 sts. Round 23: [Sc in next 4 sts, sc2tog] 6 times—30 sts. Round 24: [Sc in next 3 sts, sc2tog] 6 times—24 sts. Round 25: Sc in each sc around. Attach safety eyes between Rounds 16 and 17. Rounds 26–28: Repeat Rounds 5–7—42 sc. Rounds 29–31: Sc in each sc around. Round 32: Repeat Round 8—48 sc. Round 33: Sc in each sc around. Round 34: [2 sc in next sc, sc in next 7 sc] 6 times—54 sc. Round 35: Sc in each sc around. Round 36: [2 sc in next sc, sc in next 8 sc] 6 times—60 sc. Rounds 37–57: Sc in each sc around.
Begin stuffing piece, and continue to stuff until piece is complete. Round 58: [Sc in next 8 sc, sc2tog] 6 times—54 sts.
Round 59: [Sc in next 7 sts, sc2tog] 6 times—48 sts. Rounds 60–63: Repeat Rounds 21–24—24 sts. Round 64: [Sc in next 2 sts, sc2tog] 6 times—18 sts. Round 65: [Sc in next st, sc2tog] 6 times—12 sts.
Fasten off, leaving a long tail. Thread tail through stitches of last round. Pull to close opening. Securely weave in end. CHEST PIECE With smaller hook and C, ch 14. Row 1: Working in back bumps only, sc in 2nd ch from hook and in each ch across; change to B, turn—13 sc. Row 2: With B, ch 1, [2 sc in next sc, sc in next 3 sc] 3 times, sc in last sc, turn—16 sc. Row 3: With B, ch 1, [sc in next 3 sc, 2 sc in next sc] 4 times; change to C, turn—20 sc. Row 4: With C, ch 1, [sc in next 4 sc, 2 sc in next sc] 4 times, turn—24 sc. Row 5: With C, ch 1, sc in each sc across; change to B, turn. Rows 6–17: Ch 1, sc in each sc across and continue to change color every other row, turn. Row 18: With B, ch 1, [sc in next 5 sc, 2 sc in next sc] 4 times, turn—28 sc. Row 19: With B, ch 1, sc in each sc across; change to C, turn. Rows 20–37: Ch 1, sc in each sc across and continue to change color every other row, turn. Row 38: With B, ch 1, [sc2tog] 2 times, sc in next 20 sc, [sc2tog] 2 times—24 sc. Edging: With B, ch 1, sc evenly spaced around edges of entire piece; join with slip st in first sc. Fasten off, leaving a long tail for sewing to body. FLIPPERS (make 2) With smaller hook and B, ch 20; join with slip st in first ch to form a ring, taking care not to twist ch. Round 1: Ch 1, sc in each ch around—20 sts. Do not join, work in continuous rounds (spirals). Place a marker for beginning of round. Move marker up as each round is completed.
Jolly Holidays eBook from Red Heart Yarn
Find more crochet and knitting patterns, yarn inspiration and creative ideas at www.redheart.com. 26
Rounds 2–15: Hdc in next 10 sts, sc in last 10 sts. Round 16: Sc in next 10 sts, hdc in last 10 sts. Rounds 17–19: Hdc in each st around. Round 20: [Hdc in next 3 hdc, hdc2tog] 4 times—16 hdc. Round 21: [Hdc in next 2 hdc, hdc2tog] 4 times—12 hdc. Round 22: [Hdc in next hdc, hdc2tog] 4 times—8 hdc. Round 23: [Hdc2tog] 4 times—4 hdc.
Fasten off, leaving a long tail. Do not stuff flipper. Thread tail through stitches of last round. Pull to close opening. Securely weave in end. BEAK With smaller hook and D, ch 17; join with slip st in first ch to form a ring, taking care not to twist ch. Round 1: Ch 1, sc in each ch around—17 sc. Do not join, work in continuous rounds (spirals). Place a marker for beginning of round. Move marker up as each round is completed. Round 2: Sc in each sc around. Round 3: Sc in next sc, [sc in next 2 sc, sc2tog] 4 times—13 sts. Round 4: Sc in next sc, [sc in next sc, sc2tog] 4 times—9 sts. Round 5: Sc in each sc around.
Fasten off, leaving a long tail. Thread tail through stitches of last round. Pull to close opening. Securely weave in end. Stuff beak lightly. FEET (make 2) With smaller hook and D, ch 11. Round 1: Sc in 2nd ch from hook and in each ch across to last ch, 2 sc in last ch; working across opposite side of foundation ch, sc in next sc and in each sc across; join with slip st in first sc—20 sc. Rounds 2–5: Sc in each sc around. Round 6: [Sc in next 3 sc, sc2tog] 4 times—16 sc. Rounds 7–11: Sc in each sc around.
Round 12: [Sc in next 2 sc, sc2tog] 4 times—12 sc. Round 13: [Sc in next sc, sc2tog] 4 times—8 sc.
Fasten off, leaving a long tail for sewing. Do not stuff feet. SCARF With larger hook and E, ch 62. Row 1: Working in back bumps only, hdc in 3rd ch from hook and in each ch across, turn—60 sts. Row 2: Ch 3, dc in each st across, turn. Row 3: Ch 2, hdc in each st across. Fasten off. Weave in tail. HAT With larger hook and E, ch 12. Row 1: Sc in 2nd ch from hook and in each ch across, turn—11 sc. Rows 2–31: Ch 1, working in front loops only, sc in each sc across, turn.
Fasten off, leaving a long tail for sewing. With tail, sew short edges together to form a tube. Flatten the piece, and working through both thicknesses, slip st across top edge to seam crown of hat. Tassels (make 2): Wrap yarn around piece of heavy cardboard about 25 times. Thread a 12” strand of yarn under the top of the wraps and tie a knot to secure. Slip wraps from cardboard. Wrap a 10” strand of yarn around the wraps several times, about ½” below the top tie for tassel neck. Tie ends of strand to secure and thread ends to inside of tassel. Cut ends of wraps, trim to desired length. With ends of top tie, tie one tassel to each top corner of hat. Knot the ties securely on the inside of hat. FINISHING Sew flippers to side edges near top of chest piece. Pin chest piece to body and sew in place. Sew beak to face, centered between eyes. Sew feet to bottom of penguin. Weave in any remaining ends. Tie scarf around neck and place hat on head.

Jolly Holidays eBook from Red Heart Yarn
Find more crochet and knitting patterns, yarn inspiration and creative ideas at www.redheart.com. 27

Jolly Holidays eBook from Red Heart Yarn
Find more crochet and knitting patterns, yarn inspiration and creative ideas at www.redheart.com. 28
Hats, Wristers, and a Scarf
Cozy Knit Watercolor Wristers By Cathy Payson Easy rib knit warmers are quick to knit and keep your hands cozy and your fingers free for texting when the weather turns chilly. These make a great gift for the girls or for you. Finished Measurement: One size approximately 7” around when flat. Wrister will stretch to fit most women.
MATERIALS:
Red Heart® With Love™ Art. E400 available in solid color 7 oz (198 g), 390 yd (357 m); multi-color 5 oz (141 g), 230 yd (211 m) skeins: 1 skein 1816 Waterlily
Knitting needles: 5.5mm [US 9]
Yarn needle
GAUGE: 24 sts = 4”; 22 rows = 4” in ribbing. CHECK YOUR GAUGE. Use any size needle to obtain the gauge. SPECIAL ABBREVIATIONS Cl (Cluster) = [yo and draw up a loop, yo and draw through 2 loops on hook] 3 times all in next st, yo and draw through all 4 loops on hook. INSTRUCTIONS: Right Wrister Cast on 38 sts. Knit 1 row. Work in ribbing as follows: Row 1 (Right Side): K2, * p2, k2; repeat from * across. Row 2: P2, * k2, p2; repeat from * across.
Repeat Rows 1 and 2 for ribbing until piece measures 2”, end Row 2. Divide for Thumb (Right Side): Keeping continuity of ribbing, work across first 26 sts, bind off next 2 sts, work to end. Next Row: Work to bind-off, cast on 2 sts, work to end.
Work even in ribbing until piece measures 8” or desired length. Bind off all sts in ribbing loosely. Left Wrister Work same as for Right Wrister EXCEPT work Divide For Thumb Row as follows: K10, bind off 2 sts, work to end. Finishing Sew seams. Weave in ends.
Jolly Holidays eBook from Red Heart Yarn
Find more crochet and knitting patterns, yarn inspiration and creative ideas at www.redheart.com. 29
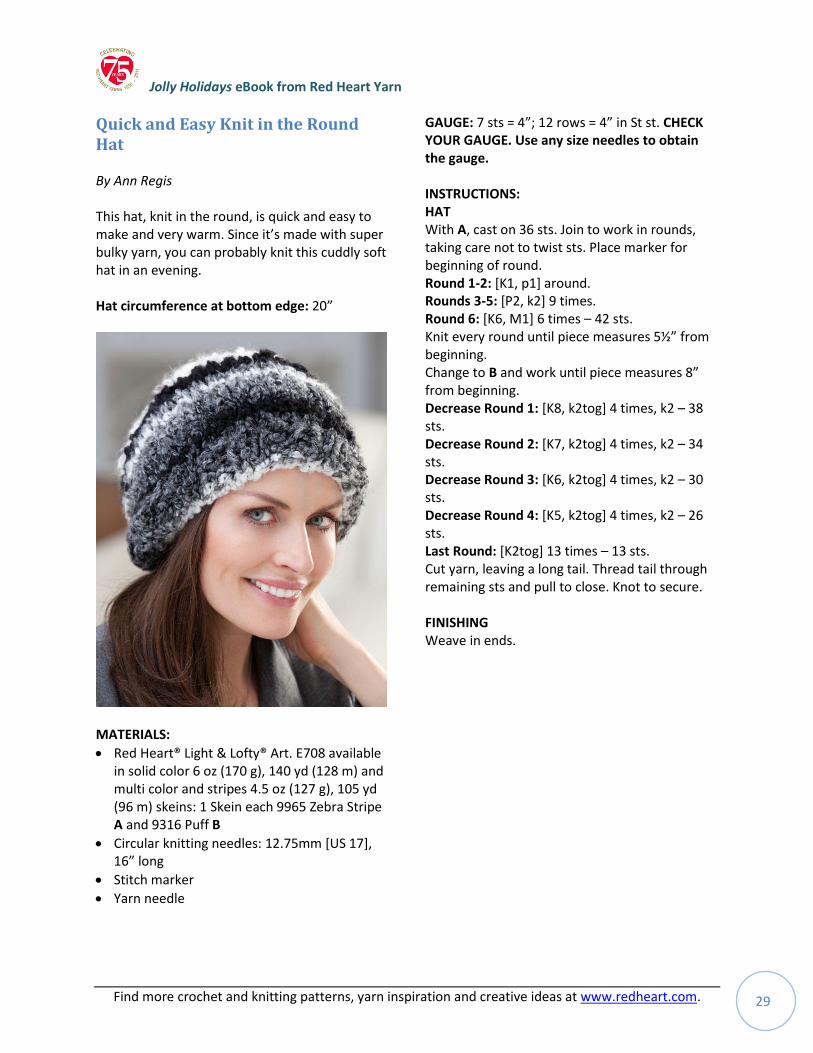
Quick and Easy Knit in the Round Hat By Ann Regis This hat, knit in the round, is quick and easy to make and very warm. Since it’s made with super bulky yarn, you can probably knit this cuddly soft hat in an evening. Hat circumference at bottom edge: 20”
MATERIALS:
Red Heart® Light & Lofty® Art. E708 available in solid color 6 oz (170 g), 140 yd (128 m) and multi color and stripes 4.5 oz (127 g), 105 yd (96 m) skeins: 1 Skein each 9965 Zebra Stripe A and 9316 Puff B
Circular knitting needles: 12.75mm [US 17], 16” long
Stitch marker
Yarn needle
GAUGE: 7 sts = 4”; 12 rows = 4” in St st. CHECK YOUR GAUGE. Use any size needles to obtain the gauge. INSTRUCTIONS: HAT With A, cast on 36 sts. Join to work in rounds, taking care not to twist sts. Place marker for beginning of round. Round 1-2: [K1, p1] around. Rounds 3-5: [P2, k2] 9 times. Round 6: [K6, M1] 6 times – 42 sts. Knit every round until piece measures 5½” from beginning. Change to B and work until piece measures 8” from beginning. Decrease Round 1: [K8, k2tog] 4 times, k2 – 38 sts. Decrease Round 2: [K7, k2tog] 4 times, k2 – 34 sts. Decrease Round 3: [K6, k2tog] 4 times, k2 – 30 sts. Decrease Round 4: [K5, k2tog] 4 times, k2 – 26 sts. Last Round: [K2tog] 13 times – 13 sts. Cut yarn, leaving a long tail. Thread tail through remaining sts and pull to close. Knot to secure. FINISHING Weave in ends.
Jolly Holidays eBook from Red Heart Yarn
Find more crochet and knitting patterns, yarn inspiration and creative ideas at www.redheart.com. 30
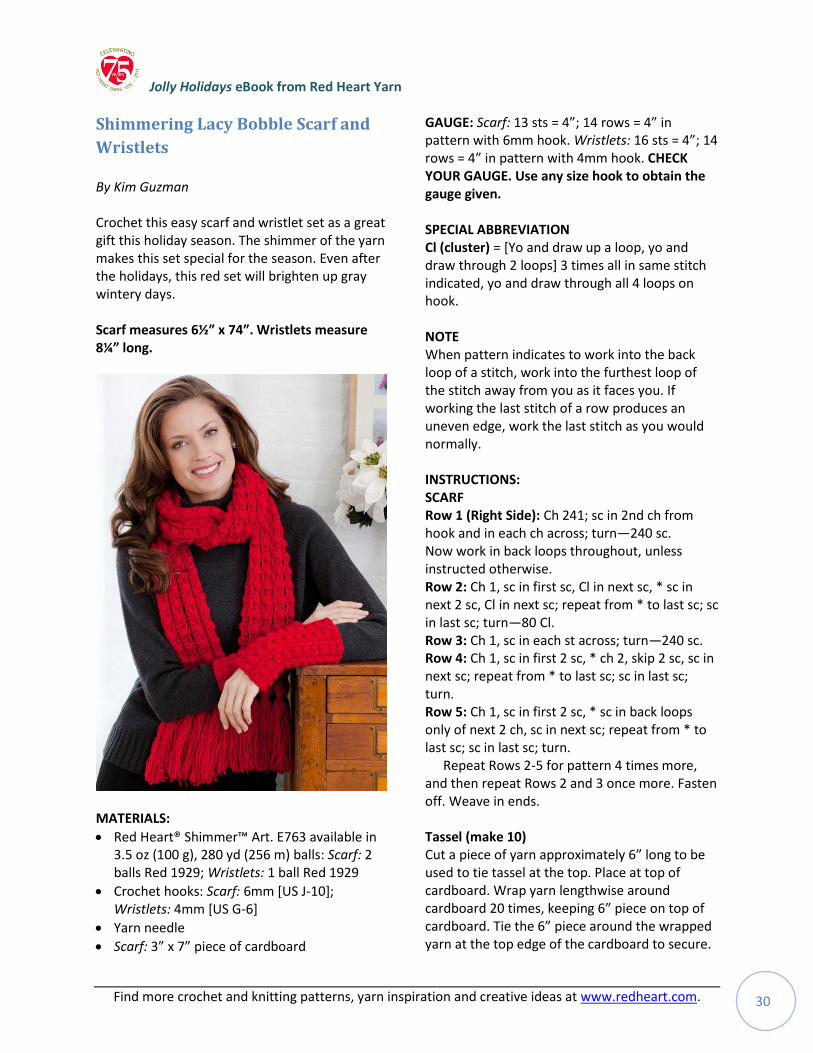
Shimmering Lacy Bobble Scarf and
Wristlets By Kim Guzman Crochet this easy scarf and wristlet set as a great gift this holiday season. The shimmer of the yarn makes this set special for the season. Even after the holidays, this red set will brighten up gray wintery days. Scarf measures 6½” x 74”. Wristlets measure 8¼” long.
MATERIALS:
Red Heart® Shimmer™ Art. E763 available in 3.5 oz (100 g), 280 yd (256 m) balls: Scarf: 2 balls Red 1929; Wristlets: 1 ball Red 1929
Crochet hooks: Scarf: 6mm [US J-10]; Wristlets: 4mm [US G-6]
Yarn needle
Scarf: 3” x 7” piece of cardboard
GAUGE: Scarf: 13 sts = 4”; 14 rows = 4” in pattern with 6mm hook. Wristlets: 16 sts = 4”; 14 rows = 4” in pattern with 4mm hook. CHECK YOUR GAUGE. Use any size hook to obtain the gauge given. SPECIAL ABBREVIATION Cl (cluster) = [Yo and draw up a loop, yo and draw through 2 loops] 3 times all in same stitch indicated, yo and draw through all 4 loops on hook. NOTE When pattern indicates to work into the back loop of a stitch, work into the furthest loop of the stitch away from you as it faces you. If working the last stitch of a row produces an uneven edge, work the last stitch as you would normally. INSTRUCTIONS: SCARF Row 1 (Right Side): Ch 241; sc in 2nd ch from hook and in each ch across; turn—240 sc. Now work in back loops throughout, unless instructed otherwise. Row 2: Ch 1, sc in first sc, Cl in next sc, * sc in next 2 sc, Cl in next sc; repeat from * to last sc; sc in last sc; turn—80 Cl. Row 3: Ch 1, sc in each st across; turn—240 sc. Row 4: Ch 1, sc in first 2 sc, * ch 2, skip 2 sc, sc in next sc; repeat from * to last sc; sc in last sc; turn. Row 5: Ch 1, sc in first 2 sc, * sc in back loops only of next 2 ch, sc in next sc; repeat from * to last sc; sc in last sc; turn.
Repeat Rows 2-5 for pattern 4 times more, and then repeat Rows 2 and 3 once more. Fasten off. Weave in ends. Tassel (make 10) Cut a piece of yarn approximately 6” long to be used to tie tassel at the top. Place at top of cardboard. Wrap yarn lengthwise around cardboard 20 times, keeping 6” piece on top of cardboard. Tie the 6” piece around the wrapped yarn at the top edge of the cardboard to secure.

Jolly Holidays eBook from Red Heart Yarn
Find more crochet and knitting patterns, yarn inspiration and creative ideas at www.redheart.com. 31
Cut wraps at bottom edge of the cardboard. Wrap another length of yarn around the tassel approximately one-inch down from the first tie. Trim bottom of tassel evenly. Using the original 6” piece at top of tassel, attach 5 tassels evenly spaced across each short edge of scarf. WRISTLETS (make 2) Row 1 (Right Side): Ch 34; sc in 2nd ch from hook and in each ch across; turn—33 sc.
Now work in back loops throughout, unless instructed otherwise. Row 2: Ch 1, sc in first sc, Cl in next sc, * sc in next 2 sc, Cl in next sc; repeat from * to last sc; sc in last sc; turn—11 Cl. Rows 3-5: Ch 1, sc in each st across; turn—33 sc.
Repeat Rows 2-5 for pattern 5 times more, and then repeat Rows 2-4 once more. Fasten off, leaving a 15” strand. With yarn needle and
strand, sew top of last row to beginning ch, matching stitch for stitch. Weave in ends.
Jolly Holidays eBook from Red Heart Yarn
Find more crochet and knitting patterns, yarn inspiration and creative ideas at www.redheart.com. 32
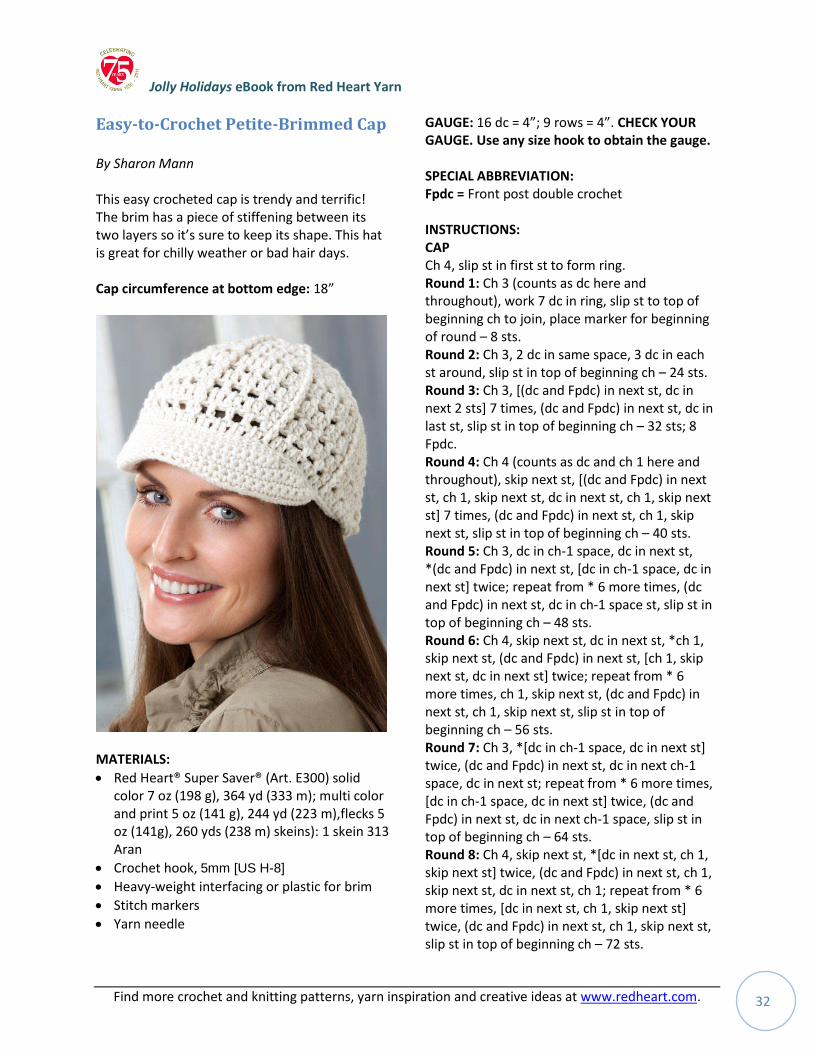
Easy-to-Crochet Petite-Brimmed Cap By Sharon Mann This easy crocheted cap is trendy and terrific! The brim has a piece of stiffening between its two layers so it’s sure to keep its shape. This hat is great for chilly weather or bad hair days. Cap circumference at bottom edge: 18”
MATERIALS:
Red Heart® Super Saver® (Art. E300) solid color 7 oz (198 g), 364 yd (333 m); multi color and print 5 oz (141 g), 244 yd (223 m),flecks 5 oz (141g), 260 yds (238 m) skeins): 1 skein 313 Aran
Crochet hook, 5mm [US H-8]
Heavy-weight interfacing or plastic for brim
Stitch markers
Yarn needle
GAUGE: 16 dc = 4”; 9 rows = 4”. CHECK YOUR GAUGE. Use any size hook to obtain the gauge. SPECIAL ABBREVIATION: Fpdc = Front post double crochet INSTRUCTIONS: CAP Ch 4, slip st in first st to form ring. Round 1: Ch 3 (counts as dc here and throughout), work 7 dc in ring, slip st to top of beginning ch to join, place marker for beginning of round – 8 sts. Round 2: Ch 3, 2 dc in same space, 3 dc in each st around, slip st in top of beginning ch – 24 sts. Round 3: Ch 3, [(dc and Fpdc) in next st, dc in next 2 sts] 7 times, (dc and Fpdc) in next st, dc in last st, slip st in top of beginning ch – 32 sts; 8 Fpdc. Round 4: Ch 4 (counts as dc and ch 1 here and throughout), skip next st, [(dc and Fpdc) in next st, ch 1, skip next st, dc in next st, ch 1, skip next st] 7 times, (dc and Fpdc) in next st, ch 1, skip next st, slip st in top of beginning ch – 40 sts. Round 5: Ch 3, dc in ch-1 space, dc in next st, *(dc and Fpdc) in next st, [dc in ch-1 space, dc in next st] twice; repeat from * 6 more times, (dc and Fpdc) in next st, dc in ch-1 space st, slip st in top of beginning ch – 48 sts. Round 6: Ch 4, skip next st, dc in next st, *ch 1, skip next st, (dc and Fpdc) in next st, [ch 1, skip next st, dc in next st] twice; repeat from * 6 more times, ch 1, skip next st, (dc and Fpdc) in next st, ch 1, skip next st, slip st in top of beginning ch – 56 sts. Round 7: Ch 3, *[dc in ch-1 space, dc in next st] twice, (dc and Fpdc) in next st, dc in next ch-1 space, dc in next st; repeat from * 6 more times, [dc in ch-1 space, dc in next st] twice, (dc and Fpdc) in next st, dc in next ch-1 space, slip st in top of beginning ch – 64 sts. Round 8: Ch 4, skip next st, *[dc in next st, ch 1, skip next st] twice, (dc and Fpdc) in next st, ch 1, skip next st, dc in next st, ch 1; repeat from * 6 more times, [dc in next st, ch 1, skip next st] twice, (dc and Fpdc) in next st, ch 1, skip next st, slip st in top of beginning ch – 72 sts.
Jolly Holidays eBook from Red Heart Yarn
Find more crochet and knitting patterns, yarn inspiration and creative ideas at www.redheart.com. 33
Round 9: Ch 3, *[dc in ch-1 space, dc in next st] 3 times, Fpdc in next Fpdc, dc in next ch-1 space, dc in next st; repeat from * 6 more times, [dc in ch-1 space, dc in next st] twice, Fpdc in next Fpdc, dc in next ch-1 space, slip st in top of beginning ch – 72 sts. Round 10: Ch 4, skip next st, *[dc in next st, ch 1, skip next st] 3 times, Fpdc in next Fpdc, ch 1, skip next st, dc in next st, ch 1; repeat from * 6 more times, [dc in next st, ch 1, skip next st] 3 times, Fpdc in next Fpdc, ch 1, skip next st, slip st in top of beginning ch – 72 sts. Rounds 11-15: Repeat Rounds 9-10, end with Round 9. Round 16: Slip st in each st around. Fasten off. Brim Top Side Mark 22 sts on front of Cap on Round 16 for Brim. Row 1: With right side facing, join yarn in first marked st, working in front loops only, sc in each next 22 sts. Row 2: Ch 1, turn, sc in each st across, sc in back loops in next 4 sts on Cap – 26 sts. Row 3: Ch 1, turn, sc in each st across, sc in front loops in next 4 sts on Cap – 30 sts. Row 4: Ch 1, turn, sc in each st across, sc in back loop in next st on Cap – 31 sts.
Row 5: Ch 1, turn, sc in each st across, sc in front loop in next st on Cap – 32 sts. Row 6: Ch 1, turn, sc in each st across, sc in back loop in next st on Cap – 33 sts. Row 7: Ch 1, turn, sc in each st across, sc in front loop in next st on Cap – 34 sts. Fasten off. Bottom Side Row 1: With wrong side facing, join yarn on wrong side of Row 1 of Brim, sc in back loops of first 22 sts. Row 2: Ch 1, turn, sc in each st across, sc in front loops in next 4 sts on Cap – 26 sts. Row 3: Ch 1, turn, sc in each st across, sc in back loops in next 4 sts on Cap – 30 sts. Row 4: Ch 1, turn, sc in each st across, sc in front loop in next st on Cap – 31 sts. Row 5: Ch 1, turn, sc in each st across, sc in back loop in next st on Cap – 32 sts. Row 6: Ch 1, turn, sc in each st across, sc in front loop in next st on Cap – 33 sts. Row 7: Ch 1, turn, sc in each st across, sc in back loop in next st on Cap – 34 sts. Fasten off. FINISHING Using Brim as a template, cut a piece of interfacing or plastic to same dimensions. Slip piece in between layers of Brim and sew Brim closed. Weave in ends.
Jolly Holidays eBook from Red Heart Yarn
Find more crochet and knitting patterns, yarn inspiration and creative ideas at www.redheart.com. 34
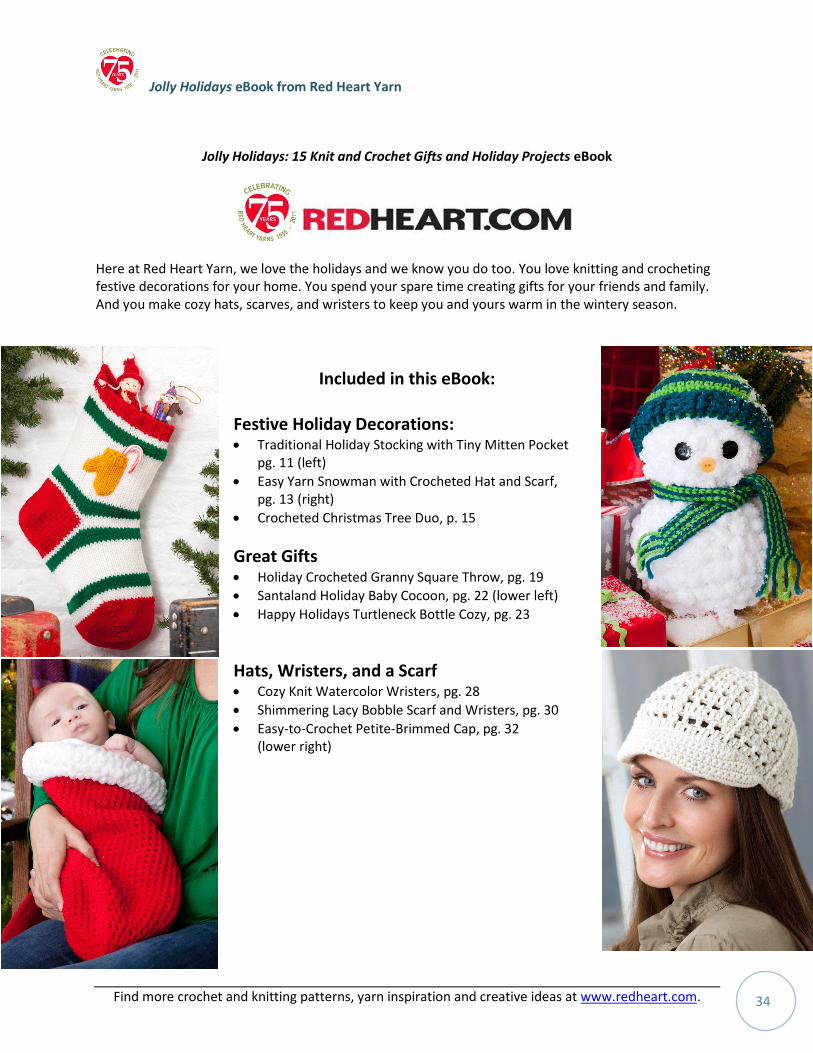
Jolly Holidays: 15 Knit and Crochet Gifts and Holiday Projects eBook
Here at Red Heart Yarn, we love the holidays and we know you do too. You love knitting and crocheting festive decorations for your home. You spend your spare time creating gifts for your friends and family. And you make cozy hats, scarves, and wristers to keep you and yours warm in the wintery season.
Included in this eBook:
Festive Holiday Decorations: Traditional Holiday Stocking with Tiny Mitten Pocket
pg. 11 (left)
Easy Yarn Snowman with Crocheted Hat and Scarf, pg. 13 (right)
Crocheted Christmas Tree Duo, p. 15
Great Gifts Holiday Crocheted Granny Square Throw, pg. 19
Santaland Holiday Baby Cocoon, pg. 22 (lower left)
Happy Holidays Turtleneck Bottle Cozy, pg. 23
Hats, Wristers, and a Scarf Cozy Knit Watercolor Wristers, pg. 28
Shimmering Lacy Bobble Scarf and Wristers, pg. 30
Easy-to-Crochet Petite-Brimmed Cap, pg. 32 (lower right)