johnathan campos and daniel kuenzli may...
TRANSCRIPT
606: Improving Microsoft Exchange 2013
Performance with NetScaler
Hands-on Lab Exercise Guide
Johnathan Campos and Daniel Kuenzli
May 2015

| 1 |
Table of Contents Table of Contents ....................................................................................................................... 1
Overview .................................................................................................................................... 2
Scenario..................................................................................................................................... 6
Exercise 1: Initial Configuration .................................................................................................. 7
Exercise 2: Configuring Custom Monitors for Exchange 2013 ...................................................23
Exercise 3: Configuring Service Groups for Exchange 2013 .....................................................37
Exercise 4: Configuring Virtual Servers for Exchange 2013 ......................................................66
Exercise 5: Configuring the Content Switching Virtual Server for Exchange 2013 .....................85
Exercise 6: Configuring Custom Responder Policies for Exchange 2013 ................................ 111
Exercise 7: Configuring Single Sign-On for Exchange 2013 .................................................... 135

| 2 |
Overview
Hands-on Training Module
Objective
Companies today conduct much of their business online. Whether email for corporate communications, websites for product and service information or sales, or server-hosted apps that run across a variety of end-user devices, companies rely on secure, reliable network connectivity in order to function and prosper. As the volume of a company’s network traffic increases, so does the need for robust, resilient, and reliable network infrastructure that can not only sustain the network traffic, but optimize it. Gaining optimum efficiency in network connections, whether between private company assets across semi-private telecommunications channels, or between companies and their customers across the public internet, is a key asset to any company’s operations. Citrix NetScaler, leveraging Load Balancing, optimizes and enhances the reliability of network infrastructures to allow better, more secure network communications, regardless of device or protocol. In this hands-on lab, we will configure Citrix NetScaler’s Load Balancing, Custom Monitors, and Responder features in tandem with Microsoft Exchange 2013. The exercises shown in this hands-on lab guide will allow administrators to work with the features focused on the replacement of Microsoft Threat Management Gateway with Citrix NetScaler. Challenges:
Providing increased reliability of email services, even in the face of individual server downtime
Ensuring that email communications facilitate business operations while not introducing potential security threats
Optimizing the user experience when access email services
Provide a replacement for the existing web proxy (Microsoft Threat Management Gateway)
Prerequisites
Basic understanding of deployment scenarios of the Citrix NetScaler.
Basic understanding of deployment scenarios of Microsoft Exchange 2013.
Basic understanding of the Microsoft Exchange 2013 management console.
Audience
Citrix Partners
Customers
Sales Engineers
| 3 |
Consultants
Technical Support
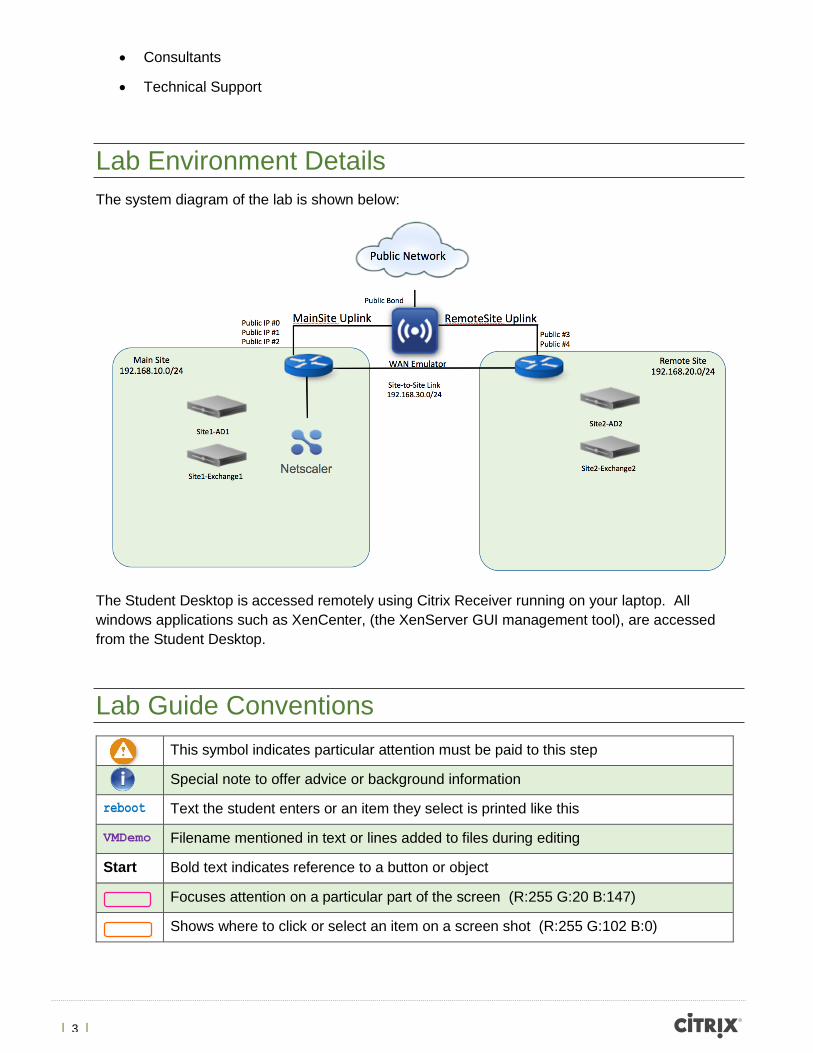
Lab Environment Details
The system diagram of the lab is shown below:
The Student Desktop is accessed remotely using Citrix Receiver running on your laptop. All
windows applications such as XenCenter, (the XenServer GUI management tool), are accessed
from the Student Desktop.
Lab Guide Conventions
This symbol indicates particular attention must be paid to this step
Special note to offer advice or background information
reboot Text the student enters or an item they select is printed like this
VMDemo Filename mentioned in text or lines added to files during editing
Start Bold text indicates reference to a button or object
Focuses attention on a particular part of the screen (R:255 G:20 B:147)
Shows where to click or select an item on a screen shot (R:255 G:102 B:0)

| 4 |
List of Virtual Machines Used
VM Name IP Address Description / OS
Site1-NS1 192.168.10.15 Citrix NetScaler Build 10.5 53.9
Site1-AD1 192.168.10.11 Windows Server 2012R2 – LDAP Server
Site1-Client1 192.168.10.45 Windows 8.1 – Client
Site1-Exchange 192.168.10.20 Windows Server 2012R2 – Exchange 2013 - CAS/MB
Site2-Exchange2 192.168.20.20 Windows Server 2012R2 – Exchange 2013 - CAS/MB
Site2-AD2 192.168.20.11 Windows Server 2012R2 – LDAP Server
Required Lab Credentials
The credentials required to connect to the environment and complete the lab exercises.
VM Name IP Address Username Password
Site1-NS1 192.168.10.15 nsroot nsroot
Site1-AD1 192.168.10.11 Training\Administrator Citrix123
Site1-Client1 192.168.10.45 Training\Administrator Citrix123
Site1-Exchange 192.168.10.20 Training\Administrator Citrix123
Site2-Exchange2 192.168.20.20 Training\Administrator Citrix123
Site2-AD2 192.168.20.11 Training\Administrator Citrix123

| 5 |
Important Lab Environment Note
When connecting to the lab environment, you may be prompted to restart the Windows on the
Student Desktop
If prompted, please select Restart Later. Selecting Restart Now will disconnect you from the
Student Desktop.
Additionally, you may receive intermittent User Access Control prompts on the Student Desktop
regarding jucheck.exe:
When prompted, please select No and continue with your lab.
| 6 |
Scenario AnyCo, Inc. has requested that a Sales Engineer demonstrate to their executive IT staff a solution that can improve the reliability and operational continuity of their infrastructure while also enhancing their network security as they increase the amount of traffic that must flow between their internal network and the public internet. Likewise, they also want to ensure that these additional security and functionality enhancements do not impede their available throughput or negatively impact their employees’ day-to-day productivity. Citrix NetScaler, through its Load Balancing feature, can provide all of these abilities and more. In order to improve email availability system-wide and provide service redundancy, your goal is to assist AnyCo, Inc. with their challenges outlined below, and ensure that these solutions fit their business needs. Challenges:
The customer wants to make sure that their email services continue despite server
maintenance or unexpected downtime in any one site
Emails sent outside the company should reveal as little network information as possible
about the sender’s environment
Fluctuating volumes of email and other network traffic should not affect users’ experience
working within the company’s network
Users experience should be considered when accessing web services
Replacement of the current web services proxy, current web services proxy is end of
support December 2015
| 7 |
Exercise 1
Initial Configuration
Overview
This exercise will guide you through the initial configuration of the NetScaler appliance in this lab
environment, which are identified as:
Site1-NS1
The following settings will be configured for each NetScaler:
NSIP (NetScaler Management IP)
SNIP (Subnet IP)
Verify Licenses
Enable Global Features
Step by step guidance
Estimated time to complete this lab: 20 minutes.
Step Action
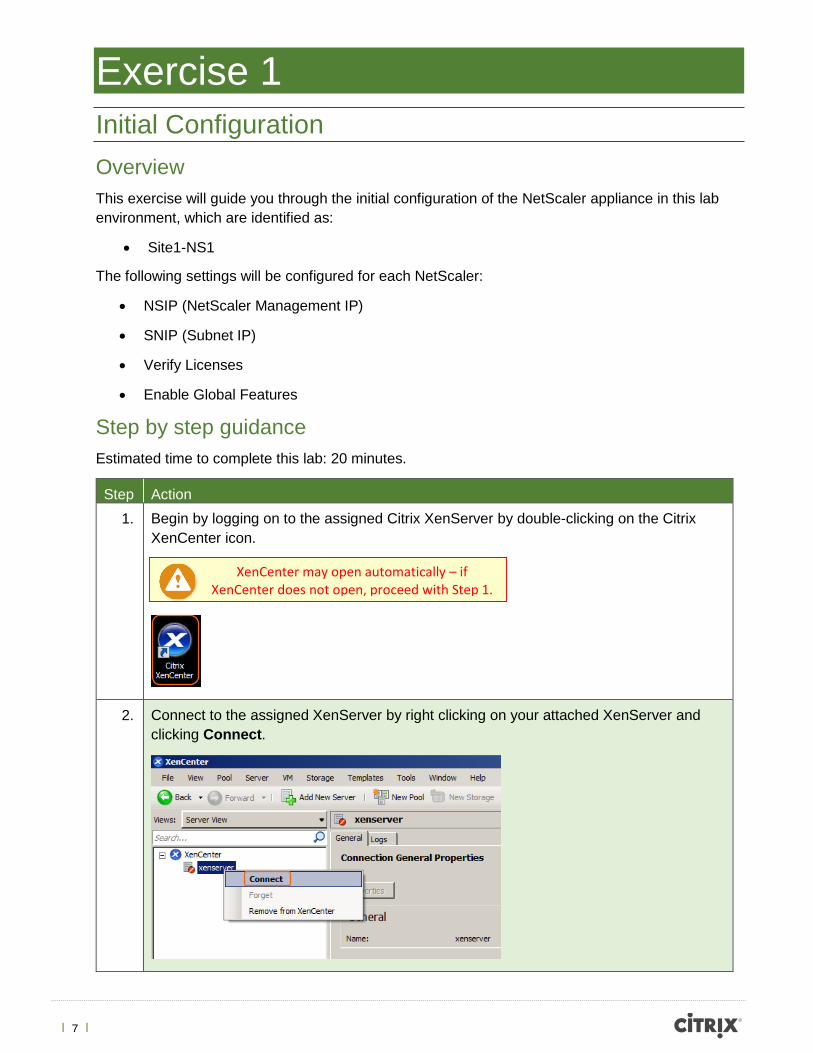
1. Begin by logging on to the assigned Citrix XenServer by double-clicking on the Citrix
XenCenter icon.
2. Connect to the assigned XenServer by right clicking on your attached XenServer and
clicking Connect.
XenCenter may open automatically – if XenCenter does not open, proceed with Step 1.

| 8 |
3. Enter the XenServer credentials shown on the login screen of the lab execution page
and click Connect.
Below is an example of assigned XenServer credentials.

| 9 |
4. Select the following VM and click on the console tab to begin the configuration of the
Citrix NetScaler.
VM: Site1-NS1
5. Enter the following IP Address, Subnet Mask and Default Gateway for the Site1-NS1,
pressing ↵Enter after each line entry.
IP Address: 192.168.10.15
Subnet Mask: 255.255.255.0
Default Gateway: 192.168.10.1

| 10 |
6. Select the following option and press ↵Enter to Save and Quit to commit the following
settings previously entered.
Option: 4
7. Once the reboot is completed proceed to login to the Site1-NS1 NetScaler ADC with the
following credentials.
Login: nsroot
Password: nsroot
When entering the password text will not display for security reasons.
| 11 |
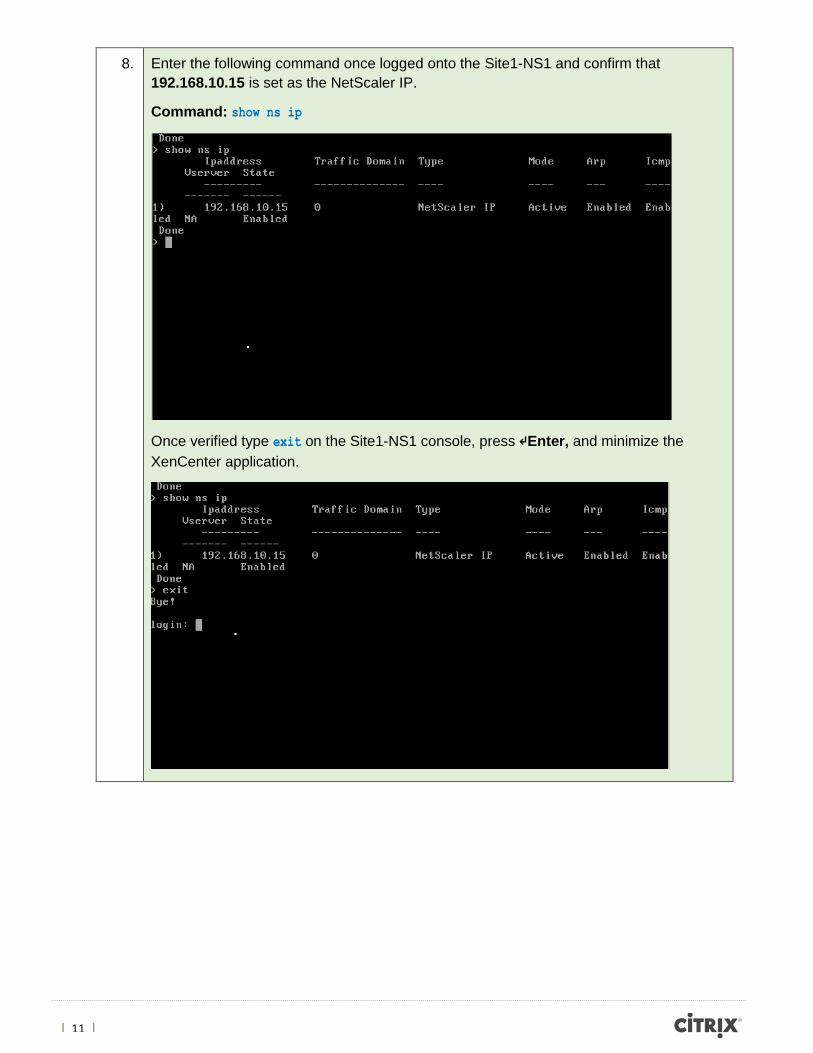
8. Enter the following command once logged onto the Site1-NS1 and confirm that
192.168.10.15 is set as the NetScaler IP.
Command: show ns ip
Once verified type exit on the Site1-NS1 console, press ↵Enter, and minimize the
XenCenter application.

| 12 |
9. Using Internet Explorer, proceed to type the below URL and credentials to logon to the
Site1-NS1 NetScaler.
http://192.168.10.15
Username: nsroot
Password: nsroot
10. Select the Subnet IP Address box on the initial NetScaler configuration wizard to enter
the SNIP (Subnet IP Address) for the Site1-NS1 NetScaler ADC.

| 13 |
11. Enter the following Subnet IP Address and click Done.
Subnet IP Address: 192.168.10.50
12. Proceed to click the Host Name, DNS IP Address, and Time Zone boxes on the initial
NetScaler configuration wizard to enter the Host Name, DNS IP Address, and Time
Zone for the Site1-NS1 NetScaler ADC.
A subnet IP address is used by the NetScaler to communicate with the backend servers. NetScaler uses this subnet IP address as a source IP address to proxy the client connections as well as to send monitor probes to check the health of the backend servers.

| 14 |
13. Enter the following Host Name, DNS IP Address, and Time Zone and click Done.
Host Name: NS1
DNS IP Address: 192.168.10.11
Time Zone: GMT-4:00-EDT-America/New_York
14. Proceed to click the Licenses box on the initial NetScaler configuration wizard to
confirm the license for the Site1-NS1 NetScaler ADC.

| 15 |
15. Confirm that the four pre-configured licenses have been uploaded to the Site1-NS1
NetScaler ADC and click Back.
16. Click Continue on the initial NetScaler configuration wizard to proceed to the Site1-NS1
NetScaler dashboard.

| 16 |
17. From the NetScaler dashboard proceed to System > Settings > and click Configure
Basic Features.
18. Select the following basic features and click OK to return to the NetScaler dashboard.
Features:
SSL Offloading
Load Balancing
Rewrite
Authentication, Authorization, and Auditing
HTTP Compression
Content Switching
| 17 |
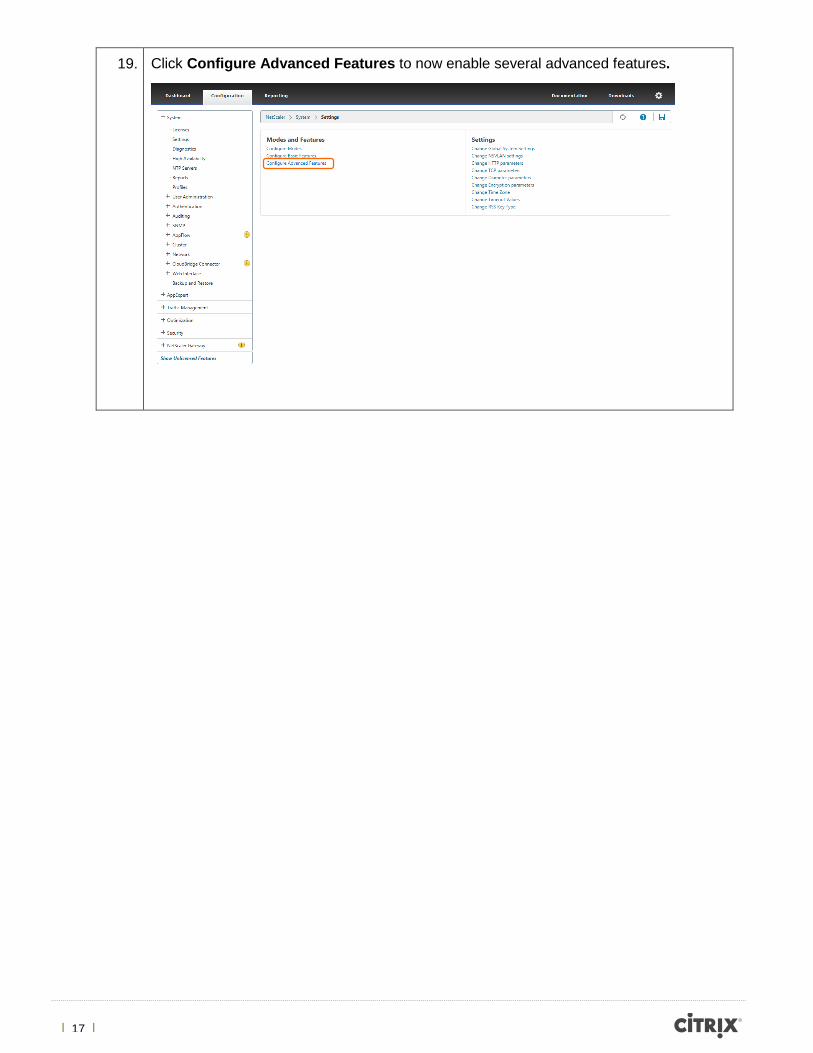
19. Click Configure Advanced Features to now enable several advanced features.

| 18 |
20. Select the following advanced features and click OK to return to the NetScaler
dashboard.
Features:
Responder
Surge Protection and Web Logging are selected by default. DO NOT un-select.
Surge Protection: This feature ensures that connections to the server occur at a rate which the server can handle. The response rate depends on how surge protection is configured. The NetScaler appliance also tracks the number of connections to the server, and uses that information to adjust the rate at which it opens new server connections.
Web Logging: This feature send logs of HTTP and HTTPS requests to a client system for storage and retrieval. This feature has two components:
The Web log server, which runs on the NetScaler.
The NetScaler Web Logging (NSWL) client, which runs on the client system.
When you run the NetScaler Web Logging (NSWL) client:
1. It connects to the NetScaler.
2. The NetScaler buffers the HTTP and HTTPS request log entries before sending them to the client.
3. The client can filter the entries before storing them.

| 19 |
21. From the NetScaler dashboard proceed to Traffic Management > SSL > Certificates
and click Install to begin the installation of the SSL certificates utilized in this lab and
exercise.
22. Add the following Certificate-Key Pair Name and browse for the Certificate File on the
local C:\Certificates folder of the student desktop for the MCTIntermediate.cer certificate
file. Click Install to complete the installation.
Certificate-Key Pair Name: MCT – Intermediate
Intermediate certificates sit between an end entity certificate and a root certificate. They help complete a “Chain of Trust” from your certificate back to your certification authorities’ root certificate.

| 20 |
23. Confirm that the MCT – Intermediate certificate has been installed and click Install to
continue installation of the second certificate utilized in this lab and exercise.
24. Add the following Certificate-Key Pair Name and browse for the Certificate File on the
local C:\Certificates folder of the student desktop for the MCTWildcard.cer certificate file
and MyCitrixTraining.key key file. Click Install to complete the installation.
Certificate-Key Pair Name: MCT – Key Pair

| 21 |
25. Confirm that the MCT – Key Pair certificate has been installed.
26. Link the MCT – Key Pair SSL Certificate and MCT – Intermediate SSL Certificate by
right clicking on the MCT- Key Pair and selecting Link.
27. Select the following CA Certificate Name and click OK to complete the link between
both SSL certificates.
CA Certificate Name: MCT – Intermediate

| 22 |
28. Click the small blue disk to save the NetScaler configuration.
Click Yes to confirm.
Exercise Summary
In this exercise, you configured the basic features of Citrix NetScaler, including its IP addresses, licensing, and advanced feature enablement.

| 23 |
Exercise 2
Configuring Custom Monitors for Exchange 2013
Overview
This exercise explains how to create custom Microsoft Exchange monitors to thoroughly inspect all
existing Microsoft Exchange virtual directories. These monitors will specifically probe the below
Exchange virtual directories. The monitor will be specifically probing the HTTP header of each
virtual directory for a 200 OK response code.
1. /owa (Outlook Web Access)
2. /ecp (Exchange Control Panel)
3. /ews (Exchange Web Service)
4. /Microsoft-Server-ActiveSync (ActiveSync Service for Mobile Mail clients)
5. /oab (Offline Address Book)
6. /rpc (Outlook Anywhere or RPC over HTTPS)
7. /Autodiscover (Autodiscover Service)

| 24 |
Step by step guidance
Estimated time to complete this lab: 45 minutes.
Step Action
1. Using Internet Explorer, type the following URL and credentials to logon to the Site1-NS1
NetScaler.
http://192.168.10.15
Username: nsroot
Password: nsroot
Skip this step if already logged into the Site1-NS1 NetScaler.
| 25 |
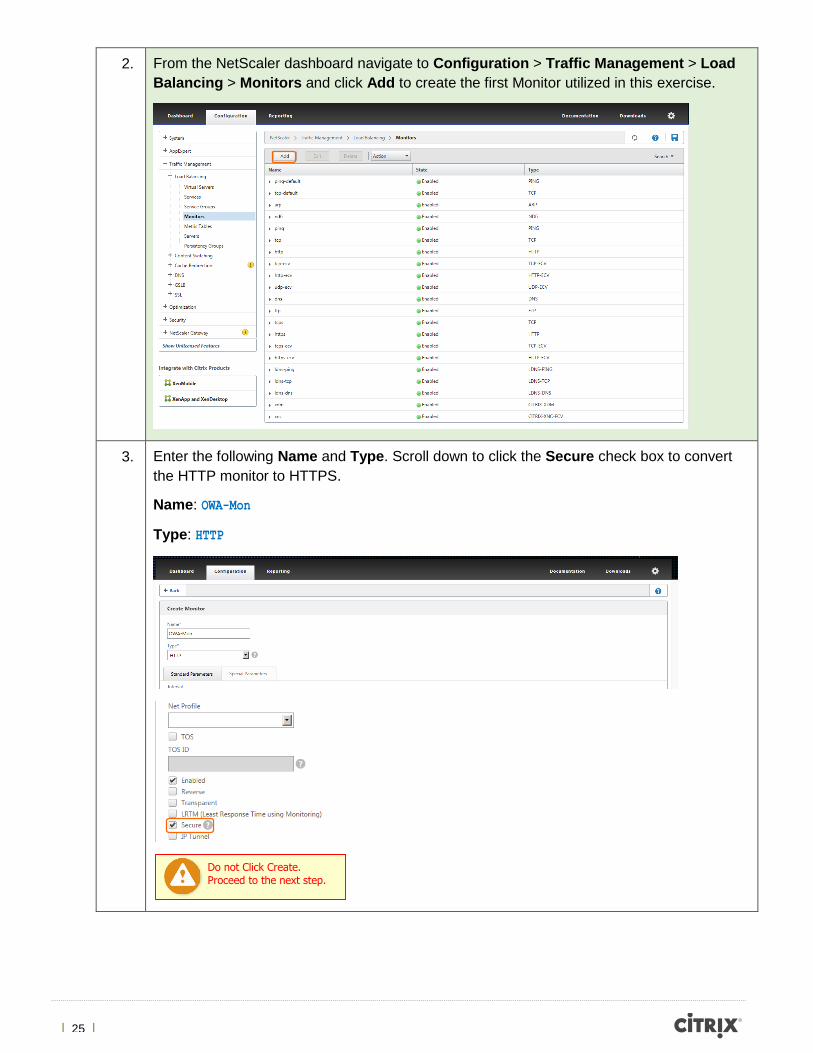
2. From the NetScaler dashboard navigate to Configuration > Traffic Management > Load
Balancing > Monitors and click Add to create the first Monitor utilized in this exercise.
3. Enter the following Name and Type. Scroll down to click the Secure check box to convert
the HTTP monitor to HTTPS.
Name: OWA-Mon
Type: HTTP
Do not Click Create.
Proceed to the next step.

| 26 |
4. Click on the Special Parameters tab, add the following HTTP Request (HTTP Header
Request), click the Treat Backslash as Escape Character check box and click Create.
HTTP Request: GET /owa/healthcheck.htm
5. Select the OWA-Mon and click Add to create a new pre-populated monitor.
The monitor created is a dedicated monitor for the Outlook Web Access virtual directory.

| 27 |
6. Change the OWA-Mon name to ECP-Mon and ensure that the Secure check box is checked.
7. Click on the Special Parameters tab, modify the following HTTP Request (HTTP Header
Request), and click the Treat Backslash as Escape Character check box and click
Create.
HTTP Request: GET /ecp/healthcheck.htm
The monitor created is a dedicated monitor for the Exchange Control Panel virtual directory.

| 28 |
8. Select the OWA-Mon and click Add to create a new pre-populated monitor.
9. Change the OWA-Mon name to EWS-Mon and ensure that the Secure check box is checked.

| 29 |
10. Click on the Special Parameters tab, modify the following HTTP Request (HTTP Header
Request), check the Treat Backslash as Escape Character check box and click Create.
HTTP Request: GET /ews/healthcheck.htm
11. Select the OWA-Mon and click Add to create a new pre-populated monitor.
The monitor created is a dedicated monitor for the Exchange Web Services virtual directory.

| 30 |
12. Change the OWA-Mon name to Activesync-Mon and ensure that the Secure check box is
checked.
13. Click on the Special Parameters tab, modify the following HTTP Request (HTTP Header
Request), check the Treat Backslash as Escape Character check box and click Create.
HTTP Request: GET /Microsoft-Server-ActiveSync/healthcheck.htm
The monitor created is a dedicated monitor for Exchange ActiveSync virtual directory used with mobile devices.

| 31 |
14. Select the OWA-Mon and click Add to create a new pre-populated monitor.
15. Change the OWA-Mon name to OAB-Mon and ensure that the Secure check box is checked.

| 32 |
16. Click on the Special Parameters tab, modify the following HTTP Request (HTTP Header
Request), check the Treat Backslash as Escape Character check box and click Create.
HTTP Request: GET /oab/healthcheck.htm
17. Select the OWA-Mon and click Add to create a new pre-populated monitor.
The monitor created is a dedicated monitor for Exchange Offline Address Book virtual directory.

| 33 |
18. Change the OWA-Mon name to RPC-Mon and ensure that the Secure check box is checked.
19. Click on the Special Parameters tab, modify the following HTTP Request (HTTP Header
Request), check the Treat Backslash as Escape Character check box and click Create.
HTTP Request: GET /rpc/healthcheck.htm
The monitor created is a dedicated monitor for the RPC virtual directory used for Basic Authentication.

| 34 |
20. Select the OWA-Mon and click Add to create a new pre-populated monitor.
21. Change the OWA-Mon name to AutoDiscover-Mon and ensure that the Secure check box is
checked.

| 35 |
22. Click on the Special Parameters tab, modify the following HTTP Request (HTTP Header
Request), check the Treat Backslash as Escape Character check box and click Create.
HTTP Request: GET /Autodiscover/healthcheck.htm
The monitor created is a dedicated monitor for AutoDiscover virtual directory used with the Auto Discover service.
| 36 |
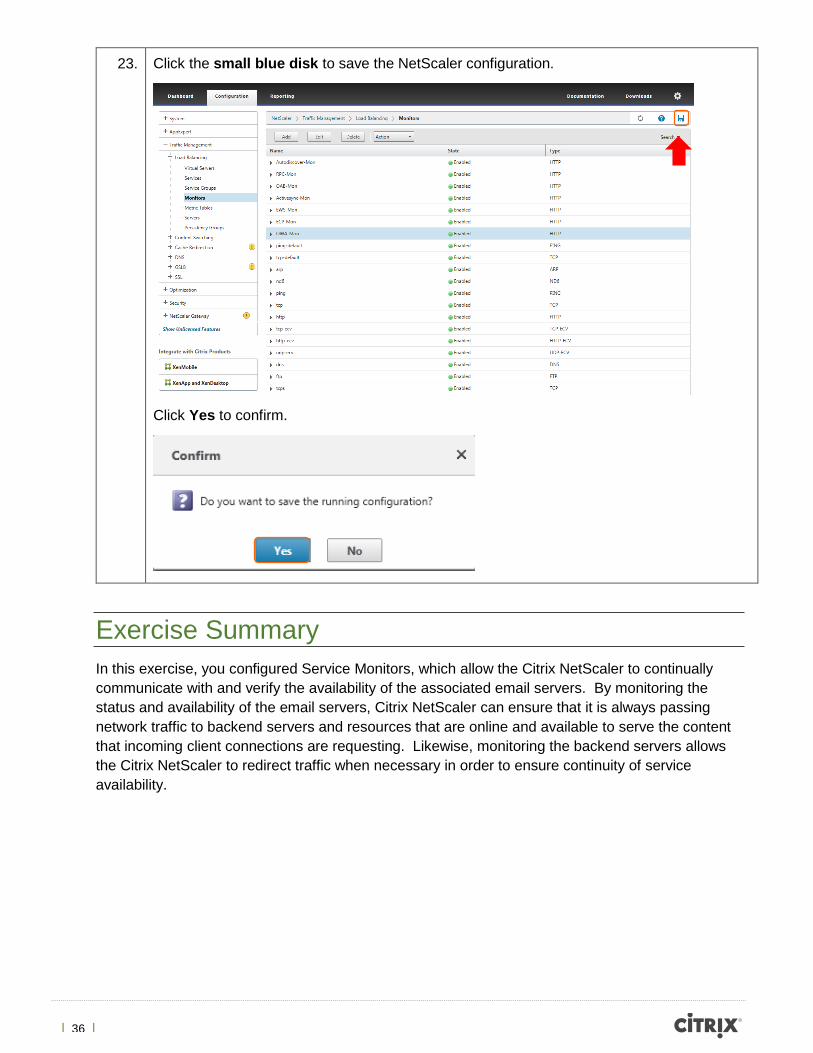
23. Click the small blue disk to save the NetScaler configuration.
Click Yes to confirm.
Exercise Summary
In this exercise, you configured Service Monitors, which allow the Citrix NetScaler to continually
communicate with and verify the availability of the associated email servers. By monitoring the
status and availability of the email servers, Citrix NetScaler can ensure that it is always passing
network traffic to backend servers and resources that are online and available to serve the content
that incoming client connections are requesting. Likewise, monitoring the backend servers allows
the Citrix NetScaler to redirect traffic when necessary in order to ensure continuity of service
availability.
| 37 |
Exercise 3
Configuring Service Groups for Exchange 2013
Overview
In this exercise, service groups are used to bind together both the previously created custom
monitors and the two existing Microsoft Exchange backend servers (Site1-Exchange and Site2-
Exchange). Each service group will contain the same backend servers, but use unique monitors for
each virtual directory used with Microsoft Exchange. Administrators are typically accustomed to
using traditional services with Citrix NetScaler for this type of implementation, however with
traditional services the same backend server cannot be used repeatedly.
Step by step guidance
Estimated time to complete this lab: 30 minutes.
This exercise covers 4 of the 7 Service Groups that can be created when Load balancing Microsoft Exchange with Citrix NetScaler. Each of the service groups will use the same backend servers but are unique in their respective monitor. The monitors used to this exercise will be the following.
OWA-Mon (Outlook Web Access)
ECP-Mon (Exchange Control Panel)
Autodiscover-Mon (Autodiscover Monitor)
ActiveSync-Mon (ActiveSync Monitor)

| 38 |
Step Action
1. Using Internet Explorer, type the following URL and credentials to logon to the Site1-NS1
NetScaler.
http://192.168.10.15
Username: nsroot
Password: nsroot
2. From the NetScaler dashboard navigate to Configuration > Traffic Management > Load
Balancing > Service Groups and click Add to create the first Service Group associated to
the Outlook Web Access virtual directory.
Skip this step if already logged into the Site1-NS1 NetScaler.

| 39 |
3. Enter the following Name, Protocol, and Click OK.
Name: OWA-SG
Protocol: SSL
4. Add the following Advanced features.
Members
Monitors

| 40 |
5. Select No Service Group Member to begin adding the first Microsoft Exchange backend
server.
6. Select Server Based followed by the “+” symbol.

| 41 |
7. Add the following Server Name, IP Address, and click Create to add the first server
associated to this Service Group.
Server Name: Site1-Exchange
IP Address: 192.168.10.20
8. Add the following Port and select Create to complete the association of the Site1-Exchange
back end server.
Port: 443

| 42 |
9. Click 1 Service Group Member to begin adding the second Microsoft Exchange backend
server to this service group.
10. Click Add to continue adding the server to this Service Group.
11. Select Server Based followed by the “+” symbol.

| 43 |
12. Add the following Server Name, IP Address, and click Create to add the second server
associated to this Service Group.
Server Name: Site2-Exchange
IP Address: 192.168.20.20
13. Add the following Port and select Create to complete the association of the Site2-Exchange
back end server.
Port: 443

| 44 |
14. Select Close to complete the Member Binding portion of the Service Group.
15. Click No Service Group to Monitor Binding to bind the previously created monitor for the
Outlook Web Access virtual directory.
16. Click the > symbol to select the necessary monitor used for the Outlook Web Access virtual
directory.

| 45 |
17. Scroll down and select the previously created monitor named OWA-Mon and click OK. This
monitor will consistently monitor the Outlook Web Access virtual directory.
18. Click Bind to bind the monitor to the OWA-SG (Outlook Web Access) Service Group.

| 46 |
19. Click Done to complete the OWA-SG (Outlook Web Access) Service Group.
20. Click Add to create the second Service Group used for the Exchange Control Panel virtual
directory.
It may be required to refresh the NetScaler dashboard to view the current State and Effective state of the recently created Service Group.

| 47 |
21. Enter the following Name, Protocol, and Click OK.
Name: ECP-SG
Protocol: SSL
22. Add the following Advanced features.
Members
Monitors

| 48 |
23. Select No Service Group Member to add both Microsoft Exchange backend servers to the
Service Group.
24. Select Server Based followed by the > symbol.

| 49 |
25. Select the following servers previously added when creating the OWA-SG Service Group
and click OK.
Site1-Exchange
Site2-Exchange
26. Add the following Port and select Create to complete the association of both the Site1 and
Site2 Microsoft Exchange backend servers to the Service Group.
Port: 443
| 50 |
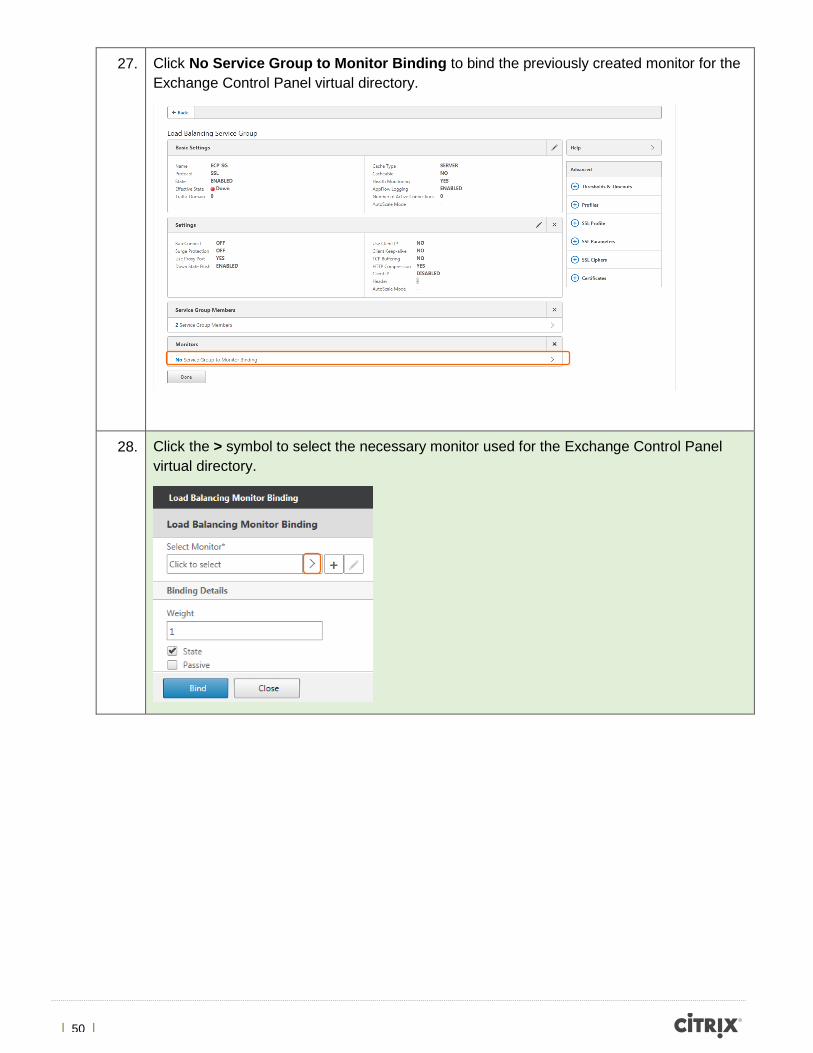
27. Click No Service Group to Monitor Binding to bind the previously created monitor for the
Exchange Control Panel virtual directory.
28. Click the > symbol to select the necessary monitor used for the Exchange Control Panel
virtual directory.

| 51 |
29. Scroll down and select the previously created monitor named ECP-Mon and click OK. This
monitor will consistently monitor the Exchange Control Panel virtual directory.
30. Click Bind to bind the monitor to the Exchange Control Panel Service Group.

| 52 |
31. Click Done to complete the ECP-SG (Exchange Control Panel) Service Group.
32. Click Add to create the third Service Group used for the Autodiscover virtual directory.
It may be required to refresh the NetScaler dashboard to view the current State and Effective state of the recently created Service Group.

| 53 |
33. Enter the following Name, Protocol, and Click OK.
Name: Autodiscover-SG
Protocol: SSL
34. Add the following Advanced features.
Members
Monitors

| 54 |
35. Select No Service Group Member to add both Microsoft Exchange backend servers to the
Service Group.
36. Select Server Based followed by the > symbol.
| 55 |
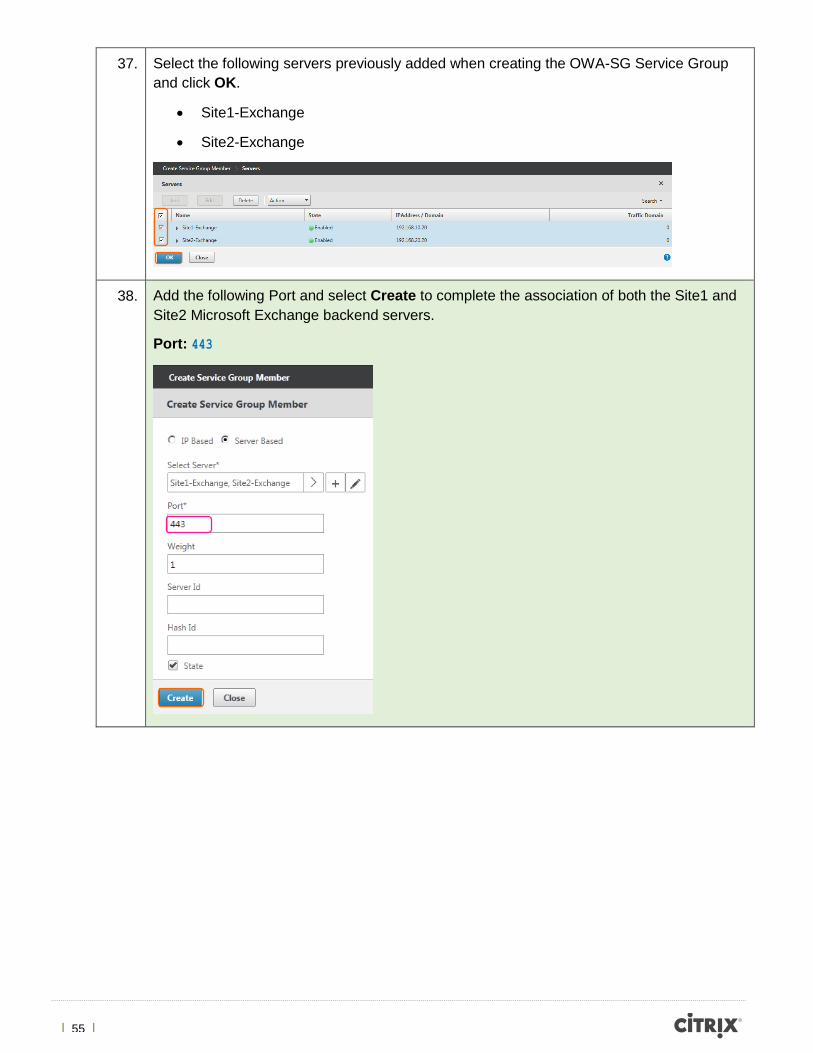
37. Select the following servers previously added when creating the OWA-SG Service Group
and click OK.
Site1-Exchange
Site2-Exchange
38. Add the following Port and select Create to complete the association of both the Site1 and
Site2 Microsoft Exchange backend servers.
Port: 443

| 56 |
39. Click No Service Group to Monitor Binding to bind the previously created monitor for
Autodiscover virtual directory.
40. Click the > symbol to select the necessary monitor used for the Autodiscover virtual
directory.

| 57 |
41. Scroll down the list of available monitors and change the view to 50 Per Page.
42. Scroll down and select the previously created monitor named Autodiscover-Mon and click
OK. This monitor will consistently monitor the Autodiscover virtual directory.

| 58 |
43. Click Bind to bind the monitor to the Autodiscover Service Group.
44. Click Done to complete the Autodiscover-SG Service Group.

| 59 |
45. Click Add to create the fourth Service Group used for the ActiveSync virtual directory.
46. Enter the following Name, Protocol, and Click OK.
Name: ActiveSync-SG
Protocol: SSL
It may be required to refresh the NetScaler dashboard to view the current State and Effective state of the recently created Service Group.
| 60 |
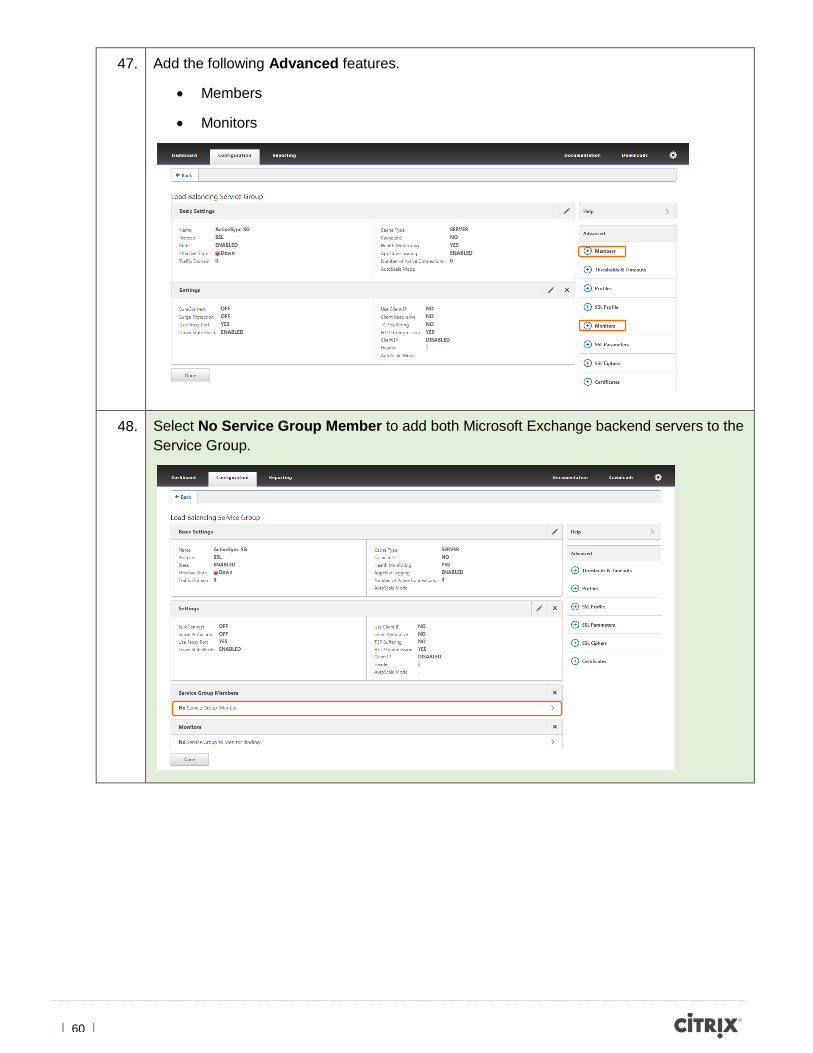
47. Add the following Advanced features.
Members
Monitors
48. Select No Service Group Member to add both Microsoft Exchange backend servers to the
Service Group.

| 61 |
49. Select Server Based followed by the > symbol.
50. Select the following servers previously added when creating the OWA-SG Service Group
and click OK.
Site1-Exchange
Site2-Exchange

| 62 |
51. Add the following Port and select Create to complete the association of both the Site1 and
Site2 Microsoft Exchange backend servers.
Port: 443
52. Click No Service Group to Monitor Binding to bind the previously created monitor for the
ActiveSync virtual directory.

| 63 |
53. Click the > symbol to select the necessary monitor used for the ActiveSync virtual directory.
54. Scroll down and select the previously created monitor named Activesync-Mon and click
OK. This monitor will consistently monitor the ActiveSync virtual directory.

| 64 |
55. Click Bind to bind the monitor to the ActiveSync Service Group.
56. Click Done to complete the ActiveSync-SG Service Group.

| 65 |
57. Click the small blue disk to save the NetScaler configuration.
Click Yes to confirm.
Exercise Summary
This exercise covered the configuration of the service groups used to bind together previously
created monitors for each Exchange 2013 virtual directory and backend servers found in this lab
environment. Each service group reflects the same two backend servers, but uniquely works with a
different custom Exchange monitor.
It may be required to refresh the NetScaler dashboard to view the currently State and Effective state of the recently created Service Group.

| 66 |
Exercise 4
Configuring Virtual Servers for Exchange 2013
Overview
In this exercise non-addressable virtual servers are created for each one of the Exchange virtual
directories for which a service group was created in the previous exercise. Creating these virtual
servers will allow the ability for administrators to apply the needed policies to allow for a better user
experience and more secure environment. Each one of the virtual servers will bind all of the service
groups created in exercise 3 along with the certificate bound to each Exchange Server in the lab
environment.
Step by step guidance
Estimated time to complete this lab: 30 minutes.
Step Action
1. Using Internet Explorer, type the following URL and credentials to logon to the Site1-NS1
NetScaler.
http://192.168.10.15
Username: nsroot
Password: nsroot
Skip this step if already logged into the Site1-NS1 NetScaler.

| 67 |
2. From the NetScaler dashboard navigate to Configuration > Traffic Management > Load
Balancing > Virtual Servers and click Add to create the first Virtual Server associated to
the Outlook Web Access virtual directory.
3. Add the following basic settings and click OK.
Name: Exchange-OWA
Protocol: SSL
IP Address Type: Non-Addressable

| 68 |
4. Click the No Load Balancing Virtual Server ServiceGroup Binding.
5. Click the > symbol to select the corresponding Service Group.
6. Select the OWA-SG Service Group and click OK. This will attach all servers hosting the
Outlook Web Access virtual directory and monitors to the Exchange-OWA Virtual Server.
7. Select Bind to complete the attachment of the OWA-SG Service Group.

| 69 |
8. Click OK to proceed with the Virtual Server configuration.
9. Click the NO Server Certificate to bind a certificate to the Exchange-OWA Virtual Server.
10. Click the > symbol to select the certificate.
11. Select the MCT – Key Pair certificate and select OK.
| 70 |
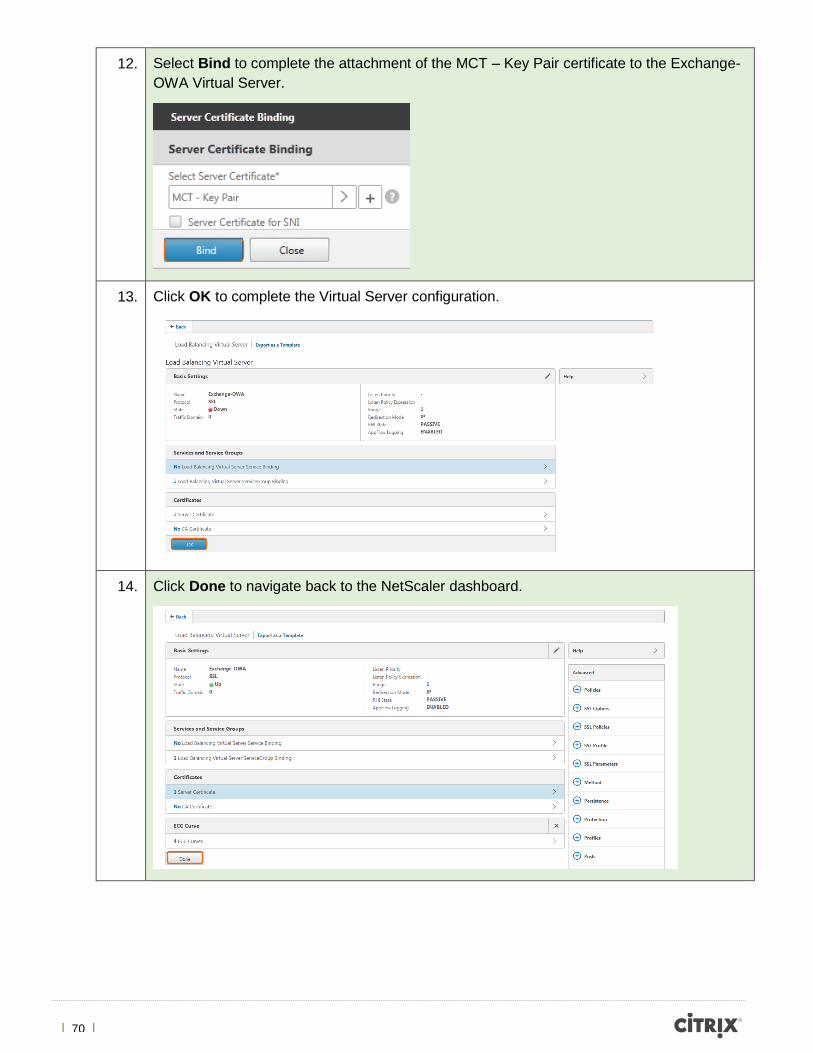
12. Select Bind to complete the attachment of the MCT – Key Pair certificate to the Exchange-
OWA Virtual Server.
13. Click OK to complete the Virtual Server configuration.
14. Click Done to navigate back to the NetScaler dashboard.

| 71 |
15. Click refresh to confirm that the Exchange-OWA Virtual Servers State and Effective State
are UP.
16. Click Add to create the second Virtual Server for Exchange 2013 associated to the
ActiveSync virtual directory.

| 72 |
17. Add the following basic settings and click OK.
Name: Exchange-ActSync
Protocol: SSL
IP Address Type: Non-Addressable
18. Click the No Load Balancing Virtual Server ServiceGroup Binding.
19. Click the > symbol to select the corresponding Service Group.

| 73 |
20. Select the ActiveSync-SG Service Group and click OK. This will attach all servers hosting
the ActiveSync virtual directory and monitors to the Exchange-ActSync Virtual Server.
21. Select Bind to complete the attachment of the ActiveSync-SG Service Group.
22. Click OK to proceed with the Virtual Server configuration.
23. Click the NO Server Certificate to bind a certificate to the Exchange-ActSync Virtual
Server.
| 74 |
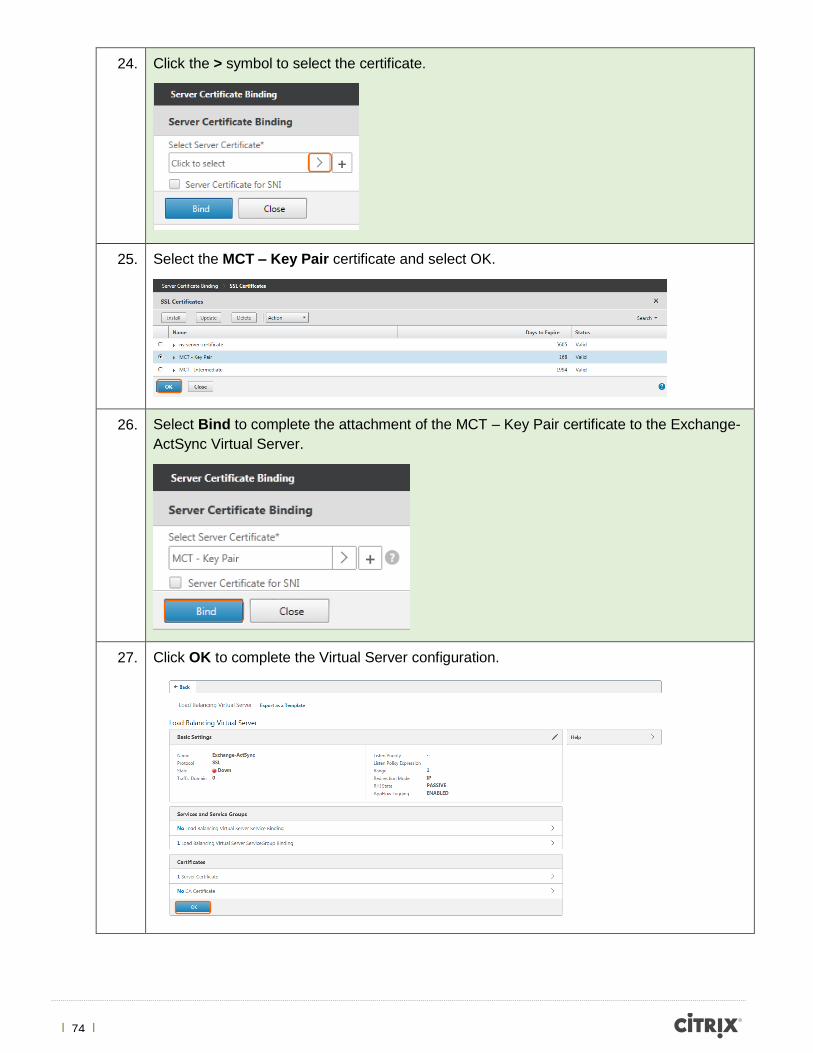
24. Click the > symbol to select the certificate.
25. Select the MCT – Key Pair certificate and select OK.
26. Select Bind to complete the attachment of the MCT – Key Pair certificate to the Exchange-
ActSync Virtual Server.
27. Click OK to complete the Virtual Server configuration.
| 75 |
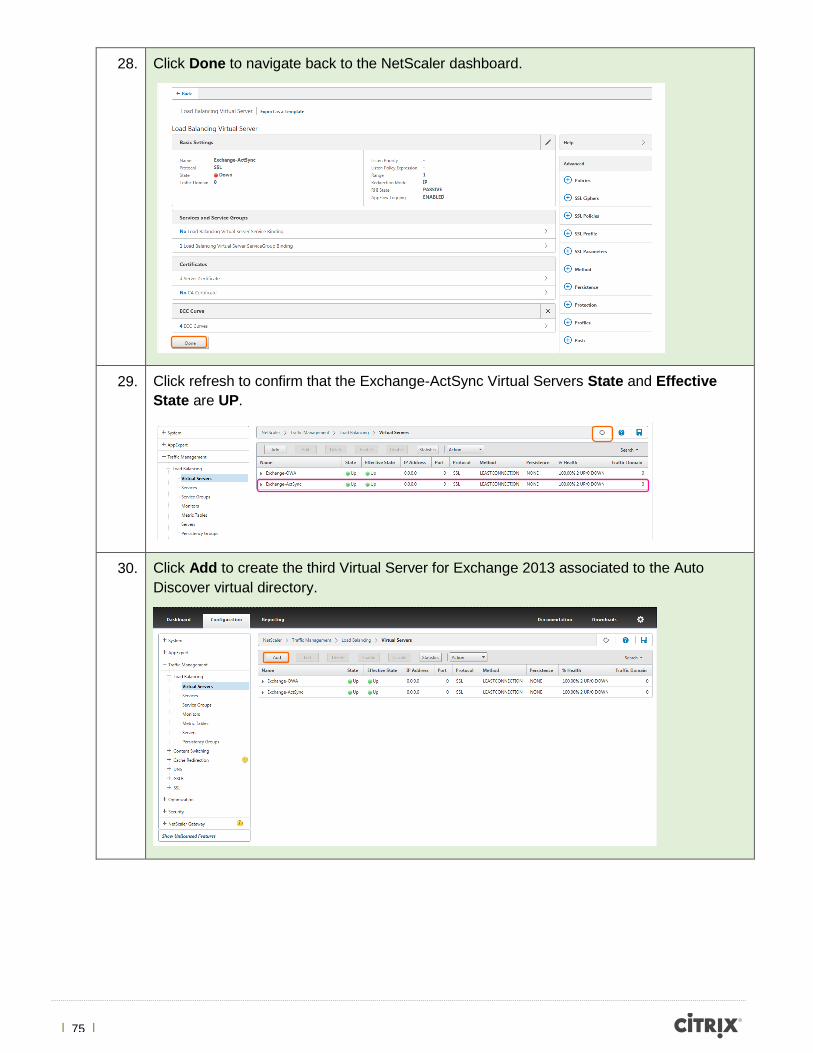
28. Click Done to navigate back to the NetScaler dashboard.
29. Click refresh to confirm that the Exchange-ActSync Virtual Servers State and Effective
State are UP.
30. Click Add to create the third Virtual Server for Exchange 2013 associated to the Auto
Discover virtual directory.

| 76 |
31. Add the following basic settings and click OK.
Name: Exchange-AutoDis
Protocol: SSL
IP Address Type: Non-Addressable
32. Click the No Load Balancing Virtual Server ServiceGroup Binding.
33. Click the > symbol to select the corresponding Service Group.

| 77 |
34. Select the AutoDiscover-SG Service Group and click OK. This will attach all servers
hosting the Auto Discover virtual directory and monitors to the Exchange-AutoDis Virtual
Server.
35. Select Bind to complete the attachment of the Autodiscover-SG Service Group.
36. Click OK to proceed with the Virtual Server configuration.

| 78 |
37. Click the NO Server Certificate to bind a certificate to the Exchange-ActSync Virtual
Server.
38. Click the > symbol to select the certificate.
39. Select the MCT – Key Pair certificate and select OK.
40. Select Bind to complete the attachment of the MCT – Key Pair certificate to the Exchange-
AutoDis Virtual Server.

| 79 |
41. Click OK to complete the Virtual Server configuration.
42. Click Done to navigate back to the NetScaler dashboard.
43. Click refresh to confirm that the Exchange-AutoDis Virtual Servers State and Effective
State are UP.

| 80 |
44. Click Add to create the fourth Virtual Server for Exchange 2013 associated to the
Exchange Control Panel virtual directory.
45. Add the following basic settings and click OK.
Name: Exchange-ECP
Protocol: SSL
IP Address Type: Non-Addressable

| 81 |
46. Click the No Load Balancing Virtual Server ServiceGroup Binding.
47. Click the > symbol to select the corresponding Service Group.
48. Select the ECP-SG Service Group and click OK. This will attach all servers hosting the
Exchange Control Panel virtual directory and monitors to the Exchange-ECP Virtual Server.
49. Select Bind to complete the attachment of the ECP-SG Service Group.

| 82 |
50. Click OK to proceed with the Virtual Server configuration.
51. Click the NO Server Certificate to bind a certificate to the Exchange-ECP Virtual Server.
52. Click the > symbol to select the certificate.
53. Select the MCT – Key Pair certificate and select OK.

| 83 |
54. Select Bind to complete the attachment of the MCT – Key Pair certificate to the Exchange-
ECP Virtual Server.
55. Click OK to complete the Virtual Server configuration.
56. Click Done to navigate back to the NetScaler dashboard.

| 84 |
57. Click refresh to confirm that the Exchange-ECP Virtual Servers State and Effective State
are UP.
58. Click the small blue disk to save the NetScaler configuration.
Click Yes to confirm.
Exercise Summary
This exercise explained how to create non-addressable virtual servers for each one of the
Exchange virtual directories for which a service group was created in the previous exercise. These
virtual servers bound all of the service groups created in Exercise 3 along with the certificate bound
to each Exchange Server in the lab environment.
| 85 |
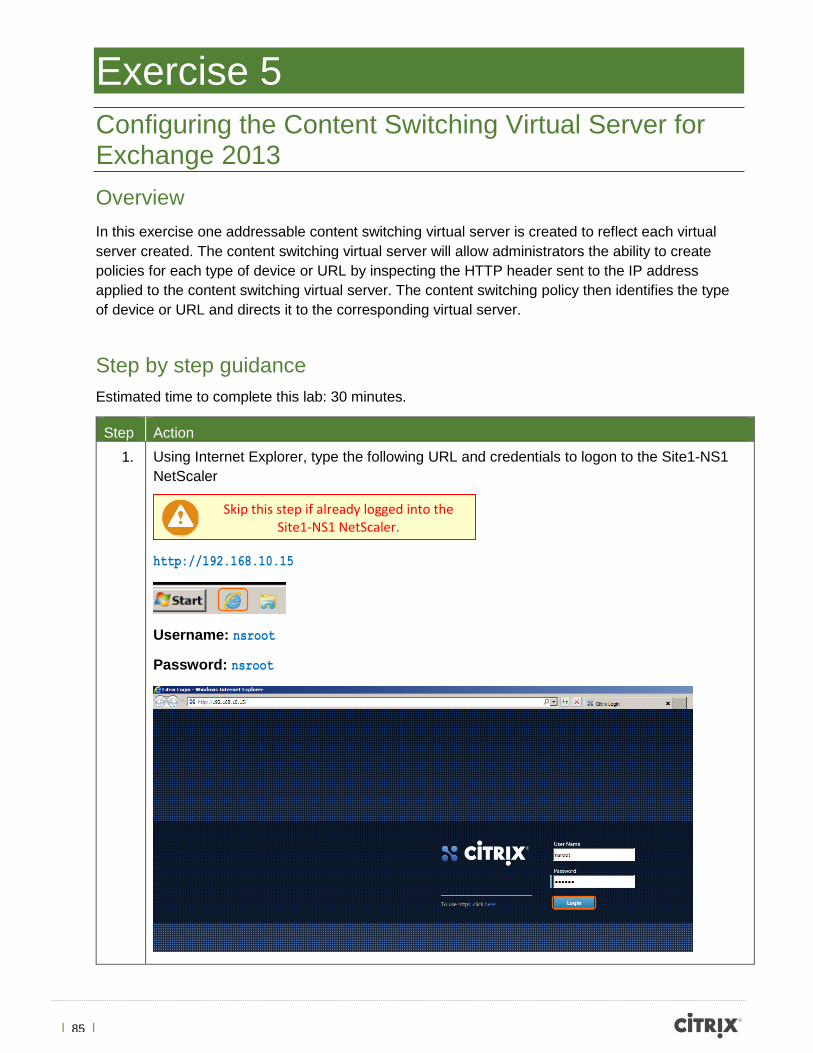
Exercise 5
Configuring the Content Switching Virtual Server for Exchange 2013
Overview
In this exercise one addressable content switching virtual server is created to reflect each virtual
server created. The content switching virtual server will allow administrators the ability to create
policies for each type of device or URL by inspecting the HTTP header sent to the IP address
applied to the content switching virtual server. The content switching policy then identifies the type
of device or URL and directs it to the corresponding virtual server.
Step by step guidance
Estimated time to complete this lab: 30 minutes.
Step Action
1. Using Internet Explorer, type the following URL and credentials to logon to the Site1-NS1
NetScaler
http://192.168.10.15
Username: nsroot
Password: nsroot
Skip this step if already logged into the Site1-NS1 NetScaler.

| 86 |
2. From the NetScaler dashboard navigate to Configuration > Traffic Management >
Content Switching > Virtual Servers and click Add to begin the creating the content
switching virtual server.
3. Add the following basic settings for the Content Switching Virtual Server and click OK.
Name: Exchange-CSvServer
Protocol: SSL
IP Address Type: IP Address
IP Address: 192.168.10.100
Port: 443
| 87 |
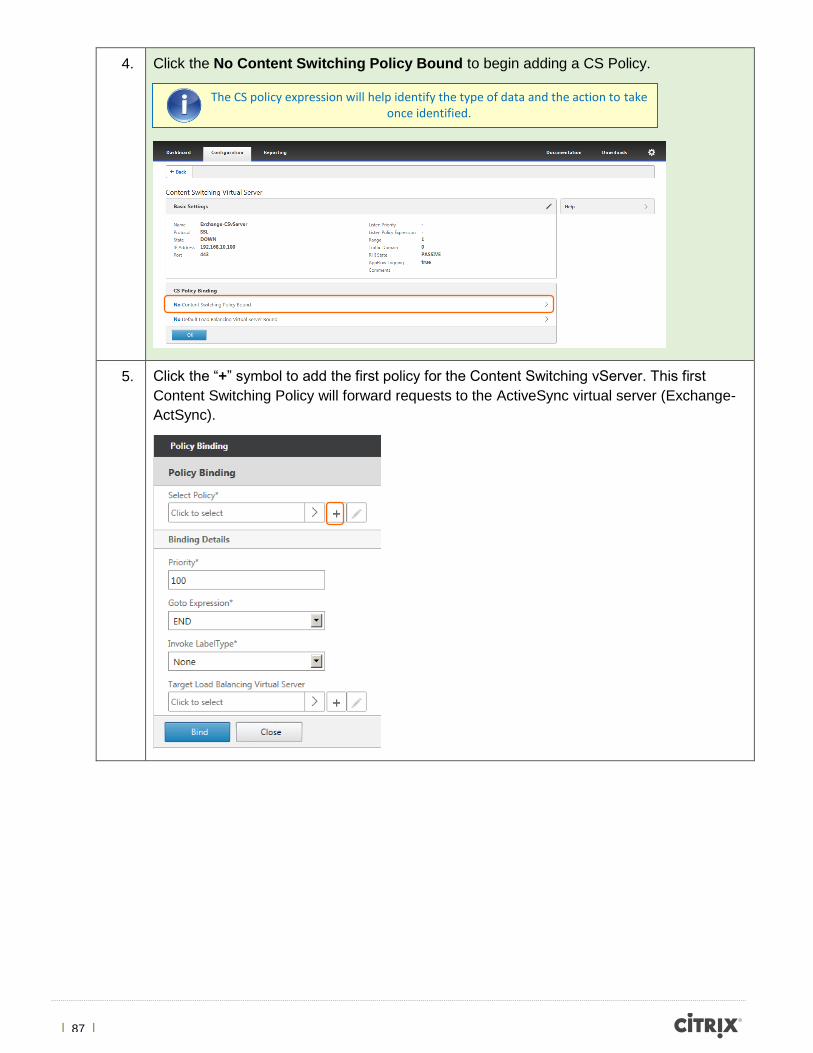
4. Click the No Content Switching Policy Bound to begin adding a CS Policy.
5. Click the “+” symbol to add the first policy for the Content Switching vServer. This first
Content Switching Policy will forward requests to the ActiveSync virtual server (Exchange-
ActSync).
The CS policy expression will help identify the type of data and the action to take once identified.

| 88 |
6. Add the following settings to the Content Switch Policy and click create.
Name: CS-POL-ACTSYNC
Expression: HTTP.REQ.URL.SET_TEXT_MODE(IGNORECASE).CONTAINS("/Microsoft-Server-ActiveSync")
Do not copy and paste the expression.
| 89 |
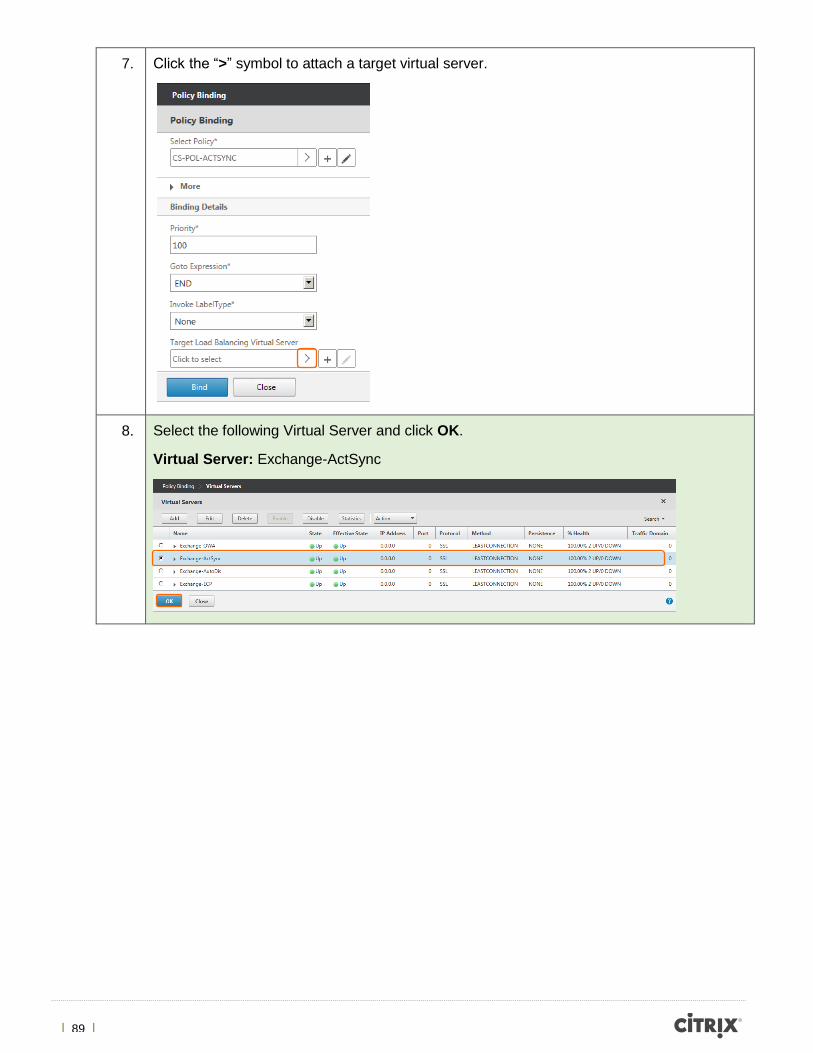
7. Click the “>” symbol to attach a target virtual server.
8. Select the following Virtual Server and click OK.
Virtual Server: Exchange-ActSync

| 90 |
9. Click Bind to complete the first Content Switching Policy.
10. Click the 1 Content Switching Policy link to add a second CS Policy.
11. Click Add Binding.
| 91 |
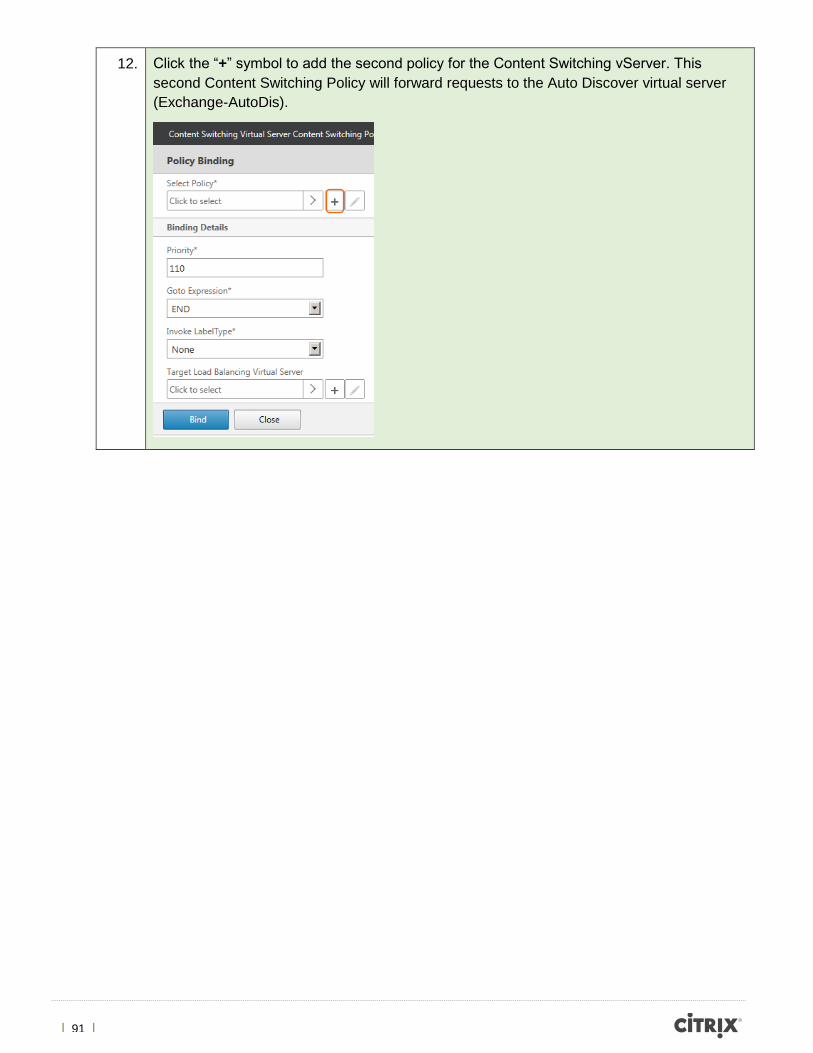
12. Click the “+” symbol to add the second policy for the Content Switching vServer. This
second Content Switching Policy will forward requests to the Auto Discover virtual server
(Exchange-AutoDis).

| 92 |
13. Add the following settings to the Content Switch Policy and click create.
Name: CS-POL-AUTODIS
Expression: HTTP.REQ.URL.SET_TEXT_MODE(IGNORECASE).CONTAINS("/Autodiscover")
14. Click the “>” symbol to attach a target virtual server.
Do not copy and paste the expression.

| 93 |
15. Select the following Virtual Server and click OK.
Virtual Server: Exchange-AutoDis
16. Click Bind to complete the second Content Switching Policy.
17. Click Add Binding.

| 94 |
18. Click the “+” symbol to add the third policy for the Content Switching vServer. This third
Content Switching Policy will forward requests to the Exchange Control Panel virtual server
(Exchange-ECP).

| 95 |
19. Add the following settings to the Content Switch Policy and click create.
Name: CS-POL-ECP
Expression: HTTP.REQ.URL.SET_TEXT_MODE(IGNORECASE).CONTAINS("/ecp")
20. Click the “>” symbol to attach a target virtual server.
Do not copy and paste the expression.
| 96 |
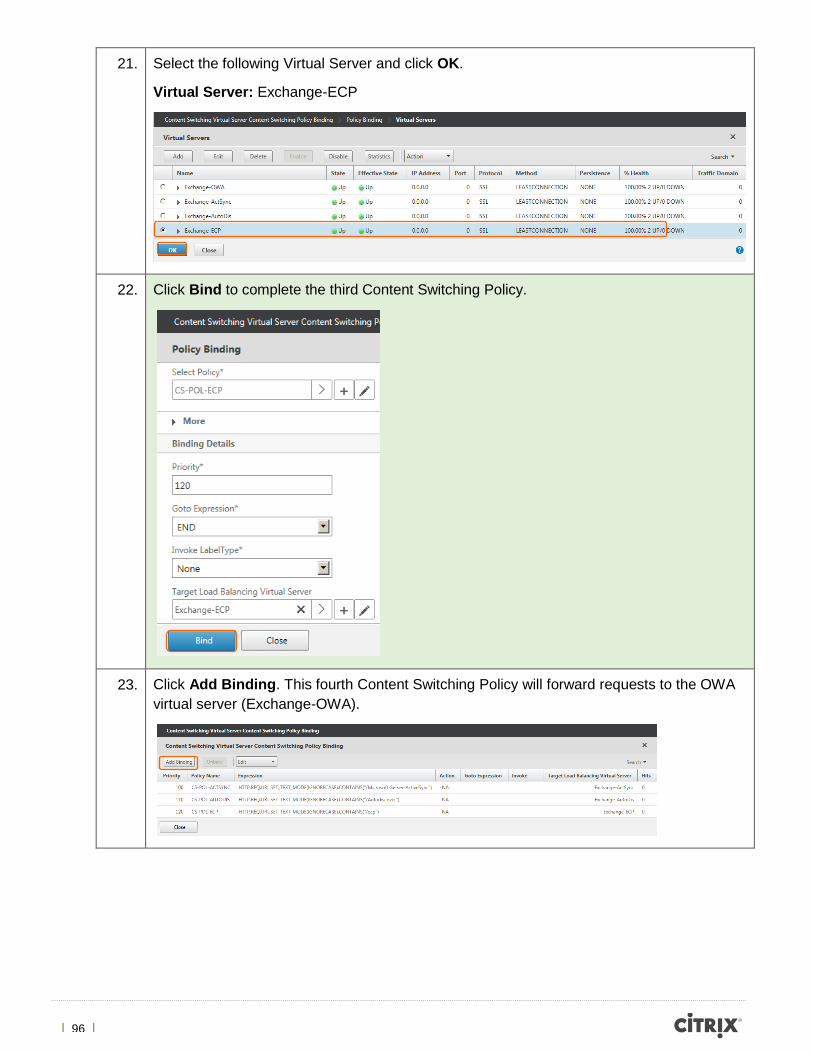
21. Select the following Virtual Server and click OK.
Virtual Server: Exchange-ECP
22. Click Bind to complete the third Content Switching Policy.
23. Click Add Binding. This fourth Content Switching Policy will forward requests to the OWA
virtual server (Exchange-OWA).

| 97 |
24. Click the “+” symbol to add the fourth policy for the Content Switching vServer. This fourth
Content Switching Policy will forward requests to the OWA virtual server (Exchange-OWA).

| 98 |
25. Add the following settings to the Content Switch Policy and click create.
Name: CS-POL-OWA
Expression: HTTP.REQ.HEADER("User-Agent").SET_TEXT_MODE(IGNORECASE).CONTAINS("Mozilla")
Do not copy and paste the expression. Also, note that expressions do not contain any spaces.
| 99 |
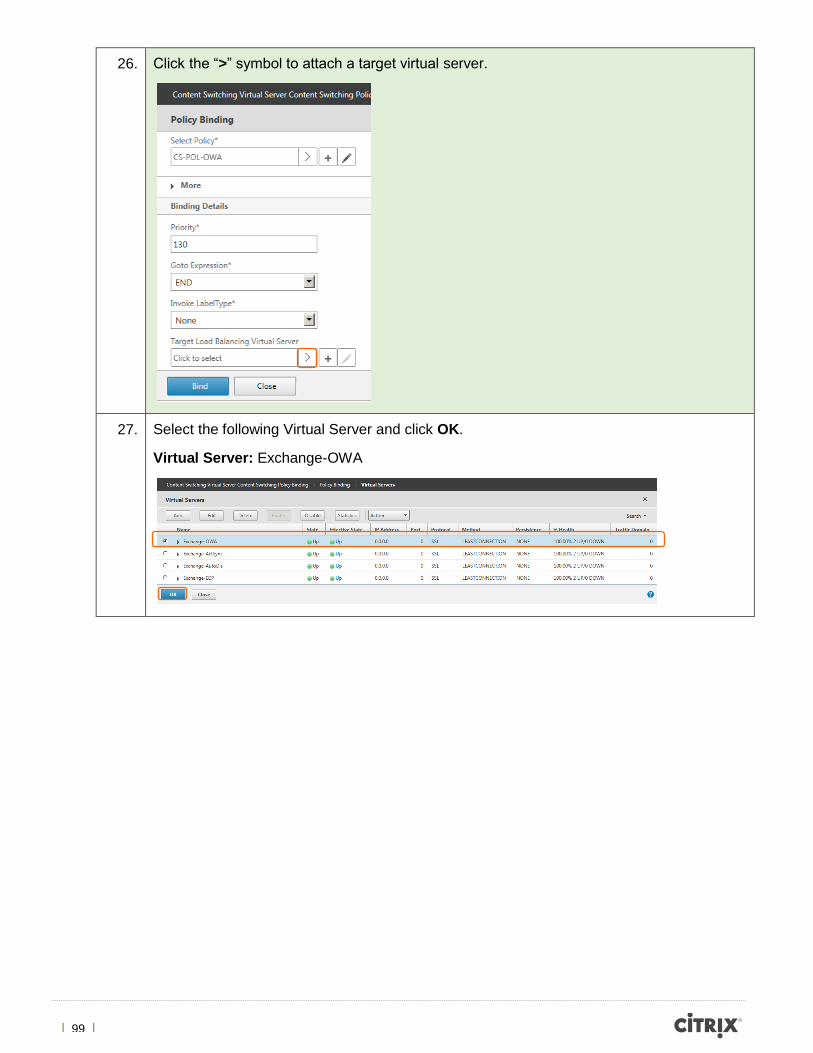
26. Click the “>” symbol to attach a target virtual server.
27. Select the following Virtual Server and click OK.
Virtual Server: Exchange-OWA
| 100 |
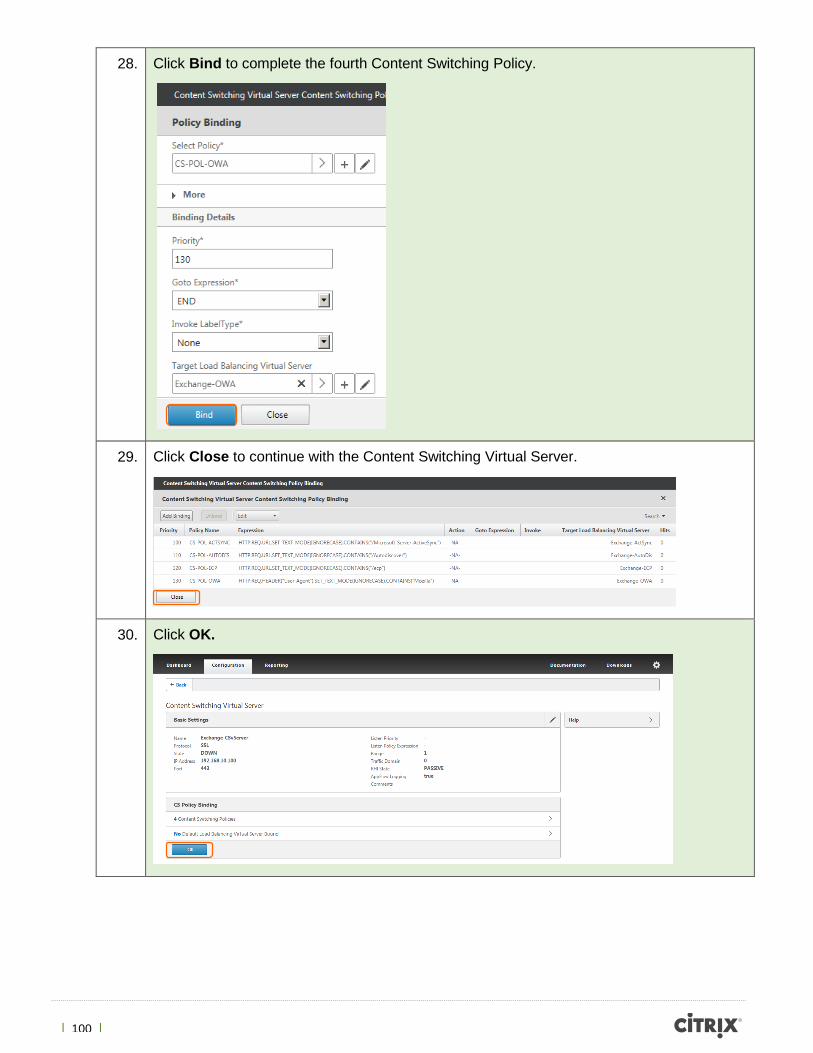
28. Click Bind to complete the fourth Content Switching Policy.
29. Click Close to continue with the Content Switching Virtual Server.
30. Click OK.

| 101 |
31. Add the following advanced setting to add a certificate to the Content Switching virtual
server.
Advanced Settings: Certificates
32. sc Click the No Server Certificate link.
33. Click the “>” symbol.

| 102 |
34. Select the following SSL certificate and click OK.
SSL certificate: MCT- Key Pair
35. Click Bind to attach the certificate to the Content Switching Virtual Server.
36. Click Close to close the certificate box.
37. Click Done to complete the Content Switching Virtual Directory.

| 103 |
38. Click refresh to confirm that the State of the Exchange-CSvServer is Up.
39. Navigate back to Traffic Management > Load Balancing > Virtual Servers, select the
Exchange-OWA virtual server, and click Edit.
40. Add the following Advanced setting to the virtual server.
Advanced Settings: Policies
Exc
han
ge-
CSv
Ser
ver
| 104 |
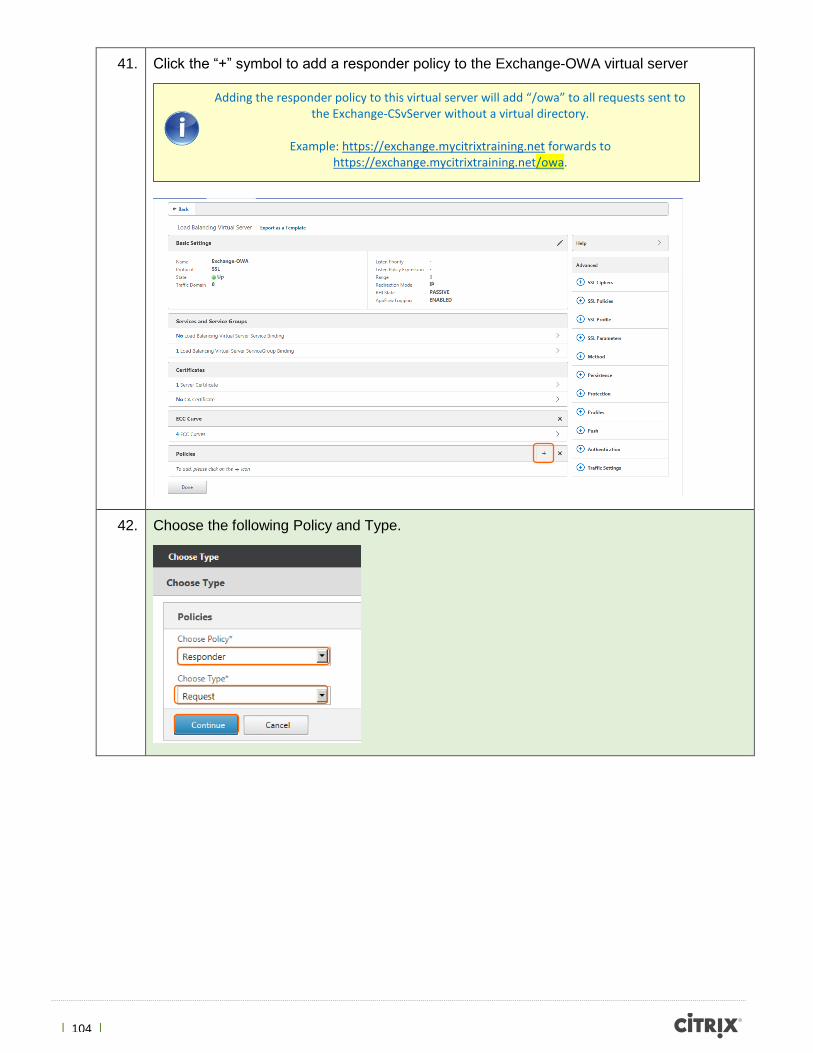
41. Click the “+” symbol to add a responder policy to the Exchange-OWA virtual server
42. Choose the following Policy and Type.
Adding the responder policy to this virtual server will add “/owa” to all requests sent to the Exchange-CSvServer without a virtual directory.
Example: https://exchange.mycitrixtraining.net forwards to
https://exchange.mycitrixtraining.net/owa.

| 105 |
43. Click the “+” symbol to set the responder properties.

| 106 |
44. Add the following Name and Expression. Continue by clicking the “+” symbol to add an
Action for the matching expression.
Name: OWA-Redirect
Expression: HTTP.REQ.URL.STARTSWITH("/owa").NOT
| 107 |
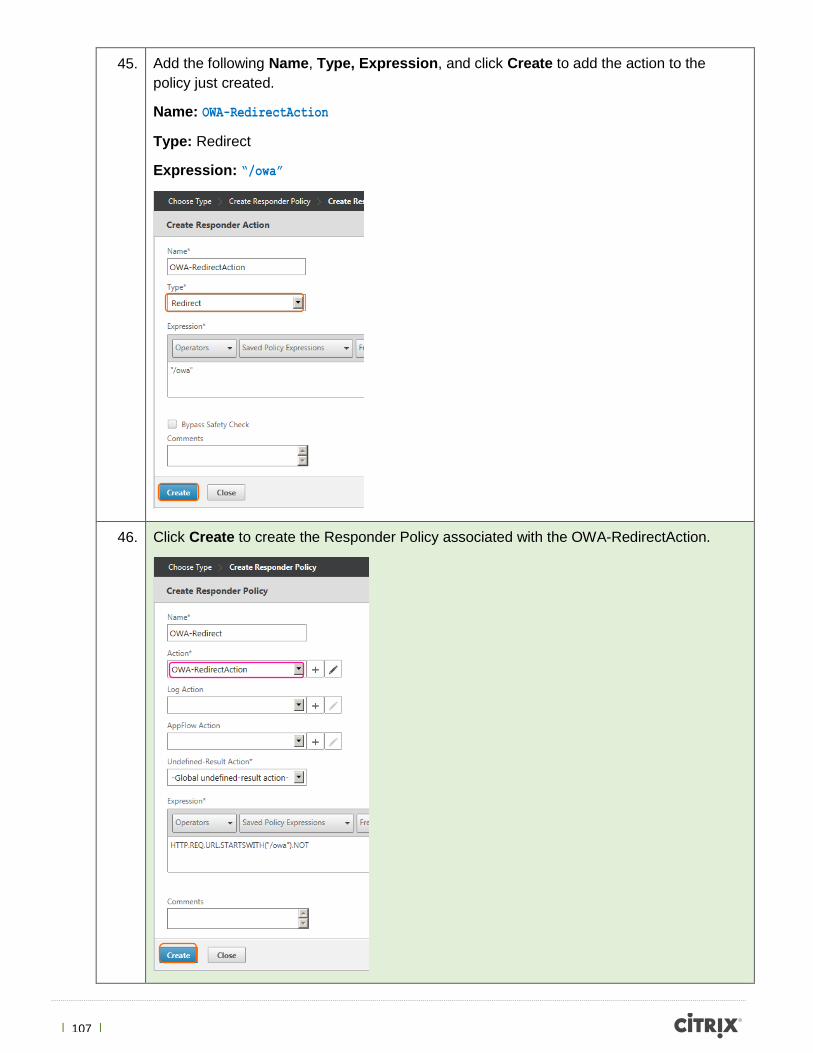
45. Add the following Name, Type, Expression, and click Create to add the action to the
policy just created.
Name: OWA-RedirectAction
Type: Redirect
Expression: “/owa”
46. Click Create to create the Responder Policy associated with the OWA-RedirectAction.

| 108 |
47. Click Bind to bind the Responder Policy to the Exchange-OWA Virtual Server.
48. Click Done to proceed back to the NetScaler dashboard.
| 109 |
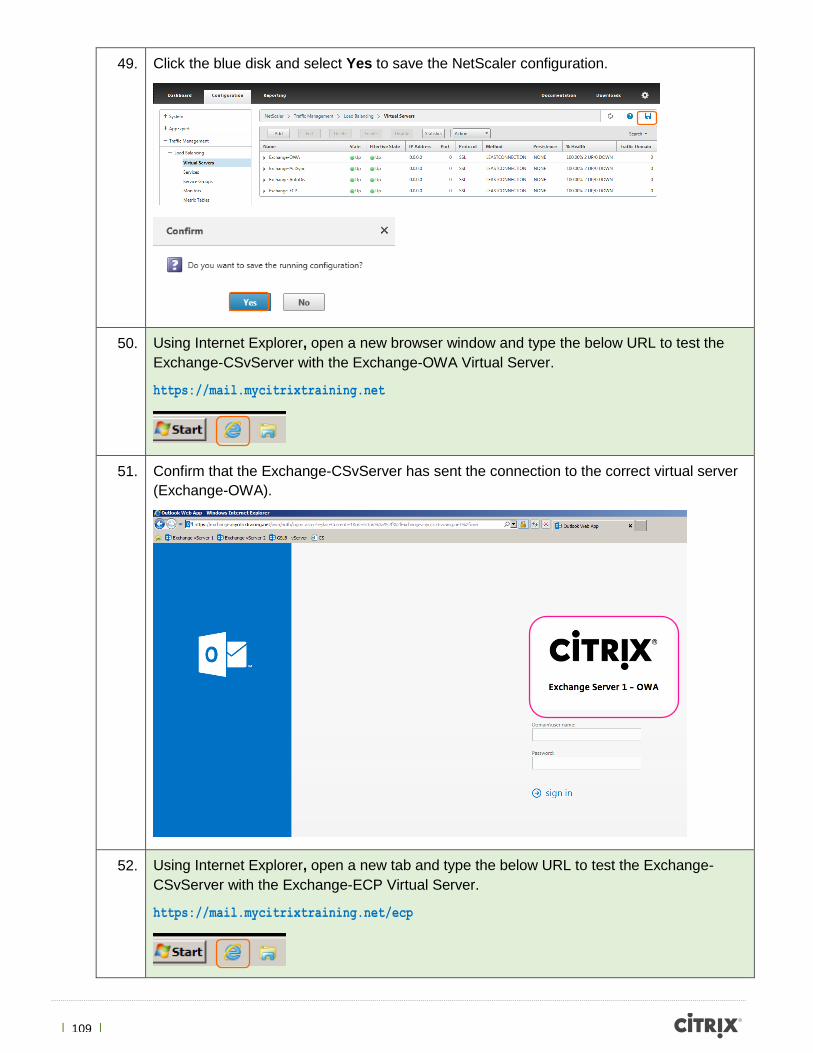
49. Click the blue disk and select Yes to save the NetScaler configuration.
50. Using Internet Explorer, open a new browser window and type the below URL to test the
Exchange-CSvServer with the Exchange-OWA Virtual Server.
https://mail.mycitrixtraining.net
51. Confirm that the Exchange-CSvServer has sent the connection to the correct virtual server
(Exchange-OWA).
52. Using Internet Explorer, open a new tab and type the below URL to test the Exchange-
CSvServer with the Exchange-ECP Virtual Server.
https://mail.mycitrixtraining.net/ecp

| 110 |
53. Confirm that the Exchange-CSvServer has sent the connection to the correct virtual server
(Exchange-ECP).
Exercise Summary
This exercise explained how to create a content switching virtual server to reflect each virtual server
created in the previous exercise. Creating the content switching virtual server custom policies
allowed the inspection of the HTTP header to correctly forward traffic to its respective virtual server.
The policies were tested to reflect two virtual servers: Exchange-OWA and Exchange-ECP.

| 111 |
Exercise 6
Configuring Custom Responder Policies for Exchange 2013
Overview
The goal of this exercise is to assist with the user experience. By default, virtual directories such as Outlook Web Access and the Exchange Control Panel require users and administrators to type long and sometimes confusing URLs, such as HTTPS://mail.company.com/owa. In this exercise, custom responder policies are created allowing users and administrators to type simple URLs. These simple URLs such as mail.company.com, when entered in a browser, will forward users and administrators to the more complex correct URL such as HTTPS://mail.company.com/owa.
Step by step guidance
Estimated time to complete this lab: 30 minutes.
Step Action
1. Using Internet Explorer, proceed to type the below URL and credentials to logon to the
Site1-NS1 NetScaler.
http://192.168.10.15
Username: nsroot
Password: nsroot
| 112 |
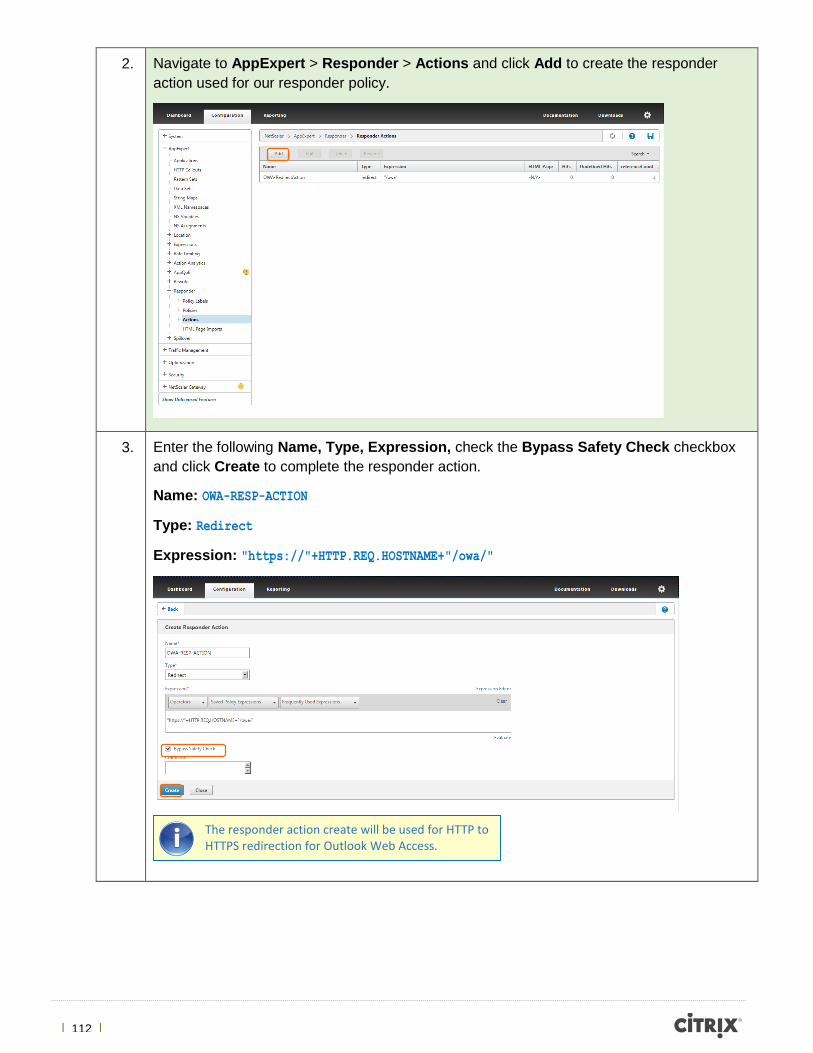
2. Navigate to AppExpert > Responder > Actions and click Add to create the responder
action used for our responder policy.
3. Enter the following Name, Type, Expression, check the Bypass Safety Check checkbox
and click Create to complete the responder action.
Name: OWA-RESP-ACTION
Type: Redirect
Expression: "https://"+HTTP.REQ.HOSTNAME+"/owa/"
The responder action create will be used for HTTP to HTTPS redirection for Outlook Web Access.
| 113 |
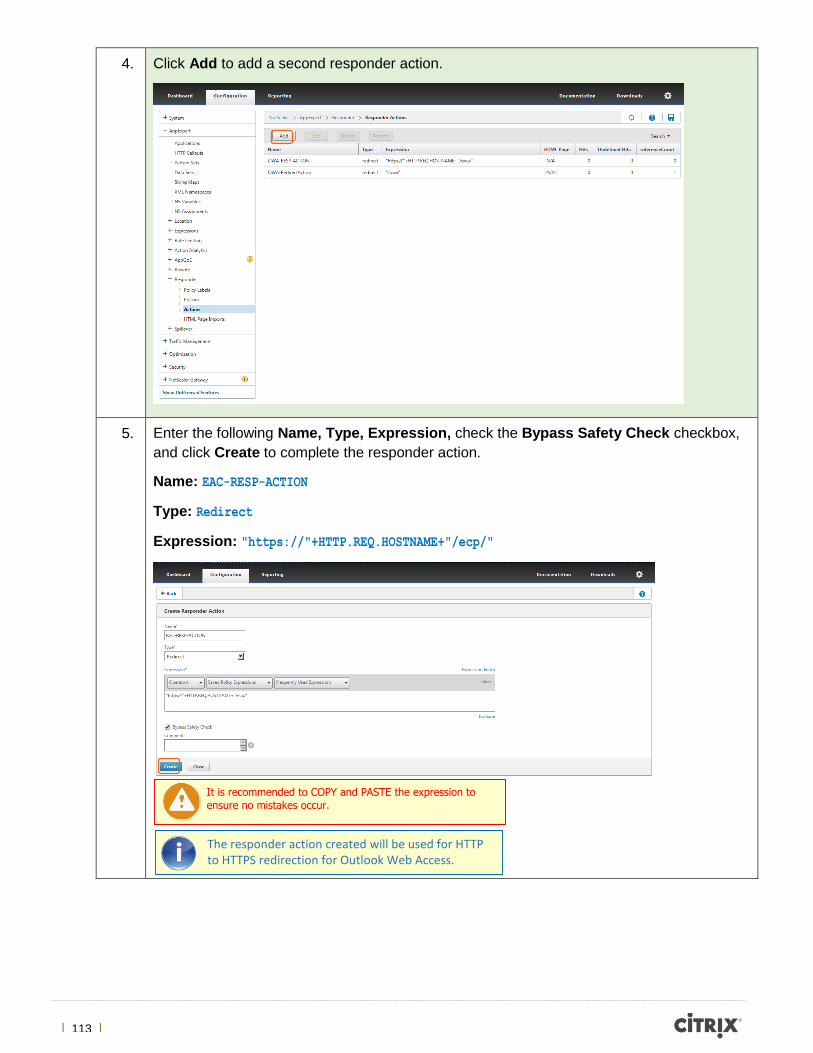
4. Click Add to add a second responder action.
5. Enter the following Name, Type, Expression, check the Bypass Safety Check checkbox,
and click Create to complete the responder action.
Name: EAC-RESP-ACTION
Type: Redirect
Expression: "https://"+HTTP.REQ.HOSTNAME+"/ecp/"
It is recommended to COPY and PASTE the expression to
ensure no mistakes occur.
The responder action created will be used for HTTP to HTTPS redirection for Outlook Web Access.

| 114 |
6. Navigate to AppExpert > Responder > Policies and click Add to create the responder
policy that will bind to the newly created actions.
7. Enter the following Name, Action, Expression, and click Create to complete the responder
policy.
Name: OWA-RESP-POLICY
Action: OWA-RESP-ACTION
Expression: CLIENT.TCP.DSTPORT.EQ(80) &&
HTTP.REQ.HOSTNAME.CONTAINS("mail.mycitrixtraining.net")
The responder policy created here will be used for HTTP to HTTPS redirection for Outlook Web Access.
| 115 |
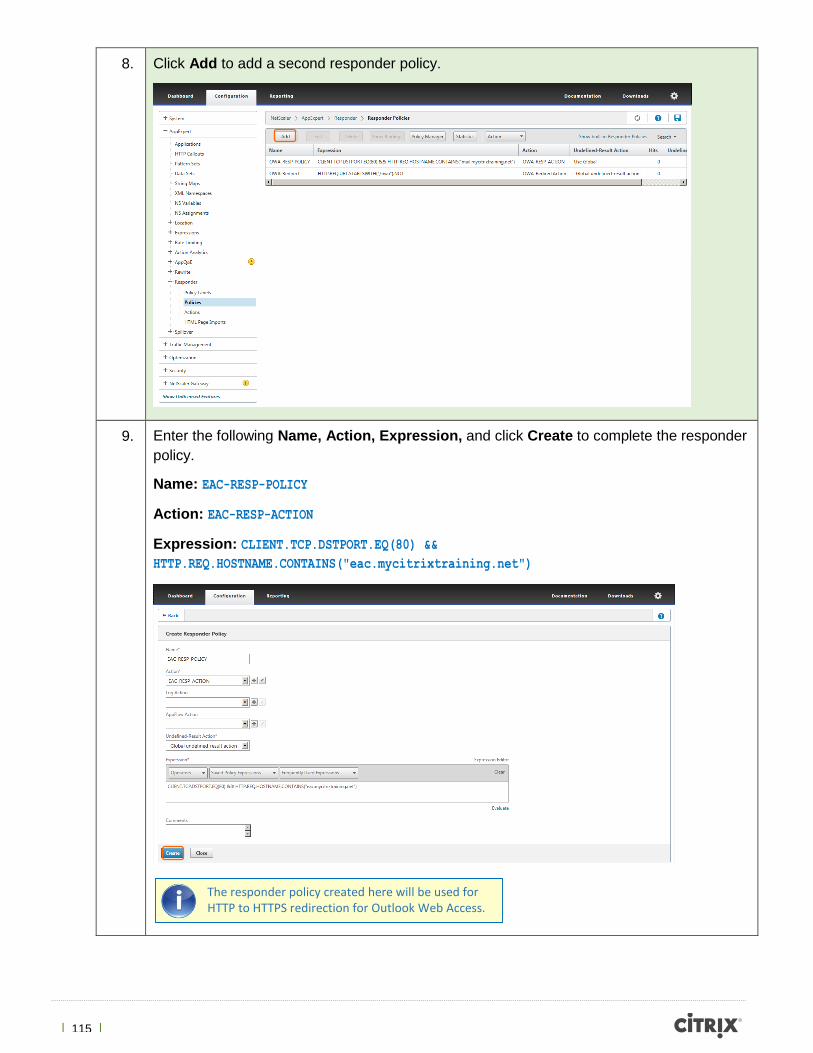
8. Click Add to add a second responder policy.
9. Enter the following Name, Action, Expression, and click Create to complete the responder
policy.
Name: EAC-RESP-POLICY
Action: EAC-RESP-ACTION
Expression: CLIENT.TCP.DSTPORT.EQ(80) &&
HTTP.REQ.HOSTNAME.CONTAINS("eac.mycitrixtraining.net")
The responder policy created here will be used for HTTP to HTTPS redirection for Outlook Web Access.

| 116 |
10. Navigate to Configuration > Traffic Management > Load Balancing > Servers and click
Add to add a fictitious server utilized by the responder policies.
11. Enter the following Server Name, IP Address, and click Create to complete the addition of
fictitious server.
Server Name: HTTP-RESP-Server
IP Address: 1.1.1.1
The IP Address 1.1.1.1 is used as a fictitious address as this virtual server sole purpose is for the responder policies.

| 117 |
12. Confirm that the HTTP-RESP-Server State is Enabled.
13. Navigate to Configuration > Traffic Management > Load Balancing > Monitors to bind
fictitious PING monitor to utilize for the future responder Virtual Server.
14. Click ping followed by Add to complete the ping monitor.

| 118 |
15. Enter the following Name and Desitination IP and click Create to complete the customer
ping monitor.
Name: Self-NS-PING
Destination IP: 127.0.0.1
16. Modify the monitors page to display 50 or more items.

| 119 |
17. Confirm that the Self-NS-PING is now Enabled.
18. Navigate to Configuration > Traffic Management > Load Balancing > Services, click
Add to bind the recently added HTTP-RESP-Server and Self-NS-PING monitor.

| 120 |
19. Enter the following Service Name, Existing Server, Protocol, Port, and click Continue.
Service Name: HTTP-RESP-Service
Existing Server: HTTP-RESP-Server
Protocol: HTTP
Port: 80
20. Click on 1 Service to LB Monitor Binding to bind the Self-NS-PING monitor to the HTTP-
RESP-Service.
21. Select Add Binding.

| 121 |
22. Click the “>” symbol to select the Self-NS-PING monitor.
23. Scroll to the bottom of the page and change the Per Page item amount to 50.

| 122 |
24. Select the following Monitor and click Insert.
Monitor: Self-NS-PING
25. Click Bind to bind the monitor.
26. Click Close to save the selected monitor to the service.

| 123 |
27. Click Done to complete the Load Balancing Service.
28. Confirm that the HTTP-RESP-Service State is Up.
29. Navigate to Configuration > Traffic Management > Load Balancing > Virtual Servers,
click Add to bind the recently added HTTP-RESP-Service to a virtual server.
It is recommended to click refresh to ensure the most accurate State of all Services.

| 124 |
30. Enter the following Name, Protocol, IP Address, Port, and click Continue.
Name: HTTP-RESP-vServer
IP Address: 192.168.10.100
Protocol: HTTP
Port: 80
31. Click on the No Load Balancing Virtual Server Service Binding to bind the HTTP-RESP-
Service to the newly create Virtual Server.

| 125 |
32. Click the “>” symbol to select the service.
33. Select the HTTP-RESP-Service and click OK.
34. Click Bind to bind the selected service.

| 126 |
35. Click OK to proceed with the addition of policies to the Load Balancing Virtual Server.
36. Select the following Advanced Setting to apply the responder policy to the load balancing
virtual server.
Policies
37. Click on the “+” symbol to add the policy.

| 127 |
38. Choose the following Policy, Type, and click Continue.
Policy: Responder
Type: Request
39. Click the “>” to select the policies recently created.
40. Choose the following Responder Policies and click OK.
Responder Policies:
OWA-RESP-POLICY

| 128 |
41. Click Bind to bind the OWA-RESP-POLICY.
42. Click on the “+” symbol to add the policy.

| 129 |
43. Choose the following Policy, Type, and click Continue.
Policy: Responder
Type: Request
44. Click Add Binding to add the EAC-RESP-POLICY.
45. Click the “>” symbol to select the policy.

| 130 |
46. Select the EAC-RESP-POLICY and click OK.
47. Click Bind to bind the policy to the Virtual Server.
48. Click Close.

| 131 |
49. Click Done to complete the HTTP-RESP-vServer.
50. Confirm the State of the HTTP-RESP-vServer State and Effective State is Up.
It is recommended to click refresh to ensure the most accurate State of all Services.

| 132 |
51. Select the small blue disk to save the NetScaler configuration.

| 133 |
52. Using Internet Explorer, navigate to the following sites to begin testing.
URL to test OWA-RESP-POLICY: http://mail.mycitrixtraining.net
URL to test EAC-RESP-POLICY: http://eac.mycitrixtraining.net
OWA-RESP-Policy will forward any requests to http://mail.mycitrixtraining.net to a secure SSL connection URL https://mail.mycitirixtraining.net/owa (Outlook Web Access)
EAC-RESP-Policy will forward any requests to http://eac.mycitrixtraining.net to a secure SSL connection URL https://eac.mycitirixtraining.net/ecp Exchange Admin Center
DNS A records for both mail.mycitrixtraining.net and eac.mycitrixtraining.net have been pre-set for this lab to point to 192.168.10.100

| 134 |
Exercise Summary
This exercise explained how to create a better user experience by the use of NetScaler responder policies. Policies for both Outlook Web Access and the Exchange Control Panel were created to allow users and administrators to type simple URLs to seamlessly forward them to the correct, more complex URL.

| 135 |
Exercise 7
Configuring Single Sign On for Exchange 2013
Overview
The goal of this exercise is to solve two major challenges. The first challenge is to improve user
experience by leveraging the NetScaler’s ability to provide single sign on services. The second is to
provide added security. Upon completing these exercises the administrator will have created a
custom form allowing users to directly authenticate on the Citrix NetScaler. The NetScaler will then
forward these credentials to any available Exchange Server and securely authenticate the user
allowing for one simple sign on. This will then enable administrators to place the Citrix NetScaler in
the DMZ resulting in no publicly accessible Exchange Servers.
Step by step guidance
Estimated time to complete this lab: 30 minutes.
Step Action
1. Using Internet Explorer, proceed to type the below URL and credentials to logon to the
Site1-NS1 NetScaler.
http://192.168.10.15
Username: nsroot
Password: nsroot

| 136 |
2. Navigate to Security > AAA – Application Traffic > Virtual Servers and click Add to
begin creating the AAA Virtual Server that will be used for single sign on.

| 137 |
3. Add the following Name, IP Address, and Authentication Domain. Then click OK.
Name: AAA-ExchangevServer
IP Address: 192.168.10.101
Authentication Domain: mycitrixtraining.net
4. Click the No Server Certificate link to attach a certificate to the AAA – Virtual Server.

| 138 |
5. Click the “>” symbol to select the server certificate.
6. Select the MCT – Key Pair certificate and click OK.
7. Click Bind to bind the certificate.
8. Confirm that the certificate has been bound to the Virtual Server and Continue.
| 139 |
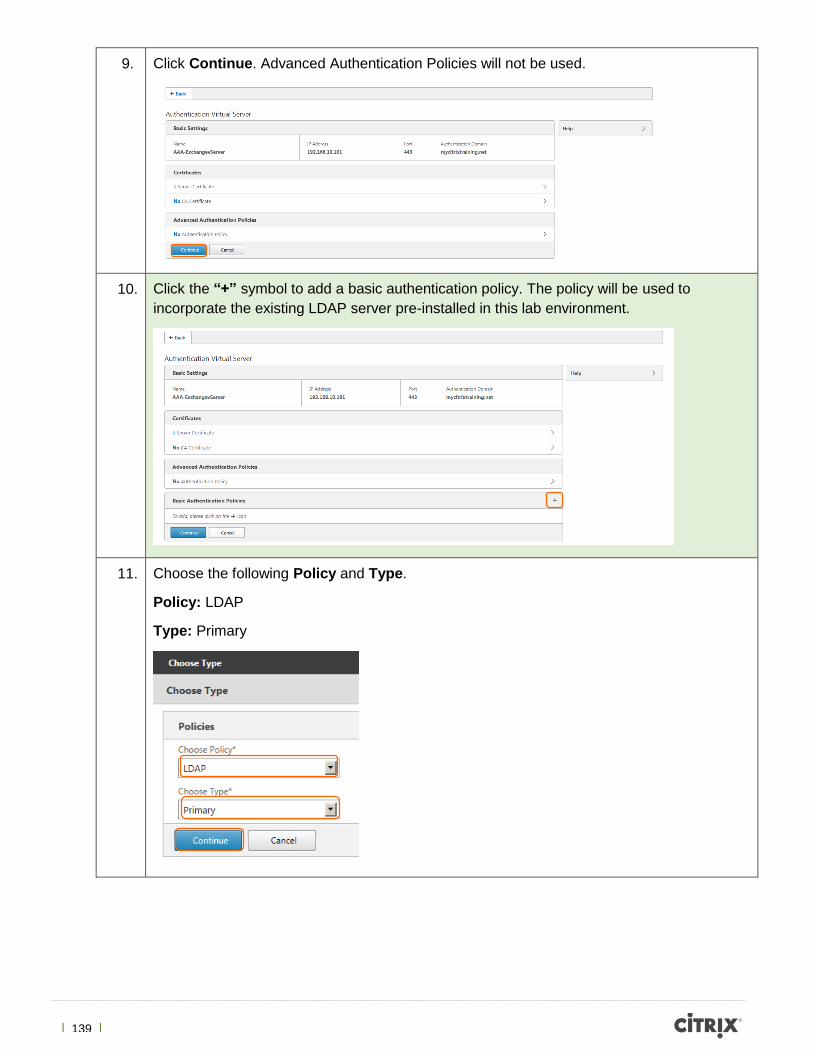
9. Click Continue. Advanced Authentication Policies will not be used.
10. Click the “+” symbol to add a basic authentication policy. The policy will be used to
incorporate the existing LDAP server pre-installed in this lab environment.
11. Choose the following Policy and Type.
Policy: LDAP
Type: Primary

| 140 |
12. Click the “+” to add the policy
13. Add the following Name and Expression. Click the “+” symbol to add the LDAP server
information.
Name: LDAP-POL-TRAINING
Expression: ns_true
| 141 |
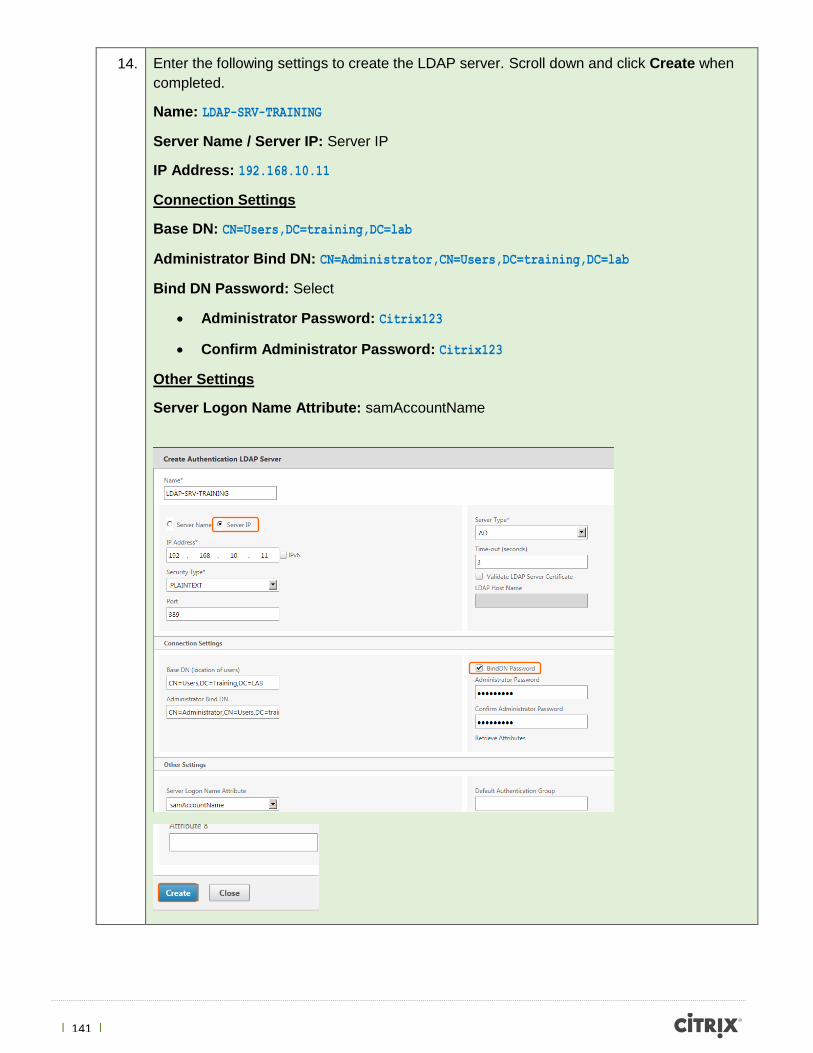
14. Enter the following settings to create the LDAP server. Scroll down and click Create when
completed.
Name: LDAP-SRV-TRAINING
Server Name / Server IP: Server IP
IP Address: 192.168.10.11
Connection Settings
Base DN: CN=Users,DC=training,DC=lab
Administrator Bind DN: CN=Administrator,CN=Users,DC=training,DC=lab
Bind DN Password: Select
Administrator Password: Citrix123
Confirm Administrator Password: Citrix123
Other Settings
Server Logon Name Attribute: samAccountName

| 142 |
15. Click Create to create the policy which is bound to the newly added LDAP server.
16. Click Bind to bind the policy to the AAA – Virtual Server.

| 143 |
17. Click Continue.
18. Click the following advanced setting.
Advanced Settings: Policies
19. Click the “+” symbol to add the session policy.

| 144 |
20. Select the type of Policy. Then click Continue.
Policy: Session
21. Click the “+” symbol to add the Session Policy.
22. Enter the following Name and Expression.
Name: SES-POL-AUTH
Expression: ns_true

| 145 |
23. Click the “+” symbol to add the request profile for this Session Policy.

| 146 |
24. Select the following properties for the request profile. Once completed click Create.
Name: SES-REQ-PRO
Default Authorization Action: ALLOW
Single Sign-on to Web Applications: ON
Credential Index: PRIMARY
Single Sign-on Domain: training.lab
HTTPOnly Cookie: NO
Enable Persistent Cookie: ON
Persistent Cookie Validity: 30

| 147 |
25. Click Create to create the session policy.
26. Click Bind to bind the policy to the AAA Virtual Server.

| 148 |
27. Click Done to complete the AAA - Virtual Server.
28. Click Refresh to and confirm that the AAA-ExchangevServer state is Up.
29. Click the Blue Disk from the NetScaler dashboard to save the NetScaler configuration and
click Yes to confirm.
30. From the NetScaler dashboard navigate back to Traffic Management > Load Balancing >
Virtual Servers. Click the Exchange-OWA virtual server and click Edit.

| 149 |
31. Add the following advanced setting.
Advanced Setting: Authentication.
32. Choose Form Based Authentication and add the following settings. Once completed click
OK.
Authentication FQDN: auth.mycitrixtraining.net
Authentication Virtual Server: AAA-ExchangevServer
Authentication Profile: BLANK
A DNS A record for auth.mycitrixtraining.net has been pre-set in this lab environment.

| 150 |
33. Proceed to the policies section of the Exchange-OWA virtual server and click the “+”
symbol to add first traffic policy that will identify to the NetScaler the logon and logoff
parameters of outlook web access.
34. Choose the following Policy and Type. Click Continue to create the policy.
Policy: Traffic
Choose Type: Request
| 151 |
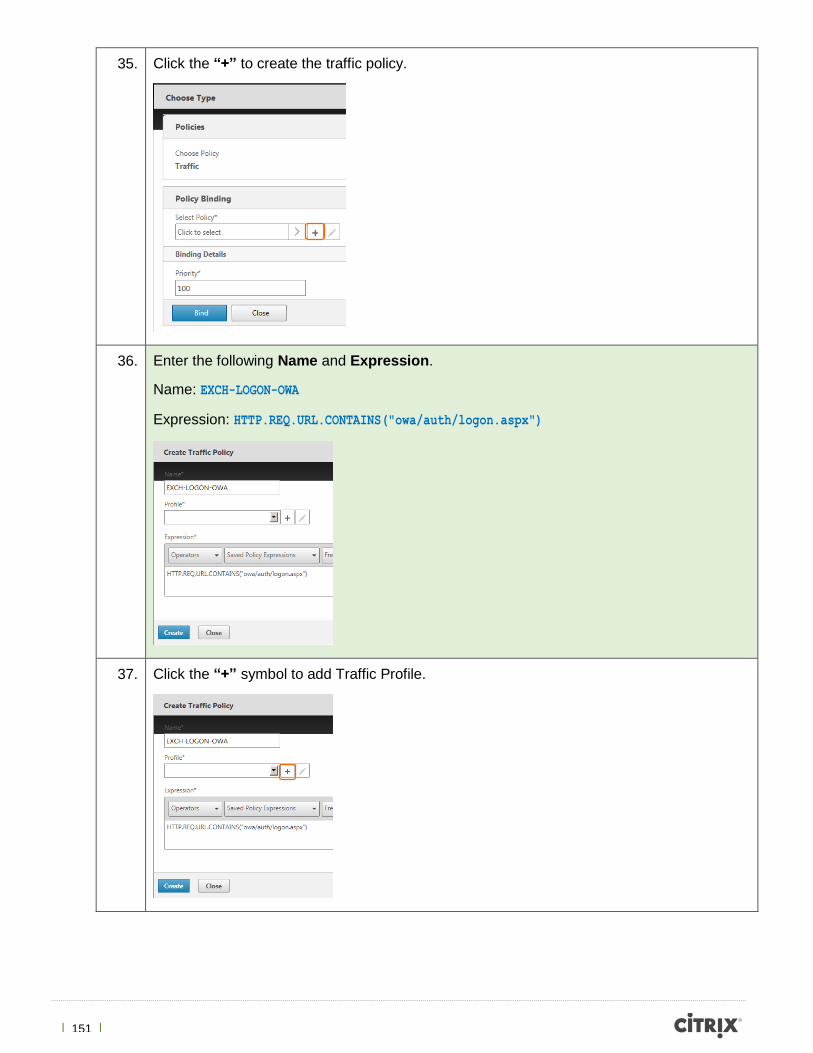
35. Click the “+” to create the traffic policy.
36. Enter the following Name and Expression.
Name: EXCH-LOGON-OWA
Expression: HTTP.REQ.URL.CONTAINS("owa/auth/logon.aspx")
37. Click the “+” symbol to add Traffic Profile.

| 152 |
38. Enter the following settings.
Name: EXCH-LOGON-PRO
AppTimeout: 1
Single Sign-On: On
39. Click the “+” symbol to add a Form SSO Profile.
All other settings should be left blank.

| 153 |
40. Add the following settings for the Form SSO Profile. Once completed click Create.
Name: EXCH-LOGON-FORMS
Action URL: /owa/auth.owa
User Name Field: username
Password Field: password
Expression: HTTP.RES.SET_COOKIE.COOKIE("cadata").VALUE("cadata").LENGTH.GT(70)
Name Value Pair: flags=0&trusted=0
Response Size: 10240
Extraction: DYNAMIC
Submit Method: POST

| 154 |
41. Click Create to create the Traffic Profile.
42. Click Create to create the Traffic Policy.

| 155 |
43. Click Bind to bind the policy to the Exchange-OWA Virtual Server.
44. Proceed back to the policies section of the Exchange-OWA virtual server and click the “+”
symbol to add second traffic policy that will identify to the NetScaler the logon and logoff
parameters of outlook web access.

| 156 |
45. Choose the following Policy and Type. Click Continue to create the policy.
Policy: Traffic
Choose Type: Request
46. Click Add Binding.
47. Change the Priority to the following number and click the “+” to begin adding the second
policy.
Priority: 90

| 157 |
48. Enter the following Name and Expression.
Name: EXCH-LOGOFF-OWA
Expression: HTTP.REQ.URL.CONTAINS("/owa/logoff.owa")
49. Click the “+” symbol to add Traffic Profile.

| 158 |
50. Enter the following settings. Scroll down and click Create when completed.
Name: EXCH-LOGOFF-PRO
AppTimeout: 1
Single Sign-On: On
Initiate Logout: Click check box.
All other settings should be left blank.

| 159 |
51. Click Create to create the Traffic Policy.
52. Click Bind to bind the policy to the Exchange-OWA Virtual Server.
53. Click Close to close the traffic polices section.

| 160 |
54. Click Done to proceed back to the NetScaler dashboard.
55. Click the Blue Disk to save NetScaler configuration.
Click Yes to confirm.

| 161 |
56. Using Internet Explorer, open a new window and type the below URL, credentials, and click
Log On to test Single Sign-On with NetScaler and Outlook Web Access.
http://mail.mycitrixtraining.net
Username: Administrator
Password: Citrix123
57. After the credentials are entered the user account should be automatically signed into
Outlook Web Access.
Exercise Summary
This exercise explains how administrators can create a AAA authentication virtual server associated
to the Outlook Web Access virtual directory (Exchange-OWA virtual server). The AAA virtual server
will allow for a more secure deployment and better user experience of Exchange 2013 within the
datacenter allowing users to have a simple and secure sign on experience.
| 162 |
Change Description Updated By Date
1.0 Original Version Johnathan Campos May 2015
About Citrix
Citrix Systems, Inc. designs, develops and markets technology solutions that enable information
technology (IT) services. The Enterprise division and the Online Services division constitute its two
segments. Its revenues are derived from sales of Enterprise division products, which include its
Desktop Solutions, Datacenter and Cloud Solutions, Cloud-based Data Solutions and related
technical services and from its Online Services division's Web collaboration, remote access and
support services. It markets and licenses its products directly to enterprise customers, over the
Web, and through systems integrators (Sis) in addition to indirectly through value-added resellers
(VARs), value-added distributors (VADs) and original equipment manufacturers (OEMs). In July
2012, the Company acquired Bytemobile, provider of data and video optimization solutions for
mobile network operators.
http://www.citrix.com