jhon wiley - guia de edición de libros.pdf
TRANSCRIPT

J O H N W I L E Y & S O N S P U B L I S H E R S
Author’s Guide to Typesetting
Wiley Books
Using LATEX
Monograph Book
Amy Hendrickson
TEXnology Inc.


CONTENTS
QUICK START: Brief Summary of Commands and Tips 3
USE RIGHT SIZE CLS FILE! 3
Using PostScript fonts 3
Tip: When making your own commands, avoiding error message 3
Book Title 3
Halftitle and Titlepage, If changing font is necessary 3
Offprintinfo 4
Draft Version 4
Contents in Brief 4
Table of Contents Advice: 4
Line breaks in Chapter or Section but NOT in TOC 4
Line breaks in the TOC 4
Start a new page in the TOC, \newpage and \eject 4
Preface, and Preface to First Edition 5
Chapter Headings 5
\thanks{} 5
Bold Math 5
Insert PostScript Illustrations, (.eps files preferred) 6
Rotate Tables or Figures 6
Centering Multiline Captions 6
Examples 7
Theorems etc. are not predefined in the Wiley macros 7
More Tips 7
INDEXING Commands 8
Quick Summary of Wiley Index Commands 8
Quick Summary of Default LaTeX Index Commands 9

4 Using the Wiley Macros
Contents Continued
The Sample File 10
The Template File 10
Starting Your Book: Setting Options 10
PostScript Font Info 11
Graphicx.sty for Inserting PostScript Illustrations 13
More Options 14
Making the Title Pages for Your Book 15
Frontmatter 16
Beginning Body of the Book 16
Making Sections 14
Tips On Special Section Heads 15
Indented Text and Lists 17
Captions 19
Centering multiline captions 21
Making Tables 22
To Illustrate an Algorithm 26
Problem Sets 27
Exercise Sets 29
Entering Solutions, and Solution section 31
Printing the Solutions 31
Ending the Chapter, Ending the Book: References 32
Chapter References 32
Using BibTeX for your Chapter References 34
References in End Matter 35
Appendices 39
Appendix at the end of the book 40
Glossary 42
Making Your Index 43
Author Index 56
Index to Documentation 57
Enjoy! 58

Using the Wiley LATEXMonograph Book Style
Welcome to the use of Wiley LATEX macro set for producing a monograph book!
You will find that most of the commands found in standard LATEX will work exactly the same when you usethem with these style files. The few new commands specifically for this style will be explained here.
Current Version
Please make sure that you have the current version of the macro files and the documentation. If you have notdownloaded the macro set rather recently, you might want to download it at the time that you are ready touse it for your book.
Technical Support
If you find that you are having a problem after you have read this documentation carefully, help maybe had by sending email to Wiley LaTeX Support: Amy Hendrickson, [email protected]. If possible,please send a small file demonstrating the problem.
Some customization is also available. Please consult your editor for permission.

2 Using the Wiley Macros
The files in the Monograph Book macro set
Basic Macro Files-------------------------------wileySix.cls Wiley LaTeX macro file, for 6x9 size used \documentclass{wileySix}wileySev.cls Wiley LaTeX macro file, for 7x10 size used \documentclass{wileySev}
w-bookps.sty PostScript font file. You will probably need to edit thisfile to enter the PS font names found on your system
m-times.sty MathTime font file. (use only if you have MathTimes fonts)
Template and Sample files-------------------------w-bktmpl.tex Template file, for authors to use in making their own book.
w-bksamp.tex Sample file, showing different title page styles and othercommands unique to this package.
w-bksamp.ind Sample index file to use with default LaTeX index
w-bksamp.srt Sample file index file with Wiley index system
w-bksamp.att Sample file to produce author index
Inserting .eps files--------------------graphics.zip Graphics files, includeing graphicx.sty, used for
including .eps files.
figsamp.eps Figure sample file, showing the use of the graphicx.stycommands for inserting .eps files, landscape tables andfigures, in a single column and in a full page.
wiley.ps File to produce Wiley logo on titlepage of book.
Documentation-------------w-bkdocs.tex Documentation in LaTeX form. You may run LaTeX on this
file and print it on your printer, or see it with yourLaTeX preview program.
w-bkdocs.pdf Documentation in PDF form. Use Acrobat Reader to view it.
Bibliography------------w-bksamp.bbl Sample bibliography filesampbib.bib Sample bibliography database file
Solutions Answers-----------------answers.sty Optional .sty file to allow authors with problem sets or
exercises to type in the answer to the problem or exercisein the problem or exercise section but have the answers printat the end of the book.

Monograph Book Style 3
QUICK START:Brief Summary of Commands and TipsRead this First!
This material is also found in readme.txt.
USE RIGHT SIZE CLS FILE!Your book will either be 6x9 or 7x10 size, ask your editor if you are not sure which size should be used.
For, for 6 x 9 trim size: \documentclass{wileySix}
Or, for 7 x 10 size: \documentclass{wileySev}
Commands in both styles are identical, only the page size is different.
Using PostScript fonts\usepackage{w-bookps} will bring in the PostScript font file. If w-bookps is not used the fonts used willbe Computer Modern. For a finished appearance for your book, you are Strongly Recommended to usew-bookps.
You may need to edit w-bookps.sty so that the font names match those on your system. Check the top ofw-bookps.sty for instructions.
Tip: When making your own commands, avoiding error messageIf you want to make your own command, for "example", for instance, and you find that"example" has already been defined, you can type\let\example\relaxand you can now enter\newtheorem{example}{Example}[chapter]without getting an error message.
Book TitleSet up the title and author information, to be used when you type in \halftitlepage and \titlepage
\booktitle{Enter book Title Here}\subtitle{Optional, enter subtitle here}\authors{First Author\\\affil{first author affil}Second Author\\\affil{second author affil}}\halftitlepage\titlepage
Halftitle and Titlepage, If changing font is necessary
If your title is too wide for the titlepage you can make the font for that page smaller by copying the followinginto your .tex file, after \usepackage{w-bookps}
\font\halftitlefont=\helveticabold at 20ptand adjusting the font size a point or two smaller until the title will fit.
The same process can be followed if there is a problem on the titlepage.\font\titlefont=\helveticabold at 27pt

4 Using the Wiley Macros
Offprintinfo\offprintinfo{}{} Puts copyright info at the bottom of selected pages automatically. You must enter thecommand with the needed text before \begin{document}
Use \offprintinfo{title, edition}{author}
Can break lines if the title and edition text should break over lines:
\offprintinfo{Survey Methodology,\\ Second Edition}{Robert M. Groves}
Draft VersionDraft version: enter \draft before \begin{document}You’ll get double spaced version, with draft footline.
Contents in BriefIf you want to start your book with a Contents in Brief, use \contentsinbrief
You will get only the chapter titles in this version of the contents.
Table of Contents Advice:Line breaks in Chapter or Section but NOT in TOC
If you break lines in a chapter or section head, you probably will not want the same breaks to appear in thetable of contents.
If you use \\ in \chapter{first line\\ second line}, then add the optional square bracket argument:
\chapter[first line second line]{first line\\ second line}.
Follow the same sequence for breaking lines in section heads,
\section[first line second line]{first line\\ second line}.
Line breaks in the TOC
If you want line breaks in the TOC, you can add them in the square bracket argument and not in the actualchapter title or in other places in the chapter title:
\chapter[first line\\ second line]{first line second\\ line}
Start a new page in the TOC, \newpage and \eject
If you want to start a chapter heading on a new page in the TOC, you can type this in your .tex file, before\chapter{}
\addtocontents{toc}{\string\newpage}\chapter{This Chapter Title}
The command \newpage will start a new page in the TOC and fill in the bottom of the previous page withwhite space.
If you want the entries on that page to spread out vertically and the entries fill to the bottom of the page, use\eject instead:
\addtocontents{toc}{\string\eject}\chapter{This Chapter Title}

Monograph Book Style 5
Preface, and Preface to First EditionIf you are doing a new edition of your book and want to include the original preface as well as a prefaceto the current edition, you can use \begin{prefacefirst}...\end{prefacefirst} for the original preface,and then the normal preface command for the current one:
\begin{prefacefirst}Here is the preface to the first edition.\prefaceauthor{R. K. Watts}\where{Madison, Wisconsin\\September, 2001}\end{prefacefirst}
\begin{preface}here is a preface to the current edition\prefaceauthor{R. K. Watts}\where{Durham, North Carolina\\September, 2007}\end{preface}
Chapter HeadingsShort chapter title for running head\chapter{long title}\markboth{short version}{short version}
Short section running head:\section{Long version}\markright{short version}
Short version for Table of Contents and Running Heads:\chapter[Short Version]{long version}\section[Short Version]{long version}
When using \\ to break lines in chapter title, enter the title in square brackets without the \\
\chapter[First line Second line]{First line\\ Second line}
\thanks{}For footnote in chapter title, use \thanks{}
\chapter{Chapter Title\thanks{Funded by NASA}}
Bold MathThere are two ways to use the bold math fonts
1. \mathbf{} For example: $\mathbf{abc\alpha\beta\epsilon}$
But, you’ll find that only abc gets bolded
2. \dobold{} For example: $\mathbf{abc}\dobold{\alpha\beta\epsilon}$,will bold the math terms that don’t ordinarily get bold, but they will also be italicized.
(Bold italic is the font that is available for these characters).

6 Using the Wiley Macros
Insert PostScript Illustrations, (.eps files preferred)Use the graphicx package:
\usepackage[<your driver program>]{graphicx}
For <your driver program> you have these choices:
[dvips], [xdvi], [dvipdf], [dvipsone], [dviwindo], [emtex], [dviwin],[pctexps], [pctexwin], [pctexhp], [pctex32], [truetex], [tcidvi],[oztex], [textures]
ie. \usepackage[dvips]{graphicx}
If you don’t know the name of the driver program (the program that translates the .dvi file to a .ps file), choosedvips.
Rotate Tables or FiguresYou must use\usepackage[dvips]{graphicx} (Choose the right term in square brackets from the list above)
For Table (table caption always typed above table):
\begin{rotatetable}\caption{Here is caption}\centerline{\begin{tabular}...\end{tabular}}\end{rotatetable}
For Figure (figure caption always typed below figure):
\begin{rotatefigure}\centerline{\includegraphics[width=3in]{figsamp}}\caption{Here is a caption}\end{rotatefigure}
Centering Multiline CaptionsThis technique will work for either figure or table caption, and may be especially useful for multiline captionsfor rotated tables or figures.
To center a multiply lined caption over a centered table, for instance, you can type
\begin{table}\caption{\vtop{\hbox{first line of caption}\hbox{Second line of caption}{Third line of caption}}%end \vtop{}%end \caption{
\centering\begin{tabular}...\end{tabular}
\end{table}

Monograph Book Style 7
Results will be
Table 1.1 First Line of captionSecond line of captionThird line of caption
and the caption will be centered over the table
Examples\begin{example}Example text...\end{example}
will produce an environment which starts with a large black square, and it is numbered, to call attention tothe example.
Theorems etc. are not predefined in the Wiley macrosYou can get any of these type of environments by using newtheorem and two arguments; the first for thename you will type in to use the new theorem. The second is the name as it will appear in the text.
For instance:
\newtheorem{theorem}{Theorem}\newtheorem{lemma}{Lemma}\newtheorem{corollary}{Corollary}
If you want chapter numbers as well as theorem numbers, you can add [chapter] at the end of each, ie,\newtheorem{theorem}{Theorem}[chapter]
The command \qed may be used to get a small square to appear at the end of a proof.
More TipsWords breaking over lines:
To keep a word from breaking over lines you can put it in an hbox: \hbox{Dictionary}will keep ‘Dictionary’breaking over lines.
Hyphenation/nonhyphenation:
You can also keep a word from breaking over lines anywhere in the document by adding it to the\hyphenation{} list. This command can be used before \begin{document} and words can be enteredwithout hyphenation, which will prevent them from breaking no matter where they are found.
You can also hyphenate words, that would not otherwise hyphenate correctly:
\hyphenation{dictionary, sym-bi-o-tic}You can add as many words as you want.

8 Using the Wiley Macros
To keep text on one page:
You can use \vtop{} to keep text on one page:
\vtop{\begin{example} example text \end{example}}
Let text go down into bottom marginSometimes it might be helpful to have an extra line or two on your current page. You can use\vtop to 0pt{text... \vss}\newpage
which will allow the text to continue down below the normal bottom margin.
Skips before section headsSome LaTeX commands have the capability built in that they will get rid of the previous vertical skip.
You will see this if before a particular section head you type \vskip-14pt\section{Here is section} andbe surprised that the spacing doesn’t change. This is because an \unskip command is built into the definitionof \section{}. To get around this, supply a very small skip and then the skip you want. The \sectioncommand will eat the small skip, and the skip you want will now work:\vskip-14pt\vskip1sp\section{Here is the section head}
INDEXING CommandsYou can use either the Wiley indexing commands or the default LaTeX indexing commands.
When to use Wiley index commands; when to use default LaTeX index commands?
If you use symbols in index, and want to use verbatim, ie. \index{&%$}, use default LaTeX indexsystem.
Otherwise, use the Wiley indexing commands
Quick Summary of Wiley Index CommandsFor terms to be indexed, use \inxx{term}
For subterm\inxx{term,second term}
For subsubterm\inxx{term,second term,third term}
To produce the index
1) Run Latex on file,
2) Run sort routine on file (ie. ‘sort filename.inx > filename.srt’ on DOS, other commands onother systems), to produce a filename.srt file.
IMPORTANT: Edit the .srt file to make sure ˜ is at the End of the file.
3) Enter \printindex at end of book. This command will input filename.srt and print the index.The index will be in two columns, sequences of page numbers for the same entry will automatically have adash between them, and subheadings will fall underneath their major headings.
You can enter index commands in a figure or table caption, but please precede it with \protect, ie,\caption{Text... \protect\inxx{engine}}
Monograph Book Style 9
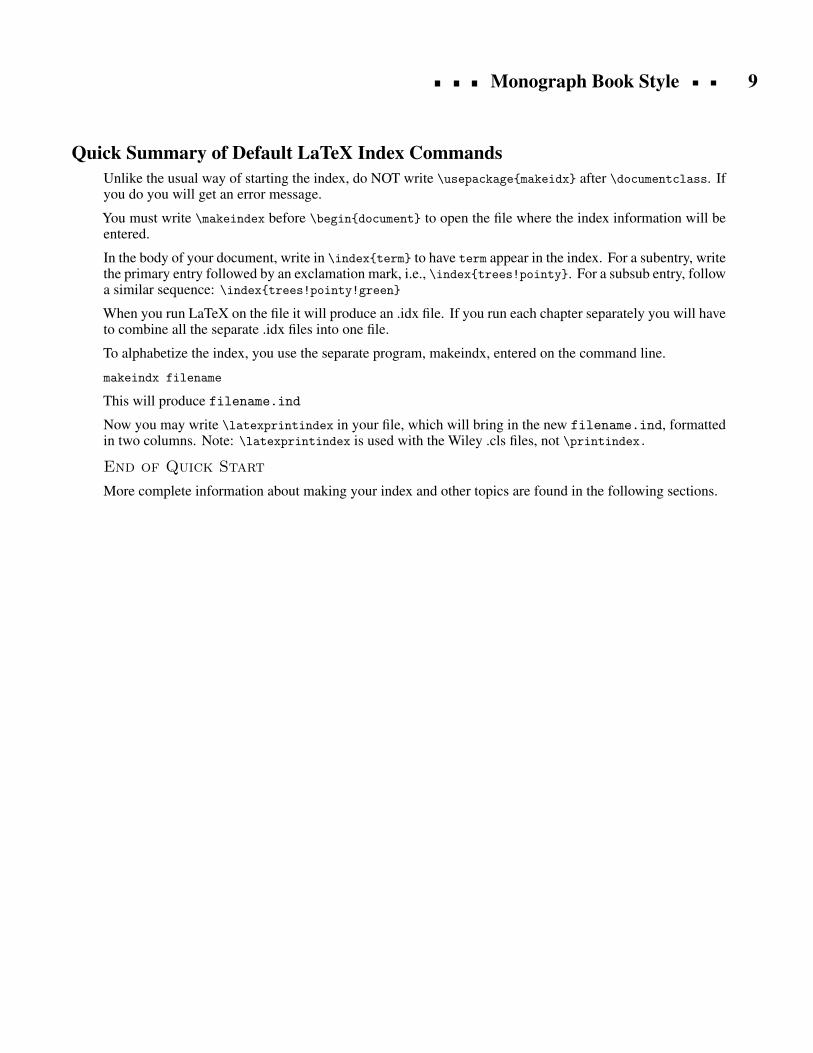
Quick Summary of Default LaTeX Index CommandsUnlike the usual way of starting the index, do NOT write \usepackage{makeidx} after \documentclass. Ifyou do you will get an error message.
You must write \makeindex before \begin{document} to open the file where the index information will beentered.
In the body of your document, write in \index{term} to have term appear in the index. For a subentry, writethe primary entry followed by an exclamation mark, i.e., \index{trees!pointy}. For a subsub entry, followa similar sequence: \index{trees!pointy!green}
When you run LaTeX on the file it will produce an .idx file. If you run each chapter separately you will haveto combine all the separate .idx files into one file.
To alphabetize the index, you use the separate program, makeindx, entered on the command line.
makeindx filename
This will produce filename.ind
Now you may write \latexprintindex in your file, which will bring in the new filename.ind, formattedin two columns. Note: \latexprintindex is used with the Wiley .cls files, not \printindex.
End of Quick Start
More complete information about making your index and other topics are found in the following sections.

10 Using the Wiley Macros
The Sample Filew-bksamp.tex is a sample file which shows examples of the commands that may be used in your article.You may run LATEX on this file to compare the results with the mark-up code within the file. This alone shouldindicate how to format your article in most cases.
The Template FileA template file, w-bktmpl.tex is provided to make it easier to enter the the initial article commands in thecorrect order. It should be self-explanatory. You are strongly urged to use this file as the basis of yourformatted article. To do this you should:
Copy w-bktmpl.tex to <yourfile>.tex.Enter your text.
Starting Your Book: Setting OptionsBelow is the beginning of the w-bktmpl.tex file, which shows some options that you can set. Each of theseitems will be described a bit more in the following sections.
NOTE: Choose Book Page Size – Important!For book style with pages that are 7 x 10 inches,
\documentclass{wileySev} %% for 7 x 10 inch book
For book style with pages that are 6 x 9 inches,
\documentclass{wileySix} %% for 6 x 9 inch book
! Ask your Wiley Editor if you are not sure which size you should use !
%%%%%%%%%%%%%%%%%%%%%%%%%%%%%%%%%%%%%%%%%%%%%%%%%%%%%%%%%%%%%%%%%% 1. Class File
%% For 7 x 10 trim size:\documentclass{wileySev}
%% Or
%% For 6 x 9 trim size\documentclass{wileySix}
%%%%%%%%%%%%%%%%%%%%%%%%%%%%%%%%%%%%%%%%%%%%%%%%%%%%%%%%%%%%%%%%%% 2. Post Script Font File(s)
% For TimesRoman Math (You must have MathTimes and MathTimes Plus% font sets, order fonts from www.yandy.com)% \usepackage[mtbold,noTS1]{m-times}
% For PostScript text\usepackage{w-bookps}
(Continued on next page)

Monograph Book Style 11
%%%%%%%%%%%%%%%%%%%%%%%%%%%%%%%%%%%%%%%%%%%%%%%%%%%%%%%%%%%%%%%%%% 3. Graphicx.sty for Including PostScript .eps files
%% If you don’t have graphicx.sty available, unzip the graphics.zip%% file included in this package.
% Choose one of these options, based on the system that you are using.% If none look like your system, use dvips% [dvips], [xdvi], [dvipdf], [dvipsone], [dviwindo], [emtex], [dviwin],% [pctexps], [pctexwin], [pctexhp], [pctex32], [truetex], [tcidvi],% [oztex], [textures]
\usepackage[dvipsone]{graphicx}
%%%%%%%%%%%%%%%%%%%%%%%%%%%%%%%%%%%%%%%%%%%%%%%%%%%%%%%%%%%%%%%%%% 4. Change options here if you want:%%%% How many levels of section head would you like numbered?%% 0= no section numbers, 1= section, 2= subsection, 3= subsubsection%%==>>\setcounter{secnumdepth}{3}
%% How many levels of section head would you like to appear in the%% Table of Contents?%% 0= chapter titles, 1= section titles, 2= subsection titles,%% 3= subsubsection titles.%%==>>\setcounter{tocdepth}{2}
%%%%%%%%%%%%%%%%%%%%%%%%%%%%%%%%%%%%%%%%%%%%%%%%%%%%%%%%%%%%%%%%%% 5. DRAFT%% Uncomment to get double spacing between lines, current date and time% printed at bottom of page.% \draft% (If you want to keep tables from becoming double spaced also uncomment% this):% \renewcommand{\arraystretch}{0.6}%%%%%%%%%%%%%%%%%%%%%%%%%%%%%%
PostScript Font InfoComputer Modern vs. PostScript Text and MathTimes Fonts
Authors can choose to use either Computer Modern or PostScript fonts, but for final production, the resultswill be much more handsome with PostScript. You may want to initially use WileySix.cls or WileySev.clswithout the PS font files, and then add the PS fonts when you are finishing the typesetting of your book.
To use Computer Modern fonts:
\documentclass{wileySix} or \documentclass{wileySev}
To use the PostScript font files:
\documentclass{WileySix} or \documentclass{WileySev}\usepackage{w-bookps} %% for PostScript text fonts

12 Using the Wiley Macros
Final Production
In final production your book should be printed using PostScript text fonts and, optionally, MathTimes fontsfor math. You may use Computer Modern fonts for text and math, but your book will have a more professionalappearance if you use PostScript fonts.
You will probably need to edit the w-bookps.sty file, to customize it to use the font names that are on yoursystem, as seen in the next section.
You can use PostScript text fonts by including the w-bookps.sty file,
\documentclass{WileySix} or \documentclass{WileySev}\usepackage{w-bookps}
Customizing the Font Files
Most authors have at least some PostScript fonts on their system. The problem is that there are differingconventions for naming these fonts depending on your implementation of TEX. This means that we cannotprovide one uniform PS font file for all authors.
To get around this problem, both the file w-bookps.sty and m-times.sty (below) are customizable.
These files are distributed with the Berry PostScript font names, as they are probably in the most widespreaduse at this time.
If you do need to change the font names, you only need to change the names for the Times and Helveticafonts.
Please look at the top of the file, where you will see the lines you need to modify to have the PS font callsuse the PS names found on your system. As soon as you have discovered what PS names are on your systemyou can make the appropriate substitutions.
You can find font names in the TeXtures menu, or, on other systems, by looking into the directory where the.tfm fonts are found and making your best guess as to what Times Roman, for example, is called.
In each case, the changes should be confined to the top part of the file. The lower part of the file will use thedefinitions you’ve written, and the rest of the style will be automatically customised to match the names ofthe fonts found on your system.
%% Change these definitions, if necessary ====>%% Times-Roman%---------------------% (Berry font names)\def\timesroman{ptmr}\def\timesbold{ptmb}\def\timesitalic{ptmri}\def\timesbolditalic{ptmbi}
% (Y & Y font names)%\def\timesroman{tir}%\def\timesbold{tib}%\def\timesitalic{tii}etc...%% <==== End of changes needed. Do not make changes below this point.%% !!!!!!!!!

Monograph Book Style 13
MathTimes Font Set
\usepackage{m-times}Using MathTimes is optional, since not many authors have these fonts. Google for information about whereto purchase these fonts if you want them. If you do buy Math Time fonts, you are strongly advised to alsoget Math Time Plus package, so that you can use the mtbold option: \usepackage[mtbold]{m-times}. Ifmtbold is not used, bold math will print as non-bold.
The m-times.sty file is also distributed with the Berry font names, so you may need to customize it as well.The changes that may be made are very similar to those which may be made to the w-bookps.sty file, andyou should not have any problem with this. Information is found near the top of the m-times.sty file.
This style file will only produce TimeRoman math if you have both the Math Time and, for bold math, MathTime Plus font sets.
\documentclass{WileySix} or \documentclass{WileySev}\usepackage[mtbold]{m-times}\usepackage{w-bookps}
You may use the noTS1 option, if you get an error message indicating that there are missing TS1 fonts:\usepackage[mtbold,noTS1]{m-times}
A description of the other optional arguments (taken from the file mtoptions.txt) is found at the end of them-times.sty, after \endinput.
Graphicx.sty for Inserting PostScript IllustrationsIf you would like to include .eps files you should use graphicx.sty, and the command\includegraphics[options]{filename.eps}
If you don’t already have graphicx.sty, unzip graphics.zip, a file that is part of the Wiley LATEX package. andyou will have graphicx.sty available. You can also get graphics.zip by going to http://www.ctan.org, andsearching for graphics.zip.
You should tune the graphicx package by selecting the driver program that is on your system and using thatname as the optional argument:
\usepackage[<your driver program>]{graphicx} %i.e.,% \usepackage[dvipsone]{graphicx}
Please choose the name that matches your program. If you don’t see the name listed here, try dvips.
[dvips], [xdvi], [dvipdf], [dvipsone], [dviwindo], [emtex], [dviwin],[pctexps], [pctexwin], [pctexhp], [pctex32], [truetex], [tcidvi],[oztex], [textures]
For information on options when using the graphicx.sty command, \includegraphics, please seegrfguide.dvi, which is included in the graphics.zip package.
14 Using the Wiley Macros
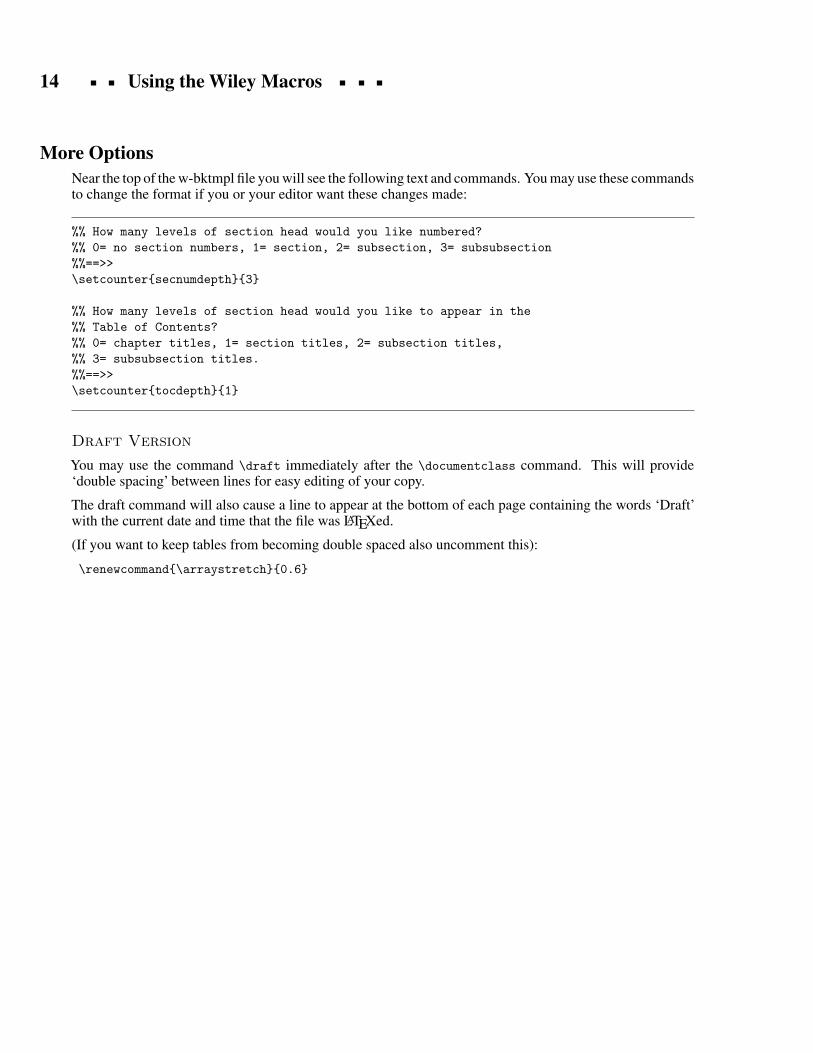
More OptionsNear the top of the w-bktmpl file you will see the following text and commands. You may use these commandsto change the format if you or your editor want these changes made:
%% How many levels of section head would you like numbered?%% 0= no section numbers, 1= section, 2= subsection, 3= subsubsection%%==>>\setcounter{secnumdepth}{3}
%% How many levels of section head would you like to appear in the%% Table of Contents?%% 0= chapter titles, 1= section titles, 2= subsection titles,%% 3= subsubsection titles.%%==>>\setcounter{tocdepth}{1}
Draft Version
You may use the command \draft immediately after the \documentclass command. This will provide‘double spacing’ between lines for easy editing of your copy.
The draft command will also cause a line to appear at the bottom of each page containing the words ‘Draft’with the current date and time that the file was LATEXed.
(If you want to keep tables from becoming double spaced also uncomment this):
\renewcommand{\arraystretch}{0.6}

Monograph Book Style 15
Making the Title Pages for Your BookYou can do the Title Page by following the commands found in the template file, w-bktmpl.tex.
%%%%%%%%%%%%%%%%%%%%%%%%%%%%%%%%%%%%%%%%%%%%%%%%%%%%%%%%%%%%%%%%%% Title Pages
%% Setting up title pages:\booktitle{}\subtitle{}
\author{}or\authors{}
%% \\ will start a new line.%% You may add \affil{} for affiliation, ie,%\authors{Robert M. Groves\\%\affil{Universitat de les Illes Balears}%Floyd J. Fowler, Jr.\\%\affil{University of New Mexico}}
%% Print Half Title and Title Page:\halftitlepage\titlepage
%%%%%%%%%%%%%%%%%%%%%%%%%%%%%%%%%%%%%%%%%%%%%%%%%%%%%%%%%%%%%%%%%% Off Print Info
%% Add your info here:\offprintinfon{title, edition}{author}
%% Can use \\ if title, and edition are too wide, ie,%% \offprintinfo{Survey Methodology,\\ Second Edition}{Robert M. Groves}
%%%%%%%%%%%%%%%%%%%%%%%%%%%%%%%%%%%%%%%%%%%%%%%%%%%%%%%%%%%%%%%%%% Copyright Page
\begin{copyrightpage}{year}Title, etc\end{copyrightpage}
% Note, you must use \ to start indented lines, ie,%% \begin{copyrightpage}{2007}% Survey Methodology / Robert M. Groves . . . [et al.].% \ p. cm.---(Wiley series in survey methodology)% \ ‘‘Wiley-Interscience."% ...% \end{copyrightpage}

16 Using the Wiley Macros
FrontmatterNotice the order of the frontmatter. Only the Dedication (optional) should be entered before the table ofcontents. You can see these commands in use by running LATEX on w-bksamp.tex and looking at the resultingw-bksamp.dvi file.
All these environments are optional, except for \tableofcontents
\dedication{}\contentsinbrief %optional\tableofcontents\listoffigures %optional\listoftables %optional
\begin{foreword}text\end{foreword}
\begin{preface}text
\prefaceauthor{}\where{place\\date}
\end{preface}
\acknowledgmentsacknowledgment text\authorinitials{} % ie, I. R. S.
\acronyms\markboth{Acronyms}{Acronyms}\acro{acronym}{meaning}...
\introduction
Beginning Body of the BookUsing Optional square brackets
\title[]{}, \part[]{}, \chapter[]{}, \section[]{} and \subsection[]{} all allow you to enter the titlein square brackets in the way you’d like it to appear in the Table of Contents, and in curly brackets in theway that you want the title to appear on the page in the body of the article. You can use \\ to break lines inany of these commands within the curly brackets, and without \\ within square brackets. This means thatyou can break lines easily in the body of the article without causing confusion in the Table of Contents.
Chapter Head and Prologue
The chapter head is made as you would expect. Please note that you should supply whatever version of thechapter head you’d like to appear on the running head in square brackets, if it is different from the chapterhead, especially if you have have used \\.
\chapter[The Submicrometer Silicon MOSFET]{The Submicrometer\\ Silicon MOSFET}Prologue
The prologue is an entirely optional addition to the title page. If you should choose to use a prologue, hereis the command to use:
\prologue{This is a sample prologue}{Author Attribution}

Monograph Book Style 13
Here is a sample beginning for a chapter:
\chapter[The Submicrometer Silicon MOSFET]{The Submicrometer\\ Silicon MOSFET}
\prologue{The sheer volumn of answers can often stifle insight...The purposeof computing\inxx{computing,the purpose} is insight, not numbers.}{Hamming \cite{hamming}}
Here is the beginning of the chapter...
. . . . . . . . . . . . . . . . . . . . . . . . . . . . . . . . . . . . . . . . . . . . . . . . . . . . . . . . . . . . . . . . . . . . . . . . . . . . . . . . . . . . . . . . . . . . . . . . . . . . . . . . . . .
CHAPTER 1
The SubmicrometerSilicon MOSFET
The sheer volumn of answers can often stifle insight...The purpose of computing is insight, notnumbers.
—Hamming [12]Here is the beginning of the chapter...

14 Using the Wiley Macros
Making SectionsMaking section heads with the Wiley macros is just the same as normal LATEX:
\section{Sample Section Head}Here is some normal text. Here is some normal text.Here is some normal text. Here is some normal text.Here is some normal text. Here is some normal text.
\subsection{This Is the Subsection}Here is some normal text. Here is some normal text.Here is some normal text. Here is some normal text.
\subsubsection{This Is the Subsubsection}Here is some normal text. Here is some normal text.Here is some normal text.
\paragraph{This Is a Paragraph}Here is some normal text. Here is some normal text.Here is some normal text.
. . . . . . . . . . . . . . . . . . . . . . . . . . . . . . . . . . . . . . . . . . . . . . . . . . . . . . . . . . . . . . . . . . . . . . . . . . . . . . . . . . . . . . . . . . . . . . . . . . . . . . . . . . .
1.1 SAMPLE SECTION HEAD
Here is some normal text. Here is some normal text. Here is some normal text. Here issome normal text. Here is some normal text. Here is some normal text.
1.1.1 This is the subsection
Here is some normal text. Here is some normal text. Here is some normal text. Here issome normal text.
1.1.1.1 This is the subsubsection Here is some normal text. Here is some normaltext. Here is some normal text.
This is a paragraph. Here is some normal text. Here is some normal text. Here is somenormal text.

Monograph Book Style 15
Tips On Special Section HeadsHere are some things you can do for special section heads.
You can use \\ to start a new line in the \section and \subsection. When you use the \\, remember to alsosupply a name without \\ within square brackets to send a section title to the Table of Contents without \\in it.
\section[This Version of Section Head will be sent Contents]{Break Long Section heads\\ with double backslash}Here is some normal text.Here is some normal text.Here is some normal text.
\section[This show how to explicitly break lines\string\hfill\string\break\space in Table of Contents]{Here is a Section Title}See the code for this section head for information onhow to explicitly break lines in table of contents.
\section{How to get \lowercase{lower case} in section head:\lowercase{$p$}$H$}Here is some normal text.Here is some normal text.Here is some normal text.
. . . . . . . . . . . . . . . . . . . . . . . . . . . . . . . . . . . . . . . . . . . . . . . . . . . . . . . . . . . . . . . . . . . . . . . . . . . . . . . . . . . . . . . . . . . . . . . . . . . . . . . . . . .
1.2 BREAK LONG SECTION HEADSWITH DOUBLE BACKSLASH
Here is some normal text. Here is some normal text. Here is some normal text.
1.3 HERE IS A SECTION TITLE
See the code for this section head for information on how to explicitly break lines in tableof contents.
1.4 HOW TO GET lower case IN SECTION HEAD: pH
Here is some normal text. Here is some normal text. Here is some normal text.

16 Using the Wiley Macros
How to Make a Section Head Containing a Macro with Upper and Lower
Cases
%% (This is entered before \begin{document})%% To get a macro to expand correctly in a section head, with upper and%% lower case math, put the definition and set the box%% before \begin{document}, so that the table of contents will also%% work:\newcommand{\VT}[1]{\ensuremath{{V_{T#1}}}}%% use a box to expand the macro before we put it into the section head:\newbox\sectsavebox\setbox\sectsavebox=\hbox{\boldmath\VT{xyz}}
...
\section{How to use a macro that has both upper and lower case parts:\copy\sectsavebox}The definition and box need to be set before the \verb+\tableofcontents+command for the Contents to format correctly.
%% Sending different version of section to running head,%% so that the size of math is correct in running head:\markright{Sample macro \VT{\lowercase{xyz}} sent to running head}
. . . . . . . . . . . . . . . . . . . . . . . . . . . . . . . . . . . . . . . . . . . . . . . . . . . . . . . . . . . . . . . . . . . . . . . . . . . . . . . . . . . . . . . . . . . . . . . . . . . . . . . . . . .
1.5 HOW TO USE A MACRO THAT HAS BOTH UPPER AND LOWER CASEPARTS: VT xyz
The definition and box need to be set before the \tableofcontents command for theContents to format correctly.

Monograph Book Style 17
Indented Text and ListsThe Wiley Monograph Book style uses standard LATEX methods to produce indented text and lists. Followingare some examples of the results in this style.
To Indent Text:
If an example satisfies the seed of a clause, then it satisfies the clauseas well. In addition, seeds have the following property:\inxx{listing,itemize}
\begin{itemize}\item[]If a seed of clause $c_T$, and example {\bf x} satisfies $c_T$ butnot $c$, then {\bf x} has at least one attribute in $c_T$ thatis not in $c$.\hfill({\tt*})\end{itemize}The procedure below...
. . . . . . . . . . . . . . . . . . . . . . . . . . . . . . . . . . . . . . . . . . . . . . . . . . . . . . . . . . . . . . . . . . . . . . . . . . . . . . . . . . . . . . . . . . . . . . . . . . . . . . . . . . .
If an example satisfies the seed of a clause, then it satisfies the clause as well. In addition,seeds have the following property:
If a seed of clause cT , and example x satisfies cT but not c, then x has at least oneattribute in cT that is not in c. (*)
The procedure below...
Bulleted List
Here is an example of a bulleted list:
\begin{itemize}\itemfor every $x\in A$ and for...
\itemfor every $x_1$, $x_2$ and for every...\end{itemize}
. . . . . . . . . . . . . . . . . . . . . . . . . . . . . . . . . . . . . . . . . . . . . . . . . . . . . . . . . . . . . . . . . . . . . . . . . . . . . . . . . . . . . . . . . . . . . . . . . . . . . . . . . . .
• for every x ∈ A and for...
• for every x1, x2 and for every...

18 Using the Wiley Macros
Numbered List
Here is an example of a numbered list:
\begin{enumerate}\itemIf $n/n_1=2$ then the Second multiplier Theorem holds without theassumption, provided that one of the following conditions holds:
\begin{enumerate}\itemThe first situation.
\itemThe second situation.\end{enumerate}
\itemIf $n/n_1=3$ then in the majority of cases the assumption may be removed.\end{enumerate}
. . . . . . . . . . . . . . . . . . . . . . . . . . . . . . . . . . . . . . . . . . . . . . . . . . . . . . . . . . . . . . . . . . . . . . . . . . . . . . . . . . . . . . . . . . . . . . . . . . . . . . . . . . .
1. If n/n1 = 2 then the Second multiplier Theroem holds without the assumption, pro-vided that one of the following conditions holds:
(a) The first situation.
(b) The second situation.
2. If n/n1 = 3 then in the majority of cases the assumption may be removed.

Monograph Book Style 19
CaptionsThe commands for making table or figure captions are the same in this macro set as they are in normal LATEX:
\begin{figure}(optional space left here)\caption{Here is the figure caption.}\end{figure}
or,
\begin{table}\caption{Here is the table caption.}\begin{tabular}...\end{tabular}\end{table}
Side by Side Captions
With this macro set there is an additional command that allows you to position a number of captions side byside in a single table or figure environment. In general terms, the macro is used like this:
\begin{figure or table} \sidebyside{}{} \end{figure or table}
Put a caption into each set of curly brackets and the captions will print next to each other:
\begin{figure}[ht]\sidebyside{Space for figure...\caption{This caption will go on the left side ofthe page. It is the initial caption of two side-by-side captions.}}{Space for second figure...\caption{This caption will go on the right side ofthe page. It is the second of two side-by-side captions.}}\end{figure}
. . . . . . . . . . . . . . . . . . . . . . . . . . . . . . . . . . . . . . . . . . . . . . . . . . . . . . . . . . . . . . . . . . . . . . . . . . . . . . . . . . . . . . . . . . . . . . . . . . . . . . . . . . .
Space for figure...
Figure 1.1 This caption will go on the left sideof the page. It is the initial caption of two side-by-side captions.
Space for second figure...
Figure 1.2 This caption will go on the right sideof the page. It is the second of two side-by-sidecaptions.

20 Using the Wiley Macros
The command \sidebyside{}{} works similarly for tables:
\begin{table}\sidebyside{\caption{Table Caption} first table}{\caption{table caption} second table}\end{table}
. . . . . . . . . . . . . . . . . . . . . . . . . . . . . . . . . . . . . . . . . . . . . . . . . . . . . . . . . . . . . . . . . . . . . . . . . . . . . . . . . . . . . . . . . . . . . . . . . . . . . . . . . . .
Table 1.1 Table Caption
first table
Table 1.2 Table Caption
second table
Caution when Cross Referencing
When using \sidebyside, one must use the cross referencing command \label{} after and outside of\caption{}:
\begin{table}\sidebyside{
\caption{table caption}\label{tab1}first table
}{\caption{table caption}\label{tab2}second table}\end{table}
or,
\begin{figure}\sidebyside{
\vskip<dimen>\caption{fig caption}\label{fig1}
}{\vskip<dimen>\caption{fig caption}\label{fig2}}\end{figure}

Monograph Book Style 21
Centering multiline captionsThis will work for either figure or table caption, but if you want to center a multiply lined caption over acentered table, for instance, you can type
\begin{table}\caption{\vtop{\hbox{first line of caption}\hbox{Second line of caption}{Third line of caption}}%end \vtop{}%end \caption{
\centering\begin{tabular}...\end{tabular}
\end{table}
Results will be
Table 1.1 First Line of captionSecond line of captionThird line of caption
and the caption will be centered over the table

22 Using the Wiley Macros
Making TablesThere are two aspects of making tables with this macro package that need to be mentioned.
First, you need to enter commands as you see in the section ‘Normal Tables’ below, in order to have the tablehave the correct appearance.
Second, since these table macros are made to make it easy to make tables with the correct appearance forthis style, you must go to some extra effort if you want to make a table with vertical lines in it.
Normal Tables
In order to make your table conform to the Wiley Monograph Book specification you must follow severalsteps.
Use \hline underneath the column headers.You are discouraged from using vertical lines in tables, but it you must include vertical lines, you mustalso use \savehline instead of \hline or there will be a gap between the vertical and horizontal lines.(\hline has been redefined to add some vertical space above and below it.)Make your table span the full page width if possible.
The following example shows these steps being followed and the form of the table preamble that will causethe table to spread out to the width of the page:
\begin{table}[h]\caption{This Is an Example Table Caption}\begin{tabular*}{\hsize}{@{\extracolsep{\fill}}lcr}$\alpha\beta\Gamma\Delta$ One&Two&Three\cr\hlineone&two&three\crone&two&three\cr\end{tabular*}\end{table}
. . . . . . . . . . . . . . . . . . . . . . . . . . . . . . . . . . . . . . . . . . . . . . . . . . . . . . . . . . . . . . . . . . . . . . . . . . . . . . . . . . . . . . . . . . . . . . . . . . . . . . . . . . .
Table 1.3 This Is an Example Table Caption
αβΓΔ One Two Three
one two threeone two three

Monograph Book Style 23
Making Table Notes
Table notes are made by entering the symbol that you want to use in math mode in a superscript. At the endof the table, please enter the command \begin{tablenotes} and enter the notes, as seen below.
\begin{table}[t]\caption{Effects of the Two Types of Scaling Proposed by \protect\inx{Dennard}and Co-Workers.$ˆ{a,b}$}\begin{tabular*}{\textwidth}{@{\extracolsep{\fill}}lcc}\hlineParameter& $\kappa$ Scaling & $\kappa$, $\lambda$ Scaling\cr\hlineDimension&$\kappaˆ{-1}$&$\lambdaˆ{-1}$\crVoltage&$\kappaˆ{-1}$&$\kappaˆ{-1}$\crCurrant&$\kappaˆ{-1}$&$\lambda/\kappaˆ{2}$\crDopant Concentration&$\kappa$&$\lambdaˆ2/\kappa$\cr\hline\end{tabular*}\begin{tablenotes}$ˆa$Refs.˜19 and 20.
$ˆb\kappa, \lambda>1$.\end{tablenotes}\end{table}
. . . . . . . . . . . . . . . . . . . . . . . . . . . . . . . . . . . . . . . . . . . . . . . . . . . . . . . . . . . . . . . . . . . . . . . . . . . . . . . . . . . . . . . . . . . . . . . . . . . . . . . . . . .
Table 1.4 Effects of the Two Types of Scaling Proposed by Dennard and Co-Workers.a,b
Parameter κ Scaling κ, λ Scaling
Dimension κ−1 λ−1
Voltage κ−1 κ−1
Currant κ−1 λ/κ2
Dopant Concentration κ λ2/κ
aRefs. 19 and 20.bκ, λ > 1.

24 Using the Wiley Macros
Tables with Vertical Lines
If at all possible to make your meaning clear without vertical lines, please leave them out.
However, if you really must use vertical lines, you must use \savehline instead of \hline. Here is theprevious example, redone, using vertical lines. (Notice that we use {tabular} instead of {tabular*})
\begin{tabular}{||l||c|c||}\savehlineParameter& $\kappa$ Scaling & $\kappa$, $\lambda$ Scaling\cr\savehlineDimension&$\kappaˆ{-1}$&$\lambdaˆ{-1}$\crVoltage&$\kappaˆ{-1}$&$\kappaˆ{-1}$\crCurrant&$\kappaˆ{-1}$&$\lambda/\kappaˆ{2}$\crDopant Concentration&$\kappa$&$\lambdaˆ2/\kappa$\cr\savehline\end{tabular}
. . . . . . . . . . . . . . . . . . . . . . . . . . . . . . . . . . . . . . . . . . . . . . . . . . . . . . . . . . . . . . . . . . . . . . . . . . . . . . . . . . . . . . . . . . . . . . . . . . . . . . . . . . .
Parameter κ Scaling κ, λ ScalingDimension κ−1 λ−1
Voltage κ−1 κ−1
Currant κ−1 λ/κ2
Dopant Concentration κ λ2/κ
But that looks pretty ugly, so we fix it by adding an extra letter to the end of the preamble, calling for acolumn that we never use, and that makes the vertical and horizontal lines meet correctly:
\begin{tabular}{||l||c|c||c}\savehlineParameter& $\kappa$ Scaling & $\kappa$, $\lambda$ Scaling\cr\savehlineDimension&$\kappaˆ{-1}$&$\lambdaˆ{-1}$\crVoltage&$\kappaˆ{-1}$&$\kappaˆ{-1}$\crCurrant&$\kappaˆ{-1}$&$\lambda/\kappaˆ{2}$\crDopant Concentration&$\kappa$&$\lambdaˆ2/\kappa$\cr\savehline\end{tabular}
. . . . . . . . . . . . . . . . . . . . . . . . . . . . . . . . . . . . . . . . . . . . . . . . . . . . . . . . . . . . . . . . . . . . . . . . . . . . . . . . . . . . . . . . . . . . . . . . . . . . . . . . . . .
Parameter κ Scaling κ, λ ScalingDimension κ−1 λ−1
Voltage κ−1 κ−1
Currant κ−1 λ/κ2
Dopant Concentration κ λ2/κ

Monograph Book Style 25
The table on the previous page looks almost acceptable, but we can certainly improve it by adding morespace above and below the lines in each column. We do this by adding this@{\vrule height 11pt depth4pt width0pt\hskip\arraycolsep},to the preamble, which produces a vertical line with no width and some horizontal space in each line in thetable:
\begin{tabular}{||l@{\vrule height 11pt depth4pt width0pt\hskip\arraycolsep}||c|c||c}\savehlineParameter& $\kappa$ Scaling & $\kappa$, $\lambda$ Scaling\cr\savehlineDimension&$\kappaˆ{-1}$&$\lambdaˆ{-1}$\crVoltage&$\kappaˆ{-1}$&$\kappaˆ{-1}$\crCurrant&$\kappaˆ{-1}$&$\lambda/\kappaˆ{2}$\crDopant Concentration&$\kappa$&$\lambdaˆ2/\kappa$\cr\savehline\end{tabular}
. . . . . . . . . . . . . . . . . . . . . . . . . . . . . . . . . . . . . . . . . . . . . . . . . . . . . . . . . . . . . . . . . . . . . . . . . . . . . . . . . . . . . . . . . . . . . . . . . . . . . . . . . . .
Parameter κ Scaling κ, λ Scaling
Dimension κ−1 λ−1
Voltage κ−1 κ−1
Currant κ−1 λ/κ2
Dopant Concentration κ λ2/κ
Voila!

26 Using the Wiley Macros
To Illustrate an AlgorithmThe \begin{algorithm}...\end{algorithm} may be used to illustrate an algorithm.
Spaces and blank lines will be preserved. Math and font changes may be used.Line beginnings may be positioned with a \ , which may be used as many times as you need. A backslashfollowed by a space will provide a space a bit wider than the width of 2 ‘M’s.If you want to break lines on the screen but not break the line in the results, use ‘%’ at the end of line, asyou see in the fifth line in this example.The command \bit will produce bold italics if you are using PostScript fonts, boldface in ComputerModern.\note{} will position the note on the right margin.
\begin{algorithm}{\bit Evaluate-Single-FOE} ({\bf x$_f$, I$_0$, I$_1$}):\ {\bf I}+ := {\bf I}$_1$;\ ($\phi,\theta$) := (0,0);\ {\it repeat}\note{/*usually only 1 interation required*/}\ \ (s$_{opt}${\bf E}$_\eta$) := {\bit Optimal-Shift}%({\bf I$_0$,I$ˆ+$,I$_0$,x$_f$});
\ \ ($\phiˆ+$, $\thetaˆ+$) := {\bit Equivalent-Rotation} ({\bf s}$_{opt}$);\ \ ($\phi$, $\theta$) := ($\phi$, $\theta$) + ($\phiˆ+$, $\thetaˆ+$);\ \ {\bf I}$ˆ+$:= {\bit Derotate-Image} ({\bf I}$_1$, $\phi$, $\theta$);\ \ {\it until} ($|\phiˆ+|\leq\phi_{max}$ \& $|\thetaˆ+|\leq\theta_{max}$);\ {\it return} ({\bf I}$ˆ+$, $\phi$, $\theta$, E$_\eta$).End pseudo-code.\end{algorithm}
. . . . . . . . . . . . . . . . . . . . . . . . . . . . . . . . . . . . . . . . . . . . . . . . . . . . . . . . . . . . . . . . . . . . . . . . . . . . . . . . . . . . . . . . . . . . . . . . . . . . . . . . . . .
Algorithm 1.1
Evaluate-Single-FOE ( xf , I0, I1):I+ := I1;(φ, θ) := (0,0);repeat /*usually only 1 interation required*/(sopt Eη) := Optimal-Shift ( I0,I+,I0,xf);(φ+, θ+) := Equivalent-Rotation ( sopt);(φ, θ) := (φ, θ) + (φ+, θ+);I+:= Derotate-Image ( I1, φ, θ);until (|φ+| ≤ φmax & |θ+| ≤ θmax);
return ( I+, φ, θ, Eη).End pseudo-code.

Monograph Book Style 27
Problem SetsThe commands need to make problem sets are: \begin{problems}...\end{problems}, \prob and \subprob.You may make side-by-side problems using the command \sidebysideprob{}{} with two arguments; andside-by-side sub problems using the command \sidebysidesubprob{}{}.
Here is an example:
\begin{problems}\probFor Hooker’s data, Problem 1.2, use the Box and Cox and Atkinson proceduresto determine a appropriate transformation of PRESin the regression of PRES on TEMP. find $\hat\lambda$, $\tilde\lambda$,the score test, and the added variable plot for the score.Summarize the results.
\probThe following data were collected in a study of the effect of dissolved sulfuron the surface tension of liquid copper (Baes and Killogg, 1953).
{\centering\vskip6pt\begin{tabular}{rlcc}\hline&&\multicolumn2c{$Y$= Decrease in Surface Tension}\\\multicolumn2c{$x$ = Weight \% sulfur}&\multicolumn2c{(dynes/cm), two Replicates}\\\hline0.&034&301&316\\0.&093&430&422\\0.&30&593&586\\\hline\end{tabular}\vskip6pt}
\subprobFind the transformations of $X$ and $Y$ sot that in the transformed scalethe regression is linear.
\subprobAssuming that $X$ is transformed to $\ln(X)$, which choice of $Y$ givesbetter results,$Y$ or $\ln(Y)$? (Sclove, 1972).
\sidebysidesubprob{In the case of $\alpha_1$?}{In the case of $\alpha_2$?}
\probExamine the Longley data, Problem 3.3, for applicability of assumptions of thelinear model.
\sidebysideprob{In the case of $\Gamma_1$?}{In the case of $\Gamma_2$?}\end{problems}

28 Using the Wiley Macros
. . . . . . . . . . . . . . . . . . . . . . . . . . . . . . . . . . . . . . . . . . . . . . . . . . . . . . . . . . . . . . . . . . . . . . . . . . . . . . . . . . . . . . . . . . . . . . . . . . . . . . . . . . .
PROBLEMS
1.1 For Hooker’s data, Problem 1.2, use the Box and Cox and Atkinson procedures todetermine a appropriate transformation of PRES in the regression of PRES on TEMP. findλ̂, λ̃, the score test, and the added variable plot for the score. Summarize the results.
1.2 The following data were collected in a study of the effect of dissolved sulfur on thesurface tension of liquid copper (Baes and Killogg, 1953).
Y = Decrease in Surface Tensionx = Weight % sulfur (dynes/cm), two Replicates
0. 034 301 3160. 093 430 4220. 30 593 586
a) Find the transformations ofX andY sot that in the transformed scale the regressionis linear.
b) Assuming that X is transformed to ln(X), which choice of Y gives better results,Y or ln(Y )? (Sclove, 1972).
c) In the case of α1? d) In the case of α2?
1.3 Examine the Longley data, Problem 3.3, for applicability of assumptions of the linearmodel.
1.4 In the case of Γ1? 1.5 In the case of Γ2?

Monograph Book Style 29
Exercise SetsThe commands need to make exercise sets are: \begin{exercises}...\end{exercises}, \exer and\subexer. You may make side-by-side exercises using the command \sidebysideexer{}{} with two argu-ments; and side-by-side sub exercises using the command \sidebysidesubexer{}{}; as you can see in theexample below. Resulting text is on the following page.
\begin{exercises}\exerFor Hooker’s data, Exercise 1.2, use the Box and Cox and Atkinson proceduresto determine a appropriate transformation of PRESin the regression of PRES on TEMP. find $\hat\lambda$, $\tilde\lambda$,the score test, and the added variable plot for the score.Summarize the results.
\exerThe following data were collected in a study of the effect of dissolved sulfuron the surface tension of liquid copper (Baes and Killogg, 1953).
{\centering\vskip6pt\begin{tabular}{rlcc}\hline&&\multicolumn2c{$Y$= Decrease in Surface Tension}\\\multicolumn2c{$x$ = Weight \% sulfur}&\multicolumn2c{(dynes/cm), two Replicates}\\\hline0.&034&301&316\\0.&093&430&422\\0.&30&593&586\\\hline\end{tabular}\vskip6pt}
\subexerFind the transformations of $X$ and $Y$ sot that in the transformed scalethe regression is linear.
\subexerAssuming that $X$ is transformed to $\ln(X)$, which choice of $Y$ givesbetter results,$Y$ or $\ln(Y)$? (Sclove, 1972).
\sidebysidesubexer{In the case of $\Delta_1$?}{In the case of $\Delta_2$?}
\exerExamine the Longley data, Problem 3.3, for applicability of assumptions of thelinear model.
\sidebysideexer{In the case of $\Gamma_1$?}{In the case of $\Gamma_2$?}\end{exercises}

30 Using the Wiley Macros
. . . . . . . . . . . . . . . . . . . . . . . . . . . . . . . . . . . . . . . . . . . . . . . . . . . . . . . . . . . . . . . . . . . . . . . . . . . . . . . . . . . . . . . . . . . . . . . . . . . . . . . . . . .
EXERCISES
1.6 For Hooker’s data, Exercise 1.2, use the Box and Cox and Atkinson procedures todetermine a appropriate transformation of PRES in the regression of PRES on TEMP. findλ̂, λ̃, the score test, and the added variable plot for the score. Summarize the results.
1.7 The following data were collected in a study of the effect of dissolved sulfur on thesurface tension of liquid copper (Baes and Killogg, 1953).
Y = Decrease in Surface Tensionx = Weight % sulfur (dynes/cm), two Replicates
0. 034 301 3160. 093 430 4220. 30 593 586
a) Find the transformations ofX andY sot that in the transformed scale the regressionis linear.
b) Assuming that X is transformed to ln(X), which choice of Y gives better results,Y or ln(Y )? (Sclove, 1972).
c) In the case of Δ1? d) In the case of Δ2?
1.8 Examine the Longley data, Problem 3.3, for applicability of assumptions of the linearmodel.
1.9 In the case of Γ1? 1.10 In the case of Γ2?

Monograph Book Style 31
Entering Solutions, and Solution sectionFor a solution section at the end of your book, and the ability to enter Solutions within the Problem or Exercisesections, enter\usepackage{answers}before \begin{document}
Then either in the Problems or the Exercises environment, enter the solution to each or selected problems, orexercise, after either the \prob command and problem text, or after the \exer command and exercise text:
\begin{sol}Solution text\end{sol}
For example:
\begin{problems}\probFirst exercise
\begin{sol}Here is the first solution\end{sol}
\probHere is the second problem.
\begin{sol}Here is the second solution\end{sol}
\end{problems}
The problems, or exercises, will be numbered sequentially throughout each chapter.
Printing the SolutionsAt the end of the book type in
\solutions
and \solutionchap{} or \solutionappendix{} with the chapter number or appendix letter, for each chapteror appendix where solutions were written, ie,
\solutions\solutionchap{1}\solutionchap{2}\solutionappendix{A}\solutionappendix{B}

32 Using the Wiley Macros
Ending the Chapter, Ending the Book: ReferencesThere are several commands that can be used at the end of a chapter or at the end of the book. To distinguishbetween them we have \chapreferences and \references and \chapappendix and \appendix. The com-mands are used in the same way but are formatted differently when they appear in the body of the chapter asopposed to the end of the book.
In addition we have the Glossary and Index commands to use at the end of the book, which we will see inexamples in following sections.
Chapter ReferencesReferences are done as in most LATEX styles, written in a reference section with each reference preceded by\bibitem{<biblabel>}. The \cite{<biblabel>} command should be used to reference the bibliographylabels. Here is an example using chapreferences:
As seen in reference \cite{beren}, we can definitely conclude.
\begin{chapreferences}\bibitem{kilby}J. S. Kilby,‘‘Invention of the Integrated Circuit,’’ {\it IEEE Trans. Electron Devices,}{\bf ED-23,} 648 (1976).
\bibitem{hamming}R. W. Hamming, {\it Numerical Methods for Scientists andEngineers}, Chapter N-1, McGraw-Hill, New York, 1962.
\bibitem{beren}A. Berenbaum, B. W. Colbry, D.R. Ditzel, R. D Freeman, andK.J. O’Connor, ‘‘A Pipelined 32b Microprocessor with 13 kb of Cache Memory,’’{\it Int. Solid State Circuit Conf., Dig. Tech. Pap.,} p. 34 (1987).\end{chapreferences}
. . . . . . . . . . . . . . . . . . . . . . . . . . . . . . . . . . . . . . . . . . . . . . . . . . . . . . . . . . . . . . . . . . . . . . . . . . . . . . . . . . . . . . . . . . . . . . . . . . . . . . . . . . .
As seen in reference [3], we can definitely conclude.
REFERENCES
1. J. S. Kilby, “Invention of the Integrated Circuit,” IEEE Trans. Electron Devices, ED-23, 648(1976).
2. R. W. Hamming, Numerical Methods for Scientists and Engineers, Chapter N-1, McGraw-Hill,New York, 1962.
3. A. Berenbaum, B. W. Colbry, D.R. Ditzel, R. D Freeman, and K.J. O’Connor, “A Pipelined 32bMicroprocessor with 13 kb of Cache Memory,” Int. Solid State Circuit Conf., Dig. Tech. Pap.,p. 34 (1987).

Monograph Book Style 33
Alternate Reference Form: Chapter Named References
To use the name-and-year form of reference, follow this example. Notice that you supply the widest bib termin curly brackets after {namedchapreferences}.
Sample named chapter reference citation: [kil76], [ham62].
\begin{namedchapreferences}{kill}\bibitem[kill]{kilby}J. S. Kilby,‘‘Invention of the Integrated Circuit,’’ {\it IEEE Trans. Electron Devices,}{\bf ED-23,} 648 (1976).
\bibitem[ham]{hamming}R. W. Hamming,{\it Numerical Methods for Scientists andEngineers}, Chapter N-1, McGraw-Hill,New York, 1962.
\bibitem[hum]{Hu}J. Lee, K. Mayaram, and C. Hu, ‘‘A TheoreticalStudy of Gate/Drain Offset in LDD MOSFETs’’
{\it IEEE Electron Device Lett.,} {\bf EDL-7}(3). 152(1986).
\end{namedchapreferences}
. . . . . . . . . . . . . . . . . . . . . . . . . . . . . . . . . . . . . . . . . . . . . . . . . . . . . . . . . . . . . . . . . . . . . . . . . . . . . . . . . . . . . . . . . . . . . . . . . . . . . . . . . . .
Sample named chapter reference citation: [kil76], [ham62].
REFERENCES
[kil76] J. S. Kilby, “Invention of the Integrated Circuit,” IEEE Trans. Electron Devices, ED-23,648 (1976).
[ham62] R. W. Hamming, Numerical Methods for Scientists and Engineers, Chapter N-1, McGraw-Hill, New York, 1962.
[hum86] J. Lee, K. Mayaram, and C. Hu, “A Theoretical Study of Gate/Drain Offset in LDD MOS-FETs” IEEE Electron Device Lett., EDL-7(3). 152 (1986).

34 Using the Wiley Macros
Using BibTeX for your Chapter ReferencesUsing BibTeX is a bit more effort, but the major advantage is that you can build a database of your referencesthat you can reuse for other books or articles. To use BibTEX in an edited book you must use two newcommands: \chapbblfile and \chapbibliography, explained below. Follow these steps:
Make a .bib file
If you do not already have one or more .bib files, make a xxx.bib file, with ‘xxx’being any file name youchoose. The .bib file or files are a database of references. Please see Leslie Lamport’s LATEX A DocumentPreparation System for information on the form of entries in the .bib file.
Supply a Bibliography style
\bibliographystyle{plain}
Make sure that plain.bst in the same directory where you are working, or in a directory where BibTEXcan find it when it is running.
Supply a .bbl file name
Write \chapbblfile{<name of your bbl file>}with the name of your bbl file being the name of the file you are writing, i.e, if you are working in a filenamed chap1.tex, the name you should supply is
\chapbblname{chap1}
Run BibTeX on your file to produce a .bbl file
Write either \cite{<label>} or \nocite{<label>} for each reference that you want to appear in thebibliography. Each citation will make a matching entry appear in the bibliography.
\cite will produce a printed citation, \nocite will not print, but in either case he citation will appear inthe finished bibliography.
Next you must write \chapbibliography{xxx}, with ‘xxx’ being the name of the .bib database file thatyou have written. You can also use more than one .bib file, in which case you must separate the filenameswith a comma: \chapbibliography{xxx,yyy}.
For example:
Here are some more citations\cite{dms80}, \cite{gm91}, \cite{hhmz77}, \cite{hb85},\cite{kt78}. \nocite{kl94}
\bibliographystyle{plain}\chapbblname{chap1}\chapbibliography{bkbib}
Run BibTEX on the file. If the file is named chap1.tex you will produce a file named chap1.bbl.
Run LATEX on your file to print your references
The next time you Run LATEX on your file your references will appear.
! Be sure to send the .bbl file to Wiley at the same time you send your .tex file. !

Monograph Book Style 35
References in End MatterTo make a reference section at the end of the book, you use the either usual LATEX commands, or\begin{namedreferences}...\end{namedreferences}
\begin{references}\bibitem{kilby}J. S. Kilby,‘‘Invention of the Integrated Circuit,’’ {\it IEEE Trans. Electron Devices,}{\bf ED-23,} 648 (1976).
\bibitem{hamming}R. W. Hamming,{\it Numerical Methods for Scientists andEngineers}, Chapter N-1, McGraw-Hill,New York, 1962.
\bibitem{Hu}J. Lee, K. Mayaram, and C. Hu, ‘‘A TheoreticalStudy of Gate/Drain Offset in LDD MOSFETs’’
{\it IEEE Electron Device Lett.,} {\bf EDL-7}(3). 152(1986).
\bibitem{beren}A. Berenbaum,B. W. Colbry, D.R. Ditzel, R. D Freeman, andK.J. O’Connor, ‘‘A Pipelined 32b Microprocessor with 13 kb of Cache Memory,’’{\it Int. Solid State Circuit Conf., Dig. Tech. Pap.,} p. 34 (1987).\end{references}
. . . . . . . . . . . . . . . . . . . . . . . . . . . . . . . . . . . . . . . . . . . . . . . . . . . . . . . . . . . . . . . . . . . . . . . . . . . . . . . . . . . . . . . . . . . . . . . . . . . . . . . . . . .
References
1. J. S. Kilby, “Invention of the Integrated Circuit,” IEEE Trans. Electron Devices, ED-23, 648(1976).
2. R. W. Hamming, Numerical Methods for Scientists and Engineers, Chapter N-1, McGraw-Hill,New York, 1962.
3. J. Lee, K. Mayaram, and C. Hu, “A Theoretical Study of Gate/Drain Offset in LDD MOSFETs”IEEE Electron Device Lett., EDL-7(3). 152 (1986).
4. A. Berenbaum, B. W. Colbry, D.R. Ditzel, R. D Freeman, and K.J. O’Connor, “A Pipelined 32bMicroprocessor with 13 kb of Cache Memory,” Int. Solid State Circuit Conf., Dig. Tech. Pap.,p. 34 (1987).

36 Using the Wiley Macros
Alternative Reference Form: End of Book Named References
To use the name-and-year form of references at the end of the book, follow this example. Notice that yousupply the widest bib term in curly brackets after {namedchapreferences}.
Sample named reference citation: [kil76], [ham62].
\begin{namedreferences}{hum86}\bibitem[kil76]{xkilby}J. S. Kilby,‘‘Invention of the Integrated Circuit,’’ {\it IEEE Trans. Electron Devices,}{\bf ED-23,} 648 (1976).
\bibitem[ham62]{xhamming}R. W. Hamming,{\it Numerical Methods for Scientists andEngineers}, Chapter N-1, McGraw-Hill,New York, 1962.
\bibitem[hum86]{xHu}J. Lee, K. Mayaram, and C. Hu, ‘‘A TheoreticalStudy of Gate/Drain Offset in LDD MOSFETs’’
{\it IEEE Electron Device Lett.,} {\bf EDL-7}(3). 152(1986).
\end{namedreferences}
. . . . . . . . . . . . . . . . . . . . . . . . . . . . . . . . . . . . . . . . . . . . . . . . . . . . . . . . . . . . . . . . . . . . . . . . . . . . . . . . . . . . . . . . . . . . . . . . . . . . . . . . . . .
Sample named reference citation: [kil76], [ham62].
References
[kil76] J. S. Kilby, “Invention of the Integrated Circuit,” IEEE Trans. Electron Devices, ED-23,648 (1976).
[ham62] R. W. Hamming, Numerical Methods for Scientists and Engineers, Chapter N-1, McGraw-Hill, New York, 1962.
[hum86] J. Lee, K. Mayaram, and C. Hu, “A Theoretical Study of Gate/Drain Offset in LDDMOSFETs” IEEE Electron Device Lett., EDL-7(3). 152 (1986).

Monograph Book Style 37
Using BibTeX for your references at the end of the book
BibTeX is a separate program which can be used with LATEX to produce a database file and build a bibliography.
To use BibTeX for references at the end of the book follow these steps:
1. Make a xxx.bib file, with ‘xxx’ being any file name you choose. This is the database file including allthe references. The form that these entries should take is described in the LATEX book.
2. In your .tex file enter \bibliographystyle{plain}.
Next you must write \bibliography{xxx}, with ‘xxx’ being the name of the .bib database file that youhave written. You can also use more than one .bib file, in which case you must separate the filenameswith a comma: \bibliography{xxx,yyy}.
3. Write either \cite{<label>} or \nocite{<label>} for each reference that you want to appear in thebibliography. \cite will produce a printed citation, \nocite will not print, but in either case he citationwill appear in the finished bibliography.
4. Run Latex on the .tex document, producing the usual .aux file.5. Run BibTex on the .tex document, producing a .bbl file,6. And, finally, run LaTeX on the .tex file, and Voila! your bibliography will appear where you have written
\bibliography{<mybibfile>},
Citations made with \cite or \nocite are necessary to get entries into the filename.bbl when BibTeXis run on your file. Here are some sample citations, followed by a sample bibliography.
A citation will look like this, \cite{jst81,bm84}.Here are some more citations;\cite{dms80}; \cite{gm91}; \cite{hhmz77}; \cite{hb85}; \cite{kt78};and \cite{jb:spectral}.
Here are sample ‘nocites’:\nocite{bhw:blproof}\nocite{jb:uncert}\nocite{cw:cardspline}\nocite{id:signal}\nocite{wh:frames}\nocite{vn:mfqm}. You see that nothing printedwhere they were written.
Each citation will make a matching entry appear in the bibliography.
. . . . . . . . . . . . . . . . . . . . . . . . . . . . . . . . . . . . . . . . . . . . . . . . . . . . . . . . . . . . . . . . . . . . . . . . . . . . . . . . . . . . . . . . . . . . . . . . . . . . . . . . . . .
A citation will look like this, Jameson et al., 1981, Barrett and Morton, 1984. Here aresome more citations; Doolan et al., 1980, Garcia-Archilla and Mackenzie, 1991, Heinrichet al., 1977, Hughes and Brooks, 1985, Kellog and Tsau, 1978, and Benedetto, 1975.
Here are sample ‘nocites’:. You see that nothing printed where they were written.Each citation will make a matching entry appear in the bibliography.

38 Using the Wiley Macros
Here is the sample bibliography that results:
\bibliographystyle{plain}\bibliography{bkbib}
. . . . . . . . . . . . . . . . . . . . . . . . . . . . . . . . . . . . . . . . . . . . . . . . . . . . . . . . . . . . . . . . . . . . . . . . . . . . . . . . . . . . . . . . . . . . . . . . . . . . . . . . . . .
References
1. Barrett, J. W. and Morton, K. W. (1984). Approximate symmetrization and Petrov-Galerkinmethods for diffusion-convection problems. Comput. Methods Appl. Mech. Engrg., 45:97–122.
2. Benedetto, J. (1975). Spectral Synthesis. Academic Press, New York.
3. Daubechies, I. (1990). The wavelet transform, time-frequency localization and signal analysis.IEEE Trans. Inform. Theory, 36:961–1005.
4. Doolan, E. P., Miller, J. J. H., and Schilders, W. H. A. (1980). Uniform Numerical Methods forProblems with Initial and Boundary Layers. Boole Press, Dublin.
5. Garcı́a-Archilla, B. and Mackenzie, J. A. (1991). Analysis of a supraconvergent cell vertex finitevolume method for one-dimensional convection-diffusion problems. Technical Report NA91/13,Oxford University Computing Laboratory, 11 Keble Road, Oxford, OX1 3QD. submitted forpublication.
6. Hughes, T. J. R. and Brooks,A. N. (1985). A multi-dimensional upwind scheme with no crosswinddiffusion. In Hughes, T. J. R., editor, Finite Element Methods for Convection Dominated Flows,pages 19–35. ASME, New York.
7. Jameson, A., Schmidt, W., and Turkel, E. (1981). Numerical solutions of the Euler equations byfinite volume methods using Runge-Kutta time stepping. AIAA Paper No. 81-1259.
8. Kellogg, R. B. and Tsan, A. (1978). Analysis of some difference approximations for a singularperturbation problem without turning points. Math. Comp., 32:1025–1039.
9. von Neumann, J. (1932, 1949, and 1955). Mathematical Foundations of Quantum Mechanics.Princeton University Press.

Monograph Book Style 39
AppendicesEnd of Chapter Appendices
For an appendix at the end of the chapter we have \chapappendix{}.
Here are some possibilities using \chapappendix{}.
\chapappendix{}This is a chapter appendix.\begin{equation}\sum_k P(k) \sum_i \sum_y f_i(y|k)ˆ2\end{equation}
\chapappendix{Pspace $\supseteq$ PCP(log n)}....
. . . . . . . . . . . . . . . . . . . . . . . . . . . . . . . . . . . . . . . . . . . . . . . . . . . . . . . . . . . . . . . . . . . . . . . . . . . . . . . . . . . . . . . . . . . . . . . . . . . . . . . . . . .
Appendix
This is a chapter appendix. ∑
k
P (k)∑
i
∑
y
fi(y|k)2 (A.1)
Appendix: Pspace ⊇ PCP(log n)
This is an appendix. ∑
k
P (k)∑
i
∑
y
fi(y|k)2 (B.1)

40 Using the Wiley Macros
Appendix at the end of the bookMake your appendix with the command \appendix{}, as seen below. If you want only one appendix, follow\appendix with facing curly brackets: \appendix{}.
Section numbers, equation numbers, and captions will all use the appendix letter ‘A’ as well as their number.
\appendix{This Is the Appendix Title}This is an appendix with a title.\begin{equation}\alpha\beta\Gamma\Delta\end{equation}\inxx{Appendix,Title}
\begin{figure}[h]\caption{This is an appendix figure caption.}\end{figure}
\begin{table}[h]\caption{This Is an Appendix Table Caption}\centering\begin{tabular}{ccc}...\end{tabular}\end{table}
. . . . . . . . . . . . . . . . . . . . . . . . . . . . . . . . . . . . . . . . . . . . . . . . . . . . . . . . . . . . . . . . . . . . . . . . . . . . . . . . . . . . . . . . . . . . . . . . . . . . . . . . . . .
Appendix A
This Is the Appendix Title
This is an appendix with a title.αβΓΔ (A.1)
Figure A.1 This is an appendix figure caption.
*

Monograph Book Style 41
Table A.1 This Is an Appendix Table Caption
one two three
C D E
\appendix{}This is an appendix without a title.
Here is a math test to show the difference between using Computer Modernmath fonts and MathTimes math fonts. When MathTimes math fonts are usedthe letters in an equation will match TimesRoman italic in the text({\it g, i, y, x, P, F, n, f} etc.). Caligraphic fonts, used for$\cal ABC$ below, will stay the samein either case.\begin{equation}g_i(y|f)=\sum_x P(x|F_n)f_i(y|x){\cal ABC}\end{equation}where $g_i(y|F_n)$ is the function specifying the probability an object willdisplay a value $y$ on a dimension $i$ given $F_n$ the observed featurestructure of all the objects.
. . . . . . . . . . . . . . . . . . . . . . . . . . . . . . . . . . . . . . . . . . . . . . . . . . . . . . . . . . . . . . . . . . . . . . . . . . . . . . . . . . . . . . . . . . . . . . . . . . . . . . . . . . .
Appendix B
This is an appendix without a title.Here is a math test to show the difference between using Computer Modern math fonts
and MathTimes math fonts. When MathTimes math fonts are used the letters in an equationwill match TimesRoman italic in the text. (g, i, y, x, P, F, n, f, etc.) Caligraphic fonts, usedfor ABC below, will stay the same in either case.
gi(y|f) =∑
x
P (x|Fn)fi(y|x)ABC (B.1)
where gi(y|Fn) is the function specifying the probability an object will display a value yon a dimension i given Fn the observed feature structure of all the objects.
*

42 Using the Wiley Macros
GlossaryAn optional glossary section is available. Its commands are very straightforward:
\begin{glossary}\term{xxx}Text...\term{yyy}Text...\end{glossary}
Here is an example:
\begin{glossary}\term{GaAs}Gallium Arsinide. For similar device sizes GaAs transistorshave three tofive times greater transconductance than those of of silicon bipolarand MOS transistors.
\term{VLSI}Very Large Scale Integration. Since the mid-1970sVLSI technology has been successfully used in many areas, but its effect oncomputers of all shapes and sizes has been the most dramatic. Some of theapplication areas got boosts in performance while others becamefeasible.
\end{glossary}
. . . . . . . . . . . . . . . . . . . . . . . . . . . . . . . . . . . . . . . . . . . . . . . . . . . . . . . . . . . . . . . . . . . . . . . . . . . . . . . . . . . . . . . . . . . . . . . . . . . . . . . . . . .
Glossary
GaAs Gallium Arsinide. For similar device sizes GaAs transistors have three to five timesgreater transconductance than those of of silicon bipolar and MOS transistors.
VLSI Very Large Scale Integration. Since the mid-1970s VLSI technology has beensuccessfully used in many areas, but its effect on computers of all shapes and sizes hasbeen the most dramatic. Some of the application areas got boosts in performance whileothers became feasible.

Monograph Book Style 43
Making Your IndexThere are four steps needed to make an index:
Marking the words to be indexed in the text,Running LATEX on the file,Sorting the .inx file, andPrinting the formatted index.
Each step will be explained briefly here, and in more detail in the following sections.
Marking the text
There are two kinds of index entries in the text:\inx{word or words}, and\inxx{word or words}.
The first form will print the term between curly brackets on the page and will also send it to an .inx filealong with the current page number.
The second, called a ‘silent’ entry, will not print on the page but will send the material between curly bracketsto the .inx file along with the current page number.
CAREFUL: Do not leave an empty space between the silent index entry and the word preceding it. Anextra space will appear in your text if there is a space both before and after the \inxx command. Yourinput should look like this:
...some words\inxx{index entry}...Not...some words \inxx{index entry}...Remember that starting a new line in your editor will also generate an empty space, so do not do thiseither:
...some words\inxx{index entry}...
Subheadings in the Index
To form an index entry as a subheading of another index entry, repeat the first entry and follow it with thenew entry.
For example:
After you have typed \inx{trees} or \inxx{trees},
you may type \inxx{trees,green} to cause ‘green’ and its associated page number to be placed in theindex under the entry for ‘trees.’
A third level of subheading is produced in the same way:\inxx{trees,green,pointy}. This will format ‘pointy’ underneath the entry for ‘green’.

44 Using the Wiley Macros
LATEXing the file
When you LATEX filename.tex containing the marked entries you will produce a filename.inx.
Sorting the .inx file
You can sort the filename.inx file with a sorting routine on your system.
The MS-DOS command is sort < filename.inx > filename.srt.
The UNIX command is sort -f filename.inx > filename.srt.
There are public domain Macintosh sorting packages available.
IMPORTANT: Edit the .srt file to make sure ˜ is at the End of the file.
Marking the .srt file
If you want to make additions to the index entries such as “See Also Douglas Firs” or to change the fonts ofcertain entries or to add a large letter and a ruled line before each new alphabetical group, you can do this infilename.srt. However, you do not need to even look at this file if you do not wish to make changes tothe index.
For more information see “Making typeface changes to index entries” and “Adding material to your sortedfile” below.
Printing the Index
The command: \printindex will print the index. This command will input the filename.srt file togenerate your index, formed in double columns, with a dash between sequential page numbers and withsubsidiary entries formatted below their major entry.
More information on each step follows.
Entering words to be indexed in the text
As described earlier, entries are to be marked either
\inx{(entry)}or
\inxx{(entry)}CAREFUL: When you mark an index entry with \inx the word or words will print in the text as well as in
the auxiliary file.
However, don’t try to use this method of marking a word or phrase if it is in the argument of anothermacro.
To index a word or words that are inside a macro argument, use the second method: rewrite the word orwords outside the macro and precede it with \inxx. If in doubt follow the second method which maybe slightly more effort, but whose results will be more predictable.

Monograph Book Style 45
To call attention to a particular page number in the index:
You may mark index entries with one or two asterisks.
\inx{index entry∗} or \inxx{index entry∗} will cause the page number to be underlined.
\inx{index entry∗∗} or \inxx{index entry∗∗} will cause the page number to appear in boldface. Youmay want to use this as a method of calling attention to the definition of a term (underlined) or an exampleof the term in use (boldface).
Examples of first, second or third level index entries
As mentioned above, second level entries are produced by writing the primary term, then a comma, then theword you are indexing. For example, index entries written on a page 33:\inx{First level} (or \inxx{First level})\inxx{First level,second level}will yield the index entries
First level, 33second level, 33
with the page numbers produced automatically.
The third level is produced similarly:\inx{First level} (or \inx{First level})\inxx{First level,second level}\inxx{First level,second level,third level}Results in:
First level, 33second level, 33
third level, 101
CAREFUL:Spaces: Notice that there are no spaces after the comma in the index entry. It is important to keep spaces
from appearing between entry levels for the index formatter to work correctly.Consistency: Capital and small letters will not be distinguished by the index formatter but will be sorted
differently. Therefore you must be careful to be consistent in capitalization.Commas: Since commas are used to separate arguments in the index entries, you must write \, when you
actually want a comma to appear in the formatted index. For example:
\inxx{Nixon\, Richard Milhous}will print in the index as:
Nixon, Richard Milhous, 72
If you forgot to put the backslash in front of the comma after ‘Nixon’ as in the following:
\inxx{Nixon, Richard Milhous}The results will be
NixonRichard Milhous, 72

46 Using the Wiley Macros
How to make a first or second level entry Without page numbers
You may occassionally want to have a major or secondary index entry that doesn’t have a page numberassociated with it, but is used as a heading for the following entries.
To do this, type the second or third level entries as you would do ordinarily, but do not make an index entryfor the first level term by itself.
For example, if these \inxx entries have been used in the text:\inxx{Cows,Holstein-Friesen}\inxx{Cows,Jersey}\inxx{Cows,holy}The index will look like this:
CowsHolstein-Friesen, 33holy, 23Jersey, 43
The same sequence follows for second and third level entries; when the third level is being looked at by theindex formatter it will check to see if the second level has been printed. If it hasn’t the formatter will supplythe second level entry without a page number.
The second level without a page number is produced like this:\inxx{Cows,four-legged,black and white}\inxx{Cows,four-legged,gentle brown}\inxx{Cows,four-legged,invisible}
Results in:Cows
four-leggedblack and white, 101gentle brown, 201invisible, 32
Index Error Control
You might have inadvertantly neglected to supply a first level entry and asked for second or third level entriesthat were to appear under the first level entry. In this case the index formatter will supply the first level entrywithout a page number, just as if that was your intention. Similarly, if third level entries have been calledfor without the preceding second level entry ever being asked for by itself, the second level entry will printwithout a page number, as if that was your intention.Thus, you have a method of index error control, that will let you know if you neglected to enter a term with\inxx that you intended. Scan your completed index to see if there are entries without page numbers. If thiswas not your intention, either edit your original file to supply the appropriate \inxx term, or edit the .srt fileto supply the term and page number.

Monograph Book Style 47
OK, the index entries are marked, now what?
The first thing to do is LATEX the file that contains the marked index entries.
You will automatically produce an auxilary file named filename.inx with ‘filename’ being the name of thefile you LATEXed and the .inx extension being added automatically.
How to sort the .inx file
The next step is to sort the contents of the file.
The UNIX command is sort -f filename.inx > filename.srt.
The MS-DOS command is sort <filename.inx > filename.srt.
If you are using another system, you must find the sorting command for that system.
IMPORTANT: Edit the .srt file to make sure ˜ is at the End of the file.
Looking at the .srt file
You can look at the sorted file in your editor. Notice that the page numbers that are less than 10 will bepreceded with two zeros, and those that are more than 10 but less than 100 will be preceded with one zero.These ‘leading zeros’ will not print but are necessary for the sort algorithm to work correctly.
Special use characters: > and ˜
There is a ‘>’ at the top of the .srt file and a ‘˜’ at the end of the file. These are commands to make theindex formatter work correctly. > must immediately precede the index entries and ˜ must immediately followthem, so do not change their position.
If you have use math in your index, you will notice that the math will end up at the top of the .srt file. Youmay move the math to whatever part of the file you want, but be sure that the > is a the top of the .srt file.
In other words, change this
$\Gamma (z)$, definition |{223}$\Gamma (z)$, recursion formula |{223}$\Gamma (z)$, reflection formula |{223}>
to this:
>$\Gamma (z)$, definition |{223}$\Gamma (z)$, recursion formula |{223}$\Gamma (z)$, reflection formula |{223}
and you might also move the gammas to the G section of the index.
You can use ˜ as you would normally, except you may not use ˜ at the beginning of an index entry (and I canthink of no reason that you would want to) except as an accent (\˜ ...).

48 Using the Wiley Macros
Making changes in the .srt file
You can make typeface changes, add or delete index entries, add comments to the index with the\addtoindexcommand, and separate the index into alphabetical sections with the use of the \ltr command. However,remember: These changes will disappear the next time you sort the .inx file to produce a new .srt file.
Making typeface changes to index entries
If you want to change the typeface of an index entry, you can do this in your sorted file with these commands:
\indexit{index entry} |1{003}\indexbf{index entry} |1{003}\indextt{index entry} |1{003}\indexsl{index entry} |1{003}
As you may have guessed, \indexit will produce italics, \indexbf will produce bold face, \indextt willproduce typewriter font, and \indexsl will produce slanted typeface.
Assuming that you will be using this command on first level index entries, each of these commands willcause the first letter to be capitalized. If you want the first letter to be lowercase use this form:
\lcindexit{index entry} |1{003}\lcindexbf{index entry} |1{003}\lcindextt{index entry} |1{003}\lcindexsl{index entry} |1{003}
If you change the typeface on any index entry, remember to do the same thing for every entry of the term onthe same level. The reason that this is important is that the index formatter will not recognize two entries asbeing the same if one is ‘\indexbf{index entry}’
and the next is ‘index entry’. If the formatter sees the entries as different, the second entry would printon its own line.
Using \addtoindex
If you want to add a comment to your index you can enter the commands \addtoindex...\endadd. Thesecommands will temporarily interrupt the index formatter and allow you to enter text or extra vertical spaceat any point in the index. See examples of this in ‘Indexing Examples’ following.
If you want a horizontal line or lines to appear, write \hrule. You will probably want to include extra verticalspace if you use \hrules since there is no interline space added by default for hrules.
You must end \addtoindex with \endadd. Here is a complete example;
Grass |1{001}\addtoindex\seealso{Blue-green grass.}\endadd
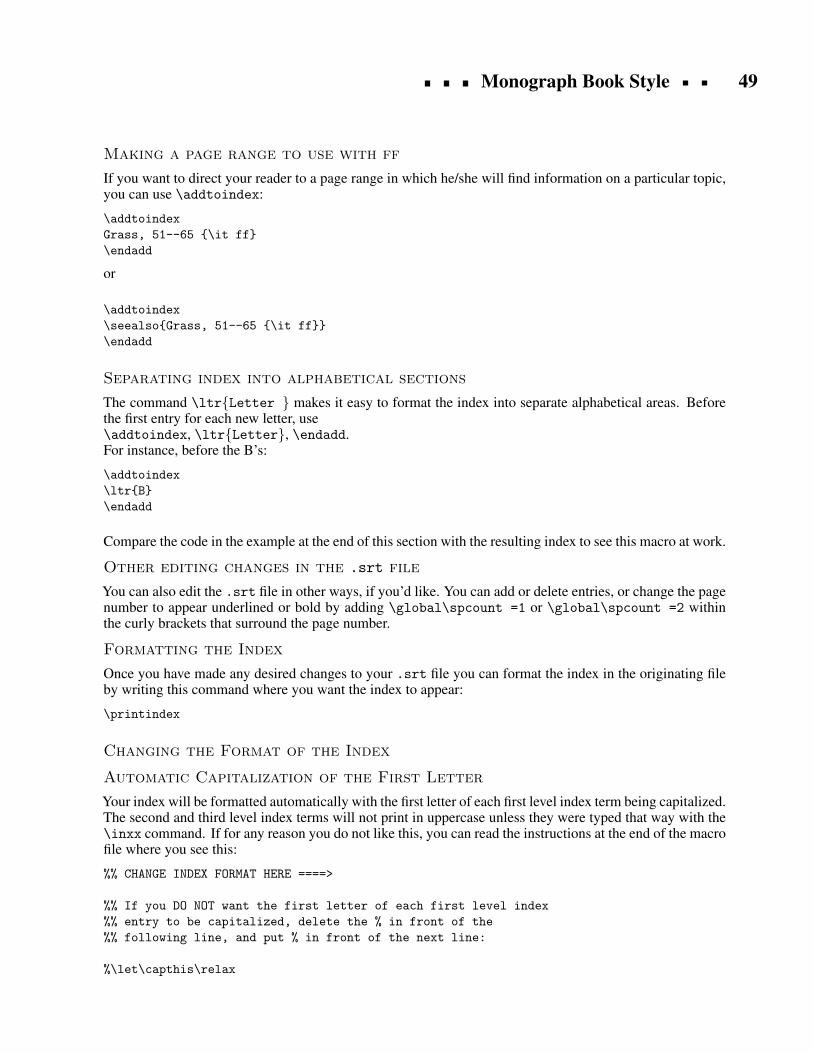
Monograph Book Style 49
Making a page range to use with ff
If you want to direct your reader to a page range in which he/she will find information on a particular topic,you can use \addtoindex:
\addtoindexGrass, 51--65 {\it ff}\endadd
or
\addtoindex\seealso{Grass, 51--65 {\it ff}}\endadd
Separating index into alphabetical sections
The command \ltr{Letter } makes it easy to format the index into separate alphabetical areas. Beforethe first entry for each new letter, use\addtoindex, \ltr{Letter}, \endadd.For instance, before the B’s:
\addtoindex\ltr{B}\endadd
Compare the code in the example at the end of this section with the resulting index to see this macro at work.
Other editing changes in the .srt file
You can also edit the .srt file in other ways, if you’d like. You can add or delete entries, or change the pagenumber to appear underlined or bold by adding \global\spcount =1 or \global\spcount =2 withinthe curly brackets that surround the page number.
Formatting the Index
Once you have made any desired changes to your .srt file you can format the index in the originating fileby writing this command where you want the index to appear:
\printindex
Changing the Format of the Index
Automatic Capitalization of the First Letter
Your index will be formatted automatically with the first letter of each first level index term being capitalized.The second and third level index terms will not print in uppercase unless they were typed that way with the\inxx command. If for any reason you do not like this, you can read the instructions at the end of the macrofile where you see this:
%% CHANGE INDEX FORMAT HERE ====>
%% If you DO NOT want the first letter of each first level index%% entry to be capitalized, delete the % in front of the%% following line, and put % in front of the next line:
%\let\capthis\relax

50 Using the Wiley Macros
\def\capthis#1{\uppercase{#1}}%
\indexindent=8pt %% indentation for index subentries\indexwrap=24pt %% indentation when term is too wide for column,
%% continues on following lines indented this much.
These commands can be changed to meet your requirements.
Indexing Examples
Sample of text marked for indexing
Here is \inx{Edward Bear*}, coming downstairs, bump, bump,bump,on the back of his head, behind \inx{Christopher Robin}. It is,as far as he knows, the only way of \inx{coming downstairs}, butsometimes he feels\inxx{coming downstairs,bumping}\inxx{comingdownstairs,stop bumping} that there really is another way, ifonly he could stop bumping for a moment and think of it.\newpage
And then he feels that perhaps there isn’t. Anyhow, here he isat the bottom, and ready to be introduced to you\inxx{comingdownstairs,stop bumping,at the bottom}. \inx{Winnie-the-Pooh**}.
\subsection{One Day}One day when he was out walking, he came to an open place in themiddle of the forest, and in the middle of this place was alarge \inx{oak-tree}, and, from the top of the tree, there came aloud buzzing-noise.\inxx{oak-tree,large}\inxx{oak-tree,large,top}\inxx{buzzing}\inxx{buzzing-noise}
Winnie-the-Pooh sat down at the foot of the tree, put his headbetween his paws and began to think.\inxx{oak-tree,large,foot}\inxx{trees,oak}\inxx{trees,maple}\inxx{trees,pine}
Sample .inx file
When TEX is run on the preceding text an .inx file will be made. It will look like this:>˜Edward Bear |{001\global \spcount =1}Christopher Robin |{001}coming downstairs |{001}coming downstairs,bumping |{001}coming downstairs,stop bumping |{001}coming downstairs,stop bumping,at the bottom |{002}Winnie-the-Pooh |{002\global \spcount =2}oak-tree |{003}oak-tree,large |{003}oak-tree,large,top |{003}...

Monograph Book Style 51
Sample .srt file
The .inx file must be sorted to produce a .srt file. That file will look like the following example. Notice theleading zeros which are needed for the sorting algorithm to work correctly.
>buzzing |{003}buzzing-noise |{003}coming downstairs |{001}coming downstairs,bumping |{001}coming downstairs,stop bumping |{001}coming downstairs,stop bumping,at the bottom |{002}Christopher Robin |{001}Edward Bear |{001\global\spcount =1}oak-tree |{003}oak-tree,large |{003}oak-tree,large,foot |{004}oak-tree,large,top |{003}...˜
Sample formatted index
The command \printindex will cause the .srt file to be input into the original file. Notice ‘trees’ whichwas never a first level entry, but is used as the first part of several second level entries, and so is formatted asan entry without a page number. The index will be formatted and look like this:buzzing, 3buzzing-noise, 3coming downstairs, 1
bumping, 1stop bumping, 1
at the bottom, 2Christopher Robin, 1Edward Bear, 1oak-tree, 3
large, 3foot, 4top, 3
treesmaple, 4oak, 4pine, 4
Winnie-the-Pooh, 2

52 Using the Wiley Macros
Making changes or additions to the .srt file
Here is the same .srt file with some comments added with \addtoindex, and Winnie-the-Pooh changed toboldface:
>buzzing |{003}buzzing-noise |{003}\addtoindex\seealso{oak-tree}\endaddcoming downstairs |{001}coming downstairs,bumping |{001}coming downstairs,stop bumping |{001}coming downstairs,stop bumping,at the bottom |{002}Christopher Robin |{001}\addtoindexChristopher Robin’s relationship to animals, 1--99 {\it ff}\endaddEdward Bear |{001\global\spcount =1}oak-tree |{003}oak-tree,large |{003}oak-tree,large,foot |{004}oak-tree,large,top |{003}trees,maple |{004}trees,oak |{004}trees,pine |{004}\indexbf{Winnie-the-Pooh} |{002\global\spcount =2}˜
Which will produce the index on the following page:

Monograph Book Style 53
buzzing, 3buzzing-noise, 3
See also oak-treecoming downstairs, 1
bumping, 1stop bumping, 1
at the bottom, 2Christopher Robin, 1Christopher Robin’s relationship to ani-
mals, 1–99 ffEdward Bear, 1oak-tree, 3
large, 3foot, 4top, 3
treesmaple, 4oak, 4pine, 4
Winnie-the-Pooh, 2

54 Using the Wiley Macros
Here is an example of using \ltr to separate the entries by their first letter and the results:
>\addtoindex\ltr{B}\endaddbuzzing |{003}\addtoindex\seealso{Bees}\endaddbuzzing-noise |{003}\addtoindex\ltr{C}\endadd\indexit{Christopher Robin} |{001}coming downstairs |{001}coming downstairs,bumping |{001}coming downstairs,stop bumping |{001}coming downstairs,stop bumping,at the bottom |{002}\addtoindex\ltr{E}\endaddEdward Bear |{001\global\spcount =1}\addtoindex\ltr{O}\endaddoak-tree |{003}oak-tree,large |{003}oak-tree,large,foot |{004}oak-tree,large,top |{003}\addtoindex\ltr{W}\endaddWinnie-the-Pooh |{002\global\spcount =2}˜

Monograph Book Style 55
Which when formatted, will look like this:
B
buzzing, 3See also Bees
buzzing-noise, 3
C
Christopher Robin, 1coming downstairs, 1
bumping, 1stop bumping, 1
at the bottom, 2
E
Edward Bear, 1
O
oak-tree, 3large, 3
foot, 4top, 3
W
Winnie-the-Pooh, 2

56 Using the Wiley Macros
Author IndexYou can make an author index in a way very similar to that of making the subject index.
There are four steps needed to make an author index:
Type \anx{Author Name} or \anxx{Author Name} in your document. If you want the author name toalso appear in the text as well as in the author index use \anx{}; if you want the term to only appear inthe index, type \anxx{}.Run LaTeX on the file. This will produce a filename.aut file.Do sort filename.aut > filename.att so that you now have a filename.att. IMPORTANT: Editthe .srt file to make sure ˜ is at the End of the file.Type \printauthorindex where you want the author index to print.
If you want to do multiple levels of author index, you can get them by typing \anxx{Author One,topic}which will produce something like
Author One 21topic 22
The information on using index commands found in the previous sections will work in a similar way for theauthor index.
Topic Index and Author Index
If you use an author index, the title produced with the \printindex command will be ‘Topic Index’ todistinguish it from the author index.

Monograph Book Style 57
Index to Documentation
algorithm environment, 26note in, 26
AppendixTitle, 40
author index, 56BibTeX, 34
chapter references, 34cite, 37end of book, 37nocite, 37
bookend matter for your book, 32
List of Commandscommands
(These commands are used with \begin{}...\end{}), 1
\addtoindex, 48\appendix{}, 41\arraycolsep, 25\arraystretch, 14\author{}, 15\booktitle{}, 15\caption{}, 8\chapappendix{}, 39\chapbblfile{}, 34\chapbblname{}, 34\chapbibliography{}, 34\draft, 14\editionstatement{}, 15\endadd, 48\exer, 29\hline, 22\inx{}, 43\inxx{}, 43\lowercase, 15\ltr{}, 48\prob, 27\prologue{}{}, 16\protect, 8\savehline, 22\seealso{}, 48\sidebyside{}{}, 19\subexer, 29\subprob, 27\subtitle{}, 15\term{}, 42
Begin/End Commands, (These commands are used with\begin{} ...\end{})
algorithm, 26chapreferences, 32exercises, 29glossary, 42namedchapreferences, 33namedreferences, 36problems, 27tablenotes, 23tabular*, 23tabular, 23
computingthe purpose, 13
current version of macro set, 1Draft Version, 14End matter, 32exercise sets, 29\exer, 29\sidebysideexer, 29\sidebysidesubexer, 29\subexer, 29
figure and table captions, 19side by side captions, 19
cross-referencing in, 20files in Monograph Book macro set, 2
optional, 11fonts
Computer Modern, 12PostScript, 12
m-times.sty, 12w-bookps.sty, 12
graphics filesincludinggraphics.zip, 13graphicx.sty, 13
indexing commands, 43author index, 56
changing the index format, 49complete description, 43example indices, 50quick overview, 8
Indexing\addtoindex, 48\endadd, 48\ltr{}, 48\seealso{}, 48

58 Using the Wiley Macros
listing environments, 17listing
bulleted list, 17enumerate, 18
MathTime font file, 12–13m-times.sty, 12–13
Optional square brackets, 16\chapter, 16\part, 16\section, 16\title, 16double backslash in, 15–16
PostScript font file, 12–13modifying, 12w-book.sty, 13w-bookps.sty, 12
problem sets, 27\prob, 27\sidebysideprob, 27\sidebysidesubprob, 27\subprob, 27
section head numberingchanging level of numbered heads, 14
section heads, 14
breaking section head into two lines in table ofcontents., 15
containing a macro, 16lowercase letters in, 15second line in, 15
sidebyside\label, 20
Table of Contentschanging level of section heads, 14
tableswith vertical lines, 24without vertical lines, 22
extra column in preamble, 24extra vertical space in table lines, 25savehline, 24
technical support, 1download files, 1
ftp site, 1WWW site, 1
Wiley Monograph Book LaTeX Packagesample file, 10template file, 10
Enjoy!