introduction - ecommerce software, online store builder, website
TRANSCRIPT

Contents
Contents
2 Specifications
3 Product Features
4 Introduction
5 Setting up Setting Up the Transmitter Locating the Transmitter Charging the Speaker Battery
8 Operating the System
Using the Speakers Using the Remote Control Replacing the Remote Control Battery Installing the RF Amplifier Accessory
12 Wall-Mounting Set Up
13 Troubleshooting
15 FCC Information
16 Warning
18 Warranty
Product Features
Product Features
The Rechargeable Indoor/Outdoor Speaker System
Speaker
Transmitter
Specifications
Carrier Frequency................Number of Channels...........
Power Source.......................Dimensions..........................Weight.................................
Voltage................................Capacity..............................Duration Time......................Charging Time.....................
Specifications
General
Built-In Sealed Lead Acid Rechargeable Battery (Speaker)
--
---
Power Source.......................Dimensions..........................Weight.................................Audio Input..........................Frequency............................
-----
----
User's Manual
www.lorest.com
Set Up
Set Up
Setting up the Transmitter
Connect the Transmitter Power Adapter to the Transmitter.
Plug in the Transmitter Power Adapter to an AC outlet and the LED power indicator located on top of the Transmitter will illuminate.
There are two options to connect the Transmitter to the audio source:
Option 1: If the audio source (MP3 player, stereo receiver, portable CD player, computer, etc.) has a headphone jack, then insert the Transmitter's built-in input cable into the audio source's headphone jack.
1
2
3
Introduction
Introduction
Before You Begin
Your Wireless Outdoor/Indoor Rechargeable Speaker System includes the following components:
(2) Wireless Speakers
Remote Control
(2) Wireless Speaker Power Adapters
Transmitter Power Adapter
RCA Y-Cable
Transmitter
(2) Wall-MountingBrackets
Wall-MountingHardware
(8) Screws
(8) Anchors
These wireless, battery-powered speakers have a water-and
UV-resistant exterior that allow you to listen to music by a
swimming pool or any location without the need for speaker
cables or outlets. The included transmitter connects to an
MP3 player, stereo system, television, or portable CD player
and broadcasts a wireless 2.4 GHz digital signal to the
speakers from up to 150 feet [46 meters] away. The wireless
signal operates on 3 channels, minimizing interference, and
penetrates walls, floors, and ceilings to deliver crisp sound to
the 15-watt speakers. The speakers have integrated 4"
subwoofers that reproduce deep bass frequencies and 1"
tweeters that disperse accurate high frequency sounds,
resulting in optimal tonal balance. The speakers have
over-molded rubber bases for ideal stability on any surface,
built in handles for ease of portability, and RCA cable for
connection to a television or stereo system. Each speaker is
powered by a rechargeable battery that operates for six hours
on a full charge, and only requires seven hours to recharge.
2.4 GHz Digital3
DC 15V Adapter (Included)
6.6" x 6.5" x 10.25"7.5 Lbs
12V4000 mAHApprox. 6-8 hours (on middle volume setting)
Approx.6-8 hours
DC 5V Adapter (Included)
4.3" x 4.3" x 1"0.3 LbsPhono Jacks/Stereo Mini Jack2.4 GHz
Built-in AudioInput Cable
Audio Source
Transmitter
RF AMPLIFIERCHANNEL
1 2 3
Transmitter Power Adapter
DC 5V300 mA
ME
NU
No
w P
laying
3:30-0:49
IN
Wireless Outdoor/Indoor Rechargeable Speaker System


Contents
Contents
2 Specifications
3 Product Features
4 Introduction
5 Setting up Setting Up the Transmitter Locating the Transmitter Charging the Speaker Battery
8 Operating the System
Using the Speakers Using the Remote Control Replacing the Remote Control Battery Installing the RF Amplifier Accessory
12 Wall-Mounting Set Up
13 Troubleshooting
15 FCC Information
16 Warning
18 Warranty
Product Features
Product Features
The Rechargeable Indoor/Outdoor Speaker System
Speaker
Transmitter
Specifications
Carrier Frequency................Number of Channels...........
Power Source.......................Dimensions..........................Weight.................................
Voltage................................Capacity..............................Duration Time......................Charging Time.....................
Specifications
General
Built-In Sealed Lead Acid Rechargeable Battery (Speaker)
--
---
Power Source.......................Dimensions..........................Weight.................................Audio Input..........................Frequency............................
-----
----
User's Manual
www.lorest.com
Set Up
Set Up
Setting up the Transmitter
Connect the Transmitter Power Adapter to the Transmitter.
Plug in the Transmitter Power Adapter to an AC outlet and the LED power indicator located on top of the Transmitter will illuminate.
There are two options to connect the Transmitter to the audio source:
Option 1: If the audio source (MP3 player, stereo receiver, portable CD player, computer, etc.) has a headphone jack, then insert the Transmitter's built-in input cable into the audio source's headphone jack.
1
2
3
Introduction
Introduction
Before You Begin
Your Wireless Outdoor/Indoor Rechargeable Speaker System includes the following components:
(2) Wireless Speakers
Remote Control
(2) Wireless Speaker Power Adapters
Transmitter Power Adapter
RCA Y-Cable
Transmitter
(2) Wall-MountingBrackets
Wall-MountingHardware
(8) Screws
(8) Anchors
These wireless, battery-powered speakers have a water-and
UV-resistant exterior that allow you to listen to music by a
swimming pool or any location without the need for speaker
cables or outlets. The included transmitter connects to an
MP3 player, stereo system, television, or portable CD player
and broadcasts a wireless 2.4 GHz digital signal to the
speakers from up to 150 feet [46 meters] away. The wireless
signal operates on 3 channels, minimizing interference, and
penetrates walls, floors, and ceilings to deliver crisp sound to
the 15-watt speakers. The speakers have integrated 4"
subwoofers that reproduce deep bass frequencies and 1"
tweeters that disperse accurate high frequency sounds,
resulting in optimal tonal balance. The speakers have
over-molded rubber bases for ideal stability on any surface,
built in handles for ease of portability, and RCA cable for
connection to a television or stereo system. Each speaker is
powered by a rechargeable battery that operates for six hours
on a full charge, and only requires seven hours to recharge.
2.4 GHz Digital3
DC 15V Adapter (Included)
6.6" x 6.5" x 10.25"7.5 Lbs
12V4000 mAHApprox. 6-8 hours (on middle volume setting)
Approx.6-8 hours
DC 5V Adapter (Included)
4.3" x 4.3" x 1"0.3 LbsPhono Jacks/Stereo Mini Jack2.4 GHz
Built-in AudioInput Cable
Audio Source
Transmitter
RF AMPLIFIERCHANNEL
1 2 3
Transmitter Power Adapter
DC 5V300 mA
ME
NU
No
w P
laying
3:30-0:49
IN
Wireless Outdoor/Indoor Rechargeable Speaker System

Contents
Contents
2 Specifications
3 Product Features
4 Introduction
5 Setting up Setting Up the Transmitter Locating the Transmitter Charging the Speaker Battery
8 Operating the System
Using the Speakers Using the Remote Control Replacing the Remote Control Battery Installing the RF Amplifier Accessory
12 Wall-Mounting Set Up
13 Troubleshooting
15 FCC Information
16 Warning
18 Warranty
Product Features
Product Features
The Rechargeable Indoor/Outdoor Speaker System
Speaker
Transmitter
Specifications
Carrier Frequency................Number of Channels...........
Power Source.......................Dimensions..........................Weight.................................
Voltage................................Capacity..............................Duration Time......................Charging Time.....................
Specifications
General
Built-In Sealed Lead Acid Rechargeable Battery (Speaker)
--
---
Power Source.......................Dimensions..........................Weight.................................Audio Input..........................Frequency............................
-----
----
User's Manual
www.lorest.com
Set Up
Set Up
Setting up the Transmitter
Connect the Transmitter Power Adapter to the Transmitter.
Plug in the Transmitter Power Adapter to an AC outlet and the LED power indicator located on top of the Transmitter will illuminate.
There are two options to connect the Transmitter to the audio source:
Option 1: If the audio source (MP3 player, stereo receiver, portable CD player, computer, etc.) has a headphone jack, then insert the Transmitter's built-in input cable into the audio source's headphone jack.
1
2
3
Introduction
Introduction
Before You Begin
Your Wireless Outdoor/Indoor Rechargeable Speaker System includes the following components:
(2) Wireless Speakers
Remote Control
(2) Wireless Speaker Power Adapters
Transmitter Power Adapter
RCA Y-Cable
Transmitter
(2) Wall-MountingBrackets
Wall-MountingHardware
(8) Screws
(8) Anchors
These wireless, battery-powered speakers have a water-and
UV-resistant exterior that allow you to listen to music by a
swimming pool or any location without the need for speaker
cables or outlets. The included transmitter connects to an
MP3 player, stereo system, television, or portable CD player
and broadcasts a wireless 2.4 GHz digital signal to the
speakers from up to 150 feet [46 meters] away. The wireless
signal operates on 3 channels, minimizing interference, and
penetrates walls, floors, and ceilings to deliver crisp sound to
the 15-watt speakers. The speakers have integrated 4"
subwoofers that reproduce deep bass frequencies and 1"
tweeters that disperse accurate high frequency sounds,
resulting in optimal tonal balance. The speakers have
over-molded rubber bases for ideal stability on any surface,
built in handles for ease of portability, and RCA cable for
connection to a television or stereo system. Each speaker is
powered by a rechargeable battery that operates for six hours
on a full charge, and only requires seven hours to recharge.
2.4 GHz Digital3
DC 15V Adapter (Included)
6.6" x 6.5" x 10.25"7.5 Lbs
12V4000 mAHApprox. 6-8 hours (on middle volume setting)
Approx.6-8 hours
DC 5V Adapter (Included)
4.3" x 4.3" x 1"0.3 LbsPhono Jacks/Stereo Mini Jack2.4 GHz
Built-in AudioInput Cable
Audio Source
Transmitter
RF AMPLIFIERCHANNEL
1 2 3
Transmitter Power Adapter
DC 5V300 mA
ME
NU
No
w P
laying
3:30-0:49
IN
Wireless Outdoor/Indoor Rechargeable Speaker System
Contents
Contents
2 Specifications
3 Product Features
4 Introduction
5 Setting up Setting Up the Transmitter Locating the Transmitter Charging the Speaker Battery
8 Operating the System
Using the Speakers Using the Remote Control Replacing the Remote Control Battery Installing the RF Amplifier Accessory
12 Wall-Mounting Set Up
13 Troubleshooting
15 FCC Information
16 Warning
18 Warranty
Product Features
Product Features
The Rechargeable Indoor/Outdoor Speaker System
Speaker
Transmitter
Specifications
Carrier Frequency................Number of Channels...........
Power Source.......................Dimensions..........................Weight.................................
Voltage................................Capacity..............................Duration Time......................Charging Time.....................
Specifications
General
Built-In Sealed Lead Acid Rechargeable Battery (Speaker)
--
---
Power Source.......................Dimensions..........................Weight.................................Audio Input..........................Frequency............................
-----
----
User's Manual
www.lorest.com
Set Up
Set Up
Setting up the Transmitter
Connect the Transmitter Power Adapter to the Transmitter.
Plug in the Transmitter Power Adapter to an AC outlet and the LED power indicator located on top of the Transmitter will illuminate.
There are two options to connect the Transmitter to the audio source:
Option 1: If the audio source (MP3 player, stereo receiver, portable CD player, computer, etc.) has a headphone jack, then insert the Transmitter's built-in input cable into the audio source's headphone jack.
1
2
3
Introduction
Introduction
Before You Begin
Your Wireless Outdoor/Indoor Rechargeable Speaker System includes the following components:
(2) Wireless Speakers
Remote Control
(2) Wireless Speaker Power Adapters
Transmitter Power Adapter
RCA Y-Cable
Transmitter
(2) Wall-MountingBrackets
Wall-MountingHardware
(8) Screws
(8) Anchors
These wireless, battery-powered speakers have a water-and
UV-resistant exterior that allow you to listen to music by a
swimming pool or any location without the need for speaker
cables or outlets. The included transmitter connects to an
MP3 player, stereo system, television, or portable CD player
and broadcasts a wireless 2.4 GHz digital signal to the
speakers from up to 150 feet [46 meters] away. The wireless
signal operates on 3 channels, minimizing interference, and
penetrates walls, floors, and ceilings to deliver crisp sound to
the 15-watt speakers. The speakers have integrated 4"
subwoofers that reproduce deep bass frequencies and 1"
tweeters that disperse accurate high frequency sounds,
resulting in optimal tonal balance. The speakers have
over-molded rubber bases for ideal stability on any surface,
built in handles for ease of portability, and RCA cable for
connection to a television or stereo system. Each speaker is
powered by a rechargeable battery that operates for six hours
on a full charge, and only requires seven hours to recharge.
2.4 GHz Digital3
DC 15V Adapter (Included)
6.6" x 6.5" x 10.25"7.5 Lbs
12V4000 mAHApprox. 6-8 hours (on middle volume setting)
Approx.6-8 hours
DC 5V Adapter (Included)
4.3" x 4.3" x 1"0.3 LbsPhono Jacks/Stereo Mini Jack2.4 GHz
Built-in AudioInput Cable
Audio Source
Transmitter
RF AMPLIFIERCHANNEL
1 2 3
Transmitter Power Adapter
DC 5V300 mA
ME
NU
No
w P
laying
3:30-0:49
IN
Wireless Outdoor/Indoor Rechargeable Speaker System

Contents
Contents
2 Specifications
3 Product Features
4 Introduction
5 Setting up Setting Up the Transmitter Locating the Transmitter Charging the Speaker Battery
8 Operating the System
Using the Speakers Using the Remote Control Replacing the Remote Control Battery Installing the RF Amplifier Accessory
12 Wall-Mounting Set Up
13 Troubleshooting
15 FCC Information
16 Warning
18 Warranty
Product Features
Product Features
The Rechargeable Indoor/Outdoor Speaker System
Speaker
Transmitter
Specifications
Carrier Frequency................Number of Channels...........
Power Source.......................Dimensions..........................Weight.................................
Voltage................................Capacity..............................Duration Time......................Charging Time.....................
Specifications
General
Built-In Sealed Lead Acid Rechargeable Battery (Speaker)
--
---
Power Source.......................Dimensions..........................Weight.................................Audio Input..........................Frequency............................
-----
----
User's Manual
www.lorest.com
Set Up
Set Up
Setting up the Transmitter
Connect the Transmitter Power Adapter to the Transmitter.
Plug in the Transmitter Power Adapter to an AC outlet and the LED power indicator located on top of the Transmitter will illuminate.
There are two options to connect the Transmitter to the audio source:
Option 1: If the audio source (MP3 player, stereo receiver, portable CD player, computer, etc.) has a headphone jack, then insert the Transmitter's built-in input cable into the audio source's headphone jack.
1
2
3
Introduction
Introduction
Before You Begin
Your Wireless Outdoor/Indoor Rechargeable Speaker System includes the following components:
(2) Wireless Speakers
Remote Control
(2) Wireless Speaker Power Adapters
Transmitter Power Adapter
RCA Y-Cable
Transmitter
(2) Wall-MountingBrackets
Wall-MountingHardware
(8) Screws
(8) Anchors
These wireless, battery-powered speakers have a water-and
UV-resistant exterior that allow you to listen to music by a
swimming pool or any location without the need for speaker
cables or outlets. The included transmitter connects to an
MP3 player, stereo system, television, or portable CD player
and broadcasts a wireless 2.4 GHz digital signal to the
speakers from up to 150 feet [46 meters] away. The wireless
signal operates on 3 channels, minimizing interference, and
penetrates walls, floors, and ceilings to deliver crisp sound to
the 15-watt speakers. The speakers have integrated 4"
subwoofers that reproduce deep bass frequencies and 1"
tweeters that disperse accurate high frequency sounds,
resulting in optimal tonal balance. The speakers have
over-molded rubber bases for ideal stability on any surface,
built in handles for ease of portability, and RCA cable for
connection to a television or stereo system. Each speaker is
powered by a rechargeable battery that operates for six hours
on a full charge, and only requires seven hours to recharge.
2.4 GHz Digital3
DC 15V Adapter (Included)
6.6" x 6.5" x 10.25"7.5 Lbs
12V4000 mAHApprox. 6-8 hours (on middle volume setting)
Approx.6-8 hours
DC 5V Adapter (Included)
4.3" x 4.3" x 1"0.3 LbsPhono Jacks/Stereo Mini Jack2.4 GHz
Built-in AudioInput Cable
Audio Source
Transmitter
RF AMPLIFIERCHANNEL
1 2 3
Transmitter Power Adapter
DC 5V300 mA
ME
NU
No
w P
laying
3:30-0:49
IN
Wireless Outdoor/Indoor Rechargeable Speaker System
Contents
Contents
2 Specifications
3 Product Features
4 Introduction
5 Setting up Setting Up the Transmitter Locating the Transmitter Charging the Speaker Battery
8 Operating the System
Using the Speakers Using the Remote Control Replacing the Remote Control Battery Installing the RF Amplifier Accessory
12 Wall-Mounting Set Up
13 Troubleshooting
15 FCC Information
16 Warning
18 Warranty
Product Features
Product Features
The Rechargeable Indoor/Outdoor Speaker System
Speaker
Transmitter
Specifications
Carrier Frequency................Number of Channels...........
Power Source.......................Dimensions..........................Weight.................................
Voltage................................Capacity..............................Duration Time......................Charging Time.....................
Specifications
General
Built-In Sealed Lead Acid Rechargeable Battery (Speaker)
--
---
Power Source.......................Dimensions..........................Weight.................................Audio Input..........................Frequency............................
-----
----
User's Manual
www.lorest.com
Set Up
Set Up
Setting up the Transmitter
Connect the Transmitter Power Adapter to the Transmitter.
Plug in the Transmitter Power Adapter to an AC outlet and the LED power indicator located on top of the Transmitter will illuminate.
There are two options to connect the Transmitter to the audio source:
Option 1: If the audio source (MP3 player, stereo receiver, portable CD player, computer, etc.) has a headphone jack, then insert the Transmitter's built-in input cable into the audio source's headphone jack.
1
2
3
Introduction
Introduction
Before You Begin
Your Wireless Outdoor/Indoor Rechargeable Speaker System includes the following components:
(2) Wireless Speakers
Remote Control
(2) Wireless Speaker Power Adapters
Transmitter Power Adapter
RCA Y-Cable
Transmitter
(2) Wall-MountingBrackets
Wall-MountingHardware
(8) Screws
(8) Anchors
These wireless, battery-powered speakers have a water-and
UV-resistant exterior that allow you to listen to music by a
swimming pool or any location without the need for speaker
cables or outlets. The included transmitter connects to an
MP3 player, stereo system, television, or portable CD player
and broadcasts a wireless 2.4 GHz digital signal to the
speakers from up to 150 feet [46 meters] away. The wireless
signal operates on 3 channels, minimizing interference, and
penetrates walls, floors, and ceilings to deliver crisp sound to
the 15-watt speakers. The speakers have integrated 4"
subwoofers that reproduce deep bass frequencies and 1"
tweeters that disperse accurate high frequency sounds,
resulting in optimal tonal balance. The speakers have
over-molded rubber bases for ideal stability on any surface,
built in handles for ease of portability, and RCA cable for
connection to a television or stereo system. Each speaker is
powered by a rechargeable battery that operates for six hours
on a full charge, and only requires seven hours to recharge.
2.4 GHz Digital3
DC 15V Adapter (Included)
6.6" x 6.5" x 10.25"7.5 Lbs
12V4000 mAHApprox. 6-8 hours (on middle volume setting)
Approx.6-8 hours
DC 5V Adapter (Included)
4.3" x 4.3" x 1"0.3 LbsPhono Jacks/Stereo Mini Jack2.4 GHz
Built-in AudioInput Cable
Audio Source
Transmitter
RF AMPLIFIERCHANNEL
1 2 3
Transmitter Power Adapter
DC 5V300 mA
ME
NU
No
w P
laying
3:30-0:49
IN
Wireless Outdoor/Indoor Rechargeable Speaker System

Contents
Contents
2 Specifications
3 Product Features
4 Introduction
5 Setting up Setting Up the Transmitter Locating the Transmitter Charging the Speaker Battery
8 Operating the System
Using the Speakers Using the Remote Control Replacing the Remote Control Battery Installing the RF Amplifier Accessory
12 Wall-Mounting Set Up
13 Troubleshooting
15 FCC Information
16 Warning
18 Warranty
Product Features
Product Features
The Rechargeable Indoor/Outdoor Speaker System
Speaker
Transmitter
Specifications
Carrier Frequency................Number of Channels...........
Power Source.......................Dimensions..........................Weight.................................
Voltage................................Capacity..............................Duration Time......................Charging Time.....................
Specifications
General
Built-In Sealed Lead Acid Rechargeable Battery (Speaker)
--
---
Power Source.......................Dimensions..........................Weight.................................Audio Input..........................Frequency............................
-----
----
User's Manual
www.lorest.com
Set Up
Set Up
Setting up the Transmitter
Connect the Transmitter Power Adapter to the Transmitter.
Plug in the Transmitter Power Adapter to an AC outlet and the LED power indicator located on top of the Transmitter will illuminate.
There are two options to connect the Transmitter to the audio source:
Option 1: If the audio source (MP3 player, stereo receiver, portable CD player, computer, etc.) has a headphone jack, then insert the Transmitter's built-in input cable into the audio source's headphone jack.
1
2
3
Introduction
Introduction
Before You Begin
Your Wireless Outdoor/Indoor Rechargeable Speaker System includes the following components:
(2) Wireless Speakers
Remote Control
(2) Wireless Speaker Power Adapters
Transmitter Power Adapter
RCA Y-Cable
Transmitter
(2) Wall-MountingBrackets
Wall-MountingHardware
(8) Screws
(8) Anchors
These wireless, battery-powered speakers have a water-and
UV-resistant exterior that allow you to listen to music by a
swimming pool or any location without the need for speaker
cables or outlets. The included transmitter connects to an
MP3 player, stereo system, television, or portable CD player
and broadcasts a wireless 2.4 GHz digital signal to the
speakers from up to 150 feet [46 meters] away. The wireless
signal operates on 3 channels, minimizing interference, and
penetrates walls, floors, and ceilings to deliver crisp sound to
the 15-watt speakers. The speakers have integrated 4"
subwoofers that reproduce deep bass frequencies and 1"
tweeters that disperse accurate high frequency sounds,
resulting in optimal tonal balance. The speakers have
over-molded rubber bases for ideal stability on any surface,
built in handles for ease of portability, and RCA cable for
connection to a television or stereo system. Each speaker is
powered by a rechargeable battery that operates for six hours
on a full charge, and only requires seven hours to recharge.
2.4 GHz Digital3
DC 15V Adapter (Included)
6.6" x 6.5" x 10.25"7.5 Lbs
12V4000 mAHApprox. 6-8 hours (on middle volume setting)
Approx.6-8 hours
DC 5V Adapter (Included)
4.3" x 4.3" x 1"0.3 LbsPhono Jacks/Stereo Mini Jack2.4 GHz
Built-in AudioInput Cable
Audio Source
Transmitter
RF AMPLIFIERCHANNEL
1 2 3
Transmitter Power Adapter
DC 5V300 mA
ME
NU
No
w P
laying
3:30-0:49
IN
Wireless Outdoor/Indoor Rechargeable Speaker System
Contents
Contents
2 Specifications
3 Product Features
4 Introduction
5 Setting up Setting Up the Transmitter Locating the Transmitter Charging the Speaker Battery
8 Operating the System
Using the Speakers Using the Remote Control Replacing the Remote Control Battery Installing the RF Amplifier Accessory
12 Wall-Mounting Set Up
13 Troubleshooting
15 FCC Information
16 Warning
18 Warranty
Product Features
Product Features
The Rechargeable Indoor/Outdoor Speaker System
Speaker
Transmitter
Specifications
Carrier Frequency................Number of Channels...........
Power Source.......................Dimensions..........................Weight.................................
Voltage................................Capacity..............................Duration Time......................Charging Time.....................
Specifications
General
Built-In Sealed Lead Acid Rechargeable Battery (Speaker)
--
---
Power Source.......................Dimensions..........................Weight.................................Audio Input..........................Frequency............................
-----
----
User's Manual
www.lorest.com
Set Up
Set Up
Setting up the Transmitter
Connect the Transmitter Power Adapter to the Transmitter.
Plug in the Transmitter Power Adapter to an AC outlet and the LED power indicator located on top of the Transmitter will illuminate.
There are two options to connect the Transmitter to the audio source:
Option 1: If the audio source (MP3 player, stereo receiver, portable CD player, computer, etc.) has a headphone jack, then insert the Transmitter's built-in input cable into the audio source's headphone jack.
1
2
3
Introduction
Introduction
Before You Begin
Your Wireless Outdoor/Indoor Rechargeable Speaker System includes the following components:
(2) Wireless Speakers
Remote Control
(2) Wireless Speaker Power Adapters
Transmitter Power Adapter
RCA Y-Cable
Transmitter
(2) Wall-MountingBrackets
Wall-MountingHardware
(8) Screws
(8) Anchors
These wireless, battery-powered speakers have a water-and
UV-resistant exterior that allow you to listen to music by a
swimming pool or any location without the need for speaker
cables or outlets. The included transmitter connects to an
MP3 player, stereo system, television, or portable CD player
and broadcasts a wireless 2.4 GHz digital signal to the
speakers from up to 150 feet [46 meters] away. The wireless
signal operates on 3 channels, minimizing interference, and
penetrates walls, floors, and ceilings to deliver crisp sound to
the 15-watt speakers. The speakers have integrated 4"
subwoofers that reproduce deep bass frequencies and 1"
tweeters that disperse accurate high frequency sounds,
resulting in optimal tonal balance. The speakers have
over-molded rubber bases for ideal stability on any surface,
built in handles for ease of portability, and RCA cable for
connection to a television or stereo system. Each speaker is
powered by a rechargeable battery that operates for six hours
on a full charge, and only requires seven hours to recharge.
2.4 GHz Digital3
DC 15V Adapter (Included)
6.6" x 6.5" x 10.25"7.5 Lbs
12V4000 mAHApprox. 6-8 hours (on middle volume setting)
Approx.6-8 hours
DC 5V Adapter (Included)
4.3" x 4.3" x 1"0.3 LbsPhono Jacks/Stereo Mini Jack2.4 GHz
Built-in AudioInput Cable
Audio Source
Transmitter
RF AMPLIFIERCHANNEL
1 2 3
Transmitter Power Adapter
DC 5V300 mA
ME
NU
No
w P
laying
3:30-0:49
IN
Wireless Outdoor/Indoor Rechargeable Speaker System

RF AMPLIFIERCHANNEL
1 2 3IN
Set Up
Setting up the Transmitter
Locating the Transmitter
Option 2: If the audio source (television, stereo receiver, etc.) has RCA-type audio outputs, then insert the Transmitter's built-in input cable into the single jack on the "Y" Cable.
Next, connect the dual RCA plugs on the other end of the "Y" Cable into the audio source's left and right audio output jacks.
The Transmitter broadcasts up to 150 feet [46 meters]. During the initial set-up, placement of the Transmitter should be carefully considered. The elevation of the Transmitter, as well as the presence of reflecting walls, will influence the range. The antennas used for this transmitter must not be co-located, or operated in conjunction with, any other antenna or transmitter.
-
Connect the Speaker Power Adapter into the Speaker's AC adapter jack. The RED light indicates that the Speaker is charging.
When the GREEN light is illuminated, the battery is fully charged. Note: The Speaker can be operated as it charges.
A battery will take approximately 6-8 hours to fully charge from empty, and the Speakers will operate for approximately 6 hours on a full charge.
Set Up
Charging the Speaker Battery
1
-
-
SpeakerPower Adapter
DC 15V2A
Using the Speakers
Plug in the Transmitter into an AC outlet.
Connect an audio source into the Transmitter (MP3 player, portable CD player, stereo, etc.) and rotate the Transmitter's antenna so that it is upright.
Turn on the audio source.
On the Transmitter, select the frequency channel by positioning the CHANNEL switch to 1, 2 or 3.
Turn on the Wireless Speakers by pressing the POWER button located on the Speaker's control panel. The SIGNAL indicator will illuminate. You may chose to operate the Speaker on battery power or from an AC outlet (See page 7).
Select the frequency channel on the Speaker by pressing the CH button to match the selected channel on the Transmitter.
The Green light indicates that the chosen frequency is clear. If the Red light is illuminated, it means the channel is not available. Please select another channel on the Transmitter and the Speaker.
1
2
3
4
5
6
-
System Operation
System Operation
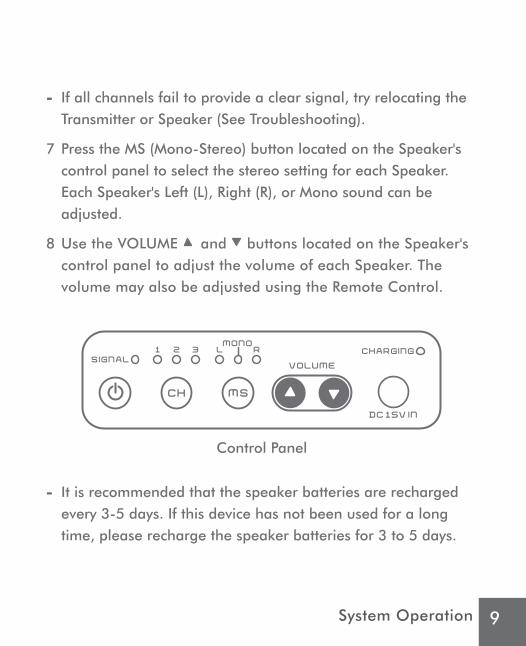
If all channels fail to provide a clear signal, try relocating the Transmitter or Speaker (See Troubleshooting).
Press the MS (Mono-Stereo) button located on the Speaker's control panel to select the stereo setting for each Speaker. Each Speaker's Left (L), Right (R), or Mono sound can be adjusted.
Use the VOLUME and buttons located on the Speaker's control panel to adjust the volume of each Speaker. The volume may also be adjusted using the Remote Control.
It is recommended that the speaker batteries are recharged every 3-5 days. If this device has not been used for a long time, please recharge the speaker batteries for 3 to 5 days.
-
7
8
-
System Operation
Control Panel
Using the Remote Control
The Remote Control controls the Volume, Mute, Bass and Treble settings on the Wireless Speakers.
Flashlight: Press the LIGHT button to use the built-in LED flashlight.
Mute: Press the MUTE button to mute both speaker volumes. Press the VOLUME and button to return to the previous listening volume.
Volume: Press Volume and buttons to control the volume of the Wireless Speakers.
Bass: Press the BASS and buttons to adjust the bass level Treble: Press the TREBLE and buttons to adjust the treble
Preset: Press the PRESET button to reset to default Bass and Treble settings.
Battery: If the remote will be stored for a long period of time, please remove the battery.
System Operation
Use a Phillips-head screwdriver to remove the battery door located on the back of the Remote Control.
Insert one CR 2032 (3V) lithium battery according to the correct polarity.
Screw the battery door back in place.
Replacing the Remote Control Battery
1
2
3
1
2
3
System Operation
Remote Control
If you are experiencing difficulties with the operating range of the wireless speaker system, or if you are experiencing a high amount of interference, you may consider the use of the RF Amplifier Accessory for the Wireless Speaker System.
The RF Amplifier boosts the range of the Wireless Speaker System's transmission. The addition of a RF Amplifier can extend the transmission range of the wireless speakers to 500 feet [150 meters].* This RF Amplifier is a accessory product to the speaker system and is sold separately. The RF Amplifier is available from Hammacher Schlemmer.
Please reference page 4 of this user's guide to ensure that you have properly located the system's transmitter and speaker before you purchase the RF Amplifier.
RF Amplifier Accessory (sold separately)
Using the RF Amplifier
The RF Amplifier accessory installs easily into the Wireless Speaker System's transmitter.
Simply insert the RF Amplifier into the slot on the system's transmitter labeled RF AMPLIFIER as indicated below.
You will feel a slight snap when the amplifier is inserted completely and the LED on the RF Amplifier should illuminate. The transmission range with the transmitter will be increased up to 500 feet [150 meters] once the RF Amplifier is inserted.
Installing the RF Amplifier
System Operation System Operation
*Maximum range; results achieved may vary by environment. The RF amplifier is sold as an accessory for the Wireless Speaker and is authorized under the FCC ID VXA SMHS256-002. The RF Amplifier accessory may not be used with any other wireless speaker or other wireless transmission system.
Transmitter
RF Amplifier
IN
Audio Source
"Y" Cable
IN
OUT
L R
Built-in AudioInput Cable
Transmitter

RF AMPLIFIERCHANNEL
1 2 3IN
Set Up
Setting up the Transmitter
Locating the Transmitter
Option 2: If the audio source (television, stereo receiver, etc.) has RCA-type audio outputs, then insert the Transmitter's built-in input cable into the single jack on the "Y" Cable.
Next, connect the dual RCA plugs on the other end of the "Y" Cable into the audio source's left and right audio output jacks.
The Transmitter broadcasts up to 150 feet [46 meters]. During the initial set-up, placement of the Transmitter should be carefully considered. The elevation of the Transmitter, as well as the presence of reflecting walls, will influence the range. The antennas used for this transmitter must not be co-located, or operated in conjunction with, any other antenna or transmitter.
-
Connect the Speaker Power Adapter into the Speaker's AC adapter jack. The RED light indicates that the Speaker is charging.
When the GREEN light is illuminated, the battery is fully charged. Note: The Speaker can be operated as it charges.
A battery will take approximately 6-8 hours to fully charge from empty, and the Speakers will operate for approximately 6 hours on a full charge.
Set Up
Charging the Speaker Battery
1
-
-
SpeakerPower Adapter
DC 15V2A
Using the Speakers
Plug in the Transmitter into an AC outlet.
Connect an audio source into the Transmitter (MP3 player, portable CD player, stereo, etc.) and rotate the Transmitter's antenna so that it is upright.
Turn on the audio source.
On the Transmitter, select the frequency channel by positioning the CHANNEL switch to 1, 2 or 3.
Turn on the Wireless Speakers by pressing the POWER button located on the Speaker's control panel. The SIGNAL indicator will illuminate. You may chose to operate the Speaker on battery power or from an AC outlet (See page 7).
Select the frequency channel on the Speaker by pressing the CH button to match the selected channel on the Transmitter.
The Green light indicates that the chosen frequency is clear. If the Red light is illuminated, it means the channel is not available. Please select another channel on the Transmitter and the Speaker.
1
2
3
4
5
6
-
System Operation
System Operation
If all channels fail to provide a clear signal, try relocating the Transmitter or Speaker (See Troubleshooting).
Press the MS (Mono-Stereo) button located on the Speaker's control panel to select the stereo setting for each Speaker. Each Speaker's Left (L), Right (R), or Mono sound can be adjusted.
Use the VOLUME and buttons located on the Speaker's control panel to adjust the volume of each Speaker. The volume may also be adjusted using the Remote Control.
It is recommended that the speaker batteries are recharged every 3-5 days. If this device has not been used for a long time, please recharge the speaker batteries for 3 to 5 days.
-
7
8
-
System Operation
Control Panel
Using the Remote Control
The Remote Control controls the Volume, Mute, Bass and Treble settings on the Wireless Speakers.
Flashlight: Press the LIGHT button to use the built-in LED flashlight.
Mute: Press the MUTE button to mute both speaker volumes. Press the VOLUME and button to return to the previous listening volume.
Volume: Press Volume and buttons to control the volume of the Wireless Speakers.
Bass: Press the BASS and buttons to adjust the bass level Treble: Press the TREBLE and buttons to adjust the treble
Preset: Press the PRESET button to reset to default Bass and Treble settings.
Battery: If the remote will be stored for a long period of time, please remove the battery.
System Operation
Use a Phillips-head screwdriver to remove the battery door located on the back of the Remote Control.
Insert one CR 2032 (3V) lithium battery according to the correct polarity.
Screw the battery door back in place.
Replacing the Remote Control Battery
1
2
3
1
2
3
System Operation
Remote Control
If you are experiencing difficulties with the operating range of the wireless speaker system, or if you are experiencing a high amount of interference, you may consider the use of the RF Amplifier Accessory for the Wireless Speaker System.
The RF Amplifier boosts the range of the Wireless Speaker System's transmission. The addition of a RF Amplifier can extend the transmission range of the wireless speakers to 500 feet [150 meters].* This RF Amplifier is a accessory product to the speaker system and is sold separately. The RF Amplifier is available from Hammacher Schlemmer.
Please reference page 4 of this user's guide to ensure that you have properly located the system's transmitter and speaker before you purchase the RF Amplifier.
RF Amplifier Accessory (sold separately)
Using the RF Amplifier
The RF Amplifier accessory installs easily into the Wireless Speaker System's transmitter.
Simply insert the RF Amplifier into the slot on the system's transmitter labeled RF AMPLIFIER as indicated below.
You will feel a slight snap when the amplifier is inserted completely and the LED on the RF Amplifier should illuminate. The transmission range with the transmitter will be increased up to 500 feet [150 meters] once the RF Amplifier is inserted.
Installing the RF Amplifier
System Operation System Operation
*Maximum range; results achieved may vary by environment. The RF amplifier is sold as an accessory for the Wireless Speaker and is authorized under the FCC ID VXA SMHS256-002. The RF Amplifier accessory may not be used with any other wireless speaker or other wireless transmission system.
Transmitter
RF Amplifier
IN
Audio Source
"Y" Cable
IN
OUT
L R
Built-in AudioInput Cable
Transmitter

It is recommended that the Wireless Speakers not be used in a temperature lower than 32° F (0° C). If you are using the speakers in temperatures lower than this and experiencing a short battery life, it is not a malfunction. Return the Speakers to a warmer environment and the battery's life will increase.
The battery life may be reduced over time. If the battery life becomes half of its normal time after it is fully charged, attempt to fully discharge the battery by powering the speaker on battery power until it is no longer able to be powered on. The recharge the battery as described on page 7. If a short battery life continues, consult the retailer.
The battery life may end. If the battery life becomes half of its normal time after it is fully charged, consult the retailer.
Turn up the volume on the connected audio/video equipment.
Change the signal frequency on the Transmitter and Speaker.
Be certain that both the transmitter and speaker frequency are set to the same channel.
If the Speaker's SIGNAL indicator is weak, red, or has turned off, charge the Speaker's built-in rechargeable battery.
The Speakers may be located too far from the Transmitter. Move the Speakers closer to the Transmitter.
Short Battery Life
Loud Background Noise
-
-
-
-
-
-
-
-
Troubleshooting
This equipment has been tested and found to comply with the limits for a class B digital device, pursuant to part 15 of the FCC Rules. These limits are designed to provide reasonable protection against harmful interference in a residential installation. This equipment generates, uses, and can radiate radio frequency energy and, if not installed and used in accordance with the instructions, may cause harmful interference to radio communications. However, there is no guarantee that interference will not occur in a particular installation.
If this equipment does cause harmful interference to radio or television reception, which can be determined by turning the equipment off and on, the user is encouraged to try to correct the interference by one or more of the following measures:
- Reorient or relocate the receiving antenna.- Increase the distance between the equipment and receiver.- Connect the equipment to an outlet on a circuit different from which the receiver is connected.- Consult the dealer or an experienced radio/TV technician for help.
This equipment complies with part 15 of the FCC Rules. Operation is subject to the following two conditions:
1. This equipment may not cause harmful interference.2. This equipment must accept any interference received, including interference that may cause undesired operation.
FCC Information
FCC Warning - FCC ID: VXA SMHS256-002
Troubleshooting
Important Safety InstructionsRead and follow all instructions.
Keep these instructions for later reference.
Heed all warnings.
Wipe with a damp cloth. Do not use abrasive chemicals.
Do not block any ventilation openings. Install in accordance with the manufacturer's instructions.
Do not install near any heat sources such as radiators, heat registers, stoves, or other devices (including amplifiers) that produce heat.
Do not alter the polarized or ground-type plug. A polarized plug has two prongs, one wider that the other. A ground-type plug has two prongs and a grounding pin. If the provided plug does not fit into your outlet or the ground-pin is exposed, consult an electrician for replacement of the outlet.
Never walk on or pinch the cords, particularly at the plugs or where the cords connect to the device.
Only use attachments/accessories specified by the manufacturer.
Unplug the devices during lightning storms or when not being used for long periods of time.
Refer all servicing to qualified service personnel. Servicing is required when the devices have been damaged in any way.
1)
2)
3)
4)
5)
6)
7)
8)
9)
10)
11)
Warning
Warning
The lightning flash with an arrowhead
symbol within the equilateral triangle, is
intended to alert the user to the presence of
uninsulated "dangerous voltage" within the
product's enclosure that may be sufficient
magnitude to cause an electronic shock.
The exclamation point within the equilateral
triangle is intended to alert the user to the
presence of important operating and
maintenance (servicing) instructions in this
owner's manual.
WARNING: To reduce the risk of electronic
shock, do not remove cover (or back). No
user-serviceable parts inside. Refer
servicing to qualified service personnel.
WARNINGRISK OF ELECTRONIC SHOCK
DO NOT OPEN
WarningTo prevent fire or electrical shock, do not use the plug with an extension cord or outlet unless all of the plug prongs can be fully inserted into the extension cord or wall outlet. Do not expose the cords to rain or moisture.
Warning
FCC Information
The warranty period is for ONE year from the time of purchase, and only covers manufacturer defects. This warranty does NOT cover damage due to abuse, unauthorized repair, submerging in any liquid, and neglect. To obtain warranty service, you may return the defective product to the authorized Lorest retailer or distributor, with proof of purchase, and receive a replacement unit. Please check with the retailer or distributor for their return policies and procedures. This warranty may give you other legal rights, which vary from state to state.
Manufactured by:Lorest Holding LLCLawrence, KS 66044
www.lorest.com
Warranty
Limited Warranty
-
-
-
-
-
-
-
-
-
-
-
No Sound
No Sound or Sound is Distored
Check the connection of the audio/video equipment.
Check the transmitter to see whether it is plugged into the AC power.
Check the speaker to see whether it has power and turned on.
Confirm that the audio source (stereo, TV, etc.) is turned on.
Check that the Speaker volume is turned up; as well as the volume on the audio source.
Change the frequency channel on the Transmitter and Speaker. Confirm that both the Transmitter and the Speaker are set to the same frequency.
The Transmitter and the Speaker might be to far from each other. Try moving the Transmitter and Speaker closer together.
If the Speaker's SIGNAL indicator is weak, red, or has turned off, recharge the Speaker's battery (See page 7).
Check that the antenna is in the upright position.
Change the location of the Transmitter. Place it as high and free from obstructions as possible.
If the transmitter doesn’t respond when changing the channel, please unglug the adapter and then insert it again.
Troubleshooting
Troubleshooting
With a pencil, make four marks on the wall (or mounting surface) while using the bracket as a guide to determine where the screws will be inserted.
Using a 3/16" (5mm) drill bit, drill a hole through each pencil mark.
Insert the plastic wall anchors if necessary (recommended for drywalls).
Align the bracket with the four holes on the wall, and secure the bracket using a Phillips-head screwdriver and the included screws.
Hang the Speaker from the wall-mounting bracket using the Speaker's built-in handle.
Wall-Mounting the Speakers
Installing the Wall-Mounting Brackets
1
2
3
4
5
Wall-Mounting the Speakers
Wall-MountingBracket
12 Wall-Mounting the Speakers

It is recommended that the Wireless Speakers not be used in a temperature lower than 32° F (0° C). If you are using the speakers in temperatures lower than this and experiencing a short battery life, it is not a malfunction. Return the Speakers to a warmer environment and the battery's life will increase.
The battery life may be reduced over time. If the battery life becomes half of its normal time after it is fully charged, attempt to fully discharge the battery by powering the speaker on battery power until it is no longer able to be powered on. The recharge the battery as described on page 7. If a short battery life continues, consult the retailer.
The battery life may end. If the battery life becomes half of its normal time after it is fully charged, consult the retailer.
Turn up the volume on the connected audio/video equipment.
Change the signal frequency on the Transmitter and Speaker.
Be certain that both the transmitter and speaker frequency are set to the same channel.
If the Speaker's SIGNAL indicator is weak, red, or has turned off, charge the Speaker's built-in rechargeable battery.
The Speakers may be located too far from the Transmitter. Move the Speakers closer to the Transmitter.
Short Battery Life
Loud Background Noise
-
-
-
-
-
-
-
-
Troubleshooting
This equipment has been tested and found to comply with the limits for a class B digital device, pursuant to part 15 of the FCC Rules. These limits are designed to provide reasonable protection against harmful interference in a residential installation. This equipment generates, uses, and can radiate radio frequency energy and, if not installed and used in accordance with the instructions, may cause harmful interference to radio communications. However, there is no guarantee that interference will not occur in a particular installation.
If this equipment does cause harmful interference to radio or television reception, which can be determined by turning the equipment off and on, the user is encouraged to try to correct the interference by one or more of the following measures:
- Reorient or relocate the receiving antenna.- Increase the distance between the equipment and receiver.- Connect the equipment to an outlet on a circuit different from which the receiver is connected.- Consult the dealer or an experienced radio/TV technician for help.
This equipment complies with part 15 of the FCC Rules. Operation is subject to the following two conditions:
1. This equipment may not cause harmful interference.2. This equipment must accept any interference received, including interference that may cause undesired operation.
FCC Information
FCC Warning - FCC ID: VXA SMHS256-002
Troubleshooting
Important Safety InstructionsRead and follow all instructions.
Keep these instructions for later reference.
Heed all warnings.
Wipe with a damp cloth. Do not use abrasive chemicals.
Do not block any ventilation openings. Install in accordance with the manufacturer's instructions.
Do not install near any heat sources such as radiators, heat registers, stoves, or other devices (including amplifiers) that produce heat.
Do not alter the polarized or ground-type plug. A polarized plug has two prongs, one wider that the other. A ground-type plug has two prongs and a grounding pin. If the provided plug does not fit into your outlet or the ground-pin is exposed, consult an electrician for replacement of the outlet.
Never walk on or pinch the cords, particularly at the plugs or where the cords connect to the device.
Only use attachments/accessories specified by the manufacturer.
Unplug the devices during lightning storms or when not being used for long periods of time.
Refer all servicing to qualified service personnel. Servicing is required when the devices have been damaged in any way.
1)
2)
3)
4)
5)
6)
7)
8)
9)
10)
11)
Warning
Warning
The lightning flash with an arrowhead
symbol within the equilateral triangle, is
intended to alert the user to the presence of
uninsulated "dangerous voltage" within the
product's enclosure that may be sufficient
magnitude to cause an electronic shock.
The exclamation point within the equilateral
triangle is intended to alert the user to the
presence of important operating and
maintenance (servicing) instructions in this
owner's manual.
WARNING: To reduce the risk of electronic
shock, do not remove cover (or back). No
user-serviceable parts inside. Refer
servicing to qualified service personnel.
WARNINGRISK OF ELECTRONIC SHOCK
DO NOT OPEN
WarningTo prevent fire or electrical shock, do not use the plug with an extension cord or outlet unless all of the plug prongs can be fully inserted into the extension cord or wall outlet. Do not expose the cords to rain or moisture.
Warning
FCC Information
The warranty period is for ONE year from the time of purchase, and only covers manufacturer defects. This warranty does NOT cover damage due to abuse, unauthorized repair, submerging in any liquid, and neglect. To obtain warranty service, you may return the defective product to the authorized Lorest retailer or distributor, with proof of purchase, and receive a replacement unit. Please check with the retailer or distributor for their return policies and procedures. This warranty may give you other legal rights, which vary from state to state.
Manufactured by:Lorest Holding LLCLawrence, KS 66044
www.lorest.com
Warranty
Limited Warranty
-
-
-
-
-
-
-
-
-
-
-
No Sound
No Sound or Sound is Distored
Check the connection of the audio/video equipment.
Check the transmitter to see whether it is plugged into the AC power.
Check the speaker to see whether it has power and turned on.
Confirm that the audio source (stereo, TV, etc.) is turned on.
Check that the Speaker volume is turned up; as well as the volume on the audio source.
Change the frequency channel on the Transmitter and Speaker. Confirm that both the Transmitter and the Speaker are set to the same frequency.
The Transmitter and the Speaker might be to far from each other. Try moving the Transmitter and Speaker closer together.
If the Speaker's SIGNAL indicator is weak, red, or has turned off, recharge the Speaker's battery (See page 7).
Check that the antenna is in the upright position.
Change the location of the Transmitter. Place it as high and free from obstructions as possible.
If the transmitter doesn’t respond when changing the channel, please unglug the adapter and then insert it again.
Troubleshooting
Troubleshooting
With a pencil, make four marks on the wall (or mounting surface) while using the bracket as a guide to determine where the screws will be inserted.
Using a 3/16" (5mm) drill bit, drill a hole through each pencil mark.
Insert the plastic wall anchors if necessary (recommended for drywalls).
Align the bracket with the four holes on the wall, and secure the bracket using a Phillips-head screwdriver and the included screws.
Hang the Speaker from the wall-mounting bracket using the Speaker's built-in handle.
Wall-Mounting the Speakers
Installing the Wall-Mounting Brackets
1
2
3
4
5
Wall-Mounting the Speakers
Wall-MountingBracket
13Troubleshooting

It is recommended that the Wireless Speakers not be used in a temperature lower than 32° F (0° C). If you are using the speakers in temperatures lower than this and experiencing a short battery life, it is not a malfunction. Return the Speakers to a warmer environment and the battery's life will increase.
The battery life may be reduced over time. If the battery life becomes half of its normal time after it is fully charged, attempt to fully discharge the battery by powering the speaker on battery power until it is no longer able to be powered on. The recharge the battery as described on page 7. If a short battery life continues, consult the retailer.
The battery life may end. If the battery life becomes half of its normal time after it is fully charged, consult the retailer.
Turn up the volume on the connected audio/video equipment.
Change the signal frequency on the Transmitter and Speaker.
Be certain that both the transmitter and speaker frequency are set to the same channel.
If the Speaker's SIGNAL indicator is weak, red, or has turned off, charge the Speaker's built-in rechargeable battery.
The Speakers may be located too far from the Transmitter. Move the Speakers closer to the Transmitter.
Short Battery Life
Loud Background Noise
-
-
-
-
-
-
-
-
Troubleshooting
This equipment has been tested and found to comply with the limits for a class B digital device, pursuant to part 15 of the FCC Rules. These limits are designed to provide reasonable protection against harmful interference in a residential installation. This equipment generates, uses, and can radiate radio frequency energy and, if not installed and used in accordance with the instructions, may cause harmful interference to radio communications. However, there is no guarantee that interference will not occur in a particular installation.
If this equipment does cause harmful interference to radio or television reception, which can be determined by turning the equipment off and on, the user is encouraged to try to correct the interference by one or more of the following measures:
- Reorient or relocate the receiving antenna.- Increase the distance between the equipment and receiver.- Connect the equipment to an outlet on a circuit different from which the receiver is connected.- Consult the dealer or an experienced radio/TV technician for help.
This equipment complies with part 15 of the FCC Rules. Operation is subject to the following two conditions:
1. This equipment may not cause harmful interference.2. This equipment must accept any interference received, including interference that may cause undesired operation.
FCC Information
FCC Warning - FCC ID: VXA SMHS256-002
Troubleshooting
Important Safety InstructionsRead and follow all instructions.
Keep these instructions for later reference.
Heed all warnings.
Wipe with a damp cloth. Do not use abrasive chemicals.
Do not block any ventilation openings. Install in accordance with the manufacturer's instructions.
Do not install near any heat sources such as radiators, heat registers, stoves, or other devices (including amplifiers) that produce heat.
Do not alter the polarized or ground-type plug. A polarized plug has two prongs, one wider that the other. A ground-type plug has two prongs and a grounding pin. If the provided plug does not fit into your outlet or the ground-pin is exposed, consult an electrician for replacement of the outlet.
Never walk on or pinch the cords, particularly at the plugs or where the cords connect to the device.
Only use attachments/accessories specified by the manufacturer.
Unplug the devices during lightning storms or when not being used for long periods of time.
Refer all servicing to qualified service personnel. Servicing is required when the devices have been damaged in any way.
1)
2)
3)
4)
5)
6)
7)
8)
9)
10)
11)
Warning
Warning
The lightning flash with an arrowhead
symbol within the equilateral triangle, is
intended to alert the user to the presence of
uninsulated "dangerous voltage" within the
product's enclosure that may be sufficient
magnitude to cause an electronic shock.
The exclamation point within the equilateral
triangle is intended to alert the user to the
presence of important operating and
maintenance (servicing) instructions in this
owner's manual.
WARNING: To reduce the risk of electronic
shock, do not remove cover (or back). No
user-serviceable parts inside. Refer
servicing to qualified service personnel.
WARNINGRISK OF ELECTRONIC SHOCK
DO NOT OPEN
WarningTo prevent fire or electrical shock, do not use the plug with an extension cord or outlet unless all of the plug prongs can be fully inserted into the extension cord or wall outlet. Do not expose the cords to rain or moisture.
Warning
FCC Information
The warranty period is for ONE year from the time of purchase, and only covers manufacturer defects. This warranty does NOT cover damage due to abuse, unauthorized repair, submerging in any liquid, and neglect. To obtain warranty service, you may return the defective product to the authorized Lorest retailer or distributor, with proof of purchase, and receive a replacement unit. Please check with the retailer or distributor for their return policies and procedures. This warranty may give you other legal rights, which vary from state to state.
Manufactured by:Lorest Holding LLCLawrence, KS 66044
www.lorest.com
Warranty
Limited Warranty
-
-
-
-
-
-
-
-
-
-
-
No Sound
No Sound or Sound is Distored
Check the connection of the audio/video equipment.
Check the transmitter to see whether it is plugged into the AC power.
Check the speaker to see whether it has power and turned on.
Confirm that the audio source (stereo, TV, etc.) is turned on.
Check that the Speaker volume is turned up; as well as the volume on the audio source.
Change the frequency channel on the Transmitter and Speaker. Confirm that both the Transmitter and the Speaker are set to the same frequency.
The Transmitter and the Speaker might be to far from each other. Try moving the Transmitter and Speaker closer together.
If the Speaker's SIGNAL indicator is weak, red, or has turned off, recharge the Speaker's battery (See page 7).
Check that the antenna is in the upright position.
Change the location of the Transmitter. Place it as high and free from obstructions as possible.
If the transmitter doesn’t respond when changing the channel, please unglug the adapter and then insert it again.
Troubleshooting
Troubleshooting
With a pencil, make four marks on the wall (or mounting surface) while using the bracket as a guide to determine where the screws will be inserted.
Using a 3/16" (5mm) drill bit, drill a hole through each pencil mark.
Insert the plastic wall anchors if necessary (recommended for drywalls).
Align the bracket with the four holes on the wall, and secure the bracket using a Phillips-head screwdriver and the included screws.
Hang the Speaker from the wall-mounting bracket using the Speaker's built-in handle.
Wall-Mounting the Speakers
Installing the Wall-Mounting Brackets
1
2
3
4
5
Wall-Mounting the Speakers
Wall-MountingBracket
14 Troubleshooting

It is recommended that the Wireless Speakers not be used in a temperature lower than 32° F (0° C). If you are using the speakers in temperatures lower than this and experiencing a short battery life, it is not a malfunction. Return the Speakers to a warmer environment and the battery's life will increase.
The battery life may be reduced over time. If the battery life becomes half of its normal time after it is fully charged, attempt to fully discharge the battery by powering the speaker on battery power until it is no longer able to be powered on. The recharge the battery as described on page 7. If a short battery life continues, consult the retailer.
The battery life may end. If the battery life becomes half of its normal time after it is fully charged, consult the retailer.
Turn up the volume on the connected audio/video equipment.
Change the signal frequency on the Transmitter and Speaker.
Be certain that both the transmitter and speaker frequency are set to the same channel.
If the Speaker's SIGNAL indicator is weak, red, or has turned off, charge the Speaker's built-in rechargeable battery.
The Speakers may be located too far from the Transmitter. Move the Speakers closer to the Transmitter.
Short Battery Life
Loud Background Noise
-
-
-
-
-
-
-
-
Troubleshooting
This equipment has been tested and found to comply with the limits for a class B digital device, pursuant to part 15 of the FCC Rules. These limits are designed to provide reasonable protection against harmful interference in a residential installation. This equipment generates, uses, and can radiate radio frequency energy and, if not installed and used in accordance with the instructions, may cause harmful interference to radio communications. However, there is no guarantee that interference will not occur in a particular installation.
If this equipment does cause harmful interference to radio or television reception, which can be determined by turning the equipment off and on, the user is encouraged to try to correct the interference by one or more of the following measures:
- Reorient or relocate the receiving antenna.- Increase the distance between the equipment and receiver.- Connect the equipment to an outlet on a circuit different from which the receiver is connected.- Consult the dealer or an experienced radio/TV technician for help.
This equipment complies with part 15 of the FCC Rules. Operation is subject to the following two conditions:
1. This equipment may not cause harmful interference.2. This equipment must accept any interference received, including interference that may cause undesired operation.
FCC Information
FCC Warning - FCC ID: VXA SMHS256-002
Troubleshooting
Important Safety InstructionsRead and follow all instructions.
Keep these instructions for later reference.
Heed all warnings.
Wipe with a damp cloth. Do not use abrasive chemicals.
Do not block any ventilation openings. Install in accordance with the manufacturer's instructions.
Do not install near any heat sources such as radiators, heat registers, stoves, or other devices (including amplifiers) that produce heat.
Do not alter the polarized or ground-type plug. A polarized plug has two prongs, one wider that the other. A ground-type plug has two prongs and a grounding pin. If the provided plug does not fit into your outlet or the ground-pin is exposed, consult an electrician for replacement of the outlet.
Never walk on or pinch the cords, particularly at the plugs or where the cords connect to the device.
Only use attachments/accessories specified by the manufacturer.
Unplug the devices during lightning storms or when not being used for long periods of time.
Refer all servicing to qualified service personnel. Servicing is required when the devices have been damaged in any way.
1)
2)
3)
4)
5)
6)
7)
8)
9)
10)
11)
Warning
Warning
The lightning flash with an arrowhead
symbol within the equilateral triangle, is
intended to alert the user to the presence of
uninsulated "dangerous voltage" within the
product's enclosure that may be sufficient
magnitude to cause an electronic shock.
The exclamation point within the equilateral
triangle is intended to alert the user to the
presence of important operating and
maintenance (servicing) instructions in this
owner's manual.
WARNING: To reduce the risk of electronic
shock, do not remove cover (or back). No
user-serviceable parts inside. Refer
servicing to qualified service personnel.
WARNINGRISK OF ELECTRONIC SHOCK
DO NOT OPEN
WarningTo prevent fire or electrical shock, do not use the plug with an extension cord or outlet unless all of the plug prongs can be fully inserted into the extension cord or wall outlet. Do not expose the cords to rain or moisture.
Warning
FCC Information
The warranty period is for ONE year from the time of purchase, and only covers manufacturer defects. This warranty does NOT cover damage due to abuse, unauthorized repair, submerging in any liquid, and neglect. To obtain warranty service, you may return the defective product to the authorized Lorest retailer or distributor, with proof of purchase, and receive a replacement unit. Please check with the retailer or distributor for their return policies and procedures. This warranty may give you other legal rights, which vary from state to state.
Manufactured by:Lorest Holding LLCLawrence, KS 66044
www.lorest.com
Warranty
Limited Warranty
-
-
-
-
-
-
-
-
-
-
-
No Sound
No Sound or Sound is Distored
Check the connection of the audio/video equipment.
Check the transmitter to see whether it is plugged into the AC power.
Check the speaker to see whether it has power and turned on.
Confirm that the audio source (stereo, TV, etc.) is turned on.
Check that the Speaker volume is turned up; as well as the volume on the audio source.
Change the frequency channel on the Transmitter and Speaker. Confirm that both the Transmitter and the Speaker are set to the same frequency.
The Transmitter and the Speaker might be to far from each other. Try moving the Transmitter and Speaker closer together.
If the Speaker's SIGNAL indicator is weak, red, or has turned off, recharge the Speaker's battery (See page 7).
Check that the antenna is in the upright position.
Change the location of the Transmitter. Place it as high and free from obstructions as possible.
If the transmitter doesn’t respond when changing the channel, please unglug the adapter and then insert it again.
Troubleshooting
Troubleshooting
With a pencil, make four marks on the wall (or mounting surface) while using the bracket as a guide to determine where the screws will be inserted.
Using a 3/16" (5mm) drill bit, drill a hole through each pencil mark.
Insert the plastic wall anchors if necessary (recommended for drywalls).
Align the bracket with the four holes on the wall, and secure the bracket using a Phillips-head screwdriver and the included screws.
Hang the Speaker from the wall-mounting bracket using the Speaker's built-in handle.
Wall-Mounting the Speakers
Installing the Wall-Mounting Brackets
1
2
3
4
5
Wall-Mounting the Speakers
Wall-MountingBracket
15FCC Information

It is recommended that the Wireless Speakers not be used in a temperature lower than 32° F (0° C). If you are using the speakers in temperatures lower than this and experiencing a short battery life, it is not a malfunction. Return the Speakers to a warmer environment and the battery's life will increase.
The battery life may be reduced over time. If the battery life becomes half of its normal time after it is fully charged, attempt to fully discharge the battery by powering the speaker on battery power until it is no longer able to be powered on. The recharge the battery as described on page 7. If a short battery life continues, consult the retailer.
The battery life may end. If the battery life becomes half of its normal time after it is fully charged, consult the retailer.
Turn up the volume on the connected audio/video equipment.
Change the signal frequency on the Transmitter and Speaker.
Be certain that both the transmitter and speaker frequency are set to the same channel.
If the Speaker's SIGNAL indicator is weak, red, or has turned off, charge the Speaker's built-in rechargeable battery.
The Speakers may be located too far from the Transmitter. Move the Speakers closer to the Transmitter.
Short Battery Life
Loud Background Noise
-
-
-
-
-
-
-
-
Troubleshooting
This equipment has been tested and found to comply with the limits for a class B digital device, pursuant to part 15 of the FCC Rules. These limits are designed to provide reasonable protection against harmful interference in a residential installation. This equipment generates, uses, and can radiate radio frequency energy and, if not installed and used in accordance with the instructions, may cause harmful interference to radio communications. However, there is no guarantee that interference will not occur in a particular installation.
If this equipment does cause harmful interference to radio or television reception, which can be determined by turning the equipment off and on, the user is encouraged to try to correct the interference by one or more of the following measures:
- Reorient or relocate the receiving antenna.- Increase the distance between the equipment and receiver.- Connect the equipment to an outlet on a circuit different from which the receiver is connected.- Consult the dealer or an experienced radio/TV technician for help.
This equipment complies with part 15 of the FCC Rules. Operation is subject to the following two conditions:
1. This equipment may not cause harmful interference.2. This equipment must accept any interference received, including interference that may cause undesired operation.
FCC Information
FCC Warning - FCC ID: VXA SMHS256-002
Troubleshooting
Important Safety InstructionsRead and follow all instructions.
Keep these instructions for later reference.
Heed all warnings.
Wipe with a damp cloth. Do not use abrasive chemicals.
Do not block any ventilation openings. Install in accordance with the manufacturer's instructions.
Do not install near any heat sources such as radiators, heat registers, stoves, or other devices (including amplifiers) that produce heat.
Do not alter the polarized or ground-type plug. A polarized plug has two prongs, one wider that the other. A ground-type plug has two prongs and a grounding pin. If the provided plug does not fit into your outlet or the ground-pin is exposed, consult an electrician for replacement of the outlet.
Never walk on or pinch the cords, particularly at the plugs or where the cords connect to the device.
Only use attachments/accessories specified by the manufacturer.
Unplug the devices during lightning storms or when not being used for long periods of time.
Refer all servicing to qualified service personnel. Servicing is required when the devices have been damaged in any way.
1)
2)
3)
4)
5)
6)
7)
8)
9)
10)
11)
Warning
Warning
The lightning flash with an arrowhead
symbol within the equilateral triangle, is
intended to alert the user to the presence of
uninsulated "dangerous voltage" within the
product's enclosure that may be sufficient
magnitude to cause an electronic shock.
The exclamation point within the equilateral
triangle is intended to alert the user to the
presence of important operating and
maintenance (servicing) instructions in this
owner's manual.
WARNING: To reduce the risk of electronic
shock, do not remove cover (or back). No
user-serviceable parts inside. Refer
servicing to qualified service personnel.
WARNINGRISK OF ELECTRONIC SHOCK
DO NOT OPEN
WarningTo prevent fire or electrical shock, do not use the plug with an extension cord or outlet unless all of the plug prongs can be fully inserted into the extension cord or wall outlet. Do not expose the cords to rain or moisture.
Warning
FCC Information
The warranty period is for ONE year from the time of purchase, and only covers manufacturer defects. This warranty does NOT cover damage due to abuse, unauthorized repair, submerging in any liquid, and neglect. To obtain warranty service, you may return the defective product to the authorized Lorest retailer or distributor, with proof of purchase, and receive a replacement unit. Please check with the retailer or distributor for their return policies and procedures. This warranty may give you other legal rights, which vary from state to state.
Manufactured by:Lorest Holding LLCLawrence, KS 66044
www.lorest.com
Warranty
Limited Warranty
-
-
-
-
-
-
-
-
-
-
-
No Sound
No Sound or Sound is Distored
Check the connection of the audio/video equipment.
Check the transmitter to see whether it is plugged into the AC power.
Check the speaker to see whether it has power and turned on.
Confirm that the audio source (stereo, TV, etc.) is turned on.
Check that the Speaker volume is turned up; as well as the volume on the audio source.
Change the frequency channel on the Transmitter and Speaker. Confirm that both the Transmitter and the Speaker are set to the same frequency.
The Transmitter and the Speaker might be to far from each other. Try moving the Transmitter and Speaker closer together.
If the Speaker's SIGNAL indicator is weak, red, or has turned off, recharge the Speaker's battery (See page 7).
Check that the antenna is in the upright position.
Change the location of the Transmitter. Place it as high and free from obstructions as possible.
If the transmitter doesn’t respond when changing the channel, please unglug the adapter and then insert it again.
Troubleshooting
Troubleshooting
With a pencil, make four marks on the wall (or mounting surface) while using the bracket as a guide to determine where the screws will be inserted.
Using a 3/16" (5mm) drill bit, drill a hole through each pencil mark.
Insert the plastic wall anchors if necessary (recommended for drywalls).
Align the bracket with the four holes on the wall, and secure the bracket using a Phillips-head screwdriver and the included screws.
Hang the Speaker from the wall-mounting bracket using the Speaker's built-in handle.
Wall-Mounting the Speakers
Installing the Wall-Mounting Brackets
1
2
3
4
5
Wall-Mounting the Speakers
Wall-MountingBracket
16 Warning

It is recommended that the Wireless Speakers not be used in a temperature lower than 32° F (0° C). If you are using the speakers in temperatures lower than this and experiencing a short battery life, it is not a malfunction. Return the Speakers to a warmer environment and the battery's life will increase.
The battery life may be reduced over time. If the battery life becomes half of its normal time after it is fully charged, attempt to fully discharge the battery by powering the speaker on battery power until it is no longer able to be powered on. The recharge the battery as described on page 7. If a short battery life continues, consult the retailer.
The battery life may end. If the battery life becomes half of its normal time after it is fully charged, consult the retailer.
Turn up the volume on the connected audio/video equipment.
Change the signal frequency on the Transmitter and Speaker.
Be certain that both the transmitter and speaker frequency are set to the same channel.
If the Speaker's SIGNAL indicator is weak, red, or has turned off, charge the Speaker's built-in rechargeable battery.
The Speakers may be located too far from the Transmitter. Move the Speakers closer to the Transmitter.
Short Battery Life
Loud Background Noise
-
-
-
-
-
-
-
-
Troubleshooting
This equipment has been tested and found to comply with the limits for a class B digital device, pursuant to part 15 of the FCC Rules. These limits are designed to provide reasonable protection against harmful interference in a residential installation. This equipment generates, uses, and can radiate radio frequency energy and, if not installed and used in accordance with the instructions, may cause harmful interference to radio communications. However, there is no guarantee that interference will not occur in a particular installation.
If this equipment does cause harmful interference to radio or television reception, which can be determined by turning the equipment off and on, the user is encouraged to try to correct the interference by one or more of the following measures:
- Reorient or relocate the receiving antenna.- Increase the distance between the equipment and receiver.- Connect the equipment to an outlet on a circuit different from which the receiver is connected.- Consult the dealer or an experienced radio/TV technician for help.
This equipment complies with part 15 of the FCC Rules. Operation is subject to the following two conditions:
1. This equipment may not cause harmful interference.2. This equipment must accept any interference received, including interference that may cause undesired operation.
FCC Information
FCC Warning - FCC ID: VXA SMHS256-002
Troubleshooting
Important Safety InstructionsRead and follow all instructions.
Keep these instructions for later reference.
Heed all warnings.
Wipe with a damp cloth. Do not use abrasive chemicals.
Do not block any ventilation openings. Install in accordance with the manufacturer's instructions.
Do not install near any heat sources such as radiators, heat registers, stoves, or other devices (including amplifiers) that produce heat.
Do not alter the polarized or ground-type plug. A polarized plug has two prongs, one wider that the other. A ground-type plug has two prongs and a grounding pin. If the provided plug does not fit into your outlet or the ground-pin is exposed, consult an electrician for replacement of the outlet.
Never walk on or pinch the cords, particularly at the plugs or where the cords connect to the device.
Only use attachments/accessories specified by the manufacturer.
Unplug the devices during lightning storms or when not being used for long periods of time.
Refer all servicing to qualified service personnel. Servicing is required when the devices have been damaged in any way.
1)
2)
3)
4)
5)
6)
7)
8)
9)
10)
11)
Warning
Warning
The lightning flash with an arrowhead
symbol within the equilateral triangle, is
intended to alert the user to the presence of
uninsulated "dangerous voltage" within the
product's enclosure that may be sufficient
magnitude to cause an electronic shock.
The exclamation point within the equilateral
triangle is intended to alert the user to the
presence of important operating and
maintenance (servicing) instructions in this
owner's manual.
WARNING: To reduce the risk of electronic
shock, do not remove cover (or back). No
user-serviceable parts inside. Refer
servicing to qualified service personnel.
WARNINGRISK OF ELECTRONIC SHOCK
DO NOT OPEN
WarningTo prevent fire or electrical shock, do not use the plug with an extension cord or outlet unless all of the plug prongs can be fully inserted into the extension cord or wall outlet. Do not expose the cords to rain or moisture.
Warning
FCC Information
The warranty period is for ONE year from the time of purchase, and only covers manufacturer defects. This warranty does NOT cover damage due to abuse, unauthorized repair, submerging in any liquid, and neglect. To obtain warranty service, you may return the defective product to the authorized Lorest retailer or distributor, with proof of purchase, and receive a replacement unit. Please check with the retailer or distributor for their return policies and procedures. This warranty may give you other legal rights, which vary from state to state.
Manufactured by:Lorest Holding LLCLawrence, KS 66044
www.lorest.com
Warranty
Limited Warranty
-
-
-
-
-
-
-
-
-
-
-
No Sound
No Sound or Sound is Distored
Check the connection of the audio/video equipment.
Check the transmitter to see whether it is plugged into the AC power.
Check the speaker to see whether it has power and turned on.
Confirm that the audio source (stereo, TV, etc.) is turned on.
Check that the Speaker volume is turned up; as well as the volume on the audio source.
Change the frequency channel on the Transmitter and Speaker. Confirm that both the Transmitter and the Speaker are set to the same frequency.
The Transmitter and the Speaker might be to far from each other. Try moving the Transmitter and Speaker closer together.
If the Speaker's SIGNAL indicator is weak, red, or has turned off, recharge the Speaker's battery (See page 7).
Check that the antenna is in the upright position.
Change the location of the Transmitter. Place it as high and free from obstructions as possible.
If the transmitter doesn’t respond when changing the channel, please unglug the adapter and then insert it again.
Troubleshooting
Troubleshooting
With a pencil, make four marks on the wall (or mounting surface) while using the bracket as a guide to determine where the screws will be inserted.
Using a 3/16" (5mm) drill bit, drill a hole through each pencil mark.
Insert the plastic wall anchors if necessary (recommended for drywalls).
Align the bracket with the four holes on the wall, and secure the bracket using a Phillips-head screwdriver and the included screws.
Hang the Speaker from the wall-mounting bracket using the Speaker's built-in handle.
Wall-Mounting the Speakers
Installing the Wall-Mounting Brackets
1
2
3
4
5
Wall-Mounting the Speakers
Wall-MountingBracket
17Warning

It is recommended that the Wireless Speakers not be used in a temperature lower than 32° F (0° C). If you are using the speakers in temperatures lower than this and experiencing a short battery life, it is not a malfunction. Return the Speakers to a warmer environment and the battery's life will increase.
The battery life may be reduced over time. If the battery life becomes half of its normal time after it is fully charged, attempt to fully discharge the battery by powering the speaker on battery power until it is no longer able to be powered on. The recharge the battery as described on page 7. If a short battery life continues, consult the retailer.
The battery life may end. If the battery life becomes half of its normal time after it is fully charged, consult the retailer.
Turn up the volume on the connected audio/video equipment.
Change the signal frequency on the Transmitter and Speaker.
Be certain that both the transmitter and speaker frequency are set to the same channel.
If the Speaker's SIGNAL indicator is weak, red, or has turned off, charge the Speaker's built-in rechargeable battery.
The Speakers may be located too far from the Transmitter. Move the Speakers closer to the Transmitter.
Short Battery Life
Loud Background Noise
-
-
-
-
-
-
-
-
Troubleshooting
This equipment has been tested and found to comply with the limits for a class B digital device, pursuant to part 15 of the FCC Rules. These limits are designed to provide reasonable protection against harmful interference in a residential installation. This equipment generates, uses, and can radiate radio frequency energy and, if not installed and used in accordance with the instructions, may cause harmful interference to radio communications. However, there is no guarantee that interference will not occur in a particular installation.
If this equipment does cause harmful interference to radio or television reception, which can be determined by turning the equipment off and on, the user is encouraged to try to correct the interference by one or more of the following measures:
- Reorient or relocate the receiving antenna.- Increase the distance between the equipment and receiver.- Connect the equipment to an outlet on a circuit different from which the receiver is connected.- Consult the dealer or an experienced radio/TV technician for help.
This equipment complies with part 15 of the FCC Rules. Operation is subject to the following two conditions:
1. This equipment may not cause harmful interference.2. This equipment must accept any interference received, including interference that may cause undesired operation.
FCC Information
FCC Warning - FCC ID: VXA SMHS256-002
Troubleshooting
Important Safety InstructionsRead and follow all instructions.
Keep these instructions for later reference.
Heed all warnings.
Wipe with a damp cloth. Do not use abrasive chemicals.
Do not block any ventilation openings. Install in accordance with the manufacturer's instructions.
Do not install near any heat sources such as radiators, heat registers, stoves, or other devices (including amplifiers) that produce heat.
Do not alter the polarized or ground-type plug. A polarized plug has two prongs, one wider that the other. A ground-type plug has two prongs and a grounding pin. If the provided plug does not fit into your outlet or the ground-pin is exposed, consult an electrician for replacement of the outlet.
Never walk on or pinch the cords, particularly at the plugs or where the cords connect to the device.
Only use attachments/accessories specified by the manufacturer.
Unplug the devices during lightning storms or when not being used for long periods of time.
Refer all servicing to qualified service personnel. Servicing is required when the devices have been damaged in any way.
1)
2)
3)
4)
5)
6)
7)
8)
9)
10)
11)
Warning
Warning
The lightning flash with an arrowhead
symbol within the equilateral triangle, is
intended to alert the user to the presence of
uninsulated "dangerous voltage" within the
product's enclosure that may be sufficient
magnitude to cause an electronic shock.
The exclamation point within the equilateral
triangle is intended to alert the user to the
presence of important operating and
maintenance (servicing) instructions in this
owner's manual.
WARNING: To reduce the risk of electronic
shock, do not remove cover (or back). No
user-serviceable parts inside. Refer
servicing to qualified service personnel.
WARNINGRISK OF ELECTRONIC SHOCK
DO NOT OPEN
WarningTo prevent fire or electrical shock, do not use the plug with an extension cord or outlet unless all of the plug prongs can be fully inserted into the extension cord or wall outlet. Do not expose the cords to rain or moisture.
Warning
FCC Information
The warranty period is for ONE year from the time of purchase, and only covers manufacturer defects. This warranty does NOT cover damage due to abuse, unauthorized repair, submerging in any liquid, and neglect. To obtain warranty service, you may return the defective product to the authorized Lorest retailer or distributor, with proof of purchase, and receive a replacement unit. Please check with the retailer or distributor for their return policies and procedures. This warranty may give you other legal rights, which vary from state to state.
Manufactured by:Lorest Holding LLCLawrence, KS 66044
www.lorest.com
Warranty
Limited Warranty
-
-
-
-
-
-
-
-
-
-
-
No Sound
No Sound or Sound is Distored
Check the connection of the audio/video equipment.
Check the transmitter to see whether it is plugged into the AC power.
Check the speaker to see whether it has power and turned on.
Confirm that the audio source (stereo, TV, etc.) is turned on.
Check that the Speaker volume is turned up; as well as the volume on the audio source.
Change the frequency channel on the Transmitter and Speaker. Confirm that both the Transmitter and the Speaker are set to the same frequency.
The Transmitter and the Speaker might be to far from each other. Try moving the Transmitter and Speaker closer together.
If the Speaker's SIGNAL indicator is weak, red, or has turned off, recharge the Speaker's battery (See page 7).
Check that the antenna is in the upright position.
Change the location of the Transmitter. Place it as high and free from obstructions as possible.
If the transmitter doesn’t respond when changing the channel, please unglug the adapter and then insert it again.
Troubleshooting
Troubleshooting
With a pencil, make four marks on the wall (or mounting surface) while using the bracket as a guide to determine where the screws will be inserted.
Using a 3/16" (5mm) drill bit, drill a hole through each pencil mark.
Insert the plastic wall anchors if necessary (recommended for drywalls).
Align the bracket with the four holes on the wall, and secure the bracket using a Phillips-head screwdriver and the included screws.
Hang the Speaker from the wall-mounting bracket using the Speaker's built-in handle.
Wall-Mounting the Speakers
Installing the Wall-Mounting Brackets
1
2
3
4
5
Wall-Mounting the Speakers
Wall-MountingBracket
17 Limited Warranty


Contents
Contents
2 Specifications
3 Product Features
4 Introduction
5 Setting up Setting Up the Transmitter Locating the Transmitter Charging the Speaker Battery
8 Operating the System
Using the Speakers Using the Remote Control Replacing the Remote Control Battery Installing the RF Amplifier Accessory
12 Wall-Mounting Set Up
13 Troubleshooting
15 FCC Information
16 Warning
18 Warranty
Product Features
Product Features
The Rechargeable Indoor/Outdoor Speaker System
Speaker
Transmitter
Specifications
Carrier Frequency................Number of Channels...........
Power Source.......................Dimensions..........................Weight.................................
Voltage................................Capacity..............................Duration Time......................Charging Time.....................
Specifications
General
Built-In Sealed Lead Acid Rechargeable Battery (Speaker)
--
---
Power Source.......................Dimensions..........................Weight.................................Audio Input..........................Frequency............................
-----
----
User's Manual
www.lorest.com
Set Up
Set Up
Setting up the Transmitter
Connect the Transmitter Power Adapter to the Transmitter.
Plug in the Transmitter Power Adapter to an AC outlet and the LED power indicator located on top of the Transmitter will illuminate.
There are two options to connect the Transmitter to the audio source:
Option 1: If the audio source (MP3 player, stereo receiver, portable CD player, computer, etc.) has a headphone jack, then insert the Transmitter's built-in input cable into the audio source's headphone jack.
1
2
3
Introduction
Introduction
Before You Begin
Your Wireless Outdoor/Indoor Rechargeable Speaker System includes the following components:
(2) Wireless Speakers
Remote Control
(2) Wireless Speaker Power Adapters
Transmitter Power Adapter
RCA Y-Cable
Transmitter
(2) Wall-MountingBrackets
Wall-MountingHardware
(8) Screws
(8) Anchors
These wireless, battery-powered speakers have a water-and
UV-resistant exterior that allow you to listen to music by a
swimming pool or any location without the need for speaker
cables or outlets. The included transmitter connects to an
MP3 player, stereo system, television, or portable CD player
and broadcasts a wireless 2.4 GHz digital signal to the
speakers from up to 150 feet [46 meters] away. The wireless
signal operates on 3 channels, minimizing interference, and
penetrates walls, floors, and ceilings to deliver crisp sound to
the 15-watt speakers. The speakers have integrated 4"
subwoofers that reproduce deep bass frequencies and 1"
tweeters that disperse accurate high frequency sounds,
resulting in optimal tonal balance. The speakers have
over-molded rubber bases for ideal stability on any surface,
built in handles for ease of portability, and RCA cable for
connection to a television or stereo system. Each speaker is
powered by a rechargeable battery that operates for six hours
on a full charge, and only requires seven hours to recharge.
2.4 GHz Digital3
DC 15V Adapter (Included)
6.6" x 6.5" x 10.25"7.5 Lbs
12V4000 mAHApprox. 6-8 hours (on middle volume setting)
Approx.6-8 hours
DC 5V Adapter (Included)
4.3" x 4.3" x 1"0.3 LbsPhono Jacks/Stereo Mini Jack2.4 GHz
Built-in AudioInput Cable
Audio Source
Transmitter
RF AMPLIFIERCHANNEL
1 2 3
Transmitter Power Adapter
DC 5V300 mA
ME
NU
No
w P
laying
3:30-0:49
IN
Wireless Outdoor/Indoor Rechargeable Speaker System