instructions for use - zenostar · instructions for use status september 2014 0123 instructions for...
TRANSCRIPT

Instructions for Use Status September 2014
0123
I N S T R U C T I O N S F O R U S E
www.zenostar.com
Zenostar T / MO

2
ZENOSTAR – THE SYSTEM ................................................................................................................................... p. 4
PRODUCT INFORMATION .................................................................................................................................... p. 5
Material ................................................................................................................................................................... p. 5
Safety first ................................................................................................................................................................ p. 6
General handling instructions .................................................................................................................................... p. 6
Area of application ................................................................................................................................................... p. 7
Composition ............................................................................................................................................................. p. 7
Zenostar shade and disc concept ............................................................................................................................... p. 8
WORKING STEPS BEFORE THE MILLING PROCESS ......................................................................................... p. 10
Shade determination – tooth shade, shade of the prepared tooth ............................................................................... p. 10
Preparation guidelines .............................................................................................................................................. p. 12
Model and die preparation ........................................................................................................................................ p. 13
Design criteria for Zenostar restorations ..................................................................................................................... p. 14
Framework design ............................................................................................................................................... p. 14
Minimum layer thicknesses and dimensions of connectors ..................................................................................... p. 14
Notes on CAD/CAM processing .................................................................................................................................. p. 15
WORKING STEPS AFTER THE MILLING PROCESS ............................................................................................ p. 16
Finishing .................................................................................................................................................................. p. 16
Stain infiltration and drying ....................................................................................................................................... p. 17
Sintering .................................................................................................................................................................. p. 18
Ivoclar Vivadent Programat S1 sintering programs ................................................................................................. p. 19
Zenotec sintering programs .................................................................................................................................. p. 23
Processing after sintering .......................................................................................................................................... p. 25
PROCESSING OPTIONS ......................................................................................................................................... p. 26
Zenostar T - Monolithic restorations fabricated in the Staining Technique .................................................................... p. 26
Finishing ............................................................................................................................................................. p. 26
Stain and Characterization firing .......................................................................................................................... p. 27
Glaze firing ......................................................................................................................................................... p. 28
Zenostar T – Monolithic restorations fabricated in the Brush Infiltration and Staining Technique ................................... p. 29
Brush-staining ..................................................................................................................................................... p. 29
Finishing ............................................................................................................................................................. p. 32
Stain and Characterization firing .......................................................................................................................... p. 32
Glaze firing ......................................................................................................................................................... p. 32
Table of Contents

3
Zenostar T - Partial veneering ....................................................................................................................................... p. 33
Finishing ............................................................................................................................................................. p. 33
Veneering ........................................................................................................................................................... p. 33
Liner and Wash firing .......................................................................................................................................... p. 34
Incisal firing ........................................................................................................................................................ p. 34
Preparing for Stain and Glaze firing ...................................................................................................................... p. 35
Stain and Characterization firing .......................................................................................................................... p. 35
Glaze firing ......................................................................................................................................................... p. 35
Zenostar T/MO – Layering Technique ......................................................................................................................... p. 36
Finishing ............................................................................................................................................................. p. 36
Firing process for zirconium oxide-supported restorations ..................................................................................... p. 36
Liner firing .......................................................................................................................................................... p. 37
Wash firing (Foundation) ..................................................................................................................................... p. 37
Dentin and Incisal firing ....................................................................................................................................... p. 38
Preparing for Stain and Glaze firing ...................................................................................................................... p. 39
Stain and Characterization firing .......................................................................................................................... p. 39
Glaze firing ......................................................................................................................................................... p. 39
Zenostar MO – Press-On Technique with IPS e.max ZirPress ........................................................................................ p. 40
Preparing the framework for overpressing ............................................................................................................ p. 40
Design of the full-contour wax-up ........................................................................................................................ p. 40
Sprueing, investing, pressing ................................................................................................................................ p. 41
Pressing and divesting ......................................................................................................................................... p. 41
Finishing and characterization .............................................................................................................................. p. 41
Seating and aftercare ................................................................................................................................................ p. 43
Cleaning ............................................................................................................................................................. p. 43
Possibilities for cementation ................................................................................................................................. p. 43
Preparing for cementation ................................................................................................................................... p. 44
Care notes .......................................................................................................................................................... p. 45
GENERAL INFORMATION ..................................................................................................................................... p. 46
Frequently asked questions ....................................................................................................................................... p. 46
Combination tables .................................................................................................................................................. p. 48
Monolithic Zenostar T Restorations - Staining Technique ....................................................................................... p. 48
Monolithic Zenostar T Restorations - Brush Infiltration .......................................................................................... p. 50
Zenostar T/MO – Layering Technique .................................................................................................................... p. 52
Zenostar T/MO – Press-On Technique ................................................................................................................... p. 53
Firing parameters for Zenostar T and Zenostar MO ................................................................................................ p. 54
Firing parameters for Zenostar Art Module ........................................................................................................... p. 55
Firing parameters for IPS e.max Ceram ................................................................................................................. p. 56

4
The Zenostar system comprises materials that are suitable for the fabrication of a universal range of restorations made of zirconium
oxide. An accurately coordinated portfolio of materials and leading-edge CAD/CAM manufacturing processes enable effi cient
working procedures and esthetic reproducible results.
In addition to zirconia discs in several shades and degrees of translucency, the Zenostar range also includes a coordinated range of
additional components for the further individualization of restorations.
Zenostar offers a versatile range of processing options, providing maximum fl exibility and reliability.

5
Product information
Material
Zenostar materials are partly sintered zirconia discs stabilized with 3 mol% yttria and designed for use in conjunction with the
CAD/CAM technique. The discs are available in both pre-shaded and non-shaded versions. When sintered to full density, the
material forms a polycrystalline oxide ceramic that consists mainly of a tetragonal zirconium oxide phase as its main constituent (3Y - TZP).
After final sintering, Zenostar demonstrates strength of more than 900 MPa and its fracture toughness exceeds that of glass-
infiltrated ceramics by a factor of more than two. Zenostar can be processed very easily in a suitable CAD/CAM unit in its partly
sintered "chalk-like" state. Milling is carried out with an enlargement of the restoration of approximately 20-25%. Subsequently,
the milled restorations are shrunk to their final dimension in a sintering process. Given the controlled manufacturing process of the
discs, combined with an optimized sintering process in a high temperature furnace from Ivoclar Vivadent or the Wieland Dental
Zenotec range, the shrinkage of the slightly enlarged restorations can be exactly controlled so that excellent accuracy of fit can be
achieved. The zirconia materials attain their final material-specific properties only during the hard sintering process, during which a
structure that is densified to more than 99% forms. This structure features a high fracture resistance and toughness and thus fully
stands up to the clinical challenges presented by the masticatory forces of the posterior region in particular.
Zenostar ideally supplements the range of indications of the IPS e.max materials. For instance, IPS e.max ZirPress can be pressed
onto the high-strength Zenostar frameworks and/or the frameworks can be veneered using IPS e.max Ceram.
CTE (100-500°C) [10-6/K] 10.5 ± 0.5
Flexural strength [MPa]1.) 2.) ≥ 900
Fracture toughness [MPa*m0,5] ≥ 5.0
Chemical solubility [μg/cm²]1.) <10
Type / Class Type II / Class 6
1.) In accordance with ISO 6872:2008 2.) Typical flexural strength values are:
Zenostar MO 1150 ± 150 MPa, Zenostar T 1200 ± 200 MPa
Micrograph of ZrO2 structure

6
Safety first
Please read the Instructions carefully before you remove the zirconium oxide milling disc from the packaging. The Instructions
contain important information on working with the Zenostar milling discs and serve the interest of your safety and the safety of
your patients.
Processing Zenostar milling discs produces dust which may lead to the irritation of the eyes and skin and damage the lungs. Always
ensure that the extraction system on your milling device and workstation is in good working order. Wear goggles, gloves and a face
mask (particle class FFP2).
General handling instructions
Zenostar milling discs are supplied in a partly sintered state. In this state, the material is easy to process but does not yet possess
the properties that it will feature as a finished dental restoration. It is therefore necessary to handle the discs with care.
Please check the goods immediately after receipt for:
damage to the packaging
damage to the product (the product must not show any nicks, cracks or irregular shading)
the CE mark and the name of the manufacturer Wieland Dental on the packaging
Ideally store Zenostar:
in the original packaging
in a dry place
When handling make sure that the Zenostar milling discs:
are not subjected to knocks or vibrations
are not touched with wet hands
do not come into contact with liquids that are not approved for this product (such as tap water, adhesives or inks)
are not contaminated with particles from other materials (e.g. glass-ceramic dust, metal milling dust)
If any of the conditions outlined in these Instructions are not met, the Zenostar milling discs must not be used for the manufacture
of dental restorations.

7
Area of application
Indications
Zenostar are milling discs designed for the manufacture of single-tooth and multiple-unit restorations* used for tooth replacements.
Depending on the indication, Zenostar is suitable for the construction of frameworks and monolithic (full-contour) restorations.
Translucency
level
Indications
Crown frameworks
Interlocked crown frameworks
Multi-unit bridge frameworks*
Primary telescope crowns
Full-contour crowns
Full contour, interlocked crowns
Full- contour, multi-unit bridges*
Zenostar T � � � � � � �Zenostar MO � � � �
*In Canada, bridge indications are limited to no more than 6 units with no more than 2 adjacent pontics.
Contraindications
More than two connected pontics
Very deep subgingival preparation
Patients with severely reduced residual dentition
Veneered Zenostar T/MO restorations are not suitable for patients suffering from bruxism.
Two or more unsupported cantilever units
Any other use not listed in the indications
Temporary insertion
Additional limitations of use
Failure to observe the following restrictions may compromise the results achieved with Zenostar:
failure to observe the necessary minimum connector and minimum framework thicknesses
milling of the discs in non-compatible CAD/CAM units (only suitable for dry machining)
sintering in a non-compatible high-temperature furnace
Composition
Zirconium oxide (ZrO2 + HfO2 +Y2O3) ≥ 99 % 10.5 ± 0.5
Yttrium oxide (Y2O3) > 4.5 – ≤ 6.0% ≥ 900
Hafnium oxide (HfO2) ≤ 5% ≥ 5.0
Aluminium oxide + other oxides ≤ 1.0 % <10
Type / Class Type II / Class 6

8
Zenostar shade and disc concept
The Zenostar milling discs are compatible with all the coordinated additional components from the Wieland Dental range and the
Ivoclar Vivadent range. The shades are matched to the IPS e.max range to expand the modular system concept.
Zenostar T
Zenostar T discs are particularly suited for the manufacture of monolithic restorations due to their high translucency and the
associated enhanced esthetic properties. The discs are supplied in pre-shaded basic shades, allowing easy reproduction of all the
16 tooth shades and additional 4 bleach shades.
Disc shade: Zenostar T 0
Available thicknesses [mm]:10, 12, 14, 16, 18, 20, 25
Disc shade: Zenostar T 1
Available thicknesses [mm]:10, 12, 14, 16, 18, 20, 25
Disc shade: Zenostar T 2
Available thicknesses [mm]:10, 12, 14, 16, 18, 20, 25
Disc shade: Zenostar T 3
Available thicknesses [mm]:10, 12, 14, 16, 18, 20, 25
Disc shade: Zenostar T 4
Available thicknesses [mm]:10, 12,14, 16, 18, 20, 25
Disc shade: Zenostar T sun
Available thicknesses [mm]:10, 12, 14, 16, 18, 20, 25
Disc shade: Zenostar T sun chroma
Available thicknesses [mm]:10, 12, 14, 16, 18, 20, 25

9
Zenostar MOGiven their high strength and elevated opacity, Zenostar MO discs are particularly suitable for esthetic frameworks. The combination of high strength and raised opacity allows the fabrication of highly esthetic restorations on discoloured preparations and metal
components even if the material is used in only a thin layer.
Disc shade: Zenostar M O 0
Available thicknesses [mm]:10, 14, 18, 20, 25
Disc shade: Zenostar MO 1
Available thicknesses [mm]:10, 14, 18, 20, 25
Disc shade: Zenostar MO 2
Available thicknesses [mm]:10, 14, 18, 20, 25
Disc shade: Zenostar MO 3
Available thicknesses [mm]: 10, 14, 18, 20, 25
Disc shade: Zenostar MO 4
Available thicknesses [mm]:10, 14, 18, 20, 25
Note
The complete Zenostar delivery program can be found at www.wieland-dental.de.
Further information on additional components, e.g. customization accessories or cementation materials, can be found at
www.ivoclarvivadent.com.

10
Working steps before the milling process
Shade determination – tooth shade, shade of the prepared tooth
Harmonious integration into the oral cavity of the patient is the prerequisite for a natural all-ceramic restoration. To achieve this,
the following guidelines and notes must be observed by both the dentist and the laboratory.
The overall esthetic result of an all-ceramic restoration is influenced by the following factors:
shade of the prepared tooth (e.g. natural preparation, non-vital preparation, core build-up or abutment)
shade of the restoration material (e.g. framework shade, translucency/opacity, brightness value, veneering and/or characterization)
shade of the cementation material
The optical effect of the preparation shade must not be underestimated in the fabrication of highly esthetic restorations. This is
especially important if severely discoloured preparations or non-tooth-shaded build-ups are present.
The desired esthetic properties can be more easily achieved if the clinician determines the shade of the prepared tooth structure.
Shade selection and shade matching
Preparation Shade
Prepared natural tooth
Core build-up
Implant, abutment
Restoration Shade
Framework
Veneer
Characterization
Cementation Material
Desired Tooth Shade
Responsibility of the Dental Office Responsibility of the Laboratory

11
Determining the shade of the natural tooth
After tooth cleaning, the shade of the non-prepared tooth and/or the adjacent teeth is determined with the help of a shade guide.
Individual characteristics should be considered when assessing the tooth shade. If a crown preparation is planned, for example, the
cervical shade should also be determined. In order to achieve the best possible true-to-nature results, shade selection should be
carried out at daylight. Furthermore, the patient should not wear clothes of intensive colours or lipstick.
Selecting the shade of the prepared tooth
After the tooth has been prepared, the shade of the tooth preparation should be determined with the help of an IPS Natural Die Material shade guide to ensure that the desired tooth shade can be reliably reproduced. This enables the technician to fabricate a model die similar to the preparation of the patient, on the basis of which the correct shade and brightness values of the all-ceramic restoration may be selected.
Shade selection using an A-D shade guide
Selecting the shade of the prepared tooth

12
Preparation guidelines
Before commencing the design process, make sure that the preparation is suitable for the placement of a ceramic restoration. Successful results can only be achieved with Zenostar if the relevant guidelines and layer thicknesses are strictly observed.
Basically, the following preparation guidelines apply:
no angles or sharp edges,
a shoulder preparation with rounded inner edges or a chamfer is ideal,
the indicated dimensions reflect the minimum thicknesses for Zenostar restorations,
the edges of the prepared tooth should have a diameter of at least 1 mm (milling tool geometry) to permit optimum milling in the CAD/CAM unit.
Preparation guidelines for single crowns – 3-unit bridges
Evenly reduce the anatomical shape and observe the stipulated minimum wall thicknesses. Ideally, a shoulder with rounded inner edges or a chamfer is prepared; the width of the shoulder or chamfer should be 1 mm.
The incisal or occusal aspect of the crown should be reduced by at least 1.5 mm.
The labial and/or lingual aspect of anterior and posterior crowns should be reduced by at least 1.2 mm.
If a conventional or self-adhesive cementation method is used, retentive surfaces must be created.
Preparation angle: 6-8° for conventional cementation; >6° for adhesive cementation
Preparation guidelines for multi-unit bridges
Evenly reduce the anatomical shape and observe the stipulated minimum wall thicknesses. Ideally, a shoulder with rounded inner edges or a chamfer is prepared; the width of the shoulder or chamfer should be 1 mm.
The incisal or occusal aspect of the crown should be reduced by at least 2 mm.
The labial and/or lingual aspect of anterior and posterior crowns should be reduced by at least 1.5 mm.
If a conventional or self-adhesive cementation method is used, retentive surfaces must be created.
Preparation angle: 6-8° for conventional cementation; >6° for adhesive cementation
1.0
1.0
1.0
1.0
1.21.2
1.5
1.5 1.5
1.2
1.2 1.2
1.01.0
1.0
1.0
1.0
1.51.5
2.0
2.0 2.0
1.5
1.5 1.5
1.01.06°
6°
13
Model and die preparation
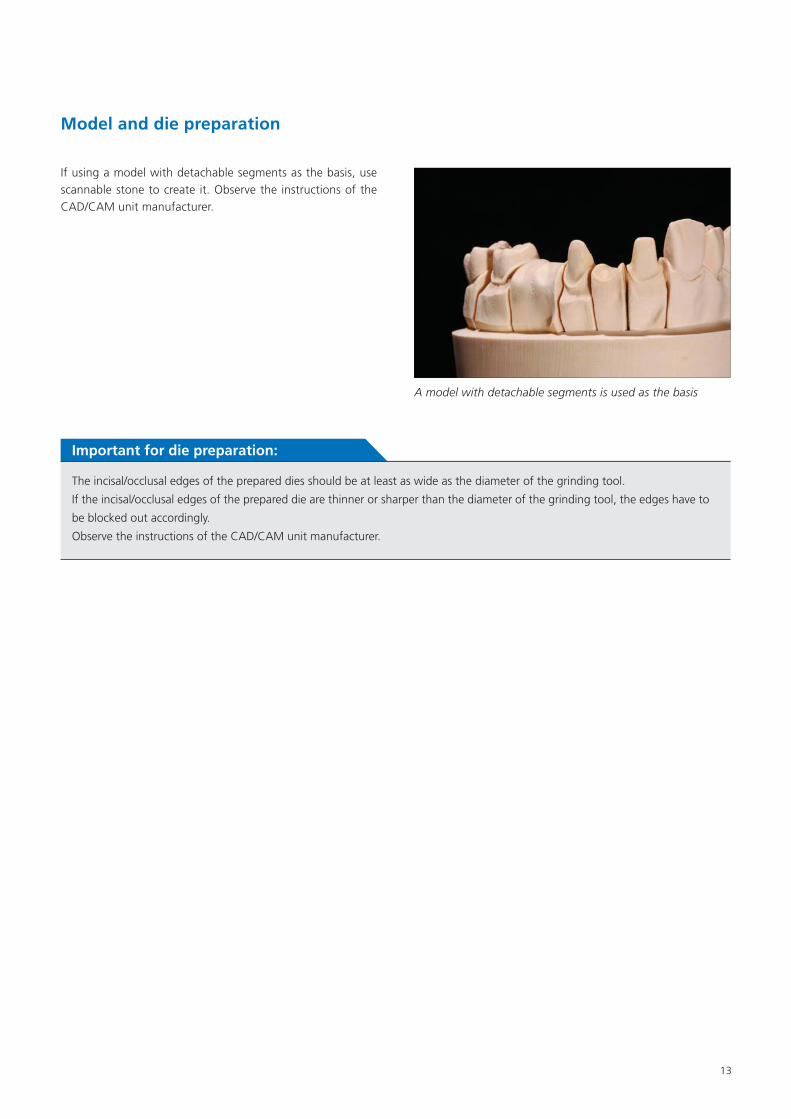
If using a model with detachable segments as the basis, use scannable stone to create it. Observe the instructions of the CAD/CAM unit manufacturer.
A model with detachable segments is used as the basis
Important for die preparation:
The incisal/occlusal edges of the prepared dies should be at least as wide as the diameter of the grinding tool.
If the incisal/occlusal edges of the prepared die are thinner or sharper than the diameter of the grinding tool, the edges have to
be blocked out accordingly.
Observe the instructions of the CAD/CAM unit manufacturer.

14
Design criteria for Zenostar restorations
In addition to high-quality materials, professional preparation and processing are equally important to attain high-quality restorations that are capable of giving long-term satisfaction to patients. The design is key to the success of durable, esthetic and clinically successful all-ceramic restorations. The following basic principles should be observed:
Framework design When designing a framework, the aim should be to achieve an anatomical design that supports the veneering ceramic in the area of the cusps so that these can be veneered with a uniform layer of 1 – 2 mm. Observe the instructions for use of the specific veneering ceramic that you are using.
Minimum layer thicknesses and dimensions of connectorsRestorations designed using Zenostar T or Zenostar MO require less space than other ceramic restorations. Yet, the specified minimum wall thicknesses and dimensions of the connectors for monolithic restorations and frameworks must be observed at all times:
Wall thickness/connector cross section for Zenostar T/MO (sintered)
Anterior region Minimum wall thickness in mm
Connector cross section in mm2 Design type
Crowns 0.4 -
Supporting the tooth shape and/or gingiva (incisal, occlusal, and/or basal)
Interlocked crowns 0.6 7
3-unit bridges 0.6 7
4-unit and more-unit bridges with two pontics* 0.6 9
Cantilever bridges with a single pontic 0.7 12
Posterior region Minimum wall thickness in mm
Connector cross section in mm2 Design type
Crowns 0.6 -
Supporting the tooth shape and/or gingiva (incisal, occlusal, and/or basal)
Interlocked crowns 0.6 9
3-unit bridges 0.6 9
4-unit and more-unit bridges with two pontics* 0.7 12
Cantilever bridges with a single pontic 0.7 12
Design parameters for frameworks veneered using the IPS e.max CAD-on veneering technique
Minimum wall thickness in mm
Connector cross section in mm2
Crowns 0.5 -
Interlocked crowns 0.5 7
3-unit bridges 0.5 9
4-unit and more-unit bridges with two pontics* 0.5 12
*In Canada, bridge indications are limited to no more than 6 units with no more than 2 adjacent pontics.
The IPS e.max CAD-on veneering technique is approved only for use in conjunction with Zenostar MO.

15
Connector design
When designing the connectors, attempt to create the largest possible cross section.
In terms of stability, the height of the connector is more important than the width. Doubling the width will lead to a twofold increase in stability while doubling the height will result in an increase in stability of up to four times.
The mechanical stress on the construction increases the further apart the abutment teeth are positioned from each other and the
higher the masticatory forces acting on the constructions are. As a consequence, frameworks comprising more than two pontics
between two abutment teeth are not permissible.
Notes on CAD/CAM processing
Zenostar T/MO materials are designed exclusively for processing in CAM milling units from the Wieland Zenotec range and by Authorized Milling Partners in conjunction with the respective milling templates. If other CAD/CAM systems are used, the quality of the resulting restoration cannot be guaranteed, particularly not in terms of accuracy of fit, milling precision, marginal quality and surface quality.
If bridges comprising more than 5 units are designed, a sinter support structure should be attached to the milling object already during the CAM process. The type of construction depends on the sintering furnace and the sintering program used. If multi-unit bridges are not supported by an appropriate sinter support structure, they may involve the risk of becoming deformed during final hard sintering.
Sinter support structures are categorized into sinter drops, sinter frames and sinter "tongues".
Please refer to the Zenostar Design Guidelines for detailed information.

16
Working steps after the milling process
Finishing
Selecting the correct grinding instruments for adjusting and finishing Zenostar restorations is of essential importance. This is true for both sintered and non-sintered objects. If unsuitable grinding instruments are used, for instance chipping of the edges and/or localized overheating may occur.
When separating the milling discs,
generally observe the following points:
Non-sintered zirconia restorations are susceptible to damage and fractures. Keep this fact in mind during all further processing steps.
Any adjustments involving the use of milling equipment should be performed while the material is still in its non-sintered state.
IAny contact with liquids (e.g. water and/or oil coolant and/or contact media (such as occlusion sprays) must be avoided. Only use suitable grinding instruments, low speed and light pressure to prevent chipping and broken-off pieces, particularly at the margins.
Do not use fine rubber polishers for finishing restorations that will be customized with
an infiltration solution. Fine rubber polishers densify the surface structure and may
result in an uneven shading of the restoration.
Carefully separate the milled objects from the disc using a separating disc or a suitable
grinding instrument. Smooth out the attachment point of the holding pins using
suitable grinding instruments.
Rough tungsten carbide burs and/or rough grinding instruments are suitable to only a
limited extent because they may cause vibrations during finishing and this may result in
chipping. Therefore, it is advisable to use only fine tungsten carbide burs and/or fine
grinding instruments.
Do not "post-separate" bridge constructions with separating discs. This may result in predetermined breaking points on the connectors and undermine the stability of the all-ceramic restoration.
Make sure that the minimum wall thicknesses are maintained after adjusting and
finishing the restoration.
In the non-sintered state, the marginal areas must be given special attention. Too thinly
ground margins are unsuitable for sintering, since the marginal area is rounded out
during the sintering process and will become too short.
Thoroughly clean the restoration after finishing. To remove any milling dust, carefully
clean the restoration with oil-free compressed air and/or a soft brush.
Make sure to completely remove all traces of milling residue (e.g. milling dust) from the restoration prior to sintering. Milling dust sticking to the restoration may become fused to the restoration and compromise the accuracy of fit.
Do not use steam or an ultrasonic bath to clean non-sintered restorations.
Do not blast the restoration with corundum or glass polishing beads.
Separating the restoration with cross-cut tungsten carbide burs or other suitable grinding instrument
Re-contouring the fissures (optional)
Smoothing out the attachment point of the holding pin

17
Stain infiltration and drying
If Zenostar restorations are infiltrated with colouring liquids such as Zenostar Color Zr prior to being sintered, they need to dry before they can undergo further processing. It is essential to observe the following notes when using colouring liquids
The restoration must be free of all traces of dust and milling residue.
The colouring liquids must not be contaminated.
If cloudy, the colouring liquids must no longer be used. Contaminated liquids change colour or spoil more quickly.
Do not decant or store colouring liquids in metal containers.
Use a metal-free clean brush to apply Zenostar Color Zr Liquids/colouring
solutions to the restoration.
Before they are sintered, the restorations must be sufficiently dry. If not, damage to the furnace and/or restoration may ensue.
Restorations may be dried either using an infrared light or a drying cabinet.
The drying time depends on the temperature and the size of the restoration. With lower temperatures, drying takes longer. Large
restorations also take longer to dry.
Drying temperatures higher than 140°C (284°F) may lead to defects. Refer to the table below for recommended drying times.
Drying times for Zenostar in relation to restoration size and drying temperature
Temperature ˜70°C (˜158°F) Temperature ˜140°C (˜284°F)
Single tooth restorationsn ≥15 min. 5-10 min.
Restorations with 2-4 units ≥40 min. ≥25 min.
Restorations with 5 units and more ≥50 min. ≥25 min.
Please refer to pages 29 for detailed instructions regarding the use of the Zenostar Color Zr colouring liquids.

18
Sintering
Sintering is one of the most important processes in the manufacture of zirconia restorations for dental use. The sintering process uses high temperatures to turn the porous "white body" into a densely sintered restoration. The material acquires its final properties such as high strength and light transmitting capabilities only at this stage. To achieve ideal mechanical and optical properties, the sintering process must be carried out using the specified sintering temperatures and times. The properties of the sintered restoration will be adversely affected if the sintering temperatures are too high or too low or if the sintering times are too long or too short.
The Programat S1 sintering furnace from Ivoclar Vivadent and all the furnaces of the Zenotec range are specifically designed for sintering Zenostar restorations. The furnaces feature various programs optimally geared towards the optical and mechanical properties of zirconia materials and thereby ensure that the best possible results are achieved.
It is essential to observe the following notes when sintering zirconia restorations:
Restorations infiltrated with colouring liquid must be completely dry before they are sintered to prevent damage to the furnace and/or object.
Generally, sintering beads are not recommended neither for the Ivoclar Vivadent Programat S1 sintering furnace nor the furnaces of the Zenotec range.
Restorations must not touch each other during sintering.
Selecting the correct program is essential.
Always keep sintering auxiliaries clean and free of dust to avoid impurities in the sintered restorations.
Remove the entire RFID label before sintering to avoid stains in the restorations and contamination of the sintering auxiliaries and furnace.
The sintering programs of the recommended sintering furnaces are shown below. Refer to the operating instructions of the specific furnace you are using for detailed information.
Please note:
It is essential to use the appropriate sinter support structure for the appropriate furnace. Detailed information on the use of sinter
support structures can be obtained from the Zenostar Design Guidelines.

19
Ivoclar Vivadent Programat S1 sintering programs
Prior to sintering, allow moist restorations to dry for a sufficiently long time depending on their size (see Table on page 17).
Restorations that are sintered while still being moist may become damaged during the sintering process due to the high heating rate.
For the sintering process in the Programat S1, the following points should be observed:
Do not use ZrO2 sintering beads in the Programat S1.
The sinter tray can be completely filled with restorations. Make sure that the restorations do
not touch each other.
Simultaneous sintering of single-tooth restorations, bridges and constructions with a sinter support structure is possible.
Selecting the correct program is essential.
Provide even support for the restorations to ensure deformation-free sintering results.
Bridge constructions should not exclusively be supported by the abutment crowns on either side. Preferably provide support to the pontics. The abutment crowns do not necessarily have to be supported by/be in contact with the sinter tray.
Bridge constructions in particular are best arranged in concentric circles on the sinter tray. Important! Do not place any restorations over the separation (groove) on the sinter tray.
Place the loaded sinter tray in its intended position in the centre of the sintering chamber of the Programat S1 using a sinter tray fork.

20
correct ok wrong
Single-tooth restorations - anterior region
Place the restorations on their labial surface.
Place the restorations on their lingual surface.
Do not place the restorations on their marginal edge (crown margin).
Single-tooth restorations - posterior region
Place the restorations on their occlusal surface.
Do not place the restorations on their marginal edge (crown margin).
3-unit anterior restorations
Place the restorations on their labial surface and provide support to the pontic. If the restoration "tilts", use an alternative positioning.
Position on the incisal edges. The pontic must also rest on the sinter tray.
Restorations should not solely rest on their marginal edges.
3-unit posterior restorations
Place the restorations on the buccal or lingual surfaces depending on their curvature. Abutment crowns do not necessarily have to be in contact with the sinter tray. The pontic must be supported.
Restorations should not solely rest on their marginal edges (crown margins). The pontic should be supported on the basal side.
If the restoration does not rest on the pontic, do not place it on its occusal surface.

21
Anterior restorations with 4 units and more
Place the restorations on their incisal surface. Make sure the pontics are supported.
Depending on the curvature, the framework can be placed on its labial surfaces. All the pontics must come into contact with the sinter tray. Abutment crowns do not necessarily have to be in contact with the sinter tray.
Restorations should not solely rest on their marginal edges.
Posterior restorations with 4 units and more
Depending on the curvature, the restoration can be placed on its buccal surfaces. All the pontics must come into contact with the sinter tray. Abutment crowns do not necessarily have to rest on the sinter tray.
Restorations should not solely rest on their marginal edges (crown margins). The pontics should be supported on the basal side.
If the restoration does not rest on the pontics, do not place it on its occusal surface.
Restorations with sinter support structure
Place the restoration on the sinter tray with the sinter support structures resting on the tray.
The restoration can also be placed on the sinter support structure / incisal or occlusal surfaces of the pontics. The sinter support structure should face the centre of the sinter tray.
Restorations should not rest on the crown margins.

22
The following programs of the Programat S1 are recommended for sintering Zenostar restorations.
These programs are available as of V 3.0.
Zenostar T:
Program No. Name Description Duration
5 Zenostar T CrownProgram for the fast sintering of full-contour Zenostar T single-tooth restorations and Zenostar T single-tooth frameworks with an elevated level of translucency
2 h 55 min
6 Zenostar T Bridge (up to 14 units)
Program for the fast sintering of full-contour Zenostar T single-tooth restorations or bridge restorations as well as Zenostar T single-tooth frameworks and bridge frameworks with an elevated level of translucency
4 h 30 min
7 Zenostar T Standard
Program for the conventional sintering of full-contour Zenostar T single-tooth restorations and bridge restorations as well as Zenostar T single-tooth frameworks and bridge frameworks and infiltrated dry Zenostar T restorations
9 h 25 min
Zenostar MO:
Program No. Name Description Duration
8 Zenostar MO Crown Program for the fast sintering of single-tooth frameworks 75 min
9 Zenostar MO Bridge (up to 4 units)
Program for the fast sintering of single-tooth frameworks and bridge frameworks with up to 4 units 90 min
10 Zenostar MO Bridge (up to 14 units)
Program for the fast sintering of single-tooth frameworks and bridge frameworks with up to 14 units 2 h 45 min
11 Zenostar MO Standard
Program for the sintering of single-tooth frameworks and bridge frameworks using the conventional parameters of the Ivoclar Vivadent Sintramat
7 h 20 min
23
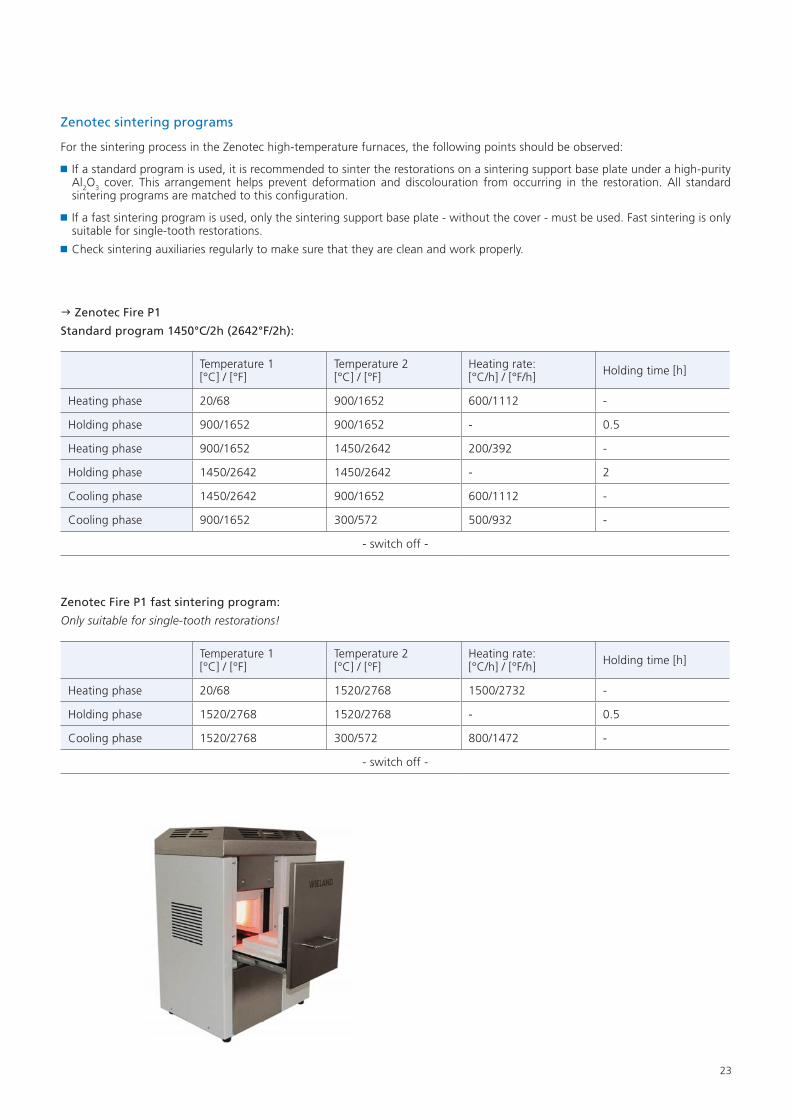
Zenotec sintering programs
For the sintering process in the Zenotec high-temperature furnaces, the following points should be observed:
If a standard program is used, it is recommended to sinter the restorations on a sintering support base plate under a high-purity Al2O3 cover. This arrangement helps prevent deformation and discolouration from occurring in the restoration. All standard sintering programs are matched to this configuration.
If a fast sintering program is used, only the sintering support base plate - without the cover - must be used. Fast sintering is only suitable for single-tooth restorations.
Check sintering auxiliaries regularly to make sure that they are clean and work properly.
� Zenotec Fire P1
Standard program 1450°C/2h (2642°F/2h):
Temperature 1 [°C] / [°F]
Temperature 2 [°C] / [°F]
Heating rate:[°C/h] / [°F/h] Holding time [h]
Heating phase 20/68 900/1652 600/1112 -
Holding phase 900/1652 900/1652 - 0.5
Heating phase 900/1652 1450/2642 200/392 -
Holding phase 1450/2642 1450/2642 - 2
Cooling phase 1450/2642 900/1652 600/1112 -
Cooling phase 900/1652 300/572 500/932 -
- switch off -
Zenotec Fire P1 fast sintering program:
Only suitable for single-tooth restorations!
Temperature 1 [°C] / [°F]
Temperature 2 [°C] / [°F]
Heating rate:[°C/h] / [°F/h] Holding time [h]
Heating phase 20/68 1520/2768 1500/2732 -
Holding phase 1520/2768 1520/2768 - 0.5
Cooling phase 1520/2768 300/572 800/1472 -
- switch off -
24
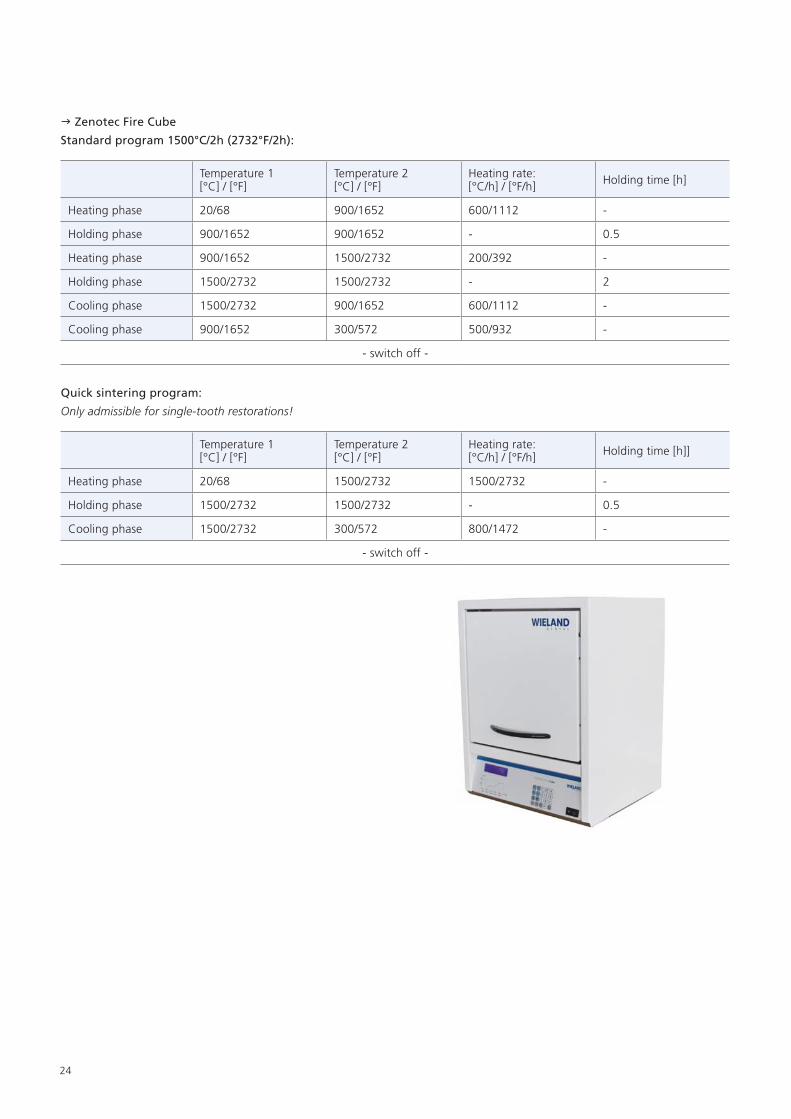
� Zenotec Fire Cube
Standard program 1500°C/2h (2732°F/2h):
Temperature 1 [°C] / [°F]
Temperature 2 [°C] / [°F]
Heating rate:[°C/h] / [°F/h] Holding time [h]
Heating phase 20/68 900/1652 600/1112 -
Holding phase 900/1652 900/1652 - 0.5
Heating phase 900/1652 1500/2732 200/392 -
Holding phase 1500/2732 1500/2732 - 2
Cooling phase 1500/2732 900/1652 600/1112 -
Cooling phase 900/1652 300/572 500/932 -
- switch off -
Quick sintering program:
Only admissible for single-tooth restorations!
Temperature 1 [°C] / [°F]
Temperature 2 [°C] / [°F]
Heating rate:[°C/h] / [°F/h] Holding time [h]]
Heating phase 20/68 1500/2732 1500/2732 -
Holding phase 1500/2732 1500/2732 - 0.5
Cooling phase 1500/2732 300/572 800/1472 -
- switch off -

25
Processing after sintering
After sintering, the restorations can be adjusted using suitable instruments. If diamond grinding instruments are used for adjustment, the restoration must be cooled with water. As an alternative, other grinding instruments may be used in conjunction with a dental-lab handpiece. Please observe the recommendation of the manufacturer regarding grinding instruments.
Use the following procedure for adjusting densely sintered, cooled Zenostar restorations:
Adjustments of sintered Zenostar restorations should be kept to a minimum.
The restoration should only be mechanically adjusted if absolutely necessary.
Place the Zenostar restoration on the model, check fit and make slight adjustments, if necessary.
Check marginal areas and slightly finish, if necessary.
Use only low pressure for finishing.
When finishing frameworks, avoid the design of sharp edges, aim for rounded ones.
Do not use a separating disc to separate interdental areas.
Make sure that the minimum layer thickness of the restoration is maintained after adjustment.
Use only immaculate grinding instruments.
Check the restoration for defects and fractures before and after further processing.
Sintered milling dust on the restoration must be removed before veneering.
Before veneering, clean the frameworks with running water or the steam jet, and dry.

26
Processing options
Zenostar T - Monolithic restorations fabricated in the Staining Technique
In this chapter, all the important steps involved in the manufacture of monolithic zirconium oxide restorations are described and illustrated. In the Staining Technique, the milled full-contour restorations are completed by applying stains and glaze materials. With the pre-shaded Zenostar T discs, very esthetic results can be achieved with little effort.
The Zenostar T shades T0, T1, T2, T3 and T4 have been especially developed for reproducing the 16 A-D + 4 Bleach shades. The Zenostar T discs in the shades T sun and T sun chroma are characterized by a warm, reddish basic shade. They can be used as alternative basic shades to obtain more individualized A and B shades.
Prior to milling, the disc shade is selected based on the respective tooth shade by means of the shade chart. The combination tables for IPS e.max Stains and the Zenostar Art Module can be found on the pages 48 and 49.
Finishing
Following sintering, the restoration may be refined with suitable instruments. Cooling of the restoration with water is mandatory when using diamond grinding instruments. Please refer to page 27 for further notes on finishing. It is essential to polish the surfaces of monolithic restorations. Good polishing, particularly in the occlusal region, protects the opposing teeth from undesired wear.
The functional status of the dynamic occlusion has to be verified at least twice a year and, if necessary, adjusted. When doing this, make sure that the surface of the ground occlusal surfaces is carefully polished after functional adjustment by grinding, and that the original condition is restored. Using the Zenostar Polishing Set is recommended.
The optimized "Zenostar Polish" polishing paste enables smooth, high gloss surfaces to be achieved in an easy manner.
Zenstar Polish polishing paste Occlusal polishing of the monolithic Zenostar restoration

27
Stain and Characterization firing
The most important staining and characterization steps are described below. Please observe the manufacturer’s directions regarding the Stains. Before the Stain and Characterization firing, the restoration must be free of dirt and grease. Clean the object with a steam cleaner to remove any dirt and grease residue. Any contamination of the object after cleaning should be avoided.
The following steps must be observed:
To improve the wetting behaviour, the surface of the restoration may be wetted with a small quantity of Stain liquid.
More intensive shades are achieved by repeated staining and firing, rather than by applying thicker layers.
To imitate the incisal area and achieve translucency in the incisal third or the occlusal third, so-called Incisal Stains may be used.
The cusps and fissures may be customized with Effect shades such as brown or orange.
Conduct the Stain and Glaze firing using the stipulated firing parameters.
Coat the surfaces with a small amount of Stain liquid to enhance the wettability of the surface.
Apply Incisal Stains to imitate the appearance of the incisal edge.
The cusps and fissures may be customized by using Effect shades.
Fire the stained crown on a honey-combed tray using the stipulated firing parameters.
Firing parameters for the Stain and Characterization firing
The firing parameters for the IPS e.max Ceram Stains and the Zenostar Art Module materials can be found in the section "Firing parameters" on the pages 55 snd 56.

28
Glaze firing
Glaze firing is conducted with powder, paste or spray glaze. The procedure indicated below is recommended. Please observe the manufacturer‘s directions.
Apply the glazing material in an even layer on the restoration in the usual manner.
If the IPS e.max Ceram Glaze Spray accidentally reaches the inner aspects of the restoration, remove it with a dry short-hair brush before firing.
Glaze firing must be conducted using the stipulated firing parameters and with the firing equipment belonging to the furnace.
After completion of the firing process, remove the restoration from the furnace. Allow the objects to cool to room temperature in a place protected from draft.
Hot objects must not be touched with metal tongs.
Glaze firing with Powder/Paste Glaze Glaze firing with Glaze Spray
Apply the Glaze evenly on the surface. Evenly spray on the Glaze Spray. If the Glaze Spray accidentally reaches the inner aspects of the crowns, remove it with a dry brush and subsequently conduct the Glaze firing using the stipulated firing parameters.
Firing parameters for the Glaze firing
The firing parameters for IPS e.max Ceram Stains and for Zenostar Art Module materials can be found under "Firing parameters" on the pages 55 and 56.
Completed Zenostar restorations fabricated in the Staining Technique
Note
If the gloss is unsatisfactory after the first Glaze firing, further Glaze firing cycles may be carried out using the same firing parameters.

29
Zenostar T – Monolithic restorations fabricated in the Brush Infiltration and Staining Technique
In the Brush Infiltration Technique, the milled, non-sintered Zenostar T restorations are brush-stained with Zenostar Color Zr colouring liquids. After sintering, the restorations can be completed with stains and glazes. In this way, highly esthetic restorations with a gradual shade transition similar to that of natural teeth can be fabricated with little extra effort.
Zenostar infiltration liquids
Brush-staining
For the Brush Infiltration Technique, Zenostar Color Zr Liquids in all the 16 A-D shades as well as 5 Effect shades (grey-violet, white, ivory, brown, orange) are available. In order to simplify the infiltration procedure, Zenostar VisualiZr Indicator Solutions are offered. They are available in 3 shades (red, blue, yellow) and can be added to the nearly colourless Zenostar Color Zr Liquids to make infiltration of the restoration with colouring liquid visible. The exact mixing ratio is as follows:
We recommend adhering to the veneering ceramic shade scheme, i.e. using red for the body of the restoration, blue for the incisal portion and yellow for areas such as fissures. Should the shade range not be sufficient, the colours can be mixed. Blue and yellow mix to a deep green, for example.
Dispensing of Zenostar VisualiZr Dispensing of Zenostar Color Zr
Mixing ratio:
2 drops of VisualiZr Indicator Solution per 2 ml of Zenostar Color Zr Liquid

30
Please observe the following instructions for brush-staining:
The restoration must be free of dust and milling residue.
Exclusively use plastic brushes for brush-staining.
The stained restorations must be fully dried before they are sintered. Please observe the notes on page 17.
Store the colouring liquids in tightly sealed containers when not in use.
Do not use Zenostar VisualiZr undiluted.
Zenostar VisualiZr Indicator Solutions are not permanently colour stable once they have been mixed with Zenostar Color Zr Liquid.
A colour map is available for brush-staining. With the help of this colour map, all the 16 A-D tooth shades can be reproduced quickly and easily. The map can be found on the pages 50/51. The terms used to indicate the location, e.g. inside, occlusal, etc.,
are schematically depicted in the Figures below.
Staining of the "outer" cervical area Staining of the "inner" cervical area
Staining of the "outer" body zone Staining of the "inner" body zone

31
Staining of the "outer" occlusal area using body shades Customization of the "outer" fissures
Individual staining of the "outer" incisal area Individual staining of the "inner" incisal area
Restoration after completion of the infiltration procedure
The stained restorations must be fully dried before they are sintered; otherwise the restorations and/or the sintering furnace may be damaged. The restorations can be dried either using an infrared lamp or a drying cabinet. The drying time depends on the temperature and the size of the restoration. With lower temperatures, drying takes longer. Large restorations also take longer to dry. Drying temperatures higher than 140°C/284°F may lead to defects, as the resulting steam cannot escape quickly enough. Refer to the table on the page 17 for recommended drying times. The specifications for the sintering procedure can be found on page 18.

32
Finishing
After sintering, the monolithic restorations can be refined and finished with suitable instruments. Please refer to page 25 for further notes on finishing. In the fabrication of monolithic restorations, appropriate polishing of the surfaces, particularly in the occlusal region, is very important. This helps to protect the opposing teeth. Failure to observe these guidelines may result in increased wear (also see Zenostar T – Monolithic restorations fabricated in the Staining Technique).
Stain and Characterization firing
The restorations are stained and glazed in the same way as restorations fabricated in the Staining Technique. Please observe the notes on page 27.
Firing parameters for the Stain and Characterization firing
The firing parameters for the IPS e.max Ceram Stains and the Zenostar Art Module materials can be found under "Firing parameters" on the pages 55 and 56.
Glaze firing
For glaze firing, the same procedure is used as for monolithic restorations fabricated in the Staining Technique. Please observe the notes on the pages 55 and 56.
Completed restoration

33
Zenostar T - Partial veneering
This procedure involves building up the incisal and occlusal areas of a reduced Zenostar T framework with Incisal materials. The limited application of layering material permits achieving highly esthetic results in an efficient manner.
Finishing
Adjustment by grinding of the sintered Zenostar T restorations should be kept to a minimum.
Overheating must be avoided. If possible, the restoration should be finished with suitable finishers under water cooling, using low speed and limited pressure.
Do not ’post-separate‘ the framework connectors. This may result in undesired predetermined breaking points, which will sub- sequently compromise the stability of the all-ceramic restoration.
Zirconium oxide surfaces must be polished. Particularly the occlusal surfaces should be polished well, as insufficient polishing may lead to increased wear.
Please observe the additional notes on finishing on page 25.
Veneering
The following paragraphs will explain the most important veneering steps if a partial veneering procedure is used. We recommend using the following system for veneering as its components are optimally matched to Zenostar T as far as the shade and mechanical properties are concerned:
IPS e.max Ceram – Ivoclar Vivadent
For detailed information on the veneering system and its processing, please refer to the Instructions for Use of the veneering ceramic.

34
Liner and Wash firing
With regard to the liner firing, please observe the Instructions for Use of the respective veneering ceramic system.
Incisal firing
Veneering materials are used to complete the anatomical shape and achieve an individual esthetic appearance. The materials are mixed with the respective build-up liquids according to the manufacturer‘s directions. If required, a second Incisal firing procedure
can be conducted using the same firing parameters. Please observe the directions of the veneering ceramic manufacturer.
Restoration prior to applying the material Build-up with Incisal material
Object to be fired on the honey-combed firing tray The bridge after firing

35
Preparing for Stain and Glaze fi ring
Before the Stain and Glaze fi ring, the restoration has to be prepared as follows:
Finish the restoration using diamonds and give it a true-to-nature shape and surface texture, such as growth lines and convex/concave areas.
Areas which should exhibit a higher gloss after Glaze fi ring can be smoothed out and pre-polished using silicone discs.
Stain and Characterization fi ring
For the Stain and Characterization fi ring, please observe the instructions of the manufacturer of the respective veneering ceramic system as well as the notes on the pages 55 and 56.
Glaze fi ring
For the Glaze fi ring, please observe the instructions of the manufacturer of the respective ceramic system as well as the notes on page 56.
Final restoration after Stain and Glaze fi ring

36
Zenostar T/MO – Layering Technique
The following paragraphs will explain the most important steps in the veneering of Zenostar MO. For more detailed information on the veneering ceramic and its processing, please refer to the respective Instructions for Use. The system indicated below is recommended for veneering. Its components are optimally matched to Zenostar as far as the shade and physical properties are concerned:
IPS e.max Ceram – Ivoclar Vivadent
For the assignment of the suitable framework shade (MO0 - MO5), please refer to the Table on page 52.
Finishing
Adjustment by grinding of the sintered Zenostar T restorations should be kept to a minimum.
Overheating must be avoided. If possible, the procedure should always be performed under water cooling, using low speed and limited pressure.
Do not ’post-separate‘ the framework connectors. This may result in undesired predetermined breaking points, which will subsequently compromise the stability of the all-ceramic restoration.
Please refer to page 25 for further notes on finishing.
Firing process for zirconium oxide-supported restorations
The following points need to be observed to achieve optimum firing results:
In order to ensure an even thickness of the veneer, the zirconium oxide framework must be designed in such a way that it provides adequate support at the cusp area.
Since zirconium oxide is a poor heat conductor compared to other framework materials, a low temperature increase rate needs to be selected. This ensures an even heat distribution within the framework and along the bonding interface between the veneer and the framework. In addition to achieving an optimum bond, homogeneous sintering of the veneering material is ensured.
During cooling of the restorations after firing, stress occurs as a result of the different cooling speed at the outside and within the material. By means of long-term cooling, particularly after the "final" firing cycle, thermally induced stress can be reduced and the risk of delamination minimized.
Notes on cooling after completion of the firing program
In order to ensure controlled cooling of the restoration after firing, please observe the following notes:
Wait for the acoustic signal or optical indication of the furnace at the end of the firing cycle before removing the firing tray
with the fired objects.
Do not touch hot objects with metal tongs.
Allow the objects to cool to room temperature in a place protected from draft.
Do not blast or quench the objects.

37
Liner firing
For the Liner firing, please observe the instructions of the manufacturer of the veneering ceramic system.
Wash firing (Foundation)
Due to the low heat conductivity of zirconium oxide, a Wash firing procedure is required. The Wash firing ensures controlled sintering of the ceramic onto the framework surface and enables a homogeneous bond to the framework/liner. Proceed as follows:
Mix the respective Dentin material with the recommended liquid.
Apply the Wash in a thin coat on the entire framework or the fired liner layer.
Position the restoration on the firing tray and fire it according to the stipulated firing parameters.
Fire the Wash with Dentin or Deep Dentin using the stipulated firing parameters

38
Dentin and Incisal firing
Please refer to the Instructions for Use of the veneering ceramic system you are using for detailed information. In order to achieve highly esthetic restorations, please observe the following procedure:
Before layering, apply IPS Model Sealer or a customary plaster sealer on the model and allow it to dry. After that, isolate the corresponding areas using IPS Ceramic Separating Liquid or a comparable ceramic separating liquid.
Place the framework on the model and make sure it is correctly positioned.
Mix the required veneering materials with the respective liquids.
Then layer the materials according to the layering diagram and the guidelines of the manufacturer of the veneering ceramic. Observe the necessary layer thickness. We recommend using IPS e.max Ceram Deep Dentin for the veneering of Zenostar T to ensure that the brightness value of the restoration is maintained.
Carefully remove the restoration from the model and supplement the contact points.
Do not apply excessive suction and prevent the restoration from drying out.
Before firing, all the interdental areas must be separated down to the framework using a scalpel.
Position the restoration on the firing tray and fire it using the stipulated firing parameters.
Isolate the model and place the Zenostar MO framework in the correct position.
Complete the layering procedure with Incisal and Transpa materials. Completely separate the interdental areas prior to firing.
Build up the tooth shape using Dentin materials.

39
Preparing for Stain and Glaze firing
Before the Stain and Glaze firing, the restoration has to be prepared as follows:
Finish the restoration using diamonds and give it a true-to-nature shape and surface texture, such as growth lines and convex/concave areas.
Areas which should exhibit a higher gloss after the Glaze firing can be smoothed out and pre-polished using silicone discs.
Stain and Characterization firing
For the Stain and Characterization firing, please observe the instructions of the manufacturer of the respective veneering ceramic system as well as the notes on the pages 55 and 56.
Glaze firing
For the Glaze firing, please observe the instructions of the manufacturer of the respective veneering ceramic system as well as the notes on page 56.
Completely veneered and individually characterized Zenostar MO restoration

40
Zenostar MO can be overpressed with IPS e.max ZirPress. For further information on the fl uorapatite press ceramic and possible processing techniques, please refer to the IPS e.max ZirPress Instructions for Use.
Preparing the framework for overpressing
Application of IPS e.max ZirLiner
Design of the full-contour wax-up
Create a full-contour wax-up on the framework. Observe the thickness of the wax.
Zenostar MO – Press-On Technique with IPS e.max ZirPress

41
Sprueing, investing, pressing
On the IPS e.max investment ring base, attach the sprues in the direction of flow of the ceramic and to the thickest part of the restorations.
Pressing and divesting
Finishing and characterization

42
Glaze fi ring with IPS e.max Ceram GlazePaste or Powder
Glaze fi ring with IPS e.max Ceram Glaze Spray
Apply the Glaze evenly on the surface and fi re it using the stipulated fi ring parameters.
Evenly spray on the Glaze Spray. If the Glaze Spray accidentally reaches the inner aspects of the restoration, remove it with a dry brush and subsequently conduct the Glaze fi ring using the stipulated fi ring parameters.
Completed IPS e.max ZirPress restoration fabricated in the Staining Technique.
Note
Please refer to the IPS e.max ZirPress Instructions for Use for detailed information on the processing procedure.
View of the restoration on a mirror – IPS e.max ZirPress HT pressed to precision

43
Seating and aftercare
Cleaning
The universal cleaning paste Ivoclean effectively cleans the bonding surfaces of prosthetic restorations after intraoral try-in and thus creates optimum pre-requisites for the luting procedure.
Possibilities for cementationEsthetic cementation options are decisive to ensure that an all-ceramic restoration harmoniously blends into the oral environment.Depending of the indication, Zenostar restorations can be seated using either an adhesive, self-adhesive or conventional luting protocol.
The restorations can be conventionally cemented using phosphate cement or glass ionomer cement. We recommend using Multilink®Automix for adhesive cementation, SpeedCEM® for self-adhesive cementation and Vivaglass®CEM PL for conventional cementation.
The range of available products may vary from country to country
Short definition of the different luting procedures:
Adhesive cementation
With adhesive cementation, adhesion is achieved by means of a chemical and/or micromechanical bond between the luting material and the restoration, and between the luting material and the preparation. Given the chemical and/or micromechanical bond, retentive preparation is not required. Depending on the cementation material, special adhesive systems are used to establish a micromechanical bond to the dentin and/or enamel. Adhesive cementation results in an enhanced "(overall) strength" of the seated all-ceramic restoration.
Self-adhesive cementation
The luting material features self-adhesive properties to the tooth, which is why pre-treatment of the tooth surface with adhesives is not required. Hence, the adhesion of the restoration is partially achieved by a micromechanical and a chemical bond. In order to achieve sufficient bonding strength, retentive preparation is recommended.
Conventional cementation
With conventional cementation, the bond is almost entirely created by static friction between the luting material and the restoration, as well as between the luting material and the preparation. To achieve the necessary static friction, retentive preparation with a preparation angle of approximately 4-6° is required.
Indication-related cementation options
Adhesive cementation
Self-adhesive cementation
Conventional cementation
Anterior and posterior crowns � � �
Bridges with/without pressed-on shoulder � � �

44
Preparing for cementation
Conditioning of the restoration and preparation depends on the cementation protocol used, as well as on the luting material. The following paragraphs describe the basic working steps to prepare for cementation. Please refer to the Instructions for Use of the corresponding cementation material regarding the detailed processing procedure.
Conditioning of the restoration
Conditioning of the ceramic surface in preparation for cementation is decisive for establishing a sound bond between the cementation material and the all-ceramic restoration. The following procedure should be used in conjunction with Zenostar restorations:
Blast the surface of Zenostar restorations with corundum at a maximum pressure of 1 bar (15 psi) before cementation.
Thoroughly clean the Zenostar restoration with water and air-dry it.
Saliva can easily be removed from the restoration by means of Ivoclean (Ivoclar Vivadent).
If you use an adhesive cementation protocol, condition the bonding surface with Monobond®Plus.
Material Zenostar T / MO
Indication Crowns and bridges with/without pressed-on shoulder
Luting protocol adhesive self-adhesive/conventional
Cleaning after try-in Ivoclean
Blasting Cleaning with corundum at a maximum pressure of 1 bar (15 psi)
Conditioning/silanization 60 s with Monobond® Plus -
Luting system Multilink® Automix SpeedCEM, Vivaglass® CEM PL
Conditioning of the preparation
Once the temporary restoration has been removed, thoroughly clean the preparation. Before it is conditioned, the restoration is tried-in and the occlusion and articulation are checked. If adjustments of the restoration are required, the restoration must be polished extraorally in these areas before final seating. Any saliva can easily be removed from the restoration by means of Ivoclean (Ivoclar Vivadent). Conditioning of the preparation depends on the cementation method used and is carried out according to the
respective Instructions for Use.

45
Care notes
Just like natural teeth, high-quality Zenostar restorations need regular professional care. This is benefi cial for both the health of the gingiva and teeth, as well as the overall appearance. The pumice-free Proxyt pink polishing paste is used to care for the surfaces without causing any wear. The low RDA* value of 7 (*Relative Dentin Abrasion) is a reliable confi rmation that a low-abrasion cleaning paste is used. Scientifi c investigations and long-term clinical experience have proved the gentle effect compared to other pastes.
Using Poxyt

46
General Information
Frequently asked questions
Do Zenostar restorations have to be pre-treated prior to sintering?
It is important to clean the restoration before sintering and remove any adhering milling dust. However, the restoration must not be cleaned in an ultrasonic bath or with a steam cleaner and it must not be blasted with corundum or glass polishing beads. If the restoration has come into contact with liquids, it must be dried before it is sintered.
Can moist frameworks be sintered?
The restorations must be fully dried before they are sintered. Moist frameworks must not be sintered. The drying time depends on the temperature and the size of the restoration. When drying the objects, a temperature of 140 °C (284 °F) must not be exceeded. If moist frameworks are sintered, the risk of cracking is considerably increased.
What needs to be observed when multi-unit restorations are sintered?
The sinter support structure to be used is dependent on the furnace model. More details on suitable sinter support structures can be found in the Design and Production Guidelines. Sintering on so-called sinter beads is not recommended.
When is Regeneration firing required in conjunction with Zenostar restorations?
The need for a Regeneration firing procedure depends on the grinding instruments used for finishing the sintered Zenostar restorations. Please observe the recommendation regarding the grinding instruments. Basic rule: The finer the grinding instrument, the lower the risk of damaging the zirconium oxide restoration. We recommend conducting a Regeneration firing procedure after diamond grinders with a grit size higher than 100 micron have been used. To remove the sinter support structures in multi-unit bridges, the recommended grinding instruments must be used.
Why is it advisable to use Zenostar VisualiZr in combination with Zenostar Color Zr Liquids?
Zenostar VisauliZr helps to identify if and with which shade a framework was stained. Zenostar Color Zr Liquids are nearly colourless and thus difficult to recognize on non-sintered zirconium oxide. For productivity-oriented laboratories in particular, this increases the process reliability and helps to check the procedures. Handle the colouring liquids with care in order to avoid contamination of the skin, clothes or laboratory equipment.
Can furnaces from other manufacturers also be used to sinter Zenostar restorations?
The Programat® S1 sintering furnace and the furnaces of the Zenotec system have been tested with and approved for Zenostar. Other high-temperature furnaces are thus suitable for sintering the restorations only to a limited extent. Please contact Customer Services if you intend to use a furnace that is not a product of Ivoclar Vivadent or Wieland.
May Zenostar restorations be blasted with corundum prior to veneering?
Do not blast the restorations with corundum, as this may damage the ceramic surface and even initiate flaws within the bond between the framework and the layering ceramic. In order to achieve a sound bond, the surface must be cleaned. Therefore, the restorations should be cleaned under running water or with a steam cleaner. After cleaning, contamination of the restoration surface (with e.g. skin oils, saliva) should be avoided.

47
Is it mandatory to polish the surfaces of monolithic restorations before the crowns are seated?
Yes, polishing of the surface, particularly in the occlusal areas, is a must. Failure to adhere to these guidelines may lead to damage to the opposing teeth.
Can Zenostar restorations be conventionally cemented?
Zenostar restorations can be seated using an adhesive, self-adhesive or conventional luting protocol. For conventional cementation, however, an appropriately retentive preparation design must be observed. If this is not possible, an adhesive luting or self-adhesive luting protocol should be preferred, e.g. with Multilink Automix or SpeedCEM. Vivaglass® CEM PL is available for conventional cementation. All the luting materials indicated are products of Ivoclar Vivadent. We advise against the use of conventional phosphate cements, since they negatively affect the light transmission through the all-ceramic and therefore compromise the esthetic appearance of all-ceramic restorations. Inlay-retained bridges fabricated in the press-on technique must be adhesively cemented.
Why should operators always use Deep Dentin when veneering Zenostar T frameworks with IPS e.max Ceram?
Zenostar T features a higher translucency than Zenostar MO. If the veneer is more than one millimetre thick, the brightness value may drop if only Dentin materials are used. Consequently, it is recommended to apply IPS e.max Ceram Deep Dentin underneath the Dentin material. For more detailed information, please refer to the IPS e.max Ceram Instructions for Use.

48
Combination tables
Monolithic Zenostar T Restorations - Staining Technique
Zenostar Art Modul Stains
Tooth shade Zenostar disc Zenostar Art StainZenostar Art Incisal Stains
(individual use)
A1 T1 A1/A2/A3
grey - violet / transpa - blue
A2 T1 A1/A2/A3
A3 T2 A1/A2/A3
A 3.5 T4 A3,5
A4 T4 A4
B1 T1 B1/B2
B2 T1 B1/B2
B3 T3 B3/B4
B4 T3 B3/B4
C1 T1 C1/C2
C2 T2 C1/C2
C3 T2 C3/C4
C4 T4 C3/C4
D2 T2 D2/D3
D3 T2 D2/D3
D4 T2 D4
BL1 T0 BL1/BL2
BL2 T0 BL1/BL2
BL3 T0 BL3/BL4
BL4 T1 BL3/BL4
Tooth shade Zenostar disc Zenostar Art StainZenostar Incisal Stains
(individual use)
A1 T sun A1/A2/A3
grey - violet / transpa - blue
A2 T sun A1/A2/A3
A3 T sun A1/A2/A3
A3,5 T sun chroma A3,5
A4 T sun chroma A4
B2 T sun B1/B2
B3 T sun B3/B4
B4 T sun chroma B3/B4
D2 T sun D2/D3
D3 T sun D2/D3

49
Tooth shade Zenostar discIPS e.max
Ceram StainsIPS e.max Ceram Incisal Stains
(individual use)
A1 T1 Shade 3
Shade Incisal 1/ Shade Incisal 2
A2 T2 Shade 1
A3 T2 Shade 2
A 3.5 T4 Shade 1
A4 T4 Shade 4
B1 T1 Shade 3
B2 T1 Shade 2
B3 T3 Shade 2
B4 T3 Shade 2
C1 T1 Shade 3
C2 T2 Shade 3
C3 T2 Shade 3
C4 T4 Shade 3
D2 T2 Shade 4
D3 T2 Shade 4
D4 T2 Shade 2
BL1 T0 Shade 0
BL2 T0 Shade 0
BL3 T1 Shade 0
BL4 T1 Shade 1
Tooth shade Zenostar disc IPS e.max Ceram Stains
IPS e.max Ceram Incisal Stains (individual use)
A1 T sun Shade 1
Shade Incisal 1/ Shade Incisal 2
A2 T sun Shade 1
A3 T sun Shade 1
A3,5 T sun chroma Shade 1
A4 T sun chroma Shade 4
B2 T sun Shade 2
B3 T sun Shade 2
B4 T sun chroma Shade 2
D2 T sun Shade 4
D3 T sun Shade 4
IPS e.max Ceram Shades
IPS e.max Ceram Shades

50
Monolithic Zenostar T Restorations - Brush Infiltration
Zenostar T0-T4
Tooth shade Zenostar disc Zenostar Color Zr Number of brush strokes
Zenostar Color Modifier
(individual use)
Stains(individual use)
body cervical
Fissures: brown, orange
Incisal/cusp areas:ivory, grey-violet,
white
See combination tables "Monolithic
restorations fabricated in the
Staining Technique"
A1 T1 A1 1x outside1x outside1x inside
A2 T1 A2 2x outside1x outside1x inside
A3 T2 A3 2x outside1x outside1x inside
A 3.5 T4 A 3.5 1x outside 1x inside
A4 T4 A4 2x outside1x outside1x inside
B1 T1 B1 1x outside1x outside1x inside
B2 T1 B2 2x outside1x outside1x inside
B3 T3 B3 1x outside1x outside1x inside
B4 T3 B4 1x outside1x outside1x inside
C1 T1 C1 3x outside1x outside1x inside
C2 T2 C2 1x outside1x outside1x inside
C3 T2 C3 1x outside 1x outside
C4 T4 C4 2x outside 1x outside
D2 T2 D2 1x outside1x outside1x inside
D3 T2 D3 1x outside1x outside1x inside
D4 T2 D4 1x outside 1x outside

51
Tooth shade Zenostar disc Zenostar Color Zr Number of brush strokes
Zenostar Color Modifier
(individual use)
Stains(individual use)
body cervical
Fissures: brown, orange
IIncisal/cusp areas:ivory, grey-violet,
white
See combination tables "Monolithic
restorations fabricated in the
Staining Technique"
A1 T sun A1 1x outside
A2 T sun A2 1x outside 1x inside
A3 T sun A3 2x outside1x outside1x inside
A4 T sun chroma A41x outside1x inside
B2 T sun B2 1x outside -
B3 T sun B3 1x outside 1x inside
D2 T sun D2 2x outside 1x outside1x inside
D3 T sun D3 1x outside 1x inside
Detailed information on the location and direction, e.g. "inside" or "outside", can be found on the pages 30 and 31.
Zenostar T sun and T sun chroma

52
Tooth shade Zenostar disc IPS e.max Ceram Dentin IPS e.max Ceram Transpa Incisal
A1 MO1/T1 A1 TI1
A2 MO1/T1 A2 TI1
A3 MO2/T2 A3 TI2
A 3.5 MO2/T2 A 3.5 TI2
A4 MO4/T4 A4 TI3
B1 MO1/T1 B1 TI1
B2 MO1/T1 B2 TI1
B3 MO3/T3 B3 TI1
B4 MO3/T3 B4 TI2
C1 MO1/T1 C1 TI1
C2 MO4/T4 C2 TI3
C3 MO4/T4 C3 TI3
C4 MO4/T4 C4 TI3
D2 MO2/T2 D2 TI3
D3 MO4/T4 D3 TI3
D4 MO4/T4 D4 TI3
BL1 MO0/T0 BL1 I BL
BL2 MO0/T0 BL2 I BL
BL3 MO0/T0 BL3 I BL
BL4 MO0/T0 BL4 I BL
We recommend using IPS e.max Ceram Deep Dentin for the veneering of Zenostar T to ensure that the brightness value of restoration is maintained. If the veneer is more than one millimetre thick, the brightness value may drop if only Dentin materials are used. Consequently, it is recommendable to apply IPS e.max Ceram Deep Dentin underneath the Dentin material. For more detailed information, please refer to the IPS e.max Ceram Instructions for Use.
IPS e.max Ceram
Zenostar T/MO – Layering Technique

53
Zenostar T/MO – Press-On Technique
Zenostar MO is pressed over with IPS e.max ZirPress
Tooth shade Zenostar disc IPS e.max ZirLiner IPS e.max ZirPress
A1 MO1 / T1 ZL clear A1
A2 MO1 / T1 ZL clear A2
A3 MO2 / T2 ZL clear A3
A 3.5 MO2 / T2 ZL clear A 3.5
A4 MO4 / T4 ZL clear A4
B1 MO1 / T1 ZL clear B1
B2 MO1 / T1 ZL clear B2
B3 MO3 / T3 ZL clear B3
B4 MO3 / T3 ZL clear B4
C1 MO1 / T1 ZL clear C1
C2 MO4 / T4 ZL clear C2
C3 MO4 / T4 ZL clear C3
C4 MO4 / T4 ZL clear C4
D2 MO4 / T4 ZL clear D2
D3 MO4 / T4 ZL clear D3
D4 MO4 / T4 ZL clear D4
BL1 MO0 / T0 ZL clear BL1
BL2 MO0 / T0 ZL clear BL2
BL3 MO0 / T0 ZL clear BL3
BL4 MO0 / T0 ZL clear BL4
If Zenostar T is used in combination with IPS e.max ZirPress HT, the framework should provide ideal structural support in order to avoid any decreases in brightness, particularly in the fabrication of large-volume restorations. In such cases, the use of an ingot with a lower translucency, e.g. LT, is recommended.

54
Firing parameters for Zenostar T and Zenostar MO
The following points need to be observed to achieve optimum firing results:
In order to ensure an even thickness of the veneer, the zirconium oxide restoration must be designed in such a way that it provides support at the cusp area. Depending on the clinical situation, the consequences are different wall thicknesses and dimensions of the framework.
Since zirconium oxide is a poor heat conductor compared to other framework materials, a low temperature increase rate is required. This ensures even heat distribution in the bonding area between the framework and the veneer, as well as at the outer surface of the restoration even with different framework thicknesses. In this way, an optimum bond is achieved and the layering material is homogeneously sintered.
During cooling of the restorations after firing, stress occurs as a result of the different cooling speed at the outside and within the material. By means of long-term cooling after the "final" firing cycle, this stress can be reduced and the risk of delamination minimized, particularly in zirconium oxide-supported restorations.
Several objects (e.g. multi-unit bridges with massive bridge pontics) in the furnace delay even heating of the objects to be fired.
An even temperature distribution within the firing chamber depends on the type of furnace as well as the size of the firing chamber.
The parameters stipulated in the Instructions for Use are coordinated with Ivoclar Vivadent furnaces (tolerance range ± 10°C).
If a non-Ivoclar Vivadent furnace is used, temperature corrections may be necessary.
At the beginning, open the furnace and wait for the acoustic signal. Subsequently, place the firing tray with the objects in the centre of the firing table and start the program.
Notes on cooling after completion of the firing program
In order to ensure controlled cooling of the restoration after firing, please observe the following notes:
Wait for the acoustic signal or optical indication of the furnace at the end of the firing cycle before removing the firing tray with the fired objects.
Do not touch hot objects with metal tongs.
Allow the objects to cool to room temperature in a place protected from draft.
Do not blast or quench the objects.

55
Firing parameters for Zenostar Art Module
Zenostar Art Module on Zenostar T/MO – Layering Technique/Staining Technique
Zenostar Art Module B°C
Smin
T°C/min
T°C
Hmin
VacuumhPa
Tension releasecooling
min
Stain firing 575 4:00 45 880 1:00-2:00 - -
Glaze firing 575 4:00 45 880 1:00-2:00 - 6
Add-on 575 4:00 45 780 1:00 50 6

56
IPS e.max Ceram on Zenostar T – Staining Technique
IPS e.max Ceram B°C
Smin
t°C/min
T°C
Hmin
V1°C
V2°C
Stain and Characterization firing 403 6:00 60 770 1:00 450 769
Glaze firing 403 6:00 60 770 1:00-2:00 450 769
Add-on after Glaze firing 403 6:00 50 770 1:00 450 699
If several objects (multi-unit bridges with massive bridge pontics or several full-contour restorations) are fired in one firing cycle, the heating of the objects in the furnace may be delayed. This delay can be counteracted by either reducing the heating rate or by extending the holding time at the final temperature.
The heating of the firing chamber depends on the type of furnace as well as the size of the firing chamber!
Firing parameters for IPS e.max Ceram
IPS e.max Ceram on Zenostar T/MO – Layering Technique
IPS e.max Ceram B°C
Smin
t°C/min
T°C
Hmin
V1°C
V2°C
L°C
ZirLiner firing 403 4:00 40 960 1:00 450 959 0
1st Margin firing 403 4:00 40 800 1:00 450 799 0
2nd Margin firing 403 4:00 40 800 1:00 450 799 0
Wash firing 403 4:00 40 750 1:00 450 749 0
1st Dentin-/Incisal firing 403 4:00 40 750 1:00 450 749 0
2nd Dentin-/Incisal firing 403 4:00 40 750 1:00 450 749 0
Stain firing 403 4:00 60 725 1:00 450 724 450
Glaze firing 403 4:00 60 725 1:00 450 724 450
Add-on with Glaze firing 403 4:00 60 725 1:00 450 724 450
Add-on after Glaze firing 403 4:00 50 700 1:00 450 699 450
57
IPS e.max Ceram on IPS e.max ZirPress/Zenostar (Cut-Back, Layering Technique)
IPS e.max Ceram on IPS e.max ZirPressCut-Back, Layering Technique
B°C
Smin
t°C/min
T°C
Hmin
V1°C
V2°C
L°C
ZirLiner firing - prior to waxing up and pressing 403 4:00 40 960 1:00 450 959 0
Wash firing 403 4:00 40 750 1:00 450 749 0
Wash firing Characterization 403 4:00 40 750 1:00 450 749 0
1st Dentin/Incisal firing 403 4:00 40 750 1:00 450 749 0
2nd Dentin/Incisal firing 403 4:00 40 750 1:00 450 749 0
Stain firing 403 6:00 60 725 1:00 450 724 450
Glaze firing 403 6:00 60 725 1:00 450 724 450
Add-on with Glaze firing 403 6:00 60 725 1:00 450 724 450
Add-on after Glaze firing 403 6:00 50 700 1:00 450 699 450
IPS e.max Ceram on IPS e.max ZirPress/Zenostar MO (Staining Technique)
IPS e.max Ceram on IPS e.max ZirpressStaining Technique
B°C
Smin
t°C/min
T°C
Hmin
V1°C
V2°C
L°C
ZirLiner firing - prior to waxing up and pressing 403 4:00 40 960 1:00 450 959 0
Stain and Characterization firing 403 6:00 60 770 1:00-
2:00 450 769 450
Glaze firing 403 6:00 60 700 1:00-2:00 450 799 450
Add-on after Glaze firing 403 6:00 50 700 1:00 450 699 450

58
IPS e.max Ceram on IPS e.max Zirpress/ Zenostar restorations (Gingiva Technique)
IPS e.max Ceram on IPS e.max ZirPress Gingiva Technique
B°C
Smin
t°C/min
T°C
Hmin
V1°C
V2°C
L°C
ZirLiner firing - prior to waxing up and pressing 403 4:00 40 960 1:00 450 959 0
Wash firing 403 4:00 40 750 1:00 450 749 450
Wash firing Characterization 403 4:00 40 750 1:00 450 749 450
1st Dentin/Incisal firing 403 4:00 40 750 1:00 450 749 450
2nd Dentin/Incisal firing 403 4:00 40 750 1:00 450 749 450
Stain firing 403 6:00 60 725 1:00 450 724 450
Glaze firing 403 6:00 60 725 1:00 450 724 450
Add-on with Glaze firing 403 6:00 60 725 1:00 450 724 450
Add-on after Glaze firing 403 6:00 50 700 1:00 450 699 450

59

6730
67/e
/201
4-08
-05/
Rev
.001
Wieland Denta l sets the s tandards in denta l technology and s tands for innovat ion
and qual i ty . As a medium-s ized enterpr i se wi th over 140 years ‘ exper ience we are
one of the wor ld‘s leading suppl iers in the f ie ld of dental technology. Future-ready
integrated technologies and materials are the hallmarks of our expertise and prowess.
Wieland Dental opens up the way to progress in dental technology. www.wieland-dental.de
LEADING DIGITAL ESTHETICS
Wieland Dental +Technik GmbH & Co. KG
Lindenstraße 2, 75175 Pforzheim, Germany
Fon +49 72 31 / 37 05 - 0 � [email protected]
www.wieland-dental.de