instructions for assembly and operation - themojack · see page 11 for hydraulic bottle jack...
TRANSCRIPT

Ver. 071613
Instructions for Assembly and OperationItem #35801
Bottle Jack Item #35090-6T

MoJack Motorcycle Lift MoJack Motorcycle Lift
2 3
Introduction
Patent pending.© 2013 (MoJack Distributors, LLC.)
MoJack and the MoJack logo are registered trademarks of MoJack Distributors, LLC.All rights reserved.
This manual contains assembly, parts, operating, maintenance, adjustment and safety instructions for your MoJack Motorcycle lift.
BEFORE USING YOUR MOJACK MOTORCYCLE LIFT, CAREFULLY READ THIS MANUAL IN ITS ENTIRETY.
By following these operating, maintenance and safety instructions, you will prolong the life of your MoJack lift and promote safe operation.
If additional information is needed, or should you require a trained service mechanic, contact your authorized MoJack equipment dealer or distributor.
All MoJack parts are thoroughly tested and inspected before leaving the factory to ensure that they comply with all relevant safety standards.
NOTE: Please save this manual for future reference.
NOTE: Location of unit Serial Number.
Warnings and Safety Instructions
IMPORTANT: The MoJack Motorcycle Lift is intended for use with motorcycles only. Submit your questions online at:
www.theMoJack.com
Need Assistance?
Please DO NOT return this product to the store.Our Customer Service Department is ready to help!
1-877-575-3173
Read and understand all safety and operating instructions before using the MoJack Motorcycle Lift.
Never allow anyone unfamiliar with the safety or operating instructions to use the MoJack Motorcycle Lift.
Follow all safety and servicing instructions provided by the motorcycle manufacturer before using the lift.
Do not modify the MoJack Motorcycle Lift in any way. Any modifications will void any and all warranties and could compromise your personal safety.
When using the MoJack Motorcycle Lift, keep ALL bystanders at a safe distance away from the lift.
The MoJack Motorcycle must be used on a solid level surface.
Always stop engine and remove key before beginning any work on the motorcycle.
Never operate the engine while using the MoJack Motocycle Lift.
Safety Stops must be engaged before starting any service on motorcycle. Maximum height is 18” (45cm)
Do not remove safety warnings or decals from MoJack Motorcycle Lift.
Before each use, always check for any worn, loose or damaged parts on the MoJack Motorcycle Lift. If any damaged parts are present, do not use the MoJack Motorcycle Lift and contact MoJack at 1-877-575-3173.
Do not climb on motorcycle while it is lifted, being lifted or being lowered.
No one should be on the motorcycle while it is lifted, being lifted or being lowered.
Failure to follow these warnings may result in property damage and serious bodily injury or death.
Fully read, understand and follow all Safety, Warning and Operating instructions for Hydraulic Bottle Jack (Item #35090-6T) before use. See page 11 for Hydraulic Bottle Jack instructions.
For maximum safety and stability, please use straps when lifting a motorcycle. Straps are NOT included with the Motorcycle Lift.
MoJack Motorcycle Lift MoJack Motorcycle Lift
4 5
LIMITED WARRANTYFor one year of use, MoJack warrants the product against failure due to defect in material or workmanship when product is used properly. MoJack will replace any defective part at no cost. This warranty does not cover any product that has been altered or adjusted, or any product that has been misused or abused. THIS IS THE CUSTOMER’S SOLE AND EXCLUSIVE REMEDY. MOJACK DISCLAIMS ALL IMPLIED WARRANTIES, INCLUDING THE WARRANTY OF MERCHANTABILITY AND FITNESS FOR A PARTICULAR PURPOSE. MOJACK SHALL NOT BE LIABLE FOR ANY INCIDENTIAL OR CONSEQUENTIAL DAMAGES. SOME STATES OR PROVINCES DO NOT ALLOW THE EXCLUSION OR LIMITATION OF THE IMPLIED WARRANTIES OR THE REMEDIES FOR BREACH OF THE IMPLIED WARRANTIES, SO THESE EXCLUSIONS MAY NOT APPLY TO YOU. THIS LIMITED WARRANTY GIVES YOU SPECIFIC LEGAL RIGHTS, AND YOU MAY ALSO HAVE OTHER RIGHTS WHICH VARY FROM STATE TO STATE OR PROVINCE TO PROVINCE.
What does this warranty cover?This warranty covers against a failure due to a defect in material or workmanship within one year of purchase.
What does this warranty NOT cover?This warranty does not cover any MoJack which has been altered or adjusted in any way from its original model. It will not cover any MoJack which has been damaged due to misuse, abuse, accident or negligence. This warranty does not cover incidental or consequential damages.
What is the period of coverage?One-year warranty on lift frame and bottle jack from date of purchase for the original owner.
What will MoJack do to correct problems?We will replace any defective part (within the coverage period) at no charge.
How can I get service?In order to be eligible for service under this warranty you MUST register your MoJack within thirty (30) days of purchasing. After the thirty (30) day period, you must provide proof of purchase (receipt) to register the product. Please register your new MoJack lift on our website at www.themojack.com or by calling our toll-free number 1-877-466-5225.
How do I contact MoJack about a warranty issue?You can contact us from our website at www.themojack.com or by calling our toll-free number 1-877-575-3173.
Do I have other rights under State Law?This warranty gives you specific legal rights, and you may also have other rights which vary from state to state.
What is the return policy?Please do not return to store. Contact MoJack for return policies and procedures at our toll-free number 1-877-575-3173 or by email at [email protected].
How do I contact MoJack?You can call our toll-free number 1-877-575-3173 or by email at [email protected].
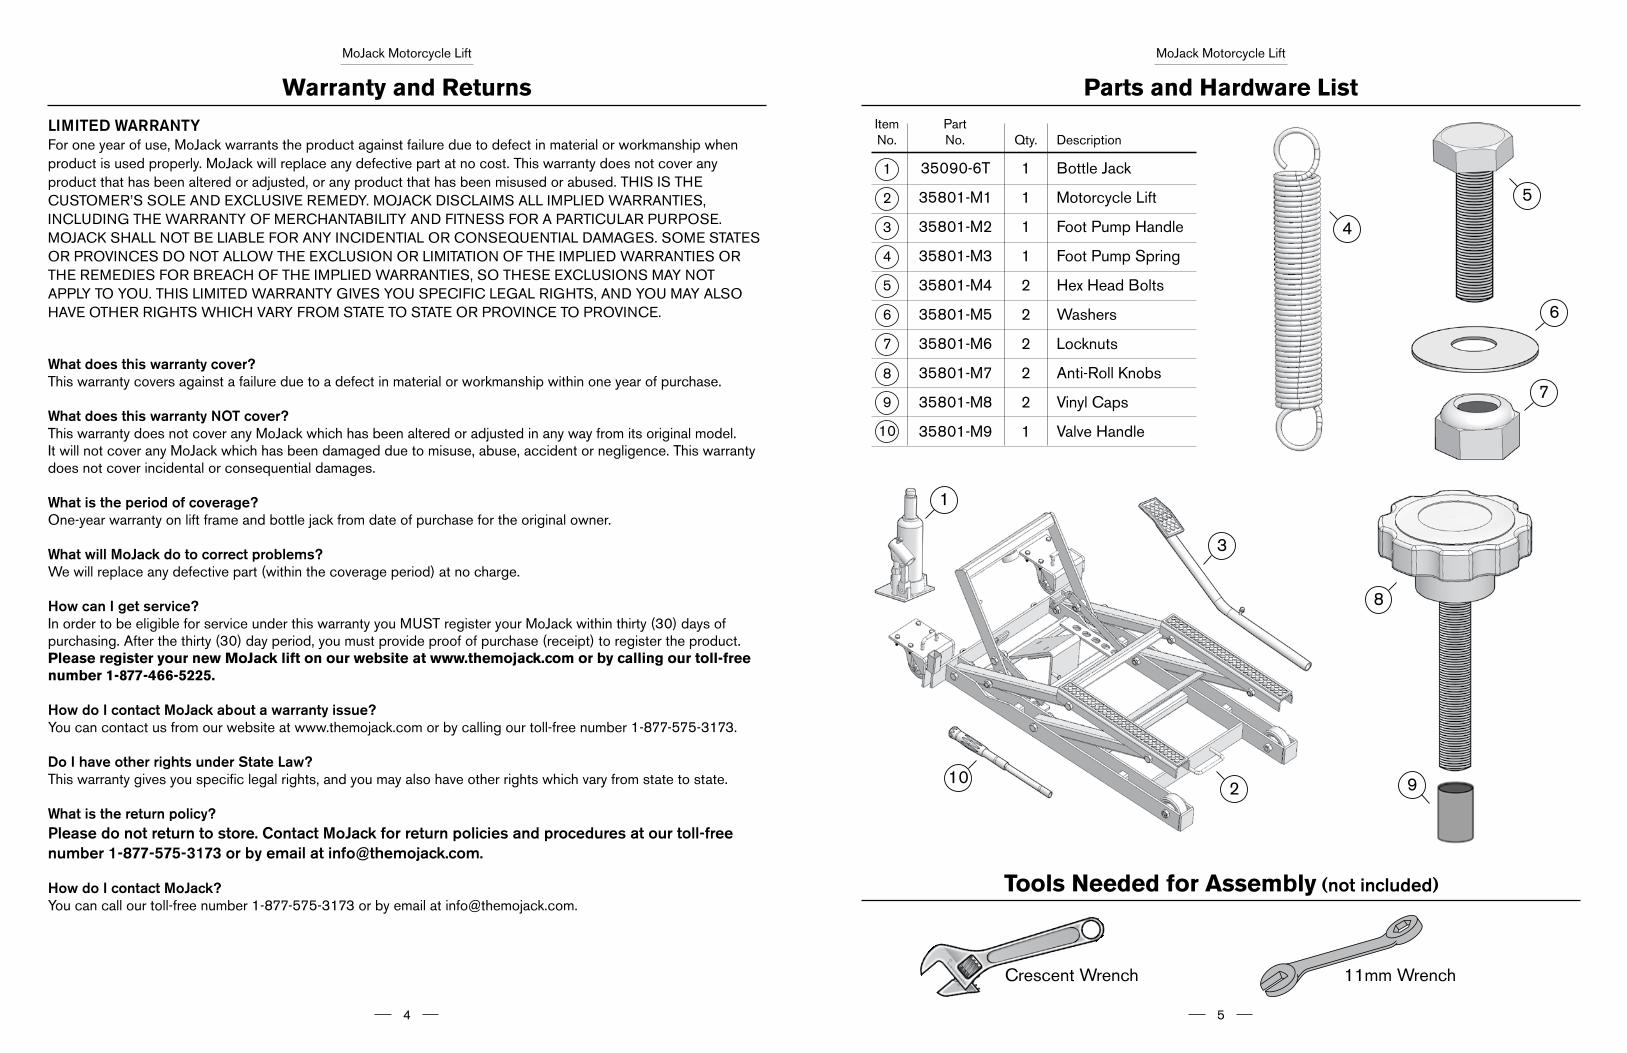
Warranty and Returns Parts and Hardware List
9
1
210
Tools Needed for Assembly (not included)
11mm Wrench
5
PartNo.
Qty.
Description
Bottle Jack
Motorcycle Lift
Foot Pump Handle
Foot Pump Spring
Hex Head Bolts
Washers
Locknuts
Anti-Roll Knobs
Vinyl Caps
Valve Handle
35090-6T
35801-M1
35801-M2
35801-M3
35801-M4
35801-M5
35801-M6
35801-M7
35801-M8
35801-M910
1
1
1
1
2
2
2
2
2
1
ItemNo.
1
2
3
4
8
7
6
9
3
Crescent Wrench
8
7
6
5
4

MoJack Motorcycle Lift MoJack Motorcycle Lift
6 7
Assembly InstructionsSTEP 3
Attaching the Bottle Jack
Attach the Bottle Jack to the Angled Plate on the lift by placing the Hex Head Bolts through the Bottle Jack base and the Angled Plate. Place the Washers on the Hex Head Bolt on the underside of the Angled Plate and loosely thread on and Locknuts .
NOTE: Do NOT tighten Locknuts at this time.
Lift the Cross Brace while rotating the Pocket Arm over the head of the Bottle Jack. Once in place, fully tighten the Hex Head Bolts and Locknuts.
STEP 2
THIS COMPLETES ASSEMBLY.
Attaching the Foot Pump Handle
Slide the Foot Pump Handle onto the Bottle Jack by aligning the bolt on the Foot Pump Handle with the notch on the Bottle Jack. Tighten bolt on Foot Pump Handle.
1
5
7
6
STEP 1
Remove MoJack Motorcycle Lift from package.
Inventory items to be certain all parts and hardware are present. If any parts or hardware are missing, please contact MoJack at 1-877-575-3173 or email us at [email protected].
3
Attaching the Anti-Roll Knobs
Thread the Anti-Roll Knobs through the nuts welded to the outside of the lift frame. Continue to rotate the Anti-Roll Knobs until they are 3/4” below the bottom of the nut.
Press on the Vinyl Caps to the ends of the Anti-Roll Knobs.
STEP 5
8
Attaching the Foot Pump Spring
Hook the Foot Pump Sping to the bolt on the lift frame. Then attach the other side of the Foot Pump Spring to the hole on the Foot Pump Handle.
STEP 4
4
9
Bolt
Bolt
Bolt
VinylCap
5
5
1
Pocket Arm
5
76

MoJack Motorcycle Lift MoJack Motorcycle Lift
8 9
Operating Instructions
Before using the MoJack Motorcycle lift, carefully read this manual in its entirety.
The Operating Instructions will show how to operate the MoJack Motorcycle Lift.
Familiarize Yourself with the MoJack Motorcycle Lift
• Practice raising and lowering the MoJack Motorcycle Lift before attempting to lift a motorcycle (see Steps 3-6 on how to raise and lower a motorcycle).
Operating InstructionsSTEP 3
Preparing the Bottle Jack for lifting
• Use the Valve Handle to close the hydraulic valve on the Bottle Jack
• Rotate both Safety Stops that are located on either side of the Bottle Jack into the lifting position.
STEP 2
Aligning the Lift with Motorcycle
The lift must be used on a solid, level surface
• Park motorcycle on kickstand
• Roll the lIft under the motorcycle approaching from the carburator side of the motorcycle
• Once lift is in correct alignment with motorcycle, rotate the Anti-Roll Knobs clockwise until they are touching the ground and the lift cannot roll
STEP 1
STEP 4
Lifting the motorcycle
• Leave motorcyle on kickstand• Raise the lift to the motorcycle by pumping the
Bottle Jack using the Foot Pump Handle. Be careful to keep the lift aligned correctly with the motorcycle (See Step 2 for correct alignment)
• Make sure Anti-Roll Knobs are touching the ground and the lift cannot roll
• Raise motorcycle to desired height
NOTE: For maximum stability, the motorcycle should be raised to the maximum lift height.
NOTE: For maximum safety and stability, please use straps when lifting a motorcycle. Straps are NOT included with the Motorcycle Lift.
Bottle Jack
Hydraulic Valve
Valve Handle
CLOSED
NOTE: The handle can be stored in the pocket located on the caster wheel bracket.
NOTE: When lifting Electra Glide™ or Road King™ models, align the rubber coated lift table toward the rear to fit into the cross brace that is built under the frame.
When lifting Dyna™ models, align the rear lift table to contact the frame on the back side of the transmission pan.
On all other models of motorcycles, align the front lift table approximately 1/2” to 1” behind the lower bend in the frame.
NOTE: May need to adjust the jack alignment depending on the model style, size, and weight.
Safety Stopin correctlifting position
Bottle Jack

11
MoJack Motorcycle Lift
10
Bottle Jack
Hydraulic Valve
Valve Handle
OPEN
Operating Instructions
STEP 6
Lowering the motorcycle
• Raise the lift slightly by pumping the Bottle Jack• Rotate the Safety Stops into the stored position• Make sure the motorcycle kickstand is down to
hold the motorcycle when the lift is lowered• Slowly turn the hydraulic valve on the Bottle Jack
counter-clockwise to let the motorcycle down to rest on the kickstand
STEP 5
THIS COMPLETES OPERATION INSTRUCTIONS.
Securing the lift for working on motorcycle
• Once motorcycle has be raised to the desired height, make sure that both Safety Stops on the lift have engaged into the Stop Notches
• Open the valve on the Bottle Jack to lower the motorcycle onto the Safety Stops. The Safety Stops will hold the weight of the motorcycle.
• Once the Safety Stops are fully supporting the weight of the motorcycle, close the hydraulic valve on the Bottle Jack
Safety Stop engaged in Safety Notches
Do NOT work under the motorcycle until the Safety Stops are set and the hydraulic pressure is relieved from the Bottle Jack.
Rotate Safety Stopto storage position
Raise lift slightly to remove weight fromthe Safety Stops
Operating Instructions & Parts Manual
Hydraulic Bottle Jack
Capacity:6 Ton
Model:35090-6T
Model 35090-6T Shown
Made in China
Distributed by:
MoJack Distributors, LLC3535 N. Rock RoadWichita, KS 672261-877-575-3173
www.theMoJack.com

Hydraulic Bottle Jack Hydraulic Bottle Jack
12 13
Operating Instructions & Parts Manual
Model
35090-6T
Capacity
6 Ton
Base Size (LxW)
4 1/4” X 4”
Min. Height
8 5/8”
Max. Height*
16 3/4”
Saddle
Ram
Handle Sleeve
Pivot Points
Handle Assembly
Resevoir
Oil Filler Plug
Release Valve
Operating Instructions
Save these instructions. For your safety, read, understand, and follow the information provided with and on this jack. The owner and operator of this equipment shall have an understanding of this jack and safe operating procedures before attempting to use. The owner and operator shall be aware that use and repair of this product may require special skills and knowledge. Instructions and safety information shall be conveyed in the operator’s native language before use of this jack is authorized. If any doubt exists as to the safe and proper use of this jack, remove from service immediately. Inspect before each use. Do not use if broken, bent, cracked or damaged parts are noted. Any jack that appears damaged in any way, or operates abnormally shall be removed from service immediately. If the jack has been or suspected to have been subjected to a shock load (a load dropped suddenly, unexpectedly upon it), immediately discontinue use until jack has been checked by an authorized service center. It is recommended that an annual inspection be done by qualified personnel. Labels and Operator’s Manuals are available from manufacturer.
PRODUCT DESCRIPTIONBottle Jacks are designed for lifting, but not sustaining, loads ranging from 2 tons thru 6 tons depending on the rated capacity of the jack. They are designed to be used vertically. After lifting, loads must be immediately supported by appropriate means. Each model is suitable for use in an appropriately rated and designed vertical or bench press structure. These jacks are not recommended for use in lifting or positioning construction trailers, houses and/or other building structures. These jacks comply with applicable ASME / ANSI Standards.
SPECIFICATIONS
Study, understand, and follow all instructions before operating this device. Do not exceed rated capacity. Use only on hard, level surfaces. Lifting device only. Immediately after lifting, support the load with appropriate means. Failure to heed these markings may result in personal injury and/or property damage.
WARNING
BEFORE USE • Verify that the product and the application are compatible. If in doubt call MoJack Customer Service at 1-877-575-3173.
• Before using this product, read the operator’s manual completely and familiarize yourself thoroughly with the product and the hazards associated with its improper use.
• Assemble handle sections by lining up spring clip of smaller diameter handle section with slot of larger handle section. Press down the spring clip and slide smaller diameter section until clip is secure in slot.
• With the notched end of the provided handle, engage and open the release valve (counterclockwise no more than 1/4 turn).
• With ram fully retracted, locate and remove the oil filler plug. Insert the handle into the handle sleeve, then pump 6 to 8 strokes. This will help release any pressurized air which may be trapped within the reservoir. Ensure the oil level is just below the oil filler plug hole. Reinstall the oil filler plug.
• Check to ensure that the pump operates smoothly before putting into service. Replace worn or damaged parts and assemblies through MoJack Customer Service only at 1-877-575-3173.
• Inspect before each use. Do not use if bent, broken or cracked components are noted.
OPERATIONLifting:
1) Assemble handle, ensure that spring clips align with slots.
2) Secure the load with wheel chocks to prevent inadvertent shifting and movement.
3) Position the jack near desired lift point.
4) Close the release valve by turning it clockwise with the provided handle until it is firmly closed.
CAUTION: Use the handle provided with this product or an authorized replacement handle to ensure proper release valve operation. When using to lift vehicle, lift only on the manufactureris recommended lift points and in accordance with the published guidelines in your vehicle owners manual. Always use jack stands to support the load immediately after lifting.
5) Insert and secure handle into handle sleeve. Pump handle until saddle contacts load.
6) Raise load to desired height, then immediately transfer the load to appropriately rated support devices such as jack stands.
Lowering:
1) Raise load enough to carefully remove jack stands.
2) Insert handle onto release valve and SLOWLY turn handle counterclockwise, but no more than 1/4 turn.
3) If load fails to lower:
A) Carefully transfer the load to another lifting device and jack stands.
B) Carefully remove affected jack, and then the jack stands. Lower the load, again by slowly turning the release valve no more than 1/4 turn.
4) After removing jack from under the load, push ram and handle sleeve down to reduce exposure to rust and contamination.
Be sure all tools and personnel are clear before lowering load. No alterations shall be made to this device. Only attachments andlor adapters supplied by the manufacturer shall be used.
WARNING
WARNING

15
Hydraulic Bottle Jack
14
Notes
Important: Use only a good grade hydraulic jack oil. Avoid mixing different types of fluid and NEVER use brake fluid, turbine oil, transmission fluid, motor oil or glycerin. Improper fluid can cause premature failure of the jack and the potential for sudden and immediate loss of load.
ADDING OIL1) With saddle fully lowered and pump piston fully depressed, set jack in its upright, level position. Remove oil filler plug.
2) Fill until oil is level with the filler plug hole, reinstall oil filler plug.
CHANGING OILFor best performance and longest life, replace the complete fiuid supply at least once per year.
1) With saddle fully lowered and pump piston fully depressed, remove the oil filler plug.
2) Lay the jack on its side and drain the fluid into a suitable container.
NOTE: Dispose of hydraulic fiuid in accordance with local regulations.
3) Fill with good quality jack oil. Reinstall oil filler plug. We recommend Mobil DTE 13 or equivalent.
LUBRICATION1) A coating of light lubricating oil to pivot points, axles and hinges will help to prevent rust and assure that wheels, casters and
pump assemblies move freely.
2) Periodically check the pump piston and ram for signs of rust or corrosion. Clean as needed and wipe with a clean, oil soaked rag.
NOTE: Never use sandpaper or abrasive material on these surfaces.
STOARAGEWhen not in use, store the Bottle Jack with pump piston and ram fully retracted.
TROUBLESHOOTING
Maintenance
Symptom
Jack will not lift load
Jack bleeds off after lift
Jack will not lower after unloading
Poor lift performance
Will not lift to full extension
Possible Causes
• Release valve not tightly closed• Overload condition
• Release valve not tightly closed• Overload condition• Hydraulic unit malfunction
• Reservoir overfilled• Linkages binding
• Fluid level low• Air trapped in system
• Fluid level low
Corrective Action
• Ensure release valve is tightly closed• Remedy overload condition
• Ensure release valve is tightly closed• Remedy overload condition• Contact MoJack Customer Service
• Drain fluid to proper level• Clean and lubricate moving parts
• Ensure proper fluid level• With ram fully retracted, remove oil filler
plug to let pressurized air escape, reinstall oil filler plug
• Ensure proper fluid level

Find all these hard working MoJack products at www.theMoJack.com
MoJack XT™500 lb Capacity
MoJack PRO™750 lb Capacity
Push Mower Lift WorkBench Attachment™
MoJack ZR™250 lb Capacity
MoJack EZ™300 lb Capacity