instruction manual...instruction manual 4000 series digital portable analyzer service department...
TRANSCRIPT

120-00008 REV B 4000 DIGITAL MANUAL – NEW OVERLAY Page 1 of 28
Instruction Manual
4000 Series Digital Portable Analyzer
Service Department
(800) 458-6153 ext. 121
(818) 882-2331 ext. 121
FAX (818) 341-0642 E-mail: [email protected]

120-00008 REV B 4000 DIGITAL MANUAL – NEW OVERLAY Page 2 of 28
THIS PAGE INTENTIONALLY LEFT BLANK

120-00008 REV B 4000 DIGITAL MANUAL – NEW OVERLAY Page 3 of 28
TABLE OF CONTENTS
SECTION TITLE PAGE
1.0 Equipment Description Front Panel 4 Rear Panel 6 Right Side Panel 7 Internal components 8 2.0 Operating Instructions Setting the Alarm 9 Zeroing the Instrument 10 Sampling 11 3.0 Calibration Introduction 12 Sample Bag & Pressurized Cylinder Calibration 14 Calibration Procedure 15 4.0 General Maintenance Battery Life 16 Battery Charging & Replacement 16 Water loss in Refillable Sensors 18 Long Term Storage 23 Post Storage Startup 23 5.0 Troubleshooting 24 6.0 Warranty 25 7.0 Return Authorization 26 8.0 Appendix
INTERFERING GAS DATA 27
SCRUBBER INFORMATION 31

120-00008 REV A 4000 DIGITAL MANUAL – NEW OVERLAY Page 4 of 28
Introduction
Note: It is not necessary to calibrate the monitor when received from the Interscan or an authorized distributor. All Interscan monitors are calibrated at the factory prior to shipment.
The Interscan 4000 Digital series operates on the principle of pulling a sample (Sample draw) through a sensor. The Electrochemical sensor is manufactured by Interscan. Electrochemical means that it produces an electrical current proportional to the level of gas passing through. The large size of the Interscan sensors results in larger reactive surface area which yields greater sensitivity.
Equipment Description
1.0 Front Panel
(fig. 1)

120-00008 REV B 4000 DIGITAL MANUAL – NEW OVERLAY Page 5 of 28
Designation Function
LCD Display: Indicates gas level when function switch is in ZERO, SAMPLE INACTIVE or SAMPLE ACTIVE, and battery level when on BAT. TEST A or B.
ALARM Light: LED. Flashes ON/OFF when alarm set point is exceeded.
ALARM SET: 25-Turn potentiometer with a screwdriver adjustment. Sets the alarm trip point at the desired gas level. (low alarm set must be greater than 5% of the full scale).
SPAN/CAL: 25-Turn potentiometer with a screwdriver adjustment. Sets display to correspond to the concentration of the calibration gas used for calibrating the instrument or to the level specified on ECS certificate.
FUNCTION SWITCH: Rotary switch as follows:
OFF: Analyzer power is OFF.
SAMPLE
INACTIVE: Analyzer power is ON (pump is OFF), Sampling is inactive.
SAMPLE
ACTIVE: Analyzer power and pump are on. Also in this position the analyzer is zeroed. Sample measurements and calibration are accomplished in the sample mode.
BAT. TEST A: Indicates state of charge of the Nickel-Cadmium (NiCd) batteries on the LCD Display. These batteries power the pump & alarm. Recharge if the LCD Display level falls to or below 100 (ignore decimal point).

120-00008 REV B 4000 DIGITAL MANUAL – NEW OVERLAY Page 6 of 28
BAT. TEST B: Indicates state of charge of the “C” size alkaline batteries on the LCD Display. These batteries power the main circuitry, display and are NOT re-chargeable. Replace if the LCD Display level falls to or below 100 (ignore decimal point). You must allow an overnight stabilize prior to use if the batteries are replaced. Batteries are to be checked every 30 days.
ZERO: 10-Turn Potentiometer. Allows the meter to be adjusted to zero, by compensating for any background signal.
1.1 Rear Panel
(fig. 2)

120-00008 REV B 4000 DIGITAL MANUAL – NEW OVERLAY Page 7 of 28
Designation Function
INLET: ¼” O.D. Quick connect or compression gas fitting.
OUTLET: ¼” O.D. Quick connect or compression gas fitting.
RECORDER OUTPUT: ¼” phone jack for Analog recorder output connection. Typically 0-100mV. Tip – positive, Ring – ground.
CHARGER INPUT: 3.5mm phone jack for 9V DC, 100mA charger input. Tip – positive, Ring – ground.
SENSOR SCREWS: Used to hold Sensor or Sensor base in place.
1.2 Right Side Panel
(fig. 3)

120-00008 REV B 4000 DIGITAL MANUAL – NEW OVERLAY Page 8 of 28
AUDIBLE ALARM: Piezoelectric Horn, sounds when alarm set point is exceeded.
The above (fig 3) page 7, #12 indicates two #1 Phillips-head screws located on the right side panel. Removing these screws allows access to the internal components. Do not remove any other screws
1.3 Internal Components
(fig. 4)

120-00008 REV B 4000 DIGITAL MANUAL – NEW OVERLAY Page 9 of 28
Operating Instructions
2.0 Setting the Alarm
Normally, the alarm is set at the Factory at 50% of full scale. The alarm can be reset to any desired level by following the procedure below. Minimum alarm level must be greater than 5% of the full scale measuring range.
Set FUNCTION switch to SAMPLE INACTIVE. Using the ZERO control, advance the LCD display to the desired alarm set point. Some analyzers require the use of span tool (provided). Adjust the ALARM SET (fig. 1 pg. 4) control until the alarm sounds. Adjust the ZERO control slightly counterclockwise until the alarm is silent. To confirm setting slowly adjust the ZERO control clockwise until the alarm sounds. Re-adjust the ALARM SET control if necessary. Adjust the ZERO control for a reading of “0” on the display.
2.1 Zeroing the Analyzer
The Analyzer must always be zeroed, prior to use.
Zero adjustments must be made in the SAMPLE ACTIVE mode, i.e. with the pump on, in air free of interfering gases. If necessary, use zero air or a C-12 filter (provided) to zero in the sampling area. When using C-12 zero filter, connect externally to gas inlet. Allow reading to stabilize, before making final zero adjustment, (stabilization can take approximately 20 minutes). The C-12 filter must be removed after zeroing the analyzer.
120-00008 REV B 4000 DIGITAL MANUAL – NEW OVERLAY Page 10 of 28
2.2 Sampling
Analyzer must be zeroed prior to sampling (section 2.1).
Set the FUNCTION switch to SAMPLE ACTIVE to activate the pump. If the INLET or OUTLET is blocked, the pump may stall. Note: Running the Analyzer with blocked INLET or OUTLET may lead to the sensor leaking caustic electrolyte leading to analyzer damage. Power analyzer off, and clear the blockage. To reset the pump, set the FUNCTION switch to SAMPLE INACTIVE momentarily and then switch again to SAMPLE ACTIVE.
Nominal sample rate in MOST analyzers is approximately 1.0, 0.2 liter per minute. NOTE: For hydrazine analyzers with the
measuring range of 0-100ppb the sample flow rate is 2.2 0.2 liters per minute. The Average sample run time, starting with fully charged “C” NiCd batteries, is 12 hours. If the BATTERY TEST “A” indication is down to 100 on the LCD display, the flow rate may have started to decrease. This is usually not a problem unless very precise readings are required.
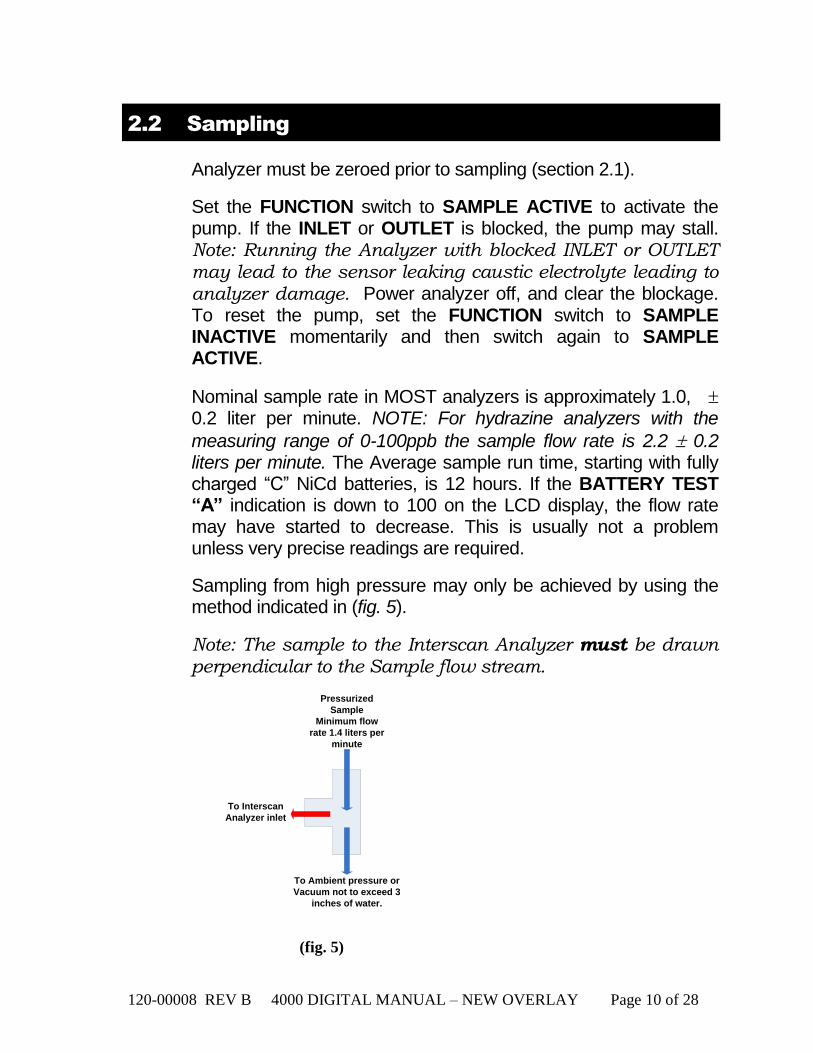
Sampling from high pressure may only be achieved by using the method indicated in (fig. 5).
Note: The sample to the Interscan Analyzer must be drawn perpendicular to the Sample flow stream.
Pressurized
Sample
Minimum flow
rate 1.4 liters per
minute
To Interscan
Analyzer inlet
To Ambient pressure or
Vacuum not to exceed 3
inches of water.
(fig. 5)

120-00008 REV B 4000 DIGITAL MANUAL – NEW OVERLAY Page 11 of 28
Calibration
3.0 Introduction
All analyzers are factory calibrated prior to shipment.
There is no easy answer as to how often a monitor should be calibrated. This is strictly a function of the application (gas concentration and frequency of exposure to target gas). The purpose for calibration is to compensate for any possible decrease in sensor sensitivity. The primary cause of sensitivity decrease is excessive loss of water by evaporation. A secondary cause may be by contamination from unknown sources. H2S sensors show an additional decrease in sensitivity due to internal sulfur formation, the rate of which depends on the gas concentration.
3.1 INTERSCAN’S Sensor Express - Electronic
Calibration Service
Interscan’s SENSOR EXPRESS® program streamlines downtime by sending you a pre-calibrated sensors on a regular basis per your needs, without the burden of returning sensors to our factory for re-certification. The sensors are shipped to you either twice , three times, or four times per year at your discretion.
Follow the instructions received with the Sensor, allow to stabilize, and the instrument is ready for use. The factory recommended procedure for calibrating all INTERSCAN analyzers, involves the use of certified calibration gas or a permeation device. Besides being essential for calibration, having a known certified gas standard on hand allows the user to test the analyzer at any time to determine that it “really works”
As indicated on the certification sheet, the Sensor Express®. It does not certify the analyzer as a whole. Most importantly, the Sensor Express® program is not a substitute for basic analyzer maintenance, nor does it check for malfunction of the analyzer components.

120-00008 REV B 4000 DIGITAL MANUAL – NEW OVERLAY Page 12 of 28
3.2 Sample Bag Calibration & Pressurized Cylinder
Calibration
Whatever the source of calibration gas, the recommended method is to collect the gas in the proper sample bag, which is then attached to the analyzer INLET. The calibration gas is drawn from the proper sample bag through the sensor. An exception to the use of a sample bag is for those gases, which are reactive with, or chemisorbed by the bag itself (e.g. Chlorine, Hydrazine). Teflon® or Tedlar® bags are suitable for H2S, SO2, NO and NO2. Several bag materials are suitable for CO. Contact the Factory for recommendations.
The sample bag method is the factory-recommended method for calibration. Since an internal pump is used, the same flow rate conditions during the sample and the calibrate modes are assured, eliminating errors due to flow rate differences. For most applications, using a bag is the simplest procedure.
A regulated pressurized certified cylinder fitted with a tee-manifold (fig. 6) and unrestricted vent is a good procedure in place of the sample bag, as long as the flow rate of the gas is at least 140 percent that of the sample pump.
Pressurized
Ceritified gas
Minimum flow
rate 1.4 liters per
minute
To Interscan
Analyzer inlet
To Ambient pressure or
Vacuum not to exceed 3
inches of water.
(fig. 6)
120-00008 REV B 4000 DIGITAL MANUAL – NEW OVERLAY Page 13 of 28
3.3 Calibration Procedure
Analyzer must be zeroed prior to calibration (sec 2.1).
1. For all gases, except Chlorine or other chemisorbable types, fill the 5 liter sample bag with calibration gas, and attach it to the external inlet fitting. This is best done by attaching a short length 4 inch (101.6mm) of 1/4 inch (6.35 mm) O.D. Teflon tubing to the sample bag, then inserting into the inlet fitting.
2. Set the FUNCTION switch to SAMPLE ACTIVE.
3. Allow 2 to 3 minutes for the reading to stabilize, and by using the SPAN/CAL control, set the display to match the calibration gas concentration being used.
4. Remove the sample bag from the analyzer and allow the display to stabilize.
5. The analyzer is now calibrated and set up for operation.
NOTE: If you require additional information on Calibration procedures, please contact the Service Department at 1-800-458-6153 ext 121 or e-mail [email protected]

120-00008 REV B 4000 DIGITAL MANUAL – NEW OVERLAY Page 14 of 28
General Maintenance
4.0 Battery Life
Because of current requirements of the circuitry, “C” size alkaline battery life should be check on a monthly basis, whether the unit is operating or not. Note: Batteries vary in capacity by manufacturer and may provide more battery life. Analyzer malfunction, as a result of low battery, will be evident as either inability to zero the monitor or clipping of the display at a fixed reading below full scale.
Nickel-cadmium battery life is indeterminate. It is somewhat dependent upon how well the charge level is maintained.
4.1 Battery Charging and Replacement
All models of the 4000 Series analyzers use two “C” size alkaline batteries. These are located on the hinged door, right side (fig. 4 pg. 8). Polarity is marked on the door over the battery holder.
A few minutes warm-up/stabilization is needed before using the analyzer if alkaline batteries are replaced before Battery Test “B” indicates a low battery condition (100). Replace “C” alkaline batteries and allow monitor to stabilize overnight if the batteries are low or dead. The FUNCTION switch should be set to OFF during this time. This is performed to allow the sensor time to stabilize.
The rechargeable batteries are ½ “C” size NiCd and are rated at 0.80 ampere hours. They are mounted on the hinged door, left side (fig. 4 pg. 8). Polarity is marked on the door, over the battery holder. All models use four ½ cell “C” size NiCd batteries. Condition is shown in the BATTERY TEST “A”, FUNCTION switch position. The NiCd battery voltage changes quite rapidly as it approaches the recharge point, which makes accurate display indication difficult. It is recommended that the batteries be

120-00008 REV B 4000 DIGITAL MANUAL – NEW OVERLAY Page 15 of 28
recharged if the reading in BATTERY TEST “A” is at 100 (ignoring the decimal place). Allowing the reading to drop below 100 is not recommended. Note: NiCd batteries can develop cell memory. Cell memory is caused by running the analyzer on battery power for a short period of time REPEATEDLY i.e: Running the analyzer for 20 minutes and then recharge. If this occurs repeatedly, the NiCd battery life will only retain a 20 minute charge memory.
The charger is an external 9V DC, 500mA transformer and is connected to the rear of the unit prior to charging. The tip is positive and the ring ground. The FUNCTION switch should be set to OFF or SAMPLE INACTIVE when charging. The recommended charge time is 16 hours.
4.2 Water loss in Refillable sensors.
(fig. 7)
All sensors provided with a fill port require that the electrolyte matrix is maintained in a near-saturated condition in order to provide optimum performance. This is achieved by injecting distilled or deionized water into the sensor via the red plug, using the plastic syringe (provided).

120-00008 REV B 4000 DIGITAL MANUAL – NEW OVERLAY Page 16 of 28
Refer to (fig. 7 pg. 16). Refillable sensors are identified by the red fill plug in the side of the sensor. The fill plug location may vary from (fig. 7 pg. 16). There are two types of refillable sensors. The S-type is a shorter sensor of slightly over 2 1/2 inches ( 64 mm) in height; the P-type is almost 4 inches (104 mm) in height. “P” and “S” type sensors connect to the analyzer by different connection methods.
For portable survey monitors, the sensor should be removed and weighed every 1 to 2 months, depending upon usage. The weight loss is indicated on the weight label on the side of the sensor.
Sensor weight is restored be removing the sensor from the analyzer and comparing the current weight of the sensor with its original weight (in grams). Sensor weight is indicated on a label located on the side of the sensor.
There are three types of gas fittings used depending on the age of the original sensor and the gas being measured.
(fig. 8)
Male elbow ¼ O.D. tube compression fitting
This is a compression fitting comprised of the body, nut and two ferrules (fig. 8). Disconnect by loosening the nut until the tubing can be pulled away from the body. To re-attach insert the tubing and tighten the nut. Do NOT over tighten the nut as this will damage the nut and fitting

120-00008 REV B 4000 DIGITAL MANUAL – NEW OVERLAY Page 17 of 28
(fig. 9)
Quick connect male elbow
This is a quick connect system comprised of the body, o-ring and ferrule (fig. 9). Disconnect by pushing on the ring where the tubing enters the fitting and gently pulling on the tubing. Re-attach by inserting the tubing all the way in and then gently pull backward.
(fig. 10)
Barbed male elbow
The fitting uses a barbed connector system (fig. 10). Disconnect by pulling on the tubing. Re-attach by pushing the tubing onto the fitting until firmly seated.
120-00008 REV B 4000 DIGITAL MANUAL – NEW OVERLAY Page 18 of 28
Fig. 11
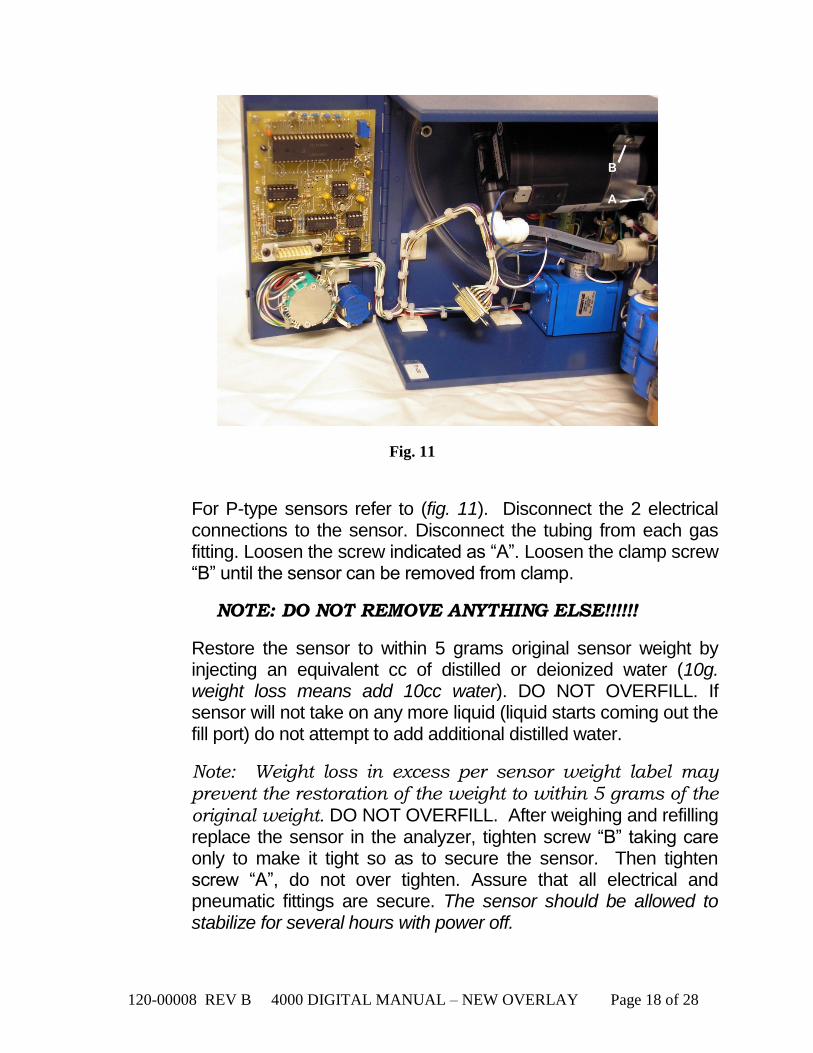
For P-type sensors refer to (fig. 11). Disconnect the 2 electrical connections to the sensor. Disconnect the tubing from each gas fitting. Loosen the screw indicated as “A”. Loosen the clamp screw “B” until the sensor can be removed from clamp.
NOTE: DO NOT REMOVE ANYTHING ELSE!!!!!!
Restore the sensor to within 5 grams original sensor weight by injecting an equivalent cc of distilled or deionized water (10g. weight loss means add 10cc water). DO NOT OVERFILL. If sensor will not take on any more liquid (liquid starts coming out the fill port) do not attempt to add additional distilled water.
Note: Weight loss in excess per sensor weight label may prevent the restoration of the weight to within 5 grams of the original weight. DO NOT OVERFILL. After weighing and refilling replace the sensor in the analyzer, tighten screw “B” taking care only to make it tight so as to secure the sensor. Then tighten screw “A”, do not over tighten. Assure that all electrical and pneumatic fittings are secure. The sensor should be allowed to stabilize for several hours with power off.
120-00008 REV B 4000 DIGITAL MANUAL – NEW OVERLAY Page 19 of 28
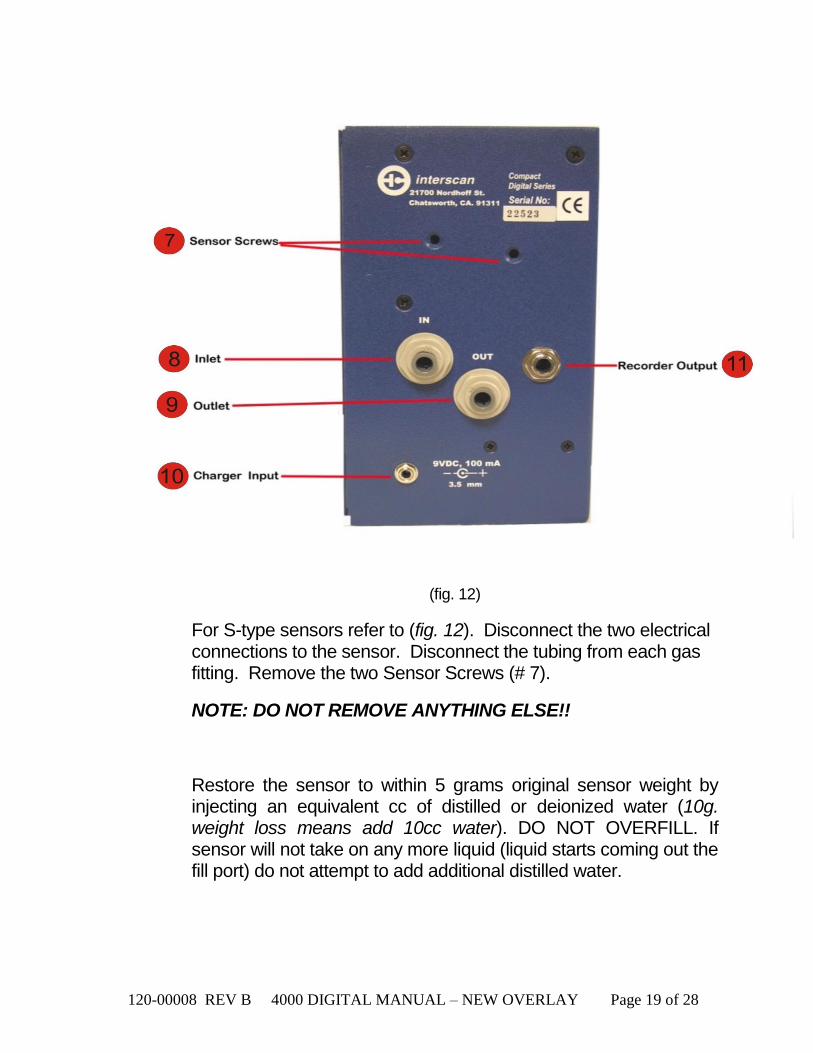
(fig. 12)
For S-type sensors refer to (fig. 12). Disconnect the two electrical connections to the sensor. Disconnect the tubing from each gas fitting. Remove the two Sensor Screws (# 7).
NOTE: DO NOT REMOVE ANYTHING ELSE!!
Restore the sensor to within 5 grams original sensor weight by injecting an equivalent cc of distilled or deionized water (10g. weight loss means add 10cc water). DO NOT OVERFILL. If sensor will not take on any more liquid (liquid starts coming out the fill port) do not attempt to add additional distilled water.

120-00008 REV B 4000 DIGITAL MANUAL – NEW OVERLAY Page 20 of 28
Note: Weight loss in excess per sensor weight label may prevent the restoration of the weight to within 5 grams of the original weight. DO NOT OVERFILL. After weighing and refilling replace the sensor in the analyzer, tighten screws on the rear of the analyzer. Assure that all electrical and pneumatic fittings are secure. The sensor should be allowed to stabilize for several hours with power off.
4.3 Long Term Storage (one month or more)
Turn FUNCTION switch to “OFF” position. Disconnect charger from analyzer. Detach 15 pin “D” connector from circuit board. Remove alkaline batteries and cover analyzer to protect from dust.
4.4 Post Storage Start-up
24 Hours Before Using:
Uncover the analyzer. Install FRESH alkaline batteries. Reconnect 15-pin “D” connector from circuit board. Connect the charger to the analyzer to charge NiCd batteries.
After 24 Hours:
Follow instructions in Section 2.0. Analyzer is ready to use or calibrate.

120-00008 REV B 4000 DIGITAL MANUAL – NEW OVERLAY Page 21 of 28
5.0 Troubleshooting
Symptom Corrective Action No power. Ensure the FUNCTION switch is not in the OFF position.
Are Ni-Cd batteries charged? (See Section 4.1)
Pump won’t run. Ensure the FUNCTION switch is not in the OFF, or SAMPLE
INACTIVE
position.
Are Ni-Cd batteries charged? (See Section 4.1)
Are INLET/OUTLET fittings plugged? Is any tubing kinked?
Can’t zero. Are alkaline batteries low? (See Section 4.1)
Were alkaline batteries just replaced? (See Section 4.1)
Are alkaline batteries installed correctly? (Proper polarity)
No response to gas Ensure the FUNCTION switch is not in the OFF, or SAMPLE
INACTIVE
position. (Function switch must be in “Sample Active” position)
Are Ni-Cd batteries charged? (See Section 4.1)
Are INLET/OUTLET fittings plugged? Is any tubing kinked?
Are alkaline batteries low? (See Section 4.1)
Were alkaline batteries recently replaced? (See Section 4.1)
Are alkaline batteries installed correctly? (Proper polarity)
Is the SPAN/CAL turned all the way down (counter clock
wise)?
Is electrical lead(s) connected to sensor?
Is sensor secure in sensor clamp?
Make sure tubing is securely connected to pump and sensor.
Ni-Cads won’t charge Are the Ni Cad batteries dead? (Remove from unit and check
with a voltmeter. Battery polarity is marked behind batteries on
panel.
voltmeter)

120-00008 REV B 4000 DIGITAL MANUAL – NEW OVERLAY Page 22 of 28
Warranty
6.0 INTERSCAN’s Warranty Policy
INTERSCAN CORPORATION warrants portable analyzers of its manufacture (sensors, batteries, fuses, lamps, tubing, fittings, filters, and scrubbers excepted) to be free from defects in material and workmanship for a period of one year from date of shipment. INTERSCAN CORPORATION warrants sensors of its manufacture to be free from defects in material and workmanship for a period of six months from date of shipment.
INTERSCAN CORPORATION'S sole obligation under this warranty is limited to repairing or replacing, at its option, any item covered under this warranty, when such item is returned intact, prepaid to the factory (or designated service center).
This warranty does not apply to any of our products which have been repaired or altered by unauthorized persons, or which have been subject to misuse, negligence, or accident, incorrect wiring by others, installation or use not in accordance with instructions furnished by the manufacturer, or which have had the serial numbers altered, effaced or removed. The sensors are factory sealed and must not be opened or modified in the field for the warranty to remain in effect. This warranty is in lieu of all other warranties, whether expressed or implied.
Additionally, in a custom system, warranty on any component shall not exceed the manufacturer's warranty given to INTERSCAN CORPORATION.

120-00008 REV B 4000 DIGITAL MANUAL – NEW OVERLAY Page 23 of 28
Return Authorization
7.0 INTERSCAN’s Return Authorization Policy
All returns for repairs require a "RETURN AUTHORIZATION
NUMBER" issued by the INTERSCAN Service Department upon
request. Below is the link to the RMA form: http://www.gasdetection.com/contact/index.php
This is done primarily to cause the user to contact the factory directly. The reason for this is that a high percentage of service problems are resolved over the telephone, avoiding the need for returning the analyzer or part.
Should return of the analyzer or part be advised by the Service Department, the "RETURN AUTHORIZATION NUMBER" will expedite prompt return of the repaired unit.
For service information, please contact:
INTERSCAN CORPORATION
Service Department
(800) 458-6153 ext. 121
(818) 882-2331 ext. 121
FAX (818) 341-0642 E-mail: [email protected]

120-00008 REV B 4000 DIGITAL MANUAL – NEW OVERLAY Page 24 of 28
8.0 Appendix
Appendix A
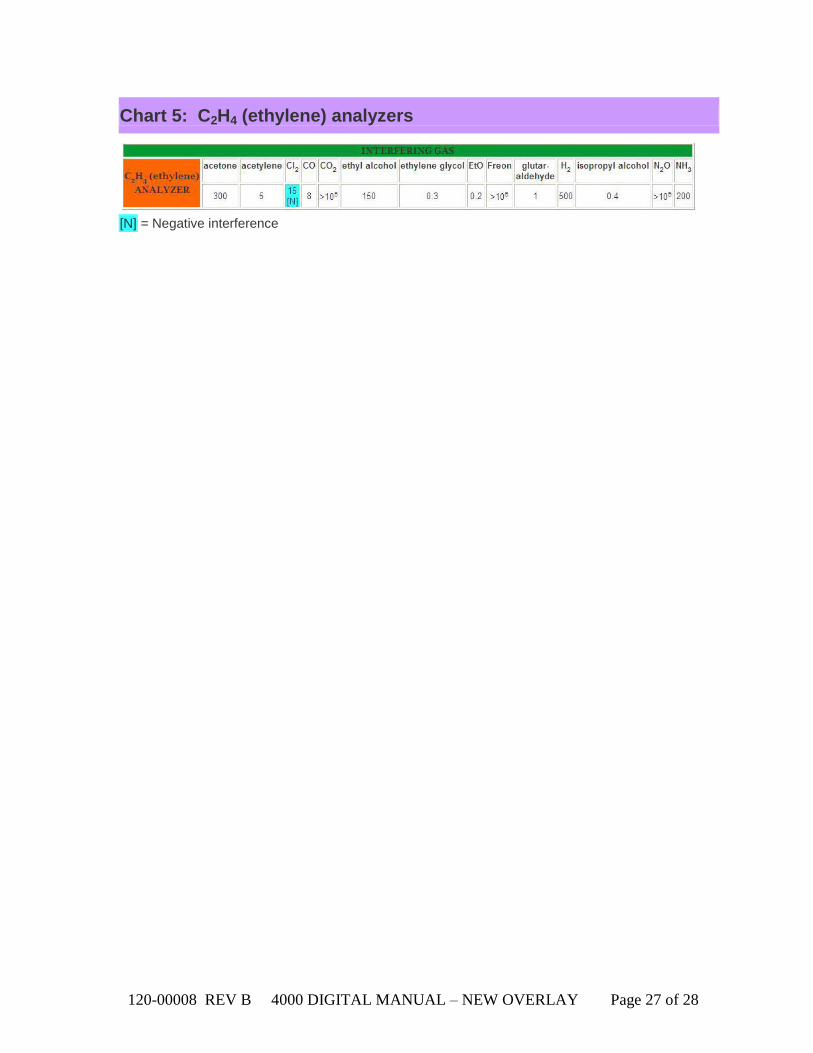
INTERFERING GAS DATA
No analytical method is completely specific. Gases present in the environment, other than the "target" gas of measurement, may affect analyzer response. Interferences are not necessarily linear, and may also exhibit time dependent characteristics.
The charts that follow detail the approximate concentration in parts per million of interfering gas required to cause a 1 ppm deflection in the chosen analyzer. In many cases, specificity can be improved. Please note that the response values given are not absolute, and may vary depending on sensor formulation.
The special case of how alcohols affect electrochemical sensors is discussed in this Knowledge Base article. (www.gasdetection.com)
For further information on the effects of interfering gases, please contact the factory.
The charts follow the format, and grouping of gases, that was originally established in early Interscan print brochures.
Chart 1: CO, Cl2, ClO2, H2, H2S, NO, NO2, O3, SO2 analyzers Chart 2: Ethylene oxide (EtO) (C2H4O) analyzers Chart 3: Formaldehyde (HCHO) analyzers Chart 4: HCl, HCN, hydrazine analyzers Chart 5: C2H4 (ethylene) analyzers

120-00008 REV B 4000 DIGITAL MANUAL – NEW OVERLAY Page 25 of 28
(1) Data shown for H2S models with ranges higher than 0-1999 ppb (2) Data shown for H2S models with ranges of 0-1999 ppb and lower
[N] = Negative interference
‡ = Hydrocarbons
¤ = Rejection ratio can be improved electronically
Chart 2: Ethylene oxide (EtO) (C2H4O) analyzers
INTERFERING GAS
EtO ANALYZER
Cl2 CO CO2 ethyl alcohol
Freon glutaraldehyde isopropyl alcohol
N2O NH3
25 [N]
20 >105
380 >105
5 1.1 ¶ >105
300
¶ Isopropyl alcohol represents the most significant interference on the ethylene oxide sensor, but in nearly all cases, potential problems can be overcome. Typical remedial actions include:
a. Point shutdown/automatic restart, which allows the operator to temporarily interrupt monitoring at points that could be affected when isopropyl alcohol is used. Monitoring restarts automatically on a time-adjustable basis.
b. Selection of monitoring points away from those areas that may be unduly affected by isopropyl alcohol.
c. Using alternative germicides, which do not contain isopropyl alcohol.
Chart 1: CO, Cl2, ClO2, H2, H2S, NO, NO2, O3, SO2 analyzers

120-00008 REV B 4000 DIGITAL MANUAL – NEW OVERLAY Page 26 of 28
The EtO sensor may also respond to strong odors of colognes and perfumes, and to certain floor strippers and waxes. Refer to guidelines above covering isopropyl alcohol. Remember that you are attempting to monitor parts per million levels of ethylene oxide in an environment that may contain percent (10,000 ppm = 1 percent) levels of these potentially interfering compounds.
[N] = Negative interference
Chart 3: Formaldehyde (HCHO) analyzers
INTERFERING GAS
HCHO ANALYZE
R
CH3CHO acetone
Cl2 CO ethanol glutaraldehyde
H2 H2
S
HCl SO2
17 >103
7
[N] 5600 127 200
>104
3 § 35 3 §
isopropanol
CH3OH methyl
ethyl keton
e
n-butano
l
n-propanol
NH3 NO NO
2
phenol
propion-
aldehyde
1000 625 >103
3200 2000 300 500 35 [N]
>103
160
[N] = Negative interference
§ = Scrubber available
Chart 4: HCl, HCN, hydrazine analyzers
INTERFERING GAS
A
N
A
L Y
Z E
R
C2H5SH
Cl
2
CO H2 H2
S
HCl
HCN
hydrazine
N2
O
NH3 NO NO
2
SO
2
SO
3
Saturated
HC
Unsat HC
HCl 0.2
17 [N]
1000
>104
0.1 — 1 5
>104
21 0.6
15 [N]
0.5 >10
4
>104
>500
HCN 0.2
20 [N]
1000
>104
0.1 1 — 6
>104
21 1
15 [N]
0.5 >10
4
>104
>500
Hydra– zine
10
5 [N]
1000
>104
0.1 45 8 —
>104
1500
1300
30 [N]
3.5 >10
4
>104
>500
[N] = Negative interference
120-00008 REV B 4000 DIGITAL MANUAL – NEW OVERLAY Page 27 of 28
Chart 5: C2H4 (ethylene) analyzers
[N] = Negative interference

120-00008 REV B 4000 DIGITAL MANUAL – NEW OVERLAY Page 28 of 28
Appendix B
SCRUBBER INFORMATION
TYPE FOR ANALYZER REMOVES
#56 NO SO2, NO2, H2S,
HCl, HCN
#158 CO, EtO, SO2F2 SO2, H2S, NO, NO2
C-12 ≤ 20 ppm range & all
EtO, HCHO, HZ
ALL GAS TYPES EXCEPT CO
MS-100 CO Alcohol & Aldehydes
MS-149 H2S Cl2, SO2
FB-160 SO2 H2S, NO2
FB-170 NO2 H2S, HCl, HCN, SO2
FB-325 HCHO, HCN H2S, HCl, SO2
FB-149
FB-150
H2S HCl, SO2, NO2
FB-100 NO2 H2S, SO2
#97 ClO2 Cl2