installing and using gns3 - d37djvu3ytnwxt.cloudfront.net · installing under windows (tested with...
TRANSCRIPT
Installing and using GNS3
Version 6. January 2017, Olivier Paul
Summary Requirements for using GNS3 and the GNS3 virtual machine ................................................................ 3
How to choose between the two environments ............................................................................ 3
Requirements for the classical version ........................................................................................... 3
Requirements for the virtualized version ....................................................................................... 3
Installing under windows (tested with Windows 7) ............................................................................... 4
Installing under Linux (tested with Ubuntu 14.04) ................................................................................. 5
Installing under an older Linux (tested with Ubuntu 12.04) ................................................................... 6
Installing under Mac OS X (tested with OS X Mavericks 64 bits) ............................................................ 7
Configuring GNS3 ................................................................................................................................... 8
Installing the VirtualBox VM (Tested under Windows 7)...................................................................... 10
Working with GNS3 .............................................................................................................................. 11
Projects......................................................................................................................................... 11
Create a new project .................................................................................................................... 11
Reloading an existing project ....................................................................................................... 11
Saving a project ............................................................................................................................ 11
Set up a project topology ............................................................................................................. 11
Positioning network devices on the white page ........................................................................... 12
Removing a network device ......................................................................................................... 12
Change a device configuration ..................................................................................................... 12
Inter-connect two devices ............................................................................................................ 13
Disconnect devices ....................................................................................................................... 14
Using the Qemu virtual machine under GNS3 ...................................................................................... 15
Start a Qemu virtual machine ....................................................................................................... 15
Shut down a Qemu virtual machine ............................................................................................. 16
Frequent problems ............................................................................................................................... 17
Classic version: Under MS Windows you denied GNS3 (or one of its components) communications
by mistake. ....................................................................................................................................... 17
Classic version: When using GNS3 the «UnicodeDecodeError » error message appears in the
console. ............................................................................................................................................ 17
Classic version: When adding a switch or hub to the GNS3 blank sheet the error message
«Dynamips.exe stopped working» appears in the console. ............................................................. 17
Classic version: Under Linux or Mac OS X nothing appears when starting a Qemu based device in
GNS3................................................................................................................................................. 18
VM version: You are using GNS3 within a virtual machine and cannot control the mouse in Qemu
virtual machines. .............................................................................................................................. 19
VM version: Virtualbox displays an execution error when starting the VM. .................................... 19
All versions: Some keyboard keys are dead. .................................................................................... 20
Download links ..................................................................................................................................... 21
For the “classic” installation mode ................................................................................................... 21
MS Windows ................................................................................................................................ 21
Linux ............................................................................................................................................. 21
MAC OS X ..................................................................................................................................... 21
Qemu virtual machine image ....................................................................................................... 21
For the VirtualBox VM based installation ......................................................................................... 21
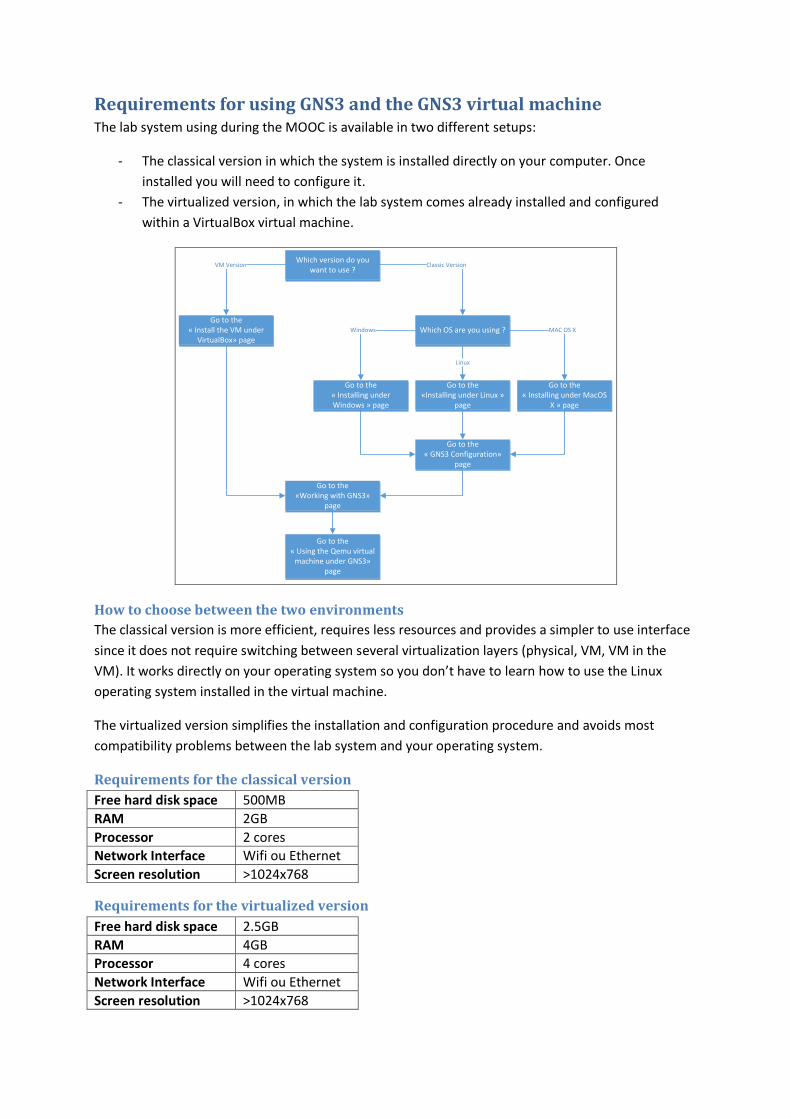
Requirements for using GNS3 and the GNS3 virtual machine The lab system using during the MOOC is available in two different setups:
- The classical version in which the system is installed directly on your computer. Once
installed you will need to configure it.
- The virtualized version, in which the lab system comes already installed and configured
within a VirtualBox virtual machine.
Which version do you want to use ?
Go to the« Install the VM under
VirtualBox» page
VM Version
Which OS are you using ?
Classic Version
Go to the« Installing under Windows » page
Go to the«Installing under Linux »
page
Go to the« Installing under MacOS
X » page
Windows MAC OS X
Linux
Go to the« GNS3 Configuration»
page
Go to the«Working with GNS3»
page
Go to the« Using the Qemu virtual
machine under GNS3» page
How to choose between the two environments
The classical version is more efficient, requires less resources and provides a simpler to use interface
since it does not require switching between several virtualization layers (physical, VM, VM in the
VM). It works directly on your operating system so you don’t have to learn how to use the Linux
operating system installed in the virtual machine.
The virtualized version simplifies the installation and configuration procedure and avoids most
compatibility problems between the lab system and your operating system.
Requirements for the classical version
Free hard disk space 500MB
RAM 2GB
Processor 2 cores
Network Interface Wifi ou Ethernet
Screen resolution >1024x768
Requirements for the virtualized version
Free hard disk space 2.5GB
RAM 4GB
Processor 4 cores
Network Interface Wifi ou Ethernet
Screen resolution >1024x768

Installing under windows (tested with Windows 7) 1. Use an account with administrator privileges and a username without special or accented
characters.
2. Download the Wireshark Windows installer (using the link on the MOOC site or the links
provided in the «Links » section of this document).
3. Launch the installer.
4. When the Wireshark welcome screen appears, click on «next ».
5. Accept the license agreement.
6. If during the following phase, you get warned that Wireshark is already installed, don’t
reinstall it by clicking on “Cancel”.
7. Leave the list of additional components unchanged and accept.
8. Leave the list of additional tasks unchanged and accept.
9. Leave the directory in which Wireshark will be installed unchanged and accept.
10. If during the following phase, you get warned that WinPcap is already installed, don’t
reinstall it by clicking on “Cancel”.
11. When the WinPcap welcome screen appears, click on «next ».
12. Accept the licence agreement.
13. Authorize the WinPcap module to get started when your system starts up.
14. Once the installation completed, click on “Finish”.
15. After Wireshark is installed click on «next » then on «finish » in the following window.
16. Download the GNS3 Windows installer (using the link on the MOOC site or the links provided
in the «Links » section of this document).
17. Launch the installer.
18. If Windows asks you whether you trust the software, please accept.
19. When the welcome window appears, click on «next ».
20. Accept the license agreement.
21. Don’t change the location in startup menu through which GNS3 can be launched.
22. In the list of components to be installed uncheck the following items.
a. WinPcap
b. Wireshark
c. SolarWinds Response
23. Then click “next”.
24. Leave the directory in which GNS3 will be installed unchanged and accept.
25. After GNS3 is installed click on «Next ».
26. When asked to register to the GNS3 mailing list, click on “next” then on “Yes” when the
confirmation window appears.
27. Uncheck “Start GNS3” and click on “Finish”.
28. The installation is completed.
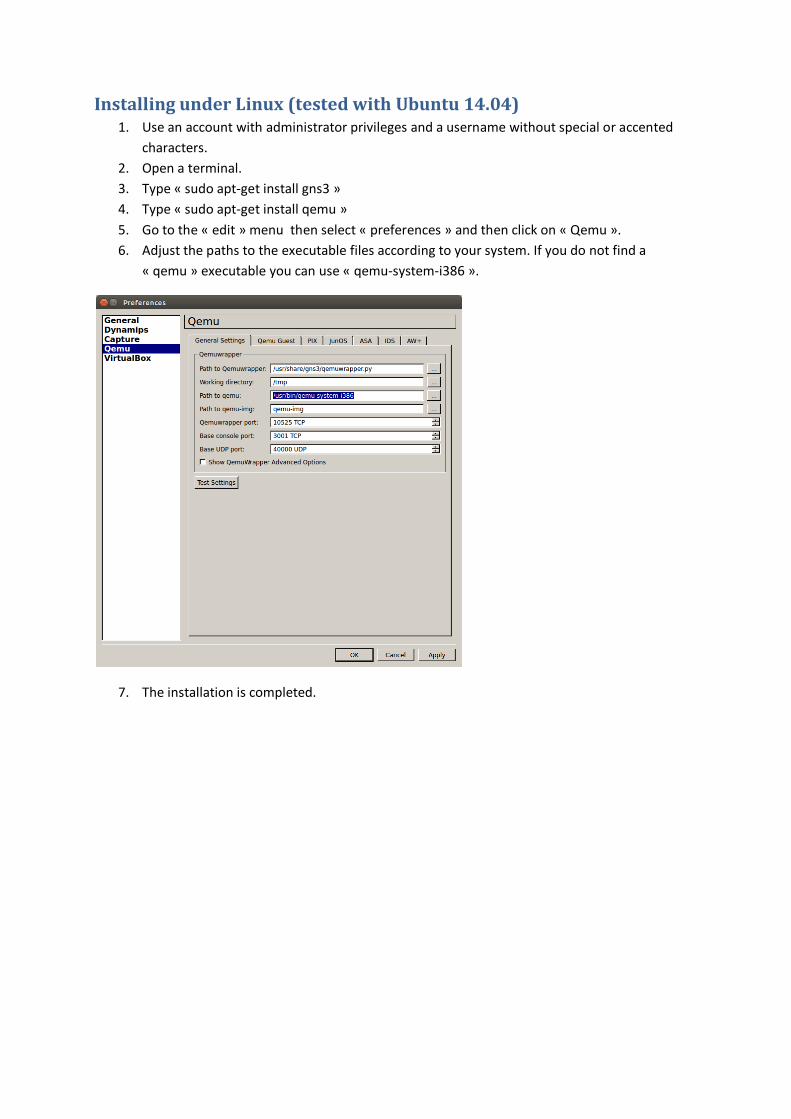
Installing under Linux (tested with Ubuntu 14.04) 1. Use an account with administrator privileges and a username without special or accented
characters.
2. Open a terminal.
3. Type « sudo apt-get install gns3 »
4. Type « sudo apt-get install qemu »
5. Go to the « edit » menu then select « preferences » and then click on « Qemu ».
6. Adjust the paths to the executable files according to your system. If you do not find a
« qemu » executable you can use « qemu-system-i386 ».
7. The installation is completed.

Installing under an older Linux (tested with Ubuntu 12.04) 1. Use an account with administrator privileges and a username without special or accented
characters.
2. Download the GNS3 package for Linux (using the link on the MOOC site or the links provided
in the «Links » section of this document).
3. If your system is 64 bits, download the 64 bits version of the Qemu archive file.
4. If your system is 32 bits, download the 32 bits version of the Qemu archive file.
5. Under Linux, open a terminal window (xterm).
6. Type : sudo dpkg –i gns3_0.8.4-1~1_all.deb
7. Type : sudo apt-get –f install
8. Validate by pressing ‘O’.
9. Uncompress the archive file QEMU-0.14.1b-GNS3-Ubuntu-Linux .tgz.
10. If your system is 64 bits, type : cd QEMU-0.14.1-GNS3-Ubuntu-Linux64
11. If your system is 32 bits, type : cd QEMU-0.14.1-GNS3-Ubuntu-Linux
12. Type: sudo ./Qinstall
13. Type: sudo apt-get install wireshark
14. Validate by pressing ‘O’.
15. The installation is completed.

Installing under Mac OS X (tested with OS X Mavericks 64 bits) 1. Use an account with administrator privileges and a username without special or accented
characters.
2. Most recent OS X allow the lab system including GNS3 and its associated software (Qemu,
Dynamips, Wireshark) to be installed without complex operations through their package
management systems.
If your package management system provides a GNS3 version more recent than 0.8.4, you
should be able to use it. The graphical interface might however be slightly different from the
one appearing on screenshots and videos.
Beware: Same OS X versions require additional packages in order for the lab system to work.
If you use this installation path, make sure that the Qemu, GNS3 and Wireshark packages are
installed.
If you select this installation path, you can ignore the following instructions and go directly to
the «Configuring GNS3 » section.
3. Download the GNS3 package for Mac OS X (using the link on the MOOC site or the links
provided in the «Links » section of this document).
4. Open the disk image.
5. Copy the GNS3 executable file to your Applications folder.
6. Download the Xquartz installer (using the link on the MOOC site or the links provided in the
«Links » section of this document).
7. Open the disk image and then the.pkg file.
8. Click on «Continue» three times and then accept the license agreement.
9. Click on «Install» and enter your administrator password when asked for it.
10. Click on «Close» to quit the installer.
11. Download the Wireshark installer (using the link on the MOOC site or the links provided in
the «Links » section of this document).
12. Open the disk image and then the.pkg file.
13. Click on «Continue» twice and then accept the license agreement.
14. Click on «Install» and enter your administrator password when asked for it.
15. Click on «Close» to quit the installer.
16. The installation is completed.
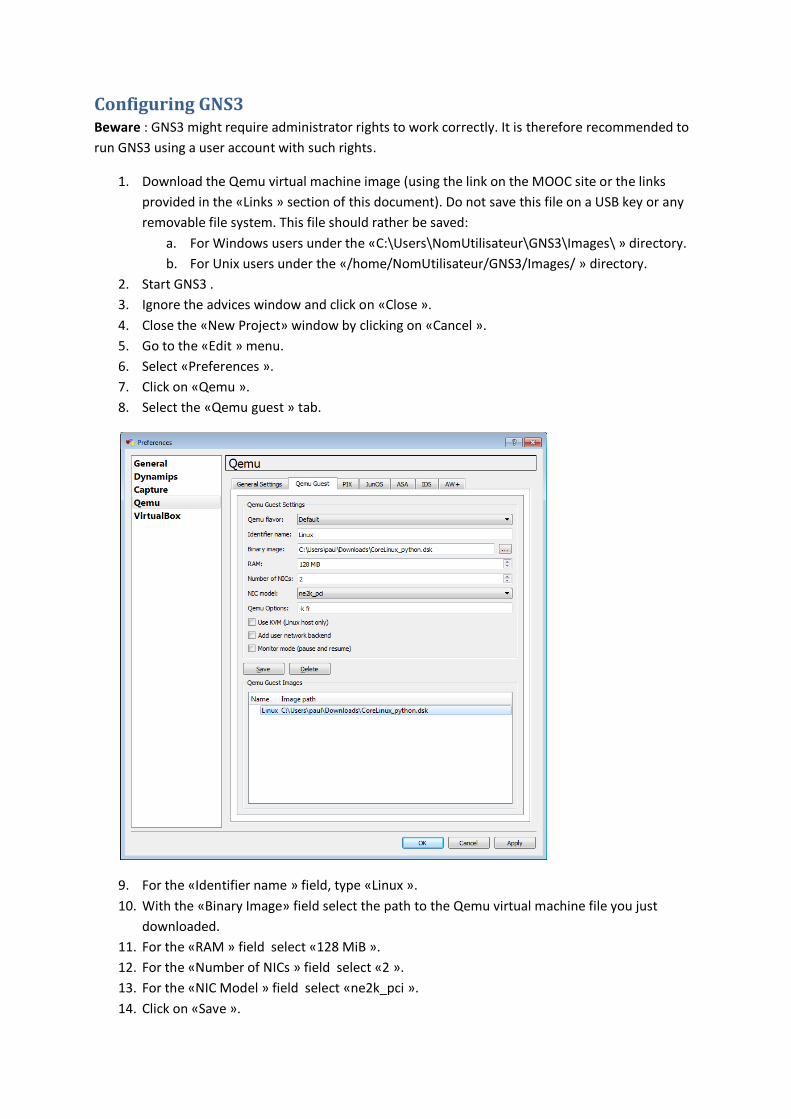
Configuring GNS3 Beware : GNS3 might require administrator rights to work correctly. It is therefore recommended to
run GNS3 using a user account with such rights.
1. Download the Qemu virtual machine image (using the link on the MOOC site or the links
provided in the «Links » section of this document). Do not save this file on a USB key or any
removable file system. This file should rather be saved:
a. For Windows users under the «C:\Users\NomUtilisateur\GNS3\Images\ » directory.
b. For Unix users under the «/home/NomUtilisateur/GNS3/Images/ » directory.
2. Start GNS3 .
3. Ignore the advices window and click on «Close ».
4. Close the «New Project» window by clicking on «Cancel ».
5. Go to the «Edit » menu.
6. Select «Preferences ».
7. Click on «Qemu ».
8. Select the «Qemu guest » tab.
9. For the «Identifier name » field, type «Linux ».
10. With the «Binary Image» field select the path to the Qemu virtual machine file you just
downloaded.
11. For the «RAM » field select «128 MiB ».
12. For the «Number of NICs » field select «2 ».
13. For the «NIC Model » field select «ne2k_pci ».
14. Click on «Save ».

15. Click on «OK ».
16. Click on «OK ».
17. If requested whether you want to create directories for GNS3, please accept.
18. Go to the «File » menu.
19. Click on «Quit ».
20. The configuration is completed.

Installing the VirtualBox VM (Tested under Windows 7) 1. Install a recent version of VirtualBox (from the www.virtualbox.org web site)
2. Download the VirtualBox virtual machine image (using the link on the MOOC site or the links
provided in the «Links » section of this document).
3. Start VirtualBox, go to the «File » menu and select «Import Appliance».
4. Select the file you just downloaded and then click on «Next ».
5. Select «Réinitialize the MAC address of all Network Interface Cards » and then click on
«Import».
6. After a few minutes, the machine appears in the virtual machine list and can be started.
7. In this virtual machine, the username and password are as follows:
User: imt
password: imt
Working with GNS3
Projects
GNS3 uses the notion de projects. A project is a network configuration describing:
Which devices or types of devices are used.
How these devices are inter-connected (network topology).
The configuration of each device.
Once created, each project is stored in a directory named after the project.
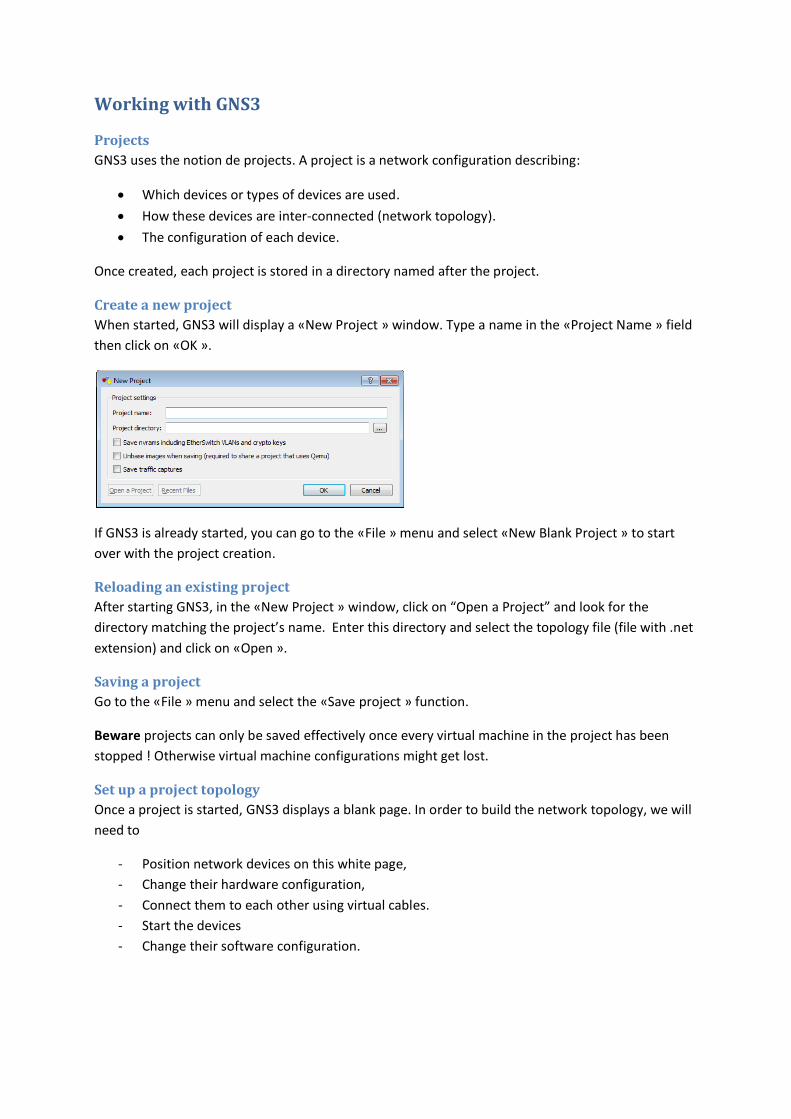
Create a new project
When started, GNS3 will display a «New Project » window. Type a name in the «Project Name » field
then click on «OK ».
If GNS3 is already started, you can go to the «File » menu and select «New Blank Project » to start
over with the project creation.
Reloading an existing project
After starting GNS3, in the «New Project » window, click on “Open a Project” and look for the
directory matching the project’s name. Enter this directory and select the topology file (file with .net
extension) and click on «Open ».
Saving a project
Go to the «File » menu and select the «Save project » function.
Beware projects can only be saved effectively once every virtual machine in the project has been
stopped ! Otherwise virtual machine configurations might get lost.
Set up a project topology
Once a project is started, GNS3 displays a blank page. In order to build the network topology, we will
need to
- Position network devices on this white page,
- Change their hardware configuration,
- Connect them to each other using virtual cables.
- Start the devices
- Change their software configuration.
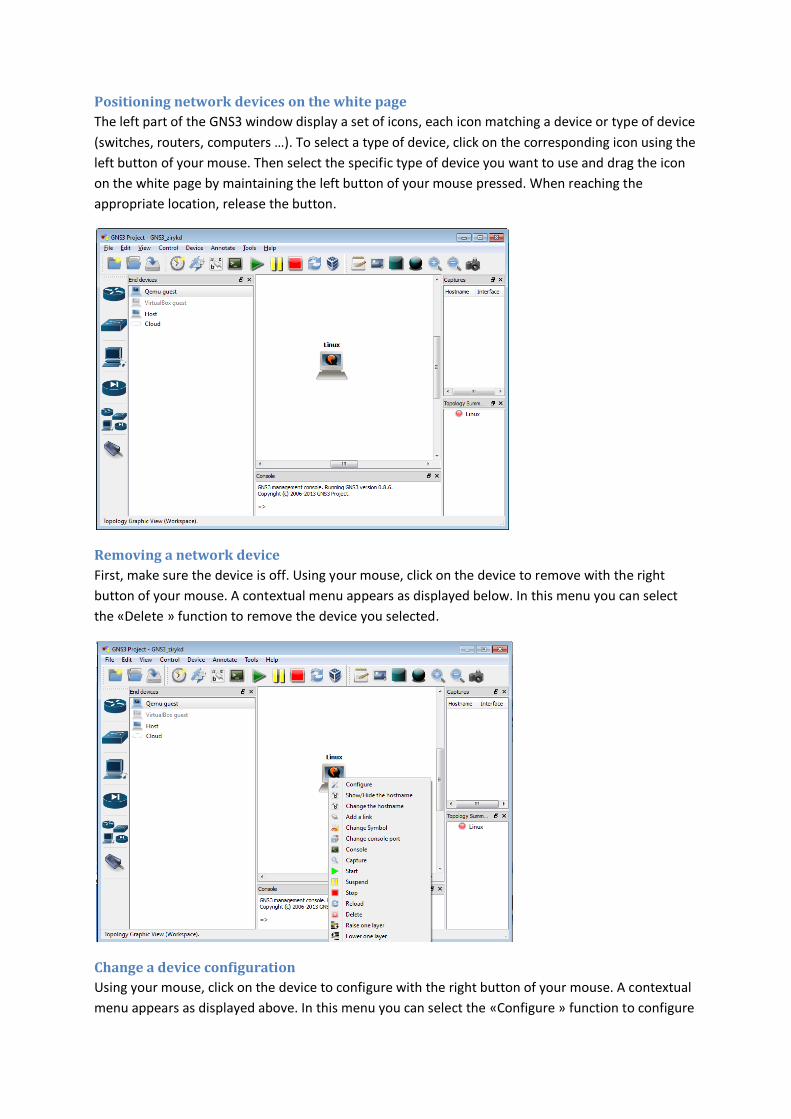
Positioning network devices on the white page
The left part of the GNS3 window display a set of icons, each icon matching a device or type of device
(switches, routers, computers …). To select a type of device, click on the corresponding icon using the
left button of your mouse. Then select the specific type of device you want to use and drag the icon
on the white page by maintaining the left button of your mouse pressed. When reaching the
appropriate location, release the button.
Removing a network device
First, make sure the device is off. Using your mouse, click on the device to remove with the right
button of your mouse. A contextual menu appears as displayed below. In this menu you can select
the «Delete » function to remove the device you selected.
Change a device configuration
Using your mouse, click on the device to configure with the right button of your mouse. A contextual
menu appears as displayed above. In this menu you can select the «Configure » function to configure

the device you selected. The configuration window itself will typically change depending on the type
of device you want to configure.
Inter-connect two devices
Click on the “Connector” icon at the bottom of the icon list using the left button of your mouse as
shown below. You are now in «connection» mode . In order to get out of this mode, just perform the
same operation.
In order to interconnect two devices, first make sure that each has at least one available interface.
Click then on the first device to interconnect using the left button of your mouse. If the device holds
several network interface, a list of interfaces appears allowing you to select the interface you want to
use using the left button again. Move now the cursor to the second device to interconnect. You
should see a line drawn from the first device to the position of the cursor. On the second device,
perform the same operation. After a few seconds a line between the two devices should appear
carrying two colored leds. The led’s color indicates the status of device connected at each end of the
the link:Green: The device is on, Red: The device is stopped, Yellow: The device is paused.
Beware: When interconnecting devices under MS Windows, you might be requested by the
operating system firewall whether you want to allow some piece of software (GNS3, Qemu,

Dynamips, …) to communicate (as seen above). Please allow access for these applications in order to
allow GNS3 components to communicate with each others.
Disconnect devices
In order to disconnect devices, first make sure both devices are off. If you are still in
«interconnection » mode, first get out of this mode as seen previously. Point the cursor of the mouse
to the link to remove and click on the right button of the mouse. In the contextual menu appearing,
select the «Delete» function.

Using the Qemu virtual machine under GNS3
Start a Qemu virtual machine
Using the mouse, click on the device you want to start using the right button of the mouse. In the
contextual menu, select «Start ». A new window appears named after the device you just started.
This window acts as a virtual screen to the virtual machine providing boot information for the
CoreLinux (a lightweight distribution for the Linux system) system. After a few minutes this window
should widen to represent a graphical interface as shown below. This graphical interface allows you
to control the virtual machine as if you where controlling a typical Linux based computer.
This window can be re-dimensioned just like any window. The content will adjust in size to the new
dimension.
In order to control the virtual machine, select the window with your mouse by clicking on it. You
might need to slowly move your mouse during a few seconds before the mouse cursor appears in the
virtual machine.
Most common operations can be performed using the task bar at the bottom of the virtual screen.
The first four icons from the left in the task bar are the most useful:
- The first one allows you to shut down the virtual machine.
- The second one allows you to start a virtual terminal where you can type unix commands.
- The fourth one is a text editor.
To get out of the virtual machine press the «CTRL » and «ALT » keys on your keyboard while moving
your mouse out of the virtual screen.
Beware: When interconnecting devices under MS Windows, you might be requested by the
operating system firewall whether you want to allow some piece of software (GNS3, Qemu,
Dynamips, …) to communicate (as seen below). Please allow access for these applications in order to
allow GNS3 components to communicate with each others.
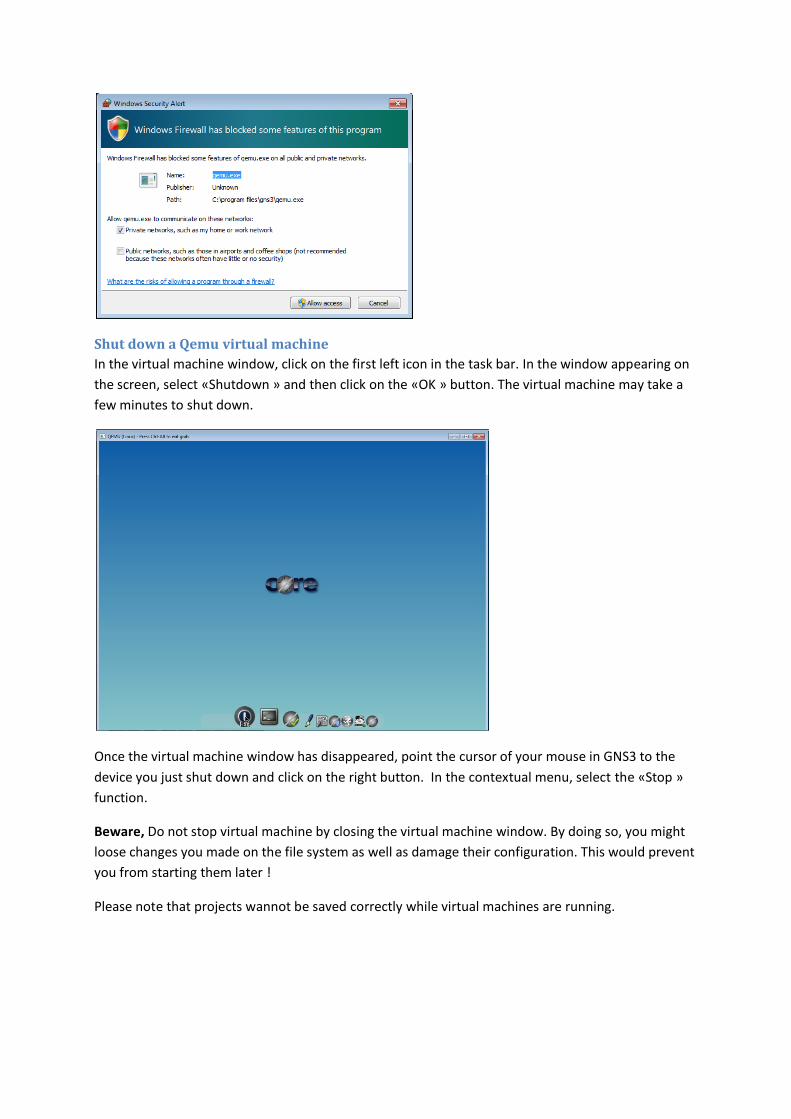
Shut down a Qemu virtual machine
In the virtual machine window, click on the first left icon in the task bar. In the window appearing on
the screen, select «Shutdown » and then click on the «OK » button. The virtual machine may take a
few minutes to shut down.
Once the virtual machine window has disappeared, point the cursor of your mouse in GNS3 to the
device you just shut down and click on the right button. In the contextual menu, select the «Stop »
function.
Beware, Do not stop virtual machine by closing the virtual machine window. By doing so, you might
loose changes you made on the file system as well as damage their configuration. This would prevent
you from starting them later !
Please note that projects wannot be saved correctly while virtual machines are running.

Frequent problems
Classic version: Under MS Windows you denied GNS3 (or one of its
components) communications by mistake. Follow these instructions to :
Close all existing Qemu virtual machines.
Quit GNS3.
Go to the Windows control panel and select «System and Security ».
In Windows firewall section, click on the «Allow a program through windows firewall »
function.
Click on “Change settings“.
Remove the lines associated with «Dynamips » .
Remove the lines associated with «Qemu ».
Close the configuration window.
Restart GNS3.
When setting up a new project, you will be asked again if you want to allow communications.
Classic version: When using GNS3 the «UnicodeDecodeError » error
message appears in the console. One possible cause for this error is when using a username with accentuated or special characters.
To solve this problem create a new use account with administrator rights and without such
characters and configure and use GNS3 using this account.
Classic version: When adding a switch or hub to the GNS3 blank sheet the
error message «Dynamips.exe stopped working» appears in the console. One possible cause for this error is that you are working outside of a project (for instance if you
clicked on «Cancel » in the «New Project » window). Another possible cause is that you did not quit
GNS3 after the initial configuration. So solve the problem first quit GNS3, restart it, create a new
project and retry the operation.
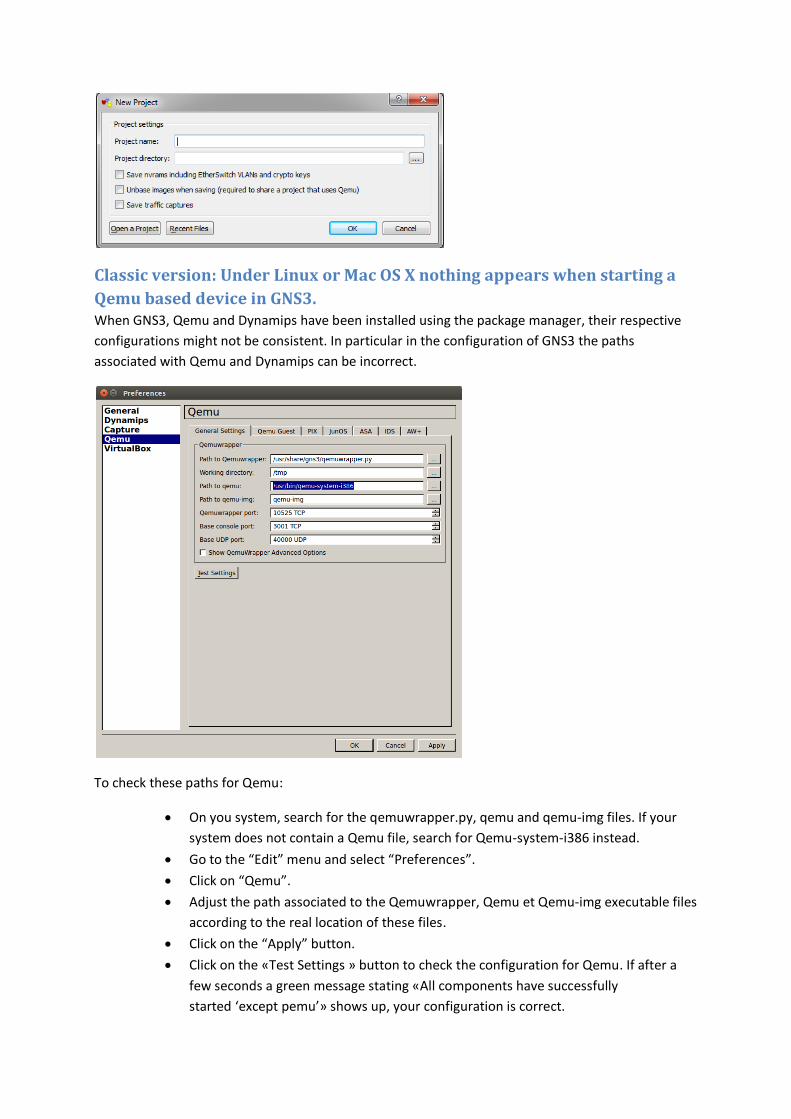
Classic version: Under Linux or Mac OS X nothing appears when starting a
Qemu based device in GNS3. When GNS3, Qemu and Dynamips have been installed using the package manager, their respective
configurations might not be consistent. In particular in the configuration of GNS3 the paths
associated with Qemu and Dynamips can be incorrect.
To check these paths for Qemu:
On you system, search for the qemuwrapper.py, qemu and qemu-img files. If your
system does not contain a Qemu file, search for Qemu-system-i386 instead.
Go to the “Edit” menu and select “Preferences”.
Click on “Qemu”.
Adjust the path associated to the Qemuwrapper, Qemu et Qemu-img executable files
according to the real location of these files.
Click on the “Apply” button.
Click on the «Test Settings » button to check the configuration for Qemu. If after a
few seconds a green message stating «All components have successfully
started ‘except pemu’» shows up, your configuration is correct.

Click on «OK» to close the window.
VM version: You are using GNS3 within a virtual machine and cannot
control the mouse in Qemu virtual machines. If you are using GNS3 and Qemu in a virtual machine (such as the VirtualBox virtual machine), you
might be unable to see or use the mouse within Qemu virtual machines. In order to solve this
problem you need to change the configuration of the Qemu virtual machine. To do so, in GNS3 go to
the “Edit” menu and select “Preferences”. Select “Qemu” and then click on the “Qemu Guest” tab.
Select the Linux guest image in the « Qemu Guest Images » list. Modify the content of the «Qemu
Options» field to «-usbdevice tablet». Save the new configuration by clicking on the “Save” button
and then click on “OK”. Note that the new configuration will only apply to new projects.
VM version: Virtualbox displays an execution error when starting the VM. Some versions of virtualbox will display the following error message when starting the imported VM.
This typically occurs when using a version of virtualbox older than the one used to set up the VM.

The following procedure typically solves the problem:
- Uninstall your current virtualbox.
- Reinstall a new version of virtualbox.
- Reboot your system.
- Restart the Ubuntu VM.
All versions: Some keyboard keys are dead. Some keyboard combinations are not fully supported by CoreLinux when used within Qemu on some
operating systems. In order to print characters associated with dead keys first open a terminal in the
virtual machine. Launch the« /home/tc/xvkdb.sh script ».1 This script displays a virtual keyboard on
the screen. In this virtual keyboard characters can be selected with the mouse. To type a character:
Using your mouse, click at the place where the character has to appear.
Using the mouse select the virtual keyboard window and click on the virtual key
associated with the desired character. Special characters can be reached by
combining special keys (shift/alt/…).
The character appears at the expected location.
1 You can also start the virtual keyboard by clicking on the right button of your mouse on the desktop and then select « Applications » and « X_Virtual_Keyboard ».

Download links
For the “classic” installation mode
MS Windows
Tool Link Backup link
Wireshark (32bits)
https://www.wireshark.org/download/win32/all-versions/Wireshark-win32-1.10.14.exe
Wireshark (64bits)
https://www.wireshark.org/download/win64/all-versions/Wireshark-win64-1.10.14.exe
GNS3 https://drive.google.com/open?id=0B8cotat1q8P5WlEtRXdKN2Y0LWM
http://my-mooc.eu/GNS3-0.8.7-all-in-one.exe
Linux
Tool Link Backup link
GNS3 https://drive.google.com/file/d/0B8cotat1q8P5Y3l1SU40VTJIYnc/edit?usp=sharing
http://my-mooc.eu/gns3_0.8.4-1_all.deb
QEMU 32 bits
https://drive.google.com/file/d/0B8cotat1q8P5VFk5YjdLNVdTZVE/edit?usp=sharing
http://my-mooc.eu/32/QEMU-0.14.1b-GNS3-Ubuntu-Linux.tgz
QEMU 64 bits
https://drive.google.com/file/d/0B8cotat1q8P5Nk40MlAyR1hjajg/edit?usp=sharing
http://my-mooc.eu/64/QEMU-0.14.1b-GNS3-Ubuntu-Linux.tgz
MAC OS X
Tool Link Backup link
GNS3 http://downloads.sourceforge.net/project/gns-3/GNS3/0.8.6/GNS3-0.8.6-OSX-Lion.dmg?r=http%3A%2F%2Fwww.gns3.net%2Fdownload%2F&ts=1390983197&use_mirror=heanet
http://my-mooc.eu/GNS3-0.8.6-OSX-Lion.dmg
XQuartz http://xquartz.macosforge.org/downloads/SL/XQuartz-2.7.5.dmg
Qemu virtual machine image
Tool Link Backup link
VM Qemu
https://drive.google.com/open?id=0B8cotat1q8P5SmQ0d1VQZFRjV3M
http://my-mooc.eu/CoreLinux-Python6.dsk
For the VirtualBox VM based installation Tool Link Backup link
Virtual-box
www.virtualbox.org
VM VB
https://drive.google.com/open?id=0B8cotat1q8P5ajJ5Ql9MclVtWTQ
http://my-mooc.eu/Ubuntu_GNS3_3_English.ova