installation guide -- vmware infrastructure perl toolkit 1 · vmware, inc. 5 this book, the...
TRANSCRIPT

Installation GuideVMware Infrastructure Perl Toolkit 1.6
VMware, Inc.3401 Hillview Ave.Palo Alto, CA 94304www.vmware.com
2 VMware, Inc.
Installation Guide
You can find the most up-to-date technical documentation on our Web site at:
http://www.vmware.com/support/
The VMware Web site also provides the latest product updates.
If you have comments about this documentation, submit your feedback to:
© 2007, 2008 VMware, Inc. All rights reserved. Protected by one or more U.S. Patent Nos. 6,397,242, 6,496,847, 6,704,925, 6,711,672, 6,725,289, 6,735,601, 6,785,886, 6,789,156, 6,795,966, 6,880,022, 6,944,699, 6,961,806, 6,961,941, 7,069,413, 7,082,598, 7,089,377, 7,111,086, 7,111,145, 7,117,481, 7,149,843, 7,155,558, 7,222,221, 7,260,815, 7,260,820, 7,269,683, 7,275,136, 7,277,998, 7,277,999, 7,278,030, 7,281,102, 7,290,253, and 7,356,679; patents pending.
VMware, the VMware “boxes” logo and design, Virtual SMP and VMotion are registered trademarks or trademarks of VMware, Inc. in the United States and/or other jurisdictions. All other marks and names mentioned herein may be trademarks of their respective companies.
Installation GuideRevision: 20080725Item: EN-000053-00
VMware, Inc. 3
Contents
About This Book 5Revision History 5Intended Audience 5Document Feedback 5Technical Support and Education Resources 5
1 Before You Begin 7Supported Platforms 7Downloading the Perl Toolkit Binary 7Connectivity Check 8Documentation 9
2 Installing a VI Perl Toolkit Package 11Installing the VI Perl Toolkit Package on Linux 11
Installation Prerequisites 11Operating System Prerequisites 11Prerequisite Libraries 12
Finding and Installing OpenSSL 12Red Hat Enterprise Linux 5 12Ubuntu Desktop 7.10 13
Installing the VI Perl Toolkit 13Uninstalling the VI Perl Toolkit 13
Installing the VI Perl Toolkit on Windows 14Uninstalling the VI Perl Toolkit 14
Upgrading the VI Perl Toolkit Package 15
3 Installing and Using the VI Perl Toolkit Virtual Appliance 17Installing and Using the Virtual Appliance on ESX Server Hosts 17
Importing the Virtual Appliance 17Running the Virtual Appliance 18
Installing and Using the Virtual Appliance on Hosted Products 18
4 Installing the VI Perl Toolkit from Source Code 19Installing the Toolkit on Linux 19
Requirements 19Installation 20
Installing the Toolkit on Windows 20Requirements 20
5 Validating the VI Perl Toolkit Installation 23

Installation Guide
4 VMware, Inc.
VMware, Inc. 5
This book, the Installation Guide, provides information about installing the VI Perl Toolkit 1.6. VMware®
provides several different SDK products, each of which targets different developer communities and platforms. This guide is intended for developers who intend to run VI Perl Toolkit scripts on VMware Infrastructure hosts.
Revision HistoryThis book is revised with each release of the product or when necessary. A revised version can contain minor or major changes. Table 1 summarizes the significant changes in each version of this book.
To view the most current version of this guide, go to http://www.vmware.com/support/pubs/sdk_pubs.html.
Intended AudienceThis book is intended for anyone who needs to install the VI Perl Toolkit. All users must understand how to modify and execute Perl scripts on the platform of their choice. If you want to install the toolkit from source code, you must also understand the source code installation process.
Document FeedbackVMware welcomes your suggestions for improving our documentation. Send your feedback to:
Technical Support and Education ResourcesThe following sections describe the technical support resources available to you. To access the current versions of other VMware manuals, go to:
http://www.vmware.com/support/pubs
About This Book
Table 1. Revision History
Revision Description
20070105 First version of the VI Perl Toolkit 1.0 documentation.
20080110 Miscellaneous documentation changes. VI Perl Toolkit no longer available on source forge. Virtual appliance now in OFV format.
20080725 Added new options for invocation, changed supported platforms.
Installation Guide
6 VMware, Inc.
Online SupportYou can submit questions or post comments to the Developer Community: SDKs and APIs forum, which is monitored by VMware technical support and product teams. To access the forum, go to:
http://communities.vmware.com/community/developer
Support OfferingsFind out how VMware support offerings can help meet your business needs. Go to:
http://www.vmware.com/support/services
VMware Education ServicesVMware courses offer extensive hands‐on labs, case study examples, and course materials designed to be used as on‐the‐job reference tools. For more information about VMware Education Services, go to:
http://mylearn1.vmware.com/mgrreg/index.cfm

VMware, Inc. 7
1
This chapter presents prerequisite information for installing the VI Perl Toolkit in the following sections:
“Supported Platforms” on page 7
“Downloading the Perl Toolkit Binary” on page 7
“Connectivity Check” on page 8
“Documentation” on page 9
Supported PlatformsYou can install the VI Perl Toolkit package on the following platforms:
Windows:
Windows Vista SP 1 (32‐bit and 64‐bit)
Windows XP SP 2 (32‐bit and 64‐bit)
Linux:
Red Hat Enterprise Linux (RHEL) 5.1 (32‐bit and 64‐bit)
Ubuntu Desktop 7.10
VI Perl Toolkit requires OpenSSL. See “Finding and Installing OpenSSL” on page 12.
You can also import the VI Perl Toolkit appliance, which is in OVF format, into VirtualCenter 2.5 and place it on any ESX Server 3.5 host. The appliance includes a pared‐down installation of Cent‐OS and both the VI Perl Toolkit and the VI Remote CLI.
Downloading the Perl Toolkit BinaryThe process of downloading the binary is the same for all three installers, and similar on Linux and Windows.
To download the VI Perl Toolkit
1 Go to the SDK and API download page at http://www.vmware.com/download/sdk/index.html.
2 In the VMware Infrastructure (VI) Perl Toolkit section, click Download.
3 Read the Perl Toolkit Agreement and click Yes to accept and continue.
You cannot download the VI Perl Toolkit unless you accept the agreement.
4 Download the binary for the installation you want to perform.
Before You Begin 1
Installation Guide
8 VMware, Inc.
Connectivity CheckBefore you start to use the VI Perl Toolkit, make sure the connection from your development system to the target ESX Server host or VirtualCenter Server system is working. The connection is required for the validation task in Chapter 5, “Validating the VI Perl Toolkit Installation,” on page 23 and for running Perl Toolkit scripts.
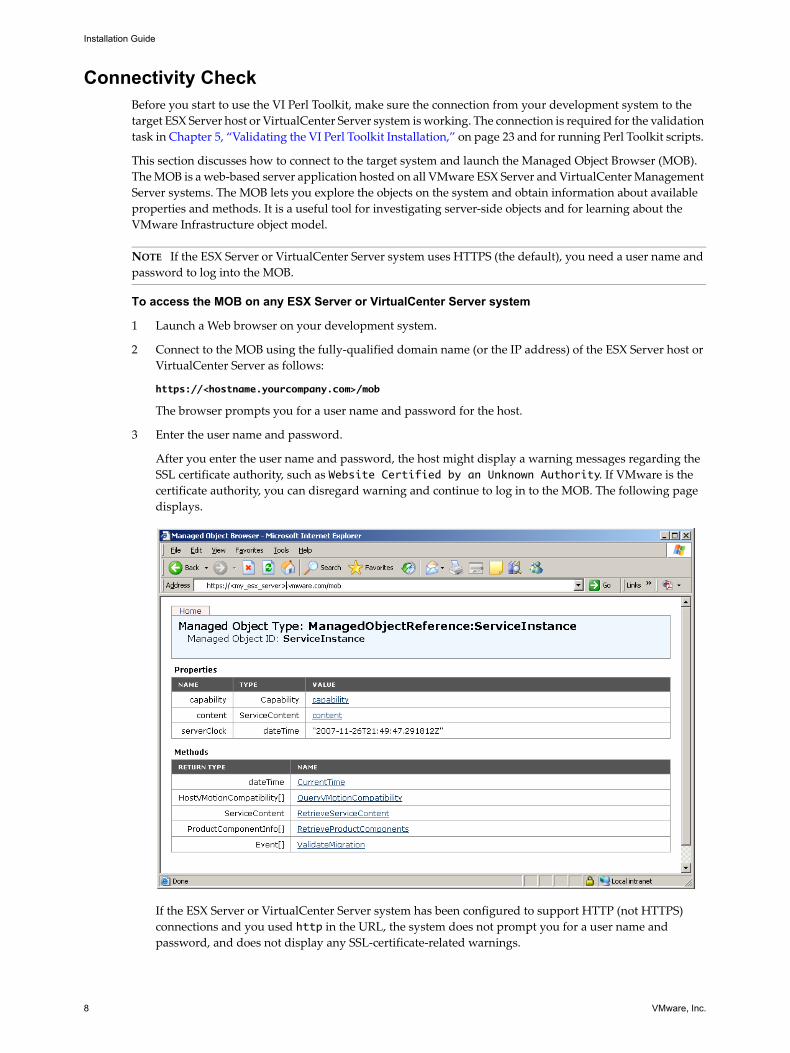
This section discusses how to connect to the target system and launch the Managed Object Browser (MOB). The MOB is a web‐based server application hosted on all VMware ESX Server and VirtualCenter Management Server systems. The MOB lets you explore the objects on the system and obtain information about available properties and methods. It is a useful tool for investigating server‐side objects and for learning about the VMware Infrastructure object model.
To access the MOB on any ESX Server or VirtualCenter Server system
1 Launch a Web browser on your development system.
2 Connect to the MOB using the fully‐qualified domain name (or the IP address) of the ESX Server host or VirtualCenter Server as follows:
https://<hostname.yourcompany.com>/mob
The browser prompts you for a user name and password for the host.
3 Enter the user name and password.
After you enter the user name and password, the host might display a warning messages regarding the SSL certificate authority, such as Website Certified by an Unknown Authority. If VMware is the certificate authority, you can disregard warning and continue to log in to the MOB. The following page displays.
If the ESX Server or VirtualCenter Server system has been configured to support HTTP (not HTTPS) connections and you used http in the URL, the system does not prompt you for a user name and password, and does not display any SSL‐certificate‐related warnings.
NOTE If the ESX Server or VirtualCenter Server system uses HTTPS (the default), you need a user name and password to log into the MOB.
VMware, Inc. 9
Chapter 1 Before You Begin
DocumentationThe documentation for the VI Perl Toolkit also includes a Programming Guide and a Utility Applications Reference available on the SDK download site.
Because your Perl script retrieves and works with server‐side objects, it is also essential that you understand the VMware Infrastructure SDK. The API Reference is included with the Perl Toolkit documentation. Some users might find the VMware Infrastructure SDK Programmer’s Guide helpful. It is available from the SDK download site at http://www.vmware.com/download/sdk/index.html.

Installation Guide
10 VMware, Inc.
VMware, Inc. 11
2
This chapter explains how to install a VI Perl Toolkit package on Linux or Windows. After you have installed the package on your administration server, you can invoke toolkit scripts on your ESX Server or VirtualCenter Server system. You must specify connection parameters, discussed in the Programming Guide.
This chapter discusses these topics:
“Installing the VI Perl Toolkit Package on Linux” on page 11”
“Installing the VI Perl Toolkit on Windows” on page 14
“Upgrading the VI Perl Toolkit Package” on page 15
Installing the VI Perl Toolkit Package on LinuxYou can install a VI Perl Toolkit package on these Linux platforms.
Red Hat Enterprise Linux (RHEL) 5
Ubuntu Desktop 7.10
Installation PrerequisitesTo work with the VI Perl Toolkit, you need a development environment, including a C compiler, and the prerequisites listed in this section.
Operating System Prerequisites
The installation script for the VI Perl Toolkit is supported on default installations of the supported Linux distributions, which are listed above.
To install the VI Perl Toolkit on a different Linux distribution, you must install all prerequisite libraries using the mechanism appropriate for the distribution (apt, rpm, and so on). See the documentation for the Linux distribution for details.
Installing a VI Perl Toolkit Package 2

Installation Guide
12 VMware, Inc.
Prerequisite Libraries
The VI Perl Toolkit installer for Linux distributions requires the following libraries:
Perl 5.8.8
The following libraries, which are included in the supported Linux distributions (see “Operating System Prerequisites” on page 11):
Linker utility (binutils package)
GNU C libraries (glibc or libc6 package)
XML DOM/SAX libraries (libxml2 package)
Perl documentation (perl-doc) package.
Perl URI library (liburi-perl package).
The OpenSSL library (libssl-dev package), which is not included in the base Linux distribution. See “Finding and Installing OpenSSL” on page 12.
The VI Perl Toolkit uses Open SSL for the communication between the VirtualCenter Server or ESX Server host and the system from which you call toolkit scripts to administer that server.
Finding and Installing OpenSSLWhen you run the scripted installer on a Linux distribution, you might see an error message that says the installer cannot find -lcrypto or is unable to link the Crypt::SSLeay module. This happens when the version of the crypto (SSL) library installed on your system is incompatible with the version of Crypt::SSLeay included in the VI Perl Toolkit distribution. This can happen because of security or other updates that have been installed on your Linux distribution.
If you get the error, you must resolve it because most VI Perl Toolkit functionality will not work until SSL is available. Most connections between the VI API running on the ESX Server and the VI Perl Toolkit are encrypted with SSL.
To resolve the issue, install Open SSL following the procedure outlined in this section, or locate a more recent version of Crypt::SSLeay in a CPAN repository (see http://www.cpan.org/) and install it using the CPAN shell tool.
This section explains how to install the OpenSSL library on Red Hat Enterprise Linux and Ubuntu Desktop.
Red Hat Enterprise Linux 5
The Red Hat Enterprise Linux (RHEL 5) installation DVD includes the OpenSSL package.
To Install OpenSSL on RHEL 5
1 Insert the installation DVD.
The system displays the DVD on the desktop.
2 From the terminal console, use rpm to install OpenSSL.
The precise filenames depend on your particular installation DVD. Here’s an example:
cd "/<the mount point>/Server" rpm -i e2fsprogs-devel.1.39-8.el5.i386.rpm rpm -i krb5-devel-1.5-17.i386.rpm rpm -i zlib-devel-1.2.3-3.i386.rpm rpm -i openssl-devel-1.2.9-8.1.i386.rpm
For 64‐Linux, use the corresponding 64‐bit packages, for example, rpm -i e2fsprogs-devel.1.39-8.el5.x86_64.rpm.
NOTE These instructions are included for your convenience only. Filenames or the installation process might be different on your system.

VMware, Inc. 13
Chapter 2 Installing a VI Perl Toolkit Package
Ubuntu Desktop 7.10
Ubuntu uses apt (advanced packaging tool) to keep a local repository of libraries up‐to‐date.
To install OpenSSL on Ubuntu Desktop 7.10
1 Make sure that your system is properly configured and connected to the Internet.
2 Update the local repository of libraries by entering into the terminal console:
sudo apt-get update
3 Install the OpenSSL library by entering into the terminal console:
sudo apt-get install libssl-dev
Installing the VI Perl ToolkitThis section explains how to unpack and install the VI Perl Toolkit using the Linux installer. Before you start the installation, you must download the package. See “Downloading the Perl Toolkit Binary” on page 7.
For some important upgrade information, see “Upgrading the VI Perl Toolkit Package” on page 15.
To install the VI Perl Toolkit
1 Untar the VI Perl Toolkit binary you downloaded.
2 Launch the installer.
/<location>/vmware-install.pl
The installer prompts you to accept the terms of the license agreement.
3 Enter yes at the prompt to accept the license terms and continue.
If you do not type yes in full and press Enter, the installer cannot continue.
The installer prompts you to provide an installation location or to accept the default, which is /usr/bin.
4 Specify an installation directory or press Enter to accept the default.
When the installation process completes:
A success message appears.
The installer lists different version numbers for required modules (if any).
The prompt returns to the shell prompt.
You can now run sample scripts or utility applications to test your installation. See Chapter 5, “Validating the VI Perl Toolkit Installation,” on page 23.
If you accepted the defaults during installation, the utility applications and samples subdirectories are in the following locations:
Utility applications – /usr/lib/vmware-viperl/apps
Sample scripts – /usr/share/doc/vmware-viperl/samples
Uninstalling the VI Perl ToolkitYou can uninstall the VI Perl Toolkit at any time by running the vmware-uninstall-viperl.pl script, as follows:
/<location>/bin/vmware-uninstall-viperl.pl
The default location is usr. If you specified a non‐default installation location, use that location.
NOTE Ubuntu requires that perl-doc and liburi-perl are included on your system. Install them when installing OpenSSL if they are not already installed. The process is the same as for OpenSSL, discussed next.

Installation Guide
14 VMware, Inc.
Installing the VI Perl Toolkit on WindowsYou can install the VI Perl Toolkit package on the following Windows platforms:
Windows Vista (SP 1)Windows XP (SP 2)
The Windows installer includes the ActivePerl runtime from ActiveState and all required Perl modules and libraries. If Perl is already installed on the target Windows system, you might be prompted to remove it.
If you don’t want to remove an existing Perl engine, consider using the virtual appliance instead. See Chapter 3, “Installing and Using the VI Perl Toolkit Virtual Appliance,” on page 17). You can also install the VI Perl Toolkit from source code (see Chapter 4, “Installing the VI Perl Toolkit from Source Code,” on page 19).
To install the VI Perl Toolkit using the Windows installer
1 Run the executable you downloaded (see “Downloading the Perl Toolkit Binary” on page 7).
If an earlier version of the VI Perl Toolkit or the Remote CLI package exists on the target Windows system, the installer offers to upgrade that version if the two versions are compatible. Otherwise, the installer prompts you to uninstall the existing version.
For compatibility information, see “Upgrading the VI Perl Toolkit Package” on page 15.
2 Click Next in the Welcome page to continue.
The Destination Folder dialog box displays.
3 If you don’t want to install the toolkit in the default directory, click Change and choose a different directory. The default location is \Program Files\VMware\VMware VI Perl Toolkit\Perl.
4 Click Next to continue.
The Ready to Install the VMware VI Perl Toolkit components dialog box displays.
5 Click Install to proceed with the installation.
The process might take a few minutes to complete.
After the Installation wizard completes, you can test the installation by running one of the sample scripts or one of the utility applications. See “Validating the VI Perl Toolkit Installation” on page 23.
Uninstalling the VI Perl ToolkitYou can uninstall the VI Perl Toolkit from a Windows system at any time using the Add or Remove Programs control panel.
VMware, Inc. 15
Chapter 2 Installing a VI Perl Toolkit Package
Upgrading the VI Perl Toolkit PackageDifferent versions of the VI Perl Toolkit support connectivity to different versions of VMware Infrastructure, as described in Table 2‐1.
When you install VI Perl Toolkit 1.6 or Remote CLI version 3.5 Update 2, the installer checks whether a version of VI Perl Toolkit is already installed, and whether that product is compatible with the version you are installing.
If the versions are not compatible, the installer either offers to repair the existing installation, or displays a message that informs you that you have to uninstall the existing version of VI Perl Toolkit before you can install the new version.
Table 2-1. VI Perl Toolkit and VMware Infrastructure
VI Perl Toolkit VMware Infrastructure Hosts
Version 1.0 ESX Server 3.0.xVirtualCenter Server 2.0.x
Version 1.0_RCLI(Included with the Remote CLI 1.0 but not shipped separately).
ESX Server 3 version 3.5ESX Server 3i version 3.5VirtualCenter Server 2.5
Version 1.5 ESX Server 3.0.x, ESX Server 3 version 3.5, ESX Server 3i version 3.5VirtualCenter Server 2.0, VirtualCenter Server 2.5
Version 1.6 ESX Server 3.0.x, ESX Server 3 version 3.5, ESX Server 3i version 3.5VirtualCenter Server 2.0, VirtualCenter Server 2.5Includes support for the Update 2 release.

Installation Guide
16 VMware, Inc.
VMware, Inc. 17
3
The VI Perl Toolkit virtual appliance is a virtual machine that has a pared‐down Linux distribution with all VI Perl Toolkit software preinstalled. It includes a Perl engine, required libraries, VI Perl Toolkit components, utility applications, and sample scripts. It also includes VMware Remote Command‐Line Interface (Remote CLI) scripts, which you can use to perform common management operations.
The virtual appliance is distributed in OVF format, which means that you can import it into VirtualCenter 2.5. If you want to run the virtual appliance on a hosted product, use the OVF Tool to convert the OVF format virtual machine to the format you require.
This chapter discusses installing and using the VI Perl Toolkit virtual appliance in the following sections:
““Installing and Using the Virtual Appliance on ESX Server Hosts” on page 17”
“Installing and Using the Virtual Appliance on Hosted Products” on page 18
Installing and Using the Virtual Appliance on ESX Server HostsThis section discusses preparing for importing and running the virtual appliance.
Importing the Virtual ApplianceAfter you have downloaded the virtual appliance or found it on the Virtual Appliance Marketplace, you can start importing the virtual appliance.
To import the virtual appliance
1 Using a VI Client, connect to a VirtualCenter Server or an ESX Server host.
2 In the Inventory pane, select the import host for the appliance.
3 Choose File > Virtual Appliance > Import.
The Import Virtual Appliance wizard is launched and offers these options on the first page:
Click Import from File, browse to an OVF file you already downloaded, and click Next.
Click Import from URL, browse to the virtual appliance’s location in the Virtual Appliance marketplace, and click Next.
4 Specify a name (optional), and choose a location for the virtual machine.
5 Choose the data store to store the virtual machine on and click Next.
6 Review the information and click Finish.
The wizard creates an appliance virtual machine on the server you selected in Step 2. This might take a few minutes.
Installing and Using the VI Perl Toolkit Virtual Appliance 3
NOTE The virtual appliance is intended for development use only. It is not intended for production.

Installation Guide
18 VMware, Inc.
Running the Virtual ApplianceAfter the Import Virtual Machine wizard completes successfully, an appliance virtual machine appears in the VI Client inventory pane.
To run the virtual appliance
1 Select and power on the virtual machine.
If you are unfamiliar with virtual machines, consider using the Getting Started guide available from the Getting Started tab.
2 Select the Console tab and click inside the console. You can now start typing.
3 Accept the End User License Agreement and provide a password for the root account to log in to the machine.
4 When prompted, log in as the network administrator with the root account password.
5 Accept the defaults to let the system assign a DHCP address to the virtual appliance unless you want to use a static IP address for the virtual machine.
6 (Optional) If you want to give the virtual machine a static IP address, you can log in to the virtual machine console as the user network (same password as root) and set the IP address from there. By default, the virtual machine has a DHCP address.
7 After the network has been configured, log in as root with the password you established in Step 3.
You can now run VI Perl Toolkit commands from the console screen prompt. The samples and utility applications are installed in the following locations:
Utility applications – /usr/lib/vmware-viperl/apps
Sample scripts – /usr/share/doc/vmware-viperl/samples
You must supply connection information each time you run a command. See the Programming Guide for more information.
VMware recommends that you validate the installation, see “Validating the VI Perl Toolkit Installation” on page 23.
Installing and Using the Virtual Appliance on Hosted ProductsMost users import the virtual appliance into an ESX Server host. However, if you want to use one of the hosted products such as VMware Player or VMware Workstation, you can do so using OVF Tool.
To install and run the virtual appliance on hosted products
1 Download the virtual appliance OVF to your local machine.
2 Download OVF Tool to your local machine.
3 Use OVF Tool to convert the virtual appliance to the format your platform requires.
4 Follow the steps listed in “To run the virtual appliance” on page 18.
NOTE To return the mouse cursor focus to your main system, press Ctrl+Alt.
NOTE You cannot use the existing root account to establish an ssh connection to the virtual appliance. If you need ssh access, create a separate user and give that user ssh permissions.

VMware, Inc. 19
4
Some developers prefer to install the VI Perl Toolkit from source code instead of installing a complete package. You can install the VI Perl Toolkit from source code on any platform that supports Perl.
This chapter discusses source code installation in the following sections:
“Installing the Toolkit on Linux” on page 19
“Installing the Toolkit on Windows” on page 20
Installing the Toolkit on LinuxThis section discusses the installation requirements and the installation process on Linux.
RequirementsBefore you install the VI Perl Toolkit, make sure that the following software is installed on your system.
Perl 5.8
Several supporting Perl modules:
Crypt‐SSLeay (0.51) [Crypt::SSLeay]
Data‐Dumper (2.102) [Data::Dumper]
MethodMaker (2.0.8) [Class::MethodMaker]
XML‐LibXML (1.60) [XML::LibXML]
libwww‐perl (5.805) [LWP]
Installing the VI Perl Toolkit from Source Code 4
NOTE This chapter does not provide detailed installation instruction. You are expected to know how to install the prerequisite software using CPAN or another mechanism.
Consider using the VI Perl Toolkit appliance or one of the VI Perl Toolkit packages if have no experience installing from source code.
NOTE You can obtain and install any missing modules using CPAN. See http://www.cpan.org/. You can also use the CPAN module included with your Perl installation.

Installation Guide
20 VMware, Inc.
InstallationThe VI Perl Toolkit source code package contains a single platform‐independent compressed file, available from the SDK download page at http://www.vmware.com/download/sdk/index.html. For download instructions, see “Downloading the Perl Toolkit Binary” on page 7.
To build the VI Perl Toolkit
1 Open a Linux shell session and change to the directory in which you downloaded the package, for example:
cd /tmp
2 Unzip the package if necessary and extract the files from the package, for example:
gunzip filename.tar.gz tar xf filename.tar
3 Change to the directory containing the extracted files and review the README file for information about licensing, additional requirements, and late‐breaking information:
cd viperltoolkit less README
4 Execute the Makefile.PL for the toolkit.
cd /tmp/viperltoolkitperl Makefile.PL
If any of the Perl prerequisites is missing, a warning message like the following displays:
Warning: prerequisite Data::Dumper 2.121 not found. We have 2.12.
In that case, you must finish installing all prerequisites before you proceed. See “Requirements” on page 19.
5 Build the toolkit files:
make
6 Test that the build succeeded:
make test
Installing the Toolkit on WindowsThis section discusses the installation requirements and the installation process on Windows.
RequirementsBefore you install the VI Perl Toolkit, make sure that the following software is installed on your system:
Perl 5.8. You can obtain and install the most recent version of ActivePerl from ActiveState from http://www.activestate.com/.
Several supporting Perl modules:
XML‐LibXML‐CommonXML‐LibXMLCrypt‐SSLeay Data‐Dumper Class‐MethodMaker
You can install the required modules and packages using the Perl Package Manager.
Microsoft nmake, which you can obtain from http://support.microsoft.com/kb/132084.

VMware, Inc. 21
Chapter 4 Installing the VI Perl Toolkit from Source Code
To build the VI Perl Toolkit
1 Launch a Windows console session (cmd.exe).
2 Navigate to the location of the VI Perl Toolkit download and run this command:
perl Makefile.PL
The console displays progress:
Writing Makefile for VIPerlToolkit
3 Enter nmake at the command prompt:
4 Enter nmake install at the command prompt:
The console displays status information while the VI Perl Toolkit components are installed. After a few seconds, the process completes. You can now validate the installation by executing a command. See “Validating the VI Perl Toolkit Installation” on page 23.
NOTE For detailed step‐by‐step instructions for installation on Windows, see Richard Gersthagen’s Web site http://www.run‐virtual.com.

Installation Guide
22 VMware, Inc.
VMware, Inc. 23
5
You can confirm successful VI Perl Toolkit installation by running any one of the utility applications or by running one of the sample scripts.
If you accepted the defaults during installation, you can find these scripts in the following locations:
The /samples/discovery/datacenterlisting.pl script is a choice for validating your installation. The script obtains a list of ESX Server hosts and associated virtual machines running in a VirtualCenter Server’s datacenter. You must pass to the script (as a parameter) the name of the VirtualCenter Server and the name of the data center.
The installer places the samples subdirectory in the following location by default:
/usr/share/doc/vmware-viperl/samples
To run the script
1 Navigate to the samples subdirectory, which is in the following location by default:
2 To execute the script, follow these steps:
a Enter perl.
b Enter the precise name of the script, including the path within the samples directory, using precisely matching capitalization.
c Enter any required parameters (and optional parameters as appropriate).
For example, for the datacenterlisting script, enter this command:
perl discovery/datacenterlisting.pl --server '<servername_or_ip_address>' --datacenter '<datacenter_name>'
For the datacenterlisting.pl script, specify a VirtualCenter Server not an ESX Server host with the --server parameter. For other scripts, an ESX Server host might be appropriate.
Validating the VI Perl Toolkit Installation 5
Utility Applications C:\Program Files\VMware\VMware VI Perl Toolkit\Perl\apps/usr/lib/vmware-viperl/apps
Sample Scripts C:\Program Files\VMware\VMware VI Perl Toolkit\Perl\samples/usr/share/doc/vmware-viperl/samples
NOTE None of the scripts in the samples directory are supported. You can, however, modify and test the scripts and use them in your applications.
Linux /usr/share/doc/vmware-viperl/samples
Windows C:\Program Files\VMware\VMware VI Perl Toolkit\Perl\samples

Installation Guide
24 VMware, Inc.
You are prompted for a user name and password. You can also supply the user name and password on the command line. Place quotes around host names and data center names that include special characters (single quotes on Linux and double quotes on Windows).
For example:
See the Programming Guide for a detailed discussion of how to invoke scripts and supply connection parameters.
Linux perl discovery/datacenterlisting.pl --server Server42 --datacenter ‘Primary_Datacenter’ --username Frog --password ‘princ#’
Windows perl discovery/datacenterlisting.pl --server Server42 --datacenter “Primary_Datacenter” --username Frog --password “princ#”