installation guide - heartland portico · click virtual terminal installation guide download. step...
TRANSCRIPT

Portico VT
Installation GuideFOR HEARTLAND MERCHANT USERS
JULY 2015
V2.9
Portico VT Installation Guide, v2.9—July 2015
NoticeTHE INFORMATION CONTAINED HEREIN IS PROVIDED TO RECIPIENT "AS IS" WITHOUT WARRANTY OF ANY KIND, EXPRESS OR IMPLIED, INCLUDING BUT NOT LIMITED TO, THE IMPLIED WARRANTIES OF MERCHANTABILITY AND FITNESS FOR A PARTICULAR PURPOSE, OR WARRANTY OF TITLE OR NON-INFRINGEMENT. ALL SUCH WARRANTIES ARE EXPRESSLY DISCLAIMED. HEARTLAND PAYMENT SYSTEMS SHALL NOT BE LIABLE FOR ANY DIRECT, INDIRECT, SPECIAL, INCIDENTAL, OR CONSEQUENTIAL DAMAGES RESULTING FROM THE USE OF ANY INFORMATION CONTAINED HEREIN, WHETHER RESULTING FROM BREACH OF CONTRACT, BREACH OF WARRANTY, NEGLIGENCE, OR OTHERWISE, EVEN IF HEARTLAND PAYMENT SYSTEMS HAS BEEN ADVISED OF THE POSSIBILITY OF SUCH DAMAGES. HEARTLAND PAYMENT SYSTEMS RESERVES THE RIGHT TO MAKE CHANGES TO THE INFORMATION CONTAINED HEREIN AT ANY TIME WITHOUT NOTICE. THIS DOCUMENT AND ALL INFORMATION CONTAINED HEREIN IS PROPRIETARY HEARTLAND PAYMENT SYSTEMS INFORMATION. UNDER ANY CIRCUMSTANCES, RECIPIENT SHALL NOT DISCLOSE THIS DOCUMENT OR THE SYSTEM DESCRIBED HEREIN TO ANY THIRD PARTY WITHOUT PRIOR WRITTEN CONSENT OF A DULY AUTHORIZED REPRESENTATIVE OF HEARTLAND PAYMENT SYSTEMS. IN ORDER TO PROTECT THE CONFIDENTIAL NATURE OF THIS PROPRIETARY INFORMATION, RECIPIENT AGREES:
A. TO IMPOSE IN WRITING SIMILAR OBLIGATIONS OF CONFIDENTIALITY AND NONDISCLOSURE AS CONTAINED HEREIN ON RECIPIENT’S EMPLOYEES AND AUTHORIZED THIRD PARTIES TO WHOM RECIPIENT DISCLOSES THIS INFORMATION (SUCH DISCLOSURE TO BE MADE ON A STRICTLY NEED-TO-KNOW BASIS) PRIOR TO SHARING THIS DOCUMENT AND
B. TO BE RESPONSIBLE FOR ANY BREACH OF CONFIDENTIALITY BY THOSE EMPLOYEES AND THIRD PARTIES TO WHOM RECIPIENT DISCLOSES THIS INFORMATION.
RECIPIENT ACKNOWLEDGES AND AGREES THAT USE OF THE INFORMATION CONTAINED HEREIN SIGNIFIES ACKNOWLEDGEMENT AND ACCEPTANCE OF THESE TERMS. ANY SUCH USE IS CONDITIONED UPON THE TERMS, CONDITIONS AND OBLIGATIONS CONTAINED WITHIN THIS NOTICE. THE TRADEMARKS AND SERVICE MARKS RELATING TO PRODUCTS OR SERVICES OF HEARTLAND PAYMENT SYSTEMS OR OF THIRD PARTIES ARE OWNED BY HEARTLAND PAYMENT SYSTEMS OR THE RESPECTIVE THIRD PARTY OWNERS OF THOSE MARKS, AS THE CASE MAY BE, AND NO LICENSE WITH RESPECT TO ANY SUCH MARK IS EITHER GRANTED OR IMPLIED. TO VERIFY EXISTING CONTENT OR TO OBTAIN ADDITIONAL INFORMATION, PLEASE CALL OR EMAIL YOUR ASSIGNED HEARTLAND PAYMENT SYSTEMS CONTACT.
©2015 Heartland Payment Systems, Inc., All Rights Reserved ii
Portico VT Installation Guide, v2.9—July 2015
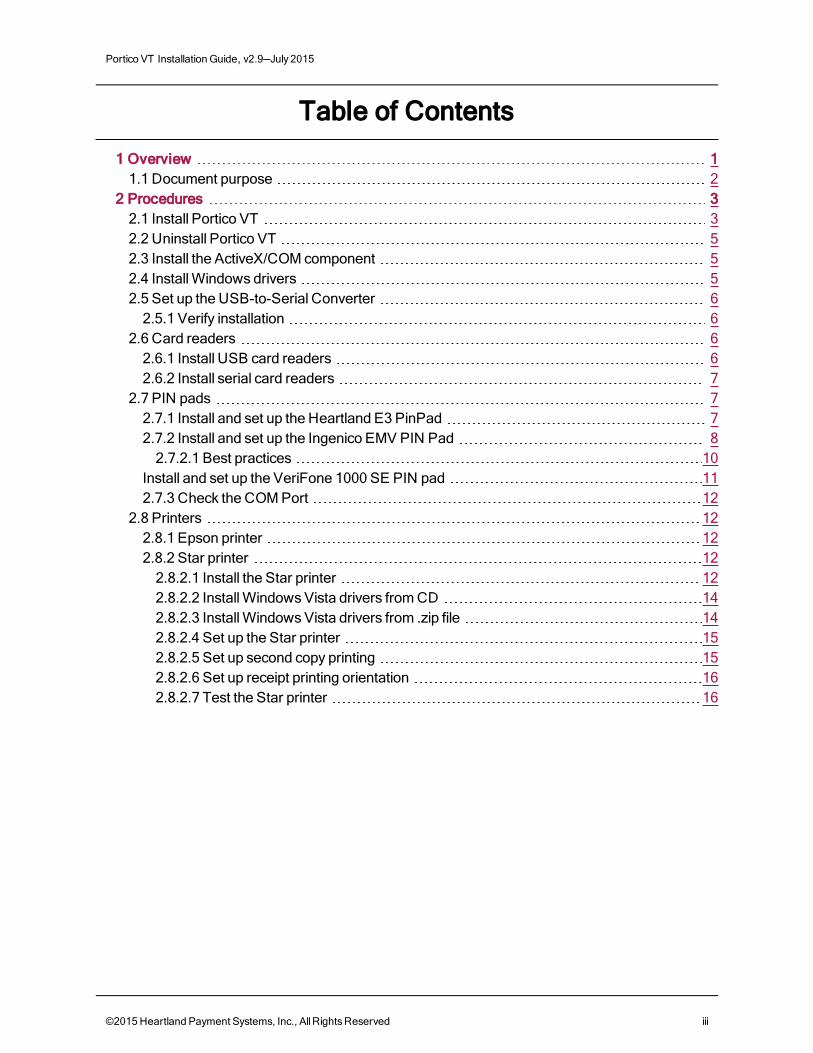
Table of Contents
1 Overview 11.1 Document purpose 2
2 Procedures 32.1 Install Portico VT 32.2 Uninstall Portico VT 52.3 Install the ActiveX/COM component 52.4 Install Windows drivers 52.5 Set up the USB-to-Serial Converter 6
2.5.1 Verify installation 62.6 Card readers 6
2.6.1 Install USB card readers 62.6.2 Install serial card readers 7
2.7 PIN pads 72.7.1 Install and set up the Heartland E3 PinPad 72.7.2 Install and set up the Ingenico EMV PIN Pad 8
2.7.2.1 Best practices 10Install and set up the VeriFone 1000 SE PIN pad 112.7.3 Check the COM Port 12
2.8 Printers 122.8.1 Epson printer 122.8.2 Star printer 12
2.8.2.1 Install the Star printer 122.8.2.2 Install Windows Vista drivers from CD 142.8.2.3 Install Windows Vista drivers from .zip file 142.8.2.4 Set up the Star printer 152.8.2.5 Set up second copy printing 152.8.2.6 Set up receipt printing orientation 162.8.2.7 Test the Star printer 16
©2015 Heartland Payment Systems, Inc., All Rights Reserved iii
Portico VT Installation Guide, v2.9—July 2015 1 Overview
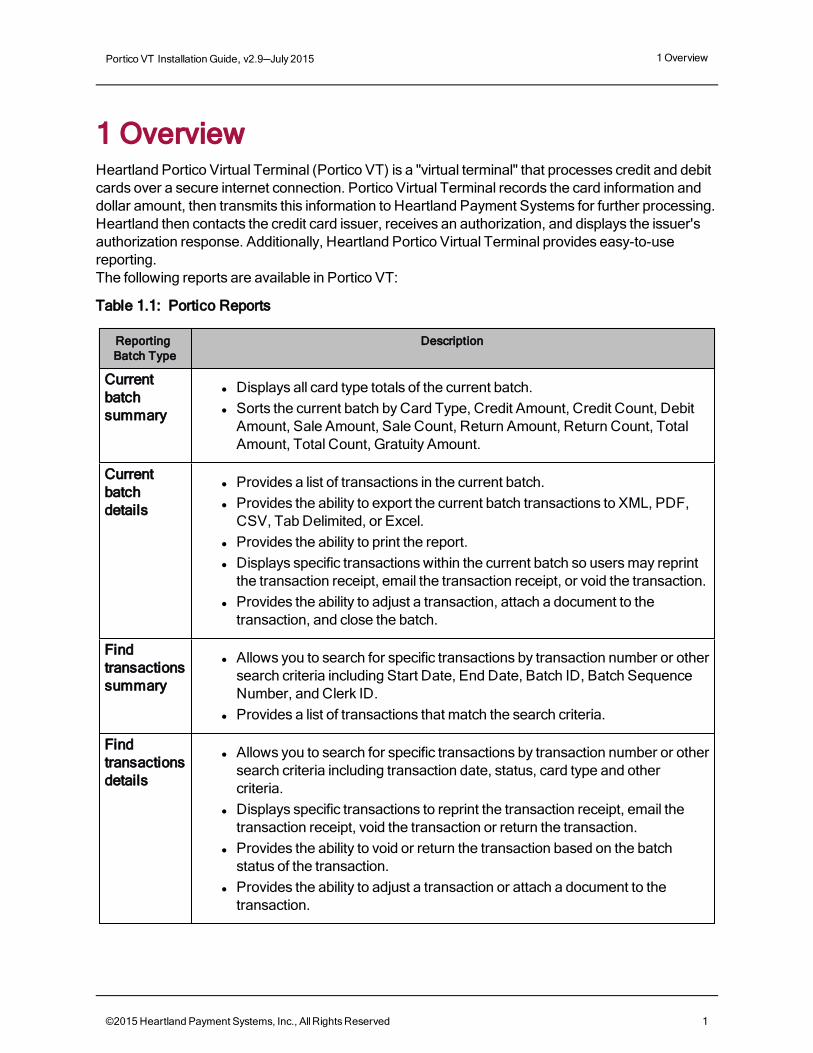
1 OverviewHeartland Portico Virtual Terminal (Portico VT) is a "virtual terminal" that processes credit and debit cards over a secure internet connection. Portico Virtual Terminal records the card information and dollar amount, then transmits this information to Heartland Payment Systems for further processing. Heartland then contacts the credit card issuer, receives an authorization, and displays the issuer's authorization response. Additionally, Heartland Portico Virtual Terminal provides easy-to-use reporting.The following reports are available in Portico VT:
Table 1.1: Portico Reports
Reporting Batch Type
Description
Current batch summary
l Displays all card type totals of the current batch. l Sorts the current batch by Card Type, Credit Amount, Credit Count, Debit
Amount, Sale Amount, Sale Count, Return Amount, Return Count, Total Amount, Total Count, Gratuity Amount.
Current batch details
l Provides a list of transactions in the current batch. l Provides the ability to export the current batch transactions to XML, PDF,
CSV, Tab Delimited, or Excel. l Provides the ability to print the report. l Displays specific transactions within the current batch so users may reprint
the transaction receipt, email the transaction receipt, or void the transaction. l Provides the ability to adjust a transaction, attach a document to the
transaction, and close the batch.
Find transactions summary
l Allows you to search for specific transactions by transaction number or other search criteria including Start Date, End Date, Batch ID, Batch Sequence Number, and Clerk ID.
l Provides a list of transactions that match the search criteria.
Find transactions details
l Allows you to search for specific transactions by transaction number or other search criteria including transaction date, status, card type and other criteria.
l Displays specific transactions to reprint the transaction receipt, email the transaction receipt, void the transaction or return the transaction.
l Provides the ability to void or return the transaction based on the batch status of the transaction.
l Provides the ability to adjust a transaction or attach a document to the transaction.
©2015 Heartland Payment Systems, Inc., All Rights Reserved 1

Portico VT Installation Guide, v2.9—July 2015 1 Overview
Reporting Batch Type
Description
Historical batch
l Displays all card type totals of a closed batch. l Allows you to search for batches by Start Date and End Date. l Provides the ability to export the closed batch transactions to XML, PDF,
CSV, Tab Delimited, or Excel. l Allows you to sort the historical batch by Device ID, Batch ID, Batch
Sequence Number, Batch Status, Open Date, Close Date, Open Transaction Number, Batch Transaction Amount, and Batch Transaction Count.
l Displays specific transactions within the selected batch to reprint the transaction receipt, email the transaction receipt, or return the transaction.
HMS details
l Allows you to search for specific transactions by transaction number or other search criteria including transaction date, status, and other criteria.
l Displays specific transactions to reprint the transaction receipt, email the transaction receipt.
Check details
l Allows you to search for specific transactions by transaction number or other search criteria including transaction date, status, card type and other criteria.
l Displays specific transactions to reprint the transaction receipt, email the transaction receipt, or void the transaction.
1.1 Document purposeThis document provides instruction for installing the Portico application, installing hardware and configuring the applicable settings. The following topics are documented separately:
Table 1.2: Documentation Reference
Component/ Function Where Documented
Merchant functions Portico Virtual Terminal User Guide
SDK functions for developers Portico Virtual Terminal SDK
Tips and FAQs for users Portico Virtual Terminal Quick Reference Guide
©2015 Heartland Payment Systems, Inc., All Rights Reserved 2
Portico VT Installation Guide, v2.9—July 2015 2 Procedures
2 Procedures
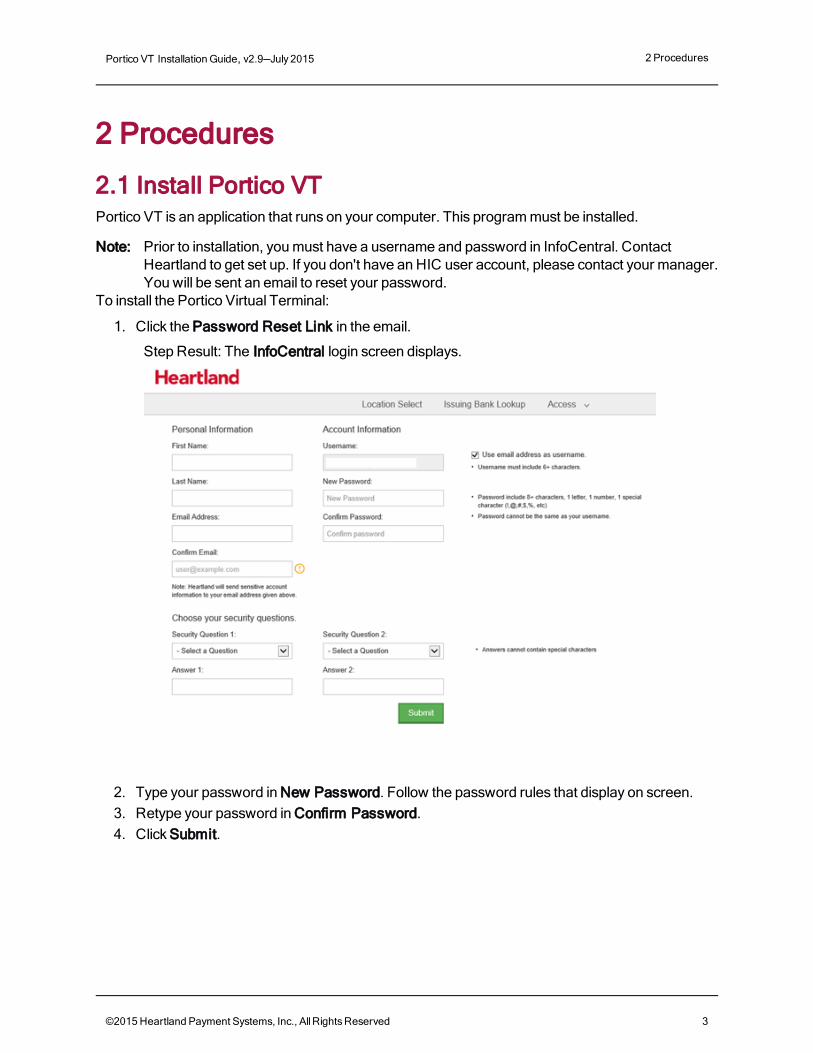
2.1 Install Portico VTPortico VT is an application that runs on your computer. This program must be installed.
Note: Prior to installation, you must have a username and password in InfoCentral. Contact Heartland to get set up. If you don't have an HIC user account, please contact your manager. You will be sent an email to reset your password.
To install the Portico Virtual Terminal:
1. Click the Password Reset Link in the email.
Step Result: The InfoCentral login screen displays.
2. Type your password in New Password. Follow the password rules that display on screen. 3. Retype your password in Confirm Password. 4. Click Submit.
©2015 Heartland Payment Systems, Inc., All Rights Reserved 3
Portico VT Installation Guide, v2.9—July 2015 2 Procedures
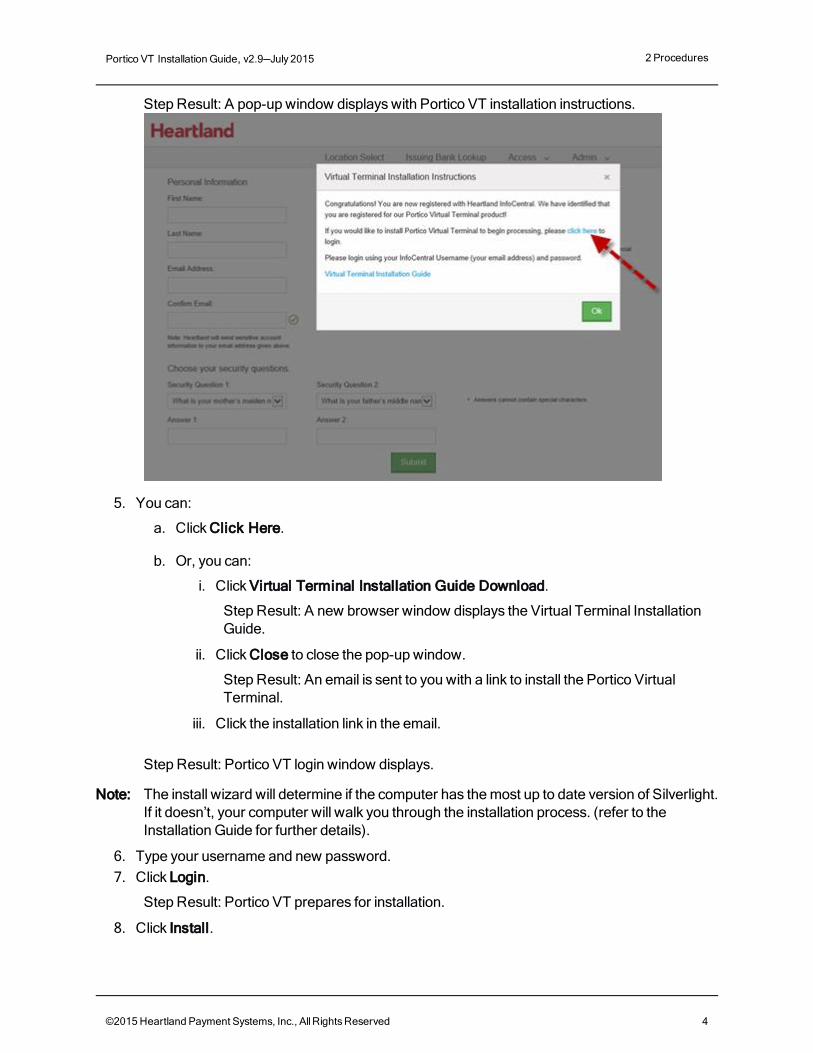
Step Result: A pop-up window displays with Portico VT installation instructions.
5. You can:
a. Click Click Here.
b. Or, you can:
i. Click Virtual Terminal Installation Guide Download.
Step Result: A new browser window displays the Virtual Terminal Installation Guide.
ii. Click Close to close the pop-up window.
Step Result: An email is sent to you with a link to install the Portico Virtual Terminal.
iii. Click the installation link in the email.
Step Result: Portico VT login window displays.
Note: The install wizard will determine if the computer has the most up to date version of Silverlight. If it doesn’t, your computer will walk you through the installation process. (refer to the Installation Guide for further details).
6. Type your username and new password. 7. Click Login.
Step Result: Portico VT prepares for installation.
8. Click Install.
©2015 Heartland Payment Systems, Inc., All Rights Reserved 4
Portico VT Installation Guide, v2.9—July 2015 2 Procedures
Step Result: A Security Warning window displays.
9. Click More options for the option of creating a Portico icon on the Start Menu, Desktop or both.
10. Click Install.
2.2 Uninstall Portico VT 1. Open the Control Panel and click Uninstall a program. 2. Double-click Heartland portico. 3. Click Yes.
Step Result: Portico VT is uninstalled.
2.3 Install the ActiveX/COM componentThe ActiveX COM component is required to use the following hardware:
l Magtek Serial Reader l VeriFone 1000SE PIN Pad l Heartland E3 PIN Pad l Ingenico EMV PinPad iPP320
To install the ActiveX/COM component:
1. Click Admin > Settings > Hardware from the main menu.
Step Result: A prompt to download the ActiveX/COM component displays.
2. Click Yes.
Step Result: Windows notifies you that the installation is successful.
3. Click OK. 4. To modify settings, click Admin > Settings > Hardware > Card Reader. 5. Once the modifications are made, click Save.
2.4 Install Windows driversTo install the Windows drivers needed for the supported hardware, such as Serial-to-USB cable, Epson printers, and Star printers:
1. Click Admin > Settings > Hardware Drivers. 2. Click the red link of the desired driver. 3. Follow the prompts.
©2015 Heartland Payment Systems, Inc., All Rights Reserved 5
Portico VT Installation Guide, v2.9—July 2015 2 Procedures
2.5 Set up the USB-to-Serial ConverterThe USB-to-Serial Convertor is required for merchants who do not have a serial port on their PC and are using a device that has a serial port connection. The setup is supported for Windows 7 and Vista operating systems. 1. Click Admin > Settings from the main menu.2. Click Hardware Drivers > the Windows 7 and Vista link.3. Click Open.4. Click Extract all files.5. Select a path where you would like to save the extracted files. Check the Show extracted files when complete box.6. Double-click the PL2303_Prolific_DriverInstaller_v10518 file.7. Click Run.8. Follow the setup wizard to its completion.
2.5.1 Verify installationDifferent devices have different port settings. To set up a device, check the settings for your specific device. To verify installation and setup, do the following:
1. From the desktop, right-click on Computerand click Properties. 2. Click Device Manager in the Tasks panel. 3. Click the + next to Ports (COM & LPT) to expand the list. 4. Note the port number (COM5 in this example). This is the COM port number you will select in
the COM Port field in the Card Reader Setup. 5. Right-click Prolific USB-to-Serial Comm Port and click Properties. 6. Click Port Settings. 7. Verify that the settings match those indicated for your specific hardware device. 8. Click OK. 9. Exit the Device Manager and Control Panel.
2.6 Card readersHeartland Portico supports Magtek and E3 card readers, which attach to the computer via USB or serial connection. The USB and Wedge card readers require no special setup; Windows automatically recognizes these devices and installs the necessarily software. The only card readers that require special setup are the serial readers.
2.6.1 Install USB card readersTo install a USB card reader, simply plug the cable into any available USB slot on your computer. Once Portico identifies the device, you can start to use it.
©2015 Heartland Payment Systems, Inc., All Rights Reserved 6
Portico VT Installation Guide, v2.9—July 2015 2 Procedures
2.6.2 Install serial card readersTo install a serial card reader:
1. Click Admin > Settings > Hardware > Card Reader. 2. Change the settings to match the following:
l Card Reader Type: Magtek Serial Reader l COM Port: COM1 l Baud Rate: 9600 l Parity: Even l Stop Bits: One l Data Bits: 8
Note: Serial COM Ports are always COM1 unless you are using a USB-to-Serial Convertor. If you are using a convertor, you need to identify the COM port and select it in the COM Port field.
3. Click Save.
2.7 PIN padsHeartland Portico Virtual Terminal supports the following PIN Pads:
l Heartland E3 PIN Pad (USB or USB-to-Serial) l Ingenico iPP320 EMV PIN Pad (USB) l VeriFone 1000SE PIN Pad (Serial or Serial-to-USB)
If you do not have a serial port on your PC, you need to use the Serial-to-USB Converter for the serial PIN pads. You can also connect the USB PIN pad to the Serial Port.
2.7.1 Install and set up the Heartland E3 PinPadTo install the Heartland E3 PinPad PP790SE:
1. Connect the Heartland E3 PinPad to a USB port. 2. Connect the power adapter and plug it in to a power source. 3. Log in to Portico VT.
Note: If you are not set to have Portico VT administrator privileges:
a. Click Start. b. Right-click the Portico VT icon and click Run as administrator. c. Log in to Portico VT.
4. Click Admin > Settings > Hardware Drivers. 5. Click Window 7 next to the E3 PinPad PP790SE USB Driver.
©2015 Heartland Payment Systems, Inc., All Rights Reserved 7

Portico VT Installation Guide, v2.9—July 2015 2 Procedures
6. When prompted, choose an option to open or save a .zip file. If you save, open the folder where you saved and open the .zip file.
7. Double-click the setup.exe file.Result: The setup script runs.
8. Click Start, right-click Computer, and click Manage.Result: The Computer Management window displays.
9. Under System Tools, click Device Manager. 10. Double-click Ports to expand the list. 11. Note which port is being used by the PIN pad. 12. Right-click the port and click Properties. 13. Click the Port Settings tab and change the settings to match the following and click OK:
l Bits per second: 9600 l Parity: None l Stop Bits: Default l Data bits: 8
14. Log out and log back in to Portico VT.Note: If you are not set to have Portico VT administrator privileges:
a. Click Start. b. Right-click the Portico VT icon and click Run as administrator. c. Log in to Portico VT.
15. Click Admin > Settings. 16. Click the Hardware tab. 17. Click the PIN Pad tab.
Note: You may be prompted to install Active X Controls; if so, follow the prompts to install. 18. In PIN Pad Type, select Heartland E3 PinPad PP790SE. 19. Change the settings to match the following:
l COM Port: (Check the COM port in the Device Manager) l Bits per second: 9600 l Parity: None l Stop Bits: Default l Data bits: 8
20. Click Save.
2.7.2 Install and set up the Ingenico EMV PIN Pad
Note: The PIN pad should not be connected to the computer until after the driver is installed. Please leave the device disconnected until Step 8.
To install the Ingenico EMV PIN Pad:
©2015 Heartland Payment Systems, Inc., All Rights Reserved 8
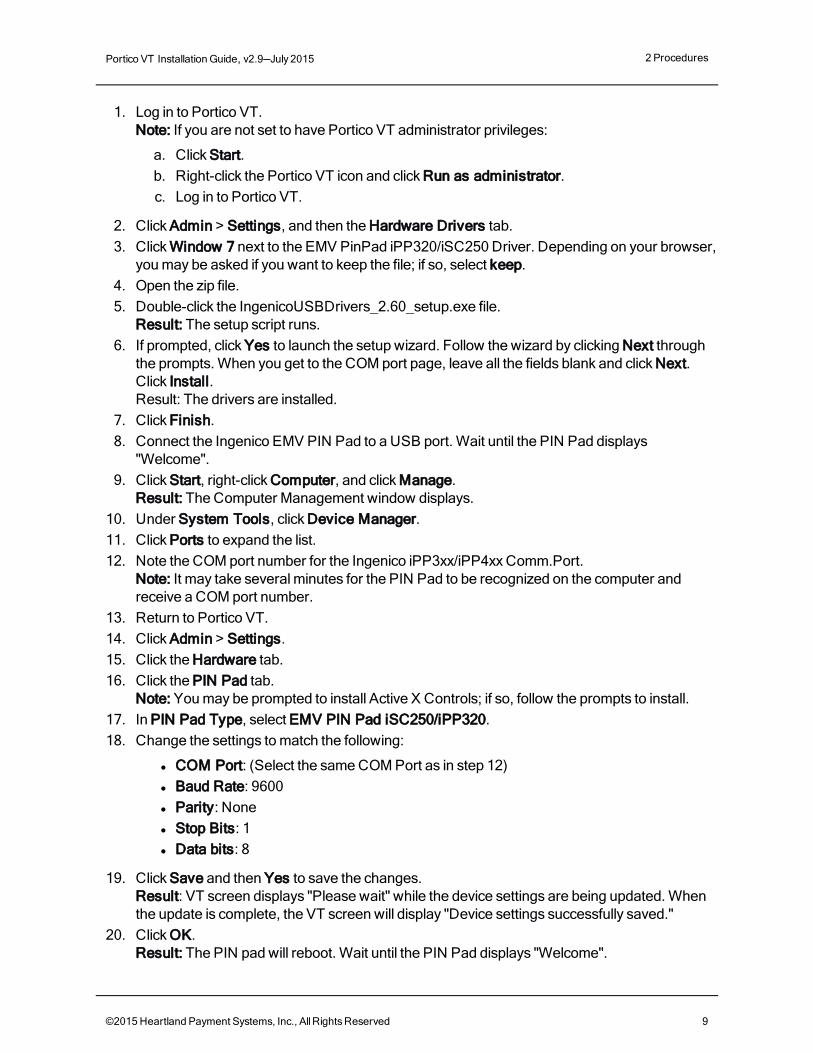
Portico VT Installation Guide, v2.9—July 2015 2 Procedures
1. Log in to Portico VT.Note: If you are not set to have Portico VT administrator privileges:
a. Click Start. b. Right-click the Portico VT icon and click Run as administrator. c. Log in to Portico VT.
2. Click Admin > Settings, and then the Hardware Drivers tab. 3. Click Window 7 next to the EMV PinPad iPP320/iSC250 Driver. Depending on your browser,
you may be asked if you want to keep the file; if so, select keep. 4. Open the zip file. 5. Double-click the IngenicoUSBDrivers_2.60_setup.exe file.
Result: The setup script runs. 6. If prompted, click Yes to launch the setup wizard. Follow the wizard by clicking Next through
the prompts. When you get to the COM port page, leave all the fields blank and click Next. Click Install.Result: The drivers are installed.
7. Click Finish. 8. Connect the Ingenico EMV PIN Pad to a USB port. Wait until the PIN Pad displays
"Welcome". 9. Click Start, right-click Computer, and click Manage.
Result: The Computer Management window displays. 10. Under System Tools, click Device Manager. 11. Click Ports to expand the list. 12. Note the COM port number for the Ingenico iPP3xx/iPP4xx Comm.Port.
Note: It may take several minutes for the PIN Pad to be recognized on the computer and receive a COM port number.
13. Return to Portico VT. 14. Click Admin > Settings. 15. Click the Hardware tab. 16. Click the PIN Pad tab.
Note: You may be prompted to install Active X Controls; if so, follow the prompts to install. 17. In PIN Pad Type, select EMV PIN Pad iSC250/iPP320. 18. Change the settings to match the following:
l COM Port: (Select the same COM Port as in step 12) l Baud Rate: 9600 l Parity: None l Stop Bits: 1 l Data bits: 8
19. Click Save and then Yes to save the changes.Result: VT screen displays "Please wait" while the device settings are being updated. When the update is complete, the VT screen will display "Device settings successfully saved."
20. Click OK.Result: The PIN pad will reboot. Wait until the PIN Pad displays "Welcome".
©2015 Heartland Payment Systems, Inc., All Rights Reserved 9
Portico VT Installation Guide, v2.9—July 2015 2 Procedures
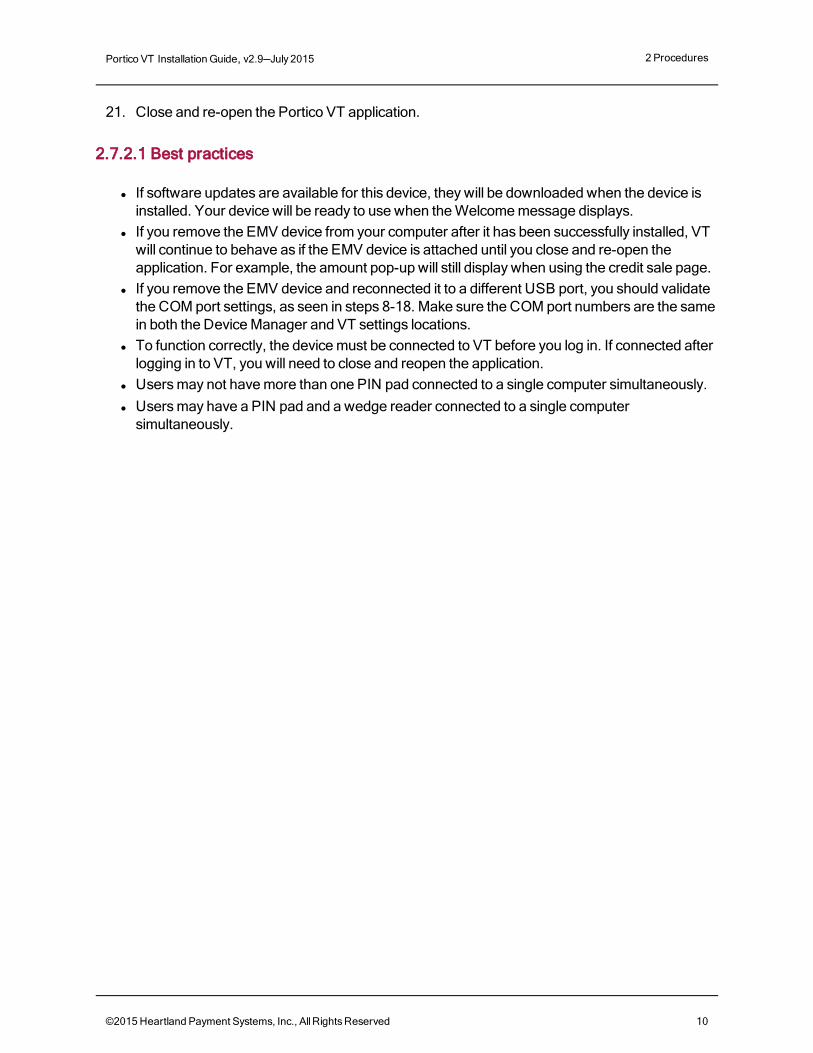
21. Close and re-open the Portico VT application.
2.7.2.1 Best practices
l If software updates are available for this device, they will be downloaded when the device is installed. Your device will be ready to use when the Welcome message displays.
l If you remove the EMV device from your computer after it has been successfully installed, VT will continue to behave as if the EMV device is attached until you close and re-open the application. For example, the amount pop-up will still display when using the credit sale page.
l If you remove the EMV device and reconnected it to a different USB port, you should validate the COM port settings, as seen in steps 8-18. Make sure the COM port numbers are the same in both the Device Manager and VT settings locations.
l To function correctly, the device must be connected to VT before you log in. If connected after logging in to VT, you will need to close and reopen the application.
l Users may not have more than one PIN pad connected to a single computer simultaneously. l Users may have a PIN pad and a wedge reader connected to a single computer
simultaneously.
©2015 Heartland Payment Systems, Inc., All Rights Reserved 10
Portico VT Installation Guide, v2.9—July 2015 2 Procedures
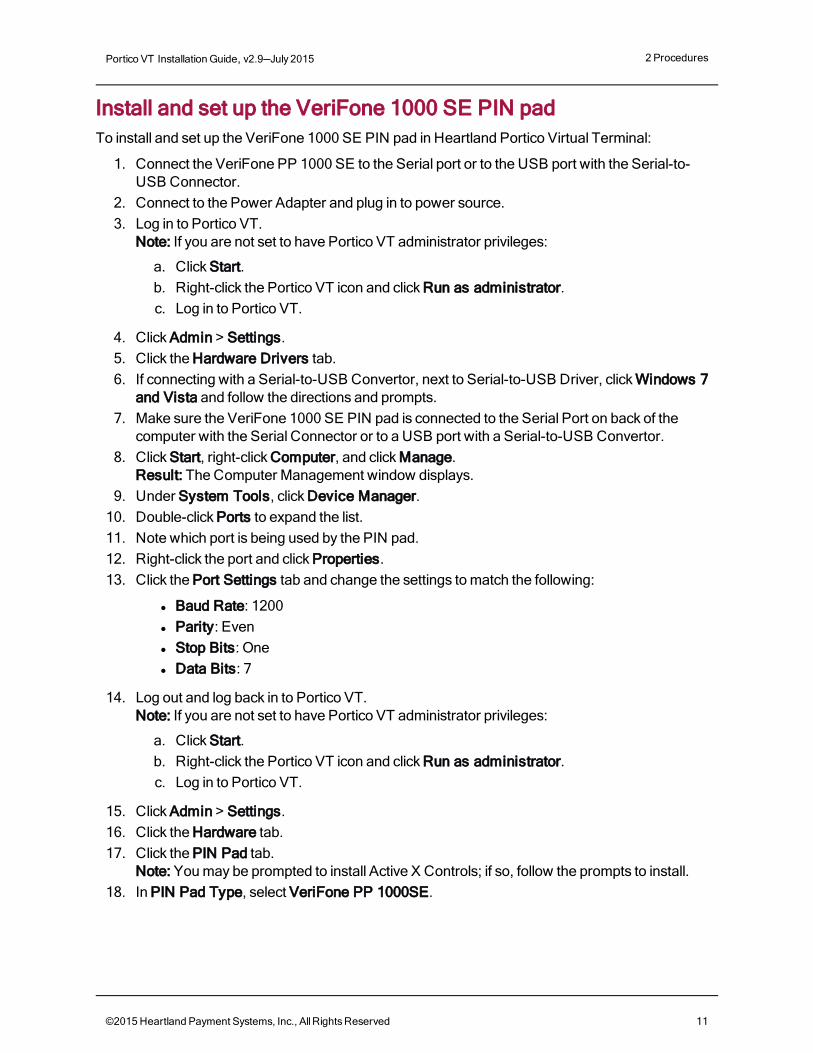
Install and set up the VeriFone 1000 SE PIN padTo install and set up the VeriFone 1000 SE PIN pad in Heartland Portico Virtual Terminal:
1. Connect the VeriFone PP 1000 SE to the Serial port or to the USB port with the Serial-to-USB Connector.
2. Connect to the Power Adapter and plug in to power source. 3. Log in to Portico VT.
Note: If you are not set to have Portico VT administrator privileges:
a. Click Start. b. Right-click the Portico VT icon and click Run as administrator. c. Log in to Portico VT.
4. Click Admin > Settings. 5. Click the Hardware Drivers tab. 6. If connecting with a Serial-to-USB Convertor, next to Serial-to-USB Driver, click Windows 7
and Vista and follow the directions and prompts. 7. Make sure the VeriFone 1000 SE PIN pad is connected to the Serial Port on back of the
computer with the Serial Connector or to a USB port with a Serial-to-USB Convertor. 8. Click Start, right-click Computer, and click Manage.
Result: The Computer Management window displays. 9. Under System Tools, click Device Manager.
10. Double-click Ports to expand the list. 11. Note which port is being used by the PIN pad. 12. Right-click the port and click Properties. 13. Click the Port Settings tab and change the settings to match the following:
l Baud Rate: 1200 l Parity: Even l Stop Bits: One l Data Bits: 7
14. Log out and log back in to Portico VT.Note: If you are not set to have Portico VT administrator privileges:
a. Click Start. b. Right-click the Portico VT icon and click Run as administrator. c. Log in to Portico VT.
15. Click Admin > Settings. 16. Click the Hardware tab. 17. Click the PIN Pad tab.
Note: You may be prompted to install Active X Controls; if so, follow the prompts to install. 18. In PIN Pad Type, select VeriFone PP 1000SE.
©2015 Heartland Payment Systems, Inc., All Rights Reserved 11
Portico VT Installation Guide, v2.9—July 2015 2 Procedures
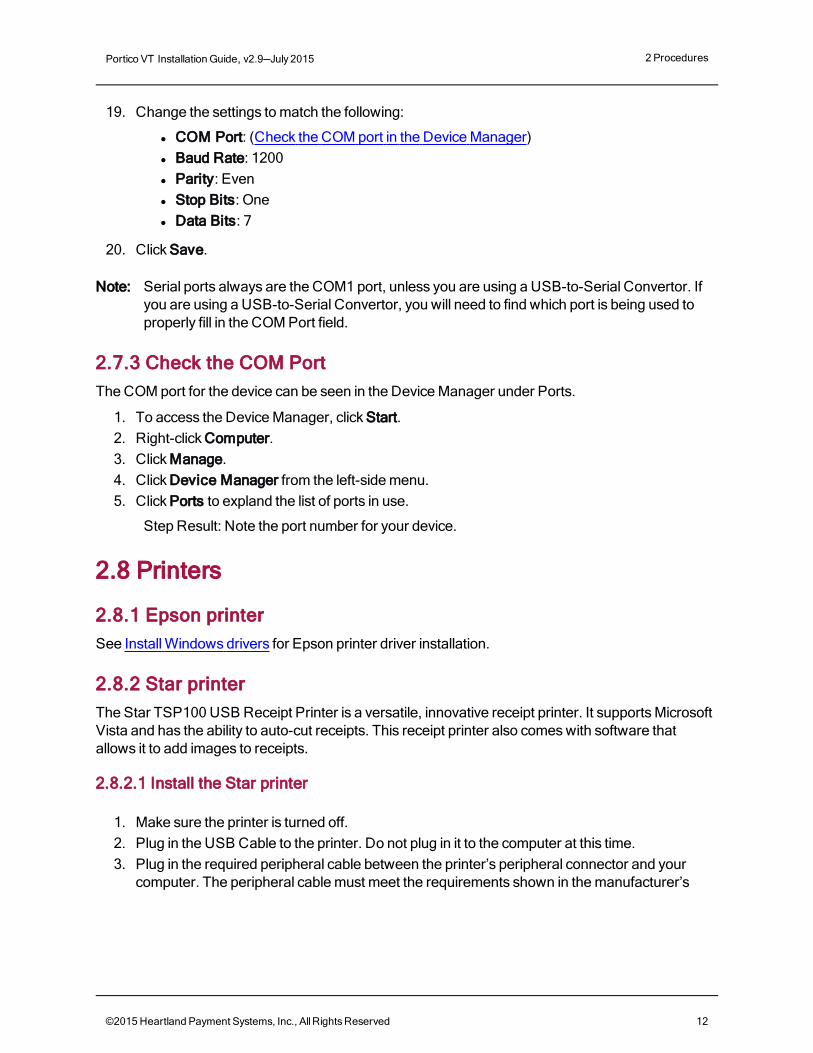
19. Change the settings to match the following:
l COM Port: (Check the COM port in the Device Manager) l Baud Rate: 1200 l Parity: Even l Stop Bits: One l Data Bits: 7
20. Click Save.
Note: Serial ports always are the COM1 port, unless you are using a USB-to-Serial Convertor. If you are using a USB-to-Serial Convertor, you will need to find which port is being used to properly fill in the COM Port field.
2.7.3 Check the COM PortThe COM port for the device can be seen in the Device Manager under Ports.
1. To access the Device Manager, click Start. 2. Right-click Computer. 3. Click Manage. 4. Click Device Manager from the left-side menu. 5. Click Ports to expland the list of ports in use.
Step Result: Note the port number for your device.
2.8 Printers
2.8.1 Epson printerSee Install Windows drivers for Epson printer driver installation.
2.8.2 Star printerThe Star TSP100 USB Receipt Printer is a versatile, innovative receipt printer. It supports Microsoft Vista and has the ability to auto-cut receipts. This receipt printer also comes with software that allows it to add images to receipts.
2.8.2.1 Install the Star printer
1. Make sure the printer is turned off. 2. Plug in the USB Cable to the printer. Do not plug in it to the computer at this time. 3. Plug in the required peripheral cable between the printer’s peripheral connector and your
computer. The peripheral cable must meet the requirements shown in the manufacturer’s
©2015 Heartland Payment Systems, Inc., All Rights Reserved 12
Portico VT Installation Guide, v2.9—July 2015 2 Procedures
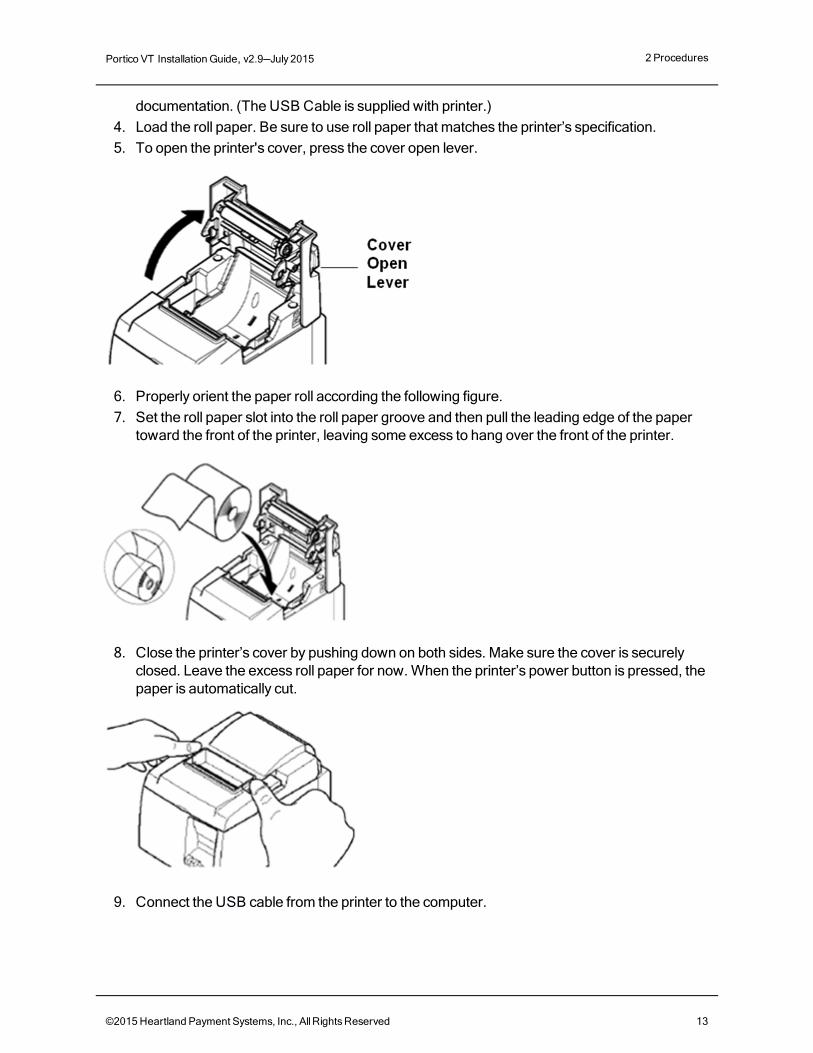
documentation. (The USB Cable is supplied with printer.) 4. Load the roll paper. Be sure to use roll paper that matches the printer’s specification. 5. To open the printer's cover, press the cover open lever.
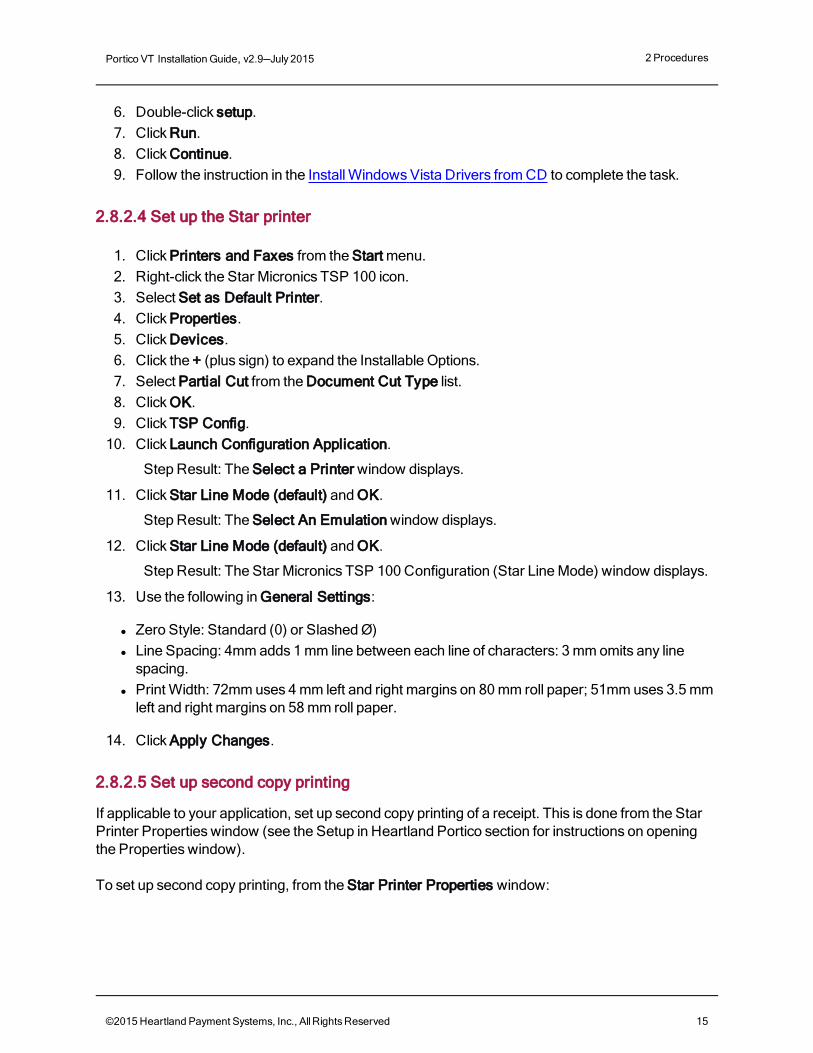
6. Properly orient the paper roll according the following figure. 7. Set the roll paper slot into the roll paper groove and then pull the leading edge of the paper
toward the front of the printer, leaving some excess to hang over the front of the printer.
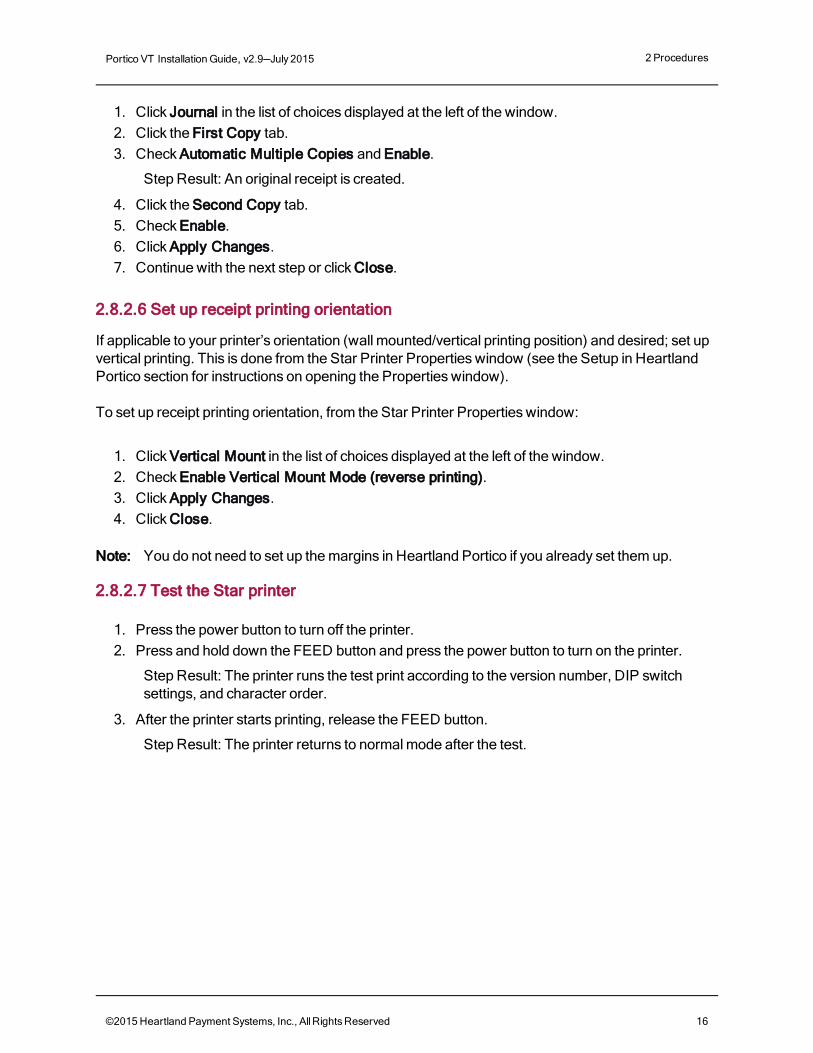
8. Close the printer’s cover by pushing down on both sides. Make sure the cover is securely closed. Leave the excess roll paper for now. When the printer’s power button is pressed, the paper is automatically cut.
9. Connect the USB cable from the printer to the computer.
©2015 Heartland Payment Systems, Inc., All Rights Reserved 13

Portico VT Installation Guide, v2.9—July 2015 2 Procedures
2.8.2.2 Install Windows Vista drivers from CD
1. Insert the supplied CD-ROM (Drivers and Utilities for Windows) into the computer’s CD-ROM drive.
2. If prompted, click Allow. 3. Click Computer from the Start menu. 4. Right-click on the CD ROM drive and click Explore. 5. Double-click the Win2K_XP folder. 6. Double-click Setup. 7. If prompted, click Allow.
Step Result: Installation begins and the TSP100 Setup window displays.
8. Click Next.
Step Result: The Customer Information screen displays.
9. Enter your name and the name of the organization. 10. Click Next.
Step Result: The Setup Type window displays.
11. Select Typical and click Next.
Step Result: The Ready to Install the Program window displays.
12. Click Install. 13. When the installation process is completed, click Finish. 14. Plug the TSP100 into a power outlet and an available USB port on your PC. 15. To turn on the printer, press the power switch.
Step Result: The Found New Hardware icon displays in your system tray. Windows installs the necessary software and indicates the printer is ready for use.
2.8.2.3 Install Windows Vista drivers from .zip file
To download the printer drivers for the Star printer from the Internet and then install them on your PC:
1. Plug the printer into USB port. 2. Go to the following website (also available from the Hardware Device tab):
http://www.starmicronics.com/uploads/download%20files/TSP100%20Vista%20Support%20driver%203.0.zip
Step Result: The File Download window displays.
3. Click Open. 4. Click Extract all files at the top of the page. 5. Click Extract.
Step Result: Extraction begins.
©2015 Heartland Payment Systems, Inc., All Rights Reserved 14
Portico VT Installation Guide, v2.9—July 2015 2 Procedures
6. Double-click setup. 7. Click Run. 8. Click Continue. 9. Follow the instruction in the Install Windows Vista Drivers from CD to complete the task.
2.8.2.4 Set up the Star printer
1. Click Printers and Faxes from the Start menu. 2. Right-click the Star Micronics TSP 100 icon. 3. Select Set as Default Printer. 4. Click Properties. 5. Click Devices. 6. Click the + (plus sign) to expand the Installable Options. 7. Select Partial Cut from the Document Cut Type list. 8. Click OK. 9. Click TSP Config.
10. Click Launch Configuration Application.
Step Result: The Select a Printer window displays.
11. Click Star Line Mode (default) and OK.
Step Result: The Select An Emulation window displays.
12. Click Star Line Mode (default) and OK.
Step Result: The Star Micronics TSP 100 Configuration (Star Line Mode) window displays.
13. Use the following in General Settings:
l Zero Style: Standard (0) or Slashed Ø) l Line Spacing: 4mm adds 1 mm line between each line of characters: 3 mm omits any line
spacing. l Print Width: 72mm uses 4 mm left and right margins on 80 mm roll paper; 51mm uses 3.5 mm
left and right margins on 58 mm roll paper.
14. Click Apply Changes.
2.8.2.5 Set up second copy printing
If applicable to your application, set up second copy printing of a receipt. This is done from the Star Printer Properties window (see the Setup in Heartland Portico section for instructions on opening the Properties window). To set up second copy printing, from the Star Printer Properties window:
©2015 Heartland Payment Systems, Inc., All Rights Reserved 15
Portico VT Installation Guide, v2.9—July 2015 2 Procedures
1. Click Journal in the list of choices displayed at the left of the window. 2. Click the First Copy tab. 3. Check Automatic Multiple Copies and Enable.
Step Result: An original receipt is created.
4. Click the Second Copy tab. 5. Check Enable. 6. Click Apply Changes. 7. Continue with the next step or click Close.
2.8.2.6 Set up receipt printing orientation
If applicable to your printer’s orientation (wall mounted/vertical printing position) and desired; set up vertical printing. This is done from the Star Printer Properties window (see the Setup in Heartland Portico section for instructions on opening the Properties window). To set up receipt printing orientation, from the Star Printer Properties window:
1. Click Vertical Mount in the list of choices displayed at the left of the window. 2. Check Enable Vertical Mount Mode (reverse printing). 3. Click Apply Changes. 4. Click Close.
Note: You do not need to set up the margins in Heartland Portico if you already set them up.
2.8.2.7 Test the Star printer
1. Press the power button to turn off the printer. 2. Press and hold down the FEED button and press the power button to turn on the printer.
Step Result: The printer runs the test print according to the version number, DIP switch settings, and character order.
3. After the printer starts printing, release the FEED button.
Step Result: The printer returns to normal mode after the test.
©2015 Heartland Payment Systems, Inc., All Rights Reserved 16