installation and pattern guide for ... - sansoucy stone
TRANSCRIPT
P A V E R S B Y I D E A L
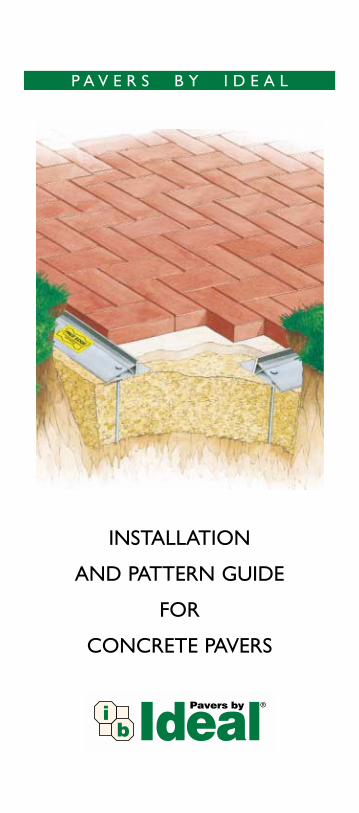
INSTALLATION
AND PATTERN GUIDE
FOR
CONCRETE PAVERS

Ideal’s Stones with Style™ are beautiful and easy toinstall. The many styles, shapes, and rich colors createdistinctive patios, walks, driveways, and pool decks thatwill bring you years of enjoyment.
Most paving skills are within your reach. Simply followthe steps we have shown. We’ve even included somehelpful hints that the professionals use. With a littleeffort and determination, you can achieve beautiful do-it-yourself results. Let’s get started!
PlanningCareful planning is essential to ensure your project goes smoothly. Start by reviewing our
Come Home to Style catalog for ideas. It will help youvisualize what your project might look like in relationto your home and site amenities. Then sketch out a fewdesigns on graph paper. When you have finished yourplan, finalize all of the dimensions and note anyexisting structures, such as your home, stairs, or otherpaved areas.
While you probably have a pretty good idea of the styleand color pavers you want, visit the Ideal AuthorizedDealer in your area to make your final selection fromactual product samples. Show them your sketch anddiscuss the shape and pattern you’d like to use, keepingin mind that some shapes and laying patterns requireless cutting than others. They will help you determinethe proper amount of pavers, edge restraints, sand,gravel, and other materials you’ll need. Most likely youwill need to have the materials delivered to your site.The pavers, sand, and gravel are heavy, so deliverymakes sense. You should select a convenient and safelocation where the materials can be placed.
You will need the following tools and equipment:
• Gloves • Mason’s Line • Tape Measure• Push Broom • Wood Stakes • Rubber Mallet• Shovel • Garden Rake • Wheelbarrow• String Level • Marking Crayon • Steel Rake• 24" Carpenter’s Square • Safety Glasses• 2 pcs 1" o.d. conduit pipe x 8' long (screed pipe)• 1 pc 2" x 4" x 8' kiln-dried lumber (screed board)
In addition, you will need a tamper or plate compactorand a guillotine cutter or masonry saw to cut some ofthe pavers. They are available from your IdealAuthorized Dealer or local equipment rental store.
1
2

PreparingBefore starting excavation, contact Dig Safe or Call Before You Dig and request that they
mark all underground cables or pipes. These servicesare usually free, but may require up to 72 hours notice.
Begin by marking out the area to be paved. Use agarden hose to layout free-form curves. A circle ismarked out from a stake at the center point. Using astring line cut to the length of the radius desired, markthe arc with chalk. Be sure to allow an additional 6" oneach side of the pavement (except where the paversabut a wall, foundation, or existing curb) for drainageand edge restraints. Set a series of stakes along theperimeter and connect them with string.
It is important to establish a 90° corner as a starting point. A simple technique uses the 3-4-5 triangle method. From the corner stake, measure 3' across the bottom and4' up the side, adjusting them untilthe distance of the diagonal line is exactly 5' long. A 24" carpenter’s square also can be used. You also will need to establish a 90° corner when setting the edging and laying the pavers.
ExcavatingIf you have a large area to excavate, you maywish to hire a contractor. They can haul away and dispose of the excavated material.
For smaller areas, a shovel and some hard work will getthe job done.Remove grass, loam, roots, and large rocks.Use a flat shovel or spade to skim off the last couple ofinches to avoid disturbing the subgrade soil. Remember,you’ll need to excavate 6" beyond the final dimensionsof the pavement to install the edge restraints.
The depth of the excavation will depend on the projectand soil conditions. The base under the pavers must besufficiently thick to support loads in order to avoidrutting over time. The chart shown will give you anidea of how deep you’ll need to dig. If you have gooddraining granular soils, such as gravel, you can use lessbase material than if you have poor soils, such as clay.Granular soil feels gritty between your fingers, whileclay soils feel slick, especially when wet.
33'
4'5'
2
3

Determine the elevation of your finished pavement - itshould be approximately 1/4" above the surrounding areato allow for lock-up over time. The pavement must besloped 1/4" per foot to provide drainage. This slope isestablished at the subgrade level by pulling string linesacross the width of the excavated area and leveling them using a line level. On the side you wish to slopetowards, move the lines down 1/4" for every foot that the pavement is wide. For example, if the area is 4'wide, lower the string 1". Measure the distance betweenthe subgrade and the string lines - the excavated depthshould be uniform across the width of the slope.
Installing the BaseThe key to a successful pavement is the base installation - it is the most important step of your project. In addition to the proper thick-
ness, the base must be placed in lifts and thoroughlycompacted, otherwise settlement may occur. The basematerial should be a coarse, granular gravel consistingof a proportioned gradation of sand and stone. Werecommend 11/2" processed gravel, 3/4" crusher run,or dense-graded gravel.
4
Good Soil
7"
9"
11"
Poor Soil
9"
11"
15"
Good Soil
4"
6"
8"
Poor Soil
6"
8"
12"
Project
Walkway/Patio
Pool Deck*
Driveway
Excavation Depth Base Thickness
*Because an in-ground pool installation involves a lot of excavation, alarge volume of earth is disturbed. Unless you are confident that the soilhas been properly back-filled and compacted in lifts, it may be advisable towait 6 months or longer for the soil around the pool to settle naturally.
Tip: Since the string lines must be removed in order to compact thesubgrade, mark their position on the stakes, which should be left in place.You’ll need to reset these lines for other steps of the installation.
For every 100 square feet (sf) of area, you will need the following amountof base materials for the thickness shown:
• 4" thick - 2 tons • 6" thick - 3 tons• 8" thick - 4 tons • 12" thick - 6 tons
You must compact the subgrade soil at the bottom ofthe excavated area with a plate compactor, or for smalljobs, a hand tamper, in order to create a firm and stablefoundation for the base. As an alternative, considerrenting a tool called The Pounder® from your IdealAuthorized Dealer. It’s similar to a hand tamper, butdoes a much better job and is easier to use.
4

Installing Edge RestraintsUnless the pavers are up against an existing curb or a foundation, it is important to installedge restraints around the entire perimeter.
This keeps the pavers in position and helps preventthem from tipping or spreading apart.
While various typesof edging materialscan be used, werecommend PaveEdge® Flexible. Few other edgingsystems can matchits performance andit is easy to installand will not rot orrust. Place the edging directly on the compacted baseand secure in place by driving the 10" spikes every 2'into the pre-drilled holes. Pave Edge Flexible can beused for straight or curved sections. Be sure that allcorners that are to be square are exactly 90°. Use the 3-4-5 triangle method described in Step 2.
5
Wet, but do not saturate the base with water as youcompact. When it cannot be compacted further, addthe next layer of gravel and compact. Take your time -do not rush this step! Continue to add and compactmaterial until the top of the base is approximately 2 3/4"to 3" below the height of the finished pavement. Verifythis by resetting the string lines to the final elevationand measuring the distance - the depth should beuniform throughout. The remaining space is for the 1"sand bed and concrete pavers after they have beencompacted into place. If necessary, add or delete basematerial to bring it to the desired slope and grade, andcompact it well.
To ensure adequatecompaction, youwill need to installthe base in lifts(layers). If you willbe using a hand-tamper, spread aneven layer of gravelabout 2" thick. If using a plate
compactor, you can spread the gravel in 3" to 4" layers.
5

Placing the Sand BedBefore the pavers can be placed, a setting bed of washed concrete sand must be installed and leveled. This process is known
as screeding. Although commonly used, we do notrecommend stone dust because it packs too tightly andcan get spongy if it becomes saturated with water.
Place the steel pipeson the compactedbase parallel to eachother about 4' to 6'apart. At severalintervals, run astring line set at theheight of thefinished elevationacross the pipes.
The top of the pipes should be 1 3/4" to 2" below theline. If necessary, adjust the height by putting a handfulof sand under each end of the pipe if too low or bytrimming the base if too high.
Cover the pipes and space between them with concretesand. Level the sand by pulling the 2" x 4" screed boardalong the top of the pipes. Fill any low spots with sandand rescreed. Move the pipes forward, fill the voidswith sand and repeat the process until the entire sandbed is installed. Do not step on, compact, or allow thesand to become wet once it has been screeded. Animportant note - you should only screed the area thatwill be covered with concrete pavers on that same day.
Tip: If the area to be paved is wider than your screed board, carefullyremove the screed pipe closest to the edge, place it on the opposite side ofthe pipe left in place and repeat the screeding process.
6For every 100 sf of pavers, approximately 1 ton of concrete sand isrequired for bedding and jointing when the sand is screeded to 1" thick.
Laying the PaversMost Ideal pavers can be installed in a variety of laying patterns. The most popular are running bond, herringbone, and basket
weave. Some shapes feature unique patterns, whileothers offer virtually unlimited design possibilities.We’ve shown some of the most popular patterns forour shapes in the Patterns with Style section includedin this booklet.
76

As pavers are notset in mortar orconcrete, you canwork at your ownpace. Follow thedirections carefully,but if you make amistake, don’tpanic! Simplyremove the pavers
to correct the error and pick up where you left off.
It is important to start your paver installation along astraight edge or from a 90° corner, even with a curvedlayout. Begin placing the pavers on the screeded sandbed along a straight line in the pattern you havechosen. Install the pavers “hand-tight” so that the jointsbetween the pavers are about 1/8" wide. With circlesand fans, joint spacing may vary. We mold our paverswith “spacers” on the sides of most of our shapes toassist in proper joint spacing. Using the “touch anddrop” method, grasp a paver between your thumb andfingers. Touch the bottom half against the sides of thepreviously placed pavers and release your grip, guidingthe paver to drop down directly onto the sand. Do notslide the paver across the sand.
Step 2 - DropStep 1 - Touch
Our traditional pavers with chamfered edges should beplaced with chamfers facing up. Yankee Cobble™ shouldbe placed with its embossed surface as the top side. OurMillStone™ and Georgetown Colonial® Pavers can beinstalled with either side face up. For a rustic look, tryalternating Georgetown Colonial® faces in a randomfashion. While BrookStone™ is typically placed with itsembossed surface face up, you also may selectively installsome with the flat side up for an interesting effect.
Always select pavers from different layers and fromseveral cubes at a time and to ensure even distributionof inherent color shades when installing. Proceed fromone starting point only. The first several rows are themost important for keeping the lines of the patternstraight. Once you have established the pattern, placingthe pavers will become easy. Every couple of feet, pullstring lines over the joints to maintain pattern lines.
7

You should work off the pavers as they are installed,keeping a foot or so back from the laying edge. If youare installing pavers on a slope, always start at thebottom and work uphill. Periodically check your rowalignment by running a string line along the front edgeof the leading row, making sure that each paver touchesthe string. If adjustment is needed, wedge the paversinto the proper position using a screwdriver or tapthem with a wood block and mallet. Install any remain-ing edge restraints at this time. For pavements that willhave curves, continue the pattern to just beyond thewidth of the pavement. Mark and cut the pavers alongthe perimeter to accommodate the curve. Unless youare using our Classico® pavers, do not attempt to turnthe pavers to follow the curves.
If you are laying a pattern with circles or fans, it is bestto start at the center of the circle and work your wayout. Refer to the charts in the Patterns with Stylesection for the shape you are using. Screed only enoughsand for the setting bed that allows you to comfortablyplace the pavers within arm’s reach. As the diameter ofthe circle increases, you will be able to work off of it toplace additional pavers. Another method is to place halfof the circle first, then install the remaining half byworking from the previously installed area. Fans areinstalled in a similar manner.
Add a professional touch to yourpavement by using Boston orGeorgetown Colonial® Pavers asa soldier or sailor course alongthe outside edges to finish theborder. This technique workswell with almost any style ofpaver and pavement shape,
including curves, by “framing” the pavement for a neatfinished appearance. See page 11 for more informationon soldier and sailor border courses.
8

Cutting the PaversYou will need to cut some of the pavers to fitneatly along the edges of the pavement. Measure and mark the pavers to be cut with
a marking crayon (it is best to cut the paver about 1/4"less than the actual dimension). Always cut the paver inthe shortest direction for a neat cut. Don’t be tooconcerned if a cut is not perfect. Jointing sand will fillthe gaps.
If using a guillotine cutter, place thepaver under the center of theblade. Push the handle downusing a quick, forceful motion.When using a masonry saw,cut under the center of theblade, using just enoughpressure to allow the blade todo the work. When cuttingpavers, exercise caution and always usesafety glasses, gloves, a dust mask, and whenusing a masonry saw, hearing protection.
8
Compacting the PaversAfter all of the pavers have been installed and the edge restraints securely set, sweep the surface clean of any debris and tamp the
pavers into the bedding sand using a plate compactor.Do not compact within three feet of an unrestrainededge. Adjust the speed of the machine so that it runswith a high vibration, but at a low amplitude (jumpingmotion). Make two or three passes at 90° angles to eachother. Spread sand over the surface, sweep into thejoints, andcompact again.It is okay toleave a thinlayer of sand onthe surface asyou compact. If any of thepavers becomedamaged,remove themby placing two large screwdrivers in the joints onopposite sides of the paver and pry and rock it straightup. Tamp the replacement pavers into place with theplate compactor.
9
9

FinishingIf you have not used SandLock, you will need to spread additional
sand over the paver surface and sweep back and forthuntil the joints are full. Allowing sand to dry prior tosweeping will make filling the joints easier. The platecompactor also can be used to vibrate sand into thejoints. Keep a small amount of sand on hand to re-fillany joints, if needed, after a few weeks. To finish thejob, sweep the pavers clean and hose the surface downwith water. Complete your landscaping by adding sodor plantings as desired.
Congratulations! You should feel a real sense ofaccomplishment! Your new walkway, patio, pool deck,or driveway is ready to use and will provide you with adurable and attractive pavement that you will enjoy formany years to come.
A white deposit known as efflorescence sometimes appears on the surfaceof clay and concrete products. Do not be alarmed! It has no detrimentaleffect on the pavers and eventually disappears. If you wish to remove itimmediately, a special efflorescence remover can be applied. You shouldnever use muriatic acid! See your Ideal Authorized Dealer forinformation on high-performance cleaners and sealers formulatedspecifically to enhance and maintain the beauty of concrete pavers. These surface treatments can help keep your pavement looking like new!
10
“Tap & Set Method” - If you have not rented a platecompactor, you will need to “tap & set” the pavers intoplace using a rubber mallet. Hit each paver firmlyenough to set it into place and level all those thatsurround it. You also can use The Pounder® by settingit on a short length of 2" x 4" board to cushion itsstriking force. Spread sand over the pavers and sweepinto the joints until full.
If using SandLock® sand binder, it should be dry-mixedinto the sand. Dump 9 to 11 shovelfuls of concretesand into a wheelbarrow and add 1 to 11/2 lb of Sand-Lock. Mix together with a shovel or a hoe for at least 5minutes until uniformly blended. Use the mixture to fillthe joints during the compaction process, as previouslydescribed. Once you have completed compaction,carefully sweep the area entirely clean of sand. You maywish to use a blower to remove all of it, though youneed to take care not to blow the sand out of the joints.Starting at the lowest elevation, spray the pavementwith a fine mist of water until you see the joints start toshed water. To fully activate the SandLock, wet thepavement with copious amounts of water for severalminutes before moving to the next section.
10

P A T T E R N S W I T H S T Y L E ™
Pavers by Ideal features a wide array of attractivepavers with shapes that can create engaging patternsand designs that no other paving material can match!The color, pattern, shape, and visual texture of ourconcrete pavers are all important elements in the designof picturesque pavements that add charm, vitality, andambiance to any landscape setting.
Most shapes can be installed in a number of patterns.Choose from classic 45° or 90° herringbone, elegantbasket weaves, traditional running bonds, dramaticcircles, fans, or sweeping curves. Some pavers, such asSymetry,® have shapes that lend themselves to patternsspecific to their geometry. Other styles can be installedin virtually unlimited patterns and combinations.
Any of the patterns are suitable for walkways, patios,and pool decks. While running bonds and basketweaves may be used for residential driveways, herring-bone patterns provide the greatest degree of interlock.Stack bond patterns and large size pavers such as our12" x 12" Plaza Pavers™ should be utilized only for foottraffic.
Border CoursesAlthough Boston and Georgetown Colonial® Pavers arethe most popular choice for border courses, other pavershapes also may be used.
4" x 8" Soldier Course 3 pieces per lineal foot4" x 8" Sailor Course 1 1/2 pieces per lineal foot8" x 8" Soldier Course 1 1/2 pieces per lineal foot
4" x 8" Soldier Coursew/ 90° Herringbone Pattern
4" x 8" Sailor Coursew/ 45° Herringbone Pattern
4" x 8" Double Sailor Coursew/ Basket Weave Pattern
8" x 8" Soldier Coursew/ Running Bond Pattern
11

Nominal Size: 4" x 8" • 4.5 pcs/sf6cm or 8cm thickness6cm - 108 sf/cube8cm - 84 sf/cube - Made to order
Boston Colonial and Georgetown Colonial Pavers may be installed in a wide variety of pattern designs including herringbones, running bonds, and basket weaves.
45° Herringbone
Running Bond
Whorling Squarewith cut 4x4
Basket WeaveTraditional #1
Running BondHead-on
90° Herringbone
Boston Colonial® PaversGeorgetown Colonial® Pavers
Boston Colonial Pavers
Georgetown Colonial Pavers
12

Basket WeaveTraditional #2
Basket WeaveOffset with cut 4x4
HerringboneVariation with cut 4x4
Basket WeaveVariation
Starting HerringbonesWhen starting herringbone patterns with Boston orGeorgetown Colonial® Pavers, some units will need tobe cut (shown as white units below). Start with the firstpaver and continue placing the pavers in the ordershown. The order of placement shown below, known asthe “Ladder”, is the most efficient installation method.
21
2021 22 23 24 25
34
5
196
78
189
1011
1712
1314
16
15
45° Herringbone Pattern
90° Herringbone Pattern
4
5
69
311 29
30
1014
817
16
1527
20
21
22
23
24
25
26
18
19
13
*For patterns that require a 4" x 4" paver (shown as white unitsabove), a 4" x 8" Double Set Plaza Paver may be cut in half tomake two 4" squares with chamfers on all four sides.
12 12
7
28
13

Large Rectangle5 3/4" x 8 5/8" • 2.9 pcs/sf93 sf/cube
Medium Rectangle5 3/4" x 4 1/3" • 5.78 pcs/sf100 sf/cube
Square Stone5 3/4" x 5 3/4" • 4.36 pcs/sf99 sf/cube
All BrookStone pavers are 6cm thick.
Our BrookStone shapes are packaged separately forgreater design flexibility in creating patterns.Percentages shown are per 100 square feet.
Pattern 1100% Squares
Pattern 440% Squares • 60% Rectangles
Pattern 2429% Squares • 24% Med. Rectangles
47% Lg. Rectangles
Pattern 627.5% Med. Rectangles72.5% Lg. Rectangles
Pattern 2331% Squares • 23% Med. Rectangles
46% Lg. Rectangles
Pattern 2100% Rectangles
BrookStone™
14

Uni-Decor®
5 1/2" x 9" • 3.5 pcs/sf6cm or 8cm thickness6cm - 103 sf/cube8cm - 80 sf/cube - Made to order
Uni-Decor® Edges4 1/2" x 9"Available in 6cm thickness1.33 pcs/lf • 100 sf/cube
When installed, Uni-Decor’s appearance remains thesame regardless of pattern selected, however, differentcolors can be used to highlight pattern designs.
Running Bond Parquet/Basket Weave
90° Herringbone
45° HerringboneWith Boston Colonial ® Paver Soldier Course
Uni-Decor®
15

Large Rectangle (Pallet 1)4 1/2" x 6 3/4" • 4.63 pcs/sf • 93 sf/cube
Square Stone (Pallet 2)4 1/2" x 4 1/2" • 7.02 pcs/sf • 103 sf/cube
Circle Pak (Pallet 3)Squares, Large & Small Wedge86 sf/cube
Classico is available in 6cm thickness.
Classico can be installed in a numberof exciting patterns including basket weaves, herringbones, running bonds, circles, fans, and curves.
Percentages shown are per 100 square feet.
Running Bond Head-On100% Squares
Herringbone Variation 240% Squares • 60% Rectangles
Herringbone Variation 127.5% Squares • 72.5% Rectangles
Herringbone Variation 337% Squares • 63% Rectangles
Running Bond 100% Rectangles
Herringbone Variation 440% Squares • 60% Rectangles
Classico®
Circle Pak
16

Random Free-FormBasket Weave Variation 342.5% Squares • 57.5% Rectangles
Large Fan62" wide x 37" high
Small Fan54" wide x 30" high
Classico® Fan PatternsPallet #3 has enough Small and Large Wedge stones tomake as many as 20 fans. When installing fans, selectconfigurations such as those shown below that can berepeated with a minimum amount of cutting and setwithin arm’s reach.
Multiple Fans
Please note that the number of Large Wedge and Square stones may varyslightly depending on joint spacing between the stones.
SM. WEDGESTONES
1
1
LG. WEDGESTONES
19-21
19-21
SQUARESTONES
23-25
41-43
NO. OF ROWS
7
8
FANS
Small
Large
17

1234567
TwoSquares
ROW
Center
1
2
3
4
5
6
7
8
9
10
11
12
13
14
15
16
17
18
19
20
DIA.
6"
121/2"
213/4"
301/2"
391/2"
481/2"
571/2"
661/2"
751/2"
841/2"
931/2"
1021/2"
1111/2"
1201/2"
130"
1381/2"
148"
157"
166"
175"
184"
SW
8
LW
14
21
13
16
20
SQ
1
13
17
20
42
48
54
62
68
74
80
86
93
99
105
111
118
124
REC
or 33
or 37
or 41
or 45
or 49
or 53
or 57
or 62
or 66
or 70
or 74
or 78
or 83
PALLET
2 Layersfrom
Pallet #3
Pallet #1Rectangles
and/or Pallet #2Squares
LEGENDSW - Small Wedge SQ - SquareLW - Large Wedge REC - Rectangle
Classico® Circle Diagram & ChartPallet #3 provides enough Small and Large Wedge stonesto create as many as 4 circles 48" in diameter. For largercircles simply use Square or Rectangle stones from our#1 and #2 Pallets in subsequent rows. Note that jointswill not all be staggered from row to row.
The diagram depicts a circle using Small and Large Wedge stones andSquare stones. Starting with Row 7, only Square stones are used. In Row 8 and above, you can add Rectangle stones if desired.
18

Symetry®
4 3/8" x 10 3/4"6cm thickness3 pcs/sf • 84 sf/cube
Symetry® Squares6 5/16" x 6 5/16"6cm thickness3.62 pcs/sf • 104 sf/cube
Symetry can be installed in single stone patterns or instriking combinations with Symetry Squares.
White area shows a single Symetry paver within the patterns. Percentages shown are per 100 square feet.
Diamond Runner100% Symetry
Venetian Parquet83% Symetry • 17% Squares
Georgian Parquet78.5% Symetry • 21.5% Squares
Palace Parquet83% Symetry • 17% Squares
Embassy Row71% Symetry • 29% Squares
Grand Parquet66.2% Symetry • 33.8% Squares
Symetry®
19

Large Rectangle6 5/16" x 9 7/16"•2.42 pcs/sf • 112 sf/cube
Medium Rectangle4 3/4" x 6 5/16" • 4.84 pcs/sf • 91 sf/cube
Small Rectangle3 1/8" x 6 5/16" • 7.24 pcs/sf • 96 sf/cube
Square Stone6 5/16" x 6 5/16"• 3.62 pcs/sf • 104 sf/cube
All Yankee Cobble and MillStone pavers are 6cm thick.Percentages shown are per 100 square feet.
Pattern 1100% Squares
Pattern 627.5% Squares • 72.5% Rectangles
Pattern 2140% Squares • 60% Lg. Rectangles
Pattern 1933% Med. Rectangles67% Lg. Rectangles
Pattern 2025% Squares • 75% Lg. Rectangles
Pattern 2100% Rectangles
Yankee Cobble™
MillStone™
Yankee Cobble
MillStone
20

Yankee Cobble™ &MillStone™ Circles
6 - Center Stone18 - Large Wedge Stone174 - Small Wedge Stone120 - Medium Rectangle6 - Small Rectangle64 sf/cube
LEGENDCS - Center Stone MR - Medium RectangleLW - Large Wedge SR - Small RectangleSW - Small Wedge
765
43
210
8
Use Medium Rectangle and/or Square stones to expand the circlebeyond the 14 rows shown in chart. Additional rows willincrease the diameter in increments of approximately 12 3/4".
Row CS LW SW SR #PackagesMRDiameter
0123456789
1011121314
88
2634212630343842
8
2124303338429097
106115
2
1
26 1/4"19 1/4"31 3/4"44 1/2"57 1/2"
70"83"96"
108 1/2"120 3/4"133 1/2"146 1/4"
159"171 3/4"184 1/2"
1st CirclePak
2nd CirclePak
MediumRectanglePackage
Packaged as follows:
21

8 x 8 Running Bond
Pattern B8 x 8 and 4 x 8 Double Set
Pattern D45° 12 x 12 and 8 x 8
Pattern E12 x 12 and 8 x 8
Pattern C12 x 12, 4 x 8 and 4 x 4
45° 12 x 12 Stack
Plaza Pavers™
12" x 12"1 pc/sf • 108 sf/cube
8" x 8"2.25 pcs/sf • 96 sf/cube
4" x 8" and 4" x 8" Double Set*4.5 pcs/sf • 108 sf/cube
All Plaza Pavers are 6cm thick.
Our modular Plaza Pavers are perfect for creatingelegant and distinctive larger-scale pavement designs.
*The 4" x 8" Double Set unit may be cut into two individual 4"squares with chamfers on all four sides, if required.
Plaza Pavers™
22

4 1/2" x 9"8cm thickness3.55 pcs/sf • 79 sf/cube
Uni Eco-Stone’s unique shape provides the same surface appearance with all of the installation patterns.
Drainage openings filled with aggregateallow rainwater to filter through to ground below
23 5/8" x 15 3/4"8cm thickness2.6 sf/pc8cm - 146 sf/cube
Turfstone’s openings can be planted with grass or filled with stone to help managestormwater runoff.
Stack Bond Running Bond 3/4 Offset
Uni Eco-Stone®
Turfstone™
23

45-55 Power Road, Westford, MA 01886 232 Lexington Street, Waltham, MA 02452
Main Phone: (781) 894-3200 • Main Fax: (978) 692-0817www.IdealConcreteBlock.com
A Registered Trademark of Ideal Concrete Block Company, Inc.
INPAT-20M-7/01 ©2001 Ideal Concrete Block Co., Inc.
You can rely on us! Ideal Concrete Block Company, Inc.has been making quality concrete masonry productssince 1923. We are one of New England’s leadingmanufacturers of concrete pavers, landscape retainingwall systems, and patio products.
We’ve prepared this booklet to help guide you for greatresults that will look like it was done by a pro! If youhave any additional questions or need some assistance,don’t hesitate to give us a call at 1-800-24-IDEAL, e-mail us at [email protected], or contactyour Ideal Authorized Dealer. We’re here to help makeyour landscape project a success from start to finish!
For information on our complete product line of paversand landscape walls, accessories, or cleaning and sealingproducts, please contact us or your Ideal AuthorizedDealer for our 36-page Come Home to Style catalog.
Pavers by Ideal provides a lifetime warranty on thestructural integrity of our concrete paving stones usedin residential applications. Material installed accordingto our guidelines that is proven to be defective will bereplaced without cost. Color matching cannot beguaranteed and replacement labor is not included.Proof of purchase is required and other exclusionsapply. Please ask for complete details.
Sizes shown are soft-converted from metric mold measurements.
Boston and Georgetown® Colonial Pavers, Yankee Cobble,™ Plaza Pavers,™ BrookStone,™andMillStone™ are trademarks of Ideal Concrete Block Company, Inc.Symetry® is a trademark of Symrah Licensing, Inc.Pave Edge,® SandLock,® and The Pounder® are trademarks of Pave Tech, Inc.Uni-Decor,® and Uni Eco-Stone® are trademarks of F. von Langsdorff Licensing Ltd.