install and configure biztalk server 2013 in a … · to be able to install and configure biztalk...
TRANSCRIPT
INSTALL AND
CONFIGURE BIZTALK
SERVER 2013 IN A
STANDALONE
MACHINE
Publication of
http://www.biztalk360.com

About the Author
Writen By Sandro Pereira [Microsoft Integration MVP]
Currently working as a BizTalk consultant at DevScope (www.devscope.net). In the last few years has
been working implementing integration scenarios and Cloud Provisioning at a major
telecommunications service provider in Portugal. His main focus is on Integration Technologies where
is been using .NET, BizTalk and SOAP/XML/XSLT since 2002.
He is an active member and moderator on the MSDN BizTalk Server Forums, TechNet Wiki author, Code Gallery
contributor and was awarded Most Valuable Professional (MVP) for BizTalk Server by Microsoft since 2010
(https://mvp.support.microsoft.com/profile/Sandro.Pereira) ) and MCTS: BizTalk Server BizTalk Server 2006 and BizTalk
Server 2010 certified.
He is also author of the Blog: http://sandroaspbiztalkblog.wordpress.com/, member of the BizTalk Brazil community: http://www.biztalkbrasil.com.br/, NetPonto community (http://netponto.org/), member of BizTalk Administrators community: http://www.biztalkadminsblogging.com, editor of the magazine “Programar” (http://www.revista-programar.info/?action=editions), public speaker and technical reviewer of "BizTalk 2010 Cookbook", Packt Publishing book and several BizTalk white papers.
You can contact Sandro at: [email protected] (Twitter: @sandro_asp).
Installing BizTalk Server 2013 in a Standalone Machine
Contents 1.BizTalk Server Installation scenario ............................................................................................................ 4
2. Important considerations before set up the server .................................................................................. 5
2.1 Join the Local Administrators Group .......................................................................................................................... 5
2.2 Change the Machine name ......................................................................................................................................... 6
2.3 Disable IPv6 ................................................................................................................................................................. 7
2.4 Turn off Internet Explorer Enhanced Security Configuration (optional) .................................................................... 7
2.5 Disable User Account Control (optional) .................................................................................................................... 9
2.6 Turn Windows Firewall off (optional) ....................................................................................................................... 10
2.7 Configure the Application Event Log ........................................................................................................................ 11
2.8 Install Critical Windows Updates .............................................................................................................................. 13
3. Preparing and install prerequisites for BizTalk Server 2013 .................................................................... 16
3.1 Important considerations before set up the server.................................................................................................. 16
3.2 Enable Internet Information Services ....................................................................................................................... 16
3.2.1 Running the BAM Portal in a 64-bit Environment ............................................................................................. 21
3.3 Install Windows Identity Foundation (WIF) .............................................................................................................. 22
3.4 Install and configure SMTP Server Feature ............................................................................................................... 24
3.4.1 Verify Your Installation ...................................................................................................................................... 28
3.5 Install Microsoft Office Excel 2013 ........................................................................................................................... 29
3.6 Install Visual Studio 2012 .......................................................................................................................................... 31
3.6.1 Remove Microsoft SQL Server Express .............................................................................................................. 33
3.7 Install SQL Server 2012 ............................................................................................................................................. 35
3.8 Configure SQL Server Database Mail feature ........................................................................................................... 45
4. Install and configure BizTalk Server 2013 ................................................................................................ 55
4.1 Install BizTalk Server 2013 ........................................................................................................................................ 55
4.1.1 Verify Your Installation ...................................................................................................................................... 60
4.2 Configure BizTalk Server ........................................................................................................................................... 61
4.2.1 Pin BizTalk Server Administration to taskbar .................................................................................................... 64
4.3 Configure SQL Server Network Configuration protocols .......................................................................................... 65
4.4 Validate Mail account used by BizTalk to send BAM Alerts ...................................................................................... 66
4.5 Install BizTalk Adapter Pack ...................................................................................................................................... 69
4.5.1 Microsoft BizTalk Adapter Pack and Microsoft BizTalk Adapter Pack (x64) ...................................................... 82
4.5.2 Add adapters to BizTalk Administration Console .............................................................................................. 82
4.6 Install and Configure Microsoft UDDI Services ......................................................................................................... 84
4.6.1Verify Your Installation ....................................................................................................................................... 90

4.7 Install and Configure the Microsoft BizTalk ESB Toolkit ........................................................................................... 90
4.8 Install Critical Windows Updates and BizTalk Server Cumulative Update Package................................................ 102
4.9 Configure BizTalk Server SQL Jobs .......................................................................................................................... 102
4.9.1 How to configure Backup BizTalk Server (BizTalkMgmtDb) ............................................................................ 103
4.9.2 How to configure DTA Purge and Archive (BizTalkDTADb) ............................................................................. 108
4.9.3 MessageBox_Message_Cleanup_BizTalkMsgBoxDb ....................................................................................... 111
4.10 Configure BizTalk Server Windows Services ......................................................................................................... 111
Appendix A: Hardware and Software Requirements ................................................................................ 115
Hardware Requirements ............................................................................................................................................... 115
Software Requirements ................................................................................................................................................ 115
Appendix B: Redistributable CAB Files ...................................................................................................... 117
List of Redistributable CAB Files for BizTalk Server 2013 ............................................................................................. 118
Appendix C: Basic Configuration vs. Custom Configuration ...................................................................... 121
Reviews ...................................................................................................................................................... 122

Installing BizTalk Server 2013 in a Standalone Machine
1. BizTalk Server Installation scenario This article explains how to install and configure Microsoft BizTalk Server 2013 on a single computer running Windows
Server 2012. This information will help you plan the installation and configuration of BizTalk Server 2013, applications
and components on which it depends focused on creating a development environmenton (you can also follow this
tutorial to help you create production environments, however if this is the case you need to skip some steps)
We will assume that the machine already have installed the operating system: Windows Server 2012 and latest critical
Windows updates from Microsoft.
In this scenario I will perform a full installation of Microsoft BizTalk Server, with the exception of the deprecated
SharePoint Adapter (SharePoint Services Service Side Object Model (SSOM)). The following components will be installed:
Enterprise Single Sign-On (SSO).
BizTalk Group.
BizTalk Runtime.
Business Rule Engine.
BAM Tools and Alerts.
BAM Portal.
BizTalk EDI/AS2 Runtime
Microsoft BizTalk Adapters for Enterprise Applications (BizTalk Adapter Pack)
Microsoft UDDI Services
Microsoft BizTalk ESB Toolkit
2. Important considerations before set up the server
There are some important considerations or suggestions, since some of these operations are not mandatory, that we
can set before starting the installation and configuration of the server.
One of the downsides of dealing with a new version of Windows Server is figuring out where things have moved in the new release.
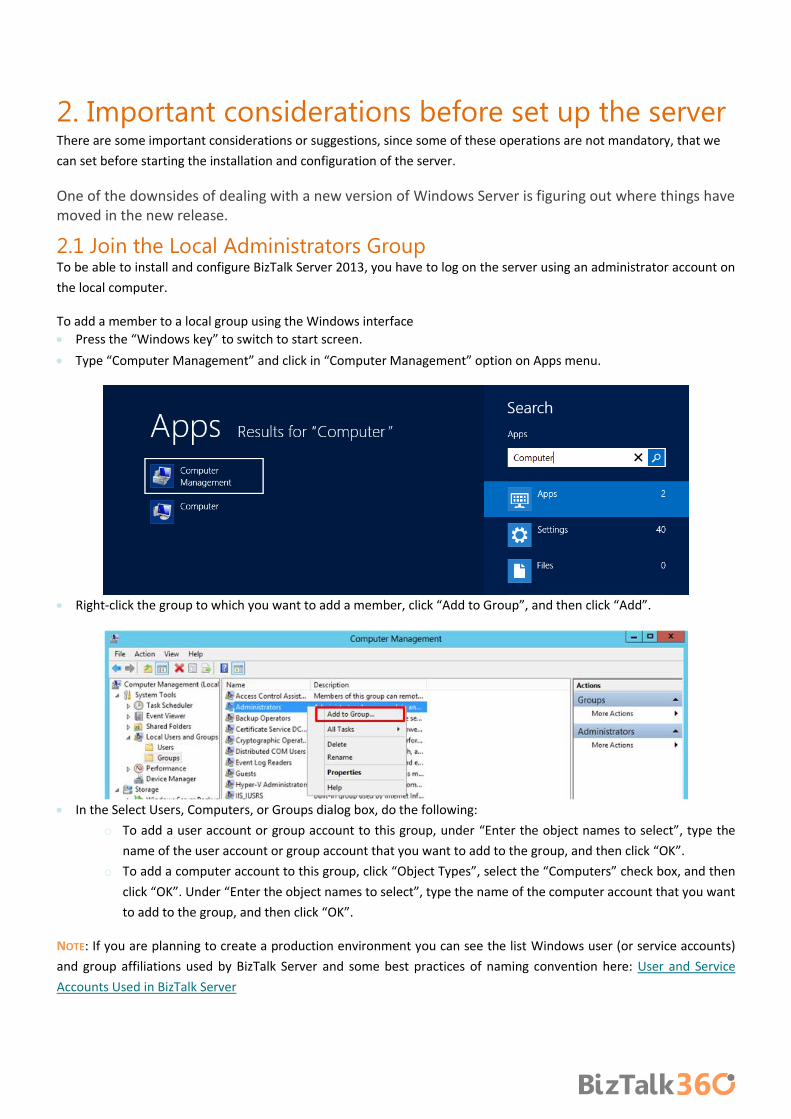
2.1 Join the Local Administrators Group To be able to install and configure BizTalk Server 2013, you have to log on the server using an administrator account on
the local computer.
To add a member to a local group using the Windows interface
Press the “Windows key” to switch to start screen.
Type “Computer Management” and click in “Computer Management” option on Apps menu.
Right-click the group to which you want to add a member, click “Add to Group”, and then click “Add”.
In the Select Users, Computers, or Groups dialog box, do the following:
o To add a user account or group account to this group, under “Enter the object names to select”, type the
name of the user account or group account that you want to add to the group, and then click “OK”.
o To add a computer account to this group, click “Object Types”, select the “Computers” check box, and then
click “OK”. Under “Enter the object names to select”, type the name of the computer account that you want
to add to the group, and then click “OK”.
NOTE: If you are planning to create a production environment you can see the list Windows user (or service accounts)
and group affiliations used by BizTalk Server and some best practices of naming convention here: User and Service
Accounts Used in BizTalk Server
Installing BizTalk Server 2013 in a Standalone Machine
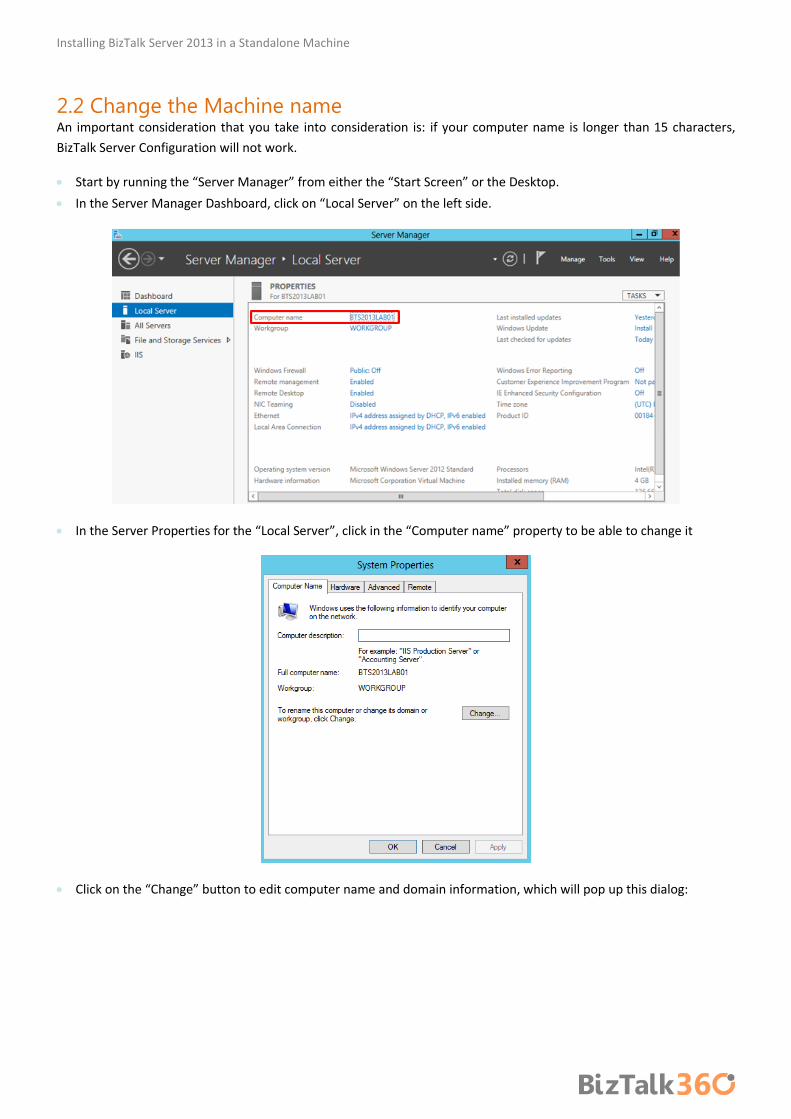
2.2 Change the Machine name An important consideration that you take into consideration is: if your computer name is longer than 15 characters,
BizTalk Server Configuration will not work.
Start by running the “Server Manager” from either the “Start Screen” or the Desktop.
In the Server Manager Dashboard, click on “Local Server” on the left side.
In the Server Properties for the “Local Server”, click in the “Computer name” property to be able to change it
Click on the “Change” button to edit computer name and domain information, which will pop up this dialog:
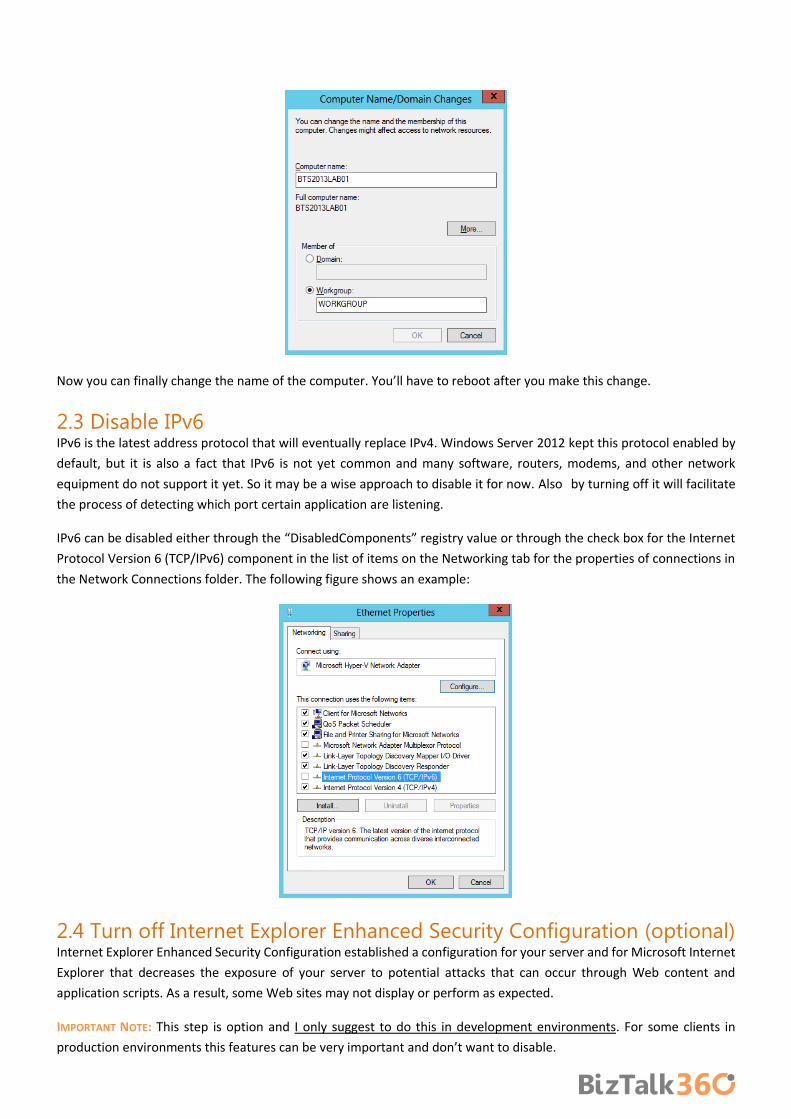
Now you can finally change the name of the computer. You’ll have to reboot after you make this change.
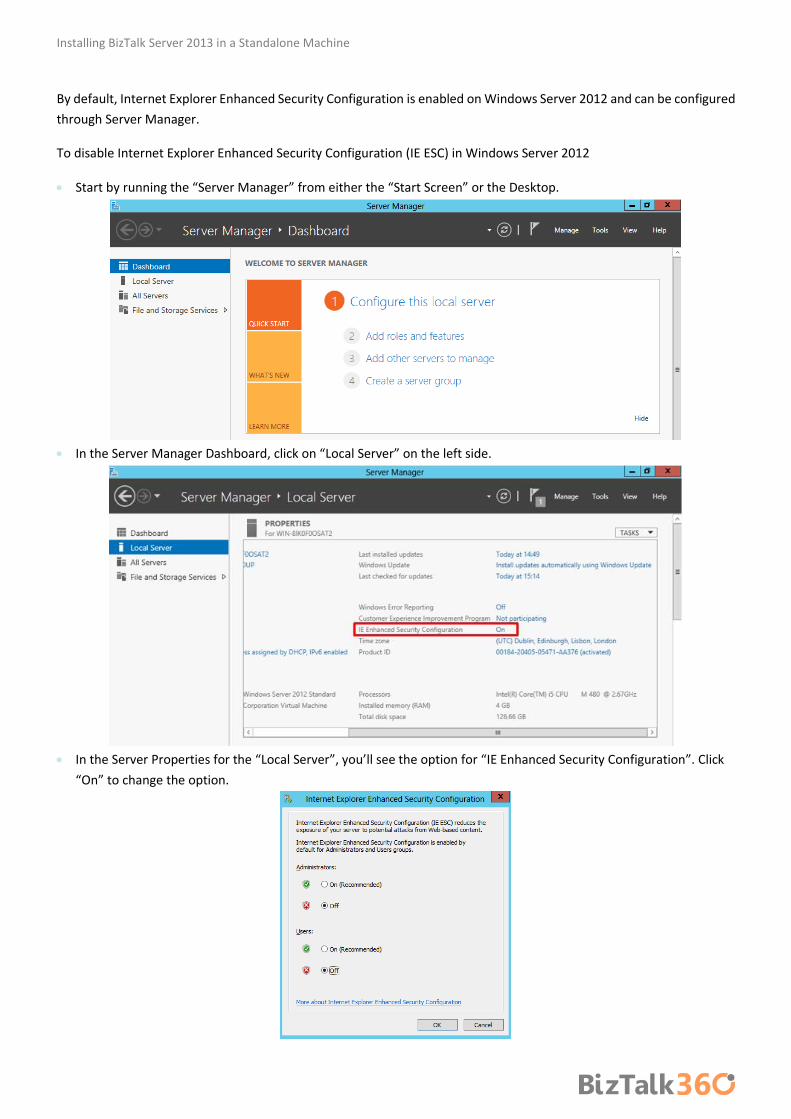
2.3 Disable IPv6 IPv6 is the latest address protocol that will eventually replace IPv4. Windows Server 2012 kept this protocol enabled by
default, but it is also a fact that IPv6 is not yet common and many software, routers, modems, and other network
equipment do not support it yet. So it may be a wise approach to disable it for now. Also by turning off it will facilitate
the process of detecting which port certain application are listening.
IPv6 can be disabled either through the “DisabledComponents” registry value or through the check box for the Internet
Protocol Version 6 (TCP/IPv6) component in the list of items on the Networking tab for the properties of connections in
the Network Connections folder. The following figure shows an example:
2.4 Turn off Internet Explorer Enhanced Security Configuration (optional) Internet Explorer Enhanced Security Configuration established a configuration for your server and for Microsoft Internet
Explorer that decreases the exposure of your server to potential attacks that can occur through Web content and
application scripts. As a result, some Web sites may not display or perform as expected.
IMPORTANT NOTE: This step is option and I only suggest to do this in development environments. For some clients in
production environments this features can be very important and don’t want to disable.
Installing BizTalk Server 2013 in a Standalone Machine
By default, Internet Explorer Enhanced Security Configuration is enabled on Windows Server 2012 and can be configured
through Server Manager.
To disable Internet Explorer Enhanced Security Configuration (IE ESC) in Windows Server 2012
Start by running the “Server Manager” from either the “Start Screen” or the Desktop.
In the Server Manager Dashboard, click on “Local Server” on the left side.
In the Server Properties for the “Local Server”, you’ll see the option for “IE Enhanced Security Configuration”. Click
“On” to change the option.

A dialog box appears, letting Internet Explorer Enhanced Security Configuration be enabled/disable separately for
normal users and administrators, turn off both. After disable both options, click “OK”.
Click the Refresh button at the top of the Server Manager and the “IE Enhanced Security Configuration” should now
show as “Off”
2.5 Disable User Account Control (optional) User Account Control (UAC) is a security component that allows an administrator to enter credentials during a non-
administrator's user session to perform occasional administrative tasks.
IMPORTANT NOTE: This step is option and I only suggest to do this in development environments. For some clients in
production environments this features can be very important and don’t want to disable.
Whenever you need to configure a Windows Server 2012 setting, even if you are logged on as the administrator - you
need elevated privileges. This is by design, and part of the fierce security initiative in Windows Server 2012. Before you
can complete any administrative task, the User Account Control manager pops-up with a 'Continue' message.
To Disable User Account Control (UAC):
Press the “Windows key” to switch to Start screen.
Type “Change User Account Control Settings” or “UAC” and click in “Change User Account Control Settings” option
on Settings menu.
Select "Never notify me when…" to disable UAC.

Installing BizTalk Server 2013 in a Standalone Machine
2.6 Turn Windows Firewall off (optional) I always advise you to turn Windows Firewall on BizTalk Server development environments unless there are specific
reasons for not doing that.
IMPORTANT NOTE: This step is option and I only suggest to do this in development environments. For some clients in
production environments this features can be very important and don’t want to turn off. However, in many scenarios,
these machines are not exposed to the outside and even if this occurs, they can be “protected” by the own network
infrastructure, and in such cases may not require that the Windows Firewall be turn on.
To turn Windows Firewall off:
Press the “Windows key” to switch to Start screen.
Type “Windows Firewall” and click in “Windows Firewall” option on Settings menu.
Select “Turn Windows Firewall on or off” option
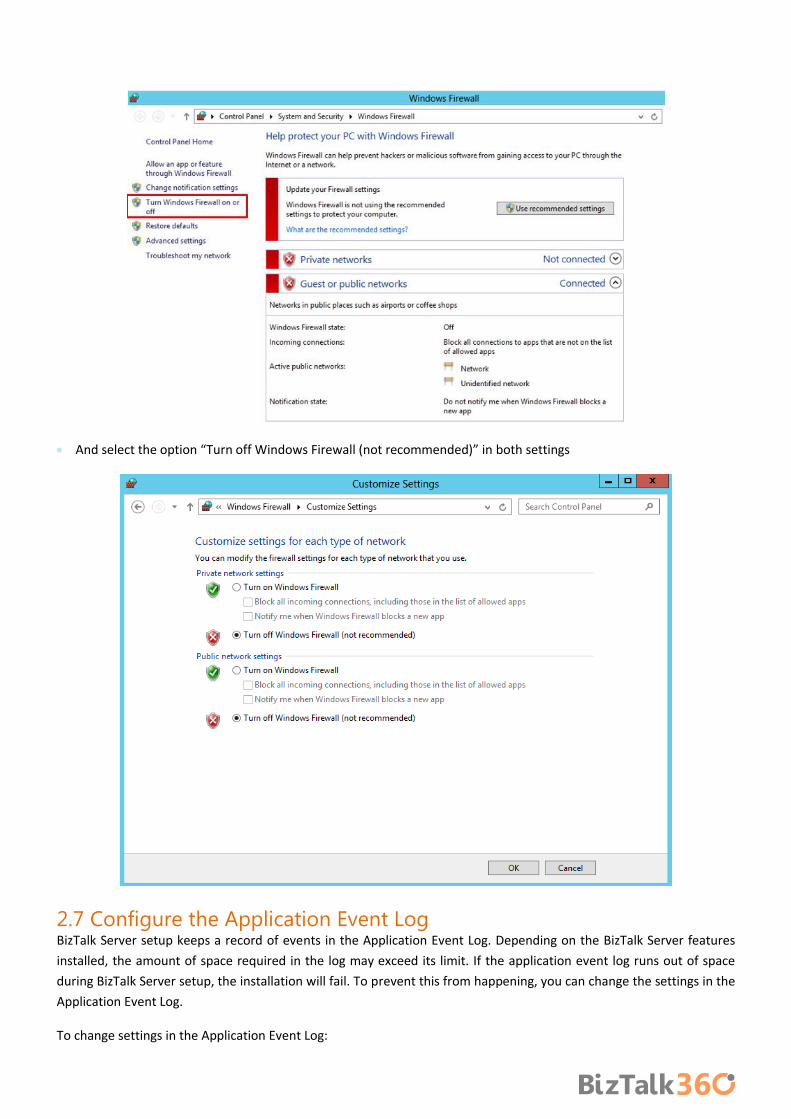
And select the option “Turn off Windows Firewall (not recommended)” in both settings
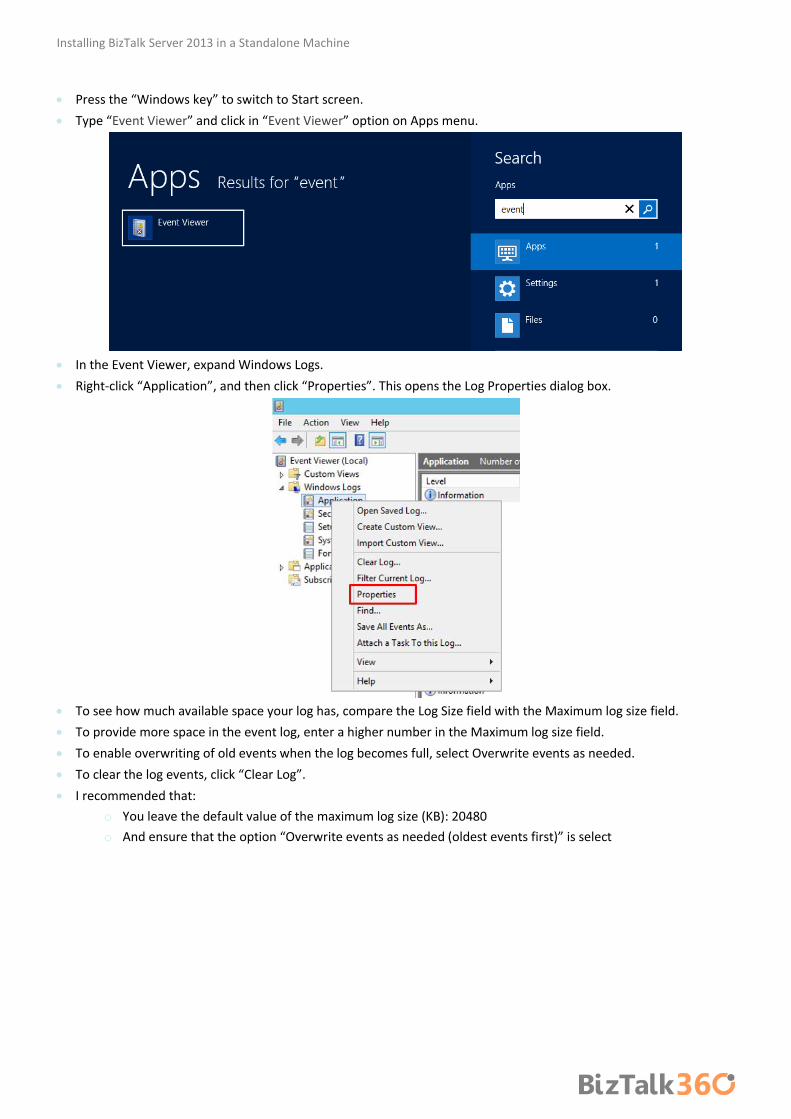
2.7 Configure the Application Event Log BizTalk Server setup keeps a record of events in the Application Event Log. Depending on the BizTalk Server features
installed, the amount of space required in the log may exceed its limit. If the application event log runs out of space
during BizTalk Server setup, the installation will fail. To prevent this from happening, you can change the settings in the
Application Event Log.
To change settings in the Application Event Log:
Installing BizTalk Server 2013 in a Standalone Machine
Press the “Windows key” to switch to Start screen.
Type “Event Viewer” and click in “Event Viewer” option on Apps menu.
In the Event Viewer, expand Windows Logs.
Right-click “Application”, and then click “Properties”. This opens the Log Properties dialog box.
To see how much available space your log has, compare the Log Size field with the Maximum log size field.
To provide more space in the event log, enter a higher number in the Maximum log size field.
To enable overwriting of old events when the log becomes full, select Overwrite events as needed.
To clear the log events, click “Clear Log”.
I recommended that:
o You leave the default value of the maximum log size (KB): 20480
o And ensure that the option “Overwrite events as needed (oldest events first)” is select
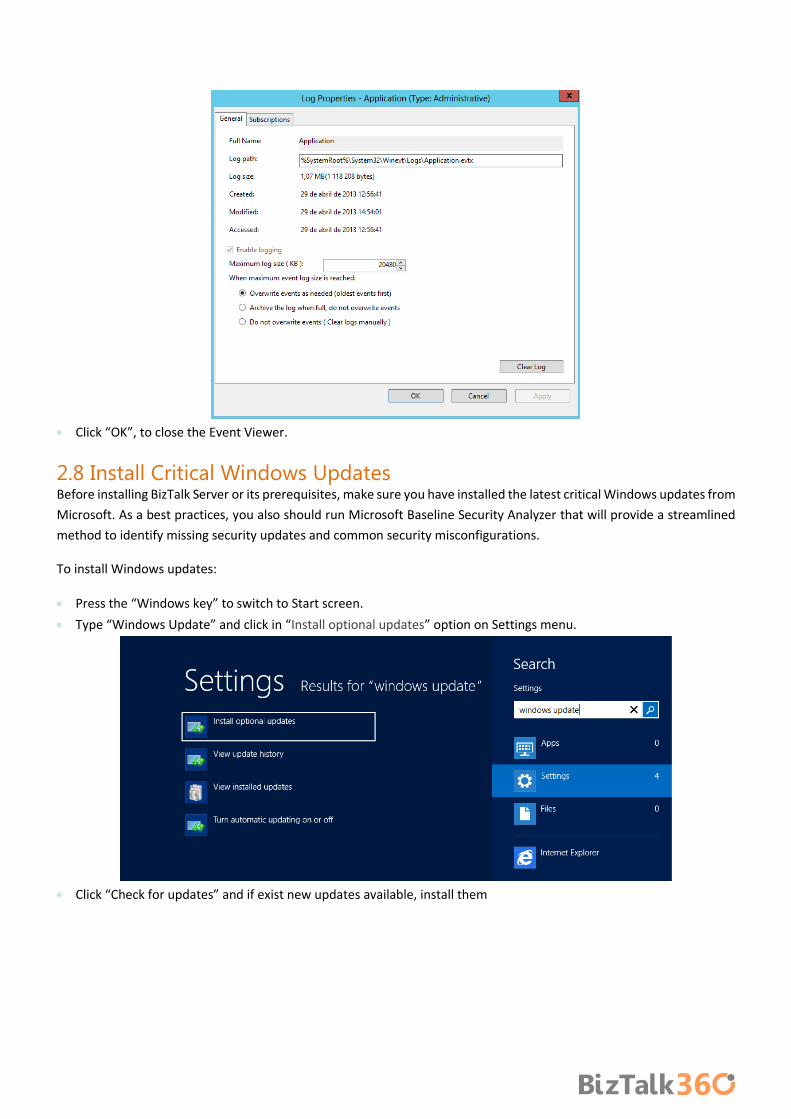
Click “OK”, to close the Event Viewer.
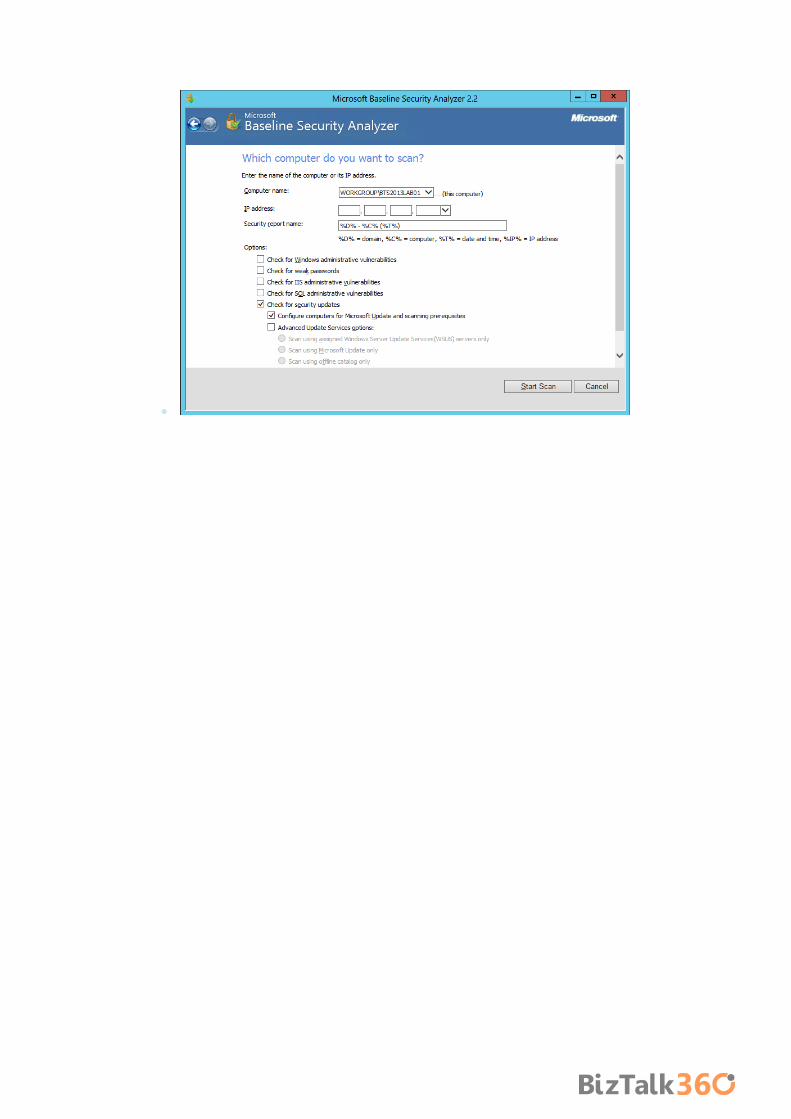
2.8 Install Critical Windows Updates Before installing BizTalk Server or its prerequisites, make sure you have installed the latest critical Windows updates from
Microsoft. As a best practices, you also should run Microsoft Baseline Security Analyzer that will provide a streamlined
method to identify missing security updates and common security misconfigurations.
To install Windows updates:
Press the “Windows key” to switch to Start screen.
Type “Windows Update” and click in “Install optional updates” option on Settings menu.
Click “Check for updates” and if exist new updates available, install them

Installing BizTalk Server 2013 in a Standalone Machine
If prompted, restart your computer
To use the Microsoft Baseline Security Analyzer to scan for updates and patches
Download MBSA from the Microsoft Download center, and then install it to the default directory
Press the “Windows key” to switch to Start screen.
Type “Microsoft Baseline Security Analyzer” and click in “Microsoft Baseline Security Analyzer” option on Apps
menu.
On the main screen click “Scan a computer” option
On the “Which computer do you want to scan?” screen, make sure that the following options are not selected, and
then click “Start scan”.
o Check for Windows administrative vulnerabilities
o Check for weak passwords
o Check for IIS administrative vulnerabilities
o Check for SQL administrative vulnerabilities
Installing BizTalk Server 2013 in a Standalone Machine
3. Preparing and install prerequisites for BizTalk
Server 2013 This part of the article will focus on installing the BizTalk prerequisites and operate the necessary configuration on BizTalk
Server machine.
Before installing BizTalk Server or its prerequisites, make sure you have installed the latest critical Windows updates from
Microsoft.
3.1 Important considerations before set up the server
Check if all the considerations described above are implemented:
Join the Local Administrators Group
Change the Machine name
Disable IPv6
Turn off Internet Explorer Enhanced Security Configuration
Disable User Account Control
Turn Windows Firewall off
Configure the Application Event Log
Install Critical Windows Updates
3.2 Enable Internet Information Services Microsoft Internet Information Services (IIS) provides a Web application infrastructure for many BizTalk Server features.
BizTalk Server requires IIS for the following features:
HTTP adapter
SOAP adapter
Windows SharePoint Services adapter
Secure Sockets Layer (SSL) encryption
BAM Portal
To install IIS 8, use the following steps:
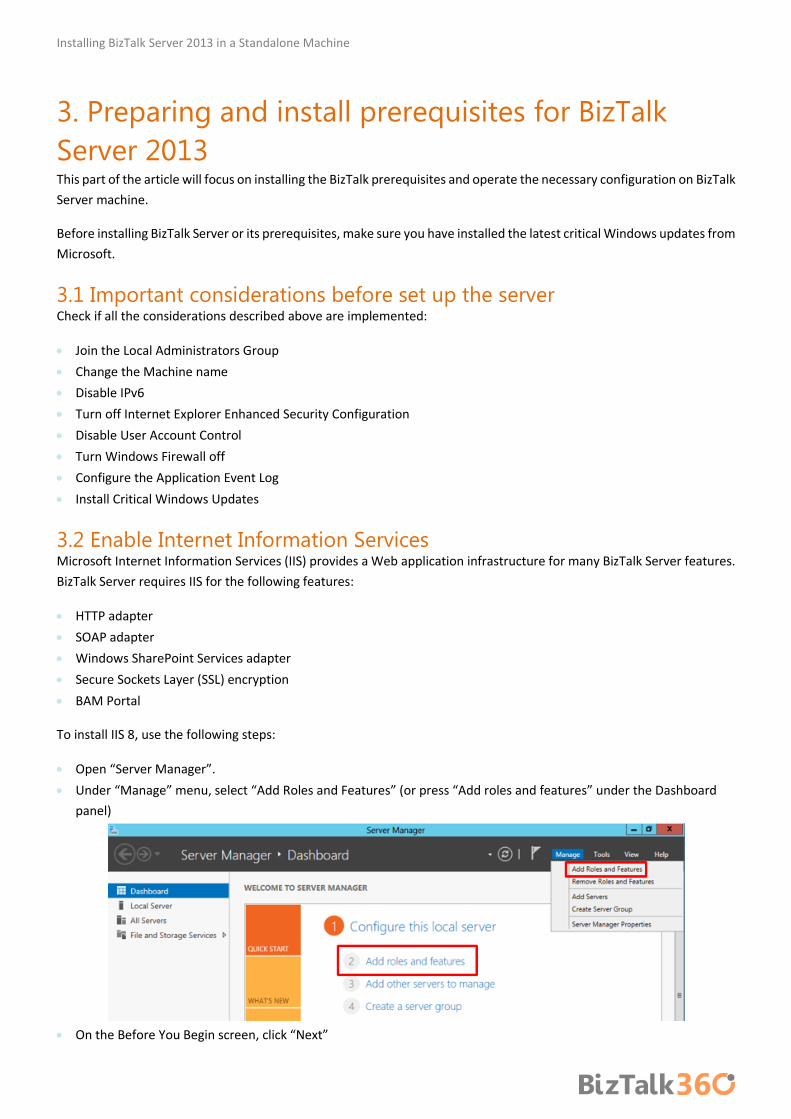
Open “Server Manager”.
Under “Manage” menu, select “Add Roles and Features” (or press “Add roles and features” under the Dashboard
panel)
On the Before You Begin screen, click “Next”

On the Installation Type screen, select “Role-based or feature-based installation” and click “Next”
On the Server Selection screen, select the appropriate server, leave the default options and click “Next”
o Select a server from the server pool
o local is selected by default

Installing BizTalk Server 2013 in a Standalone Machine
On the Server Roles screen, select “Web Server (IIS)” option
o If prompted, click "Add Features", and then click “Next”
On the Features screen, no additional features are needed for IIS, however, in addition to the default values, we will
need or should select the following options:
o .Net Framework 3.5 Features
o SMTP Server (If prompted, click "Add Features") – optional
o Windows Identity Foundation 3.5 – optional: Windows Identity Foundation (WIF) is required for the
SharePoint Services adapter or SharePoint Online when used with SharePoint Services Client Side Object
Model (CSOM).

Then click “Next”
On the Web Server Role (IIS) screen, click “Next”
On the Role Services screen under Web Server Role (IIS), we will customize our installation of IIS with the following
options:
o Common HTTP Features
Default Document
Directory Browsing
HTTP Errors
Static Content
o Health and Diagnostics
Http Logging
Logging Tools
ODBC Logging
Request Monitor
Tracking
o Performance
Static Content Compression
Dynamic Content Compression

Installing BizTalk Server 2013 in a Standalone Machine
o Security
Request Filtering
Basic Authentication
Digest Authentication
Windows Authentication
o Application Development
Select all options
o Management Tools
IIS Management Console
IIS 6 Management Compatibility
IIS 6 Metabase Compatibility
IIS 6 Management Console
IIS 6 Scripting Tools
IIS 6 WMI Compatibility
Then click “Next”
On the Confirmation screen, click “Install”

When the IIS installation completes, the wizard reflects the installation status on the Results screen
Click “Close” to exit the wizard.
3.2.1 Running the BAM Portal in a 64-bit Environment BAM Portal runs only runs on a 32-bit mode. If you are using Internet Information Services (IIS) in a 64-bit environment,
you must set IIS to 32-bit mode to run the BAM portal. To do this, follow these steps:
Open a command prompt and run the adsutil command. To do this, Press the “Windows key” to switch to Start
screen and type “cmd” and click in “Command Prompt” option on Apps menu.
Type the following at the command prompt: cscript c:\inetpub\adminscripts\adsutil.vbs SET
W3SVC/AppPools/Enable32bitAppOnWin64 1
Close the command prompt.
Or:
Press the “Windows key” to switch to Start screen.
Type “Internet Information Services (IIS) Manager” or “IIS” and click in “Internet Information Services (IIS) Manager”
option on Apps menu.
Expand the server and click on “Application Pools” to display available application pools in center panel.
Right-click on 'DefaultAppPool' and select “Advanced Settings”.
Change the value of 'Enable 32-bit Applications' from False to True. Click “OK”.

Installing BizTalk Server 2013 in a Standalone Machine
3.3 Install Windows Identity Foundation (WIF) In the previous step “Enable Internet Information Services” I mentioned that we should install the Windows Identity
Foundation 3.5 feature, why?
If we plan to use/configure SharePoint Services adapter or SharePoint Online when used with SharePoint Services Client
Side Object Model (CSOM), then Windows Identity Foundation (WIF) feature is required.
WIF is required if you are planning to use:
SharePoint Services Adapter with CSOM
SharePoint Online with CSOM
WIF is not required if you are planning to use:
SharePoint Services Adapter Web Service (deprecated)
No plan to use SharePoint
Windows Identity Foundation is included with the operating system (Windows 8 and Windows Server 2012) as a Feature
in Turn Windows features on or off. (if you plan to use Windows 7 and Windows Server 2008 R2 the download is available
here Windows Identity Foundation):
If you didn’t previous install WIF then you should following this steps:
Open “Server Manager”.
Under “Manage” menu, select “Add Roles and Features” (or press “Add roles and features” under the Dashboard
panel)
On the Before You Begin screen, click “Next”
On the Installation Type screen, select “Role-based or Feature-based Installation” and click “Next”
On the Server Selection screen, select the appropriate server, leave the default options and click “Next”

On the Server Roles screen, click “Next”
On the Features screen, select "Windows Identity Foundation 3.5" and click “Next”
On the Confirmation screen, select “Restart the destination server automatically if required” and click “Install”:
When the installation completes, the wizard reflects the installation status on the Results screen
Click “Close” to exit the wizard.

Installing BizTalk Server 2013 in a Standalone Machine
3.4 Install and configure SMTP Server Feature Again in the previous step “Enable Internet Information Services” I mentioned that we should install the SMTP Server
feature, why?
If you wish to configure BAM Alerts, you must have configured SQL Server Database Mail feature (we will see how to
accomplish that afterwards) and I will intend to configure this features using your local SMTP Server.
NOTE: This type of configuration is optional and you don’t need to install the local SMTP Server, you can configured SQL
Server Database Mail feature using an external SMTP.
If you didn’t previous install SMTP Server then you should following this steps:
Open “Server Manager”.
Under “Manage” menu, select “Add Roles and Features” (or press “Add roles and features” under the Dashboard
panel)
On the Before You Begin screen, click “Next”
On the Installation Type screen, select “Role-based or Feature-based Installation” and click “Next”
On the Server Selection screen, select the appropriate server, leave the default options and click “Next”
On the Server Roles screen, click “Next”
On the Features screen, select "SMTP Server" and click “Next”
o If prompted, click "Add Features", and then click “Next”
On the Confirmation screen, select “Restart the destination server automatically if required” and click “Install”:
When the installation completes, the wizard reflects the installation status on the Results screen
Click “Close” to exit the wizard.
To configure the SMTP Server you should following this steps:
Press the “Windows key” to switch to Start screen and type “IIS 6.0 Manager” and click in “Internet information
Services (IIS) 6.0 Manager” option on Apps menu.
Right click on the SMTP Server ([SMTP Virtual Server #1]) and select “Properties” to open the properties window
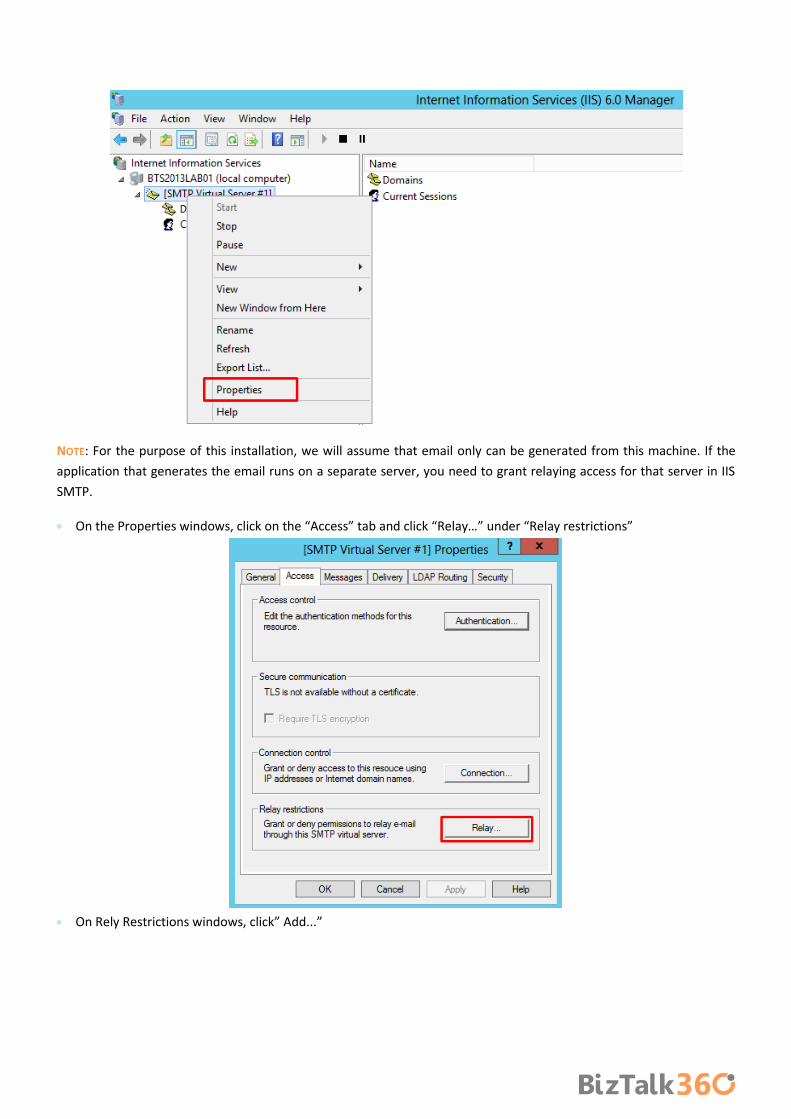
NOTE: For the purpose of this installation, we will assume that email only can be generated from this machine. If the
application that generates the email runs on a separate server, you need to grant relaying access for that server in IIS
SMTP.
On the Properties windows, click on the “Access” tab and click “Relay…” under “Relay restrictions”
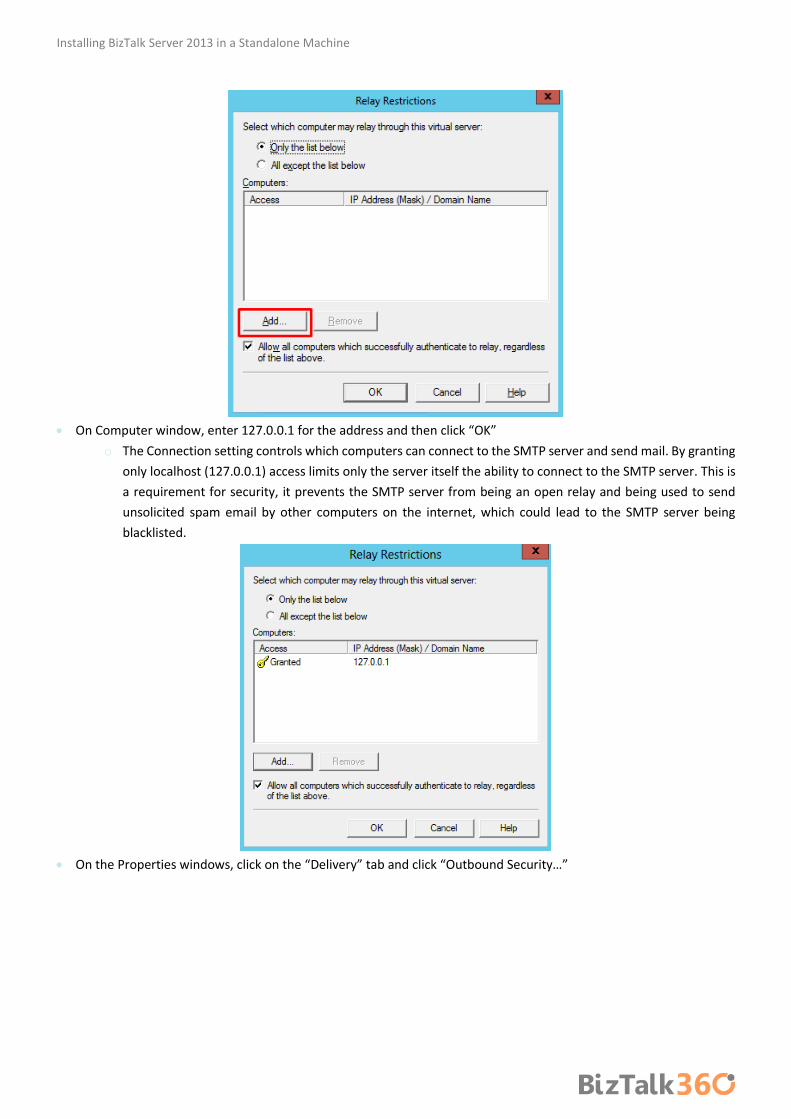
On Rely Restrictions windows, click” Add...”
Installing BizTalk Server 2013 in a Standalone Machine
On Computer window, enter 127.0.0.1 for the address and then click “OK”
o The Connection setting controls which computers can connect to the SMTP server and send mail. By granting
only localhost (127.0.0.1) access limits only the server itself the ability to connect to the SMTP server. This is
a requirement for security, it prevents the SMTP server from being an open relay and being used to send
unsolicited spam email by other computers on the internet, which could lead to the SMTP server being
blacklisted.
On the Properties windows, click on the “Delivery” tab and click “Outbound Security…”
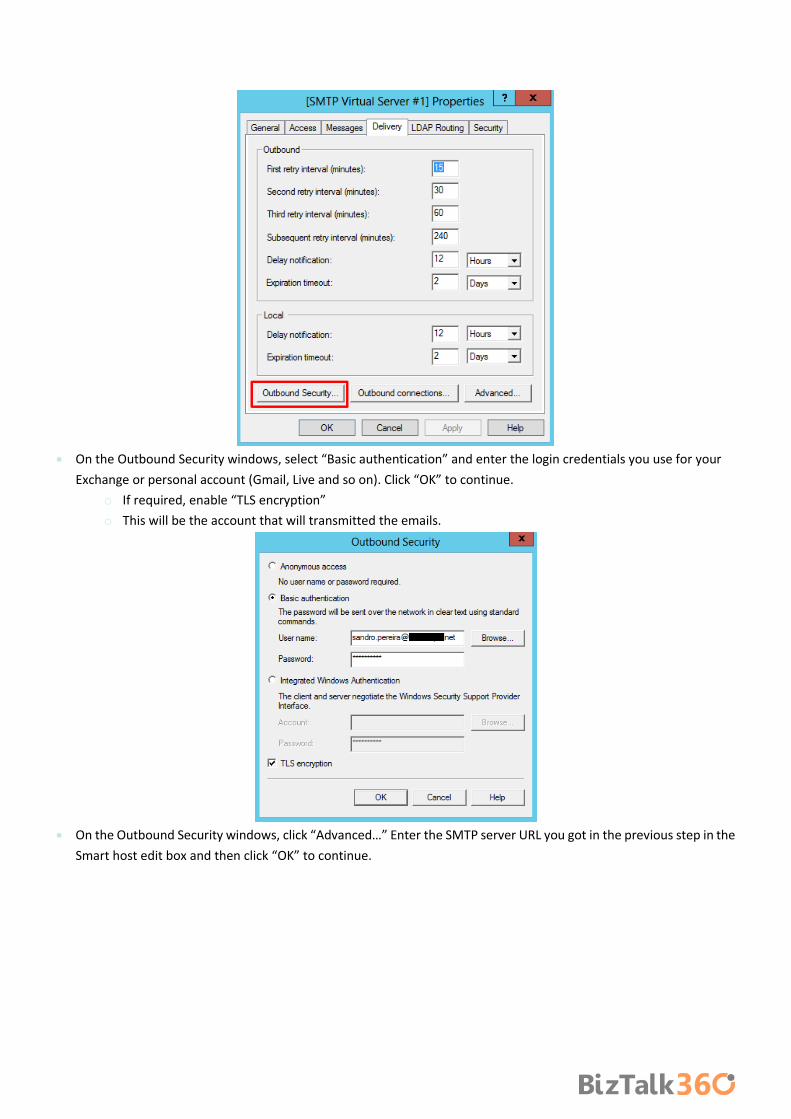
On the Outbound Security windows, select “Basic authentication” and enter the login credentials you use for your
Exchange or personal account (Gmail, Live and so on). Click “OK” to continue.
o If required, enable “TLS encryption”
o This will be the account that will transmitted the emails.
On the Outbound Security windows, click “Advanced…” Enter the SMTP server URL you got in the previous step in the
Smart host edit box and then click “OK” to continue.

Installing BizTalk Server 2013 in a Standalone Machine
On the Outbound Security windows, click on “Outgoing connections…” and set the port of your server
o Limit number of connections to: When the check box is selected, this option specifies the total number of
simultaneous outbound connections to all remote domains that can exist at one time. The default is 1,000
connections. The minimum is 1.
o Time-out (minutes): Specifies the time allowed before an inactive connection is closed. The default is 10
minutes.
o Limit number of connections per domain to: When the check box is selected, this option limits connections
to any single remote domain. The default is 100 connections. This number should be less than or equal to the
value for the Limit number of connections to option.
o TCP port: Designates the TCP port used for outgoing transmissions. The default is port 25. The outgoing port
setting can be the same as that for incoming transmissions or it can be different.
Click “Ok” twice to apply the settings on the SMTP local server
Right-click SMTP Virtual Server #1 again, and then restart the service to pick up the new configuration.
3.4.1 Verify Your Installation The next step is to verify if the SMTP is successful configured by using the simple Telnet Client, however Telnet Client is
not installed by default on Windows Server 2012.
To install Telnet Client by using a command line
Open a command prompt window. , Press the “Windows key” to switch to Start screen and type “cmd” and click in
“Command Prompt” option on Apps menu.
Type the following command:
o pkgmgr /iu:"TelnetClient"
o If the User Account Control dialog box appears, confirm that the action it displays is what you want, and
then click Continue.
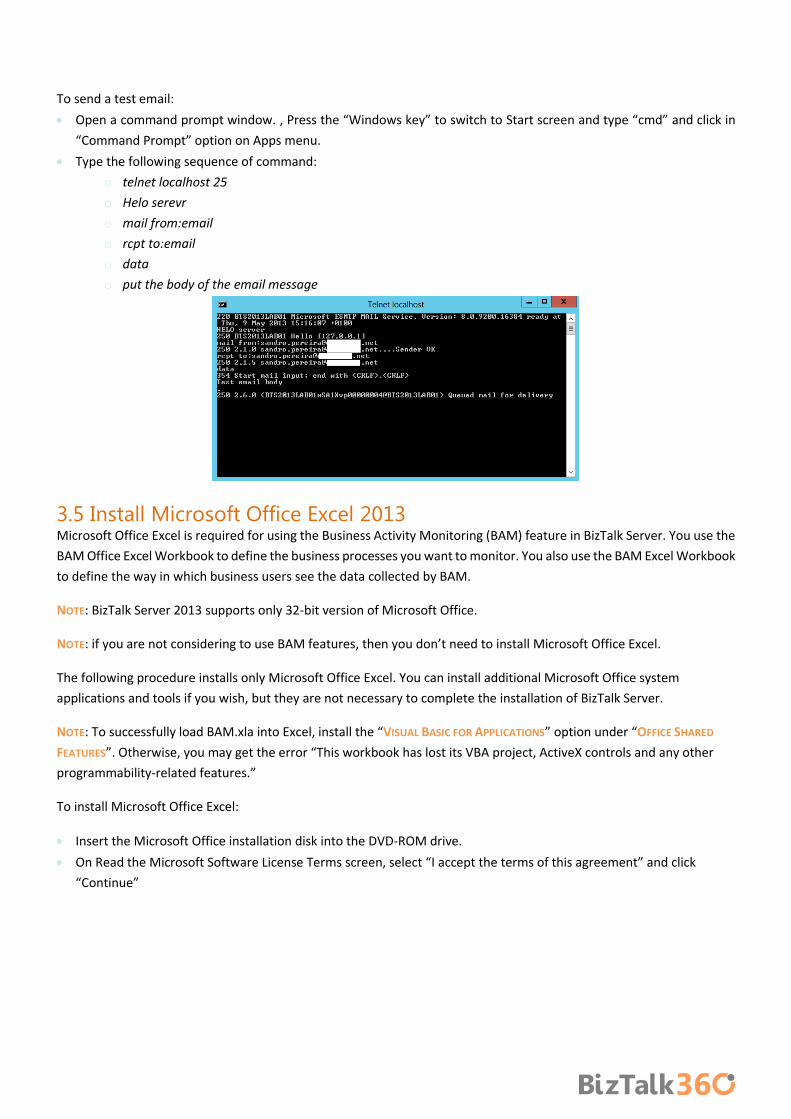
To send a test email:
Open a command prompt window. , Press the “Windows key” to switch to Start screen and type “cmd” and click in
“Command Prompt” option on Apps menu.
Type the following sequence of command:
o telnet localhost 25
o Helo serevr
o mail from:email
o rcpt to:email
o data
o put the body of the email message
3.5 Install Microsoft Office Excel 2013 Microsoft Office Excel is required for using the Business Activity Monitoring (BAM) feature in BizTalk Server. You use the
BAM Office Excel Workbook to define the business processes you want to monitor. You also use the BAM Excel Workbook
to define the way in which business users see the data collected by BAM.
NOTE: BizTalk Server 2013 supports only 32-bit version of Microsoft Office.
NOTE: if you are not considering to use BAM features, then you don’t need to install Microsoft Office Excel.
The following procedure installs only Microsoft Office Excel. You can install additional Microsoft Office system
applications and tools if you wish, but they are not necessary to complete the installation of BizTalk Server.
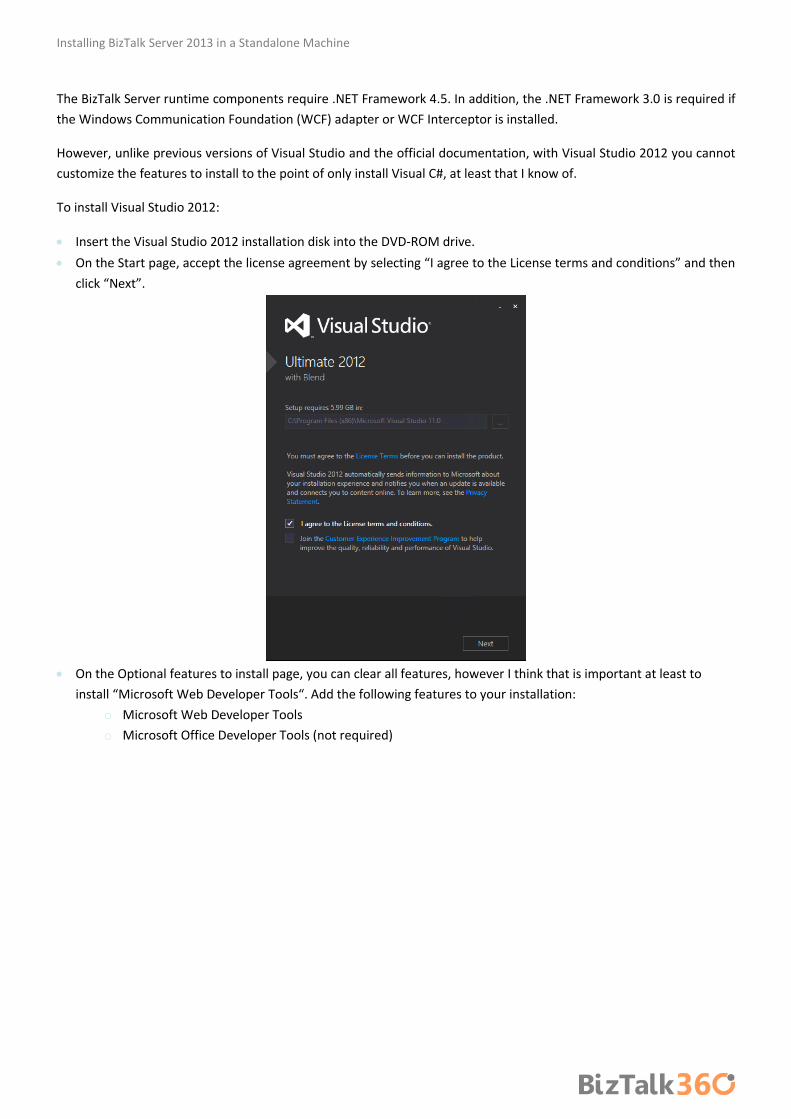
NOTE: To successfully load BAM.xla into Excel, install the “VISUAL BASIC FOR APPLICATIONS” option under “OFFICE SHARED
FEATURES”. Otherwise, you may get the error “This workbook has lost its VBA project, ActiveX controls and any other
programmability-related features.”
To install Microsoft Office Excel:
Insert the Microsoft Office installation disk into the DVD-ROM drive.
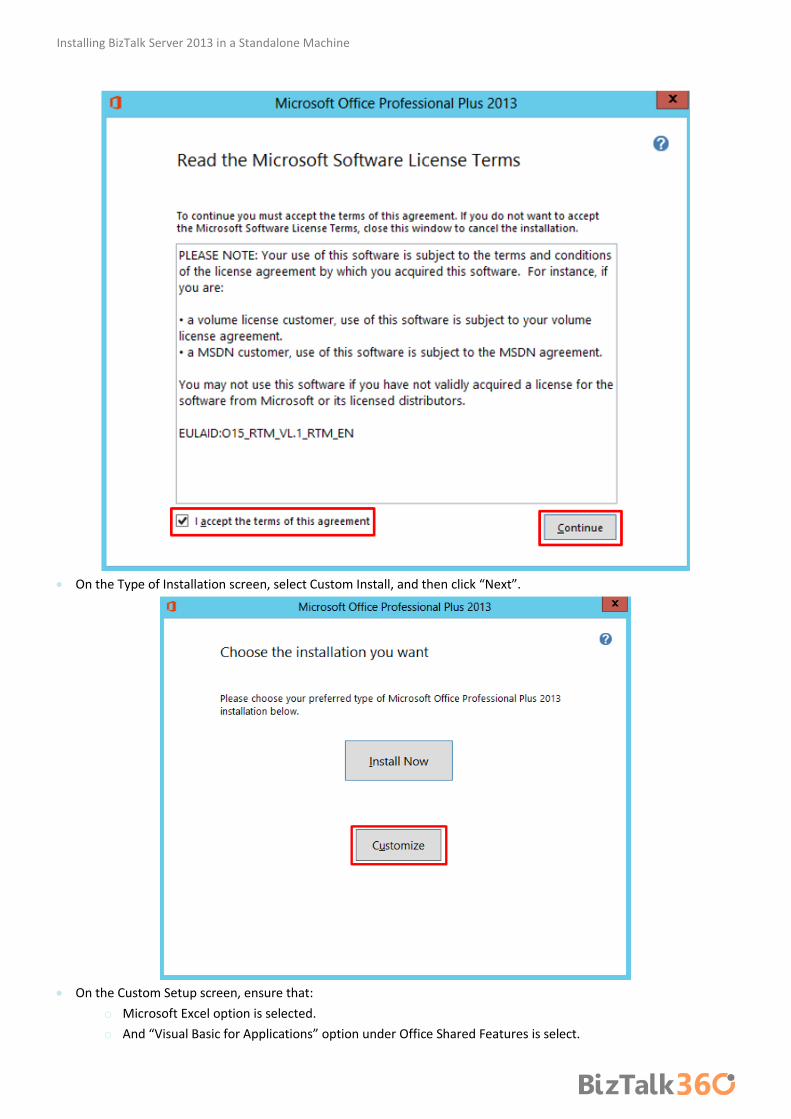
On Read the Microsoft Software License Terms screen, select “I accept the terms of this agreement” and click
“Continue”
Installing BizTalk Server 2013 in a Standalone Machine
On the Type of Installation screen, select Custom Install, and then click “Next”.
On the Custom Setup screen, ensure that:
o Microsoft Excel option is selected.
o And “Visual Basic for Applications” option under Office Shared Features is select.
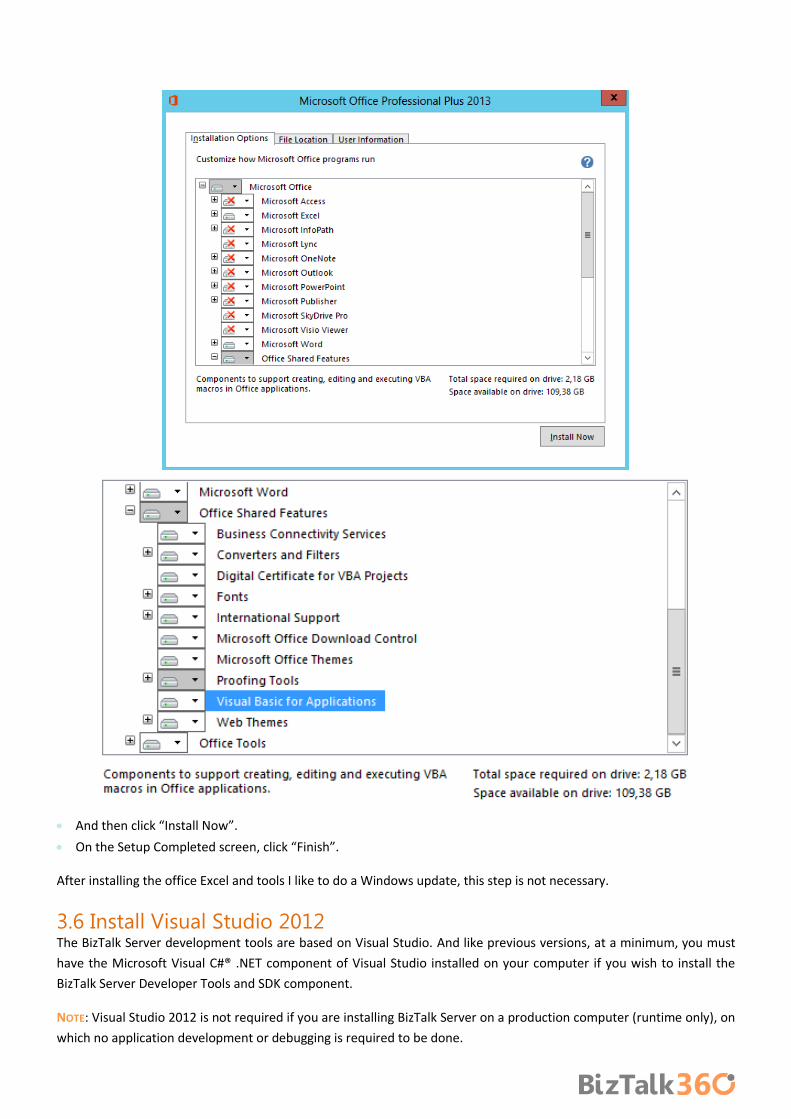
And then click “Install Now”.
On the Setup Completed screen, click “Finish”.
After installing the office Excel and tools I like to do a Windows update, this step is not necessary.
3.6 Install Visual Studio 2012 The BizTalk Server development tools are based on Visual Studio. And like previous versions, at a minimum, you must
have the Microsoft Visual C#® .NET component of Visual Studio installed on your computer if you wish to install the
BizTalk Server Developer Tools and SDK component.
NOTE: Visual Studio 2012 is not required if you are installing BizTalk Server on a production computer (runtime only), on
which no application development or debugging is required to be done.
Installing BizTalk Server 2013 in a Standalone Machine
The BizTalk Server runtime components require .NET Framework 4.5. In addition, the .NET Framework 3.0 is required if
the Windows Communication Foundation (WCF) adapter or WCF Interceptor is installed.
However, unlike previous versions of Visual Studio and the official documentation, with Visual Studio 2012 you cannot
customize the features to install to the point of only install Visual C#, at least that I know of.
To install Visual Studio 2012:
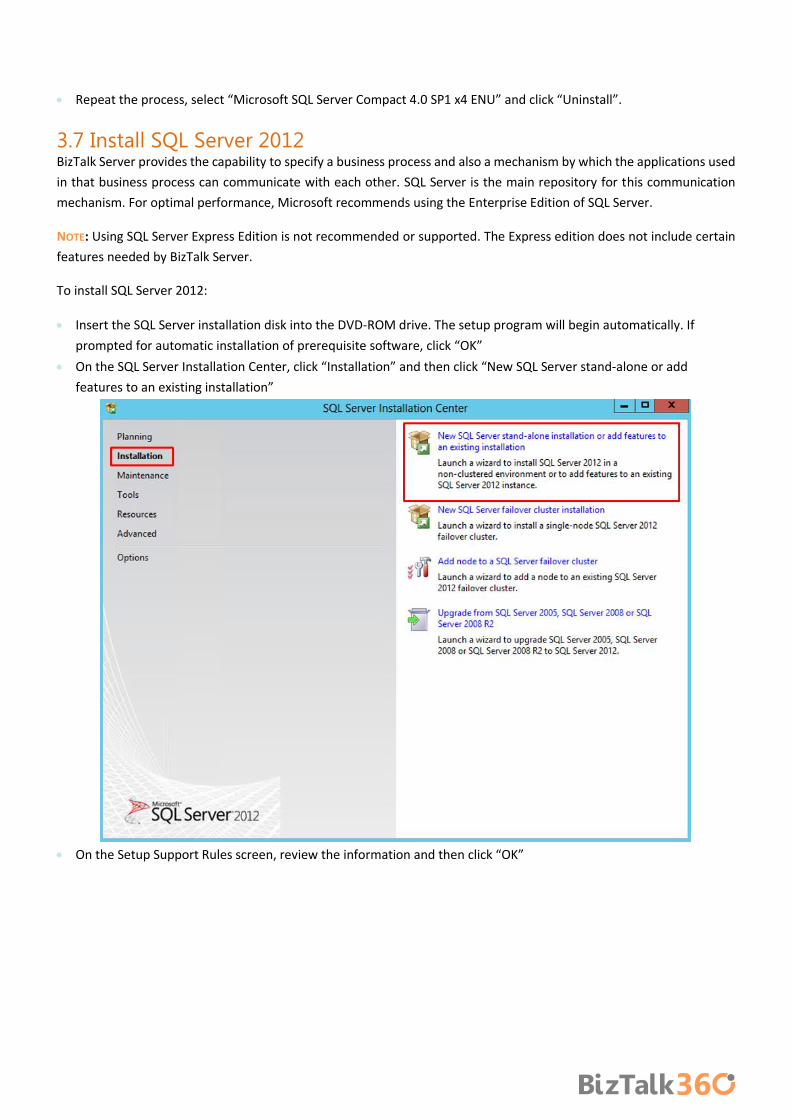
Insert the Visual Studio 2012 installation disk into the DVD-ROM drive.
On the Start page, accept the license agreement by selecting “I agree to the License terms and conditions” and then
click “Next”.
On the Optional features to install page, you can clear all features, however I think that is important at least to
install “Microsoft Web Developer Tools“. Add the following features to your installation:
o Microsoft Web Developer Tools
o Microsoft Office Developer Tools (not required)

And then click “Install”
On the Finish page, close the window or click “Launch”.
IMPORTANT NOTE: Your version of Visual Studio WILL INCLUDE MICROSOFT SQL SERVER EXPRESS OR COMPACT as an optional
feature. This feature it may cause BizTalk Server setup to fail and should not be installed but as we cannot customize the
Visual Studio 2012 installation, we should remove this features afterwards.
3.6.1 Remove Microsoft SQL Server Express As I say previous your version of Visual Studio WILL INCLUDE MICROSOFT SQL SERVER EXPRESS OR COMPACT AS an optional
feature. This feature it may cause BizTalk Server setup to fail and should not be installed but as we cannot customize the
Visual Studio 2012 installation, it’s very important that we remove this features.

Installing BizTalk Server 2013 in a Standalone Machine
To avoid futures complications I choose to uninstall this two features:
Microsoft SQL Server 2012 Express LocalBd
Microsoft SQL Server Compact 4.0 SP1 x4 ENU: Microsoft SQL Server Compact 4.0 is a free, embedded database that
software developers can use for building ASP.NET websites and Windows desktop applications. SQL Server Compact
4.0 has a small footprint and supports private deployment of its binaries within the application folder, easy application
development in Visual Studio and WebMatrix, and seamless migration of schema and data to SQL Server
To uninstall this features:
Press the “Windows key” to switch to Start screen.
Type “Programs and Features” and click in “Programs and Features” option on Settings menu.
Select “Microsoft SQL Server 2012 Express LocalBd” and click “Uninstall”.
Repeat the process, select “Microsoft SQL Server Compact 4.0 SP1 x4 ENU” and click “Uninstall”.
3.7 Install SQL Server 2012 BizTalk Server provides the capability to specify a business process and also a mechanism by which the applications used
in that business process can communicate with each other. SQL Server is the main repository for this communication
mechanism. For optimal performance, Microsoft recommends using the Enterprise Edition of SQL Server.
NOTE: Using SQL Server Express Edition is not recommended or supported. The Express edition does not include certain
features needed by BizTalk Server.
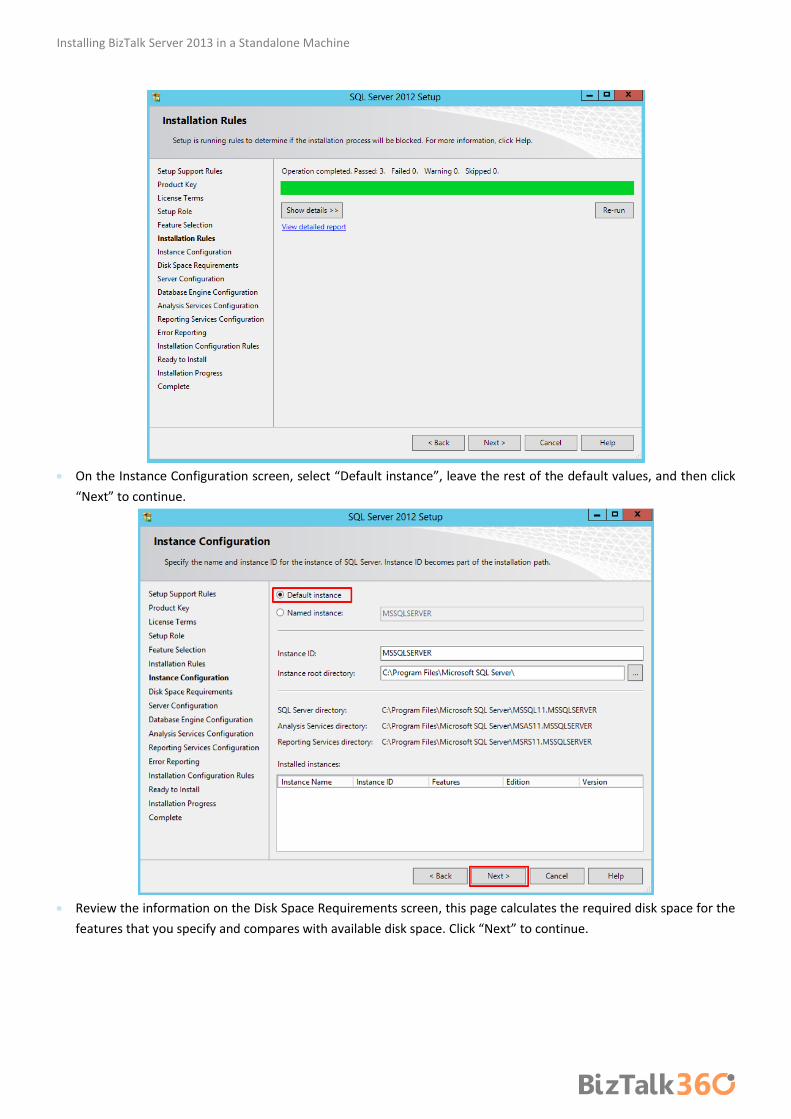
To install SQL Server 2012:
Insert the SQL Server installation disk into the DVD-ROM drive. The setup program will begin automatically. If
prompted for automatic installation of prerequisite software, click “OK”
On the SQL Server Installation Center, click “Installation” and then click “New SQL Server stand-alone or add
features to an existing installation”
On the Setup Support Rules screen, review the information and then click “OK”

Installing BizTalk Server 2013 in a Standalone Machine
On the Product Key screen, enter your product key and click “Next”
On the License Terms screen, select “I accept the license terms”, and then click “Next”

On the Product Updates page, the latest available SQL Server product updates are displayed. Select “Include SQL
Server product updates”, and then click “Next”
On the Install Setup files page, Setup provides the progress of downloading, extracting, and installing the Setup files.
If an update for SQL Server Setup is found, and is specified to be included, that update will also be installed, Click
“Install”
o The System Configuration Checker verifies the system state of your computer before Setup continues.
o If prompted to restart the computer, click "OK”

Installing BizTalk Server 2013 in a Standalone Machine
On the Setup Role page, select “SQL Server Feature Installation”, and then click “Next” to continue to the Feature
Selection page.
On the Feature Selection screen, select the following features, and then click “Next”
o Database Engine Services
SQL Server Replication
Full-Text and Semantic Extractions for Search
o Analysis Services
o Reporting Services – Native (This component is optional. But you can install this if you are considering for
example integrate BAM with SQL Server Reporting Services)
o Shared Features
SQL Server Data Tools
Client Tools Connectivity
Integration Services

Management Tools - Basic
Management Tools - Complete
On the Installation Rules page, Setup verifies the system state of your computer before Setup continues, and then
click “Next”
Installing BizTalk Server 2013 in a Standalone Machine
On the Instance Configuration screen, select “Default instance”, leave the rest of the default values, and then click
“Next” to continue.
Review the information on the Disk Space Requirements screen, this page calculates the required disk space for the
features that you specify and compares with available disk space. Click “Next” to continue.
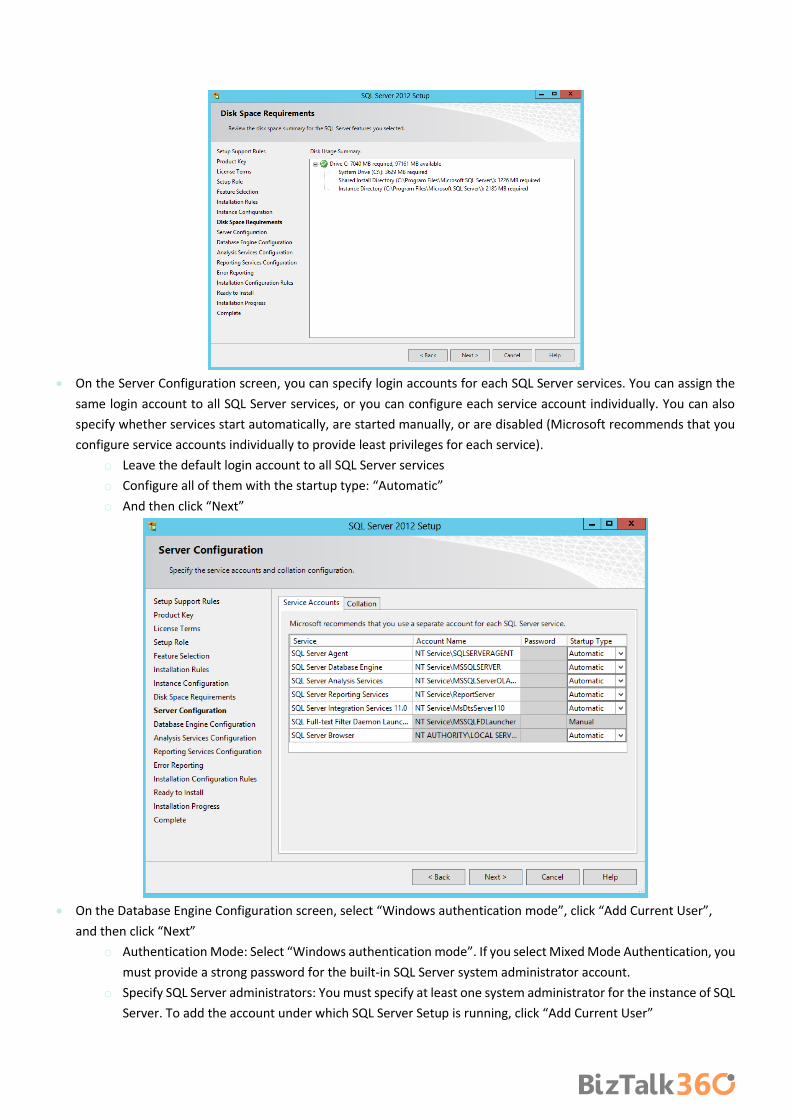
On the Server Configuration screen, you can specify login accounts for each SQL Server services. You can assign the
same login account to all SQL Server services, or you can configure each service account individually. You can also
specify whether services start automatically, are started manually, or are disabled (Microsoft recommends that you
configure service accounts individually to provide least privileges for each service).
o Leave the default login account to all SQL Server services
o Configure all of them with the startup type: “Automatic”
o And then click “Next”
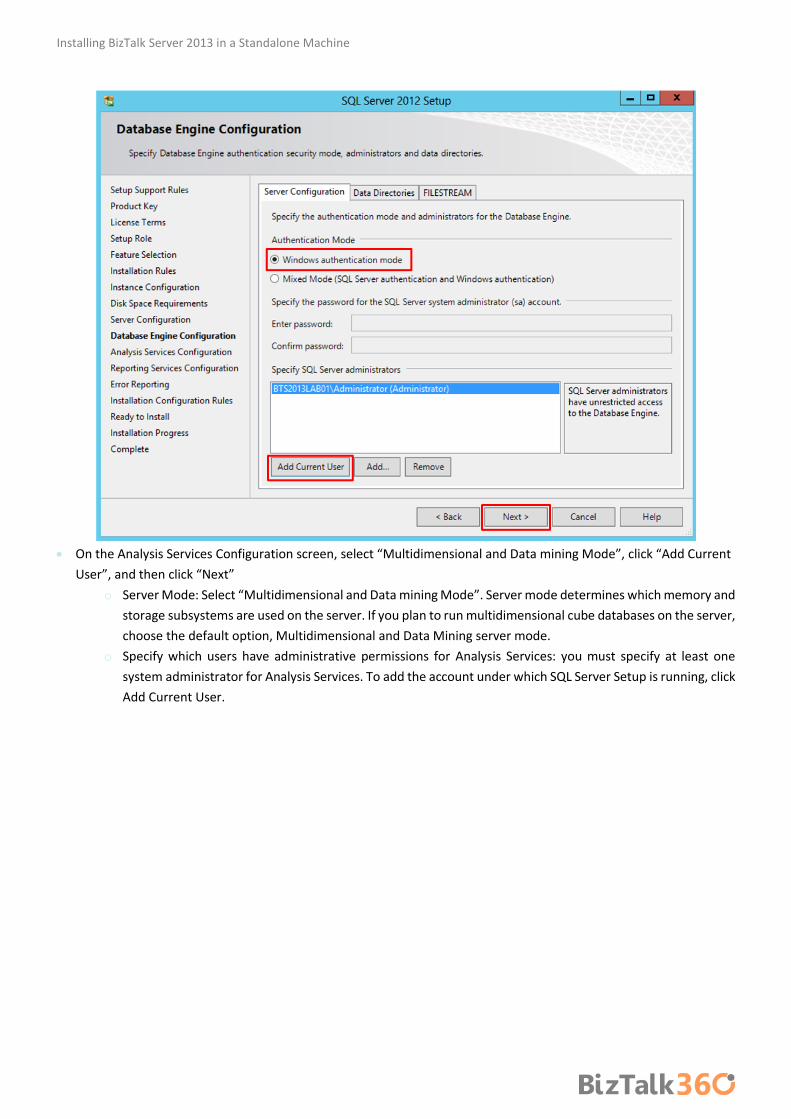
On the Database Engine Configuration screen, select “Windows authentication mode”, click “Add Current User”,
and then click “Next”
o Authentication Mode: Select “Windows authentication mode”. If you select Mixed Mode Authentication, you
must provide a strong password for the built-in SQL Server system administrator account.
o Specify SQL Server administrators: You must specify at least one system administrator for the instance of SQL
Server. To add the account under which SQL Server Setup is running, click “Add Current User”
Installing BizTalk Server 2013 in a Standalone Machine
On the Analysis Services Configuration screen, select “Multidimensional and Data mining Mode”, click “Add Current
User”, and then click “Next”
o Server Mode: Select “Multidimensional and Data mining Mode”. Server mode determines which memory and
storage subsystems are used on the server. If you plan to run multidimensional cube databases on the server,
choose the default option, Multidimensional and Data Mining server mode.
o Specify which users have administrative permissions for Analysis Services: you must specify at least one
system administrator for Analysis Services. To add the account under which SQL Server Setup is running, click
Add Current User.

On the Reporting Services Configuration screen, select “Install and configure”, and then click “Next” to continue.
On the Error and Usage Reporting screen, leave the default values, and then click “Next”
Installing BizTalk Server 2013 in a Standalone Machine
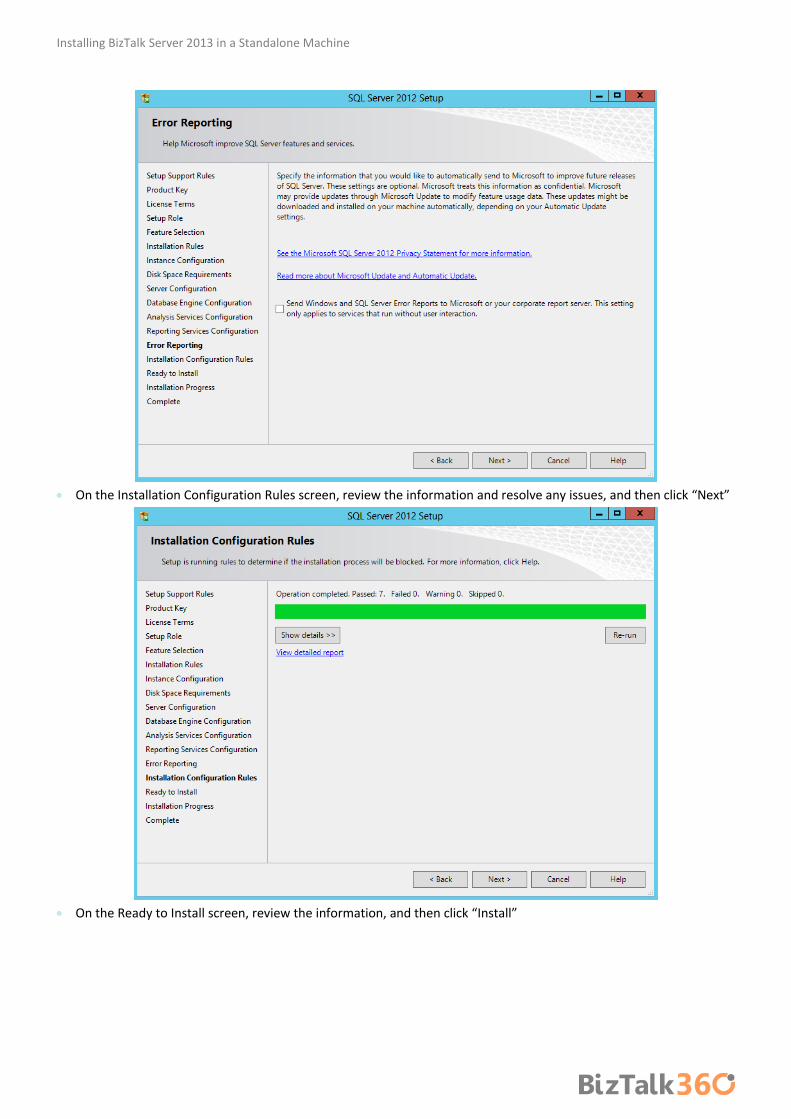
On the Installation Configuration Rules screen, review the information and resolve any issues, and then click “Next”
On the Ready to Install screen, review the information, and then click “Install”

On the Complete screen, click “Close”
NOTE: Once again, after this installation, I like to do a Windows update, this step is not necessary.
3.8 Configure SQL Server Database Mail feature If your BizTalk Server environment uses SQL Server 2012 and you wish to configure BAM Alerts, you must have already
configured SQL Server Database Mail feature before you try to configure BAM Alerts, otherwise the BizTalk Basic
configuration will ignore this feature (BAM Alerts).
Installing BizTalk Server 2013 in a Standalone Machine
Database Mail is an enterprise solution for sending e-mail messages from the SQL Server Database Engine. Using
Database Mail, your database applications can send e-mail messages to users. The messages can contain query results,
and can also include files from any resource on your network. You can read more here: http://msdn.microsoft.com/en-
us/library/ms189635.aspx
NOTE: You still can have BAM Portal with activities and aggregations without alerts, this is mandatory if you want alerts.
Before we begin, we need to determine the server name and port number for the Simple Mail Transfer Protocol (SMTP)
server that we will use to send e-mail (If the SMTP server requires authentication, determine the user name and password
for the SMTP server). In our case will be the local SMTP Server that we previous install and configure.
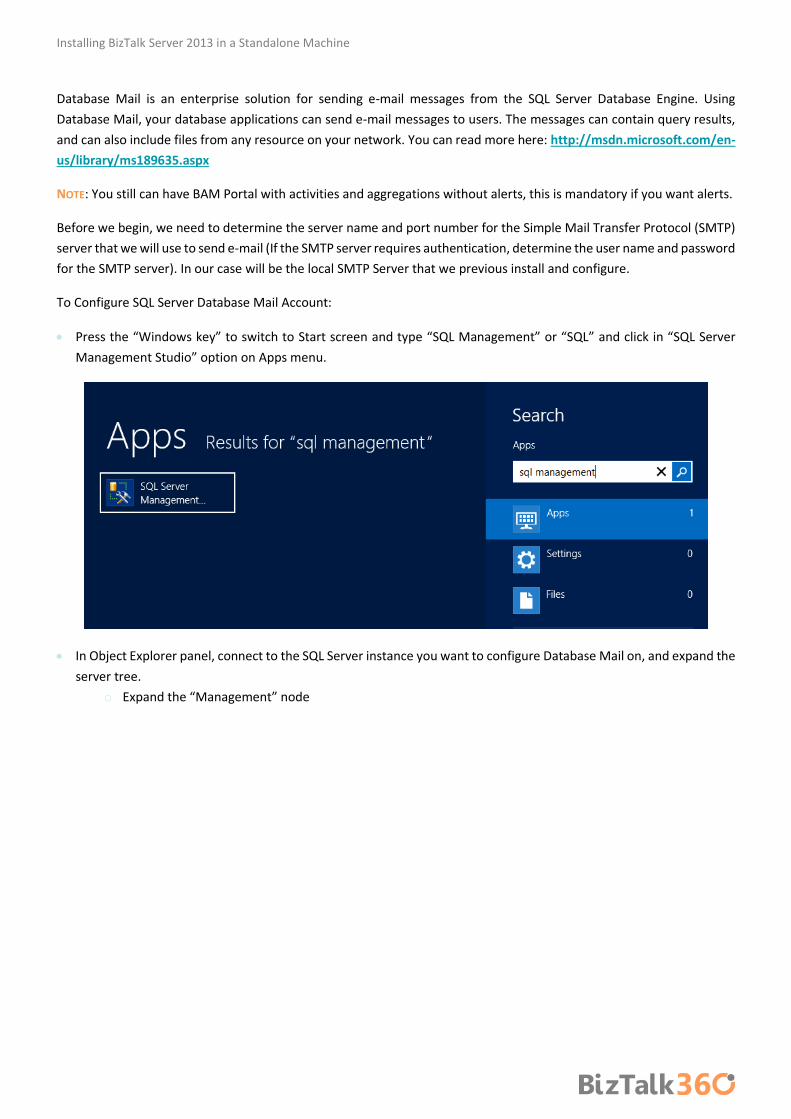
To Configure SQL Server Database Mail Account:
Press the “Windows key” to switch to Start screen and type “SQL Management” or “SQL” and click in “SQL Server
Management Studio” option on Apps menu.
In Object Explorer panel, connect to the SQL Server instance you want to configure Database Mail on, and expand the
server tree.
o Expand the “Management” node

Double click “Database Mail” to open the Database Mail Configuration Wizard.
o Or right click under “Database Mail” and select the option “Configure Database Mail”
On the Welcome to Database Mail Configuration Wizard page, click “Next” to continue
Installing BizTalk Server 2013 in a Standalone Machine
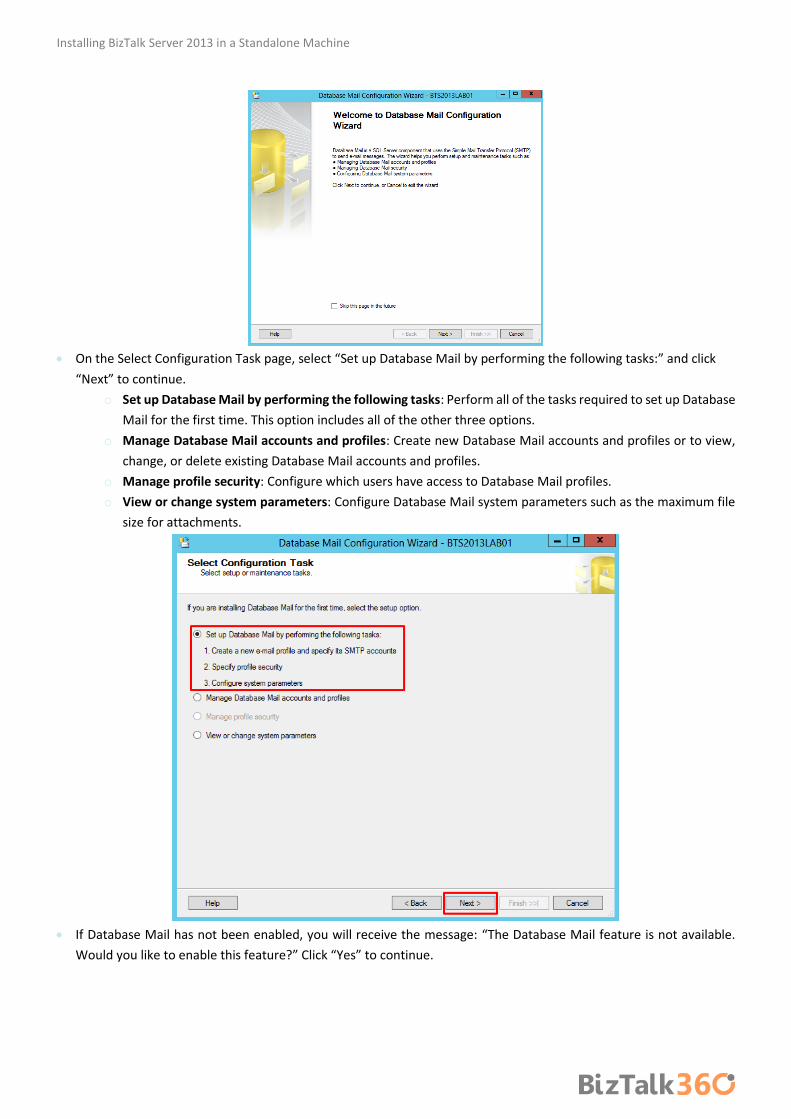
On the Select Configuration Task page, select “Set up Database Mail by performing the following tasks:” and click
“Next” to continue.
o Set up Database Mail by performing the following tasks: Perform all of the tasks required to set up Database
Mail for the first time. This option includes all of the other three options.
o Manage Database Mail accounts and profiles: Create new Database Mail accounts and profiles or to view,
change, or delete existing Database Mail accounts and profiles.
o Manage profile security: Configure which users have access to Database Mail profiles.
o View or change system parameters: Configure Database Mail system parameters such as the maximum file
size for attachments.
If Database Mail has not been enabled, you will receive the message: “The Database Mail feature is not available.
Would you like to enable this feature?” Click “Yes” to continue.

On the New Profile page, specify the “Profile name” and “Description” to be included in the profile, and click “Add...”
to specify an account
On the New Database Mail Account page, specify the account name, description, mail server information, and
authentication type. Click “OK”
o A Database Mail account contains the information that SQL Server uses to send e-mail messages to an SMTP
server. Each account contains information for one e-mail server and doesn’t correspond to a SQL Server
account or a Microsoft Windows account. Database Mail can be sent using the credentials of the SQL Server
Database Engine, using other credentials that you supply, or anonymously. When using basic authentication,
the user name and password in a Database Mail account are only used for authentication with the e-mail
server. An account need not correspond to a SQL Server user or a user on the computer running SQL Server.

Installing BizTalk Server 2013 in a Standalone Machine
Account name: Type the name of the new account.
Description: Type a description of the account. The description is optional.
E-mail address: Type the name of the e-mail address for the account. This is the e-mail address that
e-mail is sent from. For example, an account for SQL Server Agent may send e-mail from the address
Display name: Type the name to show on e-mail messages sent from this account. The display name
is optional. This is the name displayed on messages sent from this account. For example, an account
for SQL Server Agent may display the name "SQL Server Agent Automated Mailer" on e-mail
messages.
Reply e-mail: Type the e-mail address that will be used for replies to e-mail messages sent from this
account. The reply e-mail is optional. For example, replies to an account for SQL Server Agent may
go to the database administrator, [email protected].
Server name: Type the name or IP address of the SMTP server the account uses to send e-mail.
Typically this is in a format similar to smtp.<your_company>.com. For help with this, consult your
mail administrator. As I say early we will use our local SMTP Server, so the server name will be
“localhost”
Port number: Type the port number of the SMTP server for this account. Most SMTP servers use port
25.
This server requires a secure connection (SSL): Encrypts communication using Secure Sockets Layer.
Windows Authentication using Database Engine service credentials: Connection is made to the
SMTP server using the credentials configured for the SQL Server Database Engine service.
Basic Authentication: Specify the user name and password required by the SMTP server.
Anonymous authentication: Mail is sent to the SMTP server without login credentials. Use this
option when the SMTP server does not require authentication.
Back on the New Profile page, click “Next” to continue

On the Manage Profile Security page, you will be able to set the Public, Private and Default Profiles, select our profile
as public and default and click “Next”.
On the Configure System Parameters page, leave the default values and click “Next”

Installing BizTalk Server 2013 in a Standalone Machine
On the Complete the Wizard page, review the actions to be performed and click “Finish” to complete creating the
new account.
On the “Configuring…” page, ensure that all actions succeed and then click “Close”

The Database Mail should now be configured successfully and all should be correctly setup to send emails, but we must
make sure by testing it. So we will send a test email and confirm the reception. To do that:
Right-click on Database Mail and select “Send Test E-Mail…”
On the Send Test E-mail from windows, specify a “To:” email and click “Send Test E-Mail”
If all goes well you should receive the email in a few seconds. If you have received the email, you have been able to
configure Database Mail successfully.

Installing BizTalk Server 2013 in a Standalone Machine

4. Install and configure BizTalk Server 2013 This part of the article will focus on installing and configuring BizTalk Server 2013 and additional components.
4.1 Install BizTalk Server 2013 In this section you’ll install BizTalk Server, confirm that the installation succeeded, and then configure BizTalk Server.
When you installed SQL Server, setup granted your account Database Administrator rights. Since these rights are also
required for installing BizTalk Server, you must do one of the following:
Use the same account you used when you installed SQL Server.
Or make sure the account you’re using now also has Database Administrator rights and is also local administrator.
To install BizTalk Server 2013
Close any programs you have open. Run the BizTalk Server 2013 installer as Administrator.
On the Start screen, click “Install Microsoft BizTalk Server 2013”
On the Customer Information screen, type your user name and organization, enter your product key, and then click
“Next”

Installing BizTalk Server 2013 in a Standalone Machine
On the License Agreement screen, accept the license agreement, and then click “Next”
On the Customer Experience Improvement Program screen, specify whether you want to participate in the
program, and then click “Next”
o BizTalk Server 2013 participates in the Customer Experience Improvement Program. As part of this support,
you can choose to provide useful feedback to Microsoft regarding feature usage reporting functionality of
BizTalk Server. The data collected from you is anonymous and cannot be used to identify you. Microsoft
collects feature usage statistics as part of this program. By participating in this program, you can help improve
the reliability and performance of various features of BizTalk Server. For more information about this
program and its privacy policy, see Microsoft BizTalk Server CEIP Privacy Policy
(http://go.microsoft.com/fwlink/?LinkId=188553).
On the Component Installation screen, review the available components and select the ones you want to install.
o Choose all possible components
o Accept the default installation location or click Browse to move to the location where you want to install
BizTalk Server 2013.
o And then click “Next”

Installing BizTalk Server 2013 in a Standalone Machine
If your computer is missing a prerequisite component such as ADOMD.NET, Setup can install the redistributable
prerequisites. You can either:
o Select “Automatically install the redistributable prerequisites from the web”
o Or if you prefer you can select “Automatically install the redistributable prerequisites from a CAB file” if you
have already downloaded the CAB file. If you select this, you can then browse to the location of the CAB file
and select it.
o And then click “Next” to continue.
NOTE: To understand all options and where to find the Redistributable CAB Files, see: Appendix B: Redistributable CAB
Files
On the Summary screen, verify that the components that you select to install are correct.

o To enable auto-logon after a system reboot, click “Set” and provide your logon information. Auto-logon is
enabled only for reboots during setup, and is disabled when setup is complete.
o Click “Install” to start the installation process.
On the Microsoft Update Setup screen, specify whether you want to use Microsoft Update for checking for regular
updates from Microsoft:
o Select “Use Microsoft Update when I check for updates (recommended)”
o And then click “Next” to continue.
On the Installation Completed screen, clear the “Launch BizTalk Server Configuration” check box, and then click
“Finish”

Installing BizTalk Server 2013 in a Standalone Machine
4.1.1 Verify Your Installation You can check to see whether your installation was successful by using either Programs and Features or the Registry.
To verify installation using Programs and Features
Press the “Windows key” to switch to Start screen.
Type “Programs and Features” and click in “Programs and Features” option on Settings menu.
When the list is fully populated, look for BizTalk Server 2013. If it appears in the list, setup succeeded.
To verify installation using the Registry:
Press the “Windows key” to switch to Start screen and type “regedit” and click in “regedit” option on Apps menu.
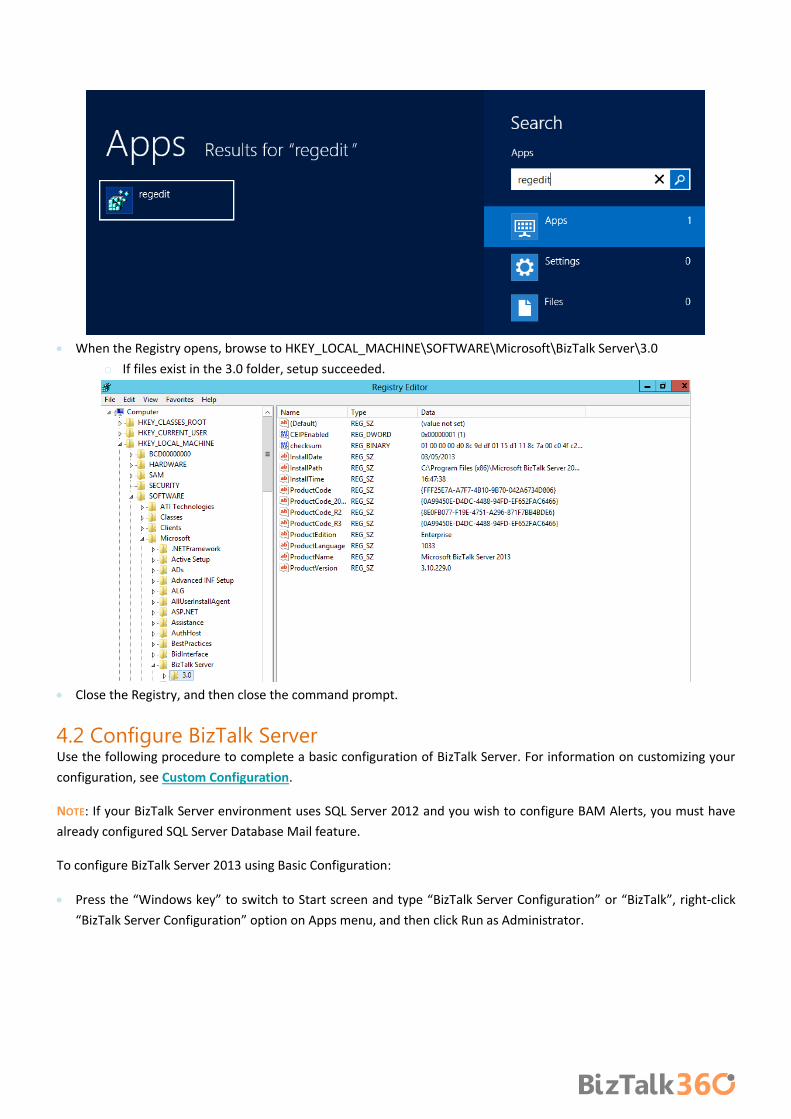
When the Registry opens, browse to HKEY_LOCAL_MACHINE\SOFTWARE\Microsoft\BizTalk Server\3.0
o If files exist in the 3.0 folder, setup succeeded.
Close the Registry, and then close the command prompt.
4.2 Configure BizTalk Server Use the following procedure to complete a basic configuration of BizTalk Server. For information on customizing your
configuration, see Custom Configuration.
NOTE: If your BizTalk Server environment uses SQL Server 2012 and you wish to configure BAM Alerts, you must have
already configured SQL Server Database Mail feature.
To configure BizTalk Server 2013 using Basic Configuration:
Press the “Windows key” to switch to Start screen and type “BizTalk Server Configuration” or “BizTalk”, right-click
“BizTalk Server Configuration” option on Apps menu, and then click Run as Administrator.
Installing BizTalk Server 2013 in a Standalone Machine
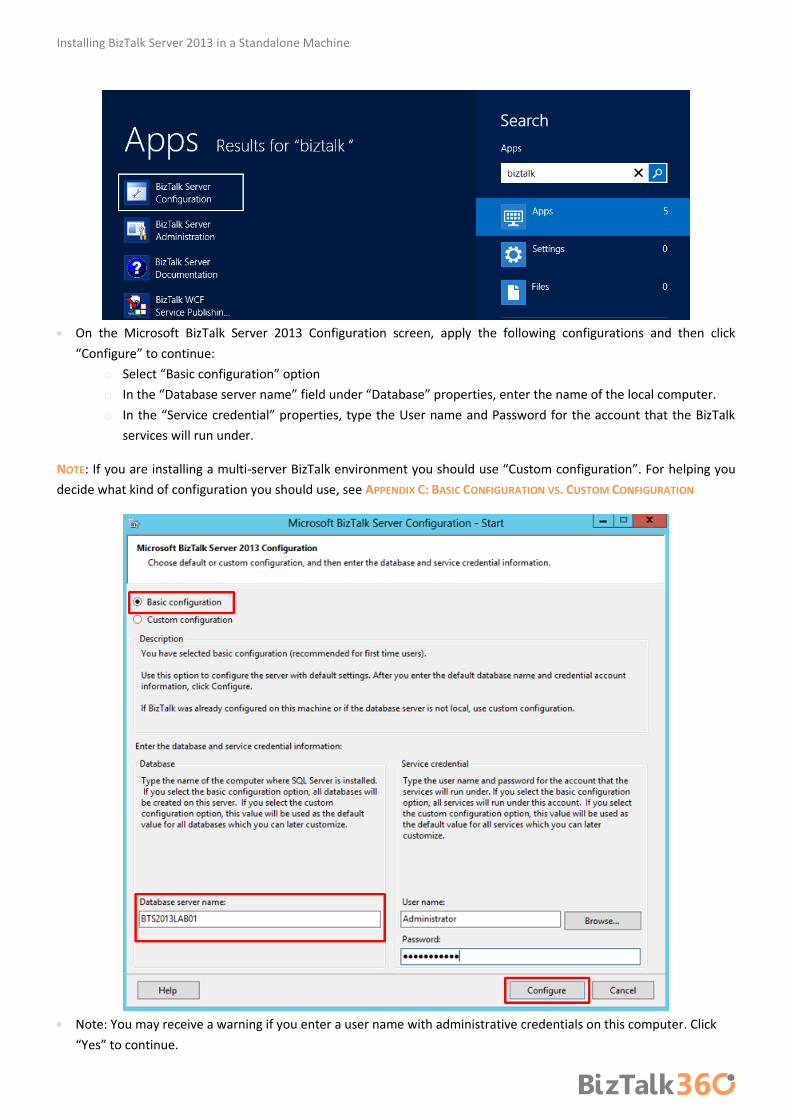
On the Microsoft BizTalk Server 2013 Configuration screen, apply the following configurations and then click
“Configure” to continue:
o Select “Basic configuration” option
o In the “Database server name” field under “Database” properties, enter the name of the local computer.
o In the “Service credential” properties, type the User name and Password for the account that the BizTalk
services will run under.
NOTE: If you are installing a multi-server BizTalk environment you should use “Custom configuration”. For helping you
decide what kind of configuration you should use, see APPENDIX C: BASIC CONFIGURATION VS. CUSTOM CONFIGURATION
Note: You may receive a warning if you enter a user name with administrative credentials on this computer. Click
“Yes” to continue.

On the Summary screen, review the configuration about to be performed, and then click “Next”
On the Completion screen, click “Finish”
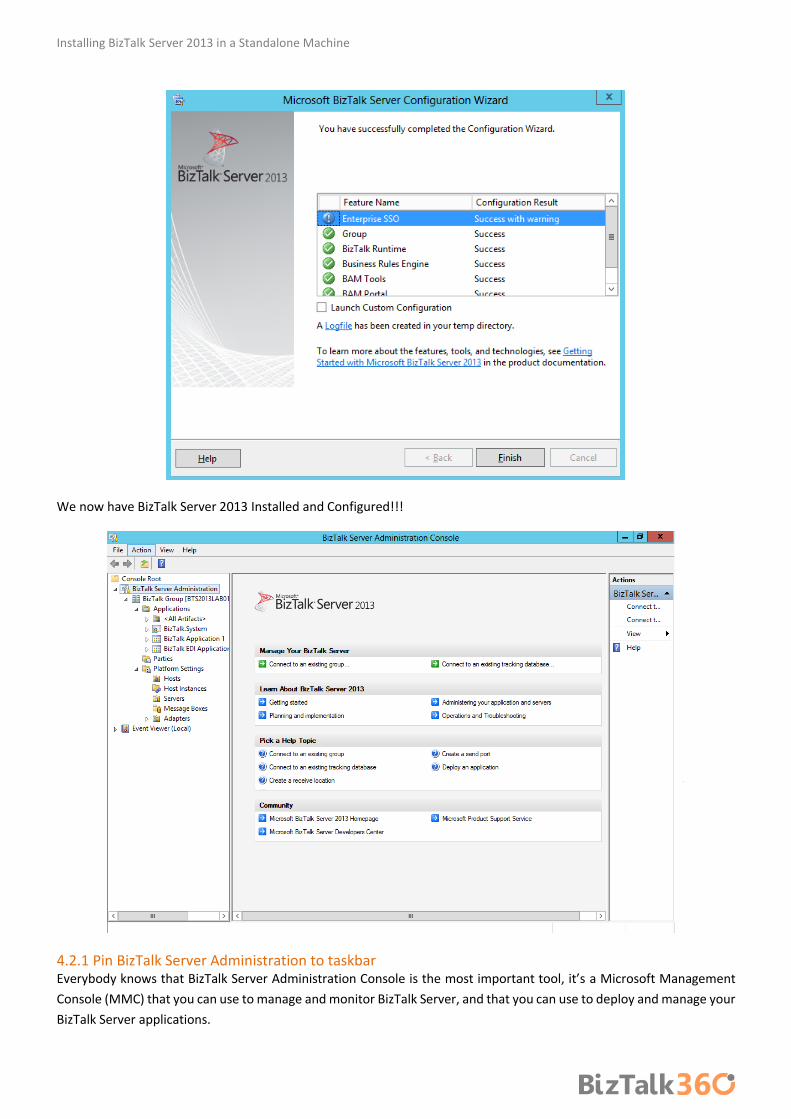
Installing BizTalk Server 2013 in a Standalone Machine
We now have BizTalk Server 2013 Installed and Configured!!!
4.2.1 Pin BizTalk Server Administration to taskbar Everybody knows that BizTalk Server Administration Console is the most important tool, it’s a Microsoft Management
Console (MMC) that you can use to manage and monitor BizTalk Server, and that you can use to deploy and manage your
BizTalk Server applications.
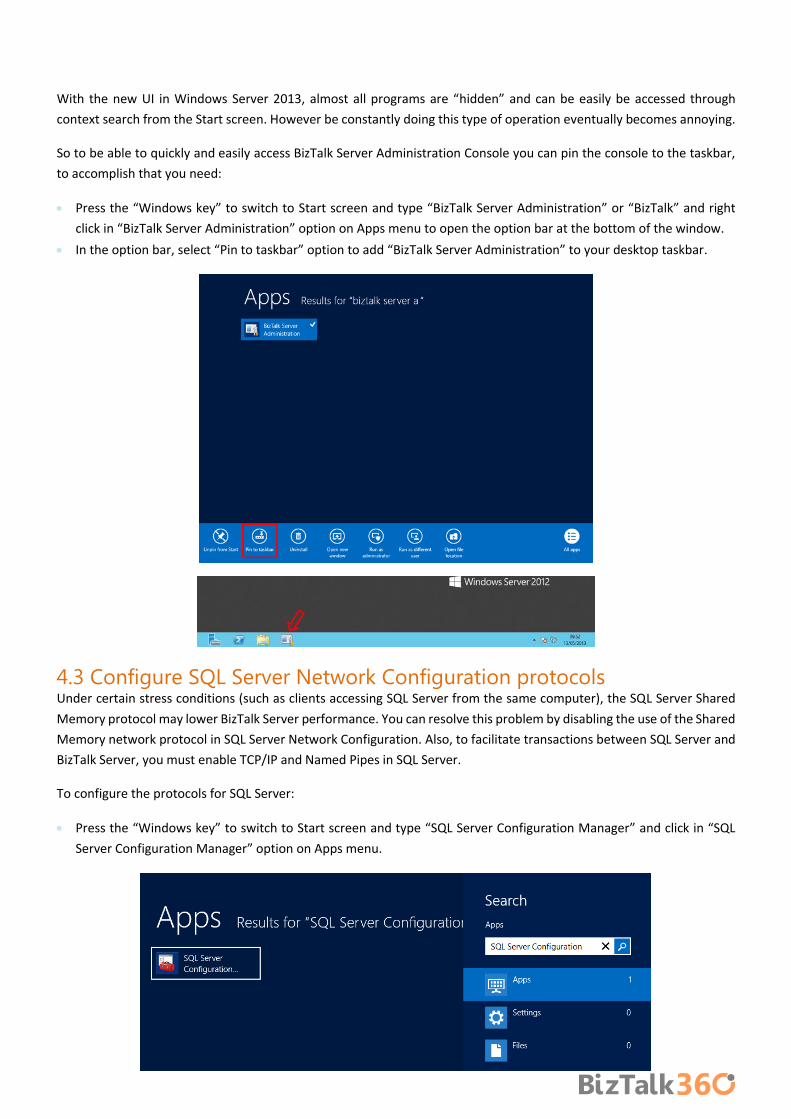
With the new UI in Windows Server 2013, almost all programs are “hidden” and can be easily be accessed through
context search from the Start screen. However be constantly doing this type of operation eventually becomes annoying.
So to be able to quickly and easily access BizTalk Server Administration Console you can pin the console to the taskbar,
to accomplish that you need:
Press the “Windows key” to switch to Start screen and type “BizTalk Server Administration” or “BizTalk” and right
click in “BizTalk Server Administration” option on Apps menu to open the option bar at the bottom of the window.
In the option bar, select “Pin to taskbar” option to add “BizTalk Server Administration” to your desktop taskbar.
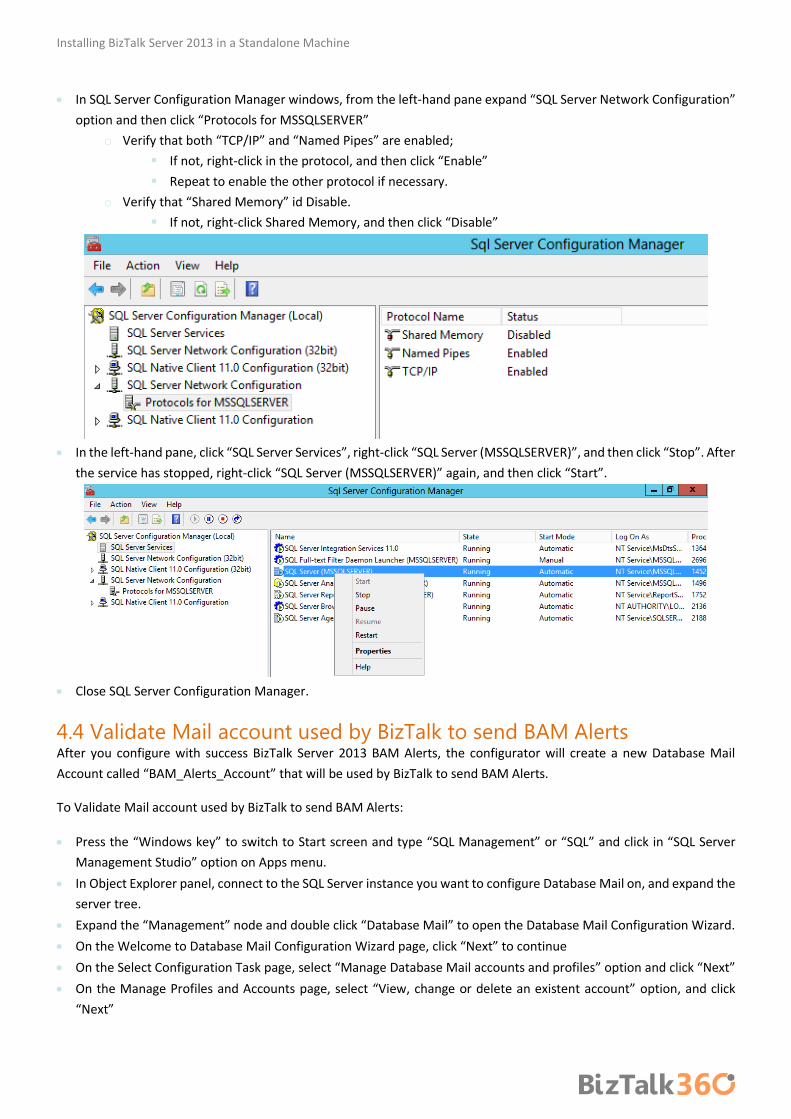
4.3 Configure SQL Server Network Configuration protocols Under certain stress conditions (such as clients accessing SQL Server from the same computer), the SQL Server Shared
Memory protocol may lower BizTalk Server performance. You can resolve this problem by disabling the use of the Shared
Memory network protocol in SQL Server Network Configuration. Also, to facilitate transactions between SQL Server and
BizTalk Server, you must enable TCP/IP and Named Pipes in SQL Server.
To configure the protocols for SQL Server:
Press the “Windows key” to switch to Start screen and type “SQL Server Configuration Manager” and click in “SQL
Server Configuration Manager” option on Apps menu.
Installing BizTalk Server 2013 in a Standalone Machine
In SQL Server Configuration Manager windows, from the left-hand pane expand “SQL Server Network Configuration”
option and then click “Protocols for MSSQLSERVER”
o Verify that both “TCP/IP” and “Named Pipes” are enabled;
If not, right-click in the protocol, and then click “Enable”
Repeat to enable the other protocol if necessary.
o Verify that “Shared Memory” id Disable.
If not, right-click Shared Memory, and then click “Disable”
In the left-hand pane, click “SQL Server Services”, right-click “SQL Server (MSSQLSERVER)”, and then click “Stop”. After
the service has stopped, right-click “SQL Server (MSSQLSERVER)” again, and then click “Start”.
Close SQL Server Configuration Manager.
4.4 Validate Mail account used by BizTalk to send BAM Alerts After you configure with success BizTalk Server 2013 BAM Alerts, the configurator will create a new Database Mail
Account called “BAM_Alerts_Account” that will be used by BizTalk to send BAM Alerts.
To Validate Mail account used by BizTalk to send BAM Alerts:
Press the “Windows key” to switch to Start screen and type “SQL Management” or “SQL” and click in “SQL Server
Management Studio” option on Apps menu.
In Object Explorer panel, connect to the SQL Server instance you want to configure Database Mail on, and expand the
server tree.
Expand the “Management” node and double click “Database Mail” to open the Database Mail Configuration Wizard.
On the Welcome to Database Mail Configuration Wizard page, click “Next” to continue
On the Select Configuration Task page, select “Manage Database Mail accounts and profiles” option and click “Next”
On the Manage Profiles and Accounts page, select “View, change or delete an existent account” option, and click
“Next”

On the Manage Existent Account page, select “BAM_Alerts_Account” option under “Account name” and validate the
configuration. After that click “Next” to make any change or “Cancel” to exit.

Installing BizTalk Server 2013 in a Standalone Machine
Finally you should test sending an email with this Database Mail Account, to do that:
Right-click on Database Mail and select “Send Test E-Mail…”
On the Send Test E-mail from windows, specify a “To:” email and click “Send Test E-Mail”

If all goes well you should receive the email in a few seconds. If you have received the email, you have been able to
configure Database Mail successfully.
4.5 Install BizTalk Adapter Pack BizTalk Adapter Pack along with BizTalk AppFabric Connect, RFID features, UDDI services and ESB Toolkit are not
automatically installed with the default installation process, instead you have to additional install this features
The Microsoft BizTalk Adapter Pack contains adapters that enable enterprise applications and databases to interface
with each other by implementing a common adapter framework. Similar to programming to Web services, adapters
enable clients to program to different enterprise applications. Technically, adapters are a binding to Windows
Communication Framework (WCF). The BizTalk Adapter Pack consists of the following adapters:
Microsoft BizTalk Adapter for Oracle Database (Oracle Database adapter).
Microsoft BizTalk Adapter for Oracle E-Business Suite (Oracle E-Business adapter).
Microsoft BizTalk Adapter for mySAP Business Suite (SAP adapter). This also includes the .NET Framework Data
Provider for mySAP Business Suite (Data Provider for SAP).
Microsoft BizTalk Adapter for Siebel eBusiness Applications (Siebel adapter). This also includes the .NET Framework
Data Provider for Siebel eBusiness Applications (Data Provider for Siebel).
Microsoft BizTalk Adapter for SQL Server (SQL adapter).
To install BizTalk Adapter Pack:
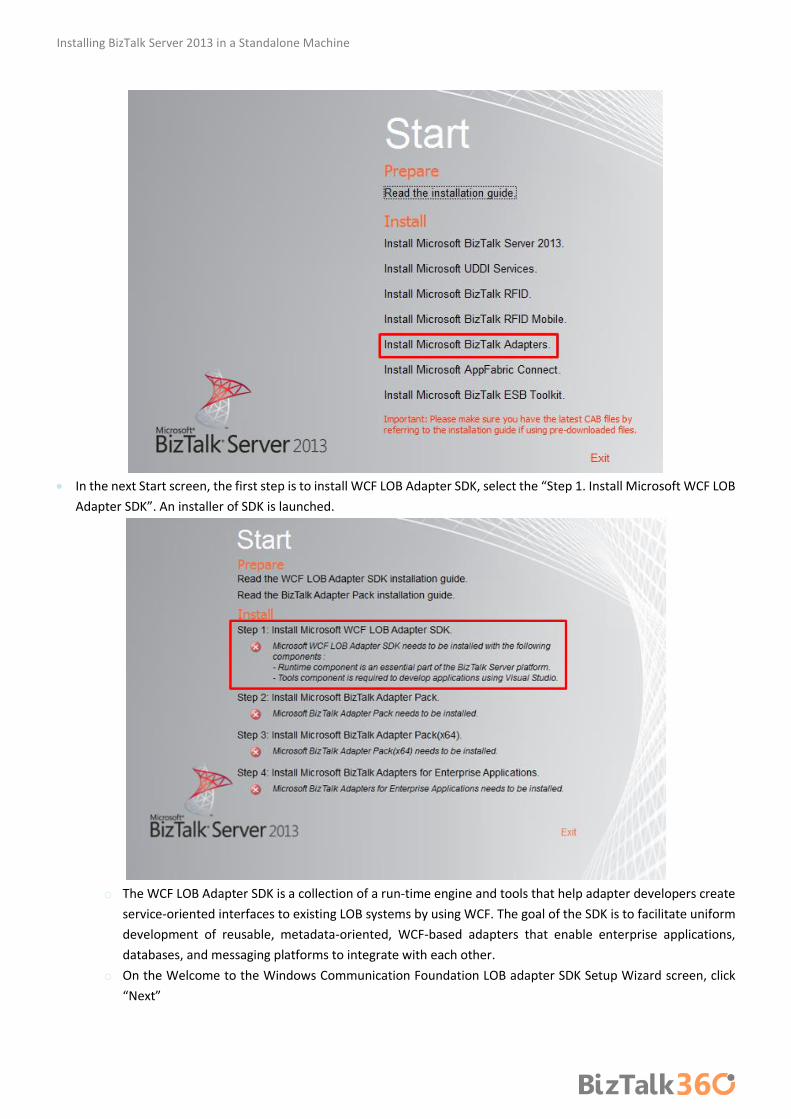
Close any programs you have open. Run the BizTalk Server 2013 installer as Administrator.
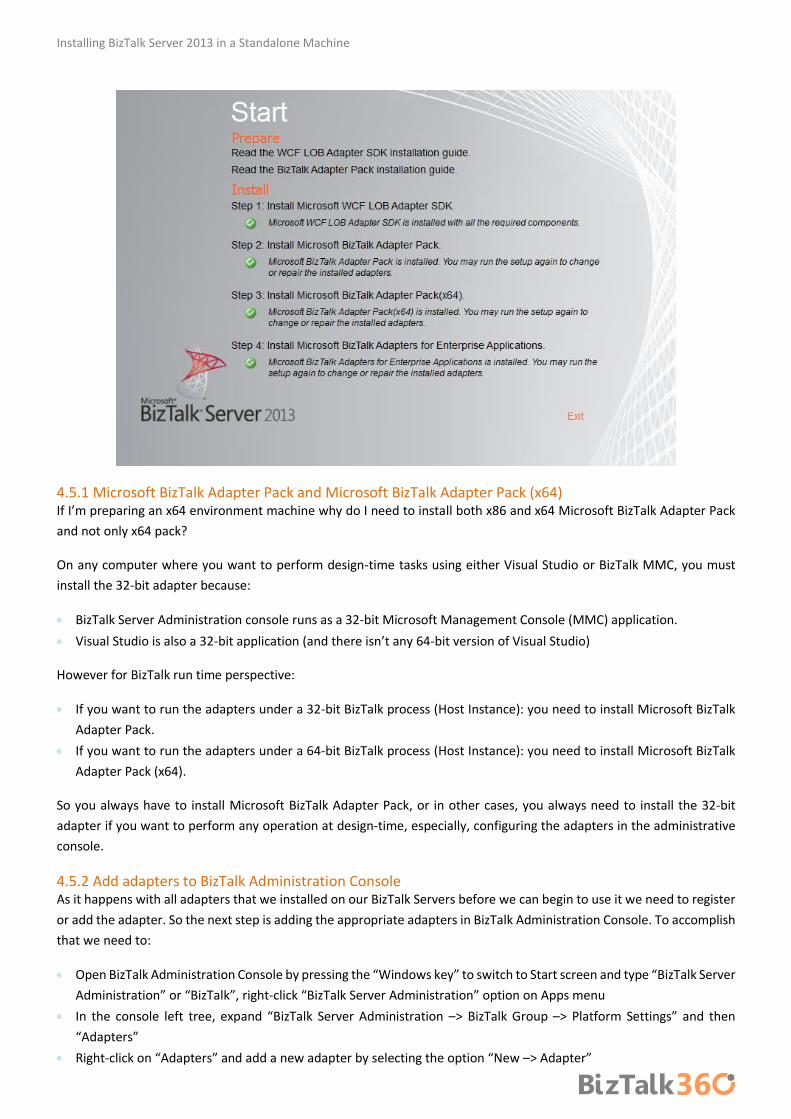
On the Start screen, click “Install Microsoft BizTalk Adapters”
Installing BizTalk Server 2013 in a Standalone Machine
In the next Start screen, the first step is to install WCF LOB Adapter SDK, select the “Step 1. Install Microsoft WCF LOB
Adapter SDK”. An installer of SDK is launched.
o The WCF LOB Adapter SDK is a collection of a run-time engine and tools that help adapter developers create
service-oriented interfaces to existing LOB systems by using WCF. The goal of the SDK is to facilitate uniform
development of reusable, metadata-oriented, WCF-based adapters that enable enterprise applications,
databases, and messaging platforms to integrate with each other.
o On the Welcome to the Windows Communication Foundation LOB adapter SDK Setup Wizard screen, click
“Next”
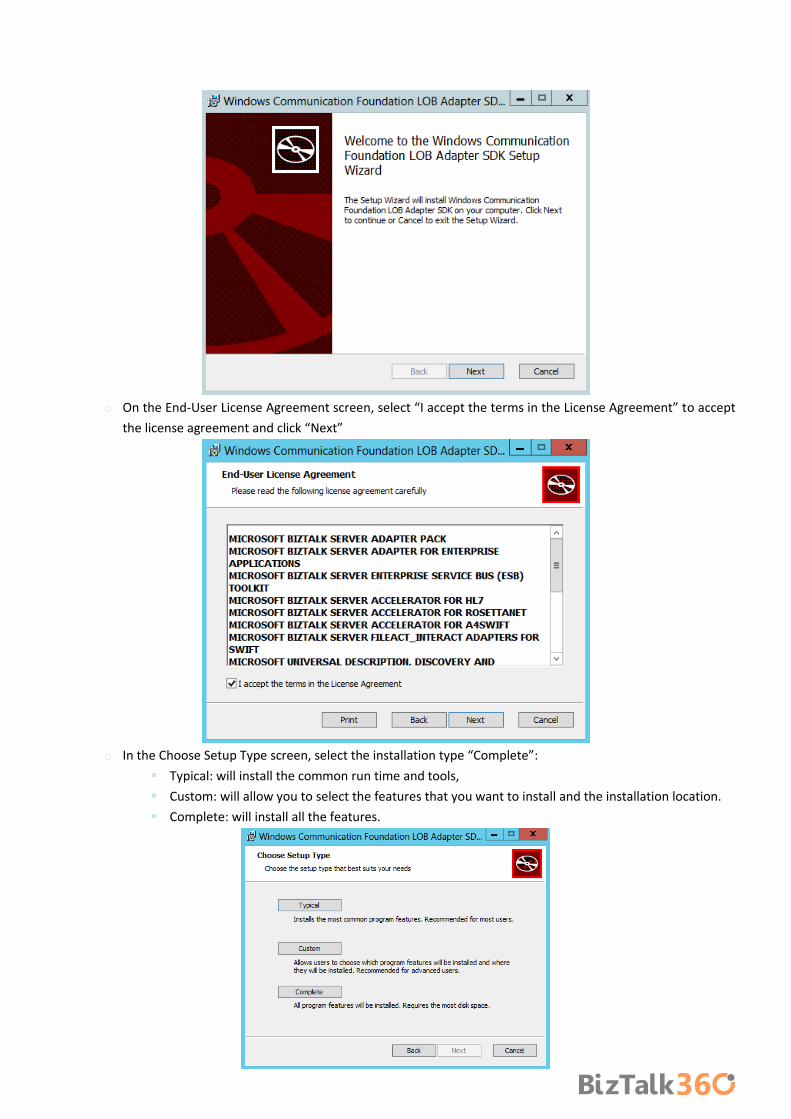
o On the End-User License Agreement screen, select “I accept the terms in the License Agreement” to accept
the license agreement and click “Next”
o In the Choose Setup Type screen, select the installation type “Complete”:
Typical: will install the common run time and tools,
Custom: will allow you to select the features that you want to install and the installation location.
Complete: will install all the features.

Installing BizTalk Server 2013 in a Standalone Machine
o On the Ready to install WCF LOB adapter SDK screen, click “Install”
o On the Completed the Windows Communication Foundation LOB Adapter SDK Setup Wizard screen, click
“Finish”
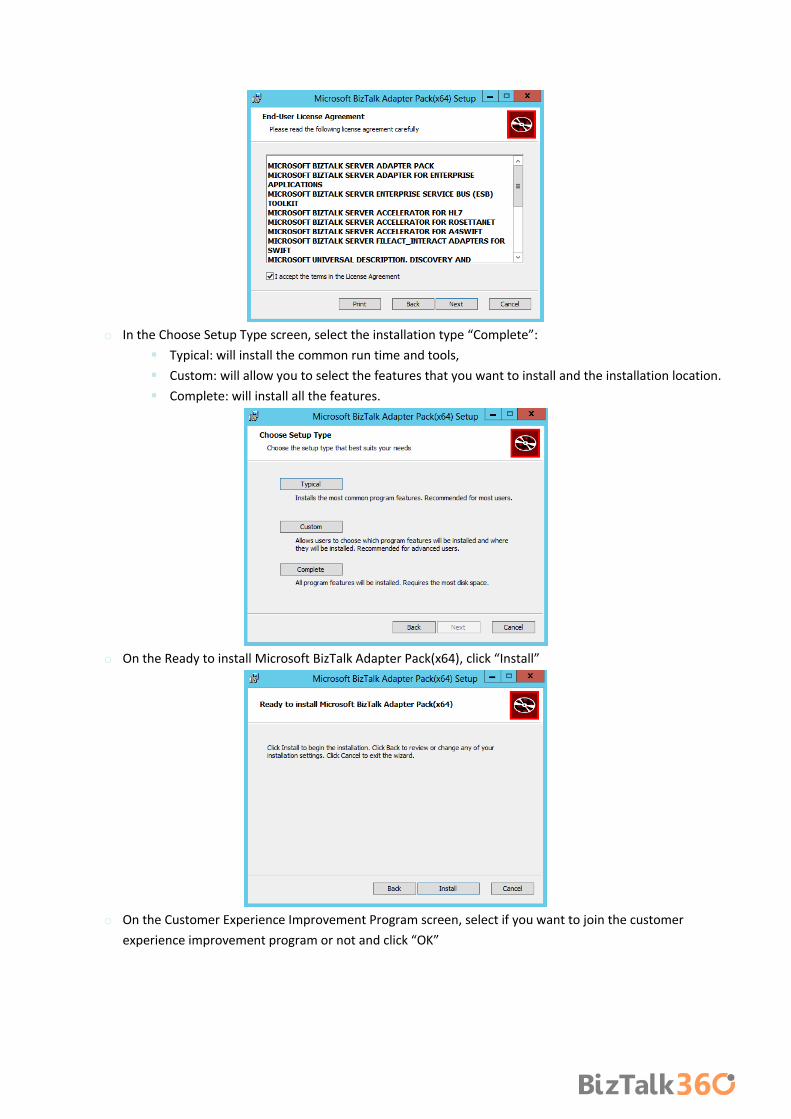
Back to the Start screen, the second step is installation of the Adapter Pack (x86), select the “Step 2. Install Microsoft
BizTalk Adapter Pack”. An installer of SDK is launched.

o On the Welcome to the Microsoft BizTalk Adapter Pack Setup Wizard screen, click “Next”
o On the End-User License Agreement screen, select “I accept the terms in the License Agreement” to accept
the license agreement and click “Next”

Installing BizTalk Server 2013 in a Standalone Machine
o In the Choose Setup Type screen, select the installation type “Complete”:
Typical: will install the common run time and tools,
Custom: will allow you to select the features that you want to install and the installation location.
Complete: will install all the features.
o On the Ready to install Microsoft BizTalk Adapter Pack screen, click “Install”
o On the Customer Experience Improvement Program screen, select if you want to join the customer
experience improvement program or not and click “OK”

o On the Completed the Microsoft BizTalk Adapter Pack Setup Wizard screen, click “Finish”
Back to the Start screen, the next step is installing the Microsoft BizTalk Adapter Pack (x64) - note that before you
install this pack you have to install x86 first - select the “Step 3. Install Microsoft BizTalk Adapter Pack(x64)”. An
installer of SDK is launched.

Installing BizTalk Server 2013 in a Standalone Machine
o On the Welcome to the Microsoft BizTalk Adapter Pack(x64) Setup Wizard screen, click “Next”
o On the End-User License Agreement screen, select “I accept the terms in the License Agreement” to accept
the license agreement and click “Next”
o In the Choose Setup Type screen, select the installation type “Complete”:
Typical: will install the common run time and tools,
Custom: will allow you to select the features that you want to install and the installation location.
Complete: will install all the features.
o On the Ready to install Microsoft BizTalk Adapter Pack(x64), click “Install”
o On the Customer Experience Improvement Program screen, select if you want to join the customer
experience improvement program or not and click “OK”
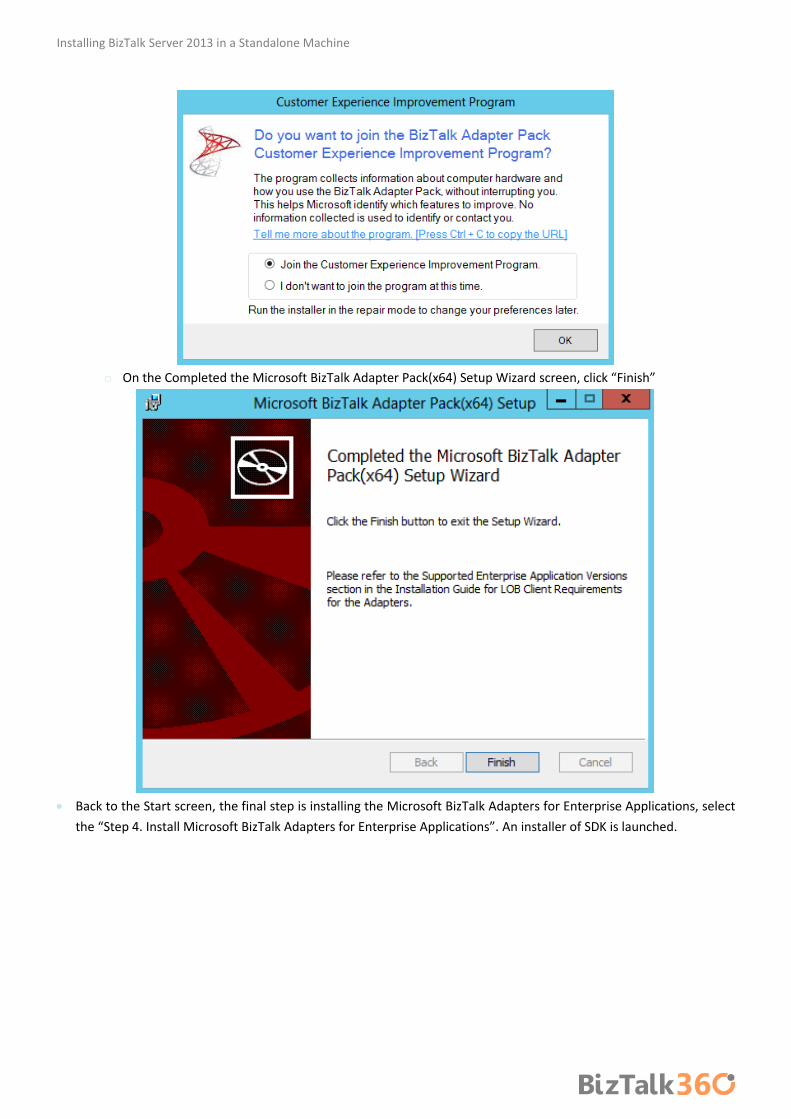
Installing BizTalk Server 2013 in a Standalone Machine
o On the Completed the Microsoft BizTalk Adapter Pack(x64) Setup Wizard screen, click “Finish”
Back to the Start screen, the final step is installing the Microsoft BizTalk Adapters for Enterprise Applications, select
the “Step 4. Install Microsoft BizTalk Adapters for Enterprise Applications”. An installer of SDK is launched.

o On the Welcome to the Microsoft BizTalk Adapters for Enterprise Applications Setup Wizard screen, click
“Next”
o On the End-User License Agreement screen, select “I accept the terms in the License Agreement” to accept
the license agreement and click “Next”

Installing BizTalk Server 2013 in a Standalone Machine
o In the Customer Information screen, type your User Name and Organization and click “Next” to continue.
o In the Choose Setup Type screen, select the installation type “Complete”:
Custom: will allow you to select the features that you want to install and the installation location.
Complete: will install all the features.
o On the Choose Destination Location screen, choose the folder location that to want to install this features
and click “Next”

o On the Ready to install screen, click “Install”
o On the Completed the Microsoft BizTalk Adapters for Enterprise Applications Setup Wizard screen, click
“Finish”
Close the Start screen, click “Exit”.
Installing BizTalk Server 2013 in a Standalone Machine
4.5.1 Microsoft BizTalk Adapter Pack and Microsoft BizTalk Adapter Pack (x64) If I’m preparing an x64 environment machine why do I need to install both x86 and x64 Microsoft BizTalk Adapter Pack
and not only x64 pack?
On any computer where you want to perform design-time tasks using either Visual Studio or BizTalk MMC, you must
install the 32-bit adapter because:
BizTalk Server Administration console runs as a 32-bit Microsoft Management Console (MMC) application.
Visual Studio is also a 32-bit application (and there isn’t any 64-bit version of Visual Studio)
However for BizTalk run time perspective:
If you want to run the adapters under a 32-bit BizTalk process (Host Instance): you need to install Microsoft BizTalk
Adapter Pack.
If you want to run the adapters under a 64-bit BizTalk process (Host Instance): you need to install Microsoft BizTalk
Adapter Pack (x64).
So you always have to install Microsoft BizTalk Adapter Pack, or in other cases, you always need to install the 32-bit
adapter if you want to perform any operation at design-time, especially, configuring the adapters in the administrative
console.
4.5.2 Add adapters to BizTalk Administration Console As it happens with all adapters that we installed on our BizTalk Servers before we can begin to use it we need to register
or add the adapter. So the next step is adding the appropriate adapters in BizTalk Administration Console. To accomplish
that we need to:
Open BizTalk Administration Console by pressing the “Windows key” to switch to Start screen and type “BizTalk Server
Administration” or “BizTalk”, right-click “BizTalk Server Administration” option on Apps menu
In the console left tree, expand “BizTalk Server Administration –> BizTalk Group –> Platform Settings” and then
“Adapters”
Right-click on “Adapters” and add a new adapter by selecting the option “New –> Adapter”
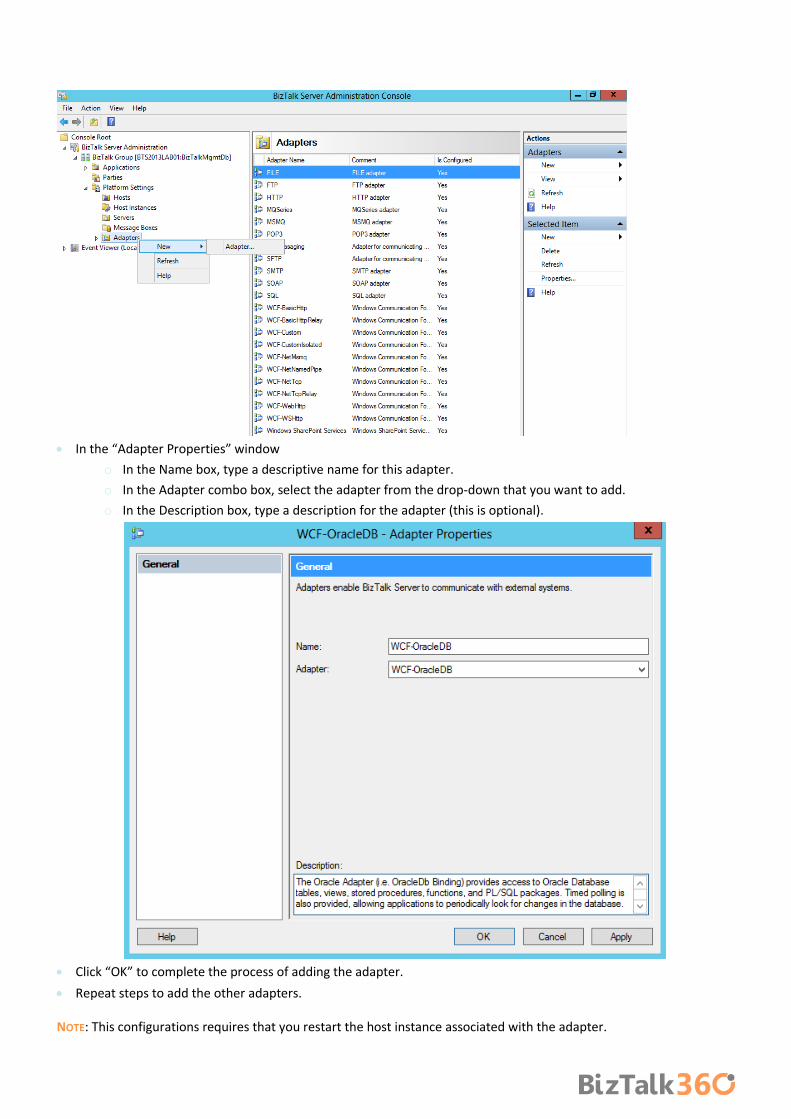
In the “Adapter Properties” window
o In the Name box, type a descriptive name for this adapter.
o In the Adapter combo box, select the adapter from the drop-down that you want to add.
o In the Description box, type a description for the adapter (this is optional).
Click “OK” to complete the process of adding the adapter.
Repeat steps to add the other adapters.
NOTE: This configurations requires that you restart the host instance associated with the adapter.
Installing BizTalk Server 2013 in a Standalone Machine
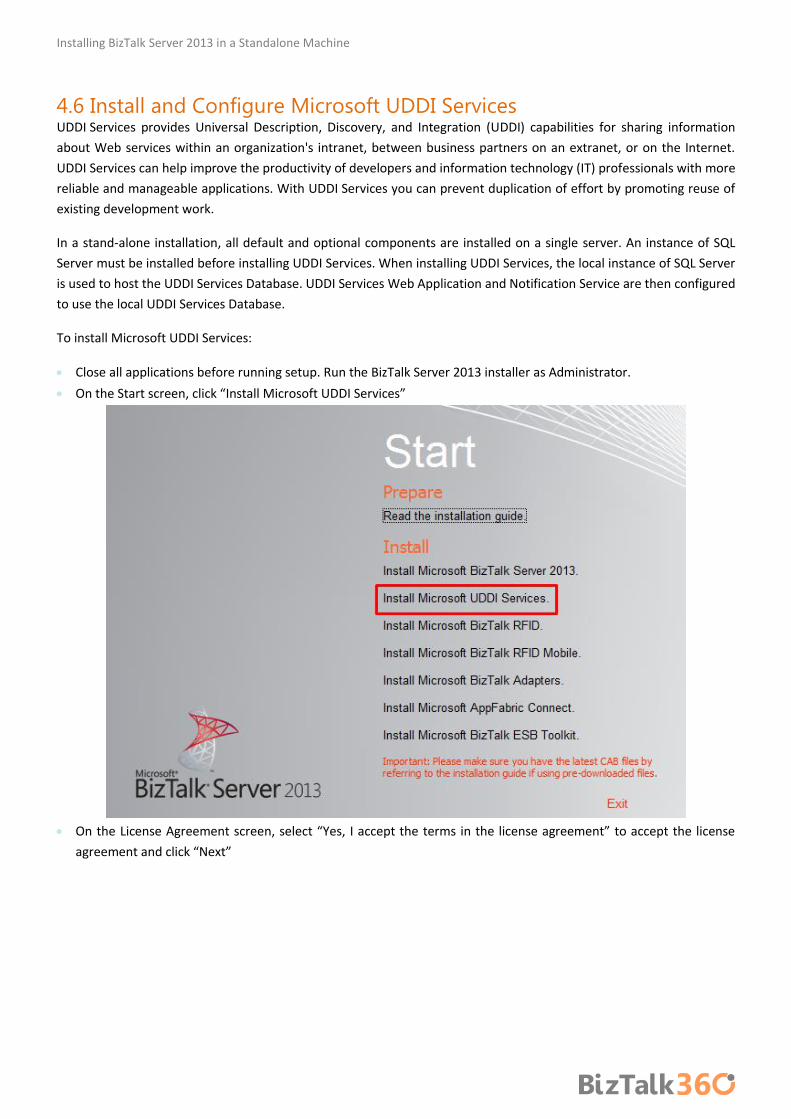
4.6 Install and Configure Microsoft UDDI Services UDDI Services provides Universal Description, Discovery, and Integration (UDDI) capabilities for sharing information
about Web services within an organization's intranet, between business partners on an extranet, or on the Internet.
UDDI Services can help improve the productivity of developers and information technology (IT) professionals with more
reliable and manageable applications. With UDDI Services you can prevent duplication of effort by promoting reuse of
existing development work.
In a stand-alone installation, all default and optional components are installed on a single server. An instance of SQL
Server must be installed before installing UDDI Services. When installing UDDI Services, the local instance of SQL Server
is used to host the UDDI Services Database. UDDI Services Web Application and Notification Service are then configured
to use the local UDDI Services Database.
To install Microsoft UDDI Services:
Close all applications before running setup. Run the BizTalk Server 2013 installer as Administrator.
On the Start screen, click “Install Microsoft UDDI Services”
On the License Agreement screen, select “Yes, I accept the terms in the license agreement” to accept the license
agreement and click “Next”

On the Component Installation screen:
o In “Available Components”: select and click from the available components you want to install
o In “Install To”: specify a location to install UDDI Services components
o And then click “Next” to continue
On the Summary screen, review installation details and then click Install.

Installing BizTalk Server 2013 in a Standalone Machine
On the Installation Completed screen, select "Launch Microsoft UDDI Services Configuration" option and then click
“Finish” to start the UDDI Services configuration.
On the Microsoft UDDI Services Configuration screen, apply the following configurations and then click “Configure”
to continue:
o Select “Basic configuration” option
o In the “Database server name” field under “Database” properties, enter the name of the local computer
that will hosts the UDDI database.
o In the “Service credential” properties, type the User name and Password for the account that the UDDI
services will run under.

Note: You may receive a warning if you enter a user name with administrative credentials on this computer. Click
“Yes” to continue.
On the Summary screen, review configuration information, and then click “Next”
o You may receive an warning on the UDDI Services Notification Service, don't worry, we'll deal with that
later

Installing BizTalk Server 2013 in a Standalone Machine
On the Completed screen, review configuration information:
o If UDDI Services Notification Service is failed, which is the case
Select “Launch Custom Configuration” option
o And then click “Finish”
On the Microsoft BizTalk Server Configuration (UDDI) screen, from the left pane, select “UDDI Services Notification
Service” option and configure the following settings:
o Select “Enable UDDI Services Notification Service” option
o Under “Windows Service”, set the service account under which the UDDI Notification Service runs.
o Under “SMTP”, type the SMTP server for sending e-mail notifications.
o Under “E-mail address”, type the address of the e-mail account used for sending e-mail notifications.
o Under “SMTP Authentication”, specify the type of authentication used when authenticating with the SMTP
server.
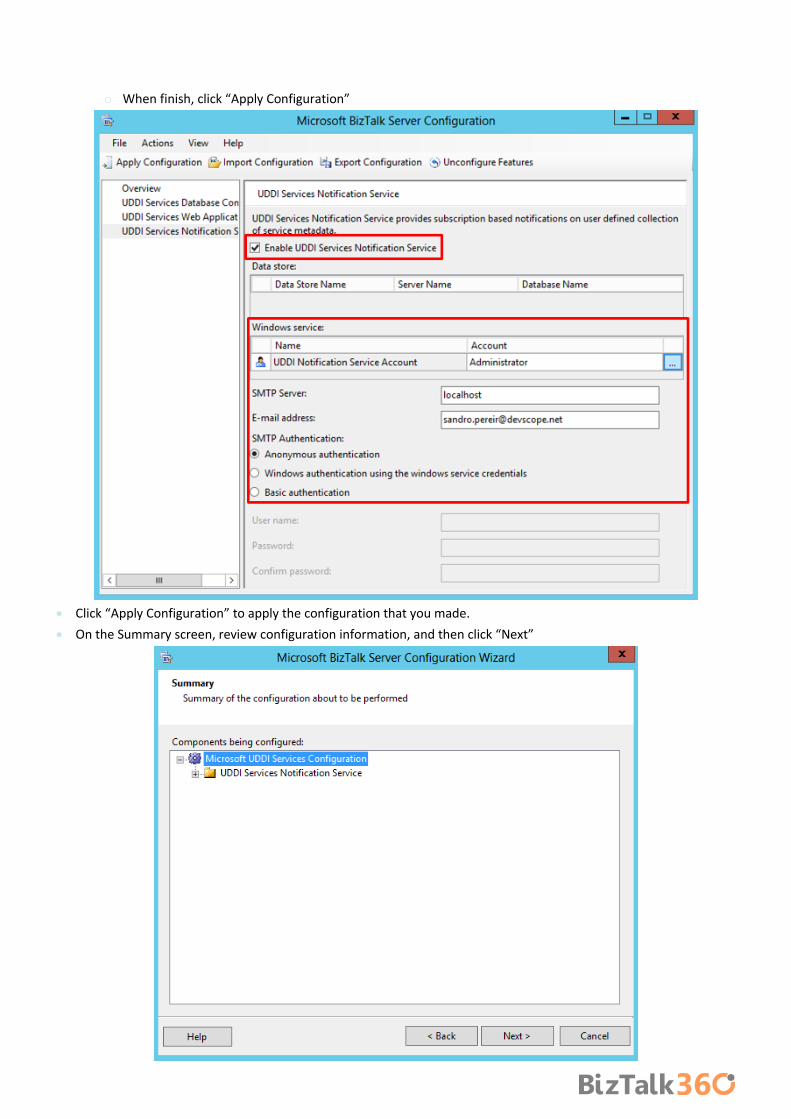
o When finish, click “Apply Configuration”
Click “Apply Configuration” to apply the configuration that you made.
On the Summary screen, review configuration information, and then click “Next”

Installing BizTalk Server 2013 in a Standalone Machine
On the Completed screen, review configuration information and then click “Finish”
4.6.1Verify Your Installation To verify that Microsoft UDDI Services is installed correctly:
Open Internet Explorer and type http://localhost/uddi, and then hit Enter
o If UDDI Services is installed correctly, you will see the Welcome to Microsoft UDDI Services page.
4.7 Install and Configure the Microsoft BizTalk ESB Toolkit BizTalk Server includes a powerful publish/subscribe mechanism for messaging applications that works by creating and
filling subscriptions, which provides a highly efficient and scalable platform for service-oriented architecture (SOA)

applications. The BizTalk ESB Toolkit extends the functionality of BizTalk Server to provide a range of new capabilities
focused on building robust, connected, service-oriented applications that incorporate itinerary-based service invocation
for lightweight service composition, dynamic resolution of endpoints and maps, Web service and WS-* integration, fault
management and reporting, and integration with third-party SOA governance solutions.
The good news is that with BizTalk Server 2013, Microsoft BizTalk ESB Toolkit is integrated with the BizTalk Server setup.
To install the Microsoft BizTalk ESB Toolkit
Close any programs you have open. Run the BizTalk Server 2013 installer as Administrator.
On the BizTalk Server installation Start screen, click “Install Microsoft BizTalk ESB Toolkit”.
On the License Agreement screen, select “Yes, I accept the terms of the license agreement” to accept the license
agreement and click “Next”

Installing BizTalk Server 2013 in a Standalone Machine
On the Component Installation screen, select the components you want to install and then click “Next”
On the Summary screen, review installation details and then click Install.

On the Installation Completed screen, click “Finish” to close the installation wizard.
To configure the Microsoft BizTalk ESB Toolkit
Press the “Windows key” to switch to Start screen and type “ESB Configuration tool” or “ESB”, right-click “ESB
Configuration tool” option on Apps menu, and then click “Run as Administrator”.
o Note: You must run the ESB Configuration Tool as an administrator.

Installing BizTalk Server 2013 in a Standalone Machine
In the ESB Configuration Tool screen, from the left pane, select “ESB Configuration” and on the right pane:
o For “Database Server (Defaults)”: specify the database server name where the databases required for BizTalk
ESB Toolkit will be created.
o In the “IIS Web Services (Defaults)” box:
Specify the user credentials under which the applications required for BizTalk ESB Toolkit will be
created.
Also specify the name of the website in IIS under which the applications will be created.
o The “BizTalk User Groups (Defaults)” box lists the default user groups available for ESB configuration.
Leave the default values
Important: At this stage, you can click “Apply Configuration” towards the top of the ESB Configuration
Tool to configure the Microsoft BizTalk ESB Toolkit with the default settings. However, we will
continue to configure the remains steps for a custom configuration.
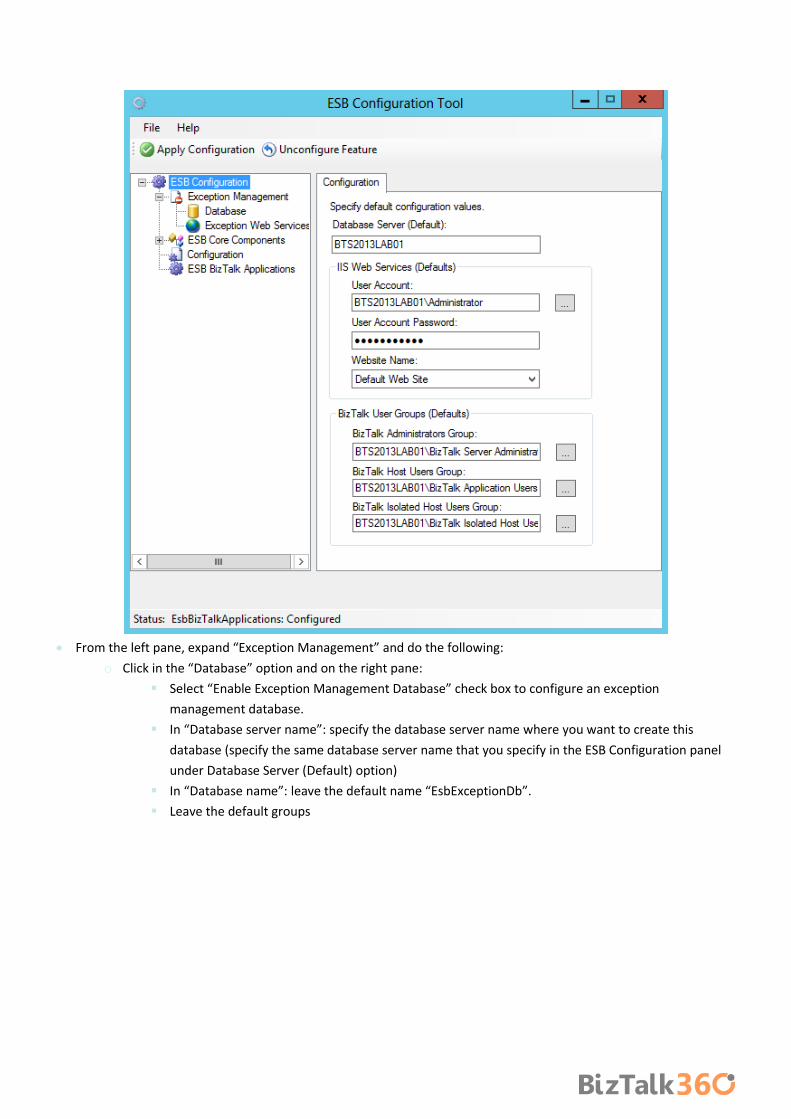
From the left pane, expand “Exception Management” and do the following:
o Click in the “Database” option and on the right pane:
Select “Enable Exception Management Database” check box to configure an exception
management database.
In “Database server name”: specify the database server name where you want to create this
database (specify the same database server name that you specify in the ESB Configuration panel
under Database Server (Default) option)
In “Database name”: leave the default name “EsbExceptionDb”.
Leave the default groups
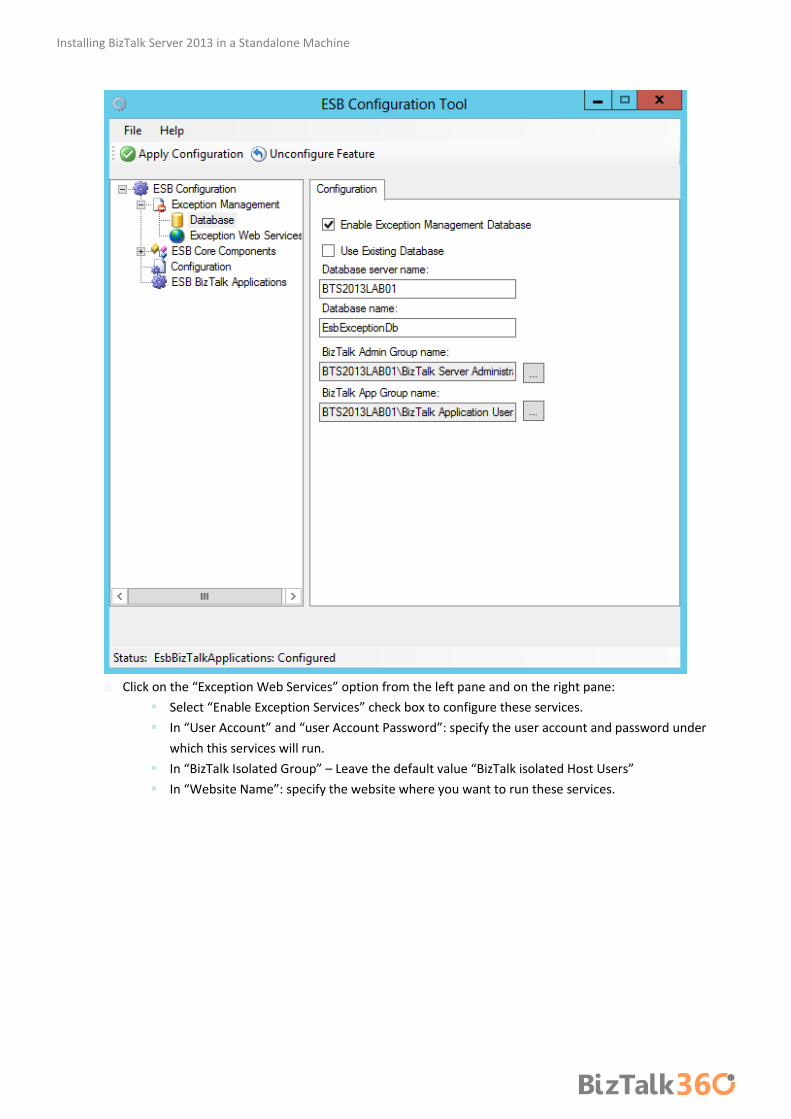
Installing BizTalk Server 2013 in a Standalone Machine
o Click on the “Exception Web Services” option from the left pane and on the right pane:
Select “Enable Exception Services” check box to configure these services.
In “User Account” and “user Account Password”: specify the user account and password under
which this services will run.
In “BizTalk Isolated Group” – Leave the default value “BizTalk isolated Host Users”
In “Website Name”: specify the website where you want to run these services.

From the left pane, expand “ESB Core Components”, and do the following:
o Click the “Itinerary Database” option and on the right pane:
Select the “Itinerary Database” check box to configure an itinerary database.
In “Database server name”: specify the database server name where you want to create this
database (specify the same database server name that you specify in the ESB Configuration panel
under Database Server (Default) option)
In “Database name”: leave the default name “EsbItineraryDb”.
Leave the default groups
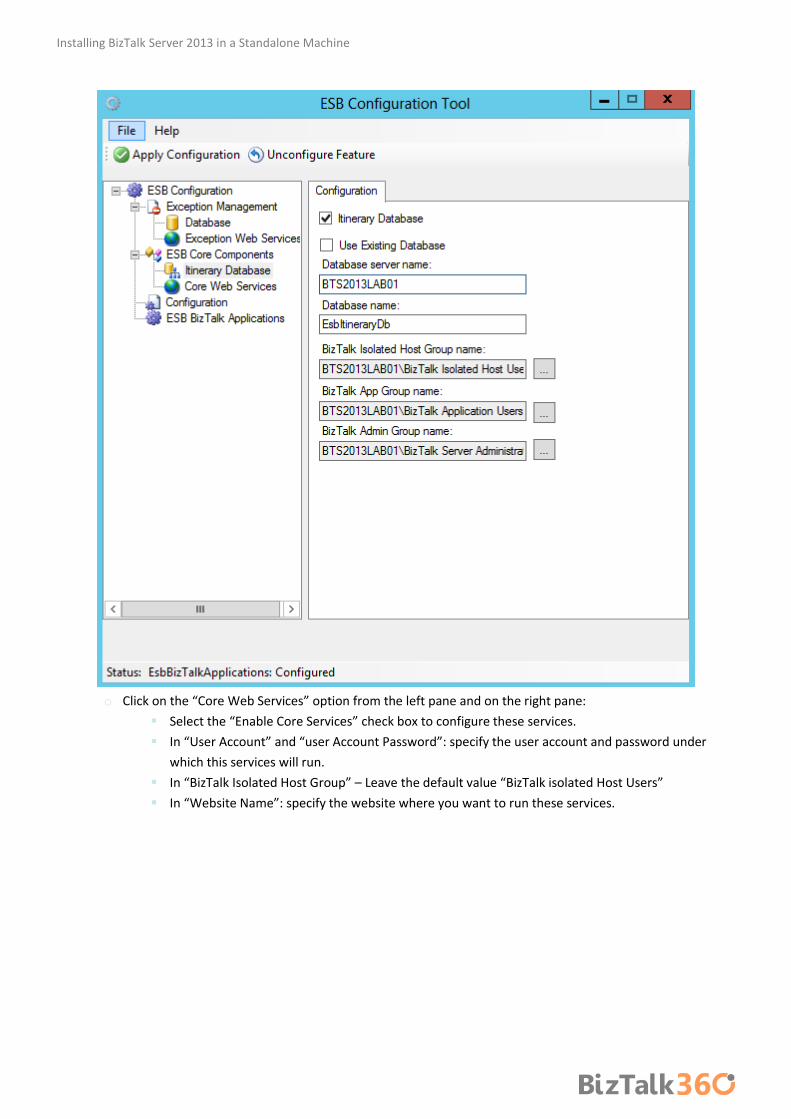
Installing BizTalk Server 2013 in a Standalone Machine
o Click on the “Core Web Services” option from the left pane and on the right pane:
Select the “Enable Core Services” check box to configure these services.
In “User Account” and “user Account Password”: specify the user account and password under
which this services will run.
In “BizTalk Isolated Host Group” – Leave the default value “BizTalk isolated Host Users”
In “Website Name”: specify the website where you want to run these services.

From the left pane, click “Configuration” to specify the SSO configuration.
o If you are installing and configuring the Microsoft BizTalk ESB Toolkit in a single server environment, you
should select “File Configuration Source”, which is the default selection. However, if you are setting up a
multiple-machine deployment, you must select the “SSO Configuration Source”, and then provide the
following values.
SSO Server: Name of the SSO server.
Configuration file: Click the ellipsis button (…), and then browse to the Esb.config file, which is
included in the Microsoft BizTalk ESB Toolkit
Application Name: Type a name for the SSO application. For example, ESB Toolkit.
Contact Information: Type the appropriate contact information in the following format:
Administrator Group Name: Click the ellipsis button (…), and then browse to the appropriate name
User Group Name: Click the ellipsis button (…), and then browse to the appropriate name
o Select “File Configuration Source”

Installing BizTalk Server 2013 in a Standalone Machine
Click “Apply Configuration” on the top of the ESB Configuration Tool to configure the Microsoft BizTalk ESB Toolkit.
Open IIS and notice that the applications required for Microsoft BizTalk ESB Toolkit are now created under the website
you specified.
Back to the “ESB Configuration Tool”, from the left pane, click “ESB BizTalk Applications” option, from the right pane,
do the following:
o Select the “Enable ESB Core Components in BizTalk Server” check box to create the application in the BizTalk
Server Administration console.
Select the “Use Default Binding” to bind this application to the default host.

Optional you can select the “Do not use Default Binding” if you do not want to bind the application
to the default host. In such a case, you must explicitly bind the application to a host, once the
application is created.
o Select the “Enable ESB JMS/WMQ Components in BizTalk Server” check box to create the application in the
BizTalk Server Administration console.
Select the “Use Default Binding” to bind this application to the default host.
Optional you select the “Do not use Default Binding” if you do not want to bind the application to
the default host. In such a case, you must explicitly bind the application to a host, once the
application is created.
Click “Apply Configuration” on the top of the ESB Configuration Tool to create the applications you selected. Verify
that the applications are created in the BizTalk Server Administration console.

Installing BizTalk Server 2013 in a Standalone Machine
4.8 Install Critical Windows Updates and BizTalk Server Cumulative
Update Package Once again, after all of this installations, I like to do a Windows update and if necessary restart the server, this step is not
necessary.
However I will like to mention that until this date there’s already one Cumulative Update for BizTalk Server 2013
(Cumulative update package 1 for BizTalk Server 2013) that you should install to solve or fix minor problems that were
detected.
Another great news in BizTalk Server 2013 is that cumulative packages for BizTalk Server will be available and delivery
using Microsoft Update:
Check for windows update
Notice available fixes for BizTalk Server under optional updates
Select the update and install
The CU will also be available through the hotfix download as well.
4.9 Configure BizTalk Server SQL Jobs BizTalk Server databases and their health are very important for a successful BizTalk Server database messaging
environment. BizTalk is shipped out with a total of 13 SQL Agent jobs. By default, the following BizTalk jobs aren’t
configured and enabled upon installation.
Backup BizTalk Server (BizTalkMgmtDb)
DTA Purge and Archive (BizTalkDTADb)
MessageBox_Message_Cleanup_BizTalkMsgBoxDb
The two jobs that needs configuration are the two most important jobs: the "Backup BizTalk Server" and the "DTA Purge
and Archive". If you want these functionalities you must configure and enabled them.

4.9.1 How to configure Backup BizTalk Server (BizTalkMgmtDb) This is the job provided by Microsoft to do a best practice backup of the BizTalk databases. This job has to be configured
for it to be able to run.
This Job consists of four steps:
Step 1 – Set Compression Option – Enable or disable compression during backup.
Step 2 – BackupFull – Performs full database backups of the BizTalk Server databases.
Step 3 – MarkAndBackUpLog – Backs up the BizTalk Server database logs.
Step 4 – Clear Backup History – Specifies for how long the backup history is kept.
To configure the Backup BizTalk Server job:
Press the “Windows key” to switch to Start screen and type “SQL Management” or “SQL” and click in “SQL Server
Management Studio” option on Apps menu.
In Object Explorer panel, connect to the SQL Server instance and expand the server tree.
o Expand the “SQL Server Agent” node
o Expand “Jobs” node
Double click “Backup BizTalk Server (BizTalkMgmtDb)” to open the job properties window.
In the Job Properties - Backup BizTalk Server (BizTalkMgmtDb) dialog box, under “Select a page”, click “Steps”.
In the “Job step list”, click in the job you want to edit, and then click “Edit”

Installing BizTalk Server 2013 in a Standalone Machine
Step 1 – Set Compression Option
Since BizTalk Server 2010, BizTalk Server supports compression for its SQL Server database backups thereby providing
some benefits like: less space needed for the backup files, fewer I/O operations for the backup and restore and so on.
This job step calls a stored procedure named sp_SetBackupCompression on the BizTalk management database
(BizTalkMgmtDb by default) to set the value on the adm_BackupSettings table.
The original script is:
exec [dbo].[sp_SetBackupCompression] @bCompression = 0 /*0 - Do not use Compression, 1 - Use Compression */
The stored procedure has only one parameter:
@bCompression: By default, Set Compression Option is set to 0, which makes backup compression off by default. To
change the default, change Set Compression Option to 1.
Change the script to:
exec [dbo].[sp_SetBackupCompression] @bCompression = 1 /*0 - Do not use Compression, 1 - Use Compression */
Step 2 – BackupFull
The BackupFull step is responsible for performing a full backup of the database.
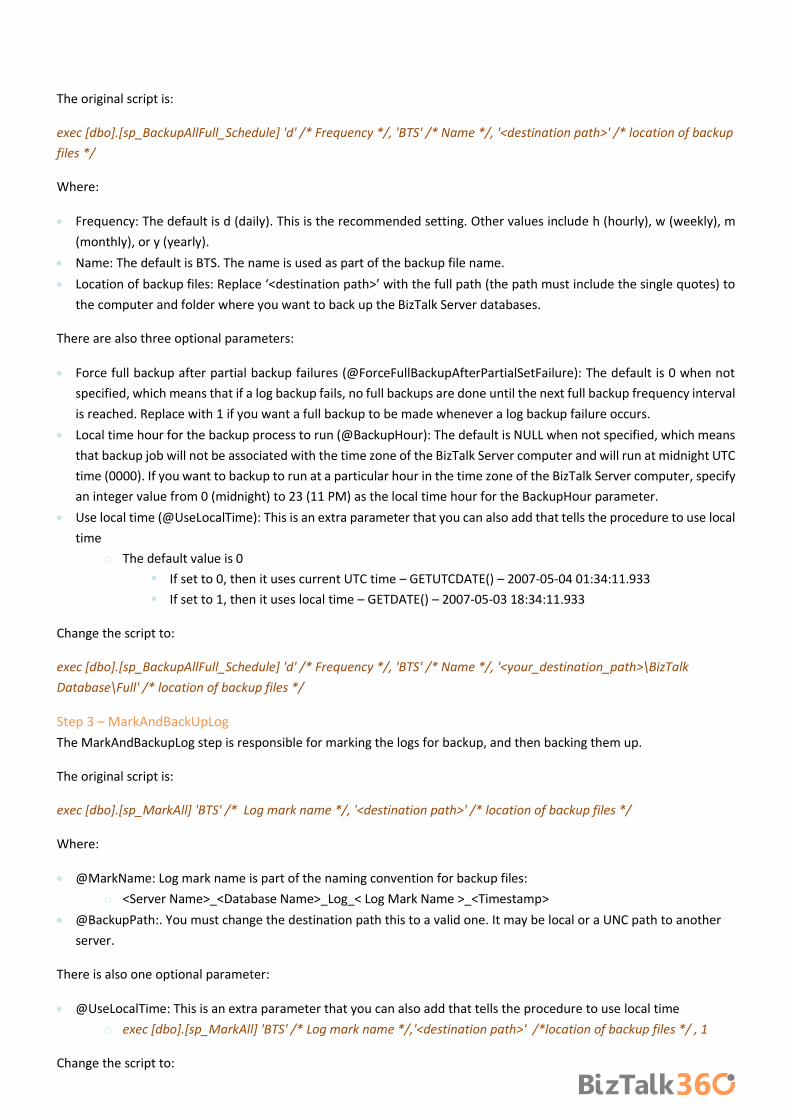
The original script is:
exec [dbo].[sp_BackupAllFull_Schedule] 'd' /* Frequency */, 'BTS' /* Name */, '<destination path>' /* location of backup
files */
Where:
Frequency: The default is d (daily). This is the recommended setting. Other values include h (hourly), w (weekly), m
(monthly), or y (yearly).
Name: The default is BTS. The name is used as part of the backup file name.
Location of backup files: Replace ‘<destination path>’ with the full path (the path must include the single quotes) to
the computer and folder where you want to back up the BizTalk Server databases.
There are also three optional parameters:
Force full backup after partial backup failures (@ForceFullBackupAfterPartialSetFailure): The default is 0 when not
specified, which means that if a log backup fails, no full backups are done until the next full backup frequency interval
is reached. Replace with 1 if you want a full backup to be made whenever a log backup failure occurs.
Local time hour for the backup process to run (@BackupHour): The default is NULL when not specified, which means
that backup job will not be associated with the time zone of the BizTalk Server computer and will run at midnight UTC
time (0000). If you want to backup to run at a particular hour in the time zone of the BizTalk Server computer, specify
an integer value from 0 (midnight) to 23 (11 PM) as the local time hour for the BackupHour parameter.
Use local time (@UseLocalTime): This is an extra parameter that you can also add that tells the procedure to use local
time
o The default value is 0
If set to 0, then it uses current UTC time – GETUTCDATE() – 2007-05-04 01:34:11.933
If set to 1, then it uses local time – GETDATE() – 2007-05-03 18:34:11.933
Change the script to:
exec [dbo].[sp_BackupAllFull_Schedule] 'd' /* Frequency */, 'BTS' /* Name */, '<your_destination_path>\BizTalk
Database\Full' /* location of backup files */
Step 3 – MarkAndBackUpLog
The MarkAndBackupLog step is responsible for marking the logs for backup, and then backing them up.
The original script is:
exec [dbo].[sp_MarkAll] 'BTS' /* Log mark name */, '<destination path>' /* location of backup files */
Where:
@MarkName: Log mark name is part of the naming convention for backup files:
o <Server Name>_<Database Name>_Log_< Log Mark Name >_<Timestamp>
@BackupPath:. You must change the destination path this to a valid one. It may be local or a UNC path to another
server.
There is also one optional parameter:
@UseLocalTime: This is an extra parameter that you can also add that tells the procedure to use local time
o exec [dbo].[sp_MarkAll] 'BTS' /* Log mark name */,'<destination path>' /*location of backup files */ , 1
Change the script to:
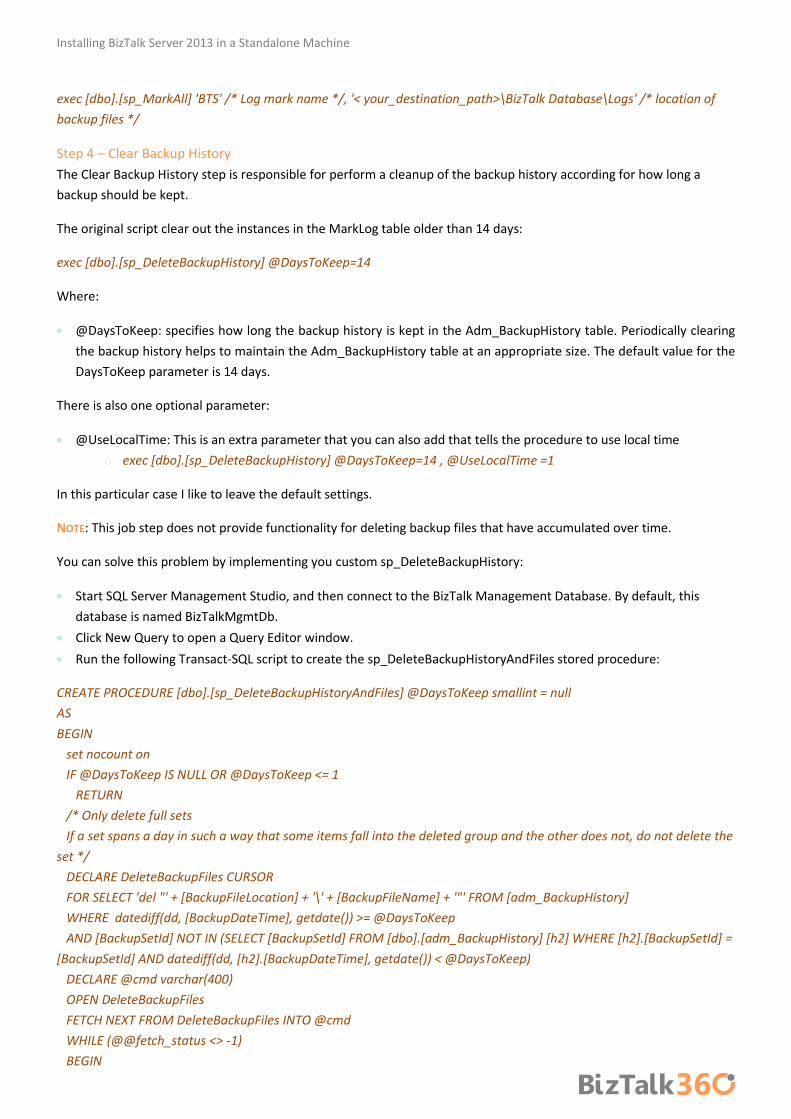
Installing BizTalk Server 2013 in a Standalone Machine
exec [dbo].[sp_MarkAll] 'BTS' /* Log mark name */, '< your_destination_path>\BizTalk Database\Logs' /* location of
backup files */
Step 4 – Clear Backup History
The Clear Backup History step is responsible for perform a cleanup of the backup history according for how long a
backup should be kept.
The original script clear out the instances in the MarkLog table older than 14 days:
exec [dbo].[sp_DeleteBackupHistory] @DaysToKeep=14
Where:
@DaysToKeep: specifies how long the backup history is kept in the Adm_BackupHistory table. Periodically clearing
the backup history helps to maintain the Adm_BackupHistory table at an appropriate size. The default value for the
DaysToKeep parameter is 14 days.
There is also one optional parameter:
@UseLocalTime: This is an extra parameter that you can also add that tells the procedure to use local time
o exec [dbo].[sp_DeleteBackupHistory] @DaysToKeep=14 , @UseLocalTime =1
In this particular case I like to leave the default settings.
NOTE: This job step does not provide functionality for deleting backup files that have accumulated over time.
You can solve this problem by implementing you custom sp_DeleteBackupHistory:
Start SQL Server Management Studio, and then connect to the BizTalk Management Database. By default, this
database is named BizTalkMgmtDb.
Click New Query to open a Query Editor window.
Run the following Transact-SQL script to create the sp_DeleteBackupHistoryAndFiles stored procedure:
CREATE PROCEDURE [dbo].[sp_DeleteBackupHistoryAndFiles] @DaysToKeep smallint = null
AS
BEGIN
set nocount on
IF @DaysToKeep IS NULL OR @DaysToKeep <= 1
RETURN
/* Only delete full sets
If a set spans a day in such a way that some items fall into the deleted group and the other does not, do not delete the
set */
DECLARE DeleteBackupFiles CURSOR
FOR SELECT 'del "' + [BackupFileLocation] + '\' + [BackupFileName] + '"' FROM [adm_BackupHistory]
WHERE datediff(dd, [BackupDateTime], getdate()) >= @DaysToKeep
AND [BackupSetId] NOT IN (SELECT [BackupSetId] FROM [dbo].[adm_BackupHistory] [h2] WHERE [h2].[BackupSetId] =
[BackupSetId] AND datediff(dd, [h2].[BackupDateTime], getdate()) < @DaysToKeep)
DECLARE @cmd varchar(400)
OPEN DeleteBackupFiles
FETCH NEXT FROM DeleteBackupFiles INTO @cmd
WHILE (@@fetch_status <> -1)
BEGIN

IF (@@fetch_status <> -2)
BEGIN
EXEC master.dbo.xp_cmdshell @cmd, NO_OUTPUT
delete from [adm_BackupHistory] WHERE CURRENT OF DeleteBackupFiles
print @cmd
END
FETCH NEXT FROM DeleteBackupFiles INTO @cmd
END
CLOSE DeleteBackupFiles
DEALLOCATE DeleteBackupFiles
END
GO
o You can find more information about this SQL script here: http://support.microsoft.com/kb/982546
Change the “Clear Backup History” step of the Backup BizTalk Server job so that it calls the
sp_DeleteBackupHistoryAndFiles stored procedure instead of the sp_DeleteBackupHistory stored procedure.
NOTE: However I don’t like this approach and I really prefer to take advantage of all features that SQL gives me and create
a maintenance plan with a Cleanup task to remove this files.
After properly configure, to enable the Backup BizTalk Server job:
Under “Jobs” in SQL Server Management Studio Object Explorer, Right click in the name of the job “Backup BizTalk
Server (BizTalkMgmtDb)” and select “Enable” option.

Installing BizTalk Server 2013 in a Standalone Machine
In the result screen, click “Close”.
4.9.2 How to configure DTA Purge and Archive (BizTalkDTADb) This job automates the archiving of tracked messages and the purging of the BizTalk Tracking database to maintain a
healthy system and to keep the tracking data archived for future use.
And it’s configured to call the stored procedure dtasp_BackupAndPurgeTrackingDatabase, which uses the six parameters
you must configure in this job:

@nLiveHours: Any completed instance older than the (live hours) + (live days) will be deleted along with all associated
data. Default is 0 hours.
@nLiveDays: Any completed instance older than the (live hours) + (live days) will be deleted along with all associated
data. Default interval is 1 day.
@nHardDeleteDays: All data (even if incomplete) older than this will be deleted. The time interval specified for
HardDeleteDays should be greater than the live window of data. The live window of data is the interval of time for
which you want to maintain tracking data in the BizTalk Tracking (BizTalkDTADb) database. Anything older than this
interval is eligible to be archived at the next archive and then purged. Default is 30 days.
@nvcFolder: Folder in which to put the backup files.
@nvcValidatingServer: Server on which validation will be done. NULL value indicates no validation is being done.
Default is NULL.
@fForceBackup: Default is 0. This is reserved for future use.
To configure the DTA Purge and Archive job:
Press the “Windows key” to switch to Start screen and type “SQL Management” or “SQL” and click in “SQL Server
Management Studio” option on Apps menu.
In Object Explorer panel, connect to the SQL Server instance and expand the server tree.
o Expand the “SQL Server Agent” node
o Expand “Jobs” node
Double click “DTA Purge and Archive (BizTalkDTADb)” to open the job properties window.
In the Job Properties - DTA Purge and Archive (BizTalkDTADb) dialog box, under “Select a page”, click “Steps”.
In the “Job step list”, click Archive and Purge, and then click Edit.

Installing BizTalk Server 2013 in a Standalone Machine
The original script after installing BizTalk looks like this:
exec dtasp_BackupAndPurgeTrackingDatabase
0, --@nLiveHours tinyint, --Any completed instance older than the live hours +live days 1, --@nLiveDays tinyint = 0, --will be deleted along with all associated data 30, --@nHardDeleteDays tinyint = 0, --all data older than this will be deleted. null, --@nvcFolder nvarchar(1024) = null, --folder for backup files null, --@nvcValidatingServer sysname = null, 0 --@fForceBackup int = 0 --
This means that:
Any completed instance that is older than the live days plus live hours will be deleted, as will any associated data.
Any data older than the HardDeleteDays will be deleted.
Normally I use these configurations for production environments:
exec dtasp_BackupAndPurgeTrackingDatabase 0, 10, 20, '<destination path>', null, 0
However in a development machine we don’t need to maintain the archived tracking data, so I just purge it periodically.
BizTalk gives you the option to Archive and Purge the tracking data or just simple purge the data without archiving:
Change the SQL Statement inside “DTA Purge and Achieve” SQL Job to
declare @dtLastBackup datetime set @dtLastBackup = GetUTCDate() exec dtasp_PurgeTrackingDatabase 1, 0, 7,
@dtLastBackup
After properly configure, to enable the Backup BizTalk Server job:
Under “Jobs” in SQL Server Management Studio Object Explorer, Right click in the name of the job “DTA Purge and
Archive (BizTalkDTADb)” and select “Enable” option.
In the result screen, click “Close”.
4.9.3 MessageBox_Message_Cleanup_BizTalkMsgBoxDb This job removes all messages that are not referenced by any subscribers in the BizTalkMsgBoxDb database tables.
IMPORTANT: This job is also started by the MessageBox_Message_ManageRefCountLog_BizTalkMsgBoxDb job. Therefore,
we recommend that you disable this job.
4.10 Configure BizTalk Server Windows Services By default, the “Startup type” propriety of BizTalk Windows Services, Enterprise Single Sign-On Service, Microsoft UDDI
Notification Service and the new BAMAlerts service are set as “Automatic”, however some of this Windows Services may
not start automatically after a system restart, to avoid this behavior you must configure the “Startup type” to “Automatic
(Delayed Start)” option in this services:
BAMAlerts
Microsoft UDDI Notification Service
Rule Engine Update Service
Also in previous version (2006 R2, 2009, 2010) of BizTalk Server also had this problem for:
Enterprise Single Sign-On Service
BizTalk Service BizTalk Group : BizTalkServerApplication Service
That we manage to solve by also configuring the startup type of the service to: “Automatic (Delayed Start)”
However, despite this services (SSO and BizTalk Services) being configured by default as “Automatic“, this problem has
been resolved in this release on Windows Server 2012 and you don’t need to configure them to “Automatic (Delayed
Start)”. Nevertheless if you are using other old SO versions supported by BizTalk Server 2013 you maybe need to apply
this configuration to avoid possible issues.
Note: if you prefer you can also configure this services as “Automatic (Delayed Start)” on Windows Server 2012
without any impact.
To proper configure the “BAMAlerts” and “Microsoft UDDI Notification Service” Windows service:
Press the “Windows key” to switch to Start screen and type “Services” and click in “View local services” option on
Settings menu.

Installing BizTalk Server 2013 in a Standalone Machine
In the Services window, on the Services (Local) panel select the BAMAlerts service, right click and select “Properties”
option.
On the BAMAlerts Properties (Local Computer) window:
o On the General tab apply the following configuration.
Startup type: “Automatic (Delayed Start)”

o On the Recovery tab, apply the following configuration:
First failure: “Restart the Service”
Second failure: “Restart the Service”
Subsequent failures: “Restart the Service”
Reset fail count after … day: 1
Restart service after … minutes: 1

Installing BizTalk Server 2013 in a Standalone Machine
o Click “OK” to apply the changes and close the window
Repeat the steps for the other services.

Appendix A: Hardware and Software Requirements
Hardware Requirements The following table shows the minimum hardware requirements for your BizTalk Server computer. In a production
environment, the volume of traffic may dictate greater hardware requirements for your servers.
Resource Id Minimum Requirement
Computer and processor
A computer with an Intel Pentium-compatible CPU that is:
1 GHz or higher for single processors
900 MHz or higher for double processors
700 MHz or higher for quad processors Notes:
Hyper-Threading and Dual-Core processors are supported.
The 64-bit versions of BizTalk Server require a 64-bit operating system running on an x64-based system. Computers based on CPUs that are compatible with the AMD64 (x86-64) and Extended Memory 64-bit Technology (EM64T) processor architecture are considered x64-based systems.
BizTalk Server is not supported on Itanium-based systems. Memory 2GB or more
Hard disk 10 GB of available hard disk space for a complete installation including the operating system and all prerequisite software. The hard disk must be NTFS formatted.
Software Requirements This table lists the software required for running BizTalk Server. You’ll be guided through installation steps for all of these
prerequisites in a later section.
Software Required Description Required for
Microsoft Windows Windows Server 2012
Windows Server 2008 R2 SP1
Windows 8
Windows 7 SP1
Internet Information Services (IIS)
IIS version 8.0 and 7.5 are supported. Provides a scalable Web application infrastructure and is required for EDI, BAM, WSS Adapter, and UDDI.
Windows Identity Foundation
OPTIONAL When using the Windows SharePoint Services Client Side Object Model (CSOM), Windows Identity Foundation is needed.
SharePoint Services adapter or SharePoint Services Online when used with SharePoint Services Client Side Object Model (CSOM). It is not needed when using the SharePoint Services Web Service, which is deprecated. Or when you don’t want to use this feature.
Microsoft SharePoint OPTIONAL The BizTalk Server Windows SharePoint Services adapter supports several Windows SharePoint Services versions, depending on your BizTalk Server installation options.
If you plan to receive or send messages from SharePoint Services, then a SharePoint Services computer is required. It can be installed on the same computer as BizTalk Server, OR
PREFERABLY ON A SEPARATE
COMPUTER.

Installing BizTalk Server 2013 in a Standalone Machine
Microsoft Office OPTIONAL Microsoft Office Excel 2010 or 2013. BIZTALK SERVER 2013 SUPPORTS ONLY 32-BIT
VERSION OF MICROSOFT OFFICE.
Required by Business Activity Monitoring (BAM) to display a real-time view of business processes
Microsoft .NET Framework
.NET Framework 4.5 This is required for all BizTalk Server managed components
Microsoft Visual Studio OPTIONAL Visual Studio 2012
Provides a development environment for building BizTalk Server applications. Ultimate Edition is recommended, but Premium and Professional are also supported. This is required for BizTalk Server Developer Tools and SDK component
Microsoft Visual C++ 2010 Redistributable Package
On an x86 computer, install only the x86 version of the package. On an x64 computer, install both x86 and x64 versions of the package. The installer is available as part of the BizTalk Server installation media under \Platform\SSO\Platform.
The Microsoft Visual C++ 2010 Redistributable Package installs runtime components of Visual C++ Libraries required to run applications developed with Visual C++ on a computer that does not have Visual C++ 2010 installed.
Microsoft SQL Server Microsoft SQL Server 2012
Microsoft SQL Server 2008 R2 SP1 For optimal performance, Microsoft recommends the Enterprise Edition of SQL Server. In order to fully use the BizTalk Server 2013 SDK, or deploy BizTalk Server applications from a Visual Studio development environment, you must also install the SQL Server Development Tools. Other considerations
If you install SQL Server 2012, you must configure SQL Server Database Mail to use BAM Alerts.
BAM real-time aggregation (RTA) is not supported in the Standard Edition of SQL Server.
Using SQL Server Express Edition t is not recommended. The Express edition does not include certain features needed by BizTalk Server.
This is required for BizTalk Server Runtime, EDI, and BAM
SQL Server 2005 Notification Services
OPTIONAL If you are configuring the BAM Alerts feature in BizTalk Server 2013 and you are using a SQL Server 2008 R2 SP1 database, you must install SQL Server 2005 Notification Services. Notification Services is not included with SQL Server 2008 R2 SP1 and must be downloaded and installed separately.
Enables the use of BAM Alerts
SQLXML 4.0 with Service Pack 1
SQLXML enables XML support for your SQL Server Database. It allows developers to bridge the gap between XML and relational data. You can create XML View
This is required for BizTalk Server Runtime, Administrative Tools, and BAM.
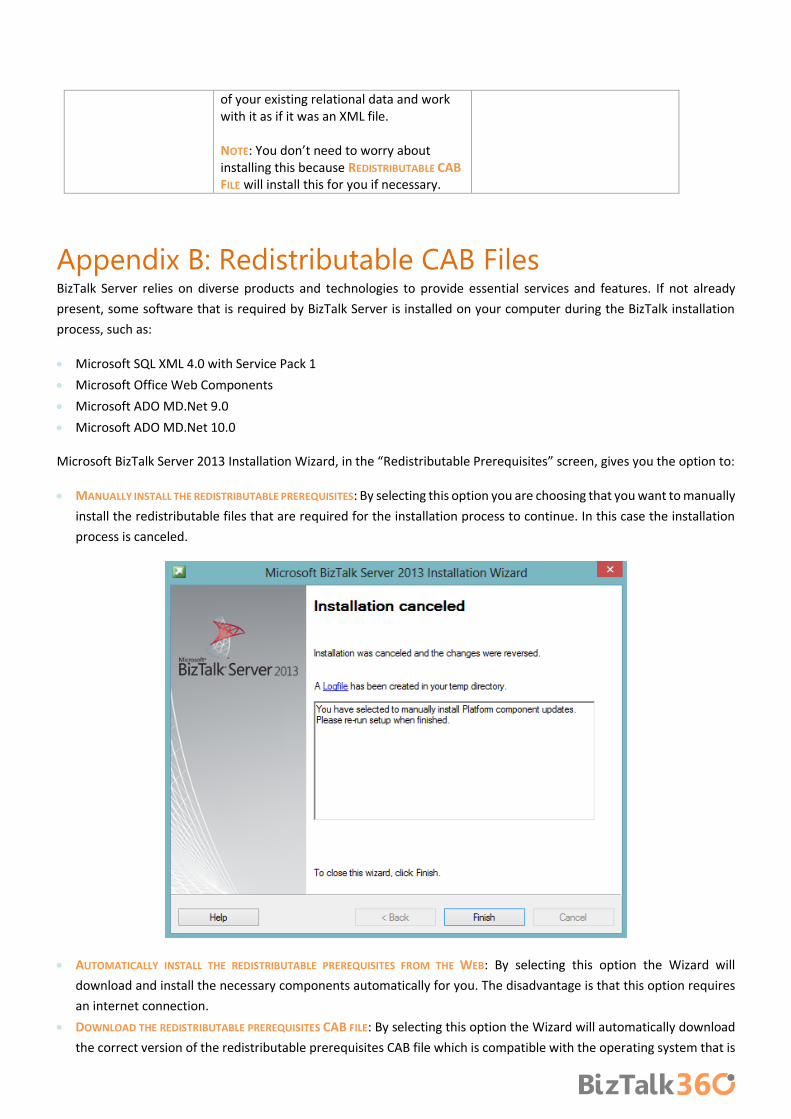
of your existing relational data and work with it as if it was an XML file. NOTE: You don’t need to worry about installing this because REDISTRIBUTABLE CAB
FILE will install this for you if necessary.
Appendix B: Redistributable CAB Files BizTalk Server relies on diverse products and technologies to provide essential services and features. If not already
present, some software that is required by BizTalk Server is installed on your computer during the BizTalk installation
process, such as:
Microsoft SQL XML 4.0 with Service Pack 1
Microsoft Office Web Components
Microsoft ADO MD.Net 9.0
Microsoft ADO MD.Net 10.0
Microsoft BizTalk Server 2013 Installation Wizard, in the “Redistributable Prerequisites” screen, gives you the option to:
MANUALLY INSTALL THE REDISTRIBUTABLE PREREQUISITES: By selecting this option you are choosing that you want to manually
install the redistributable files that are required for the installation process to continue. In this case the installation
process is canceled.
AUTOMATICALLY INSTALL THE REDISTRIBUTABLE PREREQUISITES FROM THE WEB: By selecting this option the Wizard will
download and install the necessary components automatically for you. The disadvantage is that this option requires
an internet connection.
DOWNLOAD THE REDISTRIBUTABLE PREREQUISITES CAB FILE: By selecting this option the Wizard will automatically download
the correct version of the redistributable prerequisites CAB file which is compatible with the operating system that is

Installing BizTalk Server 2013 in a Standalone Machine
running the Installation Wizard, to your computer so that you can install later and will exit the installation process.
Again this option requires an internet connection.
AUTOMATICALLY INSTALL THE REDISTRIBUTABLE PREREQUISITES FROM A CAB FILE: y selecting this option the Wizard will
automatically install the redistributable prerequisites from a CAB file that you have previous downloaded. So the
disadvantage is that you already must have downloaded the correct CAB file before running the setup but in return
you don’t need Internet connection.
The CAB file containing all the prerequisites needed, however, if you are choosing the last option “Automatically install
the redistributable prerequisites from a CAB file”:
Be sure you are using the correct CAB file according to your language and operating system.
And you cannot use CAB files from previous versions of BizTalk Server to install BizTalk Server 2013.
List of Redistributable CAB Files for BizTalk Server 2013 CAB Files for 64-bit Editions (EN)
Windows Server 2012: http://go.microsoft.com/fwlink/?LinkId=269616
Windows Server 2008 R2: http://go.microsoft.com/fwlink/?LinkId=269613
Windows 8: http://go.microsoft.com/fwlink/?LinkId=269615
Windows 7: http://go.microsoft.com/fwlink/?LinkId=269614
CAB Files for 32-bit Editions (EN)
Windows 8: http://go.microsoft.com/fwlink/?LinkId=269612
Windows 7: http://go.microsoft.com/fwlink/?LinkId=269611
Other languages:
DE (German)
o CAB Files for 64-bit Editions

Windows Server 2012: http://download.microsoft.com/download/C/7/9/C791D903-A500-4FFF-
BB96-82E812184EE3/BtsRedistW2K12DE64.cab
Windows Server 2008 R2: http://download.microsoft.com/download/C/7/9/C791D903-A500-4FFF-
BB96-82E812184EE3/BtsRedistW2K8R2DE64.cab
Windows 8: http://download.microsoft.com/download/C/7/9/C791D903-A500-4FFF-BB96-
82E812184EE3/BtsRedistWin8DE64.cab
Windows 7: http://download.microsoft.com/download/C/7/9/C791D903-A500-4FFF-BB96-
82E812184EE3/BtsRedistWin7DE64.cab
o CAB Files for 32-bit Editions
Windows 8: http://download.microsoft.com/download/C/7/9/C791D903-A500-4FFF-BB96-
82E812184EE3/BtsRedistWin8DE32.cab
Windows 7: http://download.microsoft.com/download/C/7/9/C791D903-A500-4FFF-BB96-
82E812184EE3/BtsRedistWin7DE32.cab
ES (Spanish)
o CAB Files for 64-bit Editions
Windows Server 2012: http://download.microsoft.com/download/5/D/C/5DC17D5B-4D5D-4669-
90F1-623B79909860/BtsRedistW2K12ES64.cab
Windows Server 2008 R2: http://download.microsoft.com/download/5/D/C/5DC17D5B-4D5D-
4669-90F1-623B79909860/BtsRedistW2K8R2ES64.cab
Windows 8: http://download.microsoft.com/download/5/D/C/5DC17D5B-4D5D-4669-90F1-
623B79909860/BtsRedistWin8ES64.cab
Windows 7: http://download.microsoft.com/download/5/D/C/5DC17D5B-4D5D-4669-90F1-
623B79909860/BtsRedistWin7ES64.cab
o CAB Files for 32-bit Editions
Windows 8: http://download.microsoft.com/download/5/D/C/5DC17D5B-4D5D-4669-90F1-
623B79909860/BtsRedistWin8ES32.cab
Windows 7: http://download.microsoft.com/download/5/D/C/5DC17D5B-4D5D-4669-90F1-
623B79909860/BtsRedistWin7ES32.cab
FR (French)
o CAB Files for 64-bit Editions
Windows Server 2012: http://download.microsoft.com/download/8/B/6/8B691DFD-E810-4696-
9B04-BD32E18E952A/BtsRedistW2K12FR64.cab
Windows Server 2008 R2: http://download.microsoft.com/download/8/B/6/8B691DFD-E810-4696-
9B04-BD32E18E952A/BtsRedistW2K8R2FR64.cab
Windows 8: http://download.microsoft.com/download/8/B/6/8B691DFD-E810-4696-9B04-
BD32E18E952A/BtsRedistWin8FR64.cab
Windows 7: http://download.microsoft.com/download/8/B/6/8B691DFD-E810-4696-9B04-
BD32E18E952A/BtsRedistWin7FR64.cab
o CAB Files for 32-bit Editions
Windows 8: http://download.microsoft.com/download/8/B/6/8B691DFD-E810-4696-9B04-
BD32E18E952A/BtsRedistWin8FR32.cab
Windows 7: http://download.microsoft.com/download/8/B/6/8B691DFD-E810-4696-9B04-
BD32E18E952A/BtsRedistWin7FR32.cab
IT (Italian)
o CAB Files for 64-bit Editions
Windows Server 2012: http://download.microsoft.com/download/0/B/C/0BC82018-CF05-4E78-
A9A9-7AD31A2F147A/BtsRedistW2K12IT64.cab

Installing BizTalk Server 2013 in a Standalone Machine
Windows Server 2008 R2: http://download.microsoft.com/download/0/B/C/0BC82018-CF05-4E78-
A9A9-7AD31A2F147A/BtsRedistW2K8R2IT64.cab
Windows 8: http://download.microsoft.com/download/0/B/C/0BC82018-CF05-4E78-A9A9-
7AD31A2F147A/BtsRedistWin8IT64.cab
Windows 7: http://download.microsoft.com/download/0/B/C/0BC82018-CF05-4E78-A9A9-
7AD31A2F147A/BtsRedistWin7IT64.cab
o CAB Files for 32-bit Editions
Windows 8: http://download.microsoft.com/download/0/B/C/0BC82018-CF05-4E78-A9A9-
7AD31A2F147A/BtsRedistWin8IT32.cab
Windows 7: http://download.microsoft.com/download/0/B/C/0BC82018-CF05-4E78-A9A9-
7AD31A2F147A/BtsRedistWin7IT32.cab
JA (Japanese)
o CAB Files for 64-bit Editions
Windows Server 2012: http://download.microsoft.com/download/F/B/F/FBF8AF4A-FA1E-4F26-
AF27-6F19942CB24B/BtsRedistW2K12JA64.cab
Windows Server 2008 R2: http://download.microsoft.com/download/F/B/F/FBF8AF4A-FA1E-4F26-
AF27-6F19942CB24B/BtsRedistW2K8R2JA64.cab
Windows 8: http://download.microsoft.com/download/F/B/F/FBF8AF4A-FA1E-4F26-AF27-
6F19942CB24B/BtsRedistWin8JA64.cab
Windows 7: http://download.microsoft.com/download/F/B/F/FBF8AF4A-FA1E-4F26-AF27-
6F19942CB24B/BtsRedistWin7JA64.cab
o CAB Files for 32-bit Editions
Windows 8: http://download.microsoft.com/download/F/B/F/FBF8AF4A-FA1E-4F26-AF27-
6F19942CB24B/BtsRedistWin8JA32.cab
Windows 7: http://download.microsoft.com/download/F/B/F/FBF8AF4A-FA1E-4F26-AF27-
6F19942CB24B/BtsRedistWin7JA32.cab
KO (Korean)
o CAB Files for 64-bit Editions
Windows Server 2012: http://download.microsoft.com/download/4/6/F/46FE0D2A-850A-4AE1-
BD91-B9E1063B9F84/BtsRedistW2K12KO64.cab
Windows Server 2008 R2: http://download.microsoft.com/download/4/6/F/46FE0D2A-850A-4AE1-
BD91-B9E1063B9F84/BtsRedistW2K8R2KO64.cab
Windows 8: http://download.microsoft.com/download/4/6/F/46FE0D2A-850A-4AE1-BD91-
B9E1063B9F84/BtsRedistWin8KO64.cab
Windows 7: http://download.microsoft.com/download/4/6/F/46FE0D2A-850A-4AE1-BD91-
B9E1063B9F84/BtsRedistWin7KO64.cab
o CAB Files for 32-bit Editions
Windows 8: http://download.microsoft.com/download/4/6/F/46FE0D2A-850A-4AE1-BD91-
B9E1063B9F84/BtsRedistWin8KO32.cab
Windows 7: http://download.microsoft.com/download/4/6/F/46FE0D2A-850A-4AE1-BD91-
B9E1063B9F84/BtsRedistWin7KO32.cab
CN (Chinese)
o CAB Files for 64-bit Editions
Windows Server 2012: http://download.microsoft.com/download/F/3/8/F3864688-5B3F-4AF4-
B8D4-4213C4ADD3FA/BtsRedistW2K12CN64.cab
Windows Server 2008 R2: http://download.microsoft.com/download/F/3/8/F3864688-5B3F-4AF4-
B8D4-4213C4ADD3FA/BtsRedistW2K8R2CN64.cab

Windows 8: http://download.microsoft.com/download/F/3/8/F3864688-5B3F-4AF4-B8D4-
4213C4ADD3FA/BtsRedistWin8CN64.cab
Windows 7: http://download.microsoft.com/download/F/3/8/F3864688-5B3F-4AF4-B8D4-
4213C4ADD3FA/BtsRedistWin7CN64.cab
o CAB Files for 32-bit Editions
Windows 8: http://download.microsoft.com/download/F/3/8/F3864688-5B3F-4AF4-B8D4-
4213C4ADD3FA/BtsRedistWin8CN32.cab
Windows 7: http://download.microsoft.com/download/F/3/8/F3864688-5B3F-4AF4-B8D4-
4213C4ADD3FA/BtsRedistWin7CN32.cab
TW (Taiwan)
o CAB Files for 64-bit Editions
Windows Server 2012: http://download.microsoft.com/download/2/A/B/2ABDDD44-C727-422D-
8C39-A5A3CBE0611A/BtsRedistW2K12TW64.cab
Windows Server 2008 R2: http://download.microsoft.com/download/2/A/B/2ABDDD44-C727-
422D-8C39-A5A3CBE0611A/BtsRedistW2K8R2TW64.cab
Windows 8: http://download.microsoft.com/download/2/A/B/2ABDDD44-C727-422D-8C39-
A5A3CBE0611A/BtsRedistWin8TW64.cab
Windows 7: http://download.microsoft.com/download/2/A/B/2ABDDD44-C727-422D-8C39-
A5A3CBE0611A/BtsRedistWin7TW64.cab
o CAB Files for 32-bit Editions
Windows 8: http://download.microsoft.com/download/2/A/B/2ABDDD44-C727-422D-8C39-
A5A3CBE0611A/BtsRedistWin8TW32.cab
Windows 7: http://download.microsoft.com/download/2/A/B/2ABDDD44-C727-422D-8C39-
A5A3CBE0611A/BtsRedistWin7TW32.cab
Appendix C: Basic Configuration vs. Custom
Configuration BizTalk Server can be configured using Basic Configuration or Custom Configuration.
For helping you decide what kind of configuration you should use consider the following table:
Basic Configuration Custom Configuration
BizTalk Groups Automatically creates local groups. No option to use domain groups.
You enter the domain groups.
SQL Server Use this option when SQL Server is installed on the BizTalk Server virtual machine.
Use this option when SQL Server is installed on a separate computer (virtual machine).
Database Names Generated automatically. You can modify the default values.
Service Account Microsoft SQL Server 2003 or higher (including Express Edition is supported)
You can enter different accounts for different services.

Installing BizTalk Server 2013 in a Standalone Machine
Reviews Nino Crudele [Microsoft Integration MVP]
Nino Crudele lives in Italy and he currently works as a BizTalk consultant at Microsys
(www.msys.it).He has been a BizTalk MVP for 6 years. Besides that he is also a Virtual Technology
Specialist for BizTalk Server, a role in which he works closely with Microsoft Italy. He enjoys this role
as it enables him to work with many different clients seeing BizTalk in different scenarios from a
technical point of view, size, and criticality.
Nino has worked with most of the BizTalk accelerators, Rosettanet, HL7, SWIFT and has done some big projects on EDI
and RFID. In the past he also had the opportunity to be part of a big integration project with a major Italian enterprise
organization that integrates many technologies like SAP, AS400, TIBCO and others using BizTalk.
Steef-Jan Wiggers [Microsoft Integration MVP]
Steef-Jan Wiggers is a principal consultant for a consultancy firm in the Netherlands. He has almost
15 years’ experience as a technical lead developer, application architect and consultant,
specializing in custom applications, enterprise application integration (BizTalk), Web services and
Windows Azure. Steef-Jan is very active in the BizTalk community as a blogger, Wiki author/editor,
forums, writer and public speaker in the Netherlands and Europe. For these efforts, Microsoft has
recognized him a Microsoft MVP for the past 3 years. For more information about Steef-Jan and
his BizTalk experiences please visit http://soa-thoughts.blogspot.com/.
Tord Glad Nordahl [Microsoft Integration MVP]
Tord Glad Nordahl is a BizTalk Administrator Expert for Bouvet ASA in Norway and was the first
BizTalk Administrator to be awarded as a Microsoft Integration MVP in 2013. Tord is originally a
developer but now only focuses on BizTalk Administration and has done this for the past 5 years.
Tord has been running the www.biztalkadmin.com blog and is actively contributing to the
community through his blog, TechNet Wiki, MSDN Forums and presenting at different stages all
over Europe.
Ricardo Torre [Product Strategist – BizTalk360]
Ricardo has recently joined BizTalk360 as the Head of Technical Pre-Sales & Product Strategist
after over 6 years working for Microsoft as a deep technical field specialist. He had extensive
hands-on experience with the world's top tier BizTalk customers, enabling them through training,
troubleshooting, mentoring, application design principles and architecture recommendations. As
a serious BizTalker he is passionate by the integration world and cloud computing.