industrial carbon dioxide extinguishing systems manual c06-018
TRANSCRIPT

P/N C06-018Revision: 2
April, 2008
IInndduussttrriiaall CCaarrbboonn DDiiooxxiiddeeEExxttiinngguuiisshhiinngg SSyysstteemmssDDeessiiggnn,, IInnssttaallllaattiioonn,, aannddMMaaiinntteennaannccee MMaannuuaall

TABLE OF CONTENTS
Carbon Dioxide Page: 1 of 6 Manual P/N: C06-018 Revision: 2 Revision Date: April, 2008
Section Number Page Number
1.0 Equipment ..................................................................................................................Section 1 – 29 Pages 1.1 General Information................................................................................................................ Page 1 1.2 Agent ...................................................................................................................................... Page 1
1.2.1 Storage and Pressure................................................................................................ Page 11.2.2 Temperature .............................................................................................................. Page 1 1.2.3 Visibility...................................................................................................................... Page 1 1.2.4 Noise.......................................................................................................................... Page 1 1.2.5 Cleanup ..................................................................................................................... Page 1
1.3 Use and Limitations ................................................................................................................ Page 2 1.3.1 Areas of Use.............................................................................................................. Page 2 1.3.2 Areas of Non-Use ...................................................................................................... Page 2 1.3.3 Static Electricity ......................................................................................................... Page 2
1.4 Personnel Safety .................................................................................................................... Page 3 1.4.1 Exposure.................................................................................................................... Page 3 1.4.2 Agent Migration ......................................................................................................... Page 3 1.4.3 Safety Recommandations ......................................................................................... Page 4
1.5 Cylinder Assembly.................................................................................................................. Page 5 1.6 Cylinder Valve Assembly........................................................................................................ Page 6 1.7 Master Cylinder Actuation Components................................................................................. Page 7
1.7.1 Electric Actuation ...................................................................................................... Page 7 1.7.1.1 Emergency Manual Level Actuator ............................................................... Page 7
1.7.2 Manual Actuation....................................................................................................... Page 8 1.7.3 Connecting Link Assembly ........................................................................................ Page 8 1.7.4 Pneumatic Actuation.................................................................................................. Page 8 1.7.5 Latch Door Pull Box................................................................................................... Page 9 1.7.6 Corner Pulley........................................................................................................... Page 10 1.7.7 Stainless Cable........................................................................................................ Page 10 1.7.7.1 Stainless Steel Cable Accessories.............................................................. Page 10 1.7.8 Cable Junction Box Assembly................................................................................. Page 10 1.8 Flexible Discharge Bend....................................................................................................... Page 11 1.9 Cylinder Mounting................................................................................................................. Page 12
1.9.1 Cylinder Strap.......................................................................................................... Page 12 1.9.2 Cylinder Racking ..................................................................................................... Page 12
1.9.2.1 Single Row Racking.................................................................................. Page 12 1.9.2.2 Double Row Racking ................................................................................ Page 13 1.9.2.3 Double Row – Back-to-Back Racking....................................................... Page 13
1.10 Check Valves........................................................................................................................ Page 14 1.11 Stop / Maintenance Valve..................................................................................................... Page 15 1.12 Pressure Relief Devices ....................................................................................................... Page 16
1.12.1 Header Safety Relief ............................................................................................... Page 161.12.2 Header Vent Plug .................................................................................................... Page 16
1.13 Wintergreen Odorizer ........................................................................................................... Page 17 1.14 Weigh Beam Scale Assembly .............................................................................................. Page 17 1.15 Discharge Nozzles................................................................................................................ Page 18
1.15.1 Baffle Nozzle ........................................................................................................... Page 18 1.15.2 Radial Nozzle .......................................................................................................... Page 18 1.15.3 Vent Nozzle .............................................................................................................Page 19
1.15.3.1 Vent Nozzle Flange Mounting Kit ............................................................. Page 19 1.15.4 “S” Type Nozzle....................................................................................................... Page 20
1.15.4.1 “S” Type Nozzle Flange Mounting Kit ....................................................... Page 20 1.16 Pneumatic Operated Accessories ........................................................................................ Page 21
1.16.1 Pressure Trip Assembly ......................................................................................... Page 21 1.16.2 Pressure Switch....................................................................................................... Page 22 1.16.3 Pneumatic Time Delay ............................................................................................ Page 23

TABLE OF CONTENTS
Page: 2 of 6 Carbon Dioxide Revision: 2 Manual P/N: C06-018 Revision Date: April, 2008
1.16.4 Pneumatically Operated Siren................................................................................. Page 24 1.17 Instructional Signs ................................................................................................................ Page 25
1.17.1 Warning Sign – Vacate Immediately ....................................................................... Page 25 1.17.2 Warning Sign – Do Not Enter Until Ventilated......................................................... Page 25 1.17.3 Warning Sign – When Alarm Operates ................................................................... Page 25 1.17.4 Caution Sign – Nearby Space Collection ................................................................ Page 26 1.17.5 Caution Sign – Ventilate Before Entering................................................................ Page 26 1.17.6 Warning Sign – Manual Actuator............................................................................. Page 26
1.18 Selector Valve Systems........................................................................................................ Page 27 1.18.1 Selector Valves........................................................................................................ Page 27 1.18.2 Solenoid Actuator Kit ............................................................................................... Page 28
1.19 Listing and Approvals ........................................................................................................... Page 29
2.0 System Design...........................................................................................................Section 2 – 32 Pages 2.1 General Requirements ........................................................................................................... Page 1
2.1.1 Use and Limitations ................................................................................................... Page 2 2.1.1.1 Areas of Use ............................................................................................... Page 2 2.1.1.2 Areas of Non-Use ....................................................................................... Page 2 2.1.1.3 Use Restrictions per NFPA 12.................................................................... Page 2 2.1.1.3.1 Existing Installations .................................................................... Page 3 2.1.1.3.2 Typical Installation ....................................................................... Page 3
2.2 Total Flood Systems............................................................................................................... Page 4 2.2.1 Total Flood – Surface Fire Systems .......................................................................... Page 4
2.2.1.1 Hazard Volume............................................................................................. Page 5 2.2.1.2 Flooding Factors for Surface Fires ............................................................... Page 5 2.2.1.3 Agent Adjustments for Special Conditions ................................................... Page 5 2.2.1.3.1 Ventilation .................................................................................... Page 5 2.2.1.3.2 Uncloseable Openings................................................................. Page 6 2.2.1.3.3 Concentration Adjustment for Special Materials.......................... Page 7 2.2.1.3.4 Temperature Considerations ....................................................... Page 8
2.2.1.3.4.1 High Temperatures .................................................... Page 8 2.2.1.3.4.2 Low Temperatures ..................................................... Page 8 2.2.1.3.4.3 Cylinder Storage Temperatures ................................. Page 9
2.2.1.4 Power / Fuel Source Consideration.............................................................. Page 9 2.2.1.5 Pressure Operated Sirens............................................................................ Page 9 2.2.1.6 Minimum Discharge Time / Surface Fire Application ................................... Page 9 2.2.1.7 Special Liquids ............................................................................................. Page 9
2.2.2 Total Flood / Deep-Seated Systems ....................................................................... Page 10 2.2.2.1 Hazard Volume........................................................................................... Page 10 2.2.2.2 Flooding Factors for Deep-Seated Fires .................................................... Page 11 2.2.2.3 Agent Adjustments for Special Conditions ................................................. Page 11 2.2.2.3.1 Ventilation.................................................................................... Page 11 2.2.2.3.2 Uncloseable Openings ................................................................ Page 12 2.2.2.3.3 Temperature Considerations....................................................... Page 13 2.2.2.3.3.1 High Temperatures .................................................. Page 13 2.2.2.3.3.2 Low Temperatures ................................................... Page 13 2.2.2.3.3.3 Cylinder Storage Temperatures............................... Page 13 2.2.2.4 Power / Fuel Source Consideration............................................................ Page 13 2.2.2.5 Pressure Operated Sirens.......................................................................... Page 13 2.2.2.6 Discharge Duration / Flow Rate ................................................................. Page 13 2.2.2.7 Pressure Relief Venting.............................................................................. Page 13
2.2.3 Combined Surface Fire & Deep-Seated Hazards ................................................... Page 14 2.2.4 Nozzle Selection...................................................................................................... Page 14
2.2.4.1 Radial Nozzles............................................................................................ Page 14 2.2.4.2 Baffle Nozzles............................................................................................. Page 14

TABLE OF CONTENTS
Carbon Dioxide Page: 3 of 6 Manual P/N: C06-018 Revision: 2 Revision Date: April, 2008
2.2.4.3 Vent Nozzle ................................................................................................ Page 15 2.2.4.4 “S”-Type Nozzle.......................................................................................... Page 15 2.2.4.5 Nozzle Strainer ........................................................................................... Page 15
2.3 Local Application Systems.................................................................................................... Page 16 2.3.1 General Requirements ............................................................................................ Page 16 2.3.2 Safety Requirements ............................................................................................... Page 162.3.3 Discharge Duration Requirements .......................................................................... Page 16 2.3.4 Radiant Heating....................................................................................................... Page 16 2.3.5 Storage Requirements............................................................................................. Page 16 2.3.6 Local Application / Rate-By-Area Design Method ................................................... Page 17
2.3.6.1 Nozzle Determination ................................................................................. Page 17 2.3.6.2 Number and Location of Nozzles ............................................................... Page 17 2.3.6.3 Nozzle / Application Flow Rate................................................................... Page 20 2.3.6.4 Nozzle Placement....................................................................................... Page 21 2.3.6.4.1 Nozzle Aiming Factors ................................................................ Page 21 2.3.6.5 Determine System Flow Rate & Agent Quantity Required......................... Page 21
2.3.7 Local Application / Rate-By-Volume Design Method .............................................. Page 22 2.3.7.1 Design Steps – Local Application Rate-by-Volume System....................... Page 22
2.3.7.1.1 Local Application Design – General ............................................ Page 22 2.3.7.1.1.1 Define the Hazard .................................................... Page 22 2.3.7.1.1.2 Determine Method of Protection .............................. Page 22 2.3.7.1.2 Local Application Design – Rate-by-Volume............................... Page 23 2.3.7.1.2.1 Determine the Assumed Volume ............................. Page 23 2.3.7.1.2.2 System Flow Rate .................................................... Page 23 2.3.7.1.2.3 Determine Assumed Volume w/ Perimeter Walls .... Page 24 2.3.7.1.2.4 Calculate the Total Surface Area of Assumed Volume w/ Perimeter Walls..................................... Page 24 2.3.7.1.2.5 Total “Open Area” .................................................... Page 24 2.3.7.1.2.6 “Enclosed” Area Percentage.................................... Page 25 2.3.7.1.2.7 Flow Rate per Unit Volume ...................................... Page 25 2.3.7.1.2.8 Reduced System Flow Rate .................................... Page 25 2.3.7.1.2.9 Number of Nozzles Required................................... Page 25 2.3.7.1.2.10 Final System Design Flow Rate............................. Page 28 2.3.7.1.2.11 Quantity Agent Required........................................ Page 28 2.3.7.1.2.12 Quantity Agent Supply ........................................... Page 28 2.3.7.1.2.13 Layout Pipe Network and Run Hydraulic Calc....... Page 28
2.4 Combination Total Flood and Local Application Systems .................................................... Page 28 2.5 Piping Distribution System.................................................................................................... Page 29
2.5.1 General .................................................................................................................... Page 29 2.5.2 Pipe.......................................................................................................................... Page 29 2.5.3 Fittings ..................................................................................................................... Page 29
2.5.3.1 Other Approved Fittings.............................................................................. Page 29 2.5.4 Piping Support ......................................................................................................... Page 30 2.5.5 Valves ...................................................................................................................... Page 30
2.5.5.1 Selector valves ........................................................................................... Page 30 2.5.6 Pressure Relief Provisions ...................................................................................... Page 31 2.5.7 Estimating Pipe Sizes.............................................................................................. Page 31
2.6 Equivalent Lengths ............................................................................................................... Page 32 2.6.1 Check Valves........................................................................................................... Page 32 2.6.2 Stop / Maintenance Valves...................................................................................... Page 32 2.6.3 Pneumatic Time Delay ............................................................................................ Page 32 2.6.4 Selector Valves........................................................................................................ Page 32

TABLE OF CONTENTS
Page: 4 of 6 Carbon Dioxide Revision: 2 Manual P/N: C06-018 Revision Date: April, 2008
3.0 Sample Problems ......................................................................................................... Section 3 – 31 Pages 3.1 Total Flood Application Samples............................................................................................ Page 1
3.1.1 Surface Fire Hazards................................................................................................. Page 1 3.1.1.1 Hazard Volume............................................................................................. Page 1 3.1.1.2 Required Flooding Factor ............................................................................. Page 1 3.1.1.3 Minimum Extinguishing Quantity (34% Conc.) Required ............................. Page 1 3.1.1.4 Ventilation..................................................................................................... Page 2 3.1.1.5 Uncloseable Opening(s) ............................................................................... Page 2 3.1.1.6 Special Materials Adjustment ....................................................................... Page 4 3.1.1.7 Temperature Adjustment .............................................................................. Page 5 3.1.1.8 Discharge Duration / Flow Rate ................................................................... Page 5 3.1.1.9 Nozzle Selection........................................................................................... Page 6
3.1.2 Deep Seated Fire Hazards (No Leakage or Ventilation Compensation) .................. Page 7 3.1.2.1 Hazard Volume............................................................................................. Page 7 3.1.2.2 Minimum CO2 Concentration and Flooding Factor....................................... Page 7 3.1.2.3 Minimum Extinguishing Quantity Required .................................................. Page 7 3.1.2.4 Temperature Adjustment .............................................................................. Page 7 3.1.2.5 Required Flow Rate...................................................................................... Page 8 3.1.2.6 Nozzle Selection........................................................................................... Page 9
3.1.3 Deep Seated Fire Hazards (With Leakage & Ventilation Compensation)............... Page 10 3.1.3.1 Hazard Volume........................................................................................... Page 10 3.1.3.2 Minimum CO2 Concentration and Flooding Factor..................................... Page 10 3.1.3.3 Minimum Extinguishing Quantity Required ................................................ Page 10 3.1.3.4 Ventilation................................................................................................... Page 10 3.1.3.5 Uncloseable Openings ............................................................................... Page 11 3.1.3.6 Temperature Adjustment ............................................................................ Page 13 3.1.3.7 Required Flow Rate.................................................................................... Page 13 3.1.3.8 Nozzle Selection......................................................................................... Page 14
3.1.4 Deep Seated Fire Hazards (With Leakage & Ventilation Compensation)............... Page 15 3.1.4.1 Hazard Volume........................................................................................... Page 15 3.1.4.2 Minimum CO2 Concentration and Flooding Factor..................................... Page 15 3.1.4.3 Minimum Extinguishing Quantity Required ................................................ Page 15 3.1.4.4 Required Flow Rate.................................................................................... Page 16 3.1.4.5 Nozzle Selection......................................................................................... Page 16
3.2 Local Application Samples ................................................................................................... Page 17 3.2.1 Rate-By-Area Method – Nozzles Perpendicular to Surface .................................... Page 17
3.2.1.1 Nozzle Type and Number Required ........................................................... Page 17 3.2.1.2 Required Flow Rate.................................................................................... Page 18 3.2.1.3 Minimum Required Storage Quantity of Carbon Dioxide ........................... Page 18
3.2.2 Rate-By-Area Method– Nozzles at Angle to Surface .............................................. Page 19 3.2.2.1 Nozzle Type and Number Required ........................................................... Page 19 3.2.2.2 Required Flow Rate.................................................................................... Page 20 3.2.2.3 Minimum Required Quantity of Carbon Dioxide......................................... Page 20 3.2.2.4 Nozzle Aiming Factors................................................................................ Page 20
3.2.3 Rate-By-Volume Method ......................................................................................... Page 21 3.2.3.1 Example Problem 1 – Three Dimensional Hazard without an Enclosure or Permanent Perimeter Walls .................................................. Page 21 1-1 Determine Assumed Volume ............................................................... Page 21 1-2 Determine System Flow Rate .............................................................. Page 21 1-3 Determine Quantity of Nozzle(s) Required .......................................... Page 21 1-4 Revised System Flow Rate .................................................................. Page 22 1-5 Quantity of Agent Required.................................................................. Page 22 1-6 Quantity of Agent Supplied .................................................................. Page 22 1-7 Layout Pipe Network and Run Hydraulic Calculation .......................... Page 22

TABLE OF CONTENTS
Carbon Dioxide Page: 5 of 6 Manual P/N: C06-018 Revision: 2 Revision Date: April, 2008
3.2.3.2 Example Problem 2 – Three Dimensional Hazard in Large Room with Permanent Perimeter Wall(s).............................................................. Page 23 2-1 Determine Assumed Volume ............................................................... Page 23 2-2 Determine Total Surface Area of Assumed Volume Perimeter Walls.. Page 23 2-3 Determine Total Open Area ................................................................. Page 24 2-4 Determine Open Area Percentage....................................................... Page 24 2-5 Calculate Percent Closed Area ............................................................ Page 24 2-6 Determine Flow Rate per Unit Volume................................................. Page 24 2-7 Determine Reduced Flow Rate ............................................................ Page 24 2-8 Determine Quantity of Nozzle(s) Required .......................................... Page 25 2-9 Determine Revised System Flow Rate ................................................ Page 25 2-10 Determine Quantity of Agent Required .............................................. Page 25 2-11 Determine Quantity of Agent Supplied............................................... Page 25 2-12 Layout Pipe Network and Run Hydraulic Calculation ........................ Page 26 3.2.3.3 Example Problem 3 – Enclosure with Leakage.......................................... Page 26 3-1 Determine Assumed Volume ............................................................... Page 26 3-2 Determine Total Surface Area of Assumed Volume Perimeter Walls.. Page 26 3-3 Determine Total Open Area ................................................................. Page 27 3-4 Determine Open Area Percentage....................................................... Page 27 3-5 Calculate Percent Closed Area ............................................................ Page 27 3-6 Determine Flow Rate per Unit Volume................................................. Page 27 3-7 Determine Reduced Flow Rate ............................................................ Page 27 3-8 Determine Quantity of Nozzle(s) Required .......................................... Page 28 3-9 Determine Revised System Flow Rate ................................................ Page 28 3-10 Determine Quantity of Agent Required .............................................. Page 28 3-11 Determine Quantity of Agent Supplied............................................... Page 28 3-12 Layout Pipe Network and Run Hydraulic Calculation ........................ Page 28 3.2.3.4 Example Problem 4 – Enclosure with Multiple Openings........................... Page 29 4-1 Determine Assumed Volume ............................................................... Page 29 4-2 Determine Total Surface Area of Assumed Volume Perimeter Walls.. Page 29 4-3 Determine Total Open Area ................................................................. Page 30 4-4 Determine Open Area Percentage....................................................... Page 30 4-5 Calculate Percent Closed Area ............................................................ Page 30 4-6 Determine Flow Rate per Unit Volume................................................. Page 30 4-7 Determine Reduced Flow Rate ............................................................ Page 30 4-8 Determine Quantity of Nozzle(s) Required .......................................... Page 28 4-9 Determine Revised System Flow Rate ................................................ Page 28 4-10 Determine Quantity of Agent Required .............................................. Page 28 4-11 Determine Quantity of Agent Supplied............................................... Page 28 4-12 Layout Pipe Network and Run Hydraulic Calculation ........................ Page 28
4.0 Installation Procedures.............................................................................................Section 4 – 20 Pages 4.1 General Requirements ........................................................................................................... Page 1 4.2 Cylinder Assemblies and Storage .......................................................................................... Page 1
4.2.1 Cylinder Bracketing ................................................................................................... Page 2 4.2.1.1 Cylinder Mounting Strap ............................................................................. Page 2 4.2.1.2 Cylinder Racking Assembly ........................................................................ Page 3
4.3 Pipe and Fittings..................................................................................................................... Page 3 4.3.1 Ferrous Pipe .............................................................................................................. Page 3 4.3.2 Fittings ....................................................................................................................... Page 3 4.3.3 Flanged, Welded and Miscellaneous Fittings............................................................ Page 3
4.4 Piping Distribution System...................................................................................................... Page 3 4.4.1 Threaded Connections .............................................................................................. Page 3 4.4.2 Welded Pipe Connections ......................................................................................... Page 4 4.4.3 Tube and Brazed Connections.................................................................................. Page 4
4.5 Hangers and Bracing.............................................................................................................. Page 4

TABLE OF CONTENTS
Page: 6 of 6 Carbon Dioxide Revision: 2 Manual P/N: C06-018 Revision Date: April, 2008
4.6 Closed Pipe Sections ............................................................................................................. Page 5 4.7 Pipe and Nozzle Installation ................................................................................................... Page 5
4.7.1 Piping Instalation ....................................................................................................... Page 5 4.7.2 Discharge Bend Installation....................................................................................... Page 6 4.7.3 Manifold Piping Installation........................................................................................ Page 64.7.4 Pneumatic Time Delay Installation ............................................................................ Page 6 4.7.5 Stop / Maintenance Valve Installation ....................................................................... Page 7 4.7.6 Main & Reserve Check Valve Installation ................................................................. Page 8 4.7.7 Low & High Pressure Relief Devices Installation ...................................................... Page 8 4.7.8 Pressure Switch Installation ...................................................................................... Page 9 4.7.9 Pressure Trip Installation........................................................................................... Page 9 4.7.10 Pressure Operated Siren Installation ...................................................................... Page 10 4.7.11 Selector Valve Installation ....................................................................................... Page 10 4.7.11.1 Solenoid Actuator Kit Installation............................................................... Page 11 4.7.11.1.1 Solenoid Actuator Mounting ...................................................... Page 11 4.7.11.1.2 Solenoid Installation .................................................................. Page 12 4.7.12 Wintergreen Odorizer Installation............................................................................ Page 12
4.8 Nozzle Installation ................................................................................................................ Page 12 4.9 System Installation ............................................................................................................... Page 13
4.9.1 Cylinder Instalation .................................................................................................. Page 13 4.10 Actuation Components Installation....................................................................................... Page 14
4.10.1 Master Valve Solenoid Installation .......................................................................... Page 14 4.10.2 Local Lever Actuator Installation ............................................................................. Page 16 4.10.3 Connecting Link Assembly & Installation ................................................................ Page 17 4.10.4 Electrical Installation................................................................................................ Page 17 4.10.5 Pneumatic Actuator Installation............................................................................... Page 18
4.10.5.1 Pneumatic Actuation Line Limitations ....................................................... Page 19 4.10.5.2 Master Cylinder Adapter Kit Installation .................................................... Page 19
4.10.6 Remote Pull Cable Components ............................................................................. Page 20 4.11 Disassembly Procedures...................................................................................................... Page 20
5.0 Verification and Test ...................................................................................................Section 5 – 4 Pages 5.1 Discharge Test ....................................................................................................................... Page 1 5.2 Pipe and Fittings..................................................................................................................... Page 1 5.3 Cylinders and Racking............................................................................................................ Page 1 5.4 Nozzles ................................................................................................................................... Page 1 5.5 Solenoid Actuator ................................................................................................................... Page 2 5.6 Auxiliary Devices .................................................................................................................... Page 2
5.6.1 Stop / Maintenance Valves........................................................................................ Page 2 5.6.2 Pressure Trips ........................................................................................................... Page 2 5.6.3 Pressure Switches..................................................................................................... Page 3
5.7 Training of Personnel ............................................................................................................. Page 3 5.8 Carbon Dioxide System Discharge Test ................................................................................ Page 3
5.8.1 Total Flood System Test............................................................................................ Page 45.8.2 Local Application System Test .................................................................................. Page 4
6.0 Maintenance and Inspection ......................................................................................Section 6 – 2 Pages 6.1 Monthly Inspections................................................................................................................ Page 1 6.2 Semi-Annual Inspections........................................................................................................ Page 1 6.3 Operation – After A Fire.......................................................................................................... Page 2 6.4 Recharging and Refurbishing The System............................................................................. Page 2
Appendix Material ........................................................................................................................................... 2 Pages

Carbon Dioxide - i - Manual P/N C06-018 Revision: 2 Revision Date: April, 2008
IntroductionFike is pleased to present a Design, Installation, and Maintenance manual for our Industrial Carbon Dioxide (hereinafter referred to as CO2) fire suppression systems. This document has been revised to incorporate the latest design requirements found in the National Fire Protection Association (NFPA) Standard 12, “Carbon Dioxide Extinguishing Systems”, as well as the most up-to-date information available for Fike products.
Who should read this manual? This manual is intended for those individuals who are responsible for the design, installation, and/or maintenance of Fike CO2 systems. Others such as architects, engineers, sales and marketing personnel, etc. will find the information useful as well. It also allows those parties responsible for verifying the system design to determine if the design parameters have been met.
How this manual is organized? A Table of Contents is provided at the beginning of this manual to help the reader find information. The Table of Contents shows the “big picture,” or “road map”; skim it to see how this manual is organized.
Section 1 - “Equipment” serves two purposes; first it describes the characteristics of CO2 and its uses and limitations as a fire suppression agent. Second it details the equipment used in a Fike CO2system.
Section 2 – “Design” guides the reader step by step through the process of designing a Fike CO2 suppression system.
Section 3 – “Sample Problems” offers real-world scenarios that demonstrate the design criteria presented in section 2.
Section 4 – “Installation” provides in depth details on how to install the components presented in section 1. In addition, this section covers the materials and installation standards that are approved for use with Fike CO2 systems.
Section 5 – “Verification and Test” stipulates the items that must be inspected and tested prior to placing the system into service.
Section 6 – “Maintenance and Inspection” identifies the minimum inspection and testing requirements to ensure that the CO2 system is fully operational at all times.
Warranty Information Fike provides a one-year limited manufacturer’s warranty on the product identified in this manual. Copies of the warranty can be obtained from authorized Fike Distributors, or by contacting Fike’s Marketing Department at (816) 229-4615. An authorized Fike Distributor using the MRA procedure must return warranty items, and Fike must approve all returns. Contact Fike for further information regarding the MRA procedure.
Limitation of Liability Fike Corporation cannot be held liable for any damages resulting from the use or misuse of this product.

- ii - Carbon Dioxide Revision: 2 Manual P/N C06-018 Revision Date: April, 2008
Copyright, Trademark, and Licensing Notice All Fike documentation and hardware are copyright with all rights reserved. No part of this product may be copied, reproduced or transmitted by any mechanical, photographic, electronic, or other method without Fike’s prior written consent. Fike product names are trademarked; other product names, as applicable, are trademarks of their respective holders.
DisclaimerThe information contained in this manual is as accurate as possible. This manual is intended to be an aid to Fike authorized sales outlets charged with the installation and maintenance of Fike carbon dioxide suppression systems, and as a operation manual for end users. Fike does not warrant that this manual is technically correct, complete, or the product referenced herein is free from minor flaws. Fike reserves the right to change the information contained in this manual without notice.
Quality Notice Fike Corporation has maintained ISO 9001 certification since 1994. Prior to shipment, we thoroughly test our products and review our documentation to assure the highest quality in all respects. In a spirit of continuous improvement, Fike welcomes your suggestions. Please direct all suggestions or comments to Fike’s Product Support at (800) 979-FIKE(3453). Any suggestions or comments become the property of Fike Corporation.
Warnings, Cautions, Notes, and Tips This symbol is used in this manual to warn of possible injury or death from improper use or application of the product under noted conditions.
This symbol warns of possible personal injury or equipment damage under noted conditions. Follow all safety standards of professional practice and the recommendations in this manual. Using equipment in ways other than described in this manual can present serious safety hazards or cause equipment damage.
Tips provide advice that may save time during a procedure, or help to clarify an issue. Tips may include additional reference.
This symbol indicates the message is important, but is not of a Warning or Caution category. These notes can be of great benefit to the user, and should be read.

Carbon Dioxide Manual P/N C06-018
SSeeccttiioonn 11EEqquuiippmmeenntt

SECTION 1 – EQUIPMENT
Carbon Dioxide Page: 1 of 30 Manual P/N C06-018 Revision: 2 Revision Date: April, 2008
1.1 GENERAL INFORMATION This section serves two purposes: First, it describes the characteristics of CO2 and its uses and limitations as a fire suppression agent. In addition, it details the equipment used in a Fike CO2 system. Specific control panels, initiating devices, and peripheral devices that would be used to actuate the system are NOT covered in this manual. Consult the appropriate manual(s) and/or data sheets for the device(s) used for further information.
1.2 AGENT CO2 is an odorless, colorless, electrically non-conductive, non-corrosive, and non-deteriorating inert suppression agent. It is approximately 50% heavier than air, and is normally present in the atmosphere at about 0.03% by volume. CO2 is instrumental in controlling respiration and other vital responses in animals and humans, but it WILL NOT support life.
See Sections 1.3 and 1.4 for Usage Limitations and Personnel Safety Recommendations.
CO2 is a standard commercial product commonly used for carbonating beverages, fast-freezing food products, purging pipes and tanks, medical purposes, and a multitude of additional tasks. It is also used for fire fighting purposes: i.e. hose reels, portable hand extinguishers, and engineered fixed pipe systems. CO2 is available in most large cities and seaports throughout the world.
CO2 extinguishes fire by reducing the oxygen content of the protected space and/or local flame front to a point where it will not support combustion. Oxygen reduction below 16% by volume will extinguish most fires. Surface or “flash” type fires (oils, paints, etc.) are quickly extinguished. Deep-seated or “smoldering” type fires (paper, baled cotton, clothing, etc.) are extinguished by the prolonged action of a high concentration of CO2. Retaining the agent within the protected space reduces the fire’s ability to re-ignite. In addition, CO2 has a cooling effect on the surrounding atmosphere that has been found to be a benefit to fire extinguishment.
1.2.1 STORAGE AND PRESSURE When used as a fire-fighting agent, CO2 is stored under pressure in a liquid/vapor state. There are two forms of CO2 storage: Low Pressure, using a refrigerated storage tank, and High Pressure, using spun-steel cylinders of smaller capacities. Fike systems utilize high-pressure storage cylinders containing CO2 at an internal pressure of 850 psig (5861 kPa) when stored at an ambient temperature of 70ºF (21ºC).
1.2.2 TEMPERATURE The temperature of liquid CO2 is approximately –110ºF. (-78.8ºC.) as it is discharged from a nozzle. Direct contact with the liquid agent being discharged from the nozzle(s) will have a freezing effect on objects within the hazard and can cause frostbite and/or freezing if contact is made with the skin. The liquid phase of the agent vaporizes quite rapidly when coming into contact with the atmosphere, thus limiting this hazard to the immediate vicinity of the nozzle.
1.2.3 VISIBILITY The discharge of CO2 resembles a cloud as liquid agent vaporizes. The low temperature of the agent chilling the moisture in the atmosphere causes this cloud effect, or fogging. The fine “snow” accompanying the discharged liquid is remnant particles of “dry ice”.
1.2.4 NOISE The high pressure/velocity discharge from the system nozzles(s) can cause noise loud enough to be startling, but is ordinarily insufficient to cause traumatic injury.
1.2.5 CLEANUP CO2 vaporizes completely after discharge; whereas the cost of clean-up and peripheral damage associated with water sprinkler systems, foam systems, and dry chemical agents can exceed the cost of the actual fire damage itself. Therefore, the cleanup costs and downtime associated with a CO2 system discharge are negligible.
CO2 is an inert gas and most materials or equipment are totally unaffected by exposure to the agent. It is stable, even at high temperatures, and does not decompose when subjected to open flame or extreme temperatures; therefore, CO2 does not cause metals to deteriorate or corrode.

SECTION 1 – EQUIPMENT
Page: 2 of 30 Carbon Dioxide Revision: 2 Manual P/N C06-018 Revision Date: April, 2008
1.3 USE AND LIMITATIONS CO2 systems can be used on Class “A” fires involving wood, paper, cloth, or any product that leaves a carbon ash when it burns. Class “B” fires involving flammable liquids or vapors, and Class “C” fires involving live electrical equipment can be protected with CO2.
1.3.1 AREAS OF USE CO2 is particularly useful for extinguishing fires in specific hazard areas or equipment where:
1. An inert, electrically non-conductive medium is essential or desirable. 2. The cleanup or downtime of another medium would be detrimental or costly. 3. Other mediums might contaminate solvents, coolants, or other products associated with the hazard
being protected.
Some of the hazard types and equipment that can be satisfactorily protected with CO2 include:
1.3.2 AREAS OF NON-USE CO2 should NOT be used on fires involving the following materials:
a) Chemicals that contain their own oxygen supply such as: cellulose nitrate (old movie film) and gunpowder, which are capable of rapid oxidation in the absence of air.
b) Reactive metals such as: Lithium, Sodium, Potassium, Magnesium, Titanium, Uranium, or Plutonium. c) Metal Hydrides such as: Sodium Hydride, Lithium Hydride, Calcium Hydride, Lithium Aluminum
Hydride, and Sodium Borohydride.
While CO2 will not extinguish fires involving these products, it will not react dangerously with them or increase their burning rate. A CO2 system designed for Total Flooding will provide protection of adjacent combustibles when used in these situations. Local Application systems with their attendant high velocity and directed discharge should NOT be used for these applications.
1.3.3 STATIC ELECTRICITY
CAUTION: Where CO2 may be discharged into potentially explosive atmospheres. Electrostatic charging of non-grounded conductors may occur during the discharge of liquefied gases. These conductors may discharge to another object causing an electric spark of sufficient energy to initiate an explosion.
Battery Rooms Electric Generators Ovens Flammable Liquids Storage Coating Machines Dip Tanks & Drain Boards Engine Test Cells Underfloor Areas Motors Printing Presses Fur Storage Vaults Switchgear Equipment Solvent Recovery Equipment Dust Collectors Transformer Vaults Record Storage Wave Solder Machines Ducts Wet Benches Spray Booths Hydraulic Pump Units

SECTION 1 – EQUIPMENT
Carbon Dioxide Page: 3 of 30 Manual P/N C06-018 Revision: 2 Revision Date: April, 2008
1.4 PERSONNEL SAFETY Extinguishing concentrations of CO2 create a health hazard to area personnel. High concentrations of CO2 will cause suffocation. In addition, fogging during and after discharge can limit visibility in protected areas. CO2 does not contain oxygen in any form or quantity and WILL NOT sustain life.
The following human reactions to CO2 have been documented:
a) At concentrations of 3 to 4% by volume in the atmosphere, the breathing rate increases and headaches may occur.
b) At concentrations exceeding 9% by volume, personnel can lose consciousness within minutes. This is generally preceded by disorientation, visual disturbance, ringing in the ears, tremors, etc.
c) At concentrations greater than 20% by volume, death is likely.
The above effects are important to note as inexperienced personnel may fail to think clearly and take proper action if suddenly exposed to relatively low concentrations of CO2.
Any person overcome by CO2 should be moved immediately to a location where plenty of fresh air is available and artificial respiration applied, as in a case of drowning. DO NOT use CO2 as a stimulant. Call a physician or take the patient to a hospital for examination. Persons rendered unconscious by exposure to CO2 can usually be revived without any permanent ill effects when promptly removed from a CO2 atmosphere.
1.4.1 EXPOSURE Direct contact with liquid CO2 or the dry ice particles associated with the agent discharge will cause severe frostbite burns to the skin. CO2 vaporizes quite rapidly; therefore, the hazard is generally limited to the immediate vicinity of the discharge nozzle(s).
1.4.2 AGENT MIGRATION CO2 can drift into, and settle in adjacent spaces unless specific precautions are taken to prevent leakage from the protected space, and/or leakage into nearby areas. Such leakage can accumulate into dangerous concentration levels if left unattended. Consideration must be given to warning all personnel in the area of possible agent migration. A means of ventilating the CO2 from enclosed areas, pits, etc., shall be considered when designing a CO2 suppression system. Consult NFPA 12 for additional personnel safety guidelines.
Typically, flooded hazards and low-lying areas must be well ventilated before personnel are allowed to re-enter the protected space(s). Under some circumstances, it may be necessary to provide self-contained breathing apparatus (SCBA) to all persons responsible for investigating the event. When all traces of the fire have been extinguished and the possibility of re-ignition eliminated, thoroughly ventilate the hazard to ensure that only fresh air is remaining in the protected space. When there is a question as to the presence of CO2 after a discharge, DONOT ENTER. Rely on the fire department or other responsible authorities to determine when it is safe to re-enter.

SECTION 1 – EQUIPMENT
Page: 4 of 30 Carbon Dioxide Revision: 2 Manual P/N C06-018 Revision Date: April, 2008
1.4.3 SAFETY RECOMMENDATIONS Safeguards MUST be provided to ensure the safety of personnel occupying areas in which the atmosphere could be made hazardous from the discharge of CO2. The following list taken from NFPA 12 contains safety recommendations that we urge the installer to follow with each installation.
a) Provide open aisle ways and exit routes. Keep them clear and well marked at all times.
b) Provide emergency lighting and directional signs to ensure quick and safe evacuation.
c) Provide audible/visual alarms inside and outside all protected areas that operate immediately upon the detection of a fire condition. Delay the CO2 discharge and the actuation of door closing devices for a sufficient time period to allow evacuation of the affected area(s).
d) Provide ONLY outward swinging, self-closing doors at all exit points from the hazard area(s). Where such doors could be latched or secured, provide “panic” hardware.
e) Provide continuous alarms at the entrances to all protected spaces that will operate until the atmosphere has been returned to normal and the control panel has been reset.
f) Provide warning and instructional signs at all entrances to, and inside of, each protected space. These signs should inform persons inside, or entering into the protected space, that a CO2 system is protecting the area. These signs may also contain additional information or instructions pertinent to the conditions of the specific hazard.
g) Provide for the prompt discovery and rescue of any person(s) trapped or rendered unconscious in all protected areas. This is accomplished by having all affected areas searched by trained personnel equipped with the proper breathing and rescue equipment. Only personnel trained in its use and in rescue techniques including artificial respiration should perform this task.
h) Provide instructions and drills for all personnel within, or in the near vicinity of the protected area. This instruction should include all maintenance and construction personnel who may be brought into the area. This training will ensure that the area personnel will respond correctly, should the CO2 system operate.
i) Provide a means of prompt ventilation of the protected area(s). Forced ventilation will often be necessary. Care must be taken to ensure that the CO2 atmosphere is dissipated and not merely moved to another location.
j) CO2 is much heavier than air and can collect in pits, cellars, and other areas that lie below the floor level of the protected space. Care must be taken when entering these areas after a discharge.
k) Provide all other steps and safeguards that a careful study of each CO2 system application indicates are necessary to prevent injury or death.

SECTION 1 – EQUIPMENT
Carbon Dioxide Page: 5 of 30 Manual P/N C06-018 Revision: 2 Revision Date: April, 2008
CYLINDER DATA
Assembly P/N C70-050 C70-075 C70-100
Fill Capacity lb. (kg)
50(22.7)
75(34.0)
100(45.4)
Dimension A* in. (cm)
8.50(21.6)
9.25(23.5)
10.50(26.7)
Dimension B* in. (cm)
51.0(129.5)
56.0(142.2)
58.0(147.3)
Dimension C* in. (cm)
56.625 (143.8)
61.625 (156.5)
63.625 (161.6)
Approx. Wt, lbs. (kg)
165(72.6)
225(99.8)
300(149.7)
DOT Spec. 3AA2015 3AA2300 3AA2300
* All dimensions are approximate
1.5 CYLINDER ASSEMBLY The factory filled cylinders contain the agent used in a Fike CO2 fire suppression system. A single cylinder may be used or multiple cylinders can be manifolded together to obtain the required quantity of agent for total flooding or local application methods.
The cylinders are of spun steel construction manufactured in accordance with DOT specifications. They are available in three different capacities - 50 lb. (22.7 kg), 75 lb. (34 kg), and 100 lb. (45.4 kg) sizes. Each cylinder is factory filled to capacity with CO2 to a pressure of 850 psig at 70ºF (5861 kPa at 21ºC). Partial fills of cylinders are not allowed.
The cylinders are equipped with a shipping cap attached to the threaded collar on the neck of each cylinder in accordance with DOT and OSHA requirements. This cap entirely encloses and protects the valve while in transit. The cap must only be removed after the cylinder(s) is secured. After removal, caps must be retained for reuse. Cylinder straps and racking used to secure the container(s) must be ordered separately.
See Sections 4.2 and 4.9.1 for cylinder handling and installation procedures.
WARNING: Never handle, move, weigh, or transport a cylinder (full or empty) without the shipping cap firmly in place. Serious injury and/or damage can result.
Each cylinder is equipped with a pressure seat-type cylinder valve (p/n C85-010) designed to hold the agent in the cylinder until actuated. The valve can be actuated electrically, manually, and/or pneumatically with approved valve actuation components (See Section 1.7). A siphon is provided with each valve to ensure complete discharge of the cylinder contents.
Ambient temperature limitations for cylinder storage ranges from 0º to 130ºF (-18º to 54ºC) for total flooding applications and 32º to 120ºF (0º to 49ºC) for local applications.

SECTION 1 – EQUIPMENT
Page: 6 of 30 Carbon Dioxide Revision: 2 Manual P/N C06-018 Revision Date: April, 2008
1.6 CYLINDER VALVE ASSEMBLY The cylinder valve (p/n C85-010) is a pressure seat type where the valve is held closed by the pressure of the agent contained in the cylinder. The valve body is of forged brass and consists of a main valve seat, discharge outlet, pressure relief disc, pilot valve, and pressure actuation ports. A cross section of the valve is shown below.
The discharge outlet provides the connection point for the flexible discharge bend, and serves as the actuation port for slave valves. A pressure relief disc is incorporated into the valve assembly and provides pressure relief at 2,650 - 3,000 psi (18271 – 20684 kPa). The relief disc directs the escaping pressure to avoid damage or movement of the cylinder. A stainless steel pilot valve serves as the fill port for charging of the cylinder, and serves as the actuator port for the electrical and manual actuation functions. Two separate pressure ports are machined into the valve (internal pressure port and top pressure port). The pressure ports are used to route CO2 pressure to the top of the valve piston for valve actuation.
Each valve is shipped from the factory in a slave configuration. The pressure generated within the distribution manifold by the discharge of the master valve(s) actuates the slave valves. The minimum pressure required to open the valve is 100-110 psig (689-758 kPa) at 70oF (21oC). A minimum of one slave valve must be converted to a master valve in order for the system to operate.
See Section 1.7 for valve actuation components.
Valve Cross Section

SECTION 1 – EQUIPMENT
Carbon Dioxide Page: 7 of 30 Manual P/N C06-018 Revision: 2 Revision Date: April, 2008
1.7 MASTER CYLINDER ACTUATION COMPONENTS Fike CO2 systems require that a minimum of one slave valve be converted to a master valve in order for the system to operate. Depending upon the hazard characteristics, the cylinders can be actuated electrically, manually, and/or pneumatically. Installing one of the following actuation components onto a slave valve creates a master valve. These components are field assembled to the cylinder valve prior to placing the system into service.
The number of master valves required for a system varies depending upon the total number of cylinders used, and the distribution manifold configuration. In general, a single master valve is required for a system of one or two cylinders; two master valves (minimum) are required for systems with three or more cylinders per NFPA 12. For complex systems, consult with Fike for recommendations on the number of master valves.
1.7.1 ELECTRIC ACTUATION The master actuation package provides an automatic means of discharging the CO2 system when interfaced through a Fike releasing control panel. The master actuator package is available in two operating voltages: 12 VDC (p/n C85-113) and 24 VDC (p/n C85-114). Each package consists of the following components:
Stainless steel, explosion-proof, two port solenoid valve approved for use in Class I, Group C & D, and Class II, Group E, F, & G hazardous locations
Emergency manual lever actuator (See 1.7.1.1) (2) braided steel flexible hoses Solenoid valve connector, SST (2) ¼” NPT x 90o brass elbows ¼” NPT brass tee
The 12 VDC solenoid actuator requires a minimum of 0.83 amps for its operation. The 24 VDC solenoid actuator requires a minimum of 0.42 amps for its operation. Both actuator packages contain a standard ½ inch threaded female straight connection for electrical conduit hookup.
Systems with two cylinders or less require one 24 VDC solenoid actuator. Systems with three or more cylinders require two 12 VDC solenoid actuators.
See Section 4.10 for actuator package assembly and installation procedures.
1.7.1.1 EMERGENCY MANUAL LEVER ACTUATOR The emergency manual lever actuator is provided with each master actuation package, and provides a means to manually actuate the control valve per NFPA 12. Manual discharge is accomplished by removal of a standard “pull-pin” with safety seal and operating the lever actuator ¼ turn to the OPEN position. This action releases the pressure necessary to open the valve(s) and discharge the contents of all the system cylinders.
Systems having two manual lever actuators must be interconnected with a connecting link assembly to allow both master valves to be discharged concurrently with a single operation of the manual actuators (See Section 1.7.3).

SECTION 1 – EQUIPMENT
Page: 8 of 30 Carbon Dioxide Revision: 2 Manual P/N C06-018 Revision Date: April, 2008
1.7.2 MANUAL ACTUATION The local lever actuator (p/n C85-119) provides a manual means of discharging the CO2 system when an automatic detection and control system is not desired. Manual discharge is accomplished by removing the “ring-pin”; thus breaking the plastic seal and operating the lever ¼ turn to the OPEN position. This action releases the pressure necessary to open the valve(s) and discharge the contents of all the system cylinders.
Systems having two local lever actuators must be interconnected with a connecting link assembly to allow both master valves to be discharged concurrently with a single operation of the local lever actuators (See Section 1.7.3).
See Section 4.10.2 for lever actuator installation procedures.
1.7.3 CONNECTING LINK ASSEMBLY The connecting link assembly (p/n C70-228) provides a means to interconnect manual lever actuators where two master valves are provided. This allows the master valves to be discharged concurrently.
See Section 4.10.3 for connecting link installation procedures.
1.7.4 PNEUMATIC ACTUATION The pneumatic actuator assembly (p/n C70-233) provides a pneumatic means of discharging the CO2 system when an automatic detection and control system is not desired. The assembly consists of a machined brass valve, stainless steel lever mechanism, and a spun steel container finished with red gloss, baked enamel paint. The pneumatic actuator includes a pressure gauge to monitor the nitrogen pressure in the cylinder, and a safety relief device that will rupture if the pressure in the cylinder rises to 2,650 – 3,000 psi (18,270 – 20,685 kPa) per NFPA 12.
Local Lever Actuator
Connecting Link Assembly

SECTION 1 – EQUIPMENT
Carbon Dioxide Page: 9 of 30 Manual P/N C06-018 Revision: 2 Revision Date: April, 2008
1.7.4 PNEUMATIC ACTUATION - CONTINUED Manual discharge is accomplished by first removing the pull pin, followed by operation of the manual lever on top of the valve. This action releases the pressure necessary to open the valve(s) and discharge the contents of all the system cylinders. The pressure is routed to the cylinder valve through stainless steel tubing or galvanized pipe.
See Section 4.10.5 for actuator installation procedures.
1.7.5 LATCH DOOR PULL BOX (P/N C70-242) The Latch Door Pull Box is used to provide mechanical operation of the Local Lever Actuator from a remote location. The Latch Door Pull Box has a solid cast brass door that must be opened in order to access the pull handle. The pull handle is attached to a 1/16” (2 mm) diameter stainless steel actuation cable. A 3/8” NPT female opening is provided in the back of the enclosure for connection of the cable and piping system. The Pull Box is coated with a red, corrosion-resistant, polyurethane paint.
A Corner Pulley may be attached directly to the back of the Pull Box if an immediate change of direction is necessary. Up to 100 ft. (30.5 m) of cable and a maximum of fifteen (15) Corner Pulleys may be used for each cable run. No more than four Pull Boxes may be used to operate any system.
NOTE: Do not locate a Pull Box where it will can be cut off or made inaccessible in the event of a fire.
Pneumatic Actuator
FOR FIREOPEN DOOR
PULL HANDLE HARD

SECTION 1 – EQUIPMENT
Page: 10 of 30 Carbon Dioxide Revision: 2 Manual P/N C06-018 Revision Date: April, 2008
1.7.6 CORNER PULLEY (P/N C70-241) Corner Pulleys are required on Fike Carbon Dioxide systems whenever a remote Latch Door Pull Box cable requires a change in direction. Corner Pulleys are installed as part of the stainless steel cable system to provide 90o
directional changes with minimal loss of force and elimination of induced cable kinking.
The Corner Pulley is made of brass and threaded for 3/8” NPT pipe connections. Up to fifteen (15) Corner Pulleys may be used per Pull Box.
1.7.7 STAINLESS STEEL CABLE (P/N C02-1344 = 50 ft.) (P/N C02-1343 = 250 ft.)The Stainless Steel Cable is used to mechanically connect the Latch Door Pull Box to the Local Lever Manual Actuator. The cable is a woven wire rope, 1/16” (2 mm) diameter, constructed of many individual wire threads woven into a 7 x 7 matrix for added strength and flexibility. The Stainless Steel Cable should be enclosed in 3/8” NPT piping.
1.7.7.1 STAINLESS STEEL CABLE ACCESSORIES The Stainless Steel Cable is attached to the various devices (Pull Box, Cable Junction Box, Stop/Selector Valve, etc.) using Oval Crimps (P/N C02-1345) that are compression fit devices which are installed using a Cable Crimp Tool (P/N C02-1348). A removable Cable Clamp (P/N C02-1347) is also available.
1.7.8 CABLE JUNCTION BOX ASSEMBLY (P/N C70-239) The Cable Junction Box Assembly allows manual activation of the Local Level Actuator from up to four (4) locations. The inlet side has four 3/8” NPT connections, and the outlet side has a single 3/8” NPT connection.
The cables from each Latch Door Pull Box are routed through the inlet of the Multiple Pull Control Box, while the outlet cable is routed to the Local Lever Actuator as required. Each inlet and outlet cable is fitted with an Oval Crimp/Sleeve (P/N C02-1345), and the connection is crimped as shown above using a wire loop fed back through the Oval Crimp (Sleeve). Care must be taken to attach the inlet and outlet cables no more than five (5) inches (127 mm) from the outlet end of the Control Box. This will ensure that the cable is free to move through its full range of travel.
The Multiple Pull Control Box is equipped with an easily removable cover that allows easy access to the cable assembly. The body and cover are made of carbon steel and painted with a corrosion-resistant, red polyurethane paint.
(127 mm)5.00"
(127 mm)5.00"
(527 mm)20.75"
(COVER NOT SHOWN)
DIRECTION OF PULL
WIRE LOOP (REQUIRES OVAL CRIMP)
OVAL CABLE CRIMP (C02-1345)

SECTION 1 – EQUIPMENT
Carbon Dioxide Page: 11 of 30 Manual P/N C06-018 Revision: 2 Revision Date: April, 2008
Flexible Discharge Bend
1.8 FLEXIBLE DISCHARGE BEND The flexible discharge bend (p/n C70-226) is used to provide the interconnection between the CO2 cylinder and the distribution piping and/or discharge manifold. A discharge bend must be supplied for each CO2 cylinder. The discharge bend is equipped with an internal check valve. When connected to a cylinder valve, the check valve is held open and allows the cylinder contents to be discharged. When disconnected from the cylinder, the check valve is not restrained and will prevent the back-flow of agent from the manifold should a discharge occur. All discharge bends are hydrostatically tested to 2,500 psi (17,239 kPa) per NFPA 12.
See Section 4.7.2 and 4.9.1 for discharge bend installation procedures.
CAUTION: The discharge bend MUST be connected to the cylinder valve for the system to be operational. Bends should be minimized and without kinks which could damage the hose.

SECTION 1 – EQUIPMENT
Page: 12 of 30 Carbon Dioxide Revision: 2 Manual P/N C06-018 Revision Date: April, 2008
PartNumber Description Dim. “A”
C70-211 Strap, 50 lb. (22.7kg) Cylinder 10” (254 mm) C70-212 Strap, 75 lb. (34.0kg) Cylinder 10-3/4” (273 mm) C70-213 Strap, 100 lb. (45.4kg) Cylinder 12” (305 mm)
1.9 CYLINDER MOUNTING CO2 cylinders must be adequately mounted and suitably supported in order to comply with the requirements of NFPA, OSHA, DOT, etc. Fike offers cylinder straps and cylinder racking components to comply with these requirements.
1.9.1 CYLINDER STRAP Cylinder straps are used to secure single cylinders in place per the requirements stated above. The cylinder straps may be secured to any structurally solid surface. However, anchoring into plaster or any other facing material IS NOT acceptable. The straps are made of steel with a red gloss, baked enamel finish.
See Section 4.2.1.1 for cylinder strap installation procedures.
1.9.2 CYLINDER RACKING Fike offers three standard cylinder racking configurations: Single-Row, Double-Row, and Double-Row / Back-to-Back. The racking is designed to restrain the cylinders, provide for cylinder weighing, and offer a place for the discharge manifold piping to be installed and securely fastened. The racking components are fabricated from Uni-Strut channel and galvanized brackets. Cylinder saddles, fabricated from cold-rolled steel with a galvanized finish, are provided to secure the cylinders to the racking. All racking configurations must be field assembled. Complete assembly drawings for each of the basic racking assemblies are provided in Appendix A.
See Section 4.2.1.2 for racking assembly and installation procedures.

SECTION 1 – EQUIPMENT
Carbon Dioxide Page: 13 of 30 Manual P/N C06-018 Revision: 2 Revision Date: April, 2008
1.9.2.1 SINGLE-ROW RACKING The single-row rack will secure the allotted number of cylinders in a single row, which allows access to each cylinder in the system from the front only. Single-row racks are available in 2-to-6 cylinder capacities, with rack extensions of 2-to-6 cylinders available for each. The cylinders are mounted on 12” (305 mm) centers with a maximum overall rack height of 86” (2184 mm).
Single-Row Racking
Basic Rack P/N
Description Add-on Rack P/N
C70-040-20 2-Cylinder Rack C70-040-20A C70-040-30 3-Cylinder Rack C70-040-30A C70-040-40 4-Cylinder Rack C70-040-40A C70-040-50 5-Cylinder Rack C70-040-50A C70-040-60 6-Cylinder Rack C70-040-60A Single Row
Racking Assembly
C70-040-40(Shown)
C70-040-30A(Shown)

SECTION 1 – EQUIPMENT
Page: 14 of 30 Carbon Dioxide Revision: 2 Manual P/N C06-018 Revision Date: April, 2008
1.9.2.2 DOUBLE-ROW RACKING The double-row rack will secure the allotted number of cylinders in two rows, one row behind the other, which allows for storage of a large number of cylinders in a relatively small space. Access to the rear cylinder row requires the removal of the front cylinder row. Care must be exercised to protect removed cylinders from falling or tipping over during handling. Double-row racks are available in 4-to-12 cylinder capacities, with rack extensions of 4-to-12 cylinders available for each. The cylinders are mounted on 12” (305 mm) centers with a maximum overall rack height of 86” (2184 mm).
For Main & Reserve supply applications, it is recommended that the main bank be located on the front row to allow easier access after a discharge.
1.9.2.3 DOUBLE-ROW / BACK-TO-BACK RACKING The double-row / back-to-back rack will secure the allotted number of cylinders in two rows, but requires access from both sides of the rack. This is a free-standing rack configuration that has the benefit of allowing free access to both rows of cylinders. Back-to-back racks are available in 4-to-12 cylinder capacities, with rack extensions of 4-to-12 cylinders available for each. The cylinders are mounted on 12” (305 mm) centers with a maximum overall rack height of 86” (2184 mm).
Double-Row Racking
Basic Rack P/N
Description Add-on Rack P/N
C70-040-22 4-Cylinder Rack C70-040-22A C70-040-33 6-Cylinder Rack C70-040-33A C70-040-44 8-Cylinder Rack C70-040-44A C70-040-55 10-Cylinder Rack C70-040-55A C70-040-66 12-Cylinder Rack C70-040-66A
Double-Row / Back-to-Back Racking
Basic Rack P/N
Description Add-on Rack P/N
C70-040-B22 4-Cylinder Rack C70-040-B22A C70-040-B33 6-Cylinder Rack C70-040-B33A C70-040-B44 8-Cylinder Rack C70-040-B44A C70-040-B55 10-Cylinder Rack C70-040-B55A C70-040-B66 12-Cylinder Rack C70-040-B66A
Double Row Racking Assembly
C70-044-40(Shown)
C70-040-33A (Shown)
Back to Back Racking Assembly
C70-040-B33(Shown)
C70-040-44A (Shown)

SECTION 1 – EQUIPMENT
Carbon Dioxide Page: 15 of 30 Manual P/N C06-018 Revision: 2 Revision Date: April, 2008
1.10 CHECK VALVES Two types of check valves are used on a Fike CO2 system. The larger size check valves (1/2” through 2” NPT) are used to isolate the main and reserve cylinders in a system with a connected reserve. The valve prevents pressurization of the reserve bank of cylinders by blocking the flow of agent from the main system discharge piping. This allows a common discharge manifold and piping network to be used.
The smaller check valves (1/4”) are used in the pneumatic actuation piping/tubing system to prevent backpressure from discharging out of the open piping/tubing if the pneumatic actuator is removed for service. If multiple remote pneumatic actuators are utilized, one check valve is required for each. The working pressure rating for these check valves is 3,000 psi (20,685 kPa), and the cracking pressure is 10 psi (69 kPa).
The check valves have a brass body with female pipe threads; with the exception of the ¼” tube version, which has a stainless steel body. The valve has a Buna-N seat with a working pressure rating of 3,000 psi at 100oF. (20,685 kPa at 37.7oC), and a cracking pressure is 10 psi (69 kPa). The maximum recommended service temperature is 400oF (204oC).
See Section 4.7.6 and 4.10.5 for check valve installation procedures.
Main/ReserveCheck Valve
Pneumatic Actuator Check Valves
English Metric
PartNumber
Nom.Size
(NPT)
Dim.“A” (in)
Dim.“B”(in)
Nom.Size
(NPT)
Dim.“A” (cm)
Dim.“B”(cm)
C02-1204 1/2” 2.75 1.00 1/2” 7.0 2.5 C02-1205 3/4” 2.98 1.25 3/4” 7.6 3.2 C02-1206 1” 3.64 1.63 1” 9.2 4.1 C02-1207 1-1/2” 4.63 2.50 1-1/2” 11.8 3.4 C02-1240 2” 5.85 3.00 2” 14.9 7.6

SECTION 1 – EQUIPMENT
Page: 16 of 30 Carbon Dioxide Revision: 2 Manual P/N C06-018 Revision Date: April, 2008
1.11 STOP/MAINTENANCE VALVE The stop/maintenance valve is used to prevent discharge of CO2 from the system discharge nozzles while the system is “locked out” for maintenance or other purposes. The Stop Valves are constructed of carbon steel with a stainless steel ball, Lubetal seats and a Buna-N body seal. The ¼ turn valve handle can be locked in either the “Open” or “Closed” positions. Locks and keys are not provided with the stop valves.
The stop valves are provided with a direct-drive microswitch (normally open or normally closed) rated 5 amps @ 24 VDC that should be connected to the system control panel to supervise the valve’s position per NFPA 12. The micro switch is U.L. listed and hazardous rated for Class I, Group C & D, and Class II, Groups E, F & G. This switch is not F.M. approved for hazardous locations. The switch housing is constructed of anodized aluminum, and a visual position indicator shows the current position of the valve at all times.
The valves are available in nominal pipe sizes ½” through 1-1/2”, and can be mounted in either the horizontal or vertical position. However, the recommended mounting configuration is in the horizontal position.
To meet the requirements of NFPA 12, all systems that are installed in Normally Occupied, Occupiable or Local Application hazards that can expose personnel to concentrations exceeding 4% for more than 1 minute must install a stop/maintenance valve.
See Section 4.7.5 for valve installation procedures.
Stop / Maintenance Valve Specifications Part
NumberNominal
Size (NPT) Dim. “A” In. (mm)
Dim. “B” In. (mm)
Dim. “C” In. (mm)
C02-1210 ½” 7.50 (191) 4.71 (120) 2.98 (76)
C02-1211 ¾” 7.59 (193) 4.71 (120) 3.05 (77)
C02-1212 1” 8.19 (208) 7.28 (185) 3.56 (90)
C02-1213 1-1/2” 8.88 (226) 9.53 (242) 3.74 (95)
Stop/Maintenance Valve

SECTION 1 – EQUIPMENT
Carbon Dioxide Page: 17 of 30 Manual P/N C06-018 Revision: 2 Revision Date: April, 2008
1.12 PRESSURE RELIEF DEVICES The following pressure relief devices must be used to avoid pressure build-up or over pressurization in the piping network where a closed section of piping may exist due to use of:
Stop Maintenance Valves Pneumatic Time Delays Check Valves Selector Valves
1.12.1 HEADER SAFETY RELIEF The header safety relief (p/n C70-231) is a pressure relief device designed to prevent the entrapment of liquid CO2 in sections of closed piping per NFPA 12.
The header safety relief is fabricated from brass stock and is installed in a ½” NPT tee or coupling. A pressure increase to 2,400 – 2,800 psi (16,457 – 19,305 kPa) will cause the internal disc to rupture, thus venting the pressure to atmosphere.
See Sections 4.6 and 4.7.7 for header safety installation procedure.
1.12.2 HEADER VENT PLUG The header vent plug (p/n C02-1363) is a pressure relief device designed to vent small amounts of leakage from a closed manifold and piping configuration per NFPA 12. This prevents pressure from building within the closed manifold and pipe section that could subsequently provide enough backpressure to open the cylinder valves.
The header vent plug is a ½” NPT brass pipe plug with a 0.031” (0.8 mm) diameter bleed hole drilled through. An insignificant amount of CO2 leakage will occur during a system discharge.
See Section 4.7.7 for header vent installation procedure.
Header Safety
Header Vent
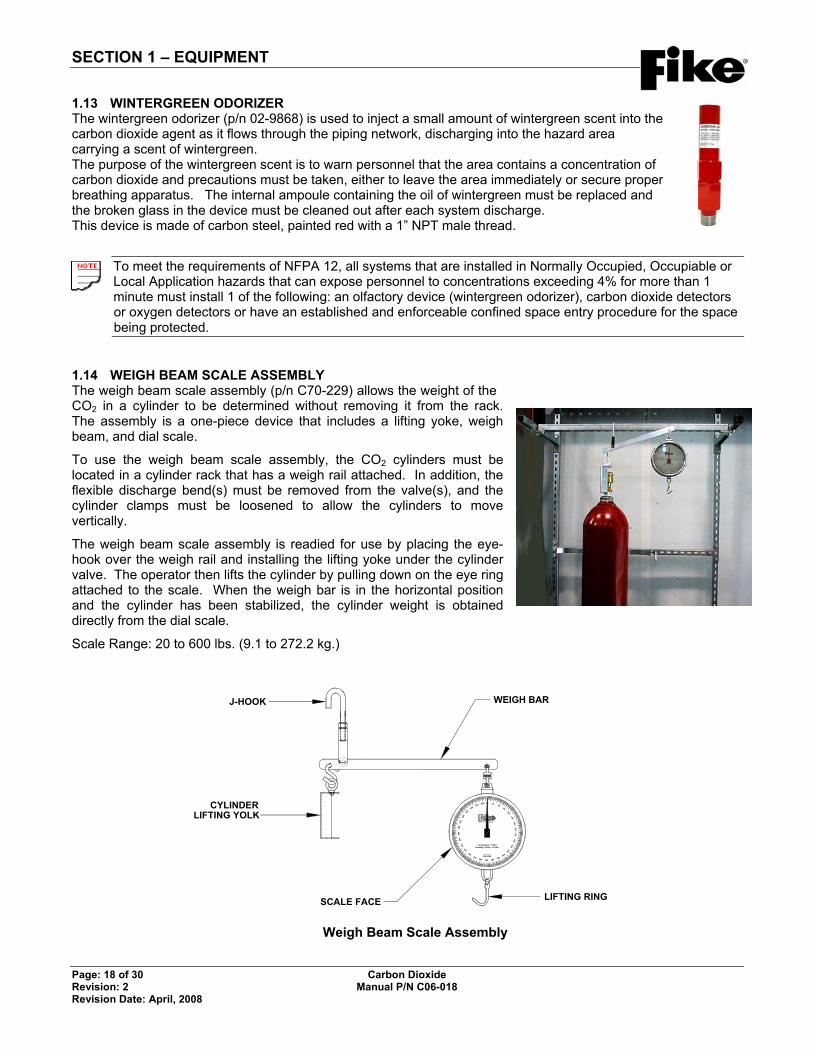
SECTION 1 – EQUIPMENT
Page: 18 of 30 Carbon Dioxide Revision: 2 Manual P/N C06-018 Revision Date: April, 2008
1.13 WINTERGREEN ODORIZER The wintergreen odorizer (p/n 02-9868) is used to inject a small amount of wintergreen scent into the carbon dioxide agent as it flows through the piping network, discharging into the hazard area carrying a scent of wintergreen. The purpose of the wintergreen scent is to warn personnel that the area contains a concentration of carbon dioxide and precautions must be taken, either to leave the area immediately or secure proper breathing apparatus. The internal ampoule containing the oil of wintergreen must be replaced and the broken glass in the device must be cleaned out after each system discharge. This device is made of carbon steel, painted red with a 1” NPT male thread.
To meet the requirements of NFPA 12, all systems that are installed in Normally Occupied, Occupiable or Local Application hazards that can expose personnel to concentrations exceeding 4% for more than 1 minute must install 1 of the following: an olfactory device (wintergreen odorizer), carbon dioxide detectors or oxygen detectors or have an established and enforceable confined space entry procedure for the space being protected.
1.14 WEIGH BEAM SCALE ASSEMBLY The weigh beam scale assembly (p/n C70-229) allows the weight of the CO2 in a cylinder to be determined without removing it from the rack. The assembly is a one-piece device that includes a lifting yoke, weigh beam, and dial scale.
To use the weigh beam scale assembly, the CO2 cylinders must be located in a cylinder rack that has a weigh rail attached. In addition, the flexible discharge bend(s) must be removed from the valve(s), and the cylinder clamps must be loosened to allow the cylinders to move vertically.
The weigh beam scale assembly is readied for use by placing the eye-hook over the weigh rail and installing the lifting yoke under the cylinder valve. The operator then lifts the cylinder by pulling down on the eye ring attached to the scale. When the weigh bar is in the horizontal position and the cylinder has been stabilized, the cylinder weight is obtained directly from the dial scale.
Scale Range: 20 to 600 lbs. (9.1 to 272.2 kg.)
480
FOR TRADENOT LEGAL
Capacity: 615lbs. x 2.5lbs.1 Graduation = 2.5lbs.
380
400
320340360
420440
460
240
300 280260
220
200
180
1 60
Division Fike CorporationProtection Systems
600 20
560
520
500
540
580 40
100
6080
140120
J-HOOK
CYLINDERLIFTING YOLK
SCALE FACE LIFTING RING
WEIGH BAR
Weigh Beam Scale Assembly

SECTION 1 – EQUIPMENT
Carbon Dioxide Page: 19 of 30 Manual P/N C06-018 Revision: 2 Revision Date: April, 2008
1.15 DISCHARGE NOZZLES Fike CO2 systems have a series of discharge nozzles designed to deliver the agent into the hazard. Nozzle selection depends on the hazard and location to be protected.
See Section 4.8 for nozzle installation procedures.
1.15.1 BAFFLE NOZZLE The Baffle Nozzle (p/n C80-030) is used for total flooding applications. Each nozzle provides a 180o discharge pattern that makes them suitable for location around the perimeter of the hazard.
The nozzle is made of brass and is available in a ½” NPT size with discharge orifice codes ranging from 1 through 13.5. Nozzle Strainers (p/n C02-1181) are required on any nozzle with an orifice code of 3 or smaller.
See Section 2.5.2 for nozzle flow rates, spacing, etc.
1.15.2 RADIAL NOZZLE The Radial Nozzle (p/n C80-041 through C80-046) is used for Total Flooding applications. The 180o nozzles can be located around perimeter of the hazard, and 360o
nozzles can be located in the center.
The nozzle is machined from brass and is available in ½”, ¾”, and 1” NPT sizes. Nozzle discharge orifice codes range from 3.5 through 25 depending upon the nozzle size and flow rate required. Nozzle Strainers (p/n C02-1181) are required for any nozzle with a discharge orifice of 7 or smaller.
See Section 2.5.1 for nozzle flow rates, spacing, etc.
Nozzle Dimensions 1/2” NPT 3/4” NPT 1” NPT
Dim. “A” 1.88(48 mm)
2.19(56 mm)
2.50(64 mm)
Dim. “B” 1.00(25 mm)
1.25(32 mm)
1.50(38 mm)
Dim. “C” 1.00(25 mm)
1.25(32 mm)
1.50(38 mm)
1.75"
2.3125" REF.
2.125" REF.
1/2" NPT
DISCHARGE ORIFICE
(54 mm)(45 mm)
(59 mm)
Baffle Nozzle
Radial Nozzle

SECTION 1 – EQUIPMENT
Page: 20 of 30 Carbon Dioxide Revision: 2 Manual P/N C06-018 Revision Date: April, 2008
1.15.3 VENT NOZZLE The Vent Nozzle (p/n C80-020-B or C80-020-S) is used for total flooding applications protecting ductwork, electrical compartments, collecting bins, or any other application that requires direct mounting of the nozzle and a narrow discharge pattern. The Vent Nozzle is made of brass or stainless steel, and is available in ½” NPT size with discharge orifice codes ranging from 1 through 13.5. Nozzle Strainers (p/n C02-1181) are required for any nozzle with a discharge orifice of 3 or smaller.
See Section 2.5.3 for nozzle flow rates, spacing, etc.
1.15.3.1 VENT NOZZLE FLANGE MOUNTING KIT The Vent Nozzle Flange Mounting Kit (p/n C80-1013) is available as an option for mounting a Vent Nozzle directly to the surface of an enclosure, hood, ductwork, etc. A Teflon sealing disc (p/n C80-1011) is provided to prevent the discharge orifice from becoming plugged when the nozzle is used in a dirty environment. A new sealing disc is required after each system discharge.
1.69"(43 mm)
1/2" NPTSUPPLY END 1/2" NPT
Vent Nozzle
MOUNTING SURFACE
SEALING DISC
#8 LOCKWASHERTYP. OF 3
"O"-RING
MTG. FLANGE
2.188"
3/16" SHEET METAL SCREWTYP. OF 3
VENT NOZZLEBODY
2.5" (64 mm) BOLT CIRCLE
DISCHARGE CUTOUT1.5" (38 mm) MINIMUM
#8-32 X 1/4" SCREWTYP. OF 3
2.0" (51 mm) MAXIMUM
3.00"
(56 mm)
9/72" DIA. (7 mm)MOUNTING HOLE
Flange Mounting Kit

SECTION 1 – EQUIPMENT
Carbon Dioxide Page: 21 of 30 Manual P/N C06-018 Revision: 2 Revision Date: April, 2008
1.15.4 ”S” TYPE NOZZLE The “S” type nozzle (p/n C80-010-B or C80-010-S) can be used for Local Application and Total Flooding systems. The nozzle is made of zinc-plated steel and a brass or stainless steel nozzle orifice insert. The nozzle is available in a ½” NPT size with orifice codes ranging from 1 through 11. Nozzle Strainers (p/n C02-1181) are required for any nozzle with a discharge orifice of 3 or smaller.
See Section 2.5.4 for nozzle flow rates, spacing, etc.
1.15.4.1 ”S” TYPE NOZZLE FLANGE MOUNTING KIT The “S” type nozzle flange mounting kit (p/n C80-1018) is available as an option for mounting a “S” Type Nozzle directly to the surface of an enclosure, hood, ductwork, etc. A Teflon sealing disc (p/n C80-1007) is provided for the purpose of preventing the discharge orifice from becoming plugged when the nozzle is used in a dirty environment. A new sealing disc is required after each system discharge.
1/2" NPT
3.875" DIA(95 mm)
5.25"(133 mm)
“S” Nozzle
“S” Nozzle Flange Mounting Kit

SECTION 1 – EQUIPMENT
Page: 22 of 30 Carbon Dioxide Revision: 2 Manual P/N C06-018 Revision Date: April, 2008
1.16 PNEUMATIC OPERATED ACCESSORIES This Section identifies the pneumatically operated accessories that can be used on Fike CO2 systems.
1.16.1 PRESSURE TRIP ASSEMBLY The pressure trip assembly (p/n C70-230) is used to provide a pneumatic release function for operation of mechanical closer on doors, ductwork, valves, etc. The pressure trip assembly is operated pneumatically using the CO2 pressure from the piping network. Pulling the manual release ring can be used to manually actuate the pressure trip.
The pressure trip assembly is attached to the CO2 piping network via the two ¼” NPT connections located on either side of the body, and will operate properly, regardless of which side is chosen as the inlet. The outlet port is connected to the next pressure trip, or plugged with a ¼” NPT pipe plug if another pressure trip is not necessary.
The minimum operating pressure required is 75 psi (517.1 kPa) with a maximum load rating of 100 lbs. (45.4 kg) on the retaining pin.
See Section 4.7.9 for pressure trip installation procedure.
Pressure Trip

SECTION 1 – EQUIPMENT
Carbon Dioxide Page: 23 of 30 Manual P/N C06-018 Revision: 2 Revision Date: April, 2008
1.16.2 PRESSURE SWITCH The pressure switch (p/n C70-202) is used to provide a positive pneumatic confirmation to the control system that the CO2 has been discharged. When a CO2system is discharged manually, the pressure switch provides the input to the control system needed to activate various audio/visual warning devices and auxiliary relays, which would not be activated otherwise. The switch is operated pneumatically using the CO2 pressure in the piping network through a ¼” NPT connection. The switch is a double-pole, single-throw unit rated for 15 amps @ 125VAC, or 8 amps @ 240VAC. The conduit inlet is a ½” NPT connection.
The explosion-proof version (p/n C02-1231) is a double-pole, double-throw device housed in an explosion rated housing. Any electrical load connected to this switch must not exceed the switch rating of 10 amps @125VAC or 5 amps @ 240VAC. The conduit inlet is ¾” NPT. This switch is not F.M. approved for hazardous locations.
The minimum activation pressure for the pressure switch is 100 psi (690 kPa). The pressure switch MUST be reset prior to resetting the control panel.
See Section 4.7.8 for pressure switch installation procedure.
C02-1074PUSH PLUNGER IN
Approved
C70-202RAINTIGHT
Pressure Switch

SECTION 1 – EQUIPMENT
Page: 24 of 30 Carbon Dioxide Revision: 2 Manual P/N C06-018 Revision Date: April, 2008
1.16.3 PNEUMATIC TIME DELAY The purpose of the pneumatic time delay is to pneumatically retard the discharge of CO2 for a specific period of time. This delay is primarily intended to allow personnel time to leave the discharge area; even if the system is discharged manually. It also allows additional time for ventilation and equipment shutdown.
The actual time delay period is pre-set at the factory. Fike offers both 30 second (p/n C70-235), and 60 second (p/n C70-237) pneumatic time delays. Each time delay is equipped with a manual override lever that allows the user to manually bypass the time delay; thus resulting in the immediate discharge of CO2. The inlet and outlet ports of the pneumatic time delay are both ¾” NPT connections.
The pneumatic time delay operates at temperatures ranging from 0oF to +130oF (18oC to 54.4oC), and the actual delay times may vary with the ambient temperature. To meet the requirements of NFPA 12, all systems that are installed in Normally Occupied, Occupiable or Local Application hazards that can expose personnel to concentrations exceeding 4% for more than 1 minute must install a pneumatic time delay.
See Section 4.7.4 for time delay installation procedure.
MATERIALS:Valve – Brass Lever – Stainless Steel Cylinder – Spun Steel
3 .50" M A X(89 m m )
22 .25"(565 m m )
4 .25" D IA .(108 m m )
3 /4" N P T
M A N U A L O V E R R ID E L E V E R
3/4" N P T
Pneumatic Time Delay

SECTION 1 – EQUIPMENT
Carbon Dioxide Page: 25 of 30 Manual P/N C06-018 Revision: 2 Revision Date: April, 2008
1.16.4 PNEUMATICALLY OPERATED SIREN The pneumatically operated siren (p/n C02-1230) is used to warn personnel of a CO2 system discharge. The CO2 pressure from the system operates the siren, which is connected to the system piping using the ½” NPT connection located at the base of the siren. The CO2 spins the turbine and sounds the siren throughout the duration of the discharge.
The siren operates at an approximate decibel level of 90 dB @ 10 ft (3.3 m). The flow rate of CO2 necessary to drive the siren is 6.0 lbs (2.7 kg) per minute and may need to be accounted for when determining the system flow rate and overall storage quantity required (See Section 2). The siren is constructed of brass and finished with red, gloss paint. To meet the requirements of NFPA 12, all systems that are installed in Normally Occupied, Occupiable or Local Application hazards that can expose personnel to concentrations exceeding 4% for more than 1 minute must install a pneumatic operated siren.
See Section 4.7.10 for siren installation procedure.
3.875" DIA. 2.75" DIA.
3.563"
(98 mm)
13/64" DIA (5 mm) MTG. HOLE
(70 mm)
(191 mm)
(90 mm)
7.50"
1/2" NPT
Pneumatic Siren

SECTION 1 – EQUIPMENT
Page: 26 of 30 Carbon Dioxide Revision: 2 Manual P/N C06-018 Revision Date: April, 2008
1.17 INSTRUCTIONAL SIGNS
Instructional signs shall be provided to inform personnel of potential hazards they may face when operating certain devices or working within areas protected by the CO2 system per NFPA 12. The signs are made from flame retardant, Lexan polycarbonate material. Each sign has an adhesive backing for mounting purposes. The warning / caution lettering and backgrounds meet the requirements of ANSI Z535.
To meet the requirements of NFPA 12, all systems that are installed in Normally Occupied, Occupiable or Local Application hazards that can expose personnel to concentrations exceeding 4% for more than 1 minute must install the proper warning and caution signs.
1.17.1 WARNING SIGN – VACATE IMMEDIATELY
This sign (p/n 02-11397) shall be used in every protected space. The sign warns all personnel working within the space that the room is protected by a CO2 system, and that they should evacuate the area immediately when the alarm operates. The sign is 14.0” (356 mm) wide by 7.8” (198 mm) tall, with black lettering on an orange background.
1.17.2 WARNING SIGN – DO NOT ENTER UNTIL VENTILATED
This sign (p/n 02-11398) shall be used at every entrance into protected space. The sign warns all personnel that if the alarm has been activated the CO2 system serving the space has discharged, and that they should not enter the space until it has been ventilated. The sign is 14.0” (356 mm) wide by 7.8” (198 mm) tall, with black lettering on an orange background.
1.17.3 WARNING SIGN – WHEN ALARM OPERATES
This sign (p/n 02-11399) shall be used at every entrance to protected space for systems provided with a wintergreen odorizer. The sign warns all personnel not to enter the space until area has been properly ventilated. The sign is 14” (356 mm) wide by 7.8” (198 mm) tall, with black lettering on an orange background.
.
WARNINGCarbon dioxide gas
can cause injury or death.When alarm operates, vacate immediately.
WARNINGCarbon dioxide gas
can cause injury or death. When alarm operates,
do not enter until ventilated.
WARNINGCarbon dioxide gas
can cause injury or death. When alarm operates or
wintergreen scent is detected, do not enter
until ventilated.

SECTION 1 – EQUIPMENT
Carbon Dioxide Page: 27 of 30 Manual P/N C06-018 Revision: 2 Revision Date: April, 2008
1.17.4 WARNING SIGN – NEARBY SPACE COLLECTION
This sign (p/n 02-11400) shall be used in every nearby space where carbon dioxide could accumulate to hazardous levels. Thesign cautions personnel that CO2 from a discharge in a nearby space may accumulate in this area, and the area should be evacuated immediately when the alarm operates. The sign is 14” (356 mm) wide by 7.8” (198 mm) tall, with black letting on a orange background.
1.17.5 WARNING SIGN – VENTILATE BEFORE ENTERING
This sign (p/n 02-11401) shall be used outside each entrance to carbon dioxide storage rooms. The sign cautions personnel not to enter the storage room before the area has been ventilated. The sign is 14” (356 mm) wide by 7.8” (198 mm) tall, with black letting on a orange background.
1.17.6 WARNING SIGN – MANUAL ACTUAT0R
This sign (p/n 02-11402) shall be placed at every location where manual operation of the system can occur (electric, mechanical and/or pneumatic). The sign warns personnel that activation of the device will cause the carbon dioxide system to discharge, and that all personnel must be evacuated prior to its operation. The sign is 14” (356 mm) wide by 7.8” (198 mm) tall, with black lettering on an orange background.
WARNING
WARNINGCarbon dioxide gas dischargeinto nearby space can collect here. When alarm operates,
vacate immediately. Carbon dioxide gas
can cause injury or death.
WARNINGCarbon dioxide gas
can cause injury or death. Actuation of this device
causes carbon dioxide to discharge. Before actuating, be sure personnel are clear
of the area.
Carbon dioxide gas can cause injury or death. Ventilate the area before entering. A high carbon
dioxide gas concentration can occur in this area and
can cause suffocation.

SECTION 1 – EQUIPMENT
Page: 28 of 30 Carbon Dioxide Revision: 2 Manual P/N C06-018 Revision Date: April, 2008
Reducing bushings can be utilized when connecting to a ½”, ¾”, 1¼” and 2½” piping network.
1.18 SELECTOR VALVE SYSTEMS
Selector valves allow a single agent supply to be utilized for protection of multiple hazards, reducing the amount of agent required. Selector valves are used in conjunction with Solenoid Actuators to direct the flow of agent into one specific hazard of a multiple hazard application.
Selector Valves are Factory Mutual approved only.
1.18.1 SELECTOR VALVES The selector valve body is available in either carbon steel or stainless steel. It is a ball valve that blocks the flow of agent through the piping network until the valve is activated. Valve actuation is accomplished either manually or electrically.
Manual actuation is accomplished by removing a ring pin and pushing a manual actuation button down. Electric actuation is accomplished when an electrical signal is received by the 24V DC electric solenoid. Both of these actuation methods result in the opening of a nitrogen cartridge that pneumatically opens the selector valve. Each selector valve is equipped with a valve position monitor that gives a visual indication if the valve is open or closed. Once opened, the pressure must be relieved using the relief/pop-off valve to allow the Selector Valve to spring-return to the closed position.
A typical selector valve assembly is made-up of the following items: Selector valve with Actuator and relief /pop-off valve Solenoid Actuator Kit ¼” check valve and ¼”-90 Degree Elbow ¼” SST Flexible Hose x 3’-0” lg.
Ordering Options 70-1899-XX-XX
B CDA 1899 – Threaded Valve
B
10 – 1” 15 – 1 ½” 20 – 2” 30 – 3”
C C – Carbon Steel Body S – Stainless Steel Body
D D – DOT Nitrogen Cylinder
Part Number Size A B C D 70-1899-10-XX 1” (25 mm) 3.37 1.68 7.95 3.34 70-1899-15-XX 1½” (40 mm) 4.37 2.18 9.05 3.85 70-1899-20-XX 2” (50 mm) 5.50 2.75 10.66 4.33 70-1899-30-XX 3” (80 mm) 6.75 3.37 14.17 5.51
Part Number Description Mounting 70-1899-10-XX Selector Valve–1” 1” (25mm) NPT Female 70-1899-15-XX Selector Valve–1½” 1½” (40mm) NPT Female 70-1899-20-XX Selector Valve–2” 2” (50mm) NPT Female 70-1899-30-XX Selector Valve–3” 3” (80mm) NPT Female
Allow 18” of clearance from the center line of the piping to the top of the indicator.

SECTION 1 – EQUIPMENT
Carbon Dioxide Page: 29 of 30 Manual P/N C06-018 Revision: 2 Revision Date: April, 2008
1.18.2 SOLENOID ACTUATOR KITThe Solenoid Actuator Kit (70-202) is used to operate / open the Selector Valve. The actuation package utilizes a 24 VDC electric solenoid with manual strike button that is connected to a small cylinder filled with nitrogen.
Operation of the actuator can occur by one of two methods (1) Electrical input from a fire control panel (2) Operation of a mechanical manual actuator.
The kit also includes a combination pressure gauge and low pressure supervisory switch that allows visual and control panel monitoring of the nitrogen cylinder pressure. One Solenoid Actuator Kit is required per selector valve.
SPECIFICATIONS
Electric Solenoid Actuator: Supply Voltage 24 VDC Maximum Signal Duration 2 seconds Maximum Supervision Current 10mA Minimum Fire Current 0.6 Amp Electrical Connection DIN 43650 Operating Temperature Range -4oF to +122oF (-20oC to +50oC)
Nitrogen Cylinder: Filling Pressure 1800 psi @ 72ºF (124 bar @ 22ºC) Volume 28 in3 / 460 ml Maximum Exposure Temp. 149 oF / 65oCClassification 2.2 Shipping Number UN1066
Pressure Gauge / Switch:Temperature Limits -40ºF to +140ºF (-40ºC to +60ºC) Housing Classification IP65 Normally Closed > 1740 psi / 120 bar Contact Rating 5-100 mA Electrical Connection DIN 43650 compact Supplied w/ 1’ (.3m) cable Pressure Setting 1740 psi / 120 bar (decreasing)
6.89" [175mm]
2.76" [70mm]
16.71" [424mm]
2.00" [51mm]
5.79" [147mm]
Ø0.40" [Ø10mm] THRU
4.06" [103mm]

SECTION 1 – EQUIPMENT
Page: 30 of 30 Carbon Dioxide Revision: 2 Manual P/N C06-018 Revision Date: April, 2008
1.19 LISTINGS AND APPROVALS
Fike CO2 systems are Underwriters Laboratories (UL) listed, and Factory Mutual (FM) approved when designed in accordance with the latest revision of NFPA 12, and this manual. The following listing and approval numbers pertain solely to the CO2 system components.
Part Number Description UL Number ULC Number FM Number
C70-050 50 lb. Cylinder Ex 4447 CEx 1312 OD8A9.AF C70-075 75 lb. Cylinder Ex 4447 CEx 1312 OD8A9.AF C70-100 100 lb. Cylinder Ex 4447 CEx 1312 OD8A9.AF C85-010 Valve Assembly Ex 4447 CEx 1312 OD8A9.AF C85-113 Master Actuation Package, 12VDC Ex 4447 CEx 1312 OD8A9.AF C85-114 Master Actuation Package, 24VDC Ex 4447 CEx 1312 OD8A9.AF C85-119 Local Lever Actuator Ex 4447 OD8A9.AF C70-226 Flexible Discharge Bend Ex 4447 CEx 1312 OD8A9.AF C70-211 50 lb. Cylinder Strap Ex 4447 CEx 1312 3002238 C70-212 75 lb. Cylinder Strap Ex 4447 CEx 1312 3002238 C70-213 100 lb. Cylinder Strap Ex 4447 CEx 1312 3002238
C02-1204 Main-Reserve Check Valve, ½” NPT Ex 4447 OD8A9.AF C02-1205 Main-Reserve Check Valve, ¾” NPT Ex 4447 OD8A9.AF C02-1206 Main-Reserve Check Valve, 1” NPT Ex 4447 OD8A9.AF C02-1207 Main-Reserve Check Valve, 1-1/2” NPT Ex 4447 OD8A9.AF C02-1240 Main-Reserve Check Valve, 2” NPT Ex 4447 OD8A9.AF C02-1340 Pneumatic Check Valve, ¼” NPT Ex 4447 3002238 C02-1355 Pneumatic Check Valve, ¼” Tube Ex 4447 3002238 C70-231 Header Safety Ex 4447 CEx 1312 3002238
C02-1363 Header Vent Ex 4447 CEx 1312 3002238 C80-030 Baffle Nozzle Ex 4447 CEx 1312 3003886
C80-041 thru 046 Radial Nozzles Ex 4447 CEx 1312 3003886 C80-020 Vent Nozzle Ex 4447 CEx 1312 3003886
C80-1013 Vent Nozzle Flange Mounting Kit Ex 4447 CEx 1312 3003886 C80-010 “S” Nozzle Ex 4447 CEx 1312 3003886
C80-1018 “S” Nozzle Flange Mounting Kit Ex 4447 CEx 1312 3003886 C70-230 Pressure Trip Ex 4447 CEx 1312 3002238 C70-202 Pressure Switch Ex 4447 CEx 1312 3002238 C70-235 Pneumatic Time Delay, 30 second Ex 4447 CEx 1312 3002238 C70-237 Pneumatic Time Delay, 60 second Ex 4447 CEx 1312 3002238 C70-233 Pneumatic Actuator Ex 4447 3002238
C02-1230 Pneumatic Siren Ex 4447 CEx 1312 3002238 70-1899-10 Selector Valve-1” 3015909 70-1899-15 Selector Valve-1½” 301590970-1899-20 Selector Valve-2” 301590970-1899-30 Selector Valve-3” 3015909

Carbon Dioxide Manual P/N C06-018
SSeeccttiioonn 22DDeessiiggnn

SECTION 2 – DESIGN
Carbon Dioxide Page: 1 of 45 Manual P/N C06-018 Revision: 2 Revision Date: April, 2008
2.0 SYSTEM DESIGN CO2 is effective in areas where flammable solids, liquids, and vapors are present. Fires in these hazards spread very rapidly. Deep-seated fires associated with hazards such as electrical equipment, bulk record storage, dust collectors, and ductwork are equally well protected with CO2. A fixed-pipe system that is engineered specifically for a particular hazard, and actuated automatically, assures the early detection and rapid extinguishment necessary to prevent major losses and downtime.
Fike CO2 Systems are custom designed to protect a specific hazard or application. The quantity of CO2 and the method of application required for the protection of a specific hazard are determined by the system designer, but the final design must be based on the materials or product involved. NFPA 12 and this design manual are used as guides to determine the appropriate design parameters.
Fike CO2 systems can be actuated automatically, pneumatically or manually. Automatic systems incorporate fire detectors and system control panels, along with electric and mechanical/manual releases that are located in the hazard area. When activated, they send a signal to the control panel to release the CO2 into the hazard.Mechanical/manual actuator(s) are generally located at, or near, the CO2 cylinder storage area. Automatically actuated systems are electrically operated and always incorporate an emergency manual override feature and standby power supply.
2.1 GENERAL REQUIREMENTS Fike CO2 systems consist of one or more cylinders connected to a fixed-piping system that delivers the CO2 to the protected hazard through one or more discharge nozzles selected for the specific application. These systems are designed to comply with specific design criteria in accordance with NFPA 12 and are separated into the following design categories:
1) Total Flood Application 2) Local Application 3) Combination Systems a) Surface Fires a) Rate-by-Area a) Total Flood – Surface & Deep Seated b) Deep Seated Hazards b) Rate-by-Volume b) Total Flood & Local Application
Each design has requirements and limitations that MUST be adhered to in order to produce an approved system that complies with the requirements of Fike Protection Systems, NFPA 12, and the Authority Having Jurisdiction (AHJ).
The following paragraphs will provide the necessary information, guidelines, and examples to allow the system designer to produce a system designed to provide quality CO2 fire protection acceptable to all associated with the project.
This manual is prepared to assist the design engineer in preparing an approved CO2 fire suppression system. However, this manual does not cover all aspects of system design and hazard analysis. It shallbe the responsibility of the system design engineer to read, and thoroughly understand, NFPA No. 12, CO2 Extinguishing Systems, before attempting to design any Fike CO2 Suppression System.

SECTION 2 – DESIGN
Page: 2 of 45 Carbon Dioxide Revision: B Manual P/N C06-018 Revision Date: April, 2008
2.1.1 USE AND LIMITATIONS CO2 systems can be used on Class “A” fires involving wood, paper, cloth, or any product that leaves a carbon ash; Class “B” fires involving flammable liquids or vapors; and Class “C” fires involving live electrical equipment.
2.1.1.1 AREAS OF USE CO2 is particularly useful for extinguishing fires in specific hazard areas or equipment:
Where an inert, electrically non-conductive, medium is essential or desirable.
Where cleanup or production downtime caused by another suppression medium would present a problem or high cost.
Where other mediums might contaminate solvents, coolants, or other products associated with the hazard being protected.
Some of the more important types of hazards or equipment that CO2 systems may satisfactorily protect include:
Automated Information Storage Electric Generators Ovens Flammable Liquids Storage Coating Machines Dip Tanks & Drain Boards Engine Test Cells Sub-floors Motors Printing Presses Switchgear Rooms Solvent Recovery Dust Collectors / Bag House Transformer Vaults Wave Solder Machines Ducts / Exhaust Plenums Wet Benches Spray Booths Hydraulic Pump Units Cable Spreading Rooms Turbine Enclosures Electrical Cabinets Anechoic Chambers Coating Lines
2.1.1.2 AREAS OF NON-USE CO2 should not be used on fires involving the following materials:
Chemicals that contain their own Oxygen supply such as: Cellulose Nitrate (old movie film) and gunpowder that are capable of rapid oxidation in the absence of air.
Reactive metals such as Lithium, Sodium, Potassium, Magnesium, Titanium, Uranium, Plutonium.
Metal Hydrides such as Sodium Hydride (NaH), Lithium Hydride (LiH), Calcium Hydride (CaH2), Lithium Aluminum Hydride (LiAlH4) and Sodium Borohydride (NaBH).
While CO2 will not extinguish fires involving these products, it will not react dangerously with them or increase their burning rate. A CO2 system designed for Total Flooding will provide protection of adjacent combustibles when used in these situations. Local Application designed systems, with their attendant high velocity and directed discharge, should not be used for these applications.
2.1.1.3 USE RESTRICTIONS PER NFPA 12 As a continuing effect to improve / enhance “Life Safety”, NFPA 12 has added use restrictions to the 2005 edition, these restrictions affect both new and existing installations as to how and when a CO2 system can be applied. Some examples of normally occupied enclosures with surface fire hazards that should be considered for other types of clean fire-extinguishing agents are: Offices Computer Rooms Control Rooms Data Centers Libraries Museums
According to NFPA 12, CO2 systems are not intended as an acceptable substitute for Halon 1301 total flood systems for normally occupied enclosures and shall not be installed in normally occupied enclosures except where there are no suitable fire-extinguishing agents that can be used to provide an equivalent level of fire protection to that of CO2.

SECTION 2 – DESIGN
Carbon Dioxide Page: 3 of 45 Manual P/N C06-018 Revision: 2 Revision Date: April, 2008
When verifying equivalent levels of fire protection, the following items that should be considered are: Fast-growth fires High-energy output fires Deep-seated fires Agent storage temperature limits Ambient temperature of hazard Design capabilities for unclosable openings Design capabilities for extended discharge systems Contamination to product, surrounding area, or environment Requirements for continued operations in areas where persistent ignition sources may be present Undefined reaction of fire suppression agent to the hazard
If it is determined that CO2 is to be used for a given application, the designer / installer shall provide supporting documentation to the AHJ to verify that CO2 is the most appropriate fire suppression agent for the application.
2.1.1.3.1 EXISTING INSTALLATIONS All existing CO2 systems that are installed in the following type areas:
Normally Occupied – defined as an enclosure where, under normal circumstances, people are present Occupiable – defined as an area or space not normally occupied by people but could be entered for brief
periods. Local Application Any system where the discharge of CO2 agent will expose personnel to hazardous concentrations of CO2.
shall be upgraded to meet the requirements for: Safety Signs Lock-out Valves Pneumatic Time Delays Pneumatic Pre-Discharge Alarms
In addition, provisions shall be made to prohibit entry of unprotected personnel to spaces made unsafe by a CO2discharge until the space is ventilated and made safe to enter. Such provisions shall include one or more of the following:
Addition of a distinctive odor (oil of wintergreen) to the discharge of CO2 agent (olfactory device) Provide automatic alarms, at the entry to and within enclosures, which are activated by CO2 or O2
detectors Establishment and enforcement of confined space entry procedure for such areas.
These upgrades shall be completed by August 7, 2006.
2.1.1.3.2 TYPICAL INSTALLATION
Pneumatic Siren
PneumaticTime Delay
Piping to CO2
Discharge Nozzle(s)
Stop / Maintenance (lock-out) Valve
OlfactoryDevice
Discharge PressureSwitch
SafetySigns

SECTION 2 – DESIGN
Page: 4 of 45 Carbon Dioxide Revision: B Manual P/N C06-018 Revision Date: April, 2008
2.2 TOTAL FLOOD SYSTEMS A Total Flood CO2 system design can be defined as follows: A fixed supply of CO2 agent discharging through piping and nozzles into a permanent enclosure that is capable of containing the agent. An extinguishing concentration of CO2 can be established and maintained for a specific period of time. Fires that can be extinguished by total flooding methods can be divided into two categories:
1) Surface fires involving Class B flammable liquids, gases, and solids.
2) Deep-seated fires involving Class A and/or C materials subject to smoldering.
2.2.1 TOTAL FLOOD – SURFACE FIRE SYSTEMS Surface fires involving flammable liquids, gases, and solids are extinguished by introducing CO2 into the enclosure quickly, and in a sufficient quantity to reduce the oxygen concentration to a point where the fire can no longer exist.
In some applications, CO2 agent loss through uncloseable openings is anticipated and can be compensated for in the system design calculations. In general, it is preferable to close all openings, shutdown all ventilation, and seal the protected enclosure to insure the CO2 concentration will be maintained for the appropriate time period.
The following flow chart identifies the necessary steps that need to be taken into consideration when designing a total flood / surface fire system:
TOTAL FLOOD – SURFACE FIRE SYSTEM DESIGN FLOW CHART
Below 0° F 0° to 200° F Above 200° F
Determine Hazard
Flooding
Special Condition Adjustments
Ventilation
Uncloseable Openings
Concentration Adjustment
No Correction
Required
+1% per +1% per 5
Nozzles Required
Agent Required – Bill of Material

SECTION 2 – DESIGN
Carbon Dioxide Page: 5 of 45 Manual P/N C06-018 Revision: 2 Revision Date: April, 2008
2.2.1.1 HAZARD VOLUME Determine the volume of the hazard by multiplying (length) x (width) x (height). For total-flood applications, the volume can be reduced to exclude any permanent, non-removable, or impermeable structures from the overall volume of the protected space.
2.2.1.2 FLOODING FACTORS FOR SURFACE FIRES The minimum extinguishing concentration required for Surface fires is 34% by volume. To determine the base CO2 agent requirement, multiply the hazard volume by the flooding factors in the following tables.
FLOODING FACTORS FOR SURFACE FIRES
English Values Vol. of Space
ft3.Vol. Factor ft3 / lb. CO2
Vol. Factorlb. CO2 / ft3.
Min. Qty. CO2lbs.
Up to 140 14 0.072 *** 141 – 500 15 0.067 10 501 – 1,600 16 0.063 35 1,601 – 4,500 18 0.056 100 4,501 – 50,000 20 0.050 250 Over 50,000 22 0.046 2500
[NFPA 12, Table 2-3.3(a)]
FLOODING FACTORS FOR SURFACE FIRES
Metric Values Vol. of Space
m3.Vol. Factor m3 / kg. CO2
Vol. Factorkg. CO2 / m3.
Min. Qty. CO2kg.
Up to 3.96 0.86 1.15 *** 3.97 – 14.15 0.93 1.07 4.5 14.16 – 45.28 0.99 1.01 15.1 45.29 – 127.35 1.11 0.90 45.4 127.36 – 1,415.0 1.25 0.80 113.5 Over 1,415.0 1.38 0.77 1135.0
[NFPA 12, Table 2-3.3(b)]
2.2.1.3 AGENT ADJUSTMENTS FOR SPECIAL CONDITIONS Additional CO2 must be supplied to compensate for specific material types, ventilation, hazard temperature, and enclosure leakage. The determination of these adjustments is explained in the following paragraphs.
See Section 3 for Sample Problems.
2.2.1.3.1 VENTILATION Where forced-air-ventilating systems are involved, they preferably shall be shutdown and/or closed before or simultaneously with the start of the CO2 system discharge. When a ventilation system cannot be shutdown prior to the CO2 system discharge, additional agent must be added to compensate for the volume expressed as cubic feet per minute (cfm) leaving the enclosure. This information is variable and will depend upon the type and capacity of the air handling system(s) present.
The additional agent required is determined by multiplying the volume moved (cfm) during the required holding period by the flooding factor used to determine the base quantity required. This amount must also be multiplied by the material conversion factor (See Section 2.2.3.3) when the design concentration for the protected space is greater than 34%. The additional agent is supplied through the regular piping distribution system.

SECTION 2 – DESIGN
Page: 6 of 45 Carbon Dioxide Revision: B Manual P/N C06-018 Revision Date: April, 2008
2.2.1.3.2 UNCLOSEABLE OPENINGS Uncloseable openings in a protected hazard must be compensated for by providing additional CO2. The additional quantity of CO2 must equal the total anticipated quantity of CO2 agent that will be lost through the openings during the required agent hold time.
Use the Leakage Compensation Chart below to determine the leak rate for the area due to the uncloseable openings. Multiply that leak rate by the total area of the opening(s) and the discharge time to determine the amount of additional CO2 agent required. If the quantity of CO2 agent required for loss compensation exceeds the base agent quantity requirement for a surface-type hazard, the system can be designed for Local Application.Consult NFPA 12 for further clarification.
To determine the additional amount of CO2 required compensating for the leakage, proceed as follows:
Find the intersection of the vertical line (representing the distance from the center of an opening to the top of the enclosure) in feet and the diagonal line (representing the design concentration of CO2).
Follow a horizontal line left to the “Leakage Rate” axis to determine the leakage rate value in lbs/min/ft2.
Determine the equivalent metric value by using the conversion value of 1 lb/min/ft.2 = 4.89 kg/min/m2.
EXCEPTION: If the opening(s) is in the side wall(s) only, divide the area of the opening(s) by two. It is assumed that one-half of the opening will provide fresh air intake while the other half allows CO2 leakage. If the opening(s) is in the ceiling, no additional CO2 is required to compensate for this opening(s).
Leak
age
Rat
e (lb
s/ft2 /m
in)
Center of Opening to Ceiling (ft) [NFPA 12, Figure A-2-3 (b)]

SECTION 2 – DESIGN
Carbon Dioxide Page: 7 of 45 Manual P/N C06-018 Revision: 2 Revision Date: April, 2008
2.2.1.3.3 CONCENTRATION ADJUSTMENT FOR SPECIAL MATERIALS Some products and/or materials require a higher extinguishing concentration of CO2 due to their specific chemical characteristics. Therefore, the design concentration must be adjusted by a “Material Conversion Factor” if any of these materials are present. To accomplish this adjustment, first determine the quantity of CO2 required at a 34% base concentration. Then, locate the specific material or product in the following table and note its required extinguishing concentration. The table below lists some of the more common liquids and gases, and the established CO2 extinguishing concentrations required for each. Consult Fike Corporation, Product Support Services, for required concentrations for any chemicals not listed below.
MINIMUM CARBON DIOXIDE EXTINGUISHING CONCENTRATIONS
Material or Product Min.
Conc.%
Material or Product Min.
Conc.%
Material or Product Min.Conc. %
Acetylene 66 Ethane 40 JP-4 36 Acetone 34 Ethyl Alcohol 43 Kerosene 34 Aviation Gas – Grades 115/145 36 Ethyl Ether 46 Methane 34
Benzol, Benzene 37 Ethylene 49 Methyl Acetate 35 Butadiene 41 Ethylene Dichloride 34 Methyl Alcohol 40 Butane 34 Ethylene Oxide 53 Methyl Butene-I 36
Butane-I 37 Gasoline 34 Methyl Ethyl Ketone (MEK) 40
Carbon Disulfide 72 Hexane 35 Methyl Formate 39 Carbon Monoxide 64 Higher Paraffin Hydrocarbons 34 Pentane 35 Coal or Natural Gas 37 Hydrogen 75 Propane 36 Cyclopropane 37 Hydrogen Sulfide 36 Propylene 36 Diethyl Ether 40 Isobutane 36 Quench/Lube Oils 34 Dimethyl Ether 40 Isobutylene 34 Toluene 40
Dowtherm 46 Isobutyl Formate 34 [NFPA 12, Table 2-3.2.1]

SECTION 2 – DESIGN
Page: 8 of 45 Carbon Dioxide Revision: B Manual P/N C06-018 Revision Date: April, 2008
Next, find the minimum concentration percentage required at the bottom of the chart below. Follow the minimum concentration percent line up, until it intersects with the curve line. Then, follow the horizontal line to the left for the conversion factor. Multiply the base CO2 requirement (in pounds/kilograms) by the conversion factor to determine the amount of agent required for that particular material.
CAUTION: When a system design involves multiple fuel sources, always use the highest required concentration for any of the materials or products present within the protected hazard; regardless of the stored quantity.
2.2.1.3.4 TEMPERATURE CONSIDERATIONS There are two areas of concern as it relates to temperature:
1) The temperature of the hazard being protected 2) The temperature range of the area where the agent storage cylinder(s) is/are located
2.2.1.3.4.1 HIGH TEMPERATURES When protecting hazards where the normal operating temperature is greater than 200°F (93.3°C), the amount of CO2 required must be increased. For every 5 degrees above 200°F (93.3°C), an additional one percent (1%) increase in the calculated quantity of CO2 agent must be provided.
2.2.1.3.4.2 LOW TEMPERATURES When the protected hazard has a normal operating temperature of less than 0°F (-17.8°C), the amount of CO2agent required must be increased. For every 1 degree below 0°F (-17.8°C), an additional one percent (1%) increase in the calculated quantity of CO2 agent must be provided.
Material Conversion Chart
Minimum Design CO2 Concentration (%) [NFPA 12, Figure 2-3.4]
Con
vers
ion
Fact
or

SECTION 2 – DESIGN
Carbon Dioxide Page: 9 of 45 Manual P/N C06-018 Revision: 2 Revision Date: April, 2008
2.2.1.3.4.3 CYLINDER STORAGE TEMPERATURES The CO2 cylinders must be located / installed in an area that falls within the temperature limitations for each system type. Where storage temperatures fall outside of the ranges stated, additional measures such as enclosures, heating, or cooling shall be provided.
1) For Total-Flooding systems, the cylinder(s) must be stored within a temperature range of 0o to 130oF(-18o to 54oC).
2) For Local Application systems, the cylinder(s) must be stored within a temperature range of 32o to 120oF(0o to 49oC).
2.2.1.4 POWER / FUEL SOURCE CONSIDERATION All electrical power and fuel sources must be shutdown prior to CO2 system discharge. This is to remove any ignition source(s) and the potential of re-flash within the hazard(s) being protected.
2.2.1.5 PRESSURE OPERATED SIRENS Pressure operated sirens that operate off of the CO2 supply must be compensated for when determining the amount of agent required. Agent consumption for each siren is approximately 6 pounds per minute. If the siren(s) is located within the protected space, additional agent compensation is not necessary.
2.2.1.6 MINIMUM DISCHARGE TIME / SURFACE FIRE APPLICATION For surface-type applications, the calculated agent quantity must be discharged within 1 minute. This includes any compensation made for materials, ventilation, temperature, and/or uncloseable openings.
2.2.1.7 SPECIAL LIQUIDS If a hazard contains a liquid having an auto ignition temperature below its boiling point, (i.e. paraffin wax and cooking oils), the CO2 concentration shall be maintained for a period sufficient for the liquid temperature to cool below its auto ignition temperature. In this circumstance, the minimum liquid discharge time shall be 3 minutes.

SECTION 2 – DESIGN
Page: 10 of 45 Carbon Dioxide Revision: B Manual P/N C06-018 Revision Date: April, 2008
2.2.2 TOTAL FLOOD / DEEP-SEATED FIRE SYSTEMS Deep-Seated hazards are those in which the materials involved are subject to smoldering fire conditions.Generally, this involves “Class A” products such as wood, paper, cloth, or any similar material that leaves a carbon ash residue. The quantity of CO2 necessary for a Deep-Seated hazard is based on tight enclosures.After the design concentration is reached, the concentration shall be maintained for a substantial period of time; but not less than 20 minutes. Any possible leakage shall be given special consideration since no allowance is included in the basic flooding factors.
TOTAL FLOOD – DEEP-SEATED FIRE SYSTEM DESIGN FLOW CHART
Below 0° F 0° to 200° F Above 200° F
2.2.2.1 HAZARD VOLUME Determine the volume of the hazard by multiplying (length) x (width) x (height). For total-flood applications, the volume can be reduced to exclude any permanent, non-removable, or impermeable structures from the overall volume of the protected space.
Determine Hazard
Flooding
Special Condition Adjustments
Ventilation
Uncloseable Openings
No Correction
Required
+1% per +1% per 5
Nozzles Required
Agent Required – Bill of Material

SECTION 2 – DESIGN
Carbon Dioxide Page: 11 of 45 Manual P/N C06-018 Revision: 2 Revision Date: April, 2008
2.2.2.2 FLOODING FACTORS FOR DEEP-SEATED FIRES The flooding factor used for a system design is based on the specific hazard being protected. To determine the base quantity of CO2 agent required, multiply the hazard volume by a flooding factor selected from the following table.
FLOODING FACTORS FOR SPECIFIC HAZARDS DesignConc. Ft3 / lb. CO2 lb. CO2 / ft3 m3 / kg. CO2 kg. CO2 / m3 Specific Hazard
50% 10 0.100 0.62 1.60 Dry electrical hazards in general. (Spaces 0 - 2,000 ft3./ 56.6 m3)
50% 12 0.083(200 lb/min) 0.75 1.33
(91 kg/min) Dry electrical hazards
(Spaces over 2,000 ft 3 / 56.6 m3)
65% 8 0.125 0.50 2.00 Record or bulk paper storage, ducts & covered trenches
75% 6 0.166 0.38 2.66 Fur storage vaults, dust collectors, etc.
[NFPA 12, Table 2-4.2.1]
2.2.2.3 AGENT ADJUSTMENTS FOR SPECIAL CONDITIONS Additional CO2 must be supplied to compensate for specific material types, ventilation, hazard temperature, and enclosure leakage. The determination of these adjustments is explained in the following paragraphs.
See Section 3, Sample Problems for additional information regarding the following conditions.
2.2.2.3.1 VENTILATION Where forced-air-ventilating systems are involved, they preferably shall be shutdown and/or closed before or simultaneously with the start of the CO2 system discharge. When a ventilation system cannot be shutdown prior to the CO2 system discharge, additional agent must be added to compensate for the volume expressed as cubic feet per minute (cfm) leaving the enclosure. This information is variable and will depend upon the type and capacity of the air handling system(s) present.
The additional agent required is determined by multiplying the volume moved (cfm) during the required holding period by the flooding factor used to determine the base quantity required. The additional agent is supplied through the regular piping distribution system.

SECTION 2 – DESIGN
Page: 12 of 45 Carbon Dioxide Revision: B Manual P/N C06-018 Revision Date: April, 2008
2.2.2.3.2 UNCLOSEABLE OPENINGS Uncloseable openings in a protected hazard must be compensated for by providing additional CO2. The additional quantity of CO2 must equal the total anticipated quantity of CO2 agent that will be lost through the openings during the required agent hold time.
Use the Leakage Compensation Chart below to determine the leak rate for the area due to the uncloseable openings. Multiply that leak rate by the total area of the opening(s) and the discharge time to determine the amount of additional CO2 agent required.
For deep-seated hazards, uncloseable openings shall be restricted to those bordering or actually in the ceiling when the size of the openings exceed the pressure relief venting requirements, Per NFPA12.
To determine the additional amount of CO2 required compensating for the leakage, proceed as follows:
Find the intersection of the vertical line (representing the distance from the center of an opening to the top of the enclosure) in feet and the diagonal line (representing the design concentration of CO2).
Follow a horizontal line left to the “Leakage Rate” axis to determine the leakage rate value in lbs/min/ft2.
Determine the equivalent metric value by using the conversion value of 1 lb/min/ft2 = 4.89 kg/min/m2.
EXCEPTION: If the opening(s) is in the side wall(s) only, divide the area of the opening(s) by two. It is assumed that one-half of the opening will provide fresh air intake while the other half allows CO2 leakage. If the opening(s) is in the ceiling, no additional CO2 is required to compensate for this opening(s).
Center of Opening to Ceiling (ft) [NFPA 12, Figure A-2-3 (b)]
Leak
age
Rat
e (lb
s/ft2 /m
in)

SECTION 2 – DESIGN
Carbon Dioxide Page: 13 of 45 Manual P/N C06-018 Revision: 2 Revision Date: April, 2008
2.2.2.3.3 TEMPERATURE CONSIDERATIONS There are two areas of concern as it relates to temperature:
1) The temperature of the hazard being protected 2) The temperature range of the area where the agent storage cylinder(s) is/are located
2.2.2.3.3.1 HIGH TEMPERATURES When protecting hazards where the normal operating temperature is greater than 200°F (93.3°C), the amount of CO2 required must be increased. For every 5 degrees above 200°F (93.3°C), an additional one percent (1%) increase in the calculated quantity of CO2 agent must be provided.
2.2.2.3.3.2 LOW TEMPERATURES When the protected hazard has a normal operating temperature of less than 0°F (-17.8°C), the amount of CO2 agent required must be increased. For every 1 degree below 0°F (-17.8°C), an additional one percent (1%) increase in the calculated quantity of CO2 agent must be provided.
2.2.2.3.3.3 CYLINDER STORAGE TEMPERATURES The CO2 cylinders must be located / installed in an area that falls within the temperature limitations for each system type. Where storage temperatures fall outside of the ranges stated, additional measures such as enclosures, heating, or cooling shall be provided.
1) For Total-Flooding systems, the cylinder(s) must be stored within a temperature range of 0oF to 130oF(-18oC to 54oC).
2) For Local Application systems, the cylinder(s) must be stored within a temperature range of 32oF to 120oF(0oC to 49oC).
2.2.2.4 POWER / FUEL SOURCE CONSIDERATION All electrical power and fuel sources must be shutdown prior to system discharge. This is to remove any ignition source(s) and the potential of re-flash within the hazard(s) being protected.
2.2.2.5 PRESSURE OPERATED SIRENS Pressure operated sirens that operate off of the CO2 supply must be compensated for when determining the amount of agent required. Agent consumption for each siren is approximately 6 pounds per minute. If the siren(s) is located within the protected space, additional agent compensation is not necessary.
2.2.2.6 DISCHARGE DURATION / FLOW RATE Deep-Seated hazard systems are discharged at a slower flow rate and for a longer duration to counter-act the characteristics of a smoldering fire. For Deep-Seated fires, the design concentration shall be achieved within 7 minutes, but at a flow rate that will provide a concentration of 30% within 2 minutes. To calculate the minimum flow rate for a 30% concentration, multiply the hazard volume by 0.043 (0.688 for metric units). This will determine the amount of CO2 to be discharged within 2 minutes. Dividing the resultant quantity of CO2 by two provides the required flow rate in pounds (kg) of CO2 per minute.
For Deep-Seated hazards requiring a 75% concentration, the flow rate required to discharge within 7 minutes is greater than the 30% requirement stated above, and must be used.
2.2.2.7 PRESSURE RELIEF VENTING Leakage from doors, windows, and dampers, though not easily calculated, or apparent have been found to provide sufficient relief venting for the system without the need for additional venting. Even “tight” spaces such as vaults, freezers, and ductwork have also been found to provide adequate venting under normal conditions.

SECTION 2 – DESIGN
Page: 14 of 45 Carbon Dioxide Revision: B Manual P/N C06-018 Revision Date: April, 2008
2.2.3 COMBINED SURFACE FIRE AND DEEP SEATED HAZARDS Some protected spaces may contain both Surface Fire hazards (such as flammable liquids or solids) and Deep-Seated hazards (such as wood, paper or cloth) within the same enclosure. Whenever this situation occurs, the system discharge flow rate must be adjusted to satisfy the Surface Fire requirements FIRST, while still satisfying the requirements for the Deep-Seated Fire. Therefore, the CO2 must be discharged within 1 minute to satisfy the Surface Fire requirements and maintain the 20 minute hold time requirement associated with a Deep-Seated Fire.
2.2.4 NOZZLE SELECTION All Fike nozzle types are acceptable for use in Total Flood applications. Each nozzle has its own discharge characteristics and recommended range of flow rates. This information will assist the system designer in determining which nozzle is the most appropriate to use for each application.
2.2.4.1 RADIAL NOZZLES The Radial Nozzle (P/N C80-041 thru C80-046) is machined from brass and is available in 1/2”, 3/4”, and 1” NPT sizes. They are available in 180 degree and 360 degree discharge patterns. Approved for Total Flood applications only, the Radial Nozzle offers flexibility and a variety of options to the system designer.
RADIAL NOZZLES
Nozzle Flow Rates Available Spacing and/or
Description Minimum Maximum Recommended OrificeCodes
Height above Floor
C80-041 – 360° 1/2” NPT
25 lbs./min (11.3 kg/min)
160 lbs./min (72.6 kg/min)
100 lbs./min (45.4 kg/min)
3.5 thru 13
20 feet (6.1 m)
C80-042 – 180° 1/2” NPT
25 lbs./min (11.3 kg/min)
160 lbs./min (72.6 kg/min)
100 lbs./min (45.4 kg/min)
3.5 thru 13
20 feet (6.1 m)
C80-043 – 360° 3/4” NPT
120 lbs./min (54.4 kg/min)
200 lbs./min (90.7 kg/min)
150 lbs./min (68.0 kg/min)
10 thru 19
25 feet (6.1 m)
C80-044 – 180° 3/4” NPT
120 lbs./min (54.4 kg/min)
200 lbs./min (90.7 kg/min)
150 lbs./min (68.0 kg/min)
10 thru 17
25 feet (6.1 m)
C80-045 – 360° 1” NPT
220 lbs./min (99.8 kg/min)
300 lbs./min (136.1 kg/min)
250 lbs./min (113.4 kg/min)
15 thru 25
30 feet (6.1 m)
C80-046 – 180° 1” NPT
220 lbs./min (99.8 kg/min)
300 lbs./min (136.1 kg/min)
250 lbs./min (113.4 kg/min)
15 thru 25
30 feet (6.1 m)
2.2.4.2 BAFFLE NOZZLE The Baffle Nozzle (P/N C80-030) provides a 180-degree, fan-shaped discharge pattern that makes it acceptable for perimeter mounting around the protected hazard space. The Baffle Nozzle is machined from brass and has a 1/2” NPT male pipe thread connection.
BAFFLE NOZZLE – P/N C80-030 Flow Rates Available Spacing and/or
Minimum Maximum Recommended Orifice Codes Height above Floor
25 lbs./min (11.3 kg/min)
160 lbs./min (72.6 kg/min)
75 lbs./min (34.0 kg/min)
1 thru 13.5
20 feet (6.1 m)

SECTION 2 – DESIGN
Carbon Dioxide Page: 15 of 45 Manual P/N C06-018 Revision: 2 Revision Date: April, 2008
2.2.4.3 VENT NOZZLE Vent Nozzles (P/N C80-020B and C80-020S) are primarily installed in ductwork and small enclosures such as shallow, covered pits; covered trenches, electrical switches and electrical cabinets. The discharge pattern is a narrow, 120-degree cone shape. The Vent Nozzle is machined from brass or stainless steel and has a 1/2" NPT pipe thread on each end. The 1/2" NPT male thread on the discharge end allows the Vent Nozzle to be mounted on the outside of a protected hazard. This results in easier installation and access, as well as preventing blockage of the nozzle due to dirty airflow and/or atmospheres.
External mounting is accomplished by using the Vent Nozzle Flange Mounting Kit (P/N C80-1013) complete with Mylar dirt seal.
VENT NOZZLE – P/N C80-020 Flow Rates Available Spacing and/or
Minimum Maximum Recommended Orifice Codes Height above Floor
10 lbs./min (4.5 kg/min)
120 lbs./min (54.4 kg/min)
60 lbs./min (27.2 kg/min)
1 thru 13.5 Special Application
2.2.4.4 “S” TYPE NOZZLE “S” Type Nozzles (P/N C80-010) can be used for both Total-Flood and Local Application hazard designs. They are particularly effective when specific objects within the hazard area need to be protected. The “S” Type Nozzle has a circular shaped discharge pattern. The bell shaped “S” Nozzle is spun from a single stock piece and provided with a 1/2” NPT female pipe thread connection. The nozzle uses a brass or stainless steel nozzle insert that contains 2 or 4 orifice holes depending upon the orifice code value requested. With the insert in position within the nozzle, an extremely “soft” CO2 discharge is realized; thus making the “S” Type Nozzle well suited for use in hazard areas were small or loose items could be dislodged and propelled about the protected space during a system discharge.
The “S” Type Nozzle can be mounted outside a protected space by using the “S” Type Nozzle Flange Mounting Kit (P/N C80-1018) complete with Mylar dirt seal.
“S” TYPE NOZZLE – P/N C80-010 Flow Rates Available Spacing and/or
Minimum Maximum Recommended Orifice Codes Height above Floor
15 lbs./min (6.8 kg/min)
130 lbs./min (59.0 kg/min)
75 lbs./min (34.0 kg/min)
1 thru 11.0
20 feet (6.1 m)
2.2.4.5 NOZZLE STRAINER Nozzle Strainers (P/N C02-1181) are required on Radial Nozzles having an orifice code of 7, or less, and all other nozzles having an orifice code of 3, or less. Nozzle Strainers do not come with the nozzles and must be ordered separately.

SECTION 2 – DESIGN
Page: 16 of 45 Carbon Dioxide Revision: B Manual P/N C06-018 Revision Date: April, 2008
2.3 LOCAL APPLICATION SYSTEMS A Local Application System consists of a fixed supply of CO2 agent permanently connected to a system of fixed piping with nozzles designed to discharge the CO2 directly into the fire for the protection of a specific piece of equipment or surface. Flammable liquids, gases, and shallow solids may be protected where the hazard is not enclosed, or where leakage prohibits the use of a Total Flooding System. Some examples of such hazards are dip tanks, quench tanks, spray booths, oil-filled transformers and hydraulic pump/reservoir systems.
Local Application Systems are divided into two design classifications, depending upon the method of application required:
1) Rate-by-Area System Design 2) Rate-by-Volume System Design
WARNING: Local Application CO2 systems cannot be applied to deep-seated or smoldering fire hazards that require longer discharge durations to ensure complete extinguishment.
2.3.1 GENERAL REQUIREMENTS Local Application Systems shall be designed, installed, tested, and maintained in accordance with applicable requirements in NFPA 12, and with the additional requirements set forth in this section of this manual.
The hazard area must be isolated from other hazards and combustibles in order to keep a fire from spreading outside the protected area. All areas that may become coated by combustible liquids due to spillage, leakage, or splashing, are considered to be part of the hazard; as well as all associated materials that may extend into, or out of, the protected space.
2.3.2 SAFETY REQUIREMENTS The discharge of carbon dioxide in fire-extinguishing concentration creates serious hazards personnel due to obscuration of vision and reduction of oxygen concentration below that which will support life; not only in the immediate area of discharge, but in adjacent areas into which the gas may migrate. Consideration shall be given to the potential for personnel to become trapped or enter into a space made hazardous by the CO2 discharge.Refer to NFPA 12 for safeguards necessary to prevent injury or death to personnel.
2.3.3 DISCHARGE DURATION REQUIREMENTS When designing a Local Application System, the minimum effective discharge time used for computing CO2 agent quantity shall be 30 seconds. This shall be increased to compensate for any additional hazard condition(s) that would require a longer cooling period to assure complete extinguishment of the fire.
When the fuel has an auto-ignition point below its boiling point, such as paraffin wax and cooking oils, the effective discharge time shall be increased to permit cooling of the fuel to prevent re-ignition. For this application, the minimum liquid discharge time shall be 3 minutes.
2.3.4 RADIANT HEATING Where there is a possibility that metal, or other materials, can become heated above the ignition temperature of the hazard fuel, the effective discharge time shall be increased to allow adequate cooling time.
2.3.5 STORAGE REQUIREMENTS The storage requirement is the quantity of CO2 required for a Local Application System. This quantity is based on the discharge flow rate required to blanket the “Hazard Area” or “Assumed Volume” being protected. Since flow rate is calculated in terms of lbs. per minute; and the required discharge time is 30 seconds, the system flow rate must be multiplied by 0.5 minutes (30 seconds). Furthermore, since the hazard is not totally enclosed in the case of Local Application Systems, only the LIQUID PORTION of the discharge may be considered to be effective. Therefore, the quantity of CO2 agent supplied for a Local Application system shall also be increased by 40%, (multiplied by 1.4), to compensate for the ineffective vapor portion of the discharge .

SECTION 2 – DESIGN
Carbon Dioxide Page: 17 of 45 Manual P/N C06-018 Revision: 2 Revision Date: April, 2008
2.3.6 LOCAL APPLICATION / RATE-BY-AREA DESIGN METHOD The Rate-by-Area design method is used to protect two dimensional, horizontal surfaces and low-level objects.The hazard can consist of a flammable solid, a liquid surface, or a coated surface.
A “liquid surface” is any pool of liquid 0.25” (6 mm) or more in depth.
A “coated surface” is defined as pools of liquid less than 0.25” (6 mm) deep, accumulating over a total area exceeding 10% of the protected surface.
2.3.6.1 NOZZLE DETERMINATION The Rate-by-Area method of protection utilizes the “S” Type Nozzle, which directs the CO2 agent discharge in a specific pattern toward the protected surface. This method of agent application is effective only when the proper agent flow rate and nozzle height are applied to a specific coverage area.
2.3.6.2 NUMBER AND LOCATION OF NOZZLES The number and location of the nozzles is based upon the height of the nozzle(s) above the hazard, and the size of the surface to be protected. When evaluating the size of the hazard area, both sides of the protected “square” (length and width) must be taken into consideration when determining the location and quantity of nozzles required.
Each nozzle is rated to protect a single, square segment of protected surface area as shown in the figure below.Therefore, irregular-shaped hazard surfaces must be carefully subdivided to provide for complete coverage. Once all these factors have been established, the correct nozzle flow rate can be determined. Each nozzle combination as shown on the selection chart provide the maximum coverage dimensions for liquid or coated surfaces based upon the height above the protected surface, and the required flow rate for each nozzle.
"S" TYPE NOZZLE
H
L1
L2
L1
L2
L1 = LIQUID SURFACEL2 = COATED SURFACE

SECTION 2 – DESIGN
Page: 18 of 45 Carbon Dioxide Revision: B Manual P/N C06-018 Revision Date: April, 2008
DETERMINE NUMBER OF NOZZLE ROWSTo determine the number of nozzle rows required to cover the width of the protected surface, divide the width by the surface dimension (Liquid = L1; Coated = L2) from the Rate-by-Area nozzle coverage chart (See Section 2.7.3). The appropriate dimension (L1 or L2) is dependent upon the nozzle height (H) above the protected surface. The result identifies the number of nozzle ROWS that are required.
DETERMINE NOZZLE ROWS English Units Metric Units
Liquid Surface:Width of Surface = 10’-0” Nozzle Height = 3’-0”
L1 = 2.68 ft. (L1 taken from Rate-by-Area Chart. See Section 2.7.3) Nozzles Rows required = 10.0’ 2.68’ = 3.7 = 4 Rows
Liquid Surface:Width of Surface = 3.05m Nozzle Height = 0.91 m
L1 = 0.82 m (L1 taken from Rate-by-Area Chart. See Section 2.7.3) Nozzles Rows required = 3.05 0.82 = 3.7 = 4 Rows
Coated Surface:Width of Surface = 10’-0” Nozzle Height = 3’-0”
L2 = 3.22 ft. (L2 taken from Rate-by-Area Chart. See Section 2.7.3) Nozzles Rows required = 10.0’ 3.22’ = 3.11 = 4 Rows
Coated Surface:Width of Surface = 3.05 m Nozzle Height = 0.91 m
L2 = 0.98 m (L2 taken from Rate-by-Area Chart. See Section 2.7.3) Nozzles Rows required = 3.05 0.98 = 3.11 = 4 Rows
SURFACELIQUID COATED SURFACE
12.0'
10.0'
(1.52 m) (3.66 m)
(3.05 m)
5.0'
NOZZLE HEIGHT = 3'-0" (0.91 m)

SECTION 2 – DESIGN
Carbon Dioxide Page: 19 of 45 Manual P/N C06-018 Revision: 2 Revision Date: April, 2008
DETERMINE NUMBER OF NOZZLES PER ROW To determine the number of nozzles per row required, divide the length of the protected space by the surface dimension (Liquid = L1; Coated = L2) from the Rate-by-Area nozzle coverage chart (See Section 2.7.3). The appropriate dimension (L1 or L2) is dependent upon the nozzle height (H) above the protected surface. The result identifies the number of nozzles required IN EACH ROW.
DETERMINE NUMBER OF NOZZLES IN EACH ROW English Units Metric Units
Liquid Surface:Length of Surface = 5’-0” Nozzle Height = 3’-0”
L1 = 2.68 ft. (L1 taken from Rate-by-Area Chart. See Section 2.7.3) Nozzles Per Row = 5.0’ 2.68’ = 1.87 = 2 Nozzles/Row
Liquid Surface:Length of Surface = 1.52 m Nozzle Height = 0.91 m
L1 = 0.82 m (L1 taken from Rate-by-Area Chart. See Section 2.7.3) Nozzles Per Row = 1.52 0.82 = 1.9 = 2 Nozzles/Row
Coated Surface:Length of Surface = 12’-0” Nozzle Height = 3’-0”
L2 = 3.22 ft. (L2 taken from Rate-by-Area Chart. See Section 2.7.3)
Nozzles Per Row = 12.0’ 3.22’ = 3.11 = 4 Nozzles/Row
Coated Surface:Length of Surface = 3.66 m Nozzle Height = 0.91 m
L2 = 0.98 m (L2 taken from Rate-by-Area Chart. See Section 2.7.3) Nozzles Per Row = 3.66 0.98 = 3.7 = 4 Nozzles/Row
DETERMINE TOTAL NUMBER OF NOZZLES The total number of nozzles is now calculated by multiplying the number of rows by the number of nozzles required for each row.
12.0'5.0'
10.0'(3.05 m)
(1.52 m) (3.66 m)
LIQUID COATEDSURFACE SURFACE
DRAIN BOARDDIP TANK
NOZZLE HEIGHT = 3.0' (0.91 M)
2.68'
2.68'
(0.82 m)
(0.82 m) (0.98 m)3.22'
3.22'(0.98 m)
"S" NOZZLE(TYP.)
COVERAGEAREA (TYP.)

SECTION 2 – DESIGN
Page: 20 of 45 Carbon Dioxide Revision: B Manual P/N C06-018 Revision Date: April, 2008
2.3.6.3 NOZZLE / APPLICATION FLOW RATE Two things are needed to determine the appropriate nozzle flow rate:
a) The height of the nozzles above the surface to be protected b) The number of nozzles required
The following Rate-by-Area nozzle selection chart must be used to determine the nozzle flow criteria for each system application.
Rate-by-Area Nozzle Coverage Chart Nozzle Height (H)
feet (meters)Flow Rate
lb./min.(kg/min.)
Liquid Surface Side of square (Y)
feet (meters)
Coated Surface Side of square (X)
feet (meters)
1.00 (0.30) 1 19.4 (8.8) 1.75 (0.53) 2.10 (0.64)1.25 (0.38) 1 21.6 (9.8) 1.84 (0.56) 2.21 (0.67)1.50 (0.46) 1 24.0 (10.9) 1.94 (0.59) 2.33 (0.71)1.75 (0.53) 1 26.6 (12.1) 2.04 (0.62) 2.45 (0.75)2.00 (0.61) 2 29.6 (13.4) 2.15 (0.66) 2.58 (0.79)2.25 (0.69) 2 33.5 (15.2) 2.28 (0.69) 2.74 (0.84)2.50 (0.76) 2 37.3 (17.0) 2.41 (0.73) 2.89 (0.88)2.75 (0.84) 2 41.2 (18.7) 2.54 (0.77) 3.05 (0.93)3.00 (0.91) 2 45.1 (20.5) 2.68 (0.82) 3.22 (0.98)3.25 (0.99) 2 49.0 (22.2) 2.79 (0.85) 3.35 (1.02)3.50 (1.07) 2 52.8 (24.0) 2.90 (0.88) 3.48 (1.06)3.75 (1.14) 2 56.7 (25.7) 3.01 (0.92) 3.61 (1.10)4.00 (1.22) 2 60.6 (27.5) 3.13 (0.95) 3.76 (1.15)4.25 (1.30) 2 64.4 (29.2) 3.23 (0.98) 3.88 (1.18)4.50 (1.37) 2 68.3 (31.0) 3.33 (1.01) 4.00 (1.22)4.75 (1.45) 2 72.2 (32.8) 3.43 (1.05) 4.12 (1.26)5.00 (1.52) 2 76.1 (34.5) 3.54 (1.08) 4.25 (1.30)5.25 (1.60) 1 76.5 (34.7) 3.54 (1.08) 4.25 (1.30)5.50 (1.68) 1 79.5 (36.1) 3.54 (1.08) 4.25 (1.30)5.75 (1.75) 1 82.5 (37.4) 3.54 (1.08) 4.25 (1.30)6.00 (1.83) 1 85.5 (38.8) 3.54 (1.08) 4.25 (1.30)6.25 (1.91) 1 89.3 (40.5) 3.54 (1.08) 4.25 (1.30)6.50 (1.98) 1 92.3 (41.9) 3.54 (1.08) 4.25 (1.30)6.75 (2.06) 1 95.3 (43.2) 3.54 (1.08) 4.25 (1.30)7.00 (2.13) 1 99.0 (44.9) 3.54 (1.08) 4.25 (1.30)7.25 (2.20) 1 102.0 (46.3) 3.54 (1.08) 4.25 (1.30)7.50 (2.29) 1 105.0 (47.6) 3.54 (1.08) 4.25 (1.30)7.75 (2.36) 1 108.0 (49.0) 3.54 (1.08) 4.25 (1.30)8.00 (2.44) 1 110.0 (50.0) 3.54 (1.08) 4.25 (1.30)
1 Fike recommended values. 2 UL listed and FM approved values (FZKX.EX4447)

SECTION 2 – DESIGN
Carbon Dioxide Page: 21 of 45 Manual P/N C06-018 Revision: 2 Revision Date: April, 2008
2.3.6.4 NOZZLE PLACEMENT Nozzles should be installed in a location that will enable an extinguishing “Envelope” to be developed around the entire protected area. Any obstructions that could interfere with the flow of CO2 from the nozzle to the protected surface, must be avoided to ensure proper system performance. If obstructions cannot be avoided, the nozzle(s) must be repositioned or relocated. If additional nozzles are required, the agent quantity will have to be revised accordingly. Nozzles should be installed perpendicular to the hazard and centered over the area protected by the nozzle whenever possible. They may also be installed at an angle between 45 degrees and 90 degrees from the plane of the hazard surface.
For nozzles mounted at an angle, the height used in determining the flow rate and area coverage shall bethe distance from the aiming point on the protected surface to the face of the nozzle; as measured along the axis of the nozzle.
2.3.6.4.1 NOZZLE AIMING FACTORS Nozzles shall be aimed at a point that is a specific distance in from the edge of the protected surface. This distance, from the near side of the protected surface to the aiming point, is calculated by multiplying the coverage dimension (L1 or L2) of the nozzle’s protected area by the Aiming Factor found in the table below. The concept is illustrated below the table.
Aiming Factors for Angular Placement of Nozzles
Discharge Angle (Degrees from plane of hazard surface)
Aiming Factor (Fractional amount of coverage area)
45 - 60 1/4 (0.25) 60 - 75 1/4 - 3/8 (0.25 - 0.375) 75 - 90 3/8 - 1/2 (0.375 - 0.50)
90 (Perpendicular) 1/2 (Centered)
2.3.6.5 DETERMINE SYSTEM FLOW RATE AND AGENT QUANTITY REQUIRED The quantity of agent required for the system is determined by the number of nozzles required to cover the projected surface area x the flow rate per nozzle as determined by the Rate-by-Area Coverage Chart (See Section 2.7.3). This gives you the total system flow rate that will be utilized to determine pipe sizes.
Take the system flow rate x 1.4 to compensate for the liquid portion of the discharge and x 0.5 (the minimum effective discharge time) to determine the total agent quantity required to protect the area being protected.
H
90°
W x 1/2
W
H
W
60°

SECTION 2 – DESIGN
Page: 22 of 45 Carbon Dioxide Revision: B Manual P/N C06-018 Revision Date: April, 2008
2.3.7 LOCAL APPLICATION / RATE-BY-VOLUME DESIGN METHOD The Rate-by-Volume protection method is used to protect three-dimensional hazards that are NOT enclosed, or those hazards that have too high a leakage rate to protect with a Total Flood / Surface Type system. The total flow rate requirement for the system will be based upon an “Assumed Enclosure” volume that surrounds the hazard. The dimensions of the assumed walls and ceiling of this “enclosure” shall be at least 2 ft. (0.61 m) greater than the extreme dimensions of the specific hazard itself; unless actual walls are involved. The assumed enclosure shall be based on an actual closed floor unless special provisions are made to take care of bottom conditions. In addition, no deductions shall be made for solid objects within this volume.
The type of hazards that can be protected by local application / rate-by-volume can be put in three different hazard / design categories: 1) Three dimensional hazards without an enclosure 2) Three dimensional hazard in large room with permanent perimeter walls 3) Enclosure with leakage, where leakage prohibits the use of a total flooding system
The following information describes the procedure required to design a Local Application rate-by-volume CO2system and the steps in the order they must be accomplished:
2.3.7.1 LOCAL APPLICATION DESIGN: GENERAL Local application can be successfully applied only when the fuels present a surface fire hazard exclusively. Stationary pieces of machinery or permanent flammable liquid storage tanks could be candidates for local application. A flammable liquids storage room for drum storage would usually be more practically protected with a total flooding system.
A robot which is designed to move about an enclosure might be difficult to protect with local application; there have been cases, however, where such mobile equipment has been protected with a local application system attached to the equipment itself.
a. Isolation of hazards The fire hazard must be isolated from other hazards or combustibles so that fire will not spread outside the area protected. The entire hazard MUST be protected. For example, it is NOT sufficient to protect only the surface of a dip tank. All associated drainboards, coated stock, hoods and ducts. . . in short, anything that might extend the fire outside the immediate area of concern. . .must also be protected.
b. Interexposed hazards A series of interexposed hazards may be divided into sub-groups or sections with the consideration and approval of the authority having jurisdiction. Systems so designed must be capable of providing immediate, independent protection to adjacent hazards. Printing presses are sometimes protected with such “zoned” coverage. A group of presses may be protected with the provision that if fire should spread to one or more adjacent groups these likewise will be immediately covered with CO2.
c. Location of hazard Local application hazards may be located within an enclosure or out of doors. If a hazard is out of doors, protection will be greatly simplified if an enclosure is provided. The effects of wind and air currents must be considered in protecting an outdoor hazard.
Assuming that the hazard is suitable for local application, the designer must choose between local application rate-by-area and local application rate-by-volume.
a. If the hazard is a two dimensional hazard such as a vat or dip tank, rate-by-area is generally the simplest method of design.
b. If the hazard is two dimensional AND is partially or completely surrounded by permanent walls which are nearby (within 4 to 8 feet / 1.22 to 2.44m) and the walls extend at least two feet above the top of the hazard, rate-by-volume design may provide good protection with less carbon dioxide required.
c. If the hazard is three dimensional, rate-by-volume is generally the simplest method of design. Printing presses and metal working (steel or aluminum) mills are common examples. A drain board with coated stock conveyed above it is another example where rate-by-volume would be preferred.

SECTION 2 – DESIGN
Carbon Dioxide Page: 23 of 45 Manual P/N C06-018 Revision: 2 Revision Date: April, 2008
2.3.7.2 LOCAL APPLICATION DESIGN – RATE-BY-VOLUME FOR THREE DIMENSIONAL HAZARDS WITHOUT AN ENCLOSURE
The following steps need to be followed to determine the assumed volume, the CO2 flow rate, the location of nozzles and the quantity of carbon dioxide required when protecting a three dimensional hazard without an enclosure.
2.3.7.2.1 DETERMINE THE ASSUMED VOLUME The “assumed volume” is calculated by first adding 2 feet (0.61m) to the extreme dimensions for all four sides and the top of the protected hazard (NFPA 12 requirement).The following conditions apply:
No volume deductions for objects within the protected volume can be used. No assumed volume dimension may be less than 4.0 feet (1.22m). Requires a “Closed Floor” or:
a) If the hazard being protected does not have a closed floor, the volume below must be added to the hazard volume and additional CO2 agent and nozzles must be provided to cover the space below the hazard.b) If the area below is being protected by a CO2 system that is discharged at the same time and has a discharge time equal to or greater than the rate-by-volume system discharge time, the agent discharged below can be considered the same as a “closed floor”. c) If the openings in the floor are relatively small they can be screened using local application – rate by area nozzle coverage directed into the rate-by-volume hazard area.
(English Units)(Length + 2.0’ + 2.0’) x (Width + 2.0’ + 2.0’) x (Height + 2.0’) = Assumed Volume
Length (L): 7.5 + 2.0 + 2.0 = 11.5 Width (W): 3.5 + 2.0 + 2.0 = 7.5 Height (H): 4.5 + 2.0 + 0 = 6.5
Assumed Volume: 11.5 x 7.5 x 6.5 = 561 ft3
(Metric Units) (Length + 0.61m + 0.61m) x (Width + 0.61m + 0.61m) x (Height + 0.61m) = Assumed Volume
Length (L): 2.29 + 0.61 + 0.61 = 3.51 Width (W): 1.07 + 0.61 + 0.61 = 2.29 Height (H): 1.37 + 0.61 = 1.98
Assumed Volume: 3.51 x 2.29 x 1.98 = 7.78m3

SECTION 2 – DESIGN
Page: 24 of 45 Carbon Dioxide Revision: B Manual P/N C06-018 Revision Date: April, 2008
2.3.7.2.2 DETERMINE SYSTEM FLOW RATE For systems protecting a three dimensional hazard without an enclosure the flow rate per unit volume is 1 lb./min./ft3 (16 kg./min./m3) per NFPA 12.
The method used to calculate the system flow rate is: (English Units) Assumed Volume x System Discharge Rate = System Flow Rate (ft3) (lb./min./ft3) (lbs./min.)
561 x 1 = 561
(Metric Units) Assumed Volume x System Discharge Rate = System Flow Rate (m3) (kg./min./m3) (kg./min.)
15.92 x 16 = 254.72
2.3.7.2.3 DETERMINE QUANTITY OF NOZZLES REQUIRED The quantity of nozzles is determined by dividing the system flow rate by the nozzle flow rate (based on the distance from the hazard) and rounding the value up to the nearest whole number of nozzles.
The number of nozzles required for a rate-by-volume system to protect a hazard in an open area is based on following factors:
Distance the nozzle(s) is located from the hazard; distance used is from the nozzle to the closest point of the hazard being protected.
Nozzle flow rate established for the distance (the flow rate should be equal to that used for rate-by-area application)
If the hazard contains liquids in depth, nozzles directed at such liquids shall have flow rate not greater than that for which the nozzle is listed at the given distance from a liquid surface. Use of the higher flow rates approved for “wetted surfaces” could produce splashing of the liquid and possibly spread the fire outside the protected volume.
Total Flood type nozzles are not acceptable for use on rate-by-volume systems.
Considerations for Nozzle Location and Selection:
Although this guide is presented to help standardize the design of local application rate-by-volume systems, it is possible to layout systems for a given local application hazard in a variety of ways. By using different styles of nozzles and locating nozzles in various positions several design layouts (all meeting the basic requirements of NFPA 12) are possible for any given hazard.
The quantity of agent required for a given hazard may vary somewhat depending on nozzle choice but the approach to calculating agent quantity should be consistent regardless of nozzle type.
Remember, rate-by-volume local application is intended to apply a blanket of carbon dioxide over all portions of the hazard for a sufficient time to extinguish the flames and permit the fuel and surroundings to cool below the auto-ignition temperature of the fuel. While the approach is based on engineering principles, there is some “art” in positioning nozzles so the discharge will tend to stay confined about the hazard.For rate by volume systems, nozzles should be located so that the discharge will be naturally contained about the hazard as much as possible. For hazards which do not have walls or partitions bounding them, pairs of nozzles discharging in opposing directions are generally preferred over a single row of nozzles all discharging parallel to each other. If the hazard is tall and fuel can collect on the floor or lower levels multiple levels of nozzles may be advisable to assure complete coverage of all areas.

SECTION 2 – DESIGN
Carbon Dioxide Page: 25 of 45 Manual P/N C06-018 Revision: 2 Revision Date: April, 2008
ACCEPTABLE METHOD PREFERRED METHOD
While the arrangement on the left may meet the requirements of NFPA 12, the arrangement on the right will provide better coverage of the hazard and better “confinement” of the carbon dioxide around the hazard. If a hazard is bounded by perimeter walls, the walls can provide a natural “confinement” of the carbon dioxide which can be enhanced by the positioning of the nozzles.
It is advisable to consider the discharge pattern of the nozzle as well as the required flow rate when selecting the type of nozzle to be used for a given hazard.
A final note on nozzle locations: Locate nozzles where they will not be subject to displacement by operations in and around the hazard. For example, a nozzle located “head high” in a walkway around a printing press will not likely be left in position for long. The first pressman who hits his head on the nozzle will likely swing it off to the side – out of his way – but also discharging into empty space. Likewise nozzles that could be hit by parts on a conveyor are unlikely to stay in the required position.
Rate-by-Volume Nozzle Chart Nozzle Height (H)
feet (meters)Flow Rate
lb./min.(kg/min.)
Coated Surface Side of square (X)
feet (meters)
1.00 (0.30) 1 19.4 (8.8) 2.10 (0.64)1.25 (0.38) 1 21.6 (9.8) 2.21 (0.67)1.50 (0.46) 1 24.0 (10.9) 2.33 (0.71)1.75 (0.53) 1 26.6 (12.1) 2.45 (0.75)2.00 (0.61) 2 29.6 (13.4) 2.58 (0.79)2.25 (0.69) 2 33.5 (15.2) 2.74 (0.84)2.50 (0.76) 2 37.3 (17.0) 2.89 (0.88)2.75 (0.84) 2 41.2 (18.7) 3.05 (0.93)3.00 (0.91) 2 45.1 (20.5) 3.22 (0.98)3.25 (0.99) 2 49.0 (22.2) 3.35 (1.02)3.50 (1.07) 2 52.8 (24.0) 3.48 (1.06)3.75 (1.14) 2 56.7 (25.7) 3.61 (1.10)4.00 (1.22) 2 60.6 (27.5) 3.76 (1.15)
Hazard
(side view)
Hazard
(side view)

SECTION 2 – DESIGN
Page: 26 of 45 Carbon Dioxide Revision: B Manual P/N C06-018 Revision Date: April, 2008
4.25 (1.30) 2 64.4 (29.2) 3.88 (1.18)4.50 (1.37) 2 68.3 (31.0) 4.00 (1.22)4.75 (1.45) 2 72.2 (32.8) 4.12 (1.26)5.00 (1.52) 2 76.1 (34.5) 4.25 (1.30)5.25 (1.60) 1 76.5 (34.7) 4.25 (1.30)5.50 (1.68) 1 79.5 (36.1) 4.25 (1.30)5.75 (1.75) 1 82.5 (37.4) 4.25 (1.30)6.00 (1.83) 1 85.5 (38.8) 4.25 (1.30)6.25 (1.91) 1 89.3 (40.5) 4.25 (1.30)6.50 (1.98) 1 92.3 (41.9) 4.25 (1.30)6.75 (2.06) 1 95.3 (43.2) 4.25 (1.30)7.00 (2.13) 1 99.0 (44.9) 4.25 (1.30)7.25 (2.20) 1 102.0 (46.3) 4.25 (1.30)7.50 (2.29) 1 105.0 (47.6) 4.25 (1.30)7.75 (2.36) 1 108.0 (49.0) 4.25 (1.30)8.00 (2.44) 1 110.0 (50.0) 4.25 (1.30)
1 Fike recommended values. 2 UL listed values (FZKX.EX4447)
The method used to calculate the nozzle quantity is: (English Units) System Flow Rate ÷ Minimum Nozzle Flow Rate @ Distance from Hazard = Total Nozzles Required (lbs./min.) (lbs./min.) (ft.)
561 ÷ 105.0 @ 7.5’ = 5.34, round up to 6
(Metric Units)System Flow Rate ÷ Minimum Nozzle Flow Rate @ Distance from Hazard = Total Nozzles Required (kg./min.) (kg./min.) (m)
254.72 ÷ 47.6 @ 2.8m = 5.35, round up to 6
2.3.7.2.4 REVISED SYSTEM DESIGN FLOW RATE After nozzles are positioned and the flow rate for each nozzle is determined (based on the distance from the nozzle to hazard), the system flow rate is recalculated based on the combined nozzle flow rates: (English Units) Nozzle(s) Required x Nozzle Flow Rate = System Flow Rate (lbs./min.) (lbs./min.)
6 x 105.0 = 630
(Metric Units) Nozzle(s) Required x Nozzle Flow Rate = System Flow Rate (kg./min.) (kg./min.) 6 x 47.6 = 285.6
Hazard
(Side View)
Nozzle Distance from Hazard

SECTION 2 – DESIGN
Carbon Dioxide Page: 27 of 45 Manual P/N C06-018 Revision: 2 Revision Date: April, 2008
2.3.7.2.5 DETERMINE QUANTITY AGENT REQUIRED The quantity of CO2 required to protect the “assumed” volume is calculated by multiplying the revised system flow rate by the minimum liquid agent discharge time1 and then multiplying that result by the liquid CO2 compensation factor. The method used to calculate is: (English Units) System Flow Rate x 1.4 x Discharge Time1 = Qty. CO2 Req’d (lbs./min.) (Liquid CO2 Compensation) (minute) (lbs.)
630 x 1.4 x 0.5 = 441
(Metric Units) System Flow Rate x 1.4 x Discharge Time1 = Qty. CO2 Req’d (kg./min.) (Liquid CO2 Compensation) (minute) (kg.)
285.6 x 1.4 x 0.5 = 200
1 Minimum liquid discharge time per NFPA 12 is 30 seconds with the exception of hazards containing a fuel whose auto ignition temperature is less than its boiling point (example, paraffin wax). In the later case, the minimum liquid discharge time is 3 minutes. In all cases, the minimum liquid discharge time will need to be increased if necessary to allow adequate cooling time for metal and otherobjects that can become heated above the auto-ignition temperature of the fuel to cool below the fuel’s auto-ignition temperature.
2.3.7.2.6 DETERMINE QUANTITY AGENT SUPPLY The total amount of CO2 to be supplied is calculated by rounding the quantity of agent required to the nearest whole cylinder size.
(NOTE: The cylinder capacity chosen is normally based on the most economical choice, taking into accountcylinder capacity, the amount of CO2, piloting hardware, cylinder racking, etc. In the examples below the option to use either 75 lb cylinders or 100 lb cylinders was provided to allow the user of this guide a clearer understanding of how the total amount of carbon dioxide supplied is derived.)
(English Units) 441 lbs. ÷ 75 lbs./cylinder = 5.88, round up to 6 (75 lb. cylinders); 6 x 75 lb./cylinder = 450 lbs. supplied or441 lbs. ÷ 100 lbs./cylinder = 4.41, round up to 5 (100 lb. cylinders); 5 x 100 lb./cylinder = 500 lbs. supplied
(Metric Units) 200 kg. ÷ 34 kg./cylinder = 5.88, round up to 6 (34 kg. cylinders); 6 x 34 kg./cylinder = 204 kg. supplied or200 kg. ÷ 45.4 kg./cylinder = 4.41, round up to 5 (45.4 kg. cylinders); 5 x 45.4 kg./cylinder = 227 kg. supplied
2.3.7.2.7 LAYOUT PIPE NETWORK AND RUN HYDRAULIC CALCULATIONBefore final design is completed a piping layout of the system should be finalized and a hydraulic calculationneeds to be run to verify that the predicted liquid discharge time for each nozzle equals or exceeds the minimum liquid discharge time. If necessary, adjust the quantity of CO2 provided in storage to deliver liquid flow at each nozzle for the minimum liquid discharge time required.

SECTION 2 – DESIGN
Page: 28 of 45 Carbon Dioxide Revision: B Manual P/N C06-018 Revision Date: April, 2008
Hazard
PermanentWall
Closed Floor
2.0’ (0.61m) Minimum
(side view)
2.3.7.3 LOCAL APPLICATION DESIGN – RATE-BY-VOLUME FOR THREE DIMENSIONAL HAZARD IN LARGE ROOM WITH PERMANENT PERIMETER WALLS
The following steps need to be followed to determine the assumed volume, the CO2 flow rate, the location of nozzles and the quantity of carbon dioxide required when protecting a three dimensional hazard in a large roomwith permanent perimeter walls.
2.3.7.3.1 DETERMINE ASSUMED VOLUME WITH PERMANENT PERIMETER WALLS The “assumed volume” is calculated by first adding 2 feet (0.61m) to the extreme dimensions for all four sides and the top of the protected hazard or by using the actual distance to the permanent wall(s) (NFPA 12 requirement).The following conditions apply:
No volume deductions for objects within the protected volume can be used. No assumed volume dimension may be less than 4.0 feet (1.22m). Requires a “Closed Floor” or:
a) If the hazard being protected does not have a closed floor, the volume below must be added to the hazard volume and additional CO2 agent and nozzles must be provided to cover the space below the hazard.b) If the area below is being protected by a CO2 system that is discharged at the same time and has a discharge time equal to or greater than the rate-by-volume system discharge time, the agent discharged below can be considered the same as a “closed floor”. c) If the openings in the floor are relatively small they can be screened using local application – rate by area nozzle coverage directed into the rate-by-volume hazard area.
Permanent perimeter wall(s) which are not part of the hazard itself may be used to reduce the required system flow rate.
The presence of such walls can reduce the discharge rate from 1 lb/min/ft3 to 0.25 lb/min/ft3 depending on the area of permanent perimeter walls that apply (Per NFPA 12).
Permanent perimeter wall(s) can reduce the amount of CO2 required if all the following conditions are present: the permanent walls are close to the hazard permanent walls extend at least 2.0’ (0.61m) above hazard the walls do not form part of the hazard itself.
General Rules: If permanent perimeter walls are more than the following distances from the hazard being protected:
1 perimeter wall = 4.0’ (1.22m) 2 perimeter walls = 5.0’ (1.53m) 3 perimeter walls = 6.0’ (1.83m) 4 perimeter walls = 8.0’ (2.44m)
the amount of agent required to protect the hazard will be less by adding 2.0’ (0.61m) to each side.
For sides of a hazard which are not bounded by walls, add 2 feet (0.61m) to each dimension. For sides of hazard which are bounded by walls, use the actual distance from the hazard to the wall. Add 2 feet (0.61m) to topmost dimension of the hazard to determine the assumed volume height.

SECTION 2 – DESIGN
Carbon Dioxide Page: 29 of 45 Manual P/N C06-018 Revision: 2 Revision Date: April, 2008
Assumed Volume = Length x Width x Height + 2.0’ (0.61m) to any side not defined by permanent walls or actual distance to permanent wall(s).
(English Units)Length (L): 7.5 + 4.0 + 2.0 = 13.5 Width (W): 3.5 + 4.0 + 2.0 = 9.5 Height (H): 4.5 + 2.0 = 6.5
Assumed Volume: 13.5 x 9.5 x 6.5 = 834 ft3
(Metric Units) Length (L): 2.28 + 1.22 + 0.61 = 4.11 Width (W): 1.07 + 1.22 + 0.61 = 2.90 Height (H): 1.37 + 0.61 = 1.98
Assumed Volume: 4.11 x 2.90 x 1.98 = 23.60 m3
2.3.7.3.2 DETERMINE TOTAL SURFACE AREA OF ASSUMED VOLUME PERIMETER WALLS (English Units)(Assumed Length x Assumed Height) x 2 = Surface Area of Front & Back (Assumed Width x Assumed Height) x 2 = Surface Area of 2 Sides (ft.) (ft.) = Total Surface Area (ft2)
Front & Back: 2 [(7.5 + 4.0 + 2.0) x (4.5 + 2.0] = 175.5 ft2Sides: 2 [(3.5 + 4.0 + 2.0) x (4.5 + 2.0] = 123.5 ft2
Total Surface Area: 175.5 + 123.5 = 299.0 ft2
(Metric Units) (Assumed Length x Assumed Height) x 2 = Surface Area of Front & Back (Assumed Width x Assumed Height) x 2 = Surface Area of 2 Sides = Total Surface Area (m) (m) (m2)
Front & Back: 2 [(2.28 + 1.22 + 0.61) x (1.37 + 0.61)] = 16.28 m2
Sides: 2 [(1.07 + 1.22 + 0.61) x (1.37 + 0.61)] = 11.48 m2
Total Surface Area: 16.28 + 11.48 = 27.76 m2
(top view)
2.0’
2.0’
3.5’
7.5’ 4.0’
4.0’
Ht. = 4
Front Surface
Side 1 Surface Side 2
Surface
Back Surface
(top view)
2.0’
2.0’
3.5’7.5’
(Use actual distance)
4.0’
4.0’
Ht. = 4.5’
SIDE A 7.5’ + 4.0’ +
SIDE B 3.5’ + 4.0’ +
Boundary of AssumedVolume

SECTION 2 – DESIGN
Page: 30 of 45 Carbon Dioxide Revision: B Manual P/N C06-018 Revision Date: April, 2008
2.3.7.3.3 DETERMINE TOTAL OPEN AREA The total “open area” is defined as the surface area (length x height) of each open wall or portion thereof added together. The “open” width dimensions include the additional “assumed” 2 feet (0.61m) and /or the distance to the fixed perimeter wall. The actual height of the hazard PLUS 2 feet (0.61m) is the height of each boundary of the assumed volume.(English Units) [(Length + 2.0 + 2.0) x (Height + 2.0)] + [(Width + 2.0 + 2.0) x (Height + 2.0)] = Total Open Area (ft.) (ft.) (ft.) (ft.) (ft2)or actual distance to permanent perimeter wall(s)
[(7.5 + 4.0 + 2.0) x (6.5)] + [(3.5 + 4.0 + 2.0) x (6.5)]or 87.75 + 61.75 Total Open Area = 149.5 ft2
(Metric Units) [(Length + 0.61 + 0.61) x (Height + 0.61)] + [(Width + 0.61 + 0.61) x (Height + 0.61)] = Total Open Area (m) (m) (m) (m) (m2)or actual distance to permanent perimeter wall(s)
[(2.29 + 1.22 + 0.61) x (1.98)] + [(1.07 + 1.22 + 0.61) x (1.98)]or 8.16 + 5.74 Total Open Area = 13.9 m2
2.3.7.3.4 DETERMINE OPEN AREA PERCENTAGE The open area percentage (expressed as a decimal) is determined by: (English Units) Open Area ÷ Total Surface Area = Open Area Percentage (ft2) (ft2) (decimal)
149.5 ÷ 299.0 = 0.50 (50%)
(Metric Units) Open Area ÷ Total Surface Area = Open Area Percentage (m2) (m2) (decimal)
13.9 ÷ 27.76 = 0.50 (50%)
(top view)
2.0’
2.0’
3.5’
7.5’ 4.0’
4.0’
Ht. = 4.5’
Front Wall (Open) 7.5+4.0+2.0
SideWall(Open) 3.5+4.0+2.0
SideWall(Closed)
Back Wall (Closed)

SECTION 2 – DESIGN
Carbon Dioxide Page: 31 of 45 Manual P/N C06-018 Revision: 2 Revision Date: April, 2008
2.3.7.3.5 DETERMINE CLOSED AREA PERCENTAGE The closed area percentage (expressed as a decimal) is determined by: (English & Metric Units) 1 – Open Area Percentage = Closed Area Percentage (decimal) (decimal)
1 – 0.5 = 0.5
2.3.7.3.6 DETERMINE FLOW RATE PER UNIT VOLUME The method used to calculate the flow rate per unit volume is shown in the figure below.
Local Application Rate By Volume
0 0.1 0.2 0.3 0.4 0.5 0.6 0.7 0.8 0.9 1
Fraction of perimeter enclosed
Rate-by-volumeMathematical methodFlow Rate per unit volume = 1 - (.75 X % enclosed (expressed as a decimal))
(English & Metric Units) 1 – (Closed Area Percentage x 0.75) = Flow Rate per unit volume (decimal) (decimal)
1 – (0.50 x 0.75) = 0.625
2.3.7.3.7 DETERMINE REDUCED FLOW RATE The method used to calculate the reduced flow rate is: (English Units)Flow Rate per Unit Volume x Assumed Volume = Reduced Flow Rate (decimal) (ft3) (lbs./min.)
0.625 x 834 = 521.25
(Metric Units) Flow Rate per Unit Volume x Assumed Volume = Reduced Flow Rate
Metric English 16.0 1.000
15.2 0.950
13.6 0.850
12.0 0.750
10.4 0.650
8.8 0.550
7.2 0.450
5.6 0.350
4.0 0.250

SECTION 2 – DESIGN
Page: 32 of 45 Carbon Dioxide Revision: B Manual P/N C06-018 Revision Date: April, 2008
(decimal) (m3) (kg./min.)
(0.625 x 16) x 23.60 = 236
2.3.7.3.7 DETERMINE QUANTITY OF NOZZLES REQUIRED The quantity of nozzles is determined by dividing the system flow rate by the nozzle flow rate (based on the distance from the hazard) and rounding the value up to the nearest whole number of nozzles.
The number of nozzles required for a rate-by-volume system to protect a hazard in an open area is based on following factors:
Distance the nozzle(s) is located from the hazard; distance used is from the nozzle to the closest point of the hazard being protected.
Nozzle flow rate established for the distance (the flow rate should be equal to that used for rate-by-area application)
If the hazard contains liquids in depth, nozzles directed at such liquids shall have flow rate not greater than that for which the nozzle is listed at the given distance from a liquid surface. Use of the higher flow rates approved for “wetted surfaces” could produce splashing of the liquid and possibly spread the fire outside the protected volume.
Total Flood type nozzles are not acceptable for use on rate-by-volume systems.
Considerations for Nozzle Location and Selection:
Although this guide is presented to help standardize the design of local application rate-by-volume systems, it is possible to layout systems for a given local application hazard in a variety of ways. By using different styles of nozzles and locating nozzles in various positions several design layouts (all meeting the basic requirements of NFPA 12) are possible for any given hazard.
The quantity of agent required for a given hazard may vary somewhat depending on nozzle choice but the approach to calculating agent quantity should be consistent regardless of nozzle type.
Remember, rate-by-volume local application is intended to apply a blanket of carbon dioxide over all portions of the hazard for a sufficient time to extinguish the flames and permit the fuel and surroundings to cool below the auto-ignition temperature of the fuel. While the approach is based on engineering principles, there is some “art” in positioning nozzles so the discharge will tend to stay confined about the hazard.For rate by volume systems, nozzles should be located so that the discharge will be naturally contained about the hazard as much as possible. If the hazard is tall and fuel can collect on the floor or lower levels multiple levels of nozzles may be advisable to assure complete coverage of all areas.
If a hazard is bounded by perimeter walls, the walls can provide a natural “confinement” of the carbon dioxide which can be enhanced by the positioning of the nozzles.
In the sketch below, the arrangement on the left may be adequate but the arrangement on the right is likely to produce better confinement of the carbon dioxide about the hazard.

SECTION 2 – DESIGN
Carbon Dioxide Page: 33 of 45 Manual P/N C06-018 Revision: 2 Revision Date: April, 2008
ACCEPTABLE METHOD PREFERRED METHOD
It is advisable to consider the discharge pattern of the nozzle as well as the required flow rate when selecting the type of nozzle to be used for a given hazard.
A final note on nozzle locations: Locate nozzles where they will not be subject to displacement by operations in and around the hazard. For example, a nozzle located “head high” in a walkway around a printing press will not likely be left in position for long. The first pressman who hits his head on the nozzle will likely swing it off to the side – out of his way – but also discharging into empty space. Likewise nozzles that could be hit by parts on a conveyor are unlikely to stay in the required position.
Rate-by-Volume Nozzle Chart Nozzle Height (H)
feet (meters)Flow Rate
lb./min.(kg/min.)
Coated Surface Side of square (X)
feet (meters)
1.00 (0.30) 1 19.4 (8.8) 2.10 (0.64)1.25 (0.38) 1 21.6 (9.8) 2.21 (0.67)1.50 (0.46) 1 24.0 (10.9) 2.33 (0.71)1.75 (0.53) 1 26.6 (12.1) 2.45 (0.75)2.00 (0.61) 2 29.6 (13.4) 2.58 (0.79)2.25 (0.69) 2 33.5 (15.2) 2.74 (0.84)2.50 (0.76) 2 37.3 (17.0) 2.89 (0.88)2.75 (0.84) 2 41.2 (18.7) 3.05 (0.93)3.00 (0.91) 2 45.1 (20.5) 3.22 (0.98)3.25 (0.99) 2 49.0 (22.2) 3.35 (1.02)3.50 (1.07) 2 52.8 (24.0) 3.48 (1.06)3.75 (1.14) 2 56.7 (25.7) 3.61 (1.10)4.00 (1.22) 2 60.6 (27.5) 3.76 (1.15)4.25 (1.30) 2 64.4 (29.2) 3.88 (1.18)4.50 (1.37) 2 68.3 (31.0) 4.00 (1.22)4.75 (1.45) 2 72.2 (32.8) 4.12 (1.26)5.00 (1.52) 2 76.1 (34.5) 4.25 (1.30)
Hazard
(side view)
Hazard
(side view)

SECTION 2 – DESIGN
Page: 34 of 45 Carbon Dioxide Revision: B Manual P/N C06-018 Revision Date: April, 2008
5.25 (1.60) 1 76.5 (34.7) 4.25 (1.30)5.50 (1.68) 1 79.5 (36.1) 4.25 (1.30)5.75 (1.75) 1 82.5 (37.4) 4.25 (1.30)6.00 (1.83) 1 85.5 (38.8) 4.25 (1.30)6.25 (1.91) 1 89.3 (40.5) 4.25 (1.30)6.50 (1.98) 1 92.3 (41.9) 4.25 (1.30)6.75 (2.06) 1 95.3 (43.2) 4.25 (1.30)7.00 (2.13) 1 99.0 (44.9) 4.25 (1.30)7.25 (2.20) 1 102.0 (46.3) 4.25 (1.30)7.50 (2.29) 1 105.0 (47.6) 4.25 (1.30)7.75 (2.36) 1 108.0 (49.0) 4.25 (1.30)8.00 (2.44) 1 110.0 (50.0) 4.25 (1.30)
1 Fike recommended values. 2 UL listed values (FZKX.EX4447)
The method used to calculate the nozzle quantity is:(English Units)System Flow Rate ÷ Minimum Nozzle Flow Rate @ Distance from Hazard = Total Nozzles Required (lbs./min.) (lbs./min.) (ft.)
522 ÷ 76.1 @ 5.0 = 6.86, round up to 7
(Metric Units) System Flow Rate ÷ Minimum Nozzle Flow Rate @ Distance from Hazard = Total Nozzles Required (kg./min.) (kg./min.) (m)
236 ÷ 34.5 @ 1.52 = 6.86, round up to 7
2.3.7.3.8 DETERMINE REVISED SYSTEM FLOW RATE After nozzles are positioned and the flow rate for each nozzle is determined (based on the distance from the nozzle to hazard), the system flow rate is recalculated based on the combined nozzle flow rates: (English Units)Nozzle(s) Required x Nozzle Flow Rate = System Flow Rate (lbs./min.) (lbs./min.)
7 x 76.1 = 532.7
(Metric Units) Nozzle(s) Required x Nozzle Flow Rate = System Flow Rate
(Side View)
Hazard
Nozzle Distance from Hazard

SECTION 2 – DESIGN
Carbon Dioxide Page: 35 of 45 Manual P/N C06-018 Revision: 2 Revision Date: April, 2008
(kg./min.) (kg./min.)
7 x 34.5 = 241.5
2.3.7.3.9 DETERMINE QUANTITY OF AGENT REQUIRED The quantity of CO2 required to protect the “assumed” volume is calculated by multiplying the revised system flow rate by the minimum liquid agent discharge time1 and then multiplying that result by the liquid CO2 compensation factor. The method used to calculate is: (English Units) System Flow Rate x 1.4 x Discharge Time1 = Qty. CO2 Req’d (lbs./min.) (Liquid CO2 Compensation) (minute) (lbs.)
533 x 1.4 x 0.5 = 374
(Metric Units) System Flow Rate x 1.4 x Discharge Time1 = Qty. CO2 Req’d (kg./min.) (Liquid CO2 Compensation) (minute) (kg.)
242 x 1.4 x 0.5 = 170
1 Minimum liquid discharge time per NFPA 12 is 30 seconds with the exception of hazards containing a fuel whose auto ignition temperature is less than its boiling point (example, paraffin wax). In the later case, the minimum liquid discharge time is 3 minutes. In all cases, the minimum liquid discharge time will need to be increased if necessary to allow adequate cooling time for metal and otherobjects that can become heated above the auto-ignition temperature of the fuel to cool below the fuel’s auto-ignition temperature.
2.3.7.3.10 DETERMINE QUANTITY OF AGENT SUPPLIED The total amount of CO2 to be supplied is calculated by rounding the quantity of agent required to the nearest whole cylinder size.
(NOTE: The cylinder capacity chosen is normally based on the most economical choice, taking into accountcylinder capacity, the amount of CO2, piloting hardware, cylinder racking, etc. In the examples below the option to use either 75 lb cylinders or 100 lb cylinders was provided to allow the user of this guide a clearer understanding of how the total amount of carbon dioxide supplied is derived.) (English Units) 374 lbs. ÷ 75 lb./cylinder = 4.98, round up to 5 (75 lb. cylinders); 5 x 75 lb./cylinder = 375 lbs. supplied or374 lbs. ÷ 100 lb./cylinder = 3.74, round up to 4 (100 lb cylinders); 4 x 100 lb./cylinder = 400 lbs supplied
(Metric Units) 170 kg. ÷ 34 kg./cylinder = 5, 5 x 34 kg./cylinder = 170 kg. supplied or170 kg. ÷ 45.4 kg./cylinder = 3.74, round up to 4 (45.4 kg. cylinders); 4 x 45.4 kg./cylinder = 181.6 kg. supplied
2.3.7.3.11 LAYOUT PIPE NETWORK AND RUN HYDRAULIC CALCULATIONBefore final design is completed a piping layout of the system should be finalized and a hydraulic calculationneeds to be run to verify that the predicted liquid discharge time for each nozzle equals or exceeds the minimum liquid discharge time. If necessary, adjust the quantity of CO2 provided in storage to deliver liquid flow at each nozzle for the minimum liquid discharge time required.

SECTION 2 – DESIGN
Page: 36 of 45 Carbon Dioxide Revision: B Manual P/N C06-018 Revision Date: April, 2008
2.3.7.4 LOCAL APPLICATION DESIGN – RATE-BY-VOLUME FOR ENCLOSURE WITH LEAKAGE, WHERE LEAKAGE PROHIBITS THE USE OF A TOTAL FLOODING SYSTEM
2.3.7.4.1 DETERMINE ASSUMED VOLUME OF ENCLOSURE Calculate by adding 2 feet (0.61m) to any side or opening not defined by permanent wall(s). (English Units) Length: 16.0 + 0 = 16.0 Width: 6.0 + 2.0 = 8.0 (open side) Height: 7.0 + 0 = 7.0
Plus the assumed volume for 2 openings, 1 on each end of cabinet
Length: 5.0 Width: 2.0 Height: 4.0 Assumed volume = (16.0 x 8.0 x 7.0) + 2 x (5.0 x 2.0 x 4.0) = 976 ft3
(Metric Units) Length: 4.88 + 0 = 4.88 Width: 1.83 + 0.61 = 2.44 (open side) Height: 2.13 + 0 = 2.13
Plus the assumed volume for 2 openings, 1 on each end of cabinet
Length: 1.52 Width: 0.61 Height: 1.22 Assumed volume = (4.88 x 2.44 x 2.13) + 2 x (1.52 x 0.61 x 1.22) = 30.95 m3
2.3.7.4.2 DETERMINE TOTAL SURFACE AREA OF ASSUMED VOLUME ENCLOSURE WALLS (excludes top and bottom) (English Units) Length: 16.0 Width: 8.0 (6.0 + 2.0) Height: 7.0
Front & Back: 2 (16.0 x 7.0) = 224 ft2Sides: 2 (8.0 x 7.0) = 112 ft2Total Surface Area: 336 ft2
(Metric Units) Length: 4.88 Width: 2.44 (1.83 + 0.61) Height: 2.13
Front & Back: 2 (4.88 x 2.13) = 20.79 m2
Sides: 2 (2.44 x 2.13) = 10.39 m2
Total Surface Area: 31.28 m2
2.3.7.4.3 DETERMINE TOTAL OPEN AREA The total “open area” is defined as the surface area (length x height) of each open wall or portion thereof added together. The “open” width dimensions include the additional “assumed” 2 feet (0.61m).
4’-0”
6’-0”
16’-0”
2’-0”
5’-0”
7’-0” Ht.
2’-0”

SECTION 2 – DESIGN
Carbon Dioxide Page: 37 of 45 Manual P/N C06-018 Revision: 2 Revision Date: April, 2008
Total Open area = total surface area of each open wall or portion thereof: (English Units) Open Front: 16.0 x 7.0 = 112 ft2Opening on Sides: (5.0 x 4.0) x 2 = 40 ft2Total Open Area: 152 ft2
(Metric Units) Open Front: 4.88 x 2.13 = 10.41 m2
Opening on Sides: (1.52 x 1.22) x 2 = 3.71 m2
Total Open Area: 14.12 m2
2.3.7.4.4 DETERMINE OPEN AREA PERCENTAGE The open area percentage (expressed as a decimal) is determined by: (English Units) Open Area ÷ Total Surface Area = Open Area Percentage (ft2) (ft2) (decimal)
152 ÷ 336 = 0.452 (45.2%)
(Metric Units) Open Area ÷ Total Surface Area = Open Area Percentage (m2) (m2) (decimal)
14.12 ÷ 31.28 = 0.452 (45.2%)
2.3.7.4.5 DETERMINE CLOSED AREA PERCENTAGE The closed area percentage (expressed as a decimal) is determined by: (English & Metric Units) 1 – Open Area Percentage = Closed Area Percentage (decimal) (decimal)
1 – 0.452 = 0.548 (54.8%)
Opening SizeL=5.0’ x W=4.0’
16’-0”
8’-0” (6’-0” + 2’-0”)
Opening SizeL=5.0’ x W=4.0’

SECTION 2 – DESIGN
Page: 38 of 45 Carbon Dioxide Revision: B Manual P/N C06-018 Revision Date: April, 2008
2.3.7.4.6 DETERMINE FLOW RATE PER UNIT VOLUME The method used to calculate the flow rate per unit volume is shown in the figure below.
Local Application Rate By Volume
0 0.1 0.2 0.3 0.4 0.5 0.6 0.7 0.8 0.9 1
Fraction of perimeter enclosed
Rate-by-volumeMathematical methodFlow Rate per unit volume = 1 - (.75 X % enclosed (expressed as a decimal))
(English & Metric Units) 1 – (Closed Area Percentage x 0.75) = Flow Per Unit Volume (decimal) (lbs./min./ft3 or kg./min./m3)
1 – (0.548 x 0.75) = 0.589
2.3.7.4.7 DETERMINE REDUCTED FLOW RATE The method used to calculate the reduced flow rate is: (English Units) Flow Rate Reduction Factor x System Discharge Rate x Assumed Volume = Reduced Flow Rate(lb./min./ft3) (lb./min./ft3) (ft3) (lbs./min.)
0.589 x 1 x 976 = 575
(Metric Units) Flow Rate Reduction Factor x System Discharge Rate x Assumed Volume = Reduced Flow Rate(kg./min./m3) (kg./min./m3) (m3) (kg./min.)
0.589 x 16 x 30.95 = 291.7
2.3.7.4.8 DETERMINE QUANTITY OF NOZZLE(S) REQUIRED The quantity of nozzles is determined by dividing the system flow rate by the nozzle flow rate (based on the distance from the hazard) and rounding the value up to the nearest whole number of nozzles.
The number of nozzles required for a rate-by-volume system to protect an enclosure with openings is based on following factors:
Distance the nozzle(s) is located from the hazard; distance used is from the nozzle to the closest point of the hazard being protected or bottom of the enclosure.
Metric English 16.0 1.000
15.2 0.950
13.6 0.850
12.0 0.750
10.4 0.650
8.8 0.550
7.2 0.450
5.6 0.350
4.0 0.250

SECTION 2 – DESIGN
Carbon Dioxide Page: 39 of 45 Manual P/N C06-018 Revision: 2 Revision Date: April, 2008
Nozzle flow rate established for the distance (the flow rate should be equal to that used for rate-by-area application).
If the hazard contains liquids in depth, the “S” nozzles must be located at 1.0 feet (0.3m) or more above the liquid surface.
Total Flood type nozzles are not acceptable for use on rate-by-volume systems.
In the sketch below, the arrangement on the left is the preferred method because the nozzle is discharging away from the opening and the arrangement on the right is not recommended because the nozzle is discharging toward the opening allows faster agent loss.
ACCEPTABLE / PREFERRED METHOD NOT RECOMMENDED METHOD
Enclosure Opening
Rate-by-Volume Nozzle Chart Nozzle Height (H)
feet (meters)Flow Rate
lb./min.(kg/min.)
Coated Surface Side of square (X)
feet (meters)
1.00 (0.30) 1 19.4 (8.8) 2.10 (0.64)1.25 (0.38) 1 21.6 (9.8) 2.21 (0.67)1.50 (0.46) 1 24.0 (10.9) 2.33 (0.71)1.75 (0.53) 1 26.6 (12.1) 2.45 (0.75)2.00 (0.61) 2 29.6 (13.4) 2.58 (0.79)2.25 (0.69) 2 33.5 (15.2) 2.74 (0.84)2.50 (0.76) 2 37.3 (17.0) 2.89 (0.88)2.75 (0.84) 2 41.2 (18.7) 3.05 (0.93)3.00 (0.91) 2 45.1 (20.5) 3.22 (0.98)3.25 (0.99) 2 49.0 (22.2) 3.35 (1.02)3.50 (1.07) 2 52.8 (24.0) 3.48 (1.06)3.75 (1.14) 2 56.7 (25.7) 3.61 (1.10)4.00 (1.22) 2 60.6 (27.5) 3.76 (1.15)4.25 (1.30) 2 64.4 (29.2) 3.88 (1.18)4.50 (1.37) 2 68.3 (31.0) 4.00 (1.22)
Hazard
(side view)
Hazard
(side view)

SECTION 2 – DESIGN
Page: 40 of 45 Carbon Dioxide Revision: B Manual P/N C06-018 Revision Date: April, 2008
4.75 (1.45) 2 72.2 (32.8) 4.12 (1.26)5.00 (1.52) 2 76.1 (34.5) 4.25 (1.30)5.25 (1.60) 1 76.5 (34.7) 4.25 (1.30)5.50 (1.68) 1 79.5 (36.1) 4.25 (1.30)5.75 (1.75) 1 82.5 (37.4) 4.25 (1.30)6.00 (1.83) 1 85.5 (38.8) 4.25 (1.30)6.25 (1.91) 1 89.3 (40.5) 4.25 (1.30)6.50 (1.98) 1 92.3 (41.9) 4.25 (1.30)6.75 (2.06) 1 95.3 (43.2) 4.25 (1.30)7.00 (2.13) 1 99.0 (44.9) 4.25 (1.30)7.25 (2.20) 1 102.0 (46.3) 4.25 (1.30)7.50 (2.29) 1 105.0 (47.6) 4.25 (1.30)7.75 (2.36) 1 108.0 (49.0) 4.25 (1.30)8.00 (2.44) 1 110.0 (50.0) 4.25 (1.30)
1 Fike recommended values. 2 UL listed values (FZKX.EX4447)
The method used to calculate the nozzle quantity is:(English Units)System Flow Rate ÷ Minimum Nozzle Flow Rate @ Distance from Hazard = Total Nozzles Required (lbs./min.) (lbs./min.) (ft.)
575 ÷ 115 @ 5.0 = 5
(Metric Units) System Flow Rate ÷ Minimum Nozzle Flow Rate @ Distance from Hazard = Total Nozzles Required (kg./min.) (kg./min.) (m)
260.8 ÷ 52.16 @ 1.52 = 5
2.3.7.4.9 DETERMINE REVISED SYSTEM FLOW RATE After nozzles are positioned and the flow rate for each nozzle is determined (based on the distance from the nozzle to hazard), the system flow rate is recalculated based on the combined nozzle flow rates: (English Units) Nozzles Required x Average Nozzle Flow Rate = System Flow Rate
Hazard
(side view)
Nozzle Distance from Hazard

SECTION 2 – DESIGN
Carbon Dioxide Page: 41 of 45 Manual P/N C06-018 Revision: 2 Revision Date: April, 2008
(lbs./min.) (lbs./min.)
5 x 115 = 575
(Metric Units) Nozzles Required x Average Nozzle Flow Rate = Revised System Flow Rate (kg./min.) (kg./min.)
5 x 52.16 = 260.8
2.3.7.4.10 DETERMINE QUANTITY OF CO2 REQUIREDThe quantity of CO2 required to protect the “assumed” volume is calculated by multiplying the revised system flow rate by the minimum liquid agent discharge time1 and then multiplying that result by the liquid CO2 compensation factor. The method used to calculate is: (English Units) System Flow Rate x 1.4 x Discharge Time1 = Qty. CO2 Req’d (lbs./min.) (Liquid CO2 Compensation) (minute) (lbs.)
575.0 x 1.4 x 0.5 = 402.5
(Metric Units) System Flow Rate x 1.4 x Discharge Time1 = Qty. CO2 Req’d (kg./min.) (Liquid CO2 Compensation) (minute) (kg.)
260.8 x 1.4 x 0.5 = 182.6
1 Minimum liquid discharge time per NFPA 12 is 30 seconds with the exception of hazards containing a fuel whose auto ignition temperature is less than its boiling point (example, paraffin wax). In the later case, the minimum liquid discharge time is 3 minutes. In all cases, the minimum liquid discharge time will need to be increased if necessary to allow adequate cooling time for metal and otherobjects that can become heated above the auto-ignition temperature of the fuel to cool below the fuel’s auto-ignition temperature.
2.3.7.3.11 DETERMINE QUANTITY OF AGENT SUPPLIED The total amount of CO2 to be supplied is calculated by rounding the quantity of agent required to the nearest whole cylinder size.
(NOTE: The cylinder capacity chosen is normally based on the most economical choice, taking into accountcylinder capacity, the amount of CO2, piloting hardware, cylinder racking, etc. In the examples below the option to use either 75 lb cylinders or 100 lb cylinders was provided to allow the user of this guide a clearer understanding of how the total amount of carbon dioxide supplied is derived.)
(English Units) 402.5 lbs. ÷ 75 lb./cylinder = 5.37, round up to 6 (75 lb. cylinders); 6 x 75 lb./cylinder = 450 lbs. supplied or402.5 lbs. ÷ 100 lb./cylinder = 4.03, round up to 5 (100 lb. cylinders); 5 x 100 lb./cylinder = 500 lbs. supplied
(Metric Units)182.6 kg. ÷ 34 kg./cylinder = 5.37, round up to 6 (34 kg. cylinders); 6 x 34 kg./cylinder = 204 kg. supplied or182.6 kg. ÷ 45.4 kg./cylinder = 4.03, round up to 5 (45.4 kg. cylinders); 5 x 45.4 kg./cylinder = 227 kg. supplied
2.3.7.4.12 LAYOUT PIPE NETWORK AND RUN HYDRAULIC CALCULATION Before final design is completed a piping layout of the system should be finalized and a hydraulic calculationneeds to be run to verify that the predicted liquid discharge time for each nozzle equals or exceeds the minimum liquid discharge time. If necessary, adjust the quantity of CO2 provided in storage to deliver liquid flow at each nozzle for the minimum liquid discharge time required.

SECTION 2 – DESIGN
Page: 42 of 45 Carbon Dioxide Revision: B Manual P/N C06-018 Revision Date: April, 2008
2.4 COMBINATION TOTAL-FLOOD AND LOCAL APPLICATION SYSTEMS For applications that require a portion of the hazard to be protected with a Total-Flood system design, and another portion to be protected with a Local Application system design, the discharge rate of the Total-Flooding portion must be determined in accordance with the Local Application requirements. Therefore, the discharge time requirement is 30 seconds for a combined application system design. To determine the total CO2 agent supply required for a combined system, calculate the Total-Flood and Local Application portions of the hazard separately as described in preceding sections of this manual and add them together. However, since the discharge time requirement is 30 seconds, the flow rate requirement for the Total-Flood portion(s) must be adjusted as follows:
NOTE: To determine the flow rate required for the total-flood portion, the agent supply quantity must be divided by 0.7 1.4 x 0.5 (vapor compensation factor x discharge time in minutes) .
2.5 PIPING DISTRIBUTION SYSTEM
2.5.1 GENERAL Pipe and fittings shall be of metallic, noncombustible, materials having physical and chemical characteristics such that their deterioration under stress can be predicted with reliability. Where piping systems are installed in severely corrosive atmospheres, special corrosion-resistant materials or coatings shall be used.
2.5.2 PIPE Pipe used in CO2 systems shall be black or galvanized steel pipe conforming to ASTM A-53, seamless or electric welded, Grade A or B; or ASTM A-106, Grade A, B, or C. ASTM A-120 pipe and ordinary cast-iron pipe shall notbe used. Stainless steel pipe shall be Type 304 or Type 316 for threaded connections, or Type 304, 316, 304L, or 316L for welded connections. Pipe that is 3/4” NPT and smaller shall be permitted to be Schedule 40.Pipe that is 1” through 4” NPT shall be Schedule 80.
While the use of flexible piping system components is not recommended, it is allowed. Flexible piping system components shall be used only when there is no alternative method of installation. All flexible piping system components shall have a minimum burst pressure of 5,000 psi (34,474 kPa).
2.5.3 FITTINGS Class 300 malleable iron and/or ductile iron fittings shall be used for all nominal sizes through 2”, and forged steel fittings shall be used for all larger sizes. Flanged joints upstream of stop valves shall be Class 600, and flanged joints downstream of stop valves, or in systems with no stop valves, may be Class 300. Stainless steel fittings shall be Type 304 or 316, wrought/forged (per ASTM A-182); Class 3000, threaded or socketweld, for all sizes 1/8” through 4”.
NOTE: Class 150 lb. malleable iron and ordinary cast iron fittings, shall not be used.
2.5.3.1 OTHER APPROVED FITTINGS Welded joints, screwed, or flanged fittings (malleable or ductile iron) may be used. Mechanical grooved joint fittings may be used only if they are specifically listed for CO2 service. Flush bushings shall not be used.Where hex bushings are used for one pipe size reduction, a 3000-lb. steel bushing shall be provided to maintain adequate strength. Where hex bushings are used for more than one pipe size reduction, the materials and strength must be in accordance with those outlined in paragraph 2.5.3 above. Suitable flared, compression-type, or brazed fittings shall be used with compatible tubing. Where brazed joints are used, the brazing alloy shall have a melting point of 1,000 F (538 C), or higher.

SECTION 2 – DESIGN
Carbon Dioxide Page: 43 of 45 Manual P/N C06-018 Revision: 2 Revision Date: April, 2008
2.5.4 PIPING SUPPORT The piping system shall be securely supported with due allowance for CO2 agent thrust forces, thermal expansion / contraction, and shall not be subject to mechanical, chemical, or other damage. Where explosions are possible, the piping system shall be provided with hangers or supports that are least likely to be displaced.
NOTE: Pipe shall be reamed and cleaned before assembly, and installed in a neat, workmanlike, manner. After assembly, the entire system shall be blown out before nozzles or other discharge devices are installed.
2.5.5 VALVES All valves shall be suitable for the intended use, particularly in regard to flow capacity and operation. They shall be used only within the temperature range and other conditions for which they are listed and/or approved. Valves shall be located, installed, or suitably protected so that they are not subject to mechanical, chemical, or other damage that would render them inoperative.
Valves used in high-pressure systems and continuously under pressure shall have a minimum bursting pressure of 6,000 psi (41,369 kPa). Those valves not under continuous pressure shall have a minimum bursting pressure of 5,000 psi (34,474 kPa).
2.5.5.1 SELECTOR VALVESSelector valves allow a single agent supply to be utilized for protection of multiple hazards, reducing the total amount of agent required. They are used to direct the flow of Carbon Dioxide to a single hazard of a multiple hazard application.
NOTE: The selector valves are Factory Approvals approved.
Selector valves are shipped from the factory in the normally closed state. The Solenoid Actuator must be fired, either electrically or manually, to actuate the selector valve. The selector valve must be activated to allow the agent to flow to the selected hazard.
The Fike Cheetah panel provides solenoid circuit supervision via use of a Solenoid Release Modules (SRM).One SRM is required for each 24v solenoid.
The equivalent length of each Selector Valve must be added to the Flow Calculation.

SECTION 2 – DESIGN
Page: 44 of 45 Carbon Dioxide Revision: B Manual P/N C06-018 Revision Date: April, 2008
2.5.6 PRESSURE RELIEF PROVISIONS In piping systems where valve arrangement introduces sections of closed piping, such sections shall be equipped with pressure relief devices, or the valves shall be designed to prevent entrapment of liquid CO2. The pressure relief device(s) shall operate between 2,400 and 3,000 psi (16,547 and 20,684 kPa). Where pressure operated cylinder valves are used, a means shall be provided to vent any cylinder gas leakage from the manifold or piping system, but will prevent loss of CO2 agent when the system operates/discharges. All pressure relief devices shall be of such design, and so located, that their discharge will not injure personnel.
2.5.7 ESTIMATING PIPE SIZES Prior to performing a CO2 flow calculation, the piping system’s required pipe sizes can be estimated by using the table located below. However, this table contains “estimated” sizes only and a flow calculation must always be performed prior to the installation of any piping or discharge nozzles.
Pipe Size Estimating TablePipe Size
(Schedule) Avg. Flow Rate
US lbs/min kg/min1/2" (40) 15 - 100 6.8 - 45.4 3/4" (40) 101 - 200 45.8 - 90.7 1" (80) 201 - 350 91.2 - 158.8
1-1/4" (80) 351 - 700 159.2 - 317.5 1-1/2" (80) 701 - 1000 318.0 - 453.6
2" (80) 1001 - 1600 454.0 - 725.8 2-1/2" (80) 1601 - 2500 726.2 - 1134.0
3" (80) 2501 - 4000 1134.5 - 1814.4

SECTION 2 – DESIGN
Carbon Dioxide Page: 45 of 45 Manual P/N C06-018 Revision: 2 Revision Date: April, 2008
2.6 EQUIVALENT LENGTHS In the process of calculating flow rates and quantities of CO2 required, it is necessary to use equivalent lengths for some of the system components. These equivalent lengths are listed in the following paragraphs.
2.6.1 CHECK VALVES The equivalent lengths listed in the table below apply for either vertical or horizontal mounting.
CHECK VALVE EQUIVALENT LENGTHS
Part No. Nominal Size (NPT)
Sch. 40 ft (m)
Sch. 80 ft (m)
C02-1204 1/2” 10.0 (3.05) 5.0 (1.52)
C02-1205 3/4” 8.0 (2.44) 4.0 (1.22)
C02-1206 1" N/A 3.0 (0.91)
C02-1207 1-1/2” N/A 3.0 (0.91)
C02-1240 2" N/A 2.5 (0.76)
2.6.2 STOP / MAINTENANCE VALVES The equivalent lengths for Stop / Maintenance Valves are listed in the table below.
STOP / MAINTENANCE VALVE EQUIVALENT LENGTHS
Part No. Nominal Size (NPT)
Sch. 40 ft (m)
Sch. 80 ft (m)
C02-1210 1/2" 0.4 (0.12) N/A C02-1211 3/4" 0.51 (0.16) N/A C02-1212 1" N/A 0.6 (0.18) C02-1213 1-1/2" N/A 0.9 (0/27)
2.6.3 PNEUMATIC TIME DELAYS The equivalent lengths for Pneumatic Time Delays are listed in the table below.
PNEUMATIC TIME VALVE EQUIVALENT LENGTHS
Part No. Time Value Sch. 40 ft (m)
Sch. 80 ft (m)
C70-235 30 Sec. 55.0 (16.8) 32.0 (9.8) C70-237 60 Sec. 55.0 (16.8) 32.0 (9.8)
2.6.4 SELECTOR VALVES The equivalent lengths for Selector Valves are listed in the table below.
SELECTOR VALVE EQUIVALENT LENGTHS
Part No. Nominal Size Sch. 80 ft (m)
70-1899-10-XX 1” (25mm) 1.40 (0.43) 70-1899-15-XX 1-1/2” (40mm) 2.70 (0.82) 70-1899-20-XX 2” (50mm) 7.81 (2.38) 70-1899-30-XX 3” (80mm) 5.16 (1.57)

Carbon Dioxide Manual P/N C06-018
SSeeccttiioonn 33SSaammppllee PPrroobblleemmss

SECTION 3 – SAMPLE PROBLEMS
Carbon Dioxide Page : 1 of 31 Manual P/N C06-018 Revision: 2 Revision Date: April, 2008
3.0 SAMPLE PROBLEMS This section contains sample problems; each detailing a specific system design concept. Each sample problem provides step-by-step instructions on how to engineer each particular system design, including adjusting agent quantities for specific hazard conditions. It should be noted that each example steps through a “worst case” scenario that involves multiple special hazard conditions. Where a condition does not exist, that step is simply deleted from the process when designing a system.
3.1 TOTAL FLOOD APPLICATION SAMPLES
3.1.1 SURFACE FIRE HAZARDS Example: Flammable Liquids Storage Room
Hazard Size: 35 ft (10.67 m) long x 15 ft (4.57 m) wide x 12 ft (3.66 m) high
3.1.1.1 HAZARD VOLUME Determine the volume of the hazard being protected.
The volume is determined by multiplying: length x width x height Volume = 35 ft x 15 ft x 12 ft = 6,300 ft3 (10.67 m x 4.57 m x 3.66 m = 178.47 m3)
3.1.1.2 REQUIRED FLOODING FACTOR The flooding factor is based upon the volume of the hazard being protected.
FLOODING FACTOR (From table “Flooding Factors for Surface Fires” in Section 2.2.1.1)
English Units Metric Units 6,300 ft3 requires a volume factor of 0.050 lb CO2/ft3 178.47 m3 requires a volume factor of 0.80 kg CO2/m3
3.1.1.3 MINIMUM EXTINGUISHING QUANTITY (34% CONC.) REQUIRED The baseline amount of CO2 required for a total-flood hazard is calculated by determining the quantity required for the hazard volume at the minimum extinguishing concentration of 34%.
Minimum Extinguishing Concentration = Hazard Volume x Flooding Factor determined in previous steps.
MINIMUM EXTINGUISHING QUANTITY OF CO2 (34% CONC.)
English Units Metric Units 6,300 ft3 x .050 lb CO2/ft3 = 315 lbs 178.4 m3 x 0.8 kg CO2/m3 = 142.7 kg

SECTION 3 – SAMPLE PROBLEMS
Page: 2 of 31 Carbon Dioxide Revision: 2 Manual P/N C06-018 Revision Date: April, 2008
3.1.1.4 VENTILATION Example: Flammable Liquids Storage Room
Hazard Size: 35 ft (10.67 m) long x 15 ft (4.57 m) wide x 12 ft (3.66 m) high Ventilation Rate: 900 ft3/min (25.5 m3/min)
If the ventilation system cannot be shutdown, the quantity of CO2 must be adjusted to compensate for the loss of agent during the required holding period. This is determined by multiplying the ventilation rate x the flooding factor x the holding period.
ADDITIONAL QUANTITY OF CO2 – VENTILATION LOSS
English Units Metric Units 900 ft3/min x .050 lb CO2/ft3 = 45 lbs
45 lbs x 1 min = 45 lbs 25.5 m3/min x 0.8 kg CO2/m3 = 20.4 kg
20.4 kg x 1 min = 20.4 kg
3.1.1.5 UNCLOSEABLE OPENING(S) Example: Flammable Liquids Storage Room
Hazard Size: 35 ft (10.67 m) long x 15 ft (4.57 m) wide x 12 ft (3.66 m) high Uncloseable opening: 2 ft x 3 ft (0.61 m x 0.91 m) in sidewall; center of opening 7 ft (2.13 m) below ceiling
The adjustment for uncloseable openings is based on the size of the opening and its distance from the ceiling.
From the Leakage Compensation Chart in Section 2.2.3.2 for an opening with the center 7 ft below ceiling and required concentration of 34% is: Leakage Rate = 18 lbs of CO2 per minute per square foot of opening. Refer to the table below for the metric conversion. The metric conversion is made in this manner because the chart in Section 2.2.3.2 is in English units and the conversion must be made after the chart is used.
The area of the uncloseable opening is 2 ft (0.61 m) x 3 ft (0.91 m) = 6 ft2 (0.56 m2). The area is further reduced by half due to the opening being in the sidewall of the enclosure. 6ft2 (0.56 m2) 2 = 3ft2 (0.28 m2).
The discharge duration for surface type applications is 1 minute.
If an uncloseable opening(s) is in a sidewall, the area of the opening(s) may be divided by 2. This is based on the assumption that half of the opening provides fresh air intake, while the other half allows CO2 leakage.
ADDITIONAL QUANTITY OF CO2 REQUIRED
English Units Metric Units
18 lbs/min x 3 ft2 x 1 min = 54 lbs additional CO218 lbs/min/ft2 x 4.89 = 88 kg/min/m2
88 kg/min x 0.28 m2 x 1 min = 24.6 kg CO2

SECTION 3 – SAMPLE PROBLEMS
Carbon Dioxide Page : 3 of 31 Manual P/N C06-018 Revision: 2 Revision Date: April, 2008
Center of Opening = 7’-0”
34% C LeakageRate =
18#/min

SECTION 3 – SAMPLE PROBLEMS
Page: 4 of 31 Carbon Dioxide Revision: 2 Manual P/N C06-018 Revision Date: April, 2008
3.1.1.6 SPECIAL MATERIAL ADJUSTMENT Example: Flammable Liquids Storage Room
Hazard Size: 35 ft (10.67 m) long x 15 ft (4.57 m) wide x 12 ft (3.66 m) high Hazard Contents: Butane, Gasoline, Propane, and Ethylene
Special Material Adjustments are made after the normal minimum extinguishing quantity is determined, and after adjustments have been made to compensate for ventilation and leakage due to uncloseable openings as illustrated in Sections 3.1.1.1 through 3.1.1.5.
When dealing with multiple fuel sources, the minimum design concentration is the highest of the concentrations required for the materials that are present within the protected area. To determine the concentration of CO2required, the minimum concentration for each of the hazard contents must be determined.
From table “Minimum Carbon Dioxide Extinguishing Concentrations” in Section 2.2.3.3 Butane = 34%, Ethylene = 49%, Gasoline = 34% and Propane = 36% Required concentration of CO2 is determined by the Ethylene = 49%
Whenever the minimum required concentration of CO2 is greater than the standard 34%, a material conversion factor must be used. The adjusted minimum required quantity of CO2 equals the Normal Minimum Extinguishing Quantity (See Section 3.1.1.3) multiplied by the Material Conversion Factor as determined below.
ADJUSTED QUANTITY OF CO2 – SPECIAL MATERIAL
English Units Metric Units 315 lbs (base requirement) + 45 lbs (ventilation loss)
+ 54 lbs (uncloseable openings) = 414 lbs. x 1.6 = 663 lbs Total CO2 required
142.7 kg (base requirement) + 20.4 kg (ventilation loss)
+ 24.6 kg (uncloseable openings) = 187.7 kg x 1.6 = 300.3 kg Total CO2 required
49%
1.6
Material Conversion Chart
Minimum Concentration Percentage
Con
vers
ion
Fact
or

SECTION 3 – SAMPLE PROBLEMS
Carbon Dioxide Page : 5 of 31 Manual P/N C06-018 Revision: 2 Revision Date: April, 2008
3.1.1.7 TEMPERATURE ADJUSTMENT Example: Flammable Liquids Storage Room
Hazard Size: 35 ft (10.67 m) long x 15 ft (4.57 m) wide x 12 ft (3.66 m) high Hazard Temperature: 216°F (102°C)
The temperature adjustment is based upon the temperature of the hazard volume (See Section 2.2.3.4).
Each 5°F (2.77°C) increment, or part thereof, above 200°F (93.3°C) requires a 1% increase in CO2quantity for high temperature adjustment
Each 1°F (0.55°C) below 0°F (-17.8°C) requires a 1% Increase in CO2 quantity for low temperature adjustment
Apply the temperature adjustment by increasing the quantity of CO2 by the calculated percentage.
ADJUSTED QUANTITY OF CO2 – TEMPERATURE
English Units Metric Units 216–200=16; 16 5 = 3.2 This is 3 and part of a 4th
increment. Therefore a 4% adjustment is req’d. 663 lbs x 1.04 = 690 lbs Total CO2 Required
102.1-93.3=8.8; 8.8 2.77 = 3.2 This is 3 and part of a 4th increment. Therefore a 4% adjustment is req’d.
300.3 kg x 1.04 = 312.3 kg Total CO2 Required
When determining the CO2 quantity to be provided in storage, ALWAYS round up to the next largest cylinder size. Therefore, the storage quantity for this example is 700 lbs (317.8 kg).
3.1.1.8 DISCHARGE DURATION / FLOW RATEFor Surface Fire hazards, the required discharge time (duration) is one minute. Therefore, the total quantity of CO2 as determined above must be discharged within one minute.
DISCHARGE FLOW RATE
English Units Metric Units 690 lbs 1 min = 690 lbs/min 312.3 kg 1 min = 312.3 kg/min

SECTION 3 – SAMPLE PROBLEMS
Page: 6 of 31 Carbon Dioxide Revision: 2 Manual P/N C06-018 Revision Date: April, 2008
3.1.1.9 NOZZLE SELECTION All nozzle types are acceptable for Total Flood applications, but the Radial Nozzle is generally recommended.This system requires a flow rate of 690 lbs/min (312.3 kg/min) that can be provided by utilizing multiple nozzles.
In order to determine the quantity required, two criteria should be considered, with the larger result of the two being the determining factor:
The first criteria will involve the system flow rate. The recommended flow rate for a 1/2” NPT Radial Nozzle is 100 lbs/min (45.4 kg/min), and the recommended flow rate for a 3/4” NPT Radial Nozzle is 150 lbs/min (68 kg/min). Choosing between the two sizes is largely a matter of preference and consideration should be given to the cost of larger pipe and fittings vs. additional smaller nozzles.Additional consideration shall given to the additional turbulence caused by the discharge from larger nozzles and its possible impact.
1/2” NPT RADIAL NOZZLE
English Units Metric Units 690 lbs/min 100 lbs/min = 6.9 = 7 Nozzles 312.3 kg/min 45.4 kg/min = 6.9 = 7 Nozzles
3/4” NPT RADIAL NOZZLE
English Units Metric Units 690 lbs/min 150 lbs/min = 4.6 = 5 Nozzles 312.3 kg/min 68 kg/min = 4.6 = 5 Nozzles
The second criteria will involve the area coverage limitations for the nozzles:
The 1/2” Radial Nozzle can cover an area 20 ft x 20 ft (6.1 m x 6.1 m). Therefore, a single row of nozzles will cover the 15 ft (4.6 m) width, and two nozzles can cover the 35 ft (10.7 m) length.
The 3/4” Radial Nozzle can cover an area 25 ft x 25 ft (7.6 m x 7.6 m). Therefore, a single row of nozzles will cover the 15 ft (4.6 m) width, and two nozzles can cover the 35 ft (10.7 m) length.
In summary, the flow rate requirement is the greater of the two and is the determining factor. Therefore, this example could be protected with (5) 3/4” Radial Nozzles, or (7) 1/2” Radial Nozzles, depending on the preference of the designer. It should also be noted that the area can be protected using multiple “S”-Type or Baffle Nozzles as well.
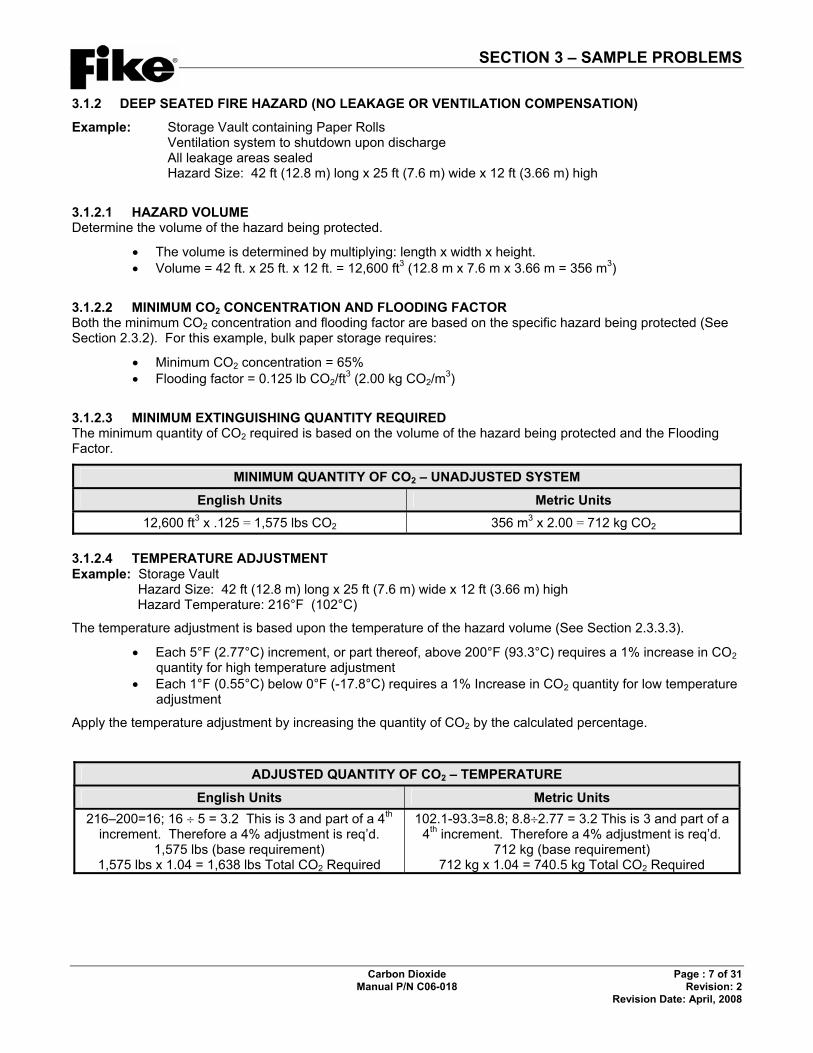
SECTION 3 – SAMPLE PROBLEMS
Carbon Dioxide Page : 7 of 31 Manual P/N C06-018 Revision: 2 Revision Date: April, 2008
3.1.2 DEEP SEATED FIRE HAZARD (NO LEAKAGE OR VENTILATION COMPENSATION)
Example: Storage Vault containing Paper Rolls Ventilation system to shutdown upon discharge All leakage areas sealed
Hazard Size: 42 ft (12.8 m) long x 25 ft (7.6 m) wide x 12 ft (3.66 m) high
3.1.2.1 HAZARD VOLUME Determine the volume of the hazard being protected.
The volume is determined by multiplying: length x width x height. Volume = 42 ft. x 25 ft. x 12 ft. = 12,600 ft3 (12.8 m x 7.6 m x 3.66 m = 356 m3)
3.1.2.2 MINIMUM CO2 CONCENTRATION AND FLOODING FACTOR Both the minimum CO2 concentration and flooding factor are based on the specific hazard being protected (See Section 2.3.2). For this example, bulk paper storage requires:
Minimum CO2 concentration = 65% Flooding factor = 0.125 lb CO2/ft3 (2.00 kg CO2/m3)
3.1.2.3 MINIMUM EXTINGUISHING QUANTITY REQUIRED The minimum quantity of CO2 required is based on the volume of the hazard being protected and the Flooding Factor.
MINIMUM QUANTITY OF CO2 – UNADJUSTED SYSTEM
English Units Metric Units 12,600 ft3 x .125 = 1,575 lbs CO2 356 m3 x 2.00 = 712 kg CO2
3.1.2.4 TEMPERATURE ADJUSTMENT Example: Storage Vault
Hazard Size: 42 ft (12.8 m) long x 25 ft (7.6 m) wide x 12 ft (3.66 m) high Hazard Temperature: 216°F (102°C)
The temperature adjustment is based upon the temperature of the hazard volume (See Section 2.3.3.3).
Each 5°F (2.77°C) increment, or part thereof, above 200°F (93.3°C) requires a 1% increase in CO2quantity for high temperature adjustment
Each 1°F (0.55°C) below 0°F (-17.8°C) requires a 1% Increase in CO2 quantity for low temperature adjustment
Apply the temperature adjustment by increasing the quantity of CO2 by the calculated percentage.
ADJUSTED QUANTITY OF CO2 – TEMPERATURE
English Units Metric Units 216–200=16; 16 5 = 3.2 This is 3 and part of a 4th
increment. Therefore a 4% adjustment is req’d. 1,575 lbs (base requirement)
1,575 lbs x 1.04 = 1,638 lbs Total CO2 Required
102.1-93.3=8.8; 8.8 2.77 = 3.2 This is 3 and part of a 4th increment. Therefore a 4% adjustment is req’d.
712 kg (base requirement) 712 kg x 1.04 = 740.5 kg Total CO2 Required

SECTION 3 – SAMPLE PROBLEMS
Page: 8 of 31 Carbon Dioxide Revision: 2 Manual P/N C06-018 Revision Date: April, 2008
3.1.2.5 REQUIRED FLOW RATEFor deep seated hazards, the minimum flow rate requirement is as follows: The system must achieve a 30% concentration within 2 minutes, with the remainder of the discharge occurring within 7 minutes.
The first step in determining the correct flow rate is to calculate the amount of CO2 required to provide a 30% concentration in 2 minutes. (See Section 2.3.4)
QUANTITY OF CO2 FOR 30% CONCENTRATION IN 2 MINUTES
English Units Metric Units 12,600 ft3 x .043 = 542 lbs / 2 min 356 m3 x 0.688 = 245 kg / 2 min
The minimum flow rate is the amount of CO2 required, divided by 2 minutes.
REQUIRED FLOW RATE OF CO2
English Units Metric Units 542 2 = 271 lbs CO2/min 245 2 = 122.5 kg CO2/min
Next, the Adjusted Quantity of CO2 must be checked with the Required Flow Rate to verify that the total discharge time does not exceed 7 minutes.
DISCHARGE DURATION VERIFICATION
English Units Metric Units 1,638 lbs 271 lbs./min = 6.04 minutes 740.5 kg 122.5 kg/min = 6.04 minutes
Therefore, this flow rate IS acceptable and should be used to determine the number of nozzles required, pipe sizes, and manifold size.

SECTION 3 – SAMPLE PROBLEMS
Carbon Dioxide Page : 9 of 31 Manual P/N C06-018 Revision: 2 Revision Date: April, 2008
3.1.2.6 NOZZLE SELECTION All nozzle types are acceptable for Total Flood applications, but the Radial Nozzle is generally recommended.This system requires a flow rate of 271 lbs/min (122.5 kg/min) that can be provided by utilizing multiple nozzles.
Nozzle selection is based on the system flow rate, not on the system supply quantity.
In order to determine the quantity required, two criteria should be considered, with the larger result of the two being the determining factor:
The first criteria will involve the system flow rate. The recommended flow rate for a 1/2” NPT Radial Nozzle is 100 lbs/min (45.4 kg/min), and the recommended flow rate for a 3/4” NPT Radial Nozzle is 150 lbs/min (68 kg/min). Choosing between the two sizes is largely a matter of preference and consideration should be given to the cost of larger pipe and fittings vs. additional smaller nozzles.Additional consideration shall given to the additional turbulence caused by the discharge from larger nozzles and its possible impact.
1/2” NPT RADIAL NOZZLE
English Units Metric Units 271 lbs/min 100 lbs/min = 2.7 = 3 Nozzles 122.5 kg/min 45.4 kg/min = 2.7 = 3 Nozzles
3/4” NPT RADIAL NOZZLE
English Units Metric Units 271 lbs/min 150 lbs/min = 1.8 = 2 Nozzles 122.5 kg/min 68 kg/min = 1.8 = 2 Nozzles
The second criteria will involve the area coverage limitations for the nozzles:
The 1/2” Radial Nozzle can cover an area 20 ft x 20 ft (6.1 m x 6.1 m). Therefore, two rows of nozzles will be necessary to cover the 25 ft. (7.6 m) width, and three nozzles will be necessary in each row to cover the 42 ft. (12.8 m) length. (6 Nozzles Total)
The 3/4” Radial Nozzle can cover an area 25 ft x 25 ft (7.6 m x 7.6 m). Therefore, a single row of nozzles will cover the 25 ft (7.6 m) width, and two nozzles can cover the 42 ft (12.8 m) length.(2 Nozzles Total)
In summary, the area coverage requirement is the greater of the two and is the determining factor. Therefore, this hazard could be protected with (2) 3/4” Radial Nozzles supplying 135.5 lbs/min (61.25 kg/min), or (6) 1/2” Radial Nozzles supplying 45.2 lbs/min (20.4 kg/min), depending on the preference of the designer. In this case, protecting the hazard with (2) 3/4” Radial Nozzles would be the less expensive option. It should also be noted that the area can be protected using multiple “S”-Type or Baffle Nozzles as well.
SECTION 3 – SAMPLE PROBLEMS
Page: 10 of 31 Carbon Dioxide Revision: 2 Manual P/N C06-018 Revision Date: April, 2008
3.1.3 DEEP SEATED FIRE HAZARD w/ VENTILATION & LEAKAGE COMPENSATION Example: Storage Vault containing Paper Rolls Ventilation system to remain active after discharge Uncloseable opening compensation required
Hazard Size: 42 ft (12.8 m) long x 25 ft (7.6 m) wide x 12 ft (3.66 m) high
3.1.3.1 HAZARD VOLUME Determine the volume of the hazard being protected.
The volume is determined by multiplying: length x width x height. Volume = 42 ft x 25 ft x 12 ft = 12,600 ft3 (12.8 m x 7.6 m x 3.66 m = 356 m3)
3.1.3.2 MINIMUM CO2 CONCENTRATION AND FLOODING FACTOR Both the minimum CO2 concentration and flooding factor are based on the specific hazard being protected (See Section 2.3.2). For this example, bulk paper storage requires:
Minimum CO2 concentration = 65% Flooding factor = 0.125 lb CO2/ft3 (2.00 kg CO2/m3)
3.1.3.3 MINIMUM EXTINGUISHING QUANTITY REQUIRED The minimum quantity of CO2 required is based on the volume of the hazard being protected and the Flooding Factor.
MINIMUM QUANTITY OF CARBON DIOXIDE – UNADJUSTED SYSTEM
English Units Metric Units 12,600 ft3 x .125 = 1,575 lbs CO2 356 m3 x 2.00 = 712 kg CO2
3.1.3.4 VENTILATION Example: Storage Vault
Hazard Size: 35 ft (10.67 m) long x 15 ft (4.57 m) wide x 12 ft (3.66 m) high Ventilation Rate: 900 ft3/min (25.5 m3/min)
If the ventilation system cannot be shutdown, the quantity of CO2 must be adjusted to compensate for the loss of agent during the required holding period. This is determined by multiplying the ventilation rate x the flooding factor x the holding period.
ADDITIONAL QUANTITY OF CO2 – VENTILATION LOSS
English Units Metric Units 900 ft3/min x .125 lb CO2/ft3 = 112.5 lbs
112.5 lbs x 20 min = 2,250 lbs 25.5 m3/min x 2.0 kg CO2/m3 = 51 kg
51 kg x 20 min = 1,020 kg
As you can see, it is often desirable to shutdown the ventilation system in lieu of compensating for the leakage with additional CO2.

SECTION 3 – SAMPLE PROBLEMS
Carbon Dioxide Page : 11 of 31 Manual P/N C06-018 Revision: 2 Revision Date: April, 2008
3.1.3.5 UNCLOSEABLE OPENING(S) Example: Storage Vault
Hazard Size: 42 ft (12.8 m) long x 25 ft (7.6 m) wide x 12 ft (3.66 m) high Uncloseable opening: 2 ft x 3 ft (0.61 m x 0.91 m) in sidewall; center of opening 7 ft (2.13 m) below ceiling
The adjustment for uncloseable openings is based on the size of the opening and its distance from the ceiling.
From the Leakage Compensation Chart in Section 2.3.3.2 for an opening with the center 7 ft below ceiling and required concentration of 65% is: Leakage Rate = 45 lbs of CO2 per minute per square foot of opening. Refer to the table below for the metric conversion. The metric conversion is made in this manner because the chart in Section 2, Paragraph 2.3.3.2 is in English units and the conversion must be made after the chart is used.
The area of the uncloseable opening is 2 ft (0.61m) x 3 ft(0.91m) = 6 ft2 (0.56 m2). The area is further reduced by half due to the opening being in the sidewall of the enclosure. 6ft2 (0.56 m2) 2 = 3ft2 (0.28 m2).
The discharge duration for surface type applications is 1 minute.
If an uncloseable opening(s) is in a sidewall, the area of the opening(s) may be divided by 2. This is based on the assumption that half of the opening provides fresh air intake, while the other half allows CO2 leakage.
ADDITIONAL QUANTITY OF CO2 REQUIRED
English Units Metric Units
45 lbs/min x 3 ft2 x 20 min = 2,700 lbs additional CO245 lbs/min/ft2 x 4.89 = 220.1 kg/min/m2
220.1 kg/min x 0.28 m2 x 20 min = 1,232.6 kg CO2
As you can see, it is often desirable to seal all uncloseable openings in lieu of compensating for the leakage with additional CO2.

SECTION 3 – SAMPLE PROBLEMS
Page: 12 of 31 Carbon Dioxide Revision: 2 Manual P/N C06-018 Revision Date: April, 2008
Center of Opening = 7’-0”
65% C LeakageRate =
45#/min

SECTION 3 – SAMPLE PROBLEMS
Carbon Dioxide Page : 13 of 31 Manual P/N C06-018 Revision: 2 Revision Date: April, 2008
3.1.3.6 TEMPERATURE ADJUSTMENT Example: Storage Vault
Hazard Size: 42 ft (12.8 m) long x 25 ft (7.6 m) wide x 12 ft (3.66 m) high Hazard Temperature: 216°F (102°C)
The temperature adjustment is based upon the temperature of the hazard volume (See Section 2.3.3.3).
Each 5°F (2.77°C) increment, or part thereof, above 200°F (93.3°C) requires a 1% increase in CO2quantity for high temperature adjustment
Each 1°F (0.55°C) below 0°F (-17.8°C) requires a 1% Increase in CO2 quantity for low temperature adjustment
Apply the temperature adjustment by increasing the quantity of CO2 by the calculated percentage.
ADJUSTED QUANTITY OF CO2 – TEMPERATURE
English Units Metric Units 216–200=16; 16 5 = 3.2 This is 3 and part of a 4th
increment. Therefore a 4% adjustment is req’d. 1,575 lbs (base requirement) + 2,250 lbs (ventilation loss)
+ 2,700 lbs (uncloseable openings) = 6,525 lbs required
6,525 lbs. x 1.04 = 6,786 lbs Total CO2 Required
102.1-93.3=8.8; 8.8 2.77 = 3.2 This is 3 and part of a 4th increment. Therefore a 4% adjustment is req’d.
712 kg (base requirement) 1,020 kg (ventilation loss)
1,232.6 kg (uncloseable openings) = 2,964.6 kg required
2,964.6 kg x 1.04 = 3,083.2 kg Total CO2 Required
3.1.3.7 REQUIRED FLOW RATEFor deep seated hazards, the minimum flow rate requirement is as follows: The system must achieve a 30% concentration within 2 minutes, with the remainder of the discharge occurring within 7 minutes.
The first step in determining the correct flow rate is to calculate the amount of CO2 required to provide a 30% concentration in 2 minutes (See Section 2.3.4).
QUANTITY OF CO2 FOR 30% CONCENTRATION IN 2 MINUTES
English Units Metric Units 12,600 ft3 x .043 = 542 lbs / 2 min 356 m3 x 0.688 = 245 kg / 2 min
The minimum flow rate is the amount of Carbon Dioxide required, divided by 2 minutes.
REQUIRED FLOW RATE OF CO2
English Units Metric Units 542 2 = 271 lbs CO2/min 245 2 = 122.5 kg CO2/min
Next, the Adjusted Quantity of CO2 must be checked with the Required Flow Rate to verify that the total discharge time does not exceed 7 minutes.
DISCHARGE DURATION VERIFICATION
English Units Metric Units 6,786 lbs 271 lbs/min = 25 minutes 3,083 kg 122.5 kg/min = 25 minutes
Therefore, this flow rate is NOT acceptable.

SECTION 3 – SAMPLE PROBLEMS
Page: 14 of 31 Carbon Dioxide Revision: 2 Manual P/N C06-018 Revision Date: April, 2008
In this case, the Required Flow Rate must be equal to the flow rate necessary to provide the total quantity of CO2 in 7 minutes. This is determined as follows:
MINIMUM FLOW RATE ADJUSTMENT
English Units Metric Units 6,786 lbs. 7 minutes = 970 lbs/min 3,083 kg 7 minutes = 440.5 kg/min
3.1.3.8 NOZZLE SELECTION All nozzle types are acceptable for Total Flood applications, but the Radial Nozzle is generally recommended.This system requires a flow rate of 970 lbs/min (440.5 kg/min) that can be provided by utilizing multiple nozzles.
Nozzle selection is based on the system flow rate, not on the system supply quantity.
In order to determine the quantity required, two criteria should be considered, with the larger result of the two being the determining factor:
The first criteria will involve the system flow rate. The recommended flow rate for a 1/2” NPT Radial Nozzle is 100 lbs/min (45.4 kg/min), and the recommended flow rate for a 3/4” NPT Radial Nozzle is 150 lbs/min (68 kg/min). Choosing between the two sizes is largely a matter of preference and consideration should be given to the cost of larger pipe and fittings vs. additional smaller nozzles.Additional consideration shall given to the additional turbulence caused by the discharge from larger nozzles and its possible impact.
1/2” NPT RADIAL NOZZLE
English Units Metric Units 970 lbs/min 100 lbs/min = 9.7 = 10 Nozzles 440.5 kg/min 45.4 kg/min = 9.7 = 10 Nozzles
3/4” NPT RADIAL NOZZLE
English Units Metric Units 970 lbs/min 150 lbs/min = 6.5 = 7 Nozzles 440.5 kg/min 68 kg/min = 6.5 = 7 Nozzles
The second criteria will involve the area coverage limitations for the nozzles:
The 1/2” Radial Nozzle can cover an area 20 ft x 20 ft (6.1 m x 6.1 m). Therefore, two rows of nozzles will be necessary to cover the 25 ft (7.6 m) width, and three nozzles will be necessary in each row to cover the 42 ft (12.8 m) length. (6 Nozzles Total)
The 3/4” Radial Nozzle can cover an area 25 ft x 25 ft (7.6 m x 7.6 m). Therefore, a single row of nozzles will cover the 25 ft (7.6 m) width, and two nozzles can cover the 42 ft (12.8 m) length.(2 Nozzles Total)
In summary, the flow rate requirement is the greater of the two and is the determining factor. This hazard should therefore be protected with (7) 3/4” Radial Nozzles supplying 139 lbs/min (63 kg/min), or (10) 1/2” Radial Nozzles supplying 97 lbs/min (44.5 kg/min), depending on the preference of the designer. It should also be noted that the area can be protected using multiple “S”-Type or Baffle Nozzles as well.

SECTION 3 – SAMPLE PROBLEMS
Carbon Dioxide Page : 15 of 31 Manual P/N C06-018 Revision: 2 Revision Date: April, 2008
3.1.4 COMBINED SURFACE AND DEEP SEATED HAZARDS
Some deep seated hazards may have flammable liquids or solids within the area being protected. When this occurs, the flow rate must be adjusted to satisfy the surface fire requirements FIRST, while still satisfying the requirements for a deep seated hazard. In other words, the quantity of agent supplied and hold time (20 minutes) are based upon the requirements for a deep seated hazard, while the flow rate and discharge time are based upon the requirements for a surface fire hazard.
Example: Oil-filled Transformer Room Hazard Contents: Oil Barrels and Electrical Equipment Hazard Size: 28 ft (8.5 m) long x 14 ft (4.3 m) wide x 12’-6” ft (3.8 m) high
3.1.4.1 HAZARD VOLUME Determine the volume of the hazard being protected.
The volume is determined by multiplying: length x width x height. Volume = 28 ft x 14 ft x 12’-6” ft = 4,900 ft3 (8.5 m x 4.3 m x 3.8 m = 138.9 m3)
3.1.4.2 MINIMUM CO2 CONCENTRATION AND FLOODING FACTOR For the deep seated portion of the fire hazard, both the minimum CO2 concentration and flooding factor are based on the specific hazard being protected (See Section 2.3.2). For this example, The electrical equipment within the room (dry electrical hazard), over 2,000 ft3 requires:
Minimum CO2 concentration = 50%. Flooding factor = 0.083 lb CO2/ft3 (1.330 kg CO2/m3)
For the surface fire portion of the fire hazard, the minimum CO2 concentration is 34%. The flooding factor is based on the volume of the hazard being protected (See Section 2.2.2).
Minimum CO2 concentration = 34% Flooding factor = 0.050 lb CO2/ft3 (0.80 kg CO2/m3)
3.1.4.3 DETERMINE QUANTITY REQUIRED Proceed as follows for both the deep seated and the surface fire portions of the fire hazard:
MINIMUM EXTINGUISHING QUANTITY OF CO2
English Units Metric Units For deep seated portion: 4,900 ft3 x .083 = 407 lbs CO2 138.9 m3 x 1.330 = 184.7 kg CO2For surface fire portion: 4,900 ft3 x .050= 245 lbs CO2 138.9 m3 x 0.80 = 111.1 kg CO2
The minimum quantity of CO2 required is the larger of the quantities: 407 lbs (184.7 kg) The actual storage quantity of CO2 is: 500 lbs (227 kg)

SECTION 3 – SAMPLE PROBLEMS
Page: 16 of 31 Carbon Dioxide Revision: 2 Manual P/N C06-018 Revision Date: April, 2008
3.1.4.4 REQUIRED FLOW RATE The surface fire flow rate requirement must be met first. This requirement is 34% concentration in 1 minute or 245 lbs/min (111.1 kg/min).
Checking the deep seated portion requirements yields: The 30% in two minutes requirement is definitely met because 34% is reached in 1 minute. The 100% in seven minutes is met because the discharge time is 1.67 minutes.
407 lbs 245 lbs/min = 1.67 min (184.7 kg 111.1 kg/min = 1.66).
3.1.4.5 NOZZLE SELECTION All nozzle types are acceptable for Total Flood applications, but the Radial Nozzle is generally recommended.This system requires a flow rate of 245 lbs/min (111.1 kg/min) that can be provided by utilizing multiple nozzles.
Nozzle selection is based on the system flow rate, not on the system supply quantity.
In order to determine the quantity required, two criteria should be considered, with the larger result of the two being the determining factor:
The first criteria will involve the system flow rate. The recommended flow rate for a 1/2” NPT Radial Nozzle is 100 lbs/min (45.4 kg/min), and the recommended flow rate for a 3/4” NPT Radial Nozzle is 150 lbs/min (68 kg/min). Choosing between the two sizes is largely a matter of preference and consideration should be given to the cost of larger pipe and fittings vs. additional smaller nozzles.Additional consideration shall given to the additional turbulence caused by the discharge from larger nozzles and its possible impact.
1/2” NPT RADIAL NOZZLE
English Units Metric Units 245 lbs/min 100 lbs/min = 2.5 = 3 Nozzles 111.1 kg/min 45.4 kg/min = 2.4 = 3 Nozzles
3/4” NPT RADIAL NOZZLE
English Units Metric Units 245 lbs/min 150 lbs/min = 1.6 = 2 Nozzles 111.1 kg/min 68 kg/min = 1.6 = 2 Nozzles
The second criteria will involve the area coverage limitations for the nozzles:
The 1/2” Radial Nozzle can cover an area 20 ft x 20 ft (6.1 m x 6.1 m). Therefore, one row of nozzles will be necessary to cover the 14 ft (4.3 m) width, and two nozzles will be necessary to cover the 28 ft (8.5 m) length. (2 Nozzles Total)
The 3/4” Radial Nozzle can cover an area 25 ft x 25 ft (7.6 m x 7.6 m). Therefore, a single row of nozzles will cover the 14 ft (4.3 m) width, and two nozzles can cover the 28 ft (8.5 m) length.(2 Nozzles Total)
In summary, the flow rate requirement is the greater of the two and is the determining factor. This hazard should therefore be protected with (2) 3/4” Radial Nozzles supplying 122.5 lbs/min (56 kg/min), or (3) 1/2” Radial Nozzles supplying 82 lbs/min (37 kg/min), depending on the preference of the designer. It should also be noted that the area can be protected using multiple “S”-Type or Baffle Nozzles as well.

SECTION 3 – SAMPLE PROBLEMS
Carbon Dioxide Page : 17 of 31 Manual P/N C06-018 Revision: 2 Revision Date: April, 2008
3.2 LOCAL APPLICATION SAMPLES
3.2.1 RATE-BY-AREA METHOD – NOZZLES PERPENDICULAR TO SURFACE
Example: Dip Tank and Drain Board
Hazard Size: Dip Tank – 2.75 ft wide x 4.25 ft long (0.84 m wide x 1.30 m long) Drain Board - 2.75 ft wide x 6.0 ft long (0.84 m wide x 1.83 m long) Nozzle height limited to 2.0 ft (0.61 m), or higher, above the hazard
3.2.1.1 NOZZLE TYPE AND NUMBER REQUIRED The recommended nozzle for the Rate-by-Area method of protection is the “S” Type nozzle (See Section 2.7.1).The number and location of nozzles is based on their height above the hazard and the size of the surface being protected. Refer to the “Rate-by-Area Nozzle Selection Chart” in Section 2.7.3, for the correct size of the area covered.
NUMBER OF NOZZLES – LIQUID SURFACE (DIP TANK)
English Units Metric Units Nozzles 2.5 ft high cover 2.41 ft x 2.41 ft Number req’d. for width: 2.75 2.41 = 1.14; 2 req’d. Number req’d. for length: 4.25 2.41 = 1.76; 2 req’d. Nozzles Required: 2 x 2 = 4
Nozzles 0.76 m high cover 0.73 m x 0.73 m Number req’d. for width: 0.84 0.73 = 1.06; 2 req’d. Number req’d. for length: 1.30 0.73 = 1.78; 2 req’d. Nozzles Required: 2 x 2 = 4
NUMBER OF NOZZLES – COATED SURFACE (DRAIN BOARD)
English Units Metric Units Nozzles 2.0 ft high cover 2.58 ft x 2.58 ft Number req’d. for width: 2.75 2.58 = 1.06; 2 req’d. Number req’d. for length: 6.00 2.58 = 2.3; 3 req’d. Nozzles Required: 2 x 3 = 6
Nozzles 0.61 m high cover 0.79 m x 0.79 m Number req’d. for width: 0.84 0.79 = 1.06; 2 req’d. Number req’d. for length: 1.83 0.79 = 2.3; 3 req’d. Nozzles Required: 2 x 3 = 6
The Total number of nozzles required, for the hazard in this example is 10.

SECTION 3 – SAMPLE PROBLEMS
Page: 18 of 31 Carbon Dioxide Revision: 2 Manual P/N C06-018 Revision Date: April, 2008
3.2.1.2 REQUIRED FLOW RATE The flow rate of nozzles is based on their height above the hazard. Refer to the “Rate-by-Area Nozzle Selection Chart” in Section 2.7.3 for the correct flow rate.
FLOW RATE
English Units Metric Units 2 nozzles for Dip Tank at 2.5 ft high: require 28 lbs/min each x 2 nozzles = 56 lbs/min 2 nozzles for Drain Board at 2.0 ft high: require 24 lbs/min each x 2 nozzles = 48 lbs/min Total required flow rate: 56 + 48 = 104 lbs/min
2 nozzles for Dip Tank at 0.76 m high: require 12.7 kg/min each x 2 nozzles = 25.4 kg/min2 nozzles for Drain Board at 0.61 m high: require 10.9 kg/min each x 2 nozzles = 21.8 kg/min Total required flow rate: 25.4 + 21.8 = 47.2 kg/min
3.2.1.3 MINIMUM REQUIRED STORAGE QUANTITY OF CO2The requirement for the storage quantity of CO2 agent, is determined by adjusting the total required flow rate by a vapor compensation factor of 1.4 (40% more CO2) and 0.5 min (30 second) discharge time. Refer to Section 2.6.5 of this manual for a more detailed explanation.
Always round up to the next larger cylinder size. Never round down. Refer to Section 7.1 for available cylinder sizes.
REQUIRED STORAGE QUANTITY OF CO2(Quantity of CO2 = Flow Rate x Vapor Compensation Factor x Discharge Time)
English Units Metric Units 104 lbs/min x 0.5 min x 1.4 = 73 lbs
(or 104 x 0.7 = 73)47.2 kg/min x 0.5 min x 1.4 = 33.1 kg
(or 47.2 x 0.7 = 33.1)
The above example shows the minimum nozzle requirements based upon the stated area coverage and height placement limitations. However, the nozzles could be placed at higher levels than those shown, but this would require adjustments to the flow rate and agent storage requirements.

SECTION 3 – SAMPLE PROBLEMS
Carbon Dioxide Page : 19 of 31 Manual P/N C06-018 Revision: 2 Revision Date: April, 2008
3.2.2 RATE-BY-AREA METHOD – NOZZLES AT ANGLE TO SURFACE Normally, nozzles should be installed perpendicular to the hazard surface and centered over the area being protected. However, when it is necessary to avoid obstructions, the nozzles can be installed at angles between 45° and 90° from the plane of the protected surface.
Example: Dip Tank and Drain Board Hazard Size: Dip Tank – 2.75 ft wide x 4.25 ft long (0.84 m wide x 1.30 m long) Drain Board - 2.75 ft wide x 6.0 ft long (0.84 m wide x 1.83 m long)
3.2.2.1 NOZZLE TYPE AND NUMBER REQUIRED The recommended nozzle for the Rate-by-Area method of protection is the “S” Type nozzle (Reference: Section 2.7.1). The number and location of nozzles is based on their height above the hazard and the size of the surface being protected, just as if the nozzles were perpendicular to the surface. However, it is important to remember that the nozzle height is measured along the axis of the nozzle. Refer to the “Rate-by-Area Nozzle Selection Chart” in Section 2.7.3 for the correct size of the area covered.
NUMBER OF NOZZLES – LIQUID SURFACE (DIP TANK)
English Units Metric Units Nozzles 3.75 ft high cover 3.01 ft x 3.01 ft Number req’d. for width: 2.75 3.01 = 0.9; 1 req’d. Number req’d. for length: 4.25 3.01 = 1.4; 2 req’d. Total Nozzles Required: 1 x 2 = 2
Nozzles 1.14 m high cover 0.92 m x 0. 92 m Number req’d. for width: 0.84 0. 92 = 0.9; 1 req’d. Number req’d. for length: 1.30 0. 92 = 1.3; 2 req’d. Total Nozzles Required: 1 x 2 = 2
NUMBER OF NOZZLES – COATED SURFACE (DRAIN BOARD)
English Units Metric Units Nozzles 3.75 ft high cover 3.61 ft x 3.61 ft Number req’d. for width: 2.75 3.61 = 0.7; 1 req’d. Number req’d. for length: 4.25 3.61 = 1.1; 2 req’d. Total Nozzles Required: 1 x 2 = 2
Nozzles 1.14 m. high cover 1.10 m x 1.10 m Number req’d. for width: 0.84 1.10 = 0.7; 1 req’d. Number req’d. for length: 1.30 1.10 = 1.1; 2 req’d. Total Nozzles Required: 1 x 2 = 2
H
60°

SECTION 3 – SAMPLE PROBLEMS
Page: 20 of 31 Carbon Dioxide Revision: 2 Manual P/N C06-018 Revision Date: April, 2008
3.2.2.2 REQUIRED FLOW RATE The flow rate of nozzles is based on their height above the hazard. Refer to the “Rate-by-Area Nozzle Selection Chart” in Section 2.7.3 for the correct flow rate.
FLOW RATE
English Units Metric Units 2 nozzles for Dip Tank at 3.75 ft high: require 38.5 lbs/min each x 2 nozzles = 77 lbs/min 2 nozzles for Drain Board at 3.75 ft high: require 38.5 lbs/min each x 2 nozzles = 77 lbs/min Total required flow rate: 77 + 77 = 154 lbs/min
2 nozzles for Dip Tank at 1.14 m high: require 17.5 kg/min each x 2 nozzles = 35.0 kg/min2 nozzles for Drain Board at 1.14 m high: require 17.5 kg/min each x 2 nozzles = 35.0 kg/min Total required flow rate: 35.0 + 35.0 = 70.0 kg/min
3.2.2.3 MINIMUM REQUIRED STORAGE QUANTITY OF CARBON DIOXIDE The requirement for the storage quantity of CO2 agent, is determined by adjusting the total required flow rate by a vapor compensation factor of 1.4 (40% more CO2) and 0.5 min. (30 second) discharge time (See to Sections 2.6.5 and 2.7.5 of this manual for a more detailed explanation).
Always round up to the next larger cylinder size. Never round down. Refer to Section 7.1 for available cylinder sizes.
REQUIRED STORAGE QUANTITY OF CO2(Quantity of CO2 = Flow Rate x Vapor Compensation Factor x Discharge Time)
English Units Metric Units 154 lbs x 0.5 min x 1.4 = 107.8 lbs
(or 154 x 0.7 = 107.8)70.0 kg x 0.5 min x 1.4 = 49.0 kg
(or 70.0 x 0.7 = 49.0)
The above example shows the minimum nozzle requirements based upon the stated area coverage and height placement limitations. However, the nozzles could be placed at different levels or angles than those shown, but this would require adjustments to the flow rate and agent storage requirements.
3.2.2.4 NOZZLE AIMING FACTORSBecause the nozzles are mounted at an angle to the surface, an adjustment must be made regarding their placement above the protected surface. This adjustment, or Aiming Factor, is based on the angle of the nozzle to the protected surface (See Section 2.7.4.1 for the table of Aiming Factors).
The Aiming Factor for this example is 1/4 because the nozzles are aimed at 60° from the plane of the surface.Therefore, the nozzles are aimed at a point a quarter of the width in from the near edge of the protected surface.
APPLICATION OF AIMING FACTOR
English Units Metric Units
2.75 ft. x 1/4 = 0.688 ft in from the edge 0.84 m x 1/4 = 0.21 m in from the edge

SECTION 3 – SAMPLE PROBLEMS
Carbon Dioxide Page : 21 of 31 Manual P/N C06-018 Revision: 2 Revision Date: April, 2008
3.2.3 RATE-BY-VOLUME METHOD To help understand the procedures require in designing a system for each category, following are four example problems with step-by-step instructions for each example.
3.2.3.1 EXAMPLE PROBLEM 1 – THREE DIMENSIONAL HAZARD WITHOUT AN ENCLOSUE OR PERMANENT PERIMETER WALLS
1-1 DETERMINE ASSUMED VOLUME (English Units) (Length + 2.0 + 2.0) x (Width + 2.0 + 2.0) x (Height + 2.0) = Assumed Volume (ft.) (ft.) (ft.) (ft3)
Length (L): 7.5 + 2.0 + 2.0 = 11.5 Width (W): 3.5 + 2.0 + 2.0 = 7.5 Height (H): 4.5 + 2.0 + 0 = 6.5
Assumed Volume: 11.5 x 7.5 x 6.5 = 561 ft3
(Metric Units) (Length + 0.61m + 0.61m) x (Width + 0.61m + 0.61m) x (Height + 0.61m) = Assumed Volume
Length (L): 2.29 + 0.61 + 0.61 = 3.51 Width (W): 1.07 + 0.61 + 0.61 = 2.29 Height (H): 1.37 + 0.61 = 1.98
Assumed Volume: 3.51 x 2.29 x 1.98 = 7.78m3
1-2 DETERMINE SYSTEM FLOW RATE (English Units) Assumed Volume x System Discharge Rate = System Flow Rate (ft3) (lb./min./ft3) (lbs./min.)
561 x 1 = 561
(Metric Units) Assumed Volume x System Discharge Rate = System Flow Rate (m3) (kg./min./m3) (kg./min.)
15.89 x 16 = 254.24
1-3 DETERMINE QUANTITY OF NOZZLE(S) REQUIRED (English Units) System Minimum Nozzle @ Distance Total Flow Rate ÷ Flow Rate from Hazard = Nozzle Required (lbs./min.) (lbs./min.) (ft.)
561 ÷ 105.0 @ 7.5’ = 5.34, round up to 6
(Metric Units)System Minimum Nozzle @ Distance Total Flow Rate ÷ Flow Rate from Hazard = Nozzle Required (kg./min.) (kg./min.) (m)
254.24 ÷ 47.6 @ 2.8m = 5.34, round up to 6
Hazard
(side view)

SECTION 3 – SAMPLE PROBLEMS
Page: 22 of 31 Carbon Dioxide Revision: 2 Manual P/N C06-018 Revision Date: April, 2008
1-4 REVISED SYSTEM FLOW RATE (English Units) Nozzle(s) Required x Nozzle Flow Rate = System Flow Rate (lbs./min.) (lbs./min.)
6 x 105.0 = 630
(Metric Units) Nozzle(s) Required x Nozzle Flow Rate = System Flow Rate (kg./min.) (kg./min.)
6 x 47.6 = 285.6
1-5 QUANTITY OF AGENT REQUIRED (English Units) System Flow Rate x Liquid CO2 Compensation x Discharge Time + Initial Vapor Compensation = Qty. CO2 Req’d (lbs./min.) (min.) (lbs.)
630 x 1.4 x 0.5 + 0 = 441
(Metric Units) System Flow Rate x Liquid CO2 Compensation x Discharge Time + Initial Vapor Compensation = Qty. CO2 Req’d (kg./min.) (min.) (kg.)
285.6 x 1.4 x 0.5 + 0 = 200
1-6 QUANTITY OF AGENT SUPPLIED Quantity of Agent Required Rounded Up to Nearest Available Container Size(English Units) 441 lbs. ÷ 75 lbs./cylinder = 5.88, round up to 6 (75 lb. cylinders); 6 x 75 lb./cylinder = 450 lbs. supplied or441 lbs. ÷ 100 lbs./cylinder = 4.41, round up to 5 (100 lb. cylinders); 5 x 100 lb./cylinder = 500 lbs. supplied
(Metric Units) 200 kg. ÷ 34 kg./cylinder = 5.88, round up to 6 (34 kg. cylinders); 6 x 34 kg./cylinder = 204 kg. supplied or200 kg. ÷ 45.4 kg./cylinder = 4.41, round up to 5 (45.4 kg. cylinders); 5 x 45.4 kg./cylinder = 227 kg. supplied
1-7 LAYOUT PIPE NETWORK AND RUN HYDRAULIC CALCULATION This needs to be done to verify that the predicted liquid discharge time for each nozzle equals or exceeds the minimum liquid discharge time. If necessary, adjust the quantity of CO2 provided in storage to deliver liquid flow at each nozzle for the minimum liquid discharge time required.

SECTION 3 – SAMPLE PROBLEMS
Carbon Dioxide Page : 23 of 31 Manual P/N C06-018 Revision: 2 Revision Date: April, 2008
3.2.3.2 EXAMPLE PROBLEM 2 – THREE DIMENSIONAL HAZARD IN LARGE ROOM WITH PERMANENT PERIMETER WALL(S)
2-1 DETERMINE ASSUMED VOLUME Assumed Volume = Length x Width x Height + 2.0’ (0.61m) to any side not defined by permanent walls or actual distance to permanent wall(s).
(English Units) Length (L): 7.5 + 4.0 + 2.0 = 13.5 Width (W): 3.5 + 4.0 + 2.0 = 9.5 Height (H): 4.5 + 2.0 = 6.5
Assumed Volume: 13.5 x 9.5 x 6.5 = 834 ft3
(Metric Units) Length (L): 2.28 + 1.22 + 0.61 = 4.11 Width (W): 1.07 + 1.22 + 0.61 = 2.90 Height (H): 1.37 + 0.61 = 1.98
Assumed Volume: 4.11 x 2.90 x 1.98 = 23.60 m3
2-2 DETERMINE TOTAL SURFACE AREA OF ASSUMED VOLUME PERIMETER WALLS (English Units)(Assumed Length x Assumed Height) x 2 = Surface Area of Front & Back (Assumed Width x Assumed Height) x 2 = Surface Area of 2 Sides (ft.) (ft.) = Total Surface Area (ft2)
Front & Back: 2 [(7.5 + 4.0 + 2.0) x (4.5 + 2.0] = 175.5 ft2Sides: 2 [(3.5 + 4.0 + 2.0) x (4.5 + 2.0] = 123.5 ft2
Total Surface Area: 175.5 + 123.5 = 299.0 ft2
(Metric Units) (Assumed Length x Assumed Height) x 2 = Surface Area of Front & Back (Assumed Width x Assumed Height) x 2 = Surface Area of 2 Sides = Total Surface Area (m) (m) (m2)
Front & Back: 2 [(2.28 + 1.22 + 0.61) x (1.37 + 0.61)] = 16.28 m2
Sides: 2 [(1.07 + 1.22 + 0.61) x (1.37 + 0.61)] = 11.48 m2
(top view)
2.0’
2.0’
3.5’
7.5’
(Use actual distance)
4.0’
4.0’
Ht. = 4.5’
7.5’ + 4.0’ + 2.0’
3.5’ + 4.0’ + 2.0’
Assumed Volume
(top view)
2.0’
2.0’
3.5’
7.5’ 4.0’
4.0’
Ht. = 4
Front Surface
Side 1 Surface Side 2
Surface
Back Surface
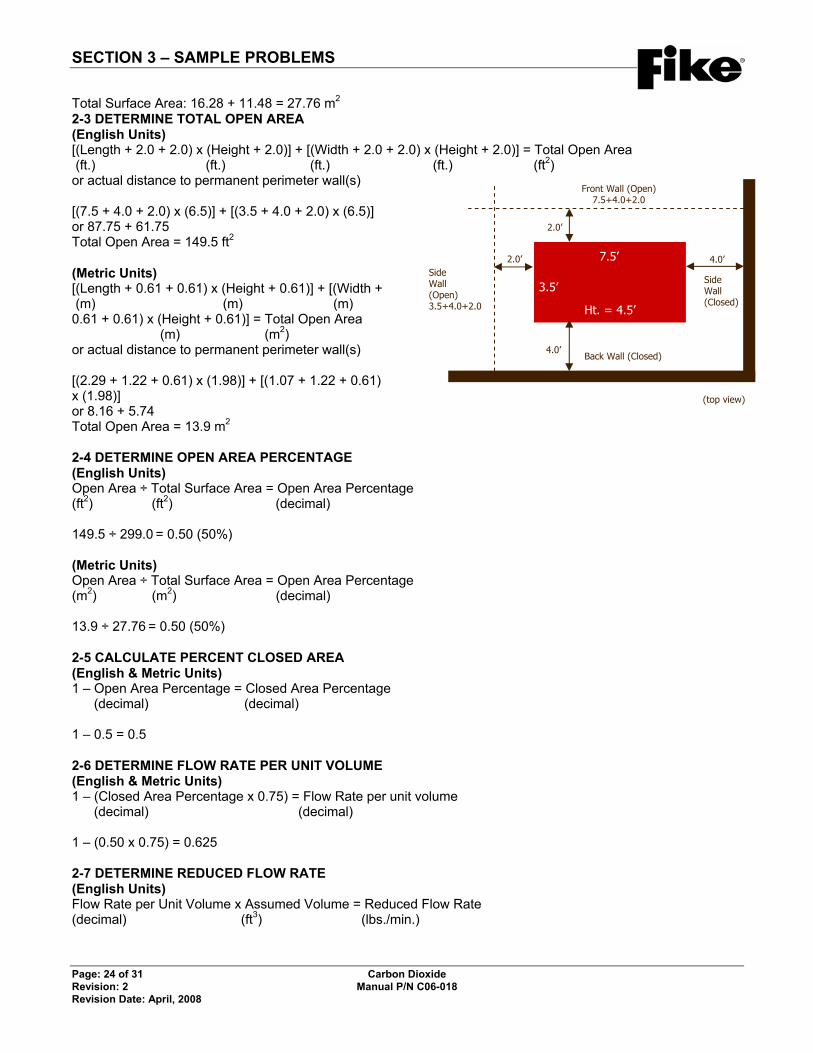
SECTION 3 – SAMPLE PROBLEMS
Page: 24 of 31 Carbon Dioxide Revision: 2 Manual P/N C06-018 Revision Date: April, 2008
Total Surface Area: 16.28 + 11.48 = 27.76 m2
2-3 DETERMINE TOTAL OPEN AREA (English Units) [(Length + 2.0 + 2.0) x (Height + 2.0)] + [(Width + 2.0 + 2.0) x (Height + 2.0)] = Total Open Area (ft.) (ft.) (ft.) (ft.) (ft2)or actual distance to permanent perimeter wall(s)
[(7.5 + 4.0 + 2.0) x (6.5)] + [(3.5 + 4.0 + 2.0) x (6.5)]or 87.75 + 61.75 Total Open Area = 149.5 ft2
(Metric Units) [(Length + 0.61 + 0.61) x (Height + 0.61)] + [(Width + (m) (m) (m) 0.61 + 0.61) x (Height + 0.61)] = Total Open Area (m) (m2)or actual distance to permanent perimeter wall(s)
[(2.29 + 1.22 + 0.61) x (1.98)] + [(1.07 + 1.22 + 0.61)x (1.98)]or 8.16 + 5.74 Total Open Area = 13.9 m2
2-4 DETERMINE OPEN AREA PERCENTAGE (English Units) Open Area ÷ Total Surface Area = Open Area Percentage (ft2) (ft2) (decimal)
149.5 ÷ 299.0 = 0.50 (50%)
(Metric Units) Open Area ÷ Total Surface Area = Open Area Percentage (m2) (m2) (decimal)
13.9 ÷ 27.76 = 0.50 (50%)
2-5 CALCULATE PERCENT CLOSED AREA (English & Metric Units) 1 – Open Area Percentage = Closed Area Percentage (decimal) (decimal)
1 – 0.5 = 0.5
2-6 DETERMINE FLOW RATE PER UNIT VOLUME (English & Metric Units) 1 – (Closed Area Percentage x 0.75) = Flow Rate per unit volume (decimal) (decimal)
1 – (0.50 x 0.75) = 0.625
2-7 DETERMINE REDUCED FLOW RATE (English Units)Flow Rate per Unit Volume x Assumed Volume = Reduced Flow Rate (decimal) (ft3) (lbs./min.)
(top view)
2.0’
2.0’
3.5’
7.5’ 4.0’
4.0’
Ht. = 4.5’
Front Wall (Open) 7.5+4.0+2.0
Side Wall (Open)3.5+4.0+2.0
Side Wall (Closed)
Back Wall (Closed)

SECTION 3 – SAMPLE PROBLEMS
Carbon Dioxide Page : 25 of 31 Manual P/N C06-018 Revision: 2 Revision Date: April, 2008
0.625 x 834 = 521.25 (Metric Units) Flow Rate Per Unit Volume x Assumed Volume = Reduced Flow Rate (decimal) (m3) (kg./min.)
(0.625 x 16) x 23.60 = 236
2-8 DETERMINE QUANTITY OF NOZZLE(S) REQUIRED (English Units)System Flow Rate ÷ Minimum Nozzle Flow Rate @ Distance From Hazard = Total Nozzles Required (lbs./min.) (lbs./min.) (ft.)
522 ÷ 76.1 @ 5.0 = 6.86, round up to 7
(Metric Units) System Flow Rate ÷ Minimum Nozzle Flow Rate @ Distance from Hazard = Total Nozzles Required (kg./min.) (kg./min.) (m)
236 ÷ 34.5 @ 1.52 = 6.86, round up to 7
2-9 DETERMINE REVISED SYSTEM FLOW RATE (English Units)Nozzle(s) Required x Nozzle Flow Rate = System Flow Rate (lbs./min.) (lbs./min.)
7 x 76.1 = 532.7
(Metric Units) Nozzle(s) Required x Nozzle Flow Rate = System Flow Rate (lbs./min.) (lbs./min.)
7 x 34.5 = 241.5
2-10 DETERMINE QUANTITY OF AGENT REQUIRED (English Units)System Liquid CO2 Initial VaporFlow Rate x Compensation x Discharge Time + Compensation = Qty. CO2 Required(lbs./min.) (minutes) (lbs.)
533 x 1.4 x 0.5 + 0 = 374
(Metric Units) System Liquid CO2 Initial VaporFlow Rate x Compensation x Discharge Time + Compensation = Qty. CO2 Required(kg./min.) (minutes) (kg.)
242 x 1.4 x 0.5 + 0 = 170
2-11 DETERMINE QUANTITY OF AGENT SUPPLIED Quantity of Agent Required Rounded Up to Nearest Available Container Size(English Units) 374 lbs. ÷ 75 lb./cylinder = 4.98, round up to 5 (75 lb. cylinders); 5 x 75 lb./cylinder = 375 lbs. supplied or374 lbs. ÷ 100 lb./cylinder = 3.74, round up to 4 (100 lb cylinders); 4 x 100 lb./cylinder = 400 lbs supplied
Hazard

SECTION 3 – SAMPLE PROBLEMS
Page: 26 of 31 Carbon Dioxide Revision: 2 Manual P/N C06-018 Revision Date: April, 2008
(Metric Units) 170 kg. ÷ 34 kg./cylinder = 5, 5 x 34 kg./cylinder = 170 kg. supplied or170 kg. ÷ 45.4 kg./cylinder = 3.74, round up to 4 (45.4 kg. cylinders); 4 x 45.4 kg./cylinder = 181.6 kg. supplied
2-12 LAYOUT PIPE NETWORK AND RUN HYDRAULIC CALCULATION
Layout pipe network and run hydraulic calculation to confirm 30 second of liquid discharge at each nozzle.
3.2.3.3 EXAMPLE PROBLEM 3 – ENCLOSURE WITH LEAKAGE
3-1 DETERMINE ASSUMED VOLUME Calculated by adding 2 feet (0.61m) to any side not defined by permanent walls (English Units) Length: 16.0 + 0 = 16.0 Width: 6.0 + 2.0 = 8.0 (open side) Height: 7.0 + 0 = 7.0
Assumed Volume: 16.0 x 8.0 x 7.0 = 896 ft3
(Metric Units) Length: 4.88 + 0 = 4.88 Width: 1.83 + 0.61 = 2.44 (open side) Height: 2.13 + 0 = 2.13
Assumed Volume: 4.88 x 2.44 x 2.13 = 25.36m3
3-2 DETERMINE TOTAL SURFACE AREA OF ASSUMED VOLUME PERIMETER WALLS(excludes top and bottom) (English Units) Length: 16.0 Width: 8.0 (6.0 + 2.0) Height: 7.0
Front & Back: 2 (16.0 x 7.0) = 224 ft2Sides: 2 (8.0 x 7.0) = 112 ft2Total Surface Area: 336 ft2
(Metric Units) Length: 4.88 Width: 2.44 (1.83 + 0.61) Height: 2.13
Front & Back: 2 (4.88 x 2.13) = 20.79 m2
Sides: 2 (2.44 x 2.13) = 10.39 m2
Total Surface Area: 31.18 m2
(Isometric View)
16.0
6.0
+ 2.0 = 8.0
7.0

SECTION 3 – SAMPLE PROBLEMS
Carbon Dioxide Page : 27 of 31 Manual P/N C06-018 Revision: 2 Revision Date: April, 2008
3-3 DETERMINE TOTAL OPEN AREA Total Open area = total surface area of each open wall or portion thereof: (English Units) Open Front: 16.0 x 7.0 = 112 ft2Total Open Area: 112 ft2
(Metric Units) Open Front: 4.88 x 2.13 = 10.39 m2
Total Open Area: 10.39 m2
3-4 DETERMINE OPEN AREA PERCENTAGE (English Units) Open Area ÷ Total Surface Area = Open Area Percentage (ft2) (ft2) (decimal)
112 ÷ 336 = 0.333 (33.3%)
(Metric Units) Open Area ÷ Total Surface Area = Open Area Percentage (m2) (m2) (decimal)
10.39 ÷ 31.18 = 0.333 (33.3%)
3-5 DETERMINE CLOSED AREA PERCENTAGE (English & Metric Units) 1 – Open Area Percentage = Closed Area Percentage (decimal) (decimal)
1 – 0.333 = 0.667 (66.7%)
3-6 DETERMINE FLOW RATE PER UNIT VOLUME (English & Metric Units) 1 – (Closed Area Percentage x 0.75) = Flow per Unit Volume (decimal) (lbs./min./ft3 or kg./min./m3)
1 – (0.667 x 0.75) = 0.50
3-7 DETERMINE REDUCTED FLOW RATE (English Units) Flow Rate Reduction Factor x System Discharge Rate x Assumed Volume = Reduced Flow Rate(lb./min./ft3) (lb./min./ft3) (ft3) (lbs./min.)
0.50 x 1 x 896 = 448.0
(Metric Units) Flow Rate Reduction Factor x System Discharge Rate x Assumed Volume = Reduced Flow Rate(kg./min./m3) (kg./min./m3) (m3) (kg./min.)
0.50 x 16 x 25.36 = 202.9
(Isometric View)
16.0
7.0

SECTION 3 – SAMPLE PROBLEMS
Page: 28 of 31 Carbon Dioxide Revision: 2 Manual P/N C06-018 Revision Date: April, 2008
3-8 DETERMINE QUANTITY OF NOZZLE(S) REQUIRED (English Units) System Flow Rate ÷ Average Nozzle Flow Rate = Nozzles Required (lbs./min.) (lbs./min.)
448.0 ÷ 115 = 4
(Metric Units) System Flow Rate ÷ Average Nozzle Flow Rate = Nozzles Required (kg./min.) (kg./min.)
202.9 ÷ 52.16 = 4
3-9 DETERMINE REVISED SYSTEM FLOW RATE (English Units) Nozzles Required x Average Nozzle Flow Rate = System Flow Rate (lbs./min.) (lbs./min.)
4 x 115 = 460
(Metric Units) Nozzles Required x Average Nozzle Flow Rate = Revised System Flow Rate (kg./min.) (kg./min.)
4 x 52.16 = 208.64
3-10 DETERMINE QUANTITY OF CO2 REQUIRED(English Units) Revised System Flow Rate x Liquid CO2 Compensation x Discharge Time = Qty. CO2 Required (lbs./min.) (minute) (lbs.)
460.0 x 1.4 x 0.5 = 322
(Metric Units) Revised System Flow Rate x Liquid CO2 Compensation x Discharge Time = Qty. CO2 Required (kg./min.) (minute) (kg.)
208.64 x 1.4 x 0.5 = 146.05
3-11 DETERMINE QUANTIY OF AGENT SUPPLIED Quantity of Agent Required Rounded Up to Nearest Available Container Size(English Units) 322 lbs. ÷ 75 lb./cylinder = 4.29, round up to 5 (75 lb. cylinders); 5 x 75 lb./cylinder = 375 lbs. supplied or322 lbs. ÷ 100 lb./cylinder = 3.22, round up to 4 (100 lb. cylinders); 4 x 100 lb./cylinder = 400 lbs. supplied
(Metric Units)146.05 kg. ÷ 34 kg./cylinder = 4.29, round up to 5 (34 kg. cylinders); 5 x 34 kg./cylinder = 170 kg. supplied or146.05 kg. ÷ 45.4 kg./cylinder = 3.22, round up to 4 (45.4 kg. cylinders); 4 x 45.4 kg./cylinder = 181.6 kg. supplied
3-12 LAYOUT PIPE NETWORK AND RUN HYDRAULIC CALCULATION Layout pipe network and run hydraulic calculation to confirm 30 second of liquid discharge at each nozzle.
(Isometric View)

SECTION 3 – SAMPLE PROBLEMS
Carbon Dioxide Page : 29 of 31 Manual P/N C06-018 Revision: 2 Revision Date: April, 2008
3.2.3.4 EXAMPLE PROBLEM 4 – ENCLOSURE WITH MULTIPLE OPENINGS The next series of steps show an example on how to calculate the system if the enclosure being protected has multiple openings.
4-1 DETERMINE ASSUMED VOLUME Calculate by adding 2 feet (0.61m) to any side or opening not defined by permanent wall(s). (English Units) Length: 16.0 + 0 = 16.0 Width: 6.0 + 2.0 = 8.0 (open side) Height: 7.0 + 0 = 7.0
Plus the assumed volume for 2 openings, 1 on each end of cabinet
Length: 5.0 Width: 2.0 Height: 4.0 Assumed volume = (16.0 x 8.0 x 7.0) + 2 x (5.0 x 2.0 x 4.0) = 976 ft3
(Metric Units) Length: 4.88 + 0 = 4.88 Width: 1.83 + 0.61 = 2.44 (open side) Height: 2.13 + 0 = 2.13
Plus the assumed volume for 2 openings, 1 on each end of cabinet
Length: 1.52 Width: 0.61 Height: 1.22 Assumed volume = (4.88 x 2.44 x 2.13) + 2 x (1.52 x 0.61 x 1.22) = 30.95 m3
4-2 DETERMINE TOTAL SURFACE AREA OF ASSUMED VOLUME PERIMETER WALLS(excludes top and bottom) (English Units) Length: 16.0 Width: 8.0 (6.0 + 2.0) Height: 7.0
Front & Back: 2 (16.0 x 7.0) = 224 ft2Sides: 2 (8.0 x 7.0) = 112 ft2Total Surface Area: 336 ft2
(Metric Units) Length: 4.88 Width: 2.44 (1.83 + 0.61) Height: 2.13
Front & Back: 2 (4.88 x 2.13) = 20.79 m2
Sides: 2 (2.44 x 2.13) = 10.39 m2
Total Surface Area: 31.28 m2
4’-0”
6’-0”
16’-0”
2’-0”
5’-0”
2’-0”
7’-0” Ht.

SECTION 3 – SAMPLE PROBLEMS
Page: 30 of 31 Carbon Dioxide Revision: 2 Manual P/N C06-018 Revision Date: April, 2008
4-3 DETERMINE TOTAL OPEN AREA Total Open area = total surface area of each open wall or portion thereof: (English Units) Open Front: 16.0 x 7.0 = 112 ft2Opening on Sides: (5.0 x 4.0) x 2 = 40 ft2Total Open Area: 152 ft2
(Metric Units) Open Front: 4.88 x 2.13 = 10.41 m2
Opening on Sides: (1.52 x 1.22) x 2 = 3.71 m2
Total Open Area: 14.12 m2
4-4 DETERMINE OPEN AREA PERCENTAGE (English Units) Open Area ÷ Total Surface Area = Open Area Percentage (ft2) (ft2) (decimal)
152 ÷ 336 = 0.452 (45.2%)
(Metric Units) Open Area ÷ Total Surface Area = Open Area Percentage (m2) (m2) (decimal)
14.12 ÷ 31.28 = 0.452 (45.2%)
4-5 DETERMINE CLOSED AREA PERCENTAGE (English & Metric Units) 1 – Open Area Percentage = Closed Area Percentage (decimal) (decimal)
1 – 0.452 = 0.548 (54.8%)
4-6 DETERMINE FLOW RATE PER UNIT VOLUME (English & Metric Units) 1 – (Closed Area Percentage x 0.75) = Flow Per Unit Volume (decimal) (lbs./min./ft3 or kg./min./m3)
1 – (0.548 x 0.75) = 0.589
4-7 DETERMINE REDUCTED FLOW RATE (English Units) Flow Rate Reduction Factor x System Discharge Rate x Assumed Volume = Reduced Flow Rate(lb./min./ft3) (lb./min./ft3) (ft3) (lbs./min.)
0.589 x 1 x 976 = 575
(Metric Units) Flow Rate Reduction Factor x System Discharge Rate x Assumed Volume = Reduced Flow Rate(kg./min./m3) (kg./min./m3) (m3) (kg./min.)
0.589 x 16 x 30.95 = 291.7
Opening SizeL=5.0’ x W=4.0’
16’-0”
8’-0” (6’-0” + 2’-0”)
7’-0”
Opening SizeL=5.0’ x W=4.0’

SECTION 3 – SAMPLE PROBLEMS
Carbon Dioxide Page : 31 of 31 Manual P/N C06-018 Revision: 2 Revision Date: April, 2008
4-8 DETERMINE QUANTITY OF NOZZLE(S) REQUIRED (English Units) System Flow Rate ÷ Average Nozzle Flow Rate = Nozzles Required (lbs./min.) (lbs./min.)
575 ÷ 115 = 5
(Metric Units) System Flow Rate ÷ Average Nozzle Flow Rate = Nozzles Required (kg./min.) (kg./min.)
260.8 ÷ 52.16 = 5
4-9 DETERMINE REVISED SYSTEM FLOW RATE (English Units) Nozzles Required x Average Nozzle Flow Rate = System Flow Rate (lbs./min.) (lbs./min.)
5 x 115 = 575
(Metric Units) Nozzles Required x Average Nozzle Flow Rate = Revised System Flow Rate (kg./min.) (kg./min.)
5 x 52.16 = 260.8
4-10 DETERMINE QUANTITY OF CO2 REQUIRED(English Units) Revised System Flow Rate x Liquid CO2 Compensation x Discharge Time = Qty. CO2 Required (lbs./min.) (minute) (lbs.)
575.0 x 1.4 x 0.5 = 402.5
(Metric Units) Revised System Flow Rate x Liquid CO2 Compensation x Discharge Time = Qty. CO2 Required (kg./min.) (minute) (kg.)
260.8 x 1.4 x 0.5 = 182.6
4-11 DETERMINE QUANTIY OF AGENT SUPPLIED Quantity of Agent Required Rounded Up to Nearest Available Container Size(English Units) 402.5 lbs. ÷ 75 lb./cylinder = 5.37, round up to 6 (75 lb. cylinders); 6 x 75 lb./cylinder = 450 lbs. supplied or402.5 lbs. ÷ 100 lb./cylinder = 4.03, round up to 5 (100 lb. cylinders); 5 x 100 lb./cylinder = 500 lbs. supplied
(Metric Units)182.6 kg. ÷ 34 kg./cylinder = 5.37, round up to 6 (34 kg. cylinders); 6 x 34 kg./cylinder = 204 kg. supplied or182.6 kg. ÷ 45.4 kg./cylinder = 4.03, round up to 5 (45.4 kg. cylinders); 5 x 45.4 kg./cylinder = 227 kg. supplied
4-12 LAYOUT PIPE NETWORK AND RUN HYDRAULIC CALCULATION Layout pipe network and run hydraulic calculation to confirm 30 second of liquid discharge at each nozzle.

Carbon Dioxide Manual P/N C06-018
SSeeccttiioonn 44IInnssttaallllaattiioonn

SECTION 4 – INSTALLATION
Carbon Dioxide Page: 1 of 20 Manual P/N C06-018 Revision: 2 Revision Date: April, 2008
4.1 GENERAL REQUIREMENTS Fike CO2 fire suppression system components are included as part of a total suppression system package. The installing Fike Distributor, or sub-contractor, provides pipe, fittings, electrical conduit and fittings, wire, hangers, brackets, and all normal mounting hardware. These items are provided to suit the installation specifications and the requirements of the specific system.
All materials provided for the CO2 system installation must be new, free from all defects and imperfections, and shall be of a grade and type that complies with NFPA 12, latest edition, and this manual.
Before the CO2 system is installed, the qualified installer should develop installation drawings in order to locate the equipment, determine pipe routing(s), and develop a bill-of-materials. All drawings shall be reviewed by the Authority Having Jurisdiction (AHJ) prior to installation.
The system installation shall be completed in accordance with the current issue of the following applicable codes and/or standards:
NFPA No. 12 – Carbon Dioxide Extinguishing Systems NFPA No. 70 – National Electrical Code (NEC) NFPA No. 72 – National Fire Alarm Code Local and state Fire and Building codes Requirements of the Authority Having Jurisdiction (AHJ)
The ambient storage temperatures for local application systems shall not exceed 120oF (49oC) nor be less than 32oF (0oC). For total-flood systems, they shall not exceed 130oF (54oC) nor be less than 0oF (-18oC) unless the system is designed for proper operation with storage temperatures outside of this range. External heating or cooling shall be permitted to keep the temperature within this range.
Specific projects and installations may have requirements for other “special” codes and/or standards as recommended by the AHJ. Where two or more codes are in conflict, the most stringent code or standard shallapply.
4.2 CYLINDER ASSEMBLIES AND STORAGE CO2 cylinders can be stored inside, or outside, the hazard space. Generally, it is preferable to locate the cylinders outside and away from the hazard area. Do not locate the cylinders in areas where they may be exposed to a fire or explosion in the hazard. When the cylinders are located within the protected space, a remote pneumatic control should be installed to release the system safely from outside of the hazard area.
CO2 cylinders should be located to provide convenient access for inspection, and removal for recharge or maintenance purposes. Do not install cylinders where they will be exposed to the elements, the sun’s direct rays, or temperatures outside of the acceptable ranges stated for each system type, (See Section 4.1).
Each cylinder is shipped as a “Slave” valve and is fitted with a pipe plug on both the Pilot port located on the side of the valve and the pressure port located on the top of the valve. To convert to the “Master” valve function, remove these plugs and install the solenoid actuation system as detailed in Section 4.10.
All Fike CO2 cylinders have a siphon tube and MUST be installed in the vertical (up) position. Horizontal mounting is not allowed.
Each CO2 cylinder assembly has a safety / shipping cap that is installed after the initial factory filling to protect against accidental discharge, or valve damage during shipping, handling and installation.
WARNING: THE SAFETY CAP MUST BE IN PLACE AT ALL TIMES UNTIL FINAL CONNECTION TO THE SYSTEM IS COMPLETE!
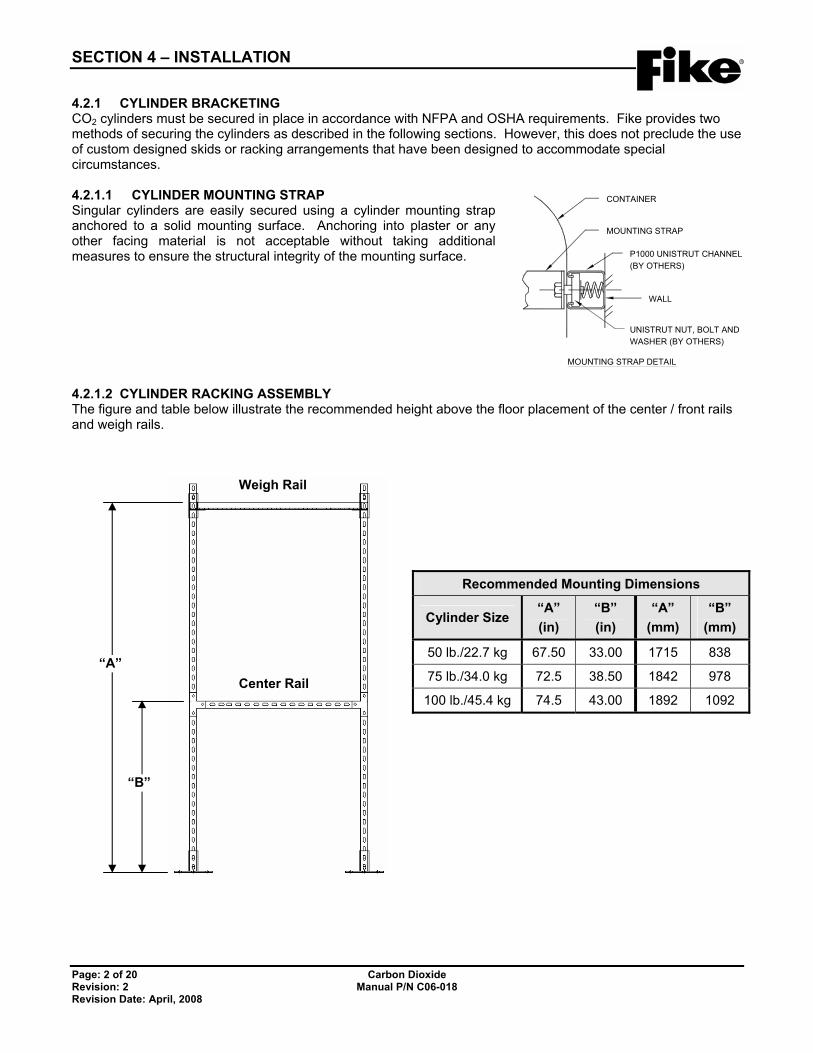
SECTION 4 – INSTALLATION
Page: 2 of 20 Carbon Dioxide Revision: 2 Manual P/N C06-018 Revision Date: April, 2008
4.2.1 CYLINDER BRACKETING CO2 cylinders must be secured in place in accordance with NFPA and OSHA requirements. Fike provides two methods of securing the cylinders as described in the following sections. However, this does not preclude the use of custom designed skids or racking arrangements that have been designed to accommodate special circumstances.
4.2.1.1 CYLINDER MOUNTING STRAP Singular cylinders are easily secured using a cylinder mounting strap anchored to a solid mounting surface. Anchoring into plaster or any other facing material is not acceptable without taking additional measures to ensure the structural integrity of the mounting surface.
4.2.1.2 CYLINDER RACKING ASSEMBLY The figure and table below illustrate the recommended height above the floor placement of the center / front rails and weigh rails.
Recommended Mounting Dimensions
Cylinder Size “A” (in)
“B” (in)
“A” (mm)
“B” (mm)
50 lb./22.7 kg 67.50 33.00 1715 838
75 lb./34.0 kg 72.5 38.50 1842 978
100 lb./45.4 kg 74.5 43.00 1892 1092
UNISTRUT NUT, BOLT ANDWASHER (BY OTHERS)
P1000 UNISTRUT CHANNEL
CONTAINER
MOUNTING STRAP
(BY OTHERS)
WALL
MOUNTING STRAP DETAIL
Center Rail
Weigh Rail
“A”
“B”

SECTION 4 – INSTALLATION
Carbon Dioxide Page: 3 of 20 Manual P/N C06-018 Revision: 2 Revision Date: April, 2008
4.3 PIPE AND FITTINGS The following sections detail the specifications for materials normally used for the installation of CO2 fire suppression systems. The information provided does not preclude the use of other materials (stainless steel, flexible hoses, etc.) providing that they comply with the minimum pressure and temperature requirements detailed in NFPA 12.
4.3.1 FERROUS PIPE Black or galvanized steel pipe shall be ASTM A-53 seamless or electric welded, Grade A or B, or ASTM A-106, Grade A, B, or C. Stainless steel pipe shall be Type 304 or 316 for threaded connections, or Type 304, 316, 304L, or 316L for welded connections.
ASTM A-120 and ordinary cast-iron pipe shall not be used in CO2 piping systems.
In high pressure piping distribution systems 3/4” NPT and smaller, Schedule 40 pipe may be used. Schedule 80 pipe shall be used for 1” thru 4” NPT piping systems. Furnace butt weld pipe conforming to ASTM A-53 SHALLNOT be used.
High pressure CO2 system piping components that are not specifically covered in this manual shall have a minimum burst pressure of 5,000 psi (34,474 kPa).
4.3.2 FITTINGS Black or galvanized malleable or ductile fittings, having a Class 300 rating, shall be used through 2”
IPS. Forged steel fittings shall be used in all sizes 2-1/2” and larger.
Flanged joints upstream of any stop valve shall be Class 600. Flange joints down-stream of stop valves, or in systems with no stop valves, may be Class 300.
Stainless steel fittings shall be type 304 or 316, wrought/forged (per ASTM A-182), Class 3000, threaded or socketweld, for all sizes 1/8” thru 4”.
4.3.3 FLANGED, WELDED AND MISCELLANEOUS FITTINGS CO2 piping systems may utilize screwed, flanged or welded joints utilizing malleable, ductile or forged steel fittings.
When hex reducing bushings are used for one pipe size reduction, a 3,000 lb. forged steel bushing shallbe used to maintain adequate strength. When hex bushings are used for more than one pipe size reduction, they must be Class 300 malleable or ductile iron through 2” IPS, and 3,000 lb. forged steel for all larger sizes. Flush or face bushings shall not be used.
Mechanical grooved fittings and couplings may be used if they are specifically listed and/or approved for high pressure CO2 service.
Suitable flared, compression-type, or brazed fittings shall be used with compatible tubing. Where brazed joints are used, the brazing alloy shall have a minimum melting point of 1,000°F (538°C).
4.4 PIPING DISTRIBUTION SYSTEM For high pressure CO2 systems, the supply piping network shall have a minimum burst pressure of 5,000 psi (34,474 kPa). The piping system shall be installed in accordance with the approved system plans and the latest version of Fike CO2 Flow Calculation Program. Any deviation from the system plans or flow calculation program must be approved by the engineer-in-charge and a system flow calculation performed to confirm the acceptability of the changes.
4.4.1 THREADED CONNECTIONS All threaded joints shall have American Standard pipe threads (NPT) conforming to ANSI B1.20.1. All threads shall be cut full length and the pipe suitably reamed and chamfered. After threading, all pipe shall be cleaned using a non-flammable cleaning solvent to remove metal shavings, cutting oil, mill scale, etc,

SECTION 4 – INSTALLATION
Page: 4 of 20 Carbon Dioxide Revision: 2 Manual P/N C06-018 Revision Date: April, 2008
When assembling pipe with threaded joints, use a quality grade of pipe sealant applied to the male threads ONLY. The pipe joint should be tightened until the fitting engagement conforms to the value specified for NPT pipe threads. Normal engagement values for tight joints are provided in the Pipe Fitting Engagement Table that follows.
Pipe shall be reamed and cleaned before assembly. After assembly, the entire piping system shall be blown out before nozzles or other discharge devices are installed.
PIPE FITTING ENGAGEMENT TABLEEnglish Values, inches
Nominal Pipe Size (NPT) 1/4 3/8 1/2 3/4 1 1-1/4 1-1/2 2 2-1/2 3 3-1/2 4 5 6
Engagement: 3/8 3/8 1/2 9/16 11/16 11/16 11/16 3/4 15/16 1 1-1/16 1-1/8 1-1/4 1-5/16
Metric Values, mmNominal Pipe Size (NPT) 1/4 3/8 1/2 3/4 1 1-1/4 1-1/2 2 2-1/2 3 3-1/2 4 5 6
Engagement: 10 10 13 14 18 18 18 19 24 25 27 29 32 33
4.4.2 WELDED PIPE CONNECTIONS When making welded connections, either bevel-type or socket-weld fittings may be used. All welding shall be performed by qualified welders in accordance with Section IX, qualification standard for welding and brazing procedures, covering welders and brazers, in the ASME Boiler and Pressure Vessel Code.
During the welding operation, care must be taken to remove any weld spatter or molten metal that may have entered the piping. Rough spots and metal build-up that could affect agent flow must be removed.
4.4.3 TUBE AND BRAZED CONNECTIONS When installing tubing, compression type fittings are preferred. Care must be taken NOT to exceed the pressure/temperature ratings of the fitting manufacturer. When tubing joints are soldered or brazed, the melting temperature of the solder or brazing material must be a minimum of 1000°F (538°C).
4.5 HANGERS AND BRACING All CO2 system piping, both vertical and horizontal, shall be securely supported with hangers conforming to the latest requirements of the ASME Power Piping Code.
Pipe hangers shall be capable of supporting pipe under all conditions of operation and service. They shall allow for the expansion and contraction of the piping and shall prevent pipe loads and stresses from being transmitted into connected equipment. Pipe hangers and brackets shall be of a rugged design and fabrication. They shall be installed so that movement of the supported pipe will not loosen them.
The piping system shall be securely supported and braced with due allowance for agent thrust forces, and thermal expansion and/or contraction. The piping system shall not be subject to mechanical, chemical or other damage. Where practical, riser piping shall be supported independently from the connected horizontal piping. An anchor must be installed at each change in piping direction and a support bracket, or hanger, installed adjacent to each discharge nozzle and/or whenever a change in direction occurs. CO2 system piping shall not be suspended or supported from other utility systems piping (i.e. water, gas, steam, compressed air, etc.) or electrical distribution system conduit.
Where explosions are possible, the piping system shall be suspended from supports or hangers that are the least likely to be displaced. In earthquake prone areas, piping hangers, brackets, anchors and supports shall conform to good engineering design practices and be approved by an Earthquake Design Engineer and the local Authority Having Jurisdiction (AHJ).
Generally, no section of piping should be without a hanger bracket or support. Maximum spacing between hangers and hanger rod sizes shall conform to the following tables.

SECTION 4 – INSTALLATION
Carbon Dioxide Page: 5 of 20 Manual P/N C06-018 Revision: 2 Revision Date: April, 2008
Hanger Spacing – Rod Sizing English Values
Nominal PipeSize (NPT) 1/2" 3/4" 1" 1-1/4" 1-1/2" 2" 2-1/2" 3" 3-1/2" 4" 5" 6"
Max. Spacing (ft.) 5’ 6’ 7’ 9’ 9’ 10’ 11’ 12’ 13’ 14’ 16’ 17’
Rod Size (in. dia.) 3/8" 3/8" 3/8" 3/8" 3/8" 3/8" 1/2" 1/2" 1/2" 5/8" 5/8" 3/4" Metric Values
Nominal PipeSize (NPT) 1/2" 3/4" 1" 1-1/4" 1-1/2" 2" 2-1/2" 3" 3-1/2" 4" 5" 6"
Max. Spacing (m) 1.5 1.8 2.1 2.8 2.8 3.1 3.4 3.7 4 4.3 5 5.2
Rod Size (mm dia.) 10 10 10 10 10 10 15 15 15 16 16 20
4.6 CLOSED PIPE SECTIONS All closed pipe sections that could trap CO2 agent shall be provided with a pressure relief device. This situation will occur if stop/maintenance or selector valves are incorporated into a CO2 system’s piping.
4.7 PIPE AND NOZZLE INSTALLATION CO2 system piping shall be installed according to the piping layout drawing(s) prepared by/for the Fike distributor, or the installing contractor. The drawings will show the proposed pipe routing, equipment and nozzle locations, general details, notes and a piping isometric drawing showing pipe sizes, lengths, nozzle type and code number(s).
CO2 flow calculations are prepared from the isometric(s) to verify pipe sizes and determine nozzle code numbers.The installer must verify that the piping can be installed as shown on the drawing, and to establish fabrication data based upon their site inspection. Changes to the piping from that shown on the drawing are critical and can affect overall system performance. Any deviations or changes to the piping system design MUST be approved by the system designer prior to implementation, and an “as built” flow calculation performed to determine the appropriate nozzle orifice code numbers.
4.7.1 PIPING INSTALLATION Pipe, fittings, hangers, and all other materials used for a CO2 system installation shall be new and of good quality; installed in a neat and workmanlike manner.
Piping shall be reamed before threading, and cleaned before and after installation. The entire piping system shall be blown out with Nitrogen or compressed air before the nozzles and other devices are installed.
A dirt trap and blow-out pocket consisting of a tee and 3” - 6” (76 –152 mm) long capped nipple, shall be installed at the end of each pipe run, and at each nozzle.
Piping installed through walls, floors, etc., shall be installed through pipe sleeves fabricated from Schedule 40 pipe that is a minimum of 2 pipe sizes larger than the pipe passing thru the sleeve, but not smaller than 1” pipe. Sleeves shall be filled with an intrumessant material to seal the space around the system pipe and eliminate the possibility of fire transmission through the sleeve.
When installing a CO2 piping system, the use of reducing tee fittings is preferred. When these fittings are not available, the use of concentric reducing couplings or bell reducers is recommended. If 2 reducing fittings are required to make the required size reduction, they shall be selected to evenly split the reduction.
After completion of the piping network portion of the CO2 system, but prior to connection to the cylinders, nozzles or other equipment; the discharge piping system should be blown out in accordance with NFPA 12.
All valves (stop, selector, etc.) should be installed with a union immediately on each side of the valve to facilitate inspection, repair, or replacement. Flanged valves are exempted.

SECTION 4 – INSTALLATION
Page: 6 of 20 Carbon Dioxide Revision: 2 Manual P/N C06-018 Revision Date: April, 2008
4.7.2 DISCHARGE BEND INSTALLATION Install the Discharge Bend by threading the 1/2” NPT male end into the piping or manifold wrench-tight in the location(s) shown on the drawings. Connect the other end of the discharge bend to the outlet of the discharge valve wrench-tight, and verify that the hose does not have any kinks in it.
Apply Teflon tape to the 1/2” NPT male threads prior to installation. When applying pipe sealant, start at the second male thread and wrap the tape (two turns maximum) clockwise around the threads, away from the pipe opening. DO NOT overlap the pipe opening, as this could possibly cause blockage of the gas pressure.
4.7.3 MANIFOLD PIPING INSTALLATION Mount the discharge manifold to a solid structural member such as the racking uprights, or on top of the weigh bar brackets using pipe clamps or U-bolts. Care must be taken to ensure that the manifold is not located at a height or location that is not compatible with the length of the discharge bend(s).
If accessories such as pressure switches, header vent plugs, pneumatic time delays, etc. are required, make certain that the manifold configuration includes the tee fittings necessary to make those connections.
4.7.4 PNEUMATIC TIME DELAY INSTALLATION The Pneumatic Time Delay is installed in the piping, and should be located as close as possible to the CO2cylinder for single cylinder systems. Securely mount the time delay to a structurally solid mounting surface using its mounting bracket.
For manifold systems, the time delay should be installed in the piping between the master cylinder(s) and the slave cylinder(s). It is recommended that the time delay be securely mounted to the rack bulkhead or another structurally solid mounting surface rather than simply suspending the device from the manifold piping.
When installing the time delay, make certain that the outlet port of the time delay is pointing toward the manifold outlet. Each port is a threaded 3/4” NPT fitting for connection to the pipe. It is also recommended that the time delay is mounted in a location that makes the manual override lever accessible from the ground; and leaves enough room to operate the lever freely as well.
SLAVEMASTER
MANUAL OVERRIDE LEVER
TIMEDELAY
9/32" DIA(7 mm)TYP. 4 PLCS.
17"(432 mm)
2" (51 mm)
6"(152 mm)
5 1/2"(140 mm)

SECTION 4 – INSTALLATION
Carbon Dioxide Page: 7 of 20 Manual P/N C06-018 Revision: 2 Revision Date: April, 2008
4.7.5 STOP / MAINTENANCE VALVE INSTALLATION Stop / Maintenance Valves are manually operated valves with a limit switch to provide a “trouble” input to the control system when the valve is in the closed position. The stop valve is installed in the discharge piping after the manifold, (if applicable), in a location that is accessible from the ground without being prone to accidental damage. It is also recommended that a union be installed on either side of the valve to facilitate removal if needed.
After installation, the stop valve should be equipped with a suitable lock to secure the valve in the “open” or “closed” position depending upon the situation. Signage should also be provided to identify the stop valve, its purpose, and its operation requirements.
All interconnect wiring to the control system must be installed using conduit and boxes that are appropriate for the environment in which they are installed.
HEADER VENT
HEADER SAFETY
STOP/MAINTENANCE VALVE
SLAVEMASTER

SECTION 4 – INSTALLATION
Page: 8 of 20 Carbon Dioxide Revision: 2 Manual P/N C06-018 Revision Date: April, 2008
4.7.6 MAIN & RESERVE CHECK VALVE INSTALLATIONBoth Main and Reserve supplies for fixed storage systems shall be permanently connected to the piping and arranged for easy changeover, except where the authority having jurisdiction permits an unconnected reserve.
When piping a connected reserve system, the reserve cylinders must be segregated from the pressure released from the main system during a discharge in order to prevent the backpressure from opening the valves on the reserve cylinders as well. This is accomplished by adding check valves on both sides of the manifold to isolate each side. It will also be necessary to add a header vent plug (See Section 4.7.7).
4.7.7 LOW & HIGH PRESSURE RELIEF DEVICES INSTALLATION When valves are installed within a CO2 system, agent being trapped in a pipe section is a concern. To protect the system piping from an over-pressure condition, high pressure relief devices shall be installed in any pipe section that has the potential of having CO2 trapped within it. The pressure relief devices shall be located in such a manner that the discharge of trapped Carbon Dioxide will not injure personnel or damage equipment.
The Header Safety Relief has a 1/2” NPT threaded body and is installed in a tee or coupling located within the closed section of piping. Closed pipe sections are potentially created where stop valves, selector valves, pneumatic time delays, and check valves are used.
The Header Vent Plug is a pressure relief device used to prevent pressure from building within a main or reserve manifold section due to small amounts of leakage being trapped by the check valves. The Header Vent Plug has a 1/2” NPT threaded body and is installed in a tee or coupling located at the each end of the manifold.
CHECK VALVE
RESERVEMAIN
TYP. OF 2 PLCS.HEADER VENT
TYP. OF 2 PLCS.HEADER SAFETY

SECTION 4 – INSTALLATION
Carbon Dioxide Page: 9 of 20 Manual P/N C06-018 Revision: 2 Revision Date: April, 2008
4.7.8 PRESSURE SWITCH INSTALLATION The Pressure Switch should be securely mounted in a location that is not prone to accidental damage, and yet is accessible to the discharge piping or manifold. Connect the pressure switch to a tee fitting installed in the discharge piping with 1/4” NPT pipe, stainless steel flex hose, or tubing.
All interconnect wiring to the control system must be installed using conduit and boxes that are appropriate for the environment in which they are installed.
All pipe, tubing, and fittings used for these connections must be supplied in accordance with the strength requirements outlined in NFPA 12.
4.7.9 PRESSURE TRIP INSTALLATION Pressure Trips should be securely mounted in the appropriate location and connected to the discharge piping using 1/4” NPT pipe or tubing. The minimum operating pressure required is 75 psi (517.1 kPa) with a maximum load rating of 100 lbs. (45.4 kg) on the retaining pin.
Pressure Trips can be installed in series from a common pressure outlet fitting on the discharge piping. When using more than 1 pressure trip on a common supply line, the outlet of the last pressure trip in line must be plugged with a 1/4” NPT pipe plug.
All pipe, tubing, and fittings used for these connections must be supplied in accordance with the strength requirements outlined in NFPA 12.
1/4" NPTFEMALE, PORT `A'
5-1/8"
1/2" (15mm)CONDUIT ENTRY
4"
2 MTG. HOLES1/4" DIA. (8 mm)
3"(76 mm)
(130 mm)
(102 mm)
3.625"(92 mm)
3.50"(89 mm)
9/32" DIA. (7 mm)TYP. OF 2 PLCS.
1/4" NPTPRESSURE INLET/OUTLETCONNECTION (TYP. OF 2)
OPERATEDPOSITION
"NORMAL"STANDBYPOSITION
DISCHARGEPIPING
1/4" (8 mm)PIPE, TUBE
OR FLEX HOSE

SECTION 4 – INSTALLATION
Page: 10 of 20 Carbon Dioxide Revision: 2 Manual P/N C06-018 Revision Date: April, 2008
SOLENOIDACTUATORS
SELECTORVALVES
TO ZONE B PIPE NETWORK
TO ZONE A PIPE NETWORK
4.7.10 PRESSURE OPERATED SIREN INSTALLATION The Pressure Operated Siren operates off of the carbon dioxide supply of the system. Securely mount the siren(s) in the appropriate location(s) and connect to the discharge piping using 1/2” NPT pipe. A dirt trap and union should also be installed to prevent contamination during operation and to provide an easy means of removal if needed.
The siren(s) should be located as close to the discharge piping as possible, with a maximum pipe length of 250 ft. (76.2 m) of 1/2” NPT pipe. Based on the flow rates and anticipated pressure drop, a maximum of 2 sirens can be supplied for a single cylinder.
Agent consumption for each siren is approximately 6 lbs. (2.7kg) per minute. Therefore, the agent consumption must be accounted for when determining the amount of agent required for the system.
All pipe, tubing, and fittings used for these connections must be supplied in accordance with the strength requirements outlined in NFPA 12.
4.7.11 SELECTOR VALVE INSTALLATION Selector Valves (P/N: 70-1899-XX-XV) are used to direct the flow of agent into one specific hazard of a multiple hazard application. One Selector Valve is required for each zone that is to be protected.
Selector Valves can be mounted in either the horizontal or vertical position. They are a normally closed spring-return ball valve that must be opened, either electrically or manually, with the solenoid actuator kit to allow the agent to flow to the particular hazard zone. Once opened, the pressure must be relieved using the relief/pop-off valve to allow the Selector Valve to spring-return to the closed position.
Reducing bushings can be utilized when connecting to a 1/2”, 3/4”, 1-1/4”, and 2-1/2” piping network.
Selector Valve Systems utilize the Solenoid Actuator Kit (P/N: 70-202).
Selector Valves are FM approved only.

SECTION 4 – INSTALLATION
Carbon Dioxide Page: 11 of 20 Manual P/N C06-018 Revision: 2 Revision Date: April, 2008
4.7.11.1 SOLENOID ACTUATOR KIT INSTALLATION The Solenoid Actuator Kit should be one of the last components installed on a system. All components are shipped as separate items to be field assembled. The following items should be completed prior to final installation of the Solenoid Actuator:
Container installation should be complete and secured in place Discharge piping installation should be complete and all bracing, brackets, etc. in
place The discharge nozzles should be installed The detection & control system installation should be complete & tested – no faults
shall be present
4.7.11.1.1 SOLENOID ACTUATOR MOUNTING The Solenoid Actuator Mounting Bracket must be secured to a solid, load-bearing surface using a minimum of four fasteners and positioned so that the total length of the actuation line does not exceed 3 feet (0.92m). As an option, the brackets may be welded into place.
6.89"(175.0mm)
2.76"(70.1mm)

SECTION 4 – INSTALLATION
Page: 12 of 20 Carbon Dioxide Revision: 2 Manual P/N C06-018 Revision Date: April, 2008
4.7.11.1.2 SOLENOID INSTALLATION
Remove the retention screw from the body of the solenoid coil and unplug the solenoid connector. Remove the rubber gasket and use a small thin blade screwdriver to remove the wiring terminal. Attach the appropriate wires, through the cable gland, from the control panel solenoid releasing circuit according to the wiring diagram shown. NOTE: The ground terminal can be attached to the control panel chassis ground to
improve ground fault detection but it is not required for proper function of the solenoid. No connection is required for Terminal 3 (NC).
Following is a typical wiring diagram showing how the electric solenoid is wired to supervisory contact of the solenoid circuit of the Fike SHP PRO. For control panel wiring details, refer to the SHP PRO Manual (p/n 06-297) or a Cheetah Xi manual if used. Remove the solenoid coil from the cylinder to prevent accidental discharges. Re-assemble the solenoid connector in the desired orientation, plug it into the front of the actuator, and secure with the retention screw. Install the nitrogen cylinder after the Final Test and Inspection of the system has been completed and the customer is ready to arm the system. 4.7.12 WINTERGREEN ODORIZER INSTALLATION The Wintergreen Odorizer is installed in the distribution piping and should be located before the stop/maintenance valve or at the end of the manifold piping. This device has a 1” NPT male thread and is installed in the side outlet of a side/thru tee and must be installed in the upright position. After a system discharge, unscrew cap, clean out basket and replace ampoule then screw cap down tight. 4.8 NOZZLE INSTALLATION Fike CO2 systems include a variety of discharge nozzles, each designed for a specific application or flow rate. Each nozzle has an orifice drilled to suit the specific nozzle location and discharge flow requirements.
When installing nozzles, it is imperative that the correct nozzle be installed in its appropriate location within the system discharge piping network. To ensure that this is accomplished, do the following:
1. Verify the orifice code value and pipe size for each nozzle in the system as listed on the project drawings. Nozzle code values are stamped on each nozzle.
2. Install the nozzles in their correct location within the pipe distribution network.
3. Be sure that each nozzle is oriented to discharge correctly.
12
11
Solenoid 24V Solenoid 2 Watt Min. / 48 Watt Max.
-
+
Control PanelSolenoid Releasing Circuit

SECTION 4 – INSTALLATION
Carbon Dioxide Page: 13 of 20 Manual P/N C06-018 Revision: 2 Revision Date: April, 2008
4.9 SYSTEM INSTALLATION The following procedures should be followed as closely as possible to ensure that the CO2 system installation is completed in a timely manner:
4.9.1 CYLINDER INSTALLATION 1. After completing the cylinder racking assembly and discharge piping, place the cylinders securely in the
rack and tighten all cylinder straps.
2. Remove the safety/shipping cap from each cylinder. Safety/shipping caps should be stored close to the cylinders so they will be readily available when the cylinders are removed from the storage rack.
WARNING: Cylinders shall not be transported under any circumstances without the safety/shipping cap securely installed on each cylinder.
3. When cylinder(s) are properly installed in the system racking, attach flexible discharge bend(s) to the cylinder(s); hand-tight. This is done to determine proper alignment between the cylinder(s) and the discharge manifold.
4. Mount the discharge manifold using the discharge bend(s) for reference, so that little, or no, strain is put on the discharge bend(s).
5. Disconnect the flexible bend(s) from the cylinder valve(s). Install the flexible bend(s) into the discharge manifold; wrench-tight. Be sure to apply a good quality pipe sealant or Teflon tape on the male thread (only) of the flexible bend(s) before installing. Do not connect the flexible discharge bend(s) to the cylinder(s) at this time.
6. Total Flood applications require that the nozzles be located at the highest practical elevation within the hazard enclosure. The exception is when more than one (1) tier of nozzles is required, or special application conditions apply. For Total Flood applications, the nozzle orifice should not be more than 1’-0” (.30 m) from the top of the hazard.
7. For Local Application systems, all system nozzles MUST be located exactly as shown on the project drawings.
8. Ensure that there are no obstructions are adjacent to the discharge nozzles (i.e. structural columns or beams, ducts, cable trays, racking, equipment, etc.) that would adversely affect the nozzle discharge pattern(s) or disbursement of the CO2 agent.
9. Install nozzle piping in the hazard as shown on the project drawings. Be sure to securely brace piping at each nozzle. Verify that nozzle orientation will provide proper discharge patterns.
10. Complete installation of piping supply from hazard to cylinder manifold. Complete the installation of piping to auxiliary devices (i.e. pressure trips, pressure switch(s), etc.).

SECTION 4 – INSTALLATION
Page: 14 of 20 Carbon Dioxide Revision: 2 Manual P/N C06-018 Revision Date: April, 2008
4.10 ACTUATION COMPONENTS INSTALLATION
4.10.1 MASTER VALVE SOLENOID INSTALLATION Systems consisting of 2 or less Carbon Dioxide cylinders require 1 Master Valve and Solenoid. Systems consisting of 3 or more CO2 cylinders require 2 Master Valves and Solenoids.
It is recommended that systems having 1 Master Valve use 1 24VDC solenoid valve for actuation; and systems with 2 Master Valves use 2 12VDC solenoid valves wired in series for actuation.
Since each cylinder is shipped with the Brass cylinder valve assembly configured as a “Slave” valve, one or more must be converted to the “Master” valve function for automatically operated systems. Systems requiring pneumatic or manual operation DO NOT require solenoids.
The 12VDC (P/N C85-113) and 24VDC (P/N C85-114) Solenoid Actuator(s) Master Cylinder Package(s) are shipped from the factory with the brass tee and emergency manual activation lever already assembled to the solenoid valve. Field assembly of the stainless steel solenoid connector to the cylinder “Master” valve and solenoid are among the last functions performed prior to placing the CO2 system into service. After all system checkouts and tests have been completed, the solenoid valve(s) must be attached to the Master cylinder(s).
The fill/actuation port of the CO2 Brass Valve contains 2 set of threads. One set is threaded with 1/2“-28 UNEF machine threads that are used to connect the CO2 fill adapter. The other set is threaded with 1/8” NPT pipe threads that are used to connect the solenoid actuator (See the figure above).

SECTION 4 – INSTALLATION
Carbon Dioxide Page: 15 of 20 Manual P/N C06-018 Revision: 2 Revision Date: April, 2008
The following are the steps required for Master Solenoid Valve Installation.
1. Prior to assembling either solenoid actuator to the “Master” Valve, remove the solenoid valve electric coil and protective housing. Disassemble the cap and coil using an 11/16” (18 mm) wrench to remove the hex nut that secures the assembly to the solenoid valve. Even if the coil has been connected to the control panel firing circuit, the coil and cap can be removed without compromising the integrity of the actuation system. The coil and cap can also be removed in this manner for all maintenance and inspection procedures.
2. Remove the 1/8” NPT pipe plugs from the top port and actuation/fill port on the side of the CO2 Brass Valve (P/N C85-010) as shown below. No CO2 leakage should be observed. Do not proceed if leakage is observed.
3. Place Teflon tape pipe sealant on the 1/8” NPT pipe thread of the 1/4” JIC x 90 brass elbow (P/N CO2-1278) and install it in the top port of the “Master” Valve. Tighten securely, orientating the elbow with the Fike logo as shown below. Tape is required to ensure that the connection will not leak and can be removed when necessary.
4. CAUTION: Install Teflon tape pipe sealant on the CO2 valve connector (P/N C85-1099) and thread into the fill/actuation port on the side of the Brass valve as shown above. Failure to use Teflon tape on this connection will result in the threads being damaged or stripped off the connector, thus rendering the connector unfit for service.
5. Carefully align and turn the assembly into the Brass valve approximately 5 turns until the assembly is snug. Some CO2 leakage will be observed. Continue tightening until the leakage stops and assembly is oriented as shown in the Master Valve figure.
6. Install the 7” (178 mm), stainless steel braided hose between the elbow on top of the “Master” Valve and the branch of the Tee fitting at the back of the solenoid valve.

SECTION 4 – INSTALLATION
Page: 16 of 20 Carbon Dioxide Revision: 2 Manual P/N C06-018 Revision Date: April, 2008
7. Install the 9” (229 mm), stainless steel braided hose between the elbow at the Manual Actuator ball valve and the Tee fitting at the back of the solenoid valve.
8. Replace the solenoid coil and protective cap. Tighten cap nut securely.
9. Repeat the above steps for any other required “Master” Valves.
10. Align Master Valves and install Manual Actuator Connecting Link. See Section 4.10.3.
11. Test for correct operation and connect electrical wiring.
12. System is now ready for service.
4.10.2 LOCAL LEVER ACTUATOR INSTALLATION The Local Lever (Manual) Actuator is installed as follows:
1. Remove the 1/8” NPT pipe plugs from the top port and actuation/fill port on the side of the CO2 Valve (P/N C85-010). No CO2 leakage should be observed. Do not proceed if leakage is observed.
2. Place Teflon tape pipe sealant on the 1/8” NPT pipe thread of the 1/4” JIC x 90o brass elbow (P/N C02-1278) and install it in the top port of the Master Valve. Tighten securely and orientate the elbow with the Fike logo as shown. Tape is required to ensure that the connection will not leak and can be removed when necessary.
3. IMPORTANT: Install Teflon tape on the CO2 valve connector (P/N C85-1099) and thread into the fill/actuation port on the side of the Master Valve as shown. Failure to use tape on this connection will result in the threads being damaged or stripped off the connector, thus rendering the connector unit for service.
4. Carefully align and turn the assembly into the Master Valve approximately 5 turns until the assembly is snug. Some Carbon Dioxide leakage will be observed. Continue tightening until the leakage stops and the assembly is oriented as shown in the Master Valve figure.
5. Install the stainless steel hose supplied between the elbows on the top of the Master Valve and the Lever Actuator.
6. Repeat the above steps for any additional Lever Actuators required.
7. Align Master Valves and install Connecting Link as described below.
8. Test for correct operation.
9. System is now ready for service.
Master Valve
Discharge Port
Plug
Slave Valve
Discharge Port
Plug
1/4"JIC x 90 Elbow(C02-1278)
Flex Hose(C02-1366)
Local Lever Actuator(C85-119)
Connector(C85-1099)

SECTION 4 – INSTALLATION
Carbon Dioxide Page: 17 of 20 Manual P/N C06-018 Revision: 2 Revision Date: April, 2008
4.10.3 CONNECTING LINK ASSEMBLY & INSTALLATION The Connecting Link assembly (P/N C70-228) is designed to connect 2 CO2 Master Valve manual actuators together in order to manually actuate both Master Valves simultaneously. The Connecting Link is provided with 3 holes for connecting the Manual Actuators together. The spacing of the holes allow for cylinders to be spaced from 11-5/8” (295 mm) to 12” (305 mm) centers.
With all cylinders secured in a Fike-approved racking system, proceed as follows:
1. Install the Valve Actuation assemblies per the instructions and procedures outlined previously.
2. Place the connecting link between the manual actuators, aligning the holes in the connecting link with the holes in the manual actuator handles.
3. Install the bolts, washers and nylon insert nuts provided to secure the connecting link.
4. NOTE: Do not over-tighten the nylon insert nuts to the handles on the manual actuators. The nuts must be loose enough to allow the handle(s) to rotate during the manual actuation operation.
5. Both Valve Actuation assemblies will be equipped with safety ring pins. After the connecting link has been installed, remove 1 ring pin and secure the other ring pin with a beaded plastic wire seal that can be easily broken if the CO2 system must be manually actuated.
4.10.4 ELECTRICAL INSTALLATION The power supply for the system’s operation and control panel shall be supplied from a clearly marked and dedicated power circuit from the building’s main power supply. The capacity of the AC power circuit and battery back-up supply must be in accordance with the requirements of the specific control system used.
Installation of the system control panel and associated detectors and devices shall be performed according to the requirements and guidelines outlined in the appropriate Installation and Operation manual for that specific system.
The CO2 system wiring, devices, and/or components shall have no connection to Ground, except as may be specifically noted on the drawings or in the panel manual. All wiring shall be tested and certified to be free of any ground connection or short. Testing of the completed system’s functions, including all shutdowns and system interface connections, shall be performed prior to the final connection of system components.
Ensure that all system initiating devices (i.e. detectors and manual release stations) are U.L. listed and/or FM approved. All devices installed in the CO2 system must be compatible with the control panel selected for the installation.
All detectors must be installed in accordance with their manufacturers’ recommendations and listings for that specific detector. Installation codes, the National Electrically Code (NEC), local electrical codes and/or other “Authorities Having Jurisdiction” may specify the location of detectors in a system. However, the most stringent of all requirements shall be followed to ensure that an acceptable CO2 system is provided.
All system components shall be installed using conduit, boxes, and materials that are compatible and/or acceptable for the environments in which they are located. Installation shall be in a neat, workmanlike manner in accordance with the accepted practices of the electrical and fire protection trades.

SECTION 4 – INSTALLATION
Page: 18 of 20 Carbon Dioxide Revision: 2 Manual P/N C06-018 Revision Date: April, 2008
4.10.5 PNEUMATIC ACTUATOR INSTALLATION The Pneumatic Actuator(s) and associated tubing should be located in the required area in a manner that will be accessible, yet not prone to accidental damage. Installation should be completed as follows:
1. Securely mount the Pneumatic Actuator mounting bracket on a structurally solid surface. The location chosen should provide protection against the effects of inclement weather.
2. Install the mounting bracket clamps and hardware. Remove the safety cap and install the nitrogen cylinder in the bracket and tighten just enough to hold the container in place.
3. Rotate the nitrogen cylinder until the cylinder valve is oriented in the desired position relative to the actuation piping/tubing connection.
The nitrogen cylinder must be positioned so that the manual lever assembly is readily accessible and cannot be obstructed during manual operation.
4. Securely tighten the mounting bracket clamps and hardware.
5. Connect the actuation piping/tubing as described below.
6. Install the emergency manual lever with the piston in the “SET” (up) position.
The pneumatic actuation tubing must be 1/4” (6 mm) O.D. x 0.035” (0.009 mm) wall thickness, stainless steel tubing or 1/4” NPT galvanized schedule 40 or 80 piping. The pipe or tubing must be routed in the most direct manner possible, with a minimum of fittings used. Each actuation line must be protected from backpressure by supplying a 1/4” check valve in-line between the pneumatic actuator and the Master Valve (or tee connection for multiple units). The actuation line(s) are then connected to the 1/4” NPT pressure inlet port(s) located on top of the Master Valve(s).
9/32" DIA(7 mm)TYP. 4 PLCS.
17"(432 mm)
2" (51 mm)
6"(152 mm)
5 1/2"(140 mm)
PRESSURE TRIP
SYMBOL LEGEND
CARBON DIOXIDE CYLINDER(WITH DISCHARGE VALVE)
PNEUMATIC ACTUATOR
PRESSURE SWITCHP/S
PNEUMATIC SIREN
TO NOZZLES
L
1/4" (8MM) CHECK VALVE
LOCAL LEVER ACTUATOR
PNEUMATIC ACTUATOR TUBING
(OPTIONAL)
P/S
(OPTIONAL)
L L

SECTION 4 – INSTALLATION
Carbon Dioxide Page: 19 of 20 Manual P/N C06-018 Revision: 2 Revision Date: April, 2008
24" BRAIDED STEEL HOSE(P/N C02-1370)
LOCAL LEVER ASSY.(P/N C85-119)
LOCAL LEVER ASSY.(P/N C85-119)
1/4" TUBE x1/8" NPT ADAPTER
(P/N C02-1357)
1/4" TUBE x 1/4" JIC ADAPTER(P/N C02-1356)1/4" TUBE TEE
(P/N C02-1359)
1/4" TUBE x 1/4" JIC ADAPTER(P/N C02-1356)
1/4" TUBE x1/8" NPT ADAPTER
(P/N C02-1357)
1/4" TUBE CROSS(P/N C02-1358)
1/4" CHECK VALVE(TUBE OR NPT)
*NOT INCLUDED
ACTUATION TUBING*NOT INCLUDED
All pipe, tubing, and fittings used for these connections must be supplied in accordance with the strength requirements outlined in NFPA 12.
4.10.5.1 PNEUMATIC ACTUATION LINE LIMITATIONS 1) 1/4” NPT pipe (Sch. 40): 300 ft. (91.5 m)
2) 1/4” NPT pipe (Sch. 80): 436 ft. (132.9 m)
3) 1/4” O.D. (6mm) tubing [0.035” (0.009mm) wall thickness]: 450 ft. (137.2 m)
4.10.5.2 MASTER CYLINDER ADAPTER KIT (C70-243) INSTALLATION Install the Master Cylinder Adapter Kit as follows:
1) Install the Local Lever Actuator as described in steps 3 and 4 of section (4.10.2).
2) Remove the 1/8” NPT pipe plugs from the top port and actuation/fill port of the CO2 Valve.
3) Place Teflon tape on the 1/8” NPT pipe thread of two (2) 1/4 Tube to 1/8” NPT Male Adapters (C02-1357) and install in the top pressure ports of the two Master Valves.
4) Install the 1/4” SST Tube Cross to the Master Cylinder closest to the actuation line connection and tighten in accordance with the manufacturer’s instructions.
5) Install the 1/4” SST Tube Tee (C02-1359) to the remaining Master Cylinder and tighten in
accordance with the manufacturer’s instructions.
6) Install the 24” long SST Hose (C02-1370) between the SST Cross and SST Tee as shown. Tighten fittings in accordance with the manufacturer’s instructions.
7) Install the loose end of the short SST hoses supplied with the Local Lever Actuator to the SST Cross and SST Tee as shown. Tighten fittings in accordance with the manufacturer’s instructions.
8) Install the actuation piping (or tubing) to the inlet of the SST Cross. An adapter will have to be supplied by the installation contractor as appropriate for the type of actuation line selected.

SECTION 4 – INSTALLATION
Page: 20 of 20 Carbon Dioxide Revision: 2 Manual P/N C06-018 Revision Date: April, 2008
PULL HANDLE
OVAL CABLE CRIMP
1/16" SST CABLE
3/8" NPT FEMALE
2 - HOLES FOR 1/4"SST MOUNTING SCREWS(NOT SUPPLIED WITH PULL BOX)
BASE
COVER
PULL BOX INSTALLATION
4.10.6 REMOTE PULL CABLE COMPONENTS Locate the Remote Pull Box(es) as shown on the system installation drawings. Connect the Pull Box(es) to the Cable Junction Box (if used) using 3/8” NPT, Schedule 40 piping. If a Cable Junction Box is not used, connect the Pull Box directly to the Local Lever Actuator. Do not run more than one cable in each pipe run. At each change in pipe direction, a Corner Pulley must be used. DO NOT bend the pipe. A Cable Junction Box MUST be used where more than one Pull Box is used to operate a Local Lever Actuator.
Beginning at the Pull Box, remove the covers of each Corner Pulley and feed the 1/16” cable through the Pulley and into the 3/8” piping. Connect one end of the cable to the cable fastener in the Pull Box. Route the other end to the Local Lever Actuator, taking up as much slack as possible, and reattach the Corner Pulley covers.
After installation is complete, test the remote cable actuation for free travel and pull force, making certain that the cable doesn’t bind or kink, and the pull force doesn’t exceed the 40 lb. pull force limitation.
4.11 DISASSEMBLY PROCEDURES When required for service, maintenance or re-charge procedures, the solenoid actuator(s) must be removed from the Master Valve(s).
When removing the Solenoid Actuation Assembly, it is normal for a small amount of CO2 vapor to leak around the 1/8” NPT threads until the pilot valve back-check seats.
Solenoid removal is accomplished, as follows:
1. Remove the nut, protective cap and solenoid coil from the solenoid valve(s).
2. Disconnect the short, stainless steel braided hose at the top of the Brass valve.
3. Hold the 3/4” (20mm) stainless steel hex fitting on the side of the Brass valve secure with an open-end wrench to keep it from turning while loosening the Solenoid Actuation assembly using a 5/8” (16 mm) wrench.
WARNING: EXTREME CARE MUST BE USED WHEN REMOVING THE SOLENOID ACTUATION ASSEMBLY. IT IS CRITICALLY IMPORTANT TO BE SURE THAT THE 3/4” (20 MM) STAINLESS STEEL HEX FITTING ON THE SIDE OF THE BRASS VALVE, INTO WHICH THE SOLENOID ACTUATION SYSTEM IS CONNECTED, REMAINS TIGHTLY SEALED IN THE BRASS VALVE. IF THIS FITTING IS REMOVED, A RAPID DISCHARGE OF ALL THE CO2 AGENT IN THE CYLINDER WILL OCCUR. SEE THE FIGURE IN PARAGRAPH 4.10.1 WHERE THIS FITTING IS SHOWN IN THE FILL/ACTUATION PORT.

Carbon Dioxide Manual P/N C06-018
SSeeccttiioonn 55VVeerriiffiiccaattiioonn
aanndd TTeesstt

SECTION 5 – VERIFICATION AND TEST
Carbon Dioxide Page : 1 of 4 Manual P/N C06-018 Revision: 2 Revision Date: April, 2008
5.0 VERIFICATION AND TEST Prior to placing the completed CO2 system into service, the installation shall be inspected and tested to confirm the following:
1. Installation conforms to the system design and drawings. 2. Piping installation conforms to the piping design, is properly anchored and supported, and contains the
correct sizes and type of pipe and fittings. 3. The installation conforms to the designed operating sequence. 4. Sealing of the hazard space has been completed. 5. All system functions perform as required and designed, all interlocks and shutdowns operate correctly
and remote alarm functions (if provided) operate as required. 6. Installed system complies with NFPA 12 and all applicable codes, standards, and this manual.
5.1 DISCHARGE TEST In order to comply with NFPA 12, a complete system discharge test must be performed unless waived by the Authority Having Jurisdiction (AHJ). See Section 5.8 for details of the tests required.
5.2 PIPE AND FITTINGS Check the piping system installation for compliance to the project drawings and flow calculation piping isometric. Check to ensure that the correct pipe sizes are installed, the correct type of pipe has been provided for each pipe size, and the appropriate pipe fittings and other devices have been installed in the distribution system.
Ensure that all piping, including the discharge manifold, has been adequately supported and anchored against the thrust of the system’s discharge.
5.3 CYLINDERS AND RACKING CO2 cylinder racking should be assembled in accordance with the information and directions contained within this manual. After assembly, anchor the rack system securely to the floor using the holes provided in the “post base” bracket(s).
CO2 cylinders should never be handled or moved without the protective safety cap securely in place. DO NOTremove this cap until the cylinders have been installed into their rack or bracket system. Once the cylinders are in place, remove the safety cap and perform the following checklist:
1. Check and record the weight of each cylinder. This can be done on a scale before placing the cylinders in the rack, or afterward using the Weigh Beam & Scale (P/N C70-229). The cylinder contents shall be within +/- 10% of normal capacity. After weighing, secure the cylinders in the rack or bracket.
2. Inspect all cylinders for evidence of external damage and replace if necessary. Check discharge bends for damage, connect to cylinders, and tighten securely. Replace any damaged bend(s).
3. Connect Solenoid Actuator(s) as detailed in this manual (See Section 4.10.1). Install solenoid actuator connecting link (P/N C70-228), if required.
4. Provide and install all necessary “Caution & Advisory” signage, including any custom signs provided.
5.4 NOZZLES CO2 systems include a variety of discharge nozzles; each designed for a specific application or flow rate. All nozzles have discharge orifices drilled to suit the specific nozzle location and discharge flow requirements.
When installing nozzles, it is imperative that the correct nozzle be installed in its appropriate location within the system discharge piping network. To ensure that this is accomplished, do the following:
1. Verify the orifice code value and pipe size for each nozzle in the system as listed on the project drawings. Nozzle code values are stamped on each nozzle.
2. Install the nozzles in their correct location within the pipe distribution network. 3. Verify that each nozzle is oriented to discharge correctly.
SECTION 5 – VERIFICATION AND TEST
Page: 2 of 4 Carbon Dioxide Revision: 2 Manual P/N C06-018 Revision Date: April, 2008
5.5 SOLENOID ACTUATOR Prior to installing the Solenoid Actuator(s), P/N C85-113 (12VDC) or C85-114 (24VDC), a complete operational checkout and test of the CO2 system control panel, detection, audible/visual devices, and all other devices or interface functions should have been conducted as specifically indicated in the appropriate system control panel manual. The final inspection and test of the CO2 system involves the qualification of the control panel firing/actuation circuit and the operation of the Master Cylinder control valves as follows:
WARNING: The stainless steel braided hose(s) connected between the top of the cylinder Master Valve(s) and the Solenoid Actuator(s), must be disconnected and removed prior to proceeding with this testing. Failure to disconnect this/these hose(s) will result in a system discharge during the testing procedures.
1. Verify that the control panel has been reset and is in a “normal” operational status. 2. Close the Stop / Maintenance Valve prior to testing the system. This should give you a “Trouble”
condition at the control panel. 3. Disconnect and remove the stainless steel braided hose from the pressure port on top of the Master
Valve(s).4. Disconnect the field wiring to the solenoid(s). This should cause a “Trouble” condition at the system
control panel. Reconnect the field wiring and reset the control panel.
The following tests should be performed with a minimum of 2 individuals as a safety precaution, and to reduce the potential loss of CO2 agent from the Master Cylinder(s).
5. Operate the system detection system to cause a “system discharge” condition at the control panel. CO2 should discharge from the stainless steel braided hose(s).
CAUTION: Care MUST be taken to ensure that subsequent CO2 discharges do not contact the skin in order to prevent cryogenic burns.
6. Reset the control panel. 7. Repeat this test for each “remote” electric manual actuator installed in the control system. 8. Remove the “safety” ring pin at the “local” manual actuator and operate. Agent should discharge from the
stainless steel hose(s). Replace the ring pin and secure with a beaded plastic wire seal, or equal. 9. Reset the control panel. 10. Reconnect the stainless steel hose(s) to the top connection of the Master Valve(s). 11. Open the Stop / Maintenance Valve and reset the control panel. If the stop valve had a lock installed,
replace it. 12. The control panel should now indicate a “normal” condition. 13. The CO2 system can now be considered “armed” and in service.
5.6 AUXILIARY DEVICES All auxiliary and optional devices provided in the CO2 system must be tested for functional operation prior to turning the system over to the customer / owner.
5.6.1 STOP/MAINTENANCE VALVES The system’s control panel electrically supervises the Stop/Maintenance valve. The valve can be tested by closing the valve manually and verifying that a “Trouble” condition is being annunciated by the control panel. Open the valve with the manual lever and reset the control panel after testing.
5.6.2 PRESSURE TRIPS With a screwdriver or other blunt instrument, manually push the stem to the retracted position. Allow the cable to fall to ensure that the connected equipment operates correctly.

SECTION 5 – VERIFICATION AND TEST
Carbon Dioxide Page : 3 of 4 Manual P/N C06-018 Revision: 2 Revision Date: April, 2008
5.6.3 PRESSURE SWITCHES To test the electrical circuits and ensure that all auxiliary functions operate correctly, do one or more of the following tests:
1. Disconnect the pressure connection and attach a small CO2 or Nitrogen cylinder as a pressure source. Open the valve on the test cylinder. The pressure switch should operate and the connected auxiliary function should perform as required. Push the reset plunger down to reset the pressure switch.
2. Disconnect the pressure connection. Insert a small rod into the pressure port opening of the cover plate and push against the piston that trips the switch. Be careful not to damage the piston. The connected auxiliary function should operate. Push the reset plunger down to reset the pressure switch.
3. Remove the switch cover plate and manually operate the interior toggle switch. The connected auxiliary function should operate. Return the toggle switch to its normal, stand-by position. Replace the cover plate.
5.7 TRAINING OF PERSONNEL The discharge of a CO2 fire suppression system can be an endangerment to personnel who are not familiar with, or who are uninformed as to the necessary precautions that need to be taken. Individuals who will be required to operate and/or maintain the CO2 system MUST be trained in the proper use and operation of the system. Other individuals who may not be directly involved with the system, but who could be in the vicinity, should be informed as to the precautionary measures and evacuation procedures to be taken should the CO2 system discharge. Generally, this training is given prior to turning the completed system installation over to the end-user/customer. When a system concentration/discharge test is to be conducted, this training MUST be completed before such testing is undertaken. Failure to conduct appropriate training can result in loss of property and/or personnel injury. Many hazards protected with a CO2 suppression system have experienced a system discharge without injury or loss simply because adequate training was provided, and appropriate safety precautions were implemented prior to the system being placed into service.
5.8 CO2 SYSTEM DISCHARGE TEST A full discharge test of the CO2 system should be conducted as required in NFPA 12. This testing is conducted to ensure that the completed system will function as intended and the design concentration of CO2 is delivered, and subsequently held, for the appropriate period of time. Individuals who are experienced and knowledgeable with the application and operation of CO2 systems should conduct the discharge test. Due caution should be taken to ensure that all personnel are informed as to safety procedures to be taken during the testing.
All CO2 systems testing should successfully accomplish the following:
1. Check the integrity of the piping distribution system including racking, hangers, supports and anchors. 2. Verify detector operation. 3. Verify audible and/or visual alarm operation. 4. Verify manual release operation. 5. Verify that all interlock and shutdown functions operate and occur at the appropriate time in the system’s
discharge sequence. 6. Actuation sequence conforms to the intended design and pre-discharge time delays (if provided),
operates correctly and with the correct time delay period. 7. All pressure operated devices function as intended and at the correct point in the firing sequence. 8. All safety and warning features are in place and operate satisfactorily.

SECTION 5 – VERIFICATION AND TEST
Page: 4 of 4 Carbon Dioxide Revision: 2 Manual P/N C06-018 Revision Date: April, 2008
5.8.1 TOTAL FLOOD SYSTEM TEST When testing a system designed for Total Flood coverage, a concentration test can ensure that:
1. Design concentration is attained within the appropriate time, in accordance with NFPA 12. 2. Designed concentration levels are attained and remain in the hazard enclosure for the period of time
(soak time) specified. The ability to reach and maintain concentration levels is STRICTLY dependent upon the enclosure’s construction and measures taken to prevent agent loss. Total flood systems perform best when agent loss due to leakage from the enclosure is held to a minimum.
3. Performing a “Room Integrity Fan Test” is strongly recommended prior to conducting a discharge test. This test is “non-destructive” and will help pinpoint points of possible hazard leakage that can be sealed and secured before the actual discharge test is performed.
5.8.2 LOCAL APPLICATION SYSTEM TEST Concentration testing CANNOT be performed on “Local Application” systems. However, a “Performance” test should be conducted to ensure that:
1. All nozzles are correctly orientated and discharge in an acceptable pattern onto the specific hazard. 2. The duration of discharge complies with the requirements of the specific hazard being protected. 3. Ensure that evacuation routes from the hazard area have been provided and ARE being maintained.

Carbon Dioxide Manual P/N C06-018
SSeeccttiioonn 66MMaaiinntteennaannccee aanndd
IInnssppeeccttiioonn

SECTION 6 – MAINTENANCE AND INSPECTION
Carbon Dioxide Page: 1 of 2 Manual P/N C06-018 Revision: 2 Revision Date: April, 2008
6.0 MAINTENANCE AND INSPECTION In order to ensure that the CO2 system is in a fully operational condition at all times, it must be inspected and tested on a regular testing schedule. All such inspection and testing shall be done by competent and trained service personnel who are thoroughly familiar with Fike CO2 systems, auxiliary devices, and control equipment. To this end, it is recommended that a maintenance and service contract be established between the owner/customer and a factory trained and authorized Fike distributor.
All persons who are expected to inspect, service, maintain and/or operate Fike CO2 fire suppression systems shall be thoroughly trained in the systems operation and the inspection/maintenance functions that they will be expected to perform. It is also recommended that all service personnel upgrade that training on a regular basis.
6.1 MONTHLY INSPECTIONS 1. Check system components for tampering and/or mechanical damage. Replace any component that
shows damage or wear. All wire seals installed on operating/releasing devices should be secure and not broken. Replace any broken seal.
2. Verify that all points of egress are clear and will allow a safe evacuation of personnel from the protected area. Verify that safe access is provided to all of the manual operating controls and the system control panel.
3. Ensure that there are no obstructions that would prevent the system from operating or prevent proper distribution of CO2 agent from the system discharge nozzle(s).
4. Check the system control panel. It should be indicating a “System Normal” supervisory condition.
6.2 SEMI-ANNUAL INSPECTIONS 1. Perform all the monthly inspection procedures. 2. Check to determine if any changes have been made to the shape, size, contents or use of the protected
space. Any changes whatsoever will necessitate a complete review of the current system design. 3. Close the Stop/Maintenance Valve. This should give you a “trouble” condition at the control panel. 4. Weigh all system cylinders. This is accomplished using a platform scale, Fike beam scale, or an
approved liquid level indicator device. Record weight on the cylinder tag and/or system logbook. If any cylinder shows a net weight loss of more than 10% of the fill weight, the cylinder must be recharged, or replaced. Cylinder fill, tare and total weights are etched on the cylinder label.
5. Check the cylinder hydro-test date. CO2 cylinders are required to be hydrostatically tested to verify cylinder strength in accordance with the following NFPA 12 requirements:
a) CO2 cylinders shall not be recharged without a hydrostatic test (and date stamping), if more than 5 years have elapsed from the date of the last test.
b) Cylinders continuously in service without discharging may be retained in service for a maximum of 12 years from the date of manufacturer or last hydrostatic test. At the end of 12 years, they shall be discharged and hydro-statically tested before being returned to service. (This is an excellent opportunity to perform a discharge test of the system to qualify the system design and equipment operation.)
Transporting charged CO2 cylinders that are out of test may be illegal. Check your local regulations before transporting.
6. Examine cylinders, racking, piping, nozzles, and any other auxiliary devices, for evidence of corrosion or other physical damage.
7. Check system piping, pipe hangers, straps and anchors to ensure all are secure and provide suitable support. This is particularly important where shock and/or vibration are encountered as a normal part of the system environment.
8. Review all discharge nozzles to determine that they are still orientated as originally installed, that the nozzle discharge orifices are clear and free of dirt or other materials, and that the nozzle discharge pattern is unobstructed.
9. Make sure that all seals are intact and installed wherever necessary. 10. Remove the solenoid and/or manual actuator(s) from all cylinders and auxiliary devices they operate and
operate the hand lever. The actuator should operate freely. The manual actuator operating pin should extend outward as required for system actuation.

SECTION 6 – MAINTENANCE AND INSPECTION
Page: 2 of 2 Carbon Dioxide Revision: 2 Manual P/N C06-018 Revision Date: April, 2008
WARNING: When 2 manual actuators are connected together with a connecting link, both must be removed prior to testing or a system discharge may occur.
11. Inspect and clean all system detectors. Check sensitivity and adjust if necessary. 12. Inspect and confirm the operation of the system control panel in accordance with the instructions and
procedures detailed in it’s associated instruction manual. The testing performed should include the operation of all alarm initiating devices, alarm signals, panel operating sequences, system actuation operation and all auxiliary panel functions. Check the supervision of all circuits.
WARNING: Before testing, ensure that all solenoid actuators have been disconnected from the cylinder valves, or have had the solenoid coils removed to render them in-operative. Failure to do so will cause a system discharge to occur.
13. Confirm the operation of all auxiliary and supplemental components such as time delays, pressure switches, release trips, damper releases, stop valves, etc. by manual operation, wherever possible. Pressure operated time delays and gas operated sirens can be tested using a small CO2 cylinder or portable extinguisher as a pressurizing source.
14. Open the Stop / Maintenance Valve and reset the control panel. If the stop valve is equipped with a locking device, it should be replaced. The control panel should now indicate a “normal” condition.
6.3 OPERATION – AFTER A FIRE In general, the CO2 system should extinguish the fire within 1 minute of the end of the system discharge. However, the protected area should be kept closed for at least 20 minutes following the system discharge to allow the area to cool to prevent a re-ignition of the fire. For “Deep Seated” hazards, the space should be kept tightly closed for at least 60 minutes following a discharge.
These time periods are recommendations only. After a fire, the fire department and responsible authorities MUST be notified, and they should determine when it is appropriate to re-enter the protected area. When in doubt, only persons who have been thoroughly trained in the use of self-contained breathing apparatus (SCBA) should enter the space after a discharge.
6.4 RECHARGING AND REFURBISHING THE SYSTEM After a system discharge, the system must be recharged and returned to service without delay to ensure continued protection. The system should be serviced by a Fike authorized distributor as follows:
1. Reset the system control panel in accordance with the panel instruction manual. 2. If a Reserve cylinder bank is present, transfer the Main-Reserve switch to the standby supply.
WARNING: Be sure that the control panel has been reset or discharge of the standby Reserve cylinders will occur.
3. Remove, inspect and recharge the discharged cylinders. If more than 5 years has elapsed since the last cylinder hydrostatic test, retest the cylinder(s) before recharging and returning to service.
4. Inspect the piping distribution system to ensure that all piping and supports are secure. 5. Inspect all system components; i.e. nozzles, switches, detectors, alarms, etc. Replace all equipment that
has been damaged or shows signs of exposure to the direct flames or extreme heat of the fire. 6. Reinstall the system in accordance with Section No. 4 of this manual. 7. Verify and test the system in accordance with Section No. 5 of this manual. 8. Arm and return the system to service. Advise the owner/customer accordingly.

Carbon Dioxide Manual P/N C06-018
AAppppeennddiixx AARRaacckkiinngg
AAsssseemmbblliieess


Fike Corporation Offices
Fike World Headquarters704 South 10th Street Blue Springs, Missouri P.O. Box 610 Blue Springs, Missouri 64013 U.S.A. Phone: (800) 979-FIKE (3453)Fax: (816) 229-0314 E-mail: [email protected]: www.fike.com
Fike EuropeToekomstlaan 52 B-2200 Herentals BelgiumTelephone: 011-32-14-210031 Fax: 011-32-14-210743
Fike Latina LTDAAv. Juvenal Arantes, 2500 Condominio Industrial Bracaiuva Bairro do Medeiros CEP 13212-370 Jundair, Brazil Telephone: 011-55-11-4525-1277 Fax: 011-55-11-4525-1201
Fike Canada4140 Morris Drive Burlington, Ontario L7L5L6 Canada Telephone: (905) 681-3100 Fax: (905) 681-3107
Fike Far East Corporation19-9 Toranomon 1 Chome Minato-Ku Tokyo 105-0001 Japan Telephone: 011-81-335-951-291 Fax: 011-81-335-951-295
Fike Protection Systems LTD.Unit 4 The Moorfield Centre Moorfield Road Guildford, Surrey GU1 1RA United Kingdom Telephone: 011-44-8700-777-540 Fax: 011-44-7000-777-540