idtv operating instructions digital high defi nition plasma
TRANSCRIPT

Please read these instructions before operating your set and retain them for future reference.
TQB0E0170-1English
[U.K. Standard]
1 2 3
4 5 6
7 8 9
C 0
OK
IDTV
The image shown is for illustration only.Pedestal stand shown above is optional extra.
TH-37PV500BTH-42PV500BTH-50PV500B
Model No.
Operating InstructionsDigital High Defi nition Plasma Television

2
Dear Panasonic Customer,We hope that you have many years of enjoyment from your new TV. The Quick Start Guide section at the be gin ning of this instruction book will allow you to use the TV as quickly as possible. We recommend that you then read the complete instruction book, and keep it to refer to as you explore the range of advanced features that this Plasma TV offers.
ContentsImportant Safety Notice ...................................................3Safety Precautions ..........................................................4Maintenance ....................................................................5Accessories .....................................................................6Fitting remote control batteries ........................................6Cable binding instructions ...............................................7How to open the front cover ............................................7Quick Start Guide ............................................................8Basic controls: front panel and remote control .............. 11Using the On Screen Displays ......................................12Picture menu .................................................................13Sound menu ..................................................................14Setup menu ...................................................................15Tuning Menu – overview ...............................................16Tuning Menu – Programme edit ....................................17
Adding / deleting a programme channel ....................17Moving a programme channel ....................................17Renaming a programme channel ...............................18Locking a programme channel ...................................18Copying programme information to a recording device ..............................................18
Tuning Menu – Auto setup .............................................19Tuning Menu – Manual tuning .......................................20Manual tuning (via front panel) ......................................20Owner ID .......................................................................21Shipping condition .........................................................22DVB Setup Menu – overview ........................................23Timer Programming menu .............................................24Profi le Edit menu ...........................................................26
Child Lock menu ............................................................27DVB Tuning Menu .........................................................28DVB System Setup ........................................................29Common Interface Module menu ..................................30System Update menu ....................................................31TV Guide - Electronic Programme Guide (EPG) ...........32Information banner ........................................................33Subtitles ON / OFF ........................................................33Q-Link ............................................................................34Aspect Controls .............................................................35Still .................................................................................36Multi window ..................................................................37PC mode .......................................................................38Card operations .............................................................40VCR / DVD operation ....................................................48Teletext operation ..........................................................49Connections ..................................................................52
How to connect the Headphones / AV3 terminals ......52How to connect the Audio Output terminals ..............53How to connect the AV1 / 2 / 4 Scart terminals ..........53How to connect the Component Input terminals ........53How to connect the HDMI Input terminal ...................54How to connect the PC Input terminal ........................55
Troubleshooting .............................................................56DVB Troubleshooting ....................................................57Scart and S-video terminal information .........................58Input signal that can be displayed .................................58Specifi cations ................................................................59
Analogue and Digital television – what are they?Analogue transmission is the system that has been used for many years for broadcasting television programmes. With continuous improvements in technology it is now possible to transmit programmes in a digital format, allowing clearer pictures, more stations and other services to be displayed on screen. Digital television is provided in three different ways; it can be sent along a cable connection direct to your house, broadcast from a satellite, or broadcast using traditional land based (terrestrial) transmitters. The fi rst two options require you to have an extra “set top box” decoder and in the case of satellite, a receiving dish mounted outdoors. While allowing you to receive traditional analogue transmissions in the usual way, this television can also receive terrestrial digital services using an integrated
(Digital Video Broadcasting) decoder. This allows you to enjoy the new era of digital terrestrial television, including interactive services, without the need for a “set top box” or satellite dish – an adequate roof or loft mounted antenna is all you need.
CAUTION:Symptoms Check
After-images appear
ABCDEFABCDEF
Do not allow a still picture to be displayed for an extended period, as this can cause a permanent after-image to remain on the Plasma TV.Examples of still pictures include logos, video games, computer images, teletext and images displayed in 4:3 mode.With no signal present, and without any user operation, the Panasonic screensaver will appear automatically after a few minutes to prevent image retention.During DVB teletext, radio service or menu display, the level of the contrast will decrease automatically after a few minutes to prevent image retention.Note:The permanent after-image on the Plasma TV resulting from fi xed image use is not an operating defect and as such is not covered by the Warranty.This product is not designed to display fi xed images for extended periods of time.
Trade Mark of the DVB Digital Video Broadcasting Project (1991 to 1996)TH-37PV500B Declaration of Conformity No 3395, 26th January 2005TH-42PV500B Declaration of Conformity No 3394, 26th January 2005TH-50PV500B Declaration of Conformity No 3393, 26th January 2005

3
IMPORTANT: THE MOULDED PLUG
Important Safety Notice
WARNING1) To prevent damage which may result in fi re or shock hazard, do not expose this appliance to dripping
or splashing. Do not place containers with water (fl ower vase, cups, cosmetics, etc.) above the set. (including on
shelves above, etc.)2) To prevent electric shock, do not remove cover. No user serviceable parts inside. Refer servicing to qualifi ed
service personnel.3) Do not remove the earthing pin on the power plug. This apparatus is equipped with a three pin earthing-type
power plug. This plug will only fi t an earthing-type power outlet. This is a safety feature. If you are unable to insert the plug into the outlet, contact an electrician.
Do not defeat the purpose of the earthing plug.
CAUTION1) This appliance is intended for use in environments which are relatively free of electromagnetic fi elds. Using this appliance near sources of strong electromagnetic fi elds or where electrical noise may overlap with the
input signals could cause the picture and sound to wobble or cause interference such as noise to appear. To avoid the possibility of damage to this appliance, keep it away from sources of strong electromagnetic fi elds.2) If a static electricity discharge occurs inside the front cover, the screen may momentarily fl icker. This is not a
malfunction. The screen will return to normality in a short while.
To prevent electric shock, ensure the grounding pin on the AC cord power plug is securely connected.
FOR YOUR SAFETY, PLEASE READ THE FOLLOWING TEXT CAREFULLY.
This appliance is supplied with a moulded three pin mains plug for your safety and convenience. A 5 amp fuse is fi tted in this plug. Shall the fuse need to be replaced, please ensure that the replacement fuse has a rating of 5 amps and that it is approved by ASTA or BSI to BS1362.
Check for the ASTA mark ASA or the BSI mark on the body of the fuse.
If the plug contains a removable fuse cover, you must ensure that it is refi tted when the fuse is replaced.If you lose the fuse cover the plug must not be used until a replacement cover is obtained.A replacement fuse cover can be purchased from your local Panasonic Dealer.
If the fi tted moulded plug is unsuitable for the socket outlet in your home, then the fuse shall be removed and the plug cut off and disposed of safety. There is a danger of severe electrical shock if the cut off plug is inserted into any 13 amp socket.If a new plug is to be fi tted, please observe the wiring code as shown below.If in any doubt, please consult a qualifi ed electrician.
WARNING: – THIS APPARATUS MUST BE EARTHED.
IMPORTANT: – The wires in this mains lead are coloured in accordance with the following code: –Green-and-Yellow: Earth Blue: Neutral Brown: Live
As the colours of the wire in the mains lead of this appliance may not correspond with the coloured markings identifying the terminals in your plug, proceed as follows.
The wire which is coloured GREEN-AND-YELLOW must be connected to the terminal in the plug which is marked with the letter E or by the Earth symbol or coloured GREEN or GREEN-AND-YELLOW.
The wire which is coloured BLUE must be connected to the terminal in the plug which is marked with the letter N or coloured BLACK.
The wire which is coloured BROWN must be connected to the terminal in the plug which is marked with the letter L or coloured RED.
How to replace the fuse. Open the fuse compartment with a screwdriver and replace the fuse.

4
Safety Precautions
WARNING Setup
This Plasma TV is for use only with the following optional accessories. Use with any other type of optionalaccessories may cause instability which could result in the possibility of injury.
(All of the following accessories are manufactured by Matsushita Electric Industrial Co., Ltd.) • Pedestal ............................................TY-ST42PX500 (TH-37PV500B, TH-42PV500B), TY-ST50PX500 (TH-50PV500B) • Display stand ....................................TY-S37PX500W (TH-37PV500B), TY-S42PX500W (TH-42PV500B), TY-S50PX500W (TH-50PV500B) • Wall-hanging bracket (vertical) ..........TY-WK42PV3W • Wall-hanging bracket (angle) ............TY-WK42PR2WAlways be sure to ask a qualifi ed technician to carry out installation.Do not place the Plasma TV on sloped or unstable surfaces. • The Plasma TV may fall off or tip over.Do not place any objects on top of the Plasma TV. • If water is spilt onto the Plasma TV or foreign objects get inside it, a short-circuit may occur which could result in fi re
or electric shock. If any foreign objects get inside the Plasma TV, please consult your local Panasonic dealer.Ventilation should not be impleded by covering the ventilation openings with items such as newspapers, table cloths and curtains.If using the pedestal (optional accessory), leave a space of at least 10 cm at the top, left and right, at least 6 cm at the bottom, and at least 7 cm at the rear. If using some other setting-up method, leave a space of at least 10 cm at the top, bottom, left and right, and at least 1.9 cm at the rear of the Plasma TV.Electromagnetic interference may occur if electronic equipments are placed near each other. • It will cause interference in image, sound, etc. In particular, keep video equipment away from this product.Keep unneeded small parts and other objects out of the reach of small children. These objects can be accidentally swallowed. Also, be careful about packaging materials and plastic sheets.
When using the Plasma TVThe Plasma TV is designed to operate on 220 - 240 V AC, 50/60 Hz.Do not cover the ventilation holes. • Doing so may cause the Plasma TV to overheat, which can cause fi re or damage to the Plasma TV.Do not insert any foreign objects into the Plasma TV. • Do not insert any metal or fl ammable objects into the ventilations holes or drop them onto the Plasma TV, as doing
so can cause fi re or electric shock.Do not remove the cover or modify it in any way. • High voltages which can cause severe electric shocks are present inside the Plasma TV. For any inspection,
adjustment and repair work, please contact your local Panasonic dealer.Ensure that the mains plug is easily accessible.Securely insert the power cord plug as far as it will go. • If the plug is not fully inserted, heat may be generated which could cause fi re. If the plug is damaged or the wall
socket plate is loose, do not use them.Do not handle the power cord plug with wet hands. • Doing so may cause electric shocks.Do not do anything that may damage the power cable. When disconnecting the power cable, pull on the plug body, not the cable. • Do not damage the cable, make any modifi cations to it, place heavy objects on top of it, heat it, place it near any
hot objects, twist it, bend it excessively or pull it. To do so may cause fi re and electric shock. If the power cable is damaged, have it repaired at your local Panasonic dealer.
If the Plasma TV is not going to be used for any prolonged length of time, unplug the power cord plug fromthe wall outlet.

5
Safety Precautions
If problems occur during use
If a problem occurs (such as no picture or no sound), or if smoke or an abnormal odour starts to come outfrom the Plasma TV, immediately unplug the power cord plug from the wall outlet. • If you continue to use the Plasma TV in this condition, fi re or electric shock could result. After checking that the
smoke has stopped, contact your local Panasonic dealer so that the necessary repairs can be made. Repairing the Plasma TV yourself is extremely dangerous, and should never be attempted.
If water or foreign objects get inside the Plasma TV, if the Plasma TV is dropped, or if the cabinet becomes damages, disconnect the power cord plug immediately. • A short circuit may occur, which could cause fi re. Contact your local Panasonic dealer for any repairs that need to
be made.
CAUTION When using the Plasma TV
Do not bring your hands, face or objects close to the ventilation holes of the Plasma TV. • Heated air comes out from the ventilation holes at the top of Plasma TV will be hot. Do not bring your hands or
face, or objects which cannot withstand heat, close to this port, otherwise burns or deformation could result.
Be sure to disconnect all cables before moving the Plasma TV. • If the Plasma TV is moved while some of the cables are still connected, the cables may become damaged, and fi re or electric shock could result.
Disconnect the power cord plug from the wall socket as a safety precaution before carrying out any cleaning. • Electric shocks can result if this is not done.
Clean the power cable regularly to prevent it becoming dusty. • If dust built up on the power cord plug, the resultant humidity can damage the insulation, which could result in fi re.
Pull the power cord plug out from the wall outlet and wipe the mains lead with a dry cloth.
This Plasma TV radiates infrared rays, therefore it may affect other infrared communication equipment.Install your infrared sensor in a place away from direct or refl ected light from your Plasma TV.
MaintenanceThe front of the display panel has been specially treated. Wipe the panel surface gently using only a cleaning cloth or a soft, lint-free cloth. • If the surface is particularly dirty, wipe with a soft, lint-free cloth which has been soaked in pure water or water to
which a small amount of neutral detergent has been added, and then wipe it evenly with a dry cloth of the same type until the surface is dry.
• Do not scratch or hit the surface of the panel with fi ngernails or other hard objects, otherwise the surface may become damaged. Furthermore, avoid contact with volatile substances such as insect sprays, solvents and thinner, otherwise the quality of the surface may be adversely affected.
If the cabinet becomes dirty, wipe it with a soft, dry cloth. • If the cabinet is particularly dirty, soak the cloth in water to which a small amount of neutral detergent has been
added and then wring the cloth dry. Use this cloth to wipe the cabinet, and then wipe it dry with a dry cloth. • Do not allow any detergent to come into direct contact with the surface of the Plasma TV. If water droplets get inside the unit, operating problems may result. • Avoid contact with volatile substances such as insect sprays, solvents and thinner, otherwise the quality of the
cabinet surface may be adversely affected or the coating may peel off. Furthermore, do not leave it for long periods in contact with articles made from rubber or PVC.

1 2 3 1 2 3
1 2 3
4 5 6
7 8 9
C 0
OK
IDTV
6
Check that you have the accessories and items shown
Accessories
Operating Instructions Remote Control Transmitter(N2QAKB000059)
Mains Lead(K2CT3DH00018)
Pan European Guarantee Card
Fitting remote control batteries
• Make sure that the batteries are fi tted the correct way round.• Do not mix old batteries with new batteries. Remove old, exhausted batteries immediately.• Do not mix different battery types, i.e. Alkaline and Manganese or use rechargeable (Ni-Cad) batteries.
Pull and hold the hook, then open the battery cover.
Insert batteries - note correct polarity ( + and -).
“R6 (UM3)” size
Replace the cover.
321
Batteries for the Re mote Control Transmitter(2 × R6 (UM3) size)
Clamper(TMME206) × 2
Ferrite coreJ0KF00000018 × 1(Small size)
Ferrite coreJ0KG00000014 × 1(Large size)
Installing the ferrite core (Small size)See page 52.
Installing the ferrite core (Large size)See page 55.
Open Open
Pull back the tabs.(in two places)
Press the cablethrough and close.
Pull back the tabs.(in two places)
Press the cablethrough and close.
1 Year Guarantee Registration

7
How to open the front cover
Raise the lower part of the door labeled “PULL”.
Cable binding instructions
How to fi x:
How to release:
Fix by pushing in till a clicking sound is heard.
Pull down while drawing the knob.
For using the pedestal
Attach the bands.Insert the spigot on the two bands into the pedestal.
Connect cables.Example of “connection cable routing”
Band
Binding strap
Mains Lead
Clamp
Fastening band
Fastening
Loosening
To tighten.
Pull off.
Keep the knob pressed.
Clamp
Band
Open Close
Removal
Fitting
1. Insert the claws (at 2 points) at the bottom end.
2. Push until it clicks.
1. Push down hooks and pull the cover slightly towards yourself to disengage the claws (at 2 points).
2. Slowly pull out in the downward direction.
Cable cover Mains Lead
Clamper
Note:To avoid interference appearing on the screen, do not bundle the RF cable and mains lead together.

Y
PB
PR
L
R
L
R
VIDEOAUDIOAUDIO
AV
RGB
VIDEO S VIDEORGB
VIDEO
S VIDEOVIDEO
COMPONENT
AV1 AV2 AV4
AUDIOIN
8
Quick Start Guide
Satellite Receiver
Connection and setting up optionsNote:Please ensure that the unit is disconnected from the mains before attaching or disconnecting any leads.
Scart Connections• The VCR / DVD Recorder can be connected to the TV using a Scart cable, if you are using a Scart equipped VCR
/ DVD Recorder.• Use the TV’s any Scart terminal for any VCR. Always use a “fully wired” Scart cable.• Use the TV’s AV1 or AV4 Scart terminal for any DVD Recorder. Always use a “fully wired” Scart cable.• Use the TV’s AV1 or AV4 Scart terminal for Satellite Receiver. Always use a “fully wired” Scart cable.
RF Connection• Connect the RF cable to the “Aerial In” terminal of the VCR / DVD Recorder and an RF cable from the VCR / DVD
Recorder “Aerial Out” terminal to the TV Aerial terminal ( ).
Notes:• If using a “Q-Link” VCR / DVD Recorder, then the AV1 Scart of the VCR / DVD Recorder must be connected to the
AV2 or AV4 terminal of the TV. If your VCR or DVD Recorder is not a “Q-Link” device, please consult the operating instruction book for that product. Further information on Q-Link can be found on page 34.
• Further details of Audio / Video connections can be found on page 52-55.• Additional equipment and cables are not supplied.
Scart cables(Not supplied)
VCR / DVD Recorder
RF cable(Not supplied)
RF cable (Not supplied) OR

9
1
2
Connect the mains plug to the wall sock et.
Press the [ ] switch on the TV set to turn the set on.
To switch the TV set to Standby mode, press the button on the remote control.The TV set can be switched on by pressing the
button
again if it was in Stand by mode.
Note:This TV will still consume some power even in the Off mode, as long as the mains plug is still connected to a live mains socket.
IDTV
1 2 3
4 5 6
7 8 9
C 0
OK
Remote control signal sensor
Power IndicatorStandby : Red On : No Light
C.A.T.S. sensorPlasma C.A.T.S. (Contrast Automatic Tracking System) automatically senses the ambient light conditions and adjusts the brightness and gradation accordingly, to optimize contrast.C.A.T.S. is in effect when Viewing mode is set to Auto. See page 13.
Programmes will appear immediately if your dealer has programmed the TV for you.If the TV has not been programmed for you then Auto setup will begin.The TV will search for DVB stations and Analogue stations:TV stations will be located, sorted into order and stored ready for use.Stations are sorted into the following order:• DVB Stations: Are sorted by their logical channel number sent by the
broadcasters, which can be made the favourites list by Profi le Edit. See page 26.
• Analogue Stations: Are sorted into channel order, but can be changed to your preference. See page 17.
In this setup, usually Analogue auto setup screen may not be displayed. The sorted programme order depends upon the TV signal, the broadcasting system, and reception conditions.
TV to VCR or DVD Recorder DownloadIf a “Q-Link”, “NEXTVIEWLINK” or compatible recording device has been connected to a Scart terminal (AV2 or AV4) before starting Step 1, programme information will be downloaded to that device.Only the analogue programme positions will be downloaded to the recording device, in the same order as stored in the TV. See page 34.Not all VCRs / DVD Recorders support this download of programme information, some may require to be started manually.Refer to the recording device’s operating instruction book.If a recording device other than those described above has been connected, then there will be no download operation.
Notes:• If the recording device has not accepted download data from the TV, you may need to select the Download
option from the device’s menu system. Refer to the recording device’s operating instruction book.• If Q-Link is not operating correctly, check the following : The Scart cable is connected to the TV’s Scart terminal, AV2 or AV4, and correctly setup in the menu. The Scart cable is connected to the recording device’s compatible (Q-Link, NEXTVIEWLINK or similar
technology) Scart terminal. The Scart cable is a “fully wired” type.• For further information on Q-Link and connecting equipment, see page 34, 53, 58.
DOWNLOAD IN PROGRESS
PLEASE WAIT
Programme : 63
Remote control unavailable
AUTO SETUP IN PROGRESS
SEARCHING : PLEASE WAIT
21 68
CH44
Exit
Please Wait !
DVB Aute Setup
Prog. Channel Service Name NetID. TS ID. Quality
This will take about 3 mins.
Exit
4
5
6
7
8
30
30
30
30
30
12302
12302
12302
12302
12302
4158
4158
4158
4158
4158
9
9
9
9
9
BBC NEWS 24
BBCI
CBBC Channel
BBC Radio Wales
BBC Radio Cymru
68 21
DVB Indicator
Quick Start Guide
3
DVB system active during Timer recording or standby for Direct TV Recording : Orange (fl ash)
Timer recording On : OrangeOtherwise : No Light

10
Quick Start Guide
4 Owner IDAs an added feature, this TV has the option of adding a security code (Owner ID) and personal details into its memory, so that in the unfortunate event of theft it will help the Police to trace the owner.
Using the numeric buttons to enter required 4 digit Owner ID PIN NUMBER.If a 4 digit PIN NUMBER was entered, you will be taken automatically to the NAME line.
If not, using the left or right cursor buttons move to the NAME line.
Change character using the up or down cursor buttons.
Select the character position using the left or right cursor buttons.
Repeat above until NAME, HOUSE NUMBER and POSTCODE are entered.
Press the OK button to store the details.Press the OK button again, when you are asked “Are you sure ?”.For further information on Owner I.D., see page 21.
A space is provided on page 21 to write down the PIN NUMBER for future reference.
Your Plasma TV is now ready for use.
To view a list of the stations that have been found, press the GUIDE button.
Use the cursor buttons to move the cursor bar.
Use the programme change button to step through the guide page by page.
To view the selected programme, move the cursor to the channel and then press the OK button.
The guide can be cleared from the screen using the EXIT button.
DVB TV Guide (DVB mode) See page 32.To make stations easier to fi nd, specifi c stations can be listed by category; press the Yellow button to show a category.The chosen category name is shown on screen.For example, if you select Free TV and press the OK button, only ‘free-to-air’ stations will be listed – you can view any of these now.
If you select Pay TV and press the OK button, only subscription stations will be listed – you will need to contact the service provider to fi nd out how to subscribe to these stations.
Exit
Info
Change display modeSelect channelSelect ProgrammeTimer Programming
Category Prog. type-24 Hr +24 Hr
DVB TV Guide:Landscape Thu 05/08/04 18:50
BBC1
BBC2
ITV1
Channel4
five
ITV2
SC4
1
2
21
44
122
142
144
Eastender
Hot Wars
Emmerdal.
10 O’ clock News BBC
Panoroma
I’m A Celebrlty
Rugby
Red Cap
The Bil l
Good bye
Terminator
News
The Bil l
So
Hell
The
Fri 6th
DIY SOS
Coronation Street
Sex And The City
15 To1
The Bil l
Hollday Program
Pepsi Char.
Pop Idol
20:00-21:00
Time: 19:30 20:00
Coronation Steet:We open in the Battersdy’s
Prog. typeCategoryAll Services
20:30 21:00 21:30
All Types
Page up
Page down
Category
All Services
Analogue Programme GuideProg. Name Chan.
VCR :1 :2 :3 :4 :5 :6 :7 :8 :9 :
10 :11 :12 :
CH21CH44CH51CH41CH47CH23CH26CH58-----
BBC1BBC2ITVS4C
Prog. Name Chan.
13 :14 :15 :16 :17 :18 :19 :20 :21 :22 :23 :24 :
------------
0123456789
You now have the opportuni tyto enter your detai ls andhelp the pol ice crack cr imesee instruct ion book
Exit
Select characterChange character
Store Owner ID
PIN NUMBER :NAME :
POSTCODE :
Owner ID
HOUSE NO :∗ ∗ ∗ ∗ ∗ ∗ ∗ ∗ ∗ ∗ ∗ ∗ ∗ ∗∗ ∗ ∗ ∗ ∗ ∗ ∗ ∗ ∗ ∗ ∗ ∗ ∗ ∗ ∗ ∗ ∗ ∗ ∗ ∗ ∗ ∗
∗ ∗ ∗ ∗
Analogue mode
DVB mode
OK
VCR
1 2 3
4 5 6
7 8 9
0
OK
EXIT
GUIDE5
C
IDTV
OK
1 2 3
4 5 6
7 8 9
0
C
OK
1 2 3
4 5 6
7 8 9
0

REC VCR DVD
VCR
TEXT
GUIDE
EXIT
TV/AV
SD REC
STTL INDEX HOLD
PROGRAMME
DIRECT TV RECMULTI WINDOW
ASPECTDVB
Analogue
MENU
TIMER
1 2 3
4 5 6
7 8 9
C 0
OK
N
MODE
11
Basic controls: front panel and remote control
Standby On / Off buttonSwitches TV On or Off (Standby mode).
ASPECT control button(see page 35, 36)
MODE button (see page 14, 15)Switch between viewing DVB and Analogue modes.
GUIDE buttonDisplays the DVB and Analogue TV Guide. (see page 32)
Press to select a function or store a setting.Press after selecting programme positions to quickly change programme.
Menu buttonPress to access the Picture, Sound and Setup menus. (see page 12-15)
Coloured buttons used for the selection, navigation and operation of various functions.
Teletext button (see page 49-51)
STTL buttonText F.P. button (Analogue mode)Subtitle On/Off (DVB mode)(see page 33, 50)
Direct channel accessAvailable in Analogue mode.During normal TV viewing or when in the Tuning, Programme edit or Manual tuning menus, press and then enter channel number using the numeric buttons.
Programme up / down button
N (Normalize) buttonResets all settings to their default levels.
MULTI WINDOW button(see page 37)
TIMER On / Off buttonSwitches Timer recording On or Off.The default setting is Off. (see page 25)
SD Record button (see page 42)
Sound mute On / Off
SD button Access Card operations.(see page 40-47)
Switch between viewing TV or AV input. (see page 52)
Cursor buttons to make selections and adjustments.
Exit the mode.
Text Hold / Picture Still button(see page 36, 49)
Text Index button (see page 51)
Programme / channel change buttons (0-9) and Teletext page buttons.(see page 49-51)When in Standby mode, switches TV On.
Information buttonPress to display status information for the current Programme position.(see page 33)
Volume up / down button
VCR / DVD buttons (see page 48)
DIRECT TV Record button(see page 34)
TV/AV button(see page 52)On / Off switch
STRUsed to store tuning in analogue mode.
Headphones jack(see page 52)
AV3 terminals(see page 52)
F (Function select)Press repeatedly to select from the available functions through the On Screen Display: - Volume, Contrast, Brightness, Colour, Sharpness, Tint (in NTSC mode), Bass, Treble, Balance and Manual Tuning (analogue mode only - see page 20).
Press either button to change TV programme up or down.Also used for changing various settings in conjunction with the F button.Press either button to switch the TV On from Standby mode.
PC CARD slot(see page 40)
PC CARD EJECT button(see page 40)SD CARD slot
(see page 40)

12
BassTrebleBalanceHeadphone volumeNICAMModeAmbience
Sound menu
OffMusicOff
Exit
AdjustSelect
Return
IDTV
1 2 3
4 5 6
7 8 9
C 0
OK
Using the On Screen Displays
Many features available on this TV can be accessed via the On Screen Display menu system. Use the remote control as shown below to access and adjust features as desired.
The MENU button is used to open the main menus and also to return to the previous menu.
The up and down cursor buttons are used to move the cursor and select menus.
The left and right cursor buttons are used to access menus, adjust levels or to select from a range of options.
The OK button is used with a number of features to store settings after adjustments have been made or options have been set.
The EXIT button is used to exit the menu system and re turn to the normal viewing screen.
An On Screen Help box is displayed whenever a menu is dis played on the TV. This Help box indicates which buttons on the remote control are used to navigate the menu shown, see above for descriptions of button functions.
Note:The Help box is not shown in the menu pictures in this in struc tion book due to space limitations. ON SCREEN HELP
‘Instructions’ box
OK
MENU
EXIT

13
Viewing mode The Viewing mode menu allows you to select four different screen settings - Dynamic, Normal, Cinema and Auto. In each Viewing mode setting, Contrast, Brightness, Colour, Sharpness, Tint (in NTSC only), Colour balance, Colour management, P-NR, MPEG NR and 3D-COMB can be adjusted and stored to suit your particular viewing requirement. (e.g., you may require different settings for viewing sports, fi lms, news etc.)Changes to any settings in a viewing mode will affect all signal sources: RF, AV1, AV2, AV3, AV4, Component, PC, HDMI and Card operations. Changes will be stored automatically. By analysing and processing the incoming picture, all four modes feature automatic enhancement.
Contrast, Brightness, Colour, SharpnessIncrease or decrease the levels of these options ac cord ing to your personal preference.
Tint With an NTSC signal source connected to the TV, the picture hue can be adjusted to suit your taste.
Colour balance Allows you to set the overall colour tone of the picture. Choose from Cool, Normal and Warm.
Colour management
Enables vivid colour adjustment automatically.
P-NR Automatically reduces unwanted picture noise.Not available during PC, HDMI and HD signal input.
MPEG NR Reduces MPEG noise.Allows you to choose from Off, Min, Mid and Max.This function is effective in reducing the digital block noise when viewing DVD, VCD, SD card or digital broad cast ing. The effect will be changed based on the scene and image.MPEG: Compression technology of the image signal adopted
by DVD, VCD, SD card or digital broadcasting.
3D-COMB Not available in DVB mode.Occasionally, whilst viewing still or slow moving pic tures, colour patterning may be seen. Set 3D-COMB to On to display sharper and more accurate colours.Displayed only when receiving PAL or NTSC signals.Not displayed during RGB Video, S-Video, Component, PC, HDMI input and Card operations (thumbnail).
IDTV
1 2 3
4 5 6
7 8 9
C 0
OK
Picture menu
Press the MENU button.
Move to Picture menu.
Access Picture menu.
Move to menu option.
Adjust chosen option or access chosen menu.
Press the EXIT button at any time to go back to watching TV.
Main menu
Picture menu
Setup menu
Sound menu
Viewing modeContrastBrightnessColourSharpnessTintColour balanceColour managementP-NRMPEG NR
NormalOnOffOff
Picture menuDynamic
3D-COMB On
Viewing modeContrastBrightnessColourSharpnessTintColour balanceColour managementP-NRMPEG NR
NormalOnOffOff
3D-COMB On
Picture menuDynamic
Viewing modeContrastBrightnessColourSharpnessTintColour balanceColour managementP-NRMPEG NR
NormalOnOffOff
Picture menuDynamic
3D-COMB On
MENU
EXIT

14
Sound menu
Press the MODE button to select DVB or Analogue mode.
Press the MENU button.
Move to Sound menu.
Access Sound menu.
Move to menu option.
Adjust chosen option or access chosen menu.
Press the EXIT button at any time to go back to watching TV.IDTV
1 2 3
4 5 6
7 8 9
C 0
OK
Main menu
Picture menu
Setup menu
Sound menu
Bass Increase or decrease level to enhance or minimise lower, deeper sound output.
Treble Increase or decrease level to enhance or minimise sharper, higher sound output.
Balance The levels of sound between the left and right speak ers can be adjusted to suit your listening position.
Headphone volume
Can be adjusted independently of the TV speakers so that everyone can enjoy listening at a level com fort able for them.
NICAM Not available in DVB mode.Select On to provide stereo sound reproduction. Select Off for FM Mono sound output.If Nicam Mono is being transmitted select either FM Mono (Off), Nicam Mono I (M1) or Nicam Mono II (M2).The options depend upon the signal being transmitted.If reception deteriorates it is advisable to switch to FM Mono (Off).
Mode Sound quality can be improved when watching music scene or drama by selecting the appropriate Music or Speech mode.
Ambience Ambience provides a dynamic enhancer to simulate improved spatial effects.
HDMI input Displayed during HDMI input mode.Allows you to choose from Auto, Digital and Analogue.Select to fi t the input signal.Auto : Set in normal useDigital : HDMI cable connectionAnalogue : HDMI-DVI adapter cable connectionSee page 54.
MENU
EXIT
BassTrebleBalanceHeadphone volumeNICAMModeAmbience
Sound menu
OffMusicOff
BassTrebleBalanceHeadphone volumeModeAmbience
Sound menu
MusicOff
DVB mode
Analogue mode
DVBAnalogue
MODE
BassTrebleBalanceHeadphone volumeNICAMModeAmbience
Sound menu
OffMusic
HDMI input AutoOff
HDMI input mode

15
Q-Link Allows you to select which AV terminal is to be used for data communication between this TV and a compatible recording device. Choose from AV2 and AV4. See page 34.
AV2 / AV4 out Offers a choice of signals to send to the Scart terminal selected in the Q-Link option. You can choose from the current TV (Analogue, DVB) programme position, the signal entering AV1 / AV2 / AV3 / AV4 or Monitor - the picture displayed on screen.Component signal input cannot be output to these Scart terminals.
Teletext Allows you to choose between FASTEXT or List mode. See page 49-51.
Off timer Switches the TV off within a preset time which you can choose from between 0 to 90 minutes in 15 minute intervals.
Side panel Allows you to choose from Off, Low, Mid and High.Do not display a picture in 4:3, 14:9, Picture out of picture, Picture and picture, Picture and text modes for an extended period, as this can cause an after-image to remain on the side panels either side of the display fi eld.To prevent the appearance of such an afterimage, illuminate the side panels.
Power save By reducing the brighness of picture, power consumption can be lowered.
Power on preference
Set to TV to view picture from TV tuner.Set to AV to view input from an external equipment connected to a Scart socket, e.g. satellite receiver.Note:The external equipment must be switched on and sending a control signal for automatic switching at power on to occur.
Tuning Menu Provides access to many other features including Programme edit and Auto setup. See page 17-19.
DVB Setup Menu Provides access to setup the DVB operations. See page 23.
Owner ID Allows you to enter a security code and address information. See page 21.
Shipping condition Allows you to clear all tuning information and reset all control levels back to factory settings. See page 22.
Volume correction During AV, PC and HDMI mode, Volume correction is displayed.You can adjust volume level of AV, PC and HDMI mode. Volume level is memorised.
Setup menu
Press the MODE button to select DVB or Analogue mode.
Press the MENU button.
Move to Setup menu.
Access Setup menu.
Move to menu option.
Adjust chosen option or access chosen menu.
Press the EXIT button at any time to go back to watching TV.
AV mode
Main menu
Picture menu
Setup menu
Sound menu
MENU
EXIT
Q-LinkAV2 out
Off timer
Power on preference
Setup menuAV2Monitor
Off
TV
Volume correction
Teletext FASTEXT
Side panel OffPower save Off
AV2 out
Setup menuAV2Q-Link
OffMonitor
TVPower on preferenceDVB Setup MenuOwner IDShipping condition
Off timerSide panel OffPower save Off
Q-LinkAV2 out
Off timer
Tuning MenuOwner IDShipping condition
Setup menuAV2Monitor
Off
Power on preference TV
Teletext FASTEXT
Side panel OffPower save Off
DVB mode
Analogue TV mode
DVBAnalogue
MODE
IDTV
1 2 3
4 5 6
7 8 9
C 0
OK
4 : 3
Side panel

16
Tuning Menu – overview (Analogue mode)
Press the MENU button.
Move to Setup menu.
Access Setup menu.
Move to Tuning Menu.
Access Tuning Menu.
Move to menu option.
Adjust chosen option or access chosen menu.
Press the EXIT button at any time to go back to watching TV.
Press the OK button after having adjusted some features to store the new settings as the default (replacing the factory setting).
IDTV
1 2 3
4 5 6
7 8 9
C 0
OK
Main menu
Picture menu
Setup menu
Sound menu
Programme edit Access in order to customize your programme set tings (e.g., adding or deleting a programme position). See page 17, 18.
Auto setup Allows you to automatically retune the TV. Useful if you move house and wish to retune your TV to the local stations. See page 19.
Manual tuning Allows individual programme positions to be tuned manually. See page 20.
MENU
EXIT
OK
In Analogue mode
Delete Add Move Download
Programme editProg. Chan. Name Lock
1 :2 :3 :4 :5 :
CH44CH51CH41CH47CH37
ABCXYZFTP123456
OffOffOffOffOff
Access
Q-LinkAV2 out
Off timer
Tuning MenuOwner IDShipping condition
Setup menuAV2Monitor
Off
Power on preference TV
Teletext FASTEXT
Side panel OffPower save Off
Programme editAuto setupManual tuning
Tuning MenuAccess

17
Tuning Menu – Programme edit (Analogue mode)
Press the MENU button.
Move to Setup menu.
Access Setup menu.
Move to Tuning Menu.
Access Tuning Menu.
Move to Programme edit.
Access Programme edit.
Move to choose programme position (e.g., Prog. 3).
Make required change, e.g., moving a programme channel (see the relevant procedure below).
Press the EXIT button at any time to go back to watching TV.
Press the OK button after having adjusted some features to store the new settings.
1 2 3
4 5 6
7 8 9
0
OK
C
IDTV
Add Cancel
Programme editProg. Chan. Name Lock
1 :2 :3 :4 :5 :
CH44CH51CH41CH47CH37
OffOffOffOffOff
ABCXYZFTP123456
Move the cursor to the programme to be deleted or added.
Press the Green button to add a programme channel to the programme position, or the Red button to delete one.
Press the same button again to confi rm your decision.
Adding / deleting a programme channel
Confirm Cancel
Programme editProg. Chan. Name Lock
1 :2 :3 :4 :5 :
CH44CH51CH41CH47CH37
ABCXYZFTP123456
OffOffOffOffOff
Move the cursor to the programme to be moved.
Press the Yellow button.
Choose the new position for the programme channel.
Press the Yellow button again to confi rm your decision.
Moving a programme channel
MENU
EXIT
OK
GreenRed
Yellow
In Analogue mode

18
Download
(Blue)
Tuning Menu – Programme edit (Analogue mode)
Note:When a programme position is locked, Direct Channel Access using the C and numeric buttons on the remote control is not available.
Copying programme information to a recording device
Locking a programme channel
Renaming a programme channel
OK
OK
Move to the Name column.
Choose the new character. The box at the bottom of the screen shows the character currently selected.
Move to the next character position.
Continue until renaming is done.
Press the OK button to store the new name.
You may wish to lock a programme channel to prevent ac cess to it.
Move to the Lock column.
Choose between Lock On or Lock Off.
Press the OK button to store the new setting.
You can copy programme information to a compatible recording device connected to AV2 / AV4. See page 52 for connection information.Press the Download (Blue) button.Programme data will now be sent to the recording device(s). This might take a few seconds, depending on the number of stations stored. If the message “Feature not available” appears on the screen, the television is unable to send the programme information to the recording device(s). See the device’s instruction book for further information.
DOWNLOAD IN PROGRESS
PLEASE WAIT
Programme : 63
Remote control unavailable
Programme editProg.
ABCDEFGHIJKLMNOPQRSTUVWXYZ+-. 0123456789
Chan. Name Lock
1 :2 :3 :4 :5 :
CH44CH51CH41CH47CH37
OffOffOffOffOff
XYZFTP123456
Programme editProg. Chan. Name Lock
1 :2 :3 :4 :5 :
CH44CH51CH41CH47CH37
ABCXYZFTP123456
OffOffOffOffOff

19
Tuning Menu – Auto setup (Analogue mode)
Auto setup automatically retunes your TV. This feature is useful if, e.g., you move house and wish to retune your TV to receive the local stations.
Press the MENU button.
Move to Setup menu.
Access Setup menu.
Move to Tuning Menu.
Access Tuning Menu.
Move to Auto setup.
Access Auto setup.
Press to start Auto setup.
Notes:• If you proceed with the next step analogue tuning data will be erased
(all stations and their programme positions stored in your TV’s memory will be wiped out so the new settings can be stored).
• If you exit the procedure after this point and before Auto setup is complete, no station information will be stored. Restart and complete the Auto setup procedure so that the TV is retuned.
IDTV
1 2 3
4 5 6
7 8 9
C 0
OK
All analogue tuning
data will be erased
WARNING
ExitReturn
Start Auto Setup
AUTO SETUP IN PROGRESS
SEARCHING : PLEASE WAIT
21 68
CH44
ExitReturn
MENU
OK
In Analogue mode
The TV will search for, locate, store and then sort into order your local stations.
If compatible recording device is connected via the AV2 / AV4 terminal, programme data will be sent to the device via Q-Link. See page 34.
Once this operation is completed the TV will display the programme now stored on programme position 1.

20
Tuning Menu – Manual tuning (Analogue mode)
Press the MENU button.
Move to Setup menu.
Access Setup menu.
Move to Tuning Menu.
Access Tuning Menu.
Move to Manual tuning.
Access Manual tuning.
Select the programme position to be tuned.
Press repeatedly until required station is found.
When the desired station is found, press the OK button to store.The programme position will fl ash.
Press the EXIT button at any time to go back to watching TV.
It is also possible to use the control panel buttons on the front of your TV to tune individual programme positions:
Press the F button until Tuning mode is reached.
Press the –/ or +/ button to access Tuning mode.
Press the TV/AV button to move between Change programme and Search.
Press the –/ or +/ button to change programme position or start search.
When the desired station is found, press the STR button to store.The programme position will fl ash.
Repeat above procedure to tune additional programme positions.
Press the F button at any time to go back to watch ing TV.
Note:If your VCR is connected to this TV by an RF cable only, choose programme position “0” to tune to the VCR signals.
Manual tuning (via front panel) (Analogue mode)
It is possible to retune individual programme positions:
1 2 3
4 5 6
7 8 9
C 0
OK
IDTV
Manual tuning
21 68
CH441
Exit
Search down/up
ReturnDirect entry
Store
C 0 9
CH441
Manual tuning
21 68
-, + : SearchTV / AV : Move cursorSTR : To storeF : To exit
STR F - / + / TV / AV
MENU
EXIT
OK
In Analogue mode
STR F TV/AV

STR F TV/AV
21
Owner ID
Owner ID allows you to enter a security code(Owner ID) and personal details into its memory, so that in the unfortunate event of theft it will help the police to trace the owner.
Press the MENU button.
Move to Setup menu.
Access Setup menu.
Move to Owner ID.
Access Owner ID.
If the Owner ID has previously been set, enter the PIN NUMBER (using 0 to 9 on the remote control) followed by the OK button to proceed, this will take you to the NAME option.
If no Owner ID has previously been set, enter the required 4 digit Owner ID PIN NUMBER (using 0 to 9 on the remote control).
If a 4 digit PIN NUMBER was entered above, you will be taken automatically to the NAME line.
If not, move to the NAME line.
Change character.
Select character position.
Repeat above until NAME, HOUSE NUMBER and POSTCODE are entered.
Press the OK button to store the details.Press again when you are asked, “Are you sure?”.
If you wish to check the personal details already entered into the TV (except your PIN number), press the F button (Front panel) and hold for 6 seconds(initially the volume level function will appear, as you continue to hold down the F button it will disappear again, and the Owner ID information will appear). The details already entered are displayed on screen and will disappear after a few seconds.
If Owner ID information was not entered when you switched on your TV for the fi rst time or it is necessary to alter some of the information, Owner ID can be re-accessed via the Setup menu.
C
IDTV
OK
1 2 3
4 5 6
7 8 9
0
MENU
Q-LinkAV2 out
Off timer
Tuning MenuOwner IDShipping condition
Setup menuAV2Monitor
Off
Power on preference TV
Access
Teletext FASTEXT
Power save OffSide panel Off
0123456789
You now have the opportuni tyto enter your detai ls andhelp the pol ice crack cr imesee instruct ion book
Exit
Select characterChange character
Return
Store Owner ID
PIN NUMBER :NAME :
POSTCODE :
Owner ID
HOUSE NO :∗ ∗ ∗ ∗ ∗ ∗ ∗ ∗ ∗ ∗ ∗ ∗ ∗ ∗∗ ∗ ∗ ∗ ∗ ∗ ∗ ∗ ∗ ∗ ∗ ∗ ∗ ∗ ∗ ∗ ∗ ∗ ∗ ∗ ∗ ∗
∗ ∗ ∗ ∗
For future reference,
write your PIN NUMBER here :
VCR
1 2 3
4 5 6
7 8 9
0
OK
VCR
1 2 3
4 5 6
7 8 9
0
OK

22
Shipping condition
Press the MENU button.
Move to Setup menu.
Access Setup menu.
Move to Shipping condition.
Access Shipping condition.
Press the OK button to start.
Press again, to confi rm, each time that you are asked, “Are you sure?”.
Switch the TV off at the mains power switch.
The next time you switch the TV on, Auto setup will begin. DVB and Analogue stations will be located, sorted and stored ready for use. See page 9.
Shipping condition allows you to reset the TV to its original condition, i.e. no channels tuned in.This is useful, for example, if you move to a different area when you will probably want the TV to tune itself to your new local stations.Note:Owner ID information will not be affected by this function.
This can be done either through the Shipping condition menu or through the Auto setup menu.
The Shipping condition menu will reset all data, except Owner ID information, clearing all DVB and Analogue tuning information and resetting all control levels back to factory settings.You may need to adjust your VCR or programme position ‘0’ VCR after operating the Shipping condition menu.
All tuning data will be erased
Are you sure ?
Are you sure ?
Shipping condition
ExitReturn
Start
Q-LinkAV2 out
Off timer
Tuning MenuOwner IDShipping condition
Setup menuAV2Monitor
Off
Power on preference TV
Access
Teletext FASTEXT
Power save OffSide panel Off
IDTV
1 2 3
4 5 6
7 8 9
C 0
OK
MENU
OK

23
DVB Setup Menu – overview (DVB mode)
Timer Programming
Allows you to enter programme times at which the DVB tuner must switch on, ready for recording. See page 24.
Profi le Edit Allows you to select your favourite programme positions and display them as a list in the TV Guide or Information banner. See page 26.
Child Lock You may wish to lock a DVB programme channel to prevent access to it. See page 27.
DVB Tuning Menu Provides access to many other DVB Tuning features.See page 28.
DVB System Setup Provides access to various specialized DVB options.See page 29.
Multi Audio Multi audio, which will only appear when a DVB programme is selected, allows you to select an alternative sound track. The number of options available depends on each broadcast.
Press the MENU button.
Move to Setup menu.
Access Setup menu.
Move to DVB Setup Menu.
Access DVB Setup Menu.
Move to menu option.
Adjust chosen option or access chosen menu.
Press the EXIT button at any time to go back to watching TV.
In DVB mode
IDTV
1 2 3
4 5 6
7 8 9
C 0
OK
MENU
EXIT
Main menu
Picture menu
Setup menu
Sound menu
AV2 out
Setup menuAV2Q-Link
OffMonitor
TVAccess
Power on preferenceDVB Setup MenuOwner IDShipping condition
Off timer
Power save OffSide panel Off
Timer Programming
Child Lock
DVB Setup menu
Multi Audio
Access
DVB System Setupeng
DVB Tuning Menu
Profile Edit

24
Timer Programming menu (DVB mode)
For an external recording device to record DVB programmes, the integrated DVB system must be active to provide the signal. The Timer programming menu allows you to choose programmes that you wish to record. At the correct time, the DVB system will switch on and tune to the correct station (even if the TV is in standby mode). If the recording device is compatible with Q-Link or similar technologies (see page 34) and connected to the TV’s AV2 / AV4 terminal, you do not need to programme the device – the DVB system will control the recording process.The device must be connected to the TV’s AV2 / AV4 terminal using a SCART cable to record DVB programmes.
Press the MENU button.
Move to Setup menu.
Access Setup menu.
Move to DVB Setup Menu.
Access DVB Setup Menu.
Move to Timer Programming.
Access Timer Programming.
Press the OK button to begin programming.
Select the Programme position to be recorded.
Move to the Date fi eld.
Set the Date on which recording is to take place.
In DVB modeMENU
EXIT
Notes:Ten seconds before the recording is due to start the DVB system will tune to the correct station. If you were already watching another DVB station you will see the station change on screen. If you were watching an analogue channel, you will not see the change.You can continue to watch analogue stations while a timer recording is in progress.If you attempt to switch to another DVB programme position while a timer recording is in progress the message “DVB Tuner Locked” will be displayed. Press the OK button to continue recording, or EXIT to unlock the programme position. Beware that if you press EXIT, timer programming for this DVB position will be immediately deleted.To immediately cancel a recording that is already in progress, press GUIDE then EXIT.You may not be able to cancel recording just before it starts. Use the recording device to cancel it.
Two minutes before the recording is due to start, a reminder will appear on screen:
Press the OK button to remove the reminder from the screen.
If you wish to cancel the recording, press the EXIT button.Note: The above 2 operations will not be necessary if the TV set is in standby mode.
OK
Timer Programming
Child Lock
DVB Setup menu
Multi Audio
Access
DVB System Setupeng
DVB Tuning Menu
Profile Edit
ExitReturn
Select timer
Edit timer
Delete
DVB Timer Programming Thu 05/08/04 18:49
1
3
40
33
92
46
18
5
BBC1
ITV1
BBC News 24
Boomerang
Kerrang!
The Community Channel
The Hits
Five
6/8 FR
7/8 SA
8/8 SU
9/8 MO
10/8 TU
11/8 WE
12/8 TH
13/8 FR
18:00
21:30
15:30
23:10
20:00
19:30
16:00
19:00
20:00
22:30
16:45
24:30
22:00
21:30
18:00
20:00
120
60
75
80
120
120
120
60
Off
Off
Off
Off
Off
Off
Off
Off
Ext
Ext
Ext
Ext
Ext
Ext
Ext
Ext
Pos. Name Date Start End min. Media
0 9
C
OK
1 2 3
4 5 6
7 8 9
0
OK
VCR
1 2 3
4 5 6
7 8 9
0
EXIT
The current Date and Time are shown at the top of the menu.See page 25 for further Date options.
Move to the Start time fi eld and set the Start time .
Move to the End time fi eld and set the End time .
The duration of the recording is shown in the min. column.
The channel position, start and end times can also be input using the numeric buttons on the remote control.
Move to the Subtitles fi eld.
If you wish to record subtitles (if available) select Auto.
Move to the Media fi eld.
Select the recording device. SD: SD card Ext: External device
Press the OK button to store.
Press the EXIT button to leave the DVB Timer Programming screen.
OK
Notes:• To delete a timer programme,
select the recording with the cursor bar and press the Red button.
• To edit a previously entered timer programme, select it with the cursor bar and press the OK button.
• Timer programmes can also be entered from the TV Guide. See page 32.

25
Timer Programming menu (DVB mode)
Daily and Weekly Timer Programmes
Encrypted Programmes
While in the Date fi eld of the DVB Timer programming menu, you can select various options to determine how often a recording should be made. Press the down cursor button repeatedly to access the following options:
Daily SU–SAThe recording device will record at the same time every day.
Daily MO–SAThe recording device will record at the same time each day from Monday to Saturday.
Daily MO–FRThe recording device will record at the same time each day from Monday to Friday.
Weekly SA, FR, TH, WE, TU, MO or SUThe recording device will record at the same time on the same day each week.
Some DVB programmes may be “encrypted”. This means that the DVB programme cannot be viewed or recorded unless you have the correct Common Interface module to decode the programme.
When you attempt to view or set Timer recording of an encrypted programme and you have no CI module inserted, a message will appear in the Information banner.
Notes:• If new timer programme data overlaps any part of an existing timer programme, a warning message will appear.• The TV set must be “On” or in “Standby” mode for the DVB programme signals to be output to the recording
device.
ExitReturn
Change dateSelectStore timer
Delete
DVB Timer Programming Thu 05/08/04 18:49
1
3
40
33
92
46
18
5
BBC1
ITV1
BBC News 24
Boomerang
Kerrang!
The Community Channel
The Hits
Five
6/8 FR
8/8 SU
9/8 MO
10/8 TU
11/8 WE
12/8 TH
13/8 FR
18:00
21:30
15:30
23:10
20:00
19:30
16:00
19:00
20:00
22:30
16:45
24:30
22:00
21:30
18:00
20:00
120
60
75
80
120
120
120
60
Off
Off
Off
Off
Off
Off
Off
Off
Ext
Ext
Ext
Ext
Ext
Ext
Ext
Ext
Pos. Name Date Start End min. Media
0 9
Weekly TH
Timer recording On / Off
After setting the DVB Timer Programming, press the TIMER button to switch Timer recording On.Confi rm the DVB indicator lights(Orange). If not, a timer recording is not available. Press the TIMER button again to be On.If there are no programme settings, you cannot switch by pressing the TIMER button. The DVB indicator fl ashes for about fi ve seconds when the TV cannot go to timer recording standby.When all programmes are completed, timer recording will be switched to the default setting(Timer recording Off).
TIMER

26
Profi le Edit menu (DVB mode)
The Profi le Edit menu allows you to select your favourite programme positions and display them as a list in the TV Guide or Information banner, to allow quick and easy access to the programmes you watch most often.You can make the 4 kinds of the list.
Press the MENU button.
Move to Setup menu.
Access Setup menu.
Move to DVB Setup Menu.
Access DVB Setup Menu.
Move to Profi le Edit.
Access Profi le Edit.
Add a channel to the Profi le listMove to the programme position which you wish to add to the profi le list.
Press the Red button repeatedly to cycle through the channel categories.Press the Green button repeatedly to cycle through the profi les.Press the Yellow button to add a channel to the profi le list.Press the Blue button to add all the channels to the profi le list.
Press the OK button to store your Profi le list.
Edit the Profi le listWhen the profi le list is highlightedPress the Red button to edit the profi le name.Press the Green button to move the channel.Press the Yellow button to delete the channel.Press the Blue button to delete the all channels.
Press the MENU button to return to the DVB Setup Menu.
Press the EXIT button at any time to exit Profi le Edit.
A list of favourites can be accessed by pressing the GUIDE button or the button.See page 32.
In DVB mode
1 2 3
4 5 6
7 8 9
0
OK
C
IDTV
MENU
Timer Programming
Child Lock
DVB Setup menu
Multi Audio
Access
DVB System Setupeng
DVB Tuning Menu
Profile Edit
Exit
Select programme
Store
Add Add AllSelect Category Select Profi le
Profi le Editor
1 BBC ONE Wales
2 BBC 2W
7 BBC THREE
10 BBC FOUR
30 CBBC Channel
31 CBeebies
40 BBC NEWS 24
All Services Profi le 1
Return
OK
MENU
EXIT
GUIDE

27
Child Lock menu (DVB mode)
You may wish to lock a DVB programme channel to prevent access to it.Note:The data of the PIN number and locked channel will be erased by operating the Shipping condition.
When entering Child Lock menu for the fi rst time, new PIN number setting screen is displayed.
Create a 4-digit password.Enter the password again to confi rm.From the second time, enter a password once to display Child Lock screen.
Move to Child Lock Service List.
Access Child Lock Service List.
Select the channel you want to lock and then press the OK button to lock. Press again to unlock.Press the Yellow button to lock all channels.Press the Blue button to unlock all channels.
The PIN number is required when you wish to watch a locked channel. If the unit is turned off it will be necessary to input the PIN number again to access any locked channels.
Change the PIN numberIn Child Lock menu
Move to Change PIN.
Access Change PIN.
Create a 4-digit new password.Enter the password again to confi rm.
Press the MENU button.
Move to Setup menu.
Access Setup menu.
Move to DVB Setup Menu.
Access DVB Setup Menu.
Move to Child Lock.
Access Child Lock.
In DVB modeMENU
C
IDTV
OK
1 2 3
4 5 6
7 8 9
0
VCR
1 2 3
4 5 6
7 8 9
0
OK
VCR
1 2 3
4 5 6
7 8 9
0
Timer Programming
Child Lock
DVB Setup menu
Multi Audio
Access
DVB System Setupeng
DVB Tuning Menu
Profile Edit
AccessChange PIN
Child Lock
Child Lock Service List
* * * *
Please enter new PIN
Child Lock-PIN Entry
PIN
Child Lock Service List
1 BBC ONE Wales
2 BBC 2W
7 BBC THREE
30 CBBC Channel
51 BBCi
89 BBC Radio Wales
90 BBC Radio Cymru
Exit
Select
Lock
Return
Lock All Unlock All

28
DVB Tuning Menu (DVB mode)
Press the MENU button.
Move to Setup menu.
Access Setup menu.
Move to DVB Setup Menu.
Access DVB Setup Menu.
Move to DVB Tuning Menu.
Access DVB Tuning Menu.
Move to menu option.
Adjust chosen option or access chosen menu.
Press the EXIT button at any time to go back to watching TV.
DVB Auto Setup Automatically retunes your TV. DVB stations will be located, sorted into order and stored.DVB tuning data will be erased.If you set the Child Lock PIN number, the number is required before DVB Auto Setup.
Add New Service You can add new DVB stations while retaining existing tuning data. When the New Services Found message appears new DVB stations are available to add to your existing DVB channel list.
New Service Message
This TV continually scans for updated DVB services and notifi es you of any changes. Set to On to receive notifi cation. Set to Off if you do not wish to be informed of any updates.
Signal Quality The signal quality function displays an indication of signal quality for each DVB programme position.The DVB system requires a good quality signal to provide the best picture. When viewing analogue pictures, interference such as signal refl ection from nearby buildings or mountains causes ‘ghosting’, but still provides a viewable picture. For the DVB system, interference such as this can disrupt the fl ow of data causing the picture to appear to be made up of large blocks, or to freeze intermittently. If the picture disappears completely, this could mean that signal quality is very poor. If this happens often, you may need to improve your aerial system to provide a better signal.
DVB Tuning Menu provides access to DVB Tuning features.
In DVB mode
IDTV
1 2 3
4 5 6
7 8 9
C 0
OK
MENU
EXIT
DVB Auto Setup
New Service Message
DVB Tuning MenuAccess
OnSignal Quality
Add New Service
Timer Programming
Child Lock
DVB Setup menu
Multi Audio
AccessDVB System Setup
eng
DVB Tuning Menu
Profile Edit
Please Wait !
Add New Services
This will take about 3 mins.
68 21
New DVB Service Found!
Press OK to add new service
Press EXIT to lgnore
Please Wait !
DVB Aute Setup
Prog. Channel Service Name NetID. TS ID. Quality
Prog. Channel Service Name NetID. TS ID. Quality
This will take about 3 mins.
4
5
6
7
8
30
30
30
30
30
12302
12302
12302
12302
12302
4158
4158
4158
4158
4158
9
9
9
9
9
BBC NEWS 24
BBCI
CBBC Channel
BBC Radio Wales
BBC Radio Cymru
68 21
New Service Message On

29
DVB System Setup (DVB mode)
Press the MENU button.
Move to Setup menu.
Access Setup menu.
Move to DVB Setup Menu.
Access DVB Setup Menu.
Move to DVB System Setup.
Access DVB System Setup.
Move to menu option.
Adjust chosen option or access chosen menu.
Press the EXIT button at any time to go back to watching TV.
Pressing the OK button after having adjusted some features will store the setting as the default (replacing the factory setting).
The DVB System Setup menu provides access to DVB specifi c options.
In DVB mode
IDTV
1 2 3
4 5 6
7 8 9
C 0
OK
MENU
EXIT
OK
English
3 seconds
Common Interface Module
System Update
DVB System SetupAccess
Display Timeout
Preferred Subtitles
Timer Programming
Child Lock
DVB Setup menu
Multi AudioAccessDVB System Setupeng
DVB Tuning Menu
Profile Edit
Common Interface Module
The Common Interface Module menu provides access to functions contained on a Common Interface Module inserted into the CI slot, located at the rear of the TV. See page 30.
Preferred Subtitles This option allows you to select the language in which subtitles should appear (if available) when the STTL button is pressed.
System Update This menu allows you to download new software to the television. See page 31.
Display Timeout This option allows you to set how long the information banner stays on screen. Select from 0 (No display) to 10 seconds in 1 second increments. See page 33.

30
Common Interface Module menu (DVB mode)
Press the MENU button.
Move to Setup menu.
Access Setup menu.
Move to DVB Setup menu.
Access DVB Setup menu.
Move to DVB System Setup.
Access DVB System Setup.
Move to Common Interface Module.
Access Common Interface Module.
Access the module.
The Common Interface Module menu provides access to software contained on Common Interface (CI) Modules. These can be inserted in the “CI” slot located at the rear of the TV.
IMPORTANT NOTES:• Switch off the TV using the front panel switch before inserting or removing a module.• If you are installing a TV software update, please follow the dedicated instructions supplied with the
module.• Insert / remove a module straightly to the CI slot.
Insert the CI module:Some Common Interface Modules may be a two piece design consisting of a card reader together with the viewing card. When using this design of card, fi rst insert the card reader fi rmly into the CI slot on the TV.Secondly, insert the viewing card into the reader.
If no module is inserted the message “No module inserted” will be displayed.(If you have inserted a module, check that it is fully inserted.)
The features that now appear on screen are dependent on the contents of the selected Common Interface Module.Refer to the instructions supplied with the card or contact the vendor.
In all cases, it is possible to navigate the pages using buttons on the remote control, but because the commands available must apply to all manufacturers of DVB equipment, some on screen commands may not correspond exactly to the remote control buttons.
For example:For the on screen command ‘select’ or ‘go’, use the OK button.
If you see the symbols, use the cursor buttons.
If you see a line of key words displayed in red, green, yellow and blue, use the coloured buttons to operate the functions.
The EXIT button should always allow you to exit the CI software.
Switch on the TV.
In DVB mode
1 2 3
4 5 6
7 8 9
0
OK
C
IDTV
MENU
English
3 seconds
Common Interface Module
System Update
DVB System SetupAccess
Display Timeout
Preferred Subtitles
OK
EXIT
Slot 1: No module inserted
Common InterfaceAccess

31
System Update menu (DVB mode)
From time to time new versions of software will become available to enhance the performance and features of this TV.
Auto Update Search in Standby (Overnight)During the night time, this TV will automatically search for any new available software being broadcast. If a new software version is found, the unit will automatically download and install this new version. At the end of this process the unit will reset. Auto Update Search in Standby will occur at 03:00 and 05:00 every day.
System Update Search Now (Manual Download)To manually check if a new software version is available, select System Update Search Now in System Update menu and press the OK button.The TV will search for new versions of software and indicate whether a newer version is available or not. This search process may take a few minutes.If a newer software version is found, an on screen message will inform the user that it is available. The user is given the chance to download this version.Press the OK button to download the new version.The TV will begin download of the new software version. This can take up to about 20 minutes.Press the EXIT button to exit without download.Please do not switch off the TV or press any buttons while this download is in progress. The TV will reset after the software download is complete.
Set to On to search for new software and update automatically in Standby mode. This does not work when the unit off.If there is a new version software being broadcast, the TV will download this automatically.Auto Update Search in Standby will only occur if:• The unit is in Standby mode• No timer recording is set for 03:00 or 05:00• No recording is being made at 03:00 or 05:00
To ensure that your TV automatically updates when new software is available, please place the TV in Standby last thing at night when you have fi nished viewing.
Press the MENU button to return to DVB System Setup menu.Press the EXIT button to exit from menus.
Software LicenceAccess to show the information of the Software Licence.
Press the MENU button.
Move to Setup menu.
Access Setup menu.
Move to DVB Setup menu.
Access DVB Setup menu.
Move to DVB System Setup.
Access DVB System Setup.
Move to System Update.
Access System Update.
Move to Auto Update Search in Standby.
Choose between On or Off.
In DVB modeMENU
IDTV
1 2 3
4 5 6
7 8 9
C 0
OK
New version 1.00 found.
Do you really want to update the software and reboot the system?
Press OK to download the new version
Press EXIT to lgnore
System Update
Searching for new software version: Please wait!
Current software version 0.30
ExitReturn
English
3 seconds
Common Interface Module
System Update
DVB System Setup
AccessDisplay Timeout
Preferred Subtitles
Auto Update Search in Standby
Software Licence
System UpdateOn
System Update Search Now
Set to Off if you do not want new software to be automatically downloaded. In this case a new software banner will appear when the TV set is switched on and tuned to a BBC channel, if new software is being broadcast.Press the OK button to download the new version.The TV will begin download of the new software version. This can take up to about 20 minutes.Press the EXIT button to exit without download.

32
TV Guide - Electronic Programme Guide (EPG) (DVB mode)
The DVB TV Guide displays the current programmes being transmitted, and forthcoming programmes on each DVB channel, up to about one week ahead (If broadcasters transmit the programmes information).When you are using the TV for the fi rst time or you have not used it for about one week, it takes thirty to forty minutes after turning the TV on to display the TV Guide fully.
Press the GUIDE button.Choose from Landscape or Portrait display style by pressing the GUIDE button repeatedly.
Press the Red button to move the EPG listing to the previous day.Press the Green button to move the EPG listing to next day.Press the Yellow button to view a list of Categories.The Favourites list can be customised using the Profi le Edit menu. See page 26.Press the Blue button to view a list of Prog. type.
EPG listing can be set to display by Category or Programme Type. For example press the Yellow button and select ‘Free TV’, ‘Radio’ services or ‘Profi le 1’ by pressing the up or down cursor buttons. Press the OK button to view a list of the selected category.
To view any of the current DVB programmes, select it with the cursor buttons and press the OK button.
You can view further information about the selected programme:
Select the programme for which you require further information using the cursor buttons.Press the button to display the information.Press the button again to return to the list of programmes.
When you select a future programme from the EPG listing, press the OK button to set timer programming for recording on a Q-Link compatible recorder. See page 24, 25, 34.
Press the MENU button to return to the TV Guide.
Press the EXIT button to exit the TV Guide.
1 2 3
4 5 6
7 8 9
0
OK
C
OK
MENU
EXIT
GUIDE
Exit
Info
Change display modeSelect ProgrammeSelect channelTimer Programming
Category Prog. type+24 Hr
DVB TV Guide: Portrait Wed 12/05/04 10:46
Wed 12th Prog. typeCategoryAll Services All Types
Page up
Page down
CategoryAll Services
19:30~20:00
20:00~21:00
21:00~22:00
22:00~22:30
22:30~23:00
22:30~23:30
23:30~00:00
23:40~23:55
Eastender
Hot Wars
Emmerdal.
10 O’clock News BBC
Panoroma
I’m A Celebrlty
Rugby
The Bil l
1 BBC1 2 BBC2 44 Channel4 444 SC4
Exit
Select
Enter
Category Prog. type-24 Hr +24 Hr
DVB TV Guide:Landscape Wed 12/05/04 10:46
BBC1
BBC2
ITV1
Channel4
five
ITV2
SC4
Eastender
Hot Wars
Emmerdal.
10 O’ clock me
Panoroma
I’m A Celebr
Rugby
Red Cap
The Bil l
Good bye
Terminator
News
The Bil l
So
Hell
The
Wed 12th
D
C
S
1
20:00-21:00
Time: 19:30 2
Coronation Steet:We open in the Battersdy’s
Prog. type
All Services
Free TV
Pay TV
Radio
Information
Profi le 1
Profi le 2
Profi le 3
Profi le 4
21:00 21:30
All Types
Category
All Services
Exit
Select
Enter
Return
DVB TV Guide:Landscape Wed 12/05/04 10:46
Eastender
Hot Wars
Emmerdal.
10 O’ clock me
Panoroma
I’m A Celebr
Rugby
Red Cap
The Bil l
Good bye
Terminator
News
The Bil l
So
Hell
The
Wed 12th
D
C
S
1
20:00-21:00
Time: 19:30 2
Coronation Steet:We open in the Battersdy’s
Prog. type
All Services
Free TV
Pay TV
Radio
Information
Profi le 1
Profi le 2
Profi le 3
Profi le 4
21:00 21:30
All Types
Category
All Services
BBC1
BBC2
ITV1
Channel4
five
ITV2
SC4
1
2
21
44
122
142
144
Exit
Select
Enter
Return
DVB TV Guide:Landscape Wed 12/05/04 10:46
Wed 12th
Eastender
Hot Wars
Emmerdal.
10 O’ clock News BBC
Panoroma
I’m A Celebrlty
Rugby
Red Cap
The Bil l
Good bye
Terminator
News
The Bil l
So
Hell
The
DIY SOS
Coronation Street
Sex And The City
15 To1
The Bil l
Hollday Program
Pepsi Char.
Pop Idol
20:00-21:00
Time: 19:30 20:00
Coronation Steet:We open in the Battersdy’s
21:30 21:00 21:30
Red Cap
The Bil l
Good bye
Terminator
News
The Bil l
So
Hell
The
21:00 21:30All Types
Movies
News
Entertainment
Sport
Children’s
Education
Lifestyle
Drama
Prog. type
All Types
Category
All Services
BBC1
BBC2
ITV1
Channel4
five
ITV2
SC4
1
2
21
44
122
142
144
Exit
Info
Change display modeSelect channelSelect ProgrammeTimer Programming
Category Prog. type-24 Hr +24 Hr
DVB TV Guide:Landscape Thu 05/08/04 18:50
BBC1
BBC2
ITV1
Channel4
five
ITV2
SC4
1
2
21
44
122
142
144
Eastender
Hot Wars
Emmerdal.
10 O’ clock News BBC
Panoroma
I’m A Celebrlty
Rugby
Red Cap
The Bil l
Good bye
Terminator
News
The Bil l
So
Hell
The
Fri 6th
DIY SOS
Coronation Street
Sex And The City
15 To1
The Bil l
Hollday Program
Pepsi Char.
Pop Idol
20:00-21:00
Time: 19:30 20:00
Coronation Steet:We open in the Battersdy’s
Prog. typeCategoryAll Services
20:30 21:00 21:30
All Types
Page up
Page down
Category
All Services
Portrait
Landscape
OK
OK
Information and Timer Programming (ex. Landscape)

33
Corontation Street
20:00~20:55
Change Category
For info press
1 BBC ONE WALES 20:30
Multi-AudioEncrypted TXT Subtit le
Now
Profi le 1
Corontation Street
20:00~20:55
Change Category
For info press
1 BBC ONE WALES 20:30
Multi-AudioEncrypted TXT Subtit le
Now
Profi le 1
News
20:55~21:00
Change Category
For info press
1 BBC ONE WALES 20:30
Next
Profi le 1
Current Programme
Current Channel
Programme Duration
Current Time
Now or Next Current Category
Features Available
Information banner
In DVB mode
Information banner will appear when changing channel, or pressing the (Information) button. The banner gives the user information about the channel and programme currently being viewed. The banner will time out and disappear from the screen after a set time period, this time period can be set in the DVB System Setup menu. See page 29.
Press the left or right cursor button while banner is displayed to switch between Now and Next.
This switches between the information for the current Programme being shown (Now) and the next Programme to be shown (Next).Press the up or down cursor button to step through the banner information for all channels.Press the OK button to view a channel. Now and Next can also be used in this mode.
While the banner appearsPress the button to display an extended banner showing any information available on the current selected programme.Press the button while in extended banner mode to return to normal banner view.To clear the banner from the screen while in extended banner mode, press the EXIT button.
Viewing CategoryPress the Blue button while in the banner to scroll through available categories.For example: All Services : All available Services All Services → TV → Radio TV : TV channels only ↑ ↓ Radio : Radio channels only User Profi les ← Information Information : DVB teletext service channels only
User Profi les : 4 individual Profi les set up by user (see page 26)
Press the EXIT button to exit the banner at any time.
In Analogue mode
Pressing the (Information) button will display the analogue channel information for a few seconds. This will then be timed out to display just the programme position number near the top left corner of the screen.To remove this programme position number, press the (Information) button again.
1 2 3
4 5 6
7 8 9
0
OK
C
IDTV
OK
EXIT
Blue
STTL
Subtitles ON / OFF (DVB mode)
In DVB mode
Press the STTL button to switch Subtitles ON.Subtitles will appear (if available) by the language you select in Preferred Subtitles in DVB System Setup menu. See page 29.Press again to switch Subtitles OFF. 1 2 3
4 5 6
7 8 9
C 0
OK
EXIT

34
Q-Link
Q-Link allows the television to communicate with a compatible VCR or DVD Recorder.For Q-Link communication to work, the TV must be connected to a recording device with the “Q-Link”, “NEXTVIEWLINK”, “DATA LOGIC”, “Easy Link”, “Megalogic” or “SMARTLINK” logo using a “fully wired” Scart cable between the AV2 / AV4 terminal of the television and the appropriate terminal on your VCR or DVD Recorder. See page 15 for details of Q-Link terminal setup. This television does not support any other types of recording control signal.For connection to the appropriate Scart terminal on the recording device, refer to the device’s instruction book.When using a “NEXTVIEWLINK” device the main features possible are the following:Preset DownloadThis allows the programme order from the TV to be downloaded to the recording device, helping to ensure that correct recordings are made; there are several ways to perform this operation:1. During installation as explained in the “Quick Start Guide” on page 8-10.2. When Auto setup is started from within the Tuning Menu. See page 16.3. Preset download started from the recording device, refer to the device’s instruction book.Because a recording device cannot tune to DVB stations, only the analogue programme positions are downloaded to the device.What You See Is What You Record (DIRECT TV RECORDING)This will allow the immediate recording of the programme currently shown on the TV, by the recording device attached to the Scart terminal, which can be chosen using “Q-Link”. See page 15.
Press the DIRECT TV REC button. DIRECT TV REC
If the recording device is in Standby mode with usable recording media inserted, it will automatically switch on when you press the DIRECT TV REC button.If a “Q-Link” device is connected, a message will appear on the TV screen showing what is being recorded, or if it is not possible to record. Some “Q-Link” compatible devices will only display the message when on the VCR programme position “0” or in AV mode. Refer to the device’s instruction book.
Recording in progress No recording -Check tape or discThe recording device is recording the programme signal from its own tuner. If you wish you can switch off the TV and leave the device recording in the normal way.
The tape or disc may have been “write protected”, miss ing or may be damaged. The device may already be re cord ing. Refer to the device’s instruction book.
Recording DVB stationsIf you press the DIRECT TV REC button while watching a DVB station, the recording device will automatically switch to its AV input to record the DVB signal from the TV (via the SCART cable), and the DVB programme position will be locked. If you attempt to select another DVB programme position while recording, you will see the message “DVB Tuner Locked”. Press the OK button to clear the message, or the EXIT button to unlock the programme. Beware that if you press EXIT, the DVB programme will be unlocked – switching to another DVB programme will spoil your intended recording. Stop the recording manually.Additionally, when using a “Q-Link” device the following main features are possible:The following features are only available from the device connected to the Scart terminal selected using “Q-Link”. See page 15.TV / Recording device Auto Power OnIf you insert pre-recorded media into the recording device and press the Play button whilst the TV is in Standby mode, the TV will automatically switch on and select the correct AV input so that you can view the content.Recording device Auto Power StandbyWhen the TV is switched into Standby mode, the recording device will also switch into Standby mode if there is no media inserted, or if there is media inserted and the device is in Rewind or Stop mode. If a VCR is rewinding a tape, it will not switch into Standby mode until rewinding has fi nished.Recording device Image View OnIf the TV is in Standby mode and the recording device sends a menu to be displayed on the TV screen (e.g., Main menu), the TV will automatically switch On and the menu will be displayed.This TV will also communicate with other recording device’s that bear the following logos :• “DATA LOGIC” (a trademark of Metz Corporation) • “Megalogic” (a trademark of Grundig Corporation)• “Easy Link” (a trademark of Philips Corporation) • “SMARTLINK” (a trademark of Sony Corporation)Important Note:Some recording devices may not support all or some of the above functions. Refer to the instruction book for the device.If Q-Link functions do not work, check the connection and ensure that the scart lead is a fully-wired type.
1 2 3
4 5 6
7 8 9
C 0
OK

35
ASPECT
OK
Aspect Controls
Panasonic Auto determines the best aspect ra tio to use to fi ll your screen. It does this using a four step process to determine if the picture being viewed is a widescreen picture.If Panasonic Auto detects a widescreen signal it switches into the ap pro pri ate widescreen mode. If Panasonic Auto does not detect a widescreen signal then this advanced TV set enhances the picture for optimum viewing pleasure.The text shown on the screen indicates how Panasonic Auto de ter mined which ratio to use:Panasonic Auto switches to the appropriate widescreen ratio.If black stripes above and below the picture are detected, aspect ratio changes automatically.Panasonic Auto chooses the best ratio and expands the picture to fi ll the screen. This process can take several minutes, depending on the darkness of the picture.You may prefer to manually select one of the other aspect options available to view the picture.Notes:• If, in Panasonic Auto mode, you experience problems with the screen display
size when playing back widescreen format recordings from your VCR then it is possible that the tracking control of your VCR requires adjustment (your VCR instruction book will contain adjustment details).
• The widescreen aspect ratios of different fi lms and programmes can vary. If these are wider than a standard 16:9 aspect picture then a black band may
be visible at the top and bottom of the screen.• “WIDE” will appear in the top left corner of the screen and picture aspect
changes accordingly in any aspect modes, if a widescreen identifi cation signal (WSS) is detected or a control signal is found through a Scart terminal.
• Automatic aspect ratio adjustment by WSS signal is not available for progressive and high defi nition component signals input.
The Widescreen TV will allow you to enjoy viewing the picture at its optimum size and aspect, including widescreen cinema format pictures.
Press the ASPECT button repeatedly to move through the aspect options.OR
Press the ASPECT button. Whilst the on screen selector keys are displayed, use the Red or Green buttons to move in either direction through the aspect options. GreenRed
Panasonic Auto WIDE
Panasonic Auto
Panasonic Auto
“WIDE” ap pears in the top left of the screen, Panasonic Auto switch es to the ap pro pri ate 16:9 or 14:9 widescreen ratio.
“Panasonic Auto” appears in the top left of the screen. The best ratio is chosen and the picture expanded to fi ll the screen.
Press the ASPECT button, then use the Red or Green buttons to move in either direction through the aspect options.
Signal nameAspect modes
Aspect Control SignalWSS Control signal through
SCART terminal (pin 8)Panasonic
Auto 16:9 14:9 Just 4:3 Zoom1 Zoom2 Zoom3 TV AV1 AV2 AV3 AV4 Component TV AV1 AV2 AV3 AV4
TV/AV1/AV2/AV3/AV4
PAL I - - - PAL 525/60 - - - DVB - - - M.NTSC - - - NTSC(AV input only) - - -
Com
ponent/HD
MI
525(480)/60i - - - - - - - - - - - -525(480)/60p - - - - - - - - - - - -625(576)/50i - - - - - - - - - - -625(576)/50p - - - - - - - - - - - -750(720)/50p - - - - - - - - - - - - - - - - - -750(720)/60p - - - - - - - - - - - - - - - - - -1125(1080)/50i - - - - - - - - - - - - - - - - - -1125(1080)/60i - - - - - - - - - - - - - - - - - -
PC input - - - - - - - - - - - - - - - - -MPEG4 view∗ - - - - - - - - - - - - -Photo view - - - - - - - - - - - - - -∗ When Frame size in Viewing setup is Normal, you can select only 16:9 and 4:3.

36
Aspect Controls
Zoom3
Zoom3
Zoom3 will display 21:9 letterbox pictures as a full screen display with no aspect distortions.16:9 will display the picture at its maximum size but with slight stretching.
Zoom3
Zoom2
Zoom2
Zoom2
Zoom2 will display 16:9 anamorphic letterbox pictures as a full screen display with no aspect distortions.
Zoom1 will display 16:9 letterbox or 4:3 pictures with no aspect distortions.
Zoom1 Zoom1
Zoom1
Just
Just
Use Just when you wish to expand a 4:3 picture to fi ll the whole screen.The 4:3 picture will be stretched horizontally so that the image fi lls the screen, this is done in such a way that the stretching is only obvious at the left and right edges of the screen.
Just
4:3 will display a 4:3 picture at its standard 4:3 size with no aspect distortions.
4 : 3 4 : 3
4 : 3
14:9 will display a 14:9 picture at its standard 14:9 size without any stretching.
14 : 9 14 : 9
14 : 9
16:9 will display a true 16:9 (anamorphic) picture with no aspect distortions.
16 : 9 16 : 9
16 : 9
Press the HOLD button to freeze the picture.Press again to return to watching the current programme.
Note:This function is not available in MPEG4 view mode.
Still
HOLD
1 2 3
4 5 6
7 8 9
C 0
OK

A
B
SwapSource
SwapSource
2
2
AV1
AV1
37
Multi window
Picture in picture
Picture out of picture
Picture and picture
SwapSource
2 AV1
SwapSource
2 AV1
sub windowmain window
MULTIWINDOW
1 2 3
4 5 6
7 8 9
C 0
OK
Press the MULTI WINDOW button. Whilst the on screen selector keys are displayed, use the Red or Green buttons to move between the Picture in picture, Picture out of picture and Picture and picture features.The on screen selector keys that appear for the features clear after a few seconds. If you want to select an operation when the keys are not shown, press the MULTI WINDOW button again and the keys will reappear.Press the MULTI WINDOW button (whilst the selector keys are displayed) to return to normal viewing.Notes:• This TV has one tuner. When the main and sub windows are both TV mode,
these are the same TV channel.• This operation cannot be made during PC mode, HDMI mode, Card operations
mode and progressive signal, 1080i signal input (Y, PB, PR).
Picture in picture
Allows two pictures to be viewed at the same time.Press the Yellow button to select the contents of the smaller window, switching between displaying a TV channel and AV sources in turn.To change the TV channel: press the Yellow button until the currently selected TV channel is shown, then use the remote control to change channel (whilst the on screen selector keys are still displayed).Press the Blue button to swap the contents of the two windows.Use the remote control to select a TV channel or an AV source to appear in the main window.
Picture out of picture
Allows two pictures to be viewed at the same time, as picture in picture does.The difference is how the two pictures are displayed: in Picture in picture the smaller window appears within the main picture; in Picture out of picture the smaller window appears to the right of the main picture.Press the Yellow button to select the contents of the smaller window, switching between displaying a TV channel and AV sources in turn.To change the TV channel: press the Yellow button until the currently selected TV channel is shown, then use the remote control to change channel (whilst the on screen selector keys are still displayed).Press the Blue button to swap the contents of the two windows.Use the remote control to select a TV channel or an AV source to appear in the main window.
Picture and picture
Allows two pictures to be viewed at the same time and same size.Press the Yellow button to select the contents of the right window, switching between displaying a TV channel and AV sources in turn.To change the TV channel: press the Yellow button until the currently selected TV channel is shown, then use the remote control to change channel (whilst the on screen selector keys are still displayed).Press the Blue button to swap the contents of the two windows.Use the remote control to select a TV channel or an AV source to appear in the left window.
Picture in picture mode
Press the Blue button.The two pictures have been swapped, the picture in the smaller window has become the main window picture.
Picture out of picture mode
Picture and picture mode

38
PC mode
TV/AV
BlueYellow
MENU
EXIT
MENU
EXIT
Main menu
Picture menu
Setup menu
Sound menu
Main menu
Picture menu
Setup menu
Sound menu
Viewing modeContrastBrightnessSharpnessColour balance NormalAdvanced setting Access
Picture menuDynamic
W / B High RW / B High BW / B Low RW / B Low BGamma 2.2
Advanced setting
1 2 3
4 5 6
7 8 9
0
OK
C
BassTrebleBalanceHeadphone volumeModeAmbience
Sound menu
MusicOff
Press the TV/AV button. Whilst the on screen selector keys are displayed, press the Blue button to move to the next page, and then press the Yellow button to access PC mode.
Press the TV/AV button again to go back to watching TV.
Picture menu
In PC modePress the MENU button.
Move to Picture menu.
Access Picture menu.
Move to menu option.
Adjust chosen option or access chosen menu.
Press the EXIT button at any time to exit Picture menu.
Viewing mode, Contrast, Brightness, Sharpness, Colour balanceAbout settings, see page 13.
Advanced setting Access to adjust to the fi ne picture at a professional level.W/B High R :W/B High B :W/B Low R :W/B Low B :Gamma :
Adjusts the white balance for light red areas.Adjusts the white balance for light blue areas.Adjusts the white balance for dark red areas.Adjusts the white balance for dark blue areas.2.0 2.2 2.5 S Curve
Note:Carry out “W/B” adjustment as follows.
1. Adjust the white balance of the bright sections using the “W/B High R” and “W/B High B” settings.2. Adjust the white balance of the dark sections using the “W/B Low R” and “W/B Low B” settings.3. Repeat steps 1 and 2 to adjust.
Steps 1 and 2 affect each other’s settings, so repeat each step in turn to make the adjustment.
Sound menu
In PC modePress the MENU button.
Move to Sound menu.
Access Sound menu.
Move to menu option.
Adjust chosen option or access chosen menu.
Press the EXIT button at any time to exit Sound menu.
Bass, Treble, Balance, Headphone volume, Mode, AmbienceAbout settings, see page 14.
When you switch to PC input, the menu will be changed.About the PC connection, see page 55.
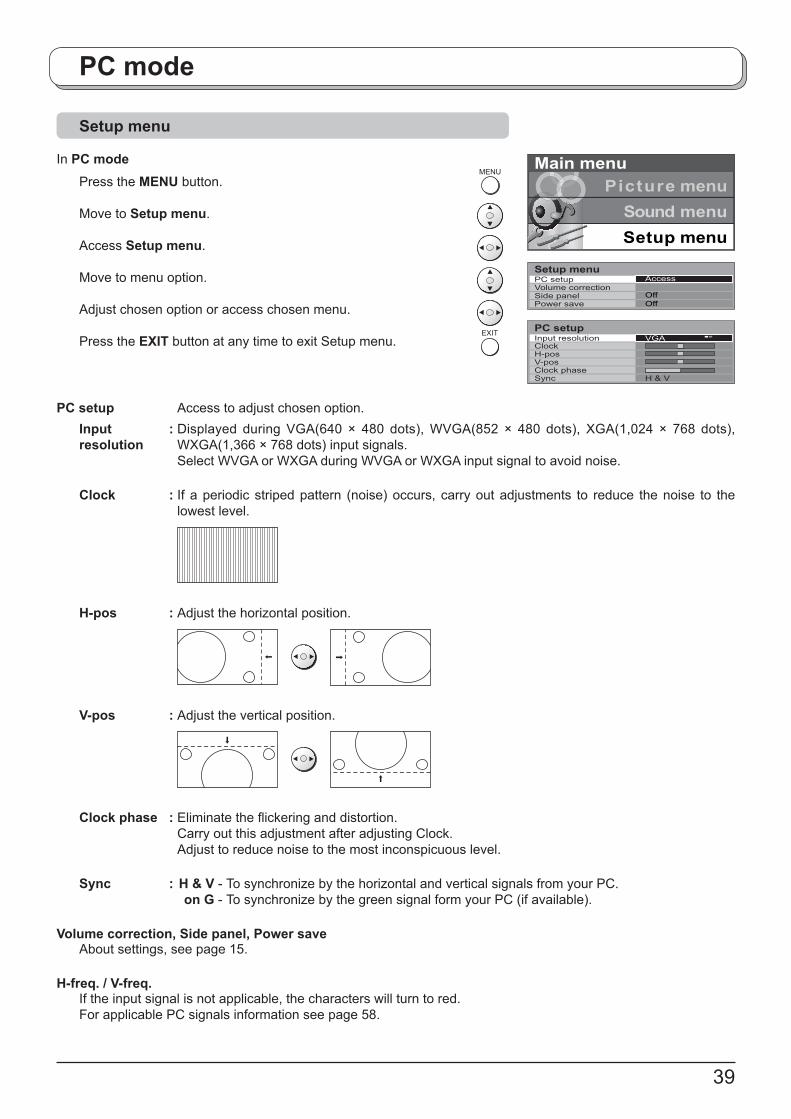
39
PC mode
Setup menu
In PC modePress the MENU button.
Move to Setup menu.
Access Setup menu.
Move to menu option.
Adjust chosen option or access chosen menu.
Press the EXIT button at any time to exit Setup menu.
MENU
EXIT
Main menu
Picture menu
Setup menu
Sound menu
PC setup Access to adjust chosen option.Input :resolution
Displayed during VGA(640 × 480 dots), WVGA(852 × 480 dots), XGA(1,024 × 768 dots), WXGA(1,366 × 768 dots) input signals.Select WVGA or WXGA during WVGA or WXGA input signal to avoid noise.
Clock : If a periodic striped pattern (noise) occurs, carry out adjustments to reduce the noise to the lowest level.
H-pos : Adjust the horizontal position.
V-pos : Adjust the vertical position.
Clock phase : Eliminate the fl ickering and distortion.Carry out this adjustment after adjusting Clock.Adjust to reduce noise to the most inconspicuous level.
Sync : H & V - To synchronize by the horizontal and vertical signals from your PC. on G - To synchronize by the green signal form your PC (if available).
Volume correction, Side panel, Power saveAbout settings, see page 15.
H-freq. / V-freq.If the input signal is not applicable, the characters will turn to red.For applicable PC signals information see page 58.
ClockInput resolution
H-posV-posClock phaseSync H & V
VGA
PC setup
PC setup
Setup menuAccess
Volume correctionSide panelPower save Off
Off

40
Card operations
This function lets you display Still images (JPEG) or Moving pictures (MPEG4) recorded by this unit, DIGA, D-snap or digital camera on a memory card when it is inserted in the proper card slot.
Inserting and removing a card
SD CARD slot• SD Card (1GB) • Multi Media Card (128MB)• miniSD Card∗ (512MB)
PC CARD slot• SD Card (1GB) • miniSD Card∗ (512MB)• Multi Media Card (128MB) • Compact Flash (1GB)• Smart Media (128MB) • Memory Stick (128MB)• xD Picture Card (512MB) • Flash ATA (128MB)• Memory Stick Pro (1GB)The cards require standard PC card adapter.(Some PC card adapter will not be compatible.)
∗ miniSD Card requires miniSD™ adapter.
• This function is not compatible with card type hard disk (Micro Drive, Mobile type hard disk, etc).
• Memory cards are not supplied with this television.• When both SD card and PC card are inserted in the slot,
SD card has the priority. You can change the priority. See page 45.
Note: Suitable SD Memory CardsPlease confi rm the latest information on the following website.http://panasonic.co.jp/pavc/global/cs(This site is in English only)
Card Data Protection• Do not remove the card or turn the unit off while the unit
is accessing the information. Such action may damage the memory card or the unit itself.
• The blue LED lights during recording.• Before inserting or removing the PC card, make sure
that the TV is turned Off. Otherwise, it may damage the unit.
• Do not touch the terminals on the back of the SD card/PC card.
• Always insert a card in the correct direction. Failure to do so may result in damage to the card and this unit.
• Do not subject the card to excessive pressure or strong impacts.
• Electrical interference, electrostatic discharges and malfunctions of the unit or card may all result in data loss or damage to the card.
• Stored data should be periodically backed up as a protection against data corruption, data loss or device malfunction. Please note that our company shall not accept any liability for damage or loss of stored data.
Compatible card type and maximum card size
WARNING: As with an small object, SD card can be swallowed by young children. Do not allow children to handle SD card. Please remove SD card immediately after use.
SD CARD slot
Removal
Label-side upwardInsert it to be clicked in.
Push the center of the card.
PC CARD slotTurn the TV off before inserting or removing a PC card.
Holding both edges, securely insert it to the depth.
Align the direction of
mark.
Label-side upward
Terminal face to the depth.
1. Push the EJECT button pops out.2. Push it again.
Insertion
Removal
Insertion
If the EJECT button does not pop outPush in PC card again, and then push again the EJECT button.Note:If the card adapter is used, remove it together with the adapter.

ROOT
DCIM
P1000001.JPGP1000002.JPGP1000003.JPGP1000004.JPG
100_PANA
SD_VIDEO
MOL001.ASFMOL002.ASFMOL003.ASFMOL004.ASF
PRL001
41
Card operations
Folders and Files
• Photo view can only show still images recorded by a digital still camera with DCF∗ and EXIF standard JPEG fi le. ∗ DCF (Design rule for Camera File system) Unifi ed standard established by Japan Electronics and Information Technology Industries Association (JEITA).• MPEG4 view can only show moving pictures recorded by this unit, Panasonic DVD recorder DIGA or mobile camera
D-snap.• When recording in MPEG4, format the SD card with this unit. The card may not operate properly if formatted with
different equipment.• Memory cards must be formatted with FAT12 or FAT16 in order to be viewed on TV. If the card is not formatted, it
may cause incompatibility with certain memory card adapters. If this happens, reformat the card using your digital camera.
Reformatting the card will erase the images and pictures stored in it. Refer to your camera manual for more information.
• Maximum number of fi les that can be displayed: 65,535.• Picture resolution: Compatible in the range 8 x 8 - 5,120 x 3,840 If the picture resolution is not compatible, the image will be shown as the error display.• If the image is imported from a PC, it must follow the EXIF (Exchangeable image fi le format) 2.0, 2.1, 2.2 in addition
to the DCF (design rule for Camera File system) format.• The JPEG modifi ed using a PC will not be displayed on TV.• This function cannot display Motion JPEG and still image not DCF formatted (i.e. TIFF, BMP).• If the fi le is partially corrupted, it may be shown in lower resolution.• The displayed image size depends on the recorded image size.• The number of pixels for movies is 320 x 240 (QVGA) or 176 x 144 (QCIF).• When the number of fi les exceeds 65,535, no further recording is possible.• The audio format used is G.726 (32 Kbps, 8 kHz sampling frequency, monaural).
Example folder structureWhen the Card fi le hierarchy is displayed on the PC as shown below.
Notes:• Folder and fi le names may vary according to the digital camera.• Do not use two-byte characters or other special codes.• The card may become unusable with this unit if fi le or folder names are changed.
Created automatically
Folder names consist of “PRL” followed by three characters.
File name consist of “MOL” followed by three characters.
(Use the characters “a-z”, “A-Z”, “0-9” and “_” to name a directory or a fi le.)
(Use the three characters “a-f”, “A-F” and “0-9” to name a directory or a fi le.)
Folder names consist of a 3-digit folder number which is followed by fi ve arbitrary characters.
File names consist of four arbitrary characters followed by a 4-digit fi le number.

42
Card operations
IDTV
1 2 3
4 5 6
7 8 9
0C
OK
SD REC
SD REC
Start recording?Not enough memory
Current setting
Rec time 180min
Rec mode Economy
Recordable at 15min
Start recording?Current setting
Rec time No setting
Rec mode Economy
Recordable at 17min
SD Record
The TV channels and AV1 input signals (PAL) can be recorded on the SD card.Setup Rec mode and Rec time in Setup menu before recording. See page 46.
Remaining time is not enough Rec time is set to No setting
Press the OK button to start recording.Press the EXIT button to cancel.
To cancel the recordingPress the SD REC button during recording.The confi rmation message will appear.
During the message appears, press the OK button.
Select the channel you want to record.
Insert the SD card into the card slot. See page 40.
Press the SD REC button to start recording.If the remaining time is not enough or Rec time in Setup menu is set to No setting, the message will appear.
Notes:• You cannot record the copy protected signals.• If the Off timer function is activated or press the [ ] button during recording, the recording will not stop.• Do not press the [ ] switch on the TV during recording. Otherwise the fi le will be broken. • Do not remove the SD card while recording. The data being recorded and other data stored on the SD card may
become unreadable.• SD recording may not be fully compatible or playable in some PC software or PDA devices.• When two pictures are shown on the same screen as Multi window functions, the main window is the one that
is recorded. The picture can be switched for the sub window.• If the signal system is changed during recording, it cannot be recorded completely.• The signals without video (only audio) cannot be recorded completely.
OK
Recordable time for SD card(Time is approximate)
Size Extra fi ne Super fi ne Fine Normal Economy64MB 7minutes 9minutes 23minutes 34minutes 1hour 21minutes
128MB 14minutes 18minutes 44minutes 1hour 6minutes 2hours 35minutes
256MB 28minutes 37minutes 1hour 32minutes 2hours 17minutes 5hours 20minutes
512MB 55minutes 1hour 10minutes 3hours 4hours 30minutes 10hours 40minutes
1GB 1hour 50minutes 2hours 20minutes 6hours 9hours 21hours 20minutes
This product is licensed under the MPEG-4 patent portfolio license for the personal and non-commercial use of a consumer to (i) encode video in compliance with the MPEG-4 Video Standard (“MPEG-4 Video”) and/or (ii) decode MPEG-4 Video that was encoded by a consumer engaged in a personal and non-commercial activity and/or was obtained from a licensed video provider. No license is granted or implied for any other use. Additional information may be obtained from MPEG LA. See http://www.mpegla.com.

Select
Select
SD : Return
Delete
Lock
Exit
Play
MPEG4VIEW MODE
00001/00028
Filename : MOL001Date : 01/01/2000
43
Card operations
SD card
MPEG4 view
Photo view
Setup
Memory left
EXIT
SD card
MPEG4 view
Photo view
Setup
Memory left
OK
1 2 3
4 5 6
7 8 9
C 0
OK
Error display(images that could not be loaded, etc.)
Selected File
Inserted card displayed (this does not appear for PC cards)
Movie without sound
Movie for which lock has been set
To enter Card operations modePress the SD button.
To return to the SD card menuPress the EXIT button.
To exit Card operationDuring the SD card menu is displayed, press the SD button to return to normal picture.
MPEG4 view
The moving pictures recorded by this unit, DIGA or D-snap will be played back.This function is supported by SD cards only.
Press the SD button.
Move to MPEG4 view.
Access MPEG4 view.The thumbnail screen is displayed.
Select the fi le.
Press the OK button.The moving picture starts.
Notes:• Picture menu, Sound menu (in playback only) or Viewing setup (in
thumbnail only) adjustment is possible by pressing the MENU button during MPEG4 view.
• “Date” shows the date on which the recording was made by this unit, DIGA or D-snap. Its format is 01/01/2000 when recordings are made without date signal.
Basic operation

OK
44
Card operations
Main menu
Picture menu
Viewing setup
Sound menu
During the playbackWhen the operation guide is not displayed, press the button to display it.
During the operation guide is displayed
( ) Press to pause.
( ) Press to playback.
( , ) Press to skip the picture. Press and hold to Rew/FF.
( ) Press to stop.
Notes:• During the playback, the volume can be adjusted using the Volume up/down button.• During the playback, no signals are output from the monitor output terminals.• During the playback, the Aspect ratio can be changed by pressing the ASPECT button.
Lock / Unlock the fi leSelect the fi le you want to lock in the thumbnail.
Press the Blue button to lock the fi le.
Press again to unlock.
Delete the fi leSelect the fi le you want to delete in the thumbnail.
Press the Red button to delete the fi le.Press again to confi rm your decision.
Note:If the fi le is locked, it is not possible to delete.
Viewing setupPress the MENU button during MPEG4 view (thumbnail).
Move to Viewing setup.
Access Viewing setup.
Move and adjust options.
Frame size (Normal or Large)Select the Frame size of the playback picture.
Repeat (Off, One fi le or All)Select the repeat mode.
MENU
Red
Blue
Frame sizeRepeat
Viewing setupNormalOff

OK
Select
Select
SD : Return
Exit
View
PHOTOVIEW MODE
Filename : 800-0003Date : 06/12/2003Pixel : 2048x1536
00001/00028
45
Card operations
Photo view
The still images recorded by the digital camera will be displayed.This function supports both SD cards and PC cards.
Press the SD button.
Move to Photo view.
Access Photo view.The thumbnail screen is displayed.
Select the fi le.
Press the OK button to view. OK
Notes:• Picture menu or Viewing setup adjustment is possible by pressing the
MENU button during Photo view.• During single view and Slide show, the Aspect ratio can be changed
by pressing the ASPECT button.
SD card
MPEG4 view
Photo view
Setup
Memory left
During single viewWhen the operation guide is not displayed, press the button to display it.
During the operation guide is displayed
Press the Red button to zoom the view.During zoom mode, you can move the position by using the cursor buttons.
Viewing setupPress the MENU button during Photo view.
Move to Viewing setup.
Access Viewing setup.
Move and adjust options or access Slide show.
MENU
Red
Slide showInterval
Viewing setupAccess5sec
Repeat OffCard SD
Slide showSelect the settings of Interval and Repeat before accessing Slide show.
Interval (5sec, 10sec, 15sec, 30sec, 60sec, 90sec or 120sec)Select the length of time that a slide is being displayed on screen.
Repeat (On or Off)Select the repeat on or off.
Card (SD or PC)Select either SD or PC when both cards are inserted in the slots.Not selected when one card is inserted.
Inserted card displayed (this does not appear for a card which is not selected)Press to skip the previous view.
Press to display the thumbnail.
Press to rotate the view.Each press rotates the view ninety degrees.
Press to skip the next view.

46
Card operations
Setup
Press the SD button.
Move to Setup.
Access Setup.
Move to menu option.
Adjust chosen option or access chosen menu.
SD card
MPEG4 view
Photo view
Setup
Memory left
Rec modeRec time
SetupEconomyNo settingAccessCard format Rec mode (Extra fi ne, Super fi ne, Fine, Normal or Economy)
The quality of picture can be changed.The recordable time will be changed by Rec mode.Notes:• Multi Media Cards do not support the Extra fi ne and Super fi ne recording mode. If the recording is started in
these status, recording will automatically be performed in the Fine mode.• The quality of audio is not changed.
Rec time (No setting, 5min, 10min, 15min, 30min, 60min, 90min, 120min or 180min)Set the recording time before recording.Note:If you set Rec time to No setting, the recording does not stop until the card is fully recorded.
Card formatYou can format the card.Notes:• If the card is formated, all data is erased.• Only cards that are supported by the SD card slot can be formatted.• Do not remove the SD card while formatting. That may cause the card to not be able to record properly.
Memory left
You can confi rm the remaining time for recording in each Rec mode.
Press the SD button.
Move to Memory left.
Access Memory left.The recordable time informations are displayed by each Rec mode.
Note:Since Multi Media Cards do not support the Extra fi ne and Super fi ne recording mode, “----” appears.
SD card
MPEG4 view
Photo view
Setup
Memory left
12MBRecordable time Economy 15min Normal 5min Fine 3min Super fine 1min Extra fine Less than 1min
Memory left
(Time is approximate)

47
Card operations
Error messages
Is SD Card in? Insert a card.
SD Card is lockedPlease unlock to operate Unlock the SD card.
This fi le is lockedPlease unlock to operate Unlock the fi le in the card.
This type of format is not supportedThe card must be formatted with FAT 12 or FAT 16.Still image must be with DCF and EXIF standard JPEG fi le.Moving picture must be with MPEG4 standard ASF fi le.
This type of card is not supported Incompatible card is inserted.
Broken fi leCannot display image The fi le is broken.
Memory full The card memory is full.
Not enough memory The card does not have enough memory to operate.
Cannot read fi le The fi le is not readable.
Unrecordable sourceSD recording is stopped It is not possible on restricted channels.
ErrorCheck card Re-insert the card. If the error persists, format the card.
Card recording in progressPlease stop recording to operate
The tuning buttons for the main picture do not work while recording is in progress.
No time dataCannot store time info
Since the signal does not have the time information, the date is recorded as 01/01/2000.

REC VCR DVD
VCR
TEXT
GUIDE
EXIT
TV/AV
SD REC
STTL INDEX HOLD
PROGRAMME
DIRECT TV RECMULTI WINDOW
ASPECTDVB
Analogue
MENU
TIMER
1 2 3
4 5 6
7 8 9
C 0
OK
N
MODE
48
VCR / DVD operation
The Remote Control is capable of operating some functions of selected Panasonic VCRs and DVD (Digital Versatile Disc) equipment. Some VCR and DVD equipment have different functions, so to ensure compatibility please refer to the equipment’s instruction book or consult your dealer for details.
VCR DVDVCR / DVD switchUse this switch to select whether controls operate the DVD equipment or VCR.
StandbyPress to switch the VCR, DVD or DVD recorder to Standby mode.Press again to switch back on.
PlayPress to playback the tape or DVD.
StopPress to stop the tape or DVD.
Skip / Fast Forward / CueVCR: Press to fast forward the tape. In Play mode, press
to view the picture rapidly forward (Cue). When fast forwarding the tape, the picture noise may
occur.DVD: Press to skip to the next track or title. Press and hold to search forward.
Skip / Rewind / ReviewVCR: Press to rewind the tape. In Play mode, press to view
the picture rapidly in reverse (Review).DVD: Press to skip to the previous track or title. Press and hold to search backward.
Pause / StillPress in Play mode, the picture will pause.Press again to restart play.DVD: Press and hold for slow-motion play.
PROGRAMMEProgramme Up / DownPress to increase or decrease the programme position by one.
REC RecordPress this button to start recording.

49
Teletext operation
TEXT TV / Teletext modePress the TEXT button to switch between the current programme and teletext.
VCR
1 2 3
4 5 6
7 8 9
0
Page SelectionPages can be selected in two ways:a. Press the Up / Down cursor buttons to increase or decrease the page number by one.b. By entering the page number, using 0 - 9 on the remote control.
MENU
Green
Full / Top / BottomPress the MENU button to display special functions, followed by the Green button.Press the Green button again to expand the BOTTOM half.Press again to return to normal (FULL) size.
MENU
Red
RevealPress the MENU button to display special functions, followed by the Red button to reveal hidden words e.g., quiz page answers. Press again to hide.
Red / Green / Yellow / Blue buttonsIn FASTEXT mode they correspond to the differently coloured subjects.In List mode they correspond to the differently coloured page numbers.
VCR
1 2 3
4 5 6
7 8 9
0
OK
List StoreIn List mode the four page numbers can be altered (programme positions 1 - 25 only).To do this, press one of the four coloured buttons and enter the new page number.Press and hold the OK button, the page numbers will change to white indicating that the page is stored.
HOLD HOLDTo hold the Teletext page when viewing multi-page information.Press again to return to automatic page update.
• Teletext features may vary depending on the Broadcasting Companies and is only available if the channel selected is transmitting Teletext.
• Pressing the MENU button whilst in Teletext operation will display the contrast function with a cyan bar, press the left and right cursor buttons to alter the setting as required.
• Pressing the MENU button whilst in Teletext operation will display special function options at the bottom of the screen.
• Pressing the Volume up / down button whilst in Teletext operation will display the volume function with a green bar, press the volume up / down button to alter the setting as required.
What is List mode?In List mode, four differently coloured page numbers are situated at the bottom of the screen. Each of these numbers can be altered and stored in the TV’s memory.
What is FASTEXT mode?In FASTEXT mode, four differently coloured subjects are situated at the bottom of the display. To access more information about one of these subjects, press the appropriately coloured button. This facility enables fast access to information on the subjects shown.
In Analogue mode

50
Teletext operation
Favourite Page (F.P.)Stores a favourite page in memory for instant recall. To store such a page, the TV must be in List mode, and the programme position must be from 1 - 25.Press the Blue button, select the page number, then press and hold the OK button. The page number is now stored.Press the STTL button to recall this page.
MENU
Yellow
Update DisplayPress the MENU button to display special functions, followed by the Yellow button to view the TV picture whilst searching for a Teletext page (this is not necessary in Picture and text mode, as the picture is displayed on the left of the screen). When found, the screen will display the page number at the top left. Press the Yellow button to view the page.Press the TEXT button again to return to normal TV operation.News FlashWhen a news fl ash page has been selected, press the MENU, Yellow buttons, to view the TV picture. When an update is received, the page number will be displayed on screen.Press the Yellow button to display the News Flash.Press the TEXT button to return to normal TV operation.UpdatePress the MENU, Yellow buttons to see the update of information on certain pages.When an update is received, the page number will be displayed at the top left of the screen.Press the Yellow button to view the page.Press the TEXT button to return to normal TV operation.
VCR
1 2 3
4 5 6
7 8 9
0
MENU
Yellow
Accessing sub pagesWhen Teletext information exceeds one page, it may take some time for the automatic changing of the sub pages to reach the sub page you require. As each sub page is found its number is displayed at the top of the page so that you may select it; as more sub pages are picked up, the display at the top of the page changes, so that you are always offered the most recently transmitted selection of sub pages.
In Teletext operation, use the following procedure to access sub pages:
If the sub page you want to look at is not yet available, press the MENU button (to display special functions) followed by the Yellow button to view the TV picture whilst waiting for more sub pages to be found. The sub pages found will be displayed across the top of the screen.
When the sub page you are waiting for is available press the Yellow button to return to viewing the Teletext pages, then use the left and right cursor buttons to select the sub page of your choice.The maximum number for sub page that can be entered is restricted to 79 by broadcasters.Notes:• If you do not want to display the on screen selector keys on the TV picture whilst waiting
for a sub page to be found, press the MENU button to clear the keys from the screen. Press again to redisplay the keys.
• If you have cleared the special function keys from the screen and then used the left and right cursor buttons to select a sub page, whilst still viewing the TV picture, you must press the MENU button then the Yellow button to display the Teletext page again.
• If the top of the page indicates that sub pages are being transmitted but the page displayed never changes, then the ‘sub page number’ is there to show the page contents have been updated, there are no sub pages.
It is not possible to change the programme position when in News fl ash, Update or Sub Coded Page Access operation.
VCR
1 2 3
4 5 6
7 8 9
0
OK
Blue
STTL

51
Teletext operation
MENU
Blue
Alternatively, if you know which sub page you require, press the MENU button (to display special functions) followed by the Blue button; T**** will be displayed where the page number is normally found.Enter desired sub page number before the T**** disappears.e.g., to select page 6 enter 0, 0, 0 and 6.Press the Yellow button to view the TV picture whilst waiting for more sub pages to be found. The sub pages found will be displayed across the top of the screen.When the page is available, press the Yellow button to view the page. Regardless of how many pages are found, pressing the Yellow button will take you to the sub page which you requested.
Press the TEXT button to return to normal TV operation.
INDEX
INDEXWhen in FASTEXT operationPress the INDEX button to return to the main index page.Depending on the way information is transmitted, this may have to be pressed more than once to return to the main index page.
TEXT
MULTIWINDOW
Picture and textPress the TEXT button, followed by the MULTI WINDOW button to move between viewing teletext and the Picture and text mode.Picture and text mode lets you see the current programme and a page of teletext side by side. Whilst using this feature, the remote control affects the teletext page; if you wish to make changes to the programme viewed press the TEXT button to return to watching the programme on its own then make the desired changes.
In DVB mode
OK
VCR
1 2 3
4 5 6
7 8 9
0
TEXT
DVB teletext servicesDVB teletext services differ greatly from analogue teletext. When you switch to a DVB teletext service, the images you see can contain graphics and text, laid out and controlled in a manner decided by the broadcaster. In all cases, it is possible to navigate the pages using buttons on the remote control, but because the commands available must apply to all manufacturers of DVB equipment, some on screen commands may not correspond exactly to the remote control buttons. For example:• For the on screen command ‘select’ or ‘go’, use the OK button.• If you see the symbols, use the appropriate cursor buttons.• If you see a line of key words displayed in red, green, yellow and blue, use the coloured
multifunction buttons to operate the functions.• For numbered options, use the numeric keypad.• The TEXT button should allow you to exit the teletext system. Alternatively, press the
Channel up / down buttons to select another channel.
As soon as you switch to a DVB channel with links to a teletext service, software is downloaded in the background to enable the teletext function. This means that when switching to a DVB channel, you should wait for approximately 5 seconds before pressing the TEXT button – this will allow the software to download. If you press the TEXT button before download is complete, there will be a short delay before the text screen is displayed.While navigating DVB teletext, you will fi nd there is a short delay when moving between pages while the page downloads.There is often a prompt shown somewhere on the page (for example “Loading”) to let you know what is happening.

52
AudioOUT
VideoOUT
S-VideoOUT
L
R
Connections
It is possible to connect a variety of additional equipment to this TV. The following pages detail how to connect external equipment to the front and rear of the TV.Once your equipment is connected, use the following procedure to view the input:
Press the TV/AV button.
Whilst the on screen selector keys are displayed, select the page by pressing the Red or Blue button and then press coloured buttons to select the AV source you wish to view. Red button : AV1 Scart terminal / Back page Green button : AV2 Video, S-Video Scart terminal / AV4 Video, S-Video Scart terminal Yellow button : AV3 Audio, Video, S-Video terminals / Component, PC, HDMI terminals Blue button : Next page / -The on screen selector keys will disappear after a few seconds. If you want to select an input when the keys are not shown, press any one of the coloured buttons and the keys will reappear.
Notes:• The volume level of the headphones can be adjusted by selecting “Headphone volume” from the Sound menu.• Additional equipment and cables shown are not supplied with this TV set.
Notes:• You can also select an AV source using the TV/AV button on the
front panel of the TV. Press the TV/AV button repeatedly until you reach the AV source
you wish to view.• When in AV mode a reduced number of options are available
in the Sound and Setup menus (e.g., in the Setup menu there is no Tuning Menu option).
• If the external devices have the aspect adjustment, set to 16:9.
TV/AV
IDTV
1 2 3
4 5 6
7 8 9
C 0
OK
How to connect the Headphones / AV3 terminals
VCR / S-VIDEO VCRDVD PLAYERCAMCORDER /S-VIDEO CAMCORDER
Connect the S-VIDEO or VIDEO terminal.
AUDIO
VIDEO
S-VIDEO
Red Blue
Example:
(Optional)(M3 plug)
Ferrite core (Small size)
Less than 10 cm

Y
PB
PR
L
R
L
R
VIDEOAUDIOAUDIO
COMPONENT
Y
PB
PR
L
R
L
R
VIDEOAUDIOAUDIO
COMPONENT
Y
PB
PR
L
R
L
R
VIDEOAUDIOAUDIO
COMPONENT
AV1/2/4
AUDIOIN
AUDIOOUT
L
R
L
R
Y
PB
PR
L
R
AUDIOOUT
L
R
Y
PB
PR
Y, PB, PR
OUT
COMPONENTAUDIO IN
RGB
VIDEO S VIDEORGB
VIDEO
S VIDEOVIDEO
AV1 AV2 AV4
RGB
VIDEO S VIDEORGB
VIDEO
S VIDEOVIDEO
AV1 AV2 AV4
RGB
VIDEO S VIDEORGB
VIDEO
S VIDEOVIDEO
AV1 AV2 AV4
AUDIOIN
AUDIOIN
AUDIOIN
53
Connections
Notes:• Additional equipment and cables shown are not supplied with this TV set.• Do not connect a computer with TTL output (5V) to this set.• For Scart terminal wiring and applicable component signals information see page 58.
DVD PLAYER
Amplifi er to Speaker System
Example:
Example:
AV4:VCR / S-VIDEO VCRQ-Link COMPATIBLE VCRSET TOP BOXDVD PLAYERDVD RECORDERQ-Link COMPATIBLE DVD RECORDERCAMCORDER / S-VIDEO CAMCORDERGAME CONSOLE / COMPUTER(RGB)
AV1:VCRSET TOP BOXDVD PLAYERDVD RECORDERCAMCORDERGAME CONSOLE /
COMPUTER(RGB)
AV2:VCR / S-VIDEO VCRQ-Link COMPATIBLE VCRDVD PLAYERDVD RECORDERQ-Link COMPATIBLE
DVD RECORDERCAMCORDER /
S-VIDEO CAMCORDER
How to connect the Component Input terminals
How to connect the Audio Output terminals
How to connect the AV1 / 2 / 4 Scart terminals
This terminal accepts progressive or non-progressive signals format, as well as high definition 750(720)/50p, 750(720)/60p, 1125(1080)/50i and 1125(1080)/60i.
Example:

HDMIOUT
HDMI IN
Y
PB
PR
L
R
L
R
VIDEOAUDIOAUDIO
AV
RGB
VIDEO S VIDEORGB
VIDEO
S VIDEOVIDEO
COMPONENT
AV1 AV2 AV4
AUDIOIN
PC
54
Connections
How to connect the HDMI Input terminal
SET TOP BOXDVD PLAYER
HDMI (High Defi nition Multi media Interface) is the fi rst all-digital consumer electronics A/V interface that supports uncompressed standard. The HDMI terminal supports both video and audio information.An HDMI-compliant device∗1, such as a Set Top Box or DVD player with HDMI or DVI output terminal can be connected to the HDMI input terminal.
• If the external device has DVI output only, use a DVI to HDMI adapter cable∗2 to connect to the HDMI terminal.• Connect the audio cables to the AUDIO IN terminals when using a DVI to HDMI adapter cable.• Select the audio setting in HDMI input. See page 14.
Notes:• This input terminal is not intended for use with computers.• 720p/1080i signals will be re-formatted to view on your display.• If the external devices have the aspect adjustment, set to 16:9.• For applicable HDMI signals information see page 58.
Compatible sampling frequency of AUDIO signal through HDMI (L.PCM) : 48 kHz / 44.1 kHz / 32 kHz
Notes:• This HDMI connector is Type A.• If you connect equipment without a digital output terminal, connect to the COMPONENT, S-VIDEO or VIDEO input
terminal on the TV so you can receive an analogue signal.• The HDMI IN terminal can only be used with 480i, 480p, 576i, 576p, 720p or 1080i picture signals. Set the Digital
Set Top Box DIGITAL OUT terminal output setting to 480i, 480p, 576i, 576p, 720p or 1080i. For detailed information, refer to the Digital Set Top Box instruction manual. If you cannot display the picture because your Digital Set Top Box does not have a DIGITAL OUT terminal output setting, use the component input (or the S-Video input or Video input). In this case the picture will be displayed as an analogue signal.
Example:
∗1. HDMI-compliant device is that has the HDMI Logo on it.∗2. HDMI-DVI adapter cable: Consult your consumer electronics dealer for availability.

L
R
PC INAUDIO IN
Y
PB
PR
L
R
L
R
VIDEOAUDIOAUDIO
AV
RGB
VIDEO S VIDEORGB
VIDEO
S VIDEOVIDEO
COMPONENT
AV1 AV2 AV4
AUDIOIN
PC
55
Connections
How to connect the PC Input terminal
1
678
3
9
45
10
15 14 13 12 11
2
Notes:• Connect a cable which matches the audio output terminal on the computer.• Computer signals which can be input are those with a horizontal scanning frequency of 31 to 69 kHz and vertical
scanning frequency of 59 to 86 Hz. (However, the image will not be displayed properly if the signals exceed 1,024 lines.)
• The display resolution is a maximum of 768 × 720 dots (TH-37PV500B), 768 × 768 dots (TH-42PV500B), 1,024 × 768 dots (TH-50PV500B) when the aspect mode is set to “4:3”, and 1,024 × 720 dots (TH-37PV500B), 1,024 × 768 dots (TH-42PV500B), 1,366 × 768 dots (TH-50PV500B) when the aspect mode is set to “16:9”. If the display resolution exceeds these maximums, it may not be possible to show fi ne detail with suffi cient clarity.
• Some PC models cannot be connected to the set.• There is no need to use an adapter for computers with DOS/V compatible D-sub 15P terminal.• The computer shown in the illustration is for example purposes only.• Additional equipment and cables shown are not supplied with this set.• Do not set the horizontal and vertical scanning frequencies for PC signals which are above or below the specifi ed
frequency range.• For applicable PC signals information see page 58.
Signal Names for D-sub 15P Connector
Pin Layout for PC Input Terminal
Pin No. Signal Name Pin No. Signal Name Pin No. Signal Name1 R 6 GND (Ground) 11 NC (not connected)2 G 7 GND (Ground) 12 NC (not connected)3 B 8 GND (Ground) 13 HD/SYNC4 NC (not connected) 9 NC (not connected) 14 VD5 GND (Ground) 10 GND (Ground) 15 NC (not connected)
Example:
COMPUTER
RGB
AUDIO
(D-sub 15p)
(Stereo plug)
Conversion adapter (if necessary)
Less than 10 cm
Ferrite core (Large size)
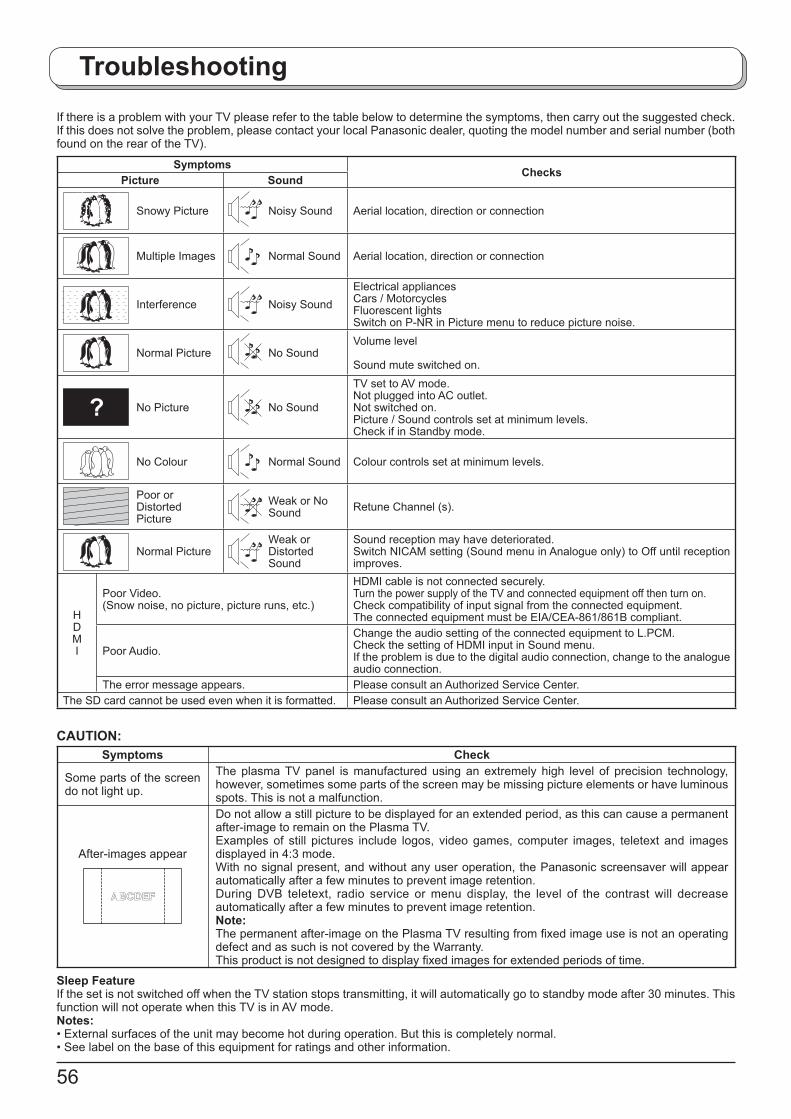
56
TroubleshootingIf there is a problem with your TV please refer to the table below to determine the symptoms, then carry out the suggested check. If this does not solve the problem, please contact your local Panasonic dealer, quoting the model number and serial number (both found on the rear of the TV).
SymptomsChecks
Picture Sound
Snowy Picture Noisy Sound Aerial location, direction or connection
Multiple Images Normal Sound Aerial location, direction or connection
Interference Noisy SoundElectrical appliancesCars / MotorcyclesFluorescent lightsSwitch on P-NR in Picture menu to reduce picture noise.
Normal Picture No SoundVolume level
Sound mute switched on.
No Picture No Sound
TV set to AV mode.Not plugged into AC outlet.Not switched on.Picture / Sound controls set at minimum levels.Check if in Standby mode.
No Colour Normal Sound Colour controls set at minimum levels.
Poor or Distorted Picture
Weak or No Sound Retune Channel (s).
Normal PictureWeak or Distorted Sound
Sound reception may have deteriorated.Switch NICAM setting (Sound menu in Analogue only) to Off until reception improves.
HDMI
Poor Video.(Snow noise, no picture, picture runs, etc.)
HDMI cable is not connected securely.Turn the power supply of the TV and connected equipment off then turn on.Check compatibility of input signal from the connected equipment.The connected equipment must be EIA/CEA-861/861B compliant.
Poor Audio.Change the audio setting of the connected equipment to L.PCM.Check the setting of HDMI input in Sound menu.If the problem is due to the digital audio connection, change to the analogue audio connection.
The error message appears. Please consult an Authorized Service Center.The SD card cannot be used even when it is formatted. Please consult an Authorized Service Center.
CAUTION:Symptoms Check
Some parts of the screen do not light up.
The plasma TV panel is manufactured using an extremely high level of precision technology, however, sometimes some parts of the screen may be missing picture elements or have luminous spots. This is not a malfunction.
After-images appear
ABCDEFABCDEF
Do not allow a still picture to be displayed for an extended period, as this can cause a permanent after-image to remain on the Plasma TV.Examples of still pictures include logos, video games, computer images, teletext and images displayed in 4:3 mode.With no signal present, and without any user operation, the Panasonic screensaver will appear automatically after a few minutes to prevent image retention.During DVB teletext, radio service or menu display, the level of the contrast will decrease automatically after a few minutes to prevent image retention.Note:The permanent after-image on the Plasma TV resulting from fi xed image use is not an operating defect and as such is not covered by the Warranty.This product is not designed to display fi xed images for extended periods of time.
Sleep FeatureIf the set is not switched off when the TV station stops transmitting, it will automatically go to standby mode after 30 minutes. This function will not operate when this TV is in AV mode.Notes:• External surfaces of the unit may become hot during operation. But this is completely normal.• See label on the base of this equipment for ratings and other information.

57
Some problems will only occur when viewing DVB channels. Due to the different techniques involved in digital reception, DVB signal quality can be poor even if you appear to have a strong signal when viewing analogue programmes.The DVB system requires a good quality signal to provide the best picture. When viewing analogue pictures, interference such as signal refl ection from nearby buildings or mountains causes ‘ghosting’, but still provides a viewable picture. For the DVB system, interference such as this can disrupt the fl ow of data causing the picture to appear to be made up of large blocks, or to freeze intermittently. If the picture disappears completely, this could mean that signal quality is very poor. If this happens often, you may need to improve your aerial system to provide a better signal. This TV contains a complex microprocessor which enables you to view enhanced digital services. Occasionally this device may need to be reset. This can be done by pressing the standby button on your remote control.
Symptoms ChecksNo DVB channels listed in the TV Guide after Auto Setup.
Exit
Info
Change display modeSelect channelSelect Programme
Category Prog. type+24 Hr
DVB TV Guide:Landscape Wed 12/05/04 10:46
Wed 12th
Time: 19:30 20:00
Prog. typeCategoryAll Services
20:30 21:00 21:30
All Types
Category
All Services
Check that DVB transmissions are available from the transmitter you are currently using. If not, try directing the aerial at another local transmitter.
Check analogue transmissions. If picture quality is poor, you will need to improve or change your aerial system to receive DVB channels. Consult a local installer.
Blocky interference.Picture freezes intermittently.
Blocky interference indicates that the signal quality is poor.You should consider improving your aerial system.To check the quality of your signal use the Signal Quality feature (see page 28).Good quality signal – indication is green.Poor quality signal – indication is red.
I have a good aerial system, but still cannot receive DVB stations.
If you have tried the previous solutions and are still unable to receive DVB channels, you may need to provide dedicated aerial feeds to the TV and other equipment.This can be implemented using an aerial splitter or separate aerials.
TV
VCR
Aerial
Input
terminal
Aerial
Input
terminal
Aerial
Input
terminal
Separate
Aerial
Separate
Aerial
Aerial
Output
Aerial
Output
AERIAL
SPLITTER
DVB Troubleshooting
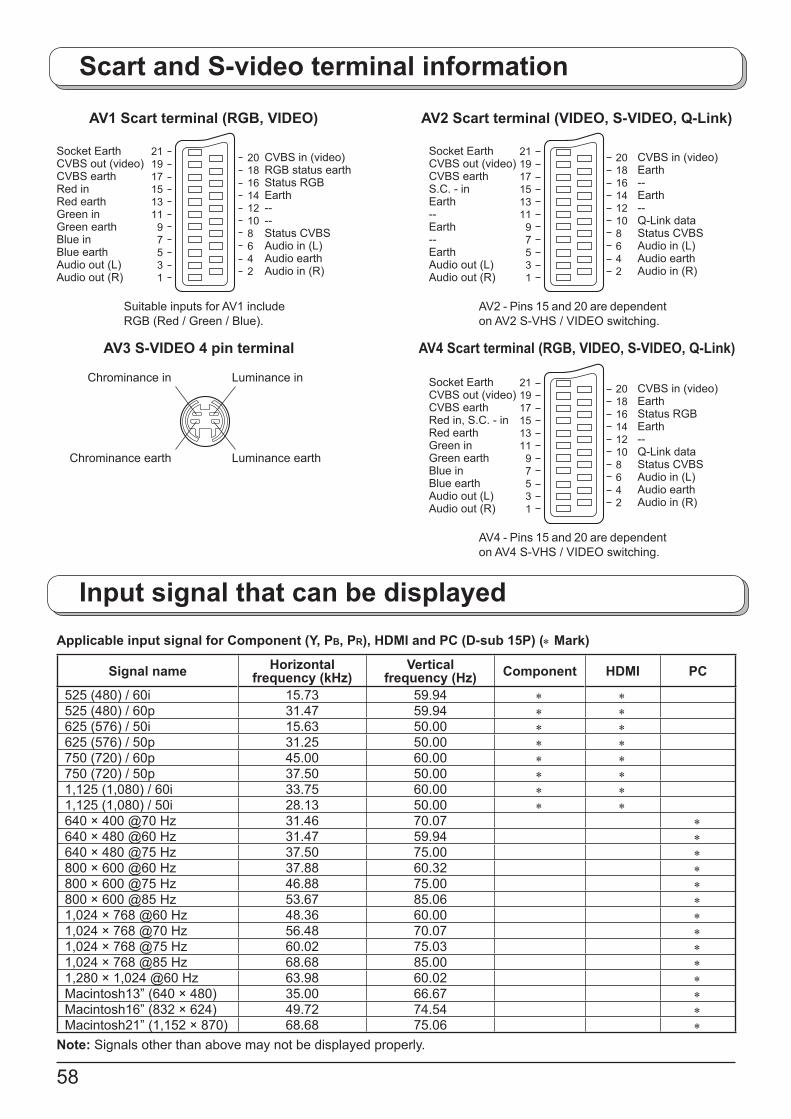
58
Input signal that can be displayed
21 19 17 15 13 11
9 7 5 31
2018161412108 6 4 2
Socket EarthCVBS out (video)CVBS earthRed inRed earthGreen inGreen earthBlue inBlue earthAudio out (L)Audio out (R)
CVBS in (video)RGB status earthStatus RGBEarth----Status CVBSAudio in (L)Audio earthAudio in (R)
AV1 Scart terminal (RGB, VIDEO)
Suitable inputs for AV1 include RGB (Red / Green / Blue).
AV2 Scart terminal (VIDEO, S-VIDEO, Q-Link)
AV2 - Pins 15 and 20 are dependent on AV2 S-VHS / VIDEO switching.
Chrominance in Luminance in
Chrominance earth Luminance earth
AV3 S-VIDEO 4 pin terminal
Socket EarthCVBS out (video)CVBS earthS.C. - inEarth--Earth--EarthAudio out (L)Audio out (R)
CVBS in (video)Earth--Earth--Q-Link dataStatus CVBSAudio in (L)Audio earthAudio in (R)
21 19 17 15 13 11
9 7 5 31
2018161412108 6 4 2
AV4 Scart terminal (RGB, VIDEO, S-VIDEO, Q-Link)
AV4 - Pins 15 and 20 are dependent on AV4 S-VHS / VIDEO switching.
Socket EarthCVBS out (video)CVBS earthRed in, S.C. - inRed earthGreen inGreen earthBlue inBlue earthAudio out (L)Audio out (R)
CVBS in (video)EarthStatus RGBEarth--Q-Link dataStatus CVBSAudio in (L)Audio earthAudio in (R)
21 19 17 15 13 11
9 7 5 31
2018161412108 6 4 2
Applicable input signal for Component (Y, PB, PR), HDMI and PC (D-sub 15P) (∗ Mark)
Signal name Horizontal frequency (kHz)
Verticalfrequency (Hz) Component HDMI PC
525 (480) / 60i 15.73 59.94 ∗ ∗525 (480) / 60p 31.47 59.94 ∗ ∗625 (576) / 50i 15.63 50.00 ∗ ∗625 (576) / 50p 31.25 50.00 ∗ ∗750 (720) / 60p 45.00 60.00 ∗ ∗750 (720) / 50p 37.50 50.00 ∗ ∗1,125 (1,080) / 60i 33.75 60.00 ∗ ∗1,125 (1,080) / 50i 28.13 50.00 ∗ ∗640 × 400 @70 Hz 31.46 70.07 ∗640 × 480 @60 Hz 31.47 59.94 ∗640 × 480 @75 Hz 37.50 75.00 ∗800 × 600 @60 Hz 37.88 60.32 ∗800 × 600 @75 Hz 46.88 75.00 ∗800 × 600 @85 Hz 53.67 85.06 ∗1,024 × 768 @60 Hz 48.36 60.00 ∗1,024 × 768 @70 Hz 56.48 70.07 ∗1,024 × 768 @75 Hz 60.02 75.03 ∗1,024 × 768 @85 Hz 68.68 85.00 ∗1,280 × 1,024 @60 Hz 63.98 60.02 ∗Macintosh13” (640 × 480) 35.00 66.67 ∗Macintosh16” (832 × 624) 49.72 74.54 ∗Macintosh21” (1,152 × 870) 68.68 75.06 ∗
Note: Signals other than above may not be displayed properly.
Scart and S-video terminal information

59
Specifi cations
TH-37PV500B TH-42PV500B TH-50PV500BPower Source AC 220-240 V, 50 / 60 HzPower Consumption Average use : 290 W
Standby condition : 0.3 W (Without DVB recording)16 W (With DVB recording)
Average use : 350 WStandby condition : 0.3 W (Without DVB recording)16 W (With DVB recording)
Average use : 470 WStandby condition : 0.3 W (Without DVB recording)16 W (With DVB recording)
Plasma Display panelDrive method AC typeAspect Ratio 16:9Contrast Ratio 3000:1Visible screen size(No.of pixels)
94 cmV 106 cmV 127 cmV818 mm (W) × 461 mm (H) × 939 mm (diagonal)
920 mm (W) × 518 mm (H) × 1,056 mm (diagonal)
1,106 mm (W) × 622 mm (H) × 1,269 mm (diagonal)
737,280 (1,024 (W) × 720 (H)) [3,072 × 720 dots]
786,432 (1,024 (W) × 768 (H)) [3,072 × 768 dots]
1,049,088 (1,366 (W) × 768 (H)) [4,098 × 768 dots]
SoundSpeaker Woofer (φ 80 mm) × 2 pcs, Tweeter (16 mm × 73 mm) × 4 pcsAudio Output 26 W (13 W + 13 W ), 10% THDHeadphones M3 (3.5 mm) Jack × 1
PC signals VGA, SVGA, XGASXGA ······ (compressed)
Horizontal scanning frequency 31 - 69 kHz
Vertical scanning frequency59 - 86 Hz
XGA displayVGA, SVGA, XGA
SXGA ······ (compressed)Horizontal scanning frequency 31 - 69 kHz
Vertical scanning frequency 59 - 86 Hz
Receiving Systems /Band name
PAL I UHF E21-68.PAL 525/60 Playback of NTSC tape from some PAL Video recorders (VCR) or
NTSC disc playback from DVD player and recorder.DVB Digital terrestrial services via UHF aerial input.M.NTSC Playback from M.NTSC Video recorders (VCR).NTSC (AV input only) Playback from NTSC Video recorders (VCR).
Aerial - Rear UHFOperating Conditions Temperature : 0 °C - 40 °C
Humidity : 20 % - 80 % RH (non-condensing)Connection Terminals
AV1 (Scart connecter) 21 Pin terminal (Audio/Video in, Audio/Video out, RGB in)AV2 (Scart connecter) 21 Pin terminal (Audio/Video in, Audio/Video out, S-Video in, Q-Link)AV3 VIDEO RCA PIN Type × 1 1.0 Vp-p (75 Ω)
S-VIDEO Mini DIN 4-pin Y:1.0 Vp-p (75 Ω) C:0.286 Vp-p (75 Ω)AUDIO L - R RCA PIN Type × 2 0.5 Vrms
AV4 (Scart connecter) 21 Pin terminal (Audio/Video in, Audio/Video out, RGB in, S-Video in, Q-Link)Others COMPONENT Y 1.0 Vp-p (including synchronization)
PB, PR ±0.35 Vp-pHDMI TYPE A ConnectorPC HIGH-DENSITY D-SUB 15PIN R,G,B/0.7 Vp-p (75 Ω)
HD, VD/TTL Level 2.0 - 5.0 Vp-p (high impedance)AUDIO L - R RCA PIN Type × 2 0.5 VrmsCard slot SD CARD slot × 1, PC CARD slot × 1
Output AUDIO L - R RCA PIN Type × 2 0.5 Vrms (high impedance)Dimensions ( W × H × D ) 1,038 mm × 670 mm × 138 mm 1,138 mm × 730 mm × 138 mm 1,327 mm × 843 mm × 138 mmWeight 35.0 kg Net 40.0 kg Net 52.0 kg Net
Notes:• Design and Specifi cations are subject to change without notice. Weight and Dimensions shown are approximate.• This equipment complies with the EMC standards listed below. EN55013, EN61000-3-2, EN61000-3-3, EN55020, EN55022, EN55024.
Trademark Credits• DVB is a trademark of the DVB Digital Video Broadcasting Project (1991 to 1996).• VGA is a trademark of International Business Machines Corporation.• Macintosh is a registered trademark of Apple Computer, USA.• S-VGA is a registered trademark of the Video Electronics Standard Association. Even if no special notation has been made of company or product trademarks, these trademarks have been fully respected.• SD Logo is a trademark.• HDMI, the HDMI Logo and High-Defi nition Multimedia Interface are trademarks or registered trademarks of HDMI Licensing
LLC.

Customer’s RecordThe model number and serial number of this product can be found on its rear panel. You should note this serial number in the space provided below and retain this book, plus your purchase receipt, as a permanent record of your purchase to aid in identifi cation in the event of theft or loss, and for Warranty Service purposes.
Model Number Serial Number
Printed in Czech Republic
Panasonic (U. K.) Ltd.Willoughby Road, Bracknell, Berks RG12 8FPWeb Site : http://www.panasonic.co.uk 2005 Matsushita Electric Industrial Co., Ltd. All Rights Reserved.
Sales and Support Information
Customer Care Centre• For customers within the UK : 08705 357357• For customers within the Republic of Ireland: 01 289 8333• Visit our website for product information www.panasonic.co.uk
• E-mail: [email protected]
Direct Sales at Panasonic UK• Order accessory and consumable items for your product with
ease and confidence by phoning our Customer Care Centre Monday – Thursday 9:00am – 5:30pm,
Friday 9:30am – 5:30pm (Excluding public holidays).• Or go on line through our Internet Accessory ordering
application at www.panasonic.co.uk.• Most major credit and debit cards accepted.• All enquiries transactions and distribution facilities are provided
directly by Panasonic UK Ltd.• It couldn’t be simpler!• Also available through our Internet is direct shopping for a wide
range of finished products, take a browse on our website for further details.
Exclusive to Plasma / DVD Ram / LCD Television / LCD Projector product:
Interested in purchasing an extended guarantee? Please contact your dealer or our Customer Support Department on 01344 476540 or [email protected] for more details.
This product incorporates copyright protection technology that is protected by U.S. patents and other intellectual property rights. Use of this copyright protection technology must be authorized by Macrovision Corporation, and is intended for home and other limited viewing uses only unless otherwise authorized by Macrovision Corporation. Reverse engineering or disassembly is prohibited.U. S. patent No. 4,907,093.
Information on Disposal for Users of Waste Electrical & Electronic Equipment (private households)
For business users in the European UnionIf you wish to discard electrical and electronic equipment, please contact your dealer or supplier for further information.
Information on Disposal in other Countries outside the European UnionThis symbol is only valid in the European Union.If you wish to discard this product, please contact your local authorities or dealer and ask for the correct method of disposal.
This symbol on the products and/or accompanying documents means that used electrical and electronic products should not be mixed with general household waste.For proper treatment, recovery and recycling, please take these products to designated collection points, where they will be accepted on a free of charge basis. Alternatively, in some countries you may be able to return your products to your local retailer upon the purchase of an equivalent new product. Disposing of this product correctly will help to save valuable resources and prevent any potential negative effects on human health and the environment which could otherwise arise from inappropriate waste handling. Please contact your local authority for further details of your nearest designated collection point. Penalties may be applicable for incorrect disposal of this waste, in accordance with national legislation.