icraftsman°i - sears parts direct · • parts list • espar_ol, p. 25 warning: ... • check for...
TRANSCRIPT

Operator's Manual
I CRAFTSMAN°I2.6 cu.in./42cc 2-CycleGASOLINE CHAIN SAW
Model No.
358,350821 - 18 in, Bar
• Safety
• Assembly
• Operation• Maintenance
• Parts List
• Espar_ol, p. 25
WARNING:Read and follow all Safety Rules and OperatingInstructions before first use of this product.
For answers to your questions about this product:Call 7 am-7 pm, Mon-Sat; Sun, 10 am-7 pm
1-800-235-5878 (Hours listed are Central Time)
Sears, Roebuck and Co., Hoffman Estates, IL 60179 U.S.A.
545133483 11/30/06

Warranty 2 Storage 18Safety Rules 2 Troubleshooting Table 19Assembly 6 Emissions Statement 21Operation 7 Parts List 23Maintenance 14 Spanish 25Service and Adjustments 17 Parts & Ordering Back Cover
ONE YEAR FULL WARRANTY ON CRAFTSMAN ® GAS CHAIN SAW
When used and maintained according to the operator's manual, if this product failsdue to a defect in material or workmanship within one year from the date of pur-chase, return it to any Sears store, Sears Service Center, or other Craftsman outlet inthe United States for free repair (or replacement if repair proves impossible).This warranty excludes the bar, chain, spark plug and air filter, which are expend-able parts that can wear out from normal use in less than one year.This warranty applies for only 30 days from purchase date if this product is usedfor commercial or rental purposes.This warranty gives you specific legal rights, and you may also have other rightswhich vary from state to state.Sears, Roebuck and Co., Hoffman Estates, IL 60179
A
WARNING: Always disconnectspark plug wire when making repairs ex-cept for carburetor adjustments. Be-cause a chain saw is a high-speedwood-cutting tool, special precautionsmust be observed to reduce the risk of
accidents. Careless or improper use ofthis tool can cause serious injury.PLAN AHEAD• Restrict the use of your saw to adult
users who understand and can fol-low safety rules, precautions, andoperating instructions found in thismanual.
Hearing / Safety Hat
Protection .,_" j-__. :./Eye_'_IIw'°ll_ Protection
SnugFitting Heavy DutyClothing Gloves
Safety Safety ChapsShoes
• Wear protective gear. Always usesteel-toed safety footwear with non-slipsoles; snug-fitting clothing; heavy-duty,non-slip gloves; eye protection suchas non-fogging, vented goggles orface screen; an approved safety hardhat; and sound barriers (ear plugs ormufflers) to protect your hearing. Reg-ular users should have hearingchecked regularly as chain saw noisecan damage hearing.
• Secure hair above shoulder length. Donot wear loose clothing or jewelry; theycan get caught in moving parts.
• Keep all parts of your body away fromthe chain when the engine is running.
• Keep children, bystanders, and ani-mals a minimum of 30 feet (10 me-ters) away from the work area whenstarting and using the saw.
• Do not handle or operate a chain sawwhen you are fatigued, ill, or upset, orif you have taken alcohol, drugs, ormedication. You must be in goodphysical condition and mentally alert. Ifyou have any condition that might beaggravated by strenuous work, checkwith doctor before operating.
• Do not start cutting until you have aclear work area, secure footing, and,if you are felling trees, a planned re-treat path.
2

OPERATE YOUR SAW SAFELY• Do not operate a chain saw with one
hand. Serious injury to the operator,helpers, bystanders or any combina-tion of these persons may result fromone-handed operation. A chain sawis intended for two-handed use.
• Operate the chain saw only in a well-ventilated outdoor area.
• Do not operate saw from a ladder orin a tree.
• Make sure the chain will not makecontact with any object while startingthe engine. Never try to start the sawwhen the guide bar is in a cut.
• Do not put pressure on the saw atthe end of the cut. Applying pressurecan cause you to lose control whenthe cut is completed.
• Stop engine before setting saw down.• Hand carry saw only when engine is
stopped. Carry with muffler awayfrom body; guide bar & chain project-ing behind you; guide bar preferablycovered with a scabbard.
• Do not operate a chain saw that isdamaged, improperly adjusted, ornot completely and securely as-sembled. Always replace bar, chain,hand guard, or chain brake immedi-ately if it becomes damaged, brokenor is otherwise removed.
MAINTAIN YOUR SAW IN GOODWORKING ORDER
,i_WARNING: Disconnect the
spark plug before performing mainte-nance except carburetor adjustments.• Have all chain saw service performed
by a qualified service dealer with theexception of the items listed in theMAINTENANCE section of this manual.
• Make certain the saw chain stopsmoving when the throttle trigger isreleased. For correction, refer toCARBURETOR ADJUSTMENT.
• Keep the handles dry, clean, andfree from oil or fuel mixture.
• Keep caps and fasteners securelytightened.
• Nonconforming replacement compo-nents or the removal of safety devicesmay cause damage to the unit andpossible injury to the operator or by-standers. Use only Craftsman acces-sories and replacement parts as rec-ommended. Never modify your saw.
• Maintain chain saw with care.• Keep unit sharp and clean for better
and safer performance.
• Follow instructions for lubricating andchanging accessories.
• Check for damaged parts. Before fur-ther use of the chain saw, a guard orother part that is damaged should becarefully checked to determine that itwill operate properly and perform itsintended function. Check for alignmentof moving parts, binding of movingparts, breakage of parts, mounting andany other conditions that may affect itsoperation. A guard or other part that isdamaged should be properly repairedor replaced by a Sears Service Centerunless otherwise indicated elsewherein the operator's manual.
• When not in use, chain saws shouldbe stored in a dry, high or locked-upplace out of the reach of children.
• When storing saw, use a scabbard orcarrying case.
HANDLE FUEL WITH CAUTION• Do not smoke while handling fuel or
while operating the saw.• Eliminate all sources of sparks or
flame in the areas where fuel ismixed or poured.
• Mix and pour fuel in an outdoor areaand use an approved, marked con-tainer for all fuel purposes. Wipe upall fuel spills before starting saw.
• Move at least 10 feet (3 meters) fromfueling site before starting engine.
• Turn the engine off and let saw coolin a non-combustible area, not ondry leaves, straw, paper, etc. Slowlyremove fuel cap and refuel unit.
• Empty the fuel tank before storing ortransporting the unit. Use up fuel left inthe carburetor by starting the engineand letting it run until it stops.
• Store the unit and fuel in an areawhere fuel vapors cannot reachsparks or open flames from waterheaters, electric motors or switches,furnaces, etc.
GUARD AGAINST KICKBACKFollow all safety rules to help avoidkickback and other forces which can
result in serious injury.
'_t_ J_;: Kickback Path

_WARNING:Avoidkickbackwhichcanresultinseriousinjury.Kickbackisthebackward,upwardorsuddenforwardmotionoftheguidebaroccurringwhenthesawchainneartheuppertipoftheguidebarcontactsanyobjectsuchasalogorbranch,orwhenthewoodclosesinandpinchesthesawchaininthecut.Contactingaforeignobjectinthewoodcanalsore-sultinlossofchainsawcontrol.• RotationalKickbackcanoccur
whenthemovingchaincontactsanobjectattheuppertipoftheguidebar.Thiscontactcancausethechaintodigintotheobject,whichstopsthechainforaninstant.Theresultisalightningfast,reversereactionwhichkickstheguidebarupandbacktowardtheoperator.
• Pinch-Kickbackcanoccurwhenthethewoodclosesinandpinchesthemovingsawchaininthecutalongthetopoftheguidebarandthesawchainissuddenlystopped.Thissud-denstoppingofthechainresultsinareversalofthechainforceusedtocutwoodandcausesthesawtomoveintheoppositedirectionofthechainrotation.Thesawisdrivenstraightbacktowardtheoperator.
• Pull4ncanoccurwhenthemovingchaincontactsaforeignobjectinthewoodinthecutalongthebottomoftheguidebarandthesawchainissuddenlystopped.Thissuddenstop-pingpullsthesawforwardandawayfromtheoperatorandcouldeasilycausetheoperatortolosecontrolofthesaw.
REDUCETHECHANCEOFKICKBACK• Recognizethatkickbackcanhap-
pen.Withabasicunderstandingofkickback,youcanreducetheele-mentofsurprisewhichcontributestoaccidents.
• Neverletthemovingchaincontactanyobjectatthetipoftheguidebar.
• Keeptheworkingareafreefromob-structionssuchasothertrees,branches,rocks,fences,stumps,etc.Eliminateoravoidanyobstructionthatyoursawchaincouldhitwhileyouarecutting.
• Whencuttingabranch,donotlettheguidebarcontactbranchorotherob-jectsaroundit.
• Keepsawchainsharpandproperlytensioned.Alooseordullchaincanincreasethechanceofkickback.Fol-lowmanufacturer'schainsharpeningandmaintenanceinstructions.Checktensionatregularintervals,butneverwiththeenginerunning.Makesurethebarnutsaresecurelytightened.
• Beginandcontinuecuttingatfullspeed.Ifthechainismovingataslowerspeed,thereisgreaterchanceofkickbackoccurring.
• Useextremecautionwhenre-enter-ingapreviouscut.
• Donotattemptcutsstartingwiththetipofthebar(plungecuts).
• Watchforshiftinglogsorotherforcesthatcouldcloseacutandpinchorfallintochain.
• UsetheReduced-KickbackGuideBarandLow-KickbackChainspeci-fiedforyoursaw.
Avoid Pinch-Kickback:• Be extremely aware of situations or
obstructions that can cause materialto pinch the top of or otherwise stopthe chain.
• Do not cut more than one log at atime.
• Do not twist the saw as the bar iswithdrawn from an undercut whenbucking.
Avoid Pull-In:• Always begin cutting with the engine
at full speed and the saw housingagainst wood.
• Use wedges made of plastic or wood.Never use metal to hold the cut open.
MAINTAIN CONTROLStand to the _eftof the saw
Thumb on \[underside ,_
Elbowlocked
Never reverse hand positions
• A good, firm grip on the saw with bothhands will help you maintain control.Don't let go. Grip the rear handle withyour right hand whether you are rightor left handed. Wrap the fingers ofyour left hand over and around thefront handlebar, and your left thumbunder the front handlebar. Keep yourleft arm straight with the elbow locked.

• Positionyourlefthandonthefronthandlebarsoitisinastraightlinewithyourrighthandontherearhandlewhenmakingbuckingcuts.Neverreverserightandlefthandpositionsforanytypeofcutting.
• Standwithyourweightevenlybal-ancedonbothfeet.
• Donotoverreach.Youcouldbedrawnorthrownoffbalanceandlosecontrolofthesaw.
• Donotcutaboveshoulderheight.Itisdifficulttomaintaincontrolofsawaboveshoulderheight.
KICKBACKSAFETY FEATURES
_, WARNING: Tile following fea-
tures are included on your saw to helpreduce the hazard of kickback; however,such features will not totally eliminatethis danger. Do not rely only on safetydevices. Follow all safety rules to helpavoid kickback and other forces which
can result in serious injury.• Front Hand Guard, designed to reduce
the chance of your left hand contact-ing the chain if your hand slips off thefront handlebar.
• Position of front and rear handlebars,designed with distance between han-dles and "in-line" with each other. Thespread and "in-line" position of thehands provided by this design worktogether to give balance and resis-tance in controlling the pivot of thesaw back toward the operator if kick-back occurs.
• Reduced-Kickback Guide Bar, de-signed with a small radius tip whichreduces the size of the kickbackdanger zone on the bar tip. This typeof bar has been demonstrated to sig-nificantly reduce the number and se-riousness of kickbacks when testedin accordance with ANSI B175.1.
_.f,, Small Radius
Tip Guide Bar
Large Radius [_ "_Tip Guide Bar
• Low-Kickback Chain, has met kick-back performance requirementswhen tested on a representativesample of chain saws below 3.8 cu-bic inch displacement specified inANS! B175.1.
Low-Kickback ChainContoured Depth Gauge
_.,,_ longated Guard Link
deflects kickbackforce And allows
wood to graduallyride into Cutter
CHAIN BRAKE
• Chain Brake, designed to stop tilechain in the event of kickback.
_,WARNING: WE DO NOT REP-
RESENT AND YOU SHOULD NOT AS-SUME THAT THE CHAIN BRAKE WILLPROTECT YOU IN THE EVENT OF A KICK-BACK. Kickback is a lightning fast actionwhich throws the bar and rotating chainback and up toward the operator. Kick-back can be caused by allowing contactof the bar tip in the danger zone withany hard object. Kickback can also becaused by pinching the saw chain alongthe top of the guide bar. This action maypush the guide bar rapidly back towardthe operator. Either of these events maycause you to lose control of the sawwhich could result in serious injury oreven death. DO NOT RELY UPON ANY OFTHE DEVICES BUILT INTO YOUR SAW.YOU SHOULD USE THE SAW PROPERLYAND CAREFULLY TO AVOID KICKBACK.Reduced-kickback guide bars and low-kickback saw chains reduce the chance
and magnitude of kickback and are rec-ommended. Your saw has a low kick-back chain and bar as original equip-ment. Repairs on a chain brake shouldbe made by an authorized Sears Ser-vice Center. Take your unit to the placeof purchase if purchased from a servic-ing dealer, or to your nearest Sears Ser-vice Center
• Tip contact in some cases may causea lightning fast reverse REACTION,kicking guide bar up and back towardoperator.
• Pinching the saw chain along the topof the guide bar may push the guidebar rapidly back toward the operator.
• Either of these reactions may causeyou to lose control of the saw whichcould result in serious injury. Do notrely exclusively upon devices built intoyour saw.

Thisunitisnotequippedwithananti-vibrationsystemandisintendedforoccasionaluseonly.SAFETYNOTICE:Exposuretovibra-tionsthroughprolongeduseofgasolinepoweredhandtoolscouldcausebloodvesselornervedamageinthefingers,hands,andjointsofpeoplepronetocirculationdisordersorabnormalswell-ings.Prolongeduseincoldweatherhasbeenlinkedtobloodvesseldamageinotherwisehealthypeople.Ifsymptomsoccursuchasnumbness,pain,lossofstrength,changeinskincolorortexture,orlossoffeelinginthefingers,hands,orjoints,discontinuetheuseofthistoolandseekmedicalattention.Ananti-vi-brationsystemdoesnotguaranteetheavoidanceoftheseproblems.Userswhooperatepowertoolsonacontinualandregularbasismustmonitorcloselytheirphysicalconditionandtheconditionofthistool.CHAINBRAKE:Ifthissawistobeusedforcommerciallogging,achainbrakeisrequiredandshallnotbere-movedorotherwisedisabledtocom-plywithFederalOSHARegulationsforCommercialLogging.
SPARKARRESTINGSCREEN:YoursawisequippedwithatemperaturelimitingmufflerandsparkarrestingscreenwhichmeetstherequirementsofCaliforniaCodes4442and4443.AllU.S.forestlandandthestatesofCalifornia,Idaho,Maine,Minnesota,NewJersey,Oregon,andWashingtonrequirebylawthatmanyinternalcom-bustionenginestobeequippedwithasparkarrestingscreen.Ifyouoperateachainsawinastateorlocalewheresuchregulationsexist,youarelegallyresponsibleformaintainingtheoperat-ingconditionoftheseparts.Failuretodosoisaviolationofthelaw.RefertotheCustomerResponsibilitieschartintheMAINTENANCEsection.STANDARDS:ThischainsawislistedbyUnderwritersLaboratories,Inc.inac-cordancewithAmericanNationalStan-dardsforGasoline-PoweredChainSawsSafetyRequirements(ANSIB175.1-2000).
,t%all.WARNING: Before using chainsaw, ensure all fasteners are secure.CARTON CONTENTSCheck carton contents against the fol-lowing list.Model 358.350821
• Chain saw (fully assembled)• Chain adjustment tool (bar tool)• 2-cycle engine oil• Carrying case
Examine parts for damage. Do not usedamaged parts.
If you need assistance or find that partsare missing or damaged, please call1-800-235-5878.
NOTE: It is normal to hear the fuel filterrattle in an empty fuel tank.Your unit has been factory tested andthe carburetor precisely adjusted. As aresult you may smell gasoline or find adrop of oil/fuel residue on the mufflerwhen you unpack the unit.
ASSEMBLYYour saw is fully assembled; noassembly is necessary.

Chain
Adjustment Tool(Bar Tool)
Front Hand Guard
KNOW YOUR CHAIN SAWREAD THIS operator's manual AND SAFETY RULES BEFORE OPERATING YOUR CHAINSAW. Compare the illustrations with your unit to familiarize yourself with the loca-tion of the various controls and adjustments. Save this manual for future refer-ence.
Front Handle
_ Starter Rope
Chain Muffler
ON/STOPSwitch Choke/
FastldleLever
BarSprocketHole
ThrottleLockout
RearHandle
Bar Oil Fill Cap
Cylinder Cover
Starter Housing Primer BulbFuel Mix Fill Cap
Chain
ChainDirectionof Travel
ThrottleTrigger Clutch Cover Bar Nuts
ON/STOP SWITCHThe ON/STOP SWITCH is used to stopthe engine.THROTTLE TRIGGERThe THROTI-LE TRIGGER controls en-gine speed.THROTTLE LOCK-OUTThe THROTI-LE LOCK-OUT must bepressed before you can squeeze thethrottle trigger. This feature prevents youfrom accidentally squeezing the trigger.CHOKE/FAST IDLE LEVERThe choke and fast idle are set by pull-ing the CHOKE/FAST IDLE LEVER out tothe full extent for cold starting or afterrefueling. The choke provides additionalfuel to the engine during cold starting.PRIMER BULBThe PRIMER BULB circulates fuel to thecarburetor to provide quicker starting.
Guide Bar
Catcher
CHAIN BRAKE
The CHAIN BRAKE is a device designedto stop the chain if kickback occurs. Thechain brake activates automatically inthe event of kickback. The chain brakeactivates manually if the front handguard is pushed forward. The chainbrake is disengaged by pulling the fronthand guard back toward the front handleas far as possible.CHAIN TENSIONIt is normal for a new chain to stretch
during the first 15 minutes of operation.You should check your chain tensionfrequently. See CHAIN TENSION underthe MAINTENANCE section.
,_WARNING: Muffler is very hotduring and after use. Do not touch themuffler or allow combustible materialsuch as dry grass or fuel to do so.
7

BEFORE STARTING ENGINE
_'WARNING: Be sure to read the
fuel handling information in the safetyrules section of this manual before youbegin. If you do not understand thefuel handling information do not at-tempt to fuel your unit. Seek help fromsomeone that does understand the in-formation or call the customer assis-
tance help line at 1-800-235-5878.GUIDE BAR AND CHAIN OILThe bar and chain require lubrication.The chain oiler provides continuouslubrication to the chain and guide bar.Be sure to fill the bar oil tank when youfill the fuel tank (Capacity = 6.8 ft. oz.).Lack of oil will quickly ruin the bar andchain. Too little oil will cause overheat-
ing shown by smoke coming from thechain and/or discoloration of the bar.For maximum guide bar and chain life,we recommend you use Craftsmanchain saw bar oil. If Craftsman bar oilis not available, you may use a goodgrade SAE 30 oil until you are able toobtain Craftsman brand. The oil outputis automatically metered during opera-tion. Your saw will use approximatelyone tank of bar oil for every tank of fuelmix. Always fill the bar oil tank whenyou fill the fuel tank.
FUELING ENGINE
_WARNING: Remove fuel cap
slowly when refueling.This engine is certified to operate onunleaded gasoline. Before operation,gasoline must be mixed with a goodquality synthetic 2-cycle air-cooled en-gine oil. We recommend Craftsmanbrand synthetic oil. Mix gasoline andoil at a ratio of 40:1. A 40:1 ratio is ob-tained by mixing 3.2 ounces of oil with1 gallon of unleaded gasoline. Includedwith this saw is a 3.2 ounce container ofoil. Pour the entire contents of this con-
tainer into 1 gallon of gasoline toachieve the proper fuel mixture.DO NOT USE automotive or boat oil.These oils will cause engine damage.When mixing fuel follow the instruc-tions printed on the oil container. Onceoil is added to the gasoline, shakecontainer momentarily to assure thatthe fuel is thoroughly mixed. Alwaysread and follow the safety rules relat-ing to fuel before fueling your unit.
IMPORTANTExperience indicates that alcohol-blended fuels (called gasohol or usingethanol or methanol) can attract mois-ture which leads to separation andformation of acids during storage. Acidicgas can damage the fuel system of anengine while in storage. To avoid engineproblems, the fuel system should beemptied before storage for 30 days orlonger. Drain the gas tank, start the en-gine and let it run until the fuel lines andcarburetor are empty. Use fresh fuelnext season. Never use engine or car-buretor cleaner products in the fuel tankor permanent damage may occur.See the STORAGE section for additionalinformation
CHAIN BRAKEEnsure chain brake is disengaged bypulling the front hand guard back towardthe front handle as far as possible. Thechain brake must be disengaged beforecutting with the saw.
_IWARNING: The chain must not
move when the engine runs at idlespeed. If the chain moves at idlespeed refer to CARBURETOR ADJUST-MENT within this manual. Avoid contactwith the muffler. A hot muffler cancause serious burns.STOPPING YOUR ENGINE• Release tile throttle trigger.• Move ON/STOP switch to the STOP
position.STARTING POSITION• To start the engine, bold tile saw
firmly on the ground as illustrated.Make sure the chain is free to turnwithout contacting any object.
Starter Rope Handle
Left Handon FrontHandle
Right Foot Through Rear HandleIMPORTANT POINTS TO REMEMBERWhen pulling the starter rope, do notuse the full extent of the rope as thiscan cause the rope to break. Do not letstarter rope snap back. Hold the han-dle and let the rope rewind slowly.

Forcoldweatherstarting,starttheunitatFULLCHOKE;allowtheenginetowarmupbeforesqueezingthethrottletrigger.NOTE:Donotattempttocutmaterialwiththechoke/fastidleleverintheFULLCHOKEposition.STARTING A COLD ENGINE (or warmengine after running out of fuel)NOTE: In the following steps, when thechoke/fast idle lever is pulled out to thefull extent, the correct throttle setting forstarting is set automatically.
IGNITIONSWITCH
ON
STOP
\\ Lever
1. Move ON/STOP switch to the ONposition.
2. Pull choke/fast idle lever out to thefull extent (to the FULL CHOKE posi-tion).
3. Slowly press primer bulb 6 times.4. Pull the starter rope sharply 5 times
with your right hand. Then, pro-ceed to the next step.
NOTE: If the engine sounds as if it is try-ing to start before the 5th pull, stop pull-ing and immediately proceed to the nextstep.5. Push the choke/fast idle lever in to
the HALF CHOKE position.CHOKE/FAST IDLE LEVER
OFFHALF
FULL
6. Pull the starter rope sharply withyour right hand until the enginestarts.
7. Allow the engine to run for approxi-mately 30 seconds. Then, squeezeand release the throttle trigger toallow engine to return to idlespeed.
STARTING A WARM ENGINE1. Move ON/STOP switch to the ON
position.2. Pull the choke/fast idle lever out to
the FULL CHOKE position to set thefast idle, then push the lever in tothe HALF CHOKE position.
3. Slowly press primer bulb 6 times.4. Pull the starter rope sharply with
your right hand until the enginestarts.
5. Squeeze and release throttle triggerto allow engine to return to idlespeed.
DIFFICULT STARTING (or starting aflooded engine)The engine may be flooded with toomuch fuel if it has not started after 10pulls.Flooded engines can be cleared of ex-cess fuel by pushing the choke/fastidle lever in completely (to the OFFCHOKE position) and then following thewarm engine starting procedure listedabove. Ensure the ON/STOP switch isin the ON position.Starting could require pulling the start-er rope handle many times dependingon how badly the unit is flooded. If en-gine fails to start, refer to the TROU-BLESHOOTING TABLE or call1-800-235-5878.
CHAIN BRAKE
_,WARNING: If the brake band is
worn too thin it may break when thechain brake is triggered. With a brokenbrake band, the chain brake will notstop the chain. The chain brake mustbe replaced if any part is worn to lessthan 0.020" (0.5 mm) thick. Repairs ona chain brake should be made by yourSears Service Center. Take your unitto the place of purchase or to the near-est Sears Service Center.
• This saw is equipped with a chainbrake. The brake is designed to stopthe chain if kickback occurs.
• The inertia-activated chain brake isactivated if the front hand guard ispushed forward, either manually (byhand) or automatically (by suddenmovement).
• If the brake is already activated, it isdisengaged by pulling the front handguard back toward the front handleas far as possible.
• When cutting with the saw, the chainbrake must be disengaged.
9

Braking function controlCAUTION: The chain brake must be
checked several times daily. The en-gine must be running when performingthis procedure. This is the onlyinstance when the saw should beplaced on the ground with the enginerunning.Place the saw on firm ground. Grip therear handle with your right hand andthe front handle with your left hand.Apply full throttle by fully depressingthe throttle trigger. Activate the chainbrake by turning your left wrist againstthe hand guard without releasing yourgrip around the front handle. The chainshould stop immediately.
Inertia activating function control
_I_WARNING: When performingthe following procedure, the enginemust be turned off.
Grip the rear handle with your right handand the front handle with your left hand.Hold the chain saw approximately 14inches (35 cm) above a stump or otherwooden surface. Release your grip onthe front handle and use the weight ofthe saw to let the tip of the guide bar fallforward and contact the stump. Whenthe tip of the bar hits the stump, thebrake should activate.OPERATING TIPS• Check chain tension before first use
and after 1 minute of operation. SeeCHAIN TENSION in the MAINTENANCEsection.
• Cut wood only. Do not cut metal, plas-tics, masonry, non-wood building ma-terials, etc.
• Stop the saw if the chain strikes aforeign object. Inspect the saw andrepair or replace parts as necessary.
• Keep the chain out of dirt and sand.Even a small amount of dirt will quicklydull a chain and thus increase the
possibility of kickback.• Practice cutting a few small logs us-
ing the following techniques to getthe "feel" of using your saw beforeyou begin a major sawing operation.
• Squeeze the throttle trigger and allowthe engine to reach full speed beforecutting.
• Begin cutting with the saw frameagainst the log.
• Keep the engine at full speed theentire time you are cutting.
• Allow the chain to cut for you. Exertonly light downward pressure. Ifyou force the cut, damage to thebar, chain, or engine can result.
• Release the throttle trigger as soonas the cut is completed, allowingthe engine to idle. Ifyou run the sawat full throttle without a cutting load,unnecessary wear can occur to thechain, bar, and engine. To maxi-mize operating efficiency, do notrun the engine for longer than 30seconds at a time at full throttle.
• To avoid losing control when cut iscomplete, do not put pressure onsaw at end of cut.
• Stop the engine before setting thesaw down after cutting.
TREE FELLING TECHNIQUES
_ILWARNING: Check for broken ordead branches which can fall while cut-ting causing serious injury. Do not cutnear buildings or electrical wires if youdo not know the direction of tree fall, norcut at night since you will not be ale tosee well, nor during bad weather suchas rain, snow, or strong winds, etc. Ifthe tree makes contact with any utilityline, the utility company should be noti-fied immediately.• Carefully plan your sawing operation
in advance.• Clear the work area. You need a clear
area all around the tree so you canhave secure footing.
• The chain saw operator should keepon the uphill side of the terrain as thetree is likely to roll or slide downhillafter it is felled.
• Study the natural conditions that cancause the tree to fall in a particular di-rection.
Natural conditions that can cause a treeto fall in a particular direction include:• The wind direction and speed.• The lean of the tree. The lean of a
tree might not be apparent due to un-even or sloping terrain. Use a plumbor level to determine the direction oftree lean.
• Weight and branches on one side.• Surrounding trees and obstacles.
lO

Look for decay and rot. If the trunk isrotted, it can snap and fall toward theoperator. Check for broken or deadbranches which can fall on you whilecutting. Make sure there is enoughroom for the tree to fall. Maintain a dis-
tance of 2-1/2tree lengths from the near-est person or other objects. Enginenoise can drown out a warning call.Remove dirt, stones, loose bark, nails,staples, and wire from the tree wherecuts are to be made.
Plan a clear retreat path to the rearand diagonal to the line of fall.
? Plan a clear retreat path
(}--_'- Direction of Fall-t45 ° / ._.",.//o_
b¢,"_.€¢"FELLING LARGE TREES(6 h_ches(15 cm) h_diameter or larger)The notch method is used to fell largetrees. A notch is cut on the side of thetree in the desired direction of fall. Aftera felling cut is made on the oppositeside of tree, the tree will tend to fall intothe notch.
NOTE: If the tree has large buttressroots, remove them before making thenotch. If using saw to remove buttressroots, keep saw chain from contactingground to prevent dulling of the chain.NOTCH CUT AND FELLING THETREE• Make notch cut by cutting the top of
the notch first. Cut through 1/3 of thediameter of the tree. Next completethe notch by cutting the bottom of thenotch. See illustration. Once thenotch is cut remove the notch ofwood from the tree.
Final (felling) cut here, 2 inches(5 era) above center of notch.
First out } ,z'; I /
I/
• After removing the wood from thenotch, make the felling cut on the op-posite side of the notch. This is doneby making a cut about two inches (5cm) higher than the center of thenotch. This will leave enough uncutwood between the felling cut and thenotch to form a hinge. This hinge willhelp prevent the tree from falling in thewrong direction.
Hinge holds tree on stump and helpscontrol fall
Openingof felling
7Closing ofnotch
NOTE: Before felling cut is complete,use wedges to open the cut if necessaryto control the direction of fall. To avoidkickback and chain damage, use woodor plastic wedges, but never steel or ironwedges.• Be alert to signs that the tree is
ready to fall: cracking sounds, widen-ing of the felling cut, or movement inthe upper branches.
• As tree starts to fall, stop saw, put itdown, and get away quickly on yourplanned retreat path.
• DO NOT cut down a partially fallen treewith your saw. Be extremely cautiouswith partially fallen trees that may bepoorly supported. When a tree doesn'tfall completely, set the saw aside andpull down the tree with a cable winch,block and tackle, or tractor.
CUTTING A FALLEN TREE(BUCKING)Bucking is tile term used for cutting afallen tree to the desired log size.
'd_WARNING: Do not stand on the
log being cut. Any portion can rollcausing loss of footing and control. Donot stand downhill of the log being cut.IMPORTANT POINTS
• Cut only one log at a time.• Cut shattered wood very carefully;
sharp pieces of wood could be flungtoward operator.
• Use a sawhorse to cut small logs.Never allow another person to holdthe log while cutting and never holdthe log with your leg or foot.
11

• Donotcutinanareawherelogs,limbs,androotsaretangledsuchasinablowndownarea.Dragthelogsintoaclearareabeforecuttingbypullingoutexposedandclearedlogsfirst.
TYPES OF CUTTING USED FORBUCKING
WARNING: If saw becomes
pinched or hung in a log, don't try toforce it out. You can lose control of thesaw resulting in injury and/or damageto the saw. Stop the saw, drive awedge of plastic or wood into the cutuntil the saw can be removed easily.Restart the saw and carefully reenterthe cut. To avoid kickback and chaindamage, do not use a metal wedge.Do not attempt to restart your sawwhen it is pinched or hung in a log.
Use a wedge to remove pinched saw
Turn saw OFF and use a plastic orwooden wedge to force cut open.
Overcutting begins on the top side ofthe log with the bottom of the sawagainst the log. When overcutting uselight downward pressure.
,\_ Overcutting J_i._J- /_...... ;_
Undercutt ng '-,:::,
Undercutting involves cutting on theunderside of the log with top of sawagainst the log. When undercuttinguse light upward pressure. Hold sawfirmly and maintain control. The sawwill tend to push back toward you.
,_WARNING: Neverturn saw up-side down to undercut. The saw can-
not be controlled in this position.Always make your first cut on the com-pression side of the log. The compres-sion side of the log is where the pres-sure of the log's weight isconcentrated.
First out on co_._pressionside of log
Second cut
Second cut
First cut on compression side of log
BUCKING WITHOUT A SUPPORT• Overcut through 1/3 of the diameter
of the log.• Roll the log over and finish with a
second overcut.• Watch for logs with a compression
side to prevent the saw from pinch-ing. See illustrations for cutting logswith a compression side.
BUCKING USING A LOG ORSUPPORT STAND• Remember your first cut is always on
the compression side of the log.(Refer to the illustrations below foryour first and second cut)
• Your first cut should extend t/3 of thediameter of the log.
• Finish with your second cut.
Using a log for support
1st Cut
1st Cut
Using a support stand
2 nd Cut k,_
l_,ZC2_ _, 1s_Cut
1st Cut
L
12

LIMBING AND PRUNING
_IWARNING: Be alert for and
guard against kickback. Do not allow themoving chain to contact any otherbranches or objects at the nose of theguide bar when limbing or pruning. Al-lowing such contact can result in seriousinjury.
_WARNING: Never climb into a
tree to limb or prune. Do not stand onladders, platforms, a log, or in any posi-tion which can cause you to lose yourbalance or control of the saw.IMPORTANT POINTS• Work slowly, keeping both hands firmly
gripped on the saw. Maintain securefooting and balance.
• Watch out for springpoles. Springpolesare small size limbs which can catch
the saw chain and whip toward you orpull you off balance. Use extreme cau-tion when cutting small size limbs orslender material.
• Be alert for springback. Watch out forbranches that are bent or underpressure. Avoid being struck by thebranch or the saw when the tensionin the wood fibers is released.
• Keep a clear work area. Frequentlyclear branches out of the way to avoidtripping over them.
LIMBING
• Always limb a tree after it is cutdown. Only then can limbing be donesafely and properly.
• Leave the larger limbs underneath thefelled tree to support the tree as youwork.
• Start at the base of the felled tree andwork toward the top, cutting branchesand limbs. Remove small limbs withone cut.
• Keep the tree between you and thechain. Cut from the side of the treeopposite the branch you are cutting.
• Remove larger, supporting brancheswith the cutting techniques describedin BUCKING WITHOUT A SUPPORT
• Always use an overcut to cut smalland freely hanging limbs. Undercuttingcould cause limbs to fall and pinch thesaw.
PRUNING
_ILWARNING: Limit pruning to limbsshoulder height or below. Do not cut ifbranches are higher than your shoulder.Get a professional to do the job.• Make your first cut 1/3of the way
through the bottom of the limb.• Next make a 2nd cut all the way
through the limb. Then cut a thirdovercut leaving a 1 to 2 inch (2.5 to 5cm) collar from the truck of the tree.
_Thi_r_ic Second cut_" _ "
Collar tit_
"x_l_ _ First cut
/ Pruning technique
13

CUSTOMER RESPONSIBILITIES
_WARNING: Disconnect the spark plug before performing maintenanceexcept for carburetor adjustments=
Fill in dates as you complete Before After Ever Every Serviceregular service Use Use 5 hrs. 25 hrs. Yearly Dates
Check for damaged/worn parts _,
Check for loose fasteners/parts _'
Check chain tension _'
Check chain sharpness _'
Check guide bar _"
Check fuel mixture level _'
Check guide bar and chain oil _"
Inspect and clean unit & decals _"
Check chain brake _'
Clean guide bar groove _"Clean air filter _'
Clean/inspect muffler and sparkarresting screen _'
Replace spark plug and fuel filter _'
GENERAL RECOMMENDATIONSThe warranty on this unit does not cov-er items that have been subjected tooperator abuse or negligence. To re-ceive full value from the warranty, theoperator must maintain unit asinstructed in this manual. Various ad-justments will need to be made period-ically to properly maintain your unit.• Once a year, replace the spark plug,
air filter, and check guide bar andchain for wear. A new spark plug andair filter assures proper air-fuel mixtureand helps your engine run better andlast longer.
CHECK FOR DAMAGED ORWORN PARTSContact your Sears Service Center forreplacement of damaged or worn parts.NOTE: It is normal for a small amount ofoil to appear under the saw after enginestops. Do not confuse this with a leakingoil tank.• ON/STOP Switch - Ensure ON/STOP
switch functions properly by movingthe switch to the STOP position. Makesure engine stops; then restart engineand continue=
• Fuel Tank - Do not use saw if fueltank shows signs of damage or leaks=
• Oil Tank - Do not use saw if oil tankshows signs of damage or leaks.
CHECK FOR LOOSEFASTENERS AND PARTS• Bar Nuts• Chain• Muffler• Cylinder Shield• Air Filter• Handle Screws• Vibration Mounts• Starter Housing• Front Hand Guard
CHECK CHAIN TENSION
_lk WARNING: Wear protectivegloves when handling chain. The chainis sharp and can cut you even when it isnot moving.Chain tension is very important. Chainsstretch during use. This is especially trueduring the first few times you use yoursaw. Always check chain tension eachtime you use and refuel your saw.1. Use the screwdriver end of the
chain adjustment tool (bar tool) tomove chain around guide bar toensure kinks do not exist. Thechain should rotate freely.
14

GuideBar
Chain AdjustmentBar Nuts Tool
Adjusting (Bar Tool)Screw
2. Loosen bar nuts until they arefinger tight against the clutch cover.
3. Turn adjusting screw clockwise un-til chain solidly contacts bottom ofguide bar rail.
4. Using bar tool, roll chain aroundguide bar to ensure all links are inbar groove.
5. Lift up tip of guide bar to check forsag. Release tip of guide bar, thenturn adjusting screw until sag doesnot exist.
6. While lifting tip of guide bar, tightenbar nuts securely with the bar tool.
7. Use the screwdriver end of the bartool to move chain around guidebar.
8. If chain does not rotate, it is tootight. Slightly loosen bar nuts andloosen chain by turning the adjust-ing screw 1/4 turn counterclock-wise. Retighten bar nuts.
9. If chain is too loose, it will sag be-low the guide bar. DO NOT operatethe saw if the chain is loose.
_,WARNING: If the saw is oper-ated with a loose chain, the chaincould jump offthe guide bar and resultin serious injury.
CHECK CHAIN SHARPNESSA sharp chain makes wood chips. Adull chain makes a sawdust powderand cuts slowly. See CHAIN SHARP-ENING.
CHECK GUIDE BARConditions which require guide barmaintenance:
• Saw cuts to one side or at an angle.• Saw has to be forced through the cut.• Inadequate supply of oil to bar/chain.Check the condition of guide bar eachtime chain is sharpened. A worn guidebar will damage the chain and makecutting difficult.After each use, ensure ON/STOPswitch is in the STOP position, thenclean all sawdust from the guide barand sprocket hole.To maintain guide bar:• Move ON/STOP switch to STOP.• Loosen and remove bar nuts and
clutch cover. Remove bar and chainfrom saw.
• Clean the oil holes and bar grooveafter each 5 hours of operation.
Remove Sawdust Prom ._ J_
Guide Bar _ov_
Oil Holes o -_
• Burring of guide bar rails is a normalprocess of rail wear. Remove theseburrs with a flat file.
• When rail top is uneven, use a flatfile to restore square edges andsides.
'_ File Rail Edges_ r] r]and Sides I U I
Square ] ]Worn Groove Correct Groove
Replace guide bar when the groove isworn, the guide bar is bent or cracked,or when excess heating or burring of therails occurs. If replacement is necessary,use only the guide bar specified for yoursaw in the repair parts list or on the de-cal located on the chain saw.
CHECK FUEL MIXTURE LEVEL• See FUELING ENGINE under the OP-
ERATION section.
15

LUBRICATION
Bar Oil
Fill Cap
• See GUIDE BAR AND CHAIN OIL un-der the OPERATION section.
INSPECT AND CLEAN UNIT ANDDECALS• After each use, inspect complete unit
for loose or damaged parts. Clean theunit and decals using a damp clothwith a mild detergent.
• Wipe off unit with a clean dry cloth.CHECK CHAIN BRAKESee CHAIN BRAKE in tile OPERA-TION section.
CLEAN AIR FILTERCAUTION: Do not clean filter in gaso-line or other flammable solvent toavoid creating a fire hazard or produc-ing harmful evaporative emissions.Cleaning the air filter:A dirty air filter decreases the life andperformance of the engine and in-creases fuel consumption and harmfulemissions. Always clean your air filterafter 10 tanks of fuel or 5 hours of op-eration, whichever comes first. Cleanmore frequently in dusty conditions. Aused air filter can never be completelycleaned. It is advisable to replace yourair filter with a new one after every 50hours of operation, or annually, which-ever comes first.
1= Loosen 3 screws on cylinder cover.2. Remove cylinder cover.3. Remove air filter cover and air filter.
4= Clean the air filter using hot soapywater. Rinse with clean cool water.Air dry completely before reinstal-ling.
5= Reinstall air filter and air filter cov-er.
6= Reinstall cylinder cover and 3screws= Tighten securely.
Air FilterCover
CylinderCover
INSPECT MUFFLER AND SPARKARRESTING SCREEN
_bWARNING: The muffler on this
product contains chemicals known tothe State of California to cause cancer.As the unit is used, carbon depositsbuild up on the muffler and spark ar-resting screen, and must be removedto avoid creating a fire hazard or af-fecting engine performance.Replace the spark arresting screen ifbreaks occur.
Spark ExhaustArresting OutIetScreen Cover
NutMuffler
CLEANING THE SPARK ARREST-ING SCREENCleaning is required every 25 hours ofoperation or annually, whichevercomes first.1. Loosen and remove the nut from
the exhaust outlet cover.2. Remove the exhaust oulet cover.
3. Remove spark arresting screen.Handle screen carefully to preventdamage.
4. Clean the spark arresting screengently with a wire brush. Replacescreen if breaks are found.
5. Replace any broken or crackedmuffler parts.
6. Reinstall spark arresting screen, ex-haust outlet cover, and nut. Tightennut securely.
16

REPLACE SPARK PLUGThe spark plug should be replacedeach year to ensure the engine startseasier and runs better. Ignition timingis fixed and nonadjustable.1. Loosen 3 screws on cylinder cover.2. Remove the cylinder cover.3. Pull off the spark plug boot.4. Remove spark plug from cylinder
and discard.5. Replace with Champion RCJ-7Y
spark plug and tighten securelywith a 3/4 inch (19 ram) socketwrench. Spark plug gap should be0.025 inch (0,6 mm).
6. Reinstall the spark plug boot.7. Reinstall the cylinder cover and 3
screws. Tighten securely.
CylinderCover
SparkPlug Boot
SparkPlug
REPLACE FUEL FILTERTo replace fuel filter, drain your unit byrunning it dry of fuel. Remove fuel capand its connected retainer from tank.Pull filter from tank and remove fromline. Replace and reassemble.
,_WARNING: Disconnect the
spark plug before performing mainte-nance, service, or adjustments exceptfor carburetor adjustments.CHAIN SHARPENINGChain sharpening requires specialtools. You can purchase sharpeningtools at Sears or go to a professionalchain sharpener.CHAIN REPLACEMENT
_. WARNING: Wear protectivegloves when handling chain. Thechain is sharp and can cut you evenwhen it is not moving.It is normal for a new chain to stretchduring the first 15 minutes of operation.You should recheck your chain tensionfrequently and adjust the chain tensionas required. See CHAIN TENSION sec-tion.
Replace the old chain when it be-comes worn or damaged. Use only theLow-Kickback replacement chain spe-cified in the repair parts list. The cor-rect replacement bar and chain is alsospecified on a decal located on thechain saw.
See your Sears Service Center to re-place and sharpen individual cutterson your chain.
TO REPLACE CHAIN:1. Move ON/STOP switch to the STOP
position.2. Remove bar nuts.3. Remove clutch cover.
\Bar nuts
\
Chain adjustment tool ,_-_,======_,(Bar Tool) _
4. Turn adjusting screw on bar coun-terclockwise to move the tension-ing rack as far as it will go towardthe front of the bar.
Tensioning Ra_['c'c_ ,_
5. Slide guide bar on bar bolts untilguide bar stops against clutchdrum sprocket.
17

GuidebarBarbolts
--...6. Remove the old chain.
7. Carefully remove the chain from thepackage. Hold chain with the drivelinks as shown.
_ ip of
Bar
DIIREOTION OF ROTATION
Cutters Depth Gauge
Drive Links8. Place chain over and behind clutch
retainer, fitting the drive links in theclutch drum sprocket.
9. Fit bottom of drive links between
the teeth in the sprocket in thenose of the guide bar.
10. Fit chain drive links into bar groove.11. Pull guide bar forward until chain is
snug in guide bar groove. Ensureall drive links are in the bar groove.
12. Install clutch cover.18. Install bar nuts and finger tighten
only. Do not tighten any further atthis point. Proceed to CHAIN AD-JUSTMENT.
CHAIN ADJUSTMENTSee CHAIN TENSION in MAINTENANCEsection.CARBURETOR ADJUSTMENT
_&WARNING: The chain will be
moving during most of this procedure.Wear your protective equipment andobserve all safety precautions. Thechain must not move at idle speed.The carburetor has been carefully setat the factory. Adjustments may benecessary if you notice any of the fol-lowing conditions:• Chain moves at idle. See IDLE
SPEED-T adjusting procedure.• Saw will not idle. See IDLE SPEED-T
adjusting procedure.Idle Speed-TAllow engine to idle. If the chain moves,idle is too fast. If the engine stalls, idle istoo slow. Adjust speed until engine runswithout chain movement (idle too fast) orstalling (idle too slow). The idle speedscrew is located in the area above theprimer bulb and is labeled T.• Turn idle screw (T) clockwise to in-
crease engine speed.• Turn idle screw (T) counterclockwise
to decrease engine speed.If you require further assistance or areunsure about performing this procedure,contact your Sears Service Center orcall our customer assistance help line at1-800-235-5878.
dt_WARNING: Perform the follow-
ing steps after each use:• Allow the engine to cool, and secure
the unit before storing or transporting.• Store chain saw and fuel in a well
ventilated area where fuel vaporscannot reach sparks or open flamesfrom water heaters, electric motors orswitches, furnaces, etc.
• Store chain saw with all guards inplace and position chain saw so thatany sharp object cannot accidentallycause injury.
• Store chain saw well out of the reachof children.
SEASONAL STORAGEPrepare your unit for storage at theend of the season or if it will not beused for 80 days or more.If your chain saw is to be stored for aperiod of time:• Clean saw thoroughly before storage.• Store in a clean dry area.• Lightly oil external metal surfaces
and guide bar.• Oil the chain and wrap it in heavy pa-
per or cloth.18

FUEL SYSTEMEmpty the fuel system before storagefor 30 days or longer. Drain the gastank, start the engine and let it run untilthe fuel lines and carburetor are empty.Use fresh fuel next season.Under FUELING ENGINE in the OPERA-TION section of this manual, see mes-sage labeled IMPORTANT regardingthe use of gasohol in your chain saw.Fuel stabilizer is an acceptable alter-native in minimizing the formation offuel gum deposits during storage. Addstabilizer to the gasoline in the fueltank or fuel storage container.Follow the mix instructions found onstabilizer containers. Run engine atleast 3 minutes after adding stabilizer.Craftsman 40:1,2-cycle engine oil (aircooled) is blended with fuel stabilizer. Ifyou do not use this oil, you can add afuel stabilizer to your fuel tank.
ENGINE• Remove spark plug and pour 1 tea-
spoon of 40:1,2-cycle engine oil (aircooled) through the spark plug open-ing. Slowly pull the starter rope 8 to10 times to distribute oil.
• Replace spark plug with new one ofrecommended type and heat range.
• Clean air filter.• Check entire unit for loose screws,
nuts, and bolts. Replace any dam-aged, broken, or worn parts.
• At the beginning of the next season,use only fresh fuel having the propergasoline to oil ratio.
OTHER• Do not store gasoline from one sea-
son to another.• Replace your gasoline can if it starts
to rust.
TROUBLESHOOTING TABLE
,_ WARNING: Always stop unit and disconnect spark plug before perform-ing all of the recommended remedies below except remedies that requireoperation of the unit.
TROUBLE CAUSE
Engine wilt notstart or will run
only a fewseconds after
starting.
Engine willnot idle
properly.
Engine will notaccelerate,
lacks power.or dies undera load.
1. ON/STOP switch in
STOP position.2. Engine flooded.
3. Fuel tank empty.4. Spark plug not firing.5. Fuel not reaching
carburetor.
6. Carburetor requiresadjustment.
7. None of the above.
1. Idle speed set too highor too low.
2. Low Speed Mixturerequires adjustment.
3. Crankshaft seals worn.
4. Compression low.5. None of the above.
1. Air filter dirty.2. Spark plug fouled.3. Carburetor requires
adjustment.4. Exhaust ports or muf-
fler outlets plugged.5. Compression low.6. Chain brake engaged.7. None of the above.
REMEDY
1. Move ON/STOP switch to ON.
2. See "Difficult Starting" in theOperation Section.
3. Fill tank with correct fuel mixture.
4. Install new spark plug.5. Check for dirty fuel filter; replace.
Check for kinked or split fuel line;repair or replace.
6. Contact Sears Service (see back cover).
7. Contact Sears Service (see back cover).
1. See "Carburetor Adjustment" in theService and Adjustments Section.
2. Contact Sears Service (see back cover).
3. Contact Sears Service (see back4. Contact Sears Service (see back5. Contact Sears Service (see back
1. Clean or replace air filter.2. Clean or replace plug and regap.3. Contact Sears Service (see back
4. Contact Sears Service (see back
5. Contact Sears Service (see back6. Disengage chain brake.7. Contact Sears Service (see back
cover).cover).cover).
cover).
cover).
cover).
cover).
19
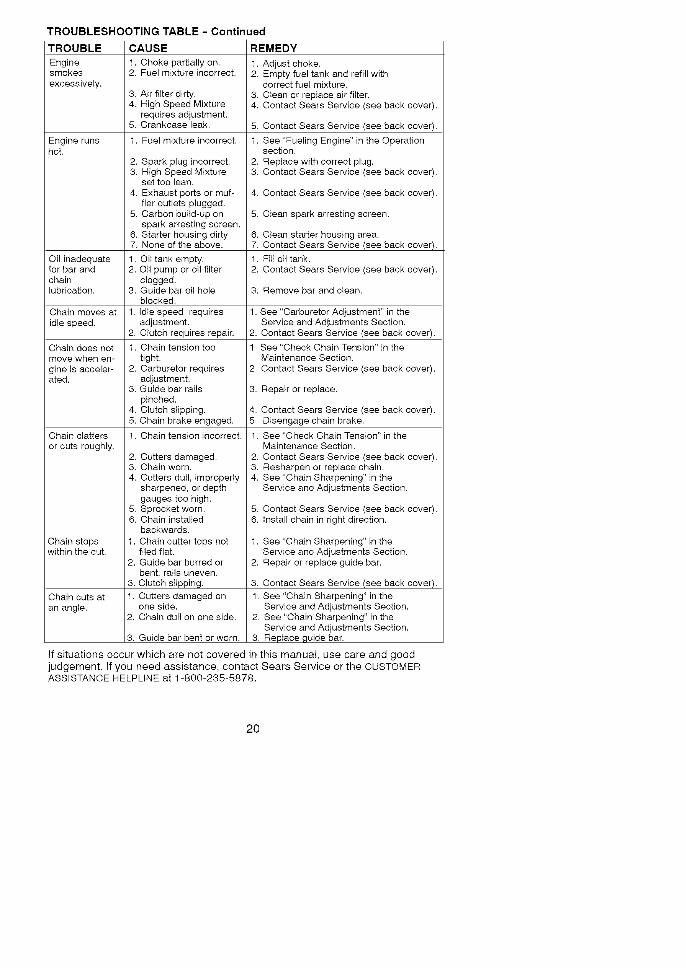
TROUBLESHOOTING TABLE - Continued
TROUBLE CAUSE REMEDY
Engine 1. Choke partially on. 1. Adjust choke.smokes 2. Fuel mixture incorrect. 2. Empty fuel tank and refill withexcessively, correct fuel mixture.
3. Air filter dirty. 3. Clean or replace air filter.4. High Speed Mixture 4. Contact Sears Service (see back cover).
requires adjustment.5. Crankcase leak.
Engine runs 1. Fuel mixture incorrect.hot.
Oil inadequatefor bar andchainlubrication.
5. Contact Sears Service (see back cover).
1. See "Fueling Engine" in the Operationsection.
2. Replace with correct plug.3. Contact Sears Service (see back cover).
4. Contact Sears Service (see back cover).
5. Clean spark arresting screen.
2. Spark plug incorrect.3. High Speed Mixture
set too tean.
4. Exhaust ports or muf-tier outlets plugged.
5. Carbon build-up onspark arresting screen.
6. Starter housing dirty7. None of the above.
1. Oil tank empty.2. Oil pump or oil filter
clogged.3. Guide bar oil hole
blocked.
1. Idle speed requiresadjustment.
2. Clutch requires repair.
1. Chain tension tootight.
2. Carburetor requiresadjustment.
3. Guide bar rails
pinched.4. Clutch slipping.5. Chain brake engaged.
1. Chain tension incorrect.
6. Clean starter housing area.7. Contact Sears Service (see back cover).
1. Fill oil tank.
2. Contact Sears Service (see back cover).
3. Remove bar and clean.
Chain moves at
idle speed.
Chain does cotmove when en-
gine is acceler-ated.
Chain clatters
or cuts roughly.
1. See "Carburetor Adjustment" in theService and Adjustments Section.
2. Contact Sears Service (see back cover).
1. See "Check Chain Tension" in theMaintenance Section.
2. Contact Sears Service (see back cover).
3. Repair or replace.
2. Cutters damaged.3. Chain worn.
4. Cutters dull, improperlysharpened, or depthgauges too high.
5. Sprocket worn.6. Chain installed
backwards.
1. Chain cutter tops notfiled flat.
2. Guide bar burred or
bent; rails uneven.3. Clutch slipping.
1. Cutters damaged onone side.
2. Chain dull on one side.
4. Contact Sears Service (see back cover).5. Disengage chain brake.
1. See "Check Chain Tension" in theMaintenance Section.
2. Contact Sears Service (see back cover).3. Resharpen or replace chain.4. See "Chain Sharpening" in the
Service and Adjustments Section.
5. Contact Sears Service (see back cover).6. install chain in right direction.
Chain stops 1. See "Chain Sharpening" in thewithin the cut. Service and Adjustments Section.
2. Repair or replace guide bar.
Chain cuts at
an angle.
3. Guide bar bent or worn.
3. Contact Sears Service (see back cover).
1. See "Chain Sharpening" in theService and Adjustments Section.
2. See "Chain Sharpening" in theService and Adjustments Section.
3. Replace ,quide bar.
If situations occur which are not covered in this manual, use care and goodjudgement. If you need assistance, contact Sears Service or the CUSTOMERASSISTANCE HELPLINE at 1-800-235-5878,
20

YOUR WARRANTY RIGHTS ANDOBLIGATIONS: The U.S. Environ-mental Protection Agency/CaliforniaAir Resources Board and Sears, Roe-buck and Co., U.S.A., are pleased toexplain the emissions control systemwarranty on your year 2007 and latersmall off-road engine. In California, allsmall off-road engines must be de-signed, built, and equipped to meet theState's stringent anti-smog standards.Sears must warrant the emission con-trol system on your small off-road en-gine for the periods of time listed belowprovided there has been no abuse, ne-glect, or improper maintenance of yoursmall off-road engine. Your emissioncontrol system includes parts such asthe carburetor, the ignition system andthe fuel tank (California only). Where awarrantable condition exists, Sears willrepair your small off-road engine en-gine at no cost to you. Expenses cov-ered under warranty include diagnosis,parts and labor.MANUFACTURER'S WARRANTYCOVERAGE: If any emissions relatedpart on your engine (as listed underEmissions Control Warranty Parts List)is defective or a defect in the materialsor workmanship of the engine causesthe failure of such an emission relatedpart, the part will be repaired or re-placed by Sears. OWNER'S WAR-RANTY RESPONSIBILITIES: As the
small off-road engine engine owner,you are responsible for the perfor-mance of the required maintenancelisted in your operator's manual. Searsrecommends that you retain all re-ceipts covering maintenance on yoursmall off-road engine, but Sears can-not deny warranty solely for the lack ofreceipts or for your failure to ensurethe performance of all scheduled main-tenance. As the small off-road engineengine owner, you should be awarethat Sears may deny you warrantycoverage if your small off-road engineengine or a part of it has failed due toabuse, neglect, improper mainte-nance, unapproved modifications, orthe use of parts not made or approvedby the original equipment manufactur-er. You are responsible for presenting
your small off-road engine to a Searsauthorized repair center as soon as aproblem exists. Warranty repairsshould be completed in a reasonableamount of time, not to exceed 30 days.If you have any questions regardingyour warranty rights and responsibili-ties, you should contact your nearestauthorized service center or call Searsat 1-800-469-4663. WARRANTYCOMMENCEMENT DATE: The war-ranty period begins on the date thesmall off-road engine is purchased.LENGTH OF COVERAGE: This war-
ranty shall be for a period of two yearsfrom the initial date of purchase.WHAT IS COVERED: REPAIR ORREPLACEMENT OF PARTS. Repairor replacement of any warranted partwill be performed at no charge to theowner at an approved Sears ServiceCenter. If you have any questions re-garding your warranty rights and re-sponsibilities, you should contact yournearest authorized service center orcall Sears at 1-800-469-4663. WAR-
RANTY PERIOD: Any warranted partwhich is not scheduled for replace-ment as required maintenance, orwhich is scheduled only for regular in-spection to the effect of "repair or re-place as necessary" shall be war-ranted for 2 years. Any warranted partwhich is scheduled for replacement asrequired maintenance shall be war-ranted for the period of time up to thefirst scheduled replacement point forthat part. DIAGNOSIS: The ownershall not be charged for diagnostic la-bor which leads to the determinationthat a warranted part is defective if thediagnostic work is performed at an ap-proved Sears Service Center. CONSE-QUENTIAL DAMAGES: Sears may beliable for damages to other enginecomponents caused by the failure of awarranted part still under warranty.WHAT IS NOT COVERED: All failurescaused by abuse, neglect, or impropermaintenance are not covered. ADD-ON OR MODIFIED PARTS: The use
of add-on or modified parts can begrounds for disallowing a warrantyclaim. Sears is not liable to cover fail-
21

ures of warranted parts caused by theuse of add-on or modified parts.HOW TO FILE A CLAIM: If you haveany questions regarding your warrantyrights and responsibilities, you shouldcontact your nearest authorized ser-vice center or call Sears at1-800-469-4663. WHERE TO GET
WARRANTY SERVICE: Warranty ser-vices or repairs shall be provided at allSears Service Centers. Call1-800-469-4663. MAINTENANCE,REPLACEMENT AND REPAIR OF
EMISSION RELATED PARTS: AnySears approved replacement part
used in the performance of any war-ranty maintenance or repair on emis-sion related parts will be provided with-out charge to the owner if the part isunder warranty. EMISSION CON-TROL WARRANTY PARTS LIST:
spark plug (covered up to mainte-nance schedule), ignition module, muf-fler including catalyst (if equipped), fueltank (California only). MAINTENANCESTATEMENT: The owner is responsi-ble for the performance of all requiredmaintenance as defined in the opera-tor's manual.
The information on the product label indicates which standard your engine is certified,Example: (Year) EPA Phase 1 or Phase 2 and/or CALIFORNIA.
41 I el I 81 I
This engine is certified to be emissions compliant for the following use:
[] Moderate (50 hours)
[] Intermediate (125 hours)
[] Extended (300 hours)
22

Declaraci6n de Garantia 25 Almacenamiento 44Reglas de Seguddid 25 Tabla Diagn6stica 45Montaje 30 Declaraci6n de Emision 47Usa 31 Lista de Piezas 23Mantenimiento 39 Repuestos y Encargos ContratapaServicio y Ajustes 43
UN AI_IO COMPLETO DE GARANTiA PARA SIERRA DE CADENA AGASOLINA CRAFTSMAN ®
Si este producto falla por un defecto en el material o de mano de obra dentro dela_o a partir de la fecha de compra y este se ha utilizado y mantenido de acuerdoal manual del usuado, envielo a cualquier tienda Sears, Centre de ServiciosSears o otra tienda Craftsman en los Estados Unidos para su reparaci6n gratuita(o reemplazo si no es posible repararlo).Esta garantia excluye la barra, la cadena, la bujia y el filtro de aire, que sonpartes desechables y pueden desgastarse al usarlas normalmente en menos deun aide,
Esta garantia es aplicable per s61o 30 dias desde la fecha de compra si este pro-ducto se usa con fines comerciales o se usa para arriendo.Esta garantia le otorga derechos legales especificos, y usted tambien puedetener otros derechos que varian de estado a estado.Sears, Roebuck and Co., Hoffman Estates, IL 60179
_ ADVERTENCIA: Desconecte
siempre el cable de la bujia al repararel aparato, excepto en el case deajustes al carburador. Debido a quelas sierras de cadena son instrumen-tos para cortar madera a alta veloci-dad, deben observarse precaucionesde seguridad especiales para reducirel riesgo de accidentes. El use des-cuidado o indebido de esta herramien-ta puede causar graves heridas.PIENSE ANTES DE PROCEDER• Limite el usa de la sierra a aquellos
usuarios adultos que comprendad ypuedan implementar todas las precau-clones, reglas de seguridad e instruc-clones de use que se encuentran eneste manual.
Proteccion _ .j Casco Duro
de Oidos _l_Protecci6n de
Ropa Ajustada Ojos
al Cuerpo _ Guantes deUso Industrial
Zapatos de PantorrillerasSeguridad uridad
• Use equipo protector. Siempre usecalzado de seguridad con puntas deacero y suelas anti-deslizantes; ropaajustada al cuerpo; guantes gruesosde usa industrial anti-deslizantes; pro-tecci6n de ojos tales coma gafas deseguridad gue no se la cara; cascoduro aprobado; y barrera de sonido(tapones de oido u orejeras anti-soni-do) para proteger la audici6n. Los queusan sierras de fuerza habitualmentedeber_tn hacerse revisar la audici6nfrecuentemente ya que el ruido de lassierras de cadena puede da_ar losoidos.
25

• Mantengaelcabellopotencimadelniveldeloshombros.Nodesgastelaropasueltaojoyeria;puedenenre-darseenlaspiezasm6viles.
• Mantengatodaslaspartesdecuerpoalejadasdelacadenasiemprequeelmotorest6enfuncionamiento.
• Mantengaalosni_os,espectadoresyanimalesaunadistanciaminimade10metros(30pies)del&readetrabajoocuandoest&haciendoar-rancarelmotor.
• Nolevantenioperelassierrasdeca-denacuandoest&fatigado,enfermo,ansiosoosihatornadoalcohol,dro-gasoremedios.Esinprescindiblequeud.est&enbuenascondicionesfisi-casyalertamentalmente.Siud.sufredecualquiercondici6nquepuedaem-peorarconeltrabajoarduo,ases6reseconsum6dico.
• Nopongaenmarchalasierrasinten-erun&readetrabajodespejada,unasuperficieestableparaparasey,siest&derrubando&rboles,uncaminopredeterminadoderetroceso.
USELA SIERRA OBSERVANDO TO-DOS LOS PROCEDIMIENTOS DESEGURIDAD• Mantenga las dos manos en las man-
ijas siempre que el aparato est6 enmarcha. El uso del aparato con unasola mano puede causar graves heri-das al usuario, a los asistentes o a losespecadores. Las sierras de cadenaest&n dise_adas para que se las usecon las dos manos en todo momento.
• Haga uso de la sierra de cadena 0ni-camente en lugares exteriores bienventilados.
• No haga uso de la sierra desde lasescaleras port&tiles ni los &rboles.
• Aseg0rese de que la cadena no vayaa hacer contacto con ning0n objetoantes de poner en marcha el motor.Nunca intente hacer arrancar la sierracon la barra guia dentro de un corte.
• No aplique presi6n a la sierra al finalde los cortes. Aplicar presi6n puedehacer uue pierda el control al com-pletarse el corte.
• Pare el motor antes de apoyar lasierra en ning0n lado.
• Cuando traslade la sierra en la mano,h&galo 0nicamente con el motor para-do. Ll_vela con el silenciador apartadodel cuerpo y la barra y cadena haciaatr&s, con la barra de preferencia cu-bierta por una funda.
• No ponga en funcionamiento la sierrade cadena si est& da_ada, incorrecta-mente ajustada, o si no est& armadacompleta y seguramente. Siemprecambie el barre, cadena, protector demano, freno de cadena, o el otras pie-zas immediatamente si da_ado, roto,o se sale pot cualquier motivo.
MANTENGA LA SIERRA EN BUE-NAS CONDICIONES DE FUNCTION-AMIENTO
,_ADVERTENCIA: Desconecte la
buj[a antes de hacer cualquier manten-imiento menos los ajustes al carburador.• Lleve la sierra de cadena a un pro-
veedor de servicio autorizado paraque haga todo servicio menos aquel-los procedimientos listados en la sec-ci6n de MANTENIMIENTO de estemanual.
• AsegOrese de que la cadena se de-tenga por completo cuando se sueltael gatillo. Para hacer correcciones,yea los AJUSTE AL CARBURADOR.
• Mantenga las manijas secas, limpiasy libres de aceite o de mezcla decombustible.
• Mantenga las tapas y los fijadoresbien fijos.
• Componentes de repuesto que noconcuerden con las piezas originaleso la remoci6n de dispositivos de segu-ridad podr[a causar daSos al aparato yaccidentes al usuario o a especta-dores. Use exclusivamente los acce-sorios y repuestos Craftsman _Rrecom-endados. Nunca modifique la sierra.
• Mantenga su sierra de cadena concuidado.
• Mantenga la herramienta afilada ylimpia para mejor funcionamiento ymayor seguridad.
• Siga todas las instrucciones para lu-bricaci6n y cambio de accesorios.
• Inspeccione todas las piezas por sihubiera daSos. Antes de continuar conel uso del aparato; el protector u otrapieza que se encuentre daSada deb-er& ser inspeccionada cuidadosa-mente para determinar si puedenusarse de forma apropiada y paravierificar si puede efectuar el funciona-miento para el cueal fue diseSada. In-speccione el alineamiento de las pie-zas movibles, piezas movibles que seencuentren atascadas, la ruptura depiezas, montura y cualquier otra con-dici6n que pueda afectar el uso delaparato. El protector o cualquier otra
26

pieza que se encuentre da_ada deb-era ser reparada apropiadamente odeber& ser reemplazada por un Cen-tro de Servicio Sears, a no ser que seindique de otra forma en este manualdel usuario.
• AI no encontrarse en use, las sierrasde cadena deber&n almacenarse enun lugar seco, en un lugar alto o bajoIlave, fuera del alcance de los ni_os.
• AI almacenar la sierra, use una fun-da o un estuche de carga.
MANEJE EL COMBUSTIBLE CONEXTREMO CUIDADO• No fume mientras trabaja con el
combustible ni cuando est& hacien-do usa de la sierra.
• Elimine todas las posibles fuentes dechispas o llamas en las &reas dondese mezcla o vierte el combustible.
• Mezcle y vierta el combustible afueray use siempre recipiente aprobadopara combustibles y marcado comotal. Limpie todos los derrames decombustible antes de poner el apa-rato en marcha.
• Alejese a per Io menos 3 metros (10pies) del lugar de abastecimientoantes de poner el rotor en marcha.
• Apaque el motor y deje que la sierrase enffie en un lugar libre de substan-cias combustibes y no sobre hojas se-cas, paja, palel, etc. Retire la tapa len-tamente y reabastezca el aparato.
• Antes de guarder el aparato, vacie eldep6sito de combustible. Arranqueel motor y dejelo en marcha hastaque se detenga con el fin de agotarel combustible que pueda quedar enel carburador.
• Guarde el aparato y el combustibleen un espacio fresco, seco y bienventilado donde los vapores delcombustible no puedan entrar encontacto con dchispas ni llamasabiertas provenientes de termotan-gues, motores o interruptores el6ctri-cos, calefactores centrales, etc.
PROTEJASE CONTRA LASRECULADASUd. debe seguir todas las precau-clones e instrucciones de seguddadpara ayudar e evitar las reculadas ylas demurs fuerzas que pueden causargraves heridas.
Trayectoria de laX_.\ ,./_ Reculada
,P,,ADVERTENCIA: Evite reculada
le pueden cauear graves heridae. Re-culada es el movimiento hacia elfrente, hacia atr&s o r&pidamente ha-cia adelante, esto puede ocurrir cuan-do la punta de la barra guia de la sier-ra de cadena entra en contacto concualquier objeto como puede ser otrarama o tronco, o cuando la madera secierra y atasca mientras se hace elcorte. El entrar en contacto con alg0nobjeto extra_o a la madera le puedecausar al usuado la p6rdida del controlde la sierra de cadena.• La Reculada Rotacional puede
acontecer cuando la cadena en mo-vimiento entra en contacto con alg0nobjeto en la parte superior de la pun-ta de la barra guia puede causar quela cadena entre al material y se de-tenga por un instante. El resultadoes una reacci6n inversa, a velocidadde rel&mpago, que hace recular labarra guia hacia arriba y hacia atr&shacia el usuario.
• La Reculada por Atasco acontecencuando la madera se cierra y atascala cadena en movimiento en el corte aIo largo de la parte superior de la bar-ra guia y la cadena se detiene repenti-namente. Esta detenci6n repentina dela cadena tiene come resultado unainversi6n de la fuerza de la cadenausada para cortar madera y causaque la sierra se mueva en sentido op-uesto al de la rotaci6n de la cadena.La sierra directamente hacia atr&s endirecci6n al usuario.
• La Reoulada por Irnpulsion puedeacontecer cuando la cadena en mo-vimiento entra en contacto con algOnobjeto extra_o a la madera en elcorte a Io largo de la parte inferior dela barra guia y la cadena se detienerepentinamente. Esta detenci6n re-pentina de la cadena tira de la sierraadelante y lejos del usuario y podria
27

hacer f_.cilmente al usuario perder elcontrol de la sierra.
REDUZCA LAS PROBABILIDADESDE RECULADA• Est6 consciente de la posibilidad de
reculada. Teniendo una buena com-prensi6n b_.sica de la reculada, ud.podr_t reducir el elemento de sorpresaque contribuye a los accidentes.
• Nunca permita que la cadena en mo-vimiento toque ningOn objeto en lapunta de la barra guia.
• Mantenga el _trea de trabajo libre deobstrucciones como por ejemplo otros_trboles, ramas, piedras, cercas, to-cones, etc. Elimine o evite toda ob-strucci6nes comp pot ejemplo otros_trboles, ramas, piedras, cercas, to-cones, etc. Elimine o evite toda ob-strucci6n que la cadena pueda tocarmientras est,. cortando.
• AI cortar una rama, no deje la barraguia entrar en contacto con otrarama o otros objetos alrededor.
• Mantenga la sierra afilada y con latensi6n correcta. Las cadenas conpoco file o flojasincrementan la pro-babilidad de reculada. Siga las in-strucciones del fabricante para afilary efectuar mantenimiento de la cade-na. Verifique la tensi6n a intervalosregulares con el motor parado, nun-ca en marcha. AsegOrese de que lastuercas de la freno de cadena est6n-parado, nunca en marcha.AsegOrese de que las tuercas de lafreno de cadena est6n ejustadas fir-memente.
• Empiece y efect_e la totalidad decada corte con el acelerador a fon-do. Si la cadena se ester moviendo auna velocidad menor que la m_txima,hay m_ts probabilidad de que la sier-ra recule.
• Use cuidado extremo al entrar denuevo en un corte ya empezado.
• No intente hacer cortes empezandocon la punta de la barra (cortes de ta-ladro).
• Tenga cuidado con troncos que sedesplazan y con las demurs fuerzasque podrian cerrar un corte y apretarla cadena o bien caer sobre ella.
• Use la barra Guia Reducidora deReculadas y la Cadena Minimizado-ra de Reculadas recomendadaspara su sierra.
Para Evitar la Reculada por Atasco:• Mant6ngase completamente conciente
de toda situaci6n u obstrucci6n que
pueda hacer que el material presionela cadena en la parte superior o quepueda parar la cadena de cualquierotto modo.
• No corte m_ts de un tronco a la vez.• No retuerza la sierra al retirar la barra
de un corte ascendiente cuando esterseccionando troncos.
Para Evitar la Reculada pot Impul-sion:• Empiece todo corte con el motor acel-
erado a fondo y con la caja de la sier-ra apoyada contra la madera.
• Use cu_as de pl_.stico o de madera(nunca de metal) para mantener abler-to el corte.
MANTENGA EL CONTROL
P_.rese hacia la izquierda de la sierra.
Nunca invierta
la posici6n de
las Codo rigido
El pulgar por debajo de la manija
• Sostener firmemente con las dosmanso le ayudar_, a mantener el con-trol de la sierra. No afloje. Mantenga lamano derecha envolviendo totalmentela manija trsera, sea ud. derecho ozurdo. Sostenga la manija delanteracon la mano izquierda, colocando elpulgar debajo de la manija y rodeandola manija con los dedos. Mantenga elbraze izquierdo totalmente extendidocon el code fijo.
• Coloque le mano izquierda el la man-ija delantera, de modo que quede enlinea recta con la mane derecha en lamanija trasera, cuando est6 haciendocortes de seccionamiento. P_.rese le-vemente hacia la izquierda de la sierrapara evitar que el cuerpo est6 el lineadirecta con la cadena.
• P_trese con el peso distribuido igual-mente entre los dos pies.
• No se extienda excesivamente. Lasierra puede impulsario o empujarlo yud. puede perder el equilibrio y el con-trol de la sierra.
• No corte arriba del nival de los horn-bros. Es dificil mantener el control dela sierra si ester por encima del nivelde los hombros.
28

DISPOSITIVOS DE SEGURIDADCONTRA LAS REGULADAS
_.ADVERTENCIA: Los siguientesdispositivos han side incluidos en lasierra para ayudar a reducir el riesgo dereculadas; sin embargo, tales implemen-tos no pueden eliminar totalmente estareacci6n peligrosa. Como usuario desierra de cadena, ud. no debe confiarsesolamente en los dispositivos de seguri-dad. Ud. debe seguir todas las precau-ciones de seguridad, instrucciones ymantenimiento que se encuentran eneste manual para ayudar a evitar las re-culadas y otras fuerzas que puedencausar graves heridas.• Protector de Maria Delantera, dise_a-
do para reducir la probabilidad que sumano izquierda entre en contacto conla cadena, si la mane se desprendede la manija delantera.
• La posici6n de las manijas delantera ytrasera, disefladas con distancia entrelas manijas y "en linea" la una con laotra. La separaci6n y la colacaci6n enlinea que este diseSo provee se cam-binan para dar equilibria y resistenciapara controlar la propulsi6n de la sier-ra hacia el usuario si acontece unareculada.
• Barra Guia Reducidora de Reculadas,diseflada con punta de radio pequefloque reduce el tamaflo de la zona depeligro en la punta de la barra. Lasbarras guias reducidoras de reculadasson aquellas que ban demostrado quereducen significativamente la cantidady la seriedad de las reculadas cuandohan side examinadas de acuerdo conlos requisitos de seguridad para lassierras de cadena a gasolina estable-cidos por el Patr6n ANSI (AmericanNational Standards Institute, Inc.)B175.1.
Punta de RadioZona de Peligro Peque_o Barra
Guia
Zona dePunta de Radio _Grande Barra IGuie
• Las Cadenas Minimizadoras de Re-culadas han satisfecho los requisitosde rendimiento del ANSI B175.1 (Re-quisitos de Seguridad para las Sier-ras de Cadena a Gasolina) en prue-bas con una muestra representativade Sierras de cadena con desplaza-
miento de menos de 3,8 pulgadas,
como se especifica en ANSI B175.1.
Cadena Minimizadora de Reculadas
Marcador de Profundidad Perfilado
Eslabon Protector_;;;1_1_.._,-_ Alargedo desvia la£, _ fuerza de reacci6n
_t, y permite que la"_ ..,_' madera entre graduel-
mente a la Cuchilla
FRENO DE CADENA• Freno de Cadena, diseflado para de-
tener la cadena en el case de recula-da.
Ai_ADVERTENCIA: NUESTRA COM-PANIA NO REPRESENTA Y USTED NODEBERA ASUMIR QUE EL FRENO DE CA-DENA LO PROTEGER_, EN CASO DE RE-CULADAS. Una reculada es una acci6nr&pida la cual lanza la barra y la cadenarotativa hacia atr&s y hacia arriba en di-recci6n al usuario. Una reculada podriaser causada cuando se permite que lapunta de la barra en la zona de peligroentre en contacto con cualquier objetoen la zona superior de la barra guia.Esta acci6n puede empujar la barraguia r&pidamente hacia atr&s en direc-ci6n donde se encuentra el usuario. Cu-alquiera de 6stos dos acontecimientospuede causar que el usuario pierda elcontrol de la sierra Io que podria resultaren lesiones de alta gravedad o hasta lamuerte. NO DEPENDA CIEGAMENTE ENCUALQUIERA DE LOS DISPOSITIVOS IN-CLUIDOS EN SU CUIDADOSAMENTEPARA EVITAR LAS RECULADAS. Las bar-ras guia reducidoras de reculadas y lascadenas de sierra de baja acci6n de re-culadas reducen la ocasi6n y magnitudde las reculadas y son recomendadas.Con su sierra vienen incluidas una ca-dena de baja acci6n de reculadas y unabarra de equipo original. Reparacionesal freno de cadena deben set hechospor un Centro de Servicio Sears queeste autorizado. Lleve la unidad al sitiode compra a el Centro de ServicioSears mas cercano.• El contacto con la punta de la sierra
puede causar una REACCION contrariaque a una velocidad vertiginosa expul-sa la espada hacia arriba y haciaatr&s, en direcci6n al operador.
• Si la cadena queda atrapada por laparte superior de la espada, estapuede rebotar bruscamente hacia eloperador.
29

• Cualquiera de estas dos reaccionespuede provocar la p6rdida del con-trol de la motosierra y causar unagrave lesi6n. No cantle exclusiva-mente en los dispositivos de seguri-dad que incorpora su sierra.
Este aparato no esta equipado con unsistema de anti-vibraci6n y se dise_asi es usado ocasionalmente.AVlSO SEGURIDAD: El estar expuestoalas vibraciones trav6s del uso prolon-gado de herramientas de fuerza a gaso-lina puede causar daSos a los vasossanguineos o a los nervios de los de-dos, las manos y las coyunturas enaquellas personas que tienen propensi-dad a los trastomos de la circulaci6n o alas hinchazonees anormales. El usoprolongado en tiempo frio ha sido aso-ciado con daSos a los vasos san-guineos de personas que por otra partese encuentran en perfecto estado desalud. Si ocurren sintomas tales comoel entumecimiento, el dolor, la falta defuerza, las cambios en el color o la tex-tufa de la piel o falta de sentido en losdedos, las manos o las coyunturas,pare de suar esta m&quina immediata-mente y procure atensi6n m6dica. Lossistemas de anti-vibraci6n no garanti-zan que se eviten tales problemas. Losusuarios que hacen uso continuo y pro-Iongando de las herramientas de fuerzadeben fiscalizar atentamente su estadofisico y el estado del aparato.
FRENO DE CADENA: Siesta sierra hade usarse para el tumbado comercialde &rboles, un freno de cadena serequiere y no ser& quitado ni ser&lisiado de otra manera conformarsecon las Regulaciones Federales delOSHA para el tumbado comercial de&rboles.REJILLA ANTICHISPA: Su sierraviene equipada con silenciadorlimitador de temperatura y con rejillaantichispa que cumple los requisitosde los C6digos de California 4442 y4443. Todas las tierras forestadasfederales, m&s los estados deCalifornia, Idaho, Maine, Minnesota,Nueva Jersey, Washington y Oreg6n,requieren por ley que muchos motoresde combusti6n interna estenequipados con rejilla antichispa. Siusted usa una sierra de cadena en un
estado y otra Iocalidad donde existentales reglamentos, usted tiene laresponsabilidad juridica de mantenerestas piezas en correcto estado defuncionameinto. De Io contrario, estar&en infracci6n de la ley. Refiera a lacarta de RESPONSABILIDADES DELUSUARIO en la secci6n delMANTENIMIENTO.PADRONES: Este sierra de cadenaconsta en la lista de Underwriters Lab-oratories, Inc. de acuerdo a los Requi-sites Nacionales de Seguridad Esta-dounidenses para Sierras de Cadenaa Gasolina (ANSI B175.1-2000).
_ADVERTENClA: Antes de usarla sierra de cadena, asegure todos losfijadores se encuentren bien ajusta-dos.
CONTENIDO DE LA CAJAUse la siguiente lista para verificar elcontenido:
Modelo 358.350821• Sierra de cadena (completamente ar-
mada)• Herramienta de ajuste de la cadena• Aceite de motor de 2-ciclos• Estuche transportadorVerifique las piezas en caso de averia.No use piezas que se encuentrenda_adas.
Si necesita ayuda, faltan piezas o en-cuentra piezas daSadas, favor Ilamaral 1-800-235-5878.AVlSO: Es normal oir el golpeteo delfiltro de combustible en el tanquevacion.
Su aparato ha sido puesto a pruebaen la f&brica y se le ha ajustado conprecisi6n el carburador. Como resulta-do, es posible que se sienta un olor agasolina o gue se encuentre una gotade residuo de aceite o combustible enel silenciador al desempacar el apara-to.MONTAJE
El aparato viene completamente arma-do y no hay necesidad de montaje.
30

CONOZCA EL APARATOLEA ESTE MANUAL DEL USUARIO Y LAS REGLAS DE SEGURIDAD ANTES DE USAR
LA SIERRA DE OADENA. Compare las ilustraciones con su aparato para familiari-zarse con la ubicaci6n de los varios controles y ajutes. Guarde este manual parauso futuro.
Herramienta de Protector _ Manija DelanteraAjuste de la Oadena de Mano _ Cuerda de Arraeque(Herramienta de la Barra) Detantera ''_
InterruptorON/STOP
Palanca detCadena Silenciador cebador/
marchalenta
r_tpida
Orificio del Tapa del Tanque de_
Engranaje Lubricante de Barra
Traba delAcelerador
ManijaTrasera _
Caja del Arranque
Tapa del Cilindro Freno deCadena
Tornillo de
BombeadorTapa del Tanque de Combustible
Cuchil4as Marcador de profundidad
Rotaoidn de
la OadenaFuneionamiento
GatilloAcelerador Cubierta del Tuercas de
Embrague la BarraINTERRUPTOR ON/STOPEl INTERRUPTOR ON/STOP est& acos-tumbrado a detener la m&quina.GATILLO DE ACELERADOREl GATILLO DE ACELERADOR controlavelocidad de m&quina.TRABA DEL ACELERADOREs necesario apretar primero la TRABADEL ACELERADOR para poder accionarel acelerador. Este dispositivo pre-viene el acionamiento accidental delacelerador.PALANCA DEL CEBADOR/MARCHA LENTA RAPIDAEl cebador y la marcha lenta rapida sonfijadas tirando la PALANOA DEL OEBA-DOR/MAROHA LENTA RAPIDA completa-mente para arrancar el aparato en fdo odespues reaprovisionado de combus-tible. La palanca del cebador proveecombustible adicional al motor al arran-car frio.
Captador Barra Guiade Cadena
BOMBEADOREl BOMBEADOR circula combustible alcarburador.FRENO DE CADENAEl FRENO DE CADENA est& diseSadopara detener la cadena en caso de re-culada. El freno de cadena se activaautom&ticamente en caso de recula-das. El freno de cadena se activamanualmente si empujan al protectorde mano delantero adelante. Para de-sactivar el freno de cadena, tire Io m&sposible del protector de mano delan-tero hacia la manija delantera.TENSION DE LA CADENAEs normal que las cadenas nuevas seestiren durante los primeros 15 minu-tos de uso. Deber& verificarse la ten-si6n de la cadena frecuentemente.Yea TENSION DE LA CADENA en la sec-ci6n de MANTENIMIENTO.
31

A41ADVERTENClA: El silenciadores extremadamente caliente durante eluso y despu6s de usar el aparato. Notoque el silenciador ni permita que elmaterial combustible tal como gasolina ohierba seca hagan contacto.ANTES DE PONER EL MOTOR ENMARCHA
,_ADVERTENCIA: Lea toda la in-
formaci6n sobre el manejo del com-bustible en la secci6n de reglas de se-guridad de este manual antes deempezar. Si no comprende la informa-ci6n sobre el manejo del combustible,no intente abastecer su aparato. Pro-cure ayuda de alguien que comprendala informaci6n o Ilame al tel_fono deayuda al consumidor al1-800-235-5878.ACEITE PARA BARRA Y LA CADENALa barra y la cadena requieren lubrica-ci6n. El libricador de la cadena proveelubricaci6n continua a la cadena y a labarra guia No se olvide de Ilenar eltanque de aceite para barra siempreque Ilene el tanque de combustible(Capacidad = 6,8 ft. oz.). La falta deaceite arruinar& la barra y la cadenar&pidamente. El uso de demasiadopoco aceite causar& exceso de calen-tamiento que set& detectable por elhumo proveniente de la cadena y/oper la descoloraci6n de la barra. Paraobtener la m&xima prolongaci6n de lavida de la bara y la cadena, recomen-damos que use el aceite para barrasde sierra de cadena Craftsman. Si elaceite Craftsman no est& dispondible,puede usarse un aceite SAE 30 debuena calidad hasta obtener el aceitemarcha Craftsman. La cantidad de lu-bdcaci6n es medida autom&ticamentedurante el funcionamiento de la sierra.La sierra usar& m&s o menos un tan-que de aceite para la barra por cadatanque de combustible. Siempre Ileneel tanque de aceite de la barra cuandoIlene el tanque de combustible.ABASTECIMIENTO DEL MOTOR
_l_ ADVERTENCIA: Remueva la
tapa del tanque de combustible lenta-mente al reabastecer combustible.Este motor est& habilitado parafuncionar con gasolina sin plomo. Antesde comenzar con el uso, se deber&mezclar la gasolina con un aceite desint@tico de buena calidad para motores
de 2 tiempos enfriados a aire.Recomendamos el aceite de sint6ticode la marca Craftsman. Mezcle lagasolina con el aceite en la proporci6n40:1. Se obtiene una proporci6n de 40:1mezclando 3,2 onzas de aceite concada gal6n de gasolina sin plomo. Seincluye con esta sierra un recipiente de3,2 onzas de aceite de sint6tico de lamarca Craftsman. Adiera el contenidoentero de este recipiente en 1 gal6n degasolina para alcanzar la mezclaapropiada del combustible. NO USEaceite para autom6viles ni para barcas.Estos aceites daflar&n el motor.AI
mezclar el combustible, siga lasinstrucciones impresas en el recipientede aceite. Una vez que haya aSadido elaceite a la gasolina, agite el recipientebrevemente para asegurar que elcombustible est@ completamentemezclado. Lea siempre y siga las reglasde seguridad que tienen que ver con elcombustible antes de abastecer elaparato.IMPORTANTELa experiencia indica que los combus-tibles mezclasdos con alcohol (los Ila-mados gasohol o los que contienen eta-nolo metanol) pueden atraer humedad,I oque puede causar la separaci6n y laformaci6n de &cidos durante el alma-cenamiento. La gasolina acidicapuede daSar el sistema de combus-tible del motor durante el almacena-miento. Para evitar promblemas con elmotor, deber& vaciarse el sistema decombustible antes de almacenar elaparato pot 30 dias o m&s. Vacie eltanque de combustible, ponga el mo-tor en marcha y d6jelo en marcha has-ta que la lineas de combustible y elcarburador queden vacios. Cuandovaya a usar el aparato nuevamente,use combustible fresco. Vea la instruc-ciones de ALMACENAMIENTO para ob-tener m&s informaciones. Nunca useproductos de limpieza de motor o car-burador en el tanque de combustibleya que hacerlo puede provocar daSospermanentes. Vea la secci6n de ALMA-CENAMIENTO para m&s informaciones.
FRENO DE CADENAAseg_rese el freno de cadena se dis-activa tirando el protector de mano de-lantero hacia atr&s, acerc&ndolo a lamanija delantera todo Io que sea pos-ible. Es necesario desactivar el frenode cadena para cortar con la sierra.
32

z__ADVERTENClA: La cadena nodebe moverse cuando el motor se en-cuentre en marcha inactiva. Si la cade-na se mueve en marcha inactiva, vea lasecci6n de AJUSTE AL CARBURADOR eneste manual. Evite contacto con el silen-ciador. Un silenciador caliente podriacausar quemaduras muy graves.PARA PARAR EL MOTOR• Suelte el gatillo acelerador.• Mueva el interruptor ON/OFF a la po-
sici6n OFF.
POSICION DE ARRANQUE• Para poner en marcha el motor, sujete
la sierra firmamente en el suelo comose ilustra. Aseg0rese de que la cade-na pueda moverse libremente sin to-car ning0n objeto.
Mango de la cuerda de arranque
La mano
izquierda enla mangodelantera
El pie derecho en el interior de la
mango trasera.
INTERRUPTOR
"\\\Cebador
1. Mueva el interruptor ON/STOP a laposici6n ON.
2. Tire de la palanca del cebador/mar-cha lenta rapida su maxima exten-si6n (a la posici6n FULL CHOKE).
3. Lentamente, oprima el bombeador 6veces.
4. Firmemente, tire del mango de lacuerda de arranque 5 veces con sumano derecha. Luego, pase al si-guiente paso.
AVlSO: Si el motor parece que esteintentando arrancar antes del quintotir6n, pare de tirar y proceda inmediata-mente al siguiente paso.5. Empuje la palanca del cebador/
marcha lenta rapida a la posici6nHALF CHOKE.
PALANOA DEL CEBADOR/MARCHA LENTA RAPIDA
PUNTOS IMPORTANTES PARARECORDARAI tirar de la cuerda de arranque, no usela extensi6n completa de la cuerda yaque esto puede causar que la cuerdase parta. No permita que la cuerda dearranque regrese a su lugar brusca-mente. Sujete el mango y permita que lacuerda rebobine lentamente.Para arranques bajo condiciones de cli-ma frio, ponga en marcha el motor conel cebador en la posici6n FULL CHOKE;permita que el motor caliente antes deapretar el gatillo acelerador.
AVlSO: No intente a cortar ningOn tipode material si la palanca del cebador/marcha lenta rapida se encuentran enla posici6n FULL CHOKE.
PARA ARRANCAR EL MOTOR FRIO(o motor caliente despues de que-dar sin combustible)AVIS0: En los pasos siguientes, cuan-do la palanca del cebador/marcha lentarapida se activa en su m&xima exten-si6n, autom&ticamente fijar& la acelera-ci6n para la puesta en marcha.
OFFHALF
FULL
6. Tire del mango de la cuerda de ar-ranque con su mano derecha hastaque el motor se ponga en marcha.
7. Permita que el motor continOe enmarcha por approximadamente 30segundos. Luego, apriete y suelte elgatillo acelerador para permitir que elmotor regrese a marcha lenta.
PARA ARRANCAR CON ELMOTOR CALIENTE1. Mueva el interruptor ON/STOP a la
posici6n ON.2. Tire de la palanca del cebador/mar-
cha lenta r&pida su m&xima exten-sion (a la posici6n FULL CHOKE)para fijar la marcha lenta r&pida;luego, regrese la palanca del ceba-
33

dor/marchalentar&pidaalaposi-ci6nHALFCHOKE).
3. Lentamente,oprimaelbombeador6veces.
4. Firmemente,tiredelacuerdadearranqueconsumanederechahastaqueelmotorsepongaenmarcha.
5. Aprieteysuelteelgatilloaceleradorparaparapermitirqueelmotorre-greseamarchalenta.
ARRANQUE DIFICIL (o arranque demotor ahogado)El motor puede encontrarse ahogadocon demasiado combustible si no seha puesto en marcha despu6s de110tir6n.
Un motor que se encuentre ahogadopuede ser aclarado del exceso de com-bustible empujando la palanca del ceba-dor/marcha lenta rapida en totalmente (ala posici6n OFF CHOKE) y luego siguien-do el procedimiento de puesta en mar-cha para motores calientes que se hasindicado anteriormente. Aseg0rese deque el interruptor ON/STOP se encuentreen la posici6n ON.Que el motor se ponga en marchapuede requerir que se tire de la cuerdade arranque muchas veces, depen-diendo cu&n ahogado se encuentre elmotor. Si el motor no arranca, refi6-rase a la TABLA DIAGNOSTICA o Ilameal 1-800-235-5878.
FRENO DE CADENA
ADVERTENCIA: La banda del
freno podr& romperee al activar el frenoei 6sta ee encuentra demasiado usaday fina. Si la banda del freno se encuen-tra rota, el freno de cadena no detendr&la cadena. El freno de cadena debe sersubstituido si cualquier parte se desgae-ta menos de 0,5 mm (0,020 de pulga-da) densamente. Reparaciones al frenode cadena deben ser hechos por unCentro de Servicio Sears que este auto-rizado. Lleve la unidad al sitio de com-pra a el Centro de Servicio Sears maecercano.• Esta sierra viene equipada con un fie-
no de cadena dise_ada para detenerla cadena en el caso de reculada.
• El freno de cadena inercia-activado
se activa si el protector delantero demano es empujado hacia adelante yasea manualmente (a mane) o au-tom&ticamente (pot el movimiento re-pentino).
• Si el freno ya est& activado, se Io de-
sactiva tirando el protector de manedelantero hacia &no&, acerc&ndolo ala manija delantera todo Io que seaposible.
• Para cortar con la sierra, es necesariodesactivar el freno de cadena.
DesactivadoActivado
Control del frenoPRECAUCION: El freno de cadenadebe ser inspeccionado variae veces aldia. AI hacer esta inspecci6n, el motorsiempre debe estar prendido. Eeta ee la0nica ocasi6n cuando la sierra se debecolocar en la suelo con el motor aunprendido.Coloque la sierra en suelo firme. Sos-tenga la manija trasera con la manoderecha y la manija delantera con lamano izquierda. Aplique a la veloci-dad m&xima preeionando el gatillo delacelerador. Active el freno de cadenadando vuelta a su muSeca izquierdacontra el protector de mano delanterasin soltar la manija delantera. La cade-na debe parar inmediatamente.Control del funcionamiento activa-do por inercia
_,ADVERTENCIA: Cuando Ileve a
cabo el procedimiento siguiente, elmotor deber& eetar apagado.Soetenga la manija traeera con la manoderecha y la manija delantera con lamano izquierda. Sujete la sierra unos35 cm (14 pulgadae) por encima de untoc6n u otto superfice de madera. Liberela empuSadura del mango delantero yque la punta de la barra guia caiga ha-cia adelanta y pueda entrar en contactocon el tocon. Cuando la punta de la bar-ra golpee el tocon, el freno debe acti-varse.SUGERENCIAS PARA EL USOCORRECTO DEL APARATO• Verifique la tensi6n de la cadena
antes del primer use y despu6s de unminuto de funcionamiento. Vea TEN-SION DE LA CADENA en la secci6n deMANTENIMIENTO.
• Corte madera Onicamente. No cortemetal, pl&stico, ladrillos, cemento,otros materiales de construcci6n queno sean de madera, etc.
34

• Parelasierrasilacadenatocacual-quierobjetoajeno.Inspeccionelasier-rayrepareoinstalerepuestosseg0nlanecesidad.
• Mantengalacadenafueradelaare-naylatierra.Lamenorcantidaddetierradesafilar_tpidamentelascade-nasyasiincrementalaposibilidaddereculadas.
• Cortevariostroncospeque_oscomepr&ctica,usandolasiguientet6cnica,paraacostumbrarsealmanejodelasierra,antesdeempezarunproyec-todegrandesdimensiones.• Acelereelmotorafondoantesde
empezaracortarapretandoelga-tilloacelerador.
• Empieceelcorteconelbastidordelasierraapoyadacontraeltronco.
• Mantengaelmotorconaceleradorafondoconstantementemientrascorta.
• Dejequelasierrahagatodoeltra-bajodecortar;nousem&squeunamuyligerapresi6nhaciaabajo.
• Suelteelgatilloaceleradorinmedia-tamentealterminardecortar,de-jandoqueelmotorfuncioneamar-chalenta.Simantienelasierraenmarchaconaceleradorafondosinestarcortando,puedecausardes-gasteinnecesario.Paramaximizarlaefieaciaoperativa,nohagafuneionarelmotordurantemasde30segundosenelmomentoalavelocidadmaxima.
• Paranoperderelcontrolcuandosehayacompletadoel corte, no leponga presi6n a la sierra al finaldel corte.
• Pare el motor antes de apoyer la sier-ra al finalizar un corte.
TECNICAS PARA TUMBAR ARBOLES
_ADVERTENCIA: Vea que nohaya ramas rotas o muertas quepodrian caerle encima mientras corta,causando heridas graves. No cortecerca de edificios ni cables el6ctricossi no sabe la direcci6n de tumbado del&rbol, ni de noche ya que no podr& verbien, ni durante mal tiempo como Ilu-via, nieve, o vientos fuertes, etc. Si el&rbol hace contacto con alg0n cablede linea de servicio pOblico, la com-papa de servicio pOblico deber& sernotificada de inmediato.• Planifique la operaci6n de corte cuida-
dosamente por adelantado.
• Despeje al _trea de trabajo. Ud. preci-sa un &rea despejada en todo el con-tomo de &rbol donde pueda pisar confirmeza entodo momento.
• El usuario de la sierra de cadena deb-er& permanecer del lado cuesta arribadel terreno ya que es probable que el&rbol rodillo o se deslice cuesta abajodespu6s de caer.
• Estudie las condiciones naturales quepuedan causar que el &rbol caiga enuna direcci6n determinada.
Entre las condiciones naturales quepueden causar que el &rbol caiga enuna direcci6n determinada, se en-cuentran:• La direcci6n y la velocidad del viento.• El &ngulo de inclinaci6n del &rbol. El
&ngulo de los &rboles a veces no senota debido al declive del terreno o a
terreno desparejo. Use plana o cordelde sonda para determinar I direcci6nde la inclinaci6n del &rbol.
• El &rbol es m&s pesado o tieno muchom&s ramas de un lado.
• Arboles y obst&culos en derredor.Verifique si hay porciones descom-puestas o podridas. Si el tronco est&podrido, puede partirse repentinamentesin aviso y caer sobre el usuario.AsegQrese de que haya suficiente es-pacio para la caida del &rbol. Manten-ga una distancia equivalente a dosveces y medio del larbo del &rbol queest& cortando entre el &rbol y la perso-na m&s cercana u otros objetos. El rui-do del motor puede impedir que se es-cuchen las advertencias gritadas.Retire la tierra, las piedras, la cortezasuelta, los clavos, las grampas y elalambre que pueda haber en el &rbolen el lugar del corte.
Planifique una ruta predeterminaday despejada de retroceso
rooeso
;_.... _L)"_m_" Retrocesoy,roceso
PARA TUMBAR ARBOLESGRANDES (con diametro de 15 cm(6 pulgadas) o mas)Se usa el m6todo de corte de muescapara los &rboles grandes. La muescaes un corte en el lado del &rbol haciael cual se desea que caiga. Despuesde hacer el corte de tumbado del lado
35

opuesto, el &rbol tendr& la tendenciade caer hacia el lado en que se ha he-cho el corte de muesca.AVlSO: Si el &rbol tiene raices deapoyo grandes, retirelas antes de hac-er el corte de muesca. Si us6 la sierrapara quitar raices grandes de apoyo,prevenir la cadena de entrar en con-tacto con la tierra esto le previene deperder del filo.CORTE DE MUESCA Y TUMBADODEL ARBOL• Haga el corte de muesca cortando
primero la base de la muesca. Hagaque el corte atraviese un tercio del an-cho del tronco. Luego complete elcorte de muesca cortando en &ngulocomo se muestra en la ilustraci6n"M6todo muesca", abajo. Una vezcompleto el corte de muesca, retire lacuria de madera del &rbol.
Corte final (corte de tumbada)aqui, a 5 cm (2 putgadas) arriba
del centro de la muesca.
Primeroorte } 5,°,m I /
="-I/!X\i t..i
• Despu6s de retirada la curia de mad-era del muesca, del lado opuesto alcorte de muesca haga el corte detumbado. El corte de tumbado debequedar a 5 cm (2 pulgadas) m&s arri-ba que la base del corte de muesca.Este procedimiento dejar& suficientemadera sin cortar entre el corte detumbado y la muesca para formar unabisagra. Esta bisagra ayudar& a evitarque el &rbol ciaga en la direcci6n equi-vocada.La bisagra sostiene el _rbol en eltoc6n y ayuda a controlar la caida
Abertura delcorte detumbada
Cierre dela muesoa
AVlSO: Antes de completar eltumbado, use cutlas para abrir elcorte, cuando sea necesario, paracontrolar la direcci6n de la caida. Usecutlas de madera o de pl&stico, peronunca de acero o de hierro, para evitarque la sierra recule y para evitar daflosa la cadena.• Este alerta a los indicios de que el
&rbol ester por caer: los crujidos, el en-sanchamiento del corte de tumbado ylos movimientos de las ramas superio-res.
• En el instante en que el b,rbol comien-za a caer, pare la sierra, ap6yela en elsuelo y retroceda r&pidamente, per latrayectoria de retroceso prevista.
• Para evitar heridas, NO corte un &rbolparcialmente caido con la sierra. Tomeextreme cuidado con los &rboles par-cialmente tumbados que tienen apoyoprecario. Cuando el arbol no cae total-mente, ponga la sierra de lade y useun montacargas a cable, un aparejode poleas o un tractor para bajarlo.
CORTANDO UN ARBOL TUMBADO(SECCIONAMIENTO)El t6rmino seccionamiento significacortar un &rbol tumbado en seccionesdel largo deseado.
'I_ADVERTENCIA: No se paresobre el tronco que eet& siendo corta-do. Cualquier parte del tronco puederodar haciendo que el usuario pierdael equilibrio y el control. No se posi-clone cueeta abajo del tronco que eet&siendo cortado.PUNTOS IMPORTANTES• Corte Onicamente un tronco a la vez.• Corte con eumo cuidado la madera
aetillada. La sierra puede arrojar peda-zoe punteagudos y filoeos hacia elusuario.
• Use un caballete para cortar troncospequeflos. Nunca permita a otra per-sona que sostenga el tronco mientrasud. corta ni sostenga el tronco con lapiema o el pie.
• No corte en lugares donde haya tron-cos, ramas y raices entrelazadascome puede acontecer despu6s deun vendavaL Arrastre los troncos has-ta un lugar despejado antes de cortar-los, empezando por los troncos ex-puenstos y ya retirados.
36

TIPOS DE CORTE QUE SE USANPARA EL SECCIONAMIENTO
ADVERTENCIA: Si la sierra que-
da apretada o atascada dentro del tron-co, no intente sacarla a la fuerza.Puede perder el control de la sierra,causando heridas o daSos al aparato.Pare la sierra, martille una curia depl&stico o de madera en el corte hastaque la sierra salga f&cilmente. Ponga lasierra de nuevo en marcha y col6quelacuidadosamente de nuevo en el corte.No intente poner en marcha la sierra denuevo cuando est& apretada o atascadaen un tronco.
Use una cul_a para sacar la sierra
Apague la sierra y use una cuba demadera o de plastico para abrir el tajo.
Corte Descendiente: empieza desdeel lado superior del tronco con la partede abajo de la sierra contra el tronco;haga una leve presi6n hacia abajo.
Corte descendiente
Primer corte de lade del troncobajo compresi6n
SECCIONAMIENTO SIN APOYO• Haga el corte descendiente de un ter-
cio del di&metro.• Haga rodar el tronco y termine con
otto carte descendiente.• Tenga cuidado con los troncos presio-
nados de un lado. Yea la ilustracionesanterior para seccionar un troncopresionado.
SECCIONAMIENTO USANDO TRON-CO O CABALLETE DE APOYO• Recuerde que el primer carte siempre
es de lado del tronco bajo compres-i6n. (Vea en la ilustraciones que sigueel primer corte y el segundo carte.)
• El primer corte deber& extenderse por1/3 del di&metro del tronco.
• Termine por el segundo carte.
Uso de tronco como apoyo2do corte
)orte ascendiente
Corte Ascendiente: empieza desdeel lado inferior del tronco con la partede arriba de la sierra contra el tronco;haga una leve fuerza hacia arriba. Su-jete la sierra firmemente para manten-er el control. La sierra tendr& la ten-dencia de empujar al usuario haciaatrAs.
,_ADVERTENCIA: Nunca invierta
la sierra para hacer cortes ascen-dientes. No se puede controlar la sier-ra de esa forma.Haga siempre el primer corte del ladodel tronco que est& bajo compresi6n.El lado de compresi6n del tronco esdonde la presi6n del peso del troncose concentra.
Primer corte del lade del tronco
bajo compresion _.
" _ = "-_le'r corte
ler corte
2do oorte - _ - • _ .
Con caballete como apoyo
/ 2do corte
_ corte
Segundo co_e
37

PARA CORTAR RAMAS Y PODAR
_ADVERTENCIA: Est6 alerta y
tenga cuidado con los recu]ada. Cuan-do cortar ramas y 9odar, nunca 9ermi -ta que ]a cadena en movimiento toqueningSn objeto en ]a punta de ]a barraguia. Permitir tal contacto puede cau-sar graves heridas.
_[_ADVERTENCIA: Nunce trepe alos irboles 9ara cortar ramas o parapodar. No se pare sobre escaleras,p]ataformas, troncos ni en ninguna po-sici6n que podria causafle que pierdael equilibrio o el control de ]a sierra.PUNTOS IMPORTANTES• Trabaje lentamente, con las dos man-
os sujetando firmemente la sierra.Mantenga el equilibrio, con los pies enuna superficie estabie.
• Tome cuidado con las ramas chicas.El material de poco di&metro 9uedeentredarse en ]a cadena, dando unlatigazo a] usuario o haciendo quepierda el equilibrio. Use extremo cui-dado a] cortar ramas pequeSas.
• Est6 alerta contra los rebotes. Tengacuidado al cortar ramas dobiadas obajo 9resi6n 9ara evitar ser golpea-do pot ]a rama o la sierra cuando sesuelte la tensi6n en las fibras demadera.
• Despeje frecuentemente ]as ramsacumuladas para no ]e hagan trope-zar.
PARA CORTAR RAMAS• Siempre corte las ramas del &rbol
despu6s de que se Io haya tumbado.Unicamente asi se puede cortar lasramas de forma adecuada y segura.
• Deje las ramas m&s gruesas debajodel &rbol tumbado para que apoyen el&rbol mientras ud. trabaja.
• Empiece por la base del &rbol tumba-do y vaya trabajando hacia el tope,cortando ]as ramas. Corte las ramaspequeSas de un solo corte.
• Mantenga el tronco del &rbol entre ud.y ]a cadena tanto como fuere posible.
• Retire ]as ramas m&s grandes y lasramas de apoyo con ]a t6cnica de untercio y dos tercios descirta en la sec-ci6n SECCIONAMIENTO SIN APOYO.
• Use siempre un corte descendientepara cortar ramas pequeSas y ramasque cuelgan libremente. Los cortesascendientes podfian hacer que lasramas caigan y apreten la sierra.
PARA PODAR
ADVERTENCIA: Pode _nica-mente last ]a altura de] hombro. Nocorte ]as ramas que queden m&s a]tasque los hombros. Consiga a un 9rofe -siona] 9ara efectuar ese trabajo.• Haga el primer corte en forma ascen-
diente de 1/3 del di&mentro de ]arama.
• Despu6s haga un segundo carte atra-vesando completamente ]a rama. Fi-nalmente haga un tercer carte, des-cendiente, dejando un toco de 2,5 a 5cm (1 a 2 pulgada) sobresaliendo de]tronco del &rbo].
38

RESPONSABILIDADES DEL USUARIO
ADVERTENCIA: Desconecte la bujia antes de hacer cualquiermantenimiento, con la excepci6n de los ajustes al carburador.
Antes Despues Cada Cada FechasAnote las fechas aNcompletar de de 5 25 Anual- deel servieio de rutina Usar Usar horas horas mente Servicio
Verifiique que no haya piezas v'daSadas/gastadas
Verifique que no hay fijadorrepiezas sueltas v'
Verifique la tensi6n de la cadena v"
Verifique el filo de la cadena v"
Inspeccione la barra guia v'
Verifique el nivel de la mezcla del v"combustible
Inspeccione la barra y verifique v"del aceite de la cadena
A_ada _ubricante a_ orificio de_ v'
engranaje
Inspeccione y limpie el aparato v"y las placas
Inspeccione el freno de cadena v'
Umpie el ranura de la barra v"
Limpie el filtro de aire v"
Limpie e inspeccione la rejiila anti-chispas e inspeccione el silenciador, v"
Cambie la bujia y la filtro decombustible v'
RECOMENDACIONES GENERALESLa garantia de este aparato no cubrelos articulos que han sido sometidos alabuso o a la negligencia de parte delusuario. Para poder recibir el valor to-tal de la garantia, el usuario deber&hacer el mantenimiento tal como seindica en este manual. Har& faltahacer varios ajustes peri6dicos paramantener el aparato adecuadamente.• Una vez por aSo, cambie la bujia y el
elemento del filtro de aire e inspec-cione la barra guia y la cadena paraver que no est6n gastadas. El reem-plazo de la bujia y del elemento delfiltro de aire asegura una mezcla cot-recta de aire y combustible y ayudaa que el motor marche mejor y quedure m&s.
VERIFIQUE QUE NO HAYAPIEZAS DAt_IADAS O GASTADASEntre en contacto con el Centro de
Servicio Sears para el reemplazo depiezas daSadas o desgastadas.AVlSO: Es normal que aparezca unapequeSa cantidad de aceite debajo dela sierra despu6s de parar el motor. Noconfunda esto con p6rdidas del tan-que de aceite.• Interruptor ON/STOP-AsegQrese que el
interruptor este funcionando correcta-mente coloc&ndolo en la posici6nSTOR AsegOrese de que el motor sehaya detenido por completo, luegoponga el motor en marcha nueva-mente y continQe.
• Tanque de Combustible-No use sierrasi hay seSales de daSos o fugas deltanque de combustible.
• Tanque de Aceite-No use sierra si eltanque de aceite da seSales de daSoo fugas.
39

VERIFIQUEQUE NO HAYA FIJA-DORES O PIEZAS SUELTAS• Tuercas de la barra• Cadena• Silenciador• Protector del Cilindro• Filtro de Aire• Tornillos de las Manijas• Fijadores Anti-Vibraci6n• Caja del Arranque• Protector de Mano DelanteraVERIFIQUE LA TENSION DE LACADENA
ADVERTENCIA: Use guantesprotectores al manejar la cadena. Lacadena tiene filo y podria causadegraves cortaduras, aun cuando 6stano se encuentre en movimiento.La tensi6n de la cadena es muy impor-tante. Estiramientos de la cadena du-rante uso. Esto es especialmente ver-dad durante los tiempos primeros queusted utiliza la sierra. Controle siemprela tensi6n de la cadena cada vez queusted utiliza y reaprovisiona su sierrade combustible.1. Use la punta en forma del destornil-
lador de la herramienta de ajustede la cadena (herramienta de labarra) para mover la cadena alre-dedor de la barra guia para asegu-rarse de que la cadena no se hayaenroscado. La cadena deber&moverse libremente.
Barraguia
HerramientaTuercas de de Ajuste de
ia Barra Tornillo de la CadenaAjuste (Herramienta
de la Barra)2. Afloje las tuercas de la barra hasta
que est6n tan ajustadas contra lacubierta del embrague con los de-dos Onicamente.
3. Gire el tornillo de ajuste a la dere-cha (en el sentido del reloj) hastaentra en contacto con s61idamenteel fondo del riel de la barra guia.
4. Usando la herramienta de la barra,haga girar la cadena alrededor dela barra guia para asegurarse deque todos los eslabones se en-cuentren dentro de las ranura de labarra.
5. Levante la punta de la barra guiapara asegurarse que ninguna partede la cadena se encuentre floja ocuelgue. Suelte la punta de la bar-ra, entonces gire el tornillo deajuste hasta que la cadena quedetirante.
6. Manteniendo la punta de la barralevantada, ajuste firmemente lastuercas de la barra con la herra-
mienta de ajuste de la cadena.
7. Use la punta en forma de destornil-lador de la herramienta de la barrapara hacer rotar la cadena por labarra.
8. Si no puede hacer rotar la cadena,est& demasiado ajustada. Aflojelevemente las tuercas de la barra yafloje cadena dar vuelta el tornillode ajuste hacia la izquierda (encontra del sentido del reloj). Vuelvaa ajustar las tuercas de la barra.
9. Si la cadena se encuentra dema-siado floja, colgar& por debajo de labarra guia. NO USE la sierra si lacadena se encuentra floja.
Ai_ADVERTENCIA: Si la sierra se
funciona con un cadena flojo, la cade-na podria saltar de la barra y resultadoen accidentes muy graves,VERIFIQUE Sl LA CADENA ESTAAFILADALas cadenas afiladas producen troci-tos de madera. Las cadenas desafila-das producen polvo de aserrin y cor-tan lentamente. Yea AFILACION DE LACADENA.INSPECClONE LA BARRA
4O

Condicionesquerequierenquesehagamantenimientoalabarra:• Lasierracortaparaunladeoen
&ngulo.• Hayqueforzarlaparaqueatravieseel
corte.• Cantidadinadecuadadelubricanteen
labarraylacadena.Verifiquelacondici6ndelabarracadavezquehagaafilarlacadena.Lasbar-rasgastadasdaSanlacadenaytornandificileltrabajodecortar.Despuesdeusar,aseg0reseelinterrup-torON/STOPestaenposici6nSTOP,lue-golimpietodoelaserrinycualquierottoescombrodelaranuradelabarraydelorificiodelengranaje.Paramantenerlabarraguia:• ColoqueelinterruptorON/STOPenpo-
sici6nSTOR• Aflojeyretirelastuercasdelfrenode
cadenayelfrenodecadena.Retirelabarraylacadenadelaparato.
• Limpielosorificiosdelaceiteyelranu-radelabarradespu6sdecada5ho-rasdelaoperaci6n.RetireelAserrindela _RanuradelaBa_
Orificios del aceite ,,
• Los rieles de la barra desarrollan pro-tuberancias al gastarse. S&quelas conuna lima plana.
• Si la superficie superior del riel estb,desnivelada, use una lima plana pararestaurar la forma cuadrada.
_'_ Encuadre los _- ___Bordes del Riels
con una Lima
Ranura correcta Ranura gastadaCambie la barra si la ranura est& gasta-da, si la barra est& torcida o resquebra-jada o si hay calentamiento excesivo oformaci6n de protuberancias en losrieles. Si es necesario cambiar la barra,use exclusivamente la barra guia espe-cificada para su sierra en la lista de re-puestos, especificada tambien en la cal-comania de repuesto de barra ycadena que se encuentra en la sierra.VERIFIQUE EL NIVEL DE LA MEZ-CLA DEL COMBUSTIBLE• Vea ABASTECIMIENTO DEL MOTOR en
la secci6n USO.
LUBRICACION
Tapa de1Tanque deAceite de la Barra
• Vea ACEITE PARA BARRA Y LA CADE-NA en la secci6n USO.
INSPECCIONE Y LIMPIE EL APARA-TO Y LAS PLACAS• Despues de que cada use, inspec-
cione la aparato completa para sabersi hay piezas flojas o da_adas. Limpieel aparato y las placas usando un tra-po h0medo con detergente suave.
• Seque el aparato con un trapo limpioy seco.
INSPECCIONE EL FRENO DE CA-DENA• Vea FRENO DE OADENA en la secci6n
USO.LIMPIE EL FILTRO DE AIREPRECAUCION: No use gasolina niningOn otro liquido inflamable para lim-piar el filtro, para evitar incendios y emi-siones nocivas.Limpieza del filtro de aire:El filtro de aire sucio disminuir& la vidaOtil y el rendimiento del motor e incre-mentar& el consumo de combustible yla producci6n de contaminantes. Lira-pie siempre el filtro de aire despu6s de10 tanques de combustible o 5 horasde uso, el que acontezca primero.L[mpielo con m_ts frecuencia en condi-clones muy polvorientas. Los filtrosusados nunca quedan totalmente lim-pios. Se aconseja reemplazar al filtrode aire por uno nuevo despu6s ducada 50 horas de uso o anualmente,Io que acontezca primero.Para limpiar el filtro:1. Afloje los 3 tornillos en la tapa del ci-
lindro.
2. Remueva la tapa del cilindro.3. Remueva la cubierta del filtro de
aire y el filtro de aire.4. Limpie el filtro de aire con agua cal-
iente y jab6n. Enjuague bien conagua clara y fria. S6quelo al airetotalmente antes de reinstalarlo.
5. Reinstale la cubierta del filtro deaire y el filtro de aire.
41

6. Reinstale la tapa del cilindro y los 3tornillos. Apriete firmemente.
Cubierta Tapa deldel Filtro Cilindrode Aire
Aire
INSPECCIONE EL SILENCIADOR YLA REJILLA ANTICHISPAS
ADVERTENCIA: El si]enciador
en este producto contiene las substan-cias quimicas que el estado de Califor-nia reconoce como causantes decancer.A medida que se use el aparato, el si-lenciador y la rejilla antichispas se vancarbonizando. Es necesario sacar lacarbonizaci6n para evitar el riesgo deincendio o afectar el rendimiento delmotor.Cambie la rejilla antichispas si ocurrenlas roturas.
RejillaAntichispas
Difusor delsilenciador
/
4. Limpie la rejilla antichispas con uncepillo de alambre. Cambie la rejillasi encuentra roturas.
5. Cambie todas las piezas del silen-ciador que est@n rotas o resque-brajadas.
6. Reinstale la rejilla antichispas, lacubierta del difusor del silenciador,y tuerca. Apriete firmemente.
[email protected] la bujia anualmentepara asegurar que el motor [email protected] y marche mejor. Lacronometrizaci6n del encendido es fijae inalterable.1. Afloje los tres tornillos en la tapa del
cilindro.2. Retire la tapa del cilindro.3. Saque la cubierta de la bujia.4. Retire la bujia del cilindro y des@-
chela.5. [email protected] con una bujia Cham-
pion RCJ-7Y ajOstela con una Ilavede 19 mm (3/4 de pulgada). Aprietefirmemente. Separaci6n de electro-dos: 0,6 mm (0,025 de pulgada).
6. Reinstale la cubierta de la bujia.7. Reinstale la tapa del cilindro y tos
tres tomillos. Apriete firmemente.
Tapa delcilindro
Cubierde la
SilenciadorTueroa
Bujia
PARA LIMPIAR LA REJILLAANTICHISPASSe requiere la limpieza cada 25 horasde uso o anualmente, el que accontez-ca primero.1. Afloje y remueva la tuerca de la cu-
bierta del difusor del silenciador.2. Remueva la cubierta del difusor del
silenciador.
3. Remueva la rejilla antichispas. Re-mueva la rejilla cuidadosamentepara prevenir daf_o.
REEMPLAZO EL FILTRO DE COM-BUSTIBLEPara reemplazar el filtro de combus-tible, vacie el aparato haciendo que elmotor marche hasta quedar sin com-bustible, luego retire el juego de tapadel filtor de combustible y retentor deltanque. Saque el filter del tanque ysep_.relo de la line& Reemplazo.
42

A,1_ ADVERTENClA: Desconecte labujia antes de realizar mantenimiento,servicio, o ajustes, excepto de ajustesdel carburador.
AFILAClON DE LA CADENALa afilaci6n de la cadena requiere her-ramientas especiales. Se puede com-prar las herramientas en Sears o Ilevarla cadena a un especialista de afila-ci6n.REEMPLAZAR LA CADENA
ADVERTENClA: Use guantesprotectores al manejar la cadena. Lacadena tiene filo y podria causadegraves cortaduras, aun cuando 6stano se encuentre en movimiento.
Es normal que una cadena nueva seestire durante los primeros 15 minutesde usa. Usted deber& verificar la tensi6nde la cadena con frecuencia y ajustarlacuando sea necesario. Vea la secci6nde TENSION DE LA CADENA.
Cambie la cadena usada cuando estegastada o dafiada.Use exclusiva-mente la cadena de repuesto Minimi-zadora de Reculadas que se especifi-ca en la lista de repuestos parareparaciones, la cadena y barra de re-puesto correctas tambien se especifi-can en una etiqueta ubicada en la sier-ra de cadena, Entre en contacto con elCentro de Servicio de Sears para cam-biar y afilar las cuchillas individuales dela cadena.
PARA REEMPLAZAR LA CADENA:1. Mueva el interruptor ON/STOP a la
posici6n STOP.2. Remueva las tuercas de la barra.3. Remueva la cubierta del embra-
gue.
Cubiertadel
embrague
\Tuercas
la barra
%JHerramienta de ajuste _,de la cadena (Herra-mienta de la barra)
4. Gire el tornillo de ajuste en la barrahacia la izquierda (en contra delsentido del reloj) para mover elpifion de tensi6n tan lejos coma seposible en direcci6n hacia la partedelantera de la barra.
Pi ondeten 5. Haga deslizar la barra per detrAs
del cilindro del embrague hasta quela barra se detenga al tocar el engra-naje del cilindro del embrague.
Pernos Barra guiade la barra \,_
\6. Retire la cadena usada.
7. Retire muy cuidadosamente la nue-va cadena del paquete. Sostengala cadena con Ion eslabones de im-
pulsidn orientados como se ve enla ilustraci6n.
PuE_taarde
LAS OUOHILLASDEBERANAPUNTAR EN DIRECCION A LA RQTAOIQN
Cuchillas Marcador de Profundidad
JEstabones de Funcionamiento
8. Coloque la cadena per encima ydetr&s del embrague, poner las esla-bones de funcionamiento en el cilin-dro del embrague.
43

9. Coloqueloseslabonesdepropul-si6nentrelosdientesdelaengra-najeenlapuntadelabarra.
10.Coloqueloseslabonesdepropul-si6nenlaranuradelabarra.
11.Tirelabarrahaciaadelantehastaquelacadenaquedetiranteenlaranuradelabarra.Aseguretodaslaseslabonesdepropulsi6nest&nenelranuradelabarra.
12.Instalelacubiertadelembrague.13.Instalelastuercasdelabarray
ajQstelasamano[_nicamente.Nolosajustem_.spotahora.VayaaAJUSTEDELACADENA.
AJUSTE DE LA CADENAVea TENSION DE LA CADENA en la sec-ci6n de MONTAJE.AJUSTE AL CARBURADOR
_ADVERTENCIA: La cadena es-
tar& en movimiento durante la mayorparte de este prodecimiento. Use elequipo protector y observe todad lasprecauciones de seguridad. La cade-na no debe moverse con el motor enmarcha lenta.El carburador ha sido ajustado cuidado-samente en la f&brica. Posiblemente sehagan necesarios ajustes si se nota cu-alquiera de las siguientes condiciones:
• La cadena se mueve con el motor enmarcha lenta. Vea procedimiento deMARCHA LENTA "T".
• La sierra no anda a marcha lenta. Veaprocedimiento de MARCHA LENTA "T".
Marcha Lenta "T"Deje que el motor trabaje en marchalenta. Si la cadena se mueve, la mar-cha lenta es demasiado. Si el motor
se para, la marcha lenta es demasiadolenta. Ajuste las revoluciones hastaque el motor se mantenga en marchasin que la cadena se mueva (la mar-cha lenta es demasiado) o que el mo-tor se ahogue (la marcha lenta es de-masiado lenta). El tornillo de la marchaest& situado arriba del bombeador ymarcado con la "T".• Gire el tomillo de la marcha lenta "T" a
la derecha (en el sentido del reloj)para aumentar las revoluciones delmotor.
• Gire el tomillo de la marcha lenta "T" a
la izquierda (en contra del sentido delreloj) para bajar las revoluciones.
Si requiriera ayuda adicional o no sesintiera seguro al desempe_ar esteprocedimiento, entre en contacto conel Centro de Servicio Sears, o Ilame anuestro telefono de ayuda al consumi-dor al 1-800-235-5878.
,_ADVERTENCIA: Realice los si-
guientes pasos despues de cada uso:• Deje que el motor se enfrie y fije bien
el aparato antes de guardarlo o detransportarlo.
• Guarde la sierra y el combustible enunlocal bien ventilado donde los va-pores de combustible no puedan en-trar en contacto con shispas ni llamasabiertas provenientes de los termotan-ques, los motores o interruptores el_c-tricos, calefactores centrales, etc.
• Guarde el aparato con todos los pro-tectores en su lugar y coloque el apa-rato de modo que las piezas filosas nopuedan causar heridas por accidente.
• Guarde el aparato bien fuera del al-cance de los niSos.
ESTACIONAL ALMACENAJEPrepare el aparato para guardarlo alfinal de la temporada o si no se Io va ausar por m&s de 30 dias o m&s.Si va a guardar el aparato durante unperiodo largo:
• Limpie la sierra a conciencia antes delalmacenaje.
• AImacene en un lugar limpio y seco.• Aplique una pequeSa cantidad de
aceite alas superficies extemasmet&licas y a la barra guia.
• Lubrique la cadena y envu61vala enpapel grueso o en tela.
SISTEMA DE COMBUSTIBLEVacie el sistema de combustible antesde almacenar el aparato por 30 dias om&s. Vacie el tanque de combustible,ponga el motor en marcha y d6jelo enmarcha hasta que las fineas de com-bustible y el carburador est6n vacios.Use combustible fresco para la pr6xi-ma temporada.Vea el mensaje marcado IMPOR-TANTE, que se refiere al uso de com-bustibles con mezcla de alcohol en suaparato, en la secci6n de uso, bajoABASTECIMIENTO DEL MOTOR.Los estabilizadores de combustibleson una alternativa aceptable paraminimizar la formaci6n de dep6sitosde goma durante el almacenamiento.
44

A_adaestabilizadoralagasolinaeneltanquedecombustibleoenelreci-pientedealmacenadodecombustible.Sigalasinstruccionesdemezclaqueseencuentranenlosenvasesdeesta-bilizador.Pongaelmotorenmarchayd6jeloenmarchaunos3minutosdes-pu6sdeponerleestabilizador.ElaceiteCraftsman40:1paramotoresde2tiempos(enfriadosaaire)vienemezcladoconestabilizadordecom-bustible.Sinousaesteaceite,en-toncespuedeailadirunestabilizadoraltanquedeconmbustible.INTERIORDEL MOTOR• Retire la bujJa y vierta una cucharada
de las de t6 de adceite 40:1 para mo-tores de 2 tiempos (enfriados a aire)por la abertura para la bujia. Tironeelentamente de la soga de arranque 8a 10 veces para distribuir el aceite.
• Reemplace la bujia con otra del tipo yde la gama de calor recomendados.
• Limpie el filtro de aire.• Examine todo el aparato para verificar
que no haya tornillos, tuercas ni per-nos sueltos. Cambie dotas las piezasda_adas, quebradas o gastadas.
• AI principio de la pr6xima temporada,use exclusivamente combustible nue-vo con la proporci6n correcta de gaso-lina a adeite.
OTRO• No guarde gasolina de una temporada
a la pr6xima.• Cambie el recipiente de gasolina si se
empieza a oxidar.
TABLA DIAGNOSTICA
ADVERTENCIA: Siempre apague el aparato y desconecte la bujJa antesde hacer cualquiera de las reparaciones recomendadas a continuaci6n ex-cepto reparaciones que requieran que el aparato est6 en operaci6n.
PROBLEMA
El motor noarranoa o se
mantiene en
marcha soleunos segundosdespues de ar-rancar.
El motor noanda enmarcha lentacomo debe.
CAUSA
1. El interrupterest&.enposicion STOP.
2. El motor esta ahogado.
3. El tanque decombustible esta vacio.
4. La bujia no hace chispa.5. E] combustible no est&.
llegando al carburador.
6. El caburador requiereajuste.
7. Ninguno de losanteriores.
1. Las revoluciones de la
marcha lenta estan muyaltos o muy bajas.
2. La Mezcia para BajasRevoiuciones requierajuste.
3. Las juntas del cigL_e[_a]estan gastadas.
4. La compresi6n estabaja.
5. Ninguno de losanteriores.
SOLUCION
1. Coloque el ieterruptor en ON.
2. Vea "Arranque Dificil" en lasecci6n Uso.
3. Uene el tanque con la mezctacorrecta de combustible.
4. Instale uea bujia nueva.5. Verifique si el fiitro de
combustible esta sucio;limpielo. Verifique si haydobieces en la linea de
combustible o si est&. partida:rep&.fla o c&.mbiela.
6. Entre en contacto con el Servicio
Sears (vea parte trasera del manual).7. Entre en contacto con el Servicio
Sears (vea parte trasera del manual).
1. Vea "Ajuste al Carburador" en lasecci6n Servicio y Ajustes.
2. Entre en contacto con el Servicio
Sears (vea parte trasera del manual).
3. Entre en contacto con el Servicio
Sears (vea parte trasera del manual).4. Entre en contacto con el Servicio
Sears (vea parte trasera del manual).5. Entre en contacto con el Servicio
Sears (vea parte trasera del manual).
45

TABLA DIAGNOSTICA (continuado)
PROBLEMA CAUSA
El motor no 1. El filtro de aire estAacetera, te falta sucio.
3otencia o se 2. La bujia estApara bajo car- carbonizadaga. 3. El carburador requiere
ajuste.4. Los puertos de escape
o tas aberturas desalida del silenciadorestan tapados.
5. La compresi6n estabaja.
6. La freno de cadena esactivado.
7. Ninguno de losanteriores.
El motor 1. EI cebador estahumea parcialmente accionado.excesiva- 2. La mezcla de combus-mente, tible se ha hecho
3. El fittro de aire est&.sucio.
4. La mezcla para AItasRevotuciones requiereajuste.
5. El carter esta perdiendo.
El motor 1. La mezcla de combus-marcha con tible se ha hecho
temperatura el- 2. Se ha instalado la bujiavada. 3. La Mezcla para AItas
Revotuciones esta
demasiado pobre.4. Los puertos de escape
o tas aberturas de
salida silenciador estantapados.
5. Acumulaci6n det carb6n.
en el rejilla antichispas.
6. Caja de1 arranque sucio.7. Ninguno del antedicho.
Insuficiencia 1. El tanque de aceitede aceite estA
para tubricar 2. El bombeador de aceitela barra y ca- o el filtor de aceite estAdena. tapado.
3. El orificio para aceite enla barra esta tapado.
La cadena se 1. La marcha lenta
mueve en requiere ajuste.marcha lenta. 2. El embrague reauiere
reparaciones.
SOLUCION
1. Mmpie o cambie el filtro de aire.
2. Umpie o cambie ia bujia ycalibre la separaci6n.
3. Entre en contacto con el Servicio
Sears (vea parte trasera del manual).4. Entre en contacto con el Servicio
Sears (vea parte trasera del manual).
5. Entre en contacto con el Servicio
Sears (vea parte trasera del manual).6. Desactive el freno de cadena.
7. Entre en contacto con el Servicio
Sears (vea parte trasera del manual).
1. Ajuste el cebador.
2. Vacie el tanque de combustibley llenelo de combustible con lamezcla oorrecta.
3. Limpie o cambie el filtro aire.
4. Entre en contacto con el ServicioSears (vea parte trasera del manual).
5. Entre en contacto con el Servicio
Sears (vea parte trasera del manual).1. Vea"Abastecimiento del
Aparato" en la secci6n Uso.2. CAmbiela por la bujia correcta.3. Entre en contacto con el Servicio
Sears (vea parte trasera del manual).
4. Entre en contacto con el Servicio
Sears (vea parte trasera del manual).
5. Vea"Para Limpiar la RejiilaAntichispas" en la seccionMantenimiento.
6. Limpie el Area.7. Entre en contacto con el Servicio
Sears (vea parte trasera del manual).
1. Llene el tanque de aceite.
2. Entre en contacto con el Servicio
Sears (vea parte trasera del manual).
3. Saque la barra y limpiela.
1. Vea "Ajuste al Carburador" enia seccion Servicio y Ajustes.
2. Entre en contacto con el Servicio
Sears (vea parte trasera del maeual).
46

PROMBLEMA
Lacadena nosemuevecuando seacelera elmotor.
TABLA DIAGNOSTICA (continuado)
CAUSA
1. La cadena est#tdemasiado tensionada.
La cadena
golpetea ocorta despa-rejo.
Parada delcadena dentrodel corte.
La oadenaoorta en#.ngulo.
2. El carburador requiere 2.ajuste.
3. Los rieles de la barra 3.guia est&.n apretados.
4. El destizarse de embrague. 4.
5. La freno de cadena es 5.activado.
1. La Cadena esta 1.incorrectamentetensionada.
2. Las cuchillas est#tn 2.da[_adas.
3. La cadena ester gastada. 3.4. Las cuchillas est_tn 4.
desafiladas o malafitadas o los medidores
de profundidad estan muyaltos.
5. Engranaje desgastada. 5.
6. La cadena instalado hacia 6.atr&s.
1. La parte de arriba de 1.las cuchillas no est&.n
planas.2. La barra tiene 2.
protuberancias o estatorcida o los rielesest#tn desparejos.
3. El embrague esta 3.patinando.
1. Las cuchillas est#tn 1.
daf_adas por un lado.2. Cadena no esta 2.
afilada.3. Barra guia esta doblada 3.
o desgastada.
SOLUCION
1. Vea "Verifique la Tensi6n de laCadena" en la secci6n Manteni-
miento.Entre en contacto con el Servicio
Sears (vea parte trasera del manual).Repara o reemplace.
Entre en contacto con el Servicio
Sears (vea parte trasera del manual).Desactive el freno de cadena.
Vea "Verifique la Tensi6n de laCadena" en la secci6n Manteni-miento.Entre en contacto con el Servicio
Sears (vea parte trasera del manual).Afile o cambie la cadena.Yea "Afilaci6n de la Cadena" en
la seccion Servicio y Ajustes.
Entre en contacto con el Servicio
Sears (vea parte trasera del manual).Instale el cadena en la direccionderecha.
Vea "Afilacion de la Cadena" en
la seccion Servicio y Ajustes.
Repara o reemplace labarra guia.
Entre en contacto con el Servicio
Sears (vea parte trasera del manual).
Vea "Afilacion de la Cadena" en
la seccion Servicio y Ajustes.Vea "Afilaci6n de la Cadena" en
la seccion Servicio y Ajustes.Reemplace la barra guia.
Si acontencen situaciones no previstas en este manual, actue con cautela y usebuen criterio. Si necesita ayuda, entre en contacto con el Centro de ServicioSears o Ilame al TELEFONO DE AYUDA AL CONSUMIDOR al 1-800-235-5878.
SUS DERECHOS Y OBLIGACIONES
DE GARANTIA: La Agencia de Pro-tecci6n Ambiental de los Estados Uni-dos, la Junta de Recursos Ambien-tales de California y Sears, Roebuckand Co., U.S.A., se complacen en ex-plicar la garantia con la que cuenta elsistema de control de emisi6n en sumotor pequeSo, modelo 2007 y m&sadelante, para uso fuera de carretera.En California, todos los motores pe-queSos para uso fuera de carretera
deben set diseSados, construidos yequipados para satisfacer las riguro-sas normas antihumo que posee el es-tado. Sears deber& garantizar el siste-ma de control de emisi6n en sum&quina de motor pequeSo para usofuera de carretera pot los periodos detiempo que explicamos a continuaci6ny con la condici6n de que su m#.quinade motor pequeSo para uso fuera decarretera no haya sufrido ning0n tipode abuso, negligencia o mantenimien-
47

toinapropiado.Susistemadecontroldeemisi6nincluyepiezastalescomoelcarburador,elsistemadeignici6nyeltanquedecombustible(solamenteenCalifornia).Dondeexistaunacondici6nquerequierareparaci6nbajogarantia,Searsreparar&gratissumotorpe-que_oparausofueradecarretera.Losgatoscubiertosbajolagarantiaincluyeneldiagn6stico,laspiezasylabor.CUBIERTA DE GARANTIA DEL FAB-RICANTE: Si cualquier pieza relacio-nada con el sistema de emisi6n de sumotor (como hemos enumerado en lalista de piezas de control de emisi6nbajo garantia) se encontrara defectuo-sa o defectos en el material o en la la-
bor del motor causaran que tal piezacomenzara a fallar, la pieza ser& repa-rada o reemplazada por Sears. GA-RANTIA DE RESPONSABILIDAD DEDEL DUEI_IO: Como due_o de unam&quina de motor peque_o para usofuera de carretera, usted serif re-sponsable por el mantenimiento ade-cuado en los periodos previamenteprogramados y enumerados en sumanual del usuario. Sears recomien-da que guarde todos los recibos queindiquen que se ha desempe_adomantenimiento en su m&quina de mo-tor peque_o para uso fuera de carret-era, pero Sears no podr_t negar el ser-vicio bajo garantia Onicamente acausa de la falta de recibos o por elincumplimiento de su parte en asegu-rarse que el mantenimiento programa-do haya sido desempe_ado. Comodue_o de una m&quina de motor pe-que_o para uso fuera de carretera,usted deber& contar con el conoci-miento de que Sears puede negar lacubierta bajo garantia si su m&quinade motor peque_o para uso fuera decarretera o alguna pieza de la mismaha dejado de funcionar debido al abu-so, negligencia, mantenimiento inapro-piado, modificaciones no aprobadas oel uso de piezas que no hayan sidofabricadas o aprobadas por el fabri-cante original del equipo. Es respon-sabilidad suya el Ilevar su m&quina demotor peque_o para uso fuera de car-retera a un centro de reparaci6n auto-rizado Sears tan pronto come se pres-ente el problem& Las reparacionesbajo garantia deber&n set completa-das en un periodo de tiempo razon-able, que no exceda los 30 dias.
Si cuenta usted con alguna preguntaen relaci6n a sus derechos y respon-sabilidades de garantia, usted deber&comunicarse con su centro de servicioautorizado m&s cercano o Ilamar aSears al 1-800-469-4663. FECHADEL COMIENZA DE LA GARANTIA:El periodo de garantia comienza en lafecha de compra de la m&quina demotor peque_o para uso fuera de car-retera. DURACION DE LA GARAN-TIA: Esta garantia cuenta con un per-iodo de duraci6n de dos aSoscomenzando en la fecha inicial decompra. QUE CUBRE LA GARAN-TIA: REPARAClON O REEMPLAZODE PIEZAS. La reparaci6n o el reem-plazo de cualquier pieza garantizadaser&n desempeSados y ofrecidos aldueSo sin costo alguno en un Centrode Servicio Sears. Si cuenta usted conalguna pregunta en relaci6n a sus der-echos y responsabilidades de ga-rantia, usted deber& comunicarse consu centro de servicio autorizado m&scercano o Ilamar a Sears al1-800-469-4663. PERIODO DE GA-
RANTIA: Cualquier pieza garantizadaque no est6 programada para ser re-emplazada como parte del mantenimi-ento requerido, o que est6 programa-da 0nicamente para inspecci6n regularpara efectos de "reparaci6n o reempla-zo si fuera necesario" deber& garanti-zarse por un periodo de dos aSos.Cualquier pieza garantizada que est6programada para set reemplazadacomo parte del mantenimiento requeri-do deber& estar garantizada pot elperiodo de tiempo que comienza en lafecha de compra inicial hasta la fechadel primer reemplazo programadopara dicha pieza. DIAGNOSTICO: Nose deber& cobrar al dueSo ning0n tipode cargos por la labor de diagn6sticola cual determine que una pieza ga-rantizada se encuentra defectuosa siel trabajo de diagn6stico ha sido de-sempeSado por un Centro de ServicioSears. DANOS POR CONSECUEClA:Sears podr& ser responsable dedaSos ocurridos a otras piezas del mo-tor causados por la falla de una piezagarantizada que se encuentre bajo elperiodo de garantia. QUE NO CUBRELA GARANTIA: Todas las fallas cau-sadas pot el abuso, negligencia omantenimiento inapropiado no est&ncubiertas.
48

PIEZAS AI_IADIDAS O MODIFICA-DAS: El uso de piezas aSadidas o lamodificaci6n de piezas podr&n servircomo base para que se anule la recla-maci6n de garantia. La garantia deSears no se responsabiliza por el malfuncionamiento debido al uso de pie-zas aSadidas o de piezas modificadas.COMO ENTABLAR UNA RECLAMA-ClON: Si cuenta usted con alguna pre-gunta relacionada con sus derechos yresponsabilidades de garantia, usteddeber& entrar en contacto con su cen-tro de servicio autorizado m&s cercanoo Ilamar a Sears al 1-800-469-4663.DONDE OBTENER SERVICIO DEGARANTIA: Servicio o reparacionesbajo garantia deber&n ser provistas entodos los Centros de Servicio Sears.Per favor comuniquese al1-800-469-4663.
MANTENIMIENTO, REEMPLAZO YREPARACION DE PIEZAS RELA-CIONADAS CON LA EMISION: Cual-
quiet pieza de repuesto Sears aproba-day utilizada en el desempeSo decualquier servicio de mantenimiento oservicio de reparaci6n bajo garantiade piezas relacionadas con la emisi6nset& provisto sin costo alguno aldueSo si la pieza se encuentra bajogaranfia. LISTA SE PIEZAS DE CON-TROL DE EMISlON GARANTIZA-DAS: carburador, sistema de ignici6n:bujia (cubierta hasta la fecha de man-tenimiento programada), m6dulo deignici6n, silenciador incluido al catali-zador (si est& equipado), tanque decombustible (solamente en California).DECLARAClON DE MANTENIMIEN-TO: El dueSo es responsable de adqui-rir redo el mantenimiento requeridocomo Io define en el manual del usuario.
La informaci6n en ia etiqueta del producto indica 1as normas de certificaci6n de su motor.Ejemplo: (A[_o) EPA Fase 1 o Fase 2 y/o CALIFORNIA.
Informacion Importante en relacional motor. Este motor satisface las
regulaciones de emision para mo-tores peque[_os operados fuera dela oarretera.
Familia
# De Serie
Horas de la durabilidad de1 motor
Vea el manual de instrucciones
para especificaciones demantenimiento y ajustes.
41 61
Se certifica este motor para satisfacer los requisitos de emisi6n para los usosiguientes:
[] Moderado (50 horas)
[] Intermedio (125 horas)
[] Extendido (300 horas)
49