i3touch excellence - i3-technologies · 6 i3touch cnc monitor user guide 2. connecting the monitor...
TRANSCRIPT

i3TOUCH Excellence
Monitor User Guide Version 3.6.3
3.6.
3 - V
3 (1
5/6)
i3TOUCH EXCELLENCE Monitor User Guide2
1. Introduction
2. Connecting the Monitor
3. Using the Monitor
4. Cleaning the screen of LCD Monitor
5. Disclaimer
6. Troubleshooting
7. Supplement
8. Touch configuration
8.1 Driver download8.2 Connecting the touch sensor8.3 Installing the drivers8.4 What to check when drivers can’t be installed8.5 Power supply8.6 USB-cabling of the i3TOUCH8.7 Connecting the display (VGA/HDMI/DVI/DP)8.8 Calibrating the I3TOUCH8.9 What to do if calibration is still inaccurate even after calibrating in V-sense & windows8.10 What to do if windows calibration does not start8.11 Disabling “USB Selective suspend setting”8.12 No touch after installing the driver8.13 What to do if you can’t duplicate your screen

3
IMPORTANT SAFETY INSTRUCTIONS
1. Please read these instructions carefully before using the product and keep it for later reference.
2. Follow all warnings and instructions marked on the product.
3. Unplug this product from the wall outlet before cleaning. Clean the product with a damp soft cloth. Do not use
liquid or aerosol cleaners as it may cause permanent damage to the screen.
4. Caution of use varies from model to model; please observe appropriate operation per model in use.
5. Do not place this product on an unstable cart, stand, or surface which may cause damage or harm to the product or
personnel.
6. Slots and openings on the cabinet, in the back cover or in the bottom, are for ventilation; to ensure reliable
operation and to prevent from overheating; these openings must not be blocked or covered at all time. The openings
should never be placed near or over a radiator or heat register, or in a built-in installation unless proper ventilation
space (min. 2 inches/ 5cm of gap) is provided.
7. This product should receive the type of power indicated on the marking label. If you are not sure of the type of pow-
er available, consult your dealer or local service company.
8. This product is equipped with a 3-wire grounding type power plug, a plug having a third (grounding) pin. This plug
will only fit into a grounding-type power outlet. This is a safety feature. If you do not have proper outlet to insert the
plug, contact your electrician to replace your obsolete outlet. Do not break the ground pin and remove the grounding.
9. Do not allow anything to rest, or persons to walk, on the power cord..
10. If an extension cord is used with this product, make sure that the total ampere rating plugged into the extension
cord does not exceed the maximum ampere rating of the extension cord.
11. Never thrust object/tool of any kind through cabinet slots of this product, as they may touch dangerous voltage
point or short out parts that could result in risk of fire or electric shock. Never spill liquid of any kind on the product
(except IP-rated models).
12. Do not attempt to service this product yourself; always refer to qualified or authorized personnel for servicing this
product.
13. Unplug this product from the wall outlet and refer servicing to qualified service personnel under the following
conditions:
• When the power cord or plug is damaged or frayed or broken.
• In case that liquid has been spilled into the product (excepting IP-rate models). In case the product does not operate
normally when the operating instructions are followed, adjust only those controls that are delineated by the operating
instructions.
14. Caution: When fixed patterns are displayed for a long time, remnant image (retention) is likely to occur.
User/owner of this product is advised to keep all packaging material for use in case for repackaging the unit for further transportation, or for repair service which demands returned unit to be properly packed in original packaging as well as proof of purchase and other required documents per each warranty prescribed.

i3TOUCH EXCELLENCE Monitor User Guide4
1. Introduction 1-1 About the Product
The monitor consists of a (LED/ TFT) LCD panel and microprocessor -controlled main board. It is designed to meet the de-
manding or rigid performance requirements of education/schools, public premises, corporate, and industrial applications.
GENERAL FUNCTION
• Display type: TFT-LCD MODULE DRIVE BOARD
• RESOLUTION: UP TO 1920X1080 with a 16:9 ASPECT RATIO @60Hz
• AUDIO/ VIDEO SIGNAL CONNECTIONS
• SOURCE INPUT:
o HDMI 1
o HDMI 2
o HDMI 3
o VGA
• SOURCE OUTPUT:
o VGA (sometimes called “Pass Through”or”Loop Through”)
o HDMI (For HDMI 1, HDMI 2 and HDMI 3)
• AUDIO INPUT:
o For VGA audio input.
• AUDIO OUTPUT:
o Audio output follow source.
• DATA CONNECTIONS
USB A1 (A type)/ USB player, support formats listed in section 3-5-2
USB A2 (A type)/ USB Player, support formats listed in section 3-5-2
USB B1 (B type)/ only for connection touch control data to a user PC
USB B2 (B type)/ only for connection touch control data to a user PC
RS232 CONTROL input
• AMBIENT LIGHT DETECT: to see detail in section 3-4(Option: Light Sensor)
• FREEZE: Freeze current picture on screen. (Freeze works with under source VGA/ HDMI. Under source USB1/ USB2, please
press on handheld remote control to pause the picture)
• Aspect Ratio
1-2 Notice
1. Do not apply any sharp object on the original LCD panel surface, if model is
without protective glass.
2. Do not use corrosive or abrasive detergents, waxes or solvents for cleaning.
Use only a dry or damp with clean water, soft cloth when cleaning.
3. Use qualified and safety-approved AC power cord only.
4. Make sure there are no objects all around the i3TOUCH touch sensor area
(left/right or top/bottom) that could influence the sensor or cause light reflection.

5
1-3 Check List
When opening the carton, please make sure that all the items listed below are present:
1. VGA cable (male-to-male) ×1
2. Power cord ×1
3. USB cable ×1 (for touch monitor models only)
4. HDMI cable x1
5. Audio cable 3.5E x1
6. User guide ×1
7. Remote control x 1
8. Battery x2
9. Cleaning fabric x2
10. Stylus x2
11. Wall mount installation guide x1
12. Screw M8*20mm & spring washers x 4
13. Cable Clip x1
If any items are missing or damaged, please contact your local dealer immediately.
Following items are optional at specific ordering:
14. VGA cable (male-to-male) (optional) for VGA out application
Adapter/Converter Advisory Should specific adapter/converter is required, i.e. tablet PCs, in order to connect to this monitor, please use original adapter/converter recommended by the original brand. Should A specific adapter/converter BE required.The length of cables should not be longer than 2 meters each.

i3TOUCH EXCELLENCE Monitor User Guide6
2. Connecting the Monitor
The procedure for setting up your Monitor kit is as followed:
2-1 Power & Signal Connections
2-1. Power cord connection:
Connect the power cord to the AC outlet.
2-2. Power on:
Switch on the main power of your monitor (switch is located next to the AC outlet)
2-3. Input Source VGA (HDMI1/ HDMI2/ HDMI3) Signal cable connection:
Plug one end of the 15-pin signal cable to the video signal connector at the rear of the PC/laptop system (or engine box) and
the other end to the monitor. Or plug one end of the HDMI signal cable to signal source (PC, laptop, IPC, media player of any
kind with proper HDMI or other out port), and the other end to the HDMI connector on the monitor.
Tighten the connector screws on both ends of the cable to secure good signal connection.
2-4. VGA/ HDMI output connection (Optional male to male VGA/ HDMI cable):
Plug one end of the VGA/ HDMI signal cable to signal source and the other end to another VGA/ HDMI in connector to dai-
sy-chain, of cascading, signal to the other monitor.
Tighten the connector screws on both ends of the cable to secure good signal connection.
2-5. USB cable connection (for touch monitor models):
Plug one end of the USB (B type) cable to the USB (A type) connector at the rear of the (PC, or, IPC, or, media player), and the
other end to the USB connector on monitor.
There are two USB (B type) connecters, one for dynamic source (VGA/ HDMI1/ HDMI2) on rear, the other for HDMI3 on side.
Please connect the signal source first, then follow by connecting USB cable for touch.
For Operating Systems other than Windows 7 or Windows 8, drivers are required. Please download the latest
drivers at www.i3-technologies.com

7
3. Using the Monitor
3-1 Get to know the monitor
The Monitor connectors are located on the rear side. They are shown in the physical monitor as figure below and described
in the following paragraphs. Please note that connectors may vary in some derivative models; please refer to individual leaf-
let for special notation.
3-2 Connector ports
The Figure below depicts the signal connectors on the main board.
Rear
Side (EZ connect)

i3TOUCH EXCELLENCE Monitor User Guide8
3.3 Controls: Keypad & remote
3.3.1 keypad
Note: Left = Enter/Select -> under source USB1 or USB2, this key is defined as Select
3.3.2 Remote control
The outlook of remote control is shown in the Figure, hereafter,
Size: 197.2 x 47.1 x 23.2mm (7.7 x 1.85 x 0.9 x in.)
Operation distance: > 10 meter (32ft.)
Working angle: not more then +/- 40 degree
CAUTION RISK OF EXPLOSION IF BATTERY IS REPLACED BY AN INCORRECT TYPE DISPOSE OF USED BATTERIES ACCORDING TO THE INSTRUCTION

9
3-4 Understanding the OSD Menu (with Remote control) a. Power Press the power button to turn on/off the monitor and IPC (If IPC is build-in with monitor).
b. HDMI 1 Press this button to select the HDMI 1signal source.
c. HDMI 2 Press this button to select the HDMI 2signal source.
d. HDMI 3 Press this button to select the HDMI 3signal source.
e. Touch Press the Touch to turn ON/OFF Touch function
f. VGA Press this button to select the VGA signal source. Source default is at VGA source.
g. Picture Press the Picture to select Zoom mode.
h. USB 1 Press this button to select the USB 1 signal source.
i. USB 2 Press this button to select the USB 2 signal source.
j. Vol.+/ Vol.- Press Vol.+/ Vol- to adjust Volume UP/ DOWN.
k. Mute Press this button to mute or un-mute.
l. Misc. Reserved
m. Freeze Press this button to Freeze picture on screen.

i3TOUCH EXCELLENCE Monitor User Guide10
n. Auto Press this button to auto-adjust and optimize picture screen of the monitor.
o. Select function for adjustment Press the (▲/▼/Enter) button to scroll up and down the intended function items for adjustment, and then press the Enter button to activate that function item.
p. Menu Press the Menu button to go into OSD menu.
q. Exit Press Exit button to exit setting, or, exit OSD menu. Alternatively, press “Menu” button to exit the OSD Menu instantly at any time. r. Info Press to show timing and resolution s. USB Function Press to control USB function.

11
3-5 Content of OSD Menu
Picture // press / (UP/Down) to select sub menu, press / to next page(Sound/ Option)
• Picture mode Contrast Brightness Color Sharpness Tint • Color Temperature Standard Cool Medium Warm• Aspect Ratio use the aspect ratio JUST SCAN for use with I3SYNC• Noise reduction• PC Setup Auto Adjust• Backlight Sound • Sound mode User Treble Bass Standard Music Movie Sports • Balance • Auto Volume (Auto Gain Control) Volume up Volume down Option • OSD Language English Français Español Português Arabic 中中 (Simple) • Restore Factory Default• Blending (OSD transparency) • Light Sensor ON/ OFF (When this function has been turned ON, the Monitor will automatically adjust back light (Luminance). Adjusting the luminance automatically has three stages. The light sensor is located with IR sensor.) • Auto Detect ON/ OFF (When this function has been turned ON, the Monitor will automatically seeking signal form input sources (status standby mode).• OSD Duration OFF 5 sec. 10 sec. 15 sec.
i3TOUCH EXCELLENCE Monitor User Guide12
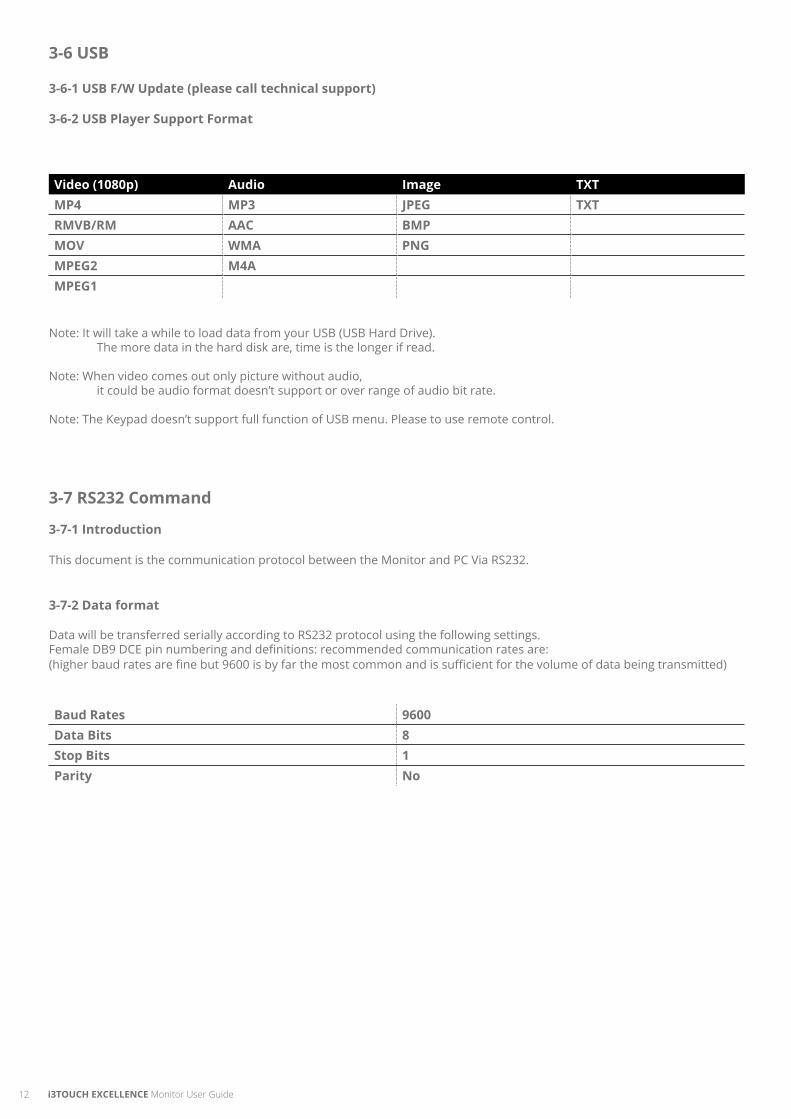
3-6 USB 3-6-1 USB F/W Update (please call technical support) 3-6-2 USB Player Support Format Video (1080p) Audio Image TXTMP4 MP3 JPEG TXTRMVB/RM AAC BMPMOV WMA PNGMPEG2 M4A MPEG1
Note: It will take a while to load data from your USB (USB Hard Drive). The more data in the hard disk are, time is the longer if read. Note: When video comes out only picture without audio, it could be audio format doesn’t support or over range of audio bit rate. Note: The Keypad doesn’t support full function of USB menu. Please to use remote control.
3-7 RS232 Command 3-7-1 Introduction This document is the communication protocol between the Monitor and PC Via RS232. 3-7-2 Data format Data will be transferred serially according to RS232 protocol using the following settings. Female DB9 DCE pin numbering and definitions: recommended communication rates are: (higher baud rates are fine but 9600 is by far the most common and is sufficient for the volume of data being transmitted) Baud Rates 9600Data Bits 8Stop Bits 1Parity No

13
3-7-3 Data structure Note: All numbers shown are in the protocol description are in string unless indicated otherwise. Percentages are shown in decimal.
General Command Form • STX. The first character is the standard Start of Text (STX) character ‘S’. • Address. The second character is the device address. If a device does not support addressing, these should be 0 and 9 to act as the global address. • Type. The third character is the command type. There are four types of commands: o Command 0 o Ack 1 o Nak 2 (option) o Notification 3 (option)
• Property ID. The four and fifth and characters are the property identifier. By using one byte we have 256 • Data Length. The sixth character is the number of characters in the parameter data section. • Data. Following the sixth character is the parameter data section that is as many characters long as the sixth character indicates. If the sixth character is 00 (as with the Reset command for example) then there are no characters in the parameter section. This parameter section contains the value (hexadecimal ) for the property. • ETX. The last character is the standard End of Text (ETX) ‘EN’.
Sample:
STX Address Type Property Length Data ETX
ID
S 0 0 0 1 1 1 EN
In this example (Power On to everything), the Address character 0, which is the global address for all devices connected to the serial port. The Type character is 0 to indicate the transmission is a command. The Property ID characters indicate a property identifier of 1, which in this protocol is the value for power. The Length character is a 1, which indicates that there is one character of data associated with this command. The Data has a value of 1, which is the value for ON. The ETX is command End code.

i3TOUCH EXCELLENCE Monitor User Guide14
3-7-4 Command code
In the following samples, the global device address of 0 is used. The numbers in brackets are the string value that has associated with the property or the property value. Note that these values are used in the command string.
For the properties that support ranges such as brightness and volume, examples are provided for low, and high. Any intervening values can be deduced from these.

15

i3TOUCH EXCELLENCE Monitor User Guide16
Note: do reset this value will be set as default 15. it works on power on status. Note: the system doesn’t allow to “Ping/ Query/ Bulk Query” more than one device at one time. Note: if your system need “Query” function, please contact engineer. It’s a standard function.
4. Cleaning the Monitor 1. Make sure the monitor is turned off. 2. Never spray or pour any liquid directly onto the screen or case (depends on different model). 3. Do not use chemical solvents, alcohol, or any other based to clean the unit or panel. It may cause permanent damage on the unit or panel. 4. Use a clean, soft, lint-free cloth, or apply a small amount of non-ammonia, non-alcohol based glass cleanser to achieve maximum cleaning. 5. Disclaimer The manufacturer assumes no responsibility, and will not be liable of any damage resulting from non-conforming safety actions or operation, or, cleaning on this product.
The standard of all panels are according to ISO 13406-2 Class II.
6. Troubleshooting 6.1 to verify in advance
Before calling for service, please try following easy and simple steps to verify:
Symptom Check Point 1. No picture Check if the signal cable is firmly seated in the socket. Check if the Power is ON at the computer Check if the brightness control is at the appropriate position, not at the minimum. State the monitor is powered on and the LED of power is GREEN, plug out the VGA cable and plug in again.

17
2. The screen is not synchronized Check the LED light if it indicates in red, the device is in power off status. Use the remote and press “Power” to turn the power on. Use the “Auto” key on remote control to automatically adjust the monitor timing scan. Check if the signal cable is firmly seated in the socket. Make sure the signal timings of the computer system are within the specification of the monitor. If your computer was working with a CRT monitor, you should check the current signal timing and turn off your computer before you connect the VGA Cable to this monitor.
3. The picture is not centered Adjust the H-position, and V-position, or perform the Auto adjustment.
4. The screen is flickering Press the “Auto” - adjustment control by remote control or OSD to adjust. Re-locate nearby devices, such as motor, or transformer, which generate magnetic field, away from the monitor. Check if the specific voltage is applied. Check if the signal timing of signal source (PC, IPC, laptop or media player) is within the specification of monitor. If you are unable to correct the fault by following this chart, stop using your monitor and contact your distributor or dealer for further assistance.
6.2 led indicator troubleshooting
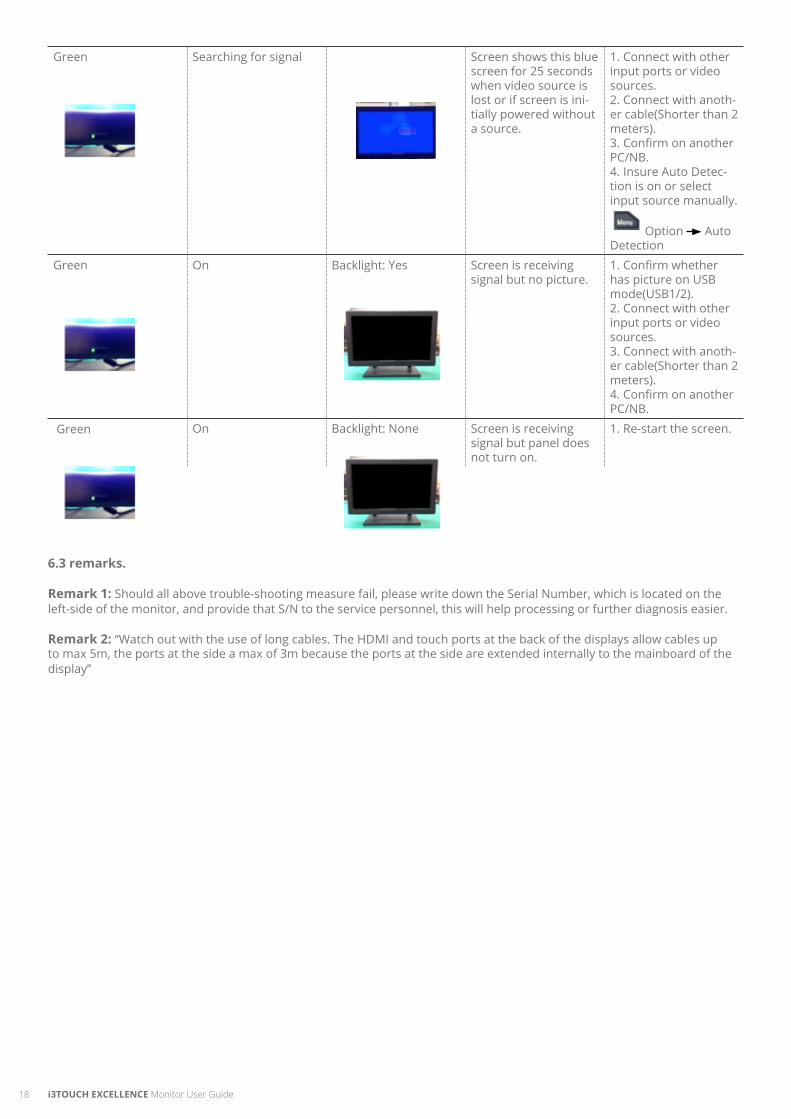
INDICATOR LED COLOR ON IR SENSORIndicator LED Power Mode Screen Status Description Tests & Actions
(Sequence) None No power Screen is not receiving
power.1. Verify power switch is on (“-” not “O”).
2. Check power cable connection.3. Check power source (Plug something else into the same wall socket).
Red Off Screen is receiving power but is not pow-ered on.
Press the power but-ton on keyboard
or button on remote control to turn screen on.
Amber Standby Screen is saving power, because it is not receiving signal. (Immediately follows below 25 seconds condition)
1. Connect with other input ports or video sources.2. Connect with anoth-er cable(Shorter than 2 meters).3. Confirm on another PC/NB.4. Insure Auto Detec-tion is on or select input source manually.
Option Auto Detection
i3TOUCH EXCELLENCE Monitor User Guide18
Green Searching for signal Screen shows this blue screen for 25 seconds when video source is lost or if screen is ini-tially powered without a source.
1. Connect with other input ports or video sources.2. Connect with anoth-er cable(Shorter than 2 meters).3. Confirm on another PC/NB.4. Insure Auto Detec-tion is on or select input source manually.
Option Auto Detection
Green On Backlight: Yes Screen is receiving signal but no picture.
1. Confirm whether has picture on USB mode(USB1/2).2. Connect with other input ports or video sources.3. Connect with anoth-er cable(Shorter than 2 meters).4. Confirm on another PC/NB.
Green On Backlight: None Screen is receiving signal but panel does not turn on.
1. Re-start the screen.
6.3 remarks.
Remark 1: Should all above trouble-shooting measure fail, please write down the Serial Number, which is located on the left-side of the monitor, and provide that S/N to the service personnel, this will help processing or further diagnosis easier.
Remark 2: “Watch out with the use of long cables. The HDMI and touch ports at the back of the displays allow cables up to max 5m, the ports at the side a max of 3m because the ports at the side are extended internally to the mainboard of the display”

19
7. Supplement This Monitor is designed to meet following VESA standard resolution and timing per two different types of panel’s native resolution.
Digital Timing
1 480i60
2 480p60
3 576p50
4 576i50
5 720p60
6 720i60
7 1080i50
8 1080i60
9 1080p50
10 1080p60
Analog Timing
1 640x480 60 31.5
2 640x480 72 37.9
3 640x480 75 37.5
4 800x600 56 35.1
5 800x600 60 37.9
6 800x600 72 48.1
7 800x600 75 46.9
8 1024x768 60 48.4
9 1024x768 70 56.5
10 1024x768 75 60
11 1280x768 60 47.4
12 1280x768 75 60.3
13 1280x960 60 60
14 1280x1024 60 64
15 1280x1024 75 80
16 1440x900 60 55.5
17 1440x900 75 70.6
18 1600x1200 60 75
19 1600x1200 65 81.3
20 1600x1200 70 87.5
21 1600x1200 75 93.8
22 1680x1050 60 64.7
23 1680x1050 75 82.3
24 1920x1080 60 67.2
Timing modes exceeding above chart may show abnormal, off-center, unproportioned, picture on the screen, or even “No Signal” as such timing mode may be completely undisplayable, please refer to graphic card output timing mode respectively.

i3TOUCH EXCELLENCE Monitor User Guide20
Appendix on i3TOUCH manual - touch configuration
1 Driver download
Go to the i3-Technologies website www.i3-technologies.com and download thelatest drivers (products -> drivers -> i3TOUCH drivers)
2 Connecting the touch sensor
Connect the port indicated “USB touch” with the supplied USB cable to the computer. If thereare 2 USB-ports and one is indicated “USB for touch OPTION”, do not use this port as it isdisabled.

21
3 Installing the drivers
install the drivers you downloaded on the website (you will find the driver in the download folderthat has been set in your browser preferences).
The drivers are compressed in a .ZIP-file. When using windows 7 or higher: double click the fileand choose “extract all”. Extract the content of the folder on your PC.
Now click on the file “V-Sense Driver – x.x.xx.xx.exe” (version number depends on thedownload date). If you cannot open the file, right click on the file and choose “run asadministrator”. Make sure you have installation rights.

i3TOUCH EXCELLENCE Monitor User Guide22
Run the installer and click 4 times “next” and finally “install”. If you can finish the installation, thedrivers will ask for a reboot. Reboot your computer to finish the installation.
If the installation was successful, skip step 4
4 What to check when drivers can’t be installed
The newest V-sense drivers can be installed even when no device is connected. If you install a driver and you get the message “please insert device and try again”, you are installing an older driver version. If you want to install an older driver (e.g. when the newest driver is not compatible anymore with your O.S.), make sure the computer is connected to the displaywhen installing the drivers. If the display is not connected properly, you cannot finish the installation. The installer will ask you to insert the device and try again.

23
If the display is connected properly but you cannot finish the installation, make sure the USBportand cable are working & supplying sufficient power (see step 5). To check if the USB-port &cable are working, first try another USB-port. Then try another computer and/or try anothershort high quality USB-cable. Do not connect the i3TOUCH with your computer using multipleUSB-cables (see step 6). Unless you concluded after testing that it is defect, we advise only touse the USB-cable delivered with the i3TOUCH. Prolonging the distance from i3TOUCH to PCusing multiple USB-cables can result in a loss of power and signal strength (data signal).
5 Power supply
The i3TOUCH needs around 5 volts to be recognized & work properly. The touch sensor ispowered via the USB-cable and the USB-port of your computer. In very seldom situations (!) ai3TOUCH Premium XX03 (XX stands for display size) can have touch that shows strangebehavior such as random “ghost touch points” on locations where no finger or pen is located.The I3TOUCH XX04 Premium and the i3TOUCH Excellence series require a lower voltage andwill therefore hardly be subject to power loss.Strange behavior or a non-recognized touch sensor - when ports & connections were checked -are mostly the result of a USB-port not supplying sufficient power, cables that are prolonged ora single cable that is too long or not high quality. If you tried another cable and/or computer andthe problem is only encountered with one computer, use a powered USB-hub (a USB-hub withits separate power supply providing a power boost to all USB-ports)
When you need to prolong the cable length to the i3TOUCH, use active USB extender cables.See step 6.

i3TOUCH EXCELLENCE Monitor User Guide24
6 USB-cabling of the i3TOUCH
Normally a computer and a i3TOUCH will communicate without any troubles if only thedelivered USB-cable is used. In some seldom cases however other cabling is necessarybecause of insufficient power (see step 5) or because the PC is located away from the display.Check if your installation setting matches with the below image. The active USB extendercables (RED) are only used when cables need to be prolonged. The USB hub (GREEN) is onlyused when the i3TOUCH is not getting sufficient power. See step 5.
7 Connecting the display (VGA/HDMI/DVI/DP)
Connect your computer with your display. If necessary, duplicate the image. The keycombinationto be used to extend your image depends on your computer brand. E.g. Dellcomputers:FN+F5

25
Choose “duplicate” to see the computer image on both PC display and i3TOUCH, or “projectoronly” to see the computer image only on the i3TOUCH.
Make sure the image shown on both your computer screen as on the i3TOUCH is full screen.
Prevent black borders left/right or top/bottom. This means there is a difference in resolution.

i3TOUCH EXCELLENCE Monitor User Guide26
If the image on the computer display or the i3TOUCH is showing black borders, go to “controlpanel -> display -> screen resolution”. Choose the FHD (1920*1080) or 4K resolution(depending on I3TOUCH). Then choose duplicate.
Now choose “advanced settings”. Choose the tab of your graphical card control panel. In thisfield you should see the options display, refresh rate, rotation and scaling.

27
Click “display” and select the screen that needs to be scaled. Either your computer display (forlaptops called “built-in display”) or the monitor. Click “scaling” and choose “scale full screen”.Then click “apply”. If necessary, have both scaled to full screen.
If you don’t manage to have both screens scaled full screen, the graphical card of yourcomputer or the drivers of this graphical card might need to be upgraded. As an alternative,choose “projector only” in your display settings and only use the 2nd display (i3TOUCH). If youprefer to use both computer display and i3TOUCH, move on to step 9 before heading to step 8.
8 Calibrating the I3TOUCH
Calibrate your i3TOUCH. The best method to calibrate is using the V-sense drivers. Go to start-> all programs -> i3learning -> V-sense -> V-Sense Driver Configuration. If you have awindows 8.1 computer, search for the V-sense driver in the search field of the start screen.

i3TOUCH EXCELLENCE Monitor User Guide28
Choose calibration and press on the 9 red circles with your finger (or the i3TOUCH pen toincrease accuracy) from the top left side to the bottom right side.
This concludes the calibration. Check if your i3TOUCH is calibrated well. If so, the display isready to be used. Before using the display, please check step 11. If you cannot calibrate thedisplay because of no touch, move to step 12.If you calibrated the display but the calibration is not accurate, you can perform an extracalibration using the Windows calibration tool on top of the V-sense calibration. Go to “controlpanel” -> “tablet PC settings” (windows 7 / windows 8)
Now choose “calibrate and press with your finger on the black crosses

29
9 What to do if calibration is still inaccurate even after calibrating in V-sense & windows
If you calibrated using the V-sense drivers & windows calibration, if there are no black borderson the PC screen or the i3TOUCH image but still the calibration is not accurate, go to “screenresolution” (see step 7) and choose “extend” instead of duplicate and apply.
Now go to “control panel” -> “tablet PC settings” (windows 7 / windows 8)
Follow the on-screen instructions. Tap on the i3TOUCH when the below instructions are shownon the display or press “enter” when you read the instructions on your computer screen only.With this step you identify the i3TOUCH as the touch screen to be used in windows. Finish with“escape”.
Touch the i3TOUCH and check if it recognizes touch, regardless to it’s accuracy. Then checkthe accuracy of the touch. If not accurate, calibrate using the V-sense driver calibration. If stillnot accurate after calibration, go to screen resolution and choose “duplicate” again to duplicateyour computer screen on the i3TOUCH.
i3TOUCH EXCELLENCE Monitor User Guide30
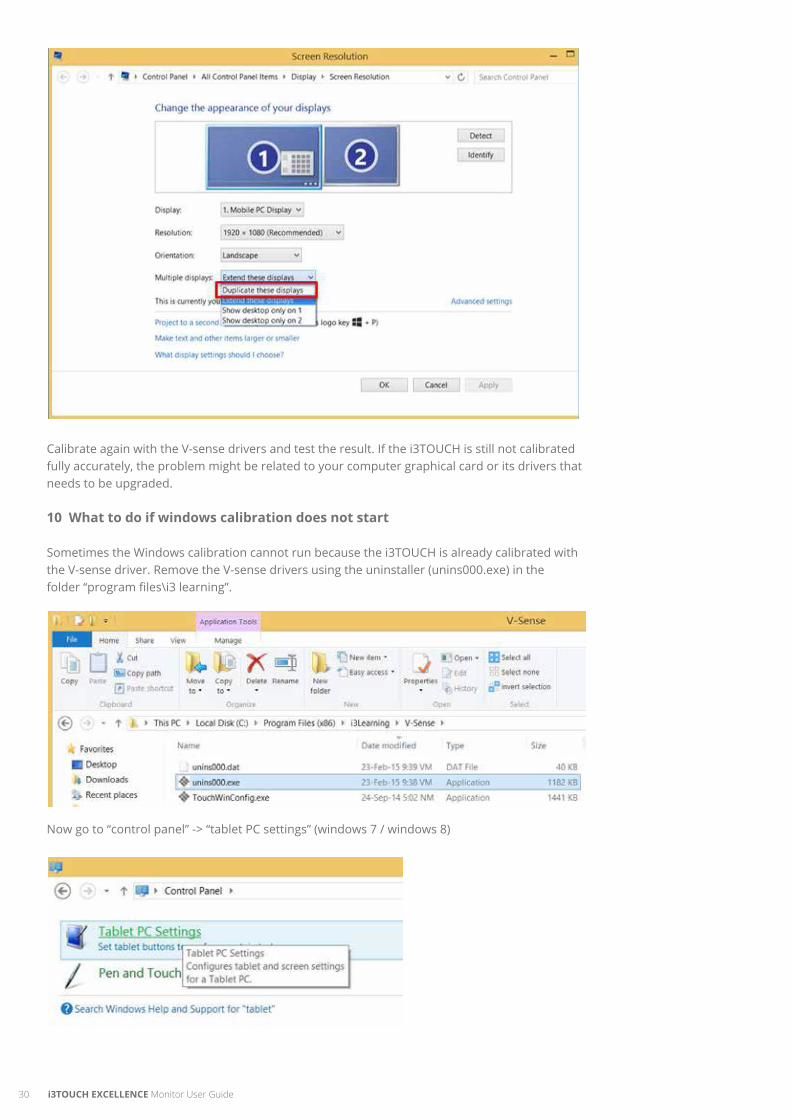
Calibrate again with the V-sense drivers and test the result. If the i3TOUCH is still not calibratedfully accurately, the problem might be related to your computer graphical card or its drivers thatneeds to be upgraded.
10 What to do if windows calibration does not start
Sometimes the Windows calibration cannot run because the i3TOUCH is already calibrated withthe V-sense driver. Remove the V-sense drivers using the uninstaller (unins000.exe) in thefolder “program files\i3 learning”.
Now go to “control panel” -> “tablet PC settings” (windows 7 / windows 8)

31
Choose “Setup”
Follow the on-screen instructions. Tap on the i3TOUCH when the below instructions are shown
on the display or press “enter” when you read the instructions on your computer screen only.
With this step you identify the i3TOUCH as the touch screen to be used in windows. Finish with
“escape”.
Now choose “calibrate and press with your finger on the black crosses
After having pressed on all the black crosses, the calibration is finished and the calibration
should be fully accurate. If this is still not the case, contact your i3DEALER. Keep in mind the
windows calibration tool only enables 7 touch points (windows 7 and higher).

i3TOUCH EXCELLENCE Monitor User Guide32
Step. 11 Disabling “USB Selective suspend setting”
Some customers experience that touch is lost after 15 minutes. This is because the i3TOUCH
touch sensor is feeded by the power supplied from the USB-port of the computer and some
computers have “USB selective suspend setting” enabled to save power. Go to Control
Panel\All Control Panel Items\Power Options\Edit Plan Settings. Click “change advanced power
settings”.
For each power plan used (!) click USB Settings -> USB selective suspend settings -> disable
both “On Battery” and “Plugged In”
33
Step. 12 No touch after installing the driver
When the driver was installed but you have no touch, this may be due to:
a) The touch sensor being recognized earlier than the display screen at start-up
To check this, unplug the USB-cable and reboot your computer. After reboot, when an
image is shown on the display, wait 10 extra seconds and plug the USB-cable. Check if
there is touch. If touch is recognized but the problem is persistent, contact your i3
support contact person. You might need a driver update. Check if you downloaded the
latest drivers on the website and if so, contact i3 support.
b) A touch driver conflict
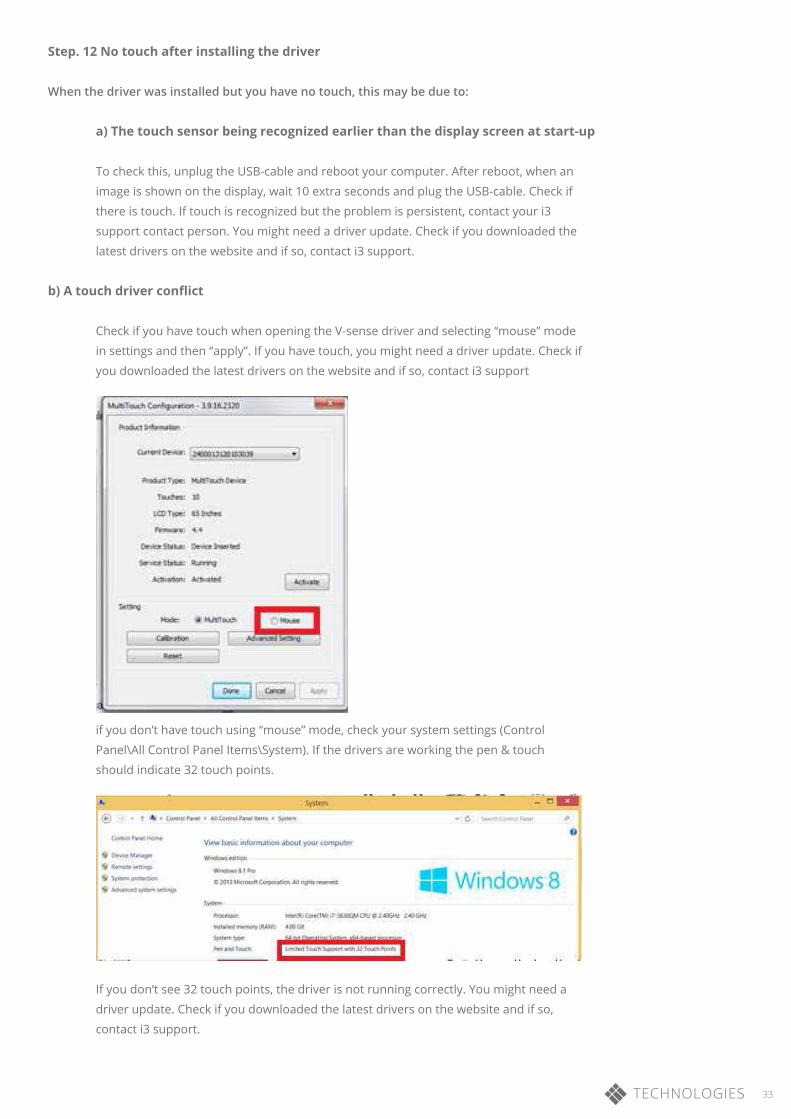
Check if you have touch when opening the V-sense driver and selecting “mouse” mode
in settings and then “apply”. If you have touch, you might need a driver update. Check if
you downloaded the latest drivers on the website and if so, contact i3 support
if you don’t have touch using “mouse” mode, check your system settings (Control
Panel\All Control Panel Items\System). If the drivers are working the pen & touch
should indicate 32 touch points.
If you don’t see 32 touch points, the driver is not running correctly. You might need a
driver update. Check if you downloaded the latest drivers on the website and if so,
contact i3 support.

i3TOUCH EXCELLENCE Monitor User Guide34
c) The “turn on fast start-up function”
Some computers have a “turn on fast start-up” function to quickly boot. If that function is
enabled, sometimes the touch sensor is not recognized at start-up or the touch sensor is
recognized before the projector/display, which causes a conflict.
Go to Control Panel\All Control Panel Items\Power Options. Choose “require a password on
wakeup”
Choose “change settings that are currently unavailable”
Turn off “fast startup”

35
Step. 13 What to do if you can’t duplicate your screen
If you can’t duplicate your screen, contact your internal ICT support. Some computers have onboard graphics of the motherboard controlling the display of the laptop (e.g. intel HD Graphics 4000) but also have an extra (stronger) graphics card (e.g. Nvidea NVS 5200M) to control (F)HD projectors or displays connected to the computer.
It can happen the settings you change in “display -> screen resolution” only change the onboard graphics settings while the device connected to your HDMI-port is controlled by the graphics card and it is difficult to duplicate. When duplicating you see this or instead of
In that case you need to enter the control panel of your graphics card and choose duplicate or clone with laptop display. Below is an example of Nvidea:

AUTHORISED DISTRIBUTOR